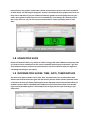
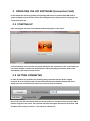
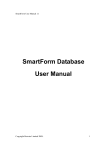
1
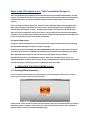
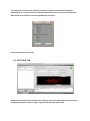
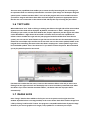
www.FlashingAD.ie
LED Presentation Designer user manual.
All copyrights reserved
Unit 3 no4 Curragh Road, Turners Cross, CORK PHONE no: 086 601 86 18_0872 4488 65
Mail : [email protected]
INDEX :
What is LPD software for ……………………..……………………………………………3
LPD installation process …………………….……………………………………………..3
1. Operating the LPD software (editor) …………………….………….…..3
1.1 Creating new presentation …………………..…………………………………..3
1.2 Edit Field Tab …………………..…………………………………………………………3
1.3 Adding new slide ………………………………………………………………………..5
1.4 Modifying the list of slides ………………………………………………………….5
1.5 Slide edition – basics …………………………….…………………………………….5
1.6 Text Slide ……………………………………………………………………………………6
1.7 Image Slide …………………..……………………………………………………………6
1.8 Animation Slide …………………..…………………………………………………….7
1.9 Information Slides: time, date, temperature …………………..…………7
1.10 Presentation preview …………………..………………………………………….8
1.11 Saving presentation file and transferring it into the LED screen..8
2. Operating the LPD software (connection field) …………………………9
2.1 Starting up ………………………………………………………………………………..9
2.2 Getting connected …………………………………………………………………….9
2.3 Connection and window layout ……………………………………………….10
2.4 Creating / downloading and editing presentation ………………..…10
2.5 Saving / overwriting / erasing presentation …………………………….11
2.6 Choice of presentation and play ………………………………………………11
2.7 Contrast …………………………………………………………………………………..12
2.8 Night mode ……………………………………………………………………………..12
2.9 Auto standby mode …………………………………………………………………12
2.10 Other options ………………………………………………………………..……….13
Summary …………………………………………………………………………….…………..13
What is the LPD software for: ( LED Presentation Designer)
LPD is an application that enables you to create spectacular presentations dedicated for our LED
screens. This software also can be used to initiate remote communication with the LED display via
computer network or an internet (available only with optional LAN or WI-FI communication
system).
Create an attractive AD for LED screen, announce new promotion, display current temperature,
time, date, and other information you want to share. All these and even more available just in
seconds with LPD software, so easy… Designed presentations are being saved on the SD card.
Once you have saved the files on the card, slide it in to SD card slot at the bottom of LED display
and play it. If you purchased our device with optional communication enlargement like LAN or WiFi you can save files and control the display via network.
LPD INSTALATION PROCES
In order to install LPD software on your PC start the the internet browser and type the following
link http:www.Flashingad.ie and visit “support” subpage.
Soonest you get on the webpage press the DOWNLOAD button and save “steup.exe” file on your
local drive. Once the file is completely downloaded run it and follow an installation steps. When
the installation process comes to the end LPD icon should appear on your desktop.
Hint! Windows XP users. This application requires . NET 3.5 to operate properly. This is not
installed by default in Win XP. Do not worry, during installation process wizard detects and install
it automatically if it is necessary, hoverer it might take some extra time.
1. OPERATING THE LPD SOFTWARE (editor).
1.1 Creating NEW presentation
In order to create new presentation start LPD software by double clicking the LPD icon on your desktop.
Once program is started, a welcome screen will appear.
Please use the “new” button to create new presentation. Once you pressed the button you will be
prompted to select resolution of your LED screen and its color (color is just for your reference ,it
does not effect on the color of purchased LED display.
It is important to select correct resolution, otherwise it might result with some significant
displaying issues. In order to find out resolution of particular LED screen, go to the specification
table placed at the end of user manual provided with the device.
Accept selection with “ok” button.
1.2 EDIT FIELD TAB
Editing screen is divided into two basic parts. At the far left on the while field you can see the list
of implemented slides, at the far right is a preview and edit field of each slide.
1.3 ADDING NEW SLIDE
At the first start new presentation contains only one text slide that says “HALLO”. In order to add
other slide, press the “Add slide” on the left side placed just below the slide list. A dialog box will
appear that allows you to choose a type and name of the new slide.
They is a choice of six slide types: text, image, animation, current time, current date, current
temperature. Choose any type you want and assign suitable name to it to keep it clear for yourself
while list of your slides extends significantly. Type the text into the white box placed below the
list. Once you have chosen as preferred confirm selection with “OK”. Number of slides in
presentation is unlimited.
When you add the new slide to the list, you will see appearance of this particular slide on the right
side of the window. To see appearance of other previously created slides, click on its name on the
list.
1.4 MODIFYING THE LIST OF SLIDES
After addition of new slides, you can rename, rearrange, duplicate or remove any of them. To
rename specific slide, double click on its name you see a field to enter new name, enter preferred
name and confirm it by pressing “Enter”. To rearrange order of slides simply use mouse gestures:
grab, drag and drop. You can also duplicate slides by using copy, cut and paste commands from
the menu “Edit”, or standard keyboard hotheys “Ctrl+C , “Ctrl+X” , Ctrl+V” .
1.5 SLIDE EDITION – Basics
Regardless of what type of slide you generate – all types have such an option as the transition
effects (in and out), the speed of those effects, the duration of the slide and optionally pulsation
of slide (pulsation draws attention of potential customer). All the options are available at the top
right of the main window.
There are many capabilities that enables you to create visually interesting ads, we encourage you
to experiment with it to achieve preferred effect. To make it quite simply our developers designed
special option “random transition effect” use it to let the program select most suitable transition
your advert. Program will choose best effect and it will adjust its speed at an appropriate level so
that the user can concentrate on the content of ads and skip the step of setting the pass effects.
1.6 TEXT SLIDE
When added new “text” slide or clicking an existing text slide on the right side of the main window
appearance of this slide will be displayed. By default, entered text is “Hello”. Change the text
according to your needs, use the white field for this purpose. Operate it just like regular text editor
such a WordPad etc.. Right above the text field is a tool bar that increases the capabilities of
edition. Choose suitable font type and size (LPD program loads all available fonts from the win
system). You can use the “Enter”button to type the text in more than one line. Remember you are
allowed to use multiple styles and font size on one slide. You can also insert symbols hidden in the
irregular fonts containing characters other then letters. Simply press “Insert symbol” to go to the
list of available symbols. Press “text inversion” if you wish to inverse the picture. We recommend
you to play with all option for best result.
If written text is wider than the sreen, is best set the transition effects in the way to ensure text
flowing from the right to the left. Set the display time to zero to avoid any unwanted stops white
text flows. If you select “Random transition effects”, the device take care of proper effects
automatically.
1.7 IMAGE SLIDE
Once “image” slide has been added to the list you can see its preview on the right site of the
window. By default there is no image loaded, so the screen shows black field. Load the image from
a file by clicking “Load from file” button. The program is compatible with almost all popular image
formats so you can use graphics such a logos, icons,symbols etc. to enhance your ad (we
Recommend to use graphics in 1bit colour palette and resolution similar to LED screen resolution
for best effect). The LPD program programe contains a few demonstration graphic, feel free to use
them. Go to LPD directory on your hard drive and brows graphics to find anything that suits your
needs. Once graphic is loaded you can invert it and adjust its formatting to fit it possibly well to
the screen. Of course you can also choose transition effects, tempo and display time for each
slide.
1.8 ANIMATION SLIDE
Edition of animation slide is very similar to edition of image slide. After addition of animation slide
you need to load an animation from file, LPD is compatible with all types of animated ”*.gif” files.
Some demo animations can be found at LPD directory. Feel free to browse them you might find
something interesting for your advert.
1.9 INFORMATION SLIDES: TIME, DATE, TEMPERATURE
The other three types of slides, such as time, date, and temperature are an information slides
which means that the LED screen gains the date itself at present. Edition of these particular slides
is limited to the font style which will be applied to the displayed content and transition effects (if
random transition effects is disabled). After addition of one of these three slides at the bottom
right a font style toolbar appears. Use available tools to adjust the font style according to your
preferences.
1.10 PRENTATION PREVIEW
The LPD software allows you to view final effect on the
screen of your computer without interfering into LED
screen. In order to play the video press “play” button
located at the top right corner of the window.
1.11 SAVING PRESENTATION FILE AND TRANSFERRING
INTO THE LED SCREEN.
Once you completed your work on the project you should save the *.prs file (presentation file). In
order to do so go to the file bar and choose save or save as if you wish to create new file. We do
recommend to save the first on the hard drive and copy it onto dedicated SD card for precautions
reasons, however it can be also saved directly on a flash drive (SD card). LED screen is able to read
any file name consisting of max 8 characters (any longer name will end at 8’th character witch
such a symbol~), to keep it clear for yourself try to not exceed this length. Do not forget to use
“Safely remove hardware” function when removing SD card from its PC slot, otherwise it might
result in some data loss. Afterwards insert the SD card into LED screen and use remote controller
to operate the screen.
Hint! If you purchased the device with a LAN or WI-FI option you can save the file remotely
without removing SD card from the LED screen. This procedure will described in details
further in this manual (at point 2.5)
2. OPERATING THE LPD SOFTWARE (Connection Field)
In this chapter we will focus generally on operating LED screen via network with LAN or Wi-Fi
system (it applies only to the LED screens with enlargement) For this purpose we are going to use
“connection field” tab.
2.1 STARTING UP
Once LPD program has been started below window will appear on the screen.
In the left bottom corner two tabs are placed “Edit Field” and “Connection Field”. At this point you
can choose whether to create new presentation or edit an existing presentation saved on the
Flash Memory (SD card) of the LED screen.
2.2 GETTING CONNECTED
In order to peform any operation via network getting connected with the device is highly
essential. Go to “Connection Field” tab and click Connect button placed at bottom left corner.
Always start your work with these steps if you intend to work via network.
Hint! In the case of the LED display with the control system it is essential to enter a proper LAN IP
address assigned to the screen. This operation has been thoroughly described in the manual “LAN
and Wi-Fi control system, uncheck “ .Use custom IP address box.
Hint! If the display is in the “Manu” mode mode which you enter by using the remote controller,
the connection attempt will Fail. Make sure that LED screen is whether in “Standby” or “Display”
mode.
2.3 CONNECTION AND WINDOW LAYOUT
Click “Connect” to establish connection with the LED device, computer needs a few seconds to
download all essential date from the display (during date exchange LED screen will display
“Once”…”). After successful initialization all available date taken from the LED screen will be
displayed in LPD window. You can see the following
-available presentations (white field on left hand site within the LPD window)
-currently played presentation (animation at right hand within the LPD window)
-LED screen settings such as : contrast, night contrast, auto standby mode, (right below the
presentation list )
-LED screen time sync with PC option (recommended)
Current time and temperature received from the screen .
2.4 CREATING/DOWNLOADING AND EDITING
PRESENTATION
To create a completely new presentation you should start from the “Edit Field” tab (this procedure
is described in the part 1 of this manual). Saving it onto memory of LED screen will be described in
next section. To download an existing presentation, click the “Edit” button located above the
window of available presentation files. New window with available files will pop-up, make a
choice for download, selection should be confirmed with “OK”.
After few second chosen presentation will be available for editing in “Edit Field” tab. Simply go
there by clicking proper tab at the bottom of LPD window and start editing the presentation (as
described in first point of this manual).
2.5 SAVING/OVERWRITING/EREASING PRESENTATION
New or edited presentation should be saved in LED screen memory to be able to play it on the
display. In order to save the file in the memory of the display go back to the “Connection Field” .
Use the sending the presentation from the editor to the screen.
Program will ask us about the name of file you are going to save. If you use completely new name
it will create a new file, if you type an existing name will result in overwriting an existing file. If
you wish remove any of unwanted files use “Delete” button
.
2.6 CHOICE OF PRESENTATION AND PLAYING
Once presentation is saved on the flash memory you can play it on the LED screen. An animation
on the “Connection Field” tab indicates currently played (look above it to see its file name). In
order to change it double click on the available presentation on the list.
2.7 CONTRAST
Adjust the contrast of the LED screen by using slider next to this option. Choose the value between
1-10 to set the optimal contrast for LED screen’s environment.
2.8 NIGHT MODE
Night mode helps you to keep optimal contrast of the LED screen over night to avoid blinding
other. This mode automatically changes contrast at the time of sunset and changes it back at the
time of sunrise. To set the contrast value dedicated for the night time click the checkbox and use
the slider next to this option.
2.9 AUTO STANDBY MODE
Given option enables you to set the time when the LED display goes automatically into standby
mode. We recommend to use this option when there is not many potentials viewers, it helps to
save power. In order to activate this option select the “Enable standby mode” checkbox and
choose the appropriate hours for this mode thanks to available drop down boxes.
2.10 OTHER OPTIONS
There is very handy way to keep your LED display time up-to-date, simply “Synchronise with PC
system time “checkbox. It will result in updating the saved on the device each time when it goes
online.
Moreover, LPD software gets useful data from the LED screen while it is online, such as current
time and local temperature.
SUMMARY
LPD software is an intuitive application that enable you to create effective presentation in
very easy and quick way. FLASHINGAD company puts pressure on innovation, ease of
handling and reliability of our products, therefore we highly appreciate any comments
regarding our devices and software. If you think that there is anything we could improve
or if you found any shortcoming please let us know we will do our best to fix it possibly
quick. To send us an information via email go to our website under contact tab.
www.FlashingAD.ie
FlashingAD Technology
Produkt FlashingAD All copyrights reserved
FlashingAD COMPANY