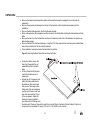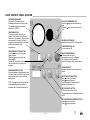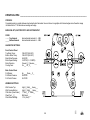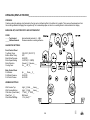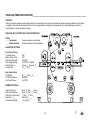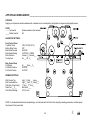
1
TABLE OF CONTENTS _________________________________________________________________________ GETTING STARTED Technical Specifications .......................................................................................4 Important Safeguards and Warranty Information...................................................5 Features of the Image 6100 Ultra........................................................................6 Image 6100 Ultra Features Diagram ....................................................................7 Safety Features....................................................................................................8 Safety Information ................................................................................................9 Installation of Your Laminator ...............................................................................10 Working Area Diagram .........................................................................................13 Front Control Panel Diagram ................................................................................14 Back Control Panel Diagram ................................................................................15 Clutch Control Panel Diagram ..............................................................................16 PROCEDURES FOR USE Laminator Set-up..................................................................................................17 Checking/Cleaning the Rollers..............................................................................18 Loading a Roll of Material/ Webbing the Laminator ...............................................19 Feeding Images ...................................................................................................20 ADJUSTMENTS AND SETTINGS Setting the Brakes ...............................................................................................21 Shim Wheels .......................................................................................................22 LAMINATING PROCESSES Preset Programs ..................................................................................................23 Encapsulating ......................................................................................................24 Double-sided Lamination … .................................................................................26 Decaling...............................................................................................................28 MOUNTING PROCEDURES Mounting ..............................................................................................................31 One-step Mounting and Laminating ......................................................................32 Applying an Over-laminate ...................................................................................34 TRANSFER PROCESS One-Pass Dry Transfer Process ...........................................................................37 TROUBLESHOOTING Error Codes..........................................................................................................43 Laminating Terminology .......................................................................................44 Maintaining Your Laminator..................................................................................45 Periodic Maintenance Sheet.................................................................................46 Process Control Sheet..........................................................................................47 Electrical Diagrams ..............................................................................................48-50 Accessories..........................................................................................................51 Replaceable Parts................................................................................................52 1 H ® LIMITED WARRANTY ON IMAGE LAMINATORS ___________________________________________________ Hunt Graphics warrant to the original consumer purchaser that all new Image laminators that prove defective in materials or workmanship within the applicable warranty period will be repaired or, at our option replaced without charge. The applicable warranty shall be one year from date of purchase with the exception of silicone roll coverings that will be six months from date of purchase. "Original consumer purchaser" means the person whom first purchased the product covered by this warranty other than for purpose of resale. The warranty extends to and is enforceable by only the original consumer purchaser, and only for the period (during the applicable term) which the product remains in the possession of the original consumer purchaser. For more information regarding this warranty, please contact your distributor. þ WARNING! Changes or modifications to this unit not expressly approved by the party responsible for compliance could void the user's authority to operate the equipment. þ WARNING! Any unauthorized changes or modifications to this unit will void the user's warranty and will transfer health and safety obligations to the user. þ WARNING! This machine is designed for mounting and laminating. Any use other than the intended may cause damage to the machine or physical harm to the user. 2 3 H INTRODUCTION ______________________________________________________________________________ Thank you for purchasing an Image 6100 Ultra laminator; a laminator designed to give you years of reliable service. As you become familiar with your laminator you will appreciate the high quality of its production and the excellence in engineering stated in its smartly styled design. The Image 6100 Ultra is a true bi-directional laminator, specifically designed for the one-pass thermal transfer process. Also designed for full range, high volume requirements including heat or pressure sensitive lamination, encapsulation and hot or cold mounting of images. The two sets of symmetrical bi-directional rollers speed production, running heat-activated materials from the front and cold pressure-sensitive applications from the back. By following the guidelines outlined in this manual for proper care and maintenance you can depend on receiving many years of trouble-free profitability from your investment. Reading your Owner’s Manual will familiarize you with the particular features, laminating procedures and operational guidelines of your laminator. The manual includes instructions for various laminating processes and diagrams that give you the comprehensive information needed for the safe and efficient use of your laminator. This basic knowledge provides the foundation for the creative innovative uses you can build on, as you achieve the basic skills through practice. SPECIAL MARKINGS þ * WARNING! Please pay special attention to all passages marked this way. This information is vital to preventing user injury and/or damage to the laminator. Failure to follow this information could void the user’s warranties and transfer all safety obligations to the user. IMPORTANT: Passages marked this way give recommendations for safety procedures and guidelines and information on the proper use and maintenance of the laminator. 3 3 H TECHNICAL SPECIFICATIONS __________________________________________________________________ LAMINATOR IDENTIFICATION Each Image laminator has a Serial Number Label located on the right side cabinet when facing the rear. This label indicates the model type, the electrical requirements, and the laminator serial number (important for reference if any servicing is required). IMAGE 6100 ULTRA SPECIFICATIONS TABLE Maximum Working Width Maximum Speed Maximum Air Pressure Maximum Roller Opening Maximum Roller Temperature Roller Surface Construction Supply Shaft Capacities (Core Inner Diameter) Maximum Substrate Thickness Dimensions Net Weight Shipping Weight Mechanical Requirements Electrical Requirements USA and Canada (Single Phase) International (Three Phase) Maximum Power Consumption NOTE: Airborne Noise * 61 inches (155 cm) 20 feet per minute (6.1 mpm) 125 psi 2 inches (5 cm) 300°F. (149°C.) High-release silicone coating 3 inches (7.6 cm) * 1inch (25.4 mm) Width: 80”(203 cm) Depth: 59”(150 cm) Height: 57”(145 cm) 1900 lb. (864 kg) 2300 lb. (1045 kg) 2 CFM compressed air @ 100 psi, 0.25”, (0.6 cm) ID flexible line 120 / 240 VAC, 50-60 Hz, Single phase, 50 Amp 380 - 415 VAC, 50-60 Hz, Three phase, 25 Amp, 4-wire plus Earth 12,000 Watts Less than 70DB(A) 4 IMPORTANT: Hunt Graphics recommends that a licensed electrician in accordance with electrical codes in your area install your mains power. Specifications subject to change without notice. IMPORTANT: The mains outlet should be fused no higher than 60 Amp, Three-phase -or- 100 Amp, Single phase. The information contained herein is based upon our research and believed to be accurate, but the accuracy and completeness of our recommendations are not guaranteed. The user shall determine the suitability of the product for their use, before using the product, and the user assumes all risk and liability whatsoever in connection with the use of the product. Neither seller nor manufacturer shall be liable for any injury, loss or inability to use product. The following is made in lieu of all warranties, expressed or implied: seller’s and manufacturer’s only obligation shall be to replace or credit such quantity of the product proved to be defective. 3 H IMPORTANT SAFEGUARDS AND WARRANTY INFORMATION ________________________________________ Your Image 6100 Ultra laminator is designed to be one of the safest laminator on the market. Operational safety features have been designed into your laminator with the user’s safety of utmost consideration. However, following safe operating guidelines is still the responsibility of the operator. n Read, heed and follow these safety and operating instructions: • POWER SOURCES: Operate the laminator only with the type of power sources indicated in this manual. Refer to the Specifications Table for the proper power requirements. • WATER AND MOISTURE: Install a GFI breaker (RCD in Europe) if using the laminator near water or in an area of high humidity. • CLEANLINESS: Use your laminator in the cleanest, most dust-free environment possible to produce the highest quality output. • SAFETY: Keep hair, hands and clothing clear of the laminating roller openings at all times. Do not wear loose clothing, scarves, ties and similar garments while operating the laminator. • PREVENTATIVE MEASURES: Do not feed objects such as staples, paper clips and rough or abrasive materials through the laminating rollers. Keep all objects, such as tools, rulers, pens, markers or knives away from the roller opening. Refrain from leaving such items on the front table to prevent them from accidentally being fed into the rollers. * IMPORTANT: NEVER cut or slice directly on the rollers as any cuts or gouges will destroy them. ALWAYS use cutters with enclosed blades to prevent cutting the rollers and to avoid extensive replacement costs. WARNING! Always adjust the shim wheels to create a gap between the laminating rollers to prevent flat spots from developing when the laminator is not in use. Flat spots will affect the quality of the output and void the warranty replacement. WARNING! Pull the front table away from the heated rollers when the laminator is not in use or when heating up the rollers. Otherwise, the front edge of the table will become extremely hot and possibly warp the table. This will void the warranty replacement. þ þ • þ þ SERVICING AND REPLACEMENT PARTS: Refer all servicing to an authorized service representative. Servicing by any unauthorized technician voids the warranty. The service technician must use replacement parts specified by Hunt Graphics. Call Technical Service for assistance (see the rear cover for the location nearest you.) IMPORTANT: Service technicians must perform safety checks after completing any service or repairs to the laminator. WARNING! The machines safety photo-eye system should be checked every 6 months (or after any internal adjustment / repair) using a tool made from a piece of 12mm (1/2”) diameter wood or similar material. To test the photo-eye system, place the tool on the table and slowly move it towards the rotating roller. The rotation must stop before the tool touches the roller face. This test must be carried out across the whole width of the tables. If the photo-eye does not operate, switch off the machine and do not use until it has been adjusted and checked by an authorized service technician. 5 3 H FEATURES OF THE IMAGE 6100 LAMINATOR ____________________________________________________ 1. SHIM WHEELS: Dial-in roller height adjustment for fast and accurate roller nip setting, which adjusts for the thickness of the material to be processed. Features include pneumatic pressure adjustment with heavy-duty air cylinders and fine tune control. This allows for optimum pressure at the roller nip. 2. FOUR PIVOTING UNWIND SHAFTS: Used for easy loading of laminates and adhesives. Allows for rapid changeover between applications. Combined with the lock collar the brake easily adjusts the film tension on each unwind shaft. 3. ROLL EASEL: This digital media supply shaft works in conjunction with the rear wind-up tube for roll-to-roll laminating and smooth, square media feeding. An optional second media supply shaft is also available. 4. HIGH-RELEASE SILICONE ROLLERS: The high-release silicone coatings prevent adhesive build-up and make cleaning easy. Reinforced steel main rollers minimize roller deflection under high pressures. 5. FIVE WIND-UP TUBES: Used for winding up the release liner off some laminates and adhesives. A clutch drive assembly, with a clutch adjustment collar, allows for the correct amount of tension needed. 6. FILM COOLING SYSTEMS: Two chill idlers and a cooling fan bank effectively cools the film during encapsulating and heat transfers producing smooth, flat output. 7. PRINT GUIDE TABLE: Allows for easy feeding of cut sheets into the laminator rollers as you feed them under the print guide. 8. DIGITAL TOUCHPAD: Touchpad control panels on the front and back of the laminator with LED indicators and 9 preset settings for temperature and speed. ADDITIONAL FEATURES • Electric High-Wattage Heating Elements and Independent Temperature Controls with Infrared Temperature Sensors – Provide for rapid, even heating to 300°F. (149°C.) and maximum accuracy. • Heavy-duty Clutch and Drive Components – Provides smoother performance at all speeds and different film thickness. • Optional Outfeed Slitter System – Provides for convenient outfeed trimming of roll-to-roll sealing and transferring processes. 6 3 H IMAGE 6100 ULTRA FEATURES DIAGRAM _______________________________________________________ 7 3 H SAFETY FEATURES ___________________________________________________________________________ HAND-OPERATED EMERGENCY STOP BUTTONS: Emergency Stop buttons are located on each side of the cabinets for easy access. Once pressed, they immediately cease the laminator’s operation and raise the rollers. Use these only in the case of an emergency or you may damage an image during a process. NOTE: Once pressed, these buttons lock and must be turned clockwise to reset. Press the laminator main power button to restart the operation. The laminator defaults to Program 1 upon restart. FOOT-OPERATED EMERGENCY TAP SWITCHES: Located on both sides of the laminator, pressing on these tap switches will immediately cease the laminator’s operation and raise the rollers. Press the main power button to restart the operation. COVERED FOOT SWITCHES: One on each side of the laminator allow for complete user control when initially feeding an image into the nip or for feeding a delicate image through the rollers. The cover prevents accidentally stepping on the foot switch and starting the laminator. þ WARNING! The foot switch overrides the photo eyes. When the photo eye is blocked the laminator runs in slow mode at a speed of 2.0 feet (0.6M) per minute. A BUZZER sounds and a light on the left cabinet flashes if an operator blocks a photo eye warning of proximity to the nip. Use care to keep hands clear of the rollers while using the foot switch to prevent possible injury. PHOTO ELECTRIC SAFETY EYES: A light beam path set directly in front and back of the laminating roller openings prevents foreign objects from passing between the rollers. (The eyes are set for use at the factory and checked by the service representative.) LOCKING CABINETS: þ The cabinets that house the inner workings of the laminator include locks that maintenance or safety personnel can open only with the supplied keys. WARNING! Use of the inside of the cabinets for storage may cause possible personal injury and/or damage to the inner workings and will void the warranty. þ Located on the left side cabinet (facing front of laminator), it automatically shuts the laminator off when the door is opened. WARNING! For any servicing, ALWAYS turn the laminator and the main power circuit breaker off before opening the side cabinets. DOOR INTERLOCK 8 3 H SAFETY INFORMATION ________________________________________________________________________ * The Image 6100 Ultra laminator is equipped with safety equipment to promote safe machine operation. You should however take note of the following: IMPORTANT: Read and make sure you understand these safety and operating instructions. WARNINGS: n * n * * n þ * Hot Surfaces – Danger of getting injured by hot parts. Take care, when webbing or touching the hot rollers. The front rollers can have a surface temperature up to 300°F (149°C). Do not touch the rollers. IMPORTANT: Even after the laminator has been shut off the rollers remain hot for a long time. Rotating Parts – Danger of getting injured by rotating parts. The laminator is equipped with photoelectric eyes to prevent contact with the rotating rollers. Make sure that these safety provisions are always in operation/installed. Follow safety measures to make sure that clothing, long hair, etc. are not caught by the rotating rollers, which might result in the risk of being trapped. IMPORTANT: The laminator operation will cease immediately when the photo electric eyes, set directly in the path of the front and back of the rollers, are blocked. THIS WILL NOT HAPPEN when using the footswitch in which case a BUZZER will sound with a flashing light and the laminator runs in slow mode at a rate of 2.0 feet (0.6M) per minute. IMPORTANT: The laminator has four emergency stop buttons, which may be pressed in dangerous situations. The rotating parts of the laminator will then be immediately stopped. Electrical Parts – Danger of getting injured by electricity. Do not open the locked cabinet doors because of the risk of being injured by voltage. Only authorized maintenance and service technicians or safety personnel should have access to the keys for mechanical upkeep or repair. WARNING! Make sure the door interlock on the left side cabinet is disengaged when opening the right side cabinet door for any maintenance. The door interlock automatically shuts the laminator off when the door is opened. IMPORTANT: Do not place heavy objects on the power supply cord. 9 3 H INSTALLATION OF YOUR LAMINATOR ___________________________________________________________ Only skilled personnel should perform installation. Heed all warnings and follow the proper installation procedures and safety guidelines. TRANSPORT • Refer to outside of crate for Uncrating/Recrating instructions. • NOTE: We recommend that you save the transport bolts, nuts and plates of the shipping crate for any major moves that you plan to make with the laminator in the future. • Remove the transport bolts from the skid’s transport plates with 2) ¾ open-end wrenches or afjustable wrenches. Loosen the top lock nut on the bolt and back the bolt up into the cabinet enough to clear the cabinet castors for ease in moving. • Remove the air compressor and ramp from the skid. Position the ramp at the end of the skid and gently roll the laminator off the skid. (NOTE: In the UK and Holland, Hunt Europe supplies the air compressor.) • Your laminator has castors to allow for easy moving. Roll the laminator into its working space area (see Working Area Diagram). • Lock the castors once it is in place and remember to unlock them before moving the laminator again. Take into account the weight of the laminator (1900-lb./864 kg net weight) when moving. Use equipment with which the weight can be safely lifted. The laminator is transported on a wooden pallet (skid). If your laminator is still on its skid, you can move it with a forklift to put it near its place of use. * IMPORTANT: Set the forks of the forklift to the maximum lifting width of the laminator, so the laminator’s center of gravity is central between the forks. Figure 1. Moving the laminator with a forklift. 10 3 H UNPACKING _________________________________________________________________________________ • Remove the transport packing and the plastic shrink-wrap the laminator is wrapped in to avoid moisture penetration. • Remove the accessory kit package from the top of the laminator, which includes the necessary tools for installation. • Remove the back table placed on the front table and set aside. • Remove the protective film wrapped around the laminator’s front table that is holding the footswitches and back table. • Remove the foam from the footswitches and place a footswitch on each side of the laminator for operator use while feeding images. • Remove the foam from the back table arms. Using the 3/16”Allen wrench in the accessory pack reattach these arms to the inside back of the left and right cabinets. • Once reattached, unwrap and insert the back table into position. Figure 2. Attaching the Back Table Arms and Inserting Table. • On the front table, remove the foam from the ends of the roll easel shaft and the front table arms. • Fit the roll easel shaft into place over the front table arms roll easel stubs. • Unpack the Air Compressor and attach the feet as instructed in the directions. We recommend that you use Teflon tape on the fitting ends of the air compressor hose to seal for leaks. Insert one end of the hose into the ‘D’port of the compressor. Attach the female air coupler included in your Accessory Kit Package onto the other end of the hose. Connect this end to the male air fitting in the back of the left cabinet. Plug the air compressor into a standard AC output (110V in U.S., 200–240V in rest of world). 11 3 H ELECTRICAL _________________________________________________________________________________ FIGURE 3. ELECTRICAL CONNECTION DIAGRAM “U.S. Domestic” * IMPORTANT: Hunt Graphics recommends that a licensed electrician in accordance with electrical codes in your area install your laminator. Refer to the Specifications Table on page 4 for the power requirements. • All domestic laminators will be shipped without a power cord. It is required that only a qualified electrician provides power to the laminator or the warranty will be void. We recommend a Ground Fault Interrupter (GFI) circuit breaker with a 60-amp load rating, not exceeding a 100-amp load rating. Use 3/6 AWG power cord, Type SOW-A/SO rated to 90` C and 600 Volts. See the Electrical Connection Diagram for detailed information. For European laminators use a Residual Current Device (RCD/RCCD). Once power is connected to your laminator, press the main power button on the front control panel once to turn the laminator ON. If you have no display, refer to the “Troubleshooting”page for problem solving info. ROLLERS • þ • * Press the roller UP button once to raise the top roll. Remove the foam placed between the top and bottom rollers. Remove the protective paper from the rolls by using your fingers only to remove the tape and then gently pulling the paper towards you to unwind off the roll. WARNING! DO NOT USE OPEN BLADES TO REMOVE THE PROTECTIVE PAPER ON THE PRESSURE ROLLERS. The pressure rollers are covered with high-quality silicone rubber, assuring excellent non-stick properties. Roller damage caused by improper use of cutting tools will void the user’s warranty. Small cuts and imperfections in the rollers greatly affect the quality of the output and roller replacement costs are expensive. IMPORTANT: Clean the laminating rollers before using. 12 3 H OPERATING CONDITIONS______________________________________________________________________ FIGURE 4. WORKING AREA DIAGRAM An area 15’(4.5 m) x 11’(3.4m) is the smallest area recommended. We recommended a room size of 20‘x 18‘or (6.1 x 5.49 m) to accommodate a laminator and 2 (4’x 8’) tables on castors for finishing/ layout work. This area is required for loading / unloading rolls of media onto the supply shafts and feeding / receiving the maximum mounting board lengths into the laminator correctly. TEMPERATURE 50°to 122°F (10°to 50°C) * IMPORTANT: Do not expose the laminator to direct sunlight as output quality may be affected. MOISTURE 30 – 95% non-condensing Ideal Humidity – 55% Too much humidity will affect the prints the operator is laminating causing problems with film adhesion. DUST Avoid a dusty environment. Because the films used are slightly static they will attract dust and the output will be affected. Working in a clean and tidy manner will minimize poor quality output and production waste. 13 3 H FRONT CONTROL PANEL DIAGRAM _____________________________________________________________ AIR PRESSURE GAUGE Indicates the PSI reading for the downward pressure of the top main roller. The standard setting for the normal operation is 40-60 psi. ROLLER UP/DOWN BUTTON Press the arrow once to raise the top roller. PROGRAM DISPLAY This display readout will signify the number of the program that is currently being run on the laminator. The programs are numbered 1 through 9,with each program having the presets for the speed and the top and bottom roller temperatures. Press the arrow once to lower the top roller. PROGRAM SELECTION BUTTON Press the arrow to advance to the next higher program. Press the arrow to go to the next lower program. Presets will be visible for a few seconds. Use this button to scroll through the programs. POWER INDICATOR LED Lit when power is ON. AIR REGULATOR KNOB Adjusts the downward PSI of the top roller. MAIN POWER/STANDBY Press this button to turn on the laminator or to put it on Standby. On Standby all functions are off, but the laminator is still operational. After an Emergency Stop, press to restart. PROGRAM ENTER BUTTON Press and release to load program shown in display. Press and hold for 3 seconds to save a new program on the numbered setting shown. NOTE: The operator can change the heat and speed settings after a program is loaded by use of the adjustment buttons. SPEED READOUT Indicates the speed in feet or meters per minute. MOTOR DIRECTION BUTTON Press arrow to go forward. Press arrow for reverse. The LED indicates which direction the laminator is in. TOP AND BOTTOM HEATERS READOUT Displays both the set and actual temperature of the top and bottom rollers. TOP AND BOTTOM HEATERS ADJUSTMENT BUTTONS Press once to view the temperature set point. Press and hold the arrow to raise the temperature. Press and hold the arrow to lower the temperature. The adjustment will begin at a slow pace then more rapidly. MOTOR ON/OFF BUTTON LED is lit when the motor is on. The footswitch can be used when the motor is off. MOTOR SPEED ADJUSTMENT BUTTON Press arrow to increase. Press arrow to decrease. TOP / BOTTOM HEATER ON/OFF BUTTONS Turns the top or bottom heaters ON or OFF. The corresponding LED is lit when the heater is ON. COOLING FANS BUTTON Turns On/Off the fans. 14 3 H BACK CONTROL PANEL DIAGRAM ______________________________________________________________ AIR PRESSURE GAUGE Indicates the PSI reading for the downward pressure of the top pull roller. The standard setting for the normal operation is 40-60 PSI. ROLLER UP/DOWN BUTTON Press the arrow once to raise the top roller. Press the arrow once to lower the top roller. PROGRAM DISPLAY This display readout will signify the number of the program that is currently being run on the laminator. The programs are numbered 1 through 9, with each program having the presets for the speed and the top and bottom roller temperatures. AIR REGULATOR KNOB Adjusts the downward PSI of the top roller. POWER INDICATOR LED Lit when power is ON. PROGRAM SELECTION BUTTON Press the arrow to go to the next higher program. Press the arrow to go to the next lower program. Presets will be visible for a few seconds. Use this button to scroll through the programs. MAIN POWER/STANDBY Press this button to turn on the laminator or to put it on Standby. On Standby all functions are OFF.. After an Emergency Stop, press to restart. SPEED READOUT Indicates the speed in feet or meters per minute. PROGRAM ENTER BUTTON Press and release to load program shown in display. Press and hold for 3 seconds to save a new program on the numbered setting shown. MOTOR DIRECTION BUTTON Press arrow to go forward. Press arrow for reverse. The illuminated LED indicates which direction the laminator is in. NOTE: The operator can change the heat and speed settings after a program is loaded by use of the adjustment buttons. MOTOR ON/OFF BUTTON LED is lit when the motor is ON. The footswitch can be used when the motor is OFF. MOTOR SPEED ADJUSTMENT BUTTON Press arrow to increase. Press arrow to decrease. 15 3 H CLUTCH CONTROL PANEL DIAGRAM____________________________________________________________ The Clutch Control Panel adjusts the amount of pull tension that is directly applied to pull the laminate through the pull rollers. The amount of tension applied affects the output and extreme pull tension will stretch the hot films causing outfeed waves in the finished product. This is a factor with films such as Print Guard ®, which stretches easily. Excessive tension will also cause downward curl in the finished product. The standard setting for normal operation is 65-70 PSI. For mounting applications using the pull rollers, set the tension for 75 PSI to avoid the pull roller from slipping. 1. AIR PRESSURE GAUGE Indicates the PSI reading for the overdrive tension of the bottom pull roller. The standard setting for normal operation is 65-70 PSI. 2. AIR REGULATOR KNOB This knob adjusts the overdrive tension of the bottom pull roller. Pull out the knob and turn to adjust; push back in to set. 1. 2. 16 3 H LAMINATOR SET-UP __________________________________________________________________________ If a process requires heat, press ON the heaters approximately 45 minutes before use to ensure that the rollers are at the correct operating temperature. CHECKING OPERATION After you are familiar with the control panel’s buttons, check all operations. n Check the Motor and Footswitches. • Press the motor On/Off button once, the corresponding LED should be lit. • Push the motor Up Arrow and the speed readout should increase in number and motor speed. • Press the Down Arrow and the speed readout should decrease in number and motor speed. n Check the Heater Controls. • Press the Top Heater On/Off button once, the corresponding LED should be lit. • The readout will display the ambient temperature. • Press the top heater Up Arrow to see the temperature set point. Watch the readout for 5 minutes to verify that the temperature increases. • Press the top heater On/Off button again once, the corresponding LED should not be lit. • Repeat this procedure for the Bottom Heater. n Check the Emergency Stop Buttons. • Press one of the Emergency Stop Buttons and the laminator will shut down. • Rotate the Emergency Stop Button clockwise to reset. • Press the Power Standby Button. The laminator will turn back on. Check to make sure the corresponding LED is lit. Repeat this procedure with all four Emergency Stop Buttons. þ WARNING! If your laminator does not operate correctly, contact Technical Service immediately. 17 3 H CHECKING THE ROLLERS _____________________________________________________________________ Your laminator has pneumatic pressure adjustment with fine-tune control for a smooth, flat finish. Correct adjustment of the pressure rollers’height is essential for safe and proper operation. Check this prior to every use. n * To check the vertical movement of the top rollers: • Press the Roller UP arrow button once. The top roller should rise smoothly and evenly on both ends. • Press the Roller DOWN arrow button once. The top roller should lower smoothly and evenly on both ends. • Repeat this procedure for both front and back top rollers. IMPORTANT: The silicone covering of the rollers is soft. Do not scratch the surface with a sharp object or fingernail. CLEANING THE ROLLERS_________________________________________________________________ * IMPORTANT: Clean the laminating rollers every day to prevent adhesive build-up and to ensure quality output. Adhesive build up may eventually damage the rollers. • When laminating, a small amount of adhesive will squeeze out between the laminate films and onto the top and bottom rollers. This residue accumulates through normal use and can be easily cleaned off the rollers. • Use the Image Roll Cleaner (catalog #960), included in your accessory pack, to remove the excess adhesive. The adhesive is easier to remove with the rollers hot. • HINT: Place a scrap piece of foam board or cardboard under the top roller when cleaning to prevent the waste adhesive from falling onto the bottom roller. • For a more thorough cleaning, allow the rollers to cool and then use a clean, lint free cloth and isopropyl alcohol to wipe the roller clean. þ þ WARNING! Isopropyl alcohol is flammable, use only when the rollers are cold. Do not spill isopropyl alcohol on the laminator. WARNING! Use only an Image Roll Cleaner or a cotton cloth and isopropyl alcohol to clean the rollers and not other solvents or cleaners. Use of other cleaners or solvents may cause roller damage and will void the warranty. 18 3 H LOADING A ROLL OF MATERIAL ________________________________________________________________ * IMPORTANT: Seal pressure-sensitive adhesives are wound with the adhesive side on the inside. Make certain that you place the roll of film on the unwind supply shaft so that the material will feed with the adhesive side facing away from the rollers. With the 5/16”T-handle included in your accessory pack, loosen the setscrew and remove the lock collar from the unwind shaft. Slide the roll of material onto the unwind shaft centering the roll as explained in “Setting the Brakes”. Reapply the lock collar and move the brake and lock collar into place and tighten the setscrews. * IMPORTANT: The position of all films, boards, rolls of media and cardboard cores for wind-ups must be set central in the laminator to ensure optimum quality and correct tracking. • Use the tape measure included in your accessory kit for alignment. • Press the unwind supply shafts firmly into the unwind brackets to prevent tension and tracking problems. WEBBING THE LAMINATOR ____________________________________________________________________ One of the most critical aspects of operating your laminator is the process of webbing. Mastering webbing is the key to operating the laminator effectively. Each particular laminating/mounting process discusses loading the laminator with the appropriate materials. Refer to the web diagrams and instructions corresponding to each process for the correct way to web the laminator. Even if you feel you have loaded the laminator correctly given the directions you’ve read, it is important to check your results against the diagrams. Cooling System: The majority of processes do not require the use of the cooling fan bank, but for extensive running time, it is recommended to use the cooling fans to cool off the chill idlers quicker. Always web the film over the first idler to cool the backside of the print first, thus preventing marks on the hot front side of the print, which could affect the finished appearance. When using Mounting Adhesive on the back of images it is best to run over both idlers. Running the film under the second idler may cause the backing to separate from the release liner. Hint: Use of thicker films will enhance the colors of the images to be laminated. 19 3 H FEEDING IMAGES_____________________________________________________________________________ * IMPORTANT: Do not stop the motor or block the photo eyes while an image is being laminated as this can cause marks in the output USING THE PRINT GUIDE TABLE • • • • Your laminator is equipped with a Print Guide Table to assist in feeding images into the nip. Feeding images under the print guide, directly into the nip, prevents the images from lifting up and interrupting the photo eyes. Feed images through correctly to ensure good results. Make sure the leading edge of each image is flat all the way across or any wrinkles or creases in the image will show when laminated – perhaps even magnified. A straight leading edge will aid in feeding in the image. Feed the image into the nip with the front edge parallel to the roller. USING THE ROLL EASEL ATTACHMENT • • • • The Roll Easel Attachment is used to encapsulate images digitally reproduced with a color plotter. The rolls of images simply slip on and off of the roll easel, which lifts on and off the front of the laminator. Mount the roll of prints on the attachment. The rolls of images should unwind with the images facing up and should be centered on the attachment so that the laminate covers the images. Leave some blank space at the beginning of the roll of images and in this space a V-shaped area should be cut out to allow for an easier and cleaner start to the laminating process. Once the prints are running through the laminator, set the brake tension for the roll easel to exert a significant amount of tension so the prints feed through without wrinkles. Set the speed control to 2-3 feet or 0.6–1.0 meters per minute. Use the footswitch until the images are tracking correctly. Then press the motor ON button and go into auto-run mode. Don’t remove your foot from the footswitch until you have pushed the motor ON button. Otherwise the laminator will stop affecting the quality of your image’s finish. 20 3 H SETTING THE BRAKES ________________________________________________________________________ The act of loading rolls onto the laminator requires care, as the material must meet in such a way as to prevent wrinkling and other abnormalities. * * * IMPORTANT: The brake setting greatly affects the smooth flow of the laminating film. • Center the rolls; on top and bottom unwind shafts, in relation to each other. Measure from the end of each film roll (not the core) to the side panel of the laminator for both rolls. Then adjust the brake and lock collar, so that both rolls match. • Tighten the rolls by adjusting the brakes and putting on the aluminum lock collars to hold the rolls in place. IMPORTANT: Do not over-tighten the lock collars or the steel screw will strip the aluminum threads of the lock collars. • Set the appropriate brake tension. Set the brake so that the material doesn’t free spin on the shaft, yet stills dispenses film without a significant amount of pull. IMPORTANT: When reloading the rolls of laminate, reset the brake to (bottom out – when no gap appears between the brake collar and tension ring) exerting no force on the roll of laminate. To increase the brake tensions turn the tension ring counterclockwise. Figure 5. Image Brake Diagram 21 3 H SHIM WHEELS _______________________________________________________________________________ Refer to the product literature, supplied with your laminator, for the proper shim wheel setting needed for your particular laminating application. The correct pressure setting is important to insure that you receive a quality output. n To Set the Shim Wheels: • Determine the thickness of the board that you will use for mounting. • NOTE: Adjust the shim wheels on both sides of the laminator to compensate for the mounting board and apply adequate pressure. IMPORTANT: Whenever you mount onto a board that is thicker than the thin laminate, you must create a gap between the top and bottom rollers nearly equal to the thickness of the board being used. By doing this, you insure the correct amount of pressure – neither too little nor too much. þ WARNING! Too much pressure can crush the board being used and even damage the top and bottom rolls. Normally, a press of .025” (0.6mm) is sufficient. * m 4m in 25 1 mm in mi 5 m/16 3 n / 19 3 Equivalent Press Measurements Inches Metric (mm) Decimal 1 25 mm 1.000 3/4 19 mm 0.75 1/2 13 mm 0.50 3/8 10 mm 0.375 1/4 6 mm 0.25 3/16 5 mm 0.1825 1/8 3 mm 0.125 1/16 2 mm 0.0625 -1/16 -2 mm -0.0625 0 0 0 -2mm -1/16 in 0 2 mm 1/1 6 in m 3 m in 1/8 Figure 6. Adjusting the Shim Wheel 22 3 H PRESET PROGRAMS __________________________________________________________________________ Purchasers should individually determine, prior to use, the suitability of each material for their specific purpose. Hunt Graphics does not accept liability for risks associated with the performance of materials in application. When using a preset program, the temperature will automatically activate. Settings provided are for optimal performance using Seal’s recommended film combinations. PROGRAM 1: FLEXIBLE DISPLAYS (ENCAPSULATING) (See webbing diagram - P. 35.) Make a rigid display by face-mounting an image to a clear acrylic using an optically clear pressure-sensitive adhesive. Coat the acrylic and mount the print. A diffuser film can be applied to the back as needed. PROGRAM 4: RIGID BACKLIT DISPLAYS (See webbing diagram - P 25.) Flexible displays are made by encapsulating, or sealing a print between two layers of hot laminating film or between a hot laminate and a hot backing film. Roller Top Bottom Speed Films Jet Guard Crystal Matte Jet Guard Gloss 3-5 FPM or 1–1.5 MPM Roller Top Bottom Speed Temperature 185-203°F/ 85-95°C 185-203°F/85-95°C Temperature 195°F/ 95°C 200°F/105°C Roller Top Bottom Speed PROGRAM 3: RIGID DISPLAYS (See webbing diagram - P 30.) First you have to make a decal. Then apply a laminating film to the face of the print, and a pressure-sensitive adhesive to the back. Then mount the print to a smooth, flat substrate of your choice. Roller Top Bottom Speed Films Jet Guard Crystal Matte Print Mount “R” 3-5 FPM or 1–1.5 MPM 3-5 FPM or 1–1.5 MPM (See webbing diagrams- P. 30.) First make a decal by applying a special non-slip, durable laminating film to the face of the print, and a permanent/removable pressuresensitive adhesive to the back. Then, using a hand roller and burnishing tool or squeegee apply the graphic to a clean, smooth floor. (See webbing diagram - P 29.) Pop-up display component panels are made by encapsulating, or sealing a print between a hot laminate and a hot backing film. Films Jet Guard Deep Crystal Stoplight 220 or 370 3 FPM or 1 MPM Temperature Ambient to 113°F/45°C Ambient to 113°F/45°C PROGRAM 5: FLOOR GRAPHICS PROGRAM 2: POP-UP DISPLAYS Roller Top Bottom Speed Films Optimount Films Seal’s Floor Guard Floor Grip 1 3-5 FPM or 1–1.5 MPM Temperature 194-203°F/90-95°C Ambient to 122°F/50°C PROGRAM 6: ONEPASS DISPLAY (See webbing diagrams- P 29 and 30.) OnePass Displays are created by taking a printable laminate and using the laminator seal it into a foam board or a rigid board. Temperature 194-203°F/ 90-95°C Ambient to 122°F/ 50°C Roller Top Bottom Speed 23 Films Seal’s OnePass NA 3 FPM or 1 MPM Temperature 220°F/105°C Ambient to 110°F/45°C 3 H ENCAPSULATING _____________________________________________________________________________ SET-UP • Select films slightly wider than the image width to allow for a border without film waste. A border of 1/8”to 1/4”is adequate. • Ensure the main rollers’temperatures are set according to the recommendations of the film being used. See product literature. þ WARNING: The rollers should be down and turning while heating up to provide even heat distribution and prevent roller flat spots from developing. • Load and center films on top and bottom supply shafts with dull adhesive side facing out and the brake tensions released. WEBBING • Press the motor button OFF and raise both top rollers. • Top film: Pull film down and web under the top idler and drape evenly over the face of the top and bottom rollers. • Bottom film: Pull film up and web behind the sleeved tie bar and set evenly over the top film. The two films will heat and adhere together. • Lower the top roller and use a leader board to feed the films into the nip. Use the footswitch to feed the films through the rollers. • From the rear of the laminator, use the footswitch to feed the film through the chill idlers and through the pull rollers. Keeping film taut hold the leader board up against the top pull roller with one hand and lower the top pull roller. Cut off the piece of leader board. • Return to the front and run the laminator applying light brake tension gradually on both supply shafts until there are no wrinkles in the film as it goes into the nip. If wrinkles do not work out within 5 feet (1.5 meters) cut the film and repeat the webbing process. • Once the laminates are tracking correctly, feed the image into the nip through the print guide table. Apply back tension to the image by holding back on the outer edges. 24 3 H ENCAPSULATING ____________________________________________________________________________ PROCESS: Completely sealing a graphic between two heat-activated laminates. Use a cut sheet or a graphic with trimmed edges since the entire image is finished with a ¼”of laminate surrounding each edge. MEDIA:INK JET, ELECTROSTATIC AND PHOTOGRAPHIC FILMS: -- --- -- Top Unwind: _____ Bottom Unwind: Heat-activated Laminate 3 – 5 Mil Heat-activated Laminate 3 – 5 Mil LAMINATOR SETTINGS: Front Control Panel Top Roller Temp: Bottom Roller Temp Main Roller Pressure Motor Speed Setting: Motor Direction: Cooling Fans: 185-203°F (85-95°C) 185-203°F (85-95°C) 40-60 PSI 3-5 FPM (1.0-1.5 MPM) Forward _X_ Reverse ___ On ___ Off _X_ Back Control Panel Pull Rollers: Pull Roller Pressure: Pull Clutch Tension Up ____ Down __X__ 40-60 PSI 65-70 PSI WEBBING SETTINGS: Web Tension Top: Web Tension Bottom: Chill Idlers: [Over/Under] Sheet Fed: __X___ Shim Wheel Settings: Light_X_ Med___ Heavy___ Light_X_ Med.___ Heavy___ 1st Over__ 2nd Under__ Roll Easel: ____ -1/16 (-2mm) 25 3 H DOUBLE-SIDED LAMINATION___________________________________________________________________ SET-UP • • • • • * Follow the same webbing procedure as Encapsulating. Mount the roll of prints on the roll easel attachment so that the images unwind facing up. Center the roll of images in alignment with the rolls of film. Use the footswitch to feed the images through the print guide table into the nip. Once the prints are running through the rollers, set the brake tension on the roll easel attachment to exert a significant amount of tension so the prints feed through without wrinkles. The type of laminate and graphics being used will determine the amount of tension required. • Use the bottom rear wind-up tube to wind up the laminated prints. Tape the front edge of the first finished print to a cardboard core placed over the tube and the prints will continue to automatically wind-up • Press the motor ON button and set the speed to 3 FPM or 1MPM to go into an effective Auto-run operation. IMPORTANT: Do not remove your foot from the footswitch until the motor is ON or the laminator will stop affecting the finished output. NOTE: With graphics in roll form, the edges are not completely sealed. Use an X-Acto ST Rotary Cutter to quickly and efficiently trim your laminated images. 26 3 H DOUBLE-SIDED LAMINATION (HEAT-ACTIVATED) _________________________________________________ PROCESS: Applying a laminate to both the front and back of graphics in roll form. The margins between and around the laminated images must be trimmed away for a finished appearance, thereby not having completely sealed edges as with encapsulating. MEDIA:INK JET, ELECTROSTATIC AND PHOTOGRAPHIC FILMS: -- -- -- Top Unwind: _____ Bottom Unwind: Heat-activated Laminate 3 – 5 Mil Heat-activated Laminate 3 – 5 Mil LAMINATOR SETTINGS: Front Control Panel Top Roller Temp: Bottom Roller Temp: Main Roller Pressure: Motor Speed Setting: Motor Direction: Cooling Fans: 185-203°F (85-95°C) 185-203°F (85-95°C) 40-60 PSI 3-5 FPM (1-1.5 MPM) Forward _X_ Reverse ___ On _X_ Off ___ Back Control Panel Pull Rollers: Pull Roller Pressure: Pull Clutch Tension Up ____ Down __X__ 40-60 PSI 65-70 PSI WEBBING SETTINGS: Web Tension Top: Web Tension Bottom: Chill Idlers: [Over/Under] Sheet Fed: _____ Shim Wheel Settings: Light _X_ Med. ___ Heavy___ Light _X_ Med. ___ Heavy___ 1st Over__ 2nd Under__ Roll Easel: __X__ -1/16 (-2mm) 27 3 H DECALING __________________________________________________________________________________ Seal recommends its comprehensive line of Print Mount pressure-sensitive mounting adhesives, Print Shield pressure-sensitive over-laminating and Print Guard low-temperature heat-activated over-laminating films for your different applications. SET-UP • Load and center the films onto the top and bottom supply shafts with the adhesive side facing out. Select films slightly wider than the image to allow for trimming. • If using a heat-activated laminate on top, set the roller temperature for the type of film being used. • Raise the top rollers and remove the front table for webbing ease. WEBBING • Bottom film: Pull the mounting adhesive up, in front of the bottom roller and drape evenly over the top roller. • Top film (heat-activated): Pull the film down, under the top idler and lay evenly over the mounting adhesive to adhere. • Top film (pressure-sensitive): First mount a core on the top, front wind-up tube and adhere a strip of the pressure-sensitive adhesive across its width. • Pull the film down, under the top idler and up to the wind-up tube. • Adhere the release liner smoothly to the wind-up tube. Separate the film from the release liner and lay squarely over the mounting adhesive to adhere. • Lower the top roller and use a leader board to feed the films into the nip. Use the footswitch to feed the films through the rollers. • From the rear of the laminator, use the footswitch to feed the film over the chill idlers and through the pull rollers. Keeping film taut hold the leader board up against the top pull roller with one hand and lower the top pull roller. Cut off the piece of leader board. • Return to the front and run the laminator applying light brake tension gradually on both supply shafts until there are no wrinkles in the film as it goes into the nip. If wrinkles do not work out within 5 feet or (1.5 m) cut the film and repeat the webbing process. • Once the laminates are tracking correctly, feed the image into the nip through the print guide table. Apply back tension to the image by holding back on the outer edges. • Once laminated, the image can be mounted to a board or other substrate. 28 3 H DECALING (HEAT-ACTIVATED)__________________________________________________________________ PROCESS: Creating a decal by applying a hot laminate to the top and a cold backing film to the bottom of a graphic. Then remove the release liner from the mounting adhesive and apply the image directly for its intended purpose or later to a mounting board or other substrate for display. MEDIA:INK JET, ELECTROSTATIC AND PHOTOGRAPHIC FILMS: -- -- -- Top Unwind: _____ Bottom Unwind: Heat-activated Laminate 3 – 5 Mil Pressure-sensitive mounting adhesive LAMINATOR SETTINGS: Front Control Panel Top Roller Temp Bottom Roller Temp Main Roller Pressure Motor Speed Setting Motor Direction: Cooling Fans: 215-225°F (102-107°C) OFF 40-60 PSI 3-5 FPM (1-1.5 MPM) Forward _X_ Reverse ___ On ___ Off _X_ Back Control Panel Pull Rollers: Pull Roller Pressure Pull Clutch Tension Up ____ Down __X__ 40-60 PSI 65-70 PSI WEBBING SETTINGS Web Tension Top: Web Tension Bottom: Chill Idlers: [Over/Under] Sheet Fed: __X__ Shim Wheel Settings: Light _X_ Med. ___ Heavy___ Light _X_ Med. ___ Heavy___ 1st Over__ 2nd Over__ Roll Easel: ____ -1/16 (-2mm) 29 3 H DECALING (PRESSURE-SENSITIVE) _____________________________________________________________ PROCESS: Creating a decal by applying a cold pressure-sensitive over-laminate to the top and a cold pressure-sensitive mounting adhesive to the bottom of a graphic. Then remove the release liner from the mounting adhesive and apply the image directly for its intended purpose or later to a mounting board or other substrate for display. MEDIA:INK JET, ELECTROSTATIC AND PHOTOGRAPHIC FILMS: -- -- -- Top Unwind: _____ Bottom Unwind: Pressure-sensitive over-laminate Pressure-sensitive mounting adhesive LAMINATOR SETTINGS: Front Control Panel Top Roller Temp: Bottom Roller Temp: Main Roller Pressure: Motor Speed Setting: Motor Direction: Cooling Fans: OFF OFF 40-60 PSI 3-5 FPM (1-1.5 MPM) Forward ___ Reverse _X_ On ___ Off _X_ Back Control Panel Pull Rollers: Pull Roller Pressure Pull Clutch Tension Up ____ Down __X__ 40-60 PSI 65-70 PSI WEBBING SETTINGS Web Tension Top: Web Tension Bottom: Chill Idlers: [Over/Under] Sheet Fed: __X__ Shim Wheel Settings: None _X_ Med. ___ Heavy___ None _X_ Med. ___ Heavy___ 1st Over__ 2nd Over__ Roll Easel: _____ -1/16 (-2mm) 30 3 H MOUNTING __________________________________________________________________________________ Mounting involves permanently affixing a previously made decal onto a substrate. No laminates or adhesives are needed. * • • • • • * • • • • • IMPORTANT: Before beginning, adjust the four shim wheels to correspond to the thickness of the backing being used. Place the mounting board on a flat surface. Lay your images face down on the mounting board. Fold back approximately one inch of the release liner along one of the edges to expose the adhesive. Crease the release paper evenly on this fold, pressing with your fingertips from the center out. Turn the image over and carefully position the exposed adhesive edge of the image onto the board, using the folded release paper to allow for grasping the release liner. Once positioned correctly, press firmly with the outer edges of your palms from the center toward the edges to insure a smooth tack. This is the edge that will be fed into the rollers first. Push the edge into the rollers and step on the foot switch until the board and image are just caught by the nip. IMPORTANT: Because the foot switch overrides the photo eye, be sure to keep your hands clear of the rollers to prevent injury. Hold the untacked portion of the image up and against the top roller with one hand. Peel the release paper off the image with the other hand, while using the foot switch to feed the board through the rollers. You must hold the image against the roller while the board feeds through to prevent wrinkles. NOTE: If the board is accidentally sent in too far at first, the release liner will get caught and will be impossible to pull back. In this case, raise the top roller, pull the board out and try again. As the process becomes more familiar, increase the speed of the laminator to make the process more efficient. Remove the mounted image from the rear of the laminator, trim it to size and display it. 31 3 H ONE-STEP MOUNTING AND LAMINATING ________________________________________________________ Generally, the process of decaling and then mounting is difficult when dealing with larger images because the images must be put through the laminator twice. However, the availability of mounting boards with heatactivated adhesive on one side, such as the Hunt Manufacturing’s Single Step Heat-Activated Foam Board, makes it possible to laminate and mount an image with one pass. * • • • • • • þ • • • • * • • IMPORTANT: Before you can begin, first adjust the four shim wheels to correspond to the thickness of the backing you will use. Set the four shim wheel settings to 3/16”or 5mm. Set the top heater temperature at 210°F or 99°C. Pull the top laminate down from the top unwind shaft, under the top idler and drape it evenly over the face of the top roller. Use a piece of standard 3/16”foam board to hold the laminate under the top roller as the roller is lowered. Use the footswitch with the motor speed setting at 2 FPM or 0.6 MPM. Check the adhesion of the laminate by sending a piece of foam board through first. The laminate must be free of wrinkles and bubbles. Set the brake tension so that the laminate is taut coming off the roll. WARNING! Too much brake tension could cause the laminate to stretch and not adhere properly. Trim the actual adhesive mounting boards slightly larger than the image – a 3”border is sufficient. Use the excess for leader boards. Tape the leading edge of the image onto the mounting board to secure its position as you feed the board through the rollers. Feed the leader board into the nip with the image to be mounted right behind. For more than one image, send them through one after another. IMPORTANT: Send the images fairly close together so that a wide gap doesn’t occur, causing the roller to slip. But do not overlap. NOTE: Thicker laminates and images require slower speeds to allow the heat to properly penetrate the laminate and the image and activate the adhesive on the mounting board. Remove the mounted image from the rear of the laminator, trim it to size and display it. The one-step process takes practice to master. Each individual combination of laminate and image requires different speeds and temperature settings. Use a copy of the Process Control Sheet to record successful combinations. 32 3 H ONE-STEP MOUNTING AND LAMINATING ________________________________________________________ PROCESS: The one-step process of hot mounting an image to a heat-activated board and applying a hot laminate to the top of an image. The option of applying a bottom laminate prevents board warping. MEDIA:INK JET, ELECTROSTATIC AND PHOTOGRAPHIC FILMS: - - - - - Top Unwind: Heat-activated Laminate 3 – 5 Mil _____ Bottom Unwind: (Opt: Heat-activated Laminate 3 – 5 Mil) LAMINATOR SETTINGS: Front Control Panel Top Roller Temp Bottom Roller Temp Main Roller Pressure Motor Speed Setting Motor Direction Cooling Fans 210-215°F (99-102°C) OFF (See Optional) 40-60 PSI 3-5 FPM (1-1.5 MPM) Forward _X_ Reverse ___ On ___ Off _X_ Back Control Panel Pull Rollers Pull Roller Pressure Pull Clutch Tension Up ____ Down __X__ 40-60 PSI 65-70 PSI WEBBING SETTINGS Web Tension Top: Web Tension Bottom: Chill Idlers: [Over/Under] Sheet Fed: ___X__ Shim Wheel Settings: Light _X_ Med. ___ Heavy___ Light ___ Med. _X_ Heavy___ 1st Over__ 2nd Over__ Roll Easel: ____ 3/16”or 5mm Optional: Applying a laminate to the bottom of the mounting board adds the benefit of preventing the warping of the foam board. An added benefit allows for the quick changeover from encapsulating to one-pass mounting. 33 3 H APPLYING AN OVERLAMINATE _________________________________________________________________ • • • • An over-laminate, such as Seal Print Shield pressure-sensitive adhesive with a release liner, can be applied to your mounted prints, photographs or images on photographic papers. Use a sled to support unmounted prints during the laminating procedure. To create a sled, coat a board with Seal Print Mount adhesive and leave the release liner on. Sleds can be reused until the surface is marked enough to transfer blemishes through the laminated print. Otherwise, recoat the board if it is still in good functional condition. Use leader boards the same thickness as the sleds/boards. Place unmounted prints to be laminated face up on the sled as the sled passes through the rollers. For over-laminating mounted prints, follow the same procedures, eliminating the use of a sled. PROCEDURE * • • • • • • • * • • • IMPORTANT: Before beginning, first adjust the four shim wheels to correspond to the thickness of the board you will use. Load a roll of pressure-sensitive over-laminating film onto the top unwind shaft. Set the brake to apply a slight drag, but not tight enough to stretch or otherwise pull the film. Apply either double stick tape or a strip of the pressure-sensitive mounting adhesive film across the width of an empty film core mounted on the front wind-up tube. Pull the over-laminate down from the top unwind shaft, under the top idler and up to the front wind-up tube. Pull the release liner square with the roll of film so that no diagonal wrinkles are apparent. Adhere the top release liner smoothly to the adhesive on the core. Separate the over-laminate from the release liner secured to the take-up core, and pull the over-laminate down evenly so that it rests (adhesive side up) over the face of the top roller. HINT: Adhere one end of scotch tape securely to a corner of the film on the wind-up tube. Pull the other end of the scotch tape down and the film will separate from the release liner. Using the foot switch, feed a leader board into the nip, making sure the film stays adhered to the leader board. Wind up any excess release liner by hand onto the wind-up tube. Set the brake to apply the minimum amount of tension needed to separate the release liner from the film. Check that the film and the release liner are tracking correctly with no diagonal wrinkles in either. After laminating, insert a leader after the last sled so the laminate will adhere properly to the last image. Trim, mount and display your newly laminated images. IMPORTANT: When applying films with plastic liners, do not stop while laminating, as a release separation line will appear in the finished lamination. This line may fade over time but initially will be visible, especially on dark materials. 34 3 H APPLYING AN OVERLAMINATE _________________________________________________________________ PROCESS: Applying a cold pressure-sensitive adhesive with a release liner to mounted prints, photographs or images on photographic papers. FILMS: -- -- -- Top Unwind: _____ Bottom Unwind: Pressure-sensitive Over-laminate NA LAMINATOR SETTINGS: Front Control Panel Top Roller Temp Bottom Roller Temp Main Roller Pressure Motor Speed Setting Motor Direction Cooling Fans 210-215°F (99-102°C) OFF 40-60 PSI 3-5 FPM (1-1.5 MPM) Forward _X_ Reverse___ On ___ Off _X_ Back Control Panel Pull Rollers Pull Roller Pressure Pull Clutch Tension Up ____ Down __X__ 40-60 PSI 65-70 PSI WEBBING SETTINGS Web Tension Top: Web Tension Bottom: Chill Idlers: [Over/Under] Sheet Fed: ___X__ Shim Wheel Settings: Light _X_ Med. ___ Heavy___ Light ___ Med. _X_ Heavy___ 1st Over__ 2nd Over__ Roll Easel: ____ 3/16”or 5mm NOTE: For double-sided laminations (encapsulating), over-laminate and trim the first side using the preceding procedures, and then repeat the process for the second side. 35 3 H NOTES ______________________________________________________________________________________ 36 3 H ONE PASS DRY TRANSFER ____________________________________________________________________ The One-Pass Dry Transfer process involves transferring an image onto a flexible Marking film and applying a high-quality pressure-sensitive laminate to the image transfer. Applying the pressure–sensitive laminate to the top of the image transfer increases the longevity of your image transfer and allows for outdoor applications. n Before webbing for the One-Pass Dry Transfer process: * • Set the top roller temperature to 300°F (149°C) and the bottom roller temperature to 140°F (60°C). Separate the rollers while heating up to prevent the bottom roller from pulling too much heat from the top roller. IMPORTANT: We recommend maintaining these temperatures during long runs to ensure the highest-quality output. Do not allow the top roller temperature to drop below 290°F (143°C). Allow the bottom roller to cool down if the temperature exceeds 160°F (71°C) before continuing the process. • Set the Front Main Roller air pressure to 100 psi. Set the Back Pull Roller air pressure to 50 psi. Set the Air Clutch tension pressure to 40 psi. The clutch tension pressure should not exceed 40 psi. This will prevent excessive pull on the film, affecting the output. • Set both Front Main Roll shim wheel settings to (-1/16 or -2mm). The One-Pass dry transfer process requires the higher nip pressure for successful transfer. • Set both the Back Pull Roll Shim Wheel settings to (0). • Set the motor direction to forward and the motor speed to 3 fpm or 7.6 cpm. This speed can be adjusted (slower or faster) depending on at what speed you have the best total transfer of the toner into the film. • The One-pass dry transfer process is established by a four-step webbing procedure. Follow the directions and corresponding webbing diagrams on the following pages to perform the process. 37 3 H STEP ONE OF WEBBING PROCEDURE DIAGRAM: _________________________________________________ _____ Establish Path of Marking Film þ WARNING! Take care reaching over the top main roller since the roller is very hot at the 300°F (149°C) temperature. • Load the roll of Marking film onto the bottom front unwind shaft, toner-accepting side facing out. Load the roll with the media feeding off the front of the unwind shaft. • Center the roll on the unwind shaft as explained in "Setting the Brakes". • Place a cardboard core over the bottom rear windup tube for winding up the finished product. Adjust and align the cardboard core to the roll of marking film. • Raise both the top rollers for ease of webbing. • Pull the Marking film forward, behind the tie bar, and through the nip of the main rollers. • Feed the film over the first chill idler and under the second chill idler. • From the back of the laminator, pull the film through the pull rollers and down to the bottom rear wind-up tube. Tape the film securely to the cardboard core and rotate a few inches of film around to secure. 38 3 H STEP TWO OF WEBBING PROCEDURE: __________________________________________________________ - - - - Establish Path of Images (Toner and Paper) * IMPORTANT: The images (toners) on the transfer media are easily scratched, so care in handling is necessary. • Load the roll of Images (toner and paper) onto the top front unwind shaft, images facing out. Load the roll with the media feeding off the back. • Adjust and align the images to the roll of Marking film. Set the brakes and lock collars as described in “Setting the Brakes”. • Rotate the roll of Marking film forward on the front bottom unwind shaft to create slack in the film. This will allow for the Scotchprint Images to be webbed through the center chill idlers easier. • Pull a length of images down, around the polished top idler and through the nip of the main rollers. • Feed the images over the first chill idler and under the second chill idler. • Pull the toner and paper up to the center wind-up tube and either tape them directly to the rewind tube or to a cardboard core over the tube. This will automatically wind-up the transferred images paper. 39 3 H STEP THREE OF WEBBING PROCEDURE: ________________________________________________________ ----- Establish Path of Pressure-sensitive Over-laminate • Load the roll of pressure-sensitive over-laminate onto the rear roll easel shaft with the roll feeding off the bottom of the roll easel shaft. • Align and adjust the roll of pressure-sensitive over-laminate to the roll of Marking film. • Pull a length of over-laminate forward and separate the release liner from the overlaminate. • Pass the over-laminate over the back of the top pull roller and into the nip of the lower pull roller. • Pull the over-laminate down over the Marking film to the lower rear wind-up tube. • Tape the release liner securely to the rear top wind-up tube so that it will be automatically wound up. • At this point, take up the slack of the Marking film roll on the front lower unwind shaft. 40 3 H STEP FOUR OF WEBBING PROCEDURE: _________________________________________________________ * IMPORTANT: The Cooling Fan Bank must be on for this process because of the high temperatures to ensure quality output. • Lower the top main and pull rollers. • Reduce the amount of tension on the lower rear take-up shaft by backing off the adjustment collar. This will prevent bubbling that might occur between the two chill idlers when excessive tension from the lower rear take-up shaft pulls the film before it can be properly cooled off. • If during operation this bubbling can not be eliminated by this method, raise the top pull roll and then lower again. Continue to run and this should remedy this problem. • Turn the motor on and run the prints through the rollers checking the quality of the output. • Minimize adjusting the motor speed during the run of the transfer process. This may cause wrinkles feeding into the nip of the main rollers. It is best to set the desired speed at the start. • It is recommended that if you want to change the speed drastically during the operation, stop the motor and raise the top roller. Adjust the speed setting and lower the top roller to reestablish good output. • Adjust the tension of the brakes on the front top and bottom unwind shafts and the rear roll easel shaft. Make sure the output is free of wrinkles and tracking properly. 41 3 H TROUBLESHOOTING __________________________________________________________________________ PROBLEM: • The laminator has no display. SOLUTION: • Check the power cord and the main power button. • Reset the Emergency stop buttons. • Unplug the laminator and check the circuit breakers inside the left cabinet. Only authorized safety or maintenance personnel should do this. • Make sure the left side cabinet door is closed and the door interlock is on. The door interlock on the left door automatically shuts the laminator off when the door is opened. PROBLEM: • Images or Prints are rippling or jumping as they are fed into the nip. SOLUTION: • Apply tension to Images or Prints as they are fed into the nip. Hold cut sheets back by hand. PROBLEM: • The film output is rippled or wavy (boat-waking). SOLUTION: • Check that you have webbed the laminator correctly. Refer to the web diagrams. • Improper film tension - most encapsulating films need a minimal amount of brake tension. • Run the laminator at a higher speed for photo materials or heat-sensitive prints because exposure to heat at low speeds can cause waving. PROBLEM: • The laminator motor will not run. SOLUTION: • Make sure the Photo eyes are not blocked. • Check that the motor button is ON, or turn the motor speed up. • Unplug the laminator and check the fuses on motor control board. PROBLEM: • The film is cloudy or mottled. SOLUTION: • Increase the roller temperature or decrease the motor speed. • Heavier mil films may require increased roller pressure due to the thicker adhesive layer. PROBLEM: • The laminator is not heating up or shows erratic temperature readings. SOLUTION: • Make sure the heaters are ON -- the LED light is illuminated. • Make sure the rollers are together (with both shim wheel settings set at 0) and turning at a moderate speed when first heating up. PROBLEM: • The display is flashing and the controls do not respond. SOLUTION: • See next page for Error Codes. For technical assistance, please contact your sales representative. 42 3 H ERROR CODES _______________________________________________________________________________ The machine shuts down and the display starts blinking. This means that the software has detected an error in the system. The numbers on the displays tell you what error has occurred. The speed display will show the error level. The top temperature display will show the error data. These displays are used to find the problem. (The bottom temperature display shows the current running program number.) The first time an error occurs on your machine, reset your power by depressing and resetting the Emergency stop button. If the error occurs again, see the chart. The chart defines some of the problems that may have caused the error. If you cannot define the problem, contact your distributor or sales representative for technical assistance. Speed Display Note: After an error has shut down the system, the power must be turned off for 10 seconds, using the Emergency stop button. After 10 seconds, turn the power on to restore the system. * Top Temp Display Error Level 1.0 Error Data 1 Error Level 1.0 Error Data 5 Error Level 2.0 Error Data 0 Error Level 2.1 Error Data 1 Error Level 2.1 Error Data 2 Error Level 2.1 Error Data 3 Error Level 2.2 Error Data 1 Error Level 2.2 Error Data 2 Error Level 2.2 Error Data 3 WARNING! The machine must be unplugged from the power source before any servicing. 43 Problem The photo-eye has failed. The digital I/O (DIO) card is defective. Reset. If error occurs again, the digital I/O (DIO) card is defective. The Solid State Relay for the top main roll heater is defective. The Solid State Relay for the bottom main roll heater is defective. If the rollers are hot, the Digital I/O (DIO) card has failed. If the rollers are cold, The Analog Card has failed. The top thermocouple is defective or has a bad connection. The bottom thermocouple is defective or has a bad connection. The Analog I/O (AIO) Card is defective. 3 H LAMINATING TERMINOLOGY ___________________________________________________________________ OUT-FEED: The side of the laminator from which completed images emerge. DECAL: An image that has been laminated on top (either heat-activated or pressure-sensitive) with an adhesive backing. PRE-COATING: The process of coating a substrate with an adhesive mounting film onto which an image can be mounted. ENCAPSULATING: Completely sealing an image between two heat-activated films. FILM: A synonym for laminate. The clear material used in the laminating and encapsulating processes. PRESS: The amount of force in distance put on anything that passes between the top and bottom rollers. Setting the shim wheel adjustment for the top roller at .100”and running an image .125” thick through puts a .025”press on the image. HEAT-ACTIVATED FILMS: Films with a dry adhesive that is activated when heat is applied. Once applied to an image the adhesive forms a strong bond locking the laminate and the image together. IN-FEED: The side of the laminator from which images are fed. PRESSURE-SENSITIVE FILMS: Films with a wet adhesive which forms a bond between the protective laminate and the surface of the image being laminated. Used primarily for fast mounting applications and recommended for heat-sensitive thermal and photographic prints. LEADER BOARD: A piece of thin foam board (about 4’x 2”) used to push films into the nip. Also used for mounting or pre-coating boards to prevent adhesive from getting onto the rollers and sealing edges. RELEASE LINER: The backing on a pressure -sensitive laminate or mounting adhesive. After peeling the release liner off, the adhesive layer becomes exposed. MIL: Refers to the thickness of the laminate/film. SLED (CARRIER BOARD): A piece of smooth, non-crushable board (preferably Masonite) coated with a mounting adhesive and leaving the release liner on to provide the necessary non-stick surface. A piece of foam board can also be used, but it will not have the longevity of the Masonite board. Sleds are used when laminating one side of an image only. MOUNTING: Applying an image onto some kind of foam board or substrate. NIP: The spot where the top and bottom rollers meet. SUBSTRATE: The material to which an image is mounted or affixed. 44 3 H MAINTAINING YOUR LAMINATOR _______________________________________________________________ CLEANING THE LAMINATOR REPLACING FUSES • þ Clean the exterior painted surfaces of your laminator with a damp cloth. Use a household detergent to remove any difficult stains. Do not use an abrasive cleaner or it may damage the paint surface. • • WARNING! Do not let water get into the control panels of the laminator, as they are not sealed. Water may enter the electrical circuits and cause personal injury and/or damage the equipment when power is applied. Replace defective fuses with fuses of the same type. Replacement fuses are included in your accessory pack and can be re-ordered through the Hunt Graphics location nearest you, see the rear cover. NOTE: You must use replacement parts specified by Hunt Graphics. The fuses are located inside the left cabinet inside the Electrical Panel Cover. GREASING THE BEARINGS • þ þ RESETTING BREAKERS You must grease the top and bottom roller bearings once each month or every 200 hours. WARNING! Failure to lube bearings will cause premature wear, which may cause costly repairs and will void your warranty. • WARNING! Authorized service technicians must unplug the laminator before any servicing. The breakers are located inside the left cabinet in the center next to the lower infrared sensor. Turn the door interlock to the OFF position and open the left cabinet door with door key. Reset the tripped circuit breaker to the up position. Call Technical Service for further assistance. 45 3 H PERIODIC MAINTENANCE SHEET ________________________________________________________________ GREASE BEARINGS REPLACE FUSES REPLACE BREAKERS CHAIN TENSION ADJUSTMENT DRAIN WATER AIR SYSTEM (FILTER) SAFETY CHECK (AFTER SERVICING) We recommend using this Periodic Maintenance Sheet to record dates that authorized safety or maintenance personnel perform these laminator maintenance procedures. Proper maintenance of your laminator ensures receiving many years of profit from your investment. 46 3 H PROCESS CONTROL SHEET ____________________________________________________________________ Process:_______________________________________ Shim Wheel Shim Wheel Front Rear Application Use:_________________________________ Top Unwind:____________________________________ Rear Top Wind-up Tube Front Top Unwind Shaft Rear Top Unwind Shaft Bottom Unwind:_________________________________ Top Idler Center Top Wind-up Tube FRONT CONTROL PANEL SETTINGS Top Roller Temp:________________________________ Front Top Wind-up Tube Top Tie Bar Rear Roll Easel Top Main Roller Top Pull Roller Front Roll Easel Motor Speed Setting:_____________________________ Chill Idler Rear Table Bottom Roller Temp:_____________________________ Bottom Pull Roller Chill Idler Print Guide Front Table Bottom Main Roller Cooling Fan Bank Main Roller Pressure:____________________________ Motor Direction: Forward ____ Reverse ____ Cooling Fans: On ____ Off ____ Rear Bottom Wind-up Tube Sleeved Tie Bar Sleeved Tie Bar Front Bottom Wind-up Tube BACK CONTROL PANEL SETTINGS Pull Rollers: Up ____ Down ____ Rear Bottom Unwind Shaft Pull Roller Pressure:_____________________________ Front Bottom Unwind Shaft Pull Roller Tension:_____________________________ WEBBING SETTINGS Web Tension Top: Chill Idlers:[Over/Under] Web Tension Bott: Sheet Fed: ______ Light___ Med___ Heavy___ 1st_______ 2nd_______ Light___ Med___ Heavy___ Roll Easel: ______ We recommend that you make a photocopy of this page. With each successfully run application, record the process and settings and a diagram of the webbing procedure. NOTE: Keep the record so the application can be repeated at a later date. HINT: If a standard image is made available for each new process then sales materials and samples can be developed for reference. 47 3 H ELECTRICAL DIAGRAMS ______________________________________________________________________ 48 3 H ELECTRICAL DIAGRAMS ______________________________________________________________________ 49 3 H ELECTRICAL DIAGRAMS ______________________________________________________________________ 50 3 H ACCESSORIES _______________________________________________________________________________ The following list of accessories is included in the Accessory Pack and can be ordered through a Hunt Graphics Sales Office near you. Accessories ----------------------------Part # --------------------------Usage Owner’s Manual ----------------------#350061-----------------------Instruction/Information Quick Reference Guide-------------#350065-----------------------Recommended Settings Terry Cloth Towel --------------------#350011-----------------------Roll Cleaning Image Roll Cleaner ------------------#350020-----------------------Roller Adhesive Removal 5/16”T-handle-------------------------#312001-----------------------Brakes/Lock Collar 3/16”Allen Wrench ------------------#313020-----------------------Table Arms Installment Tape Measure-------------------------#350015-----------------------Supply Media Alignment Zippy Cutter ----------------------------#350002-----------------------Laminate Cutting Razor Blades --------------------------#270600-----------------------Zippy Cutter Blades Grease Gun----------------------------#350021-----------------------Bearing Maintenance Gun Adapter ---------------------------#350022-----------------------Bearing Maintenance High Temp Grease-------------------#350007-----------------------Bearing Maintenance Edge Wrap Tool ----------------------#350003-----------------------Image Mounting Door Keys ------------------------------#052032-----------------------(Cabinets) Maintenance O-Rings (4)-----------------------------#169007-----------------------Clutch Drives Female Air Coupler ------------------#246701-----------------------Air Compressor 2 Amp Fuse ----------------------------#142112-----------------------Electrical 3 Amp Fuse ----------------------------#142110-----------------------Electrical Also enclosed: Installation Acceptance Form -----#314010 Hunt Graphics offers a comprehensive line of mounting and laminating equipment and supplies to add to your creative potential. Contact your nearest sales office; see rear cover for location nearest you. 51 3 H REPLACEABLE PARTS ________________________________________________________________________ PART DESCRIPTION PART # PART DESCRIPTION PART # ¾ Shaft Collar Zinc 3035 DCTN Nice Ball Bearing 7516 DLGTN Nice Ball bearing Air Clutch, Mach III Air Compressor Air Cylinder Kit (1-Stage)-Pull Air Cylinder Kit (2-Stage)-Main Air Filter Kit Air Fitting, Three-way Air Gauge Kit Air Regulator Kit Air Regulator Kit-1 Analog Board Bearing, Flange 1-15/16 Bearing, Take-up 1-15/16 Brake Kit Breaker, 25 Amp Breaker, 50 Amp Breaker, 6 Amp CBK-PMT40R Button Chain, Clutch Chain, Main Drive Chain, Motor Chill Idler, Shaft Chill Idler-Plated Clutch Drive Kit Clutch Idler Kit Connecting Link Contact Block Digital IO Board Door Disconnect, 63 Amp 200065 027420 027425 104550 225020 55043 55042 5507 234010 55069 50607 50607-1 131006 021156 025155 50623 129720 129725 129702 175060 101262 101260 101261 708666 615661 55052 4002 101036 175050 131007 143025 Electrical Panel Base Kit Electrical Panel Platform Kit Encoder Bracket Encoder Fans Fuse 250V 3Amp Hex Tensioner, Center Kit Hex Tensioner, Offset Kit Lock Collar Mechanical Transformer Shaft Mini-Tensioner Kit Motor Tension Idler, Center Kit Motor Tension Idler, Offset Kit Motor Omron, G7L-2A-TUBJ-CB-DC24 Panel Display Processor Board Rewind Tube, Gray Roll Easel Shaft Rollers, Main Rollers, Pull Solenoid Sprocket, 35B15--7/8 Bore Sprocket, 35B17— 3/4 Bore Sprocket, 35BS13--5/8 Bore Sprocket, 35BS17— 7/8 Bore Sprocket, Main Roller Unwind Shaft 55066 55065 511624 501624 136600 142110 55101 5510 516004 708604 55112 55103 55102 107550 166040 131002 131001 615461 708660 691690 691694 55053 113115 113015 113030 113057 113040 708664 52 3 H REAR COVER__________________________________________________________________________ For more information about Hunt Graphics products, contact the sales office nearest you. ____________________________________________________________________________________________________ Hunt Graphics Americas Railroad Ave. Extension Building 8 Beacon Falls, Connecticut, USA 06403-0098 Phone: 203-729-5201 •800-257-7325 Fax: 203-729-5639 •800-966-4554 Hunt Graphics Europe Unit 6 Scimitar Park Courtalds Road Basildon, Essex, England SS13 1ND Phone: 00 44 1268 591691 Fax: 0044 1268 727615 Hunt Graphics Europe Kanaaldijk O.Z. 3 P.O. Box 29, 8100 AA, Raaalte The Netherlands Phone: 00 31 572 345 500 Fax: 00 31 572 345 501 Hunt Graphics Americas 690 Gana Court Mississauga, Ontario, Canada L5S 1P2 Phone: +1-905-564-7717 •800-663-4868 Fax: 1-905-564-7079 Hunt Graphics Pacific Unit A, 13th Floor, Block 1 Leader Industrial Centre Tsuen Wan, New Territories, Hong Kong Phone: 00 852 2407 3738 Fax: 00 852 2408 0973 The Information contained herein is general and does not constitute any warranties or guarantees. Hunt Graphics: Enhancing the world's images A Subsidiary of Hunt Corporation 53 3 H