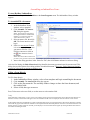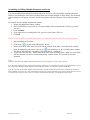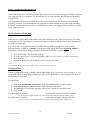
1
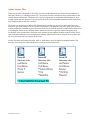
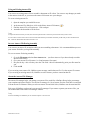
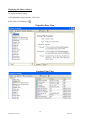
USER Manual Provided by The Indiana State Bar Association www.indianadocs.net IndianaDocs 2010-2011 10/01/2010 Table Of Contents: System Requirements: ................................................................................................................................................................................ 3 Technical Support: ...................................................................................................................................................................................... 3 Introduction: ............................................................................................................................................................................................... 4 IndianaDocs............................................................................................................................................................................................. 4 HotDocs Viewer ....................................................................................................................................................................................... 4 HotDocs Filler ......................................................................................................................................................................................... 4 Using IndianaDocs: ..................................................................................................................................................................................... 5 Display the Library .................................................................................................................................................................................. 5 Finding a Form ........................................................................................................................................................................................ 5 Opening or Closing a Folder ................................................................................................................................................................... 5 Printing the List of Forms ........................................................................................................................................................................ 5 Assembling an IndianaDocs Form:............................................................................................................................................................ 6 To start HotDocs/ IndianaDocs ............................................................................................................................................................... 6 To Assemble/Fill a document ................................................................................................................................................................... 6 Filling a Form Directly............................................................................................................................................................................ 6 Assembling and Filling Multiple Documents and Forms ......................................................................................................................... 7 Saving a Non-Bordered Documents (rtf) ................................................................................................................................................. 8 Saving a Bordered Form (hpt) ................................................................................................................................................................. 8 Printing a Form ....................................................................................................................................................................................... 8 Tab Options for Assembling Forms ......................................................................................................................................................... 9 Using an Existing Answer File................................................................................................................................................................11 Save an Answer File During Assembly ...................................................................................................................................................11 About the Answer File Manager .............................................................................................................................................................11 Displaying the Answer Library ...............................................................................................................................................................12 Finding an Answer File ..........................................................................................................................................................................13 Deleting an Answer File from the Library ..............................................................................................................................................13 Customizing IndianaDocs ..........................................................................................................................................................................14 Adding Text to a bordered form ..............................................................................................................................................................14 To size and position field to a bordered form .........................................................................................................................................14 Striking Out Text to a bordered form ......................................................................................................................................................14 Enlarging and Reducing the Form View .................................................................................................................................................14 Change Your Default Word Processor ...................................................................................................................................................15 Showing or Hiding Field Backgrounds to a bordered form ....................................................................................................................15 To open a saved form ..............................................................................................................................................................................15 Keyboard Shortcuts ...................................................................................................................................................................................16 Keystrokes for Symbols ...........................................................................................................................................................................16 -2IndianaDocs 2010-2011 10/01/2010 System Requirements: To ensure the best performance using HotDocs, please note the following requirements for hardware and software: HotDocs Player 10 Edition • IBM-compatible PC • Pentium 900 MHz or higher processor (2GHz or higher, recommended) • 1 GB RAM • 25 MB hard disk storage • 1024 x 768 screen resolution (16bit color) • For most reliable results, use a PCL-Based printer with ~8 MB RAM. • Microsoft Windows 7, Vista or Windows XP • Microsoft Internet Explorer 6.0 or later • Microsoft Word 2000, XP, 2003, 2007 or 2010; or • Corel WordPerfect 10, 11, 12, x3, or x4 • Internet connection required for software updates Technical Support: Technical Support is available to help you use IndianaDocs . If you are having difficulties installing or using the software contact us at the following: Internet Email Support Support Phone www.indiandocs.net [email protected] 877-243-3179 Support is available from 9:00 A.M. to 3:00 P.M. central standard time, Monday through Friday. -3IndianaDocs 2010-2011 10/01/2010 Introduction: IndianaDocs is a library of templates related to the practice of law in Indiana. These legal forms are created, endorsed and copyrighted by The Indiana State Bar Association. Most IndianaDocs forms are available in NonBordered (rtf ) format. IndianaDocs does contain state and federal forms that are not to be altered and are available in Bordered (hpt) format. Bordered forms (Form Templates) graphical-based electronic form files mostly state or federal forms. A form template contains fixed-space fields, represented by lines, boxes and check boxes where answers are placed. The purpose of the bordered form is to give the parties involved the assurance that the language of the document is standard, eliminating the need to proof read. Static text cannot be deleted, but must be stricken through. Additional text can only be added where existing text does not exist. Non-bordered forms (Document Templates) contain the text of a standard document. After HotDocs assembles a document, it is placed in the word processor for saving, printing or additional editing. With the purchase of IndianaDocs you actually have several programs. Each is displayed with a separate icon in the HotDocs icon group. (HotDocs Viewer, HotDocs Filler, and IndianaDocs) HotDocs Viewer is a software tool that significantly reduces the time spent generating customized documents such as contracts, court forms, and legal documents. The template prompts you for information and puts the finished document back in your word processor. By adding functionality and power to your word processor, HotDocs helps you generate customized documents accurately and efficiently. HotDocs Filler a program that allows you to fill graphics-based HotDocs form templates (Bordered Forms) created with HotDocs Pro. It is used to open previously saved IndianaDocs (Bordered) documents. Once a template is opened and completed it is detached from the IndianaDocs program and saved as a HotDocs form with the file extension .hpd (HotDocs PDF Document). Hpd files are not recognized by IndianaDocs and must be opened through the HotDocs Filler program. -4IndianaDocs 2010-2011 10/01/2010 Using IndianaDocs: Display the Library To display the IndianaDocs Library: Double-click on the IndianaDocs shortcut on the desktop – OR Choose HotDocs Player 10 > IndianaDocs at the Start/Programs menu. The IndianaDocs library window appears. To create a shortcut of IndianaDocs on your desktop: Choose HotDocs Player 10 > IndianaDocs at the Start/Programs menu. Right click on IndianaDocs, left click on Copy, right click on the desktop, left click on Paste. Finding a Form You can use the “Find” feature in order to find a form in the library. All forms have a title which can be used to find forms. You can also search on form descriptions, also. To use the find feature, have the IndianaDocs Library window open. At the bottom left locate the Find dialog box, type in your text (i.e. simple will) A list will be produced with forms that have that criteria. During this search, the checkbox will be checked. To go back to the library window, uncheck this box. Opening or Closing a Folder Open folders are represented by this icon. Closed folders are represented by this icon files and subfolders that are in it. . When a folder is open, you can see the To open or close a folder Double-click the folder icon. Printing the List of Forms To print a list of the forms please visit www.indianadocs.net for a full listing of forms. -5IndianaDocs 2010-2011 10/01/2010 Assembling an IndianaDocs Form: To start HotDocs/ IndianaDocs Choose HotDocs Player 10 > IndianaDocs at the Start/Programs menu. The IndianaDocs library window appears. To Assemble/Fill a document 1. At the IndianaDocs library window, select a template. 2. Click Assemble. The Answer File dialog box appears. NOTE: Answer Files are important to the strength of HotDocs and document assembly. To learn more please see “About Answer Files“ section. 3. Select an answer file, then click OK. The forms interview will begin. 4. If this is a new answer file then it is recommended that you save your answer file first. Go to File/Save Answers or click on the Save Answers icon in the toolbar. NOTE: Most answer files will be saved per client. Save your file as clients name. For example: save answers for client John Doe as “Doe, John”. 5. Answer the dialog questions in the “Interview Tab”, then click Next to advance to each new dialog. After the final dialog, the End of Interview dialog identifies how many questions haven't been answered. This dialog also provides options for working with the assembled document. Please see “End of Interview Options” section for a discussion on options available to you. Filling a Form Directly (not recommended) To fill a form directly 1. At the IndianaDocs library window, select a form template and begin assembling the document. 2. Click Assemble. The Answer File dialog box appears. 3. Click on the Document tab. The assembly window changes to show the form document, and the variable fields. 4. Select a field, then type an answer Press Tab to move to the next field, or use the mouse to select another field. Tip Some fields have a field wizard—a series of one or more dialogs to help you answer the field when you are filling the form directly. If a field has a wizard, a wizard button will appear next to the field when its fill control is displayed. Click the button to see the wizard. If the template author has provided help for a field, a help button may appear next to the field when its fill control is displayed. (The help button will only appear if the author has enabled it in the template and if the Show Help Buttons check box is selected in Preferences. For details, click here.) If there is help for the field, you can display it even if the button doesn't appear by clicking the What's This button in the toolbar and clicking the field. -6IndianaDocs 2010-2011 10/01/2010 Assembling and Filling Multiple Documents and Forms You can assemble and fill multiple documents and forms at once by selecting multiple templates and clause libraries. One document or form will be produced from each selected template or clause library. The Assembly Options dialog box will appear only once, and all the templates and clause libraries will use the same answer file. To assemble and fill multiple documents and forms 1. Display the IndianaDocs library window. 2. Select each template you want to use. (To select multiple items, hold down the Ctrl key as you click each one.) 3. Click Assemble. 4. If you want to use an existing answer file, specify it at the Answer File box. 5. Click OK. NOTE: If you would like to assemble documents in a certain order then you should do the following steps1. Start assembling the first form 2. Click on the to go back to the IndianaDocs library 3. Double-click on the other forms you would like to assemble in the order you would like to assemble them. Remembering each time to click on the . (you should now see the Assembly Queue window. This shows what forms are “assembling” and forms that are “confirmed”.) 4. To go back to the first form – double click on the form in the Assembly Queue. When you close/finish with this form the next form will start automatically, with the answer file you used for the other document. Tip Don't select more document templates and clause libraries than your word processor can have open at one time. If you have form templates selected, form wizards will only be used if the Use Form Wizard check box is selected at Preferences. If it is not, or if the forms don't have wizards, HotDocs will open the forms in Filler. You will need to go back and fill them. If you have selected only document templates and clause libraries, you will be asked about saving answers when the last document is done assembling. If you have one or more form templates selected, you won't be asked about saving answers until the last form is saved or closed. However, when you save a form, it is no longer connected to the answer file, even though other forms may be. -7IndianaDocs 2010-2011 10/01/2010 Saving a Non-Bordered Documents (rtf) (Word Processing Forms) At the “End of Interview” send your completed form to your word processor by clicking on the button to send to your word processor or by typing the F11 (function key) key on your keyboard. This will launch your default word processor. Once IndianaDocs displays an assembled document in your word processor, the document is a normal word processing document. You can manipulate (save and print) this document just like any other word processing document. You may change your answer or standard document text. Any changes made to variables will not be saved in the answer file. Saving a Bordered Form (hpt) (Forms with the HPT or HFT file extension) When you save a HPT or HFT form, HotDocs closes the current answer file. (You will be asked if you want to save the answers first.) Any changes you make to the answers in the form once the form has been saved will not be saved in an answer file. You will be able to save your documents as and HPD (HotDocs PDF Document) or as a PDF (portable document format). A HPD file is editable, using HotDocs Filler, but the PDF format will not be editable. A PDF format is convenient for sharing with others that do not have HotDocs, such as clients. 1. 2. 3. 4. Go to the File menu, click Save Document As. Go to the “Save Type as” field and select HPD or PDF (For security options, see “ HotDocs PDF Advantage’). Name your file. Navigate to the directory you would like to save to and click on Save. Tip A saved form has the file name extension .HPD. It also is not connected to the answer file. Printing a Form Printing a graphical form (hpd) in HotDocs with Acrobat Reader allows you to use a variety of printers. If you are given the option of using HotDocs PDF driver or the Acrobat Reader driver. The Acrobat Reader option is the best option in most cases. To print a form 1. 2. 3. 4. Click on the Form Document Tab located at the top or bottom of the Assembly window. On the File menu, click Print. (select Acrobat driver if given the option) Acrobat Reader will load, make sure paper scaling is not checked or is selected as “none”. Click on OK. To print a Question Summary Click Question Summary Tab then select Print (if you do not see the Question Summary Tab then go to View Menu and check Question Summary Tab) To print an Answer Summary Click Answer Summary Tab then select Print (if you do not see the Answer Summary Tab then go to View Menu and check Answer Summary Tab) -8IndianaDocs 2010-2011 10/01/2010 Tab Options for Assembling Forms When you are assembling a form, by default, only the Interview and Form Document (or Document Preview) are visible tabs. However there are two others that can be displayed: (These tabs are useful especially if you have forms dictated or filled out by a client because they follow the actual interview that a user fills out.) Question Summary Tab. This tab allows you to view/print all questions that the interview will aske. It will give the question and a line for an answer. To view this tab when you assemble a form, open up a form and at the Interview Tab go to View and select Question Summary Tab. This tab will always be visible. Answer Summary Tab. This tab is the same as the Question Summary except it will display any answers you have filled out already. If an answer wasn’t given then it will insert a blank line. To view this tab when you assemble a form, open up a form and at the Interview Tab go to View and select Question Summary Tab. This tab will always be visible. -9IndianaDocs 2010-2011 10/01/2010 About Answer Files When you assemble a document or fill a form, you can save the information you entered for the document or form (the "answers") in a HotDocs answer file. The answer file stores each answer along with the name of the variable that uses that answer. The answer file can be used again later to produce the same document or form without reanswering the questions. You can also use the answer file to assemble documents and fill forms from other templates that use the same variables. The best way to organize your answer files depends largely on your type of practice. Some users create one answer file per client. Others create one answer file per matter. (This method is especially good when you have multiple matters per client that use the same forms, because it prevents the answers from the current matter from overwriting the answers from a different matter and the answers from a previous matter from getting used accidentally in the current matter.) Still other users combine the two methods, creating a pattern answer file for each client that contains basic client information, and then using the pattern file to copy the answers into a new file every time they start a new matter for the client. Answer files have the filename extension .ANS or .ANX and are stored by default in the default answer file directory. You can specify a different directory when you create an answer file. NOTE: All 3 of the above forms are using the same answer file. - 10 IndianaDocs 2010-2011 10/01/2010 Using an Existing Answer File You can use an existing answer file to assemble a document or fill a form. You can save any changes you make to the answers in the file, or you can use the answer file but not save your changes. To use an existing answer file 1. Open the template you would like to use. 2. At the Answer File dialog box, click on the Select Answer File button ( 3. Find the Answer File you want to use. Click on Open 4. Assemble the document or fill the form. ). Tip To reopen the last answer file you used, click on the drop down menu to select the previous answer files you have used. You can select an answer file so that it can be used for all documents you assemble and forms you fill until you select another answer file. Check the “Remember Selected Answer File” box. Save an Answer File During Assembly You can save an answer file at anytime while you are assembling a document. It is recommended that you save your answer file before you begin the assembly. To save an answer file during assembly 1. Go to the File menu and select Save Answers As… (use Save Answers if you have already saved the answers once before) 2. Give your answer file a file name (i.e. client last name, first name) 3. Hit your tab key – this will take you to the Title field – this will automatically put in your file name for you. 4. Click on OK If you are using a new answer file, HotDocs opens an empty, untitled answer file. Give the answer file a name. If you are using an existing answer file, HotDocs saves the answers you have entered to that file. About the Answer File Manager The answer file manager helps you manage your answer files, much like a HotDocs library helps you manage your templates and clause libraries. The answer file manager is a list of answer file titles. Each title is associated with an answer file filename. When you select an answer file and click Select, HotDocs uses the associated file. Each copy of HotDocs can have only one answer file manager. If you want to separate your answer files, you can create folders in the answer file manager window. Tip Answer File Manager is disabled if you use windows explorer to save answers. - 11 IndianaDocs 2010-2011 10/01/2010 Displaying the Answer Library To display the answer library At the IndianaDocs library window, click Tools. Select Answer File Manager ( ). Properties Pane View Contents Pane View - 12 IndianaDocs 2010-2011 10/01/2010 Finding an Answer File You can quickly find a certain answer file in the library by searching for words in the answer file's title or description. To find an answer file Select the Find check box and type words from the answer file's title or notes in the text box. Deleting an Answer File from the Library (Not recommended) To delete an answer file from the library 1. 2. 3. 4. Select the answer file you want to delete. Click Delete. When HotDocs asks you for confirmation, click Yes. Choose whether to delete the actual file or just remove it from the answer library. To Delete the answer file from the computer as well as from the answer library Click Yes Delete the answer file from the library, but leave it in the computer Click No - 13 IndianaDocs 2010-2011 10/01/2010 Customizing IndianaDocs Adding Text to a bordered form (HPT or HFT forms) NOTE: Same process for HotDocs Filler. 1. 2. 3. 4. Open Form to be filled. Assemble form. Go to the Document Tab to view the actual document and make sure the select tool ( ) is selected Draw field where text is to be inserted. (Simply left click and drag.) Remember text can only be added where no text exists. 5. Double click on field created and enter text. To size and position field to a bordered form (HPT or HFT forms) NOTE: Same process for HotDocs Filler. 1. 2. 3. 4. 5. 6. Select field to be moved or resized. Once selected right click on mouse. (Menu option will appear) Select resize/move Handles or small boxes will appear on field. (These handles are used to move and resize.) The handle in upper left corner of the field is used to move a field. Selecting any other handle will resize the field. Striking Out Text to a bordered form (HPT or HFT forms) NOTE: Same process for HotDocs Filler. 1. Open Form to be filled. 2. Assemble form. 3. Go to the Document Tab to view the actual document and make sure the Select Tool ( selected 4. Position field over text to be stricken (create the field a little larger than needed). 5. Go to the Field menu and select Properties. 6. In the Properties window check “Strike-Through”(lower right corner). 7. Select the fill tool ( ), click inside the field type an “X” or a “-“. 8. Click outside the field. Your field will be inputted with the above type. NOTE: If you use HotDocs Filler then the tool ) is is called “Select Fields” and not “Select Tool”. Tip To get multiple lines to be stricken – give a hard return (type the Enter Key) for one less then the number of lines you need (i.e. If you need 4 lines to be stricken you need 3 hard returns, do this: type an x, hit enter key, type x, hit enter key, x, hit enter key, type x) Properties, such as bold, italic, etc. can be changed under the Field/Properties. Enlarging and Reducing the Form View By default, forms in HotDocs Automator display at their actual size. To enlarge or reduce the form view View Page Width or view full page - 14 IndianaDocs 2010-2011 10/01/2010 Change Your Default Word Processor If you have more than one word processor installed, you can select a default word processor to which you send an assembled document after you complete a HotDocs interview. This word processor will always be used, no matter which format the template is in when you select it for assembly. (For example, if you select a Word template but want the assembled document to be saved as a WordPerfect file, you can select WordPerfect as the default word processor and HotDocs will convert the assembled Word document to WordPerfect format.) Note, however, that if you save a document to disk (by clicking the Save Document button) without sending it to the word processor first, it will be saved in the same format as the original template file. To specify a default word processor 1. At the HotDocs library, click the Tools menu then click on the Options button. The HotDocs Options dialog box appears. 2. Click the Word Processors folder. The right pane changes to show a drop-down list of available word processors. 3. Click the Default Word Processor drop-down button and select a word processor. Showing or Hiding Field Backgrounds to a bordered form You can show or hide the field backgrounds in forms. By default, field backgrounds are visible. To show or hide field backgrounds Select the Form Document tab, go to View and select Show Answer Fields. Select again to turn back on On the View menu in Filler, click Fields. Tip You can also show or hide fields by clicking the View Fields button on the toolbar. To open a saved form 1. Start HotDocs Filler if it is not already open. 2. On the File menu, click Open. 3. Select the file you want to open and click OK or Open. If the form was saved as a PDF you can open this form using Adobe Acrobat Reader. Please refer to page 11 “Saving a Form” for more information on the difference of a HPD and PDF file. Tip A saved form has the file name extension .HPD. To create a shortcut of IndianaDocs on your desktop: Choose HotDocs Player 10 > HotDocs Filler at the Start/Programs menu. Right click on HotDocs Filler, left click on Copy, right click on the desktop, left click on Paste. - 15 IndianaDocs 2010-2011 10/01/2010 Keyboard Shortcuts Open Close Save Exit Undo Redo Cut Copy Paste Delete Select All Previous Page Next Page Go To Page Fit Page to Width Zoom In Zoom Out Ctrl+O Ctrl+F4 Ctrl+S Alt+F4 Ctrl+Z Ctrl+Y Ctrl+X or Shift+Delete Ctrl+C or Ctrl+Insert Ctrl+V or Shift + Insert Del Ctrl+A Alt+PgUp Alt+PgDn Ctrl+G Ctrl+H F10 F9 Keystrokes for Symbols º ¢ £ § © ® ¶ ¼ ½ ¾ ™ ‰ Alt+0186 (degree symbol) Alt+0162 Alt+0163 Alt+0167 Alt+0169 Alt+0174 Alt+0182 Alt+0188 Alt+0189 Alt+0190 Alt+0153 Alt+0137 - 16 IndianaDocs 2010-2011 10/01/2010