1
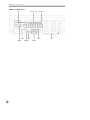
CAUTION
RISK OF ELECTRIC SHOCK
DO NOT OPEN
CAUTION: TO REDUCE THE RISK OF ELECTRIC SHOCK,
DO NOT REMOVE COVER (OR BACK).
NO USER-SERVICEABLE PARTS INSIDE.
REFER SERVICING TO QUALIFIED
SERVICE PERSONNEL.
The lightning flash with arrowhead symbol, within an equilateral triangle, is
intended to alert the user to the presence of uninsulated “dangerous voltage”
within the product’s enclosure that may be of sufficient magnitude to
constitute a risk of electric shock.
The exclamation point within an equilateral triangle is intended to alert the
user to the presence of important operating and maintenance (servicing)
instructions in the literature accompanying the appliance.
COMPLIANCE NOTICE OF FCC:
THIS EQUIPMENT HAS BEEN TESTED AND FOUND TO COMPLY WITH THE LIMITS
FOR A CLASS A DIGITAL DEVICE, PURSUANT TO PART 15 OF THE FCC RULES.
THESE LIMITS ARE DESIGNED TO PROVIDE REASONABLE PROTECTION AGAINST
HARMFUL INTERFERENCE WHEN THE EQUIPMENT IS OPERATED IN A
COMMERCIAL ENVIRONMENT. THIS EQUIPMENT GENERATES, USES, AND CAN
RADIATE RADIO FREQUENCY ENERGY AND IF NOT INSTALLED AND USED IN
ACCORDANCE WITH THE INSTRUCTION MANUAL, MAY CAUSE HARMFUL
INTERFERENCE TO RADIO COMMUNICATIONS. OPERATION OF THIS EQUIPMENT
IN A RESIDENTIAL AREA IS LIKELY TO CAUSE HARMFUL INTERFERENCE, IN
WHICH CASE USERS WILL BE REQUIRED TO CORRECT THE INTERFERENCE AT
THEIR OWN EXPENSE.
CAUTION: CHANGES OR MODIFICATIONS NOT EXPRESSLY APPROVED BY THE
PARTY RESPONSIBLE FOR COMPLIANCE COULD VOID THE USER’S AUTHORITY
TO OPERATE THE EQUIPMENT.
THIS CLASS OF DIGITAL APPARATUS MEETS ALL REQUIREMENTS OF THE
CANADIAN INTERFERENCE-CAUSING EQUIPMENT REGULATIONS.
THE INFORMATION IN THIS MANUAL IS BELIEVED TO BE ACCURATE AS OF THE DATE OF
PUBLICATION. IDIS, Co., IS NOT RESPONSIBLE FOR ANY PROBLEMS RESULTING FROM THE
USE THEREOF. THE INFORMATION CONTAINED HEREIN IS SUBJECT TO CHANGE WITHOUT
NOTICE. REVISIONS OR NEW EDITIONS TO THIS PUBLICATION MAY BE ISSUED TO
INCORPORATE SUCH CHANGES.
I M P O RTANT SAFEGUARDS
1. Read Instructions
All the safety and operating instructions should be read
before the appliance is operated.
2. Retain Instructions
The safety and operating instructions should be retained
for future reference.
3. Cleaning
Unplug this equipment from the wall outlet before
cleaning it. Do not use liquid aerosol cleaners. Use a damp
soft cloth for cleaning.
4. Attachments
Never add any attachments and/or equipment without the
approval of the manufacturer as such additions may result
in the risk of fire, electric shock or other personal injury.
5. Water and/or Moisture
Do not use this equipment near water or in contact with
water.
6. Accessories
Do not place this equipment on an unstable cart, stand or
table. The equipment may fall, causing serious injury to a
child or adult, and serious damage to the equipment. Wall
or shelf mounting should follow the manufacturer’s
instructions, and should use a mounting kit approved by
the manufacturer.
This equipment and cart combination should be moved
with care. Quick stops, excessive force, and uneven
surfaces may cause the equipment and cart combination to
overturn.
7. Ventilation
Slots and openings in the cabinet and the back or bottom
are provided for ventilation, and to ensure reliable
operation of the equipment and to protect it from
overheating. These openings must not be blocked or
covered. Do not block these openings or allow them to be
blocked by placing the equipment on a bed, sofa, rug, or
bookcase. Ensure that there is adequate ventilation and
that the manufacturer’s instructions have been adhered to.
8. Power Sources
This equipment should be operated only from the type of
power source indicated on the marking label. If you are
not sure of the type of power, please consult your
equipment dealer or local power company.
9. Power Cords
Do not allow anything to rest on the power cord. Do not
locate this equipment where the cord will be abused by
persons walking on it.
10. Lightning
For added protection for this equipment during a lightning
storm, or when it is left unattended and unused for long
periods of time, unplug it from the wall outlet and
disconnect the antenna or cable system. This will prevent
damage to the equipment due to lightning and power-line
surges.
11. Overloading
Do not overload wall outlets and extension cords as this
can result in the risk of fire or electric shock.
12. Objects and Liquids
Never push objects of any kind through openings of this
equipment as they may touch dangerous voltage points or
short-out parts that could result in a fire or electric shock.
Never spill liquid of any kind on the equipment.
13. Servicing
Do not attempt to service this equipment yourself. Refer
all servicing to qualified service personnel.
14. Damage requiring Service.
Unplug this equipment from the wall outlet and refer
servicing to qualified service personnel under the
following conditions:
A. When the power-supply cord or the plug has been
damaged.
B. If liquid is spilled, or objects have fallen into the
equipment.
C. If the equipment has been exposed to rain or water.
D. If the equipment does not operate normally by
following the operating instructions, adjust only those
controls that are covered by the operating instructions as
an improper adjustment of other controls may result in
damage and will often require extensive work by a
qualified technician to restore the equipment to its normal
operation.
E. If the equipment has been dropped, or the cabinet
damaged.
F. When the equipment exhibits a distinct change in
performance – this indicates a need for service.
15. Replacement Parts
When replacement parts are required, be sure the service
technician has used replacement parts specified by the
manufacturer or that have the same characteristics as the
original part. Unauthorized substitutions may result in fire,
electric shock or other hazards.
16. Safety Check
Upon completion of any service or repairs to this
equipment, ask the service technician to perform safety
checks to determine that the equipment is in proper
operating condition.
17. Field Installation
This installation should be made by a qualified service
person and should conform to all local codes.
18. Telnet Communication Cable
Minimum No.26 AWG wire must be used for TNV
interconnection Cable.
19. Danger of explosion if battery is incorrectly replaced.
Replace only with same or equivalent type recommended
by manufacturer. Discard used batteries according to the
manufacturer's instruction.
Table of Contents
Introduction
04
Copyright
05
Before Starting
05
Chapter 1. Product Information
06
Chapter 2. Tools
09
SmartGuard
09
SmartSearch
21
SmartBackup
33
SmartPager
39
Chapter 3. Remote Access (Option)
40
Installation
40
POST System Setup
41
BASE System Setup
42
Appendixes
44
Appendix 1: SmartShell
44
Appendix 2: Accessing Windows
47
Appendix 3: Network Setup (LAN)
48
Appendix 4: Dial-up Networking Setup
50
Appendix 5: HDD Table
56
Appendix 6: WebGuard
57
Appendix 7: Alarm Connector Pin Assignment
59
Appendix 8: Troubleshooting
60
Contact Information
61
IDR Series User’s Manual
Introduction
Thank you for choosing the Intelligent Digital Recorder (IDR).
Digital surveillance systems are quickly replacing traditional analog CCTV systems. To meet the
need of the market, IDIS Co., Ltd. has developed the IDR series - IDR 1508, IDR 2016 and IDR
3016. Each model has different features for performance (display and recording) and expansion
capacity. The IDR series provides functions such as high-quality recording, long-term recording,
easy scheduling, quick searching and image processing. The IDR series also provides advanced
networking and backup functions.
When using this manual, note the following:
This manual describes the operation of all IDR models developed and manufactured by
IDIS Co., Ltd.
This manual is arranged according to software components.
The model number is noted for functions which are specific to certain models.
IDIS Co.,Ltd.
4
Intelligent Digital Integrated Security
Copyright C 1998-2001 IDIS Co., Ltd.
IDIS Co., Ltd. reserves the right to make changes to any products herein at any time without
notice. IDIS Co., Ltd. does not assume any responsibility or liability arising out of the application
or use of any product described herein, except as expressly agreed to in writing by IDIS Co., Ltd.;
nor does the purchase or use of products from IDIS Co., Ltd. convey a license under any patent
rights, copyrights, trademark rights or any other intellectual property rights from IDIS Co., Ltd.
Before Starting
The IDR series consists of three models: IDR 1508, IDR 2016 and IDR 3016. Some buttons or
functions are disabled in the IDR 1508 and the IDR 2016 models. A premium package is available
for the IDR 2016 or higher. Check the model number before calling the dealer or the installer.
5
IDR Series User’s Manual
Chapter 1: Product Information
Features
Compatible with color cameras or other standard video sources
Video synchronization not required
Pantaplex operation for simultaneous recording, multi-screen viewing, playback,
remote monitoring and archiving
Versatile display formats for convenient user interface; single-screen, full-screen, quad, 3x3,
4x4, 3+4, 2+8
Main and Spot monitor outputs
On-screen graphic display includes camera title, location, recording status, mode display
Sequence mode available in all screen formats
Hardware watchdog timer function
Programmable motion detection for each camera input using graphic user interface
Various image enhancement functions including zoom in/out, brightness, interpolation, blur,
sharpness
Remote monitoring, playback, control through LAN, PSTN and ISDN
User-friendly interface
IDR contains the following software
SmartShell
IBankSetup
SmartGuard
SmartSearch
SmartServer
SmartBackup
SmartPager
SmartScan
IDR System Types
There are two types of IDR systems: POST system and BASE system. The POST system is a
complete system with cameras. A BASE system is a computer with software to access a POST
system. A BASE system can view live or previously recorded video from the POST system. A
POST system can access another POST system, however, it can only review previously
recorded video and cannot view live video from the other POST system.
The optional model, premium package provides web monitoring, audio recording and playback,
and tape backup functions.
6
Intelligent Digital Integrated Security
IDR System Configuration
IDR System Installation
Turning On the IDR
Press the power button located on the front panel to turn the system on. The system goes in to
the SmartGuard mode as soon as it finishes its boot process.
CAUTION: The system will lock up if the monitor does not have high enough resolution.
The IDR requires 1024x768 resolution.
Turning Off the IDR
Click POWER button in the SmartGuard mode to turn the system off.
IDR Series Front Panel
Power Button
FDD
DVD RAM (Option)
7
IDR Series User’s Manual
IDR Series Back Panel
Spot
Sensor Input
Mouse
Video In
8
USB
Keyboard
Alarm Out
Printer
RS232
Slot
Intelligent Digital Integrated Security
Chapter 2: Tools
SmartGuard - Monitoring and Recording Software
Overview
SmartGuard is powerful surveillance software. It provides multiplexer functions, digital
time-lapse recording and event-driven recording. SmartGuard also provides motion detection.
Note: The first time you turn on the system, it will immediately begin recording. If you have less
than 16 cameras, you must enter the setup screen and deactivate any inputs to which cameras
are not connected.
Features
16 channels
30 fields/sec recording (25 fields/sec PAL)
I/O: 16 inputs & 1 output
User-friendly interface
Scheduling by camera and time
Time-lapse or event-driven recording
Motion detection function
Audio recording (premium package)
Provides hundreds of solutions
Software transmitter for PTZ control
9
IDR Series User’s Manual
Monitor: Displays images from selected cameras.
System Status: Displays system status.
Screen Buttons: Select screen mode.
Camera: Selects camera.
PTZ: Controls pan, tilt and zoom.
Adjust: Adjusts image.
Utility Buttons: Auto, Record, Alarm, Setup and Search.
System Status
Clock Mode (12hours/24hours): Click the left button on the
mouse to set display mode. Click the right button to set clock.
CAUTION: If you change the time, images dated later than the
new date/time are deleted. Back up the images if you want to save
them.
Mode Status: There are two operating modes - View only mode
and recording mode. SmartGuard records images only in the
recording mode.
HDD Indicator: Shows the remaining hard disk space and the
type of hard disk usage. Go to the Setting Up the System in the
Setup section, and select the HDD usage between Once and
Recycle.
Event Logging: Shows event logs. You can use the
mouse to scroll up or down the list.
10
Intelligent Digital Integrated Security
Screen Button
To select the screen mode, click one of the buttons shown below.
single-screen
quad
3+4
3x3
2+8
4x4
full-screen
To view a specific image in the single-screen mode, move the cursor to that image and
double click the left mouse button.
To return to the previous screen mode from the single-screen mode, click the left mouse
button in the window.
To enter the full-screen, click the far right button.
CAUTION: If the user does not have a monitor that meets the resolution requirements, the
sysem will lock up.
To return from full-screen mode, click the left mouse button anywhere on the monitor.
Camera
Click one of the buttons shown below to choose camera function.
Click A or B to select the range of cameras (A for cameras 1-8, B for cameras 9-16) and then
click the number button.
PTZ
The IDR provides transmission functions. If you have the IRX-100 (produced by IDIS) or
another recognized controller and any IDR system, you can control pan, tilt and zoom.
Adjusting the Picture
Adjust the brightness, contrast, hue and saturation by clicking the designated buttons.
Click Default to reset them to the default settings.
Note: These adjustments should not be used to correct improperly set cameras or monitors.
11
IDR Series User’s Manual
Utility Buttons
Auto Sequencing: When Auto is clicked, SmartGuard sequences the cameras in
order. Whenever you click the button, it toggles between On and Off. You can
also set the switching interval manually in the Setup dialog box. Click Setup to
access the Setup dialog box.
Mode Selection: The record mode is selected when Rec is clicked.
SmartGuard goes to view only mode automatically when it is unable to
record (for example, when the hard disk is full).
Note: The IDR records only in accordance with the recording schedule, which is set manually
in the Setup dialog box (refer to the Setup section in this chapter). Before you install the IDR,
you need to fully understand the recording schedule.
Note also that clicking Rec prepares the IDR for recording. In this state, the IDR will follow the
recording schedule.
Manual Alarm Output: When Alarm is clicked, the SmartCap board sounds an
alarm. The alarm sounds automatically when any related sensor is activated. The
user can activate alarm output manually by pressing the button and deactivate it
by pressing the button again.
Setup: When Setup is clicked, the dialog box appears. The dialog box has seven
tabs.(See the SmartGuard Setup later in this chapter.) After setting the values in
each tab, click OK. If you want to restore the previously set values, click Cancel.
Accessing SmartSearch: Click Search to run SmartSearch.
Quit: Click POWER to quit the program.
Note: If this feature has NOT been password protected, double clicking on it will
shut down the system.
12
Intelligent Digital Integrated Security
SmartGuard Setup
Setting Up the System
Camera On/Off: Enables or disables cameras.
Location: Title of the location where the system is installed. Clicking the keyboard icon
allows you to enter or edit the “Location” name.
Spot sequence dwell: Sets the sequencing interval of SPOT Monitor.
The IDR provides one Spot output for a regular television or NTSC or PAL monitor.
Sequence dwell: Sets the sequencing dwell time. The camera can be sequenced to watch all
cameras on one monitor.
Event monitoring dwell: Sets the dwell time of one-screen mode when a related sensor is
activated.
Detect field: Detects field signal and shows only odd fields. If the box is not checked, the
images will be a little shaky.
Show OSD: Displays textual information on the image.
Remote control: Place a check in this box when the user
controls the IDR system from an external device using
RS232C or RS485. Click Set up Remote control... to set
up the IDR’s COM port to use. In case an external device
is using RS485, set the desirable device ID in the
Remote control dialog box.
HDD usage: There are two options. Once records until the hard disk is full and then stops
recording. Recycle records over the oldest images when the hard disk is full.
Verify password: Locks the program with a password. The program can be set up to require a
password before performing any of the following: shutting down, stopping recording,
changing the setup or performing a search.
13
IDR Series User’s Manual
Change password...: Changes the password. (The default is 111.)
Set up backup...: To set up for backup, refer to the SmartBackup section in this chapter.
Set up pager...: To set up pager information, refer to the SmartPager section in this chapter.
If a camera has a signal loss and the system reboots, the IDR will page the manager.
Set up Web Server...: Set up a personal web server for WebGuard. (premium package)
Load...: Loads typical setting values.
Save...: Saves the setting values.
Default: Loads default settings.
Setting Up Cameras
CAUTION: The system has a maximum recording speed of 30 images/sec. It is possible to set
the system for higher speeds, but it will not record more than the maximum speed when
averaged over all the cameras.
Select a camera: Selects a camera to set up.
Description: Title of the camera that is being set up. Clicking the keyboard icon allows you
to enter or edit the camera title.
14
Intelligent Digital Integrated Security
PTZ: Place a check in this box to enable pan, tilt and zoom functions. And click Set up PTZ
to set up details for PTZ. In traditional PTZ control configurations, transmitter and receiver
units are needed. The transmitter sends control signals; the receiver receives the signals from
the transmitter. The transmitter is built into the IDR. The receiver is a separate component.
Hide image: Display option. If the box is checked, the selected camera will not be displayed
on the monitor. (The images from that camera will be recorded, however.)
SmartCapture: The IDR Series captures the images very quickly using IDIS's unique
technique, SmartCapture. However, it is possible that some PAL type cameras can have
shaky images after executing the program. Do not place a check in this box for cameras
having image shake problem.
Same configuration for all cameras: If this option is checked, every camera will have the
same configuration.
Recording speed: Sets the recording speed for the time-lapse mode.
Note: The value of the recording speed means the time to record one image. Therefore the
lower the value, the more images are recorded during same time. For example, the value
"1/30" means that 30 images will be recorded per second, "1" means one image per second,
and "10" means one image per 10 seconds.
Post-event rec. speed: Sets the recording speed for the event-driven mode. If a related sensor is
activated, the IDR follows this setup. If a sensor is not activated, the IDR will not record.
Post-event rec. dwell: Sets the duration of event-driven recording.
Pre-event recording: Enables or disables the pre-alarm recording.
Pre-event rec. speed: Sets the pre-alarm recording speed.
Pre-event rec. dwell: Sets the pre-alarm recording duration.
Display image resolution: Sets the size of the screen displayed on the monitoring screen.
Note: The values of image resolution available are 160x120, 320x240, 640x240, and 640x480.
Rec. image resolution: Sets the size of the screen for recording.
Rec. image quality: Sets the recording image quality by adjusting the compression ratio.
Note: The values of image quality available are Low, Medium, High, and Very High.
Note: Higher resolution images and higher quality images require more recording (storage)
space.
15
IDR Series User’s Manual
Setting Up Schedules
Select a camera: Selects a camera to set up
Hour chart: Selects the hour(s) to record.
Rec. mode: Selects the desired recording mode.
Note: The IDR provides four different recording modes: view only mode, time-lapse mode,
event-driven mode, and time and event mode.
- View only mode: No recording.
- Time-lapse mode: Full-time recording used mainly in daytime hours.
- Event-driven mode: Records when a related sensor is activated. It is used commonly at night.
- Time and event mode: Combination of time-lapse and event-driven modes. The IDR records
slowly in normal time and starts to record faster when a related sensor is activated.
Quick setup: Copies the schedule of one camera to another or all cameras. Select the schedule
of the time and date that you want to copy by placing the cursor on the hour chart where you
want to start, and holding down the left mouse button to where you want to finish.
The time and date range you select turns blue. Click Copy, and then click Paste after selecting
another camera(s) to be scheduled.
Note: Weekdays, weekends and holidays can be
scheduled. The following function compensates
for different holidays in different countries:
Set up holiday...: Select a date you want to add
or delete in the calendar, and list it in the right
box by clicking Add. And then click Add or
Delete after selecting the date you added in the
list, and click OK.
Note: Sundays are set as holidays by default.
16
Intelligent Digital Integrated Security
Setting Up Sensors
Select a sensor: Selects a sensor to set up.
Enable: Enables or disables the sensor.
Normally closed: Determines the sensor detection method. Placing a check in this box selects
the open detection.
Description: Location where the sensor is installed.
Sensor type: The type of given sensor (e.g. magnet, thermal rays, proximity, etc).
Record Audio: Enables or disables audio recording. Place a check in this box
if you want to record audio when the associated sensor is activated.
(premium package)
Note: Recording audio will be activated when at least one camera is
associated to the sensor.
Set up Audio...: Select an audio input type in Recording Control dialog box.
Note: The sound card provides two types of audio input, Microphone and
Line-in. You must manually select the recording input type.
Camera association: Selects the number of cameras associated with a sensor (up to 16 cameras).
Alarm association: Alarms may also be associated. The connected alarm will go off when a
related sensor is activated.
17
IDR Series User’s Manual
Setting Up Motion Detection
Select a camera: Selects a camera to set up.
Enable: Enables or disables the motion detection of the selected camera.
Sensitivity: Sets the sensitivity of the motion detection. Detection can be set at five steps
from 1 to 5.
Note: The higher the number, the more sensitive it gets.
Min. size: Sets the minimum number of blocks from 1 to 100, which are determined as actual
motions regarding the number of blocks set.
Record Audio: Enables or disables audio recording. Place a check in this box
if you want to record audio when the associated sensor is activated.
(premium package)
Note: Recording audio will be activated when at least one camera is
associated.
Set up Audio...: Select an audio input type in Recording Control dialog box.
Note: Sound card provides two types of audio input, Microphone and Linein. You must select manually the recording input type.
Set up zone...: Each screen is made up of a 30x40 grid. To activate the grid, select Draw and
use the tools as follows:
Point: Place the cursor on the image and click the left
mouse button. A single box appears where the cursor is.
Line: This tool can be used to draw irregular shapes.
Place the cursor where you want to start the line.
Hold down the left mouse button and drag the cursor to
where you want the end of the line. Release the mouse
button and a group of boxes appears along the line you
drew. You can draw lines around shapes by repeating
this process.
18
Intelligent Digital Integrated Security
Rectangle: Hold down the left mouse button and drag the cursor in any direction. A
rectangle appears. Once the rectangle is in the shape you want, release the mouse button and
the rectangle fills with boxes.
Fill: When using the fill tool, clicking the mouse will fill that area of the image with boxes.
If a shape has been drawn with the line tool, clicking inside will fill the area with boxes.
Clicking outside the area will fill the outer area with boxes. If no shapes have been drawn,
the entire screen will fill with boxes.
Note: When you turn on the Erase button, you can use the tools as described above to delete
boxes.
Camera association: If motion is detected by one camera, other cameras can be associated
with it so that they will also be recorded.
Alarm association: Alarms may also be associated. The connected alarms will go off when a
related sensor is activated.
Setting Up the Alarm
Enable: Place a check in this box to activate the alarm.
From/To (start/end times): Sets the hours the selected alarm is operational. An alarm may be
turned off during working hours.
Note: In case where the From hour is later than To hour, the alarm will be activated
from the From time to the next day's To time. For example, “From: 18:00 To: 08:00” means
the alarm will be active over night from 6:00 p.m. until 8:00 a.m. the following morning.
Dwell time: Sets the alarm output duration.
19
IDR Series User’s Manual
Setting Up the Remote Access
Note: The user can review recorded video on other systems. Also, the user can view live video
or review recorded video on remote systems using the SmartBase program. Refer to Chapter 3:
Remote Access for details.
Add/Edit/Delete: Adds, edits or deletes users access from remote sites. The registered ID and
password are used when accessing the system from a remote site.
- User ID: Enter user's ID for remote access.
- Authority level: Select the user's authority level.
Note: Only the administrator can change the setup variables from a remote site.
- Password: Click Change... and enter the password for remote access.
Transmit speed: Specifies the number of images that can be transmitted per second.
Note: Maximum transmit speed users can expect over LAN is 30 frames per second, and
average transmit speed over PSTN is 1~2 frame(s) per second.
Set up network...: Refer to Appendix 3: Network Setup.
20
Intelligent Digital Integrated Security
SmartSearch - Image Data Searching Software
Overview
SmartSearch is a powerful tool for SmartGuard. It features playback and search functions for
recorded data and consists of three windows: Playback Window, Remocon (Remote Control),
and Timetable. Each area displays or controls recorded information.
Click Search in the SmartGuard mode to get into the SmartSearch mode.
Features
Searches by camera and time
Provides recording status table
Various search functions
Zoom in/out function
Image enhancement functions
Print function
Saves to floppy disk
Remote playback function
Bookmark function
Saves to AVI file
Audio playback
Playback Window: Main Screen for reviewing recorded video.
Remote Control: Function buttons for controlling playback of video, data loading buttons and
image processing buttons.
Timetable: Shows recording status.
21
IDR Series User’s Manual
Data Loading in Remocon
Data can be loaded from different locations: Local, Remote and Backup. These routes must be
set up individually. Refer to the Environment Setup section in this chapter.
After loading SmartSearch in SmartGuard, go to Environment Setup.
Local: Loads data from the local hard disk.
Remote: Connects to a remote SmartServer via modem or TCP/IP network. Since
SmartSearch presents a transparent data transfer mechanism, it is not necessary to know the
network information, except for the host address or telephone number. Click Remote, and the
following window will appear. You can select a site you want to connect or disconnect.
Note: In case the time zone is different between the POST system and the BASE system, the
information of the time table and recorded data between two systems are different. Set the
POST system and the BASE system to the same time zone.
Backup: Loads data from an extra backup device (e.g. DVD-RAM).
Refresh: Reloads the data that was recorded in search mode.
Setup: Shows the Environment Setup dialog box. Refer to the Environment Setup section on
the next page.
22
Intelligent Digital Integrated Security
SmartSearch Environment Setup
General
Local Drive: In most cases the local drive is the C: drive. Even if the software is installed on
more than one hard disk, the local drive will be the C: drive, assuming that the operating
system (Windows) and IDR have been installed on the C: drive.
Note: It is recommended that you keep the C: drive as the default unless you are using the
IDR for the test purposes.
Backup Drive: Specify the backup path in this window. (Back up to DVD-RAM, tape or the
network drive.)
Automatic Data Loading: Place a ceck in this box to automatically load data when SmartSearch is
started.
Audio Play: Place a check in this box if you want to play back the recorded audio.
(premium package)
Speaker icon: Click the icon, and then change the volume of Wave if you want to adjust the volume of
installed speaker.
On Screen Display (OSD): Check the boxes for the following to display on the screen.
- Location: Shows camera location.
- Image Resolution: Shows image resolution.
- Image Size: Shows image size.
- Time: Shows recorded time.
Default: Loads default values.
23
IDR Series User’s Manual
Network (Option)
The Network window sets up the remote playback function. The Remote is found in the
Remote Control window. Two types of connections can be made: PSTN (including ISDN) and
LAN. The default is LAN. Remove a check from the Using LAN box to use a modem for
remote access, and Phone Number and Modem will be activated.
Phone Number: Enter the target telephone number.
Host Address: If the IDR is linked to an allocated network (LAN), assign the IP address of a
POST system. You may then play back from a remote site (within the Network).
Using LAN: Place a check in this box to play back via LAN. Otherwise, the IDR will play
back via Modem.
Time Out: Set the length of time the system will wait for the remote site to respond.
About
Program: Displays software version information.
Copyright Information: Displays copyright date information.
24
Intelligent Digital Integrated Security
Playback Window
The playback window shows the current playback image and has the following control
buttons on the upper right side:
Screen Division: The IDR provides multi-screen playback function. You are able to
review more than one camera at a time. The available multi-screen formats are singlescreen, quad, 3x3, and 4x4.
Series: Review images frame by frame. (Note: Only one camera at a time can be selected
for this function.)
Zoom: Enlarges or shrinks the current image. To enlarge the image, click +. To shrink
the image, click -. This button works only in the single-screen mode.
Brightness: Changes the brightness of the current image. To make images brighter, click
the top brightness icon and to make the image darker, click the bottom brightness icon.
Note: If the image was recorded in 160x120 or 320x240 resolution, it can be viewed full
frame by clicking the right button on the mouse. Clicking the right button on the mouse again
will return to normal view.
25
IDR Series User’s Manual
Remote Control
The Remote Control window plays back and processes
images. It has a small playback window, playback
control buttons, and additional buttons. Its features are
similar to VCR remote control.
Close: To quit SmartSearch, click Close.
Small Playback Window: Displays the current playback
image. When zooming in, a box will appear; move it by
clicking the left button on the mouse and then moving
the rectangle.
Playback Control Buttons
There are 10 playback control buttons.
26
Intelligent Digital Integrated Security
Find
Press Find to bring up the following dialog box.
Find Range
- Camera: Shows the selected camera.
- From: The starting time.
- Until: The ending time.
Find All: Finds all events within the range and then lists them.
Find Next: Finds one event at a time.
Result: Displays the Find results.
Motion Detection
- Area setup icons: Use the icons to set up the areas.
- Find Method: Selects the Find method between Change and Object.
Note: With the find method “Change”, check if the image within selected
detection is changed or not. With “Object”, check if the object(s) is(are)
moved or not, or disappeared (hidden).
Sensitivity: Sets the sensitivity of the motion detection (detection can be set
at five steps from 1 to 5).
Note: The higher the number, the more sensitive it gets.
Min. Blocks: Sets the minimum number of blocks from 1 to 100, which are
determined as actual motions regarding the number of blocks set.
Sensor Detection
- Target Sensor: Selects a target sensor.
27
IDR Series User’s Manual
Storing Video Clip to an AVI (Audio Visual Interleaved) File
Any video clip of recorded data can be saved as an AVI and compression program will be
selectable among the ones installed on the current system.
How to store AVI file
Press Save on remote control in SmartSearch.
Select Save As Video File and press OK in the Save Type dialog box. The Save As Video
File dialog box will appear.
Select a camera, set the time range, and set the frame rate. Then click Start.
Specify the file name for the AVI file and then press Save in the Save As dialog box.
The Video Compression dialog box will appear.
Press OK after selecting a compressor and setting the compression quality.
Note: Depending on the system, there are many different compressors available. If you select
Full Frames (Uncompressed), the AVI file size may be large but the image quality will be
good.
Note: The target disk for saving AVI files must have at least 150 Mbytes free space.
28
Intelligent Digital Integrated Security
Additional Window
There are additional control buttons on Remote Control. Click the arrow icon to reveal these
additional image processing buttons.
Intpl. (Interpolation): Reduces the alias effect that occurs when using the zoom function.
Blur: Blurs the image to reduce noise.
Sharp: Sharpens an image.
Undo: Cancels the last image processing operation.
Revert: Cancels the image processing operation and reloads the original image.
Save: Saves the current image to the hard drive or a floppy disk as a bitmap or JPEG file format.
Print : Prints the current image.
Note: No matter how much image adjustment you do, the original image in the IBank remains
unchanged.
29
IDR Series User’s Manual
Timetable Window
The timetable window consists of a record timetable, camera label and a calendar/bookmark.
You will see the bank file recording information. Various functions of the timetable window
enable fast searching.
Camera Label Buttons
Camera label buttons show camera information. Change the current
playback camera by clicking the camera label button. The camera label
buttons that do not have recorded data cannot be selected. Only four
camera labels are shown at a time. Use the up and down arrows to scroll
through the list of cameras.
Recording Status Bar
Recorded information is shown on the recording status bar. Search specific video by clicking
the mouse on the desired segment or scrolling by using the scroll key from left to right. The
color of the bar indicates different types of recording: Yellow for Pre-alarm, Cyan for Motion
Detection, Red for Sensor, Blue for Time-lapse.
Click Go to to jump to the specific times and data.
- Click the down button in the upper box, and select the date (only the dates having recorded
data are listed in the box). And set the time by clicking up/down buttons in the lower box,
and then click OK. The image of the date and time you select will be displayed.
30
Intelligent Digital Integrated Security
Calendar
Select recorded data from the calendar. The calendar provides access to single day recorded
data. Click the date you want to search. Scroll through the months by clicking and .
Bookmark: Accesses the bookmark feature.
Bookmark
Add or delete bookmarks for recorded information. Bookmarks list camera number, date and
time.
Add: Adds the current image to bookmark table.
Del: Deletes the selected bookmark.
Calendar: Accesses the calendar feature.
31
IDR Series User’s Manual
Audio Playback (Premium Package)
Note: Move to the SmartGuard mode, and click Setup. And then select Sensor or Motion
Detection tab in the Setup dialog box, and make sure that the Record Audio box is checked.
Also, click Setup Audio... and make sure that the audio input type is selected in the Recording
Control dialog box.
1. Click Setup in SmartSearch mode, and select General tab. And then place a check in the
Audio Play box.
2. If you want to change the speaker volume, press a speaker icon, and then change the volume
in the Wave section.
3. Press a playback button in the remote control window. Audio-play icon in the shape of a
speaker will be shown at the left top in the small playback window if the target camera has
audio recorded information. The recorded audio time zone is located under camera 16, and its
information is shown on the recording status bar in pink.
Note: Audio is played only in the forward playback mode.
32
Intelligent Digital Integrated Security
SmartBackup
Use SmartBackup for backing up data. Data can be saved to DVD-RAM, tape or network
drive. The IDR provides auto and manual backup capabilities.
Note: Tape backup function is available for the premium package.
Stored Image Information
Drive Status
- Drive: Shows all attached hard disk(s).
- Recording Period: Shows the recording period of each (source or target) drive.
- Status: Shows drive’s status. (Working: source drive; Backup: backup target drive)
Recording: Shows the recording period of the source drive.
Latest Backup: Shows the date and time of the latest backup of the target drive.
Backup Drive Information
Period: Shows the recording period of the backup drive.
Remain: Calculates and shows the remaining space on the backup drive.
Note: "Repeat Backup..." means an over-write mode. For this mode, click Setup..., and place
a check in Repeat box under Backup Drive. Otherwise, the backup drive will stop when it is
full.
Status
Shows backup drive status.
Shows a progress bar for the auto/manual backup.
33
IDR Series User’s Manual
Manual Backup
This button starts manual backup mode. If the IDR is set to Auto Backup mode, clicking this
button will release the auto backup mode. Click Manual... to go to the following dialog box.
There are two ways to back up manually; backup by time and backup by list.
CAUTION: During the manual backup, SmartGuard will stop recording.
1. Manual Backup by Time
Backs up the recorded image data from starting time to ending time, and backs up the image data
recorded only in time-lapse mode.
CAUTION: Backup of pre-alarm recorded image data is available only by the Manual Backup by List.
Begin: Enter the starting date and time.
End: Enter the ending date and time.
Start: Starts manual backup.
Advanced...: Goes to manual backup by list.
2. Manual Backup by List
Backs up only selected banks in specified time range. The backup of pre-alarm recording image
data is available only by the Manual Backup by List. Use a Ctrl or a Shift key when selecting
multiple banks. Click each bank you want to select with a Ctrl key pressed. And, click the first
bank and the last bank within the range with a Shift key pressed if you want to select all banks
in a specific range.
34
Intelligent Digital Integrated Security
ID: Serial number of recording banks
Recording Start Time: Recording start time of a target bank
Recording End Time: Recording end time of a target bank
Type: Displays the type of recording banks (NORMAL: time-lapse recording, PRExx: prealarm recording).
Backup Status: Displays the backup status of a target bank (Check whether a target bank is
already backed up or not).
Selected Banks: Displays the number of selected banks to back up in the list.
Free Backup Banks: Displays the number of banks which are available for backup.
Update
Click Update to update all the values in the SmartBackup dialog box. Recording period, latest
backup and backup drive information will change when this button is clicked.
35
IDR Series User’s Manual
SmartBackup Setup
Click Setup... to set up auto-backup, manual backup, or backup path.
Auto-backup: If this box is checked, the IDR will back up automatically according to the setup.
When this box is checked, all the necessary menus will be activated. If the Auto-backup is not
checked, the IDR is in manual backup mode. In this case, the system must be backed up
manually. (Refer to the Manual Backup section in this chapter.)
- Latest Backup Time: Shows the latest backup date and time.
- Period (time): The IDR backs up during this set time.
Backup Drive
Note: Some menus under Backup Drive will be activated or inactivated according to the media
to use.
- Destination: Selects the backup target drive.
- Repeat: Place a check in this box to recycle the backup drive, and remove a check to stop the
backup drive when it is full. This menu will be inactivated when using a tape.
- Auto Eject: This menu will be activated when using a DVD-RAM or a tape.
- Initialize: To start backing up, initialize the backup space.
Note: The backup drive should be initialized before backing up,
however, only tape is not necessary to initialize.
If you initialize the backup drive, any bank contents stored on it
will be deleted.
Hide
Click Hide to hide the SmartBackup dialog box. To close SmartBackup, Click X in the top righthand corner.
36
Intelligent Digital Integrated Security
New Feature: Tape Backup and Restoring (Premium Package)
Reviewing backup data
It is difficult to search the data randomly in case of backing the data up to tape media different
from HDD or DVD-RAM. So, the IDR uses the way to search the data after restoring backup data
to the randomly accessible media like HDD. For the fast and efficient review, convert the
backup data in tape media, and restore it to HDD.
Note: Restore is not required in case of backing up to HDD or DVD-RAM.
Note: We strongly recommend that you stop auto backup during reviewing the backup data. If
you review the image during auto backup, it might reduce the speed.
How to review backup data
1. Click Setup and select General tab in SmartSearch.
2. Specify the backup drive having backup data in Backup Drive.
3. Click Backup after returning to the main window of SmartSearch. The following Backup
dialog box appears.
Note: If the specified backup drive is randomly accessible like HDD or DVD, review backup
data directly, however, if the specified backup drive is tape, the following dialog box appears
for retrieving procedure.
4. Select Restore New if you want to restore new data in a target backup drive, and select Load
Pre-Restored if you want to review the data that has been already restored in the restore drive.
When selecting Load Pre-Restored, you need to specify the restore drive.
Restoring backup data
If you select Restore New in Backup dialog box, the following Backup Restore dialog box
appears.
There are two ways to select the bank for restoring in the list of Backup Restore dialog box.
1. Selecting the bank directly
- Check the backup period and type information in the list.
- Select a bank to restore using a mouse.
Note: Use a Shift key when selecting multiple banks.
37
IDR Series User’s Manual
2. Selecting the bank after specifying restore range
- Set the starting time and ending time in the restore range.
- Press Apply, and the bank will be selected automatically in the period of assigned time range.
Restore Range: Set the starting date and time, and the ending date and time in case of
selecting the bank after specifying restore range.
Restore Drive
- Drive: Specify the drive for restoring of selected banks.
- Free Space: Shows how many banks can be restored after checking available space of the
specified drive.
Note: If the number of selected banks is more than the one of available banks shown under
Restore Drive, reset the number of banks you selected.
Refresh: Reloads the data from the backup drive.
Note: Renew the list by clicking Refresh if the data of backup drive is changed.
Restore: Start restoring by clicking Restore. If the restoring procedure is finished, close a
dialog box of the ending message by clicking Close. The SmartSearch loads restoring data
automatically.
Note: Restoring procedure might take several minutes according to the number of selected
banks.
38
Intelligent Digital Integrated Security
SmartPager
SmartPager pages the system manager when something happens to video input, such as a video
signal loss or system reboot. SmartServer and SmartPager cannot be run at the same time because
they both need the modem. Two modems must be installed to run both. Access the SmartPager
dialog box from the Setup dialog box in SmartGuard.
Modem port: Enter the COM port number of the modem.
Phone number: Enter the pager telephone number.
Note: The telephone numbers should be entered as the number must be dialed from your
telephone system; e.g., if you need to dial 9 for an outside line, enter 9 first.
Mailbox: Enter the number for paging when the pager uses voice mailbox.
Messages
- System restart: Place a check in the box and enter the user-specified number to page the
system manager in case the system is rebooted.
- Video loss: Place a check in the box and enter the user-specified number to page the system
manager in case the system loses the input video signal.
About...: Shows software version information.
Apply: This button is enabled when certain values are changed. The values are saved only
when user clicks Apply.
Hide: Hides the SmartPager dialog box.
Close: Ends SmartPager.
39
IDR Series User’s Manual
Chapter 3: Remote Access (Option)
For remote access, we provide the SmartBase program which has three major functions: Remote
monitoring, remote playback, and remote control. Remote monitoring makes it possible to do realtime monitoring of remote sites. Remote playback makes it possible to play the recorded images at
remote sites. Remote control allows controlling the IDR from the remote site.
A modem or LAN must be installed in the system for remote access. The user can monitor live
video images transmitted from the remote site in real time, and change the settings of remote IDR
systems by using the remote control function.
The remote access function is available for the IDR series.
Note: The POST system can review only recorded video on other POST systems. Base systems can
view live video or review recorded video on POST systems.
Installation
At least one POST IDR and a system for BASE are needed for using the remote access function.
POST is the system to which the camera cables connect directly, and BASE is the system which
is installed at another site for remote access.
Install the BASE software at the remote site after installing the IDR.
40
Intelligent Digital Integrated Security
POST System Setup
Set up the POST system (except Network setup) by clicking Setup in SmartGuard and then
clicking the Remote tab to see the following dialog box. Refer to the SmartGuard section in
Chapter 2 for System, Camera, Schedule, Sensor, Motion Detection and Alarm setup. To use
PSTN, refer to Appendix 3: Dial-up Networking Setup.
Remote Setup
Remote setup is the most important step in the POST system setup. The user’s ID and password
will need to be entered.
User Information Setup
- Click Add to see the dialog box shown below.
- Enter each user ID, authority and password, and click OK.
Note: There are three authority levels. Users at the administrator level can change the system
setup from a remote site.
Set up network...: Refer to Appendix 2: Network Setup.
41
IDR Series User’s Manual
BASE System Setup
Click Setup in SmartBase of the BASE system, and you will see the following dialog box. The
system's default is Local. If you want to change to a remote site setup, click the circle next to
Remote and then choose one of the registered sites. Click Setup... and continue to the Remote
Setup section below. Refer to the SmartGuard section in Chapter 2 for System, Camera,
Schedule setup.
Remote Setup
POSTs for remote functions are registered in this dialog box. Camera(s) are assigned;
select a maximum of 16 cameras from a maximum 256 cameras. (There are up to 16
POSTs, and each POST has a maximum of 16 cameras.)
42
Intelligent Digital Integrated Security
Camera assignment: There are blanks for 16 cameras. (16 cameras can be monitored at the
same time.) Select the POST and the Camera number. Each POST has a maximum of 16
cameras.
Set up network...: Refer to Appendix 2: Network Setup.
Set up site...
- Click Set up site....
- For remote sites (LAN), register the POSTs by clicking Add and then enter the site ID and
the network address.
- Click OK.
Use modem: To use a modem, Dial-up Networking must be installed in the BASE system.
(Refer to Appendix 4: Dial-up Networking Setup.)
- When connecting via modem, put a check mark in the Use modem box.
- Click Set up site.... There will be a telephone number instead of the address box in the Set up
Site dialog box. Enter the telephone number.
BASE Operation
After setting up the BASE, click Connect in SmartGuard. The system might display a
dialog box requiring the ID and the password to log on. Enter the ID and the password
and click OK.
43
IDR Series User’s Manual
Appendixes
Appendix 1: SmartShell
SmartShell is very easy and dependable software for maintaining your IDR system. This software
will help the IDR system to recover from unexpected system failures. SmartShell is also the only
way to access Windows.
Accessing SmartShell
Refer to Appendix 2: Accessing Windows.
Click the right mouse button. You will see the following Menu dialog box.
Configuration Menu
Startup: When you turn on the system, SmartShell will be accessed automatically. Then
SmartShell will open the necessary software for running the IDR, including SmartGuard
and SmartSearch.
44
Intelligent Digital Integrated Security
Execute Menu
This menu allows you to access all IDR programs.
Restart All: Restarts the programs.
SmartSetup: Refer to the IBank Setup section in Chapter 2.
SmartScan: This is invisible software. It scans the hard drive for recording.
SmartGuard: Refer to SmartGuard section in Chapter 1.
SmartSearch: Refer to SmartSearch section in Chapter 2.
SmartBackup: This is used to back up data. Refer to SmartBackup section.
SmartServer: This is invisible software that prepares images to send to remote sites via
modem or LAN.
SmartPager: Pages the manager in case something is seen on camera or if there is a system
failure. Refer to SmartPager section in Chapter 2.
Explorer: Accesses Windows.
View Log Menu
This menu allows you to view the log file, which logs every operation of the system.
45
IDR Series User’s Manual
System Menu
Close: Closes SmartShell and accesses Windows.
Restart: Restarts the system.
Shutdown: Shuts down the system.
About... Menu
This menu shows the software version information.
46
Intelligent Digital Integrated Security
Appendix 2: Accessing Windows
Since digital surveillance systems are new technology, they might be unfamiliar to many users.
Many problems can occur from incorrect Windows settings. The IDR requires specific Windows
settings for optimal performance. That is why the Windows mode has been blocked. This section
describes the steps to get into the Windows mode.
The Relationship Between "Accessing Windows" and "SmartShell"
SmartShell software is the only way to get into Windows. (Refer to Appendix 1: SmartShell.)
To access Windows you must be in SmartShell because when you end SmartGuard, the system
shuts down. Refer to the following instructions to change the Automatic Shutdown mode to be
able to access Windows from SmartShell.
How to Access the Automatic Shutdown Hidden Dialog Box
1. Double click the IDISlogo located above Rec in the SmartGuard mode.
The splash window will appear.
2. Type "idisman" and press Enter key. A small dialog box will appear.
Video compression: Select the compression method - JPEG or ML-JPEG.
Video signal: Select the input signal type - NTSC or PAL.
CAUTION: Do NOT change the factory default setting.
Automatic Shutdown: The default is "Automatic Shutdown." Remove the check
mark to change the default.
Show Size: Shows image size.
Trace: Use this when you need to test system performance.
Test Watchdog: To test the Watchdog function, place a check in this box, and the system
will restart in two and a half minutes.
View system log...: Shows the system log.
Note: When SmartGuard ends, you will see a black screen that means you are in SmartShell.
SmartShell manages the IDR. In SmartShell, the startup menu is provided. Click the right
mouse button, and a menu box will pop up. Here you may access Explorer or get into the
normal Windows mode by clicking Close.
47
IDR Series User’s Manual
Appendix 3: Network Setup (LAN)
1. Under Start in Windows, go to Settings then to Control Panel and then Network.
Under the Configuration tab, select Windows Logon under Primary Network Logon.
2. Under the same tab, select TCP/IP and click Properties. Select Specify an IP address and
enter the appropriate IP address and subnet mask, aquired from the system administrator.
Note: If TCP/IP is not shown, follow instructions:
- Click Add... in the Network dialog box.
- Select Protocol and click Add... in the Select Network Component Type dialog box.
- Select Microsoft under manufacturer, and TCP/IP under Network Protocols in the Select
Network Protocol dialog box, and then click OK.
48
Intelligent Digital Integrated Security
3. Click on the Gateway tab and enter the appropriate gateway address, aquired from the system
administrator. Click Add and then OK.
4. In the Network dialog box, click OK to reboot the system.
49
IDR Series User’s Manual
Appendix 4: Dial-up Networking Setup
1. Check whether the software is installed.
(This needs to be done for both the POST and the BASE system)
1.1. Under Start in Windows, go to Programs, to Accessories, and to Communications.
If Dial-up Networking is listed, go to Step 2.
1.2. Under Start, go to Settings, to Control Panel, to Add/Remove Programs, to Windows
Setup, and to Communication. Check the Dial-up Networking box and the Dial-up
Server box and then install the necessary software by clicking OK.
1.3. Follow Windows instructions for installing the necessary software.
2. Set up Protocol and Adapter.
(This needs to be done for both the POST and the BASE systems.)
2.1. Under Start in Windows, go to Settings, to Control Panel and to Network.
Select Windows Logon under Primary Network and then click Add.
2.2. Select Adapter and then click Add.
50
Intelligent Digital Integrated Security
2.3. Choose Microsoft under Manufacturer, Dial-Up Adapter under Network Adapters and
then click OK.
2.4. If TCP/IP Dial-Up Adapter is already installed, go to Step 2.6. Otherwise select Protocol
and click Add.
2.5. Choose Microsoft under Manufacturer, TCP/IP under Network Protocols, and then click OK.
51
IDR Series User’s Manual
2.6. In the Network dialog box, select TCP/IP Dial-Up Adapter and then click Properties.
2.7. Enter the IP address as "10.10.10.11" for the POST system and enter "10.10.10.10" for
the BASE system. The Subnet Mask for both is "255.255.255.0."
2.8. Follow Windows instructions and reboot the system.
3. Set up Dial-Up Server. (This needs to be done for the POST system only.)
3.1. Go to My computer, and make sure that the Dial-Up Networking is listed. If it does not
appear, go back to Step 1.
3.2. Go to the pull-down menu Connection and then to Dial-up Server. If it does not appear,
go back to Step 1.
3.3. Change the setting value to Allow caller access from No caller access.
52
Intelligent Digital Integrated Security
3.4. Click Server Type... and make sure that PPP: Internet, Windows NT Server, Windows
98 is selected under Type of Dial-Up Server. Do not check any box under Advanced
options. Click OK, and then close the dialog box.
4. Testing the Connection
4.1. Go to My Computer, then to Dial-up Networking. Select Make New Connection. Enter
a name for the POST system you are dialing, make sure that the installed modem in your
system is selected correctly, and click Next.
4.2. Enter the telephone number of the POST system you want to call, and click Next.
Note: Make sure to include any extra numbers such as “9” or area codes that are
necessary to dial out.
53
IDR Series User’s Manual
4.3. Click Finish.
4.4. Select the newly created connection icon, and click the right mouse button. Open the
dialog box by selecting Properties.
Note: Remove a check in the Use area code and Dialing Properties box when using an
extension.
4.5. Go to Server Types tab, and make sure that PPP: Internet, Windows NT Server,
Windows 98 is selected under Type of Dial-Up Server. Do not check any boxes under
Advanced options, and make sure that the only box under Allowed network protocols
that is checked is TCP/IP.
4.6. Close the My Network dialog box by clicking OK.
4.7. Double click the newly created connection icon and then try to connect.
54
Intelligent Digital Integrated Security
Dial-Up Networking Troubleshooting
Problem: Dial-up networking disconnects in SmartGuard or SmartSearch.
Solution: Sometimes dial-up networking disconnects due to the condition of installed modem
and telephone line. Close the System and follow instructions to test dial-up networking.
1. Go to My Network under Windows Explorer/Dial-Up Networking. Click the right button
on the mouse and select the Properties.
2. Under the General tab, make sure the correct modem is selected under Connect using.
3. Under the Server Types tab, make sure that PPP: Internet, Windows NT Server,
Windows 98 is selected under Type of Dial-Up server box, and the box next to TCP/IP is
checked under Allowed network protocols. And then click OK if everything is correct.
4. Double click on My Network to open the dialog box. Enter the telephone for the POST
system and check if it is connected.
5. The POST system is connected properly, try to access to the remote site using SmartGuard
or SmartSearch.
Note: Check the instructions again in Appendix 3: Dial-up Networking Setup if the POST
system is not connected.
Problem: The error message “The line is busy” has appeared even though the POST
system is not using the telephone.
Solution: Sometimes Windows refuses the remote connection even when the telephone line is not
busy. Try to connect again.
Problem: I cannot hear dial tone.
Solution: Sometimes the modem cannot access a dial tone if your telephone is an extension.
Follow the instructions below and then try to connect again.
1. Go to My Network under Windows Explorer/Dial-Up Networking, click the right mouse
button and select Properties.
2. Click General/Configure/Connection tab.
3. Uncheck the box next to Wait for dial tone before dialing.
Problem: The POST system does not answer a telephone call.
Solution: Under Windows Explorer/Dial-Up Networking, go to the pull-down menu Connection
and then to Dial-Up Server. Check Allow caller access.
Problem: After the POST system receives calls, the network disconnects.
Solution: Under Windows Explorer/Dial-Up Networking, go to the pull-down menu Connection
and then to Dial-Up Server. Click Server Types... and check if PPP: Internet, Windows NT
Server, Windows 98 is selected under Type of dial-Up Sever.
55
IDR Series User’s Manual
Appendix 5: HDD Table
Example I.
1. 320x240 image size
2. Recording speed per each camera: 1 ips (image per second)
HDD Size
Number of Cameras
4
8
12
16
100 GB
1,736 hours
868 hours
578 hours
434 hours
200 GB
3,472 hours
1,736 hours
1,157 hours
868 hours
Example II.
1. 640x240 image size
2. Recording speed per each camera: 1 ips (image per second)
HDD Size
Number of Cameras
4
8
12
16
100 GB
868 hours
434 hours
289 hours
217 hours
200 GB
1,736 hours
868 hours
578 hours
434 hours
Notes:
1. Calculations are for average situations. Recording capacity will vary with the environment.
2. Calculations are for Continuous Recording. Event-driven Recording mode may record much
longer than the charts shown.
3. Calculations are based on the noted Recording Image Size and Recording Speed.
56
Intelligent Digital Integrated Security
Appendix 6: WebGuard (Premium Package)
Overview
WebGuard, remote web monitoring program, allows users to access the remote systems and
monitor live video images on it through Internet web browser any time from virtually anywhere.
Features
Remote monitoring live video images by using a web browser
Accessing up to 16 remote systems
16-channel live monitoring
Safe program with VeriSign authentication
PTZ control and various image enhancement functions
WebGuard Browser
Screen Adjust
PTZ Control
Screen Mode
Camera
Title Bar
Power
Monitor
Monitor: Displays live video images transmitted in real-time from the remote site.
Power Button: Quits the program
Title Bar: Displays the ID or the title of the location where the remote system is installed.
Camera Button: Selects a camera and displays the image on a target camera.
Screen Mode Button: Every time this button is clicked, the screen mode switches
(single-screen -> quad -> 3x3 -> 4x4 modes).
PTZ Control Button: Controls pan, tilt, zoom, iris and focus.
Screen Adjust Button: Adjust brightness, contrast, hue and saturation.
57
IDR Series User’s Manual
How to connect WebGuard
Start the Web browser (Internet Explorer) in your local PC and enter the IP address of the IDR
system, aquired from the system administrator, in the location/address filed. WebGuard runs
automatically.
Note: WebGuard only works with Microsoft Internet Explorer and will NOT work with Netscape.
Web Sever
The IDR includes a personal web sever. If you do not want to run a web sever, turn it off by
clicking Setup Web Sever... under System tab of Setup dialog box in SmartGuard mode and
following the directions.
58
Intelligent Digital Integrated Security
Appendix 7: Alarm Connector Pin Assignment
The IDR 3016 provides 16 alarm outputs. And the DB-25 pin connector for alarm output, attached
on 8ch live board, is located on the back panel of the system. The pin numbers and assignments are
shown as below. (for IDR 3016 only)
1
2
3
4
5
6
7
8
9 10 11 12 13
14 15 16 17 18 19 20 21 22 23 24 25
Pin Number
Alarm Connector Pin
Assignment
Pin Number
Alarm Connector Pin
Assignment
1
Alarm Output 0
14
Alarm Output 1
2
Alarm Output 2
15
Ground
3
Alarm Output 3
16
Alarm Output 4
4
Alarm Output 5
17
Ground
5
Ground
18
Alarm Output 6
6
Alarm Output 7
19
Alarm Output 8
7
Ground
20
Alarm Output 9
8
Alarm Output 10
21
Alarm Output 11
9
Ground
22
Ground
10
Alarm Output 12
23
Alarm Output 13
11
Alarm Output 14
24
Ground
12
Alarm Output 15
25
Ground
13
Ground
59
IDR Series User’s Manual
Appendix 8: Troubleshooting
The following are some frequent problems and solutions related to the IDR. Read this section
before calling the agent or installer.
Problem: There is no image on the screen.
Solution: Check the camera cables. If the background of the IDR system is blue, something is
wrong with the camera cable or power.
Problem: How do I access Windows?
Solution: To protect unnecessary system crashes, Windows is blocked. Refer to Appendix 2:
Accessing Windows.
Problem: I have upgraded the software. How do I reinstall it?
Solution: There are three steps to reinstall the software.
1. Uninstall the old version.
- Go to My Computer. Select Control Panels and the Add/Delete program, and then select
the IDR Series model.
- The Delete button will be activated. Click Delete.
2. Scan the hard disk with the System tools under Programs/Accessories in Windows.
3. Install the new software.
Problem: The IDIS logo appears and then freezes. Sometimes the screen is black.
Solution: There is a problem with the Main Board. Reboot the system. If it happens often, call
your dealer or installer.
Problem: The "Display setup is not correct" error message appears and opens up in the
Windows mode when OK is clicked.
Solution: IDR Series requires 1024x768 resolution and true color. This message will be printed
on the screen when the requirements are not met. Access Display Setup and change the values for
the IDR Series and then reboot the system.
Problem: I am trying to change the display setup, but I cannot choose True color.
The resolution keeps jumping to a lower value.
Solution: Some VGA cards require a few steps. Set up the resolution first. Do not worry about
the color palette. Then access Display Setup and choose True color. If it happens again, the VGA
card does not support the 1024x768 resolution and True color. Change the VGA card.
60
Intelligent Digital Integrated Security
Contact Point Information
IDIS Co., Ltd.
SEOUL OFFICE
13F. City Air Tower 159-9 Samsung-Dong Kangnam-Gu Seoul 135-973 KOREA
Tel: +82-2-561-9100
Fax: +82-2-561-9889
HEADQUARTERS
#104 TSSC 23-14 Chang-Dong Yusong-gu Taejon 305-343 KOREA
Tel: +82-42-864-1300
Fax: +82-42-867-2007
Web site: www.idis.co.kr
Note: We are not responsible for any individual inquiries from system users. Please contact
your dealer/installers for customer service and/or technical inquiries.
61