1
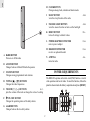
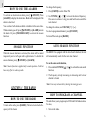
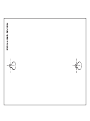
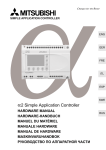
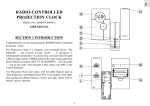
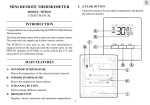
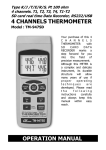
GB
CONTROL BUTTONS AND CONNECTORS
DIGITAL RF CLOCK RADIO
MODEL NO.: RRM-112 (UK VERSION RRM-113)
USER’SMANUAL
SECTION 1 INTRODUCTION
Congratulations on your purchasing the RRM-112 Digital RF
Clock Radio, a function-packed device which automatically synchronizes its current time and date when brought within an approximate 1500km radius of the radio signal generated from
Frankfurt, Germany (DCF77). (The UK version from MSF Ruby,
England)
The RRM-112 also comes with a built-in radio with digital PLL
tuning, second clock for foreign time, dual daily alarms with
snooze function and backlight.
1
GB
H CLOCK BUTTON
Changes among clock, calendar and alarm modes
A RADIO BUTTON
Turns on or off the radio
I
SLEEP BUTTON
vates the sleep function of the radio
Acti-
J
SNOOZE / LIGHT BUTTON
vates the snooze function or turns on the backlight
Acti-
K RESET BUTTON
turns all settings to default values
R e -
L POWER ADAPTER CONNECTOR
nects to power adapter
Con-
M HEADSET CONNECTOR
nects to an optional headset
Con-
N ANTENNA
tenna for radio
An-
B AM / FM BUTTON
Changes between AM and FM radio frequencies
POWER REQUIREMENTS
C STATION BUTTON
Changes among programmed radio stations
The RRM-112 operates on four AA-sized (UM3) batteries—two for
clock operation and two for radio. To insert the batteries, follow the
polarities shown inside the battery compartment and press [RESET].
D TUNING [ ] / [ ] BUTTONS
Changes the radio frequencies
E VOLUME [ + ] / [ - ] BUTTONS
Adjusts the volume of the radio or change the value of a setting
F
ON / OFF BUTTON
Changes the operating status of the daily alarms
G ALARM BUTTON
Changes between the two daily alarms
2
You can also obtain an AC/DC 4.5V power adapter from an authorized dealer. To connect it, plug it into the power adapter connector
and a wall socket.
Wall Mount
Note: The power adapter supplies
power to radio only. Clock cannot be operated by the adapter
only. To turn on the radio by using the adapter, insert the clock
battery first.
Use the enclosed drilling guide to locate the two mounting screws
on your desired location on the wall, use the recessed holes on the
back of the unit to mount it on a wall.
BEFORE YOU BEGIN
The RRM-112 is designed for table stand or wall mount.
Table Stand
Place the RRM-112 on a flat, sturdy surface. You can adjust the
display angle of the LCD by lifting up the LCD panel.
Note: Lock the latch on the back of the unit to keep unit flat before
wall mount.
3
GB
Note: Unlocking the latch on the back of the unit before lifting
up the LCD panel.
The clock and radio have separate low-battery indicators. Change
the batteries accordingly when the respective indicator lights up.
GB
When the unit is receiving radio signal, the reception icon will start
to blink. The reception icon will show either strong, weak or no
signal depending on the strength of the radio signal. A complete
reception generally takes about two to 10 minutes.
THE BACKLIGHT
Press [SNOOZE/LIGHT] to turn on the backlight. The light will
go out automatically if the control buttons are left idle for a while.
Receiving
radio
signal
SECTION 2 THE CALENDAR CLOCK
No signal
DISPLAY MODES
Weak signal
Strong signal
When the reception is completed the reception icon will stop
blinking. The reception icon will show " " for no Reception or
" " for successful reception.
In normal display, the current local time, day-of-the-week and date
will be shown. Press [CLOCK] repeatedly to display different
combinations of the current time, foreign (ZONE) time and day-ofthe-week.
For the alarm time, use [ALARM] to change between ALARM 1 and
ALARM 2.
Reception
complete
No reception, or
manually adjusted
Successful reception
ABOUT RADIO RECEPTION
For better reception of radio signals, place the clock away from
metal objects and electrical appliances to minimize interference.
The RRM-112 is designed to automatically synchronize its
current time and date when brought within range of the DCF77
RF signal.
Note: The radio reception of the calendar clock will be ceased
automatically during the radio is turned on. When the radio is
turned off, the clock will enable auto-reception again.
(UK version within a 1500km radius of radio signal (MSF) from
Ruby, England)
When the unit is within range, its radio-control mechanism will
override all manual settings.
4
If you wish to disable the auto-reception feature while the unit is
within range, switch off the radio hold down the [VOLUME - ]
button for two second. The [
] signal will disappear. The unit
will NOT respond to radio signals.
HOW TO SET THE ALARMS
1. Press [ALARM] to switch to display the alarm setting.
2. Select ALARM 1 or ALARM 2 using [ALARM].
To enable the feature again, hold down the [VOLUME + ] button
] signal will start blinking to initiate
for two seconds. The [
reception automatically.
3. Press and hold [ALARM] for two seconds.
4. Use VOLUME [ + ] / [ - ] to enter the hours.
5. Press [ALARM].
6. Use VOLUME [ + ] / [ - ] to enter the minutes.
HOW TO SET THE CALENDAR
CLOCK MANUALLY
7. Press [ALARM].
8. Use VOLUME [ + ] / [ - ] to select ALARM or RADIO. If
ALARM is selected, a two-minute crescendo alarm will be
emitted at the set time when the alarm is active. If RADIO is
chosen, the radio will be turned on for two hours at the set time
instead.
When the normal time is displayed,
1. Press [CLOCK] for two seconds.
2. Enter the hours using the [ + ] and [ - ] buttons. Hold down
either button to rapidly increase or decrease the value.
3. Press [CLOCK].
9. If RADIO is chosen, use [STATION] to choose the radio
station and press [AM / FM] to select AM or FM.
4. Enter the minutes using the [ + ] and [ - ] button.
10. Press [ALARM].
5. Press [CLOCK].
11. Use VOLUME [ + ] / [ - ] to set the volume of the wake up radio.
6. Follow the same procedure to set the display language
(English, French, German, Italian and Spanish), year, month,
day and ZONE time.
12. Press [ALARM] to exit.
Note: If there is no battery for the radio, there is no operation for
step 9 ~ 11.
Press [CLOCK] to save the changes and exit. If changes are made
after the minute adjustment, the seconds will reset and start from
zero.
5
GB
The unit will also save all changes and return to normal display
automatically after the unit has been left idle for 1 minute.
HOW TO ENABLE OR DISABLE
AUTO-RECEPTION
GB
To change the frequency,
HOW TO USE THE ALARMS
1. Press [AM/FM] to select AM or FM.
To activate or deactivate an alarm, press [
ON/OFF]. Press
[ALARM] to display the alarm time. Blank will be displayed if the
alarm is deactived.
2. Use TUNING [
] /[
] to locate the desired frequency.
Press once to advance 1 step, press and hold to auto search the
next channel.
You can have both alarms enabled or disabled at the same time.
When an alarm goes off, press [
ON/OFF] or [ALARM] to mute
the alarm. Or press [SNOOZE/LIGHT] to activate the snooze
function.
To select a programmed channel, press [STATION]
To change the volume, use VOLUME [ + ] / [ - ] .
To turn off the radio, press [RADIO].
SNOOZE FUNCTION
AUTO SEARCH FUNCTION
When the snooze function is activated, the alarm will be muted
temporarily and set off again after eight minutes. To disable the
ON/OFF] or [ALARM].
snooze function, press [
The RRM112 is equipped with the Auto Search function; the unit
will automatically search for the next clear channel.
To use the auto search function,
Note: Snooze function is applied only to wake up alarm. It will not
have any effect to wake up radio.
1. Press and hold TUNING [
function,
] /[
] to activate the auto search
2. The frequency is kept increasing or decreasing until a clear
channel is found.
Note: User may release the key during the tuning process
SECTION 3 THE RADIO
HOW TO PROGRAM A CHANNEL
HOW TO USE THE RADIO
The unit allows you to program up to 8 FM and 8 AM radio stations.
To do so,
To turn on the radio, press [RADIO]. The last selected radio frequency will be shown.
1. Turn on the radio.
6
The
flashing icon indicates the battery has no power, neither
the radio nor the radio alarm can be activated. It is a must to change
the batteries for the radio.
4. Use TUNING [
] /[
] to locate the desired frequency.
The radio memory station is kept as long as the batteries for the
clock is still in the unit during the radio batteries replacement.
5. Press and hold [STATION] for two seconds to confirm.
HOW TO USE THE SLEEP (AUTO-OFF) FUNCTION
1. Turn on the radio.
2. Press [SLEEP] to activate the sleep function. "0 min" will be
displayed when the function is deactivated.
SECTION 4
ADDITIONAL INFORMATION
3. Press [SLEEP] again to select the sleep time for the radio to
switch off automatically. You can select 120, 90, 60, 30 or 15
minutes.
THE RESET BUTTON
The [RESET] button is used to enhance synchronization of signals
after battery replacement or when the unit is operating in an
unfavorable way or malfunctioning. Use a blunt stylus to hold
down the button. All settings will return to their default values.
NOTE ON ALARM RADIO
When the alarm radio is set off, it will keep playing for two hours
before turning itself off. You can intervene by resetting the time for
the sleep function or simply turn off the radio at any time.
PRECAUTIONS
This unit is engineered to give you years of satisfactory service if
handled carefully.
BATTERY INDICATION FOR RADIO
1. Do not immerse the unit in water.
There is two level of battery indication for radio.
2. Do not clean the unit with abrasive or corrosive materials.
The
icon indicates the battery level is low. The radio and radio
alarm can still be activated for a while. However it is recommended
to change the batteries for the radio.
3. Do not subject the unit to snow or excessive force, shock, dust,
temperature or humidity.
7
GB
2. Press [AM/FM] to select AM or FM.
3. Select the desired station number using [STATION].
GB
4. Do not tamper with the unit’s internal components.
CAUTION
5. Do not mix new and old batteries or batteries of different
specifications.
Listening to headphone stereo at full power for extended periods of
time can result in hearing damage.
To maintain good performance
• Do not use the unit in places which are extremely hot, cold,
dusty or humid. In particular, do not keep the unit:
SPECIFICATIONS
- in a high humidity area such as a bathroom
Clock
- near a heater
24-hr / 12-hr
- in an area exposed to direct sunlight ( e.g., in side a parked car,
where it can become extremely hot )
: 24-hr hh : mm : ss (DCF version)
12-hr hh : mm : ss (MSF version)
Calendar
: Day / Month / Year
day-of-week in one of 5 languages
(E, D, F, I, Sp )
Alarm
: 2 minutes crescendo
Snooze
: 8 minutes
• Keep cassette tapes, magnetic cards and other magnetic recorded materials away from the speaker as the recorded information may be erased or noise may occur on cassette tapes.
Note on listening with the headphones
• Listen at moderate volumes to avoid hearing damage.
Radio
• Do not wear the headphones white driving or cycling. It may
create a traffic hazard.
AM band frequency
: 531 ~ 1602 kHz
AM step frequency
: 9 kHz
• You should use extreme caution or temporarily discontinue
use in potentially hazardous situations, such as walking,
jogging, etc.
FM band frequency
: 87.5 ~ 108 MHz
FM step frequency
: 50 kHz
• Wear them properly; L is left, R is right.
Memory station
: 8 memories for AM
8 memories for FM
• The headphones should be worn with the longer cord behind
your neck.
8
: 2 UM-3 or “AA” 1.5V for Clock
2 UM-3 or “AA” 1.5V for Radio
Weight
: 286.8 gm
Dimension
: 132 x 158 x 23 mm (H x W x D)
GB
Battery type
CAUTION
— The content of this manual is subject to change without
further notice.
— Due to printing limitation, the displays shown in this
manual may differ from the actual display.
— The manufacturer and its suppliers held no
responsibility to you or any other person for any damage
expenses, lost profits, or any other claim arise by using
this product.
— The contents of this manual may not be reproduced
without the permission of the manufacturer.
9
GB
10