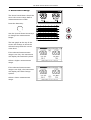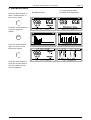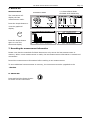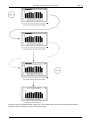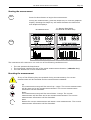
1
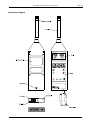
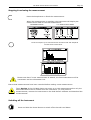
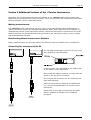
CR:260A Series Sound Level Meters User Manual for the CR:260A Series of Sound Level Meters User Manual for the CR:260A Series of Sound Level Meters User Manual for the CR:260A Series of Sound Level Meters User Manual for the CR:260A Series of Sound Level Meters This manual, the software to which it relates, the program code and drawings are all: © Copyright Cirrus Research plc 1989-2014 User Manual for the CR:260A Series of Sound Level Meters Page 1 CR:260A Series Sound Level Meters Page 2 The content of this manual, any illustrations, technical information and descriptions within this document were correct at the time of going to print. Cirrus Research plc reserves the right to make any changes necessary, without notice, in line with the policy of continuing product development and improvement. No part of this publication may be duplicated, reprinted, stored in a data processing system or transmitted by electronic, mechanical, photographic or other means, or recorded, translated, edited, abridged or expanded without the prior written consent of Cirrus Research plc. No liability is accepted for any inaccuracies or omissions in this manual, although due care has been taken to ensure that is it complete and accurate as possible. Accessories supplied by Cirrus Research plc have been designed for use with the instrumentation manufactured by Cirrus Research plc. No responsibility is accepted for damage caused by the use of any other parts or accessories. In order to take account of a policy of continual development, Cirrus Research plc reserves the right to change any of the information contained in this publication without prior notice. Produced by Cirrus Research plc, Acoustic House, Bridlington Road, Hunmanby, North Yorkshire, YO14 0PH, United Kingdom. © Copyright Cirrus Research plc 2014 Reference Number 07/14/CR:260A/04 Document Printing Date Friday, 11 July 2014 CR:260A Series Sound Level Meters Page 3 Preface ......................................................................................................................... 5 Messages and Symbols ..................................................................................................5 Section 1 Introduction .................................................................................................. 6 Main Features ...............................................................................................................6 Measurement Functions..................................................................................................6 Broadband Measurement Mode .......................................................................................6 1:1 Octave Band Measurement Mode (CR:263A & CR:264A) ...............................................8 Options & Accessories ....................................................................................................8 Section 2 Getting Started ............................................................................................. 9 Quick Start ...................................................................................................................9 Section 3 Using the CR:260A Series Sound Level Meters ............................................ 15 Unpacking and checking the Sound Level Meter .............................................................. 15 Instrument Layout ....................................................................................................... 16 Assembly ................................................................................................................... 17 Keypad Functions ........................................................................................................ 19 Switching On .............................................................................................................. 20 Calibration .................................................................................................................. 20 Setting the measurement range .................................................................................... 22 Setting the measurement mode .................................................................................... 23 Broadband Measurements ............................................................................................ 23 1:1 Octave Band Measurements (CR:264A & CR:263A Only) ............................................ 23 Making a measurement ................................................................................................ 26 Memory Functions ....................................................................................................... 26 Switching off the instrument ......................................................................................... 29 Section 4 Additional features of the +Version Instruments ........................................ 30 Making measurements ................................................................................................. 30 Downloading Measurements to the Software ................................................................... 30 Connecting the instrument to the PC .............................................................................. 30 Using the Deaf Defier3 Software.................................................................................... 32 Section 5 Maintenance & Care .................................................................................... 36 Section 6 Troubleshooting .......................................................................................... 37 Basics ........................................................................................................................ 37 Calibration .................................................................................................................. 37 Measurements & Settings ............................................................................................. 38 Downloading Measurements (+Version Only) .................................................................. 38 Section 7 Glossary ...................................................................................................... 39 Appendix 1 Specifications ........................................................................................... 42 Instrument Versions .................................................................................................... 42 Applicable Standards ................................................................................................... 42 Microphone ................................................................................................................. 42 Microphone Preamplifier ............................................................................................... 42 Microphone Extension cables (Class 1 Instruments only) .................................................. 42 Time Weightings ......................................................................................................... 42 Frequency Weightings .................................................................................................. 42 Amplitude Weighting .................................................................................................... 43 Measurement Range .................................................................................................... 43 Range Steps ............................................................................................................... 43 Noise Floor (Typical) .................................................................................................... 43 Available Measurements ............................................................................................... 43 Frequency Bands (Nominal Frequencies) ........................................................................ 44 Measurement Storage .................................................................................................. 44 Automatic Measurements (+Version Only) ...................................................................... 44 Display....................................................................................................................... 44 Weight ....................................................................................................................... 45 CR:260A Series Sound Level Meters Page 4 Dimensions................................................................................................................. 45 Batteries .................................................................................................................... 45 Battery Life................................................................................................................. 45 Environmental............................................................................................................. 45 External Connections (+ Version Only) ........................................................................... 45 Output Cables (+ Version Only) .................................................................................... 45 Software Support (+ Version Only) ................................................................................ 45 Electromagnetic Performance ........................................................................................ 45 Appendix 2 Software Installation ............................................................................... 46 System Requirements .................................................................................................. 46 Appendix 3 Acoustic Calibrators ................................................................................. 47 Operation. .................................................................................................................. 47 Changing the Battery ................................................................................................... 49 Specification. .............................................................................................................. 50 Technical Information .................................................................................................. 51 Free Field Correction .................................................................................................... 52 Appendix 4 - CE Declaration of Conformity ................................................................. 53 Warranty Information. ............................................................................................... 54 Cirrus Research Offices .............................................................................................. 55 CR:260A Series Sound Level Meters Page 5 Preface Thank you for purchasing the CR:260A Series Sound Level Meter. These instruments have been designed to be simple to use and to provide the functions and features needed from a modern Sound Level Meter. This manual describes the procedure that should be followed to set up and operate the CR:260A Sound Level Meters, as well as comprehensive technical information, information on optional and a troubleshooting guide. If you are a new user of Sound Level Meters or new to the CR:260A Series Sound Level Meters, first read Section 1 Introduction to familiarise yourself with the features, components and accessories supplied. Then read Section 2 Getting Started for step-by-step instructions on how to use the instrument. The different versions of the CR:260A Series are: CR:261A CR:262A CR:263A CR:264A Class Class Class Class 1 2 1 2 Broadband Broadband Broadband Broadband Only Only with 1:1 Octave Band Filters with 1:1 Octave Band Filters The CR:260A Sound Level Meters meet the requirements for Class 1 and Class 2 of IEC 616721:2002 standard for Class 1 Group X or Class 2 Group X Sound Level Meters as appropriate. They also meet the requirements for Class 1 and Class 2 according to IEC 60651 and 60804 depending upon the version of the instrument. Please refer to page 42 for full technical details of the CR:260A Sound Level Meters. To meet the requirements of ANSI S1.4 for Random Incidence microphone response, an NK:70 Random Incidence Adaptor should be used when making measurements. Please refer to page 18 for details of the use of the NK:70 Random Incidence Adaptor. Messages and Symbols Messages are used in this manual to bring important information to your attention. The different message classes are indicated as shown below. i Please read. A note is a hint or advice that helps you make best use of the equipment and accessories. This feature is available only from the +Version instruments which have been unlocked. This feature is not provided by the standard instruments. Pay attention! A caution informs you that improper use of the equipment or failure to follow instructions may cause data loss or may damage the equipment. Page 6 CR:260A Series Sound Level Meters Section 1 Introduction Main Features Measurement Functions The measurement functions that can be provided by the CR:260A Series depend upon the version of the instrument and if the instrument has been upgraded to the +Version further parameters will be available. Listed below is a summary of the measurements that can be provided by the basic Broadband instrument and by the addition of the 1:1 Octave Band filters. Broadband Measurement Mode In Broadband Mode, the instrument stores the overall values such as LAeq, LAFmax and Ln’s as well as storing a noise profile, or Time History, during each measurement. The frequency weighting used can be selected from either dB(A) or dB(C) by choosing the appropriate measurement mode. (See page 23). Standard Instruments The standard version of the CR:260A Series instruments can only store a single measurement. When the instrument is switched on, the display shows the last measurement. When a new measurement is started, this previous measurement is deleted and replaced by the new measurement information. The following information is measured by a Standard instrument in Broadband Mode: Function Frequency Weighting Displayed as Maximum value Minimum value Sound Level with Fast Time Weighting A or C LAF or LCF LAFmax or LCFmax LAFmin or LCFmin Equivalent Continuous Sound Pressure Level with integration time t A or C LAeqt or LCeqt - - Sound Exposure Level (SEL) A or C LAE or LCE - - Peak Sound Pressure C LCpeak - - Page 7 CR:260A Series Sound Level Meters +Version Instruments The +Version of the CR:260A instruments can store up to 100 Measurements which can be of any length, up to a maximum of 99 hours per measurement. With each measurement is stored a noise profile which consists of 1 second Leq samples, with up to a maximum of 24 hours of Noise Profile being available. Please refer to the Specifications on page 42 for full details of the available memory. Frequency Weighting Displayed as Maximum value Minimum value A LAF LAFmax LAFmin C LCF LCFmax LCFmin Z LZF LZFmax LZfmin A LAS LASmax LASmin C LCS LCSmax LCSmin Z LZS LZSmax LZsmin A LAI LAImax LAImin C LCI LCImax LCImin Z LZI LZImax LZImin A LAeqt - - C LCeqt - - Z LZeqt - - A LAE - - C LCE - - Z LZE - - Peak Sound Pressure C LCpeak - - Takt Maximum Sound Level DIN 45641 (LAFTeq) A LAFTeq - - A LAIeqt - - C LCIeqt - - Z LZIeqt - - Function Sound Level with Fast Time Weighting Sound Level with Slow Time Weighting Sound Level with Impulse Time Weighting Equivalent Continuous Sound Pressure Level with integration time t Sound Exposure Level (SEL) Impulse Weighted Equivalent Sound Pressure Level with integration time t (LIeqt) Please note that the items highlighted in bold above are the default measurement functions and can be selected from the keypad using the Mode button. All of the other configurations must be accessed via the Deaf Defier 3 software. Page 8 CR:260A Series Sound Level Meters 1:1 Octave Band Measurement Mode (CR:263A & CR:264A) In the 1:1 Octave Band Filter Mode, the CR:260A instrument provides a repeating, sequential sweep through the filter bands. In addition to the frequency bands, the instruments also provide a measurement of the overall LAeq, LCeq and LZeq functions. Standard Instruments Function Frequency Weighting Displayed as Stored Measurement Applies to Sound Level with Fast Time Weighting Z LZF No 1:1 Octave Bands Z LZeqt 1 1:1 Octave Bands A LAeqt 1 Broadband C LCeqt 1 Broadband Z LZeqt 1 Broadband Equivalent Continuous Sound Pressure Level with integration time t +Version Instruments Function Frequency Weighting Displayed as Stored Measurement Applies to Sound Level with Fast Time Weighting Z LZF No 1:1 Octave Bands Z LZeqt Yes 1:1 Octave Bands A LAeqt Yes Broadband C LCeqt Yes Broadband Z LZeqt Yes Broadband Equivalent Continuous Sound Pressure Level with integration time t The 1:1 Octave Band Filters cover the following frequency bands: 31.5Hz, 63Hz, 125Hz, 250Hz, 500Hz, 1kHz, 2kHz, 4kHz, 8kHz, 16kHz Options & Accessories A range of options and accessories are available for the CR:260A Series which can enhance the performance of your instrument. For full details, please contact Cirrus Research plc or your local representative. The most commonly used accessories are listed below. CR:514 CR:515 UA:237 CK:250 CP:65 CT:1 CM:270/1 ZL:202 ZL:205 ZL:210 ZL:225 ZL:100 SW:DD3 Class 2 Acoustic Calibrator Class 1 Acoustic Calibrator Windshield Carrying Case Carrying Pouch for Sound Level Meter (CR:261A & CR:263A Only) Tripod Preamplifier Tripod Mount 2m Microphone Extension Cable 5m Microphone Extension Cable 10m Microphone Extension Cable 25m Microphone Extension Cable USB Data Cable Deaf Defier3 Software CR:260A Series Sound Level Meters Section 2 Getting Started Quick Start 1. Switch On Press the Power button to switch on the Sound Level Meter The instrument will display the startup screen, and then will display the last measurement made. Press the Graph Key to cycle between the numerical display and the graphical display of the last measurement. Broadband Mode 1:1 Octave Band Mode CR:264A & CR:263A Only Page 9 CR:260A Series Sound Level Meters 2. Calibration Attach the Acoustic Calibrator to the Sound Level Meter and switch to the 94dB level setting. Press the Cal key to start the calibration procedure. Cal When the calibration is complete, the display will change to show the calibration level. Remove the Acoustic Calibrator, switch off the calibrator and store. Attaching the Calibrator Gently push and twist the calibrator clockwise. To remove, gently pull and twist clockwise Page 10 CR:260A Series Sound Level Meters 3. Measurement Range The Sound Level Meter should be set to the correct range before measurements are made. Press the Start Key. Start Use the Up and Down Arrow keys to change the measurement Range. The bar graph at the top of the screen will change to show the selected range and the current noise level. If the selected measurement range is too low, the instrument will display the Overload symbol. Select a higher measurement range. If the selected measurement range is too high, the instrument will display the Under-Range symbol. Select a lower measurement range. Page 11 CR:260A Series Sound Level Meters Page 12 4. Mode Select Press the Mode key to view the current setup. Mode CR:262A & CR:261A Instruments The CR:262A and CR:261A instruments provide Broadband measurements only. The Frequency Weighting can be selected from either dB(A) or dB(C) by pressing the Mode button. CR:264A & CR:263A Instruments The CR:264A and CR:263A instruments provide Broadband measurements in either dB(A) or dB(C) & 1:1 Octave Band Filter Measurements. Press the Mode Key to switch between dB(A) and dB(C) Broadband modes or 1:1 Octave Band Mode. CR:260A Series Sound Level Meters 5. Start Measurement Press the Start button to start a measurement in the current mode. Start Press the Graph button to view the graphical display. Graph Press the Graph button again to return to the Numerical display. Stop Press the Stop button to finish the measurement. The last measurement will be displayed. Broadband Mode Page 13 1:1 Octave Band Mode CR:264A & CR:263A Only Page 14 CR:260A Series Sound Level Meters 6. Review the measurement Broadband Mode 1:1 Octave Band Mode CR:264A & CR:263A Only The instrument will display the last measurement made. Press the Graph button to view the graphical display. Graph Press the Graph button again to view the Numerical display 7. Recording the measurement information Please note that the standard CR:260A Instrument only stores the last measurement in memory. When a new measurement is made, the last measurement information is erased and overwritten. Record the measurement information before making a new measurement To store additional measurements in memory, the instrument must be upgraded to the +Version. 8. Switch off Press and hold the Power button to switch off the instrument. CR:260A Series Sound Level Meters Page 15 Section 3 Using the CR:260A Series Sound Level Meters Unpacking and checking the Sound Level Meter Carefully remove the instrument from its shipping container and inspect it for possible damage or missing items. If the meter appears to be damaged or something is missing, contact Cirrus Research plc or your local representative immediately. The basic CR:260A Series instrument is supplied with the following standard accessories: Deaf Defier3 for Windows Software on CD-ROM CR:260A Series User Manual ZL:100 USB Data Cable Batteries 2 x AA Certificate of Calibration In addition, the Class 1 versions of the instrument are supplied with an MV:200D Preamplifier and a microphone box. The microphone capsule will be fitted to the MV:200D Preamplifier before shipping. If you have ordered the instrument as a complete measurement kit, you will also receive an Acoustic Calibrator, Carrying Case, Wriststrap and Pen. CR:260A Series Sound Level Meters Instrument Layout Page 16 CR:260A Series Sound Level Meters Page 17 Assembly The CR:260A instruments are supplied fully assembled apart from the removable MV:200D Preamplifier for Class 1 instruments (CR:261A & CR:263A) and the batteries. Preamplifier The preamplifier must be connected to the Sound Level Meter before the unit is switched on. This unit is connected to the top of the instrument using a locking ring. To connect the MV:200D Preamplifier, follow the diagram below: 1. Push the preamplifier into the socket on the Sound Level Meter 2. Ensure the connector has located into the socket 3. Tighten the Locking Ring. Do not cross thread the locking ring. Damage caused by misuse is not covered by the warranty for the instrument. Removing the Preamplifier Do not twist the preamplifier body. Unscrew the locking ring and pull the preamplifier from the Sound Level Meter. Using Microphone Extension Cables The Class 1 CR:261A & CR:263A instruments can be used with a microphone extension cable. If a microphone extension cable is to be used during a measurement, the instrument must be calibrated with the cable attached. CR:260A Series Sound Level Meters Page 18 Connect the microphone extension cable in the same manner as the MV:200D Preamplifier. Batteries The batteries of the CR:260A are located behind the cover on the bottom of the instrument. Slide the cover to the right hand side to remove and to access the battery holder. Ensure the instrument is switched off. Remove the battery holder from the instrument and insert the batteries. The CR:260A instruments uses two AA Class batteries, also known as LR6. Ensure that the batteries are inserted correctly. DO NOT reverse the polarity of the batteries as this may cause damage to the instrument. Windshield The CR:260A Series can be used with a UA:237 Foam Windshield which will reduce the noise levels generated by air turbulence over the microphone capsule. The windshield can also be used to protect the microphone capsule of the Sound Level Meter from dust which may affect the performance of the instrument. To use the UA:237 Windshield, push the hole in the windshield over the microphone of the Sound Level Meter. The UA:237 Windshield must be removed before the Sound Level Meter can be calibrated. NK:70 Random Incidence Corrector The NK:70 Random Incidence Corrector is designed to modify the response of the microphone capsule from Free Field to Random Incidence in order to comply with the requirements of ANSI S1.4. For instruments supplied for use outside of the USA, this adaptor may not be supplied. For further details, please contact your local representative or Cirrus Research plc. To fit the NK:70 Random Incidence Corrector, push the corrector over the microphone grill. Do not attempt to remove the microphone grill as this may cause damage to the capsule. To calibrate the instrument fitted with the microphone capsule, remove the NK:70 Corrector and follow the instructions supplied with the instrument. Do Not attempt to calibrate the instrument with the NK:70 fitted. CR:260A Series Sound Level Meters Page 19 Keypad Functions Power Switch On & Off the Sound Level Meter Mode Measurement Mode Select the measurement mode & view the current measurement mode settings Start Start Starts a new measurement. Resets the current measurement if the instrument is running Graph Graph Switches between the Numerical and Graphical displays Stop Stop Stops the current measurement Up Moves the Measurement Range up. Resets the current measurement if the instrument is running Down Moves the Measurement Range down. Resets the current measurement if the instrument is running CR:260A Series Sound Level Meters Page 20 Switching On Press the Power Button to switch on the Sound Level Meter. When the instrument is switched on, the Start-up screen will be displayed, and after a short time, the display will change to show the last measurement that was made. Viewing the last measurement When the Sound Level Meter is switched on, it will display the last measurement that has been made. If there are no measurements in the memory, the instrument will automatically start a new measurement. The information that is displayed from the last measurement is shown below. Broadband Measurement 1:1 Octave Band Measurement CR263A & CR:264A Only Press the Graph key to switch between the Numerical and Graphical displays Calibration i If a microphone extension cable is to be used during a measurement, the instrument must be calibrated with the cable attached. CR:260A Series Sound Level Meters Page 21 Calibrating the Sound Level Meter Select the calibration level on the Acoustic Calibrator. For most users, this will be 94dB when using a Cirrus CR:514 or CR:515 Acoustic Calibrator. Gently push the calibrator onto the microphone capsule, slowly twisting clockwise. Cal Press the CAL button to start the calibration procedure During the calibration, the instrument will display the calibration status. If the calibration is successful, the instrument will display the calibration level. Press the Start button to begin a new measurement or to return to the main screen. If the calibration is not successful, the instrument will display an error message. These are shown below. The calibration level is below the set level. Check that the Calibrator is switched on and that it is connected correctly to the Sound Level Meter. The calibration level is above the set level. Check that the Calibrator is set to the correct level. The calibration level is unstable. This may be caused by high background noise levels. Move to a quieter location and retry the calibration. Please note that if the CAL button is pushed when the instrument is running and making a measurement, the current measurement will be stopped and the information discarded. The measurement information will not be stored in the instrument memory. To Remove the calibrator, gently pull the calibrator whilst twisting the calibrator clockwise. This will help to ensure that the microphone capsule does not become unscrewed from the instrument. For more information refer to Appendix 4 “Acoustic Calibrators”. CR:260A Series Sound Level Meters Page 22 Changing the Calibration Level The calibration level of the Sound Level Meter can be adjusted from the default level of 93.7dB. To change the calibration level, press and hold the Cal key for more than 2 seconds. Use the Up and Down arrows to change the level. Press START to accept the new level and to return to the main operation of the Sound Level Meter. Setting the measurement range i Start One of the most important features of a Sound Level Meter is the measurement range. If the measurement range is set too high, the instrument may not be able to record low levels. If the measurement range is set too low, high noise levels will overload the instrument and make the measurement invalid. Therefore it is vital that the correct measurement range is chosen for the noise to be recorded. To set the measurement range, press the Start key. The instrument will start a measurement. The instrument is running. The measurement range in this example is 40dB to 110dB as shown at the top of the screen. Use the Up and Down keys to change the measurement range. As the range changes, the Top and Bottom of the selected range is shown on the graph. This example shows a noise level of 68dB on the different measurement ranges. Select a measurement range appropriate for the levels to be measured. It is very important that a Sound Level Meter is not overloaded when making a measurement. In this example, the range is set to 10-80dB. The noise level is higher than this and so the instrument indicates Overload as OL Change to a higher measurement range. CR:260A Series Sound Level Meters Page 23 In this example, the noise level is below the bottom of the selected measurement range. Select a lower measurement range. If the range is changed during a measurement, the current measurement will be discarded and a new measurement started. Setting the measurement mode The CR:260A Series Sound Level Meters can make either Broadband Measurements (CR:262A & CR:261A) or 1:1 Octave Band Measurements (CR:264A & CR:263A). Selecting the measurement mode allows these different measurements to be made. Broadband Measurements Press the Mode button to change the Measurement Mode to Broadband Mode. The instrument will display the current settings for the Broadband Mode. All of the CR:260A Series can measure in either dB(A) or dB(C) when set to the Broadband mode function. Press the Mode button to select the frequency weighting required. In the CR:262A & CR:261A instruments, pressing the Mode key will cycle between the Mode view and the measurement view. Press Start to begin the measurement. 1:1 Octave Band Measurements (CR:264A & CR:263A Only) Pressing the Mode key will cycle between the Broadband Modes, 1:1 Octave Mode and the measurement view. CR:260A Series Sound Level Meters Page 24 Select the Mode required and press Start to begin the measurement. Understanding how 1:1 Octave Band Measurements are made In the CR:264A and CR:263A instruments are a set of 1:1 Octave Band Filters which allow the instrument to measure the frequency content of noise sources. When the 1:1 Octave Band measurement mode is selected, the instrument will automatically sweep through the frequency bands from 31Hz to 16kHz, followed by a dB(A) Leq, a dB(C) Leq and then a dB(Z) Leq measurement. All frequency band measurements are made as Leq measurements and the Octave Band Filters are automatically weighted with the dB(Z) frequency weighting. This sweep takes 2 seconds per band, with a total of 26 seconds for a complete sweep. When the sweep is completed, the instrument starts the next sweep, with the Leq for each measurement band being added to the previous value. The instrument will continue to make sweeps of the frequency bands until the user presses the Stop key. The figures below show how this works in practice. Example 1. The user Starts the measurement and Stops the measurement when the dB(Z) Leq is completed. Example 2. The user Starts the measurement and the instrument runs for a longer period, sweeping through the filter bands more than once. CR:260A Series Sound Level Meters Page 25 At the end of the measurement when the user presses Stop, the instrument calculates and displayes the cumulative Leq for each filter band. CR:260A Series Sound Level Meters Page 26 Making a measurement Please read this section very carefully. It contains important information about making and storing measurements with the CR:260A Sound Level Meters Memory Functions The +Version of the CR:260A Series Sound Level Meters can store up to 100 measurements and up to 24 hours of 1 second Short Leq Time History (with Broadband measurements). The Standard versions of the instrument can only store 1 measurement. Understanding how measurements are stored The memory of a +Version of the CR:260A Series can store up to 100 measurements. A measurement can be one of the following Classes: Calibration Record Broadband Measurement 1:1 Octave Band Measurement The 100 measurements can be a combination of any of these Classes. In addition to the 100 measurements, the instrument also store a Time History, or noise profile, with each Broadband Measurement. Up to 24 hours of 1 second Short Leq Time History can be stored in the memory. For example, if the instrument makes 24 Broadband measurements of 1 hour duration, each measurement will have Time History data. However, if any more Broadband measurements are made, the Time History memory will be full and no further Time History data will be stored. The instrument will display a message to confirm this. The overall Broadband Measurement parameters will still be stored, but without Time History Data. Memory nearly full When the memory of the +Version instrument is nearly full, the instrument will show the following screen: When this screen is displayed, the instrument can store the following further measurements: 5 Broadband Measurements 3 1:1 Octave Band Measurements Time History Memory Full When the 24 hours of Time History memory is full, the instrument will display the following message: CR:260A Series Sound Level Meters Page 27 The instrument will continue to measure and store Broadband measurements but no further Time History data will be stored. Memory Full The instrument cannot store any more measurements in the memory and those measurements already stored must be downloaded and the memory cleared. The instrument will display the following message: Press the Start button to clear the memory. Pressing the Start button will delete all measurements from the instrument memory. Please ensure that all measurements have been downloaded to the Deaf Defier3 software before clearing the instrument memory. Once measurements have been cleared from the instrument memory, they cannot be retrieved. CR:260A Series Sound Level Meters Page 28 Starting the measurement Start Press the Start button to begin the measurement. During the measurement, press the Graph key to view the graphical display. Pressing the Graph key will switch between the Numerical and Graphical Displays. Broadband Mode 1:1 Octave Band Mode CR:264A & CR:263A Only Graph The instrument will continue to run until one of the following conditions occur: The user presses the Stop button The instrument reaches the end of the preset measurement duration (+Version Only) The user Resets the current measurement Resetting the measurement If any of the following keys are pressed during a measurement, the current measurement will be cancelled and the measurement restarted: Up The measurement range will be moved up 1 range. The current measurement will be reset and a new measurement started. The current measurement information will be discarded. Down The measurement range will be moved down 1 range. The current measurement will be reset and a new measurement started. The current measurement information will be discarded. Start Start Resets the current measurement and starts a new measurement. The current measurement information will be discarded. CR:260A Series Sound Level Meters Page 29 Stopping & reviewing the measurement Stop Press the Stop button to finish the measurement. When the measurement is complete, the instrument will display the measurement data for the last measurement. Broadband Mode Graph 1:1 Octave Band Mode Press the Graph key to switch between the Numerical and Graphical measurement information. Please note that if a new measurement is started, the last measurement will be overwritten and the information lost. Ensure that measurements have been recorded before making a new measurement. The +Version of the CR:260A Series can store up to 100 measurements but only the last measurement can be viewed from the instrument. To view previous measurements, connect the instrument to the Deaf Defier3 software and download the measurements. Switching off the instrument Press and hold the Power Button to switch off the Sound Level Meter. CR:260A Series Sound Level Meters Page 30 Section 4 Additional features of the +Version Instruments Upgrading the CR:260A Series Sound Level Meters to the +Version adds new functions and features to the performance of the instrument. These new functions are accessed from the Deaf Defier3 Software, which is described below. Making measurements The +Version of the instruments can store up to 100 measurements. Each measurement is made in the same way as the standard instruments. When each measurement is stopped, it is automatically stored in the instrument memory. When the instrument is connected to the Deaf Defier3 software, the measurements that are stored in the instrument memory can be viewed and downloaded as required. Downloading Measurements to the Software Before measurements can be downloaded, the software must be installed on to a suitable PC. Connecting the instrument to the PC The CR:260A instruments connect to the PC using the supplied ZL:100 USB Cable. Connect the ZL:100 USB Cable to the USB socket on the bottom of the instrument. Ensure that the cable is inserted correctly with the arrow on the top of the connector. Do not force the connector into the socket as this may cause damage. When the Deaf Defier3 software is installed and run, use the Download option to connect to the instrument. Please refer to the Help provided with the Deaf Defier3 software for details of the download procedure. CR:260A Series Sound Level Meters Page 31 Standard Version Instruments When a standard CR:260A Series Sound Level Meter is connected to the Software, the user will be given the option to enter the unlocking key to upgrade the instrument to the +Version specification. The screen below will be shown: To upgrade the instrument to the +Version specifications, press the Upgrade… key and the following screen will be displayed. Enter the Upgrade key and press the Upgrade Instrument button: The software will program the instrument with the key to unlock the new features. The software will show the following screens during the upgrade process: If the instrument is not upgraded to the +Version specification, measurements cannot be downloaded to the Deaf Defier3 software. For details of upgrading the standard instrument to the +Version specification, please contact your local representative or Cirrus Research plc. +Version Instruments When the Deaf Defier3 software is installed and run, use the Download option to connect to the instrument. The Deaf Defier3 software will automatically detect the CR:260A instrument and allow measurements to be downloaded. CR:260A Series Sound Level Meters Page 32 Using the Deaf Defier3 Software Ensure that the Sound Level Meter is connected to the Software and that it is switched on. If the Sound Level Meter is not switched on, the software will not be able to detect the instrument. The information provided in this manual is a brief summary of the functions available from the Deaf Defier3 software. Please refer to the information provided with the software. Downloading measurements To download measurements from the Sound Level Meter to the Deaf Defier3 software, do one of the following: Press the Instrument, Download menu Click the Download Measurement button: The software will display the measurement catalogue in the instrument, with each measurement identified by the measurement number, type, date, time and measurement duration. The user can download either selected measurements or all measurements. To select individual measurements, click on the measurement with the mouse. To select multiple measurements, hold the Control key and select the measurements. To select all of the measurements in the memory, press the Select All button and the software will highlight all of the measurements in the memory. CR:260A Series Sound Level Meters Page 33 The examples below show a single measurement selected and all of the measurements selected: To select the location where the measurements will be stored, do one of the following: Select an existing folder in the folder list Press the Create a new folder button to make a new download folder Enter the name for the new folder. Folders can be either a top level folder, ie a main folder, or can be a sub folder from an existing folder. This can be useful for storing measurements made at the same location on different days. Press OK to select the new folder. Press the Download button to download the measurements from the instrument to the software. Measurement will be automatically stored in the database for review and reporting. Please refer to the Deaf Defier3 help for further information. Setting the instrument clock Press the Configure Instrument button: Press the Set Clock button to set the clock of the Sound Level Meter to the clock in the PC. Please ensure that the clock of the PC is correct. CR:260A Series Sound Level Meters Page 34 Clearing the memory Press the Clear Memory button from the Configure Instrument screen. The software will request confirmation that the memory is to be cleared. Please note that all measurements will be deleted from the instrument memory at this point. Ensure that all measurements have been downloaded before clearing the memory. Configuring the instrument Press the Advanced button from the Configure Instrument screen (above) to view the instrument configuration options. The current configuration of the instrument will be displayed as shown in the example below. To create a new configuration, press the New Setup button and change the settings to those required. To program the instrument with the new settings, press the Send Setup to Instrument. To delete a configuration from the software, press the Delete Setup button. CR:260A Series Sound Level Meters Page 35 The user can select and alter the following parameters: Function Filter Mode Available Options Broadband Mode or 1:1 Octave Band Mode (CR:264A & CR:263A Only) Run Duration Manual, 1 minute, 5 minutes, 10 minutes, 15 minutes, 30 minutes, 1 hour, 8 hours, 12 hours, User Defined User Time Enter a user defined measurement duration and select User Defined from the Run Duration list above Time Weighting dB(A), dB(C), dB(Z) Frequency Weighting Fast, Slow, Impulse Level Range 10 to 80, 20 to 90, 30 to 100, 40 to 110, 50 to 120, 60 to 130, 70 to 140 User Metric SEL (LAE) or LIeqt Ln Ln 1 to 6, Define the exceedence level for Ln’s 1 to 6 Setup Notes User notes for the measurement setup. CR:260A Series Sound Level Meters Page 36 Section 5 Maintenance & Care The CR:260A Series are precision measurement instruments and should be treated with care. Do not allow the instrument to be exposed to substances which may cause damage to the components of the unit. If the instrument is to be used in an environment where particles such as dust may come into contact with the instrument, always use a Windshield (UA:237) to protect the microphone capsule. The instrument is not waterproof and should not be used in situations where moisture will form or condense on the microphone capsule or the instrument body. If using the instrument outdoors, use a suitable outdoor measurement kit which has been specifically designed to protect the instrument. If the instrument becomes dusty, wipe it down with a cloth that is lightly dampened with water or a mild detergent. Do not use aromatic hydrocarbons, chlorinated solvents, or methanol-based fluids when wiping down the meter. Do not clean the microphone capsule. Do not remove the microphone grill as this can cause severe damage to the membrane. Physical damage to the microphone capsule is not covered by the instrument warranty. CR:260A Series Sound Level Meters Page 37 Section 6 Troubleshooting This section contains information which may solve simple operational problems you may encounter. If you are unable to solve the problem or experience any problems with the assembly or operation of the instrument contact Cirrus Research plc or your local representative for further assistance Basics Symptom The instrument does not switch on Possible Cause The batteries are not fitted The batteries are flat or very low The batteries are not correctly fitted The instrument has become corrupted Possible Remedy Fit new batteries and switch on Fit new batteries and switch on Remove the batteries and check the polarity of the batteries Contact your local distributor or Cirrus Research plc Calibration Symptom The calibration fails: Too Low Possible Cause The Acoustic Calibrator is not switched on The Acoustic Calibrator is not fitted correctly The Preamplifer is not fitted correctly. Class 1 Instruments only The microphone capsule is loose or not fitted Calibration level set to a different level The Microphone may be damaged The calibration fails: Too High The calibration fails: Unstable The Acoustic Calibrator is set to a higher level than the expected level The background noise level is within 15dB of the calibration level The Microphone may be damaged Possible Remedy Switch on the Acoustic Calibrator and retry Check that the Acoustic Calibrator is fitted according to the instructions supplied. For Class 1 Instruments, refer to page 17 for details of fitting the preamplifier. Check that the microphone capsule is tight and fitted correctly Set the calibration level to the value provided by the Acoustic Calibrator. Contact Cirrus Research plc or your local representative for assistance Set the Acoustic Calibrator to the correct level Move to a location where the background noise level is more than 15dB below the calibration level Contact Cirrus Research plc or your local representative for assistance Page 38 CR:260A Series Sound Level Meters Measurements & Settings Standard Instruments Symptom No measurements have been stored Overload symbol is shown Under Range symbol is shown Possible Cause Only 1 measurement can be stored in the Standard instruments The measurement was reset The noise level is too high for the current range The noise level is too low for the current range Possible Remedy Possible Cause Memory is full. Possible Remedy Clear the memory using the Deaf Defier3 software. Restart the measurement Select SEL User Metric and change Time Weighting required Select a higher measurement range Select a lower measurement range. Select the Manual Run Duration Select the Manual Run Duration Select a preset Run Duration Restart the measurement Select a higher measurement range Select a lower measurement range. +Version Instruments Symptom No measurements have been stored Instrument has selected Impulse Time weighting Overload symbol is shown Under Range symbol is shown The measurement stops after a set time The measurement does not stop as expected The measurement was reset LIeqt User Metric may have been selected The noise level is too high for the current range The noise level is too low for the current range The Run Duration has been set to a preset value. The Run Duration has been set to the User Defined value. The Run Duration has been set to Manual Downloading Measurements (+Version Only) Symptom Measurements cannot be downloaded Possible Cause No measurements have been stored Instrument is not connected to PC Batteries are too low Possible Remedy Repeat Measurement Connect the USB cable between the Sound Level Meter and the PC Replace batteries CR:260A Series Sound Level Meters Page 39 Section 7 Glossary 1:1 Octave Band Filters A division of the frequency range into bands, the upper frequency limit of each band being twice the lower frequency limit. ‘A’ Weighting A standard weighting of the audible frequencies designed to reflect the response of the human ear to noise. Acoustic Calibrator An instrument that provides a reference noise source that is used to calibrate and check the performance of a Sound Level Meter. Broadband Noise Measurements using parameters which include all the audible noise, such as dB(A) and dB(C) C Weighting A standard weighting of the audible frequencies used for the measurement of Peak Sound Pressure level. CE Marking A label used to show that the Sound Level Meter conforms to the specification of a European Directive dB(A) Decibels A weighted dB(C) Decibels C Weighted dB(Z) Decibels Z weighted Decibel (dB) The units of sound level and noise exposure measurement DIN 45641 German Standard which defines the additional measurements LAFTeq & LIeqT Fast Time Weighting A standard time weighting applied by the Sound Level Meter IEC 60651:1979 The International Standard for Sound Level Meters IEC 60804:1984 The International Standard for Integrating & IntegratingAveraging Sound Level Meters IEC 61260:1995 The International Standard for 1:1 Octave & 1:3 Octave Band Filters IEC 61672-1:2003 The International standard for Sound Level Meter and Integrating Averaging Sound Level Meters that replaces both IEC 60651 and IEC 60804 Impulse Time Weighting A standard time weighting applied by the Sound Level Meter Integrating Averaging Sound Level Meter A Sound Level Meter which accumulates the total sound energy over a measurement period and calculates an average LA10.0 The noise level exceeded for 10% of the measurement period with ‘A’ frequency weighting calculated by statistical analysis LA90.0 The noise level exceeded for 90% of the measurement period with ‘A’ frequency weighting calculated by statistical analysis LAE Sound Exposure Level (SEL) with ‘A’ frequency weighting LAeq,t Equivalent continuous sound pressure level. A measure of the average sound pressure level during a period of time, t, in dB with ‘A’ weighting. LAF Sound level with ‘A’ Frequency weighting and Fast Time weighting LAFmax The maximum Sound level with ‘A’ Frequency weighting and Fast Time weighting LAFmin The minimum Sound level with ‘A’ Frequency weighting and Fast Time weighting CR:260A Series Sound Level Meters Page 40 LAFTeq Takt maximal sound level as defined by DIN 45641 LAI Sound level with ‘A’ Frequency weighting and Impulse Time weighting LAImax The maximum Sound level with ‘A’ Frequency weighting and Impulse Time weighting LAImin The minimum Sound level with ‘A’ Frequency weighting and Impulse Time weighting LAS Sound level with ‘A’ Frequency weighting and Slow Time weighting LASmax The maximum Sound level with ‘A’ Frequency weighting and Slow Time weighting LASmin The minimum Sound level with ‘A’ Frequency weighting and Slow Time weighting LCE Sound Exposure Level (SEL) with ‘C’ frequency weighting Lceq,t Equivalent continuous sound pressure level. A measure of the average sound pressure level during a period of time, t, in dB with ‘C’ weighting. LCF Sound level with ‘C’ Frequency weighting and Fast Time weighting LCFmax The maximum Sound level with ‘C’ Frequency weighting and Fast Time weighting LCI Sound level with ‘C’ Frequency weighting and Impulse Time weighting LCImax The maximum Sound level with ‘C’ Frequency weighting and Impulse Time weighting LCpeak Peak Sound pressure level with ‘C’ frequency weighting LCS Sound level with ‘C’ Frequency weighting and Slow Time weighting LCSmax The maximum Sound level with ‘C’ Frequency weighting and Slow Time weighting LEP,d Daily personal noise exposure Leq Equivalent continuous sound pressure level. A measure of the average sound pressure level during a period of time, t, in dB LIeqT Impulse weighted Leq,t as defined by DIN 45641 Ln Statistical analysis of noise levels. The n denotes the percentage exceedence. LZE Sound Exposure Level (SEL) with ‘Z’ frequency weighting LZeq,t Equivalent continuous sound pressure level. A measure of the average sound pressure level during a period of time, t, in dB with ‘Z’ weighting. LZF Sound level with ‘Z’ Frequency weighting and Fast Time weighting LZFmax The maximum Sound level with ‘Z’ Frequency weighting and Fast Time weighting LZI Sound level with ‘Z’ Frequency weighting and Impulse Time weighting LZImax The maximum Sound level with ‘Z’ Frequency weighting and Impulse Time weighting LZS Sound level with ‘Z’ Frequency weighting and Slow Time weighting CR:260A Series Sound Level Meters Page 41 LZSmax The maximum Sound level with ‘Z’ Frequency weighting and Slow Time weighting Overload The input to the Sound Level Meter is too high for the current measurement range. Change the range Peak The maximum value reached by the sound pressure at any instant during a measurement period (in dB usually with C frequency weighting) SEL Sound Exposure Level, displayed as LAE, LCE or LZE Slow Time Weighting A standard time weighting applied by the Sound Level Meter Sound Level Sound Pressure Level with a Frequency weighting, such as dB(A) Sound Level Meter An instrument for measuring various noise parameters SPL Sound Pressure Level, the basic measure of noise loudness, expressed in decibels Statistical Analysis A calculation performed by a Sound Level Meter on the noise levels measured during the measurement period to describe the statistical spread of the noise. Time History A sample of the noise levels taken every 1 second throughout the measurement period. Class 1 Laboratory & Field Grade for Sound Level Meters Class 2 General Field Grade for Sound Level Meter Under Range The input to the Sound Level Meter is too low for the current measurement range. Change the range Z Weighting Z weighting is a flat frequency response of 8Hz – 20kHz ±1,5dB excluding microphone response. CR:260A Series Sound Level Meters Appendix 1 Specifications Instrument Versions CR:261A CR:262A Class 1 Class 2 CR:263A CR:264A Class 1 with 1:1 Octave Band Filters Class 2 with 1:1 Octave Band Filters Applicable Standards Sound Level Meter IEC 61672-1:2002 Class 1 or 2 Group X IEC 60651:1979 Type 1 I or Type 2 I IEC 60804:1985 Type 1 or Type 2 ANSI S1.4 with NK:70 Random Incidence Adaptor Fitted 1:1 & 1:3 Octave Band Filters (where fitted) to IEC 61260 Class 1 Microphone Class 1 Class 2 Capacitance Class+ Class 1 pre-polarized Free-field ½" Condenser Class+ Class 2 pre-polarized Free-field ½" Condenser Random Incidence to ANSI S1.4 with NK:70 Adaptor 18pF Microphone Preamplifier Class 1 Class 2 MV:200D Removable Preamplifier MV:200D Integral Preamplifier Microphone Extension cables (Class 1 Instruments only) ZL:202 ZL:205 ZL:210 ZL:215 ZL:220 ZL:225 2m 5m 10m 15m 20m 25m Time Weightings ‘F‘ (Fast) to IEC 61672-1:2002 Class 1 or 2 Group X +Version also provides ‘S' (Slow) to IEC 61672-1:2002 Class 1 or 2 Group X ‘I' (Impulse) to IEC 61672-1:2002 Class 1 or 2 Group X Frequency Weightings Channel 1 Channel 2 ‘A' or ‘C’ User Selectable ‘C' for Peak +Version also provides Channel 1 ‘A',’C’,’Z’ Channel 2 ‘C' for Peak Page 42 CR:260A Series Sound Level Meters Page 43 Z weighting is a flat frequency response of 8Hz – 20kHz ±1.5dB excluding microphone response. When either 1:1 or 1:3 Octave Band filters are selected the ‘Z' weighting is used. Frequency Weightings can only be changed from the default values in the +Versions of the CR:260A Series. Contact your local representative for further information. Amplitude Weighting Q=3 (True Energy Integration) Measurement Range Broadband 24dB(A) to 140dB(A) Class 1 26dB(A) to 140dB(A) Class 2 143dB(C) Peak (70 to 140dB Range) 1:1 Octave Band Filters (CR:264A & CR:263A) 15dB(Z) to 140dB(Z) Range Steps 10-80, 20-90, 30-100, 40-110, 50-120, 60-130, 70-140 Noise Floor (Typical) Broadband 21dB(A) Class 1, 23dB(A) Class 2 1:1 Octave Band Filters 12dB(Z) @ 1kHz 1:1 Octave Band Available Measurements dB(A) Broadband Mode: LAF Sound Level (Not Stored), dB(A), Fast Time Weighting LAeq Equivalent Continuous Sound Level, dB(A) LAFmax Maximum Sound Level, dB(A), Fast Time Weighting LAFmin Minimum Sound Level, dB(A), Fast Time Weighting LCpeak Peak Sound Pressure, dB(C) Measurement Duration dB(C) Broadband Mode: LCF Sound Level (Not Stored), dB(C), Fast Time Weighting LCeq Equivalent Continuous Sound Level, dB(C) LCFmax Maximum Sound Level, dB(C), Fast Time Weighting LCFmin Minimum Sound Level, dB(C), Fast Time Weighting LCpeak Peak Sound Pressure, dB(C) Measurement Duration 1:1 Octave Band Mode: Selected Frequency Filtered LZF (Not stored), dB(Z), Fast Time Weighting Filtered LZeq Equivalent Sound Level LAeq, LCeq & LZeq Equivalent Sound Level Measurement Duration CR:260A Series Sound Level Meters + Version also allows the following measurements to be made Broadband Mode: LXY Sound Level (Not Stored) LXeq Equivalent Continuous Sound Level LXYmax Maximum Sound Level LXYmin Minimum Sound Level LCpeak Peak Sound Level LXE, LXIeq or LXFTeq LXn (0.1 to 99.9) Five Simultaneous values Date & Time of measurement LXeq Short Leq Time History Where X= dB(A), dB(C) or dB(Z) Frequency Weighting. Y = Fast(F), Slow(S) or Impulse(I) Time Weighting 1:1 Octave Band Mode: Selected Frequency Filtered LZF (Not stored), dB(Z), Fast Time Weighting Filtered LZeq Equivalent Sound Level LAeq, LCeq & LZeq Equivalent Sound Level Measurement Duration Date & Time of Measurement Frequency Bands (Nominal Frequencies) 1:1 Octave Band 31Hz, 63Hz, 125Hz, 250Hz, 500Hz, 1kHz, 2kHz, 4kHz, 8kHz, 16kHz Measurement Storage The Last measurement is stored. + Version also provides 100 broadband or 1:1 Octave Band measurements Calibration records are automatically stored Short Leq Time History (LAeq,LCeq, or LZeq). Up to 24 hours at 1 second Automatic Measurements (+Version Only) The unit can be set to record and store data over fixed times of 1 minute 5 minutes 10 minutes 15 minutes 30 minutes 1 hour 8 hours 12 hours or a user defined period Automatic Repeat From 2 to 999 measurements (broadband mode only) Auto-synchronise to the clock. Display Graphical LCD with Quasi-Analogue Display Selected measurement parameter with level Warnings for Overload, Under Range Battery Level Time & Frequency Weighting Elapsed measurement time Real time short Leq (broadband mode) Graphical 1:1 Octave Bands (CR:264A & CR:263A Only) Recalled Last Measurements Measurement Range Instrument settings Page 44 CR:260A Series Sound Level Meters Page 45 Weight 450 gms Dimensions 340mm x 75mm x 25mm Batteries 2 x 1.5v Alkaline LR6/AA Battery Life Broadband Filter Mode Typically >24 hours Typically >12 hours Battery voltage is continuously monitored and warning is given on display of impending low battery condition. When batteries approach end of life the unit will store any data required and switch off automatically. Environmental Temperature Operating Storage -10oC to +50oC -20oC to +60oC Humidity Up to 95% RH Non Condensing External Connections (+ Version Only) Data Output USB Type B Socket Output Cables (+ Version Only) Standard ZL:100 USB Cable (supplied as standard) Software Support (+ Version Only) Deaf Defier3 for Windows. (Version v3.1.0 or later) The Deaf Defier3 for Windows requires the following: Microsoft Windows 98SE or later 6Mb of available hard-disk space for program files CD-ROM Drive SVGA Display Microsoft compatible mouse or pointing device USB Connection Electromagnetic Performance EN EN EN EN EN EN 55022:1994 61000-4-2:1995 61000-4-3:1996 80MHz - 1GHz 61000-4-3:1996 25MHz - 80MHz 50204:1995 900MHz 61000-4-8:1994 50Hz CR:260A Series Sound Level Meters Page 46 Appendix 2 Software Installation The CR:260A Series are supplied with a CD which includes the Deaf Defier3 software on a CD. This program allows measurements to be downloaded from the +Version of the CR:260A Sound Level Meter. The Deaf Defier3 software also allows the CR:260A Series instruments to be unlocked using a unique key provided by Cirrus Research plc. Deaf Defier3 is suitable for PC’s running Microsoft Windows 95 or later, including WindowsXP, Windows2000 and Windows Vista. Deaf Defier3 is supplied on CD-ROM, with a full installation program, and comprehensive on line help, which gives details of the options and functions of the software, along with details of the calculations used in the Hearing Protector Selection Report. Please also note that full administrator access may be required to install the Deaf Defier3 software under WindowsXP, Windows2000, WindowsNT or Windows Vista. Contact your system adminstrator for further details. To install the software, insert the CD-ROM into a CD-ROM drive on the PC. The installation program should automatically start. If the installation program does not automatically start run D:\setup.exe where D is the drive letter of the CD-ROM drive on the PC. System Requirements The Deaf Defier3 for Windows requires the following: Windows 98 Second Edition, Windows ME, Windows NT Workstation 4.0 with service pack 6, Windows 2000 Professional with service pack 2, Windows XP Home Edition or Professional, Windows Vista 25Mb of available hard disk space for program files 64Mb RAM (128Mb recommended) CD-ROM Drive for Installation VGA or higher resolution monitor, Super VGA Recommended Microsoft compatible mouse or pointing device USB Port CR:260A Series Sound Level Meters Page 47 Appendix 3 Acoustic Calibrators Operation. Switching on the Calibrator Press the Power Button on the end of the Calibrator to switch the unit on. The Indicator will illuminate to show that the unit is operating. The calibrator will automatically switch off after 5 minutes to preserve battery power. To switch off the calibrator manually, press the power button again and the indicator will extinguish to show that the unit is switched off. Permanent-on Mode For some applications there may be a need to have the calibrator switched on continuously. To allow for this, the calibrator can be turned on by pressing and holding the power button for three seconds. Release the button and the indicator will flash to show that the unit is in permanent-on mode. Press the power button to switch off the calibrator. CR:260A Series Sound Level Meters Page 48 Calibrating a Sound Level Meter. Push the microphone of the Sound Level Meter into the cavity at the end of the calibrator. Ensure the microphone is fully inserted into the cavity and is past the ‘O’ ring seals. The microphone should be parallel to the body of the calibrator. Also ensure that the small bleedhole next to the microphone cavity is not blocked as this could cause damage to the microphone. Most modern Sound Level Meters have electronic calibration with the level adjusted automatically. Adjust the Sound Level Meter to the correct level where applicable. When correcting the value generated by the calibrator a correction for the Class of microphone capsule may need to be applied (see Appendix 2) Background Noise In order for the calibrator to operate as intended, the ambient acoustic noise level should be no greater than 80dBA. Stabilisation In order for the sound pressure level and frequency to stabilise after switching the calibrator on when coupled to a microphone, a period of at least 3 seconds should be allowed before performing a calibration. CR:260A Series Sound Level Meters Page 49 Changing the Battery The CR:514 & CR:515 acoustic calibrators use a single 9v alkaline battery. This Class of battery is known as 6F22 or NEDA 1604. It is also commonly known as PP3. 1. Unscrew the screw holding the battery cover on, using a coin or the keyring supplied 2. The battery, Class 6F22 (PP3) can now be eased out of its holder and replaced. The battery should be eased out terminal side first by pushing against the spring at the other end. Ensure that the battery is inserted with the correct polarity with the negative terminal at the contact with the larger cutout. Battery Class. The battery should be an alkaline battery, not an ordinary dry cell. The battery is 9 volts when new and will operate the calibrator down to 6.4 volts. When the battery voltage is below 6.6 volts but above 6.4 volts, the power LED will flash to indicate that the battery voltage is low. When the battery voltage is below 6.4 volts the calibrator will not turn on. A discharged battery may allow switch-on but will soon drop in voltage and indicate low battery or switch off. CR:260A Series Sound Level Meters Specification. Frequency 1kHz ± 1% Sound Level 94dB Standardisation CR:514 - IEC 60942:2003 Class 2 CR:515 - IEC 60942:2003 Class 1 Distortion Less than 2% Operating Humidity 25 to 90% Relative Humidity Operating Static Pressure 65 kPa to 108kPa Operating Temperature -10oC to +50oC Storing Temperature -20oC to +60oC Effective Volume 6.19 cm3 0.2 cm3 Cavity Diameter 0.525 inch Battery 1 x 9v 6F22 (Neda 1604) Battery Life Approx 15 Hours Continuous Use Battery Voltage 9v Nominal (10v Maximum, 6.4v Minimum) Weight with Battery 185g Dimensions 135mm x Ø48mm re 20μPa Page 50 CR:260A Series Sound Level Meters Page 51 Technical Information The normal mode of operation of the calibrator is with the unit switched on. When the LED indicates the unit is switched on this produces the greatest radio frequency emissions. The calibrator continues to function after exposure to contact discharges up to 4kV and air discharges up to 8kV, for both positive and negative voltages relative to earth ground. The calibrator conforms to IEC 60942:2003 for a modulated root-mean-square electromagnetic field strength of 10 V/m. The maximum susceptibility to power and radio frequency fields is with the cavity facing away from the emitter with the battery compartment facing the table, the antenna polarisation horizontal and the calibrator switched on. CR:260A Series Sound Level Meters Page 52 Free Field Correction When calibrating a microphone which is to be used for free field measurements, a small correction may be necessary to compensate for the difference between the microphone's free field response at 'zero degrees' or 'head-on' incidence and the pressure level generated by the calibrator. The correction is typically -0.3dB for ½ inch microphones (making the effective calibration level 93.7dB). The table below shows the correction values for the standard microphones of Cirrus Research plc. Calibration corrections are listed below for the Cirrus Research plc ½" Capsules and three microphone capsules commonly used in Calibration Laboratories: Microphone Correction Values Microphone Class Calibration Correction Effective Calibration Level MK:202 MK:215 MK:216 MK:226 MK:224 -0.3dB -0.3dB -0.3dB -0.3dB -0.3dB 93.7 93.7 93.7 93.7 93.7 dB dB dB dB dB B&K 4134 B&K 4180 B&K 4192 0dB 0dB 0dB 94.0 dB 94.0 dB 94.0 dB Example An example of the procedure used to calculate the value for an MK:224 microphone is shown below : Level = 94.0dB + Microphone Correction Level = 94.0dB + ( -0.3dB) Level = 93.7dB Different microphones will have different correction values. Please check the operation manual for the Sound Level Meter or microphone concerned for details. CR:260A Series Sound Level Meters Page 53 Appendix 4 - CE Declaration of Conformity Cirrus Research plc Hunmanby UK CE Certificate of Conformity Manufacturer: Cirrus Research plc Acoustic House, Bridlington Road Hunmanby, North Yorkshire, YO14 0PH United Kingdom Telephone +44 1723 891655 Equipment Description The following equipment manufactured after 1st January 2008: CR:261A Sound Level Meter CR:262A Sound Level Meter CR:263A Sound Level Meter CR:264A Sound Level Meter CR:514 Acoustic Calibrator CR:515 Acoustic Calibrator Along with their standard accessories According to EMC Directives 89/336/EEC and 93/98/EEC meet the following standards EN 61000-6-3 (2001) EMC : Generic emission standard for residential, commercial and light industrial environments. EN 61000-6-1 (2001) EMC : Generic immunity standard for residential, commercial and light industrial environments. Signed S. ORourke Director Dated 1st January 2008 CR:260A Series Sound Level Meters Page 54 Warranty Information. 1. This document is a summary of the full warranty document and explains the Cirrus Research plc warranty in ordinary English; not in legal or complex terms. 2. The warranty covers any acoustic instrument such as a sound level meter, acoustic calibrator, real time acoustic analyser or personal sound exposure meter (dosemeter) manufactured by Cirrus Research plc after September 1st 2011. 3. The warranty covers all faults on, and minor accidental damage to, the instrument except the microphone capsule for the period defined in para (5) below. 4. Minor accidental damage does not include blatant miss-use, damage caused by the use of any accessories or components not specified or recommended by Cirrus, damage caused through nonCirrus modification, continued use outside of Cirrus’ recommended procedure or conditions or use contrary to the any advice provided by Cirrus. 5. The initial period of the warranty is 2 (two) years or 104 weeks from the date of purchase as a new instrument from Cirrus Research plc or their formally approved distributors OR 130 weeks from the date the instrument passed its final manufacturing inspection at Cirrus Research plc - whichever is the shorter. 6. A shorter 1 (one) year or 52 week warranty is offered for used, ex-demo or ex-rental equipment unless a special arrangement is made and a written confirmation of the special warranty is given by Cirrus Research plc. 7. Any rechargeable battery only has the battery manufacturer’s one year warranty, however there will be a reduced charge for their replacement during the annual “Traceable Calibration.” 8. On completion of the annual “Traceable Calibration” by Cirrus Research plc, or an official Cirrus Calibration Centre, the instrument will automatically be given an additional free one year warranty. 9. It follows that should the instrument be calibrated by Cirrus Research plc, or an official Cirrus Calibration Centre every year, the warranty is effectively continuous to a maximum of 15 (fifteen) years from the date of purchase. 10. There will be a charge for this “Traceable Calibration” and the price is published in the Calibration Price List. The customer is responsible for all shipping, duty and other charges relating to the annual “Traceable Calibration”. 11. Where a repair service is conducted under warranty, Cirrus Research plc will cover the shipping, duty and other costs relating to the repair of the instrument. 12. Cirrus Research endeavors to ensure stocks of instrument components for the full fifteen year period but do not guarantee to do so as certain components do become obsolete or discontinued. 13. If a sub-component becomes obsolete and stocks are depleted then Cirrus Research will endeavor to facilitate a repair but will not offer the same length warranty. 14. In the event of any dispute on the terms of the warranty Cirrus Research plc will accept pendulum arbitration by the United Kingdom Institute of Acoustics Ltd. 15. The warranty does not in any way reduce any legal right of the buyer or user of the sound level meter; it is in addition to all legal rights determined by the European Union. 16. Cirrus Research plc reserves the right to amend or update these terms and conditions without prior notice. Warranty Terms 2.5 May 2012 CR:260A Series Sound Level Meters Page 55 Cirrus Research Offices The addresses given below are the Cirrus Research plc offices. Cirrus Research plc also have approved distributors and agents is many countries worldwide. For details of your local representative, please contact Cirrus Research plc at the address below. Contact details for Cirrus Research authorised distributors and agents are also available from the Internet Web site at the address shown below. Main Office Cirrus Research plc Acoustic House Bridlington Road Hunmanby North Yorkshire United Kingdom YO14 0PH Telephone: Fax: E-mail: Web Site: +44 (0)1723 891655 +44 (0)1723 891742 [email protected] www.cirrusresearch.co.uk Germany Cirrus Research plc Deutschland Arabella Center Lyoner Strasse 44 – 48 D-60528 Frankfurt Germany Tel: +49 (0)69 95932047 Fax +49 (0)69 95932049 Email: Web: [email protected] www.cirrusresearch.de Spain CIRRUS RESEARCH S.L. Travessera de Gracia, 62 4° 7ª 08006 Barcelona SPAIN Tel: Email: Web: (34) 933 622 891 [email protected] www.cirrusresearch.es