1
tablet pc
Comlent
,,,,,,2
1.3
i.+
Safety Instruction.
......3
,.,.,.4
,.,.,.4
,,,...4
.-....4
.cttriridio,rr..;n.r"gy....................
2 MID loroduflion.....
2.1 MlDAccessones lnlroductioD.............
2.2 N[D ApplicalioD md Prepamrion........
3
2.3 MID Status andNotice.-.
QuickStdGuide........-............
3.1 KeyFutrctions............-..-
I 2 Slamp md Shurdo
3.1 OpenandclosetheScreen-..........-...-.-....
1.4 Usage ofTouch Scr""r....................................
3.5
3.6
3.7
1.8
1.9
,5
.6
.6
.7
.8
.. ... . ................................... ... ..
Homepage hterface..--.-.....
Visit Application Procedure
10
IO
USBComection................
Wordslnput......-.................
ApplicationTechnique..-..-.
4.4 DatemdTime..-.-.............
4.5 LilguageSefiing..............
4.6 AboutMID................-......
11
-.......12
,,..,,,,.13
........11
,..,.-,.,13
'..,.,..,
l4
,,,,,,.,,15
',,',,.'. l5
-,.-,.,,,15
.
l.l Acknowledgement
1
Introduction
To avoid electronic equipment failue, please shut down the
of high-accuacy electrooic equipments.
Thmks for you puchase ofour product. The product is MID (Mobile Intemet
Device), it is a high end product, with with a rouch scr;en which resolutiotr of800x480
pixel. It is designed with TTC8923 high speed processor ad 512RAM, md 4cB flah.
The operating system is Android 4.0.
The product is built in WIFI module, frotrt md rear camera, it is easy to complish
inlernel fimction. it can be viewed high definition video md photos. ir cari also suppon
cmera shooting and video shooting fmction. Besides, it is-availa6le for mmv olfice
and entertnaimnet applications. Brand new operation interface will provide you with
diferent enjoyment.
The manual systemically intoduces the functions. use techniques
amouncemenrs. please read rhis manml
carelllly before your operation.
Please don't disassemble the
access to setrice the MlD.
MID and accessories. Only authorized agent
Please keep the MID fa away ftom magnetic equipments, the radiation
may erase the data stored in the magtretic equipments.
Never use the
station).
MID in the vicinage ofhigh temperature, inflammable
has
ofMlD
gas ( gas
and
Protect the MID md accessories from kids reach scope, and avoid the kids to
use the MID without pdents' supetrision.
Announcemetrts
Preveotiye maintainance
1,2
a
MID in the vicinage
comply with rclated rules md regulatiotr, md respect others' privacy
md legat rights while using the MID.
Please
Please always keep the MID dry. To avoid the device shofi trouble, conosion fault
and electric shon, please prevent the device, battery and cheger from water and
moisture, and don't operate the device or chager by wet hmd.
strictly adhere to related instructions in the manual when using USB
cable to ensure the safety ofthe MID or PC.
Please
To avoid failure ofdevice. battery and charger, please prevetrt the device, battery,
charger liom violent shock or shake.
Never use the MID in bathroom or other
the MID from liquid wash or wet.
hmid
envircnment, and please protect
To avoid failure ofdevice, battery atrd charger, please prevent the device, battery,
charger ofall over heating or too cold circumstance
a
Never shock. throw, prod the
a
Never disassemble the device md accessories a$itrarily,
accessories are not in our compan) wananty scope.
MID, or drop. extrude, bend the MID.
Base on IEEE
othevise the device and
1.3 Safety Instructiotr
Before the operation of the MID, please read this chapter md teach your kids about these
infomtion. For firther details, please refer ro the safery instrucrion. und u*or.c"-"nt.
2
LAN
MID Introduction
MID Accessorie$ Irtroductlon
2.1
a
Never use the
a
In the redical area, please abide by related rules atrd regulations. please shut
dom the MID when it is trear to the medical area.
o
To avoid the wireless signal to intempt the plme- conholled signal, please shut
down the MID or usitrg airplme mode whetyou ae boarding a-fligiu,
MID when driving cu, in order to ensure
wireless
safe
driving.
Package:
Below items are included in you MID package, please confiml
a
a
a
a
MID complete device
powqadptor
USB cabie
Earphooe
802.llb stmddd
a
a
a
a
Leather case
User's manual
Quick Start Guide
3
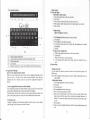
3.1 Kevs Function
Wmmty Cild
Qualification ceftificate ofproducl
llluu?- I
MID Usage and Preparation
Battery Charging
Ifthis device is first used, please {Lse AV adaptor to fully charge it.
1. Apply the power adpror to charge for MID.
2.2
2.3
l.wer kel
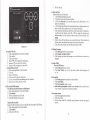
MID Status and Reminder
Reminder icons:
When some remird message appears il1 your reninder window, please click column and
slip the screen to open the reminder list. Choose the menu you need, and confim the
information. Then you can close the reminder window tfuorigh clickirg thc column to
slide up. Please refer to below status icons.
ll€u{
t l
adjushnent is connected
Eau?
keys
tT
d:a:qi
d. 3pp:i.di.. l.! r...rinl:
lunctioI description
volume
i-imy
Reminder horr.l
Rcminder icons u,ill word rvhile receiving emails. alam is set. and connect WIFI. you
can open the reninder board to l,iew the derailed infomtation.
wheD thc rcmirder columr slolvs n.$, rerninde! iron, llease hold ihe cohunn dnd Jif do*n rour fins.r ft.n
riliiderboild
mirim
main menu
iiluface
' Clrck ll rn dnv rnlcrldae lo re(ilm plc\ loL\ 1r(rll
arch (search) Clickitto enterinlo Google search
0pen the reminder board
nre
intert're
is opendd
Strrttrp and Shutdown
Startup
3.2
Long press Pouer key for tlnee keys. you can enter into stallup picture. The system
enters into screen locked status. please Llnlock it to eoter into mai[ interface 1o
opelate.
Shutdown
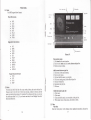
1. Long press Power, it will popup shutdown window.
2. The setting includes mute mode and shutdown. as picture 3-l
J. Clicking Shurdown is tlle last .!ep.
I
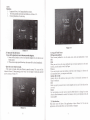
Picture 3-3
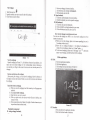
3.3 Open and Close the Screen
Screen will be closed on its own when no operation happens,
1. Screen will be closed on its own ifno operation hatpins for some time to save
battery power.
2. When screen is open, press Power key, the screen will be closed immediately.
Open the screen when it is closed.
lf the screen is closed, short press power to open the screen_ The screen wiil be
locked as Picture 3-2 after opening it, hold..lock,,icon via finger or touch pens md slid
up it to camera, as Picture 3-3.
ofTouch Screen
MID operating methods
3.4 Usage
There are man-y methods to view the main screen. menu and applications of your
MID,
Click
When you want to use the screen keybodd input or choose application in the rnain
'nlerl'ace. vou onl) need .o louch it b1 finger
Pres\ on
If you want to open some item( textbox or the link in the webpage), or shortcut and
main procedure move, you can press on this item.
Quickly slide or slide
hoizoncial movement via
Qjui"t ti ,lia" or slide indicates make quick veftical or
finger or touch Pen.
Pull
Before you pull, you need to hold it with strenghth utrtil you pull it into the position
you want.
Rotate
For most pictures, you only need to rotate the MID sidewise to chatrge the screen
direction fiom horizoncial tb vertical For instaoce, when you are inputing wods, and
listening MP3.
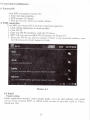
3.5 Nlain Interface
Maitr menu screen will show all the applications as below Pictue 3-4 You can use
applications, shortcut and define your main interface wailpapers
stcps
are
as
beloui
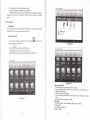
1. Dmw all the icons together.
as
Picure 3-6 shown.
2. Thco click the composited jcons to open al1 the applications as Picturc i-7.
3. Click unnamcd folder belorv black framc, it will popup hiddei keyboard, and
H.!r
]teliea
I.temtue
!-datd
lBP
hrnmedio
Picture 3-4
Ertensible homepage interface
Horncpage will extend to exceed the screen ro o:lfer morc sDacc. vou caD Dldcc neu,lv
increasd shortcuts, widgets. Click the blank spa.e rn rhe hDmel;le, rhen slide rig(t
and 1et to move to the right arld left of rhe screcn. There ar trvo eitendcd pictures as
Picture 3-5 in the horncpage-
picture
3_s
Shoft cut icons management of desktop applications
Systcm belou Android 2.3has the function of crealing lblder in the desktop, and
pul the icons in the lolder. Android ,1.0 sl,stemmake thc foider creation more simpl;. The
8
Delete the icons in the desktop
1 . Click and hold the icon needs to delete. the top left lvill shotr, the
rcon2. Dras, the ico11 to the upper ofthe DELETE icon till the icon tuns to red, lhen
move your gingcr to dclete.
Change the destop wallpaper
1. C]ick and hold the blank spacc in main scrccn, it will popup the window to
change thc wallpaper.
2. Click the photo gallary or rvallpapers gallary to choose photoVoice search
1.
Touch the Microphone icon#.
You can choose according to your need in the google selection.
You can sest the language according to your need in the voice search frame,
click OK to confim.
4. Keep your mouth direct to the microphole, ard speak out the content you
need to search, the broswer will opeo the search result list.
Note: Please make sure the intemet is s'elll connected before voice search.
2.
3.
Application Procedures
How to visit the application procedure ofIUID:
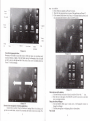
3.6 Visit
f. Cflct @
2.
button in Picture 3-6, enter into application
Picture 3-8:
Choose the application procedure you want to visit-
procedures.
as
Picture 3 9
llle into memory card
1. Comect MID and PC via USB cotulector.
2. Operatc as the MID memory seliing to connect the MID and PC.
3. Opcn "My computer" to view Mobile disk(x).
,1. Copy the file you 11eed 10 copy into "Mobile disk(x)".
5. After copying, click "close USB memory" in you computcr to uninstall.
Copy the
MID is connected in USB cable, ifyou open the USB memory
delice, you can visit the memory card through MID. Ifyou hope 10 \ isit
the rnemory ctrd, you need to disconnect the USB cable.
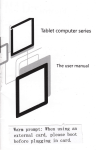
Note: Whell you
Picture 3-8
3.7 USB Connection
MID storage conliguration
Before iransmitting documents, you havc to conduot stomge configuration for your
MID:
Connect MID and PC \,ia USB connection. the remillder column
remind infonnatioll.
will
show the
1. Open the reminder boardl please view the Chapter 2.3 MID status
atrd
rcminder to leam how to open the board.
2. In the remiod board, click USB is connccted. then iouch to open USB
3.
memory device, as Picture J-9.
Now USB is well connected.
3.8 Input words
Use screen keyboard
When you start application or choose the typying word or number edit box,
popup screen keyboard. The keyboard has below input melhodsl
it will
1. Androidkeybodd
2. Uooglepinyrn input methods
Choose the input method you watrt
According to the preset, MID wili display Android keyboard
l. According to the preset, MID will display Android keyboard In the main
interface, touch settitrg application, click language and input method.
2. ln the text setting area, it will list all the input methods you MID
3.
instalied.
Choose the input method you want.
has
4 Basic setting
4.1 Voice and display
Multi-media volume setting
1. Click setting application in the main interface.
2. ClickVoice.
3. Click volme to adjust the volme for music and video.
4. When popup volume setting board, left or right progress bar to control
5. click confim.
Display setting
Adjust the bightness of screen
Click Setting application procedure in main inteface.
Click display.
Click brightness when the menu popup.
4 It will popup setting board, left md right slide the brighmess bar ro adjust
1.
2.
l.
the brightness.
5. Click OK
a Adjust screen standby time
l Click Setting application procedrLre in the main iDterface.
2. Click display.
i. Slide down the screen. and click domant.
ii. It will popup screen standby time setting, choose the standby
time you
4.2 Basic setting
Setting screen lock.
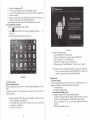
3.9 Application Technique
Enter into the widgets interface window
Click the window wigdet on the top ofthe screer in the application interface or left
slide the screen. it will tum to the window widgets interface. Long click any
component lo tum to shortcul and you can enter into application through the
shoncut.
You can unlock the picture or passord to lock the touch screen to protect your
MID privacy.
Note: After sefting the screen locked, you need to etrter the password when you
stalt the MID.
Setting unlock picture
1. Click setting application in the main interface.
Creat the application shor(cul icons in the desklop
In the application system and widgets interface, long click any icon to switch itrto
desktop, draw and hold the icon to put in any place in the desktop.
Remind: System will provide you with nrore choice and activate this widget, ifno
space in the target position, the widgct s,ill not be added into the main screen.
Click safoi.
Click screen lock.
Choose picture in the text setting area.
Move to next step according to remind.
There ile nine touch points in the picture, when it popup unlock pictue
board, comect the four points from vefrical and horizontal direction. As
Picture 4-1, move your finger when finish. System will record the picture
Switch the screen
Andrcid 4.0 applies to tl]e multascreen display, touch the screen via your finger
and slide right or left tl]e screen to switch the screen.
'7.
you set.
Click continue.
8. When
you see the remind infomation, click the screen locked picture, click
OK,
12
1u
4. PulloutSDcard.
4.4 Date and Time
Manual adjust date, time and zone
Click Setting application procedure.
. Slide dosn 5creen, and click dare and rime.
. Click select time zone. and coose the zone in the list. Slide down to view
more zone infomation.
. Click setting date and then click up and doM button or slide up and dom to
set dea to adjut date, month md year, click setting when finish.
Click setting time md click up and down or slide up md down to setting area
to adjust hou ald minute, click AM or PM to change the moming and
aftfemoon(there is no such seiection when you choose 24 hour fomat), click
setting.
Click to choose 24 hou fonnat, you cm switch beMeen 12 hou ibnnat md
24 hour fomat, the selected time fomat will be used on the alam.
Click choose date fomats. and click the date fonnats in MID.
Picture 4-l
4.5 Setting Language
Set unlock PIN code
1. Click setting application iD the main inteface.
2.
3.
4.
5.
6.
Click confim.
Click screen locked.
Choose PIN when it popup text setting area
fnter neu PIN code and cllcl conlinue
Enter new PIN code again and choose OK.
setting unlock password
L Click setting application in main interface.
2. Click safe.
3. Click screen locked.
,1. Click password in the text setting area.
5. Set nerv password(letters and nmber) and click continue.
6. Enter passu'ord again and click confrim.
4.3 SD card and MID memor]
View SD card and MID memory available space
1. Click setting application in the main interface.
2. Click memory.
3. Click language, and select the language you want, slide down to search more
language.
4.6 About Tablet
Vierv the MID Status
1. Click Seting application procesue.
2. Click About Tablet, you can view the electric volume, status messages and
so on.
System update
1. Click Setting application procedrLre in main interface.
2. ClickAbouttablet.
3. Ciick System update, update as steps.
4. click lnstall system update if there is new veersion. (Please confim there
is new version TF card in device before installation.
View system version
1. Click Setting application procedure.
3. View lhe available spce in SD card.
4. View MID intemal memory space.
Remove SD card safely
Remove the SD card safely cal prevent the SD
1. Click setting application in main interface.
1. Click setting application in main interface.
2. Click langauge and input method.
2. ClickAboutTablet.
3. You can view model NO., Android version, fimwave version and intemal
versiotr.
cad and extend the SD lifetime
2. Click memory.
:.
remore SD card.
-Click
14
15
5
5,1 Music
Your
Multi-Media
MID support below fomats
Music file formats
.
.
.
.
.
.
.
.
MP3
AAC
OGG
WAV
APE
FLAC
I
AMR
WMA
Supported video formats
.
.
.
.
.
.
.
AVI
MPG
VOB
MKV
FLV
TS/TP
Visit and play music
H261
1
.]\4PRC-,4
.
.
.
2.
3.
RMVB
DIVX
MPEG-2
JPEG
GIF
PNG
BMP
I
5.2 Music
You music can be divided into four types: artists, album, and music and play list
Choose a type to view the list. lf enter into one type, continue to choose, until the
music you want to play appears. For example, ifyou choose artist type, you caD sec
the artist name from A to Z, if you choose one dist. list will display the artists'
album and album list.
Sclect any music to play.
Add the music into new play list
l- Click music in the main interi'ace.
2. Enter to select music.
3. Click and hoid the music you want play.
4. Click music settitrg menu. cljck add into play list.
Supported photo formats
.
.
.
.
Click music in the main interface.
Enter to select music and click artist, album and play list.
J
5. Clicknewbuilderlist.
6. lnputtame into play list.
7. Click save.
Detete the music in play list
Click music.
2. Click music.
3. Click and hold the music you want delete in the play list.
4. When popup music setting menu, click delete to fi[ish.
l.
5.3 Video
Visit video
Enter into video player: in the desktop choose application procedure, choose
11
video you want to play.
l.
Click menu key, it will display menu.
2. Clickedit.
1. Click gallery application.
2. MID refresh all video files.
3. Click the file you want play.
3.
Set
bighhess, style and result setting in the selection popup
4. Click
save.
5. Click retm key to give up editing in the popup box
4.
Enter into play pictwe to play
Note: choose ielated player list,jifthere is many ways ofplayer).
5.6 Camera
5.4 HDMI
When use IIDMI comector, set the HDMI export method, MID comect HDMI TV,
display the high defrnition video in full screen, and can support 1080p resolution of
pictwe quality.
Remark: HDMI comector needs a stmdard HDMI comector to connect
Click setting application in main screen.
1. Click display, select output sefting.
2. SelectHDMI in ouQut type.
3. Comect HDMI comectot high definition digital TV should be adjusted as
HDMI output.
5.5Photo gallery
Photo gallery applicatiotr can be search into SD card memory card and video file,
md photo gallery will devide the photos md video photo, you can use the photo
gallery application to view atrd edit phot, and set the desktop and view photo.
View phots
1. Click photo gallery application in main interdface.
2. Enter into photo gallery, click the file you want to view atrd.
3. Click the photo you want to view, system will view the photo in full screen.
4. When you view photos, you can zoom itr and out, touch the screen with two
finders, and pull the fingers and sperate the fingers to decrcase and inscrease
Cmem application and video shooting function, includes two ctremas, one is front
cmera(300000piexl), another is rear camera( 2 million pixel), rear camera prcvides
" full screen" mode, cd make you shoot the photo single pictue thrcugh move the
camefa lens,
Open the camera
You cafl open the camera thiough below two ways:
l.
Slide the screen
to camera
ffH
li*
(ifyou already
set the setting to
"slide". slide down the icon
lcon,
X in tlhe main screen or all application.
Camera operation button as Picture 5-2
2. Touch cmera icon
a
a
Switch
cmera: select button
ffi
,o
,.i
"h "u-"ru.
the photo or double touch screen.
Technique: when you view photos you can slide left and right to switch the photo.
Eidt atrd setting photo
Wlen you view the photo in fuIl screen, click mmu key to display
can select the selection to edit and set photo.
a
l.
9.1r!i
menu, you
6
d(
lilm slide
Open any photo, touch menu key to display menu selection.
auto play(or in the photo gallary selection
bufton).
a ShaYe
1. Click menu key to display menu selection.
2. Then click shave, click draw related area to adjust trimmer.
3. Click trimmer to draw bigger and smaller to adjust size.
4. After adjust the size, click shave to finish.
5. Click cancel retum to photo scm if you want give uo shaving.
pMs
2. Click play the fikn slide, it will
.
Edit
$&9
Picture 5'2
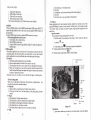
Take photos
1. open camera, make sue your device is in camera mode, screen will display
l8
19
cr
2. Aim
at the targer
you wanl take Dhors.
u.- !-u(n Drue.bunon
Oto
nke photrs.
i,:,':, J:.1',11,:1t:tifi Bl;;";
,
*.ifi
::,!1.,|fi,f;rD 'iur,,rr
uno uu61,.
4ry,Jggl.slguiceisinvideomode:
2
3.
4.
;-d':l'"'IffiTi|"'*;;
f----------------!-+-il;ii
the red buflon when finish
record.
"cord
video During rhe record.
RruS
;l'1gJfl
.
,",
;rjrir,,::i,,.,r"..,."
fd.p$h$;f::":,tffi
view
$,
videos.
if
you want lo play rhe video,
click play burton
Pan-shot
' *tffi.trfil::J;ilfli:;l:,,n,,,
I
.
screen mode, the screen
Atm at lhe scene you want to
shool ltom one end to another
end
shoot t one bridge, please
shoot your
ror example, if you wat to
offte bridee
rrom lhe head
camera
;*$mt.,'+Ef*rll,l'*n+ffi;
Remid: to view photos, please
touch the thumbnail beside
green bufton.
20
6 Connectior Establishment
).1
Erternal 3C
\bur llllD
,.2
WI!'l
can supDoll c\lcrnal -'l(i
L Entcr into niain interlircc.
2. MID conncct 3C clongle.
.'1. \(ait the JG icon. shorvs in rcmind cohnrn.
connection
Your MID can conncct \!'i-fi inlcmet. connection opeaation:
l. Click serting application in nloin inledicc.
2. Click WI-FL
3. Entcr into WI-FI inrerclfirce. click WI Ft hiltrrr
-1. MID ruill auto scan availablc Wl-Il inlernel.
As picturc 6_1.
5. Selcct thc WI-l,l yoLr want k) coDnect, il'thcrc is any password wildou
iilto rhc prssword. click (hnnecl e ij.ish.
cntcr
picture 6_l
6.3 Email
Email settiDg
Enuil rplllicrtioll allachcs cnlail setting guidc. you can adcl ordintry wch clDril
scrrice lo thc c\tcrnal POP,I or IMAP erniil account o! pro\ider (such as yahoo.
Cnrilitilnd l6-'l)
-Hfi'3ffiflT,gd:mail
picture
6_2
setting guide, please lnsure
vou
intemet is weu contrected.
L Enler into main inrerface. as piclure 6-2
emart rcon. it will popup email setting
guide to help you to set,
as picture
; JLrrcK
accout address and paaword.
I+. :lt^:::T-{"*.rait
L IcK next button. choose your
).
L
email lype is pop3 or IMAP.
lrck next bunon ro check rhe email
re&iving ,ri *rlirg.ii *"ilable or not.
i ilii,'j,ll?,iiiilT,xiiff,::fl *i,"s?:iilf;;;;;; ;ii&'iil;j:""'""
Account selup
You can set up email for most
accounts in just a few
steps.
!ma.l rrtoress
Pa
a
sword
Delete email rccount
Plcture 6-3
22
You can delete the set POP3 or IMAP email accomt ftom your MID.
l. Click
email.
2. Enter into your inbox.
3. Touch menu key.
4. Click setting.
5. Touch you account via yow fnger
5. lt will popup menu list, slide dom the screen and click delete account.
6. Click Ok to delete.
Setrd
.
.
E-m.il
Cljck Email todisplayyoumail box.
Click the inbox, it will refiesh the new emails automatically; click it to read new
email.
. tou"h& buttoninthetop of screen.
. Enter into edit new email itrterface.
5. Input the receiver's email address in the receiver colmn.
6. lnput subject md email content.
7. Click add attachment, touch menu key, it will popup menu
8. Click add attachment.
9. Select the attachment you want to send (pictures, videos)
l0.Clicksendbunon
7
7
tosendrheemail.
Internet
7.1 Browser
open and
use
internet browser
Touch browser icon in main screen or all application screen. .
Broswer will open the previous webpage you visit, ig you haven't use brcwser, it
will open your main webpage.
When you touch any itrtemet comection (for example, emial or chatting intemet),
it will open the browser.
On the top of the screen, it will display the cEent URL, expect address
colum(multi-function column) slip to the positon beyond the top. In this case,
slide
Set
dom
can display the adddrcss column again.
the main webpage,
1. Touch the bro$ser iaoo
G ir.u,n
r.raan.
2. Touch menu ke) to popup browser sening menu.
3. Slide dom the menu, click sefting.
5. Click nomal.
6. Click setting main webpage.
. 7. Select the method of setting mitr webpage in the setting
8. MID Restart after selecting.
23
column.
Visit webpage
1. Go to any webpage in browser interface.
Touch browser icon &
Input the website you watrt to search in the solt keybodd
Click finish to search website.
2. click menu key and click save to bookmark.
3. Edit bookmark and click OK.
a
Open bookmark
1. Click menu and boolondk in browser intert'ace.
the bookmark you wmt to open the webpage.
Edit bookmark
1. Click menu key and click bookmark.
2. CIrck and hold rhe er.iring booLmark ro operr rrenu.
2. Click
a
3. Click
Co
edir booLmark and e-dir. rhen click OK.
current webpage to read when no internet.
You can save all webpage into MID in casc alierwoards reading (even
Save
,qlc
(,
intemet is comected.)
1, When you view the webpage, please touch menu reponditrgly
for readitrg without intemet.
if
no
to save it
2. Below the save webpagc boolonark. it will display the thumbtrail, to
retum to the real webpage, please touch ..retum,'button. *
J, To view.ared webpage. please touch -lable page icon :;, rhen louch
menu> saved webpage, and the thumbnail ofthis webpage.
Picture
7-1
View the Eebpage
8
Other applications
8.1 Clock
Opetr the webpage as Picture 7-1, click address colum to input address, click
stanl, enter into related webpage to view conesponding website infomation.
you can slide your finger in the screen to browse and view the other parts ol the
webpage.
Increase and decrease the webpage
After opening the webpage, you cal draw the webpage, below the browser, it
will appear incrcase and desearce button, you can click to increase and decrease
the webpage.
Search the words in webpage
a) When you view the webpage, touch the menu key, it will popup menu
selection.
b)
c)
d)
e)
a
Click search in lhe webpage.
Input the item you want to search.
When you input words, the relavant words will turns to be blue colre
instead ofwhite.
Click up and down arow button in the right of search column to move
to previous and next relavant word.
Bookmark management
setting webpage bookmark
24
8.2
Calculator
1. Click calculator in the application interface
2. Enter into the basic board ofcalcrlaTor
25
,-9l::1.,.{/i9!3r1.-.,....,
3. Click menu key , then click advanced board.
z[. Touch the number or operator io the calculator.
5. Operate advanced noard as above operations cao switch into basic board.
, -l
Remind: you can left or right silde to switch the basic board and advanced
board.
File Nlanagement
tr s' ,##
Browse file
You can use llle browser edit and delete file and folder. And you can also build
share and FTP servicer to make resources be shared.
..]i,
/mnvext-sd/
ti&*
/mN/exr,sc/
SD card read path
I
- ln the main rnteface. touch file bro$ ser bunon
&d.
enter inlo flle
browser inteface. as Picture 8-2.
Picture 8-3
2. Iouch 'it#:brilton in the top of file brorvser
3. Popup folder, as Piciure E-3. click /mntiext,sd.
4. Open the tlle, you can view the file in SD card, as Picture 8-4
Cut and copy the Iile
L Click lhe file you uanr operarer in thc file brow.er.
I ll popup operction tnenu. include. cul. rop1. delere.
lnam menu ano Dronet t\
cut or cop! fiie oi folder
rename.
\ele(t all.
sel
J. Chck
'.
Picture 8-2
;
Click lo enter inro the lolder )ou $anl to pastc. tou(h menu kcy ro popup
lnenu.
Click operalc, rhen click pasre ro finr<h.
Delete file
1. In the file browser. click and hold the file vou want to delete
2. Clicl delere.
3. ClickOKlo deledte file.
Create folder
t. ln the file browser, touch menu key to popup menu.
2. Click create.
3. Click folder.
1. When popup windo\. input the new folder name in edit column.
5. Click C)K to create folds.
l.
2.
3.
4.
5.
6.
7.
9
Fast search
Click metru to popup menu in file browser.
Click create.
Click search.
Popup seach file board.
Inpuf the key words in nme edition colm.
Click OK.
The system
will auto display the
search result after search.
Installetion of Application Procedures
9.1 lnstallation
Install the third part application procedure
You can gain the thid parfy application procedure which match the Android
slstem lrom internet. and install it by loursell in \41D. Cop] lhe applicatjon
procedue inro SD card. and insen in the MID.
' L Clicl
E5 file browser; choose the application you need to install.
the anDlication vou watrt to inslall.
Popup msthllation, clicks install APK.
4. You Can operate after insullation guide.
Note: The inird p;rty procedures searched from intemet to use on the system are all
suffred with .apk.
9.2 Uninstall
Uninstall applicalion procedure
( lick setrinp in main interlace.
L Clickipplication procedure. ir sill lisl all fie applicatron lisl.
2. Select the applicaiion you want to uninstall, click uninstall.
2. Hold
you cm apply.restore [actor)_ setting to retum to factory sktus. Restore the lactory seeting
uill delele all lhe dala such as eiisiting application'procedures and user's seiting. d5
remember to backup you data.
l. When the device is in shutdom state, hotd the Volme up key by one hmd,
and press Power key into upgrade picture by anorher hmd.
2. Enter into upgEde picture. rhe picture is a riangle with a exclamalion
mdk.(As Pichre l0-l )
3. Click VolumF kev when vou see lhe trimsle.
4. The syslem enter inro mdther picrue- .ec6uery
starus, there are srx ilems lor
option.(As Picture I 0-2)
The frst option: Resrafl lhe syslem. The second option: Slstem up$ade. The
third optioh: Ripe data/ Facr;r) reser. fhe fonh oprion:-nipe cic1irg data.
t he fi fit oprion: LOGO upgradi. Bac*up user\ dara. The sixrh oprioni copy
user's data. The seventh opiion: inpur the ierial NO.
6. Nolv you_ press Volme down key, the option bar will slide down, press
Volume I kev lo execute
7 Choose wip6 data faclory resel ro execute. As Picture I0-2
8. Etrler inlo confirmation interface- click Yes ro resrore faclory selting. clicL No
to exil the confirmalion inlerface10.3 System Upgrade
Nore: Belore upgading, please confinn the eleclric \olume o[you Ny'lD is more than
Joo! lo ensure rhe upgmde cm be finished. Besides. you nced ro backup your imponant dara.
such as application prccedues, emails, etc.
5.
l.
3. Click OK to l-nish uninstallation.
mmger installed by system has many convinent methods to
un'insull,'after opening p'rocedue mariager. click minsiall. it will lisl all the
application procedures installed by s) slem.
TiD: The procedue
Palh
U;dale lhe aDolication Drocedures of Android svslem
'a Downliad Lhe laiest apphcarion procedue fiom apponted uebsite.
a Download fom the Android system related sofiware folm in tle intemet.
l0 System Upgrade
10.1 Preparation for System upgrade
DoMload lhe uosrade Drocedure
You can downlbid the'sofuare upgrade pack ftom website, then use the
9.-3 UDdate
upgrade pack to upgrade the system version
ofMID.
Preapration for syslem upgrade:
l.Download the system upgrade pack to your computer from related websit.
2.Prepare the toolffor system upgrade; one TF card, file sytem FAT or FAT 23
fomat both ok.
10,2 Restore Factorv Setting
when yow MID occures somt serious mistake or unlocked passwords are forgofien.
28
Upgrade steps:
1. ,(First insefr the TF card with update zip upgmde package into MG70l, the
file nmed update zipl
2. [n shutdoM mode, click Volume up key, then press Power key to etrter into
recovery mode.
ente_r inio system upgrade pictue, the pictue is a triangle with exclamation
mark- as Picture l0-1
4. Shon press Volume- when see trianqle.
5. Systeir enters inro another upgradipicrure, recovery mode; there are seren
seleclions fbr oprion. As PicUe l0-2
6. The llrst option: Restart the system. The second option: System upgrade. The
rhird,o1rtion: Ripe data Facrirn resel. The fonh oprion:"Ripe cdc'lring data.
I he lllllt oprion: LOCO upgradi. Backup user's daia. t he sixrh oprioni copy
user-s data. Thc sevetrrh oo[on: inout the lerial NO7. Now click volumeto slidd up md hown. click \ olurne + to oDeratc.
8. Note: before upgrade, you musr operate the third wipe ddu to make sure
upgrade successfully.
a. Enter into the second oDtion ro enter into the next inteface. still select the
\econd oprion. rhe system will enrer into upgrade mode. il uill drspla) the
progress remind.
lo.Atler system upgrade linishes, it will remind the words : "Install from SD
3.
card complete".
l.After slstem upgrade finishes, the option will scan into the first optiotr, now
click r olume I lo e{il uDprade inrerlate and ro stan un
I 2.Users can (hange rhe .j siem logo by rheir need. rhe i\le l'omar is I o numbers,
wrndows lomat..800+480. rhe file name is LOGO, fomar is.B\4P tile, palh
is memory crd. choose updare rhe first loeo direcrlv-.elecr
ro finish, long press
Volme- io option. confirri lhe re\lan lo fini.h. or
rhe fitih"oirrion
I
f
upgrade logo in Point 9
l.
10.4 Safety mode
Remind: Enter itrto safety mode, you can udnstall the software in nomal system,
after uninstall. and restart the MID to enter into safety mode.
Operation Steps:
1. Click power key to show the fist LOGO interface.
2. Picture l0-3 In the LOGO interface. long click lblume
-
and click menu
11. Troubles Shooting
The first time to turn on the MID takes too long time,
After updating the system of rhe MID. it will rake 2-3 minutes to install rhe
application softuares. Then. the speed ofrurning on the l\,11D \\'ill be faster than
before.
2. Som€times, the temperature ol the llID is a little high.
It is rhe common situation that the temperature oi the \1lD is a little high rvhen
use several applicationg at lhe same time or the backlisht is ma\imum or it is
charging.
3. MID cannot connect the WiFi.
a Make sure the wireless roiler $orks \\,ell.
o The distance between the MID and ihe \\'ireless router should be q'ithin
50- l00m and there is no u'all or other baniers bnl'een them.
a Please make sure the user and rhe passs'ord are corect.
4. Cannot surfthe Internet
a Please make sue the distance bemeen the IllD and fie trireless is *'ithin
50- 100m.
a Please re-comect the WIFL
5. Th€ system cannot run in some situation.
Wheu installing some third parry applications. the s)-'srem ma). not ru. It is
suggested to long click the Pos,er button for 6 seconds to tum offrhe \IID.
6. Cannot set the E-mail or register the application system
o Please make sure the contrcetiot ofthe internet works rvell.
a Please make sure the way to set the Ernail is coreci.
7. Cannot read the data ofthe TF car.l
31
o Please make sure the TF card inserted into the device corectly.
8. Sometimes, the MID rutrs slowly.
a This is the colmon situation. But you can close some applications in the
tast management interface, or unload some third party application to
release morc system resourse.
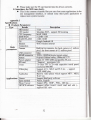
Built-in two cmeras. the back cmera N
the fiont camera is 0.3 million
AVL
MKV md FLV etc.
,
suppofl
Built-in video ptayer whlch suppoi
(word, excel read md edit ),
lE