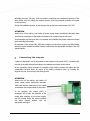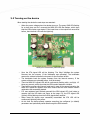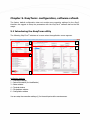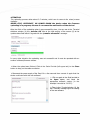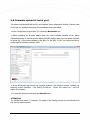
1
M2M Easy 2 Security Communicator ® Installation Guide for the software v2.1 _____________________________________ Rev: 2.1.2 2014-07-02 Document specifications This documentation was compiled for the M2M Easy 2 Security Communicator ® device developed by WM Systems LLC., and contains the step-by-step description of its installation, the program update process and the detailed introduction of the setup parameters necessary for its operation. Document Type: Installation Guide Device: M2M Easy 2 Security Communicator Author: Contact: Tóth Csaba, Benyhe Tamás (WM Rendszerház Kft.) Email: [email protected] Checked by: Tóth Zoltán Document revision: Pages: REV 2.1.2 Hardver version: REV 70 Firmware version: V2.1 R02 Bootloader version: REV 0.94 EasyTerm Software version: REV 1.1 2014.04.30. Document Status: Final Availibilty: Public Made at: 2nd of July, 2014. Last Modification: 2nd of July, 2014. Valid from: 2nd of July, 2014. 91 2 Table of Contents 1. CONFIGURATION POSSIBILITIES .................................................................. 5 2. CONNECTIVITY ............................................................................................. 6 2.1 Wiring options ..................................................................................................................... 6 2.2 Installing the device .............................................................................................................. 9 2.3 Status LEDs ....................................................................................................................... 12 2.4 Operation requirements ....................................................................................................... 16 3. INSTALLATION OF THE DEVICE .................................................................... 18 3.1 Installation steps................................................................................................................. 18 3.2 Turning on the device ......................................................................................................... 20 3.3 Possible problems .............................................................................................................. 21 4. INSTALLING THE SYSTEM SOFTWARE .......................................................... 23 4.1 Computer connection .......................................................................................................... 23 4.2 Downloading the software components ................................................................................ 24 4.3 Identifying software ............................................................................................................ 25 4.4 Onsite installation at location ............................................................................................... 25 4.5 Checking the serial port connection ...................................................................................... 26 4.6 Connection on the serial port with a terminal utility ................................................................ 26 5. EASYTERM – CONFIGURATION, SOFTWARE REFRESH ................................... 29 5.1 Introducing EasyTerm utility ................................................................................................ 29 5.2 EasyTerm start-up............................................................................................................... 30 5.3 Checking data connection settings ....................................................................................... 31 5.4 Checking the proper startup of the device ............................................................................ 33 5.5 Setting up the GPRS connection ........................................................................................... 36 5.6 Manual firmware upload, software refresh (for v2.0 software only) .......................................... 36 5.7 Firmware upload, software refresh with FTP server (from v2.1 or newer software!) .................. 39 5.8 Firmware upload at serial port ............................................................................................. 42 5.9 Gate opening ...................................................................................................................... 44 5.10 Configuration setup, programming the device ...................................................................... 46 5.10.1 Opening and displaying configuration files ........................................................................ 46 5.10.2 Sending parameters from the PC to the Easy 2.................................................................. 48 5.10.3 Reading out parameters from the Easy 2 to the PC ............................................................ 50 6. SETTING UP THE DEVICE PARAMETERS WITH EASYTERM ............................. 51 6.1 General settings .................................................................................................................. 51 6.2 Setup parameters .............................................................................................................. 53 6.3 Alarm security settings ....................................................................................................... 55 6.3 Input settings .................................................................................................................... 60 6.3 Output settings .................................................................................................................. 63 7. CONFIGURATION ON SERIAL PORT, TCP PORT ............................................. 72 7.1 Configuration on serial port ................................................................................................. 72 7.2 Configuration through the TCP port ..................................................................................... 77 7.3 Compatibility ...................................................................................................................... 78 8. CONFIGURATION WITH SMS TEXT MESSAGES .............................................. 79 8.1 Settings with SMS commands ............................................................................................... 79 8.2 Example for parameter setting with SMS commands .............................................................. 88 9. SUPPORT AVAILABILITY .............................................................................. 89 9.1 Support help ....................................................................................................................... 89 9.2 Product support .................................................................................................................. 89 10. LEGAL NOTICES.............................................................................................. 91 4 Chapter 1. Configuration possibilities Software installation and configuration options Local software refresh Software and parameter upload options Remote software refresh FTP server (EasyTerm) with Terminal software (commands) on TCP port (with commands) EasyTerm software (configuration file, parameter values) with SMS commands with EasyTerm software Local configuration Remote configuration 5 with Terminal program (RJ11 serial port) with EasyTerm software (RJ11 serial port) Chapter 2. Connectivity 2.1 Wiring options Input, output connector s 1 – SIM-card holder (push-push, insert) 2 – SMA antenna connector (50 Ohm, male) 3 – PWR: Power supply connector (12VDC) 4 – IN1, IN2: 2x inout line cable connector (for sensors) 5 – Jumpers (JP1, JP2) for selection of the operation mode for the input lines (can be voltage, contact) 6 – OUT: 1x output cable connector (for relay, sabotage switch) 7 – ALR: Alarm line (for alarm center connection) 6 8 – PROG: RJ11 connector (for configuration, software upload) 9 – Service connector (support) 10 – Communication GPRS modem External interface connectors 1– Power chord connector 2 – 2x input connector (operation mode can be selected with jumpers) 3 – 1x output (relay) 4 – 1x TIP RING input (alarm center – analog phone line) 5 – Serial RJ11-RS232 port for data cable (RJ11, program/configuration connection) 6 – Jumpers (JP1 – IN1, JP2 – IN2) – left 2 pins: contact, right 2 pins: voltage The device has 2 input lines (IN1, IN2). They can be configured seperately to operate as a voltage or contact input. These settings can be setup with the jumpers beside the terminal blocks (JP1 – IN1, JP2 – IN2 title). At the left direction the 2 pins means contact, the right 2 pins means voltage operation mode). 7 When it is configured as here below as it can be seen in the picture, then the line #1 (IN1 jumpere: JP1) works in contact input, the input #2 (IN2 jumper: JP2) works as voltage input. In case of voltage input the inputs can be actived with 2-32V DC voltage, other else they are inactivated. These modes can be also selected and configured in the configuration software. Jumper setting options Output The device has a relay output line (OUT title). There can be switched a 2A - 120VAC or 2A - 24VDC voltage. Input/output voltage Input high signal level: 2-32V Input low signal level: 0-1V Current in active status (input): 0.3-1mA Switchable voltage (relay): 2A / 120VAC; 2A / 24 VDC 8 2.2 Installing the device Preparation Take the 4 spacer fixing tabs provided with the device, and place them into the PCB holes as shown in the picture. Prepare a screwdriver, the 2 terminal blocks provided with the device, and the stripped wire pair necessary for connection, with appropriate distinctive colors (power connector – e.g. black-red, input-output wire pairs – e.g. black-blue, alarm input – e.g. black-white). Connecting the inputs As a power or contact input, one sensor can be connected to each input by wire pairs – maximum 2 pieces (IN1, IN2) in accordance with the standard connection method shown below, by fixing the cable wire pairs for each input. At the connection points set apart for reception of the cables, connect the cables with the power/input terminal block, by means of the sliding companion piece, by inserting the stripped wire pair, then driving in the fixing screws. In case of power inputs, attention should be paid to the order of polarity (+/-): the assembly should be made according to the signs in front of the line inputs. These inputs may also be used for anti- 9 sabotage purposes. This way, it can be used for monitoring the unauthorized opening of the alarm center cover for safety and security reasons (when the magnetic contactor connected to the input line). During the installation process, do not forget to set up the input mode jumper (JP1, JP2). ATTENTION Always turn off the device, and switch off power supply before performing assembly. Make sure that the metal parts of the cables connected to the contact inputs do not touch. In the example, the first input (IN1) is connected, and it handles the jumper position as contact input according to the setup. On activation of the inputs (IN1, IN2) after switching on the power supply, the LEDs located above the inputs indicate the active (closed) position with the appropriate color/light. See LED signals chapter. Connecting the outputs 1 piece of relay/switch can be connected to each output on the panel (OUT), connected with the help of the cable wire pair according to the standard connection shown below. At the connection points set apart for reception of the cables, connect the cables with the output/Alarm terminal block, by means of the sliding companion piece, by inserting the stripped wire pair, then driving in the fixing screws. ATTENTION Always turn off the device, and switch off power supply before performing assembly. Make sure that the metal parts of the cables connected to the contact inputs do not touch. In the example, the output (OUT) is connected with a relay. On activation of the output after switching on the power supply, the LED located above the output indicates the active (closed) position with the appropriate color/light. 10 Connecting the alarm line (Alarm center) The alarm center can be connected to the ALR input via 1 wire pair, thus it will be able to forward its alarm signals to the Easy 2. It is connected with the cable wire pair according to the standard connection shown below. At the connection points set apart for reception of the cables, connect the cables with the output/Alarm terminal block, by means of the sliding companion piece, by inserting the stripped wire pair, then driving in the fixing screws. Subsequent to this, if the connection shown below is ensured, the alarm device can transfer its signals converted into Contact ID format towards the Easy 2 device. On activation of the alarm center (ALR), after switching on the power supply, the LED located above the alarm center input line indicates the active (closed) position with the appropriate color/light. Connecting the power supply The 8-32 V power-supply voltage (typically 12 V adapter, or 24 V industrial power supply) can be connected to the PWR input via one wire pair. This way, the device can be powered. It is connected with the cable wire pair according to the standard connection shown below. On connecting the power supply (PWR), the device immediately starts operating, and then the 11 LED located above the power supply line indicates the active (closed) position with the appropriate color/light. Example for Easy 2 wiring and installation 2.3 Status LEDs LED Operation LED status options LED státusza Behaviour red blinks GPRS modem status In case of normal operation it signs the GPRS communication status blinks if the GPRS communication is active, lights when the GPRS communication was succesful yellow blinks/lights Input #1 signal Signs the status of the #1 input line (JP1 and I1INV or IDELAY parameters) lights if the input wires are closed (active) green lights Input #2 signal Signs the status of the #2 input line (JP2 and I1INV or IDELAY parameters) lights if the input wires are closed (active) green lights Function Description GSM receiving signal strenght In case of normal operation for signing the signal strenght – more blinking means better signal strenght GSM STA IN1 IN2 12 OUT Output relay signal MDM RDY Modem status Modem operation blinks intermittently if the modem operates and ALR Alarm center signal PWR Operation Lights: relay closed, not lights: relay opened accessible Status of the alarm center line (tip-ring), signs: speaker on, not lights: speaker off or not alarm center presented Signs the presence of the processor power supply (3,3V) yellow lights red blinks green blinks green lights GSM: GSM/GPRS status LED - red The numbers of the GSM LED blinking signs the signal strength (more blinkings means better signal). Spends cca. 10 seconds between the signals. One flash of the blinking takes 50 msec, then a 450 msec break comes. The RSSI value answered by the GSM module to the AT+CSQ command. The RSSI gives a response between -113 dBm and -51 dBm values. The conclusion at the numbers of the LED blinkings can be found in this table: RSSI value (AT+CSQ) 99 0 1…3 4…7 8…11 12…15 16…19 20…23 24…27 28…30 31 GSM receiving signal strength unknown, faulty value -113 dBm or less -111… -107 dBm -105… -99 dBm -97… -91 dBm -89… -83 dBm -81… -75 dBm -73… -67 dBm -65… -59 dBm -57… -53 dBm -51 dBm or greater LED blinkings (GSM) 0 1 1 2 3 4 5 6 7 8 8 STA: Status LED - yellow During the normal opreation the STA LED will be active only if the GPRS signal transmission permitted. In this case from the beginning of the signal transmission the LED starts to blinking. 13 This state can be change only when the transmission was succesful, then the LED continously lights until the beginning of the next transmission. Under the inicialization the simultaneous blinkings of the STA and GSM LEDs signs the fault of the SIM card. IN1, IN2: Input #1, input #2 active indication - green When the input is active (if the 2 pair wire closed; or in case of voltage the power voltage is 232VDC) then the LED lights which belongs the input number. OUT: Output active indication – yellow The output active indicator LED show the status of the primer-side of the relay. When the output is active (the relay pair of wires are closed), then the output LED lights. MDM RDY: Modem stand-by – red During the inicialization the LED blinks quickly (approx. twice per seconds). When the modem is already accessible and operates with active communication on the GSM network, then it blinks with more less frequency. 14 The LED controlled directly by the GSM module. The exact LED flash-signals can be found int he Cinterion®„BG2-E AT Command Set” document with the following figure. The following requirements must be considered: not lights: the module has turned off periodic blinkings 600 msec filling in / 600 msec filling out: the module not registrated to the network (possible causes: no SIM card, PIN authorization error, network search in progress, login in progress, etc.) periodic blinkings 75 msec filling in / 3 sec filling out: normal opreation, connected to the GSM network continuous lights: voice call active (e.g. during GSM signal transmitting) ALR: Alarm center active - green When the device connected to the alarm center it shows the status of the the alarm line (tipring). Lights: speaker pulled on, not lights: speaker put down or alarm center not presented. PWR: Power voltage active - green Signs when the PCB is under power supply and voltage. When it lights, the Easy2 is under voltage the processor operates. 15 2.4 Operation requirements General conditions 9-24V power supply with adapter, or 12V DC on 230V, or alarm center 12V/24V output Activated SIM card with public access and GPRS data service assured by the Mobile Operator. If it is recommended with private APN access. There can be differences between the Mobile Operator conditions at APN service charges and data traffic unit fees (depend on available rates). Ask for more Info at Your MO. GSM/GPRS mobile network connection and satisfied signal strenght. Configuration needs RS232 (serial) connection on RJ11 data cable to connect the device to a computer Optional: notebook USB port usage with USBRS232 converter, to connect the device to Your computer 16 PC/Notebook with serial port (DSUB-9) or USB port capabilities, and installed Microsoft Windows XP/Vista/Win7 operation system and .Net 4.0 framework, which is suitable for execute the EasyTerm® application Downloading the EasyTerm® configurator application from our website, at the Downloads / M2M Easy 2 Security Communicator product: http://m2mserver.com/en/downloads M2M Easy 2 Security Communicator® firmware (system software – uploaded to the device by factory default) – if it is needed the related .BIN extension firmware file http://m2mserver.com/en/downloads M2M Easy 2 Security Communicator® configuration file – with .CFG extension Content of the EasyTerm package – can be downloaded from the website: http://m2mserver.com/en/downloads Terminal utility (recommended software: Docklight): http://www.docklight.de/download_en.htm Safety precautions The device must be used according the User Manual. The device cannot be modified or serviced without the accept of the manufacturer. The IP protection is effective only for its intended usage. Any failure during the program refresh or upload process can cause malfunction of the device. Get help from our support line. 17 Chapter 3. Installation of the device For the Easy 2 installation follow the next steps. 3.1 Installation steps 1. The device needs protection against unathorized access and wheather conditions. As usual in the security and safety area, that used to place into the security alarm system case or fixed closed to the alarm system to a protected area. There should be used the sabotage protection which is available through a plastic case for the communicator which can be ordered. Furthermore, the open events of the security alarm system case can be monitored as sabotage events (listening the status changes of the magnetic contactor switch through the input line). 2. Take care that the communicator is not under power voltage and it is turned off and the LEDs lights are not lighting or flashing. 3. Mount the GPRS antenna (piece of the package) as it can be seen in the picture to the copper SMA antenna connector safely. (In case of wired antenna find a place to the magnetic sole antenna.) 4. For inserting the SIM-card slide the card (provide by the Mobile Operator) into the metal SIM card bay at the direction when the chip on the card looks down, and the MO logo looks upside, and the card’s cutted corner looks toward the antenna and the SIM holder (as it is shown in the picture). Push the card until it is fixed. (If it s needed You can remove the card with pushing it again – You have to do it only when the device is turned off!) 18 5. Let’s wiring the cables of the monitored input to the required terminal blocks (wire pair) of it (IN1, IN2 title for the input lines) and the output to the OUT titled wire pair. The alarm center has to be wired to the alarm input line (ALR titled). You can setup the meaning of the input line with the jumpers behind the input lines (JP1, JP2). They can be closed to interpret the input signals as contact or voltage. 6. Connect the 12V/24V DC power supply with the power adapter and let’s wire the power chord wire pair to the power plug’s terminal block (PWR titled), and take the device under voltage. (It will be turned on with the power voltage.) When the power line will be removed or the power supply will be disconnected, the device will be turned off. 7. Wire a notebook or computer for the installation or configuration of the communicator with a serial port cable to the communicator RJ11 input (PROG title). In case of using USB port at the computer, You have to use a serial portUSB converter. 19 3.2 Turning on the device When starting the device the next steps are executed: o When the power voltage given the devices turns on. The green PWR LED flashing for a short time, and for a moment the MDM RDY LED also flashes, which signs that the GSM modem was started. If the input lines or the output line were wired before, then the their LEDs will also lightning. Starting the communicator (PWR LED lights) o o o o o o o Soon the STA signed LED will be lightning. The Easy2 initializes the system firmware into the memory (if the bootloader was uploaded). The bootloader assures the minimal software environment for the firmware refresh. The bootloader loads the system firmware from the internal memory. If the system software was uploaded before, it will be started. Then the MDM RDY signed LED will be continuously flashing with a red light, 1-2 times per seconds, which signs that the GSM modem started to initialize. There will be coming a few second break and in case of the normal operation the MDM RDY signed LED flashes once which means that the GSM modem network registration was succesfully started. If it was registered and finished successful the GSM signed LED (red) starts to operate (see the LED table and figure at the page 14), the STA signed LED (yellow) will be flashing when the first life signals was received. When these life signals were succesfully transmitted the STA LED will be continuously lightning with yellow. At this time the device already operates according the configured (or default) parameters and periodically sends data through the GSM network. 20 Example for appropriate operation and successful GPRS communication PWR LED lights (green), STA LED (yellow) sometimes blinks, the GSM LED (red) flashes the GSM signal strength value (between 1 and 8) 3.3 Possible problems 1. When the STA (yellow) and GSM (red) LEDs are bilinking together at the same time then it signes SIM card failure. Please, check that the SIM card was placed right into the SIM holder. If the problem not resolves, consult with the Mobile Operator about the data package and activation, availability of the SIMcard. 2. When the MDM RDY (red) LED blinkg contiuously but slowly then the SIM card was not placed appropriated into the SIM card holder. Check it, and place it again as it is required. 3. The STA signed LED not stops the blinking and it is continuously flashing. This usually refers to APN problem, or improperly given APN name, or bad IP address. The connection to the GSM network was unsucessful. Please, ask for Information relating to the exact APN name, and IP address, and configure the right parameters into the setup, then restart the device. 21 Malfunction – signed by the LED signals (the GSM and the STAT signed LEDs are blinking together and continuously) ATTENTION When the input or output line wiring is not properly connected or wired the LED signals will not sign the wire problems. The inout/output line LEDs will be continuously lighting IN1, IN2, OUT and ALR titled LEDs), when the wiring was properly done. The SIM card must be pushed in or pulled out from the device when it is turned off and it is not under power voltage! Wait 10 seconds between the power disconnection and reconnection! After the Easy2 startup it requires cca. 30-60seconds while the device can be used, the whole operation takes time while it is loaded (communication builds up, etc.). After configuring or modifying the configured parameters (by the EasyTerm configuration software, or somehow given commands) restart the device that the Easy2 could start with the new parameter settings. It’s recommended to save the last good known configuration to the PC, just for case. 22 Chapter 4. Installing the system software 4.1 Computer connection a.) In case of using USB port When using the converter cable (this is not included in the package), the driver necessary for operating the device via this cable has to be downloaded and installed. ATTENTION It is important that at this time neither the Easy device, nor the USD connector be connected to the computer! On your PC under Control Panel / System / Device Manager check that the driver has been installed properly. This may be found in the Ports menu, where a COM port distribution for the product has to be indicated. 23 b.) In case of using RS232 serial port Due to the serial port cable connection, there is no need to install a driver into the Windows system. In accordance with the serial port inputs available on the computer, the availability of the ports can be checked under Control Panel / System / Device Manager / Ports. This can be found under the name COM…. During the further setups, one of these has to be chosen. ATTENTION The port indicating the PC modem address might be seen as a COM port. Because of this, please, check which COM ports are the actual serial port connection points. 4.2 Downloading the software components The accessories necessary for software uploading can be found on the website of WM Rendszerház, within Downloads / M2M Easy 2 Security Communicator: http://www.m2mserver.com/en/downloads 24 Please, download the listed files from the website. In order to do so, you have to register: Easy 2 Security Communicator Easy Term Configuration Software (v1.1) Easy 2 Security Communicator Firmware V2.1 R02 Easy 2 Security Communicator UC232a RS232-USB connector driver Unzip each file into separate libraries on your computer. 4.3 Identifying software a.) RS232-USB connector driver – For PCEasy2 cable connection With this, you can make serial port connection between the PC and the Easy 2. It has to be installed onto the PC. File: uc232a_win7_xp_vista_v1.0.075.zip b.) EasyTerm software package File: EasyTerm_v1_1_EN.ZIP Package content: EasyTerm software – For software upload, refresh and configuration: o EasyTerm® is a terminal program and configuration application. With the help of this, the systems software (firmware) can be uploaded, the parameters can be set up, and the programming of the device can be performed. File: EasyTerm.exe Configuration file (in the EasyTerm package) o Predefined configuration setups for the device. Upload it with the help of the EasyTerm® program. File: EASY2_V21R01_CFG_EN.cfg c.) Easy 2 Firmware – Easy 2 system software (.BIN) The device can operate with this system software. Download from the website and always update to the latest available version. Upload by the of the EasyTerm® utility. File: EASY2_V21R02.bin (binary firmware) 4.4 Onsite installation at location Install, mount, fix the Easy 2 device to the desired location. 25 Perform connecting and wiring according to the steps previously shown to the terminal blocks (input, output, power, etc.). If it’s necessary connect the alarm system phone line TIP-RING connector to the ALR input line. Place a SIM card activated with a data package into the Easy 2 device. According to the manual, take the device under power voltage (wiring the 9-24V power supply, or connect a 12V/24V power adapter to the PWR terminal block. Then connect the data cable to the RJ11 input port, and the other end of the cable to the RS232 port, or with the help of a USB converter directly to a computer. 4.5 Checking the serial port connection The Easy 2 device RJ11 connector (as serial connection) is suitable for parameter the operation values and upload or refresh the system software (firmware). This can be used connecting to PC serial/USB port (in case of USB port with a USB-RS232 converter). The serial/USB connection can be found as a COM port in the Windows® operating system. It must be used this port during the configuration or software upload (like COM1, COM3, etc. as the operating system assures. You can check it in the Device Manager with the related COM identifier. 4.6 Connection on the serial port with a terminal utility Over assuring a serial connection there is also necessary a terminal utility software. This will be used for the device software upload (firmware) and refresh. Also can be used for setup parameters or request information the Easy 2 status. For the serial connectivity the Docklight application can be offered for checking the communication and sending commands to the device. It can be downloaded from the following URL: http://www.docklight.de/download_en.htm At the left side menu of the Docklight pre-defined commands can be registered and saved to a configuration file (not available in the shareware release). 26 It is neccessary to declare the communication settings: COM port number Baud Rate: 9600 Data Bits: 8 Stop Bits: 1 Parity: None Parity Error Char: 63 Flow control: off 27 At the sequence command editor the required commands can be pre-defined in ASCII format. For every sequence line we could give a Name. At the end of the commands a control character must be used. This can be an line termination (code: <CR> ) or carriage return can be used (code: r ) The further details about the software can be found in the 7.1 chapter. 28 Chapter 5. EasyTerm: configuration, software refresh The factory default configuration does not contain some operation settings for the Easy2, therefore we suggest to setup the parameters with the EasyTerm® software before the first usage. 5.1 Introducing the EasyTerm utility The following EasyTerm® windows ca be seen when the application screen appears. 1 5 6 2 3 4 Application windows: 1 – Connection settings 2 – Device Information (for identification) 3 – Status window 4 – Terminal window 5 – File load/save window 6 – Configuration window You can setup the connection settings (1) for the serial port and the remote access. 29 In the Device Information (2) window appears the device identification informations like the IMEI number (GSM module ID), ICC number (SIM card identifier), HW ID (Easy 2 unique hardware ID), és SW VER (the uploaded software version). In the Status window (3) the connection status can be seen. The Terminal window (4) gives communication info about the proper operation of the device. In the File load/save window (5) You can open configuration files (with Configuration tab) or save config files. It is possible to refresh the system software of the Easy 2 (Firmware update tab). The remote ftp server settings can be setup for the remote software updates (FTP server tab). You can configure the Gate Opening functions (with the Gate tab). The Configuration window (6) can be seen the readout values for the parameters. These are the configured settings which You can modify and send to the device. 5.2 EasyTerm startup For the previous Easy 1 product we offered to use the HyperTerminal and DR-Term utilities. These are not recommended anymore to use in the case of the Easy 2 device. The EasyTerm gives more comfortable and easy-to-use software solution which approves the whole functionality of all these applications. ATTENTION The EasyTerm requires a Windows®-based computer to run (Windows XP, Windows Vista, Windows 7, Windows 8 operating systems are supported on 32/64 bit versions). A prerequisite of running the EasyTerm utility to install the Microsoft .Net Framework 4.0 component (which can be downloaded at the website of the publisher). IMPORTANT Wait about 30 seconds after the Easy 2 device startup before starting the EasyTerm application. 30 The program can be started from the downloaded ZIP package (from our website). You can start it after decompressing the package from a directory with executing the EasyTerm.exe program. You can see the following startup screen when you start the EasyTerm program. 5.3 Serial data connection settings When the EasyTerm was started, at the Connection window (1), at the Serial port field this offers and choose the available COM port. There You can check if the proper port number was choosed. If it was not, You can setup according the next steps. For the cable connection settings, let’s choose at the left upper part of the screen at the Serial Port part, the required value for the Serial Port field from pull-down list – like COM3. Give the password for the serial port connection. The default password is „ABCD” which was given by the software automatically by default. 31 Click on the Open button for the connection. Then in the Terminal window (5) the port connection open information appears. 2014.04.28. 12:34:30:open port COM3 2014.04.28. 12:34:32:Serial port opened As it can see the COM3 port was opened for serial port communication. Then the Easy2 communication messages and other information will be seen in the Terminal window (4). Only the request and reply messages will be appearing, the whole serial port communication will not signed. For the whole communication you have to check it with serial port monitoring & debug tool (like Docklight). The EasyTerm messages will be assinged with color blue in the Terminal window. 32 ATTENTION When login to the system (with the AT@PD=ABCD command) all debug messages will be banned, what can be enabled only by the EXIT or RESET command. 5.4 Checking the proper startup of the device At the initialization of the Easy 2 device, its software writes the bootloader version and date, and hardware and software versions to the debug port. Then it waits for a ^SYSSTART startup command. 2014.04.28. 12:28:17:Program init Apr 14 2014 13:53:16 2014.04.28. 12:28:17:SW VER: 2.1R02 2014.04.28. 12:28:17:HW ID: E2BG 2014.04.28. 12:28:17:SWPROTO: ENIGMA 2014.04.28. 12:28:17:FLASH MFG 0xEF DEV 0x4015 Then identifies the GSM module: 2014.04.28. 12:28:24:ATI1 2014.04.28. 12:28:24:Cinterion 2014.04.28. 12:28:24:BG2-E 2014.04.28. 12:28:24:REVISION 01.002 2014.04.28. 12:28:24:A-REVISION 01.002.01 Afterall, tries to connect the device to the GSM network and checks the PIN status and that given password was accepter or not. (IN case of PIN failure the module will be restarted.) 2013.08.15. 10:35:08:AT@PW=ABCD 2013.08.15. 10:35:08:OK 2013.08.15. 10:35:08:Password accepted The GSM module version and the MODEM identifier will be readout: 2014.04.28. 12:47:47:HWID=? 2014.04.28. 12:34:33:IMEI=? 2014.04.28. 12:34:33:IMEI=353196042113430 2014.04.28. 12:34:33:OK 2014.04.28. 12:47:47:HWID=E2BG 2014.04.28. 12:47:47:OK Identifying the software version: 2014.04.28. 12:47:47:SWVER=? 33 2014.04.28. 12:47:47:SWVER=2.1R02 2014.04.28. 12:47:47:OK Reads out the SIM card ICC identifier. 2014.04.28. 12:34:35:SIMICC=? 2014.04.28. 12:34:35:SIMICC=8936200003140100131 2014.04.28. 12:34:35:OK The readout identifiers will be assigned to the Device Information window (2) if the a get switches were previously enabled. You can monitor the device connection current state at the Status block (3). If the „connecting” title will be shown then the device just connecting to the network. If the „readingIDs” title will be shown then identification of the device is just in progress. 34 If the „disconnected” title will be shown then the device was disconnected and not accessable through the serial cable (for the reconnection, plug out and in the cable or restart the device). If the „connected” title will be shown then the connection to the device was successful. You have to consider the following point regarding the Easy 2 operation: - when the GPRS communication was enabled (GPRSEN parameter) then the internet services will be initialized (TCP listen, primary and secondary server, FTP server). - in case of initialization fault the GPRS module will be restarted - afterall the GSM network state will be checked (CREG) and it will be continued and repeated until the registration to the own network will be successful. - when the registration was done the device switched to normal operation mode and it sends the first life signal. If it is necessary You can save all the messages of the Terminal window with the Save log button into a text file (with giving the URL and filename and clik on Save button). The Terminal window (4) scrolls the messages by default, for the last entry. If too much information is ont he screen or it is disturbing when it scrolls down too quickly the messages and commands (lik at startup or parameter loading, or in case of restart) or if You would like to check back the system messages and answers for the request, then scroll up the Terminal screen with the right sliders (arrows). 35 With enabling the Scroll lock feature the automatic scroll-down function will be disabled and the focus will not scrolled to the last message. In this case You have to slide the window content by manual. 5.5 Setting up the GPRS connection This window contains the GPRS connection IP address settings in the Connection window (1). For the setup choose the TCP/IP (GPRS) tab at the left upper part of the screen. Give the SIM card’s IP addres to the Device IP field (You can get info from Your Mobile Operator). Give the port number to the Device IP field at right, which will be used by the device to communicate through (it is recommended to leave it at the pre-defined 9998 value). The GPRS Login field must have the last 5 characters of the device’s IMEI number. (For the required information to the login can be requested with the INFDEV and DEVSTAT SMS commands.) Click on the Connect button for the GPRS connection. 5.6 Manual firmware upload/software refresh (for v2.0 software only!) ATTENTION These steps can be used ONYL FOR THE EARLIER v2.0 BASED SOFTWARE! The refresh must be performed only if a new software version released for the Easy 2 device, when in any case You wanted to refresh the current software to the new release. 36 At the Configuration load window (5) choose the Firmware update tab. Before the software upload always check at the Device Information window (2) the SW VER (software version) value that it must be lower then the new one which You wanted to upload. E.g.: when the current software on the Easy 2 device is „SW VER: 2.0r26”, and the uploaded must be at minimal 2.0 R27. Browse the required firmware file to upload into the Firmware update file window. Please consider, that the software release filename always contains the version/relase number – e.g. EASY_BG2_NET_AUTO_20R27.BIN – „_20” means – v2.0, R27 means 27th release). Enable the Match Hardware ID when updating firmware and the Auto Send checkboxes. Leave the Send command field command as it was automatically filled by default. For the begin of the upload process, click on the Send command button. Please consider, that the Auto Send option must be enabled before selecting command Sending. Then the application sends the firmware to the Easy 2 device, which can be monitored in the Terminal window (4), at the right section of the screen (window no. 6) at the update status process indicator and the status update messages. 37 ATTENTION The uploading process takes about 2-3 minutes, which can be seen at the visual process indicator. NEVER STOP, INTERRUPT, OR POWER DOWN the device when the firmware uploading is in progress, because it can cause the malfunction of the device! After the finish of the uploading when it was successfully done, You can see at the Terminal ablakban window (4) the „transfer OK” title at the right section of the screen (6) at the update status field which is signed with the „transfer successful” message. In every other situation the uploading was not successful and it must be repeated with an another software/firmware release. When the upload was finished, Click at the Serial Port tab (left upper tab) to the Close button to hang on the cable connection. Disconnect the power supply of the Easy2 for a few seconds then connect it again that the device could start with the new software. Click on again at the Serial port tab to the Open button, and check the appropriate software version (in the example it should be 2.0 R27). Then in the Terminal window (4) the INIT FWLOAD message signs the loading of the new software. 38 The “Program started SW VER: 2.0r27” messages signs the successful loaded software. Then the device continue the its activity and other communication messages will be shown. The uploading has finished. 5.7 Firmware upload/software refresh from FTP server (in case of V2.1 or newer software!) ATTENTION This feature CAN BE USED ONLY WITH THE NEW V2.1 BASES OR NEWER SOFTWARE RELEASES for remote uploading! The refresh must be performed only if a new software version released for the Easy 2 device, when in any case You wanted to refresh the current software to the new release. 39 This function can be used for network installation when an FTP server is available on the network and You want to use it for distributing the software. It is a great way to multiply or mass installations or remote software refresh of the device park tool. The EasyTerm able to operatea as an FTP server. For the installation through the FTP it must be used an installed FTP service (ftp server) and its IP address, por number and an access login with password. Perform the related tasks! (If You need to get some help for using the FTP, there are available sources on the Internet.) If the Ftp server not located at your own network or it is installed on an anopther subnet or behind a router, then You also have to use port forward settings is. Check the network settings of Your operation system. For the access of the FTP server it is required to check the settings if the currently used firewall (e.g. at the Windows Firewall), whereas it must be enabled the used ftp port number (port 21 by default). If we’d like to use the default port number, then You only have to browse the firmware You want to upload (in .BIN format) regarding the following. In the EasyTerm software at the Configuration load window (5) choose the FTP server tab. Use the Browse button to open the firmware file which You want to install to the Easy2 device. Then the file path field will be automatically filled. 40 At the Step2 part click on the Refresh button then the Start to initiate the upload. The software tries to request info the local public IP address of the PC whereas the Easy 2 can be accessed and fills the other parameters with default values if they were empty. The Start button release the FTP server and sends the FTP parameters for the Easy 2 and the FWLOAD command. (If there is no TCP connection with the Easy 2 then these commands have to send in SMS message as commands – the EasyTerm® will assign it if it is necessary.) There is option for using other FTP server to use (like external FTP server), then if You’d like to use this then choose the BIN file and enable the checkbox at the Step1 section at Use external FTP server option. Therefore, it will be necessary to fill manually the checkFTP server parameters connection parameters (in Step2). Fill the address parameter with the IP address of the FTP server and give a port number to the port field. To the user name give the account name and password for the access to the FTP server. The Start button initializes the installation. The further details of the installation can be seen int he internal communication between devices and at the surveillance software of the alarm center and at the FTP server side. When everything were configured or the filled parameters are fine let’s click on the Start button to initiate to download the software. 41 5.8 Firmware upload at serial port The refresh must be performed only if a new software version released for the Easy 2 device, when in any case You wanted to refresh the current software to the new release. At the Configuration load window (5) choose the Bootloader tab. Before uploading the firmware always check the current software identifier at the Device Information window (2) that the current release (SW VER) must be older, than the release You want to upload. E.g.: if the current software on the Easy 2 is „SW VER: 2.1 R01” the version we’d like to upload must be minimal at release 2.1 R02. At the Bootloader tab browse the required firmware (the filename always contains the software version identifiers – like EASY2_V21R02.bin – where V21 means v2.1, and R02 means 2nd release). To start the upload process push the Upload button. ATTENTION The upload takes about 2-3 minutes. The status of the loading process can be followed with the visual process indicator. 42 The EasyTerm application screen not reacts during the whole upload process, where it means an appropriate behavior. Please, don’t switch from the current screen. NEVER interrupt or stop the device operation or don’t power it down during the firmware uploading process, because it will cause the malfunction of the device! When the loading process starts at first the Wait for bootloader… messages appears then the device will be restarted with Restart device… message. Soon appears the Sending File, please wait… message, which will be signed by the process indicator. The program sends the firmware to the Easy 2 device. When the upload finished, then the following message comes „File transfer successful (… bytes sent).”. In every other case to loading was not successful, and it had to be repeated with an another operating firmware release. When the uploading ended just in the first left window at the Serial Port tab click on the Open button, and check that conformity and match of the software version (at the example it must be 2.1 R02 release). Then the device continues its operation with the usual communication messages. The upload process has ended. 43 5.9 Gate opening settings For configuring the gate opening settings, can be done at the Configuration file window (5), in the Gate tab selection. The device able to store 125 phone numbers, which can be added the gate opening function. The phone numbers can be handled as Contact list in the system. The persons who are registered into the contact list they can call and control the gate opening (to open the gate opening control/engine/gate or pike). This can be comfortable in case of using by hotels, parking houses, companies, block of flats. Gate Opening feature a.) Programming to remote control of gate opening The load the phone numbers of the stored Contact list, just push the Read button. Then the software reads out the stored phone numbers of the device. If it loads already registered numbers then they will be listed into the center part of the screen as content. You can add new phone numbers with the Quick add/remove section. Just fill the required phone number in a pleasant format. (like +36201112233 or 0036201112233). Click on the Add button then the software sends the added numbers to the device. 44 The Read button reads back the added and configured numbers. You can add further numbers and continues these until it is necessary with adding the next number by the Add button and repeat with the steps written upper. If a number must be removed, just select it with the right checkbox in the list at the Select coloumn, and choose the Only selected option at left, then choose the Delete option. (You can choose more numbers to deletion at the same time). If you don’t want to search a number from the list and then You remove a number from the list if it is filled into the Quick add/remove secrtion field and with pusing the Remove button. If the whole contact list must be deleted then clear all checkboxes at the Only selected coloumn from every listed number then just select the Delete button at the right upper corner. This removes all phone numbers from the list! b.) Remote control of the output The output current state can be setup in the Output control section. With the ON button You can close it (shortened) and with the OFF button can be opened. Therefore You can control the output operation in this way. 45 5.10 Configuration setup, programming the device The EasyTerm® is able to load the configuration files, and makes able to modify the parameter settings and save them with sending the settings to the Easy 2 device. These config files (with .CFG extension) also contains all user-specific settings. The configuration can be done with the following steps. 5.10.1 Opening a configuration file At the Configuration load window (5) choose the Configuration tab, then use the Browse button to choose the reqiured .CFG file from the computer. The selection can be assigned in the Terminal window (4) with the selected file message feedback, and in the Configuration load window (5) at the File name and Device Type fields by the presented values. Click on the load settings button to load the previously saved or downloaded config file from Your PC. The parameters and their settings can be seen in a table view as they are listed. This will only load the settings to the PC, will NOT send to the Easy 2. 46 Fields (coloumn names): Prg. address – value name Name - parameter name Value – parameter value Selected – selection (yes/no) Default value – Default value File value – Default value (in the file) In case of changing the parameter values they can be stored by the save file button into the config file (.CFG). The previously saved files can be reloaded later to the EasyTerm application, and send to the Easy 2 device. ATTENTION The changing of the parameter values doesn’t mean that the configured values will be automatically changed on the Easy 2 also. This can be performed to choose the 47 required parameters (in the Selected coloumn to enable the checkbox(es)) then sending them to the Easy2 device to acknowledge them. 5.10.2 Sending parameters from the PC to the Easy 2 ATTENTION Before You change the current configuration or send a parameter value to the Easy 2 device, let’s perform the steps written at the Chapter 5.10.3, then afterall, just save the settings with the save file button. To send the configured parameter values to the Easy 2 device, follow these steps: 1. Click on the Deselect all button (which clears all the previous parameter selections). All of the checkboxes will disappear. 2. Choose the parameter(s) You want to modify at the Select coloumn with the enabling its checkbox. 3. Change the value(s) for the parameter(s) – like IPPROTO parameter value from „UDP” to „TCP”. 4. Click on the Write config button to send the changed value data to the Easy 2 device. 5. The sending process can be followed by the progress indicator and the Terminal window (4) succesful message will assign when it has finished. When You want to modify and send more values in the same sequence thenjust choose more values with the Selected checkboxes then push the Write config button. (There will be the Only selected option to assign that only the previously selected parameters will be override with the new values.) Afterall, the program will send the choosed parameters to the memory of the Easy 2 device. The finish of the configuration modification can be granted when the following message appears at the Terminal window (4): „config write completed”. 48 When all parameters have to be choosed, then just choose the Select all button and select the Write config button to send them (all parameter settings) to the device. When sending the changed parameters, the previously used settings will be override on the device. When the whole configuration will be sent, this could take 30 seconds or more. 49 The progress bar helps to follow the status of the sending process. When this process has finished You’ll see the „config write completed” message in the Terminal window (4). 5.10.3 Readout parameters from the Easy 2 to the PC The Easy 2 device has the configured settings. To readout them just click on the Select all button. Every parameter will be Selected with the checkboxes. Push the Read config button to readout all of the parameters from the Easy 2. Then all of the values for the parameters will be load in sequence from the device to the screen and will be shown. This process could take about 30 seconds or more which can be followed by the progress bar. When the process has been finished, in the Terminal window (4) the „config read completed” message will appear. When only one parameter must be read out from the Easy 2, then choose the Deselect all button (which clears all previous selection), then choose the name of the required parameter by the Selected checkbox at the right, and afterall push the Read config button – like in the line of the IPPROTO parameter name enabling the Selected coloumn checkbox. Therefore, the value will be readout and the successful message can be shown in the Terminal window (4). 50 Chapter 6. Setting the device parameters with EasyTerm 6.1 General settings It is required to configure at least the following parameters for the general operation of the device: APN name (enclosed APN network name - given by the Mobile Operator) User name (account for accessing the APN - if it is necessary) Password (for the APN – if it is necessary) Account No (to identify the Customer) Server #1 address (server IP) Server #1 port (server port number) Protocol (Communication protocol number) At the table all listed parameters in the Prg. address coloumn has a default Name, and a configurable Value with a pre-defined Default value. 51 The Default value coloumn default settings assign the default given and written values which were presented at the current configuration file. Steps to configure the General Settings: 1. Give the APN name to the Value coloumn whic approved by Your M.O. to access the APN network (like NET or something which can be used), then hit the Enter. 2. Give the User name (if it is necessary to register to the APN) and fill it to the UN Value or leave it empty, then hit the Enter. 3. Give a Password for the account if it is needed to the PWD Value or leave it empty, then hit the Enter. 4. Configure the central server address where it can be accessed to the SERVER1 Value with filling the IP address (like 178.48.26.177), then hit the Enter. 5. When the port setting is also necessary or it uses a non standard or special port to communicate, then give it to the PORT1 Value. We recommend to use the default 9999 port). Then hit the Enter. 6. The IPPROTO Value must be UDP (for UDP protocol communication). 7. When You use more server paralel (like sending to more destinations), then fill the SERVER2, PORT2 Value(s) – like DNS server name e.g. in this a format: wmsupport.dyndns.org If a secondary sever is not used, then set it up to the Default value or leave it empty, then hit the Enter. 8. When the secondary server connection was not defined, then leave the PORT2 Value at empty, then hit the Enter. ATTENTION Some of the fields are generally filled with default values at the File Value coloumn, and the Default Value coloumn in the same line. It is just for th epre-configuration, but they can be changed if it is necessary. When You wouldn’t give a value (but there’s already presented a default value) then just leave it empty. The Default Value(s) are used in the config files as sample to use the right syntax. 52 9. To perform and begin the deviceserver communication You have to enable the GPRS connection with the GPRSEN parameter selection and changing its value to Enable. 10. Configure the Account Value as it was gaven by the security surveillance center (like 1201 or similar), then hit the Enter. 11. The General Settings are finished. Please, check the settings once again, then select the modofied parameters in the Selected coloumn by the checkboxes (or just push insted the Select all button), then click on the Write config button to send the new/modified values to the device. 12. Please, don’t forget to save the modified configureation to save to Your PC with the save file button on a different file name. 6.2 Setup parameters The further parameters can be also configured regarding the GSM-commands and can be defined as the general settings. The possible parameters will be listed here in table lists. The options are commented and the available values has descriptions and default values also. The right syntax can be used by the examples. The order of the parameter groups are listed as can be seen in the EasyTerm. GPRS connection and service settings: Command Parameter Name APN= APN name Data Type text UN= User name text PWD= Password text 53 Description APN network name for GPRS connection (default value: -) APN account name for GPRS connection (in case of CHAP authentication), default value: APN password for the accoung for GPRS connection (in case of CHAP authentication) (default value: -) DNS1= DNS2= SERVER1= DNS 1* IP (primary DNS server address address) DNS 2* IP (secondary DNS server address address) Server #1 address* (Primary server IP address) Szerver #1 Port** (Primary server port number) Server #2 cím * (Secondary server IP address) Server #2 port** (Secondary server port number) IP address IPPROTO= Protocol selection SWPROTO= Data Format selection GPRSEN= GPRS selection (Enabling the communication) PORT1= SERVER2= PORT2= 54 number IP address number First DNS server IP address os DynDNS address for domain name service (default value: -) Secondary DNS server IP address os DynDNS address for domain name service (default value: -) Primary used IP address for the connection (default value: -) Primary server port number for used TCP or UDP connection (default value: 9999) Secondary used IP address for the connection (default value: -) Secondary server port number for used TCP or UDP connection (default value: 9999) Used protocol for connection. Possible values: UDP, TCP (Default value: UDP) Used message protocol and message format for communication. Possible values: Enigma, WM Alarm (default value: Enigma) Enabling the GPRS communication. Possible values: Disabled, Enabled. Enabled = The device sends the data packages on GPRS network to the server as it was configured with the SWPROTO parameter Disabled = uses the GSM mode, only the VOICE channel for alarm transmitting to the alarm center. It is useful when it must be operate as a simple GSM-transmitter. (default value: Disabled) 6.3 Alarm security settings The Easy 2 able to transmit events on two channel to the remote surveillance centre: on GPRS network and via voice call. This two channels can be enabled or disabled indepentently. When all the two channels are enabled then the GPRS has priority and the voice call will be activated only if the GPRS transmitting was unsuccessful. If all of the channels are disabled then the transmitting and life signal sending will be also inactivated. The device receives alarm events from several sources: from the alarm system and from the input lines. The is a notable difference between these events and signals: - when the incoming events from the alarm system needs higher priority and serving - the incoming signals and events from on input lines will be waiting for processing in sequential line Depending on the operating mode the transmitting of all the two type of events can be done on the GPRS network or by voice call. Furthermore, the received events on input could generate SMS messages or a voice call. a.) GPRS operation mode The GPRS operation mode can be enabled/disabled by the GPRSEN parameter. It’s default value is disabled. It can be configured two server in the same time, buti t will be transmitting the signals only for one server in the same time. The other server will be used as a backup channel. The order of the primary and secondary server operation can be changed with the SFUNCT parameter. The device switches from the primary to the secondary server when the primary server cannot send data. If the secondary server successfully receives the data, then the data will be still sent for 5 seconds to this server. Every sending method will be reset the counter of the timout. When the timeout spent it will switch back to the primary server. The sending method will be evaluated as successful, when a reply will income from the server after 6 seconds the sending method. 55 Voice call (backup) The voice call operation mode can be enabled/disabled by the BACKUP parameter. By default it is enabled. Life signals All of the two signal transmitting modes are able to send life signals. The life signal is a Contact ID (CID) messages which contains the following parts: Field Account Length 4 (Byte) Value Account No. Msg. type 2 Evt. qual. 1 Event Group Zone Chksum 3 2 3 1 18 1/6 603 signal life strength signal checksum If the LFPRES parameter were enabled, then the CID code event qualifier value will be ’1’, else it will be assigned with value is ’6’. When the a GPRSEN parameter was already enabled, then the frequency of the life signal sending method can be defined by the LFFREQ parameter and in case of communication problems (hangout, failure) it won’t send life signals by initiating a voice call. The LFFREQ parameter measure unit is second by default. When the LFUNIT parameter value is ’1’, then the defined value must be handles in minutes unit. If the voice call is active, the frequency of the life signal sending will be defined by the LFGSMFREQ parameter. The LFGSMFREQ value must be always handled in minutes unit. The GPRSEN switch should be leave at „Disabled” state when it is required to operate as a simple GSM transmitter. 56 b.) Alarm system operation mode Currently the Easy 2 device supports only the Contact ID (CID) protocol when communicating with the alarm system. After pull in the call the alarm system will get a dial tone when a voice call is not in progress. Under a voice call pull in method (phone receiver take on) the device don’t switches between the signalling modes (GPRS ↔ voice call). The last call which were successfully dialed the device stores in the SYSL parameter in the memory. The minimal length of the DTMF tones and the breaks between the tones can be defined when it is required, by the DTMFTIME parameter in msec measurement unit (default value: 10 msec). The GPRSEN switch should be used by default in „Enabled” mode for assuring a standalone alarm system operation (when an external alarm system is not installed). Transmitting a voice call In this operation mode the device not uses active communication, it calls only the dialed phone number by the alarm system and disconnects the call when the call was finished (phone receiver was taken off). Transmitting on GPRS network The priority order of the servers can be defined by the SFUNCT parameter. When the connection was successful, and the CID message length was proper, then the signal transmitting will be done as it was pre-defined with the SWPROTO protocol parameter. A Kissoff signal could be sent only after a received positive acknowledge of the server to the alarm system by the Easy 2 device. Sometimes the alarm system already started to repeat the message while the postive acknowledge (reply) receives from the server, in this case it won’t send again for the server, but the after repeating the message it will be akcnowledged by a kissoff signal to the alarm system. 57 Alarm Security settings: Comman Parameter name Data Type Selection SFUNCT= Event reporting BACKUP= If no GPRS communi- Selection cation (backup communication channel in case of GPRS sending failure) SYS1= System No. #1 (Phone number) Number ACCOUNT= Account No (Customer Code) Number Identifier 58 Description It is possible to define the sequence of the sending method. At here, the primary and secondary sending channels could be defined. Possible values: - Server1, Server2 - Server2, Server1 (Default value: Server1, Server2) Setup of the communication backup operation. Values: no, GSM (GSM voice channel as backup (in case of ceasing the GSM signal the signals will be sent on megszűnése Voice channel). (Default value: GSM) It is necessary to setup , if there is no alarm system installed and the voice call is active (forwards the CID code on a voice call). One phone number can be defined for this function (Default value: -) The unique customer code which identifies the customer. This will be sent by the alarm system to the centre for using own or customized signals (Default value: BCDE) LFFREQ= GPRS Test-heartbeat Number time (sec) (Life signal sending interval) LFGSMFREQ= GSM Test-heartbeat Number time (min) (Life signal sending interval) LFPRES= Visible Test-heartbeat Selection (Visible test message (life signal)) 59 GPRS life signal sending interval and frequency in second measure-ment unit. In case of thick frequency the devices distributes more data which can be unnecesary in some situations, because it is easy to override the required data packet limit (usually only max. 5 Mbytes). Always consider this and not choose a frequent or low value. (Suggested value: 300 sec) GSM life signal sending interval and frequency in second measure-ment unit. In case of thick frequency the devices distributes more data which can be unnecesary in some situations, because it is easy to override the required data packet limit (usually only max. 5 Mbytes). Always consider this and not choose a frequent or low value. (Suggested value: 60 sec). Enabling the appearance of the life signals into the dispatcher surveillance software (hidden life signal feature). Possible values: Disabled = hidden life signal (the device sends information only from the heartbeat failures for the the dispatcher software) Enabled = the life signal LFUNIT= GPRS unit Test-heartbeat Selection appears (the device sends life signals and it can be seen in the dispatcher software). (Default value: Enabled) Measurement unit for the GSM life signal. Possible values: Second, Minute. (Default value: Second) 6.4 Input settings The Easy 2 assures 2 input lines. The connectable rising edge to high (L→H) and the descending edge to low (H→L) could indicate the device to generate CID messages in case of these events and transmitting them. The input lines can be enabled or disabled by the IOGPRS parameter. The edges can be enabled with the IxLHEN (low) and IxHLEN (high) parameters for every the input line. The direction of the edge detection (rising, descending) can be reversible with the IxINV parameter. The edged are filtered in time window, which means that the input line must be in the current state for a minimal interval that the status change could be acknowledged. The length of the time window can be parametrized by the IDELAY parameter in 20 msec steps. The default status enabled for every input lineas the low/high edges without inversion with 500 msec time window (IDELAY=25). The IN1 and IN2 LEDs also gives feedback about the statuses of the input lines. The incoming event on the input lines will put into a time sequence puffer (queue). If this storage will be full, the new incoming event will be lost. The same message can be get out from the storage after a declared interval (60 seconds), therfore if the transmitting of the event was unsuccessful, then it must be wait this time between the two tries of transmission. In case of successful transmitting there is no delay. In voice mode the whole content of the time sequence puffer will be transmitted, all at once. 60 Phone number In voice mode the transmitting will be made to the phone numbas as it was defined in the SYS1 parameter. ATTENTION If there was no SYS1 defined then the device dials the phone number which were last time successfully dialed by the alarm system, and which was defined in the SYSL parameter. If nor the SYS1, not the SYSL parameter was not defined the the Easy 2 cannot perform signal transmitting! Contact ID (CID) messages The generated CID messages for the input events the customer identifier (account number) will be selected regarding the following rules: 1. ACCOUNT: the defined identifier number by the user. If it was filled then this will be valid in every case. 2. ALARMACC: the last used identifier by the alarm system which were sent in CID message. It will be used if there is at least one valid transmitting from the alarm system and the ACCOUNT parameter is not defined. 3. Default identifier: if the ACCOUNT parameter is not filled and the alarm system did not sent signals, then the Easy 2 will be sent the input events with the „BCDE” identifier. The input line generated default CID messages was collected to this table below. The configurable values for the parameter are with cursive text: Input IN1 L→H IN1 H→L IN2 L→H IN2 H→L Account Msg. type Evt. qual. Event Partition Zone Chksum BCDE BCDE BCDE BCDE 18 1 3 18 1 18 3 130 130 120 120 01 01 02 02 001 001 002 002 E 18 61 C D B Input settings: Command Parameter name IDELAY= Input delay (x20msec) Data Type Number I1INV= Input #1 Inverse Selection I2INV= Input #2 Inverse Selection I1LHEN= Input #1 LH Selection I2LHEN= Input #2 LH Selection I1HLEN= Input #1 HL Selection 62 Description Pulse width declared to the input line – defined in 20msec bontásban step (Default value: 25) Inversion of the input line no. 1. Values: Inverse, Non-Inverse (Default value: Non-Inverse) Inversion of the input line no. 2. Values: Inverse, Non-Inverse (Default value: Non-Inverse) Declared low high enabling mask for the Input line no. 1 (status change). Values: Disabled = Disabled SMS message sending, voice call, GPRS signal transmitting enabled = Enabled SMS message sending, voice call, GPRS signal transmitting (Default value: Enabled) Declared low high enabling mask for the Input line no. 2 (status change). Values: Disabled = Disabled SMS message sending, voice call, GPRS signal transmitting enabled = Enabled SMS message sending, voice call, GPRS signal transmitting (Default value: Enabled) Declared high low enabling mask for the Input line no. 1 (status change). Values: Disabled = Disabled SMS message sending, voice call, GPRS signal transmitting enabled = Enabled SMS message sending, voice call, GPRS signal transmitting (Default value: Enabled) I2HLEN= Selection Input #2 HL Declared high low enabling mask for the Input line no. 2 (status change). Values: Disabled = Disabled SMS message sending, voice call, GPRS signal transmitting enabled = Enabled SMS message sending, voice call, GPRS signal transmitting (Default value: Enabled) 6.5 Output setting The output has two operation mode: mono-stable and bi-stable. The operation mode can be selected with the OUTHDEL parameter as it is written here: OUTHDEL value is 0 or not defined: bi-stable mode OUTHDEL value greater then 0: mono-stable mode In the mono-stable operation mode the output will be in standby (relay contacts are opened) still a trigger event happens. In case of a trigger the output relay will be closed (shortened), then the after a delay of the defined OUTHDEL it will be repositioned automatically to the stand-by position. During the delay interval when a trigger comes then the timing will be restarted. 63 The OUTHDEL value can be max. 86400 (which means 1 day), but consider that when increasing the parameter value, there could be increased inaccuracy because of the lack of the RTC clock! In Bi-stable mode there is no delay, the opened and closed standing positions can be changed only by the affect of the appropriate trigger (the relay witt change its position only by this). The trigger event can be a command (OUTON or OUTOFF) or ringing (gate opening). Output setting: Command Parameter Name Data Type #1 Number Description OUTHDEL= Output delay (x1sec) (Timer value for the delay regarding the output line) Switch off delay value (in second) for the output. It holds on the output for the defined time interval, then after the time expiration turns off. In case of selecting paramater value ’0’ the output operates in normal mode, which means it does not swtich back. (Defalut value: 0 (normal mode, no delay) Settings of Contact ID codes and Events: Command Parameter Name Data Type Status Selection Description IOGPRS= Input Reporting I1EVENT= Input event #1 CID Number I1PART= Input #1 partition CID Number Sends the assigned CID codes in GPRS telegram in case of input line signal changes Values: Enabled, Disabled (Default value: Enabled) CID event code for the input line no. 1 (Default value: 130) Partition value for the input line no. 1 64 I1ZONE= Input #1 CID zone Number I2EVENT= Input event #2 CID Number I2PART= Input #2 partition CID Number I2ZONE= Input #2 CID zone Number (Default value: 01) Zone value for the input line no. 1 (Default value: 001) CID event code for the input line no. 1 (Default value: 120) Partition value for the input line no. 1 (Default value: 02) Zone value for the input line no. 1 (Default value: 002) 6.6 Setup the Notification The input line event could generate the following reacts over signalling the events to the centre: SMS mesage, voice call (ringing). 4 phone numbers (TEL1, …, TEL4) can be assigned to the inputs and it can be defined by the messaging parameter type: IxV (voice call) or IxS (SMS message) instead of the formally used IxPSEL, TxS and TxV parameters which are not used anymore (where the ’x’ was the input number (1..2)). The enabled messaging will be performed only when there is an associated and defined phone number regarding the input line. SMS messaging The SMS notification content can be one of the followings: user defined text (see: IxON and IxOFF parameters) Contact ID (CID) message If the IxON or IxOFF parameters are filled then automatically this user defined text will be the content of the SMS message. Else, the appropriate CID message will be used in the SMS message. The status of the input lines and the output line can be requested by the STATUS SMS command. 65 Voice call notification (ringing) The phone numbers will be activated for affection of the input trigger. The ringing of the active phone numbers will be used from the lower index to the higher, which is independent from that which input activated the current phone number. When the ringing was successful, then the phone numbers for the current input line will be activated. If the phone numbers which were successfully ringed were active for the other input line also then the other input line’s phone numbers will be activated too. The ringing can be defined as successful when the called number receives or rejects the call within 20 seconds. If the calling will not be answered (not received or rejected) then the devices continous the ringing with the next phone number (if it was defined). Futhermore, it can be enabled/disabled with a special parameter that in case of unsuccessful ringing an SMS notification will be sent. When the call was received the device will cut the connection immediately (without any delay). It does not make any difference in case of engaged line or rejectiion of the call. The voice mail will be handled as incoming call, therefore the messaging will not be executed in this case. It will be also unsuccessful in the same way when the notification number is busy during the messaging (ringing) and the és a call waiting was not enabled. Notification parameter settings (SMS message): Command Parameter Name TEL1= Phone No. #1 Data Type Number 66 Description Phone Number 1: a phone number which will be used primary for notification (SMS message sending) and voice call. the sequence can be used in 15 combination. The choosed sequence mask can be selected that for which numbers are valid the messaging and in which order. (e.g. 15 means – numbers in order 1,2,3,4 all the 4 numbers are enabled) (Default value: 0 – no notification). TEL2= Phone No. #2 Number TEL3= Phone No. #3 Number TEL4= Phone No. #4 Number 67 Phone Number 2: a phone number which will be used primary for notification (SMS message sending) and voice call. the sequence can be used in 15 combination. The choosed sequence mask can be selected that for which numbers are valid the messaging and in which order. (Default value: 0 – no notification). Phone Number 3: a phone number which will be used primary for notification (SMS message sending) and voice call. the sequence can be used in 15 combination. The choosed sequence mask can be selected that for which numbers are valid the messaging and in which order. (Default value: 0 – no notification). Phone Number 4: a phone number which will be used primary for notification (SMS message sending) and voice call. the sequence can be used in 15 combination. The choosed sequence mask can be selected that for which numbers are valid the messaging and in which order. (Default value: 0 – no notification). ATTENTION The calling number display service depends on the mobile operator, therfore it’s important to use the appropriate prefix of the current country when defining a phone number. Consider that the national and international (roaming) prefixes can be different. Input notification parameter settings (SMS message): Command I1S= Parameter Name Data Type Input #1 SMS Selection Selected Phone No. I2S= Input #2 SMS Selection Selected Phone No. I1V= Input #1 Voice Selection Selected Phone No. 68 Description Sends SMS to the phone nr. 1 for the configured numbers. It can be used in 15 combination. The selected order mask will be accessable when input signal change happened. Example: 15 – 1,2,3,4 which means: all the 4 phone numbers are anebled)) (Default value: 0 – no phone nr. defined). Sends SMS to the phone nr. 2 for the configured numbers. It can be used in 15 combination. The selected order mask will be accessable when input signal change happened. Example: 15 – 1,2,3,4 which means: all the 4 phone numbers are anebled)) (Default value: 0 – no phone nr. defined). Makes a voice call (ringing) for the phone nr. 1 in the order that it was defined. It can be used in 15 combination. The selected order mask will be accessable when input signal change happened. I2V= Input #2 Voice Selection Selected Phone No. I1ON= Input #1 ON - SMS Text text I1OFF= Input #1 SMS text I2ON= Input #2 ON - SMS Text text I2OFF= Input #2 SMS text SMSFWD= Forward SMS Phone No. #1 OFF OFF - Text - Text to Selection 69 Example: 15 – 1,2,3,4 which means: all the 4 phone numbers are anebled)) (Default value: 0 – no phone nr. defined). Makes a voice call (ringing) for the phone nr. 2 in the order that it was defined. It can be used in 15 combination. The selected order mask will be accessable when input signal change happened. Example: 15 – 1,2,3,4 which means: all the 4 phone numbers are anebled)) (Default value: 0 – no phone nr. defined). SMS text for the input line nr. 1 status, when it changes from low high (Default value: -) SMS text for the input line nr. 1 status, when it changes from high low (Default value: -) SMS text for the input line nr. 2 status, when it changes from low high (Default value: -) SMS text for the input line nr. 2 status, when it changes from high low (Default value: -) Forwards an SMS to an another phone number Values: Disabled, Enabled (Default value: Disabled) 6.7 Remote software refresh settings Remote software updates parameter settings: Command Parameter Name Data Type IP address FTPSERVER= FTP server address FTPPORT= FTP server port Number FTPFILE= FTP file path Text FTPUN= FTP user name Text FTPPWD= FTP password Text Description FTP sserver IP address, e.g.: 192.168.6.251 (Default value: -) FTP server port number, e.g.: 21 (Default value: -) FTP server file path (Default value: -) FTP server user account, e.g.: easy2 (Default value: -) FTP server password for the user account, e.g.: „easy2” (Default value: -) 6.8 Gate opening settings ATTENTION The calling number display service depends on the mobile operator, therfore it’s important to use the appropriate prefix of the current country when defining a phone number. Consider that the national and international (roaming) prefixes can be different. Gate opening parameters: Command GATESMS= Parameter Name Data Type SMS notification in Selection Gate mode 70 Description In case of Gate opening, enabling the SMS message notification. Values: Enabled, Disabled (Default value: Disabled) 6.9 Compatibility settings Compatibility settings: Command Parameter Name Data Type tone Text Description DTMFTIME= DTMF duration Setting the DTMF tone minimal length for the security center compatibility. The shorter values will be not sensed (Default value: -) 6.10 Important roles In case of modifying the settings check carefully that the parameter values are accomplished for the required settings, before You will send them for the Easy 2 device. When it is important to save to previous settings, then save the configuration with the Save file button to Your computer. A previously saved configuration can be refreshed in only one step. ATTENTION The changed parameter values changes only on the screen, in the EasyTerm software. These will not be sent and acknowledged by the device until You will not initiate to send them. The configuration can be started to upload by the Select all button (for all parameters), then every entry will checked by their checkboxes as enabled. Then let’s push the Write config button to send them for the Easy 2 device. The parameter upload starts immediately which can take minutes. The progress bar shows the current status of the process. The Terminal window will assing by a „config write completed” message when it has finished. The upload process MUST NOT INTERRUPTED! 71 Chapter 7. Configuration on serial port, TCP port 7.1 Configuring on the serial port The parametrize of the device and request status of the M2M Easy 2 Security Communicator® are supported via serial port. It is needed to use it a serial port wire connection and a terminal utility (like the Docklight 3rd party software). Further information related on the usage of the software can be seen at the chapter 4.6. At the parameter commands must be considered the following rules: The commands could contain only the english alphabetical charachters (capitalized letters) and number between 0 and 9 The parameter values can use lower case characters In case of write commands the parameter = part can be empty (no other value after the equality sign) The command end must be assigned with carriage return character There is no timeout when submit a character, therefor the commands can be added by manual Maximum command length: 127 characters ATTENTION The first command must be added only after when the Easy 2 device software was already loaded and it is waiting and ready for interactive actions. The login (authentication) can be done with the following commands: AT@PW=password<CR> The password is the PW parameter value (when it is missing, the default password is ’ABCD’). After the login the debug messaging on the serial port will be ended. The logout works with the EXIT command. Then the debug messaging will be used again. EXIT<CR> 72 The incoming command will be answered only after the successful and valid login. The valid command response format is the following: <CR><LF><response><CR><LF><CR><LF>OK<CR><LF> In the reply messages the <response> equals with the sent command. In case of requests the command has query sign ’?’ where the current parameter must be added and send. The command will be acknowledged and answered with a response-value and an OK message. Response format for an invalid command: <CR><LF>ERROR<CR><LF> Connection commands: Command AT@PW=password EXIT Description Login to command mode, the Easy 2 doe not sent messages ont he serial debug port anymore Logout command from the command mode, normal operation, where the Easy 2 sends messages again on the serial port The syntax of the commands (in Docklight format): EXIT<CR> ATTENTION The new configuration access password recommanded to do at the first steps (when setup the configuration)! The can be perfoprmed by the PW command, and adding the old and the new password, like this: AT@PW=password<CR> In an SMS message the command is the following for the passwords: PW=OLD_Password, PW=NEW_Password 73 Status request parameters: Command SWVER HWID IMEI SIMICC IP SQ VBATT ALARMACC SYSL Desciption Software version HW identifier GSM module IMEI identifier SIM card ICC identifier IP address (when the GPRS connection was enabled) Received signal strength by the GSM module (RSSI) Power voltage of the device (unit: V, resolution: 0.033 V) Requesting the last sent used identifier in the send CID message by the alarm system Requesting the last dialed phone number Example for executing a command (in Docklight format): SWVER=?<CR> Furthermore, it is possible to setup the device by commands with the parameters as it was written in the Chapter 6. But it’s more confortable when using the EasyTerm software for this task as it was described in the last Chapter. Valid format when a parameter will be configured (in Docklight format): APN=NET<CR> Device control commands: Command RESET ERASECONF Description Restarts the device (needed to use when finished the parameter settings) Deletion of the stored parameters and settings (configuration) from the memory Output control commands: The ouput can be controlled with two commands: OUTON and the OUTOFF. These can be performed from SMS, via serial port, through TCP: 74 Command OUTON OUTOFF Description Bi-stable: Relay conact closed (short) Mono-stable: Starts the timing Bi-stable: Relay contact opened Mono-stable: Stops the timing Control by voicel call – ringing (Gate Opening feature) In mono-stable operation mode the voice call (ringing) initializes the timing, in bi-stable mode affection for the ringing the output changes its status. The authentication will be performed by checking the caller’s number. The communicator rejects the call without any delay within the success of the authentication. The device is able to store 125 phone numbers. One number contains maximum 15 characters. The prefixes must be considered for national, international (roaming) calls – e.g. 00 and country prefix. When the calling number display service disabled this service is not working. In case of successful authentication when the GATESMS parameter was enabled, the caller will receive an SMS message about the status of the input (in mono-stable mode it the delay value will be also reported). The definition of the phone numbers and deletion of the can be performed via several ways. Command GATE GATERM Description For affection of the command the give phone number takes place into the contact list into the argumented position. The position can be defined with <n> value between 1 and 125. The phone number value can be added at here. When executing this command the given phone number will be deleted feom the contact list. When the number can’t found there will be no affection 75 The GATE and GATERM write type commands assures automatic access to the contect list of phone numbers. The GATE<n> read and write commands makes access to the list elements. The <n> values must be between 1 and 125. GATE=<phone_number> For affection of this command the given number will put into the first available entry of the contact list. If the number already exists or the memory is full then this command doesn’t have any effect. GATERM=<phone_number> This command will delete the assigned number from the list. If this number does not exists then there is no any effect. GATE<n>=<phone_number> This command gives a <phone_number> to the <n> position into the list. The <phone_number> argument can be empty which will delete the existing number from the list. GATE<n>=? This request will be answered the phone number of the <n> position. Case of Reset: The device will save the output status in bi-stable mode in case of a command. When an unexpected restart executed whis saved status will be recovered int he bi-stable mode only. By control of initiating voice call (ringing) the output status will be not stored. The stored value can be modified by the OUTON, OUTOFF commands in bi-stable mode or with the ERASECONF command (can be deleted with all other stored information from the memory). The changing an operation mode does not have any effect for the stored value! 76 Remote firmware refresh: The firmware refresh can be started with the FWLOAD command. The download will be performed from the pre-defined and parametrized FTP server. In case of successful download the device restarts automatically after finishing the download process then the device starts with the bootloader. When updating the firmware the device has only limited functionality: cannot receive the signals of the alarm system and cannot transmit the signals the incoming events ont he input lines (but they are buffered), and cannot sent eny lif signal and does not evaluate and progress the incoming SMS commands, etc. During the refresh from the progress the device sends CID messages via GPRS network (partition=99, zone=999): E991: FW refresh has began E992: FW refresh was successful E993: FW refresh was unsuccessful Command FWLOAD Desciption Performing to start firmware refresh 7.2 Configuration through the TCP port The Easy 2 is able to receive commands ont he 9998 TCP port. The login and authentication can be performed with this command: AT@PW=<IMEI identifier last 5 character> The logout can be started with the EXIT command or when disconnecting the device (automatically). EXIT<CR> Only an IP address can be used for login to the device in the same time. The login through the serial port always has priority over the other methods. 77 The executable commands and their format is the same as the command which can be performed on the serial port. The format of the responses are the same as the format of the received on-the-fly messages. 7.3 Compatibility The M2M Easy 2 Security Communicator® device assures 100% compatibility with the IP Digita Receiver (ENIGMA II). Furthermore, it is compatible with several type of alarm centers which general uses SIA CID/DTMF communication protocols. 78 Chapter 8. Configuration with SMS text messages 8.1 Configuration with SMS commands The M2M Easy 2 Security Communicator® device can be parametrized also by SMS messages (commands). The SMS content must be considered by the following points: the commands must be used the english alphabetical and numbers only there are no difference int he capital and lower case characters (all of them can be used) the following special characters can be also used: ! ” # $ % & ’ ( ) * + , - . / : ; < = >?@ The commands must be divided from each other with the following characters (and the combinations of these): space, comma, semicomma, Enter, carriage return the maximum length of the parameters in case of write command the value part of the parameter canb be empty (the part after the ’=’ (equality sign)) more parameter can be defined in SMS message the maximal length of the SMS message format is 160 characters The communicator forwards every incoming SMS messages without detecting its content to the phone number as the TEL1 parameter was defined when the SMSFWD parameter was enabled (disabled by default). The first command of an SMS message is always must be an authentication command, which has the following format: PW=password The password means the same password which used at the serial port authentication. At the login process the lower case and capital characters are not distinguished. (Comment: the authentication command has no any affect for the PW parameter value, because it has a fixed position). 79 When the authentication was unsuccessful then the other part and commands of the SMS message will be not processed too. When the authentication was successful the sender of the SMS message will receive a feedback SMS message immediately after the processing of the SMS. This will be processed in two steps. First, the validation of the commands then second, the execution of the commands will be performed. When the validation was unsuccessful then the processing of the SMS will be cancelles and any of the contained commands will be not executed and the sender will get a feedback of the failure in SMS. The possible causes of the unsuccessful validation can be one of the following: 1. unknown command or bad syntax in the given command (the bad command will be replied) 2. bad usage of request commands and other commands format (see below) In case of successful validation the execution of the command will be performed in the same sequence is they take place and order in the SMS message. Only these three commands are excluded (they will be performed after the SMS processing in this order): ERASECONF, FWLOAD, RESET. The successful SMS processing will be assigned to the sender by sending an SMS notification with the following content: 1. number of the progressed commands 2. warning if a parameter value was written to the memory but there was not performed a RESET A read type commands (info requests) cannot be used in SMS, it can be used in a special format in SMS – like current status or activity of the device or identifiers. The readout commands are using the „INF” starting part in their commands. These are the following. 80 a.) Status request: Command INFDEV or DEVSTAT INFIO INFTEL INFSMS INFIP Description of the answer It will send in an SMS reply the status summarization of the Easy 2 device: account nr. (customer ID), signal strength value, software version, hardware identifier, device IMEI identifier, SIM card ICC identifier, battery status, IP address Contained parameters: ACCOUNT, SQ, SWVER, HWID, IMEI, SIMICC, VBATT, IP Current status of the input lines and the output line. Contained parameters: ACCOUNT, SQ, current status of the inputs lines & the output line Configured voice/SMS settings, phone numbers and notification (SMS) order sequence, voice call (ringing) order sequence will be signed back. Contained parameters: ACCOUNT, SQ, TEL1, TEL2, TEL3, TEL4, I1S, I2S, I1V, I2V Input SMS settings. Contained parameters: ACCOUNT, SQ, I1ON, I1OFF, I2ON, I2OFF Server connection settings. Contained parameters: ACCOUNT, SQ, IMEI, IP, SERVER1, PORT1, SWPROTO There can be sent more request command in the same SMS, but cannot be used together in the same SMS message with other type of commands! The reply SMS order will be not followed the sequence of the executing of commands or their positions in the request SMS. The Easy 2 device general operation needs the following parameters to configure for the proper operation: APN name (proved by the Mobile Operator – enclosed network name or public APN name) APN login name APN login password Server IP address Enabling the GPRS communication 81 ATTENTION The new password for accessing the configuration suggested to performa at the first steps of the configuration! The can be performed by the PW command then adding the old password (first) then the new password (second). In an SMS message the old and new passwords must be contained in this sequence. At here below the available commands in the SMS messages are listed and categorized with the possible parameters. b.) Settings of GPRS connection and services: Parameter Name APN= Max Char Length 30 Parameter Type Text Description APN network name for the GPRS connection Like: NET UN= 30 Text PWD= DNS1= 30 30 Text IP address APN User Account Name (in case of CHAP authentication) APN User Password for the Account Used DNS server IP Address for the Domain name service – primary server Like: 8.8.8.8 DNS2= 30 IP address Used DNS server IP Address for the Domain name service – secondary server Like: 8.8.4.4 SERVER1= 30 IP address PORT1= 6 Number Used Server IP Address or Domain Name for the connection – primary server Used TCP or UDP port of the primary server Like: 9999 SERVER2= 30 IP address PORT2= 6 Number Used Server IP Address or Domain Name for the connection – secondary server Used TCP or UDP port of the secondary server Like: 9999 82 IPPROTO= 6 Text Used communication protocolt type: UDP, TCP Like: UDP SWPROTO= 6 Text Message format communication Values: 1 - WM Alarm 2 - Enigma protocol of the Like: 2 (Enigma) GPRSEN= 1 Number Enabling GPRS communication Values: 1 = Enabled, the device sends as the Enigma II IP protocol defined on GPRS to the configured server 0 = Disabled, only GSM mode – the VOICE channel will be used to signals of the alarm center as a single transmitter Like: 1 (Enabled) SFUNCT= 1 Number Connection order or priority sequence Values: 1 = server1, server2 2 = server2, server1 Like: 1 server2) BACKUP= 1 Number (prior: second: Enabling the communication backup VOICE mode on the voice channel. Values: 0 = no backup (disabled) 1 = GSM – voice channel backup (in case of GPRS connection the device sends the signals on VOICE channel). Default value: (Disabled) 83 server1, 0 No Backup c.) Settings of Inputs: Parameter Name IDELAY= Max Char Length 4 Parameter Type Text Description Pulse width (delay) in 20msec resolution which is added to the Input lines. Like: 25 (25x20msec) IXINV= 1 Numeric Inversing the Nr. X Input line, where X can be 1 or 2 (Nr. of Input line) Values: 0 = non inversing 1 = inverted Like. I1INV=0 (Input Nr. 1 is not inversed) IXLHEN= 1 Numeric Enabling mask low high for the Nr. X Input changes, where X can be 1 or 2 Values: 0 = disabled the SMS sending, the voice call and the GPRS signal sending 1 = enabled SMS sending, voice call, GPRS signal sending Like: I1LHEN=1 (Input Nr. 1 is Enabled for) IXHLEN= 1 Numeric X Enabling mask high low for the Nr. X Input changes, where X can be 1 or 2 Values: 0 = disabled the SMS sending, the voice call and the GPRS signal sending 1 = enabled SMS sending, voice call, GPRS signal sending Like: I1HLEN=1 (Input Nr. 1 is Enabled for) 84 IXEVENT= 3 Text Contact ID (CID) Event Codes for the Input Nr. X, where X can be 1, 2, 3 or 4. For the input lines in case of event can be added a CID code (Default Value: IN1: 130, IN2: 110, IN3: 100, IN4: 120) Like: I1EVENT=130 (CID Code 130 for Input 1) IXPART= 2 Text Partition value for the Input Nr. X, where X can be 1, 2, 3 or 4. Default value: IN1: 01, IN2..IN4: 98 Like: I1PART=01 (Input Partition value is 01) IXZONE= 3 Text Nr. 1 Zone value for the Input line Nr. X, where X can be 1 or 2. Default value: IN1: 001, IN2: 002 Like: I1ZONE=001 (Input Nr. 1 Zone value is 001) d.) Settings of Output: Parameter Name OUTHDEL= Max Char Length 4 Parameter Type Number Description Switch of delay (in seconds) for the output, which gives the output HIGH value delay. When configuring by SMS message it holds to turn on the output while it was defined then will it turn off. In case of adding parameter ’0’ value the output will be operated in normal mode, it doesn’t switches back (e.g. setup to value 1 for the OUT1: after the defined interval the output switched to 0). Default value: - Like: OUTHDEL=0 (the output value is 0 which means normal operation mode without delay) 85 e.) Security & Safety settings (Contact ID, Alarm Center): Parameter Name ACCOUNT= Max Char Length 15 Parameter Type Number LFFREQ= 6 Number LFGSMFREQ= 6 Number LFPRES= 1 Number LFUNIT= 1 Number 86 Description The customer ID or Account number which were used or sent by the Alarm System. Life signal sending frequency (in seconds) on GPRS. When it is often it means more data sending which can be unnecessary in some cases and it leads to override the data traffic limit (usually only 5MBytes limit for GPRS data package). Please, consider the circumstances and don’t choose an unocassionally low value. Recommended to use this default setting or a greater one then 300 sec. GSM life signal sending frequency (in seconds). Recommended default value: 60 sec Aperance of the life signals int he dispatcher software (hidden life signal feature). Values: 0 = hidden lif signal (the dispatcher software will sending information only from the outage of the life signals for the centre) 1 = apperas the life signa (the life signal which were sent by the device will appear in the dispatcher software). Life signal sending measurement unit. Values: 0 – Minutes 1 – Seconds IOGPRS= 1 Number DTMFTIME= 3 Number In case of input signal changes sends rendelt the CID code in a GPRS telegraph Values: 1 = Enabled 0 = Disabled This parameter is in relation with the alarm centre. The value is by default ’0’, when there is no filtering with DTMF timer, which means that the defense is turned off (compatible with the obsolete softwares). The parameter value can be defined in msec which means wait this time betwereen the a DTMF codes (between the tones must be minimal 50msec by the standards). The value can be defined between 0 and 255 (msec). This parameter cannot be configured by the DR-Term configurator utility, only by SMS commands. f.) Settings of GSM/SMS parameters: ATTENTION The calling number display service assured by the Mobile Operator. It’s important to use the proper prefix with the phone numbers. Consider that can be different in case of a national or an international (roaming) dial. Parameter Name TELX= Max Char Length 20 Parameter Description Type Text or Value for the Phone Number order Nr. Number X, where X can be 1, 2, 3 or 4. It will be used for SMS messages sending. Like: TEL1=+36301234567 87 IXON= 10 Text SMS text definition for Input Nr. X in case of enabled input line, where X can be 1 or 2. Like: I1ON=1_ON IXOFF= 10 Text SMS text definition for Input Nr. X in case of disabled input line, where X can be 1 or 2. Like: I1OFF=1_OFF SMSFWD= 1 Number Forwards the incoming SMS message to the Phone Number which were defined int he TEL1 parameter. Values: 1 = Enabled 0 = Disabled Like: 0 (Disabled) 8.2 Example for configuration from SMS messages Accourding the standard SMS format maximum 160 characters can be used for commands in one SMS message. Here below can be found an example for the complexity of a possible SMS command message: APN=NET,SERVER1=89.133.189.139,PORT1=9999,LFFREQ=600,IPPROTO=UDP,GPR SEN=1,SFUNCT=1,IOGPRS=1,I1EVENT=130,I1PART=01,I1ZONE=001,I2EVENT=140 ,I2PART=01,I2ZONE=002 88 9. Support availability Should you have any questions regarding the usage of the device, you can contact us in the following ways: Email: [email protected] Telephone: +36 20 333 1111 9.1 Support help For identifying the device, please, use the sticker on the PCB, which contains important information to the support staff. ATTENTION The product sticker removal causes loss of the warranty! 89 9.2 Product support Click the following link to download the available product documentations and software: http://m2mserver.com/en/products/m2m-easy-2-security-communicator The documents and softwares related to the product are available at our website: http://m2mserver.com/en/downloads Online product support can be used at here: http://m2mserver.com/en/product-support 90 10. Legal notices ©2014. WM Systems LLC. The content of this documentation (all information, pictures, tests, descriptions, guides, logos) is under copyright protection. Copying, using, distributing and publishing it is only permitted with the consent of WM Systems LLC., with clear indication of the source. The pictures in the user guide are only for illustration purposes. WM Systems LLC. does not acknowledge or accept responsibility for any mistakes in the information contained in the user guide. The published information in this document is subject to change without notice. All data contained in the user guide is for information purposes only. For further information, please, contact our colleagues. Warning Any errors occurring during the program update process may result in failure of the device. 91