1
LOGELLOOP 1
Real Time Sampler
User's manual
1
Logelloop is a tool for realtime multitrack
musical looping
LOGELLOOP is a realtime multitrack looper. With Logelloop, you can
save your loops on the HD...
With Logelloop, you can also modify the sound for each track separately
in realtime. Another goodie of the multitrack looping is the ability to erase
each track one by one or playing each track at a different speed (even in
reverse).
All logelloop's command can be accessed by MIDI controllers (note, ctl,
pgm change), by a Wiimote, by the computer's keyboard or even by a
labjack USB controller. So, it is possible to control Logelloop even while
playing a musical instrument.
You can also write your own Macros in a very simple language who permit
to access each command, function and settings of Logelloop.
2
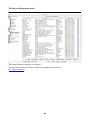
1 Logelloop Main Window
Faders!
Panners!
Aux 1 and Aux 2!
Use Auxiliaries to monitor recorded tracks :!
Solo (S button)!
Mute (M button)!
Pitch!
Speed!
Time!
Presets!
Presets : Recall Modes!
Presets : Cross-fades between presets!
Presets : Write, Read and Import!
8
8
9
9
10
10
11
11
11
12
13
13
16
2 Commands for the Looper
Record!
Erase!
Overdub !
Multiply!
Undo!
Restart!
Nextloop !
Mute!
Autofade!
Copy!
CopyAfter!
Copy To File!
A!
B!
C!
Urgence!
Inc, Dec!
19
19
19
22
22
23
23
23
25
26
26
27
28
28
28
29
29
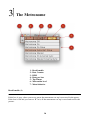
3 The Metronome
Recall enable (1)!
Beat Counter (2)!
BPM (3)!
Beats Per Bar (4)!
Tap Tempo (5)!
Metronome audio level and output (6)!
Metronome Off!
Metronome ON!
Metronome On Slave!
Metronome Autostart Slave!
Metronome in Master mode!
Metronome On External Sync!
Metronome Master External Sync!
30
31
31
31
31
31
32
32
32
32
32
33
33
3
Metronome and Nextloop !
33
4 Effects
Vst folders!
Using VST plug-ins!
SFX Plug-ins!
How to make your own SFXs!
How to load an SFX!
Convolution!
Delay!
QuadDelay!
QuadPitchDelay!
Granulaterre!
Storing Presets in Granulaterre!
RingMod!
34
34
35
36
37
38
39
41
42
43
46
47
5 File player
Functions of the File Player!
48
6 Load loops from the HD
The «Saved_loops» window!
The loop maker!
50
51
7 Inputsʼ Window
Input Paners!
Input faders and Auxiliaries!
Input To Monitor (M)!
Input ToLoop (L)!
Storing Input settings in the Presets!
53
53
53
53
54
8 Preferences
The concept of Logelloop preferences!
The Global preferences panel!
The Audio Driverʼs panel!
The Monitor panel!
The Outputs panel!
The VST plugs panel!
The Sound Files panel!
The Behavior panel!
The Look And Feel panel!
The Macro Management panel!
The Macro Mapping panel!
The Network panel!
55
56
57
58
59
60
61
62
63
64
65
66
9 Macros
How to use the macros in Logelloop !
Insérer une nouvelle macro dans Logelloop !
Inserting a Macro in a slot!
How to command a Macro with Midi!
Variables in Macros!
List and state of Macros Variables!
How to command a Macro with the Wiimote!
67
67
68
69
70
70
71
4
How to command a Macro with the LJ Footboard!
How to command a Macro with the Keyboard!
How to command a Macro with the Special USB Keyboard!
72
73
74
10 Keyboards and Remotes
How to communicate with logelloop !
Standard Mac Keyboard!
Special USB Keyboard!
Midi Commands to Logelloop !
How to configure Midi Commands!
Wiimote!
How to Connect a Wiimote to Logelloop !
Configure the Wiimote!
LabJack!
75
75
75
76
77
78
78
79
80
5
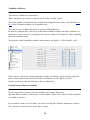
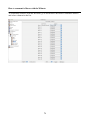
Quick View...
Function
Default Key
Description
RECORD
1rst Click
RECORD
2nd Click
-
RECORD
Long Click
Erase all tracks (first and overdubs)
OVERDUB
1rst Click
OVERDUB
2nd Click
OVERDUB
Long Click
MULTIPLY
MULTIPLY
1rst Click
2nd Click
MULTIPLY
Long Click
MUTE
1rst Click
MUTE
2nd
MUTE
Long Click
AUTOFADE
1rst Click
AUTOFADE
2nd
AUTOFADE
Long Click
UNDO
1rst Click
UNDO
2nd Click
UNDO
Long Click
COPY
1rst Click
COPY
2nd Click
CopyAfter : will copy the content of the current to the next loop.
COPY
NEXTLOOP
Long Click
1rst Click
Copy this loop on the Hard Drive (at the defined location)
Go to the next loop at the end of the current loop
NEXTLOOP
2nd Click
URGENCE
1rst Click
URGENCE
URGENCE
2nd Click
Long Click
LOOP A
1rst Click
LOOP A
2nd
LOOP A
Long Click
LOOP B
1rst Click
LOOP B
2nd Click
LOOP B
Long Click
LOOP C
1rst Click
LOOP C
2nd
LOOP C
Long Click
RESTART
1rst Click
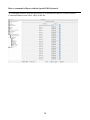
Space Bar
Record / Play the first track.
O
Record an overdub
X
Do Multiply at the end of the current loop / Stop Multiply
M
Mute at the end of the current loop / Unmute
Click
Mute immediately
F
Click
Fadeout start at the end of the current loop / fadein
Fadeout start immediately
U
Erase the last track recorded
Erase all overdubs (but doesn't erase the first track)
Y
N
Copy in another loop the content of this one
Go immediately to the next loop
E
Forget the last command if it is possible (This doesn't work with
record and overdub)
A
Go to loop A at the end of the current loop
Click
Go immediately to loop A
B
Go to loop B at the end of the current loop
Go immediately to loop B
C
Click
Go to loop C at the end of the current loop
Go immediately to loop C
R
Restart the current loop
6
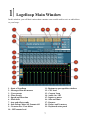
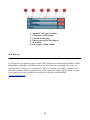
1 Logelloop Main Window
In this window, you will find a mixer that contains some useful stuffs to mix or add effects
to your loops.
1 - State of Logelloop
2 - Messages from the macros
3 - Users presets
4 - Time stretch
5 - Speed and Direction
6 - Pitch shift
7 - Aux and effects sends
8 - Solo Defeat, Mute All, Unmute All
9 - Vu meter Pre / Post faders
10 - LFE master level
11 - Buttons to open specifics windows
12 - CPU load
13 - Current Loop
14 - Audio On / Off
15 - Inputs vu meter
16 - Solo and Mute
17 - Panners
18 - Faders and Vu meters
19 - Keyboards state panel
7
Faders
Moving the fader will increase or decrease the sound.
Pushing cmd+moving a fader will move all the faders.
Pushing alt+click a fader will set the fader to 0db.
Pushing cmd+alt+click a fader will set all the faders to 0db.
Near the fader is a vu-meter this vu-meter is prefader by default. The yellow ‘Vu pre’ button
permits to set the vu-meter to post fader (PST).
When a loop is recorded in a track, the fader of this track is set to red, when the track is
empty, the fader is green.
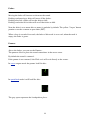
Panners
Above the faders, you can see the Panners.
The panners allow to place the sound somewhere in the stereo scene.
By default the sound is centered.
If the panner is not centered, Alt+Click on it will set it directly to the center.
In stereo outputs mode the panner look like this :
In spatialized mode it will look like this :
The grey spots represents the loudspeakers place.
8
Aux 1 and Aux 2
Aux 1 and Aux 2 permit to send audio to the plug-ins.
To use them, you just need to click and drag the green cursor.
If you want to set the auxiliaries of all channels to the same value, drag the leftmost Aux
cursor.
Under the cursor, a ‘pst’ button permit to turn the Aux sends to ‘pre’ in order to be
independent of the fader level.
Use Auxiliaries to monitor recorded tracks :
If an output is selected for each Aux (Preferences), and if the plug-in for this Aux channel is
bypassed (Plug-ins window), the sound routed from each track according to the Aux level
will be routed to the Aux audio Output.
9
Solo (S button)
Solo is useful if you want to hear only a track. If you want to hear more than one track, you
can ‘solo’ each tracks you want to hear separately.
In order to UnSolo all, hit the SD button (Solo Defeat) at the left of the faders.
Mute (M button)
If you want to mute a track and still have others tracks playing, you can hit Mute (M
button).
You can Mute more than one track by hitting more than one Mute button.
To UnMute all the muted tracks, hit UM (Yellow button) at the left of the faders.
If you want to mute all tracks at the same time, hit M button (mute all).
Note : This Mute is only a mixer mute and have no relation with the loop side of Logelloop.
To use synced mutes, you have to use the dedicated function accessed by the keyboard letter
M (default) or by clicking MUTE in the transport bar.
10
Pitch
With the pitch section of the mixer, you can change the pitch of each track separately.
In order to do that, Click the ‘off’ button to set the pitch to ‘on’ and then change the pitch in
the number box above the on/off button.
You can also change the pitch by semitone. In order to do that, click the menu above the
number box in the pitch part and select a value in semitone...
Speed
Here you can change the Speed of the loop played in
this track in the tape player way (changing the speed
and the pitch at the
same time)
You can change the speed by semitone (like for pitch)
or with the number box.
The W button permit to change between ‘Wind’ and
‘Rewind’ to play in reverse your loop.
Time
With the Time section, you can change the length of the loop without changing the pitch.
We could also call this function ‘time stretch’
11
Presets
This section permit to store and recall all the mixers settings.
When you want to store the settings, hit NEW, you will be prompted for a name.
Choose a name and press OK.
Your settings are stored and you can recall them in the menu ‘Default settings’
If the preset section is in “direct recall” mode, you just have to select an item in this menu
and the preset is immediately recalled.
You can also revert to default choosing default settings or copy the mixers settings of
another loop :
If you are on loop A and you want to set the mixer to the Loop b settings, just select ‘LOOP
B state’ in the recall menu.
If you want to edit a preset, load it, edit the settings and press STORE.
You will be prompted for a new name, if you keep the same name, the preset will be
overwritten, otherwise, you will obtain a new preset with the name you have chosen.
Delete will delete the last loaded preset.
12
Presets : Recall Modes
• ‘Direct recall’ means that when you select a preset, it will be immediately recalled.
• ‘Press recall’ means that you will need to press recall after choosing a preset to
actually recall it.
• ‘Recall with nextloop’ means that the chosen preset will be recalled when you go to
another loop.
• ‘Recall at loop end’ means that as soon as the current loop’s end is reached, the preset
is recalled.
• ‘Recall at first Beat’ means that the preset is recalled at the first beat of the
Metronome (assuming that the Metronome is On).
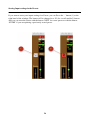
Presets : Cross-fades between presets
In the Preset section, there is a number box named Interpolation.
In this box you can set the length (in seconds) of the transition time between a preset and
another one. By default, the Interpolation Mode is the Jump mode (1).
13
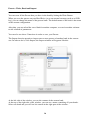
In the example below :
1 - We are in the Jump Mode
2 - The duration of the interpolation is 14 seconds.
3 - The current preset is “tutu”, the Interpolation will start from this preset. (If you changed
something after loading “tutu”, the interpolation will take this change in account and will
start from the current state.).
4 - The interpolation end will be the preset “arret”
5 - the result is a jump between “tutu” and “arret”
6 - If you select the “Thru” Mode...
7 - The Interpolation will begin with “tutu” will pass thru the adjacent preset (“tripo”) and
will finish with “arret”.
14
Note that this number will also set the length of the preset transition at a loop change
but this will not affect the audio transition.
For example, if you set the time to 1 sec in Loop A and you press Nextloop to go to Loop B,
the mixer’s changes will take one second to go from the loop A state to the new preset state.
15
Presets : Write, Read and Import
You can store all the Presets that you have in the bank by hitting the Write Button.
When you save the presets on your Hard Drive (or on an external memory such as an USB
key) you can change the name of the presets bank. The default name of the bank is the name
of the current configuration.
After that, you can reload the saved bank in another computer, or even in another software
to edit a bunch of parameters.
You can also use those 2 functions in order to save your Presets.
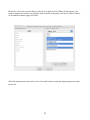
The Import function permits to import one or more presets of another bank in the current
one. In order to do it, click Import, the Import window will appears like this :
At the left side of the window, you see the content of the current bank.
At the top of the right side of the window, you can see a menu containing all your banks.
Select one bank and you will see his content in the right part of the window.
16
In the list, select one or more Preset (alt+click or Apple+click). When all the presets you
want to import are in blue, click Apply at the bottom of the page (or Cancel if don’t want to
do it) and the window page will close.
After the importation, you need to wait 2 seconds before seeing the imported presets in the
preset list.
17
2 Commands for the Looper
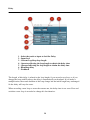
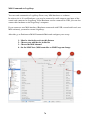
The main commands are in the transport panel.
In Logelloop, each main command can have 1, 2 or 3 functions.
For example, the Nextloop button, pressed one time, will set logelloop to the next loop at
the end of the current loop, pressed two time will set Logelloop immediately to the next
loop.
But, you can directly access to the second or third function in the preferences panel in
Keyboard commands/Main :
In the example below we have set the Direct Nextloop access (Two click on Nextloop) to
the N letter.
One important point about Logelloop’s commands is all is permitted!
You can press Record, play some music, press Overdub (will stop record and begin
overdubbing on track 2), press Multiply (will stop overdub and begin Multiply)
and after some multiplication, you can press Nextloop to go to the next loop and so
on...
18
Record
First press the Record key (space bar by default), the Logelloop begin the recording.
Play some music and when you have finished, press the record key a second time.
Logelloop stop recording and automatically play your music in loop mode.
The size of the loop is defined by time between the first hit on record and the second one.
You can Erase your recorded music by a long press on Record (also possible while
recording).
If the Metronome is On and in Master mode, the recording will begin at the first beat (see
chapter 3)
Erase
If you press Record more than one second, all tracks of the current loop are erased.
After this, if you press Copy, the content of the others loops (B and C if you were in A while
erasing) is also erased. This is interesting to erase everything in Logelloop with two clicks.
If you press Overdub more than one second, tracks 2 to 10 of the current loop are erased. In
this case, the first track is not erased.
Overdub
When the first track is recorded you can can play with it and even if you want, it is possible
to 'overdub' by pressing the overdub button ('o' key on your keyboard by default).
The overdub begin on the second track.
Overdub is an immediate action. So, when you hit the Overdub button, the recording begin
immediately. If you want to defer the recording on the next track, you can use Multiply who
will wait the end of the loop to record on the next track.
Overdub will only stop if you press 'overdub' a second time. If not, at the end of the loop,
the overdub will automatically record on the next track and so on...
If you start Overdub, you stop it and start it again before the end of the loop, the second
record is done on the same track. If you want to change this behavior, you can go to the
Preferences/Behavior and in the Options panel, check ‘Only one Overdub per track’
19
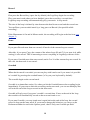
Here, the Overdub began at point
1 and was stopped at point 2. As
the second Overdub started
before the end of the loop, it is on
the same track.
Overdub in Mixed Mode and Replace Mode
Mixed Mode could also be called “feedback mode”.
This permit to use overdub on one track only. When the record head reach the end of the
loop overdub restart at the begin of the same track and everything already recorded on this
track is erased at an adjustable percentage.
To use Overdub in Mixed Mode, click on NORMAL (1) at the right side of the Transport
Window. NORMAL is changed to Mix Mode (2). After that click and drag the number
below Mix Mode (3) to put it at the percentage of feedback effect you want. for more
feedback effect, put a little percentage of erasing. If this number is at 0 percent, the previous
audio content is not erased, at 100% all is erased each time a new audio content is recorded.
If you click a third time on the Normal button it become a Replace button. In this position,
Overdub will act as in a tape recorder. It means each time you make an overdub, you replace
the previous audio content.
20
21
Multiply
You also can make a short loop at first and then choose 'Multiply' to modify the length of
this loop. When you press 'Multiply' ('X' key by default), Logelloop wait for the begin of the
loop and then record an overdub and if you don't stop Multiply, when you reach the end of
the loop, the overdub continue and the first loop you had is multiplied as many time as
permitted by the max length chosen in your preferences.
Pressing a second time Multiply will stop the multiplication at the end of the loop.
You can call the end of Multiply as soon as you want, Logelloop will wait the end of the
loop before stopping the recording.
Undo
If you made a mistake during overdub or multiply, you can press undo ('U' key by default).
Undo will delete the last track recorded. You can delete as many track as you want by
pressing undo a lot of time.
If you press Undo for a long time, all the tracks are deleted and the the fist track is still
playing.
If you want to delete all the tracks including the first one, you can press record for a long
time.
If you press Undo after Multiply, the last track recorded is deleted and multiplication is
undone.
22
Restart
Pressing Restart (‘R’ key by default) will restart the current loop at his beginning.
If the loop is muted, restart will unmute and play at the beginning.
If you select Restart while overdubbing, the loop will restart at the beginning and the
overdub will also restart at the beginning of the current track.
If you select restart while Multiplying, the multiplication will be stopped and the loop will
restart at the beginning.
If the Metronome is On the loop will restart from his beginning at the first beat (see chapter
3).
Nextloop
By pressing Nextloop ('n' by default) you go to the next loop.
If you press one time, Logelloop wait for the end of the current loop and then go to the next
loop.
If you press a second time Nextloop, Logelloop go immediately to the next loop.
By default, the next loop is B if you are on A and A if you are on B (If you want to reach the
C loop, you have to press C) but if you choose «Nextloop permit three loops» in
preferences/'Loop behavior', Nextloop call B if you are in A, C if you 're in B and A if you
are in C.
Mute
If you want to stop playing, you can press mute ('m' key by default).
If you press one time the key, Logelloop wait the end of the loop and then mute. If you
press Mute two time, the mute is immediate.
When Logelloop is muted, you can press Mute another time for resume playing.
23
You can also unmute by pressing another command like Overdub, Multiply, Autofade or
Nextloop.
If the Metronome is On and if you want to unMute a muted loop, the actual unMuting will
occur at the first beat (see chapter 3).
24
Autofade
if you press Autofade one time ('f' key by default), Logelloop wait the end of the loop and
then begin a fade out(the fade out will have a loop length). At the end of the fadeout
Logelloop is muted.
If you press a second time Autofade, the fade begin immediately and is muted at the end of
the loop. By this way, you can choice the length of the fade out.
When Logelloop is muted, you can press Autofade and then Logelloop start playing the
current loop with a fade in (This fade in have a length equal to the loop length).
After a fade out, you can also press Mute to resume playing.
If the Metronome is On and if you want to make a fade in on a muted loop, the actual Fade
In will occur at the first beat (see chapter 3).
25
Copy
If you press copy ('y' key by default), the current loop is being copied to the Nextloop.
If the current loop is A, it is copied to B and if the current is B, it is copied to A.
If you want to copy the current loop to C, you have to first press Copy and then C ('c' key by
default).
If you checked « Nextloop permit three loops » in preferences/'Loop behavior', When you
are in B, B is copied to C.
If you press a second time copy, before the beginning of the copy, you will obtain Copyafter
(see below).
CopyAfter
When you hit Copyafter (2 click on copy by default) The content of the current loop will be
copied after the content of the next loop. The Nextloop is choosen by the same way as for
Copy
26
Copy To File
A long push on Copy will make a copy of the current loop’s content to the hard drive.
In order to to make a copy to file, Logelloop must know the filepath of the folder where you
want to write those sounds. To select this folder, go in the preferences / Audio / Sound files
27
A
You can go to loop A simply by pressing A ('A' key by default).
Pressing one time will go to A at the end of the current loop.
Pressing twice on A, Logelloop will go immediately to A.
If you are already in A, nothing will happen.
B
B has the same behavior as A.
C
C has the same behavior as A.
28
Urgence
If you press a key and don't want the function to be executed, you can call Urgence and the
the last command is not executed.
This will not work with Record and Overdub.
Inc, Dec
Inc and Dec are commands that permit to increase or decrease the value of the $counter$
variable. This variable is only accessible in the macro world but is very useful if you want to
affect the work of a macro from a footboard or any controller.
Note that the $counter$ variable can be used by as many macro as you want at the same
time.
Example of macro who use Inc and Dec :
If "$counter$ == 1"
Message 'Action 1'
TrackVolume trk1 - 10
EndIf
In this macro, the statement ‘if
“$counter$==1” permit to do an
action only if $counter$ is equal to 1.
If "$counter$ == 2"
Message 'Action 2'
TrackVolume trk2 - 10
EndIf
Here, if $counter$==1, you can
change the level of track one, if
$counter$ is equal to 2, you will
change the level of track 2, and so
on...
If "$counter$ == 3"
TrackVolume trk3 - 10
Message 'Action 3'
EndIf
Each time you use this macro, you can
change the value of $counter$with Inc
and Dec.
29
3 The Metronome
1 - Recall enable
2 - Beat Counter
3 - BPM
4 - Beats per bar
5 - Tap Tempo
6 - Metronome level
7 - Menu behavior
Recall enable (1)
If this box is grey, when you save a preset the metronome set up is not saved in the preset.
If the box is red and you can see ‘R’ in it, all the metronome set up is saved and recall with
presets.
30
Beat Counter (2)
This box show the current beat of the Metronome.
BPM (3)
If Metronome is ON or MASTER, you can change the Beats Per Minutes in this place.
If the Metronome is in SLAVE and EXTERNAL SYNC, it show the current BPM, but you
can’t change it.
Beats Per Bar (4)
If you are in Master you will choose the Beats number here.
If you are in Slave mode, the tempo of the loop you recorded is calculated regarding this
Beats number.
Tap Tempo (5)
If you click 3 times on the Tap button, a new tempo is calculated regarding the tempo you
used when taping it!
This will only works if the Metronome is ON or MASTER.
Metronome audio level and output (6)
In the Metronome window, there is a level adjustment (4).
When the Metronome is On, an audio click can be heard in a chosen audio output of your
audio card. In order to choose the specific output, go to Preferences/Audio/Outputs.
At the bottom left of this page, you will see a menu containing all your audio outputs.
31
Metronome Off
If the Metronome is Off, it does nothing and there no calculation when you make a new
loop.
Metronome ON
If Metronome is ON, it does not affect the loops you will make, but it can drive Granulaterre
or other BPM related effects.
Metronome On Slave
If the Metronome is set to Slave it means that Logelloop is independent from the
metronome. In this mode, when you record a new loop in logelloop. The BPM of your loop
is automatically calculated regarding the time signature.
If the metronome is On and if you use Granulaterre in Synced Slave mode or in Synced
Master mode, Granulaterre will take the new tempo as a clock reference.
Metronome Autostart Slave
This mode is the same as Slave but the Metronome will start automatically when a new loop
is recorded. If you erase the current loop, the metronome will stop automatically.
This is particularly useful with Granulaterre in Synced mode.
Metronome in Master mode
If the metronome is set to Master, and if the metronome is On, when you will record a new
loop, Logelloop will wait the first beat to enable Record. When you will stop the recording,
logelloop will wait the end of the last beat to stop the recording. Your loop will be synced to
32
the metronome.
This mode can be useful for example if you want logelloop to be synced to Granulaterre or
an external clock.
In this case, Granulaterre must be in Synced Slave mode or in Synced Master mode.
When you record a loop in this mode, you can ear Granulaterre to play your music at the
good rhythm or set the volume of the metronome as loud as you need to ear it during the
recording.
Metronome On External Sync
This mode is not currently working.
Metronome Master External Sync
This mode is not currently working.
Metronome and Nextloop
When you change the current loop with Nextloop, A, B and C, the Metronome will not
change his state to take the state of the new loop.
If you want the Metronome settings to be different with each loop and if you want them to
change with Nextloop, put the Recall Enable button (1) ON.
33
4 Effects
Vst folders
You can choose the folders where are your Plug-ins in you computer in Preferences/Audio/
VST Plug-ins. Once you choose one folder or more, the plugs that are inside them will
appear in the upper menu of the Plug-ins window (1 in the picture below).
Using VST plug-ins
1. Be sure that a folder is selected in the Preferences/Audio/VST Plug-ins
2. Load a plug by selecting it in the popup in the Plug-ins window
3. Be sure that the plug is ON, if necessary click the Bypass or Mute button (6)
Then, if the plug have some factory presets, you can load them in the dedicated menu (4).
Or if you prefer to edit the settings yourself, click E (1). This will open the plug’s window.
After editing, you can store your changes as a preset by pressing NEW, setting a name and
then write the newly created file to your hard drive to be able to retrieve them in a another
session by pressing WRITE.
34
1 - Open the VST plug’s window.
2 - Click here to load a plug.
3 - Current loaded plug
4 - Factory presets for this plug-in.
5 - SFX menu
6 - On / Bypass / Mute switch.
SFX Plug-ins
Logelloop has a proprietary plugs system. Those Plug-ins are named Special Effects (SFX).
Depending of what they are made for, they are inserted in the signal path, they act as an
auxiliary effect or they act as a generator... There is 2 reasons to use SFX : the first one is
they don’t generate latency when inserted in the signal path (unlike VSTs) and the second
one is that any user of Logelloop can make his own plugs with Max/MSP
(www.cycling74.com).
35
How to make your own SFXs
In order to be able to make your own SFX, you just need to have Max/MSP (cycling74).
Any Max/MSP patch can be loaded as an SFX in Logelloop by just removing the .mxb
extension and replacing it with a .Logelloop_SFX extension. After that, put the patch in the
“Externals SFX” folder.
This folder is in : Library/Application Support/Logelloop
When the patch with the good extension is at the good place, open Logelloop (or close it
and re-open) and you will see your patch in the SFX menu.
In the Externals SFX folder there is an SFX called SFX_Example. In this sfx you can find
all you need to make an SFX that can communicate with Logelloop.
If you need more informations on how to do externals SFX, please contact us at
[email protected]
36
How to load an SFX
In order to load an SFX, you just need to select his name in the menu who is at the bottom
of the plug-ins window.
In Logelloop 1.1 you can find 6 internals SFXs : Convo, Delay, QuadDelay,
QuadPitchDelay, Granulaterre and Ringmod. If you have added some of yours, they also
will appears in this list.
You will find some explanation on the internal SFXs in the next pages.
37
Convolution
1 - Select Noise input
2 - Select Rhythm input
3 - Noise vu-meter and level
4 - Rhythm vu-meter and level
5 - Convolution balance
6 - Output meter
The principle of the convolution is to put the shape of a sound on an other sound.
With Convo, you can for example, modulate a drone with a percussion.
In order to do that, record a loop of drone in track 1 of Logelloop, record a percussion in
track 2 of Logelloop and then select track 1 in the left part of Convo and select track 2 in the
right part of Convo. The output will be a convoluted result of those two sounds.
Midi Controllers for Convo are :
SFX Controller 1 : Noise Input Level
SFX Controller 2 : Rhythm Input Level
SFX Controller 3 : Convolution Balance
You can affect any midi controllers to those settings in Preferences/Midi/SFX Controllers.
38
Delay
1 - Select the track or input to feed the Delay
2 - Input level
3 - Current Logelloop loop length
4 - Operator affecting the loop length to obtain the delay time
5 - Operand affecting the loop length to obtain the delay time
6 - Resulting delay
7 - Feedback
The length of this delay is related to the loop length, if you record a new loop, or if you
change the loop with Nextloop, the delay is automatically recalculated. If you make a
multiplication, the actual duration of the loop change but the initial length stay unchanged.
So the delay will stay the same.
When recording a new loop or erase the current one, the delay time is not set to Zero and
wait that a new loop is recorded to change his last duration.
39
Midi Controllers for Delay are :
SFX Controller 1 : Input Level
SFX Controller 2 : Feedback for Left channel
SFX Controller 3 : Feedback for Right channel
You can affect any midi controllers to those settings in Preferences/Midi/SFX Controllers.
The Audio Output of delay is sent to the SFX channel of Logelloop.
40
QuadDelay
Still to write.
41
QuadPitchDelay
Still to write.
42
Granulaterre
Granulaterre is an Arpeggiator based on granular synthesis. To use it, you first need to
record a sample or load it from you HD. To load a sample, you can click on the dedicated
button (1), use the command 1 or send a command from the macro world.
After that, set the ON/OFF toggle on ON position, click on some buttons in the grid to
obtain the good rhythm and set the length of grain (18) and the pitch (19, 20 and 21).
Granulaterre and the Metronome
If Granulaterre is in ‘Synced S’ this means that it will be slave of the Logelloop’s
Metronome and that you will only be able to change the Metronome settings from
Logelloop. This is particularly appreciable when you want Granulaterre to be synced to
Logelloop.
If Granulaterre is in ‘Synced M’ this means that granulaterre will be slave to the Logelloop’s
Metronome and that you will be able to change the Metronome settings from Granulaterre.
If Granulaterre is in ‘Beat synced S’ this means that granulaterre will be slave to the
Logelloop’s Metronome but only for Beats and that you will be able to choose a particular
step count for Granulaterre.
If Granulaterre is in ‘Not Synced’, it means that granulaterre have his own Metronome and
is completely independent.
Audio Outputs :
Granulaterre as 8 tracks who are routed to the 8 last main tracks of Logelloop when
Logelloop is in Mono recording. If Logelloop is in Stereo recording, the sounds of
Granulaterre will be routed to the tracks 7 to 10 of Logelloop. The menu at the right side of
Granulaterre (24) permit to choose if one track of Logelloop will play only Logelloop audio
content, Granulaterre audio content or both mixed. By default, it is mixed for each tracks.
43
1 - Hit this to rec. a sample to granulate
2 - Or load a file from your HD
3 - To save a sample to your HD
4 - In reactive mode moving the selection zone
replays sound
5 - To change the sample size
6 - Selection beginning
7 - Selection end
8 - Presets section
9 - Start the Arpeggiator
10 - Highlighted plot will plays the sample
11 - Steps number (1 to 16)
12 - BPM
13 - Selection zone
14 - Tap tempo
15 - Metronome mode (related to Logelloop
metronome)
16 - Grain shape
17 - To sync the Grain size to selection
18 - Grain size
19 - Grain start pitch
20 - Grain end pitch
21 - Grain pitch
22 - Vu meters (in red)
23 - Faders
24 - Routing selection in Logelloop
25 - Input channel and Level (1 is normal)
44
To Affect Midi commands to Granulaterre, go to the preference panel (Midi/Commands/
SFX Plug-ins for example) and choose a midi note, control change or program change for
the first 3 commands. They are affected to Granulaterre as :
• Command 1 : Record a Sample
• Command 2 : Toggle Granulaterre ON/OFF
• Command 3 : Tap tempo
• Command 4 : Clear the Sample
For Keyboard, special keyboard, LJ Footboard or Wiimote, do the same but at the specific
place :
• Keyboard commands/SFX Plug-ins
• LJ Footboard/Commands/SFX Plug-ins
• Wiiremote/Commands/SFX Plug-ins
• Special USB Keyboard/Commands/SFX Plug-ins
You can also command Granulaterre from the Macro World with messages like this one :
sfx_cmd_1.
45
Midi Controllers for Granulaterre are :
SFX Controller 1 to 8 : Control Grain length
SFX Controller 9 to 16 : Control Channel Level
SFX Controller 17 : Begin of the selection in the waveform
SFX Controller 18 : End of the selection in the waveform
You can affect any midi controllers to those settings in Preferences/Midi/SFX Controllers.
Storing Presets in Granulaterre
As Granulaterre needs a lot of settings, he has his own preset section.
This preset section have exactly the same behavior as the Logelloop preset section.
If you want that a preset in logelloop recall a preset in Granulaterre, you first have to make
the Granulaterre’s one and after that you have to store the Logelloop’s preset.
A Granulaterre Preset can be recalled from the Macro world using this syntax :
SFXRecallPreset mypresetname
or if the preset name contain spaces :
SFXRecallPreset “my preset name”
46
RingMod
1 - Select each input
2 - Vu-meter for inputs
3 - Level for each inputs
4 - Level of output modulation
5 - Vu-meter of resulting sound
The Ring Modulation Module effect multiply 2 audio signals and the result is a third signal.
Those 2 original signals come from your Logelloop’s tracks or from the inputs.
Midi Controllers for RingMod are :
SFX Controller 1 : Left Input Level
SFX Controller 2 : Right Input Level
SFX Controller 3 : Output Level
You can affect any midi controllers to those settings in Preferences/Midi/SFX Controllers.
47
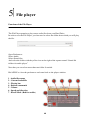
5 File player
Functions of the File Player
The File Player permits to play stereo audio files from your Hard Drive.
In order to use the File Player, you first need to select the folder from which you will play
the file.
Open Preferences
Select Audio
Select Sound files
And select the folder with the yellow icon at the right of the square named “Sound file
folders for audio player”
Note that you can select more than one folder if needed.
Hit APPLY to close the preferences and come back to the player window.
1 - Audio files menu
2 - Current loaded file
3 - Playing bar
4 - Buttons commands
5 - Volume
6 - Speed and direction
7 - Recall Mode (Red for enable)
1
6
7
48
2
3
4
5
At the top of the player’s window you can see a menu. With this menu, you will select the
file to be played.
List of all the function of the file player :
Start - To start the player
Stop - To stop the player
Pause - To pause
Resume - to resume
Loop mode off (Loop mode on) - To play play the file in loop
Loop it - To load this file in the first track of the current loop of Logelloop
Sync on begin - Restart the file each time the current loop reach the beginning
Start at Begin - The file will start next time the current loop will reach the beginning
Stop at End - Will stop playing at the end of the current loop
Open - To open a new file that is not in the selected folders
Refresh Menu - If you add a new file in one of the player’s folders from the os X finder and
you want to access to this file immediately
In the player you also have access to some commands to modify the speed and the direction
of the player.
To change the level, use the fader at the rightmost part of the window.
49
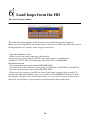
6 Load loops from the HD
The «Saved_loops» window
The Audiofiles loader permit to load files that you recorded before with Logelloop.
When you select CopyToFile, the current loop is saved on your HD in the folder you chosen
in the preferences. To reload a saved loop you can do this :
- Open the Audiofiles loader
- Select a loop in the menu at the top of the window
- If the loop was saved using CopyToFile, the current name is something like :
“20060319-122325” This is an automatic name made like “YearMonthDayHourMinuteSecond”
- You rename the loop using the button RENAME FILE
- You can load it at the location you want with : LOAD IN A, LOAD IN B or LOAD IN C
- You also can delete this loop selecting DELETE FILE
- When you Copy a loop to your HD, the state of the looper’s mixer is also recorded. To
revert to this state after loading a loop, you can choose LOAD PRESET. Please note that
this function will only works on the current loop, so, if you are in A an you want to load a
loop in B, you will have to go to loop B to recall the preset of the loaded loop.
50
The loop maker
The yellow button in the Audiofiles loader open a window named Loop_maker.
In this window, you can make loops from file you just drag and drop on the dedicated area.
You can drop up to 10 files. Then, you just need to select LOAD IN A, LOAD IN B or
LOAD IN C and your files are loaded to the selected loop.
You can choose file who haven’t the same length but the length of the created loop will be
the length of longer one.
51
7 Inputs’ Window
1 - Route this channel to the looper
2 - Route this channel to the monitor out
3 - Mute this channel
4 - Aux sends
5 - Panner settings
6 - Enable / disable the preset recall
7 - Monitor output level
8 - Input level
9 - Vu meter Pre / Post faders
52
Input Paners
The paners have an effect on the monitoring position of the sound, but not on the stuff being
recorded in the looper if you are in Mono (Preferences/Global preferences). If you are in
Stereo in the Global preferences panel, the inputs panner will change the position of the
recorded stuff in the buffer.
Input faders and Auxiliaries
The fader changes the level of the input in the monitoring, in SFXs and also in the recorded
loops.
Auxiliaries will send the input audio content to the VST plugs or, if you set them to Bypass,
directly to an output. They can be set to PRE or POST meaning that the faders will also
change the level for auxiliaries or not.
Input To Monitor (M)
Each input content can be routed to the monitoring channels.
In order to do it, you just need to go to the preferences pannel and in ‘Audio/inputs’, check
the ‘To Monitor’ box. Then the M will be red and you can ear this channel in the monitor
according that the volume of the monitor output is not at zero and that you selected outputs
for the monitor in Preferences/Audio/Monitor).
Input ToLoop (L)
Each input can be routed to the looper or not. If a channel is not routed the looper, it will not
be recorded when you press record. This can be useful to have a lot of instruments
connected and just selecting the one you want to be looped.
To choose if an input will be routed to the Looper, go to the preferences pannel and in
‘Audio/Inputs’, check the ToLoop box for this channel.
53
Storing Input settings in the Presets
If you want to store your inputs settings in a Preset, you can Press the ‘-’ button (1) at the
right hand of the window. The button will be changed to a ‘R’ (for ‘recall enabled’) button.
And you can store the Preset with the button ‘NEW’ for a new preset or with the button
‘STORE’ if you are updating a previously stored preset.
54
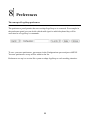
8 Preferences
The concept of Logelloop preferences
The preferences panel permits the user to adapt Logelloop to is own need. For example in
the preference panel you can decide which midi signal or which keyboard key will be
associated to a Logelloop’s commands.
To save your own preferences, put a name in the Configuration space and press APPLY.
You new preferences set-up will be added to the list.
Preferences set-up is a session like system to adapt logelloop to each working situation.
55
The Global preferences panel
Here you will set if Logelloop works in Stereo or Mono.
By default, Logelloop is Mono.
You can also set the length of your audio loops.
As the loops are recorded in the RAM and not on the Hard Drive, it is recommended to set a
loop length related to your the RAM installed in your computer.
The Administrator Password permit to set Logelloop at a hight priority level on your
computer. With this option, another application will not interrupt Logelloop.
THOSE OPTIONS NEED TO RESTART LOGELLOOP IN ORDER TO BE EFFECTIVE.
56
The Audio Driver’s panel
Here you can choose which sound card you want to use.
You can also choose the sample rate, the Input / Output vector size and the signal vector
size.
57
The Monitor panel
It is possible to send the inputs of Logelloop directly to some outputs of your soundcard.
This can add some latency regarding to the buffer size (see The Audio Driver’s panel).
Despite of this latency, it can be very useful if you need to feed the direct sound to your
front of house sound system or to a monitoring system. The monitoring level master (in
Input’s window) can be stored in presets.
58
The Outputs panel
In this panel you can choose that Logelloop’s output are in Stereo, Multitrack or Spatialized.
Stereo : The outputs of Logelloop tracks are mixed and routed to 2 of the outputs of your
sound card. You can send the FXs outputs to some different hardware outputs.
Multitrack : This is useful if you need to send each track separately to an audio mixer or to
a recorder.
Spatialized : If you choose the spatialized mode, you can tell to Logelloop where are your
loudspeakers in the audience (in degree) and then a 360° panner will permit to set the
position for each track separately.
59
The VST plugs panel
Here you choose where Logelloop will search for your VST plugs.
You can set as many folders as you want.
60
The Sound Files panel
In the “Sound file folders for audio player” panel you can choose where Logelloop will
search for audio files that will appears in the “File Player” menu. Aif, Wave, and SDII files
can be played.
More than one folder can be chosen here.
In the “Current work folder” you choose where Logelloop will write you loops with the
CopyToFile command. This also the location where logelloop will load the files with the
“Saved Loops” panel
61
The Behavior panel
In this panel you can adapt each Logelloop behavior to your preferences...
62
The Look And Feel panel
In this panel, you can choose The Logelloop’s colors and which window will automatically
open at startup.
63
The Macro Management panel
This panel permit to manage you macros.
You can write some new macros, remove and duplicate the macros.
(see chapter Macros).
64
The Macro Mapping panel
Up to 30 macros can be loaded in a Logelloop session.
(see chapter Macros).
65
The Network panel
Logelloop can send a lot informations to another computer via an ethernet connexion.
It can also receive some informations from another computer running Logelloop or another
soft like Max/MSP, Pure Data, etc.
Please, contact the Logelloop team in order to know how those informations can be used.
66
9 Macros
How to use the macros in Logelloop
A macro is a small program who permit to do a lot of command in one click.
You can write your own Macros or use a macro that you can find in ‘Preferences/Macros/
Macro management’. If you want to write your macros, please go to the ‘Reference guide’
by clicking the button at the lower part of the Macro management page.
Insérer une nouvelle macro dans Logelloop
Pour insérer une macro que quelqu’un vous a donnée dans Logelloop, cliquez sur le bouton
‘Voir Dossier’ qui se trouve en bas de la fenêtre de gestion des macros dans Logelloop.
Ensuite, glissez votre nouvelle macro dans le dossier qui vient de s’ouvrir et cliquez sur le
bouton ‘Actualisé’ qui se trouve juste à coté du précédant de ‘Voir dossier’
67
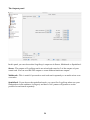
Inserting a Macro in a slot
Here we will see how to trigger a macro with a key, a midi note, midi cc, midi pc,
ljfootboard, Wiimote, etc.
First of all, you need to load a macro in a slot. In order to do it, go to ‘Preferences/Macros/
Macro mapping’ and, in the slot called Macro 1 select a macro in the menu like in the
example below :
After that, you will need to affect a command to the slot called Macro 1, to do it, please read
the explanations below.
68
How to command a Macro with Midi
To affect it to a midi note, go to Preferences/Midi/Commands/Macros, click to active the
midi commands in the “Note Commands” part, select a port and a channel. After that, select
a Midi Note in the list.
In the same page, you will find the midi control and Program Change commands for the
macros.
69
Variables in Macros
You can use Variables in your macros.
Those Variables are a way to connect a macro to the ‘outside’ world.
The main variable is $counter$. this variable will change his value when you will hit Inc or
Dec in the Transport window (or by another way).
You can also use variables that listen to connected Midi Devices.
In order to configure this, you can go to Preferences/Midi/Variables on midi controllers (or
midi notes). Once a device is configured, the macro variable will change his value regarding
the midi controller value.
You can use 8 midi controller variables whose names are $midiv_cc1$ to $midiv_cc8$.
If the you use a midi note emitter, then the variables are $midiv_nt1$ to $midiv_nt8$ who
take a value related to the last received Note and $midiv_ntv1$ / $midiv_ntv2$ / ... /
$midiv_ntv8$ who take the Velocity of the last Midi Note.
List and state of Macros Variables
If you want to have a look to all your variables and to know their state.
Open the Macro window, click on the ‘ViewVariables’ button. You will see all the variables
accessible in a macro.
If you want to create a new variable, you can do it using the ‘Declare’ function in a macro.
See ‘Advanced control action’ in the macro’s help.
70
How to command a Macro with the Wiimote
To commands a Macro with the Wiimote, go to Preferences/Wiimote/Commands/Macros
and select a button in the list.
71
How to command a Macro with the LJ Footboard
To commands a Macro with the LJ Footboard, go to Preferences/LJ Footboard/Commands/
Macros and select a button in the list.
72
How to command a Macro with the Keyboard
To commands a Macro with the Keyboard, go to Preferences/Keyboard Commands/
Commands/Macros and select a Key in the list.
73
How to command a Macro with the Special USB Keyboard
To commands a Macro with the Keyboard, go to Preferences/Special USB Keyboard/
Commands/Macros and select a Key in the list.
74
10 Keyboards and Remotes
How to communicate with logelloop
You can communicate with Logelloop by a lot of ways.
The first one is your mac keyboard, but you can also command logelloop with midi gears,
Wiimote and Labjack module.
If you want to use a specific gaer who does not seems to be compatible, please, feel free to
contact us, maybe we can add it to Logelloop.
Standard Mac Keyboard
By default, a lot of Keys are affected to some Logelloop’s functions. All of the default
keyboard commands are explained in the Quick View.
If you need to add some keyboard short cut or to modify the default keyboard commands,
you can go to Preferences/Keyboard Commands and select a page regarding which part of
Logelloop you want to command with a new keyboard shortcut.
At the end hit APPLY to record you new setup.
Special USB Keyboard
The Special USB Keyboard is also the built in computer’s keyboard but if you use the
special USB keyboard listener, the keyboard is faster and you can command Logelloop even
if Logelloop is not the front application on your Mac.
In order to use the Special Keyboard listener, go to : Preferences/Special USB Keyboard
and hit Start now (and check “Start controller at startup” if you want to always use this
listener)
75
Midi Commands to Logelloop
You can send commands to Logelloop From every Midi hardware or software.
In order to do it, if is an Hardware, you need to connect his midi output to one input of the
sound card connected to Logelloop. If the Hardware can be connected in USB, you can also
connect this hardware to the Logelloop’s computer.
If you connect a new Midi interface (Hardware connected with USB, second midi card, new
Midi software) you need to restart Logelloop.
After this go to Preferences/Midi/Commands/Main and configure your set-up.
1 - Must be checked to activate this listener
2 - Choose your midi device in this list
3 - Choose the Midi channel
4 - Set the Midi Note (Midi controller or Midi Program change
76
How to configure Midi Commands
Be sure that you can see your Midi device in the Midi device list.
If the Midi device is not there this means that Logelloop cannot see it.
Verify your connection and restart Logelloop.
If his name is followed by “?”, this mean that the device was already used by Logelloop in
this computer, but that it is not connected now.
The protocol to set-up your midi commands is :
1. Check ‘Activate this midi commands’
2. Choose the Midi device you ant to listen to in the list
3. Choose the Midi channel
4. Choose the Midi Note in the list or just click the menu and play the Midi Note on
your keyboard or on your footboard.
You can configure a lot of midi commands at the same time.
When the set up is finished, click APPLY at the bottom of the preferences window and wait
that the window is closed and the audio is on to use your new midi set-up.
This is the same for other type of commands.
77
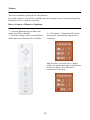
Wiimote
You can command Logelloop from a Wii Remote.
It is really simple to do it and it is probably one of the cheaper way to command Logelloop.
Furthermore, it is a cordless connexion
How to Connect a Wiimote to Logelloop
1 - Activate Bluetooth on your Mac and
connect the Wii to the Mac.
2 - Push the button 1 and 2 of the Wiimote
at the same time. The four leds will blink.
3 - Click on the ‘c’ button near Wii in the
‘Keyboards” panel on the main panel of
Logelloop.
After less than 3 seconds, the ‘c’ button
will be red and the four leds of the Wiimote
will stop to blink : Your Wiimote is
connected to Logelloop.
78
Configure the Wiimote
When the Wiimote is connected to Logelloop.
You can go to the preference panel and click Wiiremote in the left part of the panel.
After that, you can choose a command for each button of the Wiimote as in the example
below. Every functions of logelloop (and even the macros) can be commanded from the Wii
Remote.
79
LabJack
Still to write
80