1
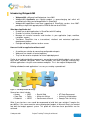
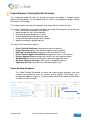
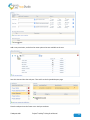
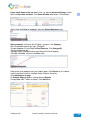
Building Your Project Management Office
For support or information from our
support center, call
864-288-1550
About Webparts360
Webparts360 AppStudio is a powerful and easy to use application development toolkit that empowers
business users and developers to assemble their own applications by configuring only 3 web parts.
These web parts provide the necessary components required for input, process and output:
•
•
•
SmartList, an advanced data entry forms with validations, child lists, lookups and actions,
SmartView, reporting widgets with animated charts, data grids, Gantt charts, calendars
and SmartMenu, contextual navigation with role based menu item security
Essentially, everything you need to build comprehensive end-to-end applications.
Webparts360 core underlying framework extends out-of-the box SharePoint to support the demands of
an enterprise solutions; including:
•
•
•
Extend SharePoint custom list to be used as a SQL table; including relational T-SQL queries
Work seamlessly between SharePoint data with back-end SQL data
Full audit log for transaction tracking and audit trails
Webparts360 AppStudio delivers all these functionalities in an integrated web development
environment that allows you to manage all the artifacts of an application from the convenience of a
single tool; including:
•
•
•
•
Visual design tools to build the entity relationship (ER) model of the database and the process
model of a transaction during data entry
Easy access to all SharePoint resources; custom list, document libraries, images, pages as well as
to external data sources or web services
Enterprise solution lifecycle management features such as web parts version control with checkin/check-out, transaction audit trail with process map
Solution package and deploy function with password protection
Today, webparts360 has been successfully used by large enterprises such as Amway, Coca Cola, Daikin,
MAS, Prudential and etc… to power mission critical business processes such as CRM, project
management, procurement, service management, employee self-service, performance dashboards and
other business process automation.
For more information, see http://www.webparts360.us
© webparts360
Project Tracking Training User Manual
2
Table of Contents
Introducing Webparts360 ........................................................................................................................ 7
Project Expense Tracking Solution Overview...................................................................... 8
Project Portfolio Dashboard ................................................................................. 8
Project Workspace ............................................................................................. 9
New Expense Item Request .................................................................................. 9
Project Expense Approval Dashboard ................................................................... 10
Expense Approval Form .................................................................................... 10
Workflow Details ............................................................................................. 11
Bar Chart: Expenses by Project ............................................................................ 12
Application Security ......................................................................................... 12
Creating the solution ................................................................................................. 14
Creating and Naming a Site ............................................................................... 14
Introducing Webparts360 AppStudio ................................................................... 16
Creating a New Page ................................................................................................. 18
Connect Existing SharePoint Lists to the Solution ............................................................. 19
Making SharePoint Relational ...................................................................................... 21
Creating Menu Navigation .......................................................................................... 22
Building the Project Portfolio Dashboard ........................................................................ 25
Adding a Data Source ....................................................................................... 25
Adding a Data View
......................................................................................... 26
Adjusting Report Columns, Headings and Formats .................................................. 26
Configuring Chart Settings
................................................................................ 27
Configuring Menu Options ................................................................................ 27
Configuring Menu Permissions ........................................................................... 28
Adding a Web Part to a Page ............................................................................. 28
Confirming That Your Changes Appear ................................................................. 28
© webparts360
Project Tracking Training User Manual
3
Creating Drill-down Reports ........................................................................................ 29
Defining the Project Detail Report ....................................................................... 29
Defining Expenses Listing for Project Workspace .................................................... 31
Defining the Project Expense Summary Report ....................................................... 34
Adding a Bar Chart for Expenses by Project ........................................................... 34
Confirming That Your Changes Appear ................................................................. 37
Defining the Project Expense Detail Report ............................................................ 37
Confirming That Your Changes Appear ................................................................. 39
Defining the Project Expense Pending Report ........................................................ 39
Making SharePoint Transactional .................................................................................. 40
© webparts360
Project Tracking Training User Manual
4
Table of Figures
Figure 1 – The Webparts360 Advantage ....................................................... 7
Figure 2 – Project Portfolio Dashboard.......................................................... 8
Figure 3 – Project Workspace Showing Details & Expense Items ................. 9
Figure 4 – New Expense Item Request ......................................................... 9
Figure 5 – Project Expense Approval Dashboard .........................................10
Figure 6 – Expense Approval Form ..............................................................10
Figure 7 – Workflow Details .........................................................................11
Figure 8 – Bar Chart: Expenses by Project...................................................12
Figure 9 – Project Manager’s view with extra function ..................................12
Figure 10 – Project Team view with limited access ......................................13
Figure 11: Entities Relationships Diagram ....................................................13
Figure 12 – New Site ....................................................................................15
Figure 13 Webparts360 AppStudio Design Console .....................................17
Figure 14 – Webparts360 AppStudio Design Console ..................................17
Figure 15 – Creating a New Page ................................................................18
Figure 16 – Configuring Page Settings .........................................................18
Figure 17 – Page List ...................................................................................19
Figure 18 – Linking Existing Lists .................................................................20
Figure 19 – Create an Entity Relationship Diagram ......................................21
Figure 20 – Relationship Diagram Design Canvas .......................................21
Figure 21 – Editing a Menu ..........................................................................22
Figure 22 – Menu Edit Screen ......................................................................22
Figure 23 – Adding a New Node (Menu Tab) ...............................................23
Figure 24: Adding a page .............................................................................23
Figure 25 – Changing Top Menu to Tabbed Items .......................................24
Figure 26: Menu Customization ....................................................................24
Figure 27 – Creating a Report (SmartView)..................................................25
Figure 28 – Adding a Data Source ...............................................................25
Figure 29 – Adding a Data View ...................................................................26
Figure 30 – Selecting a Report Column and Caption ....................................26
Figure 31 – Changing Display Format on a Report Column .........................26
Figure 32 – Selecting Dates for Gantt Chart .................................................27
Figure 33 – Configure Menu Options............................................................27
Figure 34 – Setting Menu Permissions .........................................................28
Figure 35 – Adding a Web Part to a Page ....................................................28
Figure 36 – Gantt Chart Appears on Home Tab ...........................................28
Figure 37 – Creating Project.Selected Drill-down Report..............................29
Figure 38 – Joining Lists ..............................................................................34
Figure 39 – Join Column Relationship ..........................................................34
Figure 40 – Adding an Aggregate Group ......................................................34
Figure 41 – Marking How to Aggregate Each Column ..................................34
Figure 42 – Adding a New Chart ..................................................................35
Figure 43 – Configuring Settings for a Bar Chart ..........................................35
© webparts360
Project Tracking Training User Manual
5
Figure 44 – Adding Labels to a Bar Chart.....................................................35
Figure 45 – Enabling Drill-down on a Bar Chart ...........................................36
Figure 46 – Selecting the Page for Drill-down on a Bar Chart.......................36
Figure 47 – Adding a Parameter for Drill-down on a Bar Chart .....................36
Figure 48 – Adding Bar Chart Web Part to Reports Page.............................36
Figure 49 – Bar Chart Appears on Reports Page .........................................37
Figure 50 – Selecting Datagrid Columns and Captions ................................37
Figure 51 – Adding a Filter Condition With a Parameter ...............................38
Figure 52 – Configuring Menu Parameters and Permissions ........................38
Figure 53 – Adding Menu Web Part to Page ................................................38
Figure 54 – Project Expense Detail Drill-down Report Appears ....................39
Figure 55 – Creating a Transaction ..............................................................40
Figure 56 – Visual Tab on Transaction Screen .............................................40
Figure 57 – Transaction Workflow Design Canvas With 3 Stages ................40
Figure 58 – Adding a Branch to Link 2 Stages .............................................41
Figure 59 – Edit Branch Icon ........................................................................41
Figure 60 – Edit Branch “Condition Setting” Screen .....................................41
Figure 61 – Simplifying a Branch Description to Indicate Flow .....................41
Figure 62 – Design Canvas With 3 Stages Linked by 3 Branches ................42
Figure 63 – User Icon and Edit Role Icon in a Stage ....................................42
Figure 64 – Role Definition Screen for Submit Stage ...................................42
Figure 65 – Renaming a Form on Edit Form Screen ....................................42
Figure 66 – Setting Permissions for the New Expense Form ........................43
Figure 67 – Setting Permissions for Approve Expense Form........................44
Figure 68 – Adding a New Lookup ...............................................................45
Figure 69 – Selecting Data Source for a Lookup ..........................................45
Figure 70 – Naming the Project Lookup .......................................................45
Figure 71 – Applying Lookup to Column .......................................................45
Figure 72 – Adding Projection ......................................................................45
Figure 73 – Selecting Destination and Source Columns ...............................45
© webparts360
Project Tracking Training User Manual
6
Introducing Webparts360
•
•
•
Webparts360: a Microsoft certified partner since 2001
Webparts360 AppStudio: our flagship product, a game-changing tool which will
revolutionize the way you build applications in SharePoint
Webparts360 applications have been supporting all SharePoint versions since 2007:
providing a single click upgrade path to SP2010 and now also SP2013.
What does AppStudio do?
• Enables you to build applications in SharePoint with NO coding
• Provides an intuitive visual design tool
• Manages all essential resources and functions in your application (input, workflow,
navigation, reports)
• Transforms SharePoint into a transactional, relational and contextual application
development platform
• Package and deploy solutions to other servers
How can I build an application without code?
•
•
•
Assemble your solution by connecting configurable web parts
Web parts are stored in a central repository
They can be saved as templates for future rapid deployment
Similar to pre-fabricated building components, we provide essential building blocks such as data
entry forms, workflow, data grids, charts, and navigation. We make it possible to build many
different applications using the same common web parts. This is the magic of Webparts360.
Building collaborative web applications is as easy as creating a spreadsheet!
Figure 1 – The Webparts360 Advantage
Some of our clients include:
• Amway
• MISC
• Coca Cola
• Daikin
• Prudential
• MDEC
• Barrick Gold
• Malaysian Airlines
• Government of Brunei
• NT State Government
• University of Nottingham
• Georgia Tech University
What if your business users could be empowered to build their own solutions? Imagine the
possibilities, if the same executive who created project budgets in Microsoft Excel also created
and built the budget approval system. This guide will show how these possibilities can be
achieved.
© webparts360
Project Tracking Training User Manual
7
Project Expense Tracking Solution Overview
This step-by-step guide will walk you through the process of building a complete project
expense tracking solution. The main objective of this system is to help project managers to keep
their projects within budget.
This chapter explains what we will accomplish, and shows how the solution will look.
This system is designed to assist project managers to manage all their projects so that they can:
Have visibility over the progress of all projects
Approve expenses items for each project
Keep track of project budget versus actual
Provide repository for project documentations
Assign and track tasks to project team members
Approve new projects (project sponsor)
The solution will include these features:
•
•
•
•
•
•
•
•
Project Portfolio Dashboard (summary overview of all projects)
Project Workspace (details and individual expenses for one project)
New Expense Item Request (employees fill out and submit this form)
Project Expense Approval Dashboard (manager picks from a list of requests)
Expense Approval Form (manager views details here, then approves/rejects)
Workflow Details (audit trail showing each stage in the approval process)
Bar Chart: Expenses by Project (track actual vs. budgeted expenses)
Application Security (some tabs are visible to managers only)
Project Portfolio Dashboard
The Project Portfolio Dashboard on Home tab enables project managers and team
members to conveniently access a summary of their projects. Each project has a
manager who approves expenses. Clicking a project name will drill down to show details
and expenses for this project.
Figure 2 – Project Portfolio Dashboard
© webparts360
Project Tracking Training User Manual
8
Project Workspace
The Project Workspace shows details and individual expense requests for one project.
To display this screen, click a project name on the Project Portfolio Dashboard.
Figure 3 – Project Workspace Showing Details & Expense Items
New Expense Item Request
To submit a new item, click the Actions dropdown on the Project Workspace, then click
Create new expenses and fill in the form. The Approved By field is locked; it defaults
to the name of the project manager for the project you select.
Figure 4 – New Expense Item Request
© webparts360
Project Tracking Training User Manual
9
Project Expense Approval Dashboard
Once you submit an expense claim request, it appears on the project manager’s
approval dashboard.
Figure 5 – Project Expense Approval Dashboard
The manager can click to approve or reject any expense claim. This displays the expense
approval form.
Expense Approval Form
Figure 6 – Expense Approval Form
All fields entered by the employee are locked. Only the project manager can approve or
reject the request, by clicking the Status dropdown. The system updates the Date
Approved when the manager approves. If rejected, this request is sent back to the
employee.
© webparts360
Project Tracking Training User Manual
10
Workflow Details
The following diagram shows the approval workflow for project expense items between the project
members, project manager and finance department.
Project Expense Workflow
Phase
Project
Members
Resubmit
Start
Submit Request
Rejected
Requests
Resubmit
Request
Finance
Project
Managers
No
Email
Notification
Finish
New
Requests
Approved
Requests
Approve/Reject
Request
Cancelled?
Email
Notification
Yes
Approve?
Cancelled
Requests
Yes
At any point, the user can click the workflow details to see the animated audit trail. This shows the steps
and details at each stage of the approval process and the person who make the action at each point.
Figure 7 – Workflow Details
© webparts360
Project Tracking Training User Manual
11
Bar Chart: Expenses by Project
To assist project managers to make informed decision, we will create a bar chart that shows the actual
expenses spent versus the budgeted amount on each project. The manager can click any column on the
chart to drill down and see details.
Figure 8 – Bar Chart: Expenses by Project
Please note that in order to do this report you will need to join the project table with the expense table.
Application Security
All project team members have permission to view the Home tab. In addition, the project manager has
security access to view the Approvals tab and Reports tab.
Figure 9 – Project Manager’s view with extra function
© webparts360
Project Tracking Training User Manual
12
Figure 10 – Project Team view with limited access
As with all projects, you will also need to document the following:
• Database entities relationships
• Process workflows
• Site Maps
• Logical system organization
Figure 11: Entities Relationships Diagram
Now that we understand how the application should work, let’s start building our project expense
tracking solution.
© webparts360
Project Tracking Training User Manual
13
Creating the solution
We begin the step-by-step process of building a complete project expense tracking solution by
creating a new site to hold the application. We will use a standard site predefined site template
to save time in recreating the lists. Each table in the system is already defined in this template.
Creating and Naming a Site
1. Click Site Actions at the top left
2. Click on Sites and Workspaces
3. Click on Create
© webparts360
Project Tracking Training User Manual
14
Enter the site title, description and
the url name.
Under the template selection
custom tab, select ProjectDemo.
Press “Create” to create the new
solution site.
Upon creation, the system will show
you the newly created sub site.
.
Figure 12 – New Site
You can use any name you like, just use the same name on all screens. We used Project
Tracking because that is descriptive.
When your new site is created, before you make any changes, it appears as the default
SharePoint view. At this point, you have the basic ability to manage contents.
If you click the Expenses list, you will see rows and columns of expense item data. If you click
Add new item, you will see the standard SharePoint data entry form.
© webparts360
Project Tracking Training User Manual
15
SharePoint “out of the box” does not allow you to control which users can see which columns.
All data is visible to everyone. Some columns are only appropriate at certain points during data
entry.
Webparts360 provides a SmartList, which gives you control over each column throughout the
life cycle of the transaction.
Introducing Webparts360 AppStudio
Webparts360 provides you with a design console to develop your solution:
1. Click Site Actions
2. Click Webparts360 AppStudio
3. This displays the AppStudio Design Console
1. Click on the Site Action Icon (
)
2. The click on the Solution Designer
Fill up the project
description.
You can assign a category
to the solution or to
create a new one. This
category will help you to
organize your solutions
within the server.
You can also select a
master page that you
wish to use for this
solution.
© webparts360
Project Tracking Training User Manual
16
These are the other
settings for your solution.
Turn off versioning only
after you have complete
building a solution,
otherwise it will be
tedious as the system will
track all the changes that
you make to the system.
Check-in/out is useful
when working as a large
team.
The transaction audit
creates a log file that
tracks all accesses to any
lists within the solution.
Press “create” to build
your solution.
Figure 13 Webparts360 AppStudio Design Console
Figure 14 – Webparts360 AppStudio Design Console
© webparts360
Project Tracking Training User Manual
17
Creating a New Page
Webparts360 AppStudio allows you to manage the pages (and all resources).
Figure 15 – Creating a New Page
1.
2.
3.
4.
5.
6.
7.
Click Pages on the left sidebar
Click Add New Page (blue link)
Enter File Name: ProjectWorkspace (no blanks)
Enter Title: Project Workspace (insert a space)
Add Description: This page has workspace details.
Select Page Template: Header, Footer, 3 columns.
Click the Create button.
Figure 16 – Configuring Page Settings
© webparts360
Project Tracking Training User Manual
18
Figure 17 – Page List
1. See blue message: Page is created successfully!
2. New page ProjectWorkspace.aspx appears on the list
3. All pages will be listed here, with their web parts
Connect Existing SharePoint Lists to the Solution
1. Click Custom Lists
2. Click Link Existing List
3. Click List Name
dropdown
4. Mark all checkboxes
5. Click Link existing list
button
6. Now all the lists will
appear
7. Click on the list name
to select all the list
8. Then press link to
include all the lists into
this solution
© webparts360
Project Tracking Training User Manual
19
Figure 18 – Linking Existing Lists
Here’s the description of each lists and what it does:
List Name
Projects
Departments
Purpose
Stores all the projects’ details
All the departments within the
company
Project Categories
Expenses
Expense Categories
Documents
Different type of projects
Stores all the expense items
Different type of expense items
Library to store project
documents
Stores all the periodic progress
reports for each project
Tasks assigned to project
members
Project Updates
Project Tasks
Relationships
Primary Key is ID
Linked to Projects (Department)
By default, the Head of Department is the
project sponsor
Linked to Projects (Category)
Linked to Projects (Project)
Linked to Expenses (Category)
Linked to Projects (Project)
Linked to Projects (Project)
Linked to Projects (Project)
The following are the status fields and its meanings
Lists
Projects
Expenses
Project Reports
© webparts360
Column (Values)
Project Status - New, Approved, Rejected
Status – New, Approved, Rejected,
Processed
Schedule Status, Cost Status and Risk
Status
Purpose
If a project is approved
To determine the approval status for
an expense item
These are status indicator flags for
project manager to report on the
overall status of a project.
Project Tracking Training User Manual
20
Making SharePoint Relational
To maximize value, you can easily create an Entity Relationship Diagram (ERD) to define all the
data relationships in this solution. This feature allows you to transform SharePoint data to work
as a relational data source.
1. Click Relationships
2. Click
Add
new
relationship
3. Click
Full
Screen
button
4. Drag Projects list onto
canvas
5. View the fields on this
list
Figure 19 – Create an Entity Relationship Diagram
6. Drag Departments to
canvas
7. Drag Project
Categories
8. Update the
relationships label
9. Click Save button at
top right
Figure 20 – Relationship Diagram Design Canvas
© webparts360
Project Tracking Training User Manual
21
Creating Menu Navigation
Click Navigations on left sidebar. Click Application Menu. Click the version to edit.
Figure 21 – Editing a Menu
Figure 22 – Menu Edit Screen
1.
2.
3.
4.
5.
6.
7.
Click Add New Node
This creates a new menu tab
Enter Caption: Approval
Find blue button beside URL
Click Page icon beside
File Name: Approval
Title: Approval
© webparts360
Project Tracking Training User Manual
22
8. Description: Approval
9. Click Create button
10. Click Save button
11. Repeat these steps (add node):
12. Caption, File Name: Reports
Figure 23 – Adding a New Node (Menu Tab)
Figure 24: Adding a page
Approval and Reports now appear on the list of Nodes. In Advanced Settings, Top Menu,
change dropdown to Tabbed Items (double click). Click Customize beside it to adjust colors
and settings. Click Save. Now we have finished creating the menu tabs.
© webparts360
Project Tracking Training User Manual
23
Figure 25 – Changing Top Menu to Tabbed Items
Figure 26: Menu Customization
© webparts360
Project Tracking Training User Manual
24
Building the Project Portfolio Dashboard
Now we can create reports (SmartViews) starting with the main project lists.
1.
2.
3.
4.
Figure 27 –
Click Reports on left sidebar
Click Add new SmartView definition
Enter Title: Project.Listing
Enter Description: List of projects
Creating a Report (SmartView)
There are 3 steps to defining a SmartView:
1. Add data source
2. Build data views
3. Assign permissions to user groups (control viewing privileges)
Adding a Data Source
1. Click Add new data source
Figure 28 – Adding a Data Source
2. On Primary List, pick
Projects
3. Scroll down, click Save
button
4. Data Source Projects
appears on list
5. Press Save to use it
© webparts360
Project Tracking Training User Manual
25
Adding a Data View
Select a Data View:
Click Add new Gantt
Next, we will configure the Gantt
chart.
Figure 29 – Adding a Data View
Adjusting Report Columns, Headings and Formats
Figure 30 – Selecting a Report Column and Caption
Click 1st checkbox (Display) at the far left of Projects.Title field. This field will now appear on the
report. Click the blue caption at the right, change to: Project Name.
Figure 31 – Changing Display Format on a Report Column
Click 1st checkbox at the far left of Projects.BudgetAmount field. Change the blue caption to
Budget. Click + to expand Projects.BudgetAmount, then click Formatting dropdown. Scroll down
and pick the first Number format: $#,##0.00 Click Done.
Select 2 more fields for this report. Adjust (Blue Caption) to the value in parentheses:
1st checkbox for Projects.Project Manager_UserInfo_Name (Project Manager)
1st checkbox for Projects.Department_Lookup_Description (Department)
© webparts360
Project Tracking Training User Manual
26
Configuring Chart Settings
Click Start Date dropdown, pick Projects.Start Date
Click End Date dropdown, pick Projects.Finish Date
Click Percent Completed, pick Projects.% Completed
Figure 32 – Selecting Dates for Gantt Chart
Configuring Menu Options
Figure 33 – Configure Menu Options
Expand Menu section (click +).
For View Item, set Title = View Project
For New Item, set Title = New Project
For Edit Item, set Title = Edit Project
© webparts360
Project Tracking Training User Manual
27
Configuring Menu Permissions
Menu permissions allow you to control who has
access to each menu option.
Click Add new permission. Click + below Menu
Permission (between the 2 blue arrows and [me]
field). This expands the [me] role (everyone).
Mark the 1st 3 checkboxes (View Item, New Item,
Edit Item). Click Save. Click Save again, to return
to the version page.
Figure 34 – Setting Menu Permissions
Adding a Web Part to a Page
Figure 35 – Adding a Web Part to a Page
Click Add Webpart to page.
On Solution Pages dropdown, pick Default.
On Zone dropdown, change TitleBar to Header.
Click the Add button.
Confirming That Your Changes Appear
Refresh your solution page on the browser. For example:
http://server/TrackProjectExpenses/solutionpages/default.aspx
Click the Home tab. The new Gantt chart should appear on your default page.
(You may have to refresh again to make the chart wider.)
Figure 36 – Gantt Chart Appears on Home Tab
© webparts360
Project Tracking Training User Manual
28
Creating Drill-down Reports
Defining the Project Detail Report
Now we are ready to add a drill-down page to zoom
in on Project Workspace details.
1. Click Reports on the left sidebar
2. Click Add new SmartView definition
3. Create a new report on this screen
4. Enter Title: Project.Seleted
Figure 37 – Creating Project.Selected Drill-down Report
Enter Description: This report shows details for the selected project. You must pass the
parameter [ProjectID] to select the record. Click Add new data source. On Primary List, pick
Projects, as shown in Figure 28 – Adding a Data Source.
Click Select Columns, the blue link at the lower left of the screen with Primary List.
Click the top checkbox twice to clear all boxes.
Select Projects fields: ID, Title, Project Manager, Project Manager_UserInfo_Name,
Project Scope, Start Date, Finish Date, Budget Amount
© webparts360
Project Tracking Training User Manual
29
Click Save button on the selected column. Next add a Layout to display the selected project
details.
Select the data source and set the filter condition for Projects.ID = [param:ProjectID]. This will
restrict the report to only display records that meet the parameter (ProjectID) that is passed
when opening this page (e.g. ProjectWorkspace.aspx?ProjectID=N)
Save this web part view and add it to the ProjectWorkspace.aspx page under the “Header”
zone.
© webparts360
Project Tracking Training User Manual
30
Defining Expenses Listing for Project Workspace
Now we will create the expenses lists for a selected project which is part of our project workspace page.
Add a new SmartView called “Project.Expenses”, using Expenses as a data source.
Next, add a datagrid and select the columns that you wish to display.
© webparts360
Project Tracking Training User Manual
31
Add a grouping on Amount to calculate the total expenses for a selected project.
Add a filter condition for Expenses.Project equal to [param:ProjectID] so that we will only display
expenses for the selected project. Select to display the total at the bottom. And add a filter condition for
Expense.Project = [param:ProjectID].
Change the menu caption so reflect the context.
© webparts360
Project Tracking Training User Manual
32
Add a new permission, and select the menu options that are available to the user.
Save this view and also the web part. Then add it to the ProjectWorkspace page.
Place the webpart into the Footer zone. And you are done.
© webparts360
Project Tracking Training User Manual
33
Defining the Project Expense Summary Report
Create another new report to summarize total expenses on each project:
Click Add new SmartView definition
Enter Title: Project.Expense.Summary
Enter Description: Shows the total expenses for each project.
Click Add new data source. Enter Name: Expenses by Project
On Primary List, pick Projects. Under Join Type, click Add List.
Join this list to Expenses: click Expenses on the List dropdown.
Figure 38 – Joining Lists
Join column is based on the relationship defined earlier in your diagram. Click Save.
Figure 39 – Join Column Relationship
We need to group the data by Project.
1. Under View Type, pick Aggregate Group.
2. Under Grouping, click Add Group
3. Click the Group dropdown
4. Select Projects.Title(nvarchar(255))
Figure 40 – Adding an Aggregate Group
Next, select which columns to calculate. Under Measures:
Projects.ID: mark the Min checkbox.
Projects.Budget Amount: mark the Min checkbox.
Expenses.Amount: mark the Sum checkbox. Click Save
•
•
•
Projects.ID Min will return the Project ID
Projects.Budget Amount Min will return the Project budgeted expenses.
Expenses.Amount sum will calculate the total actual expenses
Figure 41 – Marking How to Aggregate Each Column
Adding a Bar Chart for Expenses by Project
Next, create a new bar chart.
© webparts360
Project Tracking Training User Manual
34
Under Data Views, click Add new chart.
Figure 42 – Adding a New Chart
1. Data Source: Expenses by Project
(Data View changes to this name)
2. Chart Type: pick Column
3. Category Column: Projects.Title
4. Category ID: Projects.ID.min
5. Under Field Name section, mark
checkbox Expenses.Amount.sum,
Caption: Actual
6. Mark Projects.Budget Amount.min
Caption: Budgeted
Figure 43 – Configuring Settings for a Bar Chart
Add labels on the bar chart:
Click + to expand the Label section.
Chart Title Type: Above Chart
Chart Title changes to: Expenses by Project
Legend: Show Legend at Right
Figure 44 – Adding Labels to a Bar Chart
© webparts360
Project Tracking Training User Manual
35
Create a drill down on the bar chart: Click + to expand Advanced Settings section.
Mark the Chart Item checkbox. Click Same Window radio button. Click blue box:
Figure 45 – Enabling Drill-down on a Bar Chart
Select Page: pick Page on dropdown, then pick ProjectWorkspace.aspx
Figure 46 – Selecting the Page for Drill-down on a Bar Chart
Add a parameter (to choose which Project), and pass it the Category:
After /ProjectWorkspace.aspx, type: ?ProjectID=
Change dropdown list from Page to Chart Elements. Click CategoryID.
The path should now be:
/SolutionPages/ProjectWorkspace.aspx?ProjectID=[FromCategory]
Click OK, click Save, and then click Save again.
Figure 47 – Adding a Parameter for Drill-down on a Bar Chart
Drop the bar chart web part onto your Reports page: Click Reports on left sidebar.
Under SmartView Definition, highlight Project.Expense.Summary
Click Add Webpart to page
On Solution Pages dropdown, change None to Reports
Change Zone from Titlebar to Header. Click Add button.
Figure 48 – Adding Bar Chart Web Part to Reports Page
© webparts360
Project Tracking Training User Manual
36
Confirming That Your Changes Appear
Refresh your solution page on the browser. For example:
http://sps2013/TrackProjectExpenses/solutionpages/default.aspx
Click the Reports tab. The bar chart should appear on your Reports page.
Figure 49 – Bar Chart Appears on Reports Page
Defining the Project Expense Detail Report
Now we will create another drill-down report: Project Expense Detail. Similar to the Summary
report, we will add a new SmartView and call it Project.Expense.Detail. We add a data source,
select Expense list. This time leave it as Default view, and Save.
Click Add new smartview, as shown in Figure 27 – Creating a Report (SmartView).
Title: Project.Expense.Detail, Figure 37 – Creating Project.Selected Drill-down Report
Click Add new data source, Primary list = Expenses, see Figure 38 – Joining Lists.
Leave View Type = Default View. Click Save.
Click Add new datagrid
Select the columns you want to display:
Click the 1st checkbox for:
-Expenses.Title
-Expenses.Created By_Userinfo_Name
(Caption: Created By)
-Expenses.Description
-Expenses.Category_Lookup_Description
(Caption: Category)
-Expenses.Amount
Figure 50 – Selecting Datagrid Columns and Captions
Click + to expand Expenses.Amount, then click Formatting dropdown. Scroll down and pick the
first Number format: $#,##0.00 Click Done.
See Figure 31 – Changing Display Format on a Report Column.
© webparts360
Project Tracking Training User Manual
37
Add a total to Expense.Amount column:
Click + to expand Totals section, find Expense.Amount row, click Sum.
Mark the “Show Grand Total?” checkbox at the lower left.
See Figure 41 – Marking How to Aggregate Each Column.
Add a filter by Project: Click + to expand Filter section, click +Add Condition
Change Field dropdown from None to Expenses.Project
Change Operator dropdown from (None) to Equal
In Value field, type: [param:ProjectID]
Figure 51 – Adding a Filter Condition With a Parameter
Create the menu: Click + to expand
the Menu section, then see Default
Menu.
Define parameters: On all 3 rows
(View Item, New Item, Edit Item) under
Additional Parameters column, paste
this:
ProjectID=[param:ProjectID]
Under the Title column, put these
values (different for each row):
View Item:
View selected expense item
New Item: Add new expense claim
Edit Item:
Edit selected expense item
Under Menu Permission, click Add New Permission. Click + after the 2 blue arrows
This expands the [me] role.
Figure 52 – Configuring Menu Parameters and Permissions
Click the 3 checkboxes to Enable View Item, New Item and Edit Item for [me] role.
Click Save, and then click Save again, to create the menu.
Add the menu web part to the page:
Click Reports on left sidebar. Under SmartView definition,
highlight Project.Expense.Detail
Click +Add Webpart to page
On Solution pages dropdown, pick ProjectWorkspace
Change Zone from TitleBar to Footer
Click Add button
Figure 53 – Adding Menu Web Part to Page
© webparts360
Project Tracking Training User Manual
38
On Project.Listing SmartView, click version 1. Click Projects data view.
Expand Projects.Title field, click Link dropdown at the far right, click Same radio button. Click
Page in dropdown, click ProjectWorkspace.
blue box. Pick
(If the link
does not end with "?ProjectID=", then you did not add the parameter
to the Expense Summary data view correctly).
Change dropdown to Data Column. Choose Projects.ID
The path should now be: /TrackProjectExpenses/SolutionPages/
ProjectWorkspace.aspx?ProjectID=[FromColumn:Projects.ID]
Click OK, click Done, click Save, and then click Save again.
We have finished creating a contextual report with drill-down capability.
Confirming That Your Changes Appear
Refresh your solution page on the browser. For example:
http://sps2013/TrackProjectExpenses/solutionpages/default.aspx
On Home tab, now you can click any of the Project Names in the first column.
Click the 2nd project name: Conference Solution for Australian Conference.
Figure 54 – Project Expense Detail Drill-down Report Appears
Defining the Project Expense Pending Report
Now we will create another report: Project Expense Pending by cloning the
Project.Expense.Detail report. This report will be added to the Approval tab, so that the Project
Manager can see a list of New expenses waiting to be approved.
Click Reports on sidebar. Under SmartView Definition, click Project.Expense.Detail.
Click the white icon to clone it. On the copy:
Change Title from Project.Expense.Detail to Project.Expense.Pending
Change Description to: Expenses pending my approval.
Edit Expenses Data View, rename it to Pending Expenses
Mark 1st checkbox for the field Expenses.Created
Mark Expenses.Modified By_UserInfo_Name (Caption = Modified By)
Clear the 1st checkbox on Expenses.Category_Lookup_Description
Mark Expenses.Project_Lookup_Description (Caption = Project)
Expand Totals section, nothing should be marked.
So remove Sum from Expenses.Amount by clicking None.
Clear the checkbox at lower left for Show Grand Total.
Expand Filter section. Change Field dropdown from
Expenses.Project to Expenses.Status
Change Value from [param:ProjectID] to New
© webparts360
Project Tracking Training User Manual
39
Expand Menu section. Erase ProjectID=[param:ProjectID]
under Additional Parameters on all 3 rows.
Change the 3 titles to View Expense, Add Expense, Edit Expense.
Expand Menu Permission section (click the + beside [me])
Clear the checkbox on New Item. Click Save.
Finally select SmartView Project.Expense.Pending, click Add webpart to page
Change Solution pages to Approval, Zone = Left Column, Save.
Refresh browser on the Approval tab, you should see headings for New expenses.
Making SharePoint Transactional
Now that our reports are ready, let’s define a transaction, using the expense claim as an
example. Webparts360 makes SharePoint transactional, enabling SharePoint to understand the
steps in the process when an expense is submitted and approved.
Click Transactions on the left sidebar.
Under SmartList definition, click Expenses to edit.
This displays the Transactions screen.
Figure 55 – Creating a Transaction
The screen opens on the Definition tab. Click the Visual tab.
This displays the transaction workflow design canvas.
Figure 56 – Visual Tab on Transaction Screen
The canvas opens with the default Stage1 icon. Double-click icon to change caption.
Rename the Stage1 icon by replacing the text "Stage 1" with Submit
Drag a Stage icon
from the left sidebar onto
the canvas. Rename it Approve.
Drag another Stage icon to the canvas;
Rename it Process.
Now you have 3 stages on the canvas:
Submit, Approve, Process
Figure 57 – Transaction Workflow Design Canvas With 3
Stages
© webparts360
Project Tracking Training User Manual
40
Next drag a branch icon
from left sidebar onto Submit stage. Then
drag the tip of this branch from Submit onto the Approve stage. (Release
the mouse when the stage border turns blue; this connects the link.) Now
the Submit stage is linked to flow into the Approve stage.
Figure 58 – Adding a Branch to Link 2 Stages
Drag a new branch from sidebar to Approve stage. Then drag the tip of the branch from
Approve onto the Process stage. Now Approve stage is linked to Process stage.
Click the Edit Branch Icon to set the branching condition. Hover the mouse
over the Branch oval at the bottom of the Approve stage. A small blue & white
icon appears (tool tip: Edit Branch); click this icon.
Figure 59 – Edit Branch Icon
Figure 60 – Edit Branch “Condition Setting” Screen
The Condition Setting screen will pop up.
On the Field dropdown list, change None to Status.
On the Operator dropdown list, change (None) to Equal
Click the mouse into the Value field, and a list appears. Click Approved.
In Description field at the far right, change text from: “Status Equal Approved”
to: If Approved, and click Save button.
Notice that the Branch oval in the Approve stage shows "If Approved". The arrow
indicates "If Approved, go to Process stage".
The shorter “If” description makes the flow chart easier to read.
Figure 61 – Simplifying a Branch Description to Indicate Flow
Repeat these steps to send Rejected status back to Submit stage:
Drag a new branch from sidebar to Approve stage.
Then drag the tip of the branch from Approve back to Submit stage.
Mouse over the new Branch oval in Approve stage, click Edit Branch icon.
© webparts360
Project Tracking Training User Manual
41
The Condition Setting screen will pop up.
On the Field dropdown list, change None to Status.
On the Operator dropdown list, change (None) to Equal
Click the mouse into the Value field, and a list appears. Click Rejected.
In Description field, change text:
from “Status Equal Rejected” to: If Rejected.
Click Save button. Notice that the last Branch oval in the
Approve stage now says "If Rejected" and the arrow says "go
back to Submit stage". To re-open the canvas, click
Transactions on the sidebar, click SmartList Definition
Expenses, click version 1.0, click Visual tab.
Figure 62 – Design Canvas With 3 Stages Linked by 3 Branches
Click the User icon at the top left of the Submit stage. It will turn yellow. The word [me] appears
at the bottom of the stage. This is a SharePoint reserved word meaning everyone. Mouse over
the [me] and click Edit Role icon.
Figure 63 – User Icon and Edit Role Icon in a Stage
The pop-up screen Role Definition for Submit allows you to select the form you want to
change. Mouse over New Form 1; click the Edit Form icon.
Figure 64 – Role Definition Screen for Submit Stage
Change the Form Name from "New Form 1"
to New Expense
Figure 65 – Renaming a Form on Edit Form Screen
© webparts360
Project Tracking Training User Manual
42
Now select which columns you want to enable, lock or hide.
On the gray heading bar for Column Permissions, there are 3 icons:
Green check mark means the field is editable
Yellow lock means the field is locked (can't be changed)
Red circle slash means not visible (hidden)
Notice the blue arrows
to the left of Status column.
Click the blue down arrow to move Status after Approved By.
Find the Project column at the bottom of the list. Click the blue up arrow beside Project 4 times
to move Project after Amount and before Approved By. You must move the mouse up with each
arrow click, as Project moves higher on the list.
By default, all fields on the Column list have the blue radio button selected under the green
check mark, so all fields are editable when you open this screen. This setting is correct for the
1st 6 fields: Title, Attachments, Description, Category, Amount, Project
These 6 fields should all have the blue dot in the green check mark column.
All team members should be allowed to edit and Submit these values.
The Approved By field should be locked, so click the circle under the yellow lock column for
Approved By. The value for Approved By will be the project manager for the selected project.
The value will be visible, but users cannot change it.
The last 3 fields: Status, Approval Remarks, and Date Approved should all be hidden at the
Submit stage. This is because they are not used when you create a new expense item. These 3
fields are only used at the Approval stage (on a different form). So click the circle under the red
circle slash column for these 3 fields.
Click Save, then OK. Click Save for the Expenses transaction.
Figure 66 – Setting Permissions for the New Expense Form
© webparts360
Project Tracking Training User Manual
43
Click Transactions on left sidebar. Under SmartList definition, click Expenses.
Click version 1, then click the Visual tab to open the canvas.
Now we will adjust permissions on the Approval form.
Click the User icon at the top left of the Approve stage. It will turn yellow.
Mouse over the [me] and click Edit Role icon.
A pop-up screen appears: Role Definition for Approve.
This screen allows you to select the form you want to change.
Mouse over Edit Form 1 and click the Edit Form icon.
Change the Form Name from "Edit Form 1" to Approve Expense
Then select which columns you want to enable, lock or hide.
Notice the blue arrows to the left of Status column.
Click the blue down arrow to move Status after Approved By.
Find the Project column near the bottom of the list (before Modified).
Click the blue up arrow beside Project 4 times to move Project after Amount and before
Approved By.
By default, all fields on the Column list have the blue radio button selected under the green
check mark, so all fields are editable when you open this screen. This setting is correct for:
Attachments, Status, and Approval Remarks. These should all have the blue dot in the green
check mark column. Approvers should be allowed to edit these.
The following field should be locked, so click the circle under the yellow lock column for: Title,
Description, Category, Amount, Project, Approved By, and Date Approved. These fields will be
visible, but users cannot change them.
The last 4 fields: Modified, Created, Modified By, Created By should all be hidden at the
Approve stage. The circle under the red circle slash column is already selected by default for
these 4 fields. Click Save, then OK. Click Save for Expenses transaction.
Figure 67 – Setting Permissions for Approve Expense Form
© webparts360
Project Tracking Training User Manual
44
Field Look-up Validations
We need to determine who will approve an expense (based on who is the project manager). We
do this by adding a new look-up for this form.
Go to Definition tab (not Visual tab) on the Transactions screen.
Under Global Settings, click +Add New Lookup.
Figure 68 – Adding a New Lookup
On Primary List dropdown, select Projects.
This is the data source for the lookup.
Figure 69 – Selecting Data Source for a Lookup
Click Save. Change the name to Lookup Project. We will use the Projects.ID as the value
(key) while the Projects.Title is the displayed field. Now, we can specify which column will be
using this lookup by clicking +Add Column.
Figure 70 – Naming the Project Lookup
On the Column dropdown, select Project (Lookup). Then click the blue options box to assign a
default value.
Figure 71 – Applying Lookup to Column
Click +Add Projection to select what field we want to apply for this lookup. In
this case, we will default the field Approved By to the Projects.Project Manager.
Figure 72 – Adding Projection
Select Destination Column =
Approved By
Select Source Column =
Projects.Project Manager
Figure 73 – Selecting Destination and Source Columns
With this lookup in place, each time someone selects a Project, it will retrieve the project
manager and populate the ‘Expense.Approved By’ field with it.
© webparts360
Project Tracking Training User Manual
45
Save this transaction. Now you are ready to test it out.
1. Submit a new claim – On the Home tab, click a project name (use Microsoft World Partner).
This displays all the expenses so far on that project.
Click blue Actions dropdown, then click Add new expense claim
This displays the Expenses – New Item form. Notice that you see fewer fields during data
entry. Enter some test data: Title = New computer, Description = Need faster machine. On
Category dropdown, click Fixed Assets. Amount = 1000, Project = Microsoft World Partner,
click OK. The expense is now listed on Home.
2. Approve – Click Approval tab. The new expense should appear. Click title New Computer,
then click Edit Expense. Notice locked fields; only approval fields are enabled for data entry.
Click the Status dropdown, change New to Approved. In Approval remarks, put: I approved
this expense. Click OK.
3. View the processed transaction. Go to Home tab, click title New Computer, then click View
Selected. The status should change to Approved. Click the Workflow Details icon at the top.
This displays the animated workflow with audit trails of each activity.
Congratulations, you have just finished building your first Webparts360 application!
© webparts360
Project Tracking Training User Manual
46