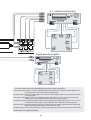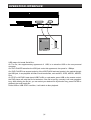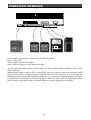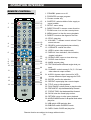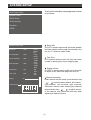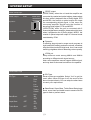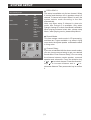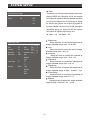
1
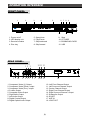
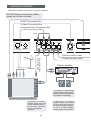
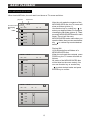
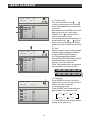
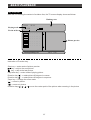
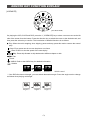
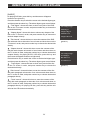
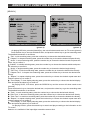
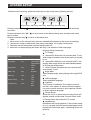
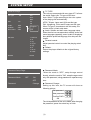
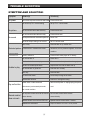
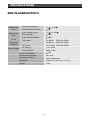
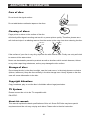
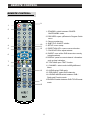
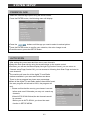
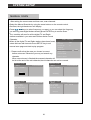
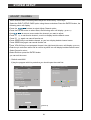
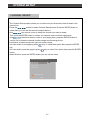
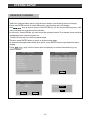
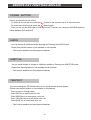
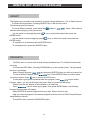
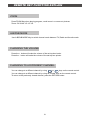
LW 108T
INSTRUCTION MANUAL
ENGLISH
CONTENTS
DVD
FEATURES...................................................A1-A2
OPERATION INTERFACE.............................B1-B6
BASIC PLAYBACK.......................................C1-C5
REMOTE KEY FUNCTION EXPLAIN............D1-D7
SYSTEM SETUP...........................................E1-E6
TROUBLE SHOOTING..................................F1
SPECIFICATIONS.........................................G1
ADDITIONAL INFORMATION........................H1
DVB-T
REMOTE CONTROL........................................I1
BASIC OPERATION........................................J1
SYSTEM SETUP...........................................K1-K6
REMOTE KEY FUNCTION EXPLAIN...........L1-L3
TROUBLESHOOTIN......................................M1
FEATURES
WARNING:
To reduce the risk of fire or electric shock, do not expose this appliance to rain or moisture.
The apparatus shall not be exposed to dripping or splashing and that no objects filled with liquid,
such as vases, shall be placed on the apparatus.
CLASS 1
CAUTION
RISK OF ELECTRIC SHOCK
LASER PRODUCT
DO NOT OPEN
The lightning flash with arrowhead symbol, within an equilateral triangle, is
intended to alert the user to the presence of uninsulated “dangerous voltage”
within the product’s enclosure that may be of sufficient magnitude to constitute
a risk of electric shock to persons.
The exclamation point within an equilateral triangle is intended to alert the user
to the presence of important operating and maintenance (servicing) instructions
in the literature accompanying the appliance.
CAUTION:
To reduce the risk of fire and electrical shock, do not remove the cover of this unit. Please refer all
servicing difficulties to qualified technicians .
Use of controls or adjustments or performance of procedures other than those specified may result
in hazardous radiation exposure.
Where the MAINS plug or an appliance coupler is used as the disconnect device, the disconnect
device shall remain readily operable.
CLASSI:
LASER PRODUCT - This marking indicates the presence of laser beams used in this unit, and CLASS
I refers to laser beams of the weaker class. There is no danger of hazardous radiation outside this
unit.
Double insulation
This is class II apparatus
Please disconnect the unit under these conditions:
Do not overload wall outlets, extension cords or convenience receptacles beyond their capacity,
since this can result in fire or electric shock.
Do not use suitable outlet, it might be dangerous.
Check the connection regularly. If any rupture or failure in insulation, call for a maintenance man
to replace them.
To ensure reliable operation, and to protect it from overheating, the unit must be put in somewhere
well ventilated.
Do not use power-line operated sets near water *for example, near a bathtub, washbowl, kitchen
sink, or laundry tub, in a wet basement, or near a swimming pool, etc.
Do not place the unit on an unstable object. The set may fall, causing serious injury to a child or
an adult, and serious damage to the unit.
Never let any liquid spattered on the unit. It might cause electric shock or fire hazard.
Never place the unit near or over such objects: for example, radiator, heat register, stove or other
heat sources. (including amplifier)
Unplug the unit from the wall outlet before cleaning or polishing it. Do not use liquid cleaners or
aerosol cleaners. Use a cloth lightly dampened with water for cleaning the exterior of the unit.
Never place heavy object on the unit.
A1
FEATURES
Important Safety Instructions:
Read these instructions.
Keep these instructions.
Heed all warning.
Follow all instructions.
Do not use this apparatus near water.
Clean only with dry cloth.
Do not block any ventilation openings, Install in accordance with the manufacturer’s instructions.
Do not install near any heat sources such as radiators, heat registers, stoves, or other apparatus
(including amplifiers) that produce heat.
Do not defeat the safety purpose of the polarized or grounding-type plug. A polarized plug has
two blades with one wider than the other, A grounding type plug has two blades and a third grounding
prong. The wide blade or the third prong are provided for your safety. If the provided plug does
not fit into your outlet, consult an electrician for replacement of the obsolete outlet.
Protect the power cord from being walked on or pinched particularly at plugs, convenience
receptacles, and the point where they exit from the apparatus.
Only use attachments/accessories specified by the manufacturer.
Use only with the cart, stand, tripod, bracket, or table specified by the manufacturer, or sold with
the apparatus. When a cart is used, use caution when moving the cart/apparatus combination to
avoid injury from tip-over.
Unplug this apparatus during lightning storms or when unused for long periods of time.
Refer all servicing to qualified service personnel. Servicing is required when the apparatus has
been damaged in any way, such as power-supply cord or plug is damaged, liquid has been spilled
or objects have fallen into the apparatus, the apparatus has been exposed to rain or moisture, does
not operate normally, or has been dropped.
Read through this instruction manual before installation and use.
To disconnect the power cord, hold the plug instead of pulling on the cord.
Switch off the main power when the unit is not in use. (Disconnect the power plug from the
power outlet when you do not intend to use the unit for a prolonged period of time.) Before moving
the unit, remove the disc from the unit`s tray first.
Do not open the cover or touch any of the components inside the unit.
Do not operate or install the unit under direct sunlight or near objects that radiate heat. This
may lead to overheating of the unit.
Do not operate or install the unit in moist or humid conditions. This may affect the pick-up of
the unit.
Install the unit on a flat surface with good air circulation. Please ensure the ventilation holes
are not covered otherwise the unit will overheat and malfunction.
Wipe the panel and case with soft dry cloth only. Do not apply any kind of thinner, alcohol or
sprays when cleaning the unit.
Our products will be updated at times. Any difference between unit
and manual in that occasion will not be noticed.
is a trademark of DVD Format/Logo Licensing Corporation.
A2
OPERATION INTERFACE
FRONT PANEL:
2
1
3
4
5
6
7 8
10
11
9
12
1. Power on/off
2. LED display unit
3. Receiver window
5. Open/close
6. Play/Pause
7. Skip backward
9. Stop
10. CF CARD
11. SD/MMC/MS CARD
4. Disc tray
8. Skip forward
12. USB
REAR PANEL:
1 2 3
17 18
4 5 6 7 8 9
10 11 12
13 14 15
1. Component Video (Y) Output
2. Component Video (Pbcb) output
3. Component Video (Prcr) output
4. S-video Output
5. Composite Video Output
6. Right Audio Output
7. Left Audio Output
8. Digital Coaxial Output
9. Digital Optical Audio Output
16
10. Left Front Channel Output
11. Left Surround Channel Output
12. Center Channel Output
13. Right Front Channel Output
14. Right Surround Channel Output
15. Subwoofer Output
16. SCART
17. ANT IN
18. LOOP OUT
B1
Operation Interface
Illustration of system connection is only for reference.
NOTICE:Before connecting the cables,
please turn off the unit power
SCART Connecting Wire
S-Video Connecting Wire
Component Video Connecting Wire
Green
Red
Antenna
Red
Composite Video
Connecting Wire
Green Blue
Blue
Optical connection cable
Coaxial connection cable
Stereo amplifier
If connected to Digital Decode
amplifier, please connect Coaxial
output on the unit to Coaxial input on
the amplifier correspondingly.
If connected to 5.1 Channels
amplifier, please connect the
5.1Channels Audio output on
the unit to the 5.1 Channels
input on the amplifier
separately.
B2
If connected to TV or Stereo
amplifier , please connect the left
& right channel audio output on
the unit to left & right audio input
on the TV or stereo amplifier
correspondingly and separately.
5.1 channel surrounding
Digital decoder amplifier
You can choose one of the following for the video output connection:
*Composite Video output: Connect Composite Video output (yellow) to Composite Video input on the
TV/monitor with a AV connecting wire (yellow jack).
*S-Video output: Connect S-Video output on the unit to S-Video output on the TV/monitor with a S-Video
connecting wire.
*Component Video output: Connect Component Video output (Cb, Cr, Y) on the unit to Component
Video input on the TV/Monitor with component connecting wires.
*Progressive Scan Component Video output: Connect Component Video output (Pb, Pr, Y) on the unit
to Component Video input on the TV/Monitor with component connecting wires.
*High definition component output: connect the Y/Pb/Pr output terminals of DVD to the corresponding
input terminals of High definition TV with the AV cable.
*SCART output: connect the special scart cable to scart output of the unit and scart input of TV/monitor.
Note:only AV cable included.
B3
OPERATION INTERFACE
or
USB flash
Card Reader
USB means Universal Serial Bus..
On The Go, the supplementary agreement of USB, is to actualize USB on the non-personal
computer.
Our DVD PLAYER actualize the USB jack under this agreement, the speed is 1.5Mbps.
Our DVD PLAYER can support majority of the USB FLASH and card reader in the market through
the USB jack, it can playback all kinds of multi-media files, such as MP3, JPEG, MPEG1, MPEG2,
Divx.
On STOP or NO DISC,state insert USB FLASH or card reader, press USB on the remote control,
the DVD player will read the file list as below. If the file is too big, normally it will cost sometime
long. After reading the file list, you can select your desired file by direction key, press ENTER to
playback the multi-media file.
Press USB on USB STOP condition, it will switch to disc playback.
B4
OPERATION INTERFACE
16 MB
8 MB
64 MB
64 MB
1D
Secure Digital
Multi Memory Card
Smart Media Card
64MB
Memory Stick
Compact Flash
It can support 5 types memory cards: CF, SD, MS, SM, MMC.
Input1 support CF,
input 2 support SD, MS, SM, MMC
input 2 can only insert one type card at one time.
You can store the following files into the cards, like: MP3, JPEG, MPEG1, MPEG2, DIVX, XVID,
OGG, OGM etc.
When the dvd player in state of STOP or NO DISC, insert the memory card, then press the CARD
key of remote control, the dvd player will read the card. If the files are more, it is normal that the
reading time will be more. After reading out the flies list, you can press UP and DOWN keys to choose
your desired file, and press PLAY key to play the file. When the card is in STOP state, press CARD
key to switch to playing disc state, and press USB key to switch to playing U disc state.
B5
OPERATION INTERFACE
REMOTE CONTROL:
1. STANDBY: power on or off.
2. PROG/EPG: arrange program.
3. Choose number key.
1
2
15
16
17
18
3
4
5
19
20
21
22
23
24
25
26
11
12
13
14
10. STOP: stop play.
11. VOLUME: "-" debase current volume"+"rise
current volume.
12. SEARCH: select playback-place directly.
13. V-REMOTE: control the video.
14. VIDEO: select video output mode.
15. DISPLAY: time indication, title indication,
6
7
8
9
10
4. SUBTITLE: select subtitle of disc supply or
cancel subtitle.
5. SETUP: menu setup.
6. DIRECTION KEY: remove cursor direction.
7. ZOOM: zoom in or out the current picture.
8. MENU:press it to the disc menu playback.
9. DIGEST: introduce the digest of the disc.
27
28
29
30
31
32
33
chapter indication.
16. OPEN/CLOSE: open or close disc tray.
17. CLEAR: clear function.
18. MARK: memory play.
19. TEXT/ANG:select different angle what you
want.
20. CHANNEL: switch among 2 CH, 5.1 CH and
other channel output models.
21. AUDIO: choose output channel for VCD,
choose different output language for DVD.
22. ENTER: confirm the selection.
23. REPEAT: repeat play the current chapter.
24. TITLE: enter to title playback.
25. PLAY/PAUSE: select pause or play the disc.
26. PREV/NEXT: skip backward/skip forward.
27. F.REV/F.FWD: fast backward/fast forward
28. SLOW: slow the formal play motion.
29. RETURN: return to disc menu playback.
30. A-B/DVB MODE:select A-B repeat mode when
play disc.
31.USB:switch USB and play disc.
32.DVB/DVD:switch DVB/DVD mode.
33.CARD: Switch CARD and play disc.
Remote function are subject to change without notice.
B6
BASIC PLAYBACK
Playback Divx Disc
DIVX/OGM file:
A new audio compression format (MPEG-4). It can transform very low bit rate to high
quality picture. In other words, the content of a DVD disc (4.78GB) can be compressed
into a normal sized CD-R disc (700MB), and the picture quality are the same, saving
must space of the disc.
This DVD player support DIVX multi subtitle files: SRT, SMI, ASS, SSA, SUB.
How to playback DIVX/OGM file
1.Burn the DIVX/OGM file into CD-R/ RW, DVD+R/RW, DVD-R/RW discs.
2.Put the burned disc into the DVD player tray, then the DVD player will read the
disc menu, as the following picture:
00:00
00:00
001/002
folder 01
.........
AVI
AVI
AVI
AVI
001......
002......
003......
004......
3.Move the cursor to the DIVX file and press “ ENTER” key to playback.
Choose Subtitle
If the DIVX file includes one or multi subtitles, press “SUBTITLE” key during playback,
to choose different subtitles showing on the screen or hidden from the screen.
Choose Language
If the DIVX file includes multi languages, press “LANGUAGE” key during playback, to
choose different language output.
Search Playback
If there are many DIVX/OGM files in the disc, press “ SEARCH” key during playback,
to choose certain file or any time of the file to playback.
C1
BASIC PLAYBACK
Play CD disc
1. Place the CD disc in.
2.Show the contents of the disc play auto matically.
3.Choose the number key to play directly.
For example: when you want the No.8 track, you can just press the
number key "8".
when you want the No.12 track, you can press the number key "1", "2".
Play VCD or SVCD disc
1.Place the disc in.
2.After reading the disc, the PBC menu will display on the TV screen.
3.Choose the chapter you want by number keys directly.
NOTICE: PBC indicates the disc hold the PBC signal which is a kind of
playing signal recorded on the VCD/SVCD disc. In the course of playing, recorded
information will show as the menu on the TV screen, which will be convenient to
choose the contents. But this function need disc support.
Play DVD disc
1.Place DVD in.
2.Read the DVD and play disc automatically.
3.Choose the desired contents you want by moving cursor.
DVD disc region instruction
Region 1: USA, Canada
Region 2: Japan, Europe, Egypt, South Africa, and Middle East
Region 3: Taiwan, Hong Kong, South Korea, and Southeast Asia
Region 4: Australia, New Zealand, Latin America, and South Pacific Islands
Region 5: Russia, Mongolia, India, Middle Asia, Eastern Europe, North Korea,
North Africa, Northwest Africa
Region 6: China mainland
C2
BASIC PLAYBACK
PLAY MP3/OGG/JPEG DISC
When load a MP3 disc, the unit read it and show on TV screen as follow:
play time
the total of file
the playing
file
surplus time
00:00
After the unit reads the contents of the
MP3/OGG/JPEG disc, the TV screen will
show as follows (picture 1):
Use direction key or number key* * to
select your desired folder. For example,
choosing the fifth folder (picture 2). There
are many MP3/OGG/JPEG tracks in each
folder. The unit will list every
MP3/OGG/JPEG tracks name when you
open the folder, then you can use direction
key * *or number key to select desired
tracks.
00:00
001 / 010
VOL
25
\
folder
MP3.01
MP3.02
* ** *
MP3.03
MP3.04
** *********
00:00
Playing Skill
1)List all tracks from all folders of a
MP3/OGG/JPEG disc.
When the unit reads the contents, press
PROG key, the TV screen will show as
follows:
All tracks of the MP3/OGG/JPEG disc
will be listed on the menu orderly. You
can use direction key or number key
* *to select desired tracks and press
ENTER key to confirm.
00:00
001 / 016
VOL
25
\MP3.05\
MP3
MP3
MP3
MP3
001
002
003
004
** *********
00:00
00:00
001 / 138
MP3
001
MP3
002
MP3
003
MP3
004
VOL
25
file list
** *********
C3
BASIC PLAYBACK
********
03:18
06:26
008 / 138
************
* ****** * ****
* ** *
007
MP3
008
MP3
009
MP3
MP3
MP3
128
VOL
MP3
* * * ** *
25
010
011
012
Add to play list
** *********
* ******* * * * ************* ****** * *
03:18
06:26
001 / 016
* ****** * *
****
VOL
MP3
008
MP3
021
MP3
035
MP3
MP3
MP3
128
25
047
051
076
2) Program Play
You can use direction key* ***
*
to move yellow curse to your desired
tracks, press MARK key to select them.
(picture 4).
After selection press PROM key to enter
playing list (picture 5), then press
direction key * *or number key to
confirm your desired track.
How to delete programmed playing list:
press direction key * ***
*to move
yellow cursor to the track you want to
delete, then press CLEAR key to delete
it.
3) Skip
Skip key only be used to change page
instead of play next/previous tracks
during MP3/OGG/JPEG playing.
4) Fast backward/Fast forward
During MP3/OGG/JPEG playing, press
Fast forward key to play forward
speedily. The class as follow
Press Fast backward key to play back
ward speedily. The class as follow:
2x*
4x*
8x*
16x*
32x
2x*
4x*
8x*
16x*
32x
file list
** *********
* **********
00:00
00:00
001 / 138
MP3
001
MP3
002
MP3
003
MP3
004
File list
play list
odeum
5) Searching
Press SEARCH key the first time to
search track, press the second time to
search any time of the track.
6) Multi Playing mode
Press REPEAT key to select different
playing mode, list order as follow:
Folder
shuffle
replet one
file list
** *********
C4
random
single
7) Press DISPLAY key to shift another
display menu (picture 6).
BASIC PLAYBACK
Play JPEG disc:
After the unit reading the content of e-album disc, the TV screen display shows as follows:
Working state
00*00
00*00
Playing track
058/158
Tracks of disc
JPEG - - - - - - JPEG - - - - - - JPEG - - - - - - JPEG - - - - - - -
Picture preview
JPEG - - - - - - JPEG - - - - - - -
Distinguishing rate
888 X 1200
Instruction of Function key:
Stop key -> enter mode of picture preview
key -> skip to the next picture.
key -> skip to the last picture.
Play/enter key -> enter mode of playing picture
Direction key “ “ -> rotate picture 90 degree in reverse
Direction key “ “ -> rotate picture 90 degree in sequence
Zoom key -> change the zoom mode
“ ” -> zoom in picture
“ ” -> zoom out picture
Direction keys * * *
move the center point of the picture when zooming in the picture
C5
REMOTE KEY FUNCTION EXPLAIN
[STANDBY]
Press this key in working status to turn the unit into standby status, or to wakeup the unit from standby status.
[OPEN/CLOSE]
Press OPEN/CLOSE to open the tray, and then place the disc on it ,press this button again to close the tray. When
finishing loading the disc , the TV screen will display the disc type and the disc will be automatically played .(MP3
and JPEG disc can not be automatically played)
[RETURN]
Press RETURN to return to the menu when playing the DVD disc. Press RETURN to return to the menu and reenter the menu-playing mode at the same time when playing S-VCD,VCD2.0 disc
[PLAY/PAUSE]
When “PAUSE”, “STOP” ,“F.REV/F.FWD” play, press this key to resume the normal playing state;when it is in the
normal playing state, press this key to pause playing.(when the unit is playing , the play indicator light on the
panel is on)
[STOP]
Press STOP one time, memorizing the stopped position. When the unit continues playing. It will play from the
stopped position. Press STOP the second time, the unit stops play and gives up the memorized position.
[MENU]
In play DVD mode, press MENU key the first time back to submenu and press again back to the main menu.
Displaying super VCD,VCD2.0 can playing menu. The disc can enter PBC menu automatically when starting
playback.
And then press number key selecting your desired song, if you want to cancel disc playback, please press MENU
key. TV screen display will show "PBC off", then press number keys to select desired song.
[TITLE]
Press this button to return to the first title playback.
[SLOW]
when playing VCD, SVCD, DVD, CD disc, press “SLOW”continuously to play forward with different speed.
D1
REMOTE KEY FUNCTION EXPLAIN
[PREV/NEXT]
When play SVCD, VCD, CD, MP3, Press skipbackward to play last chapter.
To play DVD, press skipbackward to last chapter or title.press skipforward to next chapter or title.
[F.REV/F.FWD]
When play DVD, SVCD, VCD, CD, MP3, press this key to play forward or backward speedily. The class as
bellows:
[AUDIO]
If the S-VCD,VCD,CD disc has multi channel, you can press this button to select the
sound from left vocal channel out or right vocal channel out or stereo out or downmix out .
Press this button to select your desired language when playing DVD,S-VCD which has multi-language.
[CLEAR]
Clear memory playing : Select the memeory position you want to play by direction press, then press selection
direction to play.
Note: If power off or disc out, all the memorized position will giving up automatically.
[REPEAT]
Press this key to repeat some title, some chapter ,some track or the full disc. press repeat key when playing
back DVD, the TV screen will show as follows: chapter Repeat--Title Repeat--- Repeat ALL off. When playing
back cd, VCD1.1 and VCD, VCD 2.0 disc in state of PBC off, the TV screen will show as follows: Track Repeat-Repeat ALL--Repeat off.
[ZOOM]
Pressing this button, you can appreciate the zoom picture. Just only in the state of zoom-in, you can move the
picture by direction key.
[VOL]
Volume: Press this key to adjust the output volume.
Press “+” and the screen shows 0~20, press “–”and the screen shows 20~0.
D2
REMOTE KEY FUNCTION EXPLAIN
[PROG/EPG]
If the disc has over two chapter or title, you can press this button to setup the playing order which you
want.
PROG TT- -/CH- - [TT- -(TITLE)CH- -(CHAPTER)]
01 TT:__ CH:__ 06 TT:__ CH:__
02 TT:__ CH:__ 07 TT:__ CH:__
03 TT:__ CH:__ 08 TT:__ CH:__
04 TT:__ CH:__ 09 TT:__ CH:__
05 TT:__ CH:__ 10 TT:__ CH:__
EXIT START BACK
Press PROG/EPG key to indicate in TV screen when play super VCD,CD disc.
PROG:MENU 00-00
01 __ 06 00(MENU)
02 __ 07 __
03 __ 08 __
04 __ 09 __
05 __ 10 __
EXIT START BACK
[MARK]
When playing DVD*SVCD* VCD*CD, press this key can set many memory position . You can select any
memory position to play. Press this key, the screen will be disply (picture 1) :
MARK
Press"ENTER"key to Mark
(picture 1)
MARK
01
TT*01
CH*01 time*0*01*22
Press"ENTER"key to play
Press"CLEAR"to canel
(picture 2)
One playing , press "ENTER" key for the first time, the first blank will display "01" , it means to play the
first memory position. Then press direction key to select the second blank, press "ENTER" key to play
the second memory position. The same, you can select 12 times memory position playing.(picture 2).
D3
REMOTE KEY FUNCTION EXPLAIN
[V-REMOTE]
(V-remote menu)
On playing the VCD, SVCD and DVD, press the 1 [V-REMOTE] key to show v-remote menu at the left
side of the screen from the bottom. Press the direction key to switch the cursor to the desired mark, and
then press the select key to confirm. The introduction of detailed functions is as follows:
: Play. When the unit is stepping, slow, skipping, pause and stop, press this mark to resume the normal
play.
: Step. Every press next is to move the picture one frame.
/ : Slow. Press it to slow the speed of the normal play.
/
: Skip. Press skip-forward or skip-backward to different chapter or title.
/
: Fast.
: Pause.
: AUDIO. Refer to the AUDIO key for detailed information.
: Subtitle.
Subtitle1/3
Subtitle2/3
Subtitle3/3
Subtitle cancel
* If the DVD disc has multi-angle, you can switch observation angle. Press the angle mark to change
as follows when playing multi-angle.
1/3
Angle1/3
2/3
Angle2/3
3/3
Angle3/3
C4
REMOTE KEY FUNCTION EXPLAIN
[DIGEST]
On playing DVD disc, press this key and the screen will appear
browse menu (picture1)
Press the direction key to switch the cursor to the desired digest type,
and then press the select key. The select digest types are as follows:
“Title digest”: choose this item to show every title of the DVD
disc on the TV screen in order, and press number key to choose the
desired title directly.
“Chapter digest”: choose this item to show every chapter of the
title on the TV screen in order, and press number key to choose the
desired chapter directly.
“Title interval”: choose this item to scan the contents of the DVD
disc with each title at intervals of ten minutes and show them on the
TV screen in order, and press number key to choose the desired title
directly.
“Chapter interval”: choose this item to scan the contents of the
title with each chapter at intervals of ten minutes and show them on
the TV screen in order, and press number key to choose the desired
chapter directly. On playing SVCD, VCD discs, press this key and
the screen will appear browse menu(picture2)
Press direction key to switch the cursor to the desired digest type,
and then press the select key. The select digest types are as follows:
“Track digest”: choose this item to show every track of the disc
on the TV screen in order, and press number key to choose the
desired title directly.
“Disc interval”: choose this item to scan the contents of the disc
with each paragraph at intervals of ten minutes and show them on
the TV screen in order, and press number key to choose the desired
paragraph directly.
“Track interval”: choose this item to scan the contents of the
track with each paragraph at intervals of ten minutes and show on
the TV screen in order, and press number key to choose the desired
paragraph directly. On playing CD disc, press this key and the unit
will scan the CD tracks automatically.
D5
Select Digest Type:
Title Digest
Chapter Digest
Title Interval
Chapter Interval
(picture 1)
Select Digest Type:
Track Digest
Disc Interval
Track Interval
(picture 2)
REMOTE KEY FUNCTION EXPLAIN
[SEARCH]
MENU
MENU
Title
Chapter
Audio
Subtitle
Angle
Title Time
Chapter Time
Repeat
Time Display
Bit rate
28
III
01/20
01/01
AC-3 5.1CH
VCD
CHINESE
1/4
0*06*58
0*06*58
OFF
Elapsed
Title Elapsed
Track
Disc Time
Track Time
Repeat
Time Display
01/16
1*16*28
0*03*58
OFF
Total Elapsed
SVCD
Bit rate
0*03*28
(picture 1)
28
III Total Elapsed 0*03*28
(picture 2)
On playing DVD disc, press the [search] key, the unit will show search menu on TV screen (picture1)
Press direction key to choose the desired item, and press the select key to get into searching state.
The detailed introduction is as follows:
“Title”: in title searching state, press the number key to choose the desired title directly.
“Chapter”: in chapter searching state, press the number key to choose the desired chapter directly.
“Audio”: in sound selecting state, press the number key to choose the desired sound and press the
select key to confirm it.
“Subtitle”: in subtitle selecting state, press the number key to choose the desired subtitle and press
the select key to confirm it.
“Angle”: in angle searching state, press the number key to choose the desired angle directly.
“Title Time”: in title time searching state, press the number key to choose the desired time directly.
“Chapter Time”: in chapter time searching state, press the number key to choose the desired time
directly.
“Repeat”: in repeat selecting state, press the number key to choose the desired repeat state and
press the select key to confirm it.
“Time Display”: in time display selecting state, press the number key to choose the desired display
state and press the select key to confirm it.
On playing SVCD, VCD discs, press the SEARCH key and the screen will show search menu
(picture2)
Press the direction key to choose the desired item, and press the select key to get into searching state.
The detailed introduction is as follows:
“Track”: in track searching state, press the number key to choose the desired track directly.
“Disc Time”: in disc time searching state, press the number key to choose the desired time directly.
“Track Time”: in track time searching state, press the number key to choose the desired time directly.
“Repeat”: in repeat selecting state, press the number key to choose the desired repeat state and
press the select key to confirm it.
“Time Display”: in time display selecting state, press the number key to choose the desired display
state and press the select key to confirm it.
On playing CD disc, press the search key to search and play according to the information on the
TV screen.
Attention: it is ineffective if the input digits exceed the amount limit.
D6
REMOTE KEY FUNCTION EXPLAIN
[DISPLAY]
Press DISPLAY to display the information referring to the disc on the TV screen.
playback DVD disc state
play super VCD,VCD2.0 in the state of closeing PBC
play super VCD,VCD2.0 in the state of opening PBC
[VIDEO]
In the OPEN/NO DISC state, press VIDEO key to switch among the modes of YUV, YPbPr, SCART, 720p
and 1080i etc. Connect different display equipments when select different modes.
Note: * in YUV,YPbPr mode, CVBS and S-Video has video output;
* in 720p and 1080i mode(if connect with CVBS, TV screen can display High Definition Mode), CVBS
and S-Video doesn't have video output.
Video output*
TV screen display*
Interleaving
chromatism output
RGB
Interleaving
chromatism output
YCbCr
Progressing
chromatism output
YPbPr
Progressing
chromatism output
720P
Progressing
chromatism output
1080i
D7
SYSTEM SETUP
When the unit is working, press the select key to enter setup menu (following picture):
General setup Audio setup Video setup Initial setup Password setup
Press the direction key " " to move cursor to the desired setup page, and press the select key
to confirm.
Press the direction key " " " " to move cursor to the desired setup item, and press the select
key to confirm.
Press the direction key " " to return to last setup item.
Note:
1. Move cursor to the relevant item, the menu showed at the bottom of the screen accordingly.
2. Some menu setup is related with other set up and status, if it is gray, cannot setup.
3. The setup can be memorized continue though power off.
4. When the unit stops playing and opens the tray, it can enter the initial setup page.
General Setup Page
TV Display
PS
Normal/PS
Normal/LB
Wide
Angle Mark
ON
OSD Lang
Eng
Captions
OFF
Screen Saver
ON
Last Memory
OFF
ON
OFF
English
......
ON
OFF
ON
OFF
ON
OFF
General Setup introduction:
TV Display
A. Normal/PS: When the unit connects with TV set,
wide image is showed on the whole screen, but a part
is cut.
B. Normal/LB: When the unit connects with TV set,
playing wide image, there are black bands showed
on the up and down screen.
C. Wide: Choose this when the unit connects with
wide screen TV set.
Angle Mark:
Select display angle, when playing multi-angle DVD
disc.
OSD Language:
Select operation language.
Captions:
This function is ineffective if no caption record in
the disc. If the caption is closed, press the caption
key on the remote control to open captions function
to select captions language.
Screen Saver:
When the unit is in stop mode,a moving picture will
appear several minutes later if screen saver is set
on.Screen saver will protect the TV screen.
Last Memory:
Remember the current playtime, if this function setup
is on. It can play from the memorized playtime when
playing the current disc again. If powering off the unit
gives up.
E1
SYSTEM SETUP
There are five subsidiary setup pages,each function
is as follows*
Audio Setup Page:
Speaker Setup
SPDIF Setup
3D Processing
Equalizer
HDCD
Speaker Setup Page
Downmix
STR
Front Speaker
LRG
Center Speaker
SML
Rear Speaker
SML
Subwoofer
ON
Test Tone
OFF
Dialog
Channel trim
00
LT/RT
Stereo
Off
Large
Small
Large
Small
OFF
Large
Small
OFF
ON
OFF
ON
OFF
Down Mix:
In LT/RT or stereo output mode, the center speaker
and rear speaker on this page cannot setup, only
can if in 5.1 channel output mode.
Test Tone :
In 5.1channel output mode, this item can setup
in state of opening disc tray or stopping play.
Dialog volume:
In LT/RT or stereo output mode, set up this item
to adjust voice, within the range from 0 to 20.
Channel trim setup:
Enter channel volume setup, press direction key
* to select center channel, left channel,
* **
right channel, left surround, right surround,
subwoofer channel. After selecting the channel,
* to adjust volume
press direction key * **
of the channel, then press the enter key when
adjusting to desired volume.
E2
SYSTEM SETUP
SPDIF Setup Page:
SPDIF output
RAW
Dynamic
LPCM out
SPDIF OFF
SPDIF/RAW
SPDIF/PCM
-
48k
-FULL
-3/4
-1/2
-1/4
-OFF
48k
96k
SPDIF output:
(SPDIF/RAW): when the unit and the amplifier are
connected by coaxial and optical cables, please select
this item; when it playbacks disc of Dolby digital, DTS
and MPEG, the coaxial or optical output will output
the corresponding digital signal, in this case, the
connected amplifier should have the function of
decoding Dolby digital, DTS and MPEG.
(SPDIF/PCM): when the unit is connected with 2
channel digital stereo amplifier, please select this item;
when it playbacks disc of Dolby digital, MPEG, the
coaxial or optical output will output in 2 channel mode
modulated by PCM.
Dynamic:
If watching large dynamic scope movie program at
night, select this mode to reduce the volume, meantime
keep the little minutia EQ high level, thus it can avoid
troubling neighbors without detracting volume quality.
LPCM out:
Setup different mode among 48KHz and 96KHz
according to different audio signal source.
Note: some amplifiers cannot support 96KHz signal,
and may lead to abnormal sound from the speaker.
Sound Effect Page
EQ Type
None
None
Rock
Pop
Live
Dance
Techno
Classic
Soft
Bass Boost
OFF
EQ Type:
Seven modes are available. Select “live” to get live
music effect. When EQ type is off, the sound of the
disc will output directly. You can setup the other items
to reach your requirement.
Bass Boost, Super Bass, Treble Boost Setup bass
boost, super bass and treble boost to assort with EQ
type to reach a perfect status.
ON
OFF
Super Bass
OFF
ON
OFF
Treble Boost
OFF
ON
OFF
E3
SYSTEM SETUP
3D Processing Page:
PRO LOGIC II
OFF
Mode
Mus
Reverb Mode
OFF
Channel Delay
ON
OFF
AUTO
Music
Movie
OFF
Concert
Living room
Hall
Bathroom
Cave
Arena
Church
PRO LOGIC II:
This setup is available only for two channel. When
it is setup and the down mix in speaker setup is 5
channel, 5 channel will output. When it is auto, the
system selects mode according to the disc
automatically.
Note: only when setup 5.1channel in down mix
mode, item Prologic II is available. Only when
Prologic II setup On or Auto, item Mode is available.
When playing 2channel music disc, please setup
Music; when playing movie, please setup Movie.
Reverb Mode:
This item setups reverb mode in 3D processing,
and there are 7 types available. e.g. when in living
room mode, the system speaks reverberative effect
in living room.
Channel Delay :
If you are not satisfied with the above reverb modes,
you can choose manual setup to get your desired
sound effect. Enter Channel Delay, You can setup
the distance between center speaker, surround
speaker and subwoofer. Press the direction key
* to select channel. Press the direction
* **
key* * to increase distance and *
* to
decrease distance.Then press enter key to confirm
it.
E4
SYSTEM SETUP
Filter:
HDCD Setup Page
This setup can change output sample rate when
playing HDCD disc. Setup for 44.1K, the system
Filter
1X
OFF
can output all signals of the disc sample rate from
1X
0 to 44.1K the signal over 44.1K being cut. Setup
2X
for 88.2K, the system can output all signals of
the disc sample rate from 0 to 88.2K, the signal
over88.2K being cut. Setup for off, the system
will output all signals without any limit.
44.1KHz = 1X ; 88.2KHz = 2X
Video Setup Page
Brightness
00
Brightness ||||||||
0
Hue
Contrast
Saturation
00
00
00
Hue
||||||||
Contrast ||||||||
Saturation ||||||||
0
Sharpness
MID
Luma Delay
1T
High
Medium
Low
0T
Brightness:
Setup this item to control the brightness of
image, available range from –20 to +20.
Hue:
Setup this item to control the hue of image,
available range from –9 to +9.
Contrast:
Setup this item to control the contrast of
image, available range from –16 to +16.
Saturation:
Setup this item to control the saturation of
image, available range from –9 to +9.
Sharpness:
Setup this item to control the sharpness of
image, available range as high – medium – low.
Luma Delay:
Setup this item to control the luma delay of
image, available range from 0T to 1T.
Gamma:
Setup this item to adjust the image,available
range as high –medium – ow – none.
0
0
1T
Gamma
None
High
Medium
Low
None
E5
SYSTEM SETUP
Preference Page:
TV Type
Pbc
Audio
Subtitle
Disc Menu
Pal
Pal
Auto
Ntsc
On
Off
On
SPA
SPA
SPA
English
......
Off
Parental
1. Kid Saf
2. G
3. Pg
4. Pg13
5. Pgr
6. R
7. Nc17
8. Adult
Default
Reset
TV TYPE:
The unit can correspond with erery type of TV all over
the world, Select your TV type on this item:
Auto: Select TV type according to the color system
of the playing disc automatically.
NTSC: Taiwan, Japan and USA use this type.
PAL: HongKong, China and Europe use this type,
When TV type is inconsistent with this setup, the
screen will be in black strip state.
Audio: Subtitle and disc menu language setup:
when the disc has correspondent subtitle, audio and
menu language supporting, menu is valid, if the playing
disc defaults preferred language, this setup will be
invalid.
Parental control:
Adjust parental control to control the playing rated
disc.
Default:
Return the player defaults to the original factory
settings.
Password Mode:
Password Setup Page
When the mode is "OFF", setup the age control
directly; when the mode is "ON", setup the age control
Password Mode
Password
OFF
ON
only with password, using password to operate every
OFF
time.
Change
Password Change:
Setting up this item, the TV screen will show as
following picture:
Old password
New password
Confirm PWD
OK
The initial password of the unit is 8806. After changing
the password, press the select key to finish.
E6
TROUBLE SHOOTING
SYMPTOM AND SOLUTION:
Symptom
Reason(s)
No power
Do not connect power cord to the wall outlet Connect them well
No picture
No sound
Distorted picture
Solution(s)
Do not set up TV in correct setting
Set up TV in correct mode
Do not connect video cable securely
Connect them well
Do not connect audio cable securely
Connect them well
Do not power the audio connection system on
Power it on
The audio output setting is not correct.
Set it in correct mode
Disc is dirty.
Clean the disc or try another one.
In fastforward or fastbackward mode
Sometimes, the tiny distortion appears, itis normal
condition.
Luminance unsteady
or picture with noise
Unable to play
Key no function
Circuitry influence
Connect DVD video player to TV directly
Do not load disc in
Place disc in
The disc loaded in can not play
Place readable disc in(check the disc type)
The disc is loaded upside down
Replace the disc with the label side up
Do not load disc in guide slot
Load the disc correctly
Disc dirty
Clean the disc
TV screen has menu
Press Setup turning off the menu.
Parental lock function
Unlock it or change the rating
Power wave or other abnormal
Switch on/off power or unplug/replug the power
phenomeno (such as static) disturbs
cord.
the normal condition.
Remote control
does not work
Do not point remote control at the remote
Point remote control at the remote
sensor directly.
sensor directly.
Remote control is too far from DVD unit.
Operate remote control within 7 meters
Batteries are exhausted.
Replace the batteries and insert in correct polarities.
F1
SPECIFICATIONS
DVD PLAYER/OUTPUT:
Video Guide
Line
Video OutputVp-p(V)
Level Definition(TV-line)
1.0 + 0.2 (75 )
Audio Guide
Line
Audio Output (Vrms)
S/N Ratio(db)
Audio Dynamic Range
1.8 + 0.2 (10K )
DVD Audio
Fs 48KHz
PCM 4Hz-22KHz
Fs 96KHz
PCM 4Hz-44KHz
Audio
Frequency
Response
Power Supply
450
80dB
80dB
CD Audio
Fs 44.1KHz PCM 4Hz-20KHz
AC Input(V)
Frequency(Hz)
~110 - 240V
50Hz / 60Hz
15W
Power Consumption
Temperature Condition
0 C~40 C
Operating Condition
Level manipulation
Dimension
430x 241.5 x 48 mm (L / W / H)
Weight
3.0kg
G1
ADDITIONAL INFORMATION
Care of disc:
Do not touch the signal surface.
Do not add labels or adhesive tapes on the discs.
Cleaning of discs:
Finger prints or stains on the surface of the disc
will directly affect signal recording and result in a poorer picture quality. Therefore, please use a
soft cloth and wipe in a radiating manner from the centre to the outer rims when cleaning the disc.
If the surface of your disc is very dirty, wipe the disc with a moist cloth. Finally use a dry soft cloth
to remove all the water stains.
Never use electrostatic prevention products as well as sloutions which contain benzene, thinner
or any other vaporizing substances, as they may damage the disc surface.
Storage of disc:
Do not keep the disc in the direct sunlight, near the heat source, in the dusty places or moisture
(kitchen, bathroom). Keep the disc vertically in the disc storage case. Heavy objects on the disc
case will cause deformation to the disc.
Copyright Attention:
Copy, broadcast, play or rent the disc is forbidden without legal permission.
TV System:
Please connect the unit to the TV compatible with
PAL/NTSC.
About this manual:
This manual explains the basic specifications of this unit. Some DVD disc may have special
requirement and the unit may not play such discs. Please refer to the disc instruction.
H1
DVB
INTRODUCTION
REMOTE CONTROL
REMOTE CONTROL:
1
9
2
1. STANDBY: switch between POWER
ON/STANDBY mode.
2. PROG/EPG: open upElectronic Program Guide
3
4
5
menu.
3. Choose number key.
4. SUBTITLE: ON/OFF subtitle.
5. SETUP: menu setup.
6. DIRECTION KEY: remove cursor direction.
7. COLOR KEYS:for adjust teletext.
10
11
12
8. DIGEST: scan all the DVB channels currently
6
being broadcast.
9. DISPLAY: press for current channel information:
such as time indication.
10. TEXT/ANG:open TEXT function.
11. CHANNEL: select audio:Left/Right/Stereo/
7
8
Mono.
12. AUDIO:select DVB audio.
13. PREV/NEXT: select DVB channels.
14. A-B/DVB MODE:switch between DVB /
Radio and Favorite mode.
13
15.DVB/DVD:switch between DVB-T/DVD format
mode.
14
15
I1
BASIC OPERATION
1.After opening the package, please follow the guideline to connect the DVB reciever as
atena,TV set and adaptor.
2.Turn on the power, enter the setup menu to search for the TV programs first ,for the detailed
operation please refer to setup instruction.
3. When search is finished, select the program you want directly by the number beys or
/
keys on the remote control.
J1
SYSTEM SETUP
Before turn on the unit,let us have a view at the SETUP MENU.
AREA
.
Ensure that the area has been set correctly before channel scan.
Press the SETUP button and select the DVB-T Setup Page option using the arrow
keys.
Press the ENTER button or
button when selected. The following menu will
.
.
.
display.
Select Area submenu using the
button.
Press the
buttons until the correct area is
displayed.
Press the ENTER button to confirm your selection.
..DVB-T Setup Page..
Area
ENG
UK
Australia
Time Zone
Parental Age
.
.
.
12
Auto Scan
Manual Scan
Adjust Channel
Channel Remap
*:To exit the menu, press the SETUP button.
Reserve Channel
TIME ZONE
.
.
.
..
.
Ensure that the time zone has been set correctly before watch program.
Select the Time Zone option using the arrow buttons.
Press the ENTER button to select the Change option.
The following menu will display.
Press the
buttons until the correct Hour is displayed.
Press the ENTER button to confirm your selection, the hili will jump to Minute option
automatically.
Press the
buttons until the correct Minute is displayed.
Press the ENTER button to confirm your selection,
the hili will jump to OK option automatically.
Press the ENTER button to confirm you selection after
select OK.
..DVB-T Setup Page..
Area
ENG
Time Zone
Parental Age
*:To exit the menu, press the SETUP button.
Auto Scan
Manual Scan
HOUR
Adjust Channel
+ 08
Channel Remap
OK
Reserve Channel
K1
change
12
SYSTEM SETUP
PARENTAL AGE
Select the Parental Age option using the arrow buttons.
Press the ENTER button, the following menu will display.
..DVB-T Setup Page..
Area
ENG
Time Zone
Parental Age
12
12
Auto Scan
13
Manual Scan
14
Adjust Channel
..
.
Channel Remap
Reserve Channel
..
.
Press the
buttons until the age you want to select is marked yellow.
Press the ENTER button to confirm your selection, the color change to red.
To exit the menu, press the SETUP button.
AUTO SCAN
.
.
.
After setting the correct area and time zone, scan channels:
Select the Auto Scan tab by using the arrow buttons on the remote control.
Set Start, you will see the Menu display like right Fig.If select Cancel, you can return to
Channel setup Page;If select OK, you can access to following Auto Scan Page and start to
scan channels.
The machine will scan for all the digital TV and Radio
stations available in your area and list them as above.
There is also a progress bar shown as a percentage.
When all the digital TV and Radio stations have been found,
the scan progress will arrived to 100%, the program will
.
end.
*:Please confirm that the country you choose is correct
before auto scan! Otherwise you may not search any
channels.
When AUTO SCAN finished,the old channels would
be covered.
Before you do AUTO SCAN ,you shoud do reset
function in SETUP MEAN.
..DVB-T Setup Page..
Area
Time Zone
Parental Age
Auto Scan
Manual Scan
Adjust Channel
Channel Remap
Reserve Channel
K2
ENG
12
Start
SYSTEM SETUP
MANUAL SCAN
..
.
.
After setting the correct area and time zone, scan channels:
Select the Manual Scan tab by using the arrow buttons on the remote control.
Set Start, the right hand menu will display.
Press
keys to select frequency you want, or you can select the fregueacy
you want by press digital buttons directly,press ENTER key to confirm Scan.
The machine will scan for all the digital TV and Radio
stations available in your area and list them below Found
Channels.
..DVB-T Setup Page..
When all the digital TV and Radio stations have been found, Area
ENG
Time Zone
select Add can add channels.Press SETUP key to exit
.
Parental Age
manual scan page and start to play program.
12
Auto Scan
*:Please confirm that the area you choose is correct
before auto scan! Otherwise you may not search any
channels.
When manual scan is finished,the scanned channels will
Manual Scan
Start
Adjust Channel
Channel Remap
Reserve Channel
be list at the end of the exit channels,the old channels can not be covered.
Mannual Scan
Mannual Scan
Status
Found Channels
Status
Freq:714000KHz
Freq:714000KHz
Scan
Scanning...
Mannual Scan
Status
Freq:722000KHz
Find TV No:01
Find Radio No:00
Found Channels
Mannual Scan
Found Channels
TV01
Status
SZTV-M
Freq:722000KHz
Find TV No:01
Find Radio No:00
Saving Info...
Add
K3
Found Channels
TV01
SZTV-M
SYSTEM SETUP
ADJUST CHANNEL
When channel scan is finished,please adjust the channels by "color keys".
Select the DVB-T SETUP PAGE option using the arrow buttons.Press the ENTER button, the
following menu will display.
Press the
buttons to select Adjust Channel option.
..
..
.
.
.
.
Press the ENTER button to select Start, the following menu will display. (picture 1)
Use
to remove cursor,select the channel you want to adjust.
Press RED key to set favorite channel, a red icon display beside channel name.
Press RED key again can cancel favorite set.
Press GREEN key to set delete channel, a cyan icon display beside channel name.
Press GREEN key again can cancel favorite set.
Press YELLOW key to set protected channel, the right hand side menu will display. (picture 2)
Enter the pin code then select OK to confirm.a yellow icon will display beside channel name.
Select Cancel to return.
Select Exit then press the ENTER button
you can exit the menu.
*:Default code:8806
If play the program which is protective,you should open the code first.
..DVB-T Setup Page..
Area
Adjust Channel(000-000)
ENG
001 SZTV-M
002 CCTV-M
Time Zone
Parental Age
003 GDTV-M
12
004 ZJTV-M
Auto Scan
Manual Scan
Adjust Channel
Start
Favorite
Channel Remap
Protected
Exit
Reserve Channel
(picture 1-1)
(picture 1-2)
Parental Protected
Please input the
Parental Protected
OK
Delete
CANCEL
(picture 2)
K4
SYSTEM SETUP
CHANNEL REMAP
.
.
.
The Channel Remap option allows you to select how your channels will be Ordered in the
channel list.
Press the
buttons to select Channel Remap option.Press the ENTER button to
select Start, you will see the channel remap submenu.
Use
key remove cursor to select the channel you want to remap.
Then press theENTER button to confirm, the channel name would be marked red.
Use
buttons to remove cursor to your target place, press the ENTER button to
confirm.You will see the channel list after remap from following picture.
Left picture is before remap, the right one is after remap.
.
.
.
.
You can switch to next page by press
key, or select Next option then press the ENTER
key.
You can switch to previse page by press
key, or select Prev option then press the ENTER
button.
Select Exit then press the ENTER button you can exit the menu.
Channel Remap (001-001)
001 SZTV-M
002 CCTV-M
003 GDTV-M
004 ZJTV-M
Channel Remap
Exit
K5
SYSTEM SETUP
RESERVE CHANNEL
.
..
.
Select the Channel Setup option using the arrow buttons, the following menu will display.
Press the ENTER buttons to select Start option, the following menu will display.
Use
keys to remove cursor. Press ENTER key you will see the following menu, this
menu including the program brief Introduction.
In this menu, choose Delete, you can cancel the program reserve.The channel name would be
disappeared from reserve program list.
Choose OK can return to reserve program page.
Exit then press ENTER button to return to channel setup page.
In channel setup page select Notify time option, press ENTER key the right hand side menu
..
.
display.
Press
ENTER button.
keys until the correct time is displayed, to confirm the selection by use
..DVB-T Setup Page..
Area
Reserve Program Info
ENG
001
GHOST
001 Forrest Gump
001 The city of angles
Time Zone
Parental Age
12
Auto Scan
12/01
17.00-18.00
001 Sleepless of seattle 12/01
19.00-21.50
Manual Scan
Adjust Channel
Channel Remap
Start
Reserve Channel
EXIT
Notify time
Reserve Program Info
12/01
001
14:30-15.30
TV1
GHOST
Notify time
00 Min
OK
OK
Delete
K6
12/01 14:30-15.30
12/01 16.57-17.57
REMOTE KEY FUNCTION EXPLAIN
POWER BUTTON
Ensure all connections are correct.
To switch on the set top box, press the
button on the remote control, or the set top box.
To switch the set top box off, press the
button again.
Then you will see the DVD logo or DVB logo on the TV screen.You can press DVD/DVB button to
switch between DVD and DVB.
AUDIO
You can change to a different audio language by Pressing the AUDIO button.
Please note that this feature is not available on all channels.
*:This function depends on the program broadcast.
SUBTITLE
You can on/off subtitle or change to a different subtitle by Pressing the SUBTITLE button.
Please note that this feature is not available on all channels.
*:This function depends on the program broadcast.
TELETEXT
You can pressing the TEXT/ANG button to turn on/off teletext stream display.
Please note that this feature is not available on all channels.
Press or keys to change pages.
Press RED key to select red color info.
Press GREEN key to select green color info.
Press YELLOW key to select yellow color info.
Press BLUE key to select blue color info.
*:This function depends on the program broadcast.
L1
REMOTE KEY FUNCTION EXPLAIN
DIGEST
The Digest menu is used to look at what is currently being broadcast on a TV or Radio channel.
To access the Digest Menu, Pressing DIGEST key on the remote control.
The following menu will display.
To view a different channel, press either the
button or
button. Each channel
selected will be playing in the preview box.
You can switch to next page by press
key, or select Next option then press the
ENTER button.
You can switch to previse page by press
key, or select Prev option then press the
ENTER button.
To view/listen to a channel press the ENTER button.
To exit digest menu, press the DIGEST button.
PROG/EPG
The EPG menu is used to look at what is being broadcast on a TV or Radio Channel later
in the day.
To access the EPG Menu, Pressing PROGRAM key on the remote control. The right hand
side menu will display.
Select Channel by press
key,then press ENTER button you will see channel list.
To view a different channel, press
keys. Press ENTER button to confirm which
you want to select. Press
key to return to the EPG menu.
To see what is going to be broadcast after this program, press
keys to select
Program option, you will see the right hand menu after you press ENTER button.
Please note that this feature is not available on all channels.
Press
keys to select any program, then press ENTER button, the following
Program Reserve page will display.
Select ENTER to reserve program which you want, Select Cancel to exit.
After you reserve programs, the reserve program list will be found in DVB-T setup/Channel
setup/Reserve channel.
To exit EPG menu, press the PROG/EPG button.
L2
REMOTE KEY FUNCTION EXPLAIN
ZOOM
Press ZOOM Key when playing program, could zoom in or zoom out pictures.
Zoom: 2X-3X-4X-1/2-1/3-1/4.
A-B/DVB MODE
Use A-B/DVB MODE Key to switch channel mode between TV, Radio and favorite mode.
CHANGING THE VOLUME
Press the + button will make the volume of the set top box louder.
Press the - button will make the volume of the set top box quieter.
CHANGING TO A DIFFERENT CHANNEL
You can change to a different channel by using
or
keys on the remote control.
You can change to a different channel by using all number keys on the remote control.
To return to the previously viewed channel, press the RETURN button.
L3
TROUBLESHOOTING
In some r egion, the digital terrestrial signal may be weak. So you'd better use the
antenna in which the booster was built,for watching theweak sinal channels.
Problem
Possible cause
What to do
Standby light not lit
Mains lead unplugged
Mains fuse blown
Check mains lead
Check fuse
No signal found
Aerial is disconnected
Aerial is damaged/misaligned
Out of digital signal area
Check aerial lead
Check aerial
Check with dealer
No picture or sound
Tuned to digital teletext channel
Reduce to another channel
Scrambled channel
message
Channel is scrambled
Select alternative channel
No response to
remote control
Receiver off
Handset not aimed correctly
Front panel obstructed
Hand set batteries exhausted
Plug in and turn on plug
Aimhandset at front panel
Check for obstructions
Replace handset batteries
Forgotten channel
lock code
Re-install channels to cancel
channel lock
Forgotten menu
lock code
Contact help line
The remote control
will not operate
your STB
After moving the
STB to another
room you find you
are no longer able
to receive digital
reception
(1) The batteries in your remote
control need replacing
(2) There is an obstruction
blocking the signal path
between the remote control
and the box.
The aerial feed former new point
may come through a distribution
systemwhich may reduce the
digital signal now received by the
box.
M1
(1) Replace the batteries
(2) Check that there is nothing in
the way of the path between
the remote control and the
receiver
Try a direct feed fromthe antenna