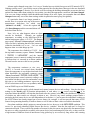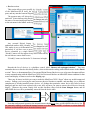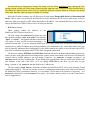
1
II
setup guide
& user manual
IT Watchdogs has taken care in the preparation of this manual, and the information is considered current as of
the date and time it was written, but IT Watchdogs makes no expressed or implied warranty of any kind and
assume no responsibilities for errors or omissions. No liability is assumed for incidental or consequential
damages in connection with or arising out of the use of, or inability to use, the information contained herein.
This manual is for use with IT Watchdogs MiniGoose/XP-II monitoring devices
running firmware revisions 3.3.x or higher. For other IT Watchdogs products or
previous firmware revisions, please consult our webpage at
http://www.itwatchdogs.com to find the appropriate manual(s) for your application.
MiniGoose/XP-II setup guide & user manual, rev. 0.05
Copyright ©2009 IT Watchdogs, Austin, TX. All rights reserved.
IT Watchdogs, the “Digger” logo, WeatherGoose, and SuperGoose are trademarks of IT Watchdogs. All other
company names, logos, or trademarks referenced herein remain the property of their respective owners, and are
for instructive or example purposes only. No endorsement of the referenced companies or products by or of IT
Watchdogs should be assumed or implied.
MiniGoose/XP-II USER MANUAL
Thank you for your purchase of this MiniGoose/XP-II remote monitoring system!
To get the most out of your MiniGoose/XP-II, please take the time to look through this manual to familiarize
yourself with the product and its features before attempting to install and operate it.
Note: This model is based on our new Series-II hardware. Users of our previous Series-I models will want
to pay particular attention to the sections dealing with network configurations and alarm settings, as these
functions have been significantly enhanced in MiniGoose/XP-II and offer a considerable array of features not
previously available in the earlier product series.
MiniGoose/XP-II USER MANUAL
As shipped from the factory, the MiniGoose/XP-II is configured with the following default network settings:
IP ADDRESS:
SUBNET MASK:
DEFAULT GATEWAY:
192.168.123.123
255.255.255.0
192.168.123.1
To initially configure the unit, you will generally need to connect it directly to a laptop or desktop PC via a crossover
Ethernet cable, and configure the PC's network card to match the 192.168.xxx.xxx subnet. If your network card is not
already configured this way, simply follow these directions (Windows 95 / 98 / 2000 / XP only; Macintosh and Linux
users, or users of Windows Vista or Windows-7, should refer to the appropriate help files for their particular systems).
1. Click START, “Settings”, then “Network Connections".
2. Locate the entry under “LAN or High-Speed Internet” which corresponds to the network card you're using to
connect to the MiniGoose/XP-II. (Most PCs only have a single network card installed, but if you have more than
one, you can determine which connection is which simply by disconnecting the cable from the MiniGoose/XP-II and
seeing which network adapter's status changes from “Connected” to “Network Cable Unplugged.”)
3. Double-click on the appropriate network adapter's entry in the Network Connections list to open its status dialog box,
then click the “Properties” button to open the Properties dialog. (fig.1)
4. Find the entry titled “Internet Protocol (TCP/IP)” in the list, then click the “Properties” button. (fig.2)
5. NOTE: Before changing any of the properties on this page, be sure to write down any existing settings so that you
can restore them afterwards!
6. Set the properties as shown. (fig.3) Note that it is not necessary to specify a default gateway or DNS server addresses,
and these fields should be left blank. Click “OK”, “OK”, and “Close” to back out of the network-settings boxes.
7. The MiniGoose/XP-II should now be accessible. Note that depending on your PC's configuration and OS version, it
may require you to reboot for the changes to take effect.
8. After you have finished configuring the MiniGoose/XP-II, simply repeat the above instructions and put back the
settings you wrote down in step 5 to restore your PC's network card to the proper settings for your network.
(fig.1)
(fig.2)
(fig.3)
Once you have configured your network card to access the MiniGoose/XP-II, open your web browser and
type http://192.168.123.123 into the address bar. You should get a page which looks similar to this:
1st-time power-up:
clock is not set
memory has no logged data
If this is the first time the unit has been powered up and configured, it will most likely show “no data to
graph” and indicate that the unit's internal real-time clock is not set. It may also indicate that the clock is not
set if the unit has been left unpowered long enough for the clock's internal backup power to run out (typically
about 10 days). While the unit will continue to monitor its sensors and trip alarms (if any are configured) for
values which exceed the alarm thresholds, it will not log or graph data until the clock is set.
In this QuickStart guide, we will set the system clock, and briefly point out some other settings which you
might want to configure at this time to get your MiniGoose/XP-II unit up and running. Note that you do not
have to set any of these (other than the clock) right now, so if you would prefer to read the more detailed user
manual before configuring your unit, feel free to skip over the QuickStart guide.
IMPORTANT NOTE: users of our previous WeatherGoose-I series should be aware that in the
MiniGoose/XP-II configuration menus, each section's Save Changes button is independent of the others; i.e.
clicking Save Changes in the System Clock section will only save changes to settings within that section; any
changes you might have made to any other sections on the Config page, such as Network or E-Mail, will not
be saved and will be lost. This is a significant difference from WeatherGoose-I, where Save Changes acted
globally and all of the settings on the page were saved at once.
When you are ready to proceed, click the Config button highlighted above to bring up the system
configuration pages.
There are a great many settings and configuration options available on the Config page. At the moment, we
will only deal with the basics of a first-time setup of the unit; a more detailed, in-depth coverage of each
available setting will be covered later, in the chapter on Configuration.
The Config page is subdivided into sections, with similar functions and settings grouped together to make
them easier to find. When you click on the Config tab, the Configuration:Network page will appear by default;
to move to one of the other pages, simply click on one of the other tabs underneath Config.
The Network tab is where you can either assign the
MiniGoose/XP-II to a specific IP address on your
network, or configure it to request its network
configuration from your router via DHCP. You can also
configure the Web Server to allow or deny encrypted
(HTTPS) or non-encrypted (HTTP) connections, change
the HTTP and HTTPS ports, and configure the
MiniGoose/XP-II to use a desired set of DNS servers.
NOTE: the moment you click Save Changes, the unit
will switch to its new settings and no longer respond on
192.168.123.123! This, too, is a significant change
from our previous WeatherGoose-I product, where the
“backup” 192.168.123.123 address was always available.
Therefore, we will skip over these setting for the moment,
and come back to them as the final step in configuring the
unit.
Instead, click on the Admin tab to switch to the
Config: Admin Options page, where we will set the clock
and password options.
To set the clock:
For this first-time setup, “Set Clock method” to
Manual.
Ÿ Set the “GMT” to the correct offset for your local
time zone. Make sure to type it in as shown; i.e.
U.S. Central Time should be entered as -06:00,
not merely -6, -6:00, or -06.
Ÿ Enter the date and time in the fields provided.
Ÿ For now, the “NTP” settings can be left alone.
Ÿ Click the Save Changes button, and the clock
will be set.
Note: currently, the MiniGoose/XP-II does not
automatically adjust for Daylight-Saving Time.
Now, scroll down the Config: Admin Options page until you find the Name and Password Configuration
options block. Here, you can set up to three levels of password protection for the MiniGoose/XP-II, allowing
you to restrict which user(s) in your organization are able to view or change the unit's settings. Although these
settings are optional, IT Watchdogs highly recommends that you at least set up the Administrator account to
prevent unauthorized changes to the network and administrative settings.
If a given account’s username and password fields are left blank, then the level(s) of access controlled by
that account are available to anyone who connects to the unit. Accounts are listed in order of privilege, from
highest to lowest, and lower-privilege accounts cannot be set unless the higher-privilege accounts above them
are set as well; i.e. you cannot have a Control account without an Administrator account, and you cannot have
a View-Only account without both a Control and Administrator account.
Ÿ Administrator: this account has complete
access to the MiniGoose/XP-II; all pages are
viewable, and any setting can be changed –
including the ability to change any other
account's passwords. Note that this account is
the only account which can access the Config
page, and that you must configure this account
before you can configure the Control or ViewOnly accounts.
Ÿ Control: this account is able to view all of the
web pages except for the Config page, and is
able to change alarm settings on the Alarms
page.
Ÿ View-Only: this account is able to view all of
the web pages except for the Config page, but
is not able to change any settings.
Once you have configured these accounts the
way you want them, click the Save Changes
button. If you have configured an Administrator
account, the unit will now ask you to log in with
that username and password before you can
continue.
Next, scroll down to the Admin Info options
block. These fields allow you to change the unit's
administrative-contact information and specify its
physical location, if desired. This information will
be displayed at the bottom of each page, as shown.
Note that these fields are for your users'
convenience only; the MiniGoose/XP-II does not
use the information entered here for anything other
than to fill out the display at the bottom of each
page, and to provide a clickable link to send the
system administrator an e-mail. They may be filled
out with any information you like, or even be left
blank if you wish.
For the moment, the rest of the settings on the various Config pages can be left alone. Go ahead and click
on the Network tab to go back to the Config: Network Settings page, and we’ll configure the unit’s IP and DNS
settings for your network.
Ÿ Network:
You can either assign your IP, Subnet Mask, and Gateway settings manually, or configure the unit to
acquire these settings via DHCP from your network router.
Ÿ Here, you can choose how the unit
gets its network-address assignment
and DNS server settings. The unit
can either attempt to acquire them
via DHCP, or use static addresses
you specify in the fields below.
Note: enabling any of the DHCP
will override the static IP and/or
DNS settings, so use caution!
Ÿ Static IP network-address settings
are entered into these boxes.
Ÿ Static DNS server settings are
entered here. If you want to specify
any other settings such as NTP time
servers, e-mail servers, etc. via
URL instead of by IP address, you
will need to provide the address of
at least one DNS server here.
Click Save Changes, and the unit will immediately switch to its newly-assigned IP address (or attempt to
procure one via DHCP.) Note that depending on your current network-card settings, you may not be able
to access the device at its new IP address until you install it in your network and change your computer’s
network-card settings back to the
correct ones for your network.
Ÿ Web Server:
For the moment, these settings can
be left alone.
And that's it! Your new MiniGoose/XP-II is now ready to mount in
your server rack and begin logging data. In the following sections, we
will cover each of the unit's functions in more detail and show you how
to set up alarm thresholds, configure e-mail and SNMP alerts, sensor
options, cameras, and all the rest.
Note: if this is the first time the unit has been powered up, or if it has
been left unpowered long enough for the clock's backup power source to
run out, we recommend leaving the MiniGoose/XP-II powered up for at
least 1 hour before disconnecting it and moving it to another location, to
give the backup-power capacitor sufficient time to recharge to full
capacity.
TIP: if you are using a single
PC
to
configure
several
MiniGoose/XP-II units in a row,
one after the other, you may find
that some units appear slow or
unresponsive when first connected
to the PC. This is often caused by
the operating system and network
stack “remembering” the MAC ID
of the previous unit at the
192.168.123.123 address, and
continuing to try to send packets to
that MAC instead of the current
unit’s MAC. This can be overcome
either by waiting a few minutes for the “remembered” MAC to expire from the ARP table (this can take
anywhere from 2 ~ 20 minutes, depending on your O/S and version), or by opening a command prompt and
issuing the command arp -d 192.168.123.123 to delete that IP address’ entry from the ARP table. (In
Windows, click START, “Programs”, “Accessories”, then “Command Prompt” to open a command prompt;
Mac OS/X and Linux users, refer to the help files for your particular systems on how to get to a command prompt or
console window. The syntax of the arp command should be the same.)
TIP: if you are unable to reach the MiniGoose/XP-II
from your web browser when the unit is directly connected
to your computer via a crossover cable, try opening a
command prompt as above and issuing the command ping
192.168.123.123 to see if the unit responds. If the unit
responds to pings, make sure your browser isn’t set to use a
proxy server; if it is, you may need to temporarily disable
proxies in order to reach the unit over a direct connection.
Ÿ in Internet Explorer, the proxy settings can be found under
“Tools” ► “Connections” ► “LAN Settings”
Ÿ in Firefox, the proxy settings are in “Tools” ► “Options” ►
“Advanced” ► “Network” ► “Settings”
in Opera, the proxy settings are in “Tools” ► “Preferences” ►
“Advanced” ► “Network” ► “Proxy Servers”.)
MiniGoose/XP-II USER MANUAL
This section is intended to help familiarize you with the MiniGoose/XP-II unit itself; in
particular, this section will focus on the hardware feartures, including the physical connectors on
the front panel and their various functions.
NOTE: much of the information in this manual can also be applied to the WeatherGoose-II,
SuperGoose-II, MiniGoose-II, and MicroGoose models as well, since these models are all
based on a common set of designs and software modules. However, this manual is oriented
specifically towards the MiniGoose/XP-II; if you need detailed installation and setup
information on the other models in the Goose-II series, we recommend downloading and
consulting the manual specific to the model(s) in question.
Users of our previous series-I units will notice that physically, the MiniGoose/XP-II unit is
nearly identical to the model formerly known under the name “MiniGoose-2”, which was also
sometimes designated by the model number “WxGoos-4”. These somewhat contradictory and
confusing series-I designations have been deprecated, in favor of a more consistent naming
scheme; however, if you should need to contact us for technical support, especially if you own
both series-I and series-II units, please make sure to specify exactly which model you’re
requesting support on in order to expedite your request and avoid confusion.
errata: Some firmware revisions of the MiniGoose/XP-II unit may identify themselves as “Mini/163 II” on the web pages.
They are both the same model; “Mini/163 II” was an internal development project name which was mistakenly left in some
firmware revisions when they were compiled.
The MiniGoose/XP-II unit is designed with rack-mounting in mind, so all of its connections and sensors
are easily accessible on the front panel. Under most normal operating conditions, there should be no need to
remove the unit from the rack once it has been installed.
The illustrations below show the front and rear panels of a MiniGoose/XP-II. The illustrations on the
following pages will highlight each element in turn and describe its purpose in more detail.
DC
ETHERNET
POWER
JACK
JACK
RESET
BUTTON
CABLE LOOMS
TEMPERATURE
SENSOR
(behind grille)
DIGITAL
SENSOR
JACKS (16)
POWER
LED
ANALOG /
DRY-CONTACT
INPUT TERMINALS
IP RESET
BUTTON
SENSOR BUS
IDLE / ACTIVITY
INDICATORS
On the back of the unit, you will find a threaded “grounding point” which will accept #10-32 hardware and
can accommodate screws up to ½” deep. This can be used to earth-ground the case, which can often be helpful
in suppressing EM noise issues in electrically noisy environments; if you find that your MiniGoose/XP-II
sometimes generates spurious “sensor disconnected” errors with no other apparent physical cause (such as
loose connections, damaged cables, etc.), try connecting a heavy-gauge copper grounding wire from the case
to a known-good earth ground, such as an electrical junction box or a water pipe. (NOTE: IT Watchdogs
recommends consulting a qualified electrician to find a good earth-grounding point in your facility.)
#10-32 THREADED
GROUNDING POINT
Ÿ DC Power Jack and Power LED:
The MiniGoose/XP-II runs on low-voltage DC power, supplied here via a standard
DC barrel-plug connector. When the unit has power, the LED next to the DC jack will
light up green. The WeatherGoose’s DC power requirements are as follows:
INPUT VOLTAGE: 6 ~ 12 VDC
CURRENT: approx. 450mA @ 6VDC, average.
(note that adding external sensors may increase this requirement, depending on sensor type and quantity.)
CONNECTOR TYPE: DC barrel plug, 2.1mm, center-positive
The MiniGoose/XP-II comes with a suitable wall transformer-style power supply. Note that the power
supply which comes with the unit is capable of worldwide voltage (100 ~ 240VAC) and line-frequency (50 /
60Hz) operation; all that is required is an appropriate adapter to go from a U.S.-style plug to the appropriate
non-U.S. socket. The power-supply unit is also suitable for use with power strips which provide 208VAC
from IEC C-13 sockets connected across two phases of a 3-phase power system, which are becoming
increasingly common in larger IT installations; again, all that is required is the correct socket adapter.
Other power-supply options for specific applications, such as -48VDC (positive-ground) telecom systems
or Power-over-Ethernet, may be available; check the IT Watchdogs web site or contact our sales department
for assistance with these applications. Please note: Using any power-supply devices other than those supplied
by IT Watchdogs may void your warranty!
Ethernet Jack
This is the MiniGoose/XP-II’s network connection, using a standard RJ-45 8p8c
modular plug. The MiniGoose/XP-II is compatible with 10Base-T and 10/100 networks,
as well as with 10/100/1000-type Gigabit networks (i.e. networks which support fallback
to 10Base-T and 10/100 operation). Note that the MiniGoose/XP-II is not compatible with
equipment which attempts to force 100Mbit-only or 1Gb/10Gb-only operation and does
not support fallback to 10Mbit! Users of certain Cisco 1Gb/10Gb Gigabit routers, in
particular, should beware of this when attempting to connect a MiniGoose/XP-II into their
Gigabit networks.
IP RESET Button
Used to restore various settings on the MiniGoose/XP-II back to their factory defaults.
This can be useful if, for example, you accidentally lock yourself out of the unit by making
a typo while changing a critical setting.
To perform a “simple” reset, use a paperclip or jeweler’s screwdriver (using pens or
pencils is not recommended, since ink or graphite particles could rub off and get into the
unit) to press and hold the switch for about 15-20 seconds, or until both the IDLE and ACTIVITY LEDs light
up simultaneously. Release the switch, and wait for the LEDs to resume their normal pattern (about 5
seconds) to indicate that the reset process is complete. After a “simple” reset, the following settings will be
reset to factory default:
Ÿ Name and Password Settings: all three accounts (Administrator, Control, and View-Only) will be cleared.
Ÿ Network Settings: will be reset to the factory default of
Ÿ DHCP: Disabled (box unchecked)
IP Address: 192.168.123.123
Subnet Mask: 255.255.255.0
Ÿ Gateway: 192.168.123.1
Ÿ Web Server: will be reset to the factory default of
Protocols: HTTP and HTTPS
HTTP Port: 80
Ÿ HTTPS Port: 443
The RESET button can also be used to perform a “total” factory reset, if necessary. Normally, there is no
need to use this procedure simply to regain access to the unit, but it might be useful if you were, for example,
moving the unit from one facility to another and wanted to start over with a “blank slate”, as it were.
To perform a “total” reset, disconnect power from the unit, then press and hold the RESET button as above
while powering the unit back up again. Continue to hold the button for 5 seconds, then release it and let the
unit reboot as normal. CAUTION: This will completely erase every setting on the MiniGoose/XP-II back to
its factory default, including all of the Alarms, Logging, and Display settings as well as Config!
Digital Sensor Bus Jacks
These are used to attach external Digital Sensor Bus
devices, such as the RT-20 temperature sensor or the
RTAFH-20 temperature/airflow/humidity sensor, sold
separately by IT Watchdogs for use with the
WeatherGoose climate-monitoring series.
The
MiniGoose/XP-II uses the same external sensors as the
previous series-I units, so if you are replacing an older unit (formerly known as “MiniGoose-2”) with a
MiniGoose/XP-II in your facility, you can still use all of your existing external IT Watchdogs sensor devices.
A full complement of sixteen jacks is provided on the front panel, allowing you to connect up to sixteen
external sensors – the maximum number supported by the WeatherGoose system – directly to the unit. The
provision of a full 16 jacks makes it easy to set up remote monitoring of multiple cabinets from a single central
monitor without requiring additional wiring or bus splitters, especially if the other points to be monitored are
relatively nearby. (If you need to locate several sensors at a more distant point – say, for example, you have
two cabinets to be monitored at opposite ends of a room – running a single wire to a splitter at the remote point
may still be preferable, to minimize the total amount of wiring being run back to the MiniGoose/XP-II unit.)
Note, however, that using splitters with the MiniGoose/XP-II will not expand the maximum number of
sensors that can be supported! Regardless of how they are connected, each MiniGoose/XP-II can only support
a maximum of 16 sensors; if you attempt to connect more than 16 devices, the additional sensors will be
ignored. Note also that attempting to add more than 16 sensors can lead to unexpected results, especially on
initial power-up, since exactly which sensors will be identified or ignored will depend greatly upon in what
order the sensors are discovered by the MiniGoose/XP-II during its bus scan and what their family-code and
ID numbers are.
NOTE: IT Watchdogs does not recommend exceeding 600ft. of total sensor-cable length in the system;
i.e. if you are using RT-100 temperature sensors with 100ft cables, we do not recommend attaching more than
6 of these to any one MiniGoose/XP-II. Exceeding this cable-length limit can potentially lead to erratic or
undesired operation due to increased RF interference and signal attenuation over long cable runs. If longer
runs are absolutely necessary, you may be able to minimize the effects of such interference by enclosing the
sensor cables within grounded metal conduits, using snap-on ferrite chokes around the sensor wires where
they connect to the MiniGoose/XP-II, and other such methods for shielding low-voltage signals against
external interference, but these techniques are highly dependent on your particular operating environment and
are not guaranteed.
Analog / Dry Contact Input Terminals
This grey 5-terminal block is used to connect non-digital sensors such as
current transformers, door switches, or water sensors. Three analog inputs are
provided, numbered “1”, “2”, and “3”; the two terminals labeled “–” (or “C”
on some models) are the electrical “common”, or ground. Two “–”
connections are provided for convenience; internally, they are tied together, so
it doesn’t matter which sensor(s) are connected to which terminal.
As you can see in the above photo, each terminal consists of two openings. The larger, square opening at
the bottom is where the wire is inserted; the smaller, narrower opening above is used to open the spring-loaded
jaws inside the terminal block so the wire can be inserted. Simply insert a small flat-blade screwdriver into
the upper slot, then pry upwards to open the spring-loaded jaw; slip the sensor wire into the larger bottom
opening, then pull out the screwdriver to allow the jaw to close around and grip the wire. Note that the
terminal jaws are not of an insulation-piercing type, and the wire ends must be stripped at least ½” prior to
insertion.
The analog inputs can be used to monitor any dry-contact pair such as a door switch, a relay, pressure
switch, etc.; or any analog-output device which outputs a proportional 0 ~ 5VDC signal. In general, the
readings will appear as follows:
Ÿ When used with a dry-contact pair, the reading will show 99 when the contacts are open, and 0 (or close
to it) when the contacts are closed. (If the wires are excessively long, their internal resistance may cause
the reading to not quite reach 0.)
Ÿ When used with an analog-voltage device, a reading of 0 ~ 99 corresponds to an input voltage of 0 ~
5VDC, proportionally. (CAUTION: if using an analog-voltage sensor, be sure it is supplying a negativeground signal and that it is connected with the correct polarity – (-), or ground, to the “–” or “C” terminal,
and (+), or positive signal voltage, to the numbered terminal, or the analog inputs could be damaged!)
Ÿ If nothing is connected to a particular terminal, it will read 99 (open contact) continuously.
Sensor Bus Idle / Activity Indicators
These red LEDs indicate the current status of the Digital Sensor Bus; when the bus is
idle, the Idle LED will flash about once a second, and when it is being actively scanned
and the attached sensors (if any) interrogated, the Activity LED will be lit during the scan
cycle. Under most circumstances, these LEDs are of no special significance to the user
and can be ignored; however, when attaching external sensors, it is preferable to wait until
the Activity cycle ends and the Idle LED is blinking, since the sudden appearance of a
new sensor on the bus while the MiniGoose/XP-II is actively acquiring data from the bus
can cause a spontaneous abort of the current scan cycle. Such spontaneous aborts are harmless to the
MiniGoose/XP-II and attached sensors themselves, but in rare cases they may temporarily fool the unit into
sending an erroneous alarm-trip or sensor-disconnect alert message.
Ÿ “Reset” Button
This pushbutton can be used to trigger a “hard” reboot of the MiniGoose/XP-II unit,
equivalent to power-cycling the device without actually requiring the power to be
physically disconnected and reconnected. This is a legacy feature carried over from the
previous series-I design; under normal circumstances, it should not be needed.
Sensors page
This is the page that the unit will default to when accessed by its IP address.
There are no user- or administrator-adjustable settings on this page; it merely
displays the current readings and historical graphs of the MiniGoose/XP-II’s
internal sensors, plus any external sensors which may be connected to the
Digital Sensor Bus or to the Analog/Dry-Contact Input terminals. The tabs
along the left-hand side of the page provide access to the rest of the
MiniGoose/XP-II’s functions.
You can also download the unit’s SNMP MIB file from this page, via a link
underneath the page tabs.
Alarms page
From here, you can add or remove alarm thresholds which will cause the
unit to send e-mails, SNMP traps, and/or activate the audible alert buzzer
(SuperGoose-II only) if any of those thresholds are exceeded.
The MiniGoose/XP-II alarm system has several significant enhancements
over the original WeatherGoose-I, including the ability to set multiple
thresholds for any given sensor and selectively determine which of up to five
e-mail address(es) and/or up to two SNMP listeners should receive alerts for a
particular condition.
Ÿ Logging page
On this page, you will find a larger graph which can be customized to
display only the sensor(s) of interest to you, and to display their history for
periods ranging from 15 minutes up to 1 month. You can also download and/or
erase the log history from this page, if desired; logs are downloadable in a
standard CSV (comma-separated values) format which can be imported into a
variety of spreadsheet and data-analysis applications.
Display page
This page allows you to control the way various items are displayed,
including the date format (USA, non-USA, or ISO-8601), unit of temperature
measurement (Farenheit or Celsius), and to assign “friendly” names to each
sensor (and to the MiniGoose/XP-II unit itself) to more easily differentiate them
on the various pages.
You also have the option to choose from several different user-interface
styles, or “skins”, depending on your preferences. All of the screenshots in this
manual are from the default “Contemporary” skin, but other options are
available, including “Austere” and “Goose Classic.”
Config page
This page provides access to all of the MiniGoose/XP-II’s system and
network configuration options, including the real-time clock, SNMP and e-mail
settings, account password settings, and camera options.
You can also send test e-mails and SNMP traps from here, reset the entire
unit to factory defaults, upload firmware upgrades, and access some selfdiagnostic syslog functions if you suspect your unit is not operating correctly.
Since there are a lot of settings available on this page, it is further divided
down into sub-pages for ease of access.
Help page
Provides a basic description of the MiniGoose/XP-II’s functions.
MiniGoose/XP-II USER MANUAL
In this section, we will cover the basic operation and functions of the MiniGoose/XP-II
climate monitoring system. Specifically, we will go through the Sensors, Alarms, Logging, and
Display pages in somewhat more detail, give a basic overview and description of what each
control and dialog box on the various web pages are used for, explain the functions of the built-in
sensor devices, and provide a few examples of how to configure alarm thresholds, add external
sensor devices, retrieve or delete the logged data, change the “friendly” device names, and receive
alerts via e-mail.
The Config page, along with advanced functions such as SNMP traps, IP cameras, enabling
or disabling HTTPS (SSL) access, firmware upgrades, etc., will be covered in the next section,
.
Ÿ The Sensors Page
This is the first page you will see whenever you
access a MiniGoose/XP-II by its assigned IP address or
URL. Here, you can get an at-a-glance view of every
sensor being monitored by your particular unit, along
with the unit’s name and IP address, local time, firmware
version and, as we will see later in the
section dealing with
, the still-image snapshots of any IP cameras the
unit has been configured to include in the display.
The screenshot shown at right is an example of a
fairly typical application consisting of a MiniGoose/XPII, four IP cameras, and a pair of external sensors. Notice
how the Door and Airflow sensors are broken out into
sections of their own, with its own graph history? All
external Digital Sensor Bus devices will display this way
on the Sensors page; each individual sensor will have its
own section. This can cause the Sensors page to get
rather long if you have a lot of external sensors attached,
but it provides you with the most comprehensive view of
everything going on in the system, displaying both every
sensor’s current reading and a graphed history up to the
present moment.
Note that on this page, the graph ranges are not
selectable; they will always automatically scale to
display the full range of data stored in the unit’s memory.
Also note that – unlike the WeatherGoose-I – the various
graphs’ time scales are independent of each other; as you
can see in the image above, the unit’s internal-sensor
graph is scaled to 63 days while the external ensors, which were connected at different times after the unit had
already been running for some time, are only showing about 2 days’ worth of data for the Door Sensor and about
20 hours of data for the RTAF temperature/airflow device. This, among other things, makes it easier to determine
if a newly-connected sensor is working correctly, since it will begin displaying a full graph within only a few
minutes.
At the top of this (and every other) page, you
will see a banner similar to this one. The unit’s
“friendly name” is prominently displayed in large
type; this name can be changed on the Display
page to help you determine which unit you’re looking at if you have more than one Goose in your facility. Below
the unit’s name, you’ll see its current IP address and the current time and date; to the right, the unit’s model and
current firmware revision. Below these, there’s an at-a-glance summary of the current alarm state; when all the
sensors are within their normal range, it will display “All is well” and the number of alarm conditions being watched
in green type. (In this case, “0 alarms monitored” indicates that we haven’t configured any alarm thresholds yet.)
If a sensor exceeds its alarm threshold, the text will turn red and display the number of alarm conditions; also, its
displayed value will turn from black to red. (More about this in a moment.)
Each unit also displays its administrative
information at the bottom of each web page. This
area is filled in by the Admin Info fields on the
Config: Admin tab, which we touched on briefly
in the
, and will go into
more detail upon in the section devoted to the
Config pages.
Along the left-hand side of the page, you’ll see
a column of labeled buttons. These allow you to
switch between the various system pages to set
alarms, change the logging and display settings, or
configure the unit.
Just below the last button, you’ll see some
smaller links labeled “PDA/Phone”, “XML”, and
“MIB”. These special-function links let you jump
to a smaller, simpler page more suitable for PDA
and cell-phone browsers, download an XML
document containing the unit’s current state
(useful if you want to write your own scripts or
programs to accumulate and process the sensor
readings or take action on them), and download a .ZIP file containing the correct SNMP MIB file for your unit.
The MiniGoose/XP-II’s internal sensors are always displayed first, at the top of the page. The current
readings are displayed at the top, along with the name and type of reading, and a color key to let you match each
sensor reading to the history graph displayed underneath. Note that this graph is not configurable or
customizable; it will always display all of the sensor readings available, across however long the unit has been in
operation, up to the limits of the unit’s memory.
Below the graph are the thumbnail images for up to four IP cameras, if configured. (If no cameras are
configured, no thumbnails will be displayed.) The thumbnails display the IP address of each camera, plus a
still-image snapshot. Note that these thumbnails do not display live motion images; to see the camera “live”, click
on the camera’s thumbnail image, and your browser will open a new tab or window and connect directly to the
camera. Also note that the MiniGoose/XP-II does not perform any monitoring, processing, or logging of the
camera images; any motion-detection alarms or video recording must be handled directly by the camera and/or
by its provided application software (if any).
Each external Digital Sensor Bus device will
have its own information block containing its
current readings and history graph. Each sensor
block is titled by the “friendly name” of the
sensor, and that sensor device’s bus ID number;
the “friendly name” can be changed on the
Display page to something more meaningful if
desired. If a sensor device is disconnected from
the unit, its associated information block will
disappear from the Sensors page.
You may have noticed that in the sample images above, some of the sensor graphs have visible gaps in them.
Normally, the graphs should be continuous; visible gaps in the graphs generally indicate one of two conditions:
1. The MiniGoose/XP-II lost power.
This is the only condition which can create gaps in the internal-sensors graph, as seen above; in this
case, the unit was turned off over a weekend, which created the large gap in the middle, and has
subsequently had power disconnected from it a few times since then. Note that due to the way the
MiniGoose/XP-II writes data to the internal memory chip, even a short power outage can cause a
visible gap; in order to extend the life of the Flash memory, the unit holds the most-recent readings in
temporary RAM, and does not write them to the Flash chip until it has accumulated enough to fill an
entire “page”. So, if power goes out between page writes, any data held in RAM but not yet written
to Flash may be lost. The exact amount of time between page writes varies, depending on the number
of sensors; a MiniGoose/XP-II by itself, with no external sensors, may take as long as 30 minutes to
fill and write a page, while a unit fully loaded with 16 RTAFH sensors may fill up and write a page of
data approximately once every 5 minutes.
2. A device on the Digital Sensor Bus was disconnected for a time, then reconnected, while the
MiniGoose/XP-II unit was in operation.
This condition is seen in the Air Flow Sensor block shown above, where the sensor device was
physically unplugged from the unit for a few hours.
Note that under normal circumstances, gaps like the ones seen in the example screenshots above should not
occur. The power-loss and sensor-disconnection conditions described above were deliberately imposed upon the
test unit from which these screenshots were taken, for example purposes.
Ÿ The Alarms Page
This is where you can set up alarm thresholds
for each sensor attached to your MiniGoose/XPII. To our customers who are familiar with our
previous WeatherGoose-I system, you will find
that there have been a lot of changes! Unlike the
older system, the MiniGoose/XP-II allows you to
set multiple alarm points for each sensor, and
selectively determine where the alerts are sent,
making it easy to set up an escalating series of
alerts for a single condition, or send different
kinds of alerts to the personnel or departments
best suited to deal with them. (For example, a
water sensor could be configured to alert both
your system administrator and building
maintenance supervisor, while a high-temperature
alarm could be made to send an e-mail directly to
your HVAC technician’s cell phone or pager.)
You can also selectively set off SNMP traps in the
same manner.
As you can see in the screenshot above, the
attached sensors are divided up in the same
fashion as the Sensors page, with each physical
sensor device (including the MiniGoose/XP-II’s internal sensors) having their own separate block. Within each
block are the alarms (if any) configured for that particular device’s sensor group. Currently, this MiniGoose/XPII has a single alarm configured; if the internal temperature sensor exceeds 85.0°F, an e-mail will be sent to the
address that corresponds to email1: on the Config: Monitoring page.
We’ll deal with setting up e-mail addresses and SNMP trap destinations later, but since this is a major new
feature in the MiniGoose/XP-II, we’ll go ahead and take a brief look at Config: Monitoring to see how the
checkboxes relate to the settings on that page. Here, to the right, we see a single sensor alarm entry; below, we
see the relevant sections of the Config: Monitoring page. The colored lines show how each checkbox connects
to the e-mail and SNMP-trap settings. (Obviously, none of these addresses are real.)
As you can see, the checkbox assignments are
fairly straightforward; email1: through email5:,
then trap1: and trap2:, numbered left to right.
But don’t worry, you won’t have to try to remember the configured e-mail
addresses in your head; as seen in the picture at right, if you roll your mouse pointer
over a checkbox, a pop-up tip will appear to remind you which e-mail address or
SNMP trap destination that checkbox controls.
Before we go any further – and in particular, before we go into the specifics of
adding external sensor devices or configuring alarm thresholds – let’s take a moment to clarify what we mean by
the terms “sensor devices” and “sensor group”, vs. “sensors” or “sensor readings.”
Ÿ A “sensor”, or “sensor reading”, refers to a condition that is monitored by a “sensor device.” Note that some
devices can have more than one sensor reading.
Ÿ A “sensor device” is a physical piece of hardware such as a remote temperature sensor, an AF/HT
Airflow/Humidity/Temperature sensor, a CCAT analog-to-digital converter, or the MiniGoose/XP-II unit
itself. Sensor devices can monitor only a single condition, such as the temperature sensors or the CCATs; or,
as mentioned above, they can monitor multiple conditions, such as the AF/HT devices or the MiniGoose/XPII’s built-in sensor devices.
Ÿ A “sensor group” is the group of readings associated with a particular sensor device.
So, now that we’ve gotten that out of the way, let’s go through the process of adding new alarms settings and
see how it all works!
Currently, in the examples shown so far, we have a single alarm set; this one will send an e-mail alert to the
email1: address, [email protected], whenever the internal temperature sensor exceeds 85°F. But what if the
temperature continues to rise? Let’s say we want to be alerted again if we exceed 90°F; and this time, we not only
want [email protected] to know about it, we want our building-maintenence supervisor at [email protected] and the
HVAC technician at [email protected] to know about it as well, and send an SNMP trap to our SNMP
monitor at lobsterpot.com.
1. First, we click the Add New Alarm button.
Note: if you have external sensors attached,
make sure you click the button associated with
the correct device! Like the buttons on the
configuration pages, the Add New Alarm and
Save Changes buttons on the Alarms page are
specific to each settings block, rather than
global. For this example, we should click the
button highlighted here.
2. Notice how a new entry has been added to the
alarm table. New entries are generally filled
in with defaults that are well outside the range
of normal sensor operations; in this case, our
new alarm is set to trip if the temperature goes
below -999°C, which is an impossible
condition. (Literally so since “absolute zero”,
the point at which all molecular activity
theoretically halts, occurs at only -273.15°C!)
This is by design, as it keeps the MiniGoose/XP-II from erroneously trying to send
alarm messages or traps before you’ve had a chance to configure the alarm thresholds.
3. The first drop-down box will give you a list of
all of the conditions monitored by that
particular device. Notice that there’s also an
option to remove alarms; we’ll get to this in a
minute. For now, we’ll pick “Temperature
(F)”, to set an alarm threshold on the
MiniGoose/XP-II’s internal temperature
sensor, in Fahrenheit.
4. Next, we choose whether we want this alarm
to be a “Low Trip” or a “High Trip.” The
distinction is just like it sounds; a “Low Trip”
alarm will send alerts if the monitored
condition falls below the threshold value that we set, while a “High Trip” alarm goes off if the monitored
condition rises above the threshold. So, to get our alert if the temperature exceeds 90F, we select “High Trip”
from the second drop-down box.
5. Next, we type 90 as our alarm-trip threshold,
and put checkmarks in the desired alarm and
SNMP boxes; in this case, we select email1:,
email2:, email4:, and trap1:, which
correspond to [email protected] (our system administrator), [email protected] (our building supervisor),
[email protected] (our HVAC technician), and our SNMP monitor at lobsterpot.com.
6. Now, we click Save Changes, and just like
that, now we have a new alarm setting in the
SuperGoose II table!
Now, whenever our
temperature exceeds 85°F, our sysadmin will
get a message; if the temperature climbs about
90°F, not only does the sysadmin get another
message, but our building-maintenence
supervisor and the HVAC technician or
service company get e-mails as well, and we
also set off an SNMP trap to our network
monitor.
More alarm thresholds – up to a maximum of
200 – can be added, simply by clicking the
appropriate Add New Alarm button for the sensor
or sensor group you wish to add a new alarm
condition to. If you attempt to add another alarm
past the 200th, an error message will appear
stating that you’re trying to set more alarms than
the MiniGoose/XP-II can support and no new
alarm entry will appear on the page.
Note that the alarm entries are not sorted in
any particular order! They simply appear in the
order in which they were added. Keep this in
mind if you intend to add a large number of
escalating alerts to any particular sensor, as long
lists of alarms added in random order can quickly
become unwieldy and difficult to manage.
Alarms can be changed at any time. Let’s say we’d rather have our initial alert go out at 80°F instead of 85°F.
Nothing could be easier – just click the cursor on the numerical box for that alarm, then type in the new threshold
and click Save Changes. Likewise, if we decide we’d like to bring the building-maintenance person into the loop
on that first alarm, rather than waiting for it to escalate, just check the appropriate e-mail box and Save Changes.
You can even change multiple alarm thresholds and settings all at once; again, just remember that each Save
Changes button only acts on the alarm settings within its particular sensor group, not globally.
If a particular alarm is no longer wanted or
needed, there is an option at the top of the sensormeasurement drop-down list which says
“(REMOVE ALARM)”. Select this option and
click Save Changes, and the unwanted alarm will
be deleted from the list.
Now, let’s see what happens when an alarm
exceeds its threshold.
Currently our ambient
temperature, according to the MiniGoose/XP-II’s
internal temperature sensor, is 76.55°F. The Sensors
page reports “All is well: 2 alarms monitored”, and all the
values are black, indicating that all of the sensors are
within the threshold(s) we’ve set. Let’s see what
happens when we warm things up a bit.
The temperature has climbed to 87.96°F. Now,
the top-banner summary reports “Alarms: 2 monitored,
1 TRIPPED, 0 UNPLUGGED”, and the internal
temperature sensor’s numeric reading has turned red
to indicate that it is currently in an alarm condition.
The unit has also sent an e-mail to our sysadmin.
The temperature continues to rise; now, at
90.46°F, it exceeds our second alarm threshold.
Since the temperature is now higher than both of our
alarm thresholds, the top-banner summary reports
“Alarms: 2 monitored, 2 TRIPPED, 0 UNPLUGGED”. The
internal temperature sensor’s numeric reading is still
red, and the unit has now tried to send another e-mail,
this time to our building-maintence supervisor and
HVAC technician as well as to our sysadmin, and has
sent an SNMP trap to our SNMP monitor.
These same principles apply to both internal and external sensors devices and readings. Note that the alarm
settings in the Alarms page all function independently of each other; i.e. any sensor exceeding any of its
associated alarm threshold(s) will trip that alarm and cause the action(s) selected by the checkboxes, regardless
of whether any other sensors are currently in alarm or not. Likewise, any sensor readings grouped under a
particular physical sensor device are still independent of each other; i.e. just because the temperature reading on
an AF/HT Sensor has already tripped one or more alarms, for example, it will not prevent that same AF/HT
Sensor from generating humidity or airflow alarms as well if either of those values exceed their thresholds.
One alarm condition which is unique to external sensor devices, however, is the UNPLUGGED condition. This
occurs if a previously-identified Digital Sensor Bus device “vanishes” from the bus and can’t be found or
communicated with. There could be any number of reasons for this: the sensor was physically disconnected from
the unit, or a cable got pinched or crushed, or the sensor device has been damaged in some way, or there could be
a high amount of ambient electrical interference being picked up by an excessively long sensor cable running
alongside high-current AC power wiring... but
whatever the reason, the result is that the
MiniGoose/XP-II is no longer able to monitor one or
more of the conditions you’re relying on it to monitor.
To illustrate this, let’s add an alarm condition to the
AF/HT Sensor connected to our example unit, as
shown at left.
Our Sensors page now shows “All is well: 3 alarms
monitored”. Now, we’ll physically disconnect the
AF/HT Sensor device from the MiniGoose/XP-II,
and see what happens.
After about a minute or so, the message switches
to “Alarms: 3 monitored, 0 TRIPPED, 1 UNPLUGGED”,
indicating that the unit has lost communication with
the AF/HT Sensor and that the one alarm setting
associated with the AF/HT Sensor is now in an
UNPLUGGED alarm state. Its information block on
the Sensors page will also change, to indicate that the
device is no longer active on the Digital Sensor Bus
and that an alarm condition has occurred.
When a sensor device goes UNPLUGGED, any
alarms associated with that device go into an alarm
condition, just as though the alarm thresholds had
been exceeded. Any actions associated with those
alarms – e-mails, SNMP traps, or audible-alarm
buzzer – will be activated. Note that if a given sensor
device does not have any alarms associated with it, the MiniGoose/XP-II will not send any alerts, and the banner
message will not change to show an UNPLUGGED alarm state. It will, however, show the device’s unavailable or
unplugged state in its associated information block on the Sensors page.
Also, when a device goes UNPLUGGED, its status
will be reflected on the Display page under the
Devices section, as shown here. Any device which
has stopped responding will have the word
“unplugged” displayed in red to the right of its name.
This will occur regardless of whether or not there are
any alarms associated with the device in question.
Note that the UNPLUGGED alarm will not occur immediately. The MiniGoose/XP-II maintains an internal
count of how many times it has tried to contact any particular device on the Digital Sensor Bus, and a device has
to fail to respond (or return only garbage data) several times in a row before the MiniGoose/XP-II will give up
trying to contact it. This keeps the MiniGoose/XP-II from spontaneously generating false alerts due to temporary
communication glitches caused by transient electrical noise or momentary RF interference; only a positive
physical disconnection, or high levels of sustained signal interference, will set off an UNPLUGGED alarm.
Reconnecting the external sensor device will clear the UNPLUGGED condition.
NOTE: if a sensor device which has alarm conditions set should go UNPLUGGED, and the MiniGoose/XP-II
should subsequently be reset or rebooted while the sensor remains disconnected, you may experience a condition
where the device’s information block and alarm table disappear from the Sensors and Alarms pages, respectively,
but the unit still shows an UNPLUGGED alarm on the status banner and attempts to perform the actions associated
with that device’s alarm(s). If this occurs, you can clear this state either by reconnecting the sensor device, which
will restore its proper display and clear the UNPLUGGED alarms; or, if the device is no longer available (damaged,
moved to another facility, etc.), you can go to the Display page and perform a “remove unplugged devices”
procedure, which will remove the absent device and its associated alarms from the system’s device table. We will
cover this procedure in more detail in the section devoted to the Display page.
A final note on alarm thresholds, before we move on: you may have noticed that the drop-down box included
both a “Temperature (F)” and a “Temperature (C)” option. These allow you to specify an alarm state in either unit
of temperature measurement, and it is important to keep in mind that these operate independently of the
Temperature Unit setting on the Display page! The MiniGoose/XP-II automatically keeps track of and converts
alarm thresholds and temperature measurements to the appropriate units internally, so if – for example – you were
to set an alarm at 85°F while the Temperature Unit was set to display in Fahrenheit, and then later changed the
Temperature Unit to display in Celsius instead, the alarm will still trip at the “correct” temperature of 29.4°C
even though the alarms page will still show the original setting of 85°F.
The final set of controls to be covered on the
Alarms page is the Alarm Behavior section.
Currently, this section has a single control,
Unplugged Alerts, which has two options:
Enabled, or Disabled. This control determines
whether or not the MiniGoose/XP-II sends out the alarm messages when a device becomes UNPLUGGED. Under
most normal circumstances, you will want to leave these alerts Enabled, but for those customers whose equipment
must be installed in electrically noisy environments where excessive levels EM and RF interference are causing
an annoyingly large number of spurious or false alerts, the ability to disable the “unplugged” alerts can be helpful.
Ÿ The Logging Page
The next stop on our tour of the MiniGoose/XP-II
system is the Logging page. Here you can examine your
logged data in greater detail, by selectively changing the
graph’s time scale or removing traces from the graph so
that only the measurements of interest are displayed. You
can also download the logged data, or erase it from the
unit’s memory, as desired.
“
•
Ž
Œ
Let’s take a brief overview of the various items on this
page, and then we’ll demonstrate a couple of examples on
how to use them.
1. This group of checkboxes controls which
measurements are displayed on the graph. The
measurements are grouped by sensor device; the
MiniGoose/XP-II’s internal sensors are always the
first group, at the top of the list, and external
Digital Sensor Bus devices are listed underneath.
If the list grows longer than the box, a scroll-bar
will appear, allowing you to scroll up and down
through the list.
•
•
’
‘
“
2. The Time Range drop-down box lets you change
the horizontal time-scale of the graph, letting you view the past history anywhere from the past 15 minutes
up to the past 30 days, assuming the unit has that much data accumulated in its memory.
3. This graph displays the selected measurements across the selected time scale. The vertical scale always
automatically adjusts to fit the upper and lower bounds of the data being displayed, while the horizontal
scale will either be the time range selected in the drop-down box above, or the length of time for which
the unit actually has data in its memory, whichever is less.
4. This provides a color key to the graph above it, showing which colored lines correspond to which sensor
device(s) and measurement(s). While there is no particular limit on the number of items that can be
graphed simultaneously, keep in mind that if you have a large number of external sensor devices attached
and attempt to graph more than 24 measurements simultaneously, the color sequence will start repeating,
which may make it difficult to tell some measurements apart.
5. This message, located directly underneath the color key, tells you the maximum amount of data that can
be logged before the memory is full. This number will change depending on the number and type of
external sensor devices attached. Once the MiniGoose/XP-II’s memory capacity has been reached, each
time a new data sample is taken, the oldest sample(s) in the buffer will be discarded to make room the new
one.
6. The Reset Logs checkbox will cause the MiniGoose/XP-II to erase all of the currently-logged data from
memory. If this checkbox is set when the Update Graph button is clicked, the data is erased, the graphs
are cleared, and the unit will begin accumulating new data. Caution: there is no “undo” feature or “recycle
bin” that will let you recover the data once erased, so don’t select Reset Logs and click Update Graph
unless you’re very sure this is what you want to do!
7. Clicking on this link will cause your browser to download all of the accumulated data in a file called
datalog.csv. This type of file, known as a comma-separated-values format (hence, the .csv extension),
contains the logged data in a simple ASCII text format which can be opened by nearly any spreadsheet
program (such as Excel, Quattro Pro, or OpenOffice Calc) or data-analysis software. Note that depending
on how long the unit has been in operation, downloading the log may take several minutes; however, the
MiniGoose/XP-II will continue to monitor sensors and alarm conditions during the download process.
8. None of the above controls or checkboxes will take effect until one of the Update Graph buttons is clicked.
Two buttons, one at the top of the page and one at the bottom, are provided simply for the user’s
convenience, so that you don’t have to scroll all the way up or down the page to find them; there is no
difference between the two.
Currently, our example unit is set to display a month’s
worth of data. However, this particular unit hasn’t been
running for a month; in fact, at the time these screenshots
were taken, it had only been running for slightly over 24
hours. So, as you can see in the image to the right, the
horizontal scale has adjusted accordingly, to show all of
the data currently available. Now let’s see what happens
when we change the scale to a shorter time scale – say, the
last two hours:
We use the Time Range drop-down box to select the
“2 hours” range, then click Update Graph. The
MiniGoose/XP-II obligingly redraws the graph, showing
us the previous two hours’ worth of data. (The rest of the
data still exists in the system’s memory, of course; it’s
simply “off screen.”)
Currently, the example unit is graphing the unit’s internal temperature sensor. Let’s say we want to see the
status of one of the Analog inputs, as well. We move the mouse pointer to the measurement-selection checkboxes
under “Mini/163 II”, check the “Analog-1” box, then click Update Graph...
The graph is redrawn again with the selected
measurements shown in the graph. Notice how the graph
goes all the way back on the Analog-1 input, even though
we only just now asked for it to be graphed? This is a key
point to keep in mind: the checkboxes do not change
which measurements are logged, only those which are
shown on the graph. Every measurement taken by every
sensor is always logged in the unit’s memory,
continuously, regardless of the checkbox settings.
Notice also that our color key has changed, since now
we’re graphing two measurements instead of one.
Now let’s add a couple of external sensor devices, and see how the display changes. For this example, we’ll
plug in an Airflow Sensor, and a CCAT. Notice how our measurement-selection box has changed? Two new
groups of measurements, titled “Door Sensor” (which is our CCAT, since the one we’re using in this example is
made to interface to a dry-contact door switch) and “Air Flow Sensor”, have appeared. Note that depending on the
number and type of devices connected, the list may end up longer than the box containing it on the page, so you
may have to scroll up and down to find all of them.
In fact, even in this relatively simple example, the list
has already exceeded the box length and the Air Flow
sensor’s checkboxes are partially hidden, so let’s scroll
down to find them.
There, that’s better, now we can see both of our new
devices in the selection list. Since the CCAT we added is
programmed to interface to a door sensor, it shows up in
the list as “Door Sensor” by default. (These names can all
be changed in the Display page; more about this later.)
So, let’s add the Air Flow Sensor’s temperature and
airflow readings to the graph, along with the CCAT-Door
Sensor’s reading. Again, we simply check the appropriate boxes, and click Update Graph...
And just like that, our new measurements are added to
the graph and color key. Notice how the new measurements
do not extend all the way across the graph, though? That’s
because these sensors were only added to the example unit
15 minutes before this screenshot was taken – so, naturally,
there’s nothing to be graphed earlier than that. But, since
this is the same unit that had been running for 24 hours on
its own, it does have enough graph history on its internal
sensors to fill out the 2-hour window we’ve specified in the
Time Range selection box, so the unit obligingly shows us
the last two hours’ worth of data, with the AF/HT Sensor
and CCAT-Water Sensor suddenly appearing only 15
minutes ago.
Notice what else has changed. Previously, the unit
said our “maximum loggable time span” was 68.27 days;
now, with the addition of the two external sensors, our
time has shrunk to 37.93 days. Keep this in mind as you add more sensor devices to your MiniGoose/XP-II
system; the more devices you have, the faster your memory will fill up and the shorter your history can be. (Note:
The size of the MiniGoose/XP-II’s data-logging memory is fixed and cannot be expanded.)
Clicking on the “Click here to download CSV log data” link
will cause your browser to download the accumulated log
history. (Be patient; depending on the amount of data in
memory, this could take a few minutes!) As mentioned before,
this file is in a plain-text ASCII format known as “commaseparated values”, which nearly any spreadsheet or dataanalysis program likely to be found on the Windows, Mac, or
Linux platforms should be able to import easily. When opened,
the result will look much like the screen-shot to the right. (This
particular shot was taken using the OPENOFFICE CALC
spreadsheet, but other spreadsheet programs should look
similar.)
Depending on the spreadsheet program, you may be asked
to provide some details about the data format so that it can be
properly imported. If any of the following parameters are asked
for, be sure to set them as follows:
Character set: Western Europe (Windows1252/WinLatin 1), or Western Europe (ASCII-US)
Ÿ Separator options: Separated by Comma
Ÿ The Display Page
This page allows you to change the way in which the
MiniGoose/XP-II displays various readings. It is divided
into three sections: General, Devices, and Sensors.
The General section allows you to change some
aspects of the user interface such as the way dates are
displayed, the unit of temperature measurement, and even
switch between one of four different web-page styles.
This last feature can be particularly useful to those users
who intend to primarily access their MiniGoose/XP-II
units remotely via devices with lesser graphics and
memory capability than a full PC, such as a web-capable
cell phone or a “netbook” computer, and would therefore
prefer a simpler layout than the default.
The Devices and Sensors sections allow you to assign
more meaningful “friendly” names to the MiniGoose/XPII unit and its associated sensor devices, to make them
easier to identify when looking at the displayed readings.
You can also identify external Digital Sensor Bus devices
which have become unplugged and, if necessary, make the
unit “forget” their existence by removing them from the
device table.
Let’s go through each section in turn.
Ÿ General section:
There are four controls underneath the General section. The first one, labeled Date Format, gives you control
over how the current date is displayed at the top of each page. You have a choice of three settings:
standard USA format
Non-USA (world) format
ISO 8601 format
(MM/DD/YY)
(DD.MM.YY)
(YYYY-MM-DD)
2-digit month, day, and year,
separated by slashes /
2-digit day, month, and year,
separated by periods .
4-digit year + 2-digit month & day,
separated by dashes -
The next control, Temperature Unit, is straightforward enough; it simply allows you to change the unit of
temperature measurement between Fahrenheit and Celsius.
Celsius
Fahrenheit
Note that this setting, as we mentioned earlier in the Alarms section, does not affect your alarm settings! All it
does is change the unit in which the sensor readings are displayed; the MiniGoose/XP-II automatically keeps track
of and converts alarm thresholds and temperature measurements to the appropriate units internally. An alarm
threshold set at 85°F while the Temperature Unit is set to display in Fahrenheit will still trip at the “correct”
temperature of 29.4°C if Temperature Unit is later changed to Celsius, even though the alarms page will still
show the original setting of 85°F.
The next control, Internal Temperature Offset,
deserves a bit of explanation. Under normal conditions,
you should not need to change this control from its default
setting of 0; however, there may be times when it appears as though the MiniGoose/XP-II’s internal temperature
sensor is reading a little higher than would be expected. Generally, when two temperature-measuring devices in
the same room disagree on their temperature readings, it is simply due to localized differences in air temperature
due to convection currents, heat generated by nearby equipment, their relative proximities to air-conditioning
vents, and even the relative accuracy and tolerances of the two devices.
However, it can sometimes be the case, especially in tightly-enclosed environments with little or no airflow,
that the heat generated by the MiniGoose/XP-II’s own electronics can register on its internal sensor. If you have
reason to believe this is the case, you can use this control to compensate for this “self-heating” effect; by adjusting
this control setting, you can cause the MiniGoose/XP-II to automatically subtract anywhere from 1°F to 13°F
(0.56°C to 7.22°C) from its internal temperature readings. Note that this does not affect any external temperaturemeasuring devices! Internal Temperature Offset applies only to the internal temperature sensor.
(Also note: the accuracy of the MiniGoose/XP-II sensors is ±0.5°C (approx. ±0.9°F). Most inexpensive, i.e.
non-laboratory-grade, thermometers and temperature-measurement devices will generally have similar levels of
accuracy, at best. This means that even if you place the MiniGoose/XP-II within an inch or two of another
thermometer for comparison, the measurements can be as far as ±1°C (±1.8°F) apart and still be within each
respective device’s range of accuracy.)
The Interface Type control allows you to switch
between any of four different web-page appearances:
Contemporary
Lite Modern
(default)
Classic Goose
Austere
“Contemporary” is the default appearance for a new unit, and is the interface which has been used (and will
continue to be used) for all of the sample screenshots in this manual. However, if you prefer one of the others,
simply change the Interface Type control (and click the by-now-familiar Save Changes button) and from that
point on the web pages will show in your preferred style. “Austere” may be of particular interest to those users
who may need to frequently access their MiniGoose/XP-II units from devices such as PDAs, mobile phones, or
over slower dial-up connections, as it is almost entirely text-based aside from the history graphs. “Classic Goose”
provides users of our previous WeatherGoose-I series with a more familiar-looking interface (although it won’t
be entirely identical, of course, since the MiniGoose/XP-II has many new features and options which the Goose-I
series lacks).
Ÿ Devices section:
This section allows you to modify the “friendly” names
of the MiniGoose/XP-II itself, the internal Analog-Input
ports, and any attached external Digital Sensor Bus devices.
The topmost entry will always be the MiniGoose/XP-II
unit itself. Notice that any title placed here changes not only
the name of its associated graph-and-measurement block, but
so the unit name in the banner at the top of the page.
al
Any external Digital Sensor Bus devices listed
underneath can have their “friendly” names changed as well.
This makes it easy to differentiate between sensor devices,
particularly if you have two or more of the same type of
device connected to a single MiniGoose/XP-II. These
“friendly” names will also appear in any alert e-mails sent by
the unit when a sensor alarm occurs.
“Friendly” names are limited to 31 characters in length.
Beneath the list of devices is a checkbox control, titled “Remove all unplugged devices.” You may
remember that we referred to this briefly before, when we discussed working with external sensors in the Alarms
section? There, we demonstrated how if an external Digital Sensor Bus device were to become disconnected from
or stop communicating with the MiniGoose/XP-II, the unit would declare an UNPLUGGED alarm condition for that
sensor and display its status as such on the Display page.
There may be times in which you want to make the MiniGoose/XP-II “forget” about any such disconnected
sensors. Perhaps you’re moving the unit from one physical location to another, and attaching it to a different
complement of already-installed sensor devices; or, perhaps that particular sensor device has failed or been
damaged, and has since been replaced with a new unit, and now you want to remove the old device from the
display. Whatever the reason, simply click on this checkbox, then click the Save Changes button, and all
UNPLUGGED devices will be permanently removed from the device table.
Note that under normal operation, the internal sensors should never show as UNPLUGGED in the device list. In
the extremely unlikely event that the internal sensors ever show as UNPLUGGED, it indicates a serious hardware
fault has occurred and the unit is in need of factory repair!
Ÿ Sensors section:
This is where you can assign “friendly” names to any of the three Analog/Dry-Contact Inputs on a
MiniGoose/XP-II unit. These fields work the same way as the ones in the Devices section, and serve the same
purpose; to make it easier for the user to give meaningful names to the sensors and differentiate between them.
The only significant difference between the Sensors section and the Devices section is that there is no “Remove
all unplugged devices” control for the analog inputs, and these can never show as UNPLUGGED, since they are
part of the internal sensor group rather than a distinct device.
This diagram shows how the Analog/Dry-Contact friendly names on the Display page correspond to the
internal-sensor readings on the Sensors page.
MiniGoose/XP-II USER MANUAL
In this section, we will show you how to get the most out of your MiniGoose/XP-II unit by
covering the all of the advanced features and options available on the Config pages, including
SNMP traps, IP cameras, HTTPS (SSL) access, e-mails, access passwords, and firmware upgrades.
Clicking on the Config tab brings up the first of a series of pages
which control all of the MiniGoose/XP-II’s networking functions, along
with some other global-configuration options not found on the previous
pages.
You will also find some system-diagnostic functions here; under
normal circumstances, you shouldn’t need to use these, but we’ll touch
on them briefly so that you can be aware of their existence in the unlikely
event that you have a problem with your system requiring in-depth
technical support and are asked to supply some information from these
diagnostic pages.
Ÿ The Configuration: Network page
The first Config page, which always comes up by default when the Config tab is clicked from any other page,
is Configuration: Network. We saw this page earlier, during the QuickStart Setup Guide portion of this manual,
and briefly touched on its functions. It is divided into three sections: Network, Web Server, and DNS Servers.
Ÿ Network settings:
These settings should be familiar to anyone who has
set up a network or an internet-capable device before.
The first set of controls is a trio of buttons which
allows you to determine how the unit will get its network
configuration settings. You can either have the unit
acquire both its IP address and DNS Server settings via
DHCP, use DHCP for the IP address while using static
DNS addresses, or use static addresses for both IP and
DNS.
The default is Use Static Network
Configuration and DNS server addresses; if you set this control to either of the DHCP-using options click
Save Changes, the unit will attempt to acquire its network settings via DHCP. Note that if a DHCP service is
available, this will immediately override any static IP settings, and the unit will no longer respond on the static
address!
Warning: if you enable one of the DHCP options, and a DHCP service is not available or cannot be reached,
the unit will no longer respond on the static address and you will not be able to get back into the unit! If this
occurs, use the hardware RESET procedure described in section 1 to reset the unit to the factory-default addresses
and disable DHCP.
The next settings are IP Address, Subnet Mask, and Gateway. When your MiniGoose/XP-II first arrives
from the factory, or if you use the RESET button on the front of the unit, these settings will default to the
following “local subnet” settings:
IP ADDRESS:
SUBNET MASK:
DEFAULT GATEWAY:
192.168.123.123
255.255.255.0
192.168.123.1
Note that when you change these settings, the change will take effect immediately upon clicking the Save
Changes button, and the unit will no longer respond on 192.168.123.123. (Users of our older WeatherGoose-I
line should take particular note of this, as it is a significant difference from the behavior of the previous design
where 192.168.123.123 was always available as a backup.)
Below the IP address settings, you will find a pair of fields named Primary DNS Server and Secondary DNS
Server. This is where you can specify the DNS servers for the MiniGoose/XP-II to use to look up any servers or
addresses which you specify by URL rather than by direct IP address. Any standard DNS server can be used, as
long as the MiniGoose/XP-II is able to access it from your network.
Ÿ Web Server settings:
These settings control the behavior
MiniGoose/XP-II’s built-in web server.
of
the
The first setting, the Protocols drop-down box, has
three possible settings: “HTTP and HTTPS” (the default),
“HTTP”, or “HTTPS”. This controls whether or not the unit
will require, or deny, an SSL-secured connection vs. an
unsecured connection. If you are using the MiniGoose/XP-II solely inside your own private network and not
exposing it to a public IP address, these settings probably aren’t important to you; on the other hand, users who
need to remotely administer their installations over the public internet may prefer to have the unit refuse HTTP
(non-SSL) connections and permit only HTTPS (SSL-encrypted) connections.
The next two settings, HTTP Port and HTTPS Port, should be left at their defaults of 80 and 443, respectively,
unless you have some particular need to change them, as these are the ports which a web browser will attempt to
connect with by default whenever you type http://<unit’s ip address> or https://<unit’s ip
address> into the browser’s address bar. If you change these port numbers, then you will need to add the new
port numbers to the end of the URL; i.e if you change HTTP Port to 95, then you will have to type
http://<unit’s ip address>:95 into the browser’s address bar.
The last setting, Telnet Service, determines whether the MiniGoose/XP-II will accept incoming Telnet
connections on port 23. This service provides access to a configuration menu which can be used to reset some of
the MiniGoose/XP-II’s parameters remotely, or even initiate a full restart of the firmware if necessary. It is
Enabled by default, but can be Disabled if you prefer. (For further details on how to use the Telnet service,
refer to Appendix B.)
Ÿ The Configuration: Monitoring page
The next page of configuration settings is Configuration: Monitoring, which contains all of the network
settings that specifically relate to environmental alarms and monitoring: E-mail, SNMP, and Cameras. You will
also find a pair of controls that let you test your e-mail and SNMP settings without actually having to drive one
of your sensors into an alarm condition.
Ÿ E-mail settings:
This set of controls allows you to configure the unit to
send e-mail alerts. Note that in order to send alerts, the
MiniGoose/XP-II must be able to reach the outgoing
e-mail server through your network and log into it with the
credentials you provide, and the server must be a standard
SMTP mail server; i.e. the MiniGoose/XP-II cannot log
into and use a Microsoft Exchange server (unless that
server is configured to also permit SMTP as well as
Exchange’s proprietary protocol). These, too, should be
reasonably familiar if you’ve had occasion to set up an
e-mail client before.
The first field, SMTP Server, allows you to specify the
outgoing mail server the MiniGoose/XP-II should use,
either by direct IP address or by URL.
Underneath SMTP Server, the SMTP Port field allows you to set the IP port used by the server to accept
connections. Normally, this should be left at its default setting of 25, unless the administrator of your e-mail
server tells you otherwise.
“From” E-mail Address lets you specify an e-mail address from which the MiniGoose/XP-II’s e-mails will
appear to come from. This field can generally be set to anything you like, although depending on how your SMTP
server is configured, you may need to make sure that the e-mail address is one that the SMTP server will consider
valid. (It is not uncommon for SMTP servers to be configured to refuse to send e-mails with “from” addresses
that don’t correspond to their list of known users, to help prevent those servers from being “hijacked” to send
spam with invalid “from” and “reply-to” addresses.)
The next five fields, labeled To E-mail Address 1 through 5, let you specify up to five potential recipients for
e-mail alerts. These, too, can be any valid e-mail address, as long as they are in the standard format of
<username>@<domain or IP address>. Users of our previous WeatherGoose-I line should keep in mind that
alert e-mails will not be automatically sent to all five of these addresses; instead, they can be be selectively
assigned so that different alarm events will send e-mails only to the selected recipients. This function is covered
in more detail in the Alarms Page section.
POP3 Server and POP3 Port serve the same function as the SMTP settings, except that they apply to your
incoming POP3 mail server. While you cannot actually send e-mails to the MiniGoose/XP-II, some mail systems
require any computer or device attempting to send e-mails through them to validate themselves as a known user
by performing an operation known as POP3-before-SMTP where the device first has to log in to a known POP3
mailbox account before it’s allowed to use the SMTP service to send mail. Here, again, the POP3 Server can be
specified either by URL or IP address, and the POP3 Port should be left at its default of 110 unless your e-mail
administrator specifically requires you to change it.
Username and Password are the login credentials used to connect to your mail servers.
The MiniGoose/XP-II’s e-mail system also supports secure, encrypted e-mail server connections via
ESMTP/SSL or ESMTP/TLS. These features can be enabled by selectively filling in certain fields on the E-mail
section and leaving others blank. The possible SMTP methods are:
for a standard (i.e. non-encrypted) SMTP connection which
does not require POP-before-SMTP validation:
for a standard (i.e. non-encrypted) SMTP connection which
requires POP-before-SMTP validation:
for an ESMTP/SSL connection:
for an ESMTP/TLS connection:
Ÿ leave POP3 Server, Username, and Password
blank
Ÿ leave SMTP Port set to 25 (unless your
administrator specifies a different port)
Ÿ fill in the POP3 Server field with the IP or URL
of your POP3 server
Ÿ enter the login credentials for your POP3 server
into the Username and Password fields
Ÿ leave SMTP Port set to 25 (unless your
administrator specifies a different port)
Ÿ leave the POP3 Server field blank
Ÿ enter the login credentials for your SMTP
server into the Username and Password fields
Ÿ set the SMTP Port to 465
Ÿ leave the POP3 Server field blank
Ÿ enter the login credentials for your SMTP
server into the Username and Password fields
Ÿ leave SMTP Port set to 25 (unless your
administrator specifies a different port)
Ÿ System Status E-Mail Reports settings:
This feature allows you to generate periodic status e-mails
reporting the unit’s current sensor readings. Any sensor which is
currently in one or more alarm states will have the word “TRIPPED”
next to its reading.
To add a new status e-mail event, click the Add New Report button. Just like we saw with the Alarms settings,
a new event appears in the list, ready to be filled in with your desired settings. Once you have filled in the various
fields and checkboxes, click the Save Changes button and the MiniGoose/XP-II will begin sending status e-mails
to the specified recipient(s) at the specified intervals. As with the Alarms, you can have multiple events – up to
a total of eight – and selectively assign them to be sent to one or more of your configured e-mail addresses.
The Report Time (hour) and (min) fields determine at what time(s) the reports will be sent out. For Report
Period intervals of 24 hours or longer, the report will be sent out once, at the specified time; for intervals of 12
hours or less, the reports will begin at the specified time and then be sent out every specified Report Period
interval thereafter. Obviously, for this function to work, the system’s clock must be set, either manually or via
an NTP server; if the clock is not set, no reports will be sent at any interval.
This provides you with a lot of flexibility, but can be potentially confusing from a brief description, so let’s
see if we can clarify it with a few examples. Let us say that the current time, just to simplify our examples, is
10:00:00 (10:00AM) on Monday, January 1st. That being the case:
Ÿ if you set a Report Time of 08:00 (8:00AM) and a Report Period of 24 hours, the unit will begin
sending status e-mails at 08:00 (8:00AM) on Tuesday, January 2nd, and will continue sending one
status e-mail every day at 08:00 (8:00AM) thereafter. The reason the reports won’t begin until the
Tuesday is because the unit has to wait for the indicated time on the clock to come back around.
Ÿ if, however, you were to set the Report Time to 13:30 (1:30PM) instead, the reports would begin at
13:30 (1:30PM) that same day (Monday, January 1st) instead.
Ÿ if you set a Report Time of 08:00 (8:00AM) and a Report Period of every Friday, the first status
report would be sent on Friday, January 5th, and continue every Friday thereafter.
Ÿ if, on the other hand, you set a Report Time of 08:00 (8:00AM) and a Report Period of every
Monday, the reports would not begin until the following Monday, January 8th, since 08:00 of the
current Monday (the 1st) has already passed.
Ÿ if you set a Report Time of 08:00 (8:00AM) and a Report Period of 2 hours, the unit would begin
sending status e-mails at 08:00 (8:00AM) on Tuesday, January 2nd, and then every two hours thereafter.
Ÿ if, however, you set a Report Time of 14:00 (2:00PM) and a Report Period of 2 hours, the unit will
begin sending e-mails at 14:00 (2:00PM) on Monday the 1st, and every 2 hours thereafter.
The E-mail Destinations checkboxes work the same way as the ones on the Alarms page; recipient(s) can be
selected by setting the appropriate checkboxes starting with email1: on the left through email5: on the right.
If you wish to remove a particular status report from the list, check
the Delete This Report checkbox for the unwanted report event and
click Save Changes.
Ÿ SNMP settings:
If your facility includes SNMP (Simple Network
Management Protocol) monitoring, you can configure the
MiniGoose/XP-II to be aware of your SNMP system so
that it can send traps when alarm conditions occur.
The MiniGoose/XP-II’s SNMP capabilities are
significantly enhanced over the previous WeatherGoose-I
system. As we hinted at earlier in the Alarms section, you
can now specify up to two different servers to receive
alarm traps and selectively direct different alarms to either
or both of the specified SNMP managers, whereas
previously all traps were globally broadcast to all specified managers. The MiniGoose/XP-II also supports SNMP
v2c and permits the sending of v2c-type NOTIFY events rather than v1 TRAPs, and supports SNMP SET
operations to set certain parameters remotely as well as read them. (As of firmware rev. 3.3.x, SNMP v3 is also
supported; additional settings for v3 support have their own parameter block and will be covered in the next
section.)
One feature which has been retained from the WeatherGoose-I to the MiniGoose/XP-II is that the appropriate
MIB file for the unit is contained within the unit’s memory and can be downloaded directly from it at any time,
simply by clicking on the MIB link directly below the column of tabbed buttons on the left-hand side of the web
page. Clicking this link will serve up a .ZIP file which contains both the MIB, and a CSV-style spreadsheet
describing the OIDs which are available to be read.
The actual setup and use of SNMP agents and management systems is well beyond the scope of this manual,
but here is a brief description of the available network settings relating to SNMP.
SNMP Service : determines whether SNMP is active or not. If you set this field to Disabled, the unit will
not send traps or accept GET or PUT requests from SNMP managers. The default is Enabled.
Read Community : this field specifies the community to which the MiniGoose/XP-II belongs for GET
operations. Any SNMP manager attempting to retrieve information via GET must belong to the same community.
Listen port for GET : is the UDP port which the MiniGoose/XP-II will listen for incoming requests from your
SNMP management system(s). The default setting is 161, which is the typical default “out-of-the-box”
destination port for SNMP agents, but you may assign any valid UDP port your particular SNMP installation
requires. Make sure that this port is not set to the same port as TRAP/NOTIFY!
Trap Community : this field specifies the community to which TRAP or NOTIFY events will be sent.
Write Community : this field specifies the community to which the MiniGoose/XP-II belongs for SET
operations. Any SNMP manager attempting to set parameters via SET must belong to the same community.
SNMP System Name, SNMP System Location, and SNMP System Contact simply allow you to specify
some information about the MiniGoose/XP-II unit, which can be used to identify it via SNMP querys later. As
with the Admin Info fields mentioned briefly in the QuickStart Setup portion of the manual (and which will be
covered again in the following section on the Configuration: Admin page), the MiniGoose/XP-II does not
actually attempt to use this information for any of its own operations, so these fields can contain whatever
information you wish, or even be left blank if you prefer.
Trap Type : this control determines whether the MiniGoose/XP-II sends SNMPv1-style TRAP events,
SNMPv2c-style NOTIFY events, or SNMPv3-style NOTIFY events when an alarm condition occurs.
Trap IP Address:port # : you can specify up to two SNMP managers to receive TRAP or NOTIFY events in
these fields, and then selectively direct alarm events to either or both via the appropriate checkboxes on the
Alarms page. The destinations can be specified either by IP address or by URL, in <address>:<port> form. Port
162 is the usual default, but may be assigned to any valid UDP port your SNMP installation requires. Make sure
this port is not the same as the LISTEN port.
Initial SNMPV3 data settings:
As of firmware revision v3.3.x, the MiniGoose/XP-II
series includes support for the newer SNMP v3 protocol,
as well as legacy support for v1 and v2c. The v3 standard
offers a number of important security and remoteconfiguration
enhancements,
including
message
authentication, privacy, and access control; this section
will allow you to view and configure the MiniGoose/XPII’s initial SNMP v3 Manager and Trap accounts. As with
SNMP v1 and v2c, a complete explanation of how to use SNMP v3 is well beyond the scope of this manual; the
following is merely a brief overview of the available settings on the Config page.
Unauthenticated User : some SNMP v3 manager implementations allow for a newly-installed piece of
equipment to be accessed by a designated “unauthenticated user” account name for initial configuration. The
MiniGoose/XP-II’s unauthenticated username defaults to ‘initial’, and can be changed here if necessary. The
“unauthenticated user” account uses a null key for both the authentication and privacy keys, and uses the
noAuthNoPriv method to provide read-only access to the MIB. Note that not all SNMP v3 implementations
permit the use of unauthenticated requests.
Authenticated Manager : the name of the SNMP v3 manager account.
Manager Authentication Password : this is the password used to sign messages sent by this account. Also
known as the user’s authKey.
Manager Privacy Password : this is the password used to encrypt the data portion of messages sent by this
account. Also known as the user’s privKey.
Trap User : the name of the SNMP v3 account which will send traps from this device to the Manager when
an alarm threshold is exceeded. (i.e. the Manager expects to receive traps from this username.)
Trap Authentication Password : the authKey password used to sign trap messages sent by the device to the
SNMP Manager.
Trap Privacy Password : the privKey password used to encrypt the data portion of messages sent by the
device to the SNMP Manager.
Save Changes and/or Reset SNMPV3 Non-volatile RAM : this button requires a bit of explanation. As with
the “Save Changes” buttons on the other configuration sections, this button will cause any changes to the Initial
SNMPV3 data section to be saved in the MiniGoose/XP-II’s flash memory. However, it will also erase any other
account settings which may have been remotely cloned or configured from the SNMP Manager on this unit! This
block of settings is only intended to be used for first-time setup of SNMP v3; once you have accessed the unit
from the Manager all further configuration, including the modification or removal of existing SNMP v3 user
accounts, should be done remotely via the Manager, rather than from the unit’s Config page.
Ÿ Cameras settings:
The MiniGoose/XP-II, like its predecessor, is able to
display still-image “thumbnails” for up to four IP cameras
as part of the monitoring display on the Sensors page.
Note that the MiniGoose/XP-II does not actually monitor
or analyze the camera images! It merely embeds the still
image into its web page and makes it a clickable link
which you can use as a convenient way to quickly access
the camera itself.
Any actual camera-monitoring
functions such as image-sequence or video recording,
motion detection, etc. must be performed by the camera
itself and its associated application software (if any), or by
appropriate 3rd-party software.
Any cameras configured here will be displayed on the
Sensors page, beneath the unit’s history graph, in order
from left to right.
All four pairs of IP Address and Model controls work
identically: IP Address, of course, specifies the IP address
of the camera you wish to display; Model specifies the
make and model of camera which is at that address. Note
that it is necessary for you, the user, to specify the model
of camera because different cameras (even ones from the
same brand or manufacturer) often have distinctly
different methods of retrieving a still image as an web
page-embeddable JPEG, and often do not provide any easy way for an outside device (such as the MiniGoose/XPII) to determine the make and model of camera on its own. Note also that due to these behavioral differences
between camera models, only the models listed in the drop-down box are supported. (Additional models may be
supported in future firmware upgrades.) It is possible that other models from the same manufacturer(s) might also
work if they are sufficiently similar to one of the listed models, but the use of non-supported cameras cannot be
guaranteed or supported.
For this function to work correctly, the IP cameras must be reachable by the computer you are browsing from,
not by the MiniGoose/XP-II itself! This is an important distinction for those users who intend to administer their
systems over the public internet from remote locations. Since the images do not pass through the MiniGoose/XPII and are not served from it, but are instead served directly from the cameras by embedded <IMG> tags in the
web page, it is not sufficient merely for the MiniGoose/XP-II to be accessible from a public, static IP address from
outside your facility’s local network and firewall; the IP cameras must also be exposed and browsable from
outside as well. Otherwise, these thumbnails will appear as blank spaces or “broken link” icons in your browser,
and clicking on them will not take you to the live camera image.
Ÿ Test SNMP Trap and E-Mail buttons:
These, at least, should be fairly self-explanatory.
Once you have your E-mail and SNMP settings
configured, you can test them by clicking either of these
buttons, and a test event will be broadcast to all of the
e-mail addresses or SNMP managers which have been
configured in the above sections.
Ÿ The Configuration: Diagnostics and Configuration: Event Log pages
These pages allow the user to configure
various system-diagnostics options to capture
error messages and debug information from the
MiniGoose/XP-II’s internals, and either send
them on to a configured Syslog daemon in
real-time or capture them to a log which can
later be e-mailed.
The Config:Diagnostics page, along with a
properly-configured Syslog daemon running on
a host computer elsewhere within the user’s
network, replaces the old udpdb diagnostic tool
which some of our WeatherGoose-I customers
may have used in the past when working with
IT Watchdogs’ technical support to resolve an
issue. Its advantages are that Syslog is a more
widely-used de facto standard which more IT
system administrators are likely to be familiar with and already have access to,
and that it minimizes network traffic by having the MiniGoose/XP-II “push” its
diagnostic messages at the Syslog daemon as each system event occurs rather
than the unit having to be constantly polled as in udpdb. Also, the matrix of event-type and severity checkboxes
allows us to narrow down the diagnostic messages to only those events which are of interest to the issue at hand,
further reducing network traffic and the amount of data needing to be logged and reviewed. These improvements
will be especially apparent if it should be necessary to gather diagnostic information over an extended period.
The Config: Event Log page, on the other hand, will be at least partly familiar to WeatherGoose-I users; the
“Memory Syslog” window at the top of the page is equivalent to the “Event Log” window which used to be at
the bottom of the Alarms page on the WeatherGoose-I, and serves a similar purpose. Again, though, its
functionality has been significantly enhanced with a matrix of event-type and severity checkboxes to choose
which events are of interest. There is also a control at the bottom of the page which allows you to enter an e-mail
address and send the logs directly from the unit (assuming that e-mail functions are not the problem at issue, of
course!), rather than needing to cut-and-paste text into a separate e-mail program.
Currently, neither of these pages are likely to be of significant interest under normal circumstances. They are
provided mainly to assist IT Watchdogs in remote diagnostics and technical support, in the unlikely event that
you encounter problems setting up or using your equipment. While altering these settings will not harm or disable
your unit, they can cause the unit to appear slower and less responsive, and/or cause the logging memory to fill
up with unnecessary status and debug data while leaving less room for actual sensor readings. Unless you are
specifically asked by IT Watchdogs technical support to enable or change any of the settings on these pages, these
settings should not be disturbed.
Ÿ The Configuration: Admin page
The last page of configuration options are primarily concerned with administrative functions such as the
real-time clock and account settings. It is also possible to upload firmware upgrades from here, and do a global
reset of the unit back to factory defaults if needed.
The first controls you will find at the top of the
Config: Admin page are a pair of buttons: Reset ALL to
Default Values, and Refresh DNS Cache. Both of these
controls do exactly as their names suggest.
Reset ALL to Default Values will reset the following
parameters back to their factory defaults:
Ÿ All configured Alarms events will be deleted.
Ÿ On the Logging page:
Ÿ the Time Range control will reset to 1 month.
Ÿ all checkboxes which determine which sensors appear on the graph will be cleared.
Ÿ On the Display page:
ŸDate Format resets to USA (MM/DD/YY)
Temperature Unit resets to Fahrenheit
ŸInternal Temperature Offset resets to 0
ŸInterface Type resets to Contemporary
Ÿ All “friendly names” reset to the default factory names for those sensors.
Ÿ the DNS Servers are reset to 208.67.222.222 and 208.67.222.220
Ÿ all E-mail addresses, username/password, and server information is erased. SMTP Port and POP3 Port reset
to the defaults of 25 and 110, respectively.
Ÿ all System Status E-mail Reports events are deleted.
Ÿ all SNMP parameters are reset:
ŸRead Community: public
ŸListen port for GET: 161
ŸTrap Community: private
ŸWrite Community: private
ŸSNMP System Name, Location, and Contact fields are reset to generic “John Doe” placeholders
use v2c notify instead of trap: unchecked (disabled)
Trap IP Address:port #: both are blanked
Ÿ all Cameras IP Address and Model settings are reset to 0.0.0.0 and No camera, respectively.
Ÿ Set Clock method is reset to Manual
Ÿ the NTP servers are reset to 192.43.244.18 and 129.6.15.28
Ÿ Sync to NTP server period is reset to 1800 seconds
Ÿ all Name and Password Configuration settings are blanked
Ÿ all Admin Info fields are reset to generic “John Doe” placeholders
In other words, Reset ALL to Default Values returns your MiniGoose/XP-II to a condition that is about as
close to fresh out-of-the-box as it can get, short of erasing the network IP address settings as well. (Those settings
are spared so that you can continue to access the unit, since obviously it would be undesirable for the unit to revert
to the “local address” setting of 192.168.123.123 if you are trying to administer the unit remotely!)
The Refresh DNS Cache button, on the other hand, simply causes the unit to erase any cached IP addresses it
has already looked up via DNS, and perform new DNS requests on URL-specified addresses in the configuration
fields. This may be useful if you have reconfigured your network or moved your e-mail servers to a different IP
address, and the MiniGoose/XP-II hasn’t yet refreshed the DNS entries on its own and is still trying to access
those services at the old IP address.
Ÿ System Clock settings:
The MiniGoose/XP-II includes a hardware real-time
clock which keeps time even when the system loses
power, and which can be set to periodically resynchronize
itself with an external NTP time server. This clock is used
to record time stamps for each entry in the data log, and to
trigger time-based events such as periodic system-status
e-mails. Note that the graphing, logging, and periodic
status e-mail functions will not operate if the clock is not
set! The unit will, however, continue to monitor the
sensors and generate alarms, since those functions are concerned only with current sensor readings and are not
dependent on knowing what particular time it is or how much time has elapsed between events.
Set Clock method allows you to determine whether the clock syncs itself with the NTP server, or only from
the time and date fields in this section. If Manual mode is selected, the clock will only be set once, when the Save
Changes button is clicked, to the time and date entered in the appropriate fields, and then will continue to keep
time from there. NTP Server mode will cause the MiniGoose/XP-II to query the time server(s) specified in the
NTP primary server and NTP secondary server fields, and then periodically re-sync itself at the intervals
specified in the Sync to NTP server period setting.
NTP time servers, regardless of their physical location, always provide the current time in GMT. The GMT
to local field lets you specify the offset to be applied to GMT for your local time zone. (Please note that the
WeatherGoose currently has no provision to automatically compensate for Daylight-Saving Time, so make sure
you take this into account when entering the offset.)
The next row of fields, below GMT to local, allow you to specify the current date as Month, Day, and two-digit
Year (the leading two digits are always assumed to be “20”, since it seems reasonable to suspect that very few, if
any, of these units will still be in service by the year 2100!), and the current Hour, Minute, and Second. Note that
if you are only using Manual setting mode and do not intend to sync with NTP servers, you could just enter the
local time here and set the GMT to local offset to 00:00 – however, if you have specified a GMT offset and intend
to use NTP time servers, make sure you enter the correct GMT time here, not necessarily your local time. (On
the other hand, if Set Clock method is set to NTP Server mode, and the NTP server IPs are valid and reachable,
it doesn’t matter what you put in these clock-setting fields since the unit will sync to the time supplied by the NTP
servers as soon as it finds them.)
NTP primary server and NTP secondary server allow you to specify the desired NTP time servers, either by
IP address or URL.
Sync to NTP server period determines how often the unit will sync with an NTP server. The default is 1800
seconds, or 30 minutes, but can be set to as long as 65535 seconds, or just over 18 hours.
The real-time clock has its own internal backup power source, which will keep the clock running for up to 10
days if the unit’s primary power source is disconnected or lost. Note that this backup power does not keep the
entire MiniGoose/XP-II running; i.e. the unit will not continue to log sensor data, generate alarms, or be
web-accessible if main power is lost!
Ÿ Name and Password Configuration settings:
Here, you can set up to three levels of password
protection for the MiniGoose/XP-II, allowing you to
restrict which user(s) in your organization are able to view
or change the unit's settings. Although these settings are
optional, IT Watchdogs highly recommends that you at
least set up the Administrator account to prevent
unauthorized changes to the network and administrative
settings.
If a given account’s username and password fields are
left blank, then the level(s) of access controlled by that
account are available to anyone who connects to the unit.
Accounts are listed in order of privilege, from highest to
lowest, and lower-privilege accounts cannot be set unless
the higher-privilege accounts above them are set as well;
i.e. you cannot have a Control account without an Administrator account, and you cannot have a View-Only
account without both a Control and Administrator account.
The three levels of accounts have the following privileges:
Ÿ Administrator: this account has complete access to the MiniGoose/XP-II; all pages are viewable, and any
setting can be changed – including the ability to change any other account's passwords. Note that this account
is the only account which can access the Config page, and that you must configure this account before you
can configure the Control or View-Only accounts.
Ÿ Control: this account is able to:
Ÿ view all of the web pages except for the Config page
Ÿ add or change Alarms entries
Ÿ change the graph’s time scale and which readings are displayed on the graph (and the LCD, on
SuperGoose-II units) on the Logging page
Ÿ download and/or erase the log history from the Logging page
Ÿ change the settings on the Display page
Ÿ View-Only: this account is able to:
Ÿ view all of the web pages except for the Config page
Ÿ download – but not erase – the log history from the Logging page.
Ÿ this account cannot change any setting on any page.
Once you have configured these accounts the way you want them, click the Save Changes button. If you
have configured an Administrator account, the unit will now ask you to log in with that username and password
before you can continue.
When changing passwords, the unit will require you to provide either the current password for that account,
or the current Administrator account password, in the Old Password field, and then type the new password into
the New Password and New Password Again fields. Both “New” fields must match exactly for the change to be
accepted.
If you no longer wish to have a username and password associated with a given account, simply leave the
Account Name, New Password, and New Password Again fields blank while providing the Administrator
account’s password in the Old Password field.
If you have forgotten your Administrator password and cannot get into the configuration pages, you will need
to use the hardware RESET button, as described in
of this manual, to reset the passwords
and regain access to the unit. Note that you will need physical access to the unit to perform the RESET, and that
the unit will also revert to its factory default IP address of 192.168.123.123 as part of the RESET, so you will also
need to reconnect the unit directly to a PC as described in the
the unit back to the correct IP-address settings for your network.
portion of the manual to re-program
Ÿ Admin Info settings:
These fields allow you to change the unit's
administrative-contact information and specify its
physical location, if desired. This information will be
displayed at the bottom of each page, as shown here.
Note that these fields are for your users' convenience
only; the MiniGoose/XP-II does not use the information
entered here for anything other than to fill out the display
at the bottom of each page, and to provide a clickable link
to send the system administrator an e-mail. (This e-mail
address does not necessarily need to be any of the alarmrecipients specified in the Config: Monitoring page, and
the unit will not attempt to send alarm or status e-mails to
this address.)
Since the MiniGoose/XP-II does not use this information for any actual monitoring functions, these fields may
be filled out with any information you like, or even be left blank if you prefer.
Ÿ Saved Configuration XML File:
One of the MiniGoose/XP-II series’ many new
features is the ability to export and import a configuration
file containing all of the settings on a particular unit. This
can be especially useful if you intend to set up multiple
identical Goose-and-sensor combinations in several facilities, since it allows you to simply configure one unit and
then rapidly “clone” its settings – including network configurations, alarm settings, display options, e-mail and
SNMP configurations, etc. – into your other installations.
To export the unit’s current configuration to an XML file on your PC, simply click the Download Current
XML File button.
Ÿ Note: depending on your browser and version, your browser may ask you where to save the XML file, or
it may simply attempt to display it as though it were a web page or a text file. If the latter occurs, simply
use your browser’s “save as” function to save the displayed XML data to a disk file. In general, you
should choose “XML file”, “Web Page, XML Only”, or similar as the “Save As Type” in the file-saving
dialog box.
Ÿ Also note: some versions of the Opera browser prior to Opera 10 may attempt to parse or display the XML
data as an unstyled web page, rather than displaying the XML data, which may result in a seemingly blank
page. If you wait until the page finishes downloading, you can still “Save As” even though the page
appears blank – however, make sure that you choose “Text File” or “All Files (*.*)” for the “Save
as Type”, then add the .XML extension to the end of the filename, as some of these older Opera versions
will write an incorrect version/encoding value into the XML header if you choose one of the “XML File”
options, which could cause the MiniGoose/XP-II to reject the file when you try to upload it back into the
unit.
Once the file has been saved to your local PC, you can use any text or XML editor to view and modify the
information in it before uploading it back into other Goose-II units. A full explanation of all of the XML fields
is well beyond the scope of this manual, and most of them you probably will not want to directly modify via the
XML data anyway since it’s much easier to change them from the unit’s web page. However, one set of
parameters which you might want to modify before cloning an XML-based configuration across multiple units
are the network IP settings; if you have multiple units to configure, each with its own statically-assigned IP
address, you can open the XML file and look for the following lines at the top of the file:
<network status="0" ip-address="192.168.123.123"
netmask="255.255.255.0"
gateway="192.168.123.1" http-port="80"
https-port="443"
web-protocols="both"
telnet-enable="1">
<dns-num0 ip-address="208.67.222.222" >
</dns-num0>
<dns-num1 ip-address="208.67.222.220" >
</dns-num1>
</network>
Here, you could save multiple copies of the XML file, one for each unit to be configured, changing the
ip-address, netmask, gateway, and the DNS settings as appropriate for each unit. (We do not recommend
changing the other settings from here; in particular status, web-protocols, and telnet-enable should be
left alone.)
To import a saved configuration into the unit from a previously-saved XML file on your PC:
1. Click the Browse... button, browse to the directory you saved the XML file to, then double-click to
select the appropriate file.
2.
Click the Upload Local XML File button, and wait. The upload process may take a few minutes,
depending on the size of the update file and network traffic. As the XML configuration data is
uploaded and parsed, you will see a series of progress messages; once you see the message “XML file
upload succeeded”, the process is complete.
3. Return to the unit’s web page (keeping in mind that depending on the XML settings, its IP address
may have changed) and it should now have the newly-imported configurations in place.
Ÿ SSL Certificate and Private Key:
As we saw earlier in the Config:Network settings, a
MiniGoose/XP-II can be accessed either via unsecured
HTTP, or over an SSL-secured HTTPS connection. A
MiniGoose/XP-II unit comes with a self-signed SSL
certificate already built in, which it will use by default.
This is usually sufficient for the average user, but for those
users who prefer to use their own self-generated SSL certificates and private keys (or whose corporate IT security
policies require the use of a properly-signed certificate/key combination provided by a trusted 3rd party such as
Verisign or Thawte), the MiniGoose/XP-II provides those users with the ability to install their certificate/key
combination here. You can either generate your own self-signed Certificate and Key files using tools such as
OpenSSL, or purchase an authenticated certificate set. In either case, the uploaded certificate and key files must
be in binary .DER format; the unit cannot accept ASCII-text .PEM-formatted certificate/key files.
At the top of this section, you’ll see a message stating whether the SSL Certificate and Private Key are “valid”
or “invalid.” Note that this only applies to the certificate data which you can upload from this section, so don’t
panic if you see an “invalid” status when you haven’t uploaded a certificate yet and the unit is still operating on
its internal self-signed credentials; this message does not indicate that the unit’s own default certificate is invalid!
To upload a prepared set of SSL Certificate and SSL Private Key files, use the Browse... buttons to locate and
select the appropriate .DER files, then click the Upload SSL Files button. Note: once the upload is complete, you
will need to reboot the unit for the new SSL certificate to take effect.
If all goes well, after you reboot the unit, you should be able to access the unit via HTTPS with its
newly-installed credentials. If you are unable to access the unit via HTTPS, or your browser insists that the
credentials are invalid, come back to this configuration page via plain HTTP and check the status message to see
whether the unit thinks the current SSL certificate/key combination is valid or invalid. Note also that it may be
necessary to clear your browser’s cache, or close and reopen the browser, to make it pick up the new certificate
and key rather than trying to use the cached certificate(s) it previously accepted from the unit.
If you wish to remove any installed SSL certificate/key combinations and revert to the unit’s default
self-signed certificate, just click the Erase SSL Data button and reboot the unit. Again, it may also be necessary
to clear your browser’s cache to get back into the unit after removing the user-installed certificates and reverting
to the unit’s own self-signed default certificate.
Ÿ Upload System Firmware:
From time to time, firmware updates may be provided
to add new features or improve the MiniGoose/XP-II’s
capabilities. Firmware-update capabilities have been
significantly improved in the MiniGoose/XP-II; unlike the
old WeatherGoose-I series, which required you to run a
separate updater program from a Windows command prompt in order to update the firmware, MiniGoose/XP-II
has this function built right in to the web-page interface. It is also no longer necessary to directly connect the unit
to a host PC via a crossover cable to ensure a reliable update, as the MiniGoose/XP-II’s ability to recover from
an interrupted or failed file transfer is greatly improved over the previous design.
To upload new firmware:
1. First, download the new firmware from our site. Updates will typically be packaged as a .ZIP file
containing several supplementary files, such as updated MIBs; simply unZIP the entire package to a
temporary directory.
2. Click the Browse... button, and browse to the temporary directory you unZIPped the update package into.
3. The file you are looking for will have a .PKG extension; double-click to select that file.
4. Click the Upload New Firmware button, and wait. The upload process may take a few minutes, depending
on the size of the update file and network traffic. (Note that due to the various differences between
browsers, you may or may not see an in-progress report as each block of data is uploaded.) During this
time, both the IDLE and ACTIVITY LEDs should blink in unison and, on the SuperGoose-II, the LCD
will read “FIRMWARE UPDATING”.
5. Once the upload is complete, you should see a page similar to
the screen shown here, with a 60-second countdown while the
unit validates and installs the new firmware. Once the
installation is complete, the unit will reboot and return to the
default Sensors page.
6. Under normal circumstances, a firmware update will not erase
your log history, unit configuration, or alarm settings. However,
if you want to take extra caution, simply download all of your
logged data from the Logging page, then use the export/import
configuration functions described above to save a copy of all of
your device configurations, before uploading your new
firmware.
MiniGoose/XP-II USER MANUAL
In addition to the standard web-page view, the MiniGoose/XP-II offers a compressed
view of the Sensors page suitable for the small screens of a PDA or internet-capable cell
phone. This compressed view can be accessed by clicking on the PDA/Phone link, as
shown here:
Initially, the compressed view will display text only, with no graphs, in order to fit the
widest variety of available PDA/phone displays. If your particular cell phone or PDA
has a higher-resolution display which is able to accommodate the graphs, clicking on the
Show Graphics button at the bottom of the page will switch to a different version of the
page which displays the graph histories and color keys. To switch back to the text-only mode, click the Hide
Graphics button.
Both of these pages are individually bookmark-able, separate from each other and from the main Sensors
page, so you can bookmark either or both of these in your PDA/cell-phone browser to go directly to them rather
than having to go through the PDA/Phone link on the main page.
Note: the Sensors page is the only page for which a compressed “PDA/Phone” view is provided.
PDA/Phone view,
no graphs
PDA/Phone view,
with sensor graphs
MiniGoose/XP-II USER MANUAL
The MiniGoose/XP-II provides a simple Telnet menu from which the user can view and modify various
system settings, clear the system’s memory, or reboot the unit. As a general rule, it’s likely that very few users
will actually need to make use of this feature, but there are some specialized circumstances where it may prove
useful to an administrator who needs to reboot or reset a unit remotely after an accidental misconfiguration.
Please note that the MiniGoose/XP-II’s Telnet service does not provide access to a general-purpose O/S
command prompt or “shell” which can be used to launch programs or perform arbitrary file-system operations; it
is merely a system-configuration menu which uses the Telnet protocol rather than HTTP. Nevertheless, if having
a device with an open listener on Telnet port 23 for any reason is a security concern for your particular
environment, the Telnet service can be disabled (and the port closed) in the Web Server settings section of the
Configuration: Network page.
To connect to the MiniGoose/XP-II Telnet service, simply open a command or shell prompt and issue the
command telnet xxx.xxx.xxx.xxx, where “xxx” represents the IP address of the unit you wish to connect to,
then enter the login name and password when prompted. Note that you must have the Administrator account
configured on the MiniGoose/XP-II to log in to Telnet! To protect against unauthorized use, the Telnet service
will not accept a blank username and password.
Once you have successfully logged in, the following commands are available:
Ÿ account – issued by itself, this command lists the current account ID settings. It can also be used to change
those settings, as follows:
Ÿ an account’s username can be changed by adding admin, control, or view to the command, followed
by the account name you wish that account to be set to.
Ÿ an account’s password can be changed by adding passwd to the command, followed by the account whose
password you wish to change (admin, control, or view), followed by the new password.
Ÿ admin – issued by itself, this command lists the current Admin Info settings. It can also be used to set or
change those settings by adding name, email, phone, or location to the command, followed by the
information you wish the specified field to be set to. Equivalent to the Admin Info section on the Admin tab
of the Configuration section.
Ÿ bye / exit / quit – close the Telnet session and exit.
Ÿ deletelog – deletes the logged sensor data
Ÿ help – by itself, gives a list of available commands. help <command> will give further information about
the specified command.
Ÿ http80 – resets HTTP Port to the standard default of 80
Ÿ https443 – resets HTTPS Port to the standard default of 443
Ÿ mail – by itself, this command lists the current e-mail settings. It can also be used to set or change those
settings, as follows:
Ÿ the SMTP and POP3 server settings may be changed by adding smtp <server> <port> or pop
<server> <port>, respectively. Note that <port> is optional, and <server> may be specified either
by IP address or URL.
Ÿ the mail-server login credentials may be changed by adding user <id> <password> to this command.
Note that both parameters must be specified.
Ÿ the e-mail recipients may be set by adding to<n> <address>; i.e. the command mail to1
[email protected] would set the To E-mail Address 1 field on the Config:Monitoring page to [email protected].
Ÿ additionally, mail test will cause the unit to attempt to send a test e-mail, equivalent to the Send Test
E-Mail button at the bottom of the Config:Monitoring page.
Ÿ net – if given with no additional parameters, this command displays the current network settings. Typing
net dhcp will enable DHCP on the unit, while net <ip> <mask> <gateway> will set the unit’s IP Address,
Subnet Mask, and Gateway. (Note that in the latter usage, all three settings must be provided; i.e. it is not
allowed to specify only an IP Address with no Mask or Gateway.)
Ÿ netreset – resets the Network settings to their factory defaults. Equivalent to using the RESET button on
the front of the unit.
Ÿ reboot – initiate a full reboot of the system firmware; equivalent to a power-cycled cold-start.
Ÿ remove – causes the unit to forget any Digital Sensor Bus devices which are unplugged. Equivalent to the
Remove all unplugged devices checkbox on the Display page.
Ÿ report – provides a complete report of the unit’s current configuration settings.
Ÿ resetall – equivalent to the Reset ALL to Default Values button on the Configuration: Admin page, this
command causes a total reset of all of the unit’s configuration settings, returning the unit to a nearly
fresh-out-of-the-box state.
Ÿ restore – reset all of the “friendly name” fields back to their factory defaults.
Ÿ server – by itself, this command shows which web-server services – HTTP or HTTPS – are enabled and
what port(s) they are set to. This command can also be used to change those port settings, or disable a service,
by issuing the command server http or server https, followed by either the port number you wish to
assign them to, or off to disable that service. Warning: it is possible, using this command, to disable both
HTTP and HTTPS; if this happens, you will be locked out of the web pages entirely and will only be able to
regain control of the unit via this Telnet service menu or the physical RESET button on the front of the unit!
Ÿ snmp – by itself, this command lists the current SNMP settings. It can also be used to set or change those
settings, as follows:
Ÿ adding port <port#> sets the listening port for incoming GET requests.
Ÿ the read, write, or trap communities can be set by adding readcom, writecom, or trapcom respectively,
followed by the name of the community.
Ÿ the SNMP system name, location, and contact e-mail can be set by adding those commands, followed
by the parameters you wish them to be set to.
Ÿ adding notify v2c or notify trap determines whether the unit will use SNMP v2c-style notify events
or v1-style trap events. Equivalent to checking or unchecking the Use v2c notify instead of trap
checkbox on the Config:Monitoring page.
Ÿ the trap1 and trap2 destinations can be set by adding those commands, followed by the SNMP host
<destination>:<port> settings. <port> is optional.
Ÿ additionally, snmp test will cause the unit to attempt to send a test SNMP trap, equivalent to the Send
Test SNMP Trap button at the bottom of the Config:Monitoring page.
MiniGoose/XP-II USER MANUAL
It used to be that environmental monitoring systems were primarily found only in large IT installations, such
as server farms and corporate data centers, which could be expected to have their own internal e-mail servers
which the monitoring units could make use of to send alerts to the IT administration staff. However, as our
low-cost monitoring systems have increasingly found their way into a wider variety of smaller-scale applications
and office environments many of these customers, who often do not possess their own dedicated in-house e-mail
servers, have expressed a need to be able to configure the units to send e-mail alerts via a “free”, publiclyaccessible e-mail service such as AOL or Gmail.
The following services have been found to be compatible with the MiniGoose/XP-II’s e-mail system.1 Note
that to use any of these services, you will first need to visit their sites and create an account if you do not already
have one there. To configure your MiniGoose/XP-II to use one of these services as its outgoing e-mail server,
click on the Config tab, then click Monitoring, go to the E-mail options block, and set the parameters as follows,
depending on the service you intend to use:
Google “Gmail”:
Ÿ SMTP Server:
smtp.gmail.com
Ÿ SMTP Port:
587
Ÿ “From” E-mail Address: your Gmail e-mail address (e.g., [email protected])
POP3 Server:
(leave blank)
Ÿ POP3 Port:
110
Ÿ Username:
your Gmail login username (e.g., user) – not the full e-mail address!
Ÿ Password:
your Gmail login password
AOL.com:
Ÿ SMTP Server:
smtp.aol.com
Ÿ SMTP Port:
587
Ÿ “From” E-mail Address: your AOL e-mail address (e.g., [email protected])
POP3 Server:
(leave blank)
POP3 Port:
Ÿ Username:
Password:
110
your AOL e-mail address (e.g., [email protected])
your AOL login password
GMX.com:
Ÿ SMTP Server:
mail.gmx.com
Ÿ SMTP Port:
25
Ÿ “From” E-mail Address: your GMX e-mail address (e.g., [email protected])
POP3 Server:
(leave blank)
Ÿ POP3 Port:
110
Ÿ Username:
your GMX e-mail address (e.g., [email protected])
Password:
your GMX login password
1
Please note: this information is provided solely as a convenience to those MiniGoose/XP-II owners and customers who may find it
useful for their intended applications. IT Watchdogs has no connection with any of the companies or services described; no
recommendation or endorsement is intended or implied, nor does IT Watchdogs make any claims or guarantee of these services’
reliability, quality of service, or fitness for any given application.