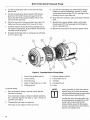
1
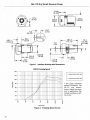
·.·.~.f.:~:·
.. . .. Agilent Technologies
'
Vacuum Products Division
C€
SH-1_12
Dry Scroll
Vacuum Pump
INSTRUCTION MANUAL
MANUALE DI ISTRUZIONI
NOTICE DE MODE D 'EMPLOI
BEDIENUNGSHANDBUCH
fPIO¥/fJJ
I!J!J!j!Jtljlj#
Manua1No.699904430
Revision C
June 2014
SH-112·
Dry Scroll Vacuum Pump
0
'
'''''''"''~'''~''
5/o-B/o and Littelfuse are registered trademarks of Littelfuse, Inc.
SH-112 Dry Scroll Vacuum Pump
Warranty
Products manufactured by Seller are warranted against
defects in materials and workmanship for twelve (12)
months from date of shipment thereof to Customer, and
Seller's liability under valid warranty claims is limited, at
the option of Seller, to repair, to replace, or refund of an
equitable portion of the purchase price of the Product.
Items expendable in normal use are not covered by this
warranty. All warranty replacement or repair of parts shall
be limited to equipment malfunctions which, in the sole
opinion of Seller, are due or traceable to defects in original materials or workmanship. All obligations of Seller
under this warranty shall cease in the event of abuse,
accident, alteration, misuse, or neglect of the equipment.
In-warranty repaired or replaced parts are warranted only
for the remaining unexpired portion of the original warranty period applicable to the repaired or replaced parts.
After expiration of the applicable warranty period, Customer shall be charged at the then current prices for parts,
labor, and transportation.
Reasonable care must be used to avoid hazards. Seller
expressly disclaims responsibility for loss or damage
caused by use of its Products other than in accordance
with proper operating procedures.
Except as stated herein, Seller makes no warranty,
expressed or implied (either in fact or by operation of
law), statutory or otherwise; and, except as stated herein,
Seller shall have no liability under any warranty,
expressed or implied (either in fact or by operation of
law), statutory or otherwise. Statements made by any person, including representatives of Seller, which are inconsistent or in conflict with the terms of this warranty shall
not be binding upon Seller unless reduced to writing and
approved by an officer of Seller.
Warranty Replacement
and Adjustment
All claims under warranty must be made promptly after
occurrence of circumstances giving rise thereto, and must
be received within the applicable warranty period by
Seller or its authorized representative. Such claims should
include the Product serial number, the date of shipment,
and a full description of the circumstances giving rise to
the claim. Before any Products are returned for repair
and/or adjustment, written authorization from Seller or its
authorized representative for the return and instructions
as to how and where these Products should be returned
must be obtained. Any Product returned to Seller for
examination shall be prepaid via the means of transportation indicated as acceptable by Seller. Seller reserves the
right to reject any warranty claim not promptly reported
and any warranty claim on any item that has been altered
or has been returned by non-acceptable means of transportation. When any Product is returned for examination
and inspection, or for any other reason, Customer shall be
responsible for all damage resulting from improper packing or handling, and for loss in transit, notwithstanding
any defect or non-conformity in the Product. In all cases,
Seller has the sole responsibility for determining the cause
and nature of failure, and Seller's determination with
regard thereto shall be final.
If it is found that Seller's Product has been returned without cause and is still serviceable, Customer will be notified and the Product returned at the Customer's expense;
in addition, a charge for testing and examination may be
made on Products so returned.
iii
SH-112 Dry Scroll Vacuum Pump
Contents
Warranty . . . . . . . . . . . . • • . • . . . . • . . . . . • • . . . . . • iii
Warranty Replacement and Adjustment. ....... iii
Instructions for Use ........................... 1
General Information ....................... 1
Storage ................. . ....... . .... 1
Installation ................. . .... .. ... . . . 2
Use .. . .. ..... . .... . ... .... .... .. . ... . . . 2
Maintenance . ... .. . ... .. ... ..... ......... 2
lstruzioni Per L'uso ........................... 3
lnformazioni Generali . ........ . ....... ... .. 3
lmmagazzinamento . ........ . .......... 3
lnstallazione . .. ....... . . . ...... . . . .. .. ... 4
Uso .... .. . .. ... .. ... ... . . .............. 4
Manutenzione .... .. . . .... .... .. . ..... . .. 4
Instructions D'utilisation .....................•. 5
Indications Generales . ......... . ... . ....... 5
Emmagasinage ..... -................... 5
Installation .. ... . .. . . .. ....... ........... 6
Utilisation . . .. . .......................... 6
Maintenance .. . . . .... . . ..... .. .. .. .... . . . 6
Gebrauchsanleitung ••.•............•.......... 7
Allgemeine Hinweise . . .. ... ...... . ........ 7
Lagerung ............................ 7
Installation . . . .... . ...... .. .. ... ......... 8
Gebrauch ........................... .. .. 8
Wartung .... . . .. ... . . . .. . . . . . . .... . ... .. 8
1tm UtPJJ . . . . . . . . . . . . . . . . . . . . . . . . . . . . . . . . . . . g
-~~.~-
Installation .............................
Safety . .. ... ........ . .... . ........ .
Startup ..... .... .... . .. .... .. . . .....
Electrical Connections . ........ ... .....
Run Currents ..... . . . ...... . ...... . ..
Start Cu rrent ... ... . .. .. .............
Mechanical Connections .. .. ...........
Operation . . . . . . . . . . . . . . . . . . . . . . . . . . . . .
Cleaning the Pump ..... . ........... ..
Startup Procedure . ..... ... .... . .... ..
Shutdown Procedure . . . . . . . . . . . . . . . . . .
Troubleshooting . .................. .. . ...
Maintenance .... .. . . . .... . . .... ...... ..
Kits and Service Options . . . . . . . . . . . . . . .
Cleaning .. . ..... ... ............... .
Tip Seal Replacement ... . ..... . ...... .
18
18
18
18
20
20
21
21
21
21
21
22
23
23
23
23
Request for Return Health and Safety Certification
List of Figures
Figure Caption
1
2
3
4
5
6
Page
Interface Drawing with Dimensions .... ..
Pumping Speed Curves ........... . ...
Outline Drawing and Principal Items .. ...
Grounding Plug and Outlet . .... .. . .....
ON/OFF Power Switch . . . . . . . . . . . . . . . .
Exploded View of Pump Body . .. .... . . .
16
16
17
20
21
24
............ . ... . ... . ...... . ... 9
9tf¥ .. . . . ...... ... .... . .. .. .. ... ... . 9
~~
........ . .. .... ......... . ......... 10
1f:ffl ........... . ........ .. .. .. ........ 10
m:t?~m~
r;~: t:.t>r::
.... ....... ... .... .... ... ... . 1o
.................................. 11
-Alt11f* . . .... . ....................... 11
i*~ . . ..... . ....................... 11
~11 .. ...... . . . ........... . . . ... .. .. . . 12
ilm . ......... . .......... ............. 12
i*~ ........ .. . ·. ......... . ............ 12
List of Tables
Table
2
3
4
A}% Al~ ..................... . ............ 13
~\11:].!2..
.............................. 13
.!i!.:B- ............................... 13
1).~1 . ... . ..... . ........... . ~ ........ . . 14
A}% . . ........ . ............ . .... . ... . . 14
%Al .!i!.'T ..... ... ............ . ..... . . . . 14
5
6
7
Title
Page
Specifications . . . . . . . . . . . . . . . . . . . . . . . 15
SH-112 Power Cord Selection . .. .... .. .. 19
SH-112 Typical Run Currents ... . .... . . . 20
Typical SH-112 Maximum Starting Current and
Duration @ 115 V .................. . 20
Troubleshooting Chart ..... . .... .. ... .. 22
Tip Seal Replacement Kit .. . ........... 23
Factory Service Options . . ....... .. ... . 23
Technical Information .............. .. ........ 15
Unpacking and Inspection ................. 17
v
SH-112 Dry Scroll Vacuum Pump
Instructions for Use
General Information
This equipment is designed for use by professionals. The
user should read this instruction manual and any other
additional information supplied by Agilent before operating the equipment. Agilent will not be held responsible
for any events that occur due to non-compliance with
these instructions, improper use by untrained persons,
non-authorized interference with the equipment, or any
action contrary to that provided for by specific national
standards.
The SH-112 is a hermetic, dry scroll vacuum pump. This
pump is suitable for pumping air or inert gases. The pump
is not intended to pump corrosive, explosive, or particulate-forming gases.
The following paragraphs contain all the information necessary to guarantee the safety of the operator when using
the equipment. Detailed information is supplied in
"Technical Information" on page 15.
This manual uses the following standard safety protocol :
WARNING
~
CAUTION
I
OJ
NOTE
The warning messages are for attracting
the attention of the operator to a particular procedure or practice which, if not
followed correctly, could lead to serious
injury.
The caution messages are displayed
before procedures, which if not followed, could cause damage to the
equipment.
The notes contain important information taken from the text.
Storage
When transporting and storing the pump, the following
environmental requirements should not be exceeded:
Temperature:
-20 oc to +60 oc (-4 oF to 140 °F)
Relative humidity:
0 to 95% (non-condensing)
Preparation for Installation
The pump is supplied in a special protective packing. If
this shows signs of damage, which may have occurred
during transport, contact your local sales office.
Total weight of the packing, SH-112 pump included, is
approximately 20 kg (44 lbs).
WARNING
~
NOTE
OJ
When unpacking the pump, be sure not
to drop it and avoid any kind of sudden
impact or shock vibration to it.
Normal exposure to the environment
cannot damage the pump. Nevertheless, it is advisable to keep the pump
inlet closed until the pump is installed
in the system.
SH-112 Dry Scroll Vacuum Pump
Installation
Maintenance
Do not install or use the pump in an environment
exposed to atmospheric agents (rain, snow, ice), dust,
aggressive gases, or in explosive environments or those
with a high fire risk.
Personnel responsible for pump operation and maintenance must be well-trained and aware of the accident
prevention rules.
If placing the SH-112 pump inside an enclosure, provide
ample room to supply ambient air to both the front and
rear air intakes of the pump.
following
During
operation,
the
conditions must be respected:
oc (41
environmental
Temperature:
+5°( to +40
Relative humidity:
0 to 95% (non-condensing)
CAUTION
I
If voltage changeover is required, use
a small screwdriver to remove the tab
holder from the power module. Position
the white tab so that the correct voltage
faces out and reinstall the tab holder.
In order to reach maximum vacuum, the pump must be
left running for about an hour with the inlet sealed.
There are no special instructions for starting the pump; it
need only be switched on using the On/Off switch.
The inlet valve will open 10 seconds after the pump is
started.
The pump is designed for operation
with neutral or noncorrosive fluids. It
is absolutely forbidden to use it with
potentially explosive or inflammable
substances.
There are no special instructions for stopping the pump; it
need only be disconnected from . the electric power
source by the On/Off switch.
The inlet valve will close immediately after the pump is
stopped.
2
0 Death may result from contact with
high voltages. Always take extreme care
and observe the accident prevention
regulations in force.
0 When machine is powered up,
be careful of moving parts and high
voltages.
0 If you have to perform maintenance
on the pump after a considerable time
in operation, allow it to cool as the temperature of the outer surface may be in
excess of 60 °C.
Be certain that your electrical mains
power voltage corresponds to that indicated on the white tab (11 0 or 220)
adjacent to the On/Off switch on the
rear of the pump.
Use
~
~
°F to 104 °F)
Connect the pump to the power supply using an IEC-320
style power cord of at least 10 A capacity.
WARNING
WARNING
0 Always disconnect your power
supply to the pump before beginning
maintenance work.
NOTE
rn
Before returning the pump to the factory
for repair, the "Health and Safety" sheet
attached to this instruction manual must
be completed and sent to the local sales
office. A copy of the sheet must be
inserted in the pump package before
shipping.
If a pump is to be discarded, it must be disposed of in
accordance with specific national standards.
SH-112 Dry Scroll Vacuum Pump
Technical Information
Table 1 Specifications
Model
SH-112 Dry Scroll Single Hermetic Vacuum Pump
Interface dimensions
See Figure 1 on page 16
Peak pumping speed
50.Hz: 90 Um, 5.4 m 3/hr (3 .3 cfm)
60 Hz: 110 L/m, 6.6 m 3/hr (4.0 cfm)
See Figure 2 on page 16 for details
Media
No corrosive, explosive or particulate forming gases
Ultimate pressure
2.0
Maximum inlet pressure
1 .0 atmosphere (0 psig)
Maximum outlet pressure
1 .5 atmosphere (7 .5 psi g)
Inlet connection
NW25
Exhaust connection
'
X
10-1 Torr (2.6
X
10-1 mbar)
Female 1/4" NPT (NW16 adapter provided)
Gas ballast
Female 1/8" NPT, (20 micron sintered plug provided; shipped w ith solid
plug)
Ambient operating temperature
5 octo 40 oc (41 °F to 104 °F)
Storage temperature
-20 oc to 60 oc (-4 °F to 140 °F)
Motor rating
0.25 HP (0.19 kW)
Operating voltages
1 phase/50-60 Hz/100-115:200-230 VAC ±10%
Run current
See Table 3 on page 20
Motor thermal protection
Automatic thermal protection
Operating speed
60 Hz: 1725 RPM, 50 Hz: 1425 RPM
Cooling system
Air-cooled
Weight
Pump only: 19.5 kg (43 lbs)
Shipping weight: 20 kg (44 lbs)
Leak rate (with exhaust sealed)
<1
Noise Level (per ISO 11201)
56 dB(A)
Vibration level at inlet (per ISO 10816-1)
Class 1 B, 1.5 mm/s
Fuse type
M5 x 20 mm, 10 A, Slo-Bio,
Littelfuse Model H21501 0 or equivalent
Hour meter
Integral Hour Meter provided, displays running time to closest .1 hour
Conformance standards
Conforms to SEMI S2-2000 and applicable CSA, CUS, and CE standards.
Installation
Indoor use, Installation Category II, Pollution Degree 2
Altitude
2000 m (6562')
X
10-? atm-cdsec helium
15
SH-112 Dry Scroll Vacuum Pump
154.8
(6 .1 0) .-----t-.j
257.2
(10.12)
43.7
(1. 72)
383.8 ---....!
(15.11)
7.7
74.2
1,(2.92)
___t_:o inlet
(.30)
63.6
(6.44)
132.6
~-..,_(5.22)
137.9
147
........---t-+--( 5. 79)
(5.43)
Figure 1
Interface Drawing with Dimensions
SH112 Pumping Speed
*
-ENG 2017 Gen EP2 llOV c50Hz
-ENG 2017 Gen EP2120V :60Hz
* This graph represents
optimal conditions. The
SH-112 may demonstrate a higher base pressure in applications that
include continuous venting cycles.
'I 'R:mlre (Torr)
Figure 2
16
Pumping Speed Curves
SH-112 Dry Scroll Vacuum Pump
1.
Front Cowling Screws; M8 (3)
2.
Front Cowling
3.
Inlet (NW25)
4.
Inlet Screen
5.
Exhaust Adapter NW16
6.
Gas Ballast Port (1/8" National Pipe Thread)
7.
Frame
8.
Base
9.
Mounting Slots; (4) for 1/4" or M6 Hardware
10. Rear Cowling
11. Rear Cowling Screws: M5 (3)
12. On/Off Switch
13. Fuse Holder and Voltage Changeover Tab
14. Power Connection (IEC-320)
15. Hour Meter
Unpacking and Inspection
Figure 3
1.
Orient the shipping container with "This End Up"
on top.
2.
Open the box and carefully lift the SH-112 out of the
box.
3.
Save the carton and all packing materials.
4.
Inspect the pump for damage. If there is shipping
damage, contact the freight carrier and your local
Agilent sales office immediately.
Outline Drawing and Principal Items
17
SH-112 Dry Scroll Vacuum Pump
Installation
Startup
1.
Safety
Do not remove or modify any safety or insulating equipment from the pump. To do so may create a serious safety
hazard and may void the warranty.
WARNING
~
0 This pump is capable of pumping
and exhausting air and inert gases only.
It is not designed to pump explosive,
flammable, corrosive or particulate
forming gases. They can cause bodily
injury, explosion, or fire.
0 Install in an area that is not exposed
WARNING
~
to 40 °C (41 °f to 104 ° f), otherwise damage to the
pump or shortened operating life may result.
CAUTION
It
0 Before reconfiguring the pump
voltage, or inspecting or servicing the
pump, be sure the electrical supply is
disconnected.
ever pumping any gas not intended to
be vented to the atmosphere.
0 An exhaust silencer option is available for those applications in which it is
desirable to diminish the sound level
produced by the pump.
0 To prevent bodily injury, avoid
exposing any part of the human body to
vacuum.
CAUTION
It
18
Although the pump can pump trace
particulates normally found in the
atmosphere, it is not designed to
process solids, chemicals, powders,
solvents, condensates, or other particulates. They can damage the equipment,
degrade its performance, or shorten its
useful life.
Do not insert a finger or any foreign
object in the path of the fan; serious
personal injury may result or the pump
may be damaged.
2. Operate the pump at an ambient temperature of 5 °C
to rain, steam, or excessive humidity.
They can cause electric shock, short
circuits, and severe bodily injury.
0 The gas ballast must be sealed when-
Check that the inlet screen is installed before beginning operation.
Do not block the fan ducts. Blocking
these ducts can cause pump overheating. A pump surface temperature in
excess of 65 °C (150 °F) is potentially
damaging. If such conditions are
observed, turn the pump off and allow it
to cool. Disassemble, inspect for damage, and repair, if necessary.
Electrical Connections
The pump can be configured for low voltage, 100 VAC to
115 VAC, or for high voltage, 200 VAC to 230 VAC.
The pump as delivered from the factory is configured for
low voltage. To change the pump voltage follow this procedure:
WARNING
~
Risk of electric shock. Disconnect the
pump from electrical power mains
before attempting to change the voltage
configuration.
1.
Verify your electrical supply voltage.
2.
Use a small flat blade screwdriver to release the fuse
holder from the power entry module.
3.
Carefully pop out the white plastic assembly and
reinsert with the desired operating voltage showing
outward.
4.
Reinsert the fuse holder into the power entry module.
SH-112 Dry Scroll Vacuum Pump
Power Cord
DANGER
Several power cord options are available from your
Agilent dealer. Descriptions of the available power cords
and their ordering numbers are given in Table 2.
NOTE
rn
Table 2
Country
For high voltage operation, the pump
must be connected to the power supply
using a high voltage /EC-320 type
power cord of at least 10 A capacity.
~
use on a nominal 120 V circuit, it must
be used with a grounding plug that
looks like the plug illustrated in
Figure 4.
0 If repair or replacement of the
cord or plug is necessary, connect
the grounding wire to the grounding
terminal only.
Order
Europe
10 A/ 220-230 VAC, 2.5 m 656494220
Denmark
10 A I 220-230 VAC, 2.5 m 656494225
Switzerland
10 A/ 230 VAC, 2.5 m
656494235
UK/Ireland
13 A I 230 VAC, 2.5 m
656494250
India
10 A I 220-250_VAC, 2.5 m 656494245
Israel
10 A I 230 VAC, 2.5 m
656494230
Japan
12 A/ 100 VAC, 2.3 m
656494240
North
America
15 A/ 125 VAC, 2.0 m
656458203
10 A I 230 VAC, 2.5 m
656494255
0 The grounding wire is insulated and
its outer surface is either solid green or
solid green with a yellow stripe.
0 When this product is configured for
use on a nominal 220 V circuit, it must
be used with a factory supplied cord
and plug that permits connection to the
proper electric circuit. See "Electrical
Connections" on page 18 for proper
rating and type of cord set.
WARNING
Grounding Instructions
This product should be grounded. In the event of an electrical short circuit, grounding reduces the risk of electric
shock by providing an escape wire for the electric current. This pump is equipped with a power cord that has a
grounding wire with an appropriate grounding plug. The
plug must be inserted into an outlet that is properly
installed and grounded in accordance with all local codes
and ordinances.
For United States and Canadian installations:
0 When this product is configured for
SH-112 Power Cord Selection
Power Cord Specification
Improper installation of the grounding
plug can result in a risk of electrical
shock.
~
Check with a qualified electrician or
serviceman if the grounding instructions
are not completely understood, or if
you are in doubt as to whether the
product is properly grounded.
Do not modify the plug provided; if it
does not fit the outlet, have the proper
outlet installed by a qualified electrician.
Connect the product only to an outlet
that has the same configuration as the
plug.
Do not use an adapter with this
product.
19
SH-112 Dry Scroll Vacuum Pump
Extension Cords
Grounded
Outlet
Box
If you must use an extension cord with this product:
~
0 For this product, Agilent recommends using only
Grounded
Outlet
Grounding
Pin
Figure 4
WARNING
Grounding Plug and Outlet
extension cords with a minimum of 16-gage wire and
a maximum length of 25 feet (7.6 m).
0 Use only a 3-wire extension cord that will accept the
plug.
0 Make sure your extension cord is in good condition.
0 Be sure the extension cord is rated high enough to
carry the current your product will draw. An undersized cord will cause a drop in line voltage resulting in
loss of power and overheating.
If the product must be reconnected
for use on a different type of electric circuit, the connector should be replaced
by qualified service personnel.
~
Run Currents
Typical run currents listed in Table 3 are approximately
constant from minimum to maximum intake pressure.
Table 3 SH-112 Typical Run Currents
Frequency
Low Voltage Range
High Voltage Range
90V
100 v
115V
126 v
180 v
200V
230
60Hz
4.4
4.2
4.0
3.7
2.2
2.1
2.0
1.9
50 Hz
4.1
4.1
4.2
4.2
2.1
2.1
2.1
2.1
Start Current
Table 4 lists the typical SH-112 maximum starting current
and duration.
Table 4 Typical SH-112 Maximum Starting Current and
Duration@ 115 V
60Hz
50 Hz
Current (A)
Time (ms)
Current (A)
Time (ms)
24
250
26
250
20
v
252
v
SH-112 Dry Scroll Vacuum Pump
Mechanical Connections
Operation
Isolation Valve
Cleaning the Pump
The SH-112 has an integral automatic isolation valve. An
internal timer opens the valve 10 seconds after the pump
is switched ON. If power is lost or the pump is switched
OFF, the isolation valve will immediately close.
Pump Inlet
Use NW25, or larger, clean vacuum hardware with as
short a length as practical between the pump and vacuum
chamber.
Insert a bellows between the pump and vacuum chamber
to provide both vibration isolation and strain relief.
Unlike conventional oil-sealed pumps, Agilent dry scroll
pumps do not contain fluid for the cleansing of accumulated dust and debris. Run the pump periodically at atmosphere for a minute or two to flush it out. Until
experience is gained on your specific process, flush the
pump regularly and adjust this schedule according to
your specific conditions.
Startup Procedure
1.
NOTE
Pump Exhaust
A female 1/4" National Pipe Thread exhaust fitting is
located radially near the front of the pump. Additionally,
an NW16 male adapter with 1/4" National Pipe Thread is
provided. To avoid overheating the pump, do not restrict
the exhaust flow with long lengths of small diameter tubing. Use as short as practical lengths of NW16, or larger,
diameter hardware.
rn
The pump incorporates an automatic gas ballast to prevent water and other condensates from accumulating
within the pump. The standard configuration has a solid
plug installed in the 1/8" National Pipe Thread gas ballast
port (item 6 on Figure 3 on page 1 7). This configuration
can be used for relatively dry applications. A sintered filter plug is also supplied with the pump. The filter plug
can be installed in the gas ballast port and will allow
enough atmospheric air to enter the pump to purge condensates while not affecting pump ultimate pressure or
pumping speed.
For applications where the ingress of atmospheric air is
undesirable, dry nitrogen at a flow rate of approximately
2 Um can be bled into the gas ballast port.
&
The pump ON/OFF switch is a rocker
type switch that has symbols in accordance with /EC Publication 417 to
represent the ON and OFF positions.
Figure 5 shows a switch in the ON
position.
ON~~(Dl
Gas Ballast
WARNING
Make sure that the pump is configured for the mains
voltage to which the pump is connected.
~.,.~---OFF
Figure 5
2.
ON/OFF Power Switch
Switch the pump ON.
3. The isolation valve will open automatically
10 seconds after starting the pump.
Shutdown Procedure
To shutdown the pump:
1.
Switch the pump OFF.
The isolation valve will close very quickly to isolate
the vacuum chamber from the pump.
The gas ballast must be sealed whenever pumping any gas not intended to
be vented to atmosphere.
21
SH-112 Dry Scroll Vacuum Pump
Troubleshooting
Use the Troubleshooting chart in Table 5 to assist in defining a problem, determining a possible cause, and defining action
steps to remedy the situation.
Table 5 Troubleshooting Chart
Problem
Will not start
Poor ultimate
pressure
One or both fuses blown
Replace fuses.
Identify cause of overload.
Check the line voltage and the voltage configuration of the pump.
Motor thermal protector open
Allow motor to cool.
Identify cause of overload.
Excessive voltage drop
Check size and length of cable.
Defective motor
Inspect. Contact Agilent.
System lea~
Locate and repair leak.
Water in pump
Flush pump with air or dry nitrogen.
Gas ba~last plugged
Replace breather vent. Contact Agilent.
Solvent in pump
Flush pump with air or dry nitrogen.
Install trap or filter.
Tip seal worn out
Replace tip seal.
Poor conductance to pump
Replumb with shorter and/or larger diameter tubing.
Hammering noise Pump overheated
Pump runs
intermittently
*
22
Corrective Actions
Possible Causes
Check ventilation to pump.
Check ambient temperature.
Debris in pump
Check intake screen.
Flush pump.
Disassemble pump and inspect.
Motor thermal protector is
cycling open and closed.*
Allow the motor to cool.
Identify the cause of the overload.
The SH- 112 is equipped with an auto-reset thermal motor protector. This protector will automatically shut down the
pump when it detects an overload condition, and will automatically restart the pump when the motor has cooled to
within an acceptable temperature range.
SH-112 Dry Scroll Vacuum Pump
Maintenance
Interior
Kits and Service Options
Run the pump periodically at atmosphere for a minute or
two to flush it out. For more information, see "Cleaning
the Pump" on page 21.
Agilent pumps will provide many years of trouble-free
service if the maintenance procedures and intervals are
observed. Cleaning and tip seal replacement are recommended when pump base pressure has risen to an unacceptably high level for your application. If your pump
exhibits humming or grinding noises from the bearings, a
major overhaul should be done by Agilent or an authorized rebuild center. Advance exchange pumps are available to minimize downtime.
The parts needed for tip seal replacement on the SH-112
are available in the kit described in Table 6. This kit contains seals and 0-rings, and can be obtained from your
Agilent dealer.
Table 6
Tip Seal Replacement Kit
Part
Number
Description
SH0112TS
Replacement
Tip Seal Set
Contents
Replacement Tip
Seals and 0-rings for
SH-112 pumps
Factory Service
NOTE
rn
SH-112 solid tip seals are not interchangeable with the SH-11 0 foam
-backed tip seal. SH-112 tip seal P/N#
SHO 112TS, SHO 11 OTS will work on this
pump.
Agilent offers rebuilding service at our factory, or you can
obtain advance exchange of complete SH-112 pumps.
The service plans available and their ordering numbers
are given in Table 7.
Table 7
Factory Service Options
Factory Service Plans
Model Number
Advance Exchange SH-112
Pump
EXSH01121 UNIV
Service/Rebuild SH-112
RPSH01121 UNIV
Cleaning
Tip Seal Replacement
The parts and tools required to replace tip seals are listed
below:
0 Tip Seal Replacement Kit P/N SH0112TS
0 4 and 8 mm Allen wrenches
0 14 mm crescent wrench
0 Razor blade or side-cutting pliers
0 Compressed air (optional)
WARNING
~
Figure 6 on page 24 shows the various components
involved in a tip seal replacement procedure. Refer to
Figure 6 as you follow the procedure.
To remove the worn tip seals:
1.
Disconnect the pump from electrical power.
2.
Remove (3) M8 socket head bolts (item 1).
3.
Using a crescent wrench, remove the exhaust adapter
(item 2).
4.
Remove the front cowling and hang out of the way
(item 3). Do not unplug.
5.
If a solid 1/8" NPT plug is installed in the gas ballast
port (item 6 in Figure 3 on page 17), remove it to vent
the pump internally.
6.
Remove (4) M5 bolts (item 4).
7.
Remove the scroll housing axially off the frame
(item 5).
8.
Remove and discard the worn tip seals (item 6) and
the main 0-ring (item 7).
9.
If compressed air is available, blow any remaining
seal debris off the scroll parts. If seal debris is
attached to the sides, use a razor or Exacto knife to
scrape the debris off.
To install the new seals and 0-rings:
1.
Unpack the Tip Seal.
2.
Install one end of the Tip Seal into the center end of
the groove on the Orbiting Scroll (item 9).
3.
Sequentially insert the seal from center to the outer
edge of the scroll wall.
Exterior
The exterior surfaces of the SH-112 may be cleaned with
alcohol or mild detergents only.
If dangerous gases were being pumped,
flush the pump with air or inert gas for
at least 10 minutes prior to disassembly.
23
SH-112 Dry Scroll Vacuum Pump
4.
Cut the Tip Seal aboutl/8" (3 mm) from the outer
groove end.
5.
Use the remaining Tip Seal material to fill the seal
groove on the Scroll Housing and again trim the
excess Tip Seal so that a gap of about 1/8" (3 mm)
remains at the outer end.
6.
Place the new main 0-ring onto the Frame (item 10).
Make sure the area where the 0-ring sits is clean.
7.
Carefully replace the Scroll Housing making sure to
line up the Locating Pins. Be sure that the Tip Seal has
not fallen out of its groove.
8.
9.
If a 1/8" NPT solid plug was removed from the gas
ballast port during disassembly, reinstall it. Apply
Loctite pipe thread sealant PTS 567 sparingly to the
threads to ensure a gas tight seal.
10. Place the front cowling in place and replace the M8
bolts.
11. Reinstall the exhaust adapter. Apply Loctite pipe
thread sealant PTS 567 sparingly to the threads to
ensure a gas tight seal.
12. Reconnect the pump to the electrical power mains.
Reinstall (4) M5 bolts (item 4). Torque the (4) M5 bolts
to 4 N-m (40 in-lbs).
\\
Figure 6
Exploded View of Pump Body
9. Orbiting Scroll
10. Frame
Run the pump for about 5 seconds. Verify that the
front fan is running.
If you hear loud noises or observe labored operation,
this indicates that the Tip Seal or main 0-ring are
possibly out of place.
2.
Disassemble and repair as necessary.
The pump is now ready to return to service.
24
Exhaust Adapter (NW16)
Frame Bolts; M5 (4)
Tip Seals
Locating Pins (2)
4.
6.
8.
To test the pump:
1.
2.
1 . Front Cowling Bolts; M8 (3)
3. Front Cowling
5. Scroll Housing
7. Main 0-ring Parker No. 2-168
NOTE
rn
Newly installed Tip Seals may require
several hours of run time to seat properly and enable the pump to meet speed
and base pressure specifications.
For the first one to two days after a tip
seal replacement, periodically run the
pump with an open inlet to help
remove debris caused by the seating
process. Typically, two to three times a
day for two minutes each.