1
TO PLACE AN ORDER CALL: 866-487-4751
USER'S MANUAL
TO PLACE AN ORDER CALL: 866-487-4751
OR VISIT: WWW.TIMECLOCKEXPERTS.COM
1
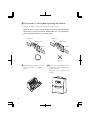
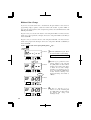
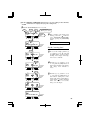
WARNING
This equipment has been tested and found to comply with the limits for a Class A
digital device, pursuant to Part 15 of FCC Rules. These limits are designed to
provide reasonable protection against harmful interference when the equipment
is operated in a commercial environment. This equipment generates, uses, and
can radiate radio frequency energy and, if not installed and used in accordance
with the instruction manual, may cause harmful interference to radio
communications. Operation of this equipment in a residential area is likely to
cause harmful interference in which case the user will be required to correct the
interference at his or her own expense.
Caution: Changes or modifications not expressly approved by the party
responsible for compliance could void the user's authority to operate the
equipment.
THIS DIGITAL APPARATUS DOES NOT EXCEED THE CLASS A LIMITS FOR RADIO NOISE EMISSIONS
FROM DIGITAL APPARATUS AS SET OUT IN THE RADIO INTERFERENCE REGULATIONS OF THE
CANADIAN DEPARTMENT OF COMMUNICATIONS.
LE PRÉSENT APPAREIL NUMÉRIQUE N'ÉMET PAS DE BRUITS RADIOÉLECTRIQUES DÉPASSANT LES
LIMITES APPLICABLES AUX APPAREILS NUMÉRIQUES DE CLASSE A PRESCRITES DANS LE
RÈGLEMENT SUR LE BROUILLAGE RADIOÉLECTRIQUE ÉDICTÉ PAR LE MINISTÈRE DES
COMMUNICATIONS DU CANADA.
1. The details of this User's Manual are subject to change without previous notification.
2. This User's Manual has been prepared with the utmost care to cover all aspects of the time
recorder's use.
If you feel, however, that some explanations are inadequate, unclear, or difficult to
understand, please do not hesitate to contact Acroprint.
3. No part of this publication may be reproduced, stored in a retrieval system, or transmitted,
in any form or by any means, mechanical, photocopying, recording or otherwise without
the written consent of Acroprint Time Recorder.
Place the time recorder at the position close to the wall outlet so that it is easily
accessible to disconnect.
ALL RIGHTS RESERVED
©2004 ACROPRINT TIME RECORDER
2
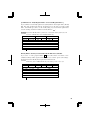
Precautions
This user's manual is prepared for safe and proper use of the unit.
Please follow all the instructions to avoid possible danger to yourself or
others and damage to the unit.
Signs
Various warnings and cautions are provided throughout this manual along with signs.
Remember each sign and its explanation listed below for your safety and proper
operation of the unit.
Warning
Improper handling may cause bodily accidents including
death and serious injury.
Caution
Improper handling may harm the human body or material.
Improper handling may cause electric
shock DANGER.
"Must-Do" sign.
DO NOT disassemble the unit.
Be sure to remove the line cord plug
from the outlet.
"Don't" sign.
Warning
Do not disassemble the unit. There is a high voltage present inside, possibly leading to an
electric shock.
Do not modify the unit. Modifications may cause a fire and/or electric shock.
If any anomaly occurs, for example, heat or smoke is generated or an odor is emitted, unplug
the unit immediately and contact your dealer for servicing. There is a danger that further use
may cause a fire or electric shock.
Do not use any voltage of the power source other than designated.
Do not share a single outlet with another plug. These may lead to fire or shock hazards.
Do not damage, break, or modify the power cord. Do not put a heavy object on, pull, or
forcefully bend the cord, either. These may damage the cord, possibly resulting in a fire or
electric shock.
1
1
3
If foreign matter should get in the unit (including a piece of metal, water, or liquid), disconnect
the plug from the outlet immediately and contact your dealer for servicing. There is a danger
that further use may cause a fire or electric shock.
Do not plug or unplug the unit with a wet hand. You may get an electric shock.
Caution
Do not place the unit on an uneven or tilted surface. This may result in injuries due to the unit
dropping or falling off.
Do not put a water-filled container or a metal object on top of the unit. If water is spilled or the
metallic object slips inside, a fire or shock hazard may occur.
Do not install the unit in a humid or dusty environment. It may cause a fire or electric shock.
Do not place the unit near kitchen counter or humidifier. Oil, smoke, or steam generating from
them may cause fire or shock hazards.
Do not yank the power cord to disconnect from the outlet. Hold the plug with your hand to do
so, or the cord may be damaged, possibly leading to a fire or electric shock.
Remove the line cord plug from the outlet before transferring the unit, or it may damage the
cord, possibly leading to a fire or electric shock.
Be careful not to contact the print head, as you may get hurt or burned.
Make sure to insert the power plug as far as it will go. Improper insertion of the plug may
develop fire or shock hazards.
Do not insert or drop any other time card than specified into the slot. Such misuse may cause a
fire or electric shock.
If the unit should be dropped or the case be broken, unplug the unit and contact your dealer for
servicing. Further use may lead to a fire or shock hazard.
2
2
4
Table of Contents
1. Introduction and Features of the ES1000
1
2. Getting Started
2
Unpacking the ES1000
Overview
Installing the Ribbon Cassette
Wall Mounting the ES1000
Where to Install the ES1000
3. Overview of Operation
What You Can Do with the ES1000
4. Settings
Preparation for Setting
Overview of Function Buttons
Setting the Hour Display Format
Setting the Time
Setting the Date
Setting Pay Period and Pay Period Ending Date
Monthly
Weekly
Bi-Weekly
Semi-monthly
Setting the Day Advance Time
Selecting the Print Format
Enabling Override and Transfer Functions
Selecting Rounding Rules
Schedule (Setting Calculation Rules)
Setting the Schedule
Free Zone or Open Shift (easy and most popular)
Time Zone or Fixed Shift (ideal when everyone is on the same schedule)
Overtime Calculation
Round and Grace Time for Start/End Time (ST/ET)
Setting the Weekly Program for External Time Signal
Setting the Auto Daylight Saving Change
Selecting the Language
Setting the Password
2
2
3
5
5
6
7
11
11
12
13
14
15
16
16
17
18
19
20
21
22
23
25
26
26
30
37
42
45
48
52
53
5
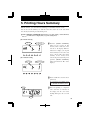
5 Printing Hours Summary
57
6. Printing List of Active Card Numbers
58
7. Printing List of Program Settings
59
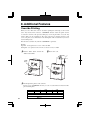
8. Additional Features
60
Override Printing
Card Transfer
Card Resetting
All Cards Resetting
9. Resetting
60
61
63
63
64
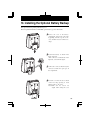
10. Installing the Optional Battery Backup
65
11. Connecting External Signal Control
66
12. Troubleshooting
68
13. Specifications
69
For accessories, visit Acroprint on-line
at www.acroprint.com or
call 800.334.7190 or (919) 872.5800 (outside the USA)
6
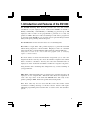
1. Introduction and Features of the ES1000
The ES1000 Totalizing Time Recorder provides fast, easy and accurate
calculations of your employee hours worked. The ES1000 can handle a
Weekly, a Bi-Weekly, a Semi-Monthly or a Monthly pay period for up to 100
employees. The recorder can be programmed to print late in or early out
punches in "RED". This state-of-the-art totalizing recorder offers a program for
an external signal (Bell/Horn, not included) and an optional full operational
battery back up for punching without AC power.
The ES1000 allows for the selection of two sets of calculating rules:
Free Zone or "Open Shift" rules permits employees to punch IN and OUT
without being assigned to a fixed schedule. Employee's times are calculated
using elapsed time or punched IN time subtracted from punched OUT time.
Using this selection is the easiest and most popular form of totalizing
employee's hours worked.
Free Zone allows for Auto Lunch deduction and permits you to select the
length of the break. You may also choose the number of regular hours worked
before overtime is calculated. You may also select the maximum hours an
employee is on the clock when it would be considered a "forgotten" out punch.
Using the Free Zone calculating rules will permit easy, accurate totalizing of
your payroll hours.
Time Zone or Fixed Schedule rules are designed for companies that have all
employees on one assigned shift. Time Zone rules allows for assignment of
"start" and "stop" times of the shift with GRACE times with early or late
punches printing in RED. Time Zone permits three break periods.
Time Zone rules may also be used with Free Zone rules under certain
circumstances. Taking advantage of all these advance features will require
additional programming time but will offer an advance time and attendance
system.
1
7
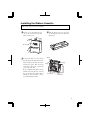
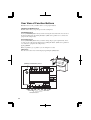
2. Getting Started
Unpacking the ES1000
Operation Manual
Keys
Ribbon Cassette
Wall Mount Screws, Brackets
and Template
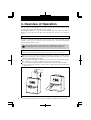
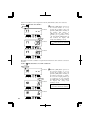
Overview
<Front view>
<Back view>
Wall-mounting holes
Card slot
Key hole
Front cover
Display
Function buttons
External signal and full
operation battery (optional)
compartment
2
8
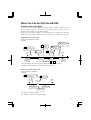
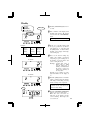
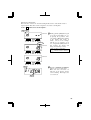
Installing the Ribbon Cassette
Make sure the power is on before installing.
1 Unlock cover and pull up the top
2 Turn the knob on the cassette in the
side of the card insertion slot and
pull it towards you.
arrow-indicated direction to make the
ribbon taut.
Front Cover
3 To insert the ribbon cassette inside
the unit, thread the ribbon between the
ribbon mask and the print head (See
drawing next page). Slide the clasps
on the lower side of the cassette into
projections on the unit.
Keep on pushing in the ribbon cassette
until the clasps at both sides catch and
the cassette snaps into position. If it is
difficult to insert the ribbon cassette,
try it while turning the knob.
Knob
Clasp
Projection
Clasp
Print head
3
9
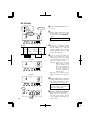
4 Precautions to take when replacing the ribbon
Take the following precautions when inserting a new ribbon cassette.
Install the ribbon cassette so that the ribbon is between the print head and the
ribbon mask (see the figure on the left). Printing failure may occur if the ribbon is
placed behind the ribbon mask (see the figure below).
Print head
Print head
Ribbon mask
Ribbon mask
Ribbon
Ribbon
Correct
Incorrect
5 Turn the knob of the ribbon cassette in
6 Replace the cover by fitting the tabs at
the counter clockwise to tighten the
ribbon.
the bottom of the cover into the holes
located on the clock.
Then close the cover letting it snap
into place.
4
10
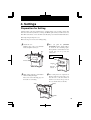
Wall Mounting the ES1000
The ES1000 may be platform or wall mounted using the wall mount screws supplied.
To mount unit on wall, take the following steps:
1 Install wall mount screws (supplied) into a wall 3.94 inches (10 cm) apart.
Be sure to keep about 0.12 inch ( 3 mm) of the screw head out of the wall.
You can use a supplied template to fix position of two screws.
The supplied screws
are intended for use
on a thick wooden
wall or wooden
column. Do not use
them on any other
materials. There is
a danger that the
unit may come off if
used
on
other
materials.
cm)
3.94" (10
0.1
2"(
Wall Mount Template
3m
m)
Screws
Wall
2 Mount
the wall mount
brackets as shown on the
right.
Where to Install the ES1000
Avoid placing the unit in environments that are:
• humid or dusty
• exposed to direct sunshine
• subject to frequent or continuous vibrations
• outside the temperature range between -5˚ and 45˚ C (23˚ to 113˚F)
• affected by chemicals or ozone
5
11
3. Overview of Operation
Once the AC line cord is plugged into the outlet, the unit can be used immediately. Basic
operations, including the time and ending dates, are preset.
The ES1000 is designed to work only with the ES1010 Time Cards. The clock will not
function correctly using other style time cards, and using other cards may cause damage to
sensors.
See "2. Getting Started".
It is easy to operate the unit. Just insert a time card. To start a time card, make sure the
"number" on the card faces outward (towards operation). The card is then automatically
pulled in, printed and then ejected.
Do not let any metallic object get into the slot, including paper clips. Do not
forcefully push in a card, either. These may cause the unit to malfunction.
The number of cards that can be automatically registered is a maximum of 100 cards.
Card numbers 001 through 100 using duplicate numbers can cause incorrect totals.
When a new card is inserted, the card will automatically be registered, and will print the
"IN" print on the first line. The month will be printed on the first line also or on the line
when the month and printing line change.
You can print "IN" and "OUT" as many times as you want per day. Concerning the printing
line, it will slide one line down each time you insert the card for "IN" print.
The recorder will record the last imprint and automatically switch the "IN" and "OUT".
You may also manually switch the column position of imprint by pushing the "IN" button
or "OUT" button.
6
Even if the "IN" is printed, when the present time passes the "Day Advance Time", it will
consider that the "OUT" print was forgotten and will print the "IN" print on the next line.
12
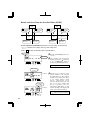
What You Can Do With the ES1000
Schedule [Time Zone Rule]
You can select days of the week which your desired schedule is applied to. All other days of
the week will be regarded as "weekend or non-scheduled work days", which you can set
threshold hours and duration of auto break deduction.
Based on the programmed schedule, you can regulate the day's working rules. The day's
partition that is the schedule's standard is the "Day advance time", and this time is selectable.
[Applicable days of the week]
Example: From Monday to Friday
11 Duration in
minutes,
Break #1
02 Start time for
irregular printing
(black red)
10 Start time
of Break #1
IN
7:30 a.m. START
8:00 a.m.
Day
advance
time
03 End time for
irregular printing
(red black)
13 Duration in
minutes,
Break #2
12 Start time
of Break #2
12:00 p.m. 1:00 p.m.
red
3:00 p.m. 3:15 p.m.
red
Printed
in black
OUT
END 5:05 p.m.
5:00 p.m.
Break time 1
red
Break time 2
Printed
in black
Day
advance
time
(If you set the Break #3, set 14 and 15 also.)
* Any punch during "break time" will be printed in black regardless of settings.
* Break time will be deducted from worked hours automatically.
[Non-selected days of the week]
Example: Saturday and Sunday
16 Threshold hours for auto
break deduction
17 Duration of
break time
IN
OUT
8:30 a.m.
Break time
(= 30 min.)
3:30 p.m.
Worked hours
Worked hours
( = 4 hours)
Worked more
than 4 hours
* All punches are printed in black.
Note: Numbers in square mean program number.
7
13
In addition to the start time and duration for the maximum settings of three "break times",
the following settings are available to fulfill your needs.
Start and End Time for Irregular (Red) Printing
Once you set the schedule for irregular printing, printing color automatically changes
according to the start/end time you've set. Color change makes it possible to easily see an
employee's late in or early out.
* Note: Any punch during break time will be printed in black regardless of the above setting.
Regular Hours and Overtime
You can select calculation type from the following four choices according to how to divide
and calculate "regular hours" and "overtime" when you selected "time zone" rule.
Semi-monthly and Monthly pay period overtime calculations are based on daily overtime
only. To assure accurate calculations for these pay periods, please select daily regular hours
limit as desired, and select "
" as the limit for weekly regular hours. This will "disable"
the weekly OT function so that the clock will calculate properly.
[Type 1]
Basically all worked hours are accumulated as regular hours.
Daily
Total
IN
OUT
RH
OT
RH
Au Mo 9:00A
Mo 6:00P
8:00
8:00
Tu 9:00A
Tu
8:00P
10:00
18:00
We 9:00A
We 10:00P
12:00
30:00
Th 9:00A
Th 6:00P
8:00
38:00
Fr 9:00A
Fr
9:00
47:00
7:00P
OT
[Type 2]
Example: Daily regular hours: 8 hours/day, Break time: start =12:00 & 60 min./day
Daily
IN
OUT
RH
Au Mo 9:00A
Mo 6:00P
8:00
Tu 9:00A
Tu 8:00P
8:00
We 9:00A
We 6:00P
8:00
Th 9:00A
Th 7:00P
8:00
Total
OT
RH
OT
8:00
2:00
1:00
16:00
2:00
24:00
2:00
32:00
3:00
You must set limit of regular working hours per day (e.g. 8 hours per day).
All worked hours, which exceed the limit, will be accumulated as overtime.
In this case, "regular hours" and "overtime" will be accumulated separately.
8
14
[Type 3]
Example: Pay Period: Weekly, Total regular hours: 40 hours/week
Break time: start =12:00 & 60 min./day
Daily
Total
IN
OUT
RH
OT
RH
Au Mo 9:00A
Mo 6:00P
8:00
8:00
Tu 9:00A
Tu
8:00P
10:00
18:00
We 9:00A
We 10:00P
12:00
30:00
Th 9:00A
Th 6:00P
8:00
38:00
Fr 9:00A
Fr
9:00
40:00
7:00P
OT
7:00
You must set limit of regular hours per week (e.g. 40 hours per week).
All worked hours shall be accumulated as regular hours until it reaches the limit. Once it
goes over the limit, then, the rest of worked hours shall be accumulated as "overtime".
[Type 4]
Example: Pay Period: Weekly, Daily regular hours: 8 hours/day, Total regular
hours: 40 hours/week, Break time: start =12:00 & 60 min./day
Daily
IN
OUT
RH
Au Mo 9:00A
Mo 6:00P
8:00
Total
OT
RH
OT
8:00
Tu 9:00A
Tu
8:00P
8:00
2:00
16:00
2:00
We 9:00A
We 10:00P
8:00
4:00
24:00
6:00
Th 9:00A
Th 6:00P
8:00
32:00
6:00
Fr 9:00A
Fr
8:00
40:00
7:00
7:00P
1:00
If you set limits for both "Daily regular hours" (Daily OT) and "Total regular hours"
(Weekly OT), then daily worked hours shall be calculated based on the rules for "Daily
regular hours", and will take precedence over the weekly setting. If you want "Total
regular hours" to be the deciding calculation for OT, then set Daily limits to "
".
If you set neither the limit for "Daily regular hours" nor "Total regular hours", all
worked hours shall be accumulated as regular hours.
9
15
Priority Rule to the Days Not Scheduled in the Time Zone
Schedule
By selecting "calculation priority" setting, weekend or non-scheduled work days' worked
hours can be always regarded and accumulated as "Overtime" prior to other rules. If you
don't select this setting, weekend or non-scheduled work days' worked hours will be
accumulated in accordance with setting for the calculation type.
Example: Pay Period: Weekly, Total regular hours: 40 hours/week
Break time: start =12:00 & 60 min./day, Calculation priority = Selected
Daily
Total
IN
OUT
RH
OT
RH
Au Mo 9:00A
Mo 6:00P
8:00
8:00
Tu 9:00A
Tu
7:00P
9:00
17:00
We 9:00A
We 12:00P
3:00
20:00
Th 9:00A
Th 6:00P
8:00
28:00
Fr 9:00A
Fr
9:00
Sa 13:00A
Sa 5:00P
7:00P
OT
37:00
4:00
4:00
Round and Grace Time for Start and End Time
Under time zone rules of calculation, you can set round and grace time for Start Time (ST)
and End Time (ET). Once you set Round Time for ST and ET, the time for calculation will
be rounded forward to ST even if a person arrives earlier than ST and back to ET even if
he/she leaves the office later than ET.
By setting of Grace Time for ST and ET, the time for calculation will be rounded back to ST
even if a person arrives later than ST and forward to ET even if he/she leaves the office
earlier than ET. You can set up to 99 minutes at maximum for round/grace time.
IN and OUT punches during the grace period are printed in black but, you can also set red
printing for any punch during this period in black or red.
Round Forward
ST
Time Zone
ET
IN
Round Back
Time Zone
OUT
Calculated Worked Hours
ST
Grace Back
Time Zone
Grace Forward
Time Zone
IN
OUT
ET
Calculated Worked Hours
10
16
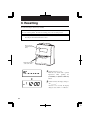
4. Settings
Preparation for Setting
Caution: If time cards were punched prior to original settings or if you wish to change Pay
Periods or when the Day Advances or change the Minute print format you will need to reset
ALL Time Cards. Please refer to the ALL Cards Resetting section under Additional Features.
Removing and replacing front cover.
Make sure the power is on before making setting.
1 Unlock the cover.
2 Once
Hold the sides of the cover with both
hands and pull it toward you.
Key
you push the [SETTING
START/END] button, display will be
as shown in the following figure.
Then, push the control button for two
seconds and you can go into the
setting mode.
SETTING START/END
button
Front Cover
Display
Function
buttons
3 Make settings using the control button
4 After setting has been completed, fit
while watching the display.
Please refer to the following pages for
the details of each setting.
the tabs at the lower sides of the cover
into the holes of the unit. Then, fit
another set of tabs at the top sides of
the cover into the holes of the unit.
Tabs
Holes
Holes
11
17
Over View of Function Buttons
With the front cover off, you will be able to access program buttons.
[SETTING START/END] button
Push this button when you go into/get out of the setting mode.
[DATE/TIME] button
Use the [DATE/TIME] button when you want to change the date and/or time. You can select
the desired setting mode by pushing this button. (Make sure to push it for 2 seconds before
going into the setting mode.)
[FUNCTION] button
Use the [FUNCTION] button when you want to change the pay period, print format, and so
on. You can select the desired setting mode by pushing this button. (Make sure to push it for
2 seconds before going into the setting mode.)
[+] or [-] button
When you push the [+] or [-] button, you can change the set value.
[SET] button
You can set the value selected on the display by pushing the [SET] button.
[SETTING START/END] Button
Function Buttons
12
18
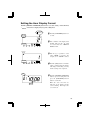
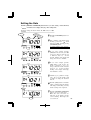
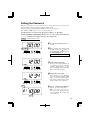
Setting the Hour Display Format
Push the [SETTING START/END] button before you start setting. At that moment,
"
" is shown on a display and you go into setting mode.
1
2
AM/PM
24hour
DISPLAY
HOURS
1 Push the [DATE/TIME] button for 2
seconds.
2 Once a number on the display starts
DATE/TIME
SET
DISPLAY
HOURS
flashing, make sure the " " mark
is located under the "DISPLAY
HOURS" mark.
3 Push the [+] or [-] button to select
either "AM/PM" or "24 hour". For
example, set 1 if "AM/PM" is desired.
DATE/TIME
SET
4 Push the [SET] button to finish the
setting. At that moment, the display
will change from flashing to steady,
and the setting is now completed.
Date
5 Push the [SETTING START/END]
AM
Colon
button to get out of setting mode. Or
press the [DATE/TIME] function
button to set the time.
Make sure "date" and "time" are
indicated on the display and the
colon is flashing. Then replace the
cover and lock.
13
19
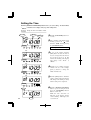
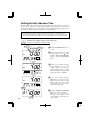
Setting the Time
Push the [SETTING START/END] button before you start setting. At that moment,
"
" is indicated on a display and you go into setting mode.
Example Change the time from 10:08 to 10:09.
Hour
Second
Minute
1 Push the [DATE/TIME] button for 2
seconds.
TIME
2 Once a number on the display starts
AM
DATE/TIME
SET
flashing, position the " " mark
under the "TIME" mark by pressing
the [DATE/TIME] button.
A flashing number can be changed.
TIME
3 In case of the example, push the
AM
DATE/TIME
SET
[SET] button because the hour is
not to be changed. Now the hour of
10 o'clock has been set. At that
moment, the flashing of the display
will change from "Hour" to
"Minute".
TIME
4 Push the [+] or [-] button to change
AM
DATE/TIME
SET
TIME
5 Push the [SET] button to finish the
setting. At that moment, the display
will change from flashing to steady,
and the setting is now completed.
AM
DATE/TIME
SET
6 Push the [SETTING START/END]
Date
AM
14
"minute". In case of the example,
push [+] button to change the
minute from 08 to 09.
Colon
button to get out of setting mode. Or
press the [DATE/TIME] function
button to set the date.
Make sure "date" and "time" are
indicated on the display and the
colon is flashing. Then replace the
cover and lock.
20
Setting the Date
Push the [SETTING START/END] button before you start setting. At that moment,
"
" is indicated on a display and you go into setting mode.
Example Change the date from Oct. 20, 2004 to Oct. 21, 2004.
Year
Month
Date
1 Push the [DATE/TIME] button for 2
seconds.
DATE
2 Once a number on the display starts
flashing, position the " " mark
under the "DATE" mark by pressing
[DATE/TIME] button.
DATE/TIME
SET
A flashing number can be changed.
DATE
DATE/TIME
3 In case of the example, push the
[SET] button because the year 2004
is not to be changed. Now the year
of 2004 has been set. At that
moment, flashing of the display will
change from "Year" to "Month".
SET
4 In case of the example, push the
DATE
DATE/TIME
[SET] button again because the
month of October is not to be
changed. Now the month of October
has been set. At that moment,
flashing of the display will change
from "Month" to "Date".
SET
5
DATE
DATE/TIME
SET
Date
Push the [+] or [-] button to change
"date". In case of the example, push
[+] button to change the date from
20 to 21.
6 Push the [SET] button to finish the
setting. At that moment, the display
will change from flashing to steady,
and the setting is now completed.
7 Push the [SETTING START/END]
AM
Colon
button to get out of setting mode.
Make sure "date" and "time" are
indicated on the display and the
colon is flashing. Then replace the
cover and lock.
15
21
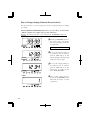
Setting Pay Period and Pay Period Ending Date
The clock default is "weekly pay period".
All time cards will be reset automatically after pay ending date.
You will not be allowed to change pay period while in a current pay period.
Error message E-49 will be displayed. You may change a current pay period after you
reset all time cards. Please refer to "Card Resetting" section of this manual.
Push the [SETTING START/END] button before you start setting. At that moment,
"
" is indicated on a display and you go into setting mode.
Monthly
1
2
3
4
Monthly
Weekly
Bi-Weekly
Semi-Monthly
Ending date
1 Push the [FUNCTION] button for 2
seconds.
2 Once a number on the display starts
PAY PERIOD
flashing, make sure the " " mark is
located under the "PAY PERIOD"
mark.
A flashing number can be changed.
FUNCTION
SET
3 In the case of monthly ending, Push
the [+] or [-] button to set the leftside number at "1" and then push
the [SET] button. At that moment,
flashing of the display will change
to the closing date.
PAY PERIOD
FUNCTION
SET
4 Push the [+] or [-] button to set the
desired date. For example, if the
ending date is the 20th, set the
ending date at 20.
PAY PERIOD
5 Push the [SET] button to finish the
FUNCTION
SET
setting. At that moment, the display
will change from flashing to steady,
and the setting is now completed.
Date and time are recorded on the
card when you set the monthly
ending.
Date
6 Push the [SETTING START/END]
AM
16
Colon
button to get out of setting mode.
Make sure "date" and "time" are
indicated on the display and the
colon is flashing. Then replace the
cover and lock.
22
Weekly
1
2
3
4
Monthly
Weekly
Bi-Weekly
Semi-Monthly
Ending day
1 Push the [FUNCTION] button for 2
seconds.
2 Once a number on the display starts
PAY PERIOD
flashing, make sure the " " mark is
located under the "PAY PERIOD"
mark.
A flashing number can be changed.
FUNCTION
SET
3 In the case of weekly ending, push
Example
Today
Ending day
······ ·· July 23
Friday
0
July 24
July 25········· ·····
Saturday
Sunday
1
2
the [+] or [-] button to set the leftside number at "2" and then push
the [SET] button. At that moment,
flashing of the display will change
to the ending day.
4 Next, set the desired ending day,
PAY PERIOD
FUNCTION
SET
PAY PERIOD
which comes within a week from
today. The pay period ending date is
the number of days from the date
you are setting the clock.
Example: Assume that today is
Friday, July 23, 2004
and the ending day is
Sunday. As illustrated in
the figure on the left,
ending day (Sunday) is
two days after.
Push the [+] or [-] button to set the
right-side number of the display at
"2".
5 Push the [SET] button to finish the
setting. At that moment, the display
will change from flashing to steady,
and the setting is now completed.
FUNCTION
SET
Day of the week and time are
recorded on the card when you
set the weekly ending.
Date
6 Push the [SETTING START/END]
AM
Colon
button to get out of setting mode.
Make sure "date" and "time" are
indicated on the display and the
colon is flashing. Then replace the
cover and lock.
17
23
Bi-Weekly
1
2
3
4
Monthly
Weekly
Bi-Weekly
Semi-Monthly
Ending day
1 Push the [FUNCTION] button for 2
seconds.
2 Once a number on the display starts
PAY PERIOD
flashing, make sure the " " mark is
located under the "PAY PERIOD"
mark.
A flashing number can be changed.
FUNCTION
SET
3 In
Example
Today
Ending day
···· ·· July 16 July 17······· July 20
Friday Saturday
1 ·············· 8
0
July 25······ ····
Saturday Sunday
9
··············
··············
PAY PERIOD
FUNCTION
SET
PAY PERIOD
the case of bi-weekly ending,
push the [+] or [-] button to set the
left-side number at "3" and then
push the [SET] button. At that
moment, flashing of the display will
change to the ending day.
4 Next, set the desired ending day,
which comes within two weeks
from today. The pay period ending
date is the number of days from the
date you are setting the clock.
Example: Assume that today is
Friday, July 16, 2004
and the ending day is
Sunday the week after
next. As illustrated in
the figure on the left,
ending day (Sunday) is
nine days after.
Push the [+] or [-] button to set the
right-side number of the display at
"9".
5 Push the [SET] button to finish the
FUNCTION
SET
setting. At that moment, the display
will change from flashing to steady,
and the setting is now completed.
Day of the week and time are
recorded on the card when you
set the bi-weekly ending.
Date
6 Push the [SETTING START/END]
AM
18
Colon
button to get out of setting mode.
Make sure "date" and "time" are
indicated on the display and the
colon is flashing. Then replace the
cover and lock.
24
Semi-Monthly
1
2
3
4
Monthly
Weekly
Bi-Weekly
Semi-Monthly
The1st
ending date
The 2nd
ending date
PAY PERIOD
1 Push the [FUNCTION] button for 2
seconds.
2 Once a number on the display starts
flashing, make sure the " " mark is
located under the "PAY PERIOD"
mark.
A flashing number can be changed.
FUNCTION
SET
PAY PERIOD
FUNCTION
3 In the case of semi-monthly ending,
SET
push the [+] or [-] button to set the
left-side number at "4" and then
push the [SET] button. At that
moment, flashing of the display will
change to the 1st ending date.
4 Push the [+] or [-] button to set the
desired date. For example, if the 1st
ending date is the 15th, set the
ending date at 15 and then push the
[SET] button. At that moment,
flashing of the display will change
to the 2nd ending date.
PAY PERIOD
FUNCTION
SET
5 Push the [+] or [-] button to set the
desired date. For example, if the
2nd ending date is the end of each
month, set the ending date at 31 and
then push the [SET] button to finish
the setting. At that moment, the
display will change from flashing to
steady, and the setting is now
completed.
PAY PERIOD
FUNCTION
SET
Date and time are recorded on the
card when you set the semimonthly ending.
Date
6 Push the [SETTING START/END]
AM
Colon
button to get out of setting mode.
Make sure "date" and "time" are
indicated on the display and the
colon is flashing. Then replace the
cover and lock.
19
25
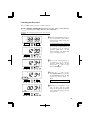
Setting the Day Advance Time
The Day Advance Time refers to the time when printing shifts to the next line on a time card
for the next day. This function enables the punch out time record to print on the same line of
the previous working day even if leaving time is after midnight. Changing the Day Advance
Time will also change the time of day the Day of week will change.
You will not be allowed to change day advance time while in a current pay period.
Error message E-49 will be displayed. You may change a current day advance time
after you reset all time cards. Please refer to "Card Resetting" section of this manual.
Push the [SETTING START/END] button before you start setting. At that moment,
"
" is indicated on a display and you go into setting mode.
Example Change the line shift time from 0:00 to 7:00.
Hour
DAY ADVANCE
TIME
Minute
1 Push the [FUNCTION] button for 2
seconds.
2 Once a number on the display starts
AM
FUNCTION
SET
flashing, position the " " mark
under the "DAY ADVANCE TIME"
mark by pressing [FUNCTION]
button.
DAY ADVANCE
TIME
3 Push the [+] or [-] button to change
AM
FUNCTION
SET
the line shift time. In case of the
example, push the [+] button to
change the hour from 5 to 7. At that
moment, flashing of the display will
change from "Hour" to "Minute".
DAY ADVANCE
TIME
4 In case of the example, push the
AM
FUNCTION
SET
[SET] button once more because the
minute is not to be changed. At that
moment, the display will change
from flashing to steady, and the
setting is now completed.
Date
5 Push the [SETTING START/END]
AM
20
Colon
button to get out of setting mode.
Make sure "date" and "time" are
indicated on the display and the
colon is flashing. Then replace the
cover and lock.
26
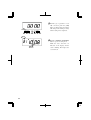
Selecting the Print Format
You will not be allowed to change minute print format while in a current pay period.
Error message E-49 will be displayed. You may change a current minute print format
after you reset all time cards. Please refer to "Card Resetting" section of this manual.
Push the [SETTING START/END] button before you start setting. At that moment,
"
" is indicated on a display and you go into setting mode.
Example Change the print format of the hour to "AM/PM" and the minute to "1/100" min.
[HOURS]
1 AM/PM
2 24Hour
1 Push the [FUNCTION] button for 2
PRINT
FORMAT
seconds.
2 Once a number on the display starts
flashing, position the " " mark
under the "PRINT FORMAT" mark
by pressing [FUNCTION] button.
SET
FUNCTION
[MINUTES]
1 Regular
2 Hundredths
PRINT
FORMAT
A flashing number can be changed.
3 In case of the example, push the [+]
or [-] button to set the left-side
number at "1" to select "AM/PM"
format and then push the [SET]
button. At that moment, flashing of
the display will change to the rightside number.
4 Push the [+] or [-] button to set the
SET
FUNCTION
PRINT
FORMAT
SET
FUNCTION
desired minute type. In case of the
1/100 min., set the right-side
number of the display at "2".
Even if you select "2", only
calculation result is printed in the
hundredths (1/100) min.
IN
and OUT punches are always
printed in regular (1/60) min.
the [SET] button to finish the
5 Push
setting. At that moment, the display
will change from flashing to steady,
and the setting is now completed.
Date
6 Push the [SETTING START/END]
AM
Colon
button to get out of setting mode.
Make sure "date" and "time" are
indicated on the display and the
colon is flashing. Then replace the
cover and lock.
21
27
Enabling Override and Transfer Functions
Enabling these functions allows employees to move time totals on card or transfer to another
card. (Not recommended.) See Additional Features sections for how these features are used.
Push the [SETTING START/END] button before you start setting. At that moment,
"
" is indicated on a display and you go into setting mode.
Example Make both "Override" and "Card Transfer" functions enabled.
[OVERRIDE]
1 Disabled
2 Enabled
1 Push the [FUNCTION] button for 2
BUTTON
FUNC.
seconds.
2 Once a number on the display starts
flashing, position the " " mark
under the "BUTTON FUNC." mark
by pressing [FUNCTION] button.
SET
FUNCTION
[TRANSFER]
1 Disabled
2 Enabled
3 In case of the example, push the [+]
BUTTON
FUNC.
or [-] button to set the left-side
number at "2" to make "Override"
function enabled and then push the
[SET] button. At that moment,
flashing of the display will change
to the right-side number.
SET
FUNCTION
BUTTON
FUNC.
SET
FUNCTION
Date
4 In case of the example, push the [+]
or [-] button to set the right-side
number at "2" to make "Card
Transfer" function enabled and then
push the [SET] button. At that
moment, the display will change
from flashing to steady, and the
setting is now completed.
5 Push the [SETTING START/END]
button to get out of setting mode.
Make sure "date" and "time" are
indicated on the display and the
colon is flashing. Then replace the
cover and lock.
AM
22
A flashing number can be changed.
Colon
28
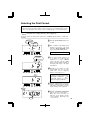
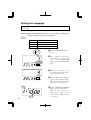
Selecting Rounding Rules
For "Rounding", there're 2 settings: "Types of Rounding" and "Rounding Unit". For "Types
of Rounding", there're "Hours Rounding" and "Punch Time Rounding", and you can choose
one.
For "Hours Rounding", the recorder calculates the hours from "IN" punch to "OUT" punch,
and then, rounds that result with the "Rounding Unit" that you have selected.
For "Punch Time Rounding", the recorder rounds both time of "IN" and "OUT" punches, and
then, calculates the hours from the time "IN" to "OUT". (Recommended)
Breakpoint means the point where it will raise or omit fractions.
Selection #2 Punch Rounding is recommended.
Push the [SETTING START/END] button before you start setting. At that moment,
"
" is shown on a display and you go into setting mode.
Example Type of rounding is "Punch". Rounding unit is "15 minutes".
[TYPE]
1 Hours
2 Punch
1 Push the [FUNCTION ] button for 2
ROUND
seconds.
2 Once a number on the display starts
FUNCTION
flashing, position the " " mark
under the "ROUND" mark by
pressing [FUNCTION] button.
SET
A flashing number can be changed.
[UNIT]
1 None
2 6 minutes
3 10 minutes
4 15 minutes
3 In case of the example, push the [+]
ROUND
FUNCTION
or [-] button to set the left-side
number at "2" to select "punch time
rounding" and then push the [SET]
button. At that moment, flashing of
the display will change from "Type
of Ronuding" to "Rounding Unit".
SET
23
29
ROUND
FUNCTION
SET
Date
4 In case of the example, push the [+]
or [-] button to set the right-side
number at "4" to select rounding
unit of "15 minutes" and then push
the [SET] button. At that moment,
the display will change from
flashing to steady, and the setting is
now completed.
5 Push the [SETTING START/END]
button to get out of setting mode.
Make sure "date" and "time" are
indicated on the display and the
colon is flashing. Then replace the
cover and lock.
AM
Colon
24
30
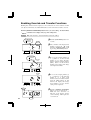
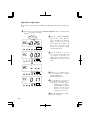
Schedule (Setting Calculation Rules)
Selecting the schedule or calculating rules for the schedule determines the
features that may be set. First determine which zone will best meet your
needs. In most cases the Free Zone schedule meets most company's needs.
Free Zone or "Open Shift" rules permits employees to punch IN and OUT
without being assigned to a fixed schedule. Employee's times are calculated
using elapsed time or punched IN time subtracted from punched OUT time.
Using this selection is the easiest and most popular form of totalizing
employee's hours worked.
Free Zone allows for Auto Lunch deduction and permits you to select the
length of the break. You may also choose the number of regular hours worked
before overtime is calculated. You may also select the maximum hours an
employee is on the clock when it would be considered a "forgotten" out punch.
Using the Free Zone calculating rules will permit easy, accurate totalizing of
your payroll hours.
Time Zone or Fixed Schedule rules are designed for companies that have all
employees on one assigned shift. Time Zone rules allows for assignment of
"start" and "stop" times of the shift with GRACE times with early or late
punches printing in RED. Time Zone permits three break periods.
Time Zone rules may also be used with Free Zone rules under certain
circumstances. Taking advantage of all these features will require additional
programming time but will offer an advanced time and attendance system.
The ES1000 has many advanced features offered only in the more expensive
Time and Attendance Systems. Selecting the type of schedule or calculating
rule, Free Zone or Time Zone, activates the features available. See the chart
below.
25
31
Setting the Schedule
Program
Description
No.
Calculation Rule
01
Start Time for Irregular Printing (Black
Red)
02
End Time for Irregular Printing (Red
Black)
03
Limit of Regular Hours per Day
04
Limit of Regular Hours per Week
05
Duration of Round Time (Start & End Shift Times)
06
Duration of Grace Time (Start & End Shift Times)
07
Red Printing for Grace Time Period
08
Rules for Working Days Outside Regular Schedule
09
Start Time of Break #1
10
Duration in Minutes, Break #1
11
Start Time of Break #2
12
Duration in Minutes, Break #2
13
Start Time of Break #3
14
Duration in Minutes, Break #3
15
Threshold Hours for Auto Break Deduction
16
Duration of Break Time
17
Threshold Hours for Overtime Calculation
18
Limit Hours for OUT punch
19
*Free Zone Rule Recommended
Free Zone
Rule*
1
Yes
Yes
Yes
Yes
Time Zone
Rule
2
Yes
Yes
Yes
Yes
Yes
Yes
Yes
Yes
Yes
Yes
Yes
Yes
Yes
Yes
Yes
Yes
Selecting Free Zone calculations (#1) under Program 1, you will have access only to
program numbers 16, 17, 18, and 19. (See chart above.)
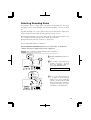
Free Zone or Open Shift (easy and most popular)
You can regulate the worked hours of the day by setting the "Limit hours for OUT punch".
17 Duration of break time
16 Threshold hours for
auto break deduction Break time
Worked more than 4 hours
(= 30 min.)
IN
OUT
Regular
worked hours
( = 4 hours)
Regular
Overtime
worked hours (= 1hour)
( = 2 hours)
Worked more
than 6 hours
18 Threshold hours for overtime
calculation (= 6 hours)
19 Limit hours for OUT punch (= 18 hours)
Note: Numbers in square mean program number.
Push the [SETTING START/END] button before you start setting. At that moment,
"
" is indicated on a display and you go into setting mode.
Set the " 01 Calculation rule".
Program No.
1
2
Free Zone
Time Zone
SCHEDULE
FUNCTION
26
SET
1 Push the [FUNCTION] button for 2
seconds.
2 Once a number on the display starts
flashing, position the " " mark next
to the "SCHEDULE" mark by
pressing the [FUNCTION] button.
A flashing number can be changed.
32
SCHEDULE
SET
FUNCTION
3 Make
sure the left-side number
indicates "01" and push the [SET]
button.
4 Push the [+] or [-] button and set at
1 to select "Free Zone" rule.
SCHEDULE
5 Push the [SET] button to fix the setting
SET
FUNCTION
Order Option Calculation Rules
1
Free Zone
2
Time Zone
value. At that moment, the display will
change from flashing to steady.
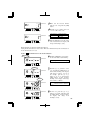
Threshold Hours for Auto Break (Lunch) Deduction
Setting the threshold hours for auto deduct. This is the minimum time (hours worked) before
an auto lunch deduct can occur.
Set the " 16 Threshold hours for auto break deduction".
Program No.
6 Push the [SET] button again. Then,
SCHEDULE
the left-side number starts flashing.
A flashing number can be changed.
SET
FUNCTION
Hour
7 Push the [+] or [-] button to select
SCHEDULE
FUNCTION
SET
Minute
SCHEDULE
FUNCTION
Range of values: 1-24 hour(s)
("
" makes the function disabled.)
SET
SCHEDULE
FUNCTION
"16" and push the [SET] button. At
that moment, flashing of the display
will change to "Hour". In case of
the example, push the [+] or [-]
button to set at "4" and push the
[SET] button. At that moment,
flashing of the display will change
from "Hour" to "Minute".
SET
8 In
this case, push the [+] or [-]
button to set at "00". And then, push
the [SET] button. At that moment,
the display will change from
flashing to steady.
27
33
Duration of break time or the length of the "lunch" (hours/minutes) that can be deducted.
Set the " 17 Duration of break time".
9 Push the [SET] button again to set
Program No.
SCHEDULE
FUNCTION
SET
Minute
SCHEDULE
FUNCTION
the left-side number at "17" by
pressing the [+] button. Once you
push the [SET] button, flashing of
the display will change to
"Minutes". In case of the example,
push the [+] or [-] button to set at
"30" and push the [SET] button. At
that moment, the display will
change from flashing to steady.
Range of values: 1-99 min.
("
" makes the function disabled.)
SET
SCHEDULE
FUNCTION
SET
Threshold of overtime calculation or regular hours worked before time worked is considered
Overtime.
Set the " 18 Threshold hours of overtime calculation".
Program No.
SCHEDULE
FUNCTION
SET
Hour
SCHEDULE
FUNCTION
10 Push the [SET] button again to set
the left-side number at "18" by
pressing the [+] button. Once you
push the [SET] button, flashing of
the display will change to "Hour".
In case of the example, push the [+]
or [-] button to set at "6" and push
the [SET] button. At that moment,
the display will change from
flashing to steady.
Range of values: 1-24 hour(s)
("
" makes the function disabled.)
SET
SCHEDULE
FUNCTION
SET
28
34
Limit hours for OUT punch.
This is the time "on the clock" from the last IN punch before the clock should consider a
forgotten punch. This allows for the next punch to be treated as an IN punch.
Set the " 19 Limit hours for the OUT punch".
Program No.
SCHEDULE
SET
FUNCTION
Hour
SCHEDULE
to set the left-side number at "19"
by pressing the [+] button. Once
you push the [SET] button, flashing
of the display will change to
"Hour". In case of the example,
push the [+] or [-] button to set at
"18" and push the [SET] button. At
that moment, the display will
change from flashing to steady.
Range of values: 1-48 hour(s)
("
" makes the function disabled.)
SET
FUNCTION
11 Finally, push the [SET] button again
SCHEDULE
SET
FUNCTION
Date
12 Push the [SETTING START/END]
button to get out of setting mode.
Make sure "date" and "time" are
indicated on the display and the
colon is flashing. Then replace the
cover and lock.
AM
Colon
29
35
Time Zone or Fixed Shift (ideal when everyone is on the same schedule.)
You can select days of the week which your desired schedule is applied to. All other days of
the week will be regarded as "weekend or non-scheduled work days", which you can set
threshold hours and duration of auto break deduction.
Program
No.
01
02
03
04
05
06
07
08
09
10
11
12
13
14
15
16
17
18
19
Free Zone
Rule*
1
Description
Calculation Rule
Start Time for Irregular Printing (Black
Red)
End Time for Irregular Printing (Red
Black)
Limit of Regular Hours per Day
Limit of Regular Hours per Week
Duration of Round Time (Start & End Shift Times)
Duration of Grace Time (Start & End Shift Times)
Red Printing for Grace Time Period
Rules for Working Days Outside Regular Schedule
Start Time of Break #1
Duration in Minutes, Break #1
Start Time of Break #2
Duration in Minutes, Break #2
Start Time of Break #3
Duration in Minutes, Break #3
Threshold Hours for Auto Break Deduction
Duration of Break Time
Threshold Hours for Overtime Calculation
Limit Hours for OUT punch
Time Zone
Rule
2
Yes
Yes
Yes
Yes
Yes
Yes
Yes
Yes
Yes
Yes
Yes
Yes
Yes
Yes
Yes
Yes
Yes
Yes
Yes
Yes
*Free Zone Rule Recommended
Selecting Time Zone calculations (#2) under Program 1 allows access to program numbers
02 through 17.
[Applicable days of the week]
Example: From Monday to Friday
11 Duration in minutes,
Break #1
02 Start time for
irregular printing
(black red)
10 Start time
of Break #1
IN
7:30 a.m. START
8:00 a.m.
Day
advance Printed
time
03 End time for irregular
printing (red black)
12 Start time
of Break #2
red
Break time 1
OUT
3:00 p.m.3:15 p.m.
12:00 p.m. 1:00 p.m.
red
13 Duration in minutes,
Break #2
Break time 2
red
in black
END 5:05 p.m.
5:00 p.m.
Day
Printed advance
in black time
(If you set the Break #3, set 14 and 15 also.)
* Any punch during "break time" will be printed in black regardless of settings.
* Break time will be deducted from worked hours automatically.
[Non-selected days of the week]
Example: Saturday and Sunday
16 Threshold hours for
auto break deduction
IN
8:30 a.m.
17 Duration of
break time
Break time
(= 30 min.)
OUT
3:30 p.m.
* All punches are printed in black.
30
Worked hours
( = 4 hours)
Worked more
than 4 hours
Worked hours
Note: Numbers in square mean
program number.
36
Push the [SETTING START/END] button before you start setting. At that moment,
"
" is indicated on a display and you go into setting mode.
Set the " 01 Calculation rule". Selecting "1: Free Zone" is recommended for most
operations.
1
2
Program No.
Free Zone
Time Zone
1 Push the [FUNCTION] button for 2
seconds.
SCHEDULE
2 Once a number on the display starts
flashing, position the " " mark next
to the "SCHEDULE" mark by
pressing the [FUNCTION] button.
SET
FUNCTION
A flashing number can be changed.
SCHEDULE
sure the left-side number
indicates "01" and push the [SET]
buttons.
4 Push the [+] or [-] button and set at
SET
FUNCTION
3 Make
2 to select "Time Zone" rule.
Day of the week
SU
MO
TU
WE
TH
FR
SA
SCHEDULE
5 Push
the [SET] button to fix the
setting value. At that moment,
flashing of the display will change
to "Days of the Week".
SET
SU
MO
TU
WE
TH
FR
SA
SCHEDULE
SET
FUNCTION
SU
MO
TU
WE
TH
FR
SA
SCHEDULE
FUNCTION
SET
Order Option Calculation Rules
1
Free Zone
2
Time Zone
6 In case of the example, push the [-]
button not to set schedule on
Sunday. Then, flashing will change
to the " " mark under "MO". Push
the [+] button five times to set the
schedule from Monday to Friday.
At that moment, the " " mark under
"SA" will flash. Then, push the [-]
button not to set schedule on
Saturday and push the [SET] button.
At that moment, flashing of the
display will change from flashing to
steady.
Applicable days of the week can
be selected by the [+] button. The
[-] button should be used for the
days of the week on which the
program isn't set.
31
37
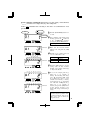
Ribbon Color Change
If you have selected the "Time Zone" calculation rule, Program numbers 2 and 3 allow for
programming employee punches, outside the normal work schedule, to print in "RED" to
flag early out or late in punches. The example below punches after 8:01 AM and before 5:00
PM will print in RED.
Program 2 lets you select the time that the clock will print in RED. You must select the
minute before the program time. Example: To have the clock print in RED at 8:01 AM you
must set 8:00 AM.
Program 3 lets you select the time the clock will print in BLACK. You must select the
minute at the program time. Example: To have the clock print in BLACK at 5:00 PM you
must set 5:00 PM.
Set the " 02 Start time for irregular printing (black
red)".
Program No.
SCHEDULE
7 Push the [SET] button again.
Then,
the left-side number starts flashing.
A flashing number can be changed.
SET
FUNCTION
Hour
8 Push the [+] or [-] button to set the
SCHEDULE
AM
FUNCTION
SET
Minute
left-side number at "02" and push
the [SET] button. At that moment,
flashing of the display will change
to "Hour". In case of the example,
push the [+] or [-] button to set at "8
(a.m.)" and push the [SET] button.
At that moment, flashing of the
display will change from "Hour" to
"Minute".
SCHEDULE
AM
FUNCTION
SET
SCHEDULE
AM
FUNCTION
SET
9 In
this case, push the [+] or [-]
button to set at "30". And then, push
the [SET] button. At that moment,
the display will change from
flashing to steady.
32
38
Set the " 03 End time for irregular printing (red
Program No.
black)".
10 Next, push the [SET] button again
SCHEDULE
SET
FUNCTION
Hour
SCHEDULE
to set the left-side number at "03"
by pressing the [+] or [-] button.
Once you push the [SET] button,
flashing of the display will change
to "Hour". In case of the example,
push the [+] or [-] button to set at "5
(p.m.)" and push the [SET] button.
At that moment, flashing of the
display will change from "Hour" to
"Minute".
PM
SET
FUNCTION
Minute
SCHEDULE
PM
11 In
this case, push the [+] or [-]
button to set at "30". And then,
push the [SET] button. At that
moment, the display will change
from flashing to steady.
SET
FUNCTION
SCHEDULE
PM
SET
FUNCTION
Set the " 10 Start time of Break #1".
Program No.
12 Push the [SET] button again to set
SCHEDULE
SET
FUNCTION
Hour
SCHEDULE
the left-side number at "10" by
pressing the [+] or [-] button. Once
you push the [SET] button, flashing
of the display will change to
"Hour". In case of the example,
push the [+] or [-] button to set at
"12 (p.m.)" and push the [SET]
button. At that moment, flashing of
the display will change from "Hour"
to "Minute".
PM
SET
33
39
Minute
SCHEDULE
PM
13 In
this case, push the [+] or [-]
button to set at "00". And then,
push the [SET] button. At that
moment, the display will change
from flashing to steady.
SET
FUNCTION
SCHEDULE
PM
SET
FUNCTION
Set the " 11 Duration in minutes, Break #1".
Program No.
14 Push
SCHEDULE
SET
FUNCTION
Minute
SCHEDULE
the [SET] button again and
select "11" by pressing the [+] or [-]
button. Once you push the [SET]
button, flashing of the display will
change to "Minute". In case of the
example, push the [+] or [-] button
to set at "60" and push the [SET]
button. At that moment, the display
will change from flashing to steady.
Range of values: 1-99 min.
("
" makes the function disabled.)
SET
SCHEDULE
SET
Set the " 12 Start time of Break #2".
Program No.
Hour
Minute
SCHEDULE
PM
FUNCTION
15 Make settings for the "Start time of
break #2" in the same manner as for
the "Start time of break #1", as
illustrated in the figure on the left.
SET
34
40
Set the " 13 Duration in minutes, Break #2".
Program No.
Minute
SCHEDULE
16 Make settings for the "Duration in
minutes, Break #2" in the same
manner as for the "Duration in
minutes, Break #1", as illustrated in
the figure on the left.
SET
FUNCTION
Program #14 and #15 (not shown) are for Break #3.
[For non-selected days of the week (which the above schedules aren't applied
to.)]
Set the " 16 Threshold hours for auto break deduction".
Program No.
SCHEDULE
17 Push the [SET] button again.
Then,
the left-side number starts flashing.
A flashing number can be changed.
FUNCTION
SET
Hour
18 Push the [+] or [-] button to select
SCHEDULE
FUNCTION
SET
Minute
SCHEDULE
"16" and push the [SET] button. At
that moment, flashing of the display
will change to "Hour". In case of the
example, push the [+] or [-] button
to set at "4" and push the [SET]
button. At that moment, flashing of
the display will change from "Hour"
to "Minute".
Range of values: 1-24 hour(s)
("
" makes the function disabled.)
SET
SCHEDULE
FUNCTION
SET
19 In
this case, push the [+] or [-]
button to set at "00". And then,
push the [SET] button. At that
moment, the display will change
from flashing to steady.
35
41
Set the " 17 Duration of break time".
Program No.
SCHEDULE
SET
FUNCTION
Minute
SCHEDULE
20 Push the [SET] button again to set
the left-side number at "17" by
pressing the [+] button. Once you
push the [SET] button, flashing of
the display will change to
"Minutes". In case of the example,
push the [+] or [-] button to set at
"30" and push the [SET] button.
At that moment, the display will
change from flashing to steady.
Range of values: 1-99 min.
("
" makes the function disabled.)
SET
FUNCTION
SCHEDULE
SET
FUNCTION
Date
21 Push the [SETTING START/END]
AM
Colon
button to get out of setting mode.
Make sure "date" and "time" are
indicated on the display and the
colon is flashing. Then replace the
cover and lock.
36
42
Overtime Calculation
Basically, all worked hours are accumulated as regular hours.
By setting maximum length of regular hours per day or week, you can fix how to divide
worked hours into regular hours and overtime.
Semi-monthly and Monthly pay period overtime calculations are based on daily overtime
only. To assure accurate calculations for these pay periods, please select daily regular hours
limit as desired, and select "
" as the limit for weekly regular hours. This will
"disable" the weekly OT function so that the clock will calculate properly.
[Daily Regular Hours]
Example: Daily regular hours: 8 hours/day, Break time: start =12:00 & 60 min./day
Daily
IN
OUT
RH
Total
OT
Mo 9:00A
Mo 6:00P
8:00
Tu 9:00A
Tu 3:00P
8:00
RH
OT
8:00
2:00
16:00
2:00
You must set limit of regular hours per day (e.g. 8 hours per day).
All worked hours, which exceed the limit, will be accumulated as overtime.
In this case, "regular hours" and "overtime" will be accumulated separately.
Push the [SETTING START/END] button before you start setting. At that moment,
"
" is indicated on a display and you go into setting mode.
Set the " 04 Limit of regular hours per day".
Program No.
1 Push the [FUNCTION] button for 2
seconds.
SCHEDULE
2 Once a number on the display starts
FUNCTION
flashing, position the " " mark next
to the "SCHEDULE" mark by
pressing the [FUNCTION] button.
SET
A flashing number can be changed.
Hour
3 Push the [+] or [-] button and select
SCHEDULE
FUNCTION
"04". Once you push the [SET]
button, flashing of the display will
change to the "Hour".
SET
37
43
SCHEDULE
SET
FUNCTION
4 Push the [+] or [-] button to set the
desired hours. In case of the
example, push the [+] or [-] button
to set at "6" and push the [SET]
button. At that moment, the display
will change from flashing to steady.
Range of values: 1-24 hour(s)
("
" makes the function disabled.)
Date
5 Push the [SETTING START/END]
AM
Colon
button to get out of setting mode.
Make sure "date" and "time" are
indicated on the display and the
colon is flashing. Then replace the
cover and lock. Or push the set
button to advance to Program #05,
Setting total regular hours per week.
38
44
[Total Regular Hours per Week]
Example: Pay period: Weekly, Total regular hours: 40 hours/week
Break time: start =12:00 & 60 min./day
Daily
Total
IN
OUT
RH
OT
RH
Mo 9:00A
Mo 6:00P
8:00
8:00
OT
Tu 9:00A
Tu
8:00P
10:00
18:00
We 9:00A
We 10:00P
12:00
30:00
Th 9:00A
Th 6:00P
8:00
38:00
Fr 9:00A
Fr
9:00
40:00
7:00P
7:00
You must set limit of regular hours per week (e.g. 40 hours per week).
All worked hours shall be accumulated as regular hours until it reaches the limit. Once it
goes over the limit, then, the rest of worked hours shall be accumulated as "overtime".
Set the " 05 Limit of regular hours per week".
Push the [SETTING START/END] button before you start setting. At that moment,
"
" is indicated on a display and you go into setting mode.
Program No.
1 Push the [FUNCTION] button for 2
seconds.
SCHEDULE
2 Once a number on the display starts
flashing, position the " " mark next
to the "SCHEDULE" mark by
pressing the [FUNCTION] button.
SET
A flashing number can be changed.
Hour
3 Push the [+] button to select "05".
SCHEDULE
FUNCTION
Once you push the [SET] button,
flashing of the display will change
to the "Hour".
SET
39
45
Hour
4 Push the [+] or [-] button to set the
SCHEDULE
SET
SCHEDULE
SET
Date
desired hours. In case of the
example, push the [+] button to set
the first one digit at "0" and push the
[SET] button.
At that moment, the flashing of the
display will change to the last two
digits. Then, push the [+] or [-]
button to set at "40" and push the
[SET] button. At that moment, the
display will change from flashing to
steady.
Range of values: 1- 168 hour(s)
("
" makes the function disabled.)
5 Push the [SETTING START/END]
AM
Colon
button to get out of setting mode.
Make sure "date" and "time" are
indicated on the display and the
colon is flashing. Then replace the
cover and lock. Or push the [SET]
button to advance to program #06,
Setting round & grace times.
40
46
[Combination of "Daily Regular Hours" and "Total Regular Hours"]
If you set limits for both "Daily regular hours" (Daily OT) and "Total regular hours" (Weekly
OT), then daily worked hours shall be calculated based on the rules for "Daily regular
hours", and will take precedence over the weekly setting. If you want "Total regular hours"
to be the deciding calculation for OT, then set Daily limits to "
".
Example: Pay Period: Weekly, Daily regular hours: 8 hours/day, Total regular hours: 40
hours/week, Break time: start =12:00 & 60 min./day
Daily
IN
OUT
RH
Mo 9:00A
Mo 6:00P
8:00
Total
OT
RH
OT
8:00
Tu 9:00A
Tu
8:00P
8:00
2:00
16:00
2:00
We 9:00A
We 10:00P
8:00
4:00
24:00
6:00
Th 9:00A
Th 6:00P
8:00
32:00
6:00
Fr 9:00A
Fr
8:00
40:00
7:00
7:00P
1:00
Priority Rule to the Days Not Scheduled in the Time Zone Schedule
If you select "1" in the program number 09 , any worked hours on weekend or nonscheduled work days will be regarded and accumulated as "overtime" prior to other settings.
Example: Pay Period: Weekly, Total regular hours: 40 hours/week
Break time: start =12:00 & 60 min./day, Calculation priority = Selected
Daily
Total
IN
OUT
RH
OT
RH
Mo 9:00A
Mo 6:00P
8:00
8:00
Tu 9:00A
Tu
7:00P
9:00
17:00
We 9:00A
We 12:00P
3:00
20:00
Th 9:00A
Th 6:00P
8:00
28:00
Fr 9:00A
Fr
9:00
37:00
Sa 13:00A
Sa 5:00P
7:00P
4:00
OT
4:00
41
47
Round and Grace Time for Start/End Time (ST/ET)
Start time
(ST)
06 Duration of
round time
for ST
15
min.
Round forward
time zone
End time
(ET)
07 Duration of
grace time
for ST
5
min.
07 Duration of
grace time
for ET
20
min.
Grace back
time zone
Grace forward
time zone
06 Duration of
round time
for ET
30
min.
Round back
time zone
Push the [SETTING START/END] button before you start setting. At that moment,
"
" is indicated on a display and you go into setting mode.
Set the " 06 Duration of round time (start & end shift times)".
Program No.
1 Push the [FUNCTION] button for 2
seconds.
SCHEDULE
2 Once a number on the display starts
flashing, position the " " mark next
to the "SCHEDULE" mark by
pressing the [FUNCTION] button.
SET
FUNCTION
A flashing number can be changed.
Round time
for ST
SCHEDULE
FUNCTION
SET
Round time
for ET
SCHEDULE
FUNCTION
SET
3 Push the [+] or [-] button to set the
left-side number at "06" and push
the [SET] button. At that moment,
flashing of the display will change
to the middle numbers which
indicate round-forward period
(min.) for IN punch before the start
time. In case of the example, push
the [+] or [-] button to set at "15"
and push the [SET] button. At that
moment, flashing of the display will
change to the right-side numbers.
Range of values: 1-99 min.
("
"makes the function disabled.)
42
48
SCHEDULE
SET
4 The
right-side numbers indicate
round-back period (min.) for OUT
punch after the end time. In this
case, push the [+] or [-] button to set
at "30". And then, push the [SET]
button. At that moment, the display
will change from flashing to steady.
Set the " 07 Duration of grace time (start & end shift times)".
Program No.
5 Next, push the [SET] button again
SCHEDULE
FUNCTION
SET
Grace time
for ST
SCHEDULE
FUNCTION
to set the left-side number at "07"
by pressing the [+] button. Once
you push the [SET] button, flashing
of the display will change to the
middle numbers which indicate
grace-back period (min.) for IN
punch after the start time. In case of
the example, push the [+] or [-]
button to set at "5" and push the
[SET] button. At that moment,
flashing of the display will change
to the right-side numbers.
Range of values: 1-99 min.
("
" makes the function disabled.)
SET
Grace time
for ET
SCHEDULE
FUNCTION
SET
SCHEDULE
FUNCTION
6 The
right-side numbers indicate
grace-forward period (min.) for
OUT punch after the end time. In
this case, push the [+] or [-] button
to set at "20". And then, push the
[SET] button. At that moment, the
display will change from flashing to
steady.
SET
43
49
Set the " 08 Red printing for grace time period".
Program No.
7 Again, push the [SET] button to set
SCHEDULE
SET
FUNCTION
For IN Punch
SCHEDULE
the left-side number at "08" by
pressing the [+] button. At that
moment, flashing of the display will
change to the middle numbers
which control "red" printing for IN
punch after the start time. If you
want to print any IN punch after the
start time in red, push the [+] or [-]
button to set at "1" and push the
[SET] button.
Option Action
1
Red printing for any punch
during the grace time for
irregular recognition.
--
Any punch during grace
time period will be printed
in black.
SET
FUNCTION
For OUT Punch
Note: All punches during break time
will be printed in black regardless of
above setting.
For OUT Punch
SCHEDULE
SET
FUNCTION
8 At
that moment, flashing of the
display will change to the right-side
numbers, which control "red"
printing for OUT punch before the
end time. If you want to print any
OUT punch before the end time in
red, push the [+] or [-] button to set
at "1" and push the [SET] button.
SCHEDULE
SET
FUNCTION
Date
9 Push the [SETTING START/END]
AM
Colon
button to get out of setting mode.
Make sure "date" and "time" are
indicated on the display and the
colon is flashing. Then replace the
cover and lock.
44
50
Setting the Weekly Program for External Time Signal
You can set weekly time schedule for external signal up to 48 programs. Each program can
have different duration.
Push the [SETTING START/END] button before you start setting. At that moment,
"
" is indicated on a display and you go into setting mode.
Example
Program No.
Day of the Week
Time
Duration
01
Mon. - Fri.
9:00 a.m.
5 sec.
02
Mon. - Fri.
5:30 p.m.
7 sec.
Program No.
SU
MO
TU
WE
TH
FR
1 Push the [FUNCTION] button for 2
SA
WEEKLY
PROGRAM
FOR EXT.
SIGNAL
SET
FUNCTION
SU
MO
TU
WE
TH
FR
SA
WEEKLY
PROGRAM
FOR EXT.
SIGNAL
2
3
5
Duration
Days of the week
SU
MO
TU
WE
TH
FR
SA
WEEKLY
PROGRAM
FOR EXT.
SIGNAL
2
3
5
7
SET
FUNCTION
Hour
SU
MO
TU
WE
TH
FR
SA
WEEKLY
PROGRAM
FOR EXT.
SIGNAL
2
FUNCTION
3
5
7
SET
2 Once a number on the display starts
flashing, position the " " mark next
to the "WEEKLY PROGRAM FOR
EXT. SIGNAL" mark by pressing
[FUNCTION] button. At that
moment, the flashing digits indicate
program number.
A flashing number can be changed.
3 Set the program No. 1.
Push the [SET] button. At that
moment, flashing of the display will
change to "duration" of signal. In
case of the example, push the [+] or
[-] button and position the " " mark
over the "5" to select 5 seconds and
then push the [SET] button. At that
moment, flashing of the display will
change to "Days of the Week".
7
SET
FUNCTION
seconds.
4 In case of the example, push the [-]
button not to set external signal on
Sunday. Then, flashing will move
to " " mark under "MO". Push the
[+] button five times to set the
signal from Monday to Friday.
At that moment, " " mark under
"SA" will flash. Then, push the [-]
button not to set external signal on
Saturday and [SET] button. At that
moment, the flashing of the display
will change to "Hour".
Applicable days of the week can
be selected by the [+] button. The
[-] button should be used for the
days of the week on which the
program isn't set.
45
51
SU
MO
TU
WE
TH
FR
SA
5 In case of the example, push the [+]
WEEKLY
PROGRAM
FOR EXT.
SIGNAL
AM
2
3
5
SU
7
SET
FUNCTION
MO
TU
WE
TH
FR
SA
6 Push
WEEKLY
PROGRAM
FOR EXT.
SIGNAL
AM
2
3
5
MO
7
TU
WE
TH
FR
SA
7 Set the program No. 2.
WEEKLY
PROGRAM
FOR EXT.
SIGNAL
2
3
5
7
SET
FUNCTION
SU
MO
TU
WE
TH
FR
SA
WEEKLY
PROGRAM
FOR EXT.
SIGNAL
PM
2
the [+] or [-] button to set
"00". Then, push the [SET] button.
SET
FUNCTION
SU
or [-] button to set "9" and push the
[SET] button. At that moment,
flashing of the display will change
from "Hour" to "Minute".
3
FUNCTION
Date
5
7
SET
Push the [SET] button again and the
"Program No." starts flashing. Push
the [+] button to set at "02", and
then, push the [SET] button.
Make settings for the Program No. 2
in the same manner as for the
Program No. 1, as illustrated in the
figure on the left, and push the
[SET] button to finish the setting.
At that moment, the display will
change from flashing to steady, and
the setting is now completed.
8 Push the [SETTING START/END]
AM
Colon
button to get out of setting mode.
Make sure "date" and "time" are
indicated on the display and the
colon is flashing. Then replace the
cover and lock.
46
52
Confirming the Weekly Program
Refer to the Step 1 and 2 in the previous setting section. Every time you push the [+] button,
the program number changes (01 02 03 ...) and you can confirm each setting.
After confirming the settings, push the [SETTING START/END] button to get out of setting
mode. Make sure "date" and "time" are indicated on the display and the colon is flashing.
Then replace the cover and lock.
Changing the Weekly Program
Refer to the Step 1 and 2 in the previous setting section and select the program number,
which you want to change settings. Once the desired program number starts flashing, push
the [SET] button and change settings in the same manner as you originally set.
Deleting the Weekly Program
Refer to the Step 1 and 2 in the previous setting section and select the program No., which
you want to delete settings. Once the desired program No. starts flashing, push the [SET]
button and delete the " " mark over the selected duration by pressing the [-] button. Then,
push the [SET] button. At that moment, the display will change as illustrated in the
following figure and now settings are deleted.
WEEKLY
PROGRAM
FOR EXT.
SIGNAL
FUNCTION
SET
Push the [SETTING START/END] button to get out of setting mode. Make sure "date" and
"time" are indicated on the display and the colon is flashing. Then replace the cover and
lock.
Date
AM
Colon
47
53
Setting the Auto Daylight Saving Change
Daylight saving time function
1 D.S.T. execution time
At 2:00 a.m. on the first day of summer time, the clock
automatically gains one hour to show 3:00 a.m. When 2:00
a.m. comes on the last day of the summer time period, it loses
one hour and returns to 1:00 a.m.
2 Setting D.S.T.
Example:
Start date Sunday, April 3, 2005
End date Sunday, October 30, 2005
If set as the above, the unit remembers the start date as the
first Sunday of April and the end date as the first Sunday of
October. Once set, the unit automatically updates the settings
every year thereafter. No further manual setting is necessary.
When there is a time change between the "IN" and "OUT" because of the "Daylight Savings"
settings, an "S" will appear on the calculated result as a record mark.
The "S" mark may not be printed properly when "Daylight Savings" turned on because of
other changes in settings.
The setting for daylight saving time will be
described using the following example.
Example
Today (present day)
Starting date of daylight
saving time
Ending date of daylight
saving time
Wednesday,
January 26, 2005
Sunday,
April 3, 2005
Sunday,
October 30, 2005
The first Sunday of April
The last Sunday of
October
48
54
Push the [SETTING START/END] button before you start setting. At that moment,
"
" is indicated on a display and you go into setting mode.
1 Push the [FUNCTION] button for 2 seconds.
Month
Year
FUNCTION
Date
SET
" " mark means
"starting date" setting.
DAYLIGHT
SAVING
TIME
Month
2 Once a number on the display starts
flashing, position the " " mark next
to the "DAYLIGHT SAVING TIME"
mark by pressing the [FUNCTION]
button.
A flashing number can be changed.
FUNCTION
SET
DAYLIGHT
SAVING
TIME
Set the "starting date".
Month
FUNCTION
3 In case of the example, push the [+]
SET
DAYLIGHT
SAVING
TIME
Date
FUNCTION
SU
SET
or [-] button to set at "05" and push
the [SET] button. At that moment,
flashing of the display will change
from "Year" to "Month".
4 Push the [+] or [-] button to set at
DAYLIGHT
SAVING
TIME
"4" and push the [SET] button. At
that moment, flashing of the display
will change from "Month" to
"Date".
Date
5 Push the [+] or [-] button to set at
FUNCTION
SET
DAYLIGHT
SAVING
TIME
SU
FUNCTION
FUNCTION
SET
SET
"3" and push the [SET] button. At
that moment, "starting date" on the
display will change from flashing to
steady and the " " mark is displayed
under "SU". Wait a few seconds,
then go on to the Step 6.
DAYLIGHT
SAVING
TIME
DAYLIGHT
SAVING
TIME
49
55
" " mark means "ending date".
Set the "ending date".
Month
Year
Date
6 Next, push the [SET] button. At that
SET
FUNCTION
DAYLIGHT
SAVING
TIME
moment, flashing of the display will
change from "Year" to "Month".
Month
SET
FUNCTION
DAYLIGHT
SAVING
TIME
Month
7 Push the [+] or [-] button to set at
SET
FUNCTION
DAYLIGHT
SAVING
TIME
"10" and push the [SET] button. At
that moment, flashing of the display
will change from "Month" to
"Date".
Date
SET
FUNCTION
DAYLIGHT
SAVING
TIME
Date
SU
SET
FUNCTION
8 Push the [+] or [-] button to set at
DAYLIGHT
SAVING
TIME
SU
"30" and push the [SET] button. At
that moment, "starting date" on the
display will change from flashing to
steady and the " " mark is displayed
under "SU".
9 Push the [SETTING START/END]
SET
FUNCTION
DAYLIGHT
SAVING
TIME
button to get out of setting mode.
Make sure "date" and "time" are
indicated on the display and the
colon is flashing. Then replace the
cover and lock.
Date
AM
50
Colon
56
Deleting the Daylight Saving Time Settings
To delete and cancel the daylight saving time settings, change the display of "Month" of the
starting setting to "
".
Example
To change "April 3, 2005" of "starting date" and delete daylight saving time settings.
Push the [SETTING START/END] button before you start setting. At that moment,
"
" is indicated on a display and you go into setting mode.
1 Push the [FUNCTION] button for 2 seconds.
Year
SU
Month
FUNCTION
2 Once a number on the display starts
SET
DAYLIGHT
SAVING
TIME
A flashing number can be changed.
SU
FUNCTION
flashing, position the " " mark next
to the "DAYLIGHT SAVING TIME"
mark by pressing the [FUNCTION]
button.
SET
DAYLIGHT
SAVING
TIME
3 Push the [SET] button and flashing
of the display will change from
"Year" to "Month". Next, push the
[+] or [-] button to set at "
".
4 Push the [SET] button twice. This
FUNCTION
SET
DAYLIGHT
SAVING
TIME
cancels the daylight saving time
settings.
5 Push the [SETTING START/END]
button to get out of setting mode.
Make sure "date" and "time"are
indicated on the display and the
colon is flashing. Then replace the
cover and lock.
51
57
Setting the Language
This function is available if weekly or bi-weekly ending has been selected in the pay
period setting.
The print language can be selected from the following three.
Push the [SETTING START/END] button before you start setting. At that moment,
"
" is shown on a display and you go into setting mode.
Example
Order Options Print Example: Thursday 15:30
1. English
TH 15:30
2. Spanish
JU 15:30
3. French
JE 15:30
1
2
3
English
Spanish
French
1 Push the [FUNCTION] button for 2
seconds.
2 Once
LANGUAGE
FUNCTION
SET
a number on the display
starts flashing, position the " "
mark over the "LANGUAGE"
mark by pressing the [FUNCTION]
button.
3 Push the [+] or [-] button to select
the desired language. For example,
set 3 if "French" is desired.
LANGUAGE
FUNCTION
SET
4 Push the [SET] button to finish the
setting. At that moment, the display
will change from flashing to steady,
and the setting is now completed.
Date
5 Push the [SETTING START/END]
AM
Colon
button to get out of setting mode.
Make sure "date" and "time" are
indicated on the display and the
colon is flashing. Then replace the
cover and lock.
52
58
Setting the Password
When the password is set, you are asked to enter it. If the password you entered does not
coincide with the setting, you cannot change the setting values.
You may select any 4-digit number from 0001 to 9998 as your password.
Note: Numbers "0000" and "9999" are not valid as password.
All settings must be reset if you forget the password. Refer to "8. Resetting".
Push the [SETTING START/END] button before you start setting. At that moment,
"
" is indicated on a display and you go into setting mode.
Example Set the password "1234".
1 Push the [FUNCTION] button for 2
seconds.
2 Once a number on the display starts
PASSWORD
FUNCTION
SET
flashing, position the " " mark over
the "PASSWORD" mark by pressing
the [FUNCTION] button.
A flashing number can be changed.
3 Change the first two digits.
PASSWORD
FUNCTION
SET
In case of the example, push the [+]
or [-] button to set at "12" and then,
push the [SET] button. At that
moment, flashing of the display will
change to the last two digits.
4 Change the last two digits.
PASSWORD
FUNCTION
SET
Date
Next, push the [+] or [-] button to
set at "34" and then, push the [SET]
button. At that moment, the display
will change from flashing to steady,
and the setting is now completed.
5 Push the [SETTING START/END]
button to get out of setting mode.
Make sure "date" and "time" are
indicated on the display and the
colon is flashing. Then replace the
cover and lock.
AM
Colon
53
59
How to Change Settings When the Password Is Set
Once the password is set, you are requested to enter the current password before changing
any settings.
Push the [SETTING START/END] button before you start setting. At that moment,
"
" is indicated on a display and you go into setting mode.
Example The current password is "1234" and go into the "DATE/TIME" setting mode.
1 Push the [DATE/TIME] button for
DATE/TIME
SET
two seconds. Then, "9999" will be
indicated on the display and the first
two digits flash.
A flashing number can be changed.
2 In case of the example, push the [+]
DATE/TIME
SET
or [-] button to set at "12" and then,
push the [SET] button. At that
moment, flashing of the display will
change to the last two digits.
3 In case of the example, push the [+]
DATE/TIME
SET
DISPLAY
HOURS
DATE/TAIME
or [-] button to set at "34" and then,
push the [SET] button. At that
moment, the " " mark is located
under "DISPLAY HOURS".
4 Select
desired setting mode by
pressing the [DATE/TIME] button.
Then make any changes to setting
as explained.
SET
54
60
Canceling the Password
The code "0000" must be entered to cancel the password.
Push the [SETTING START/END] button before you start setting. At that moment,
"
" is indicated on a display and you go into setting mode.
Example The curent password is "1234" and cancel it.
1 Push the [FUNCTION] button for
two seconds. Then, "9999" will be
indicated on the display and the first
two digits flash.
FUNCTION
SET
A flashing number can be changed.
In case of the example, push the [+]
or [-] button to set at "12" and then,
push the [SET] button. At that
moment, flashing of the display will
change to the last two digits.
FUNCTION
SET
2 In case of the example, push the [+]
FUNCTION
SET
or [-] button to set at "34" and then,
push the [SET] button. At that
moment, the " " mark is located
under "PAY PERIOD".
3 Position
the " " mark over the
"PASSWORD" mark by pressing
the [FUNCTION] button. At that
moment, the first two digits "12"
flash.
PASSWORD
FUNCTION
SET
A flashing number can be changed.
4 Push the [+] or [-] button to set at
"00" and then, push the [SET]
button. At that moment, the flashing
of the display will change to the last
two digits "34".
PASSWORD
FUNCTION
SET
55
61
5 Push the [+] or [-] button to set at
PASSWORD
FUNCTION
SET
"00" and then, push the [SET]
button. At that moment, the display
will change from flashing to steady,
and the setting is now completed.
Date
6 Push the [SETTING START/END]
AM
Colon
button to get out of setting mode.
Make sure "date" and "time" are
indicated on the display and the
colon is flashing. Then replace the
cover and lock.
56
62
5. Printing Hours Summary
With this function, you can check hours summary per card number and total on card.
You can select "hours summary" for either the active time cards in use or the cards which
were already closed in the previous/current period.
Push the [SETTING START/END] button before you start setting. At that moment,
"
" is indicated on a display and you go into setting mode.
[For Active Cards]
Page No.
Total Pages
[For Closed Cards]
Page No.
Total Pages
1 Push
the [HOURS SUMMARY]
button for two seconds. At that
moment, "HA" is indicated on the
left side of the display. When it's
indicated on a display, you can print
hours summary for active time cards
in use. (If you want to have hours
summary for the already- closed
cards in the previous/current period,
push the [HOURS SUMMARY]
button again and show "HC" on the
display.)
2 Insert a blank time card and a list is
printed out.
If you want to stop printing, push
the [SETTING START/END] button.
Date
3 Once
list printing is completed,
"date" and "time" are indicated on
the display and the colon starts
flashing. Then replace the cover and
lock.
AM
Colon
57
63
6. Printing List of Active Card Numbers
With this function, you can check what numbers of time cards are used in the current pay
period.
Push the [SETTING START/END] button before you start setting. At that moment,
"
" is indicated on a display and you go into setting mode.
Page No.
Total Pages
1 Push
the [ACTIVE CARD NO.]
button for two seconds. At that
moment, "CL" is indicated on the
left side of the display.
2 Insert a blank time card and a list is
printed out.
If you want to stop printing, push
the [SETTING START/END] button.
Date
3 Once
list printing is completed,
"date" and "time" are indicated on
the display and the colon starts
flashing. Then replace the cover and
lock.
AM
Colon
58
64
7. Printing List of Program Settings
With this function, you can check what rules are currently set in the clock.
Push the [SETTING START/END] button before you start setting. At that moment,
"
" is indicated on a display and you go into setting mode.
Page No.
Total Pages
1 Push the [SETTING INFO.] button
for two seconds.At that moment,
"IP" is indicated on the left side of
the display.
2 Insert a blank time card and a list is
printed out.
If you want to stop printing, push
the [SETTING START/END] button.
Date
3 Once
list printing is completed,
"date" and "time" are indicated on
the display and the colon starts
flashing. Then replace the cover
and lock.
AM
Colon
59
65
8. Additional Features
Override Printing
When you select "Time Zone" rule for calculation, printing line will change to the next line
at the "Day Advance Time". However, "OVERRIDE" function enables the punch out time
records to the same line of the previous working day even if exit punch time crosses the "Day
Advance Time". It's also applicable for "Free Zone" rule and you can punch out time records
even leaving time crosses "limit hours for the OUT punch". This is useful when you want to
extend working hours.
This function is available only when the "OVERRIDE" is permitted.
Example
IN punch - already printed at 8:15 a.m. on Oct. 20, 2004
OUT punch - to be printed on the same line at 1:50 a.m. on Oct. 21, 2004
1 Push the "OVR." button, and then the
2 Insert a time card.
"OVR." button blinks.
"OVR."
button
Blink
OVR
3 The OUT punch is printed on the same line.
Even if you use "OVERRIDE" function, you can't exceed the limit of 48 hours from IN
punch to OUT punch.
Daily
IN
OUT
Total
OT
RH
8:00
8:00
Tu 9:00A Tu 5:00P
8:00
16:00
We 9:00A Th1:00 v
16:00
32:00
Au Mo 9:00A Mo 5:00P
60
RH
OT
Override
66
Card Transfer
When the card that you are using becomes full before reaching the "Pay Period" day, it will
show "END" on the display and the buzzer will sound. When the "END" appears, you can
use the "Card Number Transfer" mode to transfer the card and have a new card take over
from the old one.
In this function, it will be useful........
• when the card has become full before reaching the "Pay Period".
• when the card that is being used is lost, or unable to function because of stain.
• if you want to change the card to a new one.
Example
Card of No.3
Card of No.17
003
017
transfer
Employee's Operation
This function is available only when the "CARD TRANSFER" is enabled.
1 Push
TRANSFER
the "TRANSFER" button and
insert the card "003".
2 Once the card is ejected, insert a new
card with the same number (or one of
the numbers which isn't registered
yet). In case of the example, insert the
card "017".
3 "Date/time", "TRANSFER (in the selected language)", and "the previous card No. to a
new card No." are printed on the new card and the calculation data (total) of the
previous card will be transferred.
4 Now the setting of card number transfer is completed.
61
67
Supervisor's Operation
In this mode, you can transfer the card numbers by pushing buttons as well as inserting time
cards.
1 Open the front cover and push the "SETTING START/END" button.
"
At that moment,
" is indicated on a display.
2 Push
The number
of cards
CARD
TRANSFER
the "CARD TRANSFER"
button for two seconds. When you
have a card that you are using, the
number of cards that you are using
will be shown on the display. If
there are no cards used at the
present state, it will show "n0 00"
and will end the mode.
3 After
SET
SET
the numbers of cards are
shown, in the example, push the [+]
or [-] button to show the card
number "003" and then push the
[SET] button. (Or insert the card
"003".)
4 Push the [+] or [-] button to pick a
new card number "017" and then
push the [SET] button.
(Or insert the card "017".)
5 Now calculation data (total) of the
SET
previous card has been transferred.
Note: When you transfer data by
inserting a card, "Date/time",
"TRANSFER (in the selected
language)", and "the previous
card No. to a new card No."
are printed on the new card.
6 When the card number is changed,
this mode will finish.
62
68
Card Resetting
When you want to reset the card manually before reaching the "Pay Period" day, you can go
into the "Card Resetting" mode.
Example The number of the card you want to reset is "003".
Push the [SETTING START/END] button before you start setting. At that moment,
"
" is indicated on a display and you go into setting mode.
1 Push
The number
of cards
the [CARD RESET] button
for 2 seconds. Then, the number of
cards that you are using will be
shown on the display.
SET
CARD
RESET
2 Select the desired card number by
pushing the [+] or [-] button. In
case of the example, push [+] button
to set at "03" and then, push the
[SET] button. At that moment, the
display will change from flashing to
steady, and push the [SET] button
once more.
SET
3 Now the setting is completed.
Make sure "date" and "time" are
indicated on the display and the
colon is flashing. Then replace the
cover and lock.
All Cards Resetting
When you want to reset all cards manually......
1 Refer to the Step 1 in "Card Re-
The number
of cards
setting".
2 Push the [+] or [-] button to show
SET
CARD
RESET
"ALL" and then push the [SET]
button. At that moment, the display
will change from flashing to steady,
and push the [SET] button once
again.
3 Now the setting is completed.
SET
Make sure "date" and "time" are
indicated on the display and the
colon is flashing. Then replace the
cover and lock.
63
69
9. Resetting
To return all settings to their factory defaults.
Please note that all settings will be deleted and will revert to the factory defaults when
the reset switch is pushed. To make new settings, please refer to setting section.
Note: Pressing the reset switch does not reset the time cards. Please refer to the All Cards
Resetting in the Additional Features section.
Reset switch
(small round
hole)
Push these buttons
at the same time
1 Unlock and remove cover.
Push the reset switch with a pointed
implement while pushing the
[DATE/TIME] and [HOURS SUMMARY]
button.
2 At that moment, the display change to
AM
"AC
".
And after a few seconds, the display
changes to date & time "1 12:00 a.m.".
64
70
10. Installing the Optional Battery Backup
This option allows for printing without AC power.
Order Acroprint Part Number 58-0108-000, optional battery pack, for this feature.
1 Remove
the cover of the battery
compartment on the back of the unit
by pushing down the top side of the
cover, and then release it from the two
clasps.
2 Position the battery as shown in the
figure on the left.
* The connector cord should be on the
right side, as shown in the figure.
3 Connect the connector. Tuck away the
connector cord into the open space in
the compartment.
4 Insert the cover into the slot as shown
on the left. Keep pressing it down
until it hooks to the clasp.
Note: Make sure the cord is not
caught when closing the cover.
65
71
11. Connecting External Signal Control
If external signal(s) are required, the addition of a relay (not supplied) will be necessary.
Please consult your local electrician.
When a signal is activated the internal contacts close completing the circuit. These internal
contacts are "dry" and supply no voltage. Voltage applied to these contacts must not exceed
30 volts. An external relay must be used to activate signaling devices.
Recommended Relays: (Or similar line voltage switching relays)
Available at W. W. Grainger
HoneyWell
#RA89A1074
Grainger #2E866
Dayton
#809A-189
Grainger #2E553
120 VAC
Nuetral
2
ES1000
Internal
Relay
1
External
Relay
3
4
External
Signal
30V
Class 2
Connections shown for Dayton 2E553. Add jumper from terminals 1 to 3.
CAUTION: Disconnect the ES1000 from the AC Power before connecting the External
Signal Relay. Improper connection may cause a malfunction of the unit.
Also make sure to secure wires with the wire clamp.
1 Remove
the cover of the battery
compartment on the back of the unit
by pushing down the top side of the
cover, and then release it from the two
clasps.
66
72
2 Remove two screws holding the wire
clamp.
Wire clamp
3 Insert
wires into two terminals for
external time signal relay and tighten
both screws. Then, tuck away the
cord and place it as shown in the
figure.
4 Secure the wire clamp with screws.
5 Insert the cover into the slot as shown
on the left. Keep pressing it down
until it hooks to the clasp.
Note: Make sure the cord is not caught
when closing the cover.
67
73
12. Troubleshooting
Error No. appears
No.
Error contents
Action
E-00
CPU error
E-01
The remaining life of lithium battery for
memory back-up is short.
E-03
The front and back of the time card inserted is
wrong.
Correctly insert the time card.
E-05
The card is not pulled in properly.
Make sure that the time card is not bended and
another time card is not jamming in the time
recorder.
Aftr making sure of the avove, close the cover.
E-10
Can't save information of time cards.
Open and close the cover once to see if the unit
returns to work properly. Then, try to print once
again.
E-15
Card sensor error
E-30
The printer motor or the sensor is not normal.
Make sure that another time card is not jamming
in the time recorder and the ribbon cassette is
correctly inserted in place.
After making sure of the above, close the cover.
E-33
Can't change printing color correctly.
Make sure that the ribbon caaaette is correctly
inserted in place. After making sure of the above,
close the cover.
E-37
The card forwarding motor or the sensor does
not operate properly.
Make sure that another time card is not jamming
in the time recorder and the ribbon cassete is
correctly inserted in place.
After making sure of the above, close the cover.
E-38
The print head motor or the sensor for the
printer head can not operate properly.
E-40
Password error
Input the correct password you set. (4-digit
numbers)
E-41
The start and end dates of the daylight saving
time are the same date.
Correctly set the daylight saving time.
E-49
Input the wrong figures.
Check the setting contents and input the correct
figures.
E-50
Can't use the time card.
Check the bar code area whether it is smudged or
damaged.
E-51
Print error
Check whether the time was turned back or not.
Also check whether the card was inserted within
1 minute after the last punch.
E-53
Failed in registering a time card.
Register the time card once again.
E-59
Can't use the time cards because of memory
error.
Use the "Card Reset" function to reset the card.
Make sure if you can print by inserting the time
card with the same number.
END
When the card that you are using becomes full
before reaching the closing day/date.
Use the "Card Number Transfer" function to
transfer the card and have a new card take over
for the old one.
Contact the store from whom you bought the
unit.
*If the error number is still displayed after cheeking above points, contact the store from
whom you bought the unit.
68
74
13. Specifications
Clock Accuracy
Monthly accuracy ± 15 sec. (at ordinary temperatures)
Calendar
Year up to 2099. Automatically adjusted to leap years, 31-day
months and months with thirty or fewer days, and the days of the
week.
Printing System
Dot matrix
Power failure
compensation
Three years of cumulative power failure hours after the date of
shipment
Print at power
failure
Optional Ni-Cd battery, 100-time printing or 24 hours
Acroprint part number 58-0108-000
Lithium battery
CR2450THC
Time cards
Acroprint time card (Form No. ES1010)
Time Program
External time signal
(External Alarm device: No voltage signal output)
Operating
Environment
Temperature: -5˚C to +45˚C, +23˚F to +113˚F
Humidity: 20 to 80%, no condensation
The unit operates normally at temperatures of 5˚C or below, but the
print density, reaction of the liquid crystal display, and the number
of prints at power failure are inferior to those at normal
temperature operation.
Dimensions
7.17" (w) x 5.51" (d) x 9.53" (h)
182 (w) x 140 (d) x 242 (h) mm
Weight
Approx. 4.9 lbs. (2.2 kg)
Rating
120VAC 50/60Hz 0.4A
69
75
TO PLACE AN ORDER CALL: 866-487-4751
OR VISIT: WWW.TIMECLOCKEXPERTS.COM
5640 Departure Drive
Raleigh, North Carolina 27616 USA
(919) 872-5800
In USA (800) 334-7190
Fax: (919) 850-0720
www.acroprint.com
Q0170-6120-1
P/N 06-0331-000 Rev. A
76