1
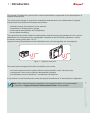
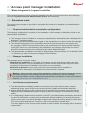
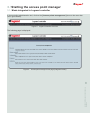
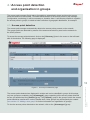
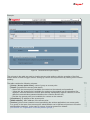
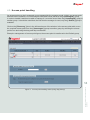
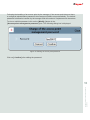
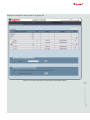
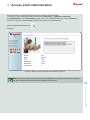
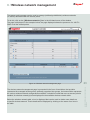
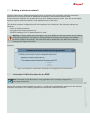
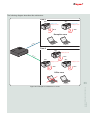
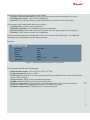
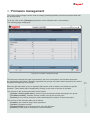
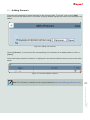
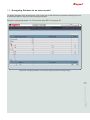
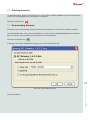
Legrand
Access point manager
User manual
Ve r sio n 4.0.1
www.legrand.fr
Table of contents
1 / Introduction
7
2 / Access point manager installation
8
2.2.1 / Required administration workstation configuration
2.2.2 / Manager installation
2.2.3 / Architecture requirements
3 / Starting the access point manager
3.1 / Mode integrated in Legrand controller
3.2 / Standalone mode
4 / Access point detection and organisation in groups
4.1 / Access point detection
4.2 / Access point handling
4.3 / Organisation of access points in groups
4.3.1 / Adding a new group
4.3.2 / Renaming a group
4.3.3 / Deleting a group
4.3.4 / Changing an access point to another group
8
8
8
8
8
9
9
11
12
12
14
17
19
19
20
20
5 / Access point administration
22
6 / Wireless network management
23
6.1 / Adding a wireless network
6.1.1 / Automatic VLAN allocation for an SSID
6.2 / Assigning a wireless network to an access point
6.2.1 / Assigning an SSID to an access point group
6.2.2 / Assigning an SSID to an access point
6.3 / Editing a wireless network
6.3.1 / Mode integrated in Legrand controller
6.3.1.1 / Use of zones
6.3.2 / Standalone mode
6.4 / Deleting a wireless network
25
25
27
27
29
31
31
32
36
37
3
ACCESS POINT MANAGER USER MANUAL
Legrand
2.1 / Mode integrated in Legrand controller
2.2 / Standalone mode
7 / Configuration management
38
8 / Firmware management
43
9 / Access point monitoring
47
10 / Configuration backup/restoration
49
11 / Documentation
51
8.1 / Adding firmware
8.2 / Assigning firmware to an access point
8.3 / Deleting firmware
8.4 / Downloading firmware
10.1 / Mode integrated in Legrand controller
10.2 / Standalone mode
40
41
42
42
44
45
46
46
49
49
4
ACCESS POINT MANAGER USER MANUAL
Legrand
7.1 / Adding a configuration
7.2 / Assigning a configuration to an access point
7.3 / Deleting a configuration
7.4 / Renaming a configuration
Table of figures
7
9
9
11
12
13
14
15
15
16
18
19
20
21
22
23
24
25
27
28
28
29
29
31
33
34
35
35
36
38
39
41
41
5
ACCESS POINT MANAGER USER MANUAL
Legrand
Figure 1. Legrand access point
Figure 2. Legrand controller menu bar
Figure 3. Access point manager home page (integrated mode)
Figure 4. Access point manager home page (standalone mode)
Figure 5. Access point detection page
Figure 6. Detected access point display
Figure 7. Access point handling action (using drag & drop)
Figure 8. Example of access point handling
Figure 9. Manual access point addition for management
Figure 10. Editing an access point password
Figure 11. Organisation of access points in groups
Figure 12. Adding a group
Figure 13. Renaming a group
Figure 14. Access point group change action (using drag & drop)
Figure 15. Native access point Web administration interface
Figure 16. Wireless network management page
Figure 17. Detailed information display for a wireless network
Figure 18.Example of conflict while activiating the management
of an access point
Figure 19.Assigning an SSID to an access point group
(by means of drag & drop)
Figure 20. Option selection when assigning an SSID to an access point group
Figure 21. SSID update report
Figure 22. Assigning an SSID to an access point (by means of drag & drop)
Figure 23. Option selection when assigning an SSID to an access point
Figure 24. Editing a wireless network
Figure 25. Example of architecture in zones
Figure 26. Example of SSID distribution
Figure 27. SSID editing example: step 1
Figure 28. SSID editing example: step 2
Figure 29. SSID editing example: step 3
Figure 30. Configuration management page
Figure 31. Detailed information display for a configuration
Figure 32.Assigning a configuration to an access point group
(by means of drag & drop)
Figure 33. Configuration installation selection for a group
Renaming a configuration
Firmware management page
Adding new firmware
Firmware addition example
Assigning firmware to an access point (by means of drag & drop)
Downloading firmware
Access point monitoring page
Monitoring information display for an access point
Backup/Restoration page
Saving the backup file
User manuals
42
43
44
44
45
46
47
48
49
50
51
6
ACCESS POINT MANAGER USER MANUAL
Legrand
Figure 34.
Figure 35.
Figure 36.
Figure 37.
Figure 38.
Figure 39.
Figure 40.
Figure 41.
Figure 42.
Figure 43.
Figure 44.
1 / Introduction
This manual is intended for system and/or network administrators responsible for the administration of
Legrand access points.
The access point manager is used for the centralised administration of an installed base of Legrand
access points. It performs the following main functions:
- automatic access point detection on the network;
- organisation of access points in groups;
- access points administration and configuration;
- access points monitoring.
The Legrand access points suitable for administration with the access point manager are the versions
dedicated to the commercial sector (manageable, integrated in the LCS/LCS2 programme, running
a firmware version greater than 1.6.2.2).
Legrand access points dedicated to the residential sector (non-manageable) are not supported.
Wi-Fi
Wi-Fi
Figure 1. Legrand access point
The access point management function is available in two modes:
- one mode integrated in the Legrand controller (and accessible via the «Access points
management» menu on the controller administration interface)
- one standalone mode on Windows 7 and Windows XP platforms.
In this manual, we will describe both modes and specify the differences in their operation if applicable.
7
ACCESS POINT MANAGER USER MANUAL
Legrand
Note: When using the manager integrated in the Legrand controller, it is recommended
to consult the «Legrand Controller Administration Guide» documentation.
2 / Access point manager installation
2.1 / Mode integrated in Legrand controller
The Legrand controller must be previously installed to be able to access the access point manager.
See the «Legrand Controller Administration Guide» documentation.
2.2 / Standalone mode
The access point manager is provided in executable file format to be installed on an administration
workstation.
2.2.1 / Required administration workstation configuration
The following configuration is required for the installation of the manager in standalone mode on an
administration workstation:
1. The manager must be installed on a computer (administration workstation) with a Windows XP or
Windows 7 operating system.
2. The user must have the administrator rights on the workstation to be able to install the manager.
3. The firewall configuration on the workstation should not prevent access to the network and
the reception of UPnP announcements sent by the access points for their automatic detection.
If the UPnP service is not activated on the workstation, the manager will activate it to ensure
that UPnP announcements are not filtered by the native Windows firewall.
4. The administration workstation must have a Web browser (Internet Explorer 5.5 or Mozilla Firefox
1.5 minimum) in order to access the manager’s Web interface.
2.2.2 / Manager installation
The manager can be run in two modes:
- Mode without installation: in this mode, the manager can be used directly without any prior
installation operations. Only the installation of a Java execution environment may prove to be
necessary if it has not been installed or the version is not compatible.
- Mode with installation: in this mode, the access point manager will be installed on
the administration workstation, including the Java environment if required.
Warning : When using the mode without installation, configuration data is temporarily stored
during the execution of the software and will thus be lost when you exit the manager.
It is recommended to use the configuration backup/restore mechanism to save work between
sessions (see section 10.2 “Standalone mode”).
1. The administration workstation should be connected to the same subnet (same network
addressing range, same VLAN) as the access points to enable their automatic detection.
2. Access points belonging to other subnets may be handled by the manager using the manual
addition function provided that network routing enables the manager to contact these access
points.
3. If no addressing is defined on the network (no DHCP), the administration workstation should use
the auto-IP mechanism to assign itself an automatic address enabling it to access the access
points. In this case, it will not be possible to detect and contact the access points for which autoIP mode has been deactivated. Therefore, it will not be possible to handle them.
The same applies for the access points situated on other subnets; the manager will be unable to
contact them.
8
ACCESS POINT MANAGER USER MANUAL
Legrand
2.2.3 / Architecture requirements
3 / Starting the access point manager
3.1 / Mode integrated in Legrand controller
In the controller administration tool, click on the [ Access points management ] item on the menu bar
(see Figure below).
Figure 2. Legrand controller menu bar
The following page is displayed.
Figure 3. Access point manager home page (integrated mode)
ACCESS POINT MANAGER USER MANUAL
Legrand
9
Administration operations are classified in categories. Five categories are available:
- [ Discovery ]
This category is used for automatic access point detection via the network, access point
organisation in groups and access to the native administration interface of an access point.
- [ Wireless networks ]
This category is used to associate a wireless network (SSID) with an access point.
The wireless network can be edited to change the associated VLAN in particular.
- [ Configurations ]
In this category, it will be possible to change the overall configuration of an access point by
replacing it with another one.
- [ Firmwares ]
This category is used to update the access points with new firmware.
- [ Monitoring ]
This category is used to monitor the access points by viewing their operating status and the main
configuration settings.
10
ACCESS POINT MANAGER USER MANUAL
Legrand
3.2 / Standalone mode
If the manager has been installed on the administration workstation, it can be started in different ways
according to the installation selections, for example in the program menu or using a desktop icon.
If the manager is not installed, it can only be started by double-clicking on the executable.
When the manager is started, the following page is displayed.
Figure 4. Access point manager home page (standalone mode)
To exit the access points manager, click on the [ Quit ] button at the bottom left of the page.
11
ACCESS POINT MANAGER USER MANUAL
Legrand
Administration operations are classified in categories; six categories are available.
The first five are the same as for the manager integrated in the Legrand controller (see previous
section). The last category (Configuration management) relates to the configuration backup and
restoration mechanism.
4 / Access point detection
and organisation in groups
The access point manager firstly makes it possible to automatically detect and view the access
points accessible on the network. To enable administration of the access points by the manager
(configuration, monitoring), it will be necessary to «handle» them. It will also be possible to organise
the access points in groups, to obtain a better reflection of geographic distribution, for example.
4.1 / Access point detection
The access point manager automatically detects the access points present on the network.
The access points are detected by means of the announcements they send on the network via
the UPnP protocol.
To access the access points detected, click on the [ Discovery ] item in the menu on the left-hand
side of the window. The following page is displayed:
Figure 5. Access point detection page
The access points detected are displayed in a table and can be classified in groups. At this stage,
only two groups are available, the [ Unmanaged ] group containing all the access points detected
but not yet handled and the [ Default ] group. The [ Default ] group is the group to which the access
points should be transferred in order to handle them. Other groups may subsequently be created
(see section 4.3 “Adding a new group” for further information on organisation in groups).
To view the access points detected on the network, click on the [ Unmanaged ] group.
ACCESS POINT MANAGER USER MANUAL
Legrand
12
Example:
Figure 6. Detected access point display
The columns in the table are used to view the access point settings, with the exception of the final
column which is used to trigger actions. Sorting by column can be performed by clicking on the column
heading.
13
ACCESS POINT MANAGER USER MANUAL
Legrand
The table contains the following columns:
- [ Group / Access point name ]: name of group or access point.
- [ Status ]: specifies the access point status:
- Green dot: the access point is available for contact on the network and operational.
- Yellow dot: the access point is available for contact on the network but not operational (for
example, incorrect firmware or access point already managed by another controller, or even
different communication password between the controller and the AP).
- Red dot: the access point is not available for contact on the network.
- [ IP address ]: IP address of the access point.
- [ MAC address ]: MAC address of the access point.
- [ Actions ]: this column contains icons representing the actions applicable to an access point
or a group. In the case of an access point, administration can be performed (access to its native
administration interface). In the case of a group, it can be renamed or deleted
(see section 4.3 “Organisation of access points in groups”).
4.2 / Access point handling
An access point may be in managed or non-managed by the manager mode. Initially, an access point
detected on the network is in non-managed mode and is thus placed in the [ Unmanaged ] group.
In order to handle it and thus be able to manage it, it must be moved from the [ Unmanaged ] group to
another group. It should be noted that, the first time the manager is used, only the [ Default ] group is
available.
Click on the [ Discovery ] item in the left-hand menu of the window. In the access point table, move
the required access point from the [ Unmanaged ] group to another group by selecting the access
point’s icon and using the drag and drop mechanism.
Example: management of access point Agora; the access point is transferred to the Default group.
Figure 7. Access point handling action (using drag & drop)
ACCESS POINT MANAGER USER MANUAL
Legrand
14
The access points will be organised as follows:
Figure 8. Example of access point handling
Following the management of an access point, the description of its configuration will be displayed
along with its wireless networks in the pages accessible in the [ Configurations ] and [ Wireless
networks ] menus.
Figure 9. Manual access point addition for management
Following the use of this method, the access point appears in the table and will be added directly to all
the managed access points ([ Default ] group).
Warning: If the access point added manually is configured for dynamic addressing (DHCP)
and is located behind a router, its change of IP address may result in it becoming inaccessible.
15
ACCESS POINT MANAGER USER MANUAL
Legrand
Access points that have not been detected automatically can be handled manually.
To do this, it is simply necessary to complete the [ IP address ] field in the [ Manual addition of an
access point ] box at the bottom of the page and click on the [ Add ] button next to the field.
Following the handling of an access point by the manager, if the access point does not have
a configured administration password, the manager will define one automatically. The default
password is defined at random by the manager and will consist of 8 alphanumeric characters.
To view or edit this password, click on the [ Modify ] button in the
[ Access points management password ] box. The following dialog box is displayed.
Figure 10. Editing an access point password
Click on [ Confirm ] after editing the password.
ACCESS POINT MANAGER USER MANUAL
Legrand
16
4.3 / Organisation of access points in groups
The [ Discovery ] page is also used to organise access points in groups. For this purpose, it is
possible to create, rename and delete a group, and add/delete one or more access points in a group.
There are three pre-defined groups:
- One group named [ Unmanaged ] containing the access points detected on the network but not
handled by the manager. This group will no longer be displayed if no non-managed access points
are found on the network. This group can only be viewed on the [ Discovery ] page.
-O
ne group named [ Default ] used as the default group for the access points handled by
the manager. Access points added manually to all the managed access points are inserted in
this group.
-O
ne group named «All access points» used to designate all the access points.
It is used to perform overall operations on all the managed access points, independently from
their affiliation in a group. This group is not displayed on the [ Discovery ] page.
Note: The predefined groups cannot be renamed or deleted.
It is not possible to create subgroups.
This group-based structure can be used, for example, to reflect the geographic distribution of
the access points. It can also be used to factor in wireless network, configuration or firmware update
operations.
ACCESS POINT MANAGER USER MANUAL
Legrand
17
The screenshot below shows an example of organisation in groups.
Figure 11. Organisation of access points in groups
Next to the name of each group, a help icon can be used to display a message describing the group
when the mouse passes over the icon. The wording of the message can be entered when the group is
created.
The [ Actions ] column for a group is used to rename or delete the group.
18
ACCESS POINT MANAGER USER MANUAL
Legrand
To display or hide the access points belonging to a group, simply click on the name of the group
(reduce/extend a group). This operation can be performed with all groups by using the button
at the top right-hand corner of the access point table, adopting the value [ Expand groups ] or
[ Add a group ] according to the circumstances.
4.3.1 / Adding a new group
To add a new group, click on the [ Add a group ] button located at the top of the access point table.
This action displays a popup window prompting the entry of the name of the group and the wording of
the group description. The descriptive wording will subsequently be associated with the help icon.
Figure 12. Adding a group
Enter the fields and click on [ Confirm ].
4.3.2 / Renaming a group
To rename a group, click on the renaming icon in the [ Actions ] column, on the row corresponding to
the group to be renamed.
Group renaming icon:
19
ACCESS POINT MANAGER USER MANUAL
Legrand
This action displays a popup window prompting the entry of the new name of the group selected and
the new description.
Figure 13. Renaming a group
Enter the fields and click on [ Confirm ].
4.3.3 / Deleting a group
To delete a group, click on the deletion icon in the [ Actions ] column, on the row corresponding to
the group to be deleted.
Group deletion icon:
Note: If the deleted group is not empty, the access points in this group will be assigned
to the [ Default ] group.
4.3.4 / Changing an access point to another group
Note: Moving an access point from one group to another does not change its configuration.
Note: Moving an access point to the [ Unmanaged ] group will remove it from the set of
managed access points. The access point will be notified of this change by the manager.
20
ACCESS POINT MANAGER USER MANUAL
Legrand
To change an access point to another group, click on the icon of the access point to be moved and
drag the icon to its new group.
Example: moving AP1 from group G1 to group G2.
Figure 14. Access point group change action (using drag & drop)
ACCESS POINT MANAGER USER MANUAL
Legrand
21
5 / Access point administration
An access point is administered by accessing its native Web interface.
To do this, in the access point table found on the [ Discovery ], [ Wireless networks ],
[ Configurations ] and [ Firmwares ] pages, click on the administration icon in the [ Actions ]
column, on the row corresponding to the access point to be administered.
Access point administration icon:
Example:
Figure 15. Native access point Web administration interface
Note: For further details on the access point configuration procedure via its native interface,
see the user guide provided with your Legrand access point.
ACCESS POINT MANAGER USER MANUAL
Legrand
22
6 / Wireless network management
The access point manager can be used to manage (add/assign/edit/delete) wireless networks
(or SSIDs) associated with the access points.
To do this, click on the [ Wireless networks ] item in the left-hand menu of the window.
The page is displayed; in the example below, the page displayed shows the presence of a «Wi-Fi»
SSID on all the access points.
The wireless network management page is presented in the form of two tables: the top table
represents the managed access points, optionally organised into groups, the bottom table represents
the various wireless network configurations available. It should be noted that once an access point is
handled, its wireless network(s) is/are displayed in the available wireless network table.
Below the wireless network table, a box is displayed that can be used to obtain more details on
a specific wireless network. These details will be displayed by clicking on the name of an item in
the table.
23
ACCESS POINT MANAGER USER MANUAL
Legrand
Figure 16. Wireless network management page
The access point table contains the following columns:
- [ Group / Access point name ]: name of group and access points belonging to the group.
- [ Wireless network name ]: list of the names of the wireless networks configured on the access
point.
- [ Actions ] : icon used to access the native administration interface of the access point
The wireless network table contains the following columns:
- [ Wireless network name ]: name of wireless network.
- [ Encryption type ]: open, WEP, WPA, WPA2. Use of 802.1x.
- [ Access points ] : list of the access points (name of access point) using the wireless network.
- [ Actions ]: icons used to edit or delete the wireless network.
To view more information on a wireless network, click on its name. The additional information is
displayed in the box below the table.
Example:
Figure 17. Detailed information display for a wireless network
The following information is displayed:
- [ Zone : ]: the name of zones on which this wireless network is defined and the VLAN associated
with the wireless network for each zone.
- [ Radio : ]: type of radios activated for this wireless network: 2.4GHz, 5GHz or 2.4 and 5GHz
-R
ADIUS configuration: if 802.1x authentication is used: IP address and port of the RADIUS
server, 802.1x reauthentication period.
Note: Zones are not included in the standalone manager mode; only the VLAN associated
with the wireless network will be displayed.
24
ACCESS POINT MANAGER USER MANUAL
Legrand
6.1 / Adding a wireless network
Wireless networks are added automatically when an access point is handled; wireless network(s)
defined on the access point will be displayed accordingly in the wireless network table.
If these wireless networks are already found on other managed access points, they will not be added
because a given wireless network is only displayed once in the table.
Two wireless network configurations will be considered to be identical if the following settings are
identical:
- name of wireless network,
- encryption type and encryption key,
- RADIUS settings if 802.1x authentication is used.
Warning: If, when adding an access point, one of its SSIDs has the same name as an existing
SSID but with different encryption or different RADIUS settings, the manager will consider
an SSID conflict to be present. The new SSID will be displayed in the table but a warning
message will signal the conflict.
Example:
Figure 18. Example of conflict while activiating the management of an access point
6.1.1 / Automatic VLAN allocation for an SSID
During this wireless network addition operation, a VLAN will be automatically assigned to the wireless
network if required so as to always guarantee an operational «SSID/VLAN» pair.
25
ACCESS POINT MANAGER USER MANUAL
Legrand
Note: Automatic VLAN allocation is only applicable to the manager integrated in
the Legrand controller.
The VLAN allocation algorithm for an SSID is as follows:
- If a VLAN is defined on the SSID when the access point is handled, the manager checks whether
an identical SSID already exists on the manager.
- If so, the manager checks that the SSID VLAN of the access point handled is defined on
the existing SSID.
› If so, the manager retains the VLAN
› If not, the manager assigns the VLAN with the lowest number from those of the existing
SSID.
- If not, the manager checks that the associated VLAN is not associated with another SSID and
that the VLAN is associated with the Default zone.
› If so, the manager retains the VLAN
› If not, the manager assigns the VLAN with the lowest number available on the controller
associated with the Default zone and not assigned to an SSID.
- If no VLAN is defined on the SSID when the access point is handled, the manager checks whether
an identical SSID already exists on the manager
- If so, the manager assigns the VLAN with the lowest number from those of the existing SSID.
- If not, the manager assigns the VLAN with the lowest number available on the controller
associated with the Default zone and not assigned to an SSID.
If no VLAN is available, the manager will create it automatically. In this case, it will be
associated with the Default zone. Its number will be the lowest number available.
This algorithm ensures that each SSID is associated with a different VLAN thus enabling traffic
isolation.
To edit the association of an SSID with a VLAN, see section 6.3.1 “Mode integrated in Legrand
controller”.
Note: In automatic VLAN allocation mode: (1) The native (non-tagged) VLAN and VLAN 1
will not be used, (2) only the predefined [ Default ] zone will be used. All VLANs will belong
to this zone.
ACCESS POINT MANAGER USER MANUAL
Legrand
26
6.2 / Assigning a wireless network to an access point
To assign a wireless network to an access point, click on the icon of the wireless network in question
and drag the icon to an access point or a group in the access point table.
6.2.1 / Assigning an SSID to an access point group
Example: assigning the Employees wireless network to the Floor 1 group.
Before assigning the SSID to the access point group, the manager offers the following options
in a dialogue box.
27
ACCESS POINT MANAGER USER MANUAL
Legrand
Figure 19. Assigning an SSID to an access point group (by means of drag & drop).
Figure 20. Option selection when assigning an SSID to an access point group
- [ Add / update this wireless network ] option
The wireless network to be assigned will be added on all the access points of the group or,
if it already exists, it will be edited.
- [ Replace all wireless networks with this one ] option
All the other wireless networks on the access points will be deleted and replaced by the new
wireless network.
In addition, the VLAN associated with the wireless network can be edited during the allocation.
Click on [ Continue ] to continue the allocation operation.
Note: If the Radio setting is not activated on the access points, it will be automatically activated
following this operation. If a RADIUS configuration is associated with the SSID, it will be copied
to the access points.
Once the operation has been completed, a report is displayed giving the result of the operation.
Figure 21. SSID update report
ACCESS POINT MANAGER USER MANUAL
Legrand
28
6.2.2 / Assigning an SSID to an access point
Example: assigning the wireless network “Internet” to access point AP3.
Figure 22. Assigning an SSID to an access point (by means of drag & drop)
29
ACCESS POINT MANAGER USER MANUAL
Legrand
Before assigning the SSID to the access point, the manager offers the following options:
Figure 23. Option selection when assigning an SSID to an access point
- [ Add the wireless network ] option
The wireless network to be assigned will be added to the access point.
- [ Replace all wireless networks with this one ] option
All the other wireless networks on the access points will be deleted and replaced by the new
wireless network.
- [ Replace the wireless network ] option
The wireless network may replace a wireless network to be selected from the list of possible
wireless networks (selectable list).
In addition, the VLAN associated with the wireless network can be edited during the allocation.
Click on [ Continue ] to continue the allocation operation.
Note: If the Radio setting is not activated on the access point, it will be automatically activated
following this operation. If a RADIUS configuration is associated with the SSID, it will be copied
to the access point.
ACCESS POINT MANAGER USER MANUAL
Legrand
30
6.3 / Editing a wireless network
To edit a wireless network (SSID), click on the edit icon found in the column entitled [ Actions ]
in the wireless network table, on the row corresponding to the wireless network to be edited.
SSID edit icon:
6.3.1 / Mode integrated in Legrand controller
For example, the following window is displayed for the wireless network “Wi-Fi”.
Figure 24. Editing a wireless network
The editing window consists of several boxes, each used to configure the SSID in relation to a zone.
If no zone is defined on the Legrand controller, only the box corresponding to the [ Default ] zone will
be displayed. Otherwise, a number of boxes corresponding to the number of zones on which the SSID
is defined will be displayed.
Each box associated with a zone contains the following information:
- The VLAN associated with the SSID; it should be noted that the manager performs automatic
SSID/VLAN association by default.
- Two access point lists: the left-hand list relates to the access points on which the SSID is defined,
the right-hand list relates to the list of access points available, i.e. handled by the manager.
The [ Add ] and [ Delete ] buttons are used to add or remove the SSID on an access point. The
removal operation makes it possible to remove an SSID from one or more access points without
deleting the SSID completely.
31
ACCESS POINT MANAGER USER MANUAL
Legrand
Note: It should be noted that a zone is a set of VLANs. Therefore, an SSID will be defined
on a zone if there is an SSID/VLAN association with a VLAN belonging to the zone.
See section 6.3.1.1 “Use of zones” for the use of zones with the access point manager.
6.3.1.1 / Use of zones
The Legrand controller refers to zones used to describe locations such as the reception, meeting
rooms or offices. Security and mobility policies such as «prohibition of a population to connect to
an access point belonging to a given zone» or «display of a suitable portal for the zone» may be
applied to these zones.
In network terms, a zone corresponds to a set of VLANs. The zone/VLAN correspondence is
performed during the Legrand controller configuration.
Since an SSID is always associated with a VLAN, the implementation of the zones will consist of
working on the SSID/VLAN associations. Consequently, for each zone in which the SSID exists,
it is possible to modify its association with a VLAN in the zone; the SSID may also be configured
for new zones.
We will illustrate the use of zones through the following example:
- Zones
› Reception zone = (VLAN2) on first floor
› Offices zone = (VLAN3) on second floor
- Access points
› The Reception zone will contain 2 access points (AP1, AP2)
› The Offices zone will contain 3 access points (AP3, AP4, AP5)
- SSIDs
› An Employees SSID will be defined on all the access points.
› A Visitors SSID will be defined on the access points in the Reception zone.
The purpose of the zones in this example is to implement the following policies:
- Authorisation for Employees type populations to connect everywhere.
- Authorisation for Visitors type populations to connect to the reception zone but not to the offices
zone.
- Display of a portal operating in SMS mode for the reception zone.
- Display of a standard portal (username, password) on the office zone.
32
ACCESS POINT MANAGER USER MANUAL
Legrand
The following diagram describes this architecture.
Floor 1
AP1
AP2
Visitors SSID
Employees SSID
Visitors SSID
Employees SSID
Wi-Fi
Wi-Fi
Reception zone
AN
VL
2
Visitors
Floor 2
Employees
AP3
Employees SSID
VL
AN
3
Wi-Fi
AP5
AP4
Employees SSID
Employees SSID
Wi-Fi
Wi-Fi
Office zone
Figure 25. Example of architecture in zones
Employees
33
ACCESS POINT MANAGER USER MANUAL
Legrand
Visitors
The access point manager will reflect the SSID organisation as follows.
Figure 26. Example of SSID distribution
1. Create the reception and offices zones.
2. Associate the entry VLANs with the suitable zones, i.e. VLAN 2 with the reception zone and
VLAN 3 with the office zone. This action will associate the Visitors SSID with the reception zone
and the Employees SSID with the offices zone.
3. Edit the Employees SSID so that it is defined both on the reception and offices zones.
34
ACCESS POINT MANAGER USER MANUAL
Legrand
To configure the manager in order to implement this zone-based architecture, it will be necessary to:
a. Click on the edit icon for the Employees SSID, the following window is displayed.
Figure 27. SSID editing example: step 1
b. Add the reception zone by selecting the reception zone from the selectable list and click on
the [ Add the zone ] button. The following window is displayed.
35
Figure 28. SSID editing example: step 2
ACCESS POINT MANAGER USER MANUAL
Legrand
c. R
emove access points AP 1 and AP 2 from the office zone by moving them from the list of
active access points to the list of available access points. Add access points AP 1 and AP 2
to the reception zone. The window below shows the result obtained.
Figure 29. SSID editing example: step 3
d. Click on [ Confirm ]
6.3.2 / Standalone mode
For example, the following window will be displayed for the wireless network Visitors.
The window will display the following information:
- The VLAN associated to the SSID
- Two lists of access points, the left-hand side list concerns the access points on which the SSID is
defined, and the right-hand side list, the available access points (ie managed by the AP manager).
The buttons [ Add ] and [ Delete ] allow to add or remove the SSID on an access point.
The deletion operation allows to remove an SSID from one or several access points but will not
always completely remove the SSID.
36
ACCESS POINT MANAGER USER MANUAL
Legrand
Zones, which are specific to the Legrand controller, are not included in the standalone version of
the access point manager. In this case, only the VLAN associated with the SSID will be displayed
and suitable for editing.
6.4 / Deleting a wireless network
To delete a wireless network, click on the deletion icon found in the column entitled [ Actions ] in
the wireless network table, on the row corresponding to the wireless network to be deleted.
This action triggers the deletion of the SSID(s) on all the access points on which the SSID(s) is/are
defined. To remove an SSID on a specific access point, the SSID edit operation should be used
(see section above).
Wireless network deletion icon:
ACCESS POINT MANAGER USER MANUAL
Legrand
37
7 / Configuration management
The access point manager can be used to manage (add/assign/rename) the configurations associated
with the access points.
To do this, click on the [ Configurations ] submenu in the left-hand menu of the window. The following
page is displayed.
The configuration management page is presented in the form of two tables: the top table represents
the managed access points, optionally organised into groups, the bottom table represents the various
access point configurations available.
It should be noted that once an access point is handled, its configuration is displayed in the configuration
table.
Below the configuration table, a box is displayed that can be used to obtain more details on a specific
configuration. These details will be displayed by clicking on the name of an item in the table.
38
ACCESS POINT MANAGER USER MANUAL
Legrand
Figure 30. Configuration management page
The columns in the access point table are as follows:
- [ Groupe / Access point name ]: name of group and access points belonging to the group.
- [ Configuration name ]: name of the configuration.
- [ Actions ]: icon used to access the native administration interface of the access point.
The columns in the configuration table are as follows:
- [ Configuration ]: name of the configuration.
- [ Wireless networks ]: list of SSIDs found in the configuration
- [ Access point(s) ]: list of the access points (name of access point) using this configuration.
- [ Actions ]: icons used to rename the configuration.
To view more information on a configuration, click on the name of the configuration. The additional
information will be displayed in the box below the table.
Example:
Figure 31. Detailed information display for a configuration
The following information will be displayed:
- [ Web interface mode ]: HTTP, HTTPS, HTTP + HTTPS.
- [ Addressing mode ]: autoip or static.
- VLAN support: activated or not (this information will only be displayed in the case of the software
version of the manager).
- [ UPnP service ]: UPnP service activation/deactivation.
- [ SNMP service ]: SNMP service activation/deactivation.
- [ Syslog configuration ]: Syslog service activation/deactivation. If the service is activated,
the service settings are displayed (Syslog server IP address and port).
- [ RADIUS configuration ]: RADIUS server IP address and port.
39
ACCESS POINT MANAGER USER MANUAL
Legrand
7.1 / Adding a configuration
When an access point is handled, its configuration will be displayed automatically in the configuration
table. The manager checks beforehand that an identical configuration is not already found in the table;
indeed, a configuration will only be displayed once even if it is used by several access points.
Two configurations will be considered to be identical if the following configuration settings are identical:
- IP addressing mode (DHCP or static)
- Web interface mode (HTTPS or HTTP+HTTPS)
- VLAN support activation (in the case of standalone manager mode only as, in the case of
the mode integrated in the Legrand controller, VLAN support will always be activated on handled
access points)
- SNMP, UPnP and Syslog settings
- RADIUS settings
- Configured SSIDs
- Types of radios activated, channels used and preamble types.
40
ACCESS POINT MANAGER USER MANUAL
Legrand
7.2 / Assigning a configuration to an access point
To assign a configuration to an access point, click on the icon of the configuration in question and drag
the icon to an access point or a group in the access point table.
Example: assigning the AP_configuration_4 configuration to the group G1.
Figure 32. Assigning a configuration to an access point group (by means of drag & drop)
Figure 33. Configuration installation selection for a group
The advantage of the parallel method is the time saved; the advantage of the sequential method is
that it ensures an operational service during the configuration installation operation.
41
ACCESS POINT MANAGER USER MANUAL
Legrand
A configuration may be assigned to an access point group in parallel on all the access points or
sequentially, one access point after the other.
The manager offers this option in a window such as that shown below.
7.3 / Deleting a configuration
A configuration cannot be deleted explicitly; once a configuration is no longer in use, it automatically
disappears from the table.
Warning: If a new configuration is assigned to an access point, the old configuration may be
lost if it was only found on that access point.
7.4 / Renaming a configuration
By default, configuration names observe the following format:
AP_configuration_<number>
The number is incremented for each additional configuration detected.
To rename a configuration, click on the renaming icon in the [ Actions ] column, on the row
corresponding to the configuration to be renamed.
Configuration renaming icon:
This action displays a popup window prompting the entry of the new name of the configuration.
Click on [ Rename ].
ACCESS POINT MANAGER USER MANUAL
Legrand
Figure 34. Renaming a configuration
42
8 / Firmware management
The access point manager can be used to manage (add/assign/delete) the firmware associated with
the access points.
To do this, click on the [ Firmwares ] submenu in the left-hand menu of the window.
The following page is displayed.
Figure 35. Firmware management page
Below the firmware table, a box is displayed that can be used to obtain more details on specific
firmware. These details will be displayed by clicking on the name of an item in the table.
The columns in the access point table are as follows:
- [ Groupe / Access point name ]: name of group and access points belonging to the group.
- [ Firmware version ]: firmware version number used by the access point.
- [ Actions ]: icon used to access the native administration interface of the access point.
The columns in the firmware table are as follows:
- Firmware: icon used for drag & drop operations.
- [ Version ]: firmware version.
- [ Access point(s) ]: list of access points using this firmware.
- [ Actions ]: icons used to download or remove firmware.
43
ACCESS POINT MANAGER USER MANUAL
Legrand
The firmware management page is presented in the form of two tables: the top table represents
the managed access points, optionally organised into groups, the bottom table represents the various
firmwares managed by the manager.
8.1 / Adding firmware
Firmware will essentially be added manually to the firmware table. To do this, click on the [ Add ]
button on the top left-hand corner of the table. A popup window requests the name of the firmware to be
added.
Figure 36. Adding new firmware
Click on [ Browse... ] to select the file corresponding to the firmware to be added and then click on
[ Save ].
Once the firmware has been loaded, it is displayed in the firmware table as shown by the screen shot
below.
Figure 37. Firmware addition example
44
ACCESS POINT MANAGER USER MANUAL
Legrand
Note: The firmware is available on the Legrand Website (http://www.wifi.legrandelectric.com)
8.2 / Assigning firmware to an access point
To assign firmware to an access point, click on the icon of the firmware in question and drag the icon
to an access point or a group in the access point table.
Example: assigning firmware 1.6.2.2 to access point AP1 in the group G1.
Figure 38. Assigning firmware to an access point (by means of drag & drop)
ACCESS POINT MANAGER USER MANUAL
Legrand
45
8.3 / Deleting firmware
To delete firmware, click on the deletion icon in the column entitled [ Actions ] in the firmware table,
on the row corresponding to the firmware to be deleted.
Firmware deletion icon:
8.4 / Downloading firmware
Firmware can be downloaded using the access point manager to be saved on another computer.
To download firmware, click on the download icon in the column entitled [ Actions ] in the firmware
table, on the row corresponding to the firmware to be downloaded.
Firmware download icon:
A dialogue box will be displayed to prompt you to save the firmware file.
Figure 39. Downloading firmware
Click on [ Save ].
ACCESS POINT MANAGER USER MANUAL
Legrand
46
9 / Access point monitoring
The access point manager is used to monitor all the handled access points. To do this, click on
the [ Monitoring ] item in the left-hand menu of the window. The following page is displayed.
Figure 40. Access point monitoring page
47
ACCESS POINT MANAGER USER MANUAL
Legrand
A table displays the following information for each access point:
- [ Last name ]: name of access point.
- [ Group ]: group to which the access point belongs.
- [ Status ]: specifies the access point status:
- Green dot: the access point is available for contact on the network and operation.
- Yellow dot: the access point is available for contact on the network but not operational
(incorrect firmware for example).
- Red dot: the access point is not available for contact on the network.
- [ Radio type ]: 2.4GHz, 5GHz or 2.4 and 5GHz
- [ IP address ]: IP address of the access point.
- [ MAC address ]: MAC address of the access point.
- [ Firmware version ]: firmware version number of the access point.
- [ Number of wireless networks ]: number of SSIDs configured on the access point.
- [ Connected users ]: number of users connected to the access point.
To view more information on an access point, click on the name of the access point.
The additional information will be displayed in the box below the table.
Example:
Figure 41. Monitoring information display for an access point
The information displayed consists of the information associated with the users actually connected to
the access point:
- [ IP address ]: the IP address of the connected user workstation if it can be detected by the
controller (in the ARP cache for example).
- [ MAC address ]: the MAC address of the connected user workstation.
- RSSI ([ Received signal strength ] Indication): the strength of the radio signal emitted by the
user workstation.
- [ Bitrate ]: the Wi-Fi connection speed of the user workstation.
ACCESS POINT MANAGER USER MANUAL
Legrand
48
10 / Configuration backup/restoration
10.1 / Mode integrated in Legrand controller
This function will be accessible in the «Configuration management» submenu found in
the «Operation» menu of the Legrand controller. See the «Legrand controller Administration
Manual» documentation.
10.2 / Standalone mode
It is possible to make a backup of the access point manager configuration.
It can subsequently be restored if required.
The backup will include:
- the list of handled access points and their settings,
- the access point configurations,
- the access point SSIDs,
- the access point firmware.
Warning: Dynamic access point information such as the number of users connected
to the access point will not be backed up.
To backup or restore a configuration, click on the [ Backup and Restore ] submenu in the left-hand
menu of the window. The following page is displayed.
Figure 42. Backup/Restoration page
ACCESS POINT MANAGER USER MANUAL
Legrand
49
To backup the configuration, click on the [ Backup ] button. A window prompts you to save the backup
file in your file system:
Figure 43. Saving the backup file
Click on [ Save ].
Warning: Do not open the file. Do not edit the file name extension (.bz2) when saving the file.
To restore the configuration, select the backup file using the [ Browse… ] button.
Click on [ Restore ].
50
ACCESS POINT MANAGER USER MANUAL
Legrand
To ensure that the access points are updated with the backup information,
check [ Update contactable access points ].
11 / Documentation
The Legrand controller and access point manager user manuals are available «online». The manuals
are in PDF format. To access the manuals, click on the «Documentation» item in the menu bar.
The following page is displayed.
Figure 44. User manuals
Note: In standalone manager mode, only the manager manual will be provided.
Click on the required documentation to view it.
ACCESS POINT MANAGER USER MANUAL
Legrand
51
Siège social :
128, av. du Maréchal-de-Lattre-de-Tassigny
87045 Limoges Cedex - France
tél. : 05 55 06 87 87 +
télex : 580048 F
fax : 05 55 06 88 88
LE03419AA_EN
LEGRAND SNC
snc au capital de 6 200 000F
RCS Limoges 389 290 586
Code A.P.E. 516J
N° d’identification
TVA FR 15 389 290 586