1
7 INCH TOUCHSCREEN CAR DVD RECEIVER
lnstruction Manual
lrel
Thans for your purchase of the Car multimedia player f rom our company.
Please read this instruction manual before you use it,and confirm to set up it correclly
and please keep this manual for future reference.
This instruction Manual introduces you how to operate DVD;GpS;AV;TV.
The manual used in the example screen may vary with the actual picture.
This manual of the product will improve its performance,functions and change the
screen at any time without notice.
The machine to display the contents of the screen may be diflerent
with the actual content. '
lrel
l.Please read the instruction manual carefully before using the unit, in case of wrong
operation caused.
2.when you want to change other mode from Gps mode, please use NAV button on the
unit to switch.
Please do not use any strident goods or apparatus to touch panel and that will break
the touch screen.
4.when the Unit working abnormality, please press RET key with roothpicks, or other
little and sharp things to reset UNIT.
5.Please don' t move the display monitor when the screen stretches out or shrinks, to
avoid to brake the screen and the mechanism!
3.
Foreword
J
I
Before using this equipment, be sure to carefully read and fully understand the following
safety information:
Before operating this machine, please read the entire user's manual.
The navigation function of this product (and optional reversing camera) only play the
role as supplement when you are driving a vehicle, it doesn't mean you can be
distracted, careless or loss of judge while driving.
lf the operation of the equipment (and optional reversing camera) will distribute your
attention of security when you are driving a vehicle, please do not operate on.
Ensure compliance with safe driving, as well as the obeying traffic rules and
regulations. lf there are any difficuities when you are operating the systern by
watching the monitor, please park the vehicle in a safe place, use the parking brake,
and then do the necessary adjustments.
No other person using this system, unless they have read and understand
instructions.
ln case of you are on the road of going to hospitalls,police stations or similar
organizations emergently,it is prohibited to use the navigation system.
The routes and navigation informations which the system shows is for reference only
and may not accurately reflect the latest licensed line, the traffic, one-way road, road
closures or traffic restrictions.
The traffic proposal and restrictions of the current implementation is always the first
issue of this navigation system navigation information. Therefore, be sureto comply
with the current traffic restrictions, even when the navigation system provides the
current recommendations of the contrary.
lf it is unable to enter the accurate local time, it may lead to that the navigation
system can not provide appropriate routes and navigation instructions.
Do not set the volume of equipment too highly, otherwise you can not hear the vehicle
traffic conditions outside the vehicle and emergency vehicles.
Considering the security, some of the features will not be able to operate. Unless you
stop the vehicle or use the parking brake.
Please keep this manual on hand for the refernce of operating procedures and safety
information.
Please pay special attention to all the manual notes, and strictly comply with the
instructions.
ln the following cases, please do not install the equipment: (i) may block the drlver's
line of sight; (ii) that may affect the operation system of the vehicle and the
performance of safety, including air bags, risk alarm light button; (lll)that mey effect
drivers safely driving vehicles.
Please remember to fasten your seat belt when you are drlvlng,lt wlll brlng much less
harm and danger for your fastennng the seat belt than not faetonnlng,onoa there is a
trafflc accident.
Pleage do not wear headphones when driving a vehlcle,
The pink wire of the power connector is used to detect the status of parking, lt must be
connected to the power-side switch of the parking brake.
It may violate applicable law and resulting in serious injuries or damage if the wire is
not connected or used properly.
Do not place this product under the environments which is damp or can be easily
affected with damp and corrosion.you'd better install it in dry and ventilation
environment.
lf the battery power off orthe discharge, the system's memory will be cleared, and it
must be re-programmed.
Do not contact the system with the liquid,otherwies,it will lead to electric shork,and
damage or smoke or overheating to the system.
Warning:Security of driving.
ln order to prevent accidents, to avoid possible violation of applicable laws,please
don't use the system for other purpose which beyond the the manual.simultaneously
the rehr monitor can't be used when it hinder the driver's sight.
In some areas,it is illegal for the driver or other people in the vihicle to watch the
images in the monitor.These laws and regulations should be obeyed under the
applicable situation,and the rear video output also shouldn't be used.
The system can detect whether the parking brake of the vehicle is working or not.And
it can prevent you from watching the images in the monitor at the front. when you try
to watch an image, it will appear warning words in front of the monitor of "No
witching the video information in the front seat while driving".
Do not connect the brake test line with the ground for mandatory to achieve the
purpose of watching the video, otherwise, it may lead to serious potential safety
hazard,when you are driving, part of the menu which can not operate the equipment,
also can not operate some AV features.
To see the image in front of the monitor, please park the vehicle in a safe place and
use the parking brake.
when you have to use the monior to connect with the rear monitor output,the rear
monitor output of the system used to connect the monitor,so as to let the people in
the rear seat can watch the images.
Do not installed in the rear monitor in the location which the driver could watch its
image while driving,ln order to prevent the depletion of the battery, please follow the
following instructions.
Make sure to use the system only when you start the engine.cause the battery will
run out ifyou use the system when you not start the engine.
To the identify the rear condition of the vehicle convenienfly, the images which the
rear camera displays may be the mirrorimage.
Please do not repair, decompose or improve the product. lf this product has the fault
or can not work normally, please ask the customer service Advisory department for
help.
I
I
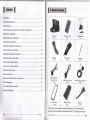
Catalogue.
StandardAccessory...
Specification.....
Touch Screen Area and Function
Main Menu
lnterface...
.........1
...................2
................
Button lnstruction.
........3
.........4
................5
lnstruction...........
.... ......................8
DTV/ATV Operation lnstruction.
.....14
AUX Operation lnstruction....
...........16
USB/SD Operation lnstruction.
................16
IPOD operation instruction......... ..i.............
.....16
User Normal Setup Menu........
...............17
User General Setup Menu........
..........18
Bluetooth lnstruction.
..........20
GPS lnstruction.........
...........21
Remote Control Function lnstruction.
.............28
Wiring Diagram....
.............29
The Technical Parameters..........
.........31
Trouble Shooting.
............32
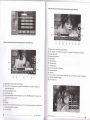
Main unit
1 pcs
Remote control
1 pcs
ISO wire
DTV Antenna
USER Manual
'l pcs
DVD Player
1 pcs
Touch Pen
1 pcs
USB connectorwire
1 pcs
GPS Antenna (Optional)
IPOD connector
wire (optional)
1
pcs
Plastic Frame
1
I
pcs
1
pcs
Metal Shrouder
1 pcs
'
lpcs
RCAwire
1 pcs
*Note: When you
order the machine with build-in GpS;and then the
accessory have the GPS Antennaalso the DVB-T Antenna is the same.
Stardand Accessory
I
I
I
I
Main Function lnstruction:
1)Built-in Amplif ier & DVD player. 4x50W max power output.
2)Standard one Din Size (50MM) Height, 7"inch Touch Screen.
3)Four angles adiust screen.
4)Compatible with DivX/DVD/DVDRS/DVD+RS/DVD_RW,CD_R/CD_RW, MP3/MP4,WMA format. Support J PEG
display.
5)Compatible with PAL/NTSC/SECAM/SECAM_L TV system. 100 stations preset.
6)Support USAiEurope/Russia /JanpanRadio System.
7)Support SD card reader(Note: SD is for the use of GPS when the unit has the GPS
f unction).
8)Front USB 2.0 slot.
9)Preset manifold audio/video system.
10)Socket and circuit, two aUdio input.
1 1)1x video input.
12)2x audio output.
13)2x video output.
14)Rear view camera input.
1 5)Wireless remote control.
16)18FM l12AM presets.
17)RDS built-in.
Optional Function lnstruction
:
Buili-in WlNCE5.0 Navigation System GPS, compatible with all kind of map software all
over the world.
ffi
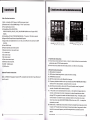
Specification
(24) (1)
l23t
e)
(22) (3)
(21)
$)
(24)
(23)
(22]-
(21)
(1s) | 117) I (1s) i
ll(10)
1ir1 i trsll
(12) (14) (16) (18) (20)
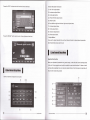
1. Touch Screen lnstruction:
1) A touch area is main interface for enter, or return to main interf ace f rom current mode,
suitable for radio/TV/DVD mode operation.
2) B touch area only suitable for DVD mode operation, no effect for other modes.
2. Button Function lnstruction
(1). Microphone for bluetooth.
(2). SRC button: Mode change button, press one time to change.
(3). POWER(source) button.
(4). MUTE is mute function .when Bluetooth is hang up.
(5). Frequency adjustment button ,when you relevant band FM1/FM2lFM3lAM1/AM2.in
DVD and TV is video standard . bluetooth function is re-dial.
(6). Auto/manual scan button, under radio/TV mode it is station scan, long press 3
seconds the station will be manual scanned.
(7). - voL button: turn decrease button for volume, +VoL button: increase button for
volume, vertical press is to enter, long press is to setup the machine core when
playing DVD, long press is to make a call when bluetooth. VoL- +VoL/sEL button:
contra rotation turn down the voice, clockwise rotation turn up the voice, press
voice menu once can switch BAS/THE/BAL/FAD and can turn VoL- + to setup the
parameter you need.
(8). seek button: on DVD mode, short press to forward a chapterltrack, long press to fast
forward. on TV/radio mode, short press to forward next station, long press for three
seconds to scan next frequency and will be stopped when successful scan the
station.
Touch Screen Area
*ffi
(9). Seek button: on DVD mode, short press to rearward a chapter/track, long press to
fast return. On TV/radio mode, short press to return last station, long press for three
seconds to scan previous frequency and will be stopped when successful scan the
station.
(10). Remote control display area
(1 1 ). Out connector audio input..RADlO/DVD/AUX/TV/GPS function
(12). SD card jack:For DVD and GPS to chose.
(13). Disc display area.
(14). LED screen.
(15). S-radio state is for next station choose ,when DVD state is Pause buttion.
(16). S+radio state is for up station chose ,when DVD state is OSD display tunction.
(17). Navigation Shortcut Key.(lf no GPS for LOUD function)
(1 8). Bluetooth shortcut key
(19). DISP is the o' clock switch display ,touch the buttom to display the current time
under any mode.
(20). SCREEN lN OR OUT BUTTON: the screen Stretches out or Shrinks when you
press once.
MlNl*USB.input connector port.
(22). EJECT button: eject disc.
(23). MlNl-IPOD input connector port.
(24). RST: system reset button. When the system is setted up by unusual and
inappropriate to use RST.
(21 ).
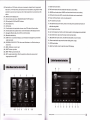
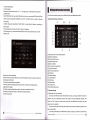
1). Radio mode touch button.
2). DVD touch button (when disc inside then the button can be effect).
3). USB/SD touch button (when USB/SD card insert then the button can be effect).
4). GPS touch button (when GPS connected then the button can be normal used).
5). Power on/off touch button, touch once will power off .
6). DTV receiver touch button.
7). User general setup touch button, please do not setup inner parameter so that its will
affect the using effect.
8). AUX Output touch button.
9). User normal setup touch button, which mainly used for setting image and sound effect.
10). Up screen buttion -,per press the screen come back top station.
1
1). Bluetooth enter touch screen ,only filter have bluetooth can use it normal.
12). Down screen buttion.per press the screen sliding down a angle.
13). IPOD touch button.
14). Eject touch button, insert or eject disc when DVD playing.
I
! .n.fitr:rrinu lnterr,; lnsituciiun !
'r{'-
Main Menu
Radio Operation
llM
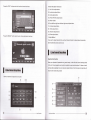
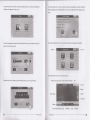
l.lnterface lnstruction
I
1). Frequency display area.
2). Up screen button.
I
3). Down screen button.
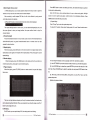
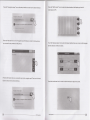
lnsert/Eject disc
4). Mute button.
1.
5). Band button.
You can insert /eiect disc under any mode.when you want to insert disc lust press tageeject
disc buttion on touchscreen .and touchscreen will autio slide down ,insert the disc ,the unit
6). Auto/manual scan button, touch once the station will be manual scanned and stored,
will auto slide into the disc ,at the same time DVD mode will be displayer on the screen ,if
you want to eject disc form the unit ,just press eiect function on touchscrenn ,the panel will
touch 1.5 seconds the stations will be auto scanned and stored.
7). Rearward scan button, touch once to rearward scan, touch 1.5 seconds to auto scan
be auto slide down and the disc in the enter mouth ,if you do not take off the disc within-S-8
and its will be stopped when stations scanned.
seconds then the disc will be auto slide into again.
8). Forward scan button, touch once to forward scan, touch 'l .5 seconds to auto scan and
its will be stopped when stations scanned.
2, DVD lnterface Instruction;
9). Select button, enter to user normal setup system to set sound and image effect.
'10). Treble/bass control button, you can select rock/pop/classic etc
sound effect.
1
1). Sound effect control button.
12). Stereo control button.
13). Current receive frequency display area.
14). Off button.
1
5). Back button.
2. Manual adjustment station
Press the forward or rearward scan button on the touch screen, you can select the
station frequency step by step up or down, long press over 'l .5 seconds to auto scan status
and it will be stopped until the effective station searched and stored.
3.
Auto adjustment station
Press A/PS button for 1.5 seconds on the touch screen, the unit will enter to auto scan
status, and will store the effective stations to the relevant band FM1/FMZIFM} (1-6). And
the stored stations will be displayed on the TFT panel preset frequency area. Then scan
finished, the unit will start to play the first station on FM1.
4. Select preset station
Press the station stored before on the touch screen, and selected station will be
displayed on the preset frequency area, the current display area will display the playing
station.
5. Turn
on/off stereo function
lf the received signal is weak, you can press ST button on touch screen to turn off
Stereo function and change to single receiving. Then the stereo noise will be restrained and
make it more clearly.
When receive more stronger signal, then you can turn on ST, then now the ?ST ON? will be
thowed on the screen, and you can receive stereo station program.
'on AM mode, this function is not effective.
n
Radio Operation
.
(1). Reture key,reture main interface
(2). VoL-button: volume down key, press for a reduction of cell volume, length reduced
by continuous.
(3). Play Pause .play / pause.
(4). Stop button. Stop / eiect.
(5). Rearward button, touch once its will quick rearward by 214l\l16120 speed, press
play/pause button to cancel quick rearward.
(6). Forward button, touch once its will quick forward by Zl4lgl16120 speed, press
play/pause button to cancel quick forward.
(7). The previous chapter/track, press this button to play previous chapter/track.
(8). The next chapter/track, press this button to play next chapter/track.
(9). Audio/video adjustment button, press this button to enter audio/video adiustment
menu.
(10). Flip key.
(1 1). VOL + button: volume increase in key short by d cell volume Increase, according to
a continuous increase in length.
(12). Out of disc key.
DVD PIayer Operation
i
Click on
Click on
a
a
flip chart to the next map interface to enter the menu
flip chart to the next map interface to enter the menu
(1). Back button: return to the main interface.
(2)' vol-button: vorume down key, press for a reduction
of ce, vorume, rength by a
continuous decrease.
(3). Menu settings button.
(4). Angle button.
(5). Duplicate key.
(6). Title track keys.
(7). Subtitles button.
(8). Key figure selections. (Below)
(9). Overscan button.
(10). Flip key.
(1 1).
voL
+ button: vorume increase in key short by a ceil vorume
increase, according to
a continuous increase in length.
(12). Out of disc key.
(1). Back button: return to the main interface.
(2). vol-button: volume down key, press for a reduction of cell volume, length by a
continuous decrease.
(3). Channel switching button.
(4). Track display key.
(5)" cursor up and down move left selection key: when the Mp3 player for the cursor
up
and down and move around.
(6) Koy.
(/). Flip key.
(tl),
vol
(l))
r;rrrrlinuous increase in length.
Orrl 0l disc key.
l.button: volume increase in key short by a cell volume increase, according to a
DVD Player Operation
DVD Player Operation
.ri0il
3. Select chapter what
you need
(1)When playing disc, you can press up/down chapter on the touch screen or panel for
selection, and you can also use remote control to select chapters.
Note: according to multi chapters DVD disc, its will not be effective by using remote
Press MENU button to enter user setting main menu, then select DVD setup by up/down
button and do details setting.
Note: on DVD menu, menu up/down button is for up or down moving option, left/right
button is for left or right moving option, confirm button is for confirmation effective. Press
MENU button to exit DVD setup at any time.
control flgure buttons for selection.
1).System Setup
(2)Press GOTO button on remote control then below menu will be displayed.
Press "Set up" key to enter the system setup menu.
To setup the TV system, Video output, Display mode, pin, Level, Default as below menu.
Then press left/right button to move cursor, you can select title/chapter/play time, and
then press figures to enter your target position, then press confirm button to play the
relevant chapter.
4, Forward/rearward
Press forward/rearward button on touch screen, press once its will forward/rearward by
x2lx4/x8/x16x20 speed, long press forward/rearward button on remote control can also
operate the above function.
5. Repeat playing
When disc playing, press AMS button on the remote control, the original chapter will be
repeat played, press again all of chapters will be repeat played. Then press again to cancel
repeat playing.
6. Random playing
You can setup the Display, Sound, Language, System etc. Operations as below:
(1). Use LEFT/RIGHT key to select function in Menu Function List, the ltem list appears.
When disc playing, press LOC (RDM) button on the remote control, the unit will be on
random playing status, press again to cancel random playing.
7. Program playing
When disc playing, press ST (PROG) button on remote control, the panel will display
(2). Use UP/DOWN key to select item, press ENTER key to enter the value list of the
item.Then Press UP/DOWN key to select the wanted value and press ENTER back to item
Iist.
below menu.
(3). After setup, select Exit Setup Menu among items, or press pLAy key to exit the
system setup menu.
System setup menu as below:
Then you can input whatever chapter you like by the relevant number, the direction key
oan be adlueted up/down/left/right. When you programmed your favorite songs, press PLAY
button to pley eongs one by one.
t.
DVD
rrtup
On DVD mode, you can special setup DVD, the setting method as following.
tfr
DVD Player Operation
DVD Player Operation
ffi
2). System function setup menu and original setup.
I
The system function original setup as below:
Menu
Item
TV system
Video Output
Display mode
System
Setup
PIN
Level
Default
Exit setup menu
Display
Audio
Subtitle
Language
Setup
Menu
DIVX LANG
Audio
Setup
Data output
Tone
Exit setup menu
Brightness
Contrast
NTSC/PAL/Auto
I
NTERLACE-YUV/TV-RGB/P-SCAN YPBPR/S-VI DEO
4:3PS/4:3LB/16:9
Default PIN is 0000
KID SAFE/G/PG/PG1 3/PG_R/R/NC-1 7/ADULT
Reversion
Enter this item then press ENTER key to exit setup menu.
Enqlish/ German/Spanish/French/Portuguese
Enqlish/ Japanese/German/Spanish/French/Portuguese/Latin
En
glish/ Japanese/German/Spanish/French/Portuguese/Off
English/Japanese/German/Spanish/French/Portuguese/Latin
WINCEN EU/WINWEST EU/ISOWEST EU/ISOCEN
Enter this item then press ENTER key to exit setup menu
SPDIF/OFF SPDIF/Source Code SPDIF/PCM
#l+4/+210/-21-4lb
Enter this item then press ENTER key to exit setup menu.
01214/618110t12
o
l2/ 4l
61 81
TINT
+61+4/+2101-21-41-G
Setup
Color
ot2t4/6/8/10t12
012t4/6/8
Exit setup menL
Speaker
Mix mode
Mode
Exit setup menL
Data
Solrrp
LT/RT STEREO DummySTEREO
Enter this item then press ENTER key to exit setup menu.
LINE OUT / RF REMOD
Dynamic Range
FULL 6/8 4t8 2t8 oFF
Left+fiffi
Exit setup menu
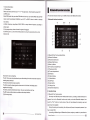
2.On TV mode, TFT LCD display instruction
Enter this item then press ENTER key to exit setup menu.
Output Mode
Dolby
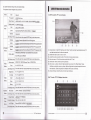
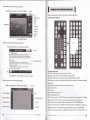
(1). Scan button: ln the DTV interface click "Scan" button will start automatically scan TV
and radio section back to the store search.
(2). Select the radio button: Click on a TV.
(3). under the radio selection button: Point click of a television station.
( ). the main menu: Click the function module into the TV set.
(5). exit button: Click exit the current operation.
(6). the.cursor up, down, left and right selection key move in the "Main Menu" setup
interface, using the cursor up, down, left and right set of projects required to move
the selection, select and press the middle "OK" button conf irmed.
(7). returns the key: Click the return to the main interface
10 t12
Video
Sharp
I
1.ln DTV mode the TFT screen display
Default
EU/CYRILLIC/TURKISH
Exit setup menu
G.ltru/ATUoperarhntnsrrucrion
Stereo/MONO L/MONO R/ MIX MONO
Enter this item then press ENTER key to exit setup menu.
DVD Player Operation
DTV/ATV Operation
:!31
(1). Preset frequency figures button.Each figure button store the relevant frequency channel,
touch relevant figure button to select your favorite TV channel, total 100 channels
I
available.
This function is for external Video and Audio input, you must make the right wtre
(2). Current TV channel display area.
connections (Video and Audio line ) with the external device when use this function.
(3). Return button, return to main interface.
(4). Previous folder, touch once to return to previous folder.
(5). Panel slide up button.
(7). Panel slide down button.
(8). Eject button.
1. USB Operation
(9). Mute button.
I
lnstruction
ln any mode,you stick the U disk to the USB interface .the equipment can read the
multimedia program ,such as MP3/MP4 and as well all the format which the equipment can
(10). Auto scan and store button, press once to auto scan all relevant TV channels and store
to figure buttons.
(1
0[era[on ln$rruc[ofi,i
I
(6). Next folder, touch once to enter to next folder.
suppoft
.
1).Audio system switch button.
2. SD card Operation lnstruction
(1). The SD card (face up) into the panel on the right side of printed characters NAV slot, the
(12114). Channel fine tune button, you can turn up the current channel up or down fine tune.
(13i 15). stored channel turn up button , press this button to increase cH1 to cH100.
system will automatically switch to the SD card reader mode).
(16). Audio/video effect adjustment menu.
(2). Now you can adjust the panel to a good angle and enjoy all pictures and format files in'
(17). Confirm button, use for current option confirmation and enter to TV channel mode.
(18). Ek kay.press it to switch f rom rock to,popular to classic sequential.
SD card.
(19). Off button.
(20). Back button.
2.
Auto scan and store channel
I
(1). Press TV function button on main interface to enter to TV status.
(2) Press SCAN button on main interface, TV is starting to auto scan and store channel to
ligure buttons, after scanning and the unit start to play CH.l program.
1. l-pod
t
Connect
Press the IPOD button on the main menu to enter the IPOD mode (please make sure the
IPOD is connected correctly ).For example ,if the IPOD setup in the system is setted to
auto connected "on" ,it willautomatically switch to IPOD mode .
(3) Now you can search your favorite channel using up/down button.
3. Manual scan and store channel
(1).on TV mode, press upidown channel tune button to search what channel you want.
(2). Searched effective channel, long press figure button for 1.5 seconds then you can store
the channel what you searched to the relevant figure buttons.
4. TV picture/ system switching
(1). Picture system change:
I
lt
lf the current picture system is different from unit setting system, you can press SyS
button on touch screen or BAND (P/N/S) button on remote control to switch to relevant
ploture system
(2) Audlo Bystem change:
lf the ourrent audio system is different from unit setting system, you can press AUO button
on touch scroon or AUDIO button on remote control to switch to relevant picture system.
;
DTV/ATV Operation
USB and SD card Operation
ffi
Press the "KEY " button enter the function choose interface
Function Key Button lnstruction:
(1). Vol-/Vol+ adjust button.
(2). Luminance adiust button.
(3). Color adiust button.
(4). Preset AV effect adiust button.
(5)..Return button.
(6).Front left/front right/rear left/rear right sound adjust button.
(7). Contrast adjust button.
(8). Treble adiust button.
(9). Acutance adiust button.
(1
Press the "MODE" button enter music /video adiustment interface
0). Bass adiust button.
2. Adiust Method
lf you want to adjust relevant item, just touch relevant button to adjust relevant parameter,
after f inished then press return to exit.
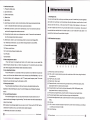
I,,,i.util.oinamisorrifirilil
I
Important lnstruction:
When you adjusted all parameters on general setup, it will affect the normal working mode
of the uhit. So we suggest user should be caref ully to use inside functions. lf it does not work
I
1.
normally after adjusting, then you can press reset button on the front panel to make the unit
li,UiOrttormal $Gtu[ ]rtenu
I
return to the normal setup status!
User can random set pictures and sounds
l-pod Operation
User Normal Setup
1A6:l
l.General Setup Menu
(1).Clock adjust:
select clock menu and then touch "+" or "-uto adjust clock. Then finished to press EXlr.
(2).RDS setup:
select RDS mode: then you select oN button and now you can receive RDS radio.(3).Rear
|,rr,rrtootn0rotationlnstructloni,
camera switch setup:Select CAMERA: touch LEFT or RIGHT button to switch to relevant
l.BIuetooth lnterface lnstruction:
!
(This function should be match up one GSM cell phone with Bluetooth function)
rear camera.
@
(4).Radio frequency setup:select RADE FREQ to setup relevant frequency according to
@@
@
@
actual region.
(5).Language setup :please choose the types of language
(6).Streeing set up : press entre streeing button to set up the opertaion phot.( as the
below photo)
@
@
@
@
@
@
@
@
@@
The second: press the reset up button
The third: press the streeing buttion f rom mode. ln this time it will display each
(1).Bluetooth Pair Communication Button.
(2). Dialed Call Browse.
(3).Received Call Browse.
(4).Missed Call Browse.
(5).Back Up Button.
(6).The previous chapter/track.
(7). Play/pause button.
(8).The next chapter/track.
(9).Off Button.
(10).Status Display.
(1 I).Delete Button.
( 12).Dial Keys.
(1 3).Back button.
(14).Hang up key.
magnitude of voltage
(1
the prose for set up streeting
The fist: from user setup interface to press the streeing for touch screen then enter the
streeing setup interface
The fouth: press the distribution buttion ,the user can distribute for f ree.
The fifth: press confirm buttion is withdraw the setup interface
(7).Exit set up menu.
5).Number Dialing Area.
2. Operation Steps
.
(1) Bluetooth Pair Communication
Get ready one GSM cell phone with Bluetooth function, according to mobile instruction to
operate, find out the Bluetooth function enter button, and select Bluetooth adapter, then
touch the "Pair" button on touch screen of the unit. Now Bluetooth is starting to pair and
search each one together.
During the pairing and connecting, the cell phone will prompt to request a password, you
,ffi
have to enter 0000.
(according to different type of Bluetooth cell phone, maybe you need to try more times to
User General Setup
Blueiooin
Cperation
A*
I
Press the "KEY " button enter the function choose interface
Function Key Button lnstruction:
l
(1). Vol-/Vol+ adjust button.
I
(2). Luminance adjust button.
:
(3). Color adjust button.
$
I
i
(4). Preset AV effect adiust button.
(5)..Return button.
(6).Front left/f ront right/rear lefllrear right sound adjust button.
(7). Contrast adlust button.
(8). Treble adjust button.
(9). Acutance adjust button.
(1
Press the "MODE" button enter music /video adjustment interface
0). Bass adiust button.
2. Adjust Method
If you want to adjust relevant item, just touch relevant button to adjust relevant parameter,
after finished then press return to exit.
| .,,iit t,dilili.iltunilenu I
lmportant lnstruction
:
When you adjusted all parameters on general setup, it will affect the normal working mode
of the unit. So we suggest user should be carefully to use inside f unctions. lf it does not work
!
iu*rr romat
sGrur
menu
normally after adiusting, then you can press reset button on the front panel to make the unit
I
return to the normal setup status!
1.User can random set pictures and sounds
l-pod Operation
User Normal Setup
i:i$i
l.General Setup Menu
(1).Clock adjust:
select clock menu and then touch
adjust clock. Then finished to press EXlr.
(2).RDS setup:
select RDS mode: then you select oN button and now you can receive RDS radio.(3).Rear
|
camera switch setup:Select CAMERA: touch LEFT or RIGHT button to switch to relevant
l.Bluetooth lnterface lnstruction:
,,,u
nruetoot[ orcration
tnstructillr'
I
(This function should be match up one GSM cell phone with Bluetooth function)
rear camera.
@@@@
(a).Radio frequency setup:select RADE FREQ to setup relevant frequency according to
@
actual region.
(5).Language setup :please choose the types of language
(6).streeing set up : press entre streeing button to set up the opertaion phot.( as the
below photo)
o*
@
@
o
@
@@
@
(4
@
).Bluetooth Pair Communication Button.
(2).Dialed Call Browse.
(3).Received Call Browse.
(4).Missed Call Browse.
(5).Back Up Button.
(6).The previous chapter/track.
(7). Play/pause button.
(8).The next chapter/track.
(9).Off Button.
(10).Status Display.
(11).Delete Button.
(12).Dial Keys.
(1 3).Back button.
(14).Hang up key.
(1
the prose for set up streeting
The fist: from user setup interface to press the streeing for touch screen then enter the
streeing setup interface
The second: press the reset up button
The third: press the streeing buttion f rom mode. ln this time it will display each
magnitude of voltage
The fouth: press the distribution buttion ,the user can distribute for f ree.
The fifth: press confirm buttion is withdraw the setup interface .
(7).Exit set up menu.
(1
5).Number Dialing Area.
2. Operation Steps
(1) Bluetooth Pair Communication
Get ready one GSM cell phone with Bluetooth function, according to mobile instruction to
operate, find out the Bluetooth function enter button, and select Bluetooth adapter, then
touch the "Pair" button on touch screen of the unit. Now Bluetooth is starting to pair and
search each one together,
During the pairing and connecting, the cell phone will prompt to request a password, you
ffi
have to enter 0000.
(according to different type of Bluetooth cell phone, maybe you need to try more times to
User General Setup
Bluetooth Operation
t?,gi
pair the units, then could be successful).
When "LINK ON" dlsplayed on the screen, then it can work normally.
(2)Make Phone Catt
Nsert the SD card with Map into the SD card slot "NAV". Please kindly pay attention that the
metal side of the SD card must be on the top side(Follow up the prompt)
when successfully connected, you can dial telephone number by touching the number
2.Navigation path setup
buttons on the screen, then touch the green color button to make call out. Now you can talk
with your friend, you can hear your friend?s sound from the car speaker. When you finished
the conversation, just touch the red color button to hang up the call.
(3)Receive Phone Call
When there is a call coming, telephone number will be displayed on the telephone area ol
the screen Now you can touch the green color button to receive call , when finished the
conversation, just touch the red color button to hang up.
(4)Dialed Call Browse
Touch the "Dialed call" button, you can browse all the phone calls you made, touch again
will display all the phone calls you made, total 20 pieces phone number call will be browse.
And in 3 seconds, you can touch the "call out" button in color green to make a phone call of
this number that you are browsing now.
(5)Missed Call Browse
Press the GPS icon of the main interface,then appear below interface:
o
Touch the "Missed call" button, you can browse all the phone calls you missed, touch
again will display all the phone calls you missed, total 20 pieces phone number call will be
@
browse. And in 3 seconds, you can touch the "call out', button in color green to make a
phone call of this number that you are browsing now.
3. Other
lnstruction.
e
When the unit is on the other working mode but not Bluetooth mode, at the same time if
there is a phone call coming in, then the mode interface will auto switch to the Bluetooth
mode interface, after call finished, then it will auto return back to the one that is working
before Bluetooth mode.
1.Back icon:press it to go back to main interface(it only effect when you press it 3 seconds
I
after it entering any modes.
2.Setup lcon:Press it to enter into setup interface.
3.Entertainment function icon:press it to enter into entertainment interface.
4.Navigation function icon:press it into navigation interface.
x,epsonerafior
lmrrucrion
I
(lnstruction: This function only can work normally when the unit is the one with
GpS built-in
function and at the same time the SD card with map is install correct in the SD card slot
of
the unit.
Press the "setup" icon on the console interface,then appear the below interface:
1.The installation of the SD card with Map.
SD Card Slot for GPS
Bluetooth
Operation
GPS Operation
te:
Press the "navigation setup" icon on the setup interface to enter into the below interface:
Press the "GPS monitor" icon to enter into below interface,it will display any kinds of
information of GPS.
Press the "file folder"icon on the "navigation setup"interface to enter into below picture,
Touch the "General setup" icon to enter into below interface,then you can set up the language
and choose the map software on the picture.
and the selection of effect for switch.
Press the oK button,then you successfully set up the navigation path.Then touch the back
button to return to the console interface.
Touch the touchscreen icon to enter into below interface to adjust the screen.
GPS Operation
GPS Operation
::?*
Touch the screen icon to enter into below interface,then you can setup the brightness,
Touch the system icon to enter into below interface,it will display the version number,the
position and magnitude of the screen.
memory capacity and the details.What' s more,you can operate the initial setup and file
fixing.
Touch the volume icon to enter into below interface,then you can setup the volume for
Touch the entertainment icon in the console interface,it will appear below picture.
system voice and press voice
Turn off
Touch the Music icon to enter into below picture.
Touch the time icon to enter into below interface,then you can set up the time.
Return key:press return "control panel" interface
File
Turn off
te
Turnup
Turn down
7t
GPS Operation
GPS Operation
&$
Touch the Movie icon to enter into below picture.
I
Return key:press return "control panel" interface
o
trroto Gontrot tunction lnstruction
I
File
Note: Please take off the battery plate before using the remote control.
Picture zoom
l.Remote Gontrol Buttons.
button
' 'Next
''' Last
Photo menu
Stop/play
'' Volume -
-' Volume +
'.-Ejection
'''' Mute
r-
play progress display
Touch the e-book icon to enter into below picture.
Return key:press return "control panel" interface
-
1 (General Description)
This product is suitable setup to the single DIN, double DIN car's
DVD product inner paft, complete low cost and high performance
DVD + Navigation function, may also make into outer Navigation
box.
2 E Featureto
?trExtremely high integration, super small physical volume
(only 38 mm iA 75 mm iA 8 mms), convenient to inteqrate single car
DVD and double DIN DVD.
?DAbundant intefaces, perfect with car DVD to combine, the
function expands huge potentials.
Turn off
Ebook shows area
2.Function lnstruction
File
web page
play
(1).
(2).
(3).
(4).
Page shows area Turn up Turn down
Touch the picture icon to enter into below picture.
Return key:press return "control panel" interface
Picture Enlarge
Picture Rotation
picture Narrow
Picture Enlarge
Turn off
File
Full screen button
Power on/off button, press once to turn on/off unit.
Pause button, on DVD mode this button is for pause function.
Mode switch button, press once to switch to RADIO/DVD/AUX/TV/GPS.
Eject button, when disc inside then press this button to eject disc. lf not press this button
to insert disc.
(5). DVD button, press this button direct to enter DVD mode.
(6). DVD stop button.
(7). Volume +.
(8). Mute botton: mute function.
(9). GPS navigation button.
(10). Rear scan button, on RADIO/TV mode to rear scan frequency, long press t.5 seconds
Turn up
to auto scan. On DVD mode to turn previous chapter, long press to quick rearward.
(1 1). Select button, to be adjust sound mode and switch to VOL/TRE/BAS/BAL/FAD.
(12). Forward scan button, on RADIO/TV mode to forward scan frequency, long press 1.5
Turn down
seconds to auto scan. On DVD mode to turn next chapter, long press to quick forward.
(13). Auto/manual scan button, on RADIO/TV mode to auto scan. On DVD mode to be
27
GPS Operation
Remote Control Function
g{r
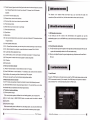
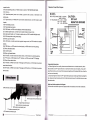
l.Speakers Output Wires Diagram
repeat function.
(1 4). Band switching button, on RADIo mode to switch to FM1/FM2]FM3/AM1/AM2.
(15). Volume -.
MODE L:
(16). open/close panel, press once to slide up panel to the top side, or slide down to be
bottom side.
(17). Figure buttons, on RADIO/TV mode to select station/channel, on DVD mode to select
chapter.
(18). Panel slide up button.
(19). Panel slide down button.
(20). OSD button, on DVD mode to display current chapter playing.
(21). Select chapter button, on DVD mode to select chapter to play on disc.
(22). Audio switch button, on TV mode to switch audio, on DVD to switch left/right sound.
(23). DVD setup button to be general setup.
(24). Menu up select button.
(25). Loc button, on radio mode to be long/short range control, on DVD mode to be random
RA
"'
1
08.0 MHz
AMP2-1620K1-E
TV FREQ.RA tlGE :VH F- L 48.25--1 70MFa
v HF-H 1 70- 450 tv?-{ z
U
playing.
(26). PBC button, on VCD mode to be view playing, on DVD mode to be menu playing.
(27). Menu left select button.
(28). Confirm button.
(29). Menu right select button.
(30). sr butt6n, on radio mode to be stereo switch, on DVD mode to be memory playing.
(31). PTY button, on RDS mode to be PTy function, on DVD mode to be TtrLE playing.
(32). Menu Down select button.
(33). TA button, on RDS mode to be TA message on/off function, on DVD mode to be picture
HF
450- -863 .25
MH z
CAUTION:
DC14.4V
NEGATIVE GROUND
lmportant lnstruction:
zoom/reduce function.
(34). AF button, on RDS mode to be AF message on/off function, on DVD mode to be picture
slow function.
l&
DO FR EQ.RA IGE :FMffi
a. Brake high level have valid, please connect brake wire to car brake test wire, when
the car brake , the TFT panel will turn off , so that the driver can drive safety. lf you don' t
need this f unction, just connect the brake wire together with the black GND wire, then the
unit can work normally.
b. Back car high level valid, the TFT panel will display back video sight when backing the
car, please connect reverse wire form to the back car test wire. So that the driver can see
l
the obstruction.
Audio and video output wire diagram.
All the audio and video output wires please refer to the sticker on them for connection.
GPS antenna connector jack
Power output wire conn'ector jack
Fan
Signal input and output
Fladio antenna connector iack
#
m
*,
#'
KEY antenna connector jack
.i
ti:l
Wiring Diagram
&
Wiring Diagram
m
I
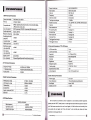
1.DVD Technical Parameters
Laser wave length
Pick up
Compatible disc
Anti-Shockproof
Audio output level
Frequency respons(
DVD 650nm; CD 780nm
HITACHIl2OOW
MPEG-4(DIVX),DVD,DVD+R, DVD-R,VCD,CD,Mp3,WMA,
JPEG,CD,CD-R,CD-R/W,
DVD 3 seconds; VCD/CD 10 seconds; Mp3 90 seconds
Audio:1 .2V?0.2
20Hz-2OKl{z
Audio signal-noise
ratio(S/N)
>80d8
Dynamic scope
Video ouput level
>80dB
1.0r0.2Vp-p
Brightness signalnoise ratio(S/N)
>56d8
Color signalnoise ratio(S/N)
>60dB
Display system
Menu language
Warm start time
Cold start time
The biggest fixed height
The biggest velocity
2.TV Technical Parameters
Audio system
48.25MH2-847.25MH2
PAL/NTSC/SECAMiSECAM L
DK/I/BG
AM frequency ranqe
LCD Screen Size
LCD Screen Ratio
Spot Ditch
Resolution
Contrasl
Briqhtness
Response speed
Viewing angle
Original luminous lamp
Lamp longevity
Power suoolv
87.5MHz-108.0MH2
522KHz-162OKHz
FM sensitivity
<25d8
Am sensitivity
Siqnal-noise ratio (S/N)
Distortion
<45dB
-1 59dBm
10m, 2D RMS 5m,2D RMS, WAAS enable
O.1m/s
1HZ
Average 0.1s
Average 1s
Average 38s
Average 42s
18,000m
515m/s
7 inch
16:9
0.107(h)x0.372(V)
800x3(RGB)x480
1
50:1
30Ocd/m'z
R:30/F:50
U:15/D:35 L/R:55
LED
Over 10 thousand hours
Outer dimension
Net Weioht
Standby Currenl
DC 13.8V
1 78mm(W)x50mm(H)x205mm(D)
About 2.SKG
<1OMA
>50d8
I
<0.3%
4.GPS Specifications
As the machine is controlled by micro-computer, if any functional problem happened,
System parameters
Main frequency
Operation system
Support audio type
S|RF Star lll
1.575GH2
20 channels
6.Other Technical Parameters
3.Radio Technical Paiameters
FM frequency range
ASF/AVI^/vMV/DIVX
Stereo CD qualitv
5.Technical Parameters of TFT-LCD Screen
AUTO/NTSC
Chinese/En glish/Spanish/French/German/ltalian
Frequency Range
TV display system
'
Support video type
Audio outDUt
Chip set
Frequency
Channel number
Tracking sense degree
Position accuracv
Velocity
Data renewal rate
Re-catching time
Hot start time
please press the "RST" (reset) button on at the right hand side of the front panel to reset the
400MHZ
WINCE5.O COBE
unit. Wait some seconds and turn on the unit again, if all the funclions work normally, then
can operate the unit again. But if the unit doesn't work normally yet, please try below
MP3/PCM/WMA
solutions to check again the unit.
T
The Technical Parameters
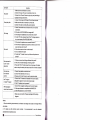
Trouble Shooting
ffi
Symptom
No power
Canot play disc
Solution
1.Make sure the connection is correct.
2.Check if the key of the car is inserted and turn on.
3.Check if the "Power" button is plug up by any hard things.
4.Check if the fuse was blown.
l.Check if the screws on the top of the unit are removed.
2.Make sure the disc is inserted in correct side.
3.Check if the disc is terrible dirty and scratched.
l.Check if the brake wire and reserve wire are in correct
No image
connection.
2.lf the disc is DVDA/CD/MP4 etc image disc?
3.lf the setup for brightness and contrast are correct?
4.lf under TV mode, please check if the TV image system is
in correct system (PAL/NTSC/SECAM)?
No sound
1.lf the wires for speakers are connected correct ?
2.lf ihe wires for speakers and power are short circuit? or the
outer shell are short circuit?
3.lf the volume are turn down to the lowest ?
4.lf it is in the MUTE mode?
5.lf under the TV mode, the set up of the audio system are
correct?
No response for
touch / touch
departure
1.lf there are some hard things withstand the panel?
2.lf the unit are under Backing or Braking mode?
3.Press the ?PLAY? button when the unit is power off. Adjust
and re-set up the touch point area to see if it will work normally?
No response
from remote
control
No TV signal
or weak TV signal
GPS navigation
cannot work normally
l.Check if the plastic are removed out.
2.Check if the batteries were run out.
S.Please point to the lR area to use the remote control.
'l .Check if the TV
antenna is installed in the correct place.
2.Maybe the signal in local is not strong enough.
3.lf the TV system is set up correct?
l.Check if the navigation software path is correct setup.
2.lf the map software is compatible with WlNCE5.0?
3.lf the GPS antenna is correct installed.
l.Brake wire connect Err, Please read page 25 the wiring
diagram
Notes:
1. Due to continuing improvements, the features and design are subiect to change without
any notice.
2. To make sure the machine work normally, it is recommended to use the
accessories and optional parts.
I
"tt"tn"o
Trouble Shooting


![Umted State Patent [19] [11] 4,142,232](http://vs1.manualzilla.com/store/data/005874596_1-c39d4064b00ab778afe28c128abc9f97-150x150.png)