1
[Jser's Guide
Thanks:
Dear User
Thank you for purchasing our product.These
operational guidelines for the user, to ensure
you a quick and convenient to use, read the
instructions carefully before use.
Contents
Contents..........
1. Notes..........
2. Random Accessories.....
3. Hardware Specifications..
4. Startup and shutdown..
5. Desktop......
6. Button.........
7. Main Menu Operation......................
8. System Settings...........
- Date and time settings............
*
Screen brightness,-......
Standby screen.............
. WlFl Wireless Connection......
9. lnstall, uninstall, run the app|ication....................
10. Touch Calibration...,...
1 1. Network....
1
2
3
3
4
6
6
7
7
8
I
I
" This product is a high precision eleckonic products, do not disassemble.
' Avoid slrong beat, the collision ol the product.
Avoid using this product lhe following conditions: high and low temperature,
moisture, dtrst, magnetic Jields strong and long-term exposure to sunlight.
- Please use a wel cotton cloth wrung gently wipe the product shell, do not
use other chemical cleaning solution. This product should not be dripping
or splashing water, so should not be placed near the product category,
such as glass lilled with a liquid items.
. Too long, use the headphone volume is too large may cause pelmanent
hearing damage.
- Do not cross the road, driving motor veh,cle or bicycle use headphones to
avoid traflic accidents.
* Please only use permitted batteries, chargers and accessories, use any
other type of products would violate the warranty regulations and may be
10
12
dangerous.
'13
13
obsolete machines and accessories.
. This product is in the course of any questions, please conlact your local
14
dealer or directly w:th the company's customer service center.
For those because the product is damaged, repair or other causes of
memory loss wipe coating, the Company assumes no responsibility, please
'16. Recording.
17. E-mail client........-...-...
15
16
17
17
18
18. Extemal devices............
21
12. Music........
13. Video........
14, Photo Browse.............
15. Wdlpaper.
'
USB connection,...................
'OTG use....,...
t Keyboard and mouse......
1
9.
20.
Finmvare upgrade,..........
Frcquently Asked Questions Treatrnent.....
21
21
21
22
25
'Please follow the relevant local environmental regulations to deal with
-
follow the user manual for standard operation, and timely backups.
(Belated diagram)
'iLllD
j)Warranty
hosl
Card
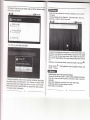
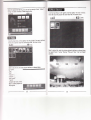
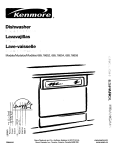
*Boot: Press and hold the power button, the green LED indicator
light, the system will enter the startup process, as follows:
2)gV 1.5A DC charger 3)Quick Start Guide
S)HDMI cable
6)USB cabte
Builtin llash memory 2GB/4cB/8GB/16c8/32G8
TF card, maxjmum capacity ol 32GB
lEEE802.
1 1
Support external
I
b / g wireless network
USBl.1 high speed intedace and USB2.0 OTG
HDMI'1 .3 Full HD Vrdeo Output Intedace
Analog AV composite video output interface
Audro
3.5mrn headphone lack
High-quality stereo loud speaker
Built-in microDhone
Headset maximum outpLt power of 40mW
Frequency response : 20Hz -20KH2
SNR: greater than 90db
System has been started, are entering the Android system
Besolution I WVGA 800-480 '1024-600
Color I 16 million colors
Operating Resistive Touch Screen More
size | 193"115'14.3mr 260',165'13mm
Power adagter {DC V / A)
HDM! €ble {optional)
USB Cab:e
Certiricate, quick guide and
The system enters the delault home interface
-S:-:to,.'*.n:
S'-r Dsnn.
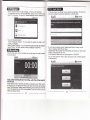
Press the power button, pop-up device opttons,
select
as follows:
Sf/stem after the completion ol normal stafi, Desktop can see
Android2.
(The figure)
The default desktop by the: Status Bar. euick Search
Bar. Main menu
labels and a number of shortcut icons form.
{}2:qau
you can safely shut down
to disptay rhe currenr
lf"I?t^y:b1
rnrormarton. euick search box for
system of network status, Battery. Time
Web search by typing key words. Middle
right of the screen the main menu tab stop, cr;c(oi'o-ia"g
ioihe main menu
bar to start the default.Bottom of the screen oisptay;ng
ifre-lrowser shortcut
icon.
Opttmization of the status bar results, lncrease the volume
of two icons
{:.
Volume reduction
Volume 'lealures.
{*,
Ctict< to aO.iust the volume. Equivalent to Volume +
and
Android system uses in the course of the keys:
Volume keys: the task bar vorume +, vorume-achreve chanqes
in the vorume.
Power key: Press and switch machines. Short pressto
When the time beinq use r-his MtD
To reduce power coisumption.
;il;;;;t;"i;'; i;;ilil ffi;,
o, leave the
hibernation.
"'ni",
Menu button: Displays the currenl form of the menu ltems (if
any).
Home button: Back to the main intertace or choose.
Beturn: Return on an interface.
Date and time settings:
:
rEr
:€
:'arag the main interface ol the main menu tab, the main menu
*:-
will
:rght to leit (or bottom-first, last), and is as lollows:
Set interface options "time and date settings oplions'to ente. the date anc
time settings interface:
Can choose io automatacally: use the Network Time.
Can also select to set the date, select the time zone, sel the :ime. time
format, date format and other inlormalion.
For example, choose to set the date, as follows:
in the main menu, the system can be set to run existing applications, install
a ne',v application, start the touch calibration, music ptayer, video player, web
browsing, games and other operations.
@
Click the main menu interface in the "Settings" icon, you can open the system
seftings interface, as shown below:
Select tFre approp{iate operation of lhe relevant items, such as
- Wireless and n€twork
- Sound and dbplay
'Date and time settings
- Aboul Equipmenl
Etc.
Select +: that the increase ol 1 unit,
Select -: that the reduction of I unit.
Also can choose the number, enler the input mode. Directly entering the
desired number, then select Done. As follows:
Select "Settings.' lf you enter the number oJ legitimate, then the operation
is successlul, the system will set the option to use the new.
3,:--- :.
r- 1-€
gi tness:
:F-a-i ntedace choose
:j ::::i-*ni"9s
WlFl Wireless Connection:
,,sound
and display settings,, to enter the souna
jnte#ace, scrolt down
section, seteicr ,,Brilhtness,,, ther=
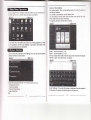
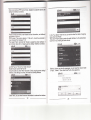
Clickthe main menu "Settings" icon, goto "system Settings,,screen. ctick o'Wireless and network" into the "Wireless and nehvork,,setup interface. Click
ihe "WlFl" section to quickly
open the WlFl feature, click
cn "WlFl settings" column
enter "WlFl set interface"
as shown below.
ln the "WlFl settings" interface (above), click on the WIFI column also can
open and close the WlFl feature, click on the ,,Network Notice,, lists MID
search to the wireless router, wireless router, click the search name will
pop up settings window , please follow the prompts to complete the WIFI
network links. Some encrypted network, need to enter a valid key. Link
dragram below:
Srandby screen: the screen automatically locks
the delay before.
. :.i
,'sound
seiup rntedace choose
:
and display settings,,to enter the sound and
sa al" settinqs interface. scroll rlown section,
select the ,,standby screen,, interface
-:ea.s.S, Aas tollows
Note: ln
ln'the video, the screen auto_standby function does not
work
EI
tB
2147
All
HDMIf[TVOUT:
This product supports HDMI
output and TVouT.
IO
[Jsing the HDMI cable to connect a HDMI input
MID ad
esinnent. ln the 'Settings" / "sound and display,,/ ,,Output Seh
d
to select HDMI output mode, the syslem output to HDMI.
ctroGe HDMI ouFut, you can .HDMI Setting,' which choose to charE!
ff you
tE aIBn lomat
tm formats.
System
of
1
920X1
080p 60Hz and 1 zgOX7ZOp 60Hz chri*
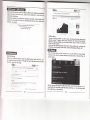
' lnstallation: Android install the application there are a variety of
ways, such as through USB install, install third-party program aid,
Here we introduce assisted by APK installer to install.
Click the main menu interface "APK installer" can enter the "application
installation and management" interface. As shown below:
888
&''qgasl
t+r'zo
*im&rtr&t:l
.Xiiarg*r
MID
Through the AV cable to connect
and digital input devices
with complex.
ln the'Settings' /'sound and display,, /,,Outputselect,, select Composite
ou@ul mode, the system output to AV.
lf you choose to AV oulput, you can ,'Composite Seuing,, which choose to
change the output lormat. System ,NTSC,,"pAL,' choiCe of two formats.
3
2:49^r,
NONE
FD!,41
Click "lnstall Installer" install options into the APK interface. ln the choice of
interface and file browse the directory, find your path to the file storage APK,
what you want to APK file into the application installation interface, click on
lnstall to automatically ;nstall the application.
After installation is complete, there will be "open" or "complete" message.
Click "Open" to open to install ihe program directly. Click ''Finish" then exit the
installation interface. Generally installed in the main menu program to create
the corresponding icon. Directly in the main menu you can click on the icon to
open the appropriate application.
Users can "Andrews market" online installation, or download via the computer,
or online through the machine built-in browsel to download and install.
- Uninstall applications: You can use the appropriate third-party
When usirg the HDMI or Composlte output on, LCD will display the contents
of the scaled ouput to elitemal devices at the same time.
11
software management tools or applications that use the Android
comes with management software
Select "Settings" / "Application" / "Managernenl Applications", select the
appropriate application has been installed, to view program info.mation, the
uninstall program and olher operations.
t2
El9a
-'s: start the system by default
called touch calibration procedures
r so n the main menu, select ,,touch calibration,,,
.
untei tf,e ior": iocedures.
srompts to complete the calibration operation,
if successful toucr
:.e system prompts and automaticaily
tn" ror"n
As lcllows
"rit
"l[ni"rio.
,.ref
-
-,r
E ll;l (J
1
5:25
:Iap:,/ler€lish.siaa.acr/iader htmj
;r,"*,-*
Be.\a,{ilRtlorcqLsFo.eflflortrrc,FL
i+al a5 & sB€rmdes aend & qen
kBs .M
o, *m€ &yto eRd
w%
- -:_
-[.
Online video:
Through "Andrews market,, or other means to download
online video player
1oftwa1e, onrine TV player, onrine musJ jon*arel rii;;l;"ilii'i" lhjs machine.
rv
you can watch onr,ne,loel oi ontine
risrenin g
8r""X,
;?TJ3ffi,|'i;l1,,"o,
Users can atso downtoad o,hnlllllr_d. pgly Web
apptications, inctuding web
browsing, video playback, Web client, instinr
messdging-soii*are, etc.
l:
,r,'eb browsing:
,'.:s- 1." connected network, open the Web browser
enter the URL, you
a^ :13xt:,, browse the Web; or through tne
main Jesf<top'ie"rcn bar enter
-e JrL tcen the web page.
SSa
-
" ' 5i
S{:;
Click the main menu in the ,,music', icon, you
can enter the music player
intertace. Here tisrs the system defautt user
d"t;r;;';i ali auoio rites. As
shown below'
rs':n
- J,r,r;9,:ts,e.romln?it.en&gl_Ei&lllert_... i
:::
:i I .i.a-
raiii.,ai..(rrt.
a,)r.R,r..
riru.-yn"hllilI-manner, or by
X::il,
:lf ygll,i.:.y^:Binsertrng :f:T,q
rhe SD card
with audio fites",dro
*"r"
;;l.#'atloft#l
"rJioiir".,
the audio files via the network
13
14
:E:::
:-e att!'opriate tab key, you can see for example "Artist", "album"
'>:-:: a-:
cther interfaces. Select song to play.
Cl ck the main irenu in the "gallery" lnto the "gallery'the main interface
:here will list all the picture files and video files. As shown below:
AAn]I
&l
(lltf
rs,eo
Ciick the main menu in the "gallery" into the "gallery" the main interface
video filds and picture files. As shown trelow:
G"i. irnl tljt att tne
Select a picture file, enter the picture playback interface, as shown below.
Can select "Zoom", "naffow" "sharing", "Previous" "Next," "set" and "delete"
operation.
SaLe:: , o3a r ie irlto the video player interface, as shown below
'=.
'VClJf'lE -
'Volurre
''iast
-'.
fc.'{ard'.
'rewind'.
'progress bar- and control
keys to control Playback ot
the progress.
l6
E@
ffi
Si,ste.n sJpgcris static lmage wallpaper, as well as 3D wallpaper.
l.:ne Jes(lo3,nlerface, hold down the Menu button, pop-up mbnu opticr
se ec::ie '','raiioaper'. the pop-up "Choose wallpaper iodrcer, selectiori bc,
3 2:r2 AM
!
-,e
F1
E '-,
I
ln the main menu, click "Email" icon to enter the e-mail client. The first entry
will ask to conrigure the account information. As shown below:
&ag
'
$[z's:rt,t
rratlp3p3r5
,-.
,r,alipaper galiery
Have the follo\'ing options:
Select "Wallpaper Gallery": You can select the system provides a static
orcture as wallpaper.
Select "C_unent Wallpapel': You can select the system provides 3D wallpaper
Select'Photo": You can use the picture as wallpape'r Customize.
E-mail requile network support, please email links to ensure normal.
Here we [email protected] Case:
dadahacker@ 126.com(Enter the email address bar inside your valid e-mail
Click the main menu in the "recorder" icon into the ',tape', the main interlace
As shown below:
aall
address: dadahacker@ 1 26.com).
In the Password field enter your valid password: 123456789.
You can then select the'Next", select the account type interface appears
as shown below:
$l
Note: when inserting SD card recording, audio file will be saved in
the SD card.
Select "Reeord' button recording, recording is completed, select',Stop', button
At lhis-point you can select the'Play' button plays the sound just iecorded.
Select "Use this record" button, save the recordingi this can be fdund in the SD
card in,the appropriate recording documentation; li you do not save, you can
select the 'Discard' button.
t7
fl
z:sl
arvr
Here we are using a POP3 account type. Appears to accept the server after
setting the interface as lollows:
Please e-mail providers, each based on the information, set differenl
paramelers, such as:
POP3 server: The system default is "126.com", should be amended to
"pop. 1 26.com'Port number "l 1 0"
Then select'Next", will enter the "Check to accepl the server settings", il
oulgoing
ln the "Your Name" enter the bar you want to show the name of
mail, enter here: RockY
i'ri"i .ritr, ,;nnistr,, rufton to enter the mail interface. lt will automatically
load the e-mail, mailing lisl below shows:
set correctly, there will be "outgoing server settings'' interface as follows:
sed SMIP server'126.com" as'smtp.1 26.com'
Modify the porl number "587" lo "25"
Drag the scroll bar, select "Next' and enter "Check outgoing server settings"
interface. lf the s€ttings are corect, will enter the following interface:
I
+
7129
Select a column can view the messages, you can view the column inside
a "reply", "delete", "Open attachment" and other operations'
8E*:-t+rr
&&A!l -
:trirrrtilii, mla
3UAS.
,1&.
€i8g. hf*rl
Alr. 9t. {t1. itr!
|Qrlr07cr:Ul;t,i&5;ir
,ollrl
--
I:I
H!
!
ea*r
Select "Next', you can enter the account information to customize the interface:
l9
20
.
rJL
l
'
USB connection:
MID uslng he USB coflnection and PC, the detault connection method is the
synchronous mode- Can drag the status bar pulled down, there are interface
2 ScrtlEbd 2Ol,
88gtxx
iffi*
t
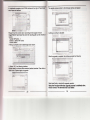
Android upgrade process will lormat the intemal flash memory and, tf necessary.
back up your dala in advance.
Android PC upgrade client upgrades ihe use oi specialized tools, the latest
upgrade tool for download:
Upgrade file include: lk.rom and tcc8900-mtd.img. Can be downloaded through
the following website package:
Upgrade process is as follows: (in order to upgrade the Windows XP example)
.d
1: Download and
upgrade tool.
2: Download and extract
t:::!
the upgrade files.
3: ln the PC side running
unzip .
g
UsB
:!:::
(onnected(Int€rnal)
. ::', I :s::'::-
lajr.ofrputer
A
UsB debutging conrected
:e.:: :: : *: r ,:3 r.:il; rg
the uoorade tool FWDN
I tt pr"ompted to install
dnvers, install the driver
,-".;:"-*;rxw
A
SD
FWDNdirectoryl.The
card unexpectedly remoyed
'USB Connected (lnternal)": that built-in memory.
.USB
is connected": said external memory (SD card).
l{ you need to copy data using USB, you can select the load you need the
memory, as:
upgrade files will be added
to the FilePath lk.rom and
tcc8900 mtd.img list, as
shown below.
MID D_C adapter. I Upgrade
process needs to ensure that external power supply I .
presses
5:
MID the touch screen, and pressing the power key. The
machine starts, the lollowing prompt appears the wordl
tii you wani to.update,,plbiiree,.ler€a$e .pswer .brlttOn :"
Follow the prompts Language: Belease the
)e power button
butto and the screen
pornt the lollowing
A_t
il this
tnrs point
lollowtng prompt screen will aooear:
appear:
"ll you want lo upoate ,ploa€e touch poweroutton."
rollow the prompls
prompls Words: hand-hold the power button and hold lor a while,
Follow
until the screon the following word prompted:
"FWDN Start", belore we can release the power button
Finally, please use the USB cable to connect PC terminal and MID
At
this point, PC-side FWDN program i
interface appears as follows:
4: Please add to the need to upgrade lhe
Loading is complete, you can see in the PC end of the corresponding letter
* OTG use
Support the FAT32 lormat for mobile devices: for example, U disk, mobile
hard drive.
Plug and Play connection method.
USB OTG port and externai device.
Use OTG cable
MID
* Keyboa:d Mouse
Support plug and play USB mouse, keyboard equipment.
21
22
lrffzatirn cornplete, click FWDN interface to the right of "Nand Data'
aree- lheae are interface:
6:
The upgrade plocess similar to the following intertace will appeac
lmageFilePath: Nand Data liles store the resulting path can be chosen at
random.
Number Of Partion : 1
Partion 1: Select FAT format
Partion Lable:a
T.Filling is complete, click Createlmage button below:
8: Select'OK', the lollowing interface:
Please selec't Low tormat whole memeory before download. Then click on
Start bufton. System begins to upgrade.
!ryr4@ry}:tl5*fi'&t{
l+-'
::
'
r''
.:".
I
.=l
I,
l
l
l
.
::-1::
==
23
Reset reset button, complete the upgrade operation.
Note: the first boot aft6r the upgrade process is relatively slow,
this is normal. The second boot much faster.
24
'l: What is Android?
A: Android is Google on November S, ZOO7 announced the open
source Linux-based operating system name.
2: What is APK?
A: APK is Android Package acronym that Android installation package.
3: How to obtain the ApK?
'* (ftx)'<r*' H g4 H9zyv*x|f;4' m*rnqE
+fB*: ?ltrU**4 '1+*o€ 'sdctr:VfdEW+
A: You can download via PC-side installation, you can also ,'Andrews
market' online to download and install.
'qEI!,9*& 'ES*4+1#U
EffiEJ/'*q(&Erd3egE'rr{f
4: The machine operating system version?
A: This machine adopts Android2.1, built-in hardware BD acceleration,
can run Android applications market most.
5: The machine can charge through USB?
Answer: no. But the results can be powered through the USB
implementation. Recommend the use ol Annex DC 5V adapter
to charge.
Pictures for reference only, product appearance,
functionality please prevail in kind, tire product
rules and design are subject to change without
prior notice
gJ'+*s4HE
.Bg*SEEEEI
CO+}M Hil})S
g
^6
"
EE E}' rd E:L : *
4Eg8sn$tEIK.Eggtl* :s
E&E
ffi ffIEESNTIEIrJ
o*/E*H4/plorpuv
WEYT H.9LtEI.ts' gI(oe+,ElEtyl' f zptorpuvH*ll*S : g
L*WWV.*t&u+* :,
,L*Y,,%i4H8,,
GPS, 3G optional, support HDMI out put(HDMI
need according to the shell)please reference the
"*+E
FI EIf.1
-tr+' ?FE#:LH+HCdIIEIf.1.is. : *
.ydv&*&l[[ :r
"B+FEplorpuvdH,tsgEf,o0e1ce6 ptojpuvexdv
c\)dVEYrfI
sample.
lf
0H
B ?bxn un + E
4,H
+E
E
9
0H tt
"w?rfrw*+t&w
* L00z +ag 6oo g gpror puy
aptoJpuve'7+,
25
:*
tZ