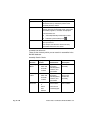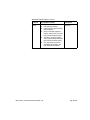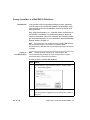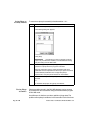
1
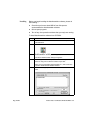
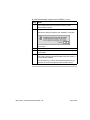
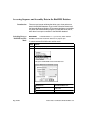
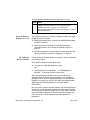
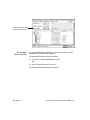
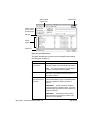
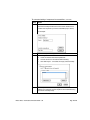
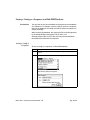
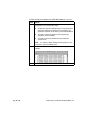
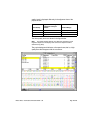
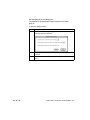
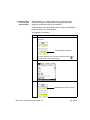
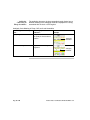
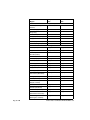
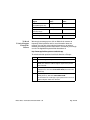
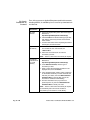
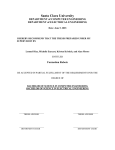
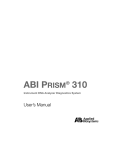
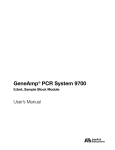
Release Notes New Features in AutoAssembler v. 2.1 1998 (Updated 02/2001) SUBJECT: AutoAssembler DNA Sequence Assembly Software v. 2.1 Summary of New Features These are the new features in the version 2.1 release of the AutoAssembler™ software: ♦ Installation from CD-ROM (see page 3) ♦ Inclusion of IUPAC/IUB ambiguity codes in the consensus sequence (see page 22) ♦ Client support for the BioLIMS® 2.0 database on an Oracle7™ Database Server and on a Sybase SQL Server™ (see page 7) ♦ Complete integration with the BioLIMS 2.0 database including saving of assembly projects to the database (see page 14) ♦ An enhanced BioLIMS Chooser that replaces the Sequence Chooser and permits searches for collections and assembly projects in the BioLIMS database (see page 8) ♦ Integration of AutoAssembler with the phrap assembly engine and the BioLIMS database (see page 25) If you are upgrading from AutoAssembler v. 1.X to AutoAssembler v. 2.1 software, these features, incorporated in version 2.0, will be new to you: ♦ The CAP v. 2 engine, which is twice as fast as the local CAP v. 1 algorithm ♦ Support for AppleScript® commands In These Release Notes These release notes supplement the ABI PRISM AutoAssembler DNA Sequence Assembly Software v. 2.0 User’s Manual (P/N 904947). New features and configuration instructions that are not documented in the user’s manual are described here. Topics in This Document Topic See Page Installation of AutoAssembler v. 2.1 Software Configuring Your Computer for Access to a Database Page 2 of 40 BioLIMS® 3 7 Accessing Sequence and Assembly Data in the BioLIMS Database 8 Saving Assemblies to a BioLIMS 2.0 Database 14 Saving a Contig as a Sequence in a BioLIMS Database 19 IUPAC/IUB Codes Recognized 22 Phred, Phrap, Cross_Match, BASIS, and AutoAssembler (BioLIMS only) 25 Known Problems 31 Fixed Bug 32 Technical Support 33 Release Notes: New Features in AutoAssembler v. 2.1 Installation of AutoAssembler v. 2.1 Software Introduction AutoAssembler v. 2.1 is installed from a CD-ROM. This section contains information about: System Requirements and Recommendations ♦ Power Macintosh® computer requirements and recommendations (page 3) ♦ How to install the AutoAssembler software (page 4) ♦ How to remove the software (page 6) Below are the system requirements and recommendations for running the AutoAssembler v. 2.1 on your computer. Note These are the minimum requirements. In general, the more memory, the larger the screen size, and the more processing power you have, the better. System Requirements System Component Requirements CPU A Power Macintosh (PowerPC CPU) computer. (You will benefit from using the fastest computer available.) CD-ROM Drive Any Operating System Mac OS version 8.0 with Open Transport 1.1 or later. Disk Space Approximately 6MB of free disk space. Memory (RAM) The suggested memory allocation is 10MB of random-access memory (RAM). System Recommendations System Component Recommendations Monitor A 17-inch monitor or larger is recommended. Although a monitor of 640 x 480 resolution can be used, you will benefit from having a monitor of higher resolution. Printer A PostScript-compatible color printer is recommended; e.g., HP DeskJet 1600CM and 1200C/PS printers. Release Notes: New Features in AutoAssembler v. 2.1 Page 3 of 40 Installing Before you begin installing the AutoAssembler software, please do the following: ♦ Check that you have at least 5MB of free disk space to accommodate the AutoAssembler software. ♦ Quit all open programs. ♦ Turn off any virus protection software that you may have running. To install AutoAssembler software from CD-ROM: Step Action 1 Insert the AutoAssembler™ 2.1 CD-ROM into the computer’s CD-ROM drive. 2 Double-click the AutoAssembler Installer icon. 3 When the Installer start-up screen appears, choose Continue. The About AutoAssembler dialog box appears. 4 This dialog box contains important information that you should read. You may print or save the contents if you want. After you have read About AutoAssembler 2.1, click Continue to open the AutoAssembler Installer window. 5 Page 4 of 40 Check that the pop-up menu is set to Custom Install as shown here. Release Notes: New Features in AutoAssembler v. 2.1 To install AutoAssembler software from CD-ROM: (continued) Step Action 6 Use the pop-up menu in the lower section of the installer dialog box to select the hard drive and folder on which to install AutoAssembler software. 7 To begin the installation, choose Install. The following dialog box appears when installation is complete. Choose Quit. 8 Enable any virus protection that you turned off before installation. 9 Drag the AutoAssembler 2.1 CD-ROM icon to the Trash to eject the CD-ROM. 10 The AutoAssembler Installer Log file is created by the Installer. The log file is placed in the AutoAssembler folder and contains a list of all the files installed. Use this log file if you need to remove AutoAssembler from your hard disk. (See “Removing AutoAssembler Software” below.) Release Notes: New Features in AutoAssembler v. 2.1 Page 5 of 40 Removing AutoAssembler Software This section describes how to remove the AutoAssembler v. 2.1 Software from your Macintosh computer. The Uninstall process deletes all folders and files installed by the AutoAssembler Installer. Note If you have moved AutoAssembler files or folders from their original installed locations, they may not be found and deleted by the uninstall operation. Also any files that have been added to the application folders, such as those created when the applications are run, are not deleted by the uninstall operation. To remove installed AutoAssembler software: Step Action 1 Follow steps 1–4 in the procedure “Installing” on page 4 to open the AutoAssembler Installer window. 2 Select Uninstall from the pop-up menu in the upper left corner of the window. 3 Choose the Select Folder item on the Install Location pop-up menu. A Macintosh browser box appears. 4 Use the browser box to locate the folder that contains the AutoAssembler folder. 5 Click Uninstall to begin the removal of the files from your disk. 6 At the conclusion of the remove operation, an alert box appears with the message whether or not the remove was successful. Note If files have been moved or added to the AutoAssembler folder, the remove operation will be reported as unsuccessful; you should then examine and delete the remaining files in the AutoAssembler folder yourself. Page 6 of 40 Release Notes: New Features in AutoAssembler v. 2.1 Configuring Your Computer for Access to a BioLIMS® Database Introduction The extensions and other support files required for access to a BioLIMS database are not part of the AutoAssembler v. 2.1 installation. Before you can use AutoAssembler in BioLIMS mode, you must install either the BioLIMS Client Software or the BioLIMS Instrument Software. Oracle and Sybase Database Compatibility How to Set Up Your Computer For BioLIMS 2.0, the database platform is either an Oracle7 Database Server v. 7.3.3.X or a Sybase SQL Server v. 11.0.2. The procedure for configuring your computer to connect to a BioLIMS database depends upon the server type. Detailed information about how to configure your Macintosh computer for connection to an Oracle®-based or a Sybase®-based BioLIMS database and how to troubleshoot problems with database connection is given in the following manuals: ♦ ABI PRISM BioLIMS Sample2DB Software User’s Manual (P/N 4304072) ♦ ABI PRISM DNA Sequencing Analysis Software User’s Manual (P/N 4306158) ♦ ABI PRISM BioLIMS Manager Software User’s Manual (P/N 4304073) Release Notes: New Features in AutoAssembler v. 2.1 Page 7 of 40 Accessing Sequence and Assembly Data in the BioLIMS Database Introduction Switching Between BioLIMS and File Mode There are two browser windows that allow you to view and access data in the BioLIMS database. They are the Collection Browser and the Assembly Browser windows. The browser windows are accessible only when the AutoAssembler program is in BioLIMS mode; that is, when there is an open connection to the BioLIMS database. IMPORTANT In AutoAssembler v. 2.1, you can only switch between BioLIMS mode and file mode when there are no projects open. To switch between BioLIMS mode and file mode: Step Action 1 Close any open projects. 2 Select BioLIMS Access… from the Edit menu. This opens the BioLIMS Access Information box. Page 8 of 40 When the connection to the database is… AutoAssembler is in… closed file mode. open BioLIMS mode. Release Notes: New Features in AutoAssembler v. 2.1 To switch between BioLIMS mode and file mode: (continued) Step 3 When the Browser Windows Are Used The Collection Browser Window Action To open a database connection, fill in the username, password, database, and server fields. For more information about database connection, see page 3-13 of ABI PRISM AutoAssembler DNA Sequence Assembly Software v. 2.0 User’s Manual (P/N 904947). There are three reasons to access the browser windows from within the AutoAssembler program: ♦ Adding new sequences to a project from the BioLIMS database (Collection Browser). ♦ Opening an existing assembly in the BioLIMS database (Assembly Browser). See “Saving an Assembly Project” on page 14. ♦ Selecting assemblies for AutoUpdate (Assembly Browser). See “Saving an Empty Assembly and Updating It” on page 16. Use the Collection Browser window to search for and add sequences to assembly projects. The Collection Browser window opens when: ♦ Connection to a BioLIMS database is open, and ♦ “Add Sequence(s) from BioLIMS…” or “Add Multiple from BioLIMS…” is selected from the Project menu. The Collection Browser window works the same way as the Sequence Chooser window in AutoAssembler v. 2.0. A detailed description can be found in “Adding Sequences From the BioLIMS Database” on pages 3-12 to 3-24 of the ABI PRISM AutoAssembler DNA Sequence Assembly Software v. 2.0 User’s Manual (P/N 904947). One new search criterion has been added to the Collection Browser window. The Instrument Name identifies the sequencing instrument on which the gel or capillary sample was run. This name is set in the General Settings Preferences of the Data Collection software. The name can be up to 255 characters and include spaces and punctuation. Release Notes: New Features in AutoAssembler v. 2.1 Page 9 of 40 Instrument Name search criterion for sequences The Assembly Browser Window Use the Assembly Browser window to search for and open or select assemblies from the BioLIMS database. The Assembly Browser window opens when: ♦ Connection to a BioLIMS database is open, and ♦ Open is selected from the File menu. The Assembly Browser window looks like this: Page 10 of 40 Release Notes: New Features in AutoAssembler v. 2.1 Select Criteria pop-up menu Search button Search criteria pop-up menus and text boxes Split bar Search results Status line Function of the Window Parts This table describes the six parts of the Assembly Browser window (see the figure on page 11). Item Description Select Criteria pop-up menu Use this pop-up menu to specify which search criteria are visible in the Assembly Browser window. Note The search results are the same whether a criterion is invisible or blank and visible. Search button Click this button to query the BioLIMS database. This button is the default. Pressing the Return key also begins a search. Search criteria pop-up menus and text boxes Use these pop-up menus and text boxes to define your BioLIMS database query. The available search criteria are explained in detail in the table on page 12. IMPORTANT Search criteria are combined using the logical AND operation. That is, only those assemblies that match each and every criterion you specify are returned. IMPORTANT Narrowing the search criteria makes the search process faster as there is less query time on the database. Release Notes: New Features in AutoAssembler v. 2.1 Page 11 of 40 Item Description Split bar Drag on this bar to alter the amount of space allocated to the top and bottom portions of the Assembly Browser window. Search results After a successful query, assemblies found are listed in this area. The assembly name, owner, date assembled, algorithm, and status are displayed. The assemblies are: Status line ♦ Sorted alphabetically/numerically by name ♦ Prefaced by the assembly icon: Error messages and other important information are reported here. For example, the status line shows how many assemblies were found in a search. Assembly Search Criteria These are the criteria by which you can search for assemblies in the BioLIMS database. Assembly Search Criteria Criterion Page 12 of 40 Pop-up Menu Choices Allowed Text Description Assembly Name ♦ ♦ ♦ ♦ is starts with ends with contains Up to 255 characters including letters, numbers, and punctuation Name of the assembly Assembly Owner ♦ ♦ ♦ ♦ is starts with ends with contains Up to 255 characters including letters, numbers, and punctuation Name of the person who created the assembly Assembly Mod Date ♦ ♦ ♦ ♦ ♦ any is before after between Date — set with arrow buttons Date assembly was modified The format is month/day/year. Release Notes: New Features in AutoAssembler v. 2.1 Assembly Search Criteria (continued) Criterion Pop-up Menu Choices Description Assembly Status ♦ ♦ ♦ Status of the assembly ♦ ♦ ♦ Release Notes: New Features in AutoAssembler v. 2.1 any new (waiting assembly) edit in progress (open on another client computer) ready for assembly (applies to projects waiting to be processed by the phrap assembly engine) assembly in progress (applies only to projects being assembled by the phrap assembly engine) up to date (project has been assembled and assembly has been attempted and failed) Page 13 of 40 Saving Assemblies to a BioLIMS 2.0 Database Introduction In the previous version of the AutoAssembler program, sequences could be read in from the BioLIMS database, but assembled contig data could not be stored in the database, it had to be written out to local project files. Now, using AutoAssembler v. 2.1, assembly results can be written to the BioLIMS 2.0 database. Use the Assembly Browser window to search for assemblies. (The terms “assembly” and “assembly project” are used interchangeably.) For more information about the Assembly Browser window, see page 10. Note If the sequences in the project are stored in the BioLIMS database, then the assembly project is also saved to the database. When AutoAssembler is in BioLIMS mode, the assembly project cannot be saved to a local file. Saving an Assembly Project Note Unusual Macintosh characters can create problems. We recommend restricting assembly and owner names to letters, numbers, periods (full stops), and underscore characters. To save a project to the BioLIMS database: Step Action 1 The first time you choose to save a new project (with Save from the File menu), or if you choose to Save As… or Save a Copy In… a box like this appears. 2 Enter a name in the Owner box. This is usually your own name. (An owner name is suggested if you are “saving as” or “saving a copy as”.) Page 14 of 40 Release Notes: New Features in AutoAssembler v. 2.1 To save a project to the BioLIMS database: (continued) Step When a Phrap Assembly Is Saved Action 3 Enter a name for the assembly in the “Save this assembly as:” box. 4 Choose Save to save the assembly project to the BioLIMS database. When an assembly project is saved, a collection with the same name as the assembly project is created in the root directory and references to all the sequences that belong to the assembly project are placed in a collection. If a collection with that name already exists, sequences are added or removed from the collection so that the collection contains only sequences belonging to the assembly project. The assembly itself is saved in the root collection. Empty Projects Are a Special Case Empty assembly projects are treated as a special case. When you save a project that does not contain any sequences, the collection with the same name as the assembly is not modified or created. This allows you to automate the loading of sequences into an assembly. Release Notes: New Features in AutoAssembler v. 2.1 Page 15 of 40 Saving an Empty Assembly and Updating It To automate loading of sequences into assemblies: Step 1 Action Note down the name of the collection that contains the sequences that you want to assemble. You can use the BioLIMS Manager program to search for, edit, or rename this collection. In this example, the sequences to be assembled are contained in a collection called “Test_One”. Page 16 of 40 2 Open the AutoAssembler program and establish connection to a BioLIMS database. 3 Choose New from the File menu to open a new untitled project window. Release Notes: New Features in AutoAssembler v. 2.1 To automate loading of sequences into assemblies: (continued) Step 4 Action Choose Save As… from the File menu. Save the assembly with the same name as the collection that contains the sequences you want to assemble (step 1 above). For example: 5 Choose AutoUpdate Settings… from the Edit menu. 6 In the dialog box: a. 7 Check the Activate Automated Update box. b. Choose at least a 10-minute wait before starting. c. Click Add Project… and select the empty saved assembly. After the specified wait time, the sequences in the collection are added to the assembly and the sequences are assembled using the current Assembly Setup. Release Notes: New Features in AutoAssembler v. 2.1 Page 17 of 40 For more information about AutoUpdating, see pages 3-43 to 3-45 of the ABI PRISM AutoAssembler DNA Sequence Assembly Software v. 2.0 User’s Manual (P/N 904947). Deleting Data from the BioLIMS Database Page 18 of 40 Assemblies, like individual sequence data, can be deleted from the BioLIMS database using the BioLIMS Manager program. (You cannot delete from the database using the AutoAssembler program.) Release Notes: New Features in AutoAssembler v. 2.1 Saving a Contig as a Sequence in a BioLIMS Database Introduction You may want to save an assembled contig sequence to the database as a sequence. For example, once the contig is saved as a sequence object in the database, the contig can itself be used as a sequence in a larger assembly. When saved to the database, the contig looks like a text file uploaded by the Sample2DB program would. That is, there is no electropherogram data, no EPT data, and only minimal annotation information associated with the sequence. Saving a Contig as a Sequence To save a contig as a sequence in a BioLIMS database: Step Action 1 If the assembly window containing the contig is not already open, open it. 2 Choose Build Consensus… from the Project menu. The following dialog box appears. Release Notes: New Features in AutoAssembler v. 2.1 Page 19 of 40 To save a contig as a sequence in a BioLIMS database: (continued) Step 3 Action Use the pop-up menu to choose the case of the characters in the consensus in one of the following ways: ♦ To retain the case the characters have in the project window (lowercase characters for ambiguous base positions and uppercase characters for all others), use the default (Mixed). ♦ To create a consensus sequence with all upper-case characters, choose “UPPER”. ♦ To create a consensus with all lower-case characters, choose “lower”. Note It is easier to identify ambiguous base positions in the consensus if you choose Mixed case. Page 20 of 40 4 Click OK. A sequence window with the consensus sequence appears: 5 Choose Save from the File menu. Release Notes: New Features in AutoAssembler v. 2.1 To save a contig as a sequence in a BioLIMS database: (continued) Step 6 Action Save the contig sequence to the database. The contig sequence is saved into a root level collection called Consensus Sequences. You can use the BioLIMS Manager program to rename the collection or to move the contig sequence into another collection. Release Notes: New Features in AutoAssembler v. 2.1 Page 21 of 40 IUPAC/IUB Codes Recognized AutoAssembler v. 2.1 Recognizes IUPAC/IUB Codes AutoAssembler v. 2.1 Software recognizes IUPAC/IUB ambiguity codes when it builds the consensus sequence. In previous versions, the AutoAssembler program would not put an ambiguity code in a consensus sequence. Some applications like mutation detection, heterozygote detection, and microbial identification, can benefit from the ability to assemble using the full IUPAC/IUB character set. The extended set of 14 base characters provides the ability to indicate ambiguous knowledge about bases. Using IUPAC/IUB Codes Whenever IUPAC/IUB ambiguity codes are present in the base-called sequence, the AutoAssembler program takes them into account in displaying the consensus sequence. If your sequences do not contain IUPAC/IUB codes but you want to take advantage of the new capability, use Factura™ Feature Identification software to identify and assign IUPAC/IUB codes within sequences. For more information about how to do this, refer to the ABI PRISM Factura Feature Identification Software v. 2.1 User’s Manual (P/N 904946). Page 22 of 40 Release Notes: New Features in AutoAssembler v. 2.1 An Example This table gives an example of the difference between the way the AutoAssembler v. 2.0 and v. 2.1 Programs handle IUPAC/IUB codes within consensus sequences. Version Displays a consensus this way… 2.0 2.1 IUPAC/IUB Codes T+R=t T+R=d The table below provides translations for IUPAC/IUB codes used in the CAP 2 engine. IUPAC/IUB Codes Code Translation A Adenosine C Cytidine G Guanosine T Thymidine B C,G, or T D A, G, or T H A, C, or T R A or G (puRine) Y C or T (pYrimidine) K G or T (Keto) M A or C (aMino) S G or C (Strong—3 H bonds) W A or T (Weak—2 H bonds) N aNy base Release Notes: New Features in AutoAssembler v. 2.1 Page 23 of 40 Complements The table below shows the complements for the IUPAC/IUB character set. Complement Table Page 24 of 40 Character Complement A T C G G C T A R Y Y R K M M K W S S W B V D H H D V B N N Release Notes: New Features in AutoAssembler v. 2.1 Phred, Phrap, Cross_Match, BASIS, and AutoAssembler This Section This section only applies to those who have the installed the BioLIMS database, phred, phrap, cross_match, and the BASIS suite of programs on their UNIX platforms. Phred/Phrap Software New in BioLIMS 2.0 is the integration of the third-party phred, phrap, and cross_match assembly software with the BioLIMS 2.0 system. The suite of programs and scripts that interfaces phred and phrap to the BioLIMS database and to AutoAssembler is called BioLIMS/Assembly System Integration Software (BASIS). For more information about the BASIS suite itself, see the ABI PRISM BASIS BioLIMS/Assembly System Integration Software User’s Manual (P/N 4304074). Phred, Phrap, and Cross_Match Functions Sequences and Assembly Names for Phrap Program Description phred Base calls the raw sequence data and assigns quality values to each base call cross_match Screens the sequences against known vector sequences, replacing vector bases by “x” phrap Assembles fragments into contigs and generates the consensus sequence for each contig In general, we recommend restricting sequence and assembly names to letters, numbers, underscore characters, and only one period (full stop). Sequence Names Sequence names for BASIS assemblies must conform to the phred and phrap sequence naming rules. It is important that you refer to your phred and phrap documentation for details. Common problem characters are spaces and bullets (•). Assembly Names Assembly names must conform to UNIX file name rules. Common problem characters are slashes (/) and spaces. Release Notes: New Features in AutoAssembler v. 2.1 Page 25 of 40 Setting Phrap as Assembly Method To set and use phrap for assembly in AutoAssembler v. 2.1: Step 1 Action Choose Assembly Setup… from the Project menu. The following dialog box appears: Click phrap. IMPORTANT If the phrap icon does not appear, the phrap option may not have been installed, or the file SAServer.Config may be missing from the ABI Folder. 2 Occasionally you may want to specify phrap parameters to be passed on to phrap when the program is executed. Enter the parameters into the phrap Parameters field. Each parameter must be separated from others by a space. The format of the individual parameters must comply with phrap’s requirements. See phrap documentation for more details. 3 To set the assembly method to phrap and close the dialog box, click OK. or To assemble the project using phrap, click Submit. Viewing Phrap Assemblies Phrap assemblies stored in the BioLIMS database can be opened and viewed like other assemblies using the AutoAssembler program in BioLIMS mode. One difference is that there are three qualities of phrap data. The qualities reflect phrap’s confidence in the basecalls. Each of the three Page 26 of 40 Release Notes: New Features in AutoAssembler v. 2.1 quality levels is displayed differently in the alignment view of the project window. Data Quality Appearance of Fragment Sequences in Project Window Default Range Good Full color 25 and up Fair Grey 11–25 Low Light grey 0–10 The three quality levels are shown in the figure below. Note The Quality Display Settings only affect the appearance of the fragment sequences. The display of the consensus sequence itself is determined by phrap. The purple background indicates a discrepant base; that is, a high quality base that disagrees with the consensus. Release Notes: New Features in AutoAssembler v. 2.1 Page 27 of 40 The Phrap Display Setting Dialog Box The defaults for the data quality ranges are given in the table page 27. To alter the quality ranges: Step Page 28 of 40 Action 1 Choose Quality Display Settings from the Edit menu. The following dialog box appears: 2 Edit the Low quality and Fair quality fields. Values of 0–100 are allowed. 3 Click OK to save the Quality Display Settings and close the dialog box. Release Notes: New Features in AutoAssembler v. 2.1 Overriding Phrap Consensus with AutoAssembler AutoAssembler v. 2.1 software allows you to override the phrap consensus sequence (contig) without changing the individual sequence records that make up the assembly. Follow the steps in the table below to edit a contig by overriding the phrap consensus for a given basecall. To designate as consensus: Step 1 Action In Alignment view, select a base or range of bases in a fragment sequence. Select AGAAAA in fragment (To enter alignment view, choose the alignment button ( the bottom left of the project window.) 2 Choose Designate as Consensus from the Edit menu. 3 The selected bases then become the consensus bases. ) in AGAAAA becomes the consensus Release Notes: New Features in AutoAssembler v. 2.1 Page 29 of 40 Ambiguity Characters in Phrap Assemblies The ambiguity characters in phrap-assembled contig display have a different meaning to the ambiguity characters displayed for a contig assembled with the local or CAP engines. Ambiguity Code Meaning in Phrap, CAP, and Local Assemblies In a contig assembled by the… the ambiguity character indicates… phrap engine phrap’s lower confidence in the quality of the base at that position. CAP or local engine Example ambiguity character any mismatch in the aligned fragments. ambiguity character Page 30 of 40 Release Notes: New Features in AutoAssembler v. 2.1 Known Problems Future Release Printing Smooth Peak Shapes A future release of the software will address these problems. We apologize for any inconvenience they may cause. Printing electropherograms with between 1000 and 1400 points per panel may result in peak shapes that do not appear smooth. To avoid this, select less than 999 points per panel or greater than 1400 points per panel. The default is 1500 points per panel. Searching and Opening Assemblies in the Assembly Browser Assembly Sequence Status Opening an assembly from the Assembly Browser in BioLIMS mode takes significantly longer than opening an assembly in file mode. If your database is very large, searching for assemblies and sequences may also be slow. The Sequence Status search criteria in the Collection Browser window includes the status “assembly.” AutoAssembler software does not assign the assembly status to sequences. The assembly item will be removed from the Sequence Status menu in the next release of software. Release Notes: New Features in AutoAssembler v. 2.1 Page 31 of 40 Fixed Bug Don’t Save Option Is Back for Sequence Edits In the AutoAssembler v. 2.0 Program, if you edited bases of a sequence from within the sequence window in Electropherogram view or Sequence view, the edits took effect immediately because when the sequence window closed, the sequence edits were always saved to the project or to the sequence file and the project file. This problem is resolved in the AutoAssembler v. 2.1 program. When you close an edited sequence window, the following alert box appears. You can choose not to save changes to the sequence file. Page 32 of 40 Release Notes: New Features in AutoAssembler v. 2.1 Technical Support Contacting Technical Support You can contact Applied Biosystems for technical support by telephone or fax, by e-mail, or through the Internet. You can order Applied Biosystems user documents, MSDSs, certificates of analysis, and other related documents 24 hours a day. In addition, you can download documents in PDF format from the Applied Biosystems Web site (please see the section “To Obtain Documents on Demand” following the telephone information below). To Contact Technical Support by E-Mail Contact technical support by e-mail for help in the following product areas: Hours for Telephone Technical Support Product Area E-mail address Genetic Analysis (DNA Sequencing) [email protected] Sequence Detection Systems and PCR [email protected] Protein Sequencing, Peptide and DNA Synthesis [email protected] Biochromatography, PerSeptive DNA, PNA and Peptide Synthesis systems, CytoFluor®, FMAT™, Voyager™, and Mariner™ Mass Spectrometers [email protected] LC/MS (Applied Biosystems/MDS Sciex) [email protected] or [email protected] Chemiluminescence (Tropix) [email protected] In the United States and Canada, technical support is available at the following times: Product Hours Chemiluminescence 8:30 a.m. to 5:30 p.m. Eastern Time Framingham support 8:00 a.m. to 6:00 p.m. Eastern Time All Other Products 5:30 a.m. to 5:00 p.m. Pacific Time Release Notes: New Features in AutoAssembler v. 2.1 Page 33 of 40 To Contact Technical Support by Telephone or Fax In North America To contact Applied Biosystems Technical Support, use the telephone or fax numbers given below. (To open a service call for other support needs, or in case of an emergency, dial 1-800-831-6844 and press 1.) Product or Product Area Telephone Dial... Fax Dial... ABI PRISM® 3700 DNA Analyzer 1-800-831-6844, then press 8 1-650-638-5981 DNA Synthesis 1-800-831-6844, then press 21 1-650-638-5981 Fluorescent DNA Sequencing 1-800-831-6844, then press 22 1-650-638-5981 Fluorescent Fragment Analysis (includes GeneScan® applications) 1-800-831-6844, then press 23 1-650-638-5981 Integrated Thermal Cyclers (ABI PRISM ® 877 and Catalyst 800 instruments) 1-800-831-6844, then press 24 1-650-638-5981 ABI PRISM ® 3100 Genetic Analyzer 1-800-831-6844, then press 26 1-650-638-5981 BioInformatics (includes BioLIMS®, BioMerge™, and SQL GT™ applications) 1-800-831-6844, then press 25 1-505-982-7690 Peptide Synthesis (433 and 43X Systems) 1-800-831-6844, then press 31 1-650-638-5981 Protein Sequencing (Procise Protein Sequencing Systems) 1-800-831-6844, then press 32 1-650-638-5981 PCR and Sequence Detection 1-800-762-4001, then press 1 for 1-240-453-4613 PCR, 2 for the 7700 or 5700, 6 for the 6700 or dial 1-800-831-6844, then press 5 Page 34 of 40 Release Notes: New Features in AutoAssembler v. 2.1 Product or Product Area Telephone Dial... Fax Dial... Voyager MALDI-TOF Biospectrometry and Mariner ESI-TOF Mass Spectrometry Workstations 1-800-899-5858, then press 13 1-508-383-7855 Biochromatography (BioCAD Workstations and Poros Perfusion Chromatography Products) 1-800-899-5858, then press 14 1-508-383-7855 Expedite Nucleic acid Synthesis Systems 1-800-899-5858, then press 15 1-508-383-7855 Peptide Synthesis (Pioneer and 9050 Plus Peptide Synthesizers) 1-800-899-5858, then press 15 1-508-383-7855 PNA Custom and Synthesis 1-800-899-5858, then press 15 1-508-383-7855 FMAT 8100 HTS System and Cytofluor 4000 Fluorescence Plate Reader 1-800-899-5858, then press 16 1-508-383-7855 Chemiluminescence (Tropix) 1-800-542-2369 1-781-275-8581 Applied Biosystems/MDS Sciex 1-800-952-4716 (U.S. only), or 1-781-271-0045 1-650-638-6223 Outside North America Telephone Dial... Region Fax Dial... Africa and the Middle East Africa (English Speaking) and West Asia (Fairlands, South Africa) 27 11 478 0411 27 11 478 0349 South Africa (Johannesburg) 27 11 478 0411 27 11 478 0349 Middle Eastern Countries and North Africa (Monza, Italia) 39 (0)39 8389 481 39 (0)39 8389 493 Release Notes: New Features in AutoAssembler v. 2.1 Page 35 of 40 Telephone Dial... Region Fax Dial... Eastern Asia, China, Oceania Australia (Scoresby, Victoria) 61 3 9730 8600 61 3 9730 8799 China (Beijing) 86 10 64106608 86 10 64106617 Hong Kong 852 2756 6928 852 2756 6968 Korea (Seoul) 82 2 593 6470/6471 82 2 593 6472 Malaysia (Petaling Jaya) 60 3 758 8268 60 3 754 9043 Singapore 65 896 2168 65 896 2147 Taiwan (Taipei Hsien) 886 2 2358 2838 886 2 2358 2839 Thailand (Bangkok) 66 2 719 6405 66 2 319 9788 Austria (Wien) 43 (0)1 867 35 75 0 43 (0)1 867 35 75 11 Belgium 32 (0)2 712 5555 32 (0)2 712 5516 Czech Republic and Slovakia (Praha) 420 2 61 222 164 420 2 61 222 168 Denmark (Naerum) 45 45 58 60 00 45 45 58 60 01 Finland (Espoo) 358 (0)9 251 24 250 358 (0)9 251 24 243 France (Paris) 33 (0)1 69 59 85 85 33 (0)1 69 59 85 00 Germany (Weiterstadt) 49 (0) 6150 101 0 49 (0) 6150 101 101 Hungary (Budapest) 36 (0)1 270 8398 36 (0)1 270 8288 Italy (Milano) 39 (0)39 83891 39 (0)39 838 9492 Norway (Oslo) 47 23 12 06 05 47 23 12 05 75 Poland, Lithuania, Latvia, and Estonia (Warszawa) 48 (22) 866 40 10 48 (22) 866 40 20 Portugal (Lisboa) 351 (0)22 605 33 14 351 (0)22 605 33 15 Russia (Moskva) 7 095 935 8888 7 095 564 8787 South East Europe (Zagreb, Croatia) 385 1 34 91 927 385 1 34 91 840 Spain (Tres Cantos) 34 (0)91 806 1210 34 (0)91 806 1206 Sweden (Stockholm) 46 (0)8 619 4400 46 (0)8 619 4401 Switzerland (Rotkreuz) 41 (0)41 799 7777 41 (0)41 790 0676 The Netherlands (Nieuwerkerk a/d IJssel) 31 (0)180 331400 31 (0)180 331409 United Kingdom (Warrington, Cheshire) 44 (0)1925 825650 44 (0)1925 282502 Europe Page 36 of 40 Release Notes: New Features in AutoAssembler v. 2.1 Telephone Dial... Fax Dial... All other countries not listed (Warrington, UK) 44 (0)1925 282481 44 (0)1925 282509 Japan (Hacchobori, Chuo-Ku, Tokyo) 81 3 5566 6230 Region Japan 81 3 5566 6507 Latin America Del.A. Obregon, Mexico To Reach Technical Support Through the Internet 305-670-4350 305-670-4349 We strongly encourage you to visit our Web site for answers to frequently asked questions and for more information about our products. You can also order technical documents or an index of available documents and have them faxed or e-mailed to you through our site. The Applied Biosystems Web site address is http://www.appliedbiosystems.com/techsupp To submit technical questions from North America or Europe: Step Action 1 Access the Applied Biosystems Technical Support Web site. 2 Under the Troubleshooting heading, click Support Request Forms, then select the relevant support region for the product area of interest. 3 Enter the requested information and your question in the displayed form, then click Ask Us RIGHT NOW (blue button with yellow text). 4 Enter the required information in the next form (if you have not already done so), then click Ask Us RIGHT NOW. You will receive an e-mail reply to your question from one of our technical experts within 24 to 48 hours. Release Notes: New Features in AutoAssembler v. 2.1 Page 37 of 40 To Obtain Documents on Demand Free, 24-hour access to Applied Biosystems technical documents, including MSDSs, is available by fax or e-mail or by download from our Web site. To order documents... Then... by index number a. Access the Applied Biosystems Technical Support Web site at http://www.appliedbiosystems.com/techsupp b. Click the Index link for the document type you want, then find the document you want and record the index number. c. Use the index number when requesting documents following the procedures below. by phone for fax delivery a. From the U.S. or Canada, call 1-800-487-6809, or from outside the U.S. and Canada, call 1-858-712-0317. b. Follow the voice instructions to order the documents you want. Note through the Internet for fax or e-mail delivery There is a limit of five documents per request. a. Access the Applied Biosystems Technical Support Web site at http://www.appliedbiosystems.com/techsupp b. Under Resource Libraries, click the type of document you want. c. Enter or select the requested information in the displayed form, then click Search. d. In the displayed search results, select a check box for the method of delivery for each document that matches your criteria, then click Deliver Selected Documents Now (or click the PDF icon for the document to download it immediately). e. Fill in the information form (if you have not previously done so), then click Deliver Selected Documents Now to submit your order. Note There is a limit of five documents per request for fax delivery but no limit on the number of documents you can order for e-mail delivery. Page 38 of 40 Release Notes: New Features in AutoAssembler v. 2.1 © Copyright 2001, Applied Biosystems For Research Use Only. Not for use in diagnostic procedures. ABI PRISM, the ABI PRISM design, Applied Biosystems, and BioLIMS are registered trademarks of Applera Corporation or its subsidiaries in the U.S. and certain other countries. ABI, AutoAssembler™, and Factura are trademarks of Applera Corporation or its subsidiaries in the U.S. and certain other countries. AppleScript, Macintosh and Power Macintosh are registered trademarks of Apple Computer, Inc. Oracle is a registered trademark and Oracle7 is a trademark of Oracle Corporation. Sybase is a registered trademark and Sybase SQL Server is a trademark of Sybase, Inc. All other trademarks are the sole property of their respective owners. P/N 4304077B