1
User Manual
winTMCA 32
winTMCA 32/en/1.2(3366)/May2009
winTMCA 32
User Manual
ICx Technologies
This document is changed in accordance with the ICx Radiation Quality Management system. Changes
are archived.
Revision
winTMCA 32/en/1.2(3366)/May2009
Product
winTMCA 32
Language
Version
Latest Change
English (en)
1.2 (3366)
May 08, 2009 at 14:33 (UTC+0200h)
ICx is a trademark of ICx Technologies, Inc.
ICx Radiation is a trademark of ICx Radiation, Inc.
All other trademarks belong to their respective holders.
Copyright © 2009 ICx Technologies Inc.
All rights reserved.
winTMCA 32/en/1.2(3366)/May2009
ii
User manual winTMCA32
Contents
1
Contents
Chapter 1
Introduction
6
1.1
6
1.4.2.2
Manufacturer
Hardware and software requirements
Installation issues
Available acquisition hardware and their technical data
Plug-in cards
dMCA-card
External acquisition hardware
identiFINDER
nanoSPEC
Chapter 2
Software specifications
11
Chapter 3
Operating winTMCA32
13
3.1
Starting instructions
Main Program
Menu Header
Program Menu
winTMCA information
Select nuclide database
Select language
Help
Exit
Register User
Change Password
User Administration
View Menu
Acquisition Menu
Start
Stop
Start All
Stop All
Mode
Spectrum Menu
Energy calibration
Clear
13
1.2
1.3
1.4
1.4.1
1.4.1.1
1.4.2
1.4.2.1
3.2
3.3
3.3.1
3.3.1.1
3.3.1.2
3.3.1.3
3.3.1.4
3.3.1.5
3.3.1.6
3.3.1.7
3.3.1.8
3.3.2
3.3.3
3.3.3.1
3.3.3.2
3.3.3.3
3.3.3.4
3.3.3.5
3.3.4
3.3.4.1
3.3.4.2
6
6
7
7
7
8
8
8
13
14
14
15
15
15
15
16
16
16
17
18
19
19
20
20
20
20
21
21
23
© ICx Radiation GmbH
User manual winTMCA32
3.3.4.3
3.3.4.4
3.3.4.5
3.3.4.6
3.3.4.7
3.3.4.8
3.3.4.9
3.3.4.10
3.3.4.11
3.3.5
3.3.5.1
3.3.5.2
3.3.5.3
3.3.5.4
3.3.5.5
3.3.5.6
3.3.5.7
3.3.6
3.3.7
3.3.8
3.3.8.1
3.3.8.2
3.3.8.3
3.3.8.4
3.3.8.5
3.3.8.6
3.3.8.7
3.3.8.8
3.3.9
3.3.10
3.3.10.1
3.3.10.2
3.3.10.3
3.3.10.4
3.3.10.5
3.3.10.6
3.3.11
3.4
3.4.1
3.4.2
Length
Save
Save as
Load
Definitions
ROIs
Clear marked peaks
Select spectrum
Select sub spectrum
Hardware Menu
High Voltage...
ULD...
Gain
COM...
Stabilisation
Coincidence (only dMCA)
Pole Zero
Print Menu
Window Menu
Compute Menu
Integrate
Add spectrum
Subtract spectrum
Multiply spectrum
Divide spectrum
Rescaling x-axis
Smooth spectrum
Peak search
Preset Menu
Miscellaneous Menu
Editor
WinPROC Monitor
WinPROC Error Wait
Execute Batch
Peak Search Sensitivity
Preferences
nanoSPEC/identiFINDER Menu
Tool Bar
Real Time
Port Number
© ICx Radiation GmbH
Contents
2
23
23
24
24
24
24
26
26
26
26
27
28
30
31
32
33
34
34
35
35
36
37
38
38
39
39
40
41
41
45
45
47
47
47
48
49
50
51
52
52
User manual winTMCA32
3.4.3
Contents
3
52
3.6
Status
Window Selection
Count rate
Buttons
Batch status
Window List
Spectrum Window
Spectrum header
Spectrum display
Vertical scroll bar
Horizontal scroll bar
Meter
Text window
Spectrum window context menu
LOG file
Chapter 4
Changing graphical user interface
63
4.1
63
4.2
Adapting the menu header
Adapting the buttons
Chapter 5
Batch files
66
5.1
66
5.6
Batch structure
Batch commands
Special Characters
Pre-defined internal variables
Program winproc
winproc command line parameters
winproc dialog window
winproc monitor
Information window
Chapter 6
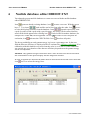
Nuclide database editor DBEDIT.TXT
112
Chapter 7
Appendix
114
7.1
Configuration file TMCAINIT.TXT
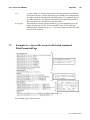
Example for a layout file created with batch command PrintFormattedPage
Evaluation module NAJCALC
Evaluation
Efficiency Calibration
Quality Control
Batch file examples
Generating spectrum names
114
3.4.4
3.4.5
3.4.6
3.4.7
3.4.8
3.5
3.5.1
3.5.2
3.5.3
3.5.4
3.5.5
3.5.6
3.5.7
5.2
5.3
5.4
5.5
5.5.1
5.5.2
5.5.3
7.2
7.3
7.3.1
7.3.2
7.3.3
7.4
7.4.1
52
53
53
54
54
54
55
56
56
57
57
57
58
61
63
67
105
105
105
106
107
108
109
115
116
117
119
121
123
123
© ICx Radiation GmbH
User manual winTMCA32
7.4.2
Contents
4
123
7.7
Creating a mcs spectrum
Inserting values into excel files
Example for a startup batch file
Acquiring and integrating
Spectra format
Trouble Shooting
No spectrum can be acquired
Spectra are not stored in the chosen directory
Malfunction peak integration
Using webMCA
Chapter 8
Credits
131
7.4.3
7.4.4
7.4.5
7.5
7.6
7.6.1
7.6.2
7.6.3
Index
© ICx Radiation GmbH
124
125
126
127
128
128
128
129
129
132
Chapter
1
Introduction
User manual winTMCA32
1
Introduction
6
Introduction
Manufacturer
Hardware and software requirements
Installation issues
Available acquisition hardware and their technical data
1.1
Manufacturer
winTMCA32 is developed and distributed by
ICx Technologies
1.2
Hardware and software requirements
The following items are required for the use of winTMCA32:
·
·
·
·
·
1.3
personal computer (IBM or compatible) with either Pentium or a faster processor
with a minimum frequency of 200 MHz
hard disk with at least 20 MB free disk space
dMCA- respectively external acquisition hardware nanoSPEC or identiFINDER
VGA graphic card
MS-Windowsâ version 9x, ME, NT, 2000 or XP
Installation issues
Insert the winTMCA32 distribution CD into your CD-ROM drive. Select the desired
winTMCA version on the CD (for example "winTMCA32 nanoSPEC English") with the
windowsâ explorer and open the directory. Start the program SETUP. EXE in the
selected folder and follow the instructions of the installation program.
After installation, the sub directories "NUCDATA", "CONFIG" and "SPECTRUM" are
located in the selected or newly created directory. All nuclide databases used by the
winTMCA32 software are stored in the NUCDATA directory. The SPECTRUM directory
serves as default directory for saving spectra.
In the CONFIG directory all files corresponding to the actual configuration as for example
batch-, menu- and button files are located. The names of these sub directories must not be
changed.
© ICx Radiation GmbH
User manual winTMCA32
Introduction
7
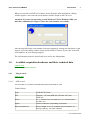
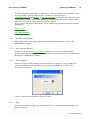
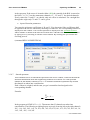
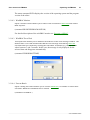
When you start the winTMCA32 software for the first time after installation, a dialog
window appears. Now enter the serial number which is found on the CD cover.
Attention! If you use the operating system Windows-NT and Windows-2000, you
must have administrator rights to enter the serial number successfully.
After having entered the serial number you must confirm by clicking the OK button. If the
input is correct the dialog window closes and winTMCA32 starts. If you enter an invalid
serial number, an error message appears.
The serial number must be entered only once and is user independent.
1.4
Available acquisition hardware and their technical data
plug-in cards
external acquisition hardware
1.4.1
Plug-in cards
dMCA-card
1.4.1.1
dMCA-card
The winTMCA32 software automatically detects the dMCA card.
Technical data:
Type
32 Bit PC/PCI card
Size
160 mm ´ 107 mm (dMCA4) 305 mm ´107 mm
(dMCA8)
+5 V, 600mA (max. for dMCA4) +5 V, 800mA (max.
for dMCA8)
LEMO connectors (depending on module)
Power
Inputs
Spectra parameters
spectra length: 4-65535 channels bits per channel: 24
storage capacity: 4194304 channels
© ICx Radiation GmbH
User manual winTMCA32
1.4.2
Introduction
8
External acquisition hardware
identiFINDER
nanoSPEC
1.4.2.1
identiFINDER
Initialize the identiFINDER with a configuration file named TMCAINIT.TXT file. In
order to communicate with a identiFINDER the file must contain the following lines:
r=0
p=1,F,c,96
c refers to the COM port number, to which the infrared adapter is connected, for example
1 for COM1, 2 for COM2 etc.
Technical data:
Size
230 mm ´ 90 mm ´ 70 mm
Power
4 batteries/storage batteries type AA, LR6, 1,2-1,8 V
Spectroscopy specifications resolution 1024 (NaI), 4096 (CdTe) channels
differential Nonlinearity = 0.1/0.2 % over 99 % of the
channels
integral Nonlinearity = 0.05% over 99% of the channels
spectra memory: 256 spectra á 1024 channels
Amplifier
digital filter
High Voltage
1.4.2.2
+50 to +1275 V
nanoSPEC
Initialize the nanoSPEC with a configuration file named TMCAINIT.TXT file. In order to
communicate with a nanoSPEC the file must have the following lines:
r=0
p=1,N,c,384
c refers to the COM port number to which the nanoSPEC is connected, for example: 1 for
COM1, 2 for COM2 etc.
Technical data:
© ICx Radiation GmbH
User manual winTMCA32
Introduction
Size
117 mm, Æ 62 mm
Power
4 batteries/storage batteries type AA, LR6, 1,2-1,8 V
Spectroscopy
specifications
Amplifier
resolution 512-2048 channels
differential Nonlinearity = 1 % over 98 % of the channels
integral Nonlinearity = 0.05% over 98% of the channels
spectra memory: 16 spectra á 1024 channels
1 µs shaping time gain software selected (x1...4)
High voltage
software selected +50 to +1200 V
9
© ICx Radiation GmbH
Chapter
2
Software specifications
User manual winTMCA32
2
Software specifications
11
Software specifications
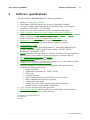
The MCA software winTMCA32 has the following attributes:
·
·
·
·
·
·
·
·
·
·
·
·
·
·
·
·
·
·
·
·
display of 1...64 spectra windows
at maximum 4 000 000 channels per spectrum (depending on RAM)
32 bits per channel signed (that means the maximum range of the channel
contents is –2147483647...+2147483648)
x-axis calibration with a polynome in the at maximum fourth degree
linear, logarithmic and inverse square scaling of the channel height axis
spectra manipulation: add, subtract, multiply, divide, smooth and rescale channels
using a polynome in the at maximum second degree
spectra evaluation: integration via gauss fit, peak search
definition up to 128 ROIs (regions of interest) for each spectrum
selectable nuclide database for online display within the spectrum
nuclide database editor
acquisition modes: PHA (pulse height analysis)1, MULPHA (multiple PHA)1,
STABIL (stabilized)1, MCS (multi channel scaling)1, DOSIS1, DUAL1,3,
RAWDATA1, WINDOW1, LIST2
pre-set acquisition time depending on: real time, dead time corrected acquisition
time (live time), total count rate, channel maximum, next channel (MCS)
user configurable menu headers and buttons
user administration protected by pass word
configuration is stored (i.e. window sizes, positions, etc.) in the windows registry
setting up acquisition hardware parameters1
integrated interpreter to build user specific program- and acquisition runs
containing the following functions:
o usage of variables
o conditioned instructions (IF...THEN...ELSE)
o FOR-loops
o calculator function
o ASCII communication via serial interface with any advice
o DDE communication with other programs
o configurable menu inputs
o screen respectively printer outputs using ASCII layout files
o parallel execution of maximum 64 batch files
editor to create and alter batch files, spectra etc.
ROI evaluation module containing efficiency consideration for NaI detectors 3
3D display of two parametric spectra (matrices)3
1
depending on acquisition hard ware
in preparation
3
optional
2
© ICx Radiation GmbH
Chapter
3
Operating winTMCA32
User manual winTMCA32
3
Operating winTMCA32
13
Operating winTMCA32
In order to operate the winTMCA32 software a mouse or comparable input device is
necessary. But you can also call up many functions by using the keyboard.
Starting instructions
Main program
Menu header
Tool bar
Changing graphical user interface
Batch files
3.1
Starting instructions
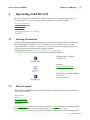
Start the program winTMCA32 by double clicking on the symbol which was created on
the desktop during installation, or by selecting the file "winTMCA32.EXE" in the
installation path via START Þ EXECUTE ÞSEARCH. But the program can also be
started by direct selection using the windows explorer.
The programs DBEDIT.EXE (nuclide data base editor) and
winTMCAEDIT.EXE (editor) are not connected with the desktop.
Starts the MCA software
winTMCA32.
Starts the
nuclide database editor.
Starts the editor which handles
batch files,
spectra, text files…
3.2
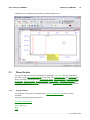
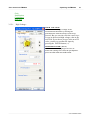
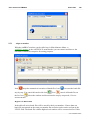
Main Program
When the winTMCA32 program is started, the main window is displayed. It is divided
into various sections:
menu header
tool bar
spectrum display
spectrum window
output line
The menu header shows the various commands. The toolbar contains abbreviations and
measurement displays. You can open up to 64 spectra windows in the
spectra display area. And you can use an output line, where various status messages and
© ICx Radiation GmbH
User manual winTMCA32
Operating winTMCA32
14
comments can be displayed beyond the spectrum display area.
3.3
Menu Header
You specify the menu header optionally by editing the menu file. This file depends on
user name, if the user administration is activated. The program menu and view menu are
always available. The menu items Acquisition Menu, Spectrum Menu, Hardware Menu,
Print Menu, Window Menu, Compute Menu, Preset Menu, Miscellaneous Menu and
nanoSPEC/identiFINDER Menu are declared in the definition file MENU.DEF and can
be specified by the user.
3.3.1
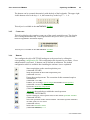
Program Menu
The program menu does not depend on the menu configuration file and is always
available.
You can select the following registers:
winTMCA information
Select nuclide database
Select language
Help
Exit
© ICx Radiation GmbH
User manual winTMCA32
Operating winTMCA32
15
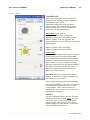
The following three menu items are optional (i.e. they are normally not selectable). They
provide options to specify different users. Each user can have his own
customized menubar and buttons. If user administration is activated, the actual user name
registered for windows will be searched and its configuration files will be loaded. If the
name does not exist, no menu and button files are loaded.
If you wish to install user management, please contact target systemelectronic for further
information.
Register User
Change Password
User Administration
3.3.1.1
winTMCA information
Shows the version of the operating system and the modules which are used by the
winTMCA32 program.
3.3.1.2
Select nuclide database
Enables you to select the nuclide database which is used for online display in the
spectrum. The nuclide databases are located in the NUCDATA directory. By default only
the file NUCLIDE.DB is available.
3.3.1.3
Select language
Enables you to select the language for the winTMCA32 software. These settings take
effekt to all modules and programs as for example the winTMCA32 editor or the
winTMCA32 help files.
You can select between german, english or french.
3.3.1.4
Help
Starts the winTMCA32 help. By selecting an object or an area within the winTMCA32 a
help text pops up.
© ICx Radiation GmbH
User manual winTMCA32
3.3.1.5
Operating winTMCA32
16
Exit
Terminates the program.
3.3.1.6
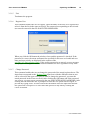
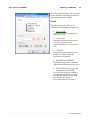
Register User
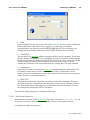
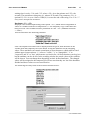
This command enables the user to register. Enter the name of the user to be registered or
select it from the list in the upper text field. The password corresponding to the selected
user must be entered in the text field ENTER PASSWORD.
When you click the OK button the window closes and the password is checked. If the
password is correct, the menu and button list specified for this user are loaded and user
name and user priority are displayed in the caption of the
winTMCA32 main window frame. If the wrong password was entered, an error message
is displayed. Clicking the CANCEL button terminates the user registration at any time.
3.3.1.7
Change Password
This command enables the user to change the password of the actual registered user. The
input form corresponds to the Register User input form with the difference that no user
can be selected in the upper text field. In order to change the password, you enter the
actual password in the lower text field. After clicking the OK button and if the password
was correct, you enter a new password in the text field ENTER NEW PASSWORD. After
clicking the OK button the user is prompted to enter the new password once again, to
prevent any typing errors. A final click on the OK button closes the input form and the
new password is accepted. You can cancel this process at any time by clicking the
CANCEL button.
© ICx Radiation GmbH
User manual winTMCA32
3.3.1.8
Operating winTMCA32
17
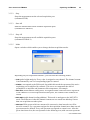
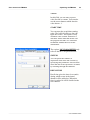
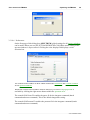
User Administration
This menu item enables the user management and registration of new users. It is only
available for users having a priority of 10, otherwise this menu is not activated. In order to
change the configuration of an existing user, select the name from the user list. The
menu file and button file assigned to the selected user are displayed in the fields MENU
FILE and BUTTON FILE. You can change them by selecting a different file from the list
of files. In the password field the password of the selected user is displayed encrypted.
You change it by entering a new password in the text field. In the user priority field you
can change the user priority (1, 5, 10). In order to register a new user enter a name in the
upper text field and specify password, priority, menu and icon list as described above. In
the field BATCH you can select a batch file, which is always executed if the
corresponding user has registered. This allows to realize user specific configurations. In
the field AUTO-LOGOUT TIME you enter the time interval (in seconds), after which the
registered user is logged out if the winTMCA32 program is idle.
© ICx Radiation GmbH
User manual winTMCA32
3.3.2
Operating winTMCA32
18
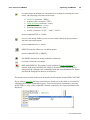
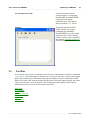
View Menu
This menu is like the program menu independent of the menu configuration file. It can be
used to attach or delete objects in the tool bar. This menu can be deactivated to prevent
the user from making changes (see Preferences in Miscellaneous Menu).
© ICx Radiation GmbH
User manual winTMCA32
Operating winTMCA32
19
Real time
Port number
Status
Window Selection
Count rate
Buttons
Batch status
Window list
3.3.3
Acquisition Menu
This menu item as well as the following items are declared in the default
menu definition file MENU.DEF and can be specified by the user. The default features in
the acquisition menu are:
Start
Stop
Mode
StartAll
StopAll
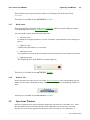
3.3.3.1
Start
Starts the measurement on the selected acquisition port. The port number is displayed in
the icon object port number.
(command: START)
© ICx Radiation GmbH
User manual winTMCA32
3.3.3.2
Operating winTMCA32
20
Stop
Stops the measurement on the selected acquisition port.
(command STOP)
3.3.3.3
Start All
Starts the measurement on all available acquisition ports.
(command: STARTALL)
3.3.3.4
Stop All
Stops the measurement on all available acquisition ports.
(command STOPALL)
3.3.3.5
Mode
Opens a window which enables you to change the data acquisition modes.
Depending on your acquisition hardware, you can select the following modes:
· PHA (pulse height analysis): Every value is assigned to one channel. The channel content
is incremented by one if a corresponding signal is counted.
· STABIL: corresponds to the PHA mode, but within this mode the spectrum of the active
acquisition port is stabilised by software. This serves to compensate the drift of
preamplifier or amplifier and parameters like temperature, for example.
· MCS STO (multi channel scaling store): All signals within a time interval are registered
in one channel. If several acquisition runs take place, the contents of the channels are
erased.
· MCS ADD (multi channel scaling addition): This mode is analogous to the MCS STO
mode. The difference is that the channel contents are not erased but added up if more
than one acquisition run takes place.
· MULPHA: PHA spectra which are measured in consecutive time intervals Dt will be
stored in a matrix. For a spectrum assigned to the acquisition channel more than one sub
spectrum must be defined. Every sub spectrum corresponds to a matrix row. After the
given time interval Dt, the next spectrum in the following row (with successor spectrum
© ICx Radiation GmbH
User manual winTMCA32
Operating winTMCA32
21
number) is used.
· DUAL: mode for two parametric data acquisitions.
· DOSIS: special type of MCS mode, where the counted signals (from a dose rate probe)
are sampled via TMCA2 acquisition channel.
· RAWDATA (only dMCA): Displays raw data, which are located at the input of DMCA
acquisition channel (digital oscilloscope)
· WINDOW (only dMCA): The detector signals are displayed after use of the digital filter.
3.3.4
Spectrum Menu
This item contains a number of commands referring to spectra administration. All
commands are related to the spectrum which is assigned to the active spectrum window.
Clear
Energy Calibration
Length
Save
Save as
Load
Definitions
ROIs
Clear marked peaks
Select spectrum
Select sub spectrum
3.3.4.1
Energy calibration
With this command you calibrate the x-axis of the actual spectrum. Therefore you can use
a polynomial function in the third degree at maximum. In the input form you can up to 20
channel-energy pairs.
© ICx Radiation GmbH
User manual winTMCA32
Operating winTMCA32
22
You can enter the channel values by typing in floating point values or double clicking on
the cursor position in the spectrum. If the cursor is located within a ROI, the integration
centroid is inserted. If you enter the channel value by double clicking into the spectrum
the input focus is set to the respective VALUE field.
If the desired nuclide is not visible in the nuclide list this list can be extended by typing
the initial letter(s) of the specific nuclide. If you type e.g. 'CS' each nuclide in the selected
nuclide database (show in the status bar of the winTMCA32) beginning with 'CS' will be
added to the list. If you just type 'C' this is true for all nuclides beginning with 'C'.
Once all channel energy pairs are specified the degree of the polynomial can be adjusted
using the DEGREE selector. The button FIT initiates the fit procedure which determines
the coefficients for the function. If the fit succeeds the resulting function will be displayed
in the spectrum window. Additionally the coefficients will be show at the bottom of the
energy calibration window.
The differences between the data and the fitted function is displayed in the column DIFF.
The fit will use the error of the peak centroid if a ROI is defined for that peak. This is
inicated by a '*' behind the difference value. Pushing the SET buttons accepts the fit.
In the UNIT field you select the unit for the channel axis from a list. If you want to use
other units you have the option to create a file named XUNIT.TXT which must be located
the .\CONFIG directory. Within this file all units must be listed one beneath the other. If
this file exists its unit list will be loaded instead of the default one.
© ICx Radiation GmbH
User manual winTMCA32
Operating winTMCA32
23
(command ENERGYCALIBRATION)
3.3.4.2
Clear
Erases the content of the actual spectrum. This execution requires confirmation.
If not stored, the acquisition data will be lost!
(command: CLEAR)
3.3.4.3
Length
This command changes the number of channels and sub spectra of the actual spectrum.
You can select values from the list in the LENGTH field of the input form or enter an
optional value.
With sub spectra a spectra matrix is defined, the x-dimension of the matrix is the length
and the y-dimension is the number of sub spectra. Spectra matrices are required for
MULPHA and DUAL mode.
The maximum channel number (length) and the maximum sub spectrum number is 4 000
000 channels.
Please note that the total number of channels from the resulting matrix dimension does not
exceed 16777216, for example 4096x4096.
(command LENGTH)
3.3.4.4
Save
You store the actual spectrum by specifying its spectrum name and spectrum path. The
default spectra path is .\SPECTRUM. If the name of the spectrum is not specified, it will
be stored under NONAME.SPC. If a spectrum with the same name already exists, a
warning appears.
(command SAVE)
© ICx Radiation GmbH
User manual winTMCA32
3.3.4.5
Operating winTMCA32
24
Save as
The default dialog box for file selection appears and enables you to change path and file
name. The selected file name will be entered as spectrum name. The chosen file path is
used as new spectra path for the actual spectrum.
(command SAVEAS)
3.3.4.6
Load
You load an existing spectrum file by using this command. You can also select spectra
with the windows explorer via "drag and drop" and load them to the spectra windows.
(command LOAD)
3.3.4.7
Definitions
When you use this dialog box spectrum name, comment and the path for saving the
spectrum are specified. You can type in the path or select it by clicking the icon next to
the text file. If the entered path does not exist it will be created.
(command DEFINITIONS)
3.3.4.8
ROIs
A dialog box is opened which enables you to create and alter ROIs (regions of interest) in
the actual spectrum. The defined ranges within the spectrum are highlighted.
© ICx Radiation GmbH
User manual winTMCA32
Operating winTMCA32
25
Adding a region of interest is done via right mouse context menu, the menu appears by
right-mouse-clicking into the table.
Choosing Add from the context menu adds a new ROI to the list, choosing Delete deletes
the selected ROI. It is also possible to delete a ROI using the "Drag and Drop" function:
just click on the selected ROI and drag it into the recycle bin, keeping the mouse button
pressed. Over the recycle bin, release the mouse button.
In the fields Left Margin and Right Margin, you alter the margins by typing in a value or
double clicking the desired channel in the spectrum.
A preview window is displayed beneath the ROI list, where the actual spectrum is
dispayed in logarithmic scale. Adding or deleting a ROI is directly reported in the preview
window. To transfer changes to the actual spectrum the Save button has to be clicked.
In the Color field you can choose from 16 colors to highlight the ROI in the spectrum.
By activating the check box in the Hist field you fill the ROI with the selected color. By
default only the wrapping curve is highlighted.
The text field enables the user to display an optional text over the region of interest in the
spectrum.
Changes have to be confirmed by clicking the Save button before they are taking effect in
the spectrum.
Clicking the Delete button deletes all ROIs in the spectrum.
Clicking the CH or E button enables the user to display the ROI margins in channels or in
energy values.
To close the window the user has to click on the close symbol in the upper right corner.
© ICx Radiation GmbH
User manual winTMCA32
Operating winTMCA32
26
(command DEFINEROI)
3.3.4.9
Clear marked peaks
This command erases peaks which were marked as a result of the menu command
PEAKSEARCH.
(command CLEARPEAKS)
3.3.4.10 Select spectrum
Enables you to select the spectrum corresponding to the actual spectrum window.
You can display the same spectrum in more than one spectrum window.
(command SELECTSPECTRUM)
3.3.4.11 Select sub spectrum
This dialog window enables you to select the sub spectra to be displayed in the actual
spectrum window. You type in the sub spectrum number directly and confirm it by
clicking the SET button, or you can use the -¯-keys to change the sub spectrum number.
The cursor keys have an automatically repetition function. Pressing the OK button closes
the input form.
(command SELECTSUBSPECTRUM)
3.3.5
Hardware Menu
This item contains the hardware set up for acquisition hardware.
(command SETUP)
High Voltage...
ULD...
COM...
© ICx Radiation GmbH
User manual winTMCA32
Operating winTMCA32
27
Gain
Stabilisation
Coincidence
Pole Zero
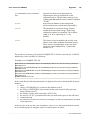
3.3.5.1
High Voltage...
HIGH VOLTAGE
You can alter the high voltage of the
measurement hardware by turning the
potentiometer with the mouse cursor kept
pressed. But you can also click the cursor keys
or type in the desired high voltage value in the
text field. If you choose to type in the new HV
value, you have to confirm the input by
pressing the ENTER button (¿).
PREAMP POWER (dMCA)
In order to activate (light green LED) or
deactivate (dark green LED) the preamplifier
press the PREAMP POWER button.
© ICx Radiation GmbH
User manual winTMCA32
3.3.5.2
Operating winTMCA32
28
ULD...
You can type in all values within this input
form and confirm by pressing the ENTER key
(¿) or you can use the slider by keeping the
left mouse button pressed and moving the
mouse cursor in the fields.
ULD (upper level discriminator)
ULD discriminates the upper level of the
signal acquisition. The voltage, which may not
be exceeded by the signal in order to be
registered, is defined here.
Please note that the settings 0 to 255 don't
belong to a channel directly, but 0 relates to
the lowest channel and 255 to the top channel.
When you use a nanoSPEC (1K) 0 is related
to 0 and 255 to 1024
Using scintiSPEC ULD is given in channel
values.
LLD (lower level discriminator)
The LLD discriminates the lowest level of
signal acquisition. Which means the lowest
voltage required for a signal to be registered is
defined here. Like ULD the set ups 0 – 255
are not directly related to the channels.
In order not to discriminate a channel you put
the lower LLD to 0. With the nanoSPEC the
set up remains the same as in the ULD mode.
Using scintiSPEC LLD is given in channel
values.
© ICx Radiation GmbH
User manual winTMCA32
Operating winTMCA32
29
CONVERSION GAIN
Conversion gain defines the number of
channels for spectra acquisition, thus the
relation of channels and voltage. The value
varies from 0 to 255. The smaller the value the
bigger the number of channels used. When
you use nanoSPEC, 255 means a spectrum
with 512 channels, 0 a spectrum with 2048
channels.
Please note that the spectrum length can be set
independently of conversion gain. If the
spectrum's length is smaller than the
conversion gain, it will not be possible to
display the whole spectrum acquired. Thus,
the spectrum length should equal the
conversion gain.
NOISE
Noise defines which of the signals registered
are events and which are noise. Only events
which give a higher voltage value than the
noise value will be registered. In principal,
NOISE works like LLD but events beyond the
noise level are not considered for the dead
time and base line calculations. The higher the
value, the bigger the noise level which has to
be surpassed by a signal in order to be
registered as an event.
© ICx Radiation GmbH
User manual winTMCA32
3.3.5.3
Operating winTMCA32
30
Gain
COARSE GAIN
Sets up the coarse gain for the acquisition
hardware. The adjustment range depends on
the hardware type. If more
adjustment ranges exist you can choose
between them. You select the desired gain
factor by clicking on it or by clicking the
cursor keys on the right margin.
POLARITY (only dMCA)
This option enables you to adapt the
acquisition hardware to the polarity of the
detector signals. You can recognize the
expected polarity on the LED color and on the
button legend.
negative polarity: NEG (red LED)
positive polarity: POS (green LED)
FINE GAIN
The fine gain is a gain factor which is applied
to the input signals via software algorithm.
The fine gain does not depend on acquisition
hardware. The acquisition port must be set to
the STABIL mode. You can select the fine
gain factor between 0 and 2 (using scintiSPEC
fine gain is set between 0.722 and 1.625). A
factor of 2 refers to a gain factor of 1, the
factor of 1 refers to 0.5 etc. .
Attention: When you use the fine gain the
number of channels is reduced, because only
gain factors £1 are allowed.
You can type in the fine gain and confirm by
pressing the ENTER (¿) key, but you can also
move the button with the mouse or use the
cursor buttons. These cursor buttons are
4
changing the value about 10 each time with
automatically repetition.
OFFSET
The use of channel offset is like the fine gain
only allowed in the STABIL mode. You can
type in the value or enter it by clicking the
cursor buttons with the mouse. The cursor
buttons change the value about 0.1 each time
with automatically repetition.
© ICx Radiation GmbH
User manual winTMCA32
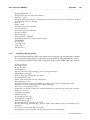
3.3.5.4
Operating winTMCA32
31
COM...
COM (only nanoSPEC, identiFINDER)
This dialog window enables you to choose a
serial COM port.
BAUD (only nanoSPEC, identiFINDER)
You can specify the serial transfer rate to the
acquisition hardware. Default values are 38400
for nanoSPEC and 9600 for identiFINDER.
DMCA REGISTERSET (only dMCA)
When you use the button SAVE you can store
the complete hardware setup of the dMCA
card in the windows registration database.
When you use LOAD it can be loaded from
there. Clicking RESET sets all parameters to
their default values. By clicking the buttons
LOAD ALL and SAVE ALL you load or
store the set up for all dMCA cards within the
system.
© ICx Radiation GmbH
User manual winTMCA32
3.3.5.5
Operating winTMCA32
32
Stabilisation
The stabilisation controls the fine gain factor
via software in such a way that the centroid of
a chosen peak keeps its channel. In this way
the drift of detector and (pre-) amplifier are
compensated. The acquisition mode must be
set to STABIL. (If you use scintiSPEC
stabilisation is done by PHA mode)
Only the centroid of a peak existing in the
spectrum can be kept in its channel. Therefore
the fine gain factor is varied.
Clicking the STABILISATION button with the
mouse activates the stabilisation. Then you
have to enter the peak parameters to the dialog
window. LEFT MARGIN and RIGHT
MARGIN fixes the spectrum range whose
centroid is used for stabilisation. You should
select the range around the peak in a way that
the peak lies in the range even if the drift is
small. CENTROID refers to the centroid of the
integration range. For determining the centroid
no background correction is done. This means
that with descending or ascending background
the centroid and the peak maximum do not
have the same values.
If scintiSPEC is used only the centroid value
has to be entered, left margin and right margin
are set automatically.
You enter the values by typing in or by double
clicking on the desired channels within the
spectrum.
By pressing the AUTO button you determine
these values automatically, if the spectrum
cursor is located within a peak with enough
statistics.
The value given by the GROS field determines
the number of events which have to be
registered in the defined range until a new
centroid and fine gain factor will be calculated.
Setting the GROS value to 0 deactivates the
stabilisation!
(If scintiSPEC is used the GROS value is
always set to 300).
© ICx Radiation GmbH
User manual winTMCA32
Operating winTMCA32
33
Default values for GROS are within the range
of 300 and 500. The statistical error of centroid
calculation sinks with rising number of events.
Otherwise more time is used until the required
events are registered and the fine gain factor is
corrected.
Clicking the LATENT button activates the
background stabilisation. This means that
stabilisation is active even if no acquisition
takes place. (scintiSPEC does not allow
background stabilisation.)
You have to confirm all parameters by clicking
the SET button.
3.3.5.6
Coincidence (only dMCA)
This dialog allows the registration of events
depending on an external triggering signal,
which must be connected to the input of each
acquisition port.
With the button TRIGGER POLARITY you
choose between the positive (light green LED)
and the negative (light red LED) flank.
With the MODE button you select between
trigger mode COINC (coincident) and
ANTICOINC (anti-coincident). In the COINC
mode an event is only registered if a
corresponding triggering signal exists. In
ANTICOINC mode the event is registered if
no triggering signal is given.
When you use the DELAY slider a delay
between event and triggering signal is set. If a
positive time is given it means that the
triggering signal must lie before the event. A
negative time means that the event lies before
the triggering signal.
The parameter GATE sets up the time interval
for the triggering signal. That means that in the
COINC mode an event is only registered if it
lies within this time interval which is located
before or after the triggering signal, as preset
by delay time.
© ICx Radiation GmbH
User manual winTMCA32
Operating winTMCA32
34
You change values for DELAY or GATE by
using the slider or by typing the values into the
text field. You have to confirm by pressing the
ENTER (¿) key.
3.3.5.7
Pole Zero
You determine the decay constant of the
internal differentiation stage by specifying PZ
INTERNAL (PZ1). This value is preset by
manufacturer and should not be changed.
With PZ EXTERNAL (PZ2) the decay
constant of the detector preamplifier can be
compensated.
In order to set up these values, you move the
corresponding control knob with the mouse or
type in the values directly, confirmed by
pressing the ENTER (¿) key.
The parameter COMPENSATION (PZ3)
serves to compensate the signal outbreaks.
3.3.6
Print Menu
Printer Setup
This command opens the default printer dialog window.
(command PRINTERSETUP)
Spectrum
Prints the active spectrum with regard to the same attributes for
displaying (grid, display area,...)
(command PRINTSPECTRUM)
© ICx Radiation GmbH
User manual winTMCA32
3.3.7
Operating winTMCA32
35
Window Menu
Tile
Changes the size of spectra windows such, that there is no overlapping
of spectra windows in the spectra field. Because of the minimum size of
the spectra windows depending on the size of the
winTMCA32 main window and the number of visible spectra windows,
an overlap may occur.
(command TILE)
Cascade
Makes the spectra windows overlap in cascade form. Only the title bars
of the hidden windows are visible.
(command CASCADE)
Arrange icon
This command arranges icons horizontally in the lower left part of the
window. Windows minimized to icon size can be moved in the
spectra window.
(command ARRANGEICONS)
Close all
Closes all visible spectra windows.
(command CLOSEALLWINDOWS)
3.3.8
Compute Menu
The compute menu contains various commands referring to different calculation events of
a spectrum.
Integrate
Add spectrum
Subtract spectrum
Multiply spectrum
Divide spectrum
Rescaling x-axis
Smooth spectrum
Peak search
© ICx Radiation GmbH
User manual winTMCA32
3.3.8.1
Operating winTMCA32
36
Integrate
Integrates the area within a ROI or between 2
marking lines if the position marker is within the
area which has to be integrated.
The first page of the result window is shown on
the left. In the channel area the centroid
(corrected by background) is displayed, also the
full width of half maximum (FWHM), the full
width of tenth maximum (FWTM) and the
integration area. If an energy calibration was
done before, the results for the corresponding
energy units are also given below.
On the second page the number of net events,
which means the background corrected area, the
number of background events (BACKGROUND),
the number of total events (GROS) and the net
count rate (CPS) in counts per second are
displayed. If the peak centroid lies within the
range of a peak energy of one of the nuclides in
the selected nuclide data base, the name of the
nuclide will be displayed. Therefore, it is required
that the CHECK field of this line in the
nuclide database is activated. The Bq-field shows
the activity calculated from the net count rate, the
efficiency factor of the nuclide database line was
taken into consideration.
© ICx Radiation GmbH
User manual winTMCA32
Operating winTMCA32
37
In the symbol bar, the following functions are
given:
Prints the integration results, the
default printer is used.
Stores the integration results in a file in
the .\CONFIG directory. The file name
corresponds to the spectrum name, but the file
extension is set to "INT". If the integration results
for the same spectrum are stored again the data
will be appended to the file.
Executes a new integration.
Executes a new integration every second.
If you click this button once again this function is
deactivated.
Closes the result window.
Comment:
The integration algorithm tries to make a gauss fit
into the area (in the spectrum the curve of this
function can be seen). As background an iterative
calculated background spectrum is used. If the fit
isn't successful, the net counts are calculated by a
geometric procedure. For background calculation
a straight line is used which is determined by five
channels in the integration area margins.
(command INTEGRATE)
3.3.8.2
Add spectrum
This command enables you to add another spectrum channelwise to the actual one. You
select the spectrum to be added by typing in the spectrum number or by using the cursor
buttons. The acquisition times of the chosen spectrum are added to the times of the actual
spectrum.
(command ADDSPECTRUM)
© ICx Radiation GmbH
User manual winTMCA32
3.3.8.3
Operating winTMCA32
38
Subtract spectrum
This command enables you to subtract a spectrum from the spectrum in the actual window
channelwise. You select the spectrum to be added by typing in the spectrum number or by
using the cursor buttons.
(command SUBTRACTSPECTRUM)
3.3.8.4
Multiply spectrum
If you use this command the channel contents of the spectrum displayed in the active
window are multiplied by a chosen factor. This factor can be a floating point value, but the
resulting channel contents are rounded up. Use the cursor buttons to select the factor or
type it in directly. The acquisition times are also multiplied.
(command MULTIPLYSPECTRUM)
© ICx Radiation GmbH
User manual winTMCA32
3.3.8.5
Operating winTMCA32
39
Divide spectrum
This command divides the spectrum in the active window through the chosen spectrum.
The division is executed channelwise. If you divide through 0 the result is also 0. The
resulting channel contents are multiplied by the result factor and rounded up.
(command DIVIDESPECTRUM)
3.3.8.6
Rescaling x-axis
This command rescales the channel axis of the active spectrum. The channel contents are
distributed corresponding to the rescaling function. This function is a polynome in the
second degree. You can type in the function parameters directly or they are calculated by
typing in one till three channel pairs. In order to get from one mode to the other one the
channel box in the bottom left corner must be activated. If the box is activated you can
type in the channel pairs, if the box is not activated you can enter the function parameters.
·
input of channel pairs
You can enter the channel pairs directly or by double clicking the corresponding channel
© ICx Radiation GmbH
User manual winTMCA32
Operating winTMCA32
40
in the spectrum. If the cursor is located within a ROI the centroid of the ROI is entered to
the field. C1, C2, C3 are the momentary channels, C1´, C2´and C3´ the desired channels.
If only values for C1 and C1´ are chosen, only one off set is calculated. For a straight line
through the origin only C2 and C2´ can be given.
·
input of function parameters
You enter the polynome coefficients A, B, and C. You determine if the coefficients shall
be applied to the inverse function by checking INVERTED. The corresponding function is
displayed in the window. The rescaled spectrum is displayed in the spectrum window
whose number is shown in the DESTINATION SPECTRUM field. You enter the number
by typing in or by selecting it with the cursor buttons. By clicking OK you execute the
rescaling process.
(command RESCALESPECTRUM)
3.3.8.7
Smooth spectrum
This command serves to smooth the spectrum in the active window, which means that the
statistical fluctuations from the neighboring channels are reduced. For each spectrum
channel Kx the channel contents of 2n+1=m channels distributed symmetrically around
the channel are taken into consideration.
Each of them is weighed, and the sum you get is normalized and assigned to the
corresponding channel.
Formula:
m -1
Kx
åw ×K
=
w
i =0
i
x - n +1
i
In the program winTMCA32 n = 11. That means that 23 channels are taken into
consideration. The following weighing factors are used: (from the left to the right channel)
285, -114, -285, -285, -165, 30, 261, 495, 705, 870, 975,1011, 975, 870, 705, 495, 261, 30,
-165, -285, -285, -114, 285.
© ICx Radiation GmbH
User manual winTMCA32
Operating winTMCA32
41
The sum of these weighing factors is 6555 (= S wi).
(command SMOOTHSPECTRUM)
3.3.8.8
Peak search
This function tries to find peaks within the spectrum channel per channel via gauss fit.
You change the peak search sensitivity in the MISCELLANEOUS menu. The peaks
found are marked in black, which enables you to set ROIs.
(command PEAKSEARCH)
3.3.9
Preset Menu
By selecting the item SERVICE a dialog appears. In this dialog, acquisition time, actions
after acquisition etc. are preset for acquisitions at the active port.
© ICx Radiation GmbH
User manual winTMCA32
Operating winTMCA32
42
The following parameters can be altered
by the customer, depending on how the
acquisition should be stopped.
MODE
The following modes allow to set
conditions for terminating acquisitions.
· REAL TIME
Acquisition stops when the preset
real time is over.
· LIVE TIME
Acquisition stops when the preset
live time (acquisition time
containing dead time correction) is
over.
· COUNTS
Acquisition stops when the preset
number of counts within the
spectrum are registered.
· MAXIMUM CHANNEL
Acquisition stops when a channel
content has reached the preset value.
NEXT CHANNEL (only with
acquisition mode DOSIS)
If you use this mode no condition
for stopping acquisition is set but
user specific actions for dwelling
next channel are allowed.
(see register SERVICE below)
·
© ICx Radiation GmbH
User manual winTMCA32
Operating winTMCA32
43
VALUE
In this field, you can enter a preset
value for time or counts. You can also
use the cursor buttons which alter the
value about ± 1.
STARTTIME
You can enter the acquisition starting
point. The left field refers to date, the
right one to time. This option is only
available if the STARTTIME box is
activated. Please note that in this case
the program winTMCA32 cannot be
terminated without the loss of this
information.
The register MCS PARAMETER only
refers to the MCS acquisition mode.
SWEEPS
You can preset the number of
acquisition runs in the MCS mode by
specifying this parameter. One run ends
when the end of the spectrum is reached
by dwelling through the channels.
DWELLTIME
Dwell time gives the time (in seconds)
during which events in the actual
channel will be added up. When this
time is reached it will be dwelled to the
next channel.
© ICx Radiation GmbH
User manual winTMCA32
Operating winTMCA32
44
When you use the input form
SERVICE you can preset services
which have to be executed after
acquisition stops. In order to activate
these services, the corresponding box
must be activated.
CLEAR
Spectrum is erased after acquisition.
SAVE
Spectrum is stored after acquisition. If
no name was entered, the spectrum is
saved as NONAME.SPC.
REPEAT
When the REPEAT box is activated,
you can enter the number of repetitions
to the lower field. By using the ¥
button you repeat the acquisitions until
they are terminated. After the
acquisition, the spectrum extension is
automatically incremented by one,
whereby the first extension is "000". If
no name was given for the spectrum, it
is automatically set to
"NONAME.000". After the next
acquisition, the name is
"NONAME.001". If SAVE is
activated, a series of continuous
acquisitions can be saved singularly. If
REPEAT is selected, CLEAR is
activated automatically. If CLEAR is
deactivated, also the function REPEAT
is no more active.
PROGRAM
If program is activated, you can enter a
program name to the program field.
After acquisition is finished, this
program will be executed. This file can
be a windows executable file or a
winTMCA32 batch file executed by
winPROC.
© ICx Radiation GmbH
User manual winTMCA32
3.3.10
Operating winTMCA32
45
Miscellaneous Menu
The miscellaneous menu contains the following items:
Editor
WinPROC Monitor
WinPROC Error Wait
Peak Search Sensitivity
Execute Batch
Preferences
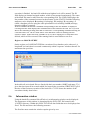
3.3.10.1 Editor
Selecting this item opens the winTMCA32 editor. When you create batch files you should
always use this editor, because batch files acquire fixed line length. The editor takes this
automatically into consideration. But you can also use this editor to create and alter ASCII
files like menu and button definition files, spectra etc... .
(command: WINTMCAEDIT)
The editor is an independent program, so you can use more than one editor.
The symbol bar of the editor enables the following functions:
© ICx Radiation GmbH
User manual winTMCA32
Operating winTMCA32
46
(LOAD) Opens the default file selection box for loading an existing file to the
editor. The following selections can be made :
·
·
·
·
·
·
batch file (extension ".WPB")
temporary file (extension ".INF")
menu definition (extension ".DEF")
gain table (extension ".GTB")
spectrum (extension ".SPC")
text file (extension ".TXT", ".VAR", ".DAT")
(menu command FILE Þ LOAD)
(SAVE) This dialog enables you to save the editor content by using a chosen
file name and selected path.
(menu command FILE Þ SAVE)
(PRINT) Prints the editor text via default printer.
(menu command FILE Þ PRINT)
(SEARCH) Searches for strings within the editor text.
(UNDO) Undoes the last change.
(RELOAD MENUS) This option is only available if menu definitions are
created. If the menu definition file which is already used by winTMCA32 is
changed by the customer, this command reloads the menu definition file. Please
note that the changed file must be saved before.
The actual cursor position is shown in the display field using the format LINE/COLUMN.
If you create a batch file and enter more than two characters to the editor, a selection list
containing all available commands appears. You can enter these commands by pressing
the RETURN (¿) key. If the command is entered completely, the required parameters are
displayed.
© ICx Radiation GmbH
User manual winTMCA32
Operating winTMCA32
47
The menu command INFO displays the version of the operating system and the program
version of the editor.
3.3.10.2 WinPROC Monitor
Opens a window which enables you to observe the execution of batch files and control
them stepwise.
(command SHOWWINPROCMONITOR)
For detailed description of the winPROC monitor see Program winPROC.
3.3.10.3 WinPROC Error Wait
This input form enables you to influence the behavior of the error message window. The
default value is ENTER which means that the error message waits during batch file
execution until you confirm by clicking the OK button. Alternatively, you can choose
values between 1 and 5 seconds. In this case, the message is only displayed for the
selected time and disappears automatically.
(command: ERRORWAITTIME)
3.3.10.4 Execute Batch
Opens a dialog box which enables you to execute batch files, to continue or cancel their
execution. Batch file commands can be entered.
(command: WINPROC)
© ICx Radiation GmbH
User manual winTMCA32
Operating winTMCA32
48
· NEW
In the field BATCH you type in the name of the batch file or select one by clicking the
folder symbol until a file selection box appears. You enter the port number
corresponding to the batch file to the PORTNUMBER field. You can change it by
clicking the cursor buttons. When you click START the batch file is executed.
· CONTINUE
The execution of a batch file which was stopped before, can be continued. If you enter
the port number (by typing in or by clicking the cursor keys) the name of the batch file
which was interrupted is displayed in the BATCH field. If no active batch file with the
corresponding port number was interrupted, the field will stay empty. You can
continue the execution of the selected batch file by clicking the CONTINUE button.
· TERMINATE
After the port number is entered, the batch file corresponding to the port number will
be displayed in the BATCH field. If the field stays empty, no batch file is active.
When you click the TERMINATE button the execution of the batch file is terminated,
if the execution was interrupted before.
· EXECUTE
This input form allows the interactive execution of batch file commands. Therefore
you have to type the commands into the input line or select one by using the selection
list. This selection list contains the last 15 commands which were entered. You start
the execution by clicking the EXECUTE button.
You close the dialog window by clicking the OK button.
3.3.10.5 Peak Search Sensitivity
Influences the sensitivity of the peak search algorithm. The values 3, 2.5, 2, 1.5, 1, 0.5 can
be selected. In order to identify the smaller peaks, a lower value must be entered.
(command: PEAKSEARCHSENS)
© ICx Radiation GmbH
User manual winTMCA32
Operating winTMCA32
49
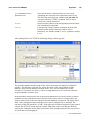
3.3.10.6 Preferences
On the first page of this dialog box (SPECTRUM) global settings for all spectra windows
can be made. When you use SELECT BACKGROUND COLOR the actual setting of the
spectra windows is super scribed. Clicking the color display field displays a color
selection box.
The control field ENABLE SCROLLBAR enables the horizontal and vertical scrollbar
for all spectra windows.
Within the control field ENABLE POPUP MENUS you select if a popup menu is
available by clicking the right mouse button within the spectrum area.
The control field Gauss Fit enables the gauss fit for the integrate command (batch
command and menu command). This is the default integration setting.
The control field Pearson Fit enables the pearson fit for the integrate command (batch
command and menu command).
© ICx Radiation GmbH
User manual winTMCA32
Operating winTMCA32
50
The second dialog side (MENU DEFINITION) allows it to activate or deactivate the
VIEW menu and the SELECT NUCLIDE DATABASE item (in the PROGRAM menu)
to avoid changes made by other users.
(command PREFERENCES)
3.3.11
nanoSPEC/identiFINDER Menu
Load actual spectrum
Loads the actual spectrum of the
nanoSPEC, nanoPROBE or
identiFINDER connected to the
actual port from the acquisition
memory.
Load top spectrum
The top spectrum, i.e. the
spectrum that was saved last to
the spectra memory (FIFO) of
the nanoSPEC, nanoPROBE or
identiFINDER connected to the
actual port is loaded from the
spectra memory.
Remove top spectrum
Erases the spectrum of the
nanoSPEC, nanoPROBE or
identiFINDER connected to the
actual acquisition port, which
was saved last, from the spectra
memory.
© ICx Radiation GmbH
User manual winTMCA32
3.4
Operating winTMCA32
51
Save all spectra to disk
Loads all spectra from the
spectra memory of nanoSPEC,
nanoPROBE or identiFINDER
connected to the actual
acquisition port. The spectra
data in spectrum <V> is lost!
Terminal
Opens the terminal window
which enables you to enter
commands for nanoSPEC,
identiFINDER etc. on the actual
acquisition port. This terminal
enables you to set up or question
the internal hardware parameters
and test the communication.
Tool Bar
The visibility of the objects contained by the tool bar is determined by selection within the
VIEW menu. You can arrange the objects in the tool bar as you like. Click the left margin
of the object and keep the left mouse button pressed while you move within the tool bar.
When you double click onto the margin and keep the left mouse button pressed, the object
can be seated on the screen at pleasure. The arrangement and visibility of the objects
within the tool bar are saved to the windows data base.
Real Time
Port Number
Status
Window Selection
Count Rate
Buttons
Batch Status
Window List
© ICx Radiation GmbH
User manual winTMCA32
3.4.1
Operating winTMCA32
52
Real Time
This object displays the elapsed acquisition and dead time for the actual port. You can
choose between real or live time (dead time corrected acquisition time) display by clicking
the caption. For dead time display, you can select between seconds or %.
This object is available in the winTMCA32 Toolbar.
3.4.2
Port Number
This object displays the port number of the actual acquisition port. By using the cursor
buttons you change the port number, if more than one port is given and the corresponding
spectrum is visible.
This object is available in the winTMCA32 Toolbar.
3.4.3
Status
Displays the acquisition status of the actual acquisition port:
·
·
STP: acquisition is stopped.
ACQ: acquisition is active.
This object is available in the winTMCA32 Toolbar.
3.4.4
Window Selection
You can activate or deactivate the corresponding spectra windows by using the numbered
buttons of this object. If a window is visible, the corresponding number is set to black, if
the window is invisible, it is set to gray. If a visible spectrum window is the actual
window, its number is displayed in red.
If you press the button of a spectrum which is visible but not the actual window it
becomes the actual window. When the button is pressed again, the window is deactivated.
When an acquisition port corresponds to a spectrum and the acquisition is active, the
background color of the corresponding window button changes to yellow.
Clicking the cursor buttons on the right displays the window buttons of the remaining
windows.
© ICx Radiation GmbH
User manual winTMCA32
Operating winTMCA32
53
The buttons can be operated alternatively with the help of the keyboards. The upper eight
visible buttons refer to the keys 1...8, the bottom keys to the keys ñ + 1...8.
This object is available in the winTMCA32 Toolbar.
3.4.5
Count rate
This object displays the complete count rate of the actual acquisition port. The display
area is changed automatically. If an acquisition for this port is active, you can select
between logarithmic and linear display
This object is available in the winTMCA32 Toolbar.
3.4.6
Buttons
You configure the object BUTTONS analogous to the menu bar by editing the
corresponding configuration file. This configuration file depends on user name, if user
administration is activated. 12 buttons can be defined at maximum. The default
configuration which is available after installing the software is now explained.
Starts acquisition on the actual acquisition port.
(command: START)
Stops acquisition on the actual acquisition port.
(command: STOP)
Erases the actual spectrum. The execution of this command requires
confirmation.
(command: CLEAR)
Enables you to change spectra length and number of sub spectra.
(command: LENGTH)
Opens the hardware setup menu.
(command SETUP)
Integrates the marked area within the actual spectrum.
(command: INTEGRATE)
Opens a dialog to select spectra files for the actual spectrum window.
(command LOAD)
Saves the spectrum in the actual window. The actual spectra attributes
as name, path, etc. are used.
(command SAVE)
Shows the PRESET menu.
(command PRESET)
© ICx Radiation GmbH
User manual winTMCA32
Operating winTMCA32
54
These buttons can be operated by the mouse or with help of the keyboard (Ý and
F1...F12).
This object is available in the winTMCA32 Toolbar.
3.4.7
Batch status
This object displays the name of the active batch file, which is started with port number
corresponding to the actual spectrum window.
The LED of the object shows the following state:
· dark red color
No batch file with port number 0 is active (normally system batch files are running on
port 0).
· light red color
A batch with port number 0 is executed.
· dark green color
The repeated execution of the loop batch file (name must be LOOP.WPB) is activated.
· light green color
The loop batch file LOOP.WPB is executed right now.
This object is available in the winTMCA32 Toolbar.
3.4.8
Window List
In the selection list of this object, all visible spectra windows with corresponding spectra
names will be listed. Choosing an entry from the list brings the corresponding window to
front.
This object is available in the winTMCA32 Toolbar.
3.5
Spectrum Window
Spectra are displayed in spectra windows within the spectra area of winTMCA32. These
spectra windows can be positioned and scaled within this area as you like. Size and
position are saved to the registration data base when winTMCA32 is terminated. A
© ICx Radiation GmbH
User manual winTMCA32
Operating winTMCA32
55
maximum of 64 spectra windows can be used, whereby the maximum number of spectra
windows displayed without overlap depends on screen solution and form size of
winTMCA32.
On the following pages, some elements of the spectrum window are described. In order to
operate them a mouse must be used.
The spectrum window contains the following items:
spectrum header
spectrum display
vertical scroll bar
horizontal scroll bar
meter
text window
spectrum window context menu
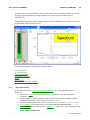
3.5.1
Spectrum header
In the spectrum header (1 in figure spectrum window) the following information is
displayed:
· acquisition mode, if an acquisition port is connected to the spectrum (here:
STABIL)
· window number (WN), spectrum number (SN) and sub spectra number (SUN)
which use the format (WN):(SN):(SUN) (here: 1:1:0)
· spectrum name, if the name was fixed before (SPECTRUM Þ DEFINITIONS)
· preset settings, if an acquisition port is connected to the spectrum and
preset settings were defined before (PRESET ð SERVICE). The following format
is used:
(PM):Value R:(MD):(VD)
© ICx Radiation GmbH
User manual winTMCA32
with
·
·
·
Operating winTMCA32
56
(PM) preset mode: available values are PR (Preset Real time), PL (Preset
Live time), PC (Preset Counts) and PM (Preset Maximum Channel)
(MD) Number of repetitions, if repetitions were set
(VD) Number of remaining runs to be repeated, if repetitions were set
Example:
PR:200 R:10:6, which means "Preset Real time" =200 s, 10 repetitions whereby 4 were
executed. If the number of repetitions is unlimited, this will be shown by R:¥.
3.5.2
Spectrum display
Within the spectrum display, various objects will be displayed, some of them can be faded
in and out, if required.
The red beam (number 2 in figure spectrum window) on top of the spectrum shows size
and position of the displayed spectra area in relation to the complete spectrum length. If
the beam covers the whole area, the complete spectrum can be seen.
The range over the spectrum (number 3 in figure spectrum window) serves to display the
channel information to the corresponding displaying area.
If an energy calibration was carried out the corresponding energy scale
(number 8 in figure spectrum window) is displayed then at the bottom of the spectrum. If
the energy unit on the upper end of the cursor line is set to "keV" the name of the nuclide
with an energy line within the cursor range will appear. The nuclide database can be
called up via PROGRAM Þ SELECT NUCLIDE DATABASE. The default file is
NUCLIDE.DB. Please note that only nuclide lines are displayed which have their CHECK
fields in the nuclide database editor activated.
The rectangle field in the upper left corner number 4 in figure spectrum window of the
window shows that an acquisition port is connected to the spectrum displayed by the
window. If an acquisition is active on this port, the color of the inner area of this field
changes from gray to yellow.
3.5.3
Vertical scroll bar
By using the vertical scrollbar (number 7 in figure spectrum window) you can influence
the minimal and maximal values for spectrum display:
The upper cursor buttons
serve to set up the maximum display, the bottom buttons to
change the minimum display. Any change of these values disables the automatical
minimum/maximum scale. By clicking the button
the auto scale is activated again.
The display mode for the vertical spectra axis is selected via the button
. You can
choose between LIN (linear), LOG (logarithmic), and SQR (square). The caption of the
button displays the actual mode.
© ICx Radiation GmbH
User manual winTMCA32
3.5.4
Operating winTMCA32
57
Horizontal scroll bar
The horizontal scroll bar (number 9 in figure spectrum window) enables you to influence
the left respectively right margin of the spectra display. You can push the display margin
into cursor direction by using the corresponding cursor buttons
. When you click
the button
the minimum respectively maximum channel is used as margin.
Additionally, the position of the spectra cursor (vertical red line) is displayed within the
scroll bar using the form
. If an energy calibration was carried out the position
is displayed in energy units, otherwise in channels. If the x-axis is declared as time axis
using days (d) or hours (h), the display of the cursor position can be changed between the
formats hours and date by mouse clicking on the x-position.
Within the vertical scroll bar, the number of events for the channel onto which the cursor
is positioned is also displayed (
), alternatively the number of total counts within
the spectrum (
) or the gross count rate (
) can be selected.
3.5.5
Meter
Within the spectrum window a meter can be displayed
(number 6 in figure spectrum window), which shows the count rate or the refresh rate by
displaying the window. In the count rate display an alarm function can be activated. If you
double click the meter, a dialog window pops up. In order to use the alarm function, the
ALARM field has to be activated by mouse click on the checking box. You enter the
threshold to the THRESHOLD (CPS) field by typing in or using the cursor buttons.
Values above this threshold will start the alarm. In this case, the LED on the bottom left
margin of the meter changes its color from dark red to light red.
Additionally, a .WAV file from the ./CONFIG directory can be selected in the
SOUNDFILE field, which will be rendered if the count rate limit is exceeded. In order to
use this function, a sound card with adapted speakers is necessary.
3.5.6
Text window
The text window (number 5 in figure spectrum window) can only be activated or changed
with the help of batch files (batch file command SETSPECTEXTWINDOW). Clicking
onto the text window spreads it to its maximum size which is the whole size of the
© ICx Radiation GmbH
User manual winTMCA32
Operating winTMCA32
58
spectrum window. Clicking again resets the window size.
3.5.7
Spectrum window context menu
When you click the right mouse button a context menu pops up which allows the
following selections and setups:
GRID
When you use this menu item the grid for spectrum display can be activated.
·
If an energy calibration was carried out, the grid for the x-axis can be arranged for the
channel- or energy-axis.
· ROI
© ICx Radiation GmbH
User manual winTMCA32
CLEAR MARKER(S)
SET MARKER
SET ROI
DELETE ROI
Operating winTMCA32
59
Erases earlier defined markers within the
spectrum.
Sets a marker to the actual cursor position.
Previous defined markers will be erased. The
markers serve to select a range within the
spectrum to integrate or define a ROI.
If two markers were set using this menu item,
a ROI can be defined in between these
markers. In this case, the markers will be
erased automatically.
Erases a ROI if the cursor is located within.
If the cursor is inside a ROI, the spectrum
view is expanded so that the ROI is displayed
in the whole window.
If the cursor is within a ROI and more than
NEXT ROI
one ROI is defined, the next ROI on the right
of the actual ROI is displayed to expand the
whole window. If the last ROI is reached the
next one will be the first ROI on the left side.
CHANGE MARKED PEAKS TO ROI Defines all peaks found by COMPUTE Þ
PEAKSEARCH as ROI and colors them red.
ZOOM ROI
·
CHANNEL « ENERGY
This menu item is only available if an energy calibration was carried out. For the cursor
display in the vertical scroll bar you can select between energy or channel representation.
·
Y-CURSOR
This menu item enables you to select how the channel contents of the channel having the
cursor within are displayed.
You can select between channel contents (COUNTS), complete counts over all spectra
ranges having the same color as the cursor channel (GROS), or the complete count rate
over all spectra ranges having the same color as the cursor channel but with dead time
corrected acquisition time (GROS CPS). These values will be displayed within the
vertical scroll bar.
·
Y-AXES
This menu item enables you to select the display mode for the vertical scroll bar.
You can select between the modes LIN (linear), LOG (logarithmic) and SQR (square).
© ICx Radiation GmbH
User manual winTMCA32
Operating winTMCA32
60
·
METER
This menu item enables you to activate a meter within the spectrum window. You can
select between the modes COUNT RATE and REFRESH RATE.
In the mode COUNT RATE, the whole count rate for the spectrum is displayed. In the
mode REFRESH RATE the frequency for screen refresh is displayed.
·
DISPLAY REAL/LIVE TIME
With this menu item the real and/or the dead time corrected acquisition time in the upper
right corner of the spectrum is displayed.
·
DISABLE SCROLLBAR
The vertical and horizontal scroll bar are enabled or disabled.
·
OVERLAY WINDOWS
Other spectra can be overlaid within the actual spectrum and compared directly. By using
the menu item SELECT FROM LIST a dialog window opens which enables you to select
one or more spectra windows from the list.
The spectra corresponding to the selected windows are displayed with a relative scaling.
This serves to compare spectra with significant different channel contents. When you
select EQUAL SCALING the overlaid spectra are displayed having the same y-axes
scaling as the actual one.
If overlayed spectra are printed out the names of the overlayed spectra are listed after the
© ICx Radiation GmbH
User manual winTMCA32
Operating winTMCA32
61
printout.
ATTENTION! Only spectra having the same length can be overlaid!
·
SPECTRUM SETTINGS
Opens the dialog for spectrum settings.
·
SHOW ENERGY CALIBRATION
When this menu item is activated the energy calibration function is displayed within the
spectrum window instead of the spectrum, provided that an energy calibration was carried
out.
·
SELECT BACKGROUND COLOR
Opens a dialog box for color selection in which the background color for the
spectra window can be chosen.
·
3D
This menu item allows the plane display of a two dimensional spectrum on the screen.
This menu item is only available if more than one sub spectrum is defined for the actual
spectrum. This option must be enabled by a special winTMCA32 series number.
·
EDIT CHANNEL CONTENTS
If the vertical and horizontal scroll bars are activated and the display mode COUNTS was
selected for the y-cursor, an input form is opened, which enables you to specify the
channel contents of the cursor channel. The changes must be confirmed by pressing the
ENTER (¿) key.
3.6
LOG file
All user actions done by menu commands or buttons are recorded in the LOG file
supplied with date and time. The file is created each day within the .\CONFIG directory
and uses the format LOGddmmy.TXT (dd=day, mm=month, y=last number of the year).
LOG files, which are older than seven days, are erased automatically.
Additionally, all exceptions and all executed batch file commands can be recorded. In
order to activate this function, you have to use the batch file command SetWinprocDebug.
© ICx Radiation GmbH
Chapter
4
Changing graphical user interface
User manual winTMCA32
4
Changing graphical user interface
63
Changing graphical user interface
In this section, the menu files and button files which enable you to adapt the functions of
the winTMCA32 software are described. You can use these files in connection with the
user administration and for creating user profiles.
Adapting the menu header
Adapting the buttons
4.1
Adapting the menu header
If the user administration is not activated, the menu definition file MENU.DEF in the
.\CONFIG directory is used for the menu header definitions when winTMCA32 is started.
If user administration is active, individual menu definition files can be assigned to the
users. Those files will be loaded automatically if the user logs in. The menu definition
files must have the format M*.DEF to distinguish them from the button definition files.
Menu definition files are ASCII files. You can create or alter them with the help of the
winTMCA32 editor, for example. The file registers must have the following format:
m "menu register" "command"
m.n "menu text" "command"
Thereby "m" refers to the number of the menu register in the menu header and "n" to the
number of the menu item within the menu register "m". These numbers must start at 1 and
have no gaps between them. The "menu text" refers to the text which should be displayed
for the corresponding menu item. Text should be set in quotation marks (" "), if it contains
blanks.
"command" refers to an internal menu command, to a batch file or to a windows program
(the program name should be entered with program name and, if required, with path).
Examples:
1 "acquisition"
1.1 "start" START
1.2 "stop" "winproc STOP –p=1"
1.3 "calculator" CALC.EXE
4.2
Defines the (main) menu register ACQUISITION.
Defines the menu item START which is connected
to the internal command START.
Connects the menu item STOP to the execution of
the batch file STOP.WPB.
Connects the menu item CALCULATOR to the
windows calculator program CALC.
Adapting the buttons
Analogous to the menu definition file the BUTTON.DEF file in the .\CONFIG directory is
used for assigning actions to the buttons without active user administration. If the user
administration is used all button definition files must have the format "B*.DEF" to
distinguish them from menu definition files.
© ICx Radiation GmbH
User manual winTMCA32
Changing graphical user interface
64
Button definition files are ASCII files that can be created and altered using the
winTMCA32 editor, for example. The registers must have the following format:
m bitmap-filename "command" "text"
"m" is the button number. Values are available from 1 – 12, whereby the position number
within the icon object is fixed. The bitmap file refers to a file from the .\CONFIG
directory which must contain the desired bitmap. The bitmap size for one button must be
28 ´ 28 pixels, whereby three bitmaps must be given for the modes "not pressed",
"deactivated" and "pressed", so the effective size is 28 ´ 84 pixels. In the figure above the
SETUP.BMP bitmap from the .\CONFIG directory is displayed. "command" must be one
of the internal menu commands, a batch file or a windows program (the complete program
name and, if required, the path must be given). "text" is an optional text which will be
displayed if the mouse is dwelled on the button. This text should be set between quotation
marks (" ") if it contains blanks.
© ICx Radiation GmbH
Chapter
5
Batch files
User manual winTMCA32
5
Batch files
66
Batch files
When you use batch files you can specify acquisition executions, including interactive
data input, communication with external acquisition hardware, communication with other
windows programs and the representation of results. Batch files are ASCII files and
therefore can theoretically be read and handled by every text editor. The line length is
fixed to 128 characters, whereby shorter lines must be filled with spaces. The fixation of
line length allows an easier access to any line within the batch file. In order to avoid
troubles when creating or executing batch files, it is advisable to use the winTMCA32
editor, which automatically takes care that the right format (recognizable by extension
.WPB) is used.
Batch files must be located in the .\CONFIG directory, otherwise they will not be
executed.
5.1
Batch structure
Every batch file consists of two sections, the first one contains the commands, in the
second one the variables are declared. The sections must be separated by the keyword
"VARIABLES". At runtime, the commands in the first part are executed by the
winTMCA32 program sequentially from top to bottom. Please note that each line can only
contain one command, and the command key word has to be placed at the beginning. The
variables which are used in the command part have to be defined in the declaration part
and only one variable can be declared in each line using the format:
Name Type (Value)
NAME fixes the variable name, which is chosen freely by the user and does not contain
any blanks.
TYPE must have the following format:
%f
floating point numbers
%d
integer numbers
%s
strings
%c
characters
%b
logical value
VALUE allows an optional starting value for a variable to be set. If strings are used, they
should be set in quotation marks ("), in particular if they contain spaces. For logical
values a 0 or a 1 can be used, but also TRUE or FALSE.
Example:
weight %f 12.234
status %s "confirm weight"
weightvariable %s "weight"
© ICx Radiation GmbH
User manual winTMCA32
Batch files
67
textline %s
OK %b FALSE
In order to get access to the value of a variable in a command line, you set a "$"in front of
the variable name. Also "$$" can be used.
Example:
SETPAR textline $weight
With this command, the value "weight" (here: 12.234) is assigned to the variable
"textline".
The command line
SETPAR textline $$weightvariable
leads to the same result, because $WEIGHTVARIABLE, which has the value WEIGHT,
is evaluated first.
It is possible to use arrays within batch files. An array must be declared within the
variables section:
arrayname[n] type value
n...array length
For example:
TestArray[2] %d 1,2
Within the command section $TestArray1 gives access to the first element; $TestArray2
gives access to the second one.
The variable names and commands are not case sensitive, which means that there is no
difference between lower and upper case letters.
If a batch file is started, a port number has to be assigned, which can be within the range
of 1 to 99. This port number defines the relations to other active batch files. If there exists
already another active batch file with the same port number, the execution of the old batch
file is stopped until the new started batch file has finished. Batch files with various port
numbers can be executed simultaneously. At runtime, a temporary copy of the batch file to
be executed is created and the variables and their starting values are copied to this
temporary file. The file name has the format PORT_nn.INF, "nn" refers to the port number
of the batch file (e. g. 01, 02…). If variables are changed during execution, only the
temporary file is affected, but not the batch file. After execution, the temporary file is
completely erased.
5.2
Batch commands
<N> and <V> are used as parameters for batch file commands, whereby <N> respectively
<N1>, <N2>… refers to variables names, and <V> respectively <V1>, <V2>… refers to
values which can directly be assigned to variables or via evaluation of variables ($variable
name).
ActivateStabilisation <V1> <V2>
Enables or disables the software stabilization on port <V1>=1,2,… .The acquisition mode
© ICx Radiation GmbH
User manual winTMCA32
Batch files
68
must be set to "STABIL". <V2> denotes the number of events necessary to calculate a
new fine gain factor. This number must be within the range specified by the command
SetStabilisationParameter. Setting <V2> to zero disables the stabilization.
If you use scintiSPEC please note that stabilization is activated or deactivated by the
command SetStabilisationParameter.
AcquisitionStatus <N> <V>
This command checks if there is an active acquisition on port <V>=1,2,… .
If acquisition is active, a 1 is assigned to variable <N>, otherwise a 0.
If you want to know if a batch is active at the moment use the batch command
CheckBatchActive.
AddLoopTask <V1> <V2> <V3> (<V4> <V5>)
Adds Batch <V1> to the list of batches to be continuously repeated. <V2> sets the port
number, <V3> the time interval (in seconds) between the executions as a real number.
With parameter <V4> a starting point can be set using the format "dd.mm.yyyy
hh:mm:ss". With <V5> an additional parameter for calling up the batch file can be given
(as for example "-e").
AddSecondsToDate <N> <V1> <V2>
Adds an amount of seconds <V2> to the value of variable <V1> and assigns the result to a
new variable <N>. Variable <V1> must have the following format: dd.mm.yy hh:nn:ss.
Each time unit must consist of two characters.
AddSpectrum <V1> <V2>
The counts of each channel of spectrum <V1> are added to the corresponding channel of
spectrum <V2>. The command is only executed if both spectra have the same length.
AddVariable <V1> <V2> <V3> <V4>
Variable <V2> is added to batch file <V1> (with or without extension). <V3> defines the
variable type (%f, %d …) and <V4> the value of the new variable. If the command is
executed in file <V1>, variable <V2> is also added to the temporary file.
AppendFile <V1> <V2> <V3> (<V4>)
This command opens the text file <V2> and appends the line <V3> at the end of the file.
If the specified file does not exist, it is generated automatically. The file search path is the
same as of spectrum <V1> (see SetSpectrumPath).
Exception: If <V1> is set to zero, the .\CONFIG directory will be selected. If a value is
given for the optional parameter <V4>, <V3> and <V4> will be joined together with a
blank between them. The resulting line will be added to the file.
AutoScale <V>
Scales the axes of spectrum window <V>=1,2… automatically.
Break <V>
This command will terminate a FOR...NEXT loop. The execution of the loop will be
continued after the command NEXT <V>. <V> refers to the loop parameter.
Cancel
Cancels the batch file execution.
© ICx Radiation GmbH
User manual winTMCA32
Batch files
69
ChannelToEnergy <N> <V1> <V2>
Converts for spectrum <V1> channel <V2> into energy if an energy calibration was done
before. The result will be assigned to <N>.
See also energy calibration.
CheckBatchActive <N> <V>
Checks if there is a batch running on port <V>=1,2,… If an active batch is found, the
variable <N> will be set to one, otherwise to zero.
If you only want to know if an acquisition is active use the batch command
AcquisitionStatus.
CheckCursorInRoi <V1> <N1> <N2> <N3> <V2>
This command checks if there is a special channel (<V2>¹0) or the cursor (<V2>=0) of
the spectrum window <V1> within a ROI. The internal ROI number will be assigned to
<N3> if the channel or cursor is within a ROI, <N1> and <N2> will be set to the left
respectively right margins (in channels) of the ROI. If no ROI was defined, <N3> will be
set to –1 and <N2> to zero.
You define ROIs with the batch commands MkNaIROI or DefineEnergyROI, but you can
also create ROIs choosing Spectrum ÞROIs in the winTMCA32 menu header.
CheckStabil <N> <V>
Checks if the software stabilisation of acquisition port <V> with acquisition mode
STABIL is active. If no peak (i.e. a peak suited to calculate the stabilisation parameters)
was found, <N> will be set to zero, otherwise to one.
You activate the stabilisation with the batch command ActivateStabilisation. Please note
that stabilisation parameters must be set (batch command SetStabilisationParameter)!
You can also activate the stabilisation or set the parameters by selecting the stabilisation
register from the hardware menu in the winTMCA32 menu header.
CHKPeak <V1> <N1> <N2> <V2> <V3>
Calculates the fine gain and offset values for energy calibrated spectrum <V1> and
assigns them to variables <N1> and <N2>. Therefore you can enter two energy values
<V2> and <V3, and the peaks found will be assigned to them. If only one energy value is
used, <V3> must be set to zero. In this case the first peak found (peak search is started
from the right margin) is set to the given energy <V2> and the fine gain is calculated by
"pulling" this peak to this energy.
ClearAllSpectra
All spectra windows are cleared.
ClearChronometer <V>
Resets one of the two chronometers (<V>=0,1) of the winTMCA32 software back to zero.
The chronometer or stopwatch can be reset while running.
ClearNanoActSpec <V>
This command erases data from the acquisition memory of the nanoSPEC connected to
port <V>
© ICx Radiation GmbH
User manual winTMCA32
Batch files
70
ClearNanoTopSpec <V>
Clears the spectrum, which was saved at last, from the spectra memory of nanoSPEC
connected to port <V>.
ClearSpectrum <V1> (<V2> <V3>)
Clears the channel contents of the selected spectrum <V1>=1,2,… . Optionally, more than
one spectrum can be erased at the same time (<V2> etc).
CloseExcelWorksheet
Closes the excel worksheet opened with batch command OpenExcelWorksheet.
An example is given in the appendix.
CloseIPCConnection
Closes the connection opened with batch command OpenIPCConnection.
CloseMessageWindow
This command closes a message window created by the command ShowMessage.
CloseWinTmca
This command terminates winTMCA32.
ConfigCOM <V1> <V2> <V3> <V4> <V5>
Enables the configuration of a serial interface <V1>=1,2,... for communication with an
external device. The parameters can be set to standard values, e. g. Baud-Rate <V2>:
1200, 2400, …, 9600, 14400, 19200, etc., parity <V3> : N (None), O (Odd), E (Even), bits
per character <V4>: 7 or 8 and stop bits <V5>: 1 or 2.
ConnectMCSAuxSpectrum <V1> <V2>
If mcs mode is used the mcs spectrum of spectrum <V1> will be displayed in spectrum
<V2> (see also DisconnectMCSAuxSpectrum)
ConnectUDP <V>
Connects spectrum <V> with the acquisition port server given by the command
SetPortUDPInfo.
ConvertDate <N> <V>
Converts the date given by <V> (format DD.MM.YYYY) into a real number, the integer
part gives the number of days since 1899, the decimal places the time as a fraction of the
actual day. The result is assigned to variable <N>.
ConvertDateTime <N> <V>
The date/time given by <V> (format DD.MM.YYYY HH:NN:SS) is converted to real
format (see ConvertDate).
ConvertTime <V>
The time given by <V> (format HH:NN:SS) is converted to real format (see
ConvertDate).
CustomTimeWaitComString <V1> <N> <V2> <V3> <V4> <V5> <V6>
Analogous to the WaitComString command, but enables the user to modify the waiting
time for response. <V3> is the string which is sent to the device on com port <V1>. The
© ICx Radiation GmbH
User manual winTMCA32
Batch files
71
waiting time is set by <V4> and <V5> where <V4> gives the minutes and <V5> the
seconds. The maximum waiting time is 1 minute 59 seconds. The parameter <V6> is
optional. If <V6> is set to 1 then a CHR(10) is sent at the end of the string. For <V4>="^"
every text is accepted as an answer.
DataInput <V1> <V2>
Displays a user defined input dialog with caption <V1>, which allows assignment of
values to variables located in a temporal file, i.e. the temporary copy of the batch file
being serviced. The variables must be predefined in a file <V2> (standard extension
"*.VAR").
This file must have the following structure:
First a description text which will be displayed must be given, then the name of the
variable from the temporary file of the batch. At last the attributes for the assigning
values. These attributes can contain a maximum of four characters, which must be listed
without spaces between them. "v" refers to "visible", "c" to "changeable", "r" to
"requested" and "b" to "box" which means a selection list. All four characters can be given
but the attribute can also be left. In the resulting window the actual values of the variables
will be shown. You can change them depending on their defined attributes. The changed
values will be assigned to the temporary file. Please note that they are lost if the batch has
finished and these values were not stored before.
The following file entry leads to the selection window below:
© ICx Radiation GmbH
User manual winTMCA32
Batch files
72
If you declare variables as logical variables (%b), a "checkbox" appears in the input
window instead of a text field. You can set a group number additionally behind the
attributes. If more variables have the same group number, only one can be selected, all the
others are automatically deactivated.
If a selection list is used, the desired values must be entered in rectangular brackets []
behind the attributes.
You can use variable names and text, if you choose variable names, the actual variable
value is entered to the list. If the attribute "c" is not given, the values from the list can only
be selected but the customer is not able to enter new values.
DBSetNuclideTestFlag <V1> <V2> <V3>
You can activate (<V3>=1) or deactivate (<V4>=0) the "CHECK"-flags of nuclide <V2>
in the nuclide database <V1>. Activated flags are taken into consideration by the
representation of nuclide names at cursor position in the spectrum window, and by the
evaluation of spectra with the optional module NAJCALC.
DDEChangeTopic <V>
Sets the TOPIC preferences for connection to DDE server to value <V> (see
DDEConnectServer).
DDECloseConnection
Closes the DDE connection to server.(Connection is opened using the command
DDEConnectServer)
DDEConnectServer <N> <V1> <V2> (<V3>)
This command opens a DDE (dynamic data exchange) connection to another windows
program which is used as DDE server. This default windows communication channel
allows the client (here: winTMCA32) to read items from the server side and to change
them. You can also transmit makro commands if this is allowed by the server. In order to
set the connection, the program path must be entered by <V1> and the name of the server
program by <V2>. The parameter <V3> is optional and allows to declare the "topic"
parameter for DDE connection (case sensitivity!). This serves to select more item plains if
this is supported by the server. If <V3> is not used, <V3> is set to it's default value
"system". If the connection to the DDE server can be built, the variable <N> is set to 1,
otherwise to 0. With winTMCA32 a second DDE channel can be used, the commands for
this option are DDEAux... (DDEAuxConnectServer, for example).
Connection must be closed with the DDECloseConnection command!
DDEExecuteAndWait <N> <V1> <V2>
This command erases the content of item <V1> of a DDE server, delivers command <V2>
and waits for the server changing the value of item <V1> as a fact of command <V2> (see
also DDEConnectServer). The new value of the item is assigned to variable <N>. If the
value doesn't change within ten seconds, the command will be cancelled and an error
message will appear.
DDEExecuteMakro <V>
Delivers makro command <V> to DDE server (see DDEConnectServer).
DDEPokeData <V1> <V2>
© ICx Radiation GmbH
User manual winTMCA32
Batch files
73
Sets item <V1> from the DDE server to value <V2>.
(see DDEConnectServer)
DDERequestAndWait <N> <V1> <V2>
This command waits for DDE server (see DDEConnectServer) setting item <V1> to value
<V2> (maximum waiting time: 30 seconds). If this happens in time, variable <N> is set to
one, otherwise to zero.
DDERequestData <N> <V>
The content of item <V> of the DDE server is assigned to variable <N>.
(see DDEConnectServer)
DecayTime <N> <V1> <V2> <V3>
Calculates the time [s] for radioactive decay, until the starting activity <V1> has fallen to
the value <V2> at a half life time <V3> given in seconds. The result is assigned to
variable <N>.
DecryptString <N> <V>
This command decrypts string <V> which was encrypted by the command EncryptString.
The result is assigned to variable <N>.
DefineEnergyROI <V1> <V2> <V3>
A ROI is defined in spectrum <V1> ranging between energy <V2> and energy <V3>,
<V3> has to be larger than <V2>. In order to use this command, you have to carry out an
energy calibration before.
You can also define ROIs with the batch command MkNaIROI or by selecting Spectrum
ÞROIs in the winTMCA32 menu header.
DeleteAllROIs <V>
Erases all defined ROIs (region of interest) in a spectrum <V>.
the command DefineEnergyROI or MkNaIROI.
ROIs are defined with
DeleteLoopTask <V1> <V2> (<V3>)
Deletes the loop batch <V1> on port <V2> from the list of batches to be continuously
repeated. <V3> is optional. If the loop batch <V1> does not exist an error message is
displayed on the screen. If <V3> is set to 1 this error message is suppressed.
DisableScrollbar <V>
Disables the horizontal and vertical scroll bar in spectrum window <V>.
DisableSpectrumSelection
Disables the spectrum selection window within the icon bar.
DisconnectMCSAuxSpectrum <V>
If mcs mode is used the mcs spectrum of spectrum <V> is displayed in spectrum <V> (see
also ConnectMCSAuxSpectrum).
EnableAutoTransfer <V1> <V2>
Enables (V2=1) or disables (V2=0) for acquisition port <V1> the REMOTE acquisition
mode.
© ICx Radiation GmbH
User manual winTMCA32
Batch files
74
EnableGaussFit <V>
For <V>=1 (this is the default setting) the gauss fit is used within the batch file command
Integrate and the menu command Integrate. <V>=0 disables the gauss fit.
EnableMenuBar <V1> <V2>
Enables (V2=1) or disables (V2=0) the menu items within the tool bar. The following
menu items can be used (=V1):
BATCHMENU
TIMEMENU
PORTMENU
ACQSTATUSMENU
WINDOWSELECTMENU
RATEMETERMENU
BUTTONMENU
WINDOWLISTMENU
EnablePearsonFit <V>
Setting <V>=1 enables the pearson fit for the batch- and menu command Integrate.
<V>=0 disables the pearson fit.
EnableScrollbar <V>
Enables the horizontal and vertical scroll bar in spectrum window <V>.
EnableSpectrumSelection
Enables the spectrum selection window within the icon bar.
EncryptString <N> <V>
String <V> is encrypted and assigned to variable <N>.
EnergyCalibration <V1> <V2> <V3> (<V4>… <V9>)
Executes an energy calibration within spectrum <V1> by assigning channels to energies.
At least one combination (<V2>, <V3>) must be pre-set. The coherence between energy E
and channel C is given by a polynome in the fourth degree:
Optionally, up to 3 more combinations can be assigned. Calibration with only one pair
results in a straight line (a=b=d=0) crossing the origin (C=0 Þ E=0). Two combinations
result in a straight line (a=b=0) etc.
An energy calibration can also be done by selecting Spectrum Menu ÞEnergy Calibration
from the winTMCA32 menu header.
EnergyToChannel <N> <V1> <V2>
Converts energy <V2> to channel for spectrum <V1>. The result is assigned to variable
<N>.
Please note that an energy calibration has to be carried out before!
Eval <V1> <N> (>V2>)
This command executes mathematical calculations, the result is assigned to variable <N>.
The following operations can be performed:
© ICx Radiation GmbH
User manual winTMCA32
Batch files
75
sin (sine), con (cosine), tan (tangent), sqr (evolve a root), log (logarithm), ln (natural
Ù
logarithm), abs (absolute value), trunc (the integer part of a real number is given) a b
(exponentiate), as well as the fundamental rules of arithmetic "*", "/", "+", "-", and the
use of brackets "(", ")".
You can enter values in the default format (i.e. 1.2345) or in the exponential format (i.e.
1.2345e+1), whereby a "." must be used instead of a ",". Optionally, the output format of
the result variable can be given by parameter <V2>. The format declaration must be
"%n.mf" for default format and "%n.me" for exponential format. "m" refers to the decimal
places and "n" to the total character number of the result. If "n" is bigger than the total
resulting character number, the absent characters are filled up with blanks.
Example:
Eval ln($Value) Result %.3f
By using the variable
Value %f 10
this leads to Result "2.303".
Using the format "%10.3e" the value "
2.303" is assigned to variable RESULT.
ExecuteIPCMacro <VG>
Delivers macro command <V> to the server program opened by batch command
OpenIPCConnection.
FileExists <V1> <V2> <N>
This command checks if file <V2> (without path declaration) already exists . If the file
was found, <N> is set to one, otherwise to zero. The file search path is the same as of
spectrum <V1>. If <V1> is set to zero, the .\CONFIG directory will be selected.
You set the spectrum path by using the batch command SetSpectrumPath of by selecting
Spectrum Menu ÞDefinitions from the winTMCA32 menu header.
FindFile <N> <V1> <V2>
Searches for file name <V2> in directory path <V1>, including all sub directories. If the
file exists, the file path is assigned to variable <N>.
FindFist <N1> <N2> <V1> <V2>
This command searches for a file having the attributes <V2> within the spectrum
directory of spectrum number <V1>. If the search was successful and a file was found the
name of the file is assigned to variable <N2> and a "1" is assigned to variable <N1>. If no
such file exists a "0" is assigned to variable <N1>. If more files having the attribute <V2>
exist they can be given out by the command FindNext.
FindNext <N1> <N2>
For the next file having the attributes given by the command FindFirst is searched. If the
search was successful a „1" is assigned to variable <N1> and the name of the file is
assigned to variable <N2>. If the search was not successful a "0" is assigned to variable
<N1>.
FloatingMeanValue <N> <V1> <V2> (<V3>)
With this command you can use one of the ten memory cells reserved for mean values
© ICx Radiation GmbH
User manual winTMCA32
Batch files
76
(<V1>=1...10) in order to evaluate a floating mean value for acquisition values etc. . The
mean value of the last <V2> values is evaluated. In order to initialize memory cells the
number of the values to be evaluated must be given by <V3> = 3...20, the starting value is
<V2>. If the function is called up again without the declaration of parameter <V3> a new
mean value is evaluated. The respective mean value is assigned to variable <N>.
FormatDateTime <N> <V1> <V2>
The date or time information given by <V2> is set to format <V1> and written to variable
<N>. You can use the following formats:
dd
Day
mm
Month
yy
Year (two place number)
yyyy
Year (four place number)
hh
Hour
nn
Minutes
ss
Seconds
zzz
Milliseconds
Here is an example for formatting date/time:
"dd.mm.yyyy hh:nn:ss:zzz"
For <V> … Next <V>
"FOR" in connection with "NEXT" allows it to construct loops where one command can
be executed more than once.
The loop parameter <V> must have the following format:
Var = Start TO Stop (STEP…)
whereby "Var" declares the variable of type %d, "Start" and "Stop" are the start and end
values of the loop parameter. "STEP" refers to the step with. The default step width is
one, but another can also be used. If "Stop"<"Start" , STEP must be set to a negative
value.
If you want to terminate a FOR-NEXT-loop before "Stop" is reached, the batch command
Break must be used.
E.g.:
For I=$Start To $Stop
Eval $Result+1 Result
Next I
For I=10 to 1 Step –1
Eval $Result+$I Result
Break I
Next I
© ICx Radiation GmbH
User manual winTMCA32
Batch files
77
GenerateSPCName <N> <V1> <V2> <V3> <V4> (<V5>)
Generates a name for spectrum <V1> and assigns it to variable <N>. The name is created
in different ways, depending on the text alignment parameter <V2>. If you create the
name with the string variables <V3> and <V4>, <V2> must be set to "%s%s". Before,
after and between the strings specified by the variables, a text can be inserted. If you used
only one variable, the second one must be set to "@". In the text arrangement (<V2>),
only one "%s" is allowed. Usually, the extension is enumerated from "000" to "999". By
setting the optional parameter <V5> to "ASCII", the numbers are represented as letters (0
= A … 9 = I).
GetAcquisitionMode <N> <V>
This command assigns the acquisition mode of spectrum <V> as numerical value to
variable <N>. The following values can be assigned:
VALUE
ACQUISITON MODE
1
PHA
2
MCSADD
3
MCSSTORE
4
LIST
5
MULPHA
6
DUAL
10
DOSIS
13
STABIL
18
REMOTE
24
RAWDATA
25
WINDOW
GetActualDateTime <N>
Assigns the actual date as real number to variable <N> (see also ConvertDate).
GetActualMCSValue <N> <V>
This command assigns the last value written into spectrum <V> during virtual MCSacquisition to variable <N>.
GetActualPort <N>
Assigns the active acquisition port to variable <N>.
GetActualSpectrum <N>
Assigns the spectrum number of the active spectrum of the winTMCA32 software to
variable <N>.
GetActualSubSpectrumNumber <N> <V>
Assigns the actual subspectrum number of acquisition port <V> to variable <N>, if the
acquisition port is set to the MULPHA acquisition mode.
© ICx Radiation GmbH
User manual winTMCA32
Batch files
78
GetActualWindow <N>
Assigns the number of the actual spectrum window to variable <N>.
GetBaselineLength <N> <V>
Assigns the actual hardware parameter "baseline length" of acquisition port <V> to
variable <N>.
GetChannel <N> <V1> <V2>
This command assigns the channel content of channel <V2> in spectrum <V1> to variable
<N>.
GetChronometerTime <N> <V>
Assigns the elapsed time of chronometer <V>=0,1 to variable <N> in the following
format: "hh.nn.ss". Each time unit consists of two characters.
GetCoarseGain <N> <V>
The variable <N> is set to the coarse gain factor of port <V>.
GetConversionGain <N> <V>
The variable <N> is set to the actual hardware parameter conversion gain of port <V>.
GetDate <N>
The actual date is assigned to a string variable <N> in the following way; dd.mm.yyyy" (y
® year, m ® month, d ® day).
GetDateTime <N>
Assigns the actual date and time to string variable <N> in the following way: "dd.mm.yy
hh:nn:ss" (y ® year, m ® month, d ® day, h ® hour, n ® minute, s ® seconds).
GetDayOfWeek <V>
As result value the first two letters of the actual day of the week are assigned to variable
<N>.
GetDBLClickString <N1> <N2>
If text is declared as "selectable" in a layout file used by the batch command
ShowFormattedPage, the form closes by double clicking on the text. The command
GetDBLClickString checks if the form was closed in that way. In this case <N2> is set to
1, the text is assigned to variable <N1>. Otherwise <N2> is set to 0, <N1> to „ ".
GetDeadTime <N> <V>
The actual dead time of spectrum <V> is assigned to variable <N>.
GetDLLBoolean <N> <V>
Assigns the contents of a boolean memory cell <V> to a variable <N>. "FALSE" is
represented as 0, "TRUE" as 1. 64 of these memory cells are available in winTMCA32.
The return value is 1 (true) or 0 (false). This value can also be displayed in the
information window of the winTCA32 using a LED.
GetDLLFloat <N> <V>
Assigns the contents of a floating point memory cell <V> to variable <N>. 64 of these
memory cells are available in winTMCA32. The value can be displayed in the
© ICx Radiation GmbH
User manual winTMCA32
Batch files
79
information window of winTMCA32 as real number or beam display in connection to
SetDLLFloatMaxValue.
GetDLLMaxFloatValue <N> <V>
The maximum value of a floating point memory cell <V> set with SetDLLFloatMaxValue
is assigned to variable <N>. This value is used for normalization to 100% by the beam
display in the information window.
GetDLLFloatPercentageAlarm <N> <V>
Assigns the alarm threshold (in %) for the internal numerical memory variable
<V>=1,2,...64 given by the command SetDLLFloatPercentageAlarm to variable <N>.
This value will be displayed as beam in the information window of the winTMCA32
program. IF the value of the memory variable is smaller than the percent value, the beam
is green, if the value exceeds the percent value the beam becomes red.
GetDLLString <N> <V>
The value of the internal logical text variable <V>=1,2,...64 is assigned to variable <N>.
GetDwellTime <N> <V>
Assigns the dwell time of port <V> to variable <N>.
GetEnergyCalibration <V> <N1> <N2> …<N7> <N8>
This command assigns the four energy/channel pairs used for energy calibration of
spectrum <V> to the variables N1, N2 … N8, where N1, N3, N5 and N7 refer to the
channel values, N2, N4, N6 and N8 to the energies.
Please note that an energy calibration has to be carried out before!
GetEnergyCalibrationCoefficients <V> <N1> <N2> <N3> <N4>
Assigns the energy calibration coefficients from spectrum <V> to variables N1…N4.
Coefficient A is assigned to N1, B to N2, C to N3 and D to N4 (see EnergyCalibration).
GetFineGain <N> <V>
Assigns the fine gain value of port <V> to variable <N>.
GetHV <N> <V>
Assigns the hardware parameter HV of port <V> to variable <N>.
GetIPCItemData <N> <V>
The content of item <V> is written to variable <N>. Please note that a connection has to
be opened before (using the command OpenIPCConnection).
GetLivetime <N> <V>
Assigns the actual acquisition time (with dead time correction) of spectrum <V> to
variable <N>.
GetLLD <N> <V>
Assigns the hardware parameter LLD (LowerLevelDiscriminator) of port <V> to variable
<N>.
GetMCSAuxSpectrum <N> <V>
© ICx Radiation GmbH
User manual winTMCA32
Batch files
80
Variable <N> gives the number of the spectrum which contains the mcs spectrum of
spectrum <V> (see also ConnectMCSAuxSpectrum).
GetMCSChannelNumber <N> <V>
This command assigns the actual channel number of virtual MCS-acquisition of spectrum
<V> to variable <N>.
GetMinMaxAverageValue <V1> <V2> <V3> <V4> <V5> <N1> <N2> <N3>
This command determines the minimum- <N1>, the maximum- <N2>, and the average
<N3> value of the channel contents ranging from channel <V2> to channel <V3> in
spectrum <V1>. <V4> refers to the scale factor and <V5> to the offset value.
GetNanoDailyMeasurementStart <N> <V>
If the daily repeated measurement for nanoSPEC on port <V> is activated, the starting
time of the measurement can be assigned to variable <N>. The time format is
"dd.mm.yyyy hh:nn:ss". The date refers to the next day when measurement starts.
GetNanoMeasurementStart <N> <V>
If a starting point for measurement with nanoSPEC on port <N> is given, this starting
point will be assigned to variable <N> using the format "dd.mm.yyyy hh:nn:ss".
GetNanoNumberOfRuns <N> <V>
This command assigns the number of runs given for nanoSPEC on port <V> to variable
<N>.
GetNanoSystemTime <N> <V>
Assigns the system time of nanoSPEC on port <V> to variable <N>, using the format
"dd.mm.yyyy hh:nn:ss".
GetNetLiveCPS <N> <V1> <V2> <V3>
This command assigns the net count rate of all ROIs of spectrum <V1> having the color
<V2> to variable <N>. For background all regions having the color <V3> will be taken
into consideration. If <V2> = <V3> no background consideration is used. The following
colors can be used:
BLACK, MAROON, GREEN, OLIVE, NAVY, PURPLE, TEAL, GRAY, SILVER, RED,
LIME, YELLOW, BLUE, FUCHSIA, ACQUA, WHITE
Alternatively a 3-byte hexadecimal value can be specified, to adjust the RGB-colorintensity for blue, green and red. In this case, the number must be declared with "0x" in
front of it.
Example:
"0xFF0000" refers to red, "0x00FF00" to green, etc.
GetNoiseLevel <N> <V>
The actual hardware parameter noise level of port <V> is assigned to variable <N>.
GetNumberOfPorts <N>
The number of all actual available acquisition ports is assigned to variable <N>.
GetNumberOfSubSpectra <N> <V>
© ICx Radiation GmbH
User manual winTMCA32
Batch files
81
Assigns the number of subspectra of spectrum <V> to variable <N>.
GetPresetTime <N> <V>
Assigns the maximum acquisition time for port <V>, given by batch commands
PresetLivetime or PresetRealtime, to variable <N>.
GetPZExternal <N> <V>
Assigns the value of hardware parameter "pole zero (PZ external)" of acquisition port
<V> to variable <N>.
GetRealTime <N> <V>
Assigns the acquisition time (real time) of spectrum <V> to variable <N>.
GetROIInfo <N1> <V1> <V2> <N2> <N3> <N4> <N5>
This command gives information of ROI <V2>=1,2…128 in spectrum <V1>. If the ROI is
not defined, <N1> is set to 0, otherwise to 1. (A ROI is defined with the batch commands
DefineEnergyROI or MkNaIROI.)
The following parameters are assigned:
left margin ® <N2>
right margin ® <N3>
ROI color ® <N4>
If histogram mode is set, a 1 is assigned to variable <N5>, otherwise a 0.
GetSDate <N>
Assigns the actual date to a string variable <N> with the following format: "ddmmy" (d ®
day, m ® month, y ® year).
GetSerialNumber <N> <V>
The serial number from the acquisition device on port <V> is written to variable <N>.
GetServiceMode <N> <V>
The PRESET mode for acquisition port is assigned to variable <N>. The values assigned
are:
value preset mode
1
real time
2
live time
3
total counts
5
maximum
GetShapingTime <N> <V>
The hardware parameter shaping time of port <V> is assigned to variable <V>.
GetSpectrumComment <N> <V>
The comment line of spectrum <V> is assigned to variable <N>.
© ICx Radiation GmbH
User manual winTMCA32
Batch files
82
GetSpectrumExtension <V1> <N> (<V2>)
Assigns the file extension of spectrum <V1> to a string variable <N>, if a filename was
specified for this spectrum. Usually, the GenerateSpcName command enumerates the
extension from "000" to "999". When you set the optional parameter <V2> to "ASCII" the
numbers are represented as letters (0 = A … 9 = I).
GetSpectrumLength <N> <V>
The length of spectrum <V> is assigned to <N>.
GetSpectrumPath <N> <V>
Assigns the directory name of spectrum <V> to variable <N>.
You set the spectrum path by using the batch command SetSpectrumPath of by selecting
Spectrum Menu ÞDefinitions from the winTMCA32 menu header.
GetStartDateTime <N> <V>
The starting point of the last acquisition of spectrum <V> is assigned to variable <N>.
Format "dd.mm.yyyy hh:nn:ss" is required.
GetStopDateTime <N> <V>
The stopping point of the last acquisition of spectrum <V> is assigned to variable <N>,
using the format "dd.mm.yyyy hh:nn:ss".
GetSubSpectrumNumber <N> <V>
The actual number of sub spectra of spectrum <V> is assigned to variable <N>.
GetTime <N>
Assigns the actual time to string variable <N> in the following format: "hh:nn:ss" (h ®
hour, n ® minute, s ® seconds).
GetTimeSinceLastStabilisation <N> <V>
This command assigns the time since last successful stabilisation (in seconds) of spectrum
<V> to variable <N>.
Stabilisation is enabled with batch command ActivateStabilisation. Please note that
Stabilisation Parameter must be set!
GetTopLength <N> <V>
The hardware parameter "top length" of port <V> is assigned to variable <N>.
GetULD <N> <V>
The hardware parameter ULD (upper level discriminator) of port <V> is assigned to
variable <N>.
GetUserName <N1> <N2> <N3> <N4>
The name of the actual user is assigned to variable <N1>, if the user registry is activated.
In this case the user priority will be assigned to <N2>, the menu definition file to <N3>
and the button file to <N4>.
GetWorkingDirectory <N>
The path of the .\CONFIG-directory is assigned to variable <N>.
© ICx Radiation GmbH
User manual winTMCA32
Batch files
83
Goto <V>
The execution of the batch file will jump to a given label <V>.
A ":" must be added in front of the label, for example:
Goto Label
…
:Label
HalfLiveCorrectedActivity <N> <V1> <V2> <V3>
The activity from the beginning <V1> for a time interval <V2> (in seconds) is corrected,
the half life time <V3> (in seconds) is taken into consideration.
HideStatus
Closes the communication window opened by the command ShowStatus.
HideWindow <V>
This command closes spectrum window <V>=1...64 respectively the information window
(<V=0>).
If <V> … (Else…)
This function allows the execution of following commands depending on the boolean term
<V>. If <V> is "TRUE", the following instructions will be executed, otherwise the
instructions after ELSE. If ELSE does not exist, the next following command after the IFinstruction will be executed. If more than one instruction should be executed, all
commands must be set in brackets "{", "}". Note that no command can be in the same line
as a bracket. For boolean terms the following operators can be used:
= (equal), < (smaller), > (bigger),<= (smaller or equal),>= (bigger or equal),!= (unequal),
AND (and), OR (or), XOR (exclusive or), ! (negation).
If these operators are used, the range has to be marked with brackets, for example:
if ($A>3) and !($B<=10)
{
instruction 1
…
}
else
{
instruction 2
…
}
In this example, instruction 1 and the following will be executed if the value of variable A
is greater than 3 and variable B is greater than 10. Otherwise, instruction 2 and the
following will be executed.
Optionally the operator "In" can be used. This operator checks if a value lies within a
value range. The syntax therefore is given by
If $A in [$B..$C]
© ICx Radiation GmbH
User manual winTMCA32
Batch files
84
This is equivalent to
If ($A>=$B) and ($A <=$C).
Ifdef <V> … (Else…)
Checks if a value is assigned to the variable which was transmitted with name <V>. If this
is true the following instructions are executed, otherwise the instructions after ELSE (if
ELSE exists).
Ifndef <V> … (Else…)
Checks if a value is assigned to the variable which was transmitted with name <V>. If this
is not true, the following instructions are executed, otherwise the instructions after ELSE
(if ELSE exists).
ImportInExcelWorksheet <V>
This command imports the contents of text file <V> into the excel file opened with batch
command OpenExcelWorksheet.
Within text file <V> the value has to be written under the corresponding column name.
The file name <V> can be given with or without path. If it is given without path it has to
be placed within the winTMCA32 directory.
If it is placed somewhere else you have to enter the name including the path.
Here you will find an example for inserting values into an excel file.
Incpar <N> <V>
Adds value <V> to variable <N>.
IncrementExcelWorksheetRow
This command increments the actual row number within an excel worksheet opened by
the command OpenExcelWorksheet.
Here you will find an example for inserting values into an excel file.
IncrementSpectrumName <V>
This command increments the file extension of spectrum <V> by one, if it consists of
numbers.
InsertItemInExcelWorksheet <N1> <N2>
This batch command inserts value <N2> into column <N1>, where <N1> gives the name
of the column. Before you are able to insert values you have to open the excel worksheet
using the command OpenExcelWorkSheet. If you want to insert more than one value into
one column you have to increment the row number using the batch command
IncrementExcelWorksheetRow.
In the appendix you will find an example for inserting values into an excel file.
Integrate <V1> <N1> <N2> <N3> <N4> <N5> <V2> (<V3>)
The peak area (that means the number of counts with considered background) is
evaluated. The spectrum number is given by parameter <V1>. To fix integration margins
the energy <V2> for a channel within the ROI can be given or the left (<V2>) and right
(<V3>) margins of the integration area. The peak centroid is assigned to variable <N1>,
the full width of half maximum (FWHM) to <N2>, the net area (corrected by
background) to <N3>, the gross area to <N4> and the number of background events to
© ICx Radiation GmbH
User manual winTMCA32
Batch files
85
<N5>.
If there was no energy calibration for this spectrum <V2> and <V3> are interpreted as
channel numbers.
In order to determine the peak area it is tried to describe the peak form fitting a gauss
function G (x) ,
If the fit is not convergent, the background is determined by adapting a straight line. In
addition to that, the mean of several channel contents of the left and right margins is
evaluated.
You can also integrate an area by selecting Compute Menu ÞIntegrate from the
winTMCA32 menu header.
LoadDMCASetup <V1> <V2>
Loads the setup file <V2> for acquisition port <V1>. (only dMCA card!).
LoadNanoActSpec <V>
Loads the current spectrum stored in the acquisition memory of external connected
nanoSPEC, nanoPROBE or identiFINDER in spectrum <V>.
LoadNanoAllSpecs <V>
Loads all spectra from the spectra memory of nanoSPEC, nanoPROBE or identiFINDER
on acquisition port <V>. Thereby the spectra data of spectrum <V> are lost!
LoadNanoTopSpec <V>
Loads the actual spectrum stored in the spectrum memory of external connected
nanoSPEC, nanoPROBE or identiFINDER in spectrum <V>.
LoadSpectrum <V1> <V2>
Loads spectrum file <V2> into spectrum window <V1>. Only spectra within the specified
directory can be loaded (see SetSpectrumPath).
MaximizeSpecTextWindow <V>
Maximizes the spectrum text window of a spectrum <V> to full window size. This text
window is created with the command SetSpecTextWindow.
MaximizeSpecWindow <V>
This command enlarges spectrum window <V> to its maximum window size.
MinimizeSpecTextWindow <V>
Minimizes the spectrum text window of a spectrum <V> to its original size. This text
window is created with the command SetSpecTextWindow.
MinimizeSpecWindow <V>
Minimizes spectrum window <V> to its minimum window size.
MkNaIROI <V1> <V2> <V3> (<N1> <N2> <N3>)
© ICx Radiation GmbH
User manual winTMCA32
Batch files
86
Creates a region of interest (ROI) in a spectrum <V1> symmetrically around energy <V2>
which is taken as centroid. The margins are calculated automatically. The standard
resolution of 7% of the 137Cs 662 keV peak and its energy-dependence are taken into
consideration. By assigning a value greater then 1 to the factor <V3> it is possible to
enlarge the width of the ROI. (But spreading the ROI reduces its resolution.) A factor of 2
doubles the width of the ROI. Optionally, three other variables can be specified, to which
the left <N1> respectively the right <N2> margin of the ROI and the earlier defined
energy <N3> can be assigned.
You can also define a ROI by using the batch command DefineEnergyROI or by selecting
Spectrum Menu ÞROIs from the winTMCA32 menu header.
MultiplySpectrum <V1> <V2>
All channel contents of spectrum <V1> are multiplied by factor <V2>.
OpenExcelWorksheet <V1> <V2> <V3>
This command opens an excel worksheet. <V1> sets the name (including path) of the
excel file and <V2> the name of the worksheet. Setting parameter <V3> to 1 means that
the excel file is opened if it is already existing. <V3> = 0 will delete the existing file. If
the excel file is opened you can insert values using the batch commands
InsertItemInExcelWorkSheet or ImportInExcelWorkSheet.
In the appendix you find an example for inserting values into an excel file.
OpenIPCConnection
Opens the connection to the server program <V>. If the connection was opened succesfull
the variable <N> is set to 1, otherwise it is set to 0.
Please note that the program <V> has to be already opened when you use this batch
command. (You can open the program using the command WinExec).
OverwriteString <N> <V1> <V2> (<V3>)
This command overwrites a string given by <V1> with another string <V2>. The result is
assigned to variable <N>. Normally <V2> is placed at the beginning of <V1>. If the
command line contains the optional parameter <V3>=R the text is seated on the end of the
original string.
PeakSearch <V1> <V2>
Enables the peak search for spectrum <V1>. This function tries to find peaks within the
spectrum channel per channel via gauss fit. The peak search sensitivity is set by parameter
<V2> (0.5 … 3). In order to identify smaller peaks, a lower value must be entered.
The peaks which were found are marked as ROIs.
PreampPower <V1> <V2>
Enables (<V2>=1) or disables (<V2>=0) the preamplifier of acquisition port <V1>.
PresetCounts <V1> <V2>
Acquisitions on port <V1> will be stopped if count rate <V2> is reached.
(See also Preset Menu Þ Services in the winTMCA32 menu header.)
PresetDwelltime <V1> <V2>
© ICx Radiation GmbH
User manual winTMCA32
Batch files
87
Pre-sets the dwell time for MCS-mode acquisition for the active port <V1>. The time in
seconds is given as real number <V2>. The time resolution for MCS compatible hard
ware as the dMCA card is <= 1 ms.
PresetLivetime <V1> <V2>
Pre-sets the acquisition time <V2> (dead time corrected) of an acquisition port <V1> in
seconds. Acquisitions will be stopped if this time is reached.
(See also Preset Menu Þ Services in the winTMCA32 menu header.)
PresetMaximumCounts <V1> <V2>
Acquisitions of port <V1> will be stopped if the content of one channel reaches the given
rate <V2>.
(See also Preset Menu Þ Services in the winTMCA32 menu header.)
PresetNextChannel <V>
With this command, the preset mode NEXTCHANNEL is set. This allows it to respond to
the channel changes within a batch file in connection to a &-operator.
PresetRealtime <V1> <V2>
Pre-sets acquisition time <V2> in seconds (real number) of an acquisition port <V1>. The
accuracy of time preset depends on hardware and is within the range of 100 ms and 1ms.
(See also Preset Menu Þ Services in the winTMCA32 menu header.)
Print <V1> <V2> <V3> (<V4>)
String <V2> read from file <V1> in the .\CONFIG directory can be displayed for a certain
time <V3> (in seconds) in the status bar at the bottom of the winTMCA32 program
window. If an optional text <V4> is defined, <V4> will be attached to <V3> separated by
a space. If <V2> is set to zero the filename given by <V1> will be ignored and only the
optional text <V4> will be displayed.
PrintFormattedPage <V1> <V2>
This command enables the customer to create customized single or multi page printouts.
The layout is specified in the layout file <V1>.
If any variables of the temporary copy of the batch file should be used in the printout, the
name of the temporary file must be specified as parameter <V2>, e. g. : If the batch is
running on port 1, the name of the temporary copy is "PORT_01.INF".
BEGINHEADER
Defines the beginning of a command block appearing at the top
of each page
ENDHEADER
Defines the end of the page header block. It is possible to define
headers at any place in the layout file. Older header settings are
replaced on the pages after definition.
© ICx Radiation GmbH
User manual winTMCA32
TEXTOUT
· xpos
· ypos
· csize
· bold
· underline
· position
· text
· format
Batch files
88
This command is used to customize position and appearance of
a string. All parameters must be specified and all numerical
values are real umbers. As decimal symbol a "." is used instead
of an ",".
xpos – horizontal position
ypos – vertical position
csize – specifies the font size in pars pro mille of the page
height.
bold – text is printed bold, if this parameter is set to 1 (0 =
normal)
underline – text is underlined, if parameter is set to 1 (0 =
normal)
position – specifies the alignment of the string with respect to
the desired X/Y-position. L aligns text on the left, R on the right
and C centers text on the specified x-position.
text - specifies the text to be printed. Any variables located in
the temporal file to be printed must be prefixed with a "$"character, for example: $NUCLIDE1.
format – this optional parameter allows the specification of the
output format for floating point numbers according to the "C"conventions (e. g. : %.2f)
DRAWLINE
· x1pos
· y1pos
· x2pos
· y2pos
· width
Draws a single line.
DRAWFRAME
Draws a rectangle.
·
·
·
·
·
x1pos
y1pos
x2pos
y2pos
width
x1pos, y1pos – specifies the origin
x2pos, y2pos – specifies the end of the line
width - specifies the line thickness in per mil of the page
height
x1pos, y1pos – specifies the upper left corner in percent of the
side width respectively height
x2pos, y2pos – specifies the lower right corner of the rectangle
width – specifies the line thickness in per mil of the page height
© ICx Radiation GmbH
User manual winTMCA32
DRAWGAUGE
· xpos
· ypos
· xwidth
· ywidth
· color
· value
Batch files
89
A gauge is printed out on the current page.
xpos,ypos – specifies the upper left corner of the spectra
printout.
xwidth,ywidth – specifying the width respectively height of the
outer frame.
color – specifying the color which is used for the gauge beams.
The following 16 colors are available:
0
1
2
3
4
5
6
7
8
9
10
11
12
13
14
15
black
dark red
green
olive green
dark blue
violet
blue green
gray
light gray
light red
light green
yellow
blue
lilac
light blue
white
value – gives the %-value which is considered for the gauge
beam.
DRAWSPECTRUM
· spcnr
· xpos
· ypos
· xwidth
· ywidth
· grid
This command prints a spectrum on the actual page.
spcnr - denotes the number of the spectrum to be printed
xpos, ypos – specifies the upper left corner of the spectrum
printout
xwidth, ywidth – specifies width and height of the spectrum
printout
grid – if the parameter is set to 1 the spectrum is printed with a
grid (0 no grid is printed)
BEGINTABLE
Defines the beginning of a table. After this command the
elements table columns are specified by the TABLETEXTOUTcommand.
ENDTABLE
Marks the end of a table definition.
© ICx Radiation GmbH
User manual winTMCA32
Batch files
90
SAVEX
Stores the actual x-position for later use.
SAVEY
Stores the actual y-position for later use.
TABLETEXTOUT
· xpos
· start_ypos
· delta_y
· csize
· bold
· underline
· position
· start_index
· end_index
· delta_index
· text
· format
This command specifies the contents of a table column and can
only be used in connection with variables located in the
temporary copy of the batch file being executed. These variables
must be numbered consecutively (e. g. $NUCLID1,
$NUCLID2,…).
xpos – specifies the horizontal position of the column on the
page
start_ypos – specifies the vertical position of the first row of the
column on the page.
delty_y – specifies the interval between the rows of the
columns.
csize, bold, underline, position – see TEXTOUT
start_index – specifies the variable that should be used in the
first row (e. g. if start_index is 5 the variable "$variable5" would
appear in the first row.
end_index – specifies the variable terminating the column
delta_index – specifies the interval of the used variables (e. g. if
set to 2, only variables having even respectively uneven
numbers will be used)
text, format – see TEXTOUT
position parameters:
There are two different ways of specifying a position on the page.
· absolute positioning: the number specifying the position must be real and
represents the position in per cent of the available page width (x-position) resp.
page height (y-position).
· relative positioning: allows the usage of the internal variables x, y storing the
coordinates of the lower right corner of the last printed object. These can be used
with an offset, i.e. an integer value in per cent of page width resp. height (e g :
X+10.5, X-5.2, etc). Positions saved with "SAVEX" of "SAVEY" can be used
with an optional offset too (e. g. SAVEX+10)
SETFONT
· fontname
This command changes the character set of the printout.
fontname – displays the WINDOWSâ - fontname
PrintTextFile <V1> (<V2> <V3>)
The specified text file in <V1> is printed out on your default printer. It is possible to
© ICx Radiation GmbH
User manual winTMCA32
Batch files
91
assign a caption <V2> and a commentary <V3> to the printout.
ReadCOMString <V> <N>
A string is read via a serial interface <V>=1,... and assigned to a string variable <N> using
the FIFO (First In /First Out)-principle. If the FIFO memory is empty, a space " " will be
assigned to the variable. As text line margin a CR (carriage return= hex. OD) is expected
by the function.
ReadFromFile <N> <V1> <V2>
Reads the line <V1> of file <V2> and assigns the value to variable <N>. <V2> must be
found in the ./CONFIG directory.
ReadidentiFINDERResults <V>
The identiFinder spectrum analysis results are read from file <V> (which must be located
in the ./CONFIG directory).
The variables $NUCLID, $NUCTYPE and $NUCPERC were read out and assigned to the
temporary PORT_xx.INF file where they are incremented automatically ( e.g.
$NUCLID1, $NUCTYPE1, $NUCPERC1, $NUCLID2…). NUCLID gives the nuclide
name (e. g. "Cs-137"), NUCTYPE the nuclide type (e. g. IND. for industrial), NUCPERC
gives the probability [%] that the nuclide is within the spectrum.
ReadLineFromFile <N1> <N2> <V1> <V2>
Reads line number <V2> of file <V1> and assigns the value to variable <N2>. The search
path of file <V1> is the ./CONFIG directory. If the function is successful a "1" is assigned
to variable <V1>, otherwise "-1".
ReadSampleResults <V>
This command reads the result files created by the program "NAJCALC.EXE" (optional)
so that the contents can be used within batch files. The files (<V> = "NAJCRES.TXT" or
"NAJQRES.TXT") are read by the line. The contents (i.e. values) are assigned to variables
in the temporary copy of the batch file being executed. Nuclide specific parameters as
nuclide name and activity are assigned to variables of the same name, which are
incremented automatically.
E.g.: If the first line of the result file looks like "NUCLID=Cs-137" the following entry in
the temporary file would look like "NUCLID1 %s Cs-137".
The nuclide name of the second line would be assigned to the variable "NUCLID2".
It is not necessary, that the variables are listed in the variable section of the batch file,
because they are generated in the temporary file automatically, if the declarations are
missing.
Result values like NETSUM, ERRORSUM, NETCOUNTS etc. are also assigned to the
variables of the same name in the temporary file of the actual batch file.
ReadVar <V>
Reads the stored values from a file <W> and assigns them to their respective variables
within the temporary copy of the batch file being executed.
ReceiveNanoString <V> <N>
The reply from nanoSPEC on port <V> is assigned to variable <N> (see also
SendNanoString).
© ICx Radiation GmbH
User manual winTMCA32
Batch files
92
Remove <V1> <V2>
Erases the file <V1> within the working (.\CONFIG) directory. <V2> is an optional
parameter. If <V2> is used, the file <V1> in the spectrum directory of spectrum <V2> is
removed.
RenameFile <N> <V1> <V2>
Changes the name of a file from <V1> to <V2>. If the function is successful, a 1 is
assigned to variable <N>, otherwise a 0.
Replace Character <N> <V1> <V2> <V3>
Character <V2> within string <V1> is replaced by character <V3>. The resulting string is
assigned to variable <N>.
RescaleSpectrumXAxis <V1> <V2> <V3> <V4> <V5> <V6> <V7>
This command rescales the channel axis of the spectrum displayed in spectrum window
<V1>.
The rescaled spectrum will be displayed in spectrum window <V2>. The channel contents
are distributed corresponding to the rescaling function:
The polynomial coefficients A, B, C and D are given by <V3>, <V4>, <V5> and <V6>. If
the coefficients shall be applied to the inverse function
<V7> must be set to 1, otherwise to 0.
ResetService <V>
Deletes all preset-adjustments for port <V>.
Rpbt <V> <N1> <N2>
The value of variable <N1> within batch file <V> can be assigned to a variable <N2>
within the temporary copy of the batch file being executed.
SaveDMCASetup <V1> <V2>
The DMCA hardware parameters of port <V1> are written to file <V2> (which is stored
in the ./SETUP directory). Using the batch command LoadDMCASetup reloads the
configuration.
SaveFileAs <N1> <N2> <N3> <V1> <V2> <V3> <V4>
This command calls up the default file open box for saving files. <V1> defines the
window caption, <V2> the file type i.e. text file, <V3> the default extension (i.e.
"*.TXT"). The file path is specified by <V4>. If a file was chosen, <N1> is set to 1, the
file name is assigned to <N2>, and the file path to <N3>. If the dialog was cancelled, a 0
is assigned to <N1>.
SaveORTECSpectrum <V1> <V2>
Saves spectrum <V1>=1,2… to the spectra directory using filename <V2> and ORTEC
format. If <V2> is set to ´´´´, the file name will be set to its spectrum name (default
© ICx Radiation GmbH
User manual winTMCA32
Batch files
93
NONAME.SPC).
SaveSpectrum <V1> <V2> (<V3> <V4>)
Saves spectrum <V1>=1,2… using file name <V2> to the spectra directory . If <V2> is
set to "", the file name will be set to its spectrum name (default NONAME.SPC). If there
are any sub spectra defined, the range of sub spectra can be set with the optional
parameters <V3> and <V4>, sub spectra from <V3> to <V4> will be stored. If all sub
spectra should be stored, <V3> and <V4> must be set to –1.
SaveVar <V1> <V2>
Stores the actual values of specified variables to a file <V2>. Before using this command,
the variables that are to be stored must be specified in a declaration file <V1>. For the
structure of this file see DataInput. All variables will be stored in the same format as in
temporary files.
SelectSpectrumFile <N1> <N2> <N3> <V1> <V2> (<V3> <V4>)
This function calls up the "file open" - dialog box for loading a spectra file. The caption of
the window is determined by <V2>. Parameter <V3> fixes the file type (i.e. spectra file),
<V4> the default file extension (i.e. "*.SPC"), <V1> specifies the spectrum number. The
corresponding spectra path is used as a search path. After finishing the dialog a 1 is
assigned to variable <N1> if a file was selected. If the dialog is cancelled, a 0 is assigned
to <N1>. If selection was successful the filename is assigned to <V2> and the file path to
<V3>.
SelectFile <N1> <N2> <N3> <V1> <V2> <V3> <V4>
This command displays the "file open"- dialog box. For declaration of parameters see
SaveFileAs.
SendCOMChar <V1> <V2>
Sends a single character <V2> via a serial interface <V1>. Non printable characters are
sent as hexadecimal numbers with "0x" as prefix (e. g. : CR is sent with <V2>="0x0D").
SendCOMString <V1> <V2>
Sends a string <V2> via serial communication port <V1>. The string is terminated by CR.
SendMessage <V1> <V2> <V3>
This command sends a windows-information to all applications. <V1> declares the
information number (4 byte), <V2> and <V3> are information parameters. If hexadecimal
values were chosen as parameters, they have to be marked with a "0x" at the beginning.
SendNanoString <V1> <V2>
This command sends line <V2> to nanoSPEC on COM port <V1>.
SetAcquisitionDate <V1> <V2>
Presets the starting point <V2> for acquisition on port <V1>. At this point the
winTMCA32 has to be opened. Time format is given by "dd.mm.yyyy hh:nn:ss" (y ®
year, m ® month, d ® day, h ® hour, n ® minute, s ® seconds).
SetAcquisitionMode <V1> <V2>
This command allows the changing of acquisition mode for port <V1>. <V2> can be set
© ICx Radiation GmbH
User manual winTMCA32
Batch files
94
to the following modes:
PHA, MCS, MCSSTO, LIST, MULPHA1, MULPHA2, DUAL, DOSIS, STABIL and
REMOTE.
SetAlarmParameter <V1> <V2> <V3> <V4> (<V5>)
An alarm threshold <V4> for spectrum <V1> can be defined, parameter <V2> enables
(V2=1) or disables (V2=0) alarm. <V3>=1,0 enables or disables the acoustical alarm, if
acoustical alarm is activated, a wave file can be specified by parameter <V5>.
(See also Meter.)
SetBaseLineLength <V1> <V2>
The hardware parameter "baseline length" of port <V1> is assigned to <V2>.
SetBGIntegrationChannels <V>
Changes the number of channels which were taken into consideration for determining the
background straight line with the alternative integration method. By default five channels
on the right and on the left integration margin are used.
SetBGStabilisation <V1> <V2>
This command enables (<V2>=1) or disables (<V2>=0) the background software
stabilisation on acquisition port <V1> ("STABIL"-mode), i.e. spectra are stabilised, even
if the system is not acquiring data.
SetChannel <V1> <V2> <V3> <V4>
Sets the content of channel <V3> of sub spectrum <V2> of spectrum <V1> to value
<V4>.
SetCoarseGain <V1> <V2>
Changes the hardware parameter coarse gain of acquisition port <V1> to any value <V2>.
SetCOMOutputLine <V1> <V2>
This command enables you to set or reset DTR- and RTS output of COM-port <V1>.
<V2> can be set to the following values: "CLRDTR" refers to "reset DTR", "SETDTR" to
"set DTR", "CLRRTS" to "reset RTS", and "SETRTS" to "set RTS".
SetCompensationAmplitude <V1> <V2>
The hardware parameter "compensation amplitude" of port <V1> is set to value <V2>.
SetCompensationDecay <V1> <V2>
Sets the hardware parameter "compensation decay" from acquisition port <V1> to value
<V2>.
SetConversionGain <V1> <V2>
The hardware parameter conversion gain of port <V1> is set to <V2>.
SetCursorPosition <V1> <V2>
The cursor in spectrum window <V1> is set to channel <V2>.
SetDeadTime <V1> <V2>
This command sets the dead time of spectrum <V1> to value <V2> (in seconds).
© ICx Radiation GmbH
User manual winTMCA32
Batch files
95
SetDetectorLimit <V1> <V2>
Sets the HV limit <V2> for the detector on acquisition port <V1>. The HV value can not
be set to a value higher than this limit.
SetDLLBoolean <V1> <V2>
Assigns a value <V2> to one of the boolean memory cells <V1>=1,2… . "FALSE" is
represented by 0, "TRUE" by 1.
SetDLLFloat <V1> <V2>
Assigns a value <V2> to one of the floating-point memory cells <V1>. These are
numbered from 1 to 64.
SetDLLFloatFormat <V1> <V2>
The decimal place number n of the floating-point memory cell <V1> used by the
information window can be determined. The format is given by <V2> using "%.nf".
SetDLLFloatMaxValue <V1> <V2>
The normalization value <V2> for the floating-point memory cell <V1> is given. <V2> is
used within the information window for percentage beam display.
SetDLLFloatPercentageAlarm <V1> <V2>
<V1> refers to the floating-point memory cell and <V2> to the percentage value at which
the beam display within the information window changes its color from green to red.
SetDLLString <V1> <V2>
Assigns a string <V2> to one of the 64 string memory cells <V1>.
SetEnergyCalibrationEx <N1> <V1> <V2> <N2> <N3>
An energycalibration is carried out (see also 3.3.4, Energy Calibration). If the fit is
successful, the variable <N1> is set to 1. The spectrumwindow is given by <V1>, the
degree of the polynomial by <V2>. Variables <N2> and <N3> have to be declared and
enumerated in the variable part of the batch file. <N2> sets the channel and <N3> the
corresponding energy.
Here is an example:
SetEnergyCalibrationEx Res 1 3 Ch E
VARIABLES
Res %d
CH1 %f 81.02
CH2 %f 162.99
CH3 %f 230.13
CH4 %f 518.62
CH5 %f 641.75
CH6 %f 734.03
CH7 %f 938.0
E1 %f 81.02
E2 %f 162.99
E3 %f 230.13
E4 %f 518.62
E5 %f 641.75
E6 %f 734.03
E7 %f 938.0
© ICx Radiation GmbH
User manual winTMCA32
Batch files
96
SetErrorWaitTime <V>
Sets the time <V> (0...60 seconds) in which a batch error message shall be displayed. If
you select <V>=0 (this is the default value) the error message must be confirmed with the
ENTER (¿) key.
SetExcelWorksheetValueFormat <V>
Parameter <V> gives the format which is used for inserting values into an excel file.
Parameter <V> must be given using excel format. You can use this command before you
insert values with batch command InsertItemInExcelWorksheet, to fix the format for the
inserted values.
SetExclusiveFlag <V1> <V2>
Determines if other batch files having the port number <V1> shall be executed (<V2>=0)
or not (<V2>=1). Using this command you avoid calling up a batch file for more than one
time without having finished.
SetFineGain <V1> <V2>
The fine gain of an acquisition port <V1> is set to the given value <V2>.
SetHV <V1> <V2>
Sets the hardware parameter high-voltage of an acquisition port <V1> to the given value
<V2>.
SetIPCItemData <V1> <V2>
Sets the content of item <V1> to the value given by <V2>. Please note that a connection
has to be opened before (with batch command OpenIPCConnection).
SetLiveTime <V1> <V2>
This command sets the dead time corrected acquisition time for spectrum <V1> to value
<V2> (using seconds).
SetLLD <V1> <V2>
This command sets the lower level discriminator (LLD) of an acquisition port <V1> to
value <V2>.
SetMarker <V1> <V2> <V3>
Sets a left (<V2=0>) or right (<V2=1>) marker within spectrum <V1>=1,2…64 at the
desired channel <V3>.
SetMCSChannelNumber <V1> <V2>
This command sets the actual channel number of a virtual MCS-acquisition for spectrum
<V1> to channel <V2>.
SetMeterMode <V1> <V2>
This command sets the meter mode of spectrum <V1> to count rate (<V2>=1), or refresh
rate (<V2>=2). <V2>=0 disables meter.
SetMeterWidth <V1> <V2>
<V2> specifies meter width of spectrum <V1> in percent of spectrum window width.
SetNanoDailyMeasurementStart <V1> <V2> <V3>
© ICx Radiation GmbH
User manual winTMCA32
Batch files
97
This command activates a daily measurement for nanoSPEC on port <V1>. The time is
given by parameter <V2> (using format hh:nn:ss), the date by parameter <V3>
(dd.mm.yyyy).
SetNanoMeasurementStart <V1> <V2> <V3>
This command gives date and time for nanoSPEC measurement on port <V1>. Parameter
<V2> is set to time (using format hh:nn:ss), parameter <V3> to date (format
dd.mm.yyyy).
SetNanoNumberOfRuns <V1> <V2>
This command fixes the number of measurements <V2> for nanoSPEC on port <V1>. It is
required to define a starting point. The runs are executed continuously.
SetNanoSystemTime <V1> <V2> <V3>
Sets the system timer of nanoSPEC connected to port <V1> to date <V2> (using format
dd.mm.yyyy) respectively time <V3> (format hh:nn:ss).
SetNoiseLevel <V1> <V2>
The hardware parameter noise level of port <V1> is set to value <V2>.
SetNuclideDatabaseName <V>
Allows it to change the actual nuclide database. The nuclide database is needed to display
the name of the nuclides in the spectrum window and the resulting integration window.
File <V> must be located in the .\NUCDATA directory.
SetNumberOfSubSpectra <V1> <V2>
This command defines the number of sub spectra <V2> for spectrum <V1>.
SetOffset <V1> <V2>
Sets the hardware parameter offset of port <V1> to value <V2>.
SetPar <N> <V>
Assigns value <V> in the temporary batch file to variable <N>.
SetPortUDPInfo <V1> <V2> <V3>
This command prepares the network connection to an external spectra UDP-server. The
local spectrum <V1>=1,2…64 is assigned to spectrum <V2> to server with IP address
<V3>.
SetProgramName <V1> <V2>
Selects a windows application which will be executed on port <V1> after a pre-set service
has finished. Parameter <V2> contains the application name and, if required, the file path
and command line parameters. If a batch file should be executed you have to call up the
program winPROC with the corresponding command line parameters.
SetPulser <V1> <V2>
This command activates (<V2>=1) an internal pulser for dMCA acquisition channel
<V1>. <V2>=0 disables the pulser.
SetPZExternal <V1> <V2>
The hardware parameter „PZ (pole zero) external" of acquisition port <V1> is set to value
<V2>.
© ICx Radiation GmbH
User manual winTMCA32
Batch files
98
SetPZInternal <V1> <V2>
The hardware parameter "PZ (pole zero) internal" of acquisition port <V1> is set to value
<V2>.
SetRealTime <V1> <V2>
This command sets the acquisition time of spectrum <V1> to value <V2> ( in seconds).
SetRefreshrate <V>
Sets the display refresh rate to the given value in milliseconds (V). The assigned time
represents the time between two display updates.
SetROIColor <V1> <V2> <V3>
Assigns a color <V3> to a ROI defined within spectrum <V1>. The ROI is selected via an
energy value <V2> lying within the ROI. If no energy calibration was carried out the
value is explained as channel. For the format of color definition see GetNetLiveCPS.
For defining ROIs see the batch commands DefineEnergyROI and MkNaIROI.
SetScreenState <V>
Sets the size of the winTMCA32 program window respectively the arrangement of the
spectra windows depending on parameter <V>:
VALUE ACTION
0
The main window is minimized.
1
The main window will be set to default size. (This
disables V=0,2.)
2
The main window is maximized.
3
The spectra windows will be arranged side by side.
4
The spectra windows will be arranged overlapped.
5
The active application window will be set to
background while overlapping with other applications.
SetShapingTime <V1> <V2>
The hardware parameter "shaping time" of port <V1> is set to value <V2>.
SetSpecTextWindow <V1> <V2> <V3>
Displays a text (V3) within a window located in spectrum <V1>. By specifying the color
value <V2>, the window color can be set to :
VALUE
COLOR
0
green
1
red
2
gray
3
yellow
Combined with a text the special function "[mcsvalue]" can be used. The actual channel
content which was written at last to the spectrum using WriteMCSChannel is displayed in
© ICx Radiation GmbH
User manual winTMCA32
Batch files
99
the text window.
SetSpecTextZoom <V1> <V2>
This command maximizes (<V2>=1) text window (see SetSpecTextWindow) in spectrum
<V1>. Setting <V2> to 0, the text window will be set to default size.
SetSpectrumBGColor <V1> <V2>
This command chooses the background color of spectrum <V1>. For color definition
<V2> see GetNetLiveCPS.
SetSpectrumComment <V1> <V2>
Defines a comment <V2> for spectrum <V1>. Comments are displayed in the bottom left
corner of the spectrum window.
SetSpectrunLeftMargin <V1> <V2>
Sets the left display margin of spectrum <V1>. The first channel <V2> that is to be
displayed must be specified as margin.
SetSpectrumLength <V1> <V2>
Sets the spectrum length of spectrum <V1> to channel number <V2>.
SetSpectrumName <V1> <V2>
Assigns a name <V2> to spectrum <V1>.
SetSpectrumPath <V1> <V2>
This command sets the spectrum path of spectrum <V1> to path <V2>.
SetSpectrumRightMargin <V1> <V2>
Sets the right display margin of spectrum <V1> . The last channel that is to be displayed
must be set as margin.
SetStabilisationParameter <V1> <V2> <V3> <V4>
Sets the parameters used for software stabilization on acquisition port <V1>. The
parameters <V2> and <V3> specify the range (left and right channel) in which is searched
for the desired peak position <V4>. To activate stabilization, the command
ActivateStabilisation must be used. (If you use a scintiSPEC stabilization is activated
automatically by the SetStabilisationParameter command. Please note that left and right
margin are set automatically, only the centroid <V4> is evaluated.)
SetStopBatch <V>
The batch file <V> will be executed if the actual batch file is cancelled due to an error.
SetSubSpectrumNumber <V1> <V2>
A sub spectrum <V2> can be chosen and displayed in spectrum window <V1>. This is
only possible if any sub spectra are defined.
SetTextFileFont <V1> <V2>
Sets the text file font to <V1>. <V2> is a factor to multiply the default size.
SetTopLength <V1> <V2>
The hardware parameter "top length" of acquisition port <V1> is set to value <V2>.
© ICx Radiation GmbH
User manual winTMCA32
Batch files
100
SetULD <V1> <V2>
Sets the hardware parameter ULD (upper level discriminator) of acquisition port <V1> to
value <V2>.
SetWindowFunctionCoeff <V1> <V2> (<V3> <V4> <V5> <V6> <V7>)
In a spectrum window a polynome in the sixth degree can be displayed instead of or
additionally to a spectrum:
<V1> refers to the spectrum window, <V2>=f, <V3>=e, <V4>=d, <V5>=c, <V6>=b,
<V7>=a. If an energy calibration was implemented, the polynome refers to energies,
otherwise to channels.
SetWindowFunctionFlag <V1> <V2>
This command activates or deactivates the polynome display (see
SetWindowFunctionCoeff) for spectrum window <V1>. Parameter <V2> can be set the
following values:
value spectrum
polynome
0
visible
invisible
1
invisible
visible
2
visible
visible
SetWindowFunctionPoints <V1> <V2> <V3> <V4> (<V5>)
Data points for polynome display in spectrum window <V1> can be set. Using
<V2>=1,2...64 the data points are selected. The x-coordinate of the point is given by
<V3>, the y-coordinate by <V4>. Parameter <V5> is optional and considers a y-error
which will be displayed as an error beam.
SetWinprocCancelRequest <V>
This command cancels all batches running on acquisition port <V>.
SetWinprocDebug <V>
If <V> is set to 1, all following commands in the batch file to be executed are written to
the actual LOG file named LOGddmmy.TXT (d=day, m=month, y=last number of the
year). The log file is located in the .\CONFIG directory.
SetXLabelChannel <V>
Changes the legend of the x-cursor position in the tool bar of spectrum <V> to channels.
SetXLabelEnergy <V>
Changes the legend of the x-cursor position in the tool bar of spectrum <V> to energies, if
an energy calibration was implemented.
SetXUnit <V1> <V2>
Changes the legend of the x-axis to the specified text (V2). The legend is displayed in the
bottom right corner of the spectrum window <V1>.
© ICx Radiation GmbH
User manual winTMCA32
Batch files
101
SetYDisplay <V1> <V2>
This command changes the display mode for spectrum window <V1>. Parameter <V2>
can be set to the following modes:
LIN – linear
LOG-logarithmic
SQR-square root
SetYUnit <V1> <V2>
Changes the legend of the y-axis to the specified text (V2). The legend is displayed in the
bottom right corner of the spectrum window <V1>.
ShowError <V1> <V2> (<V3>)
This command opens an error window displaying a text line <V2> from text file <V1>.
<V3> displays an optional text. The text file must be located in the .\CONFIG directory. If
<V1> is set to 0, the parameter <V2> is ignored and only text <V3> is displayed. The
error message must be confirmed by the user.
ShowFormattedPage <V1> <V2> <V3> <V4> (<V5> <V6>)
Displays a formular on the screen, analogous to the command PrintFormattedPage. The
layout file must be given by parameter <V4>. Width <V1> and height <V2> must be
given in percent of screen size. The origin of the window is the upper left screen angle.
Parameter <V3> defines the window caption. If variables from the temporary batch file
are used, the name of the file must be given as additional parameter <V5>. If a print
layout file is specified by the optional parameter <V6>, the formular on the screen can be
printed analogous to PrintFormattedPage.
ShowMessage <V1> <V2> <V3> (<V4>)
Displays a message window for a specified time <V3> (seconds). The message window
contains a line <V2> stored in file <V1> in the .\CONFIG directory plus an optional text
<V4>. If <V2> is set to 0, parameter <V1> is ignored and only the optional text <V4> is
displayed. If <V3> is set to 0, the user has to confirm the message by clicking the button
in the message window.
ShowMinMax <V1> <V2>
The minimum and maximum values of the MCS spectrum in spectrum window <V1> are
displayed in the upper left corner of the spectrum window. This function is enabled by
setting <V2>=1 and disabled by <V2>=0.
ShowQuestion <N> <V1> <V2> (<V3>)
Displays a question <V2>. The question must be stored as line in an ASCII-text file
<V1>. Beneath the text three buttons can be displayed ("OK", "NO", "CANCEL"). The
value of variable <N> depends upon which button was clicked: OK ® 0, NO ® 1,
CANCEL ® 2. If parameter <V2> is set to 0, <V1> will be ignored and only the optional
text <V3> will be displayed.
ShowStatus <V1> <V2> (<V3>)
Analogous to command ShowMessage a message window is displayed. This window is
visible until it is closed by the command HideStatus or the batch file is finished. The
execution of the batch file is not terminated by this command.
ShowUserDialog
© ICx Radiation GmbH
User manual winTMCA32
Batch files
102
Opens the window for user selecetion if users are defined before.
ShowWindow <V>
Opens one of the 64 spectra windows (<V>=1,2….64) or the information window
(<V>=0).
SmoothSpectrum <V>
Smoothes spectrum <V>.
Sprintf <N> <V1> <V2>
Allows the formatted output of parameter <V2> to variable <N>. The format is given by
parameter <V1> corresponding to the c-syntax.
StartAcquisition <V1> (<V2> <V3> …)
Starts spectrum acquisition on port <V1>. Optionally, more than one acquisition can be
started by specifying <V2>, <V3>… .
Using the symbol & behind this command the batch file can be set into a sleeping mode.
This is very necessary if you use preset settings for acquisition.
Example:
...
PresetRealtime 1 30
StartAcquisition 1 &
...
After the command StartAcquisition the batch file is set into a sleeping mode until the
preset acquisition time has expired. After that the batch file is executed as usual.
StartChronometer <V>
Starts the internal chronometer <V>=0,1. The actual time can be displayed in the
information window.
StartLoopTimer <V>
Executes a batch file repeatedly after a specified time <V> (given in seconds). The batch
file must be named as "LOOP.WPB" (see also StopLoopTimer).
StopAcquisition <V1> (<V2> <V3> …)
Stops spectrum acquisition on port <V1>. More than one spectrum can be stopped if the
optional parameters <V2>, <V3> … are given.
StopChronometer <V>
This command stops the internal chronometer <V>. The chronometer is started with the
batch command StartChronometer.
StopLoopTimer
Terminates the repeated execution of the loop batch LOOP.WPB which was started with
the batch command StartLoopTimer.
StrCat <N> <V1> <V2> (<V3> <V4>…)
Joins two strings <V1> and <V2> together, the result is assigned to variable <N>.
Optionally, more than two strings can be specified.
© ICx Radiation GmbH
User manual winTMCA32
Batch files
103
StrCopy <N> <V1> <V2> <V3>
A part of string <V1> is assigned to variable <N>. The starting position is given by
parameter <V2>, the number of characters to be copied by parameter <V3>.
StrDelete <N> <V1> <V2> <V3>
Characters in string <V1> are deleted starting from position <V2>. The number of deleted
characters is given by <V3>. The result is assigned to variable <N>.
StripExtension <N> <V>
The extension of file name <V> is erased, the result is assigned to variable <N>.
StrLength <N> <V>
The number of characters in string <V> is assigned to variable <N>.
StrPos <N> <V1> <V2>
This function checks if string <V1> is located within text line <V2>. The start position of
the string within the line is assigned to variable <N>. If the text is not found a 0 is
assigned.
SubtractSpectrum <V1> <V2>
Spectrum <V1> is subtracted from spectrum <V2> channel by channel.
SyncNano <V>
winTMCA32 waits until the measurement device connected to port <V> sends "OK:".
TerminateAllLoopTasks
Deletes all batches which were added by the command AddLoopTask to the list of batches
to be continuously repeated.
TerminateAllTasks
Cancels all active batches.
TimeCalibration <V1> <V2> (<V3>)
Executes a time calibration for the x-axis of spectrum <V1>. The parameter <V2> gives
the time per channel in seconds. When you use the optional parameter <V3> a starting
date for channel 0 (format "DD.MM.YYYY HH:NN:SS) is determined if the current date
shall not be used.
Try..Except..EndTry
All commands within the try-section will be executed. If none of the commands fail the
except-section will be ignored. If one command fails the except-section will be executed.
The exception message will be assigned to variable $ExceptionMessage.
The syntax for this command is:
Try
…
Except
…
EndTry
Here is an example:
© ICx Radiation GmbH
User manual winTMCA32
Batch files
104
Variable "testvariable" is not declared in the variables section and will therefore lead to an
exception. The exception message will be displayed on the screen.
Try
SetPar testvariable 10
Except
StrCat Line "Exception: " $ExceptionMessage
ShowMessage Dummy 0 0 $Line
EndTry
VARIABLES
Line %s
Wait <V>
This command stops the execution of a batch file for a given time <V> (in seconds, also
fractions of seconds can be given).
WaitCOMString <V1> <N> <V2> <V3>
The text line <V3> is sent via serial interface <V1>=1,2,..., whereby automatically a CR is
appended to the line. The interface must have been initialized earlier using the command
ConfigCOM. The function waits for a maximum of 30 seconds for an answer from COM
port <V1>, which must correspond to the answering text <V2>. The answering text must
be terminated with a CR. For <V2>="Ù" every text is accepted as an answer. The received
answer is assigned to variable <N>.
WindowFrame <V1> <V2> <V3> <V4> <V5>
The position and size of spectrum window <V1> within the spectrum display window is
defined. <V2> and <V3> give the x- respectively y-position and <V4>,<V5> the window
width resp. window height in percent of the display area.
WinExec <V1> <V2> <V3>
The external program <V2> which is located in the directory <V1> (full path!) is started.
<V3> must be set to SHOWNORMAL.
WinProc <V>
Starts the execution or continuation of a batch file. For the command line parameters <V>
please see winPROC commanc line parameters.
Wpbt <V1> <N> <V2>
Value <V2> is assigned to variable <N> in batch file <V1> as permanent starting value.
The batch file must have the extension ".WPB".
Example:
Wpbt STARTUP.WPB HV 800
or
Wpbt STARTUP.WPB HV $AktHV
WriteMCSChannel <V1> <V2> (<V3> <V4>)
Writes a numerical value <V2> into an acquisition channel of spectrum <V1>. The first
value will be written to channel number 0 or into the channel specified by the command
SetMCSChannelNumber. The channel number is incremented automatically with each
execution of this command. If you use the optional parameter <V3> = 1,2…, the given
© ICx Radiation GmbH
User manual winTMCA32
Batch files
105
value <V2> will also be written in the following channels, counted by <V3>. Setting
<V4> to "M" enables the representation of the channels and their contents as histogram.
For each channel a bar in the respective color is chosen.
WriteMCSToEnergy <V1> <V2> <V3>
The value <V2> is written into mcs spectrum <V1>. The x axis is time scaled, the
corresponding time <V3> has to be a real number (i.e. batch command
GetActualDateTime).
5.3
Special Characters
You can set two special characters at the end of a line:
"&": After command execution the batch is set into SLEEP mode.
With the command line WINPROC @ -p=n the process is continued. If you use "&" in
connection to the commands StartAcquisition and SetAcquisitionDate, this command line
will be entered automatically as program which will be started after the preset command is
executed (see SetProgramName). With this option it is possible to start an acquisition and
to continue executing a batch file if acquisition has finished.
"#": With this special character the command line will be delivered as "shell" command,
which means that executable programs can be called up.
Example:
CALC.EXE #
This calls up the windowsâ calculator.
The batch file will be continued when the external program is finished.
ATTENTION: A "#" in front of a command line defines this line as a comment!
Example:
# This line is a comment.
5.4
Pre-defined internal variables
The following variables are predefined and need not be declared:
5.5
$WintmcaDir
Gives the winTMCA32 installation directory.
$ConfigDir
Gives the path of the CONFIG-directory.
$WinprocPort
Gives the batch port number.
Program winproc
The program winPROC, which is located in the winTMCA32 working directory, allows
batch file execution. This can be done via dialog window or command line parameters.
© ICx Radiation GmbH
User manual winTMCA32
Batch files
106
winPROC command line parameters
winPROC dialog window
winPROC monitor
5.5.1
winproc command line parameters
If a batch file shall be executed again, the syntax must have the following format:
WINPROC BATCHFILE –p=n (-e) (-s=STOPBATCH)
The parameters are described below:
-p=n
Defines the port number for batch file execution. This port number should be the same as
the acquisition port number corresponding to the batch file, but this is not required. With
the help of port numbers, daughter processes are administrated, that means batch files can
be called up within another batch file. When you start a daughter process on the same port
number, the other process is stopped and will be continued if this daughter process has
finished. If the port numbers are not equal the processes are running parallel. The port
number is also used to name the temporary file, in which a running process stores its
variables. The format of the name is PORT_nn.INF, whereby "nn" refers to the port
number 00, 01... . The value of the port number must range between 0 and 99. Please note
that system batch files like STARTUP.WPB, LOOP.WPB... are running on port 0.
BATCHFILE
refers to the name of the batch file which shall be executed. The name of the batch file
must be entered without the extension ".WPB".
Batch files must be located in the .\CONFIG directory, because winPROC is only
searching for batch files within this directory.
-e (exclusive)
This is an optional parameter which takes care that no other process can be started on the
same port until the first process is finished. This feature serves to prevent the user from
calling up a batch file twice.
-s=STOPBATCH
This parameter allows to determine a batch file which shall be executed if the actual
running process is canceled or not finished orderly. If this batch file is executed the same
port number is assigned to it.
If a batch file in the SLEEP mode shall be continued, the syntax is
WINPROC –p=n @
winPROC can be called up via menu commands, buttons or WINDOWSâ directly
(START Þ EXECUTE).
© ICx Radiation GmbH
User manual winTMCA32
5.5.2
Batch files
107
winproc dialog window
If you call up the program winPROC without command line parameters (for example by
selecting Miscellaneous menu Þ EXECUTE BATCH from the winTMCA32 menu
header), a dialog window appears, containing the four registers NEW, CONTINUE,
TERMINATE and EXECUTE.
In the register NEW, you enter the name of the batch file into the corresponding field or
with help of the file selection dialog which pops up when you click the folder symbol on
the right.
With the PORTNUMBER field a port number is assigned to the batch file. You start the
batch execution with the START button.
With the CONTINUE register a batch file in SLEEP mode can be continued. Therefore
you have to select the desired port number with the PORTNUMBER field. The name of
the active batch file in SLEEP mode appears in the BATCH field. Click the CONTINUE
button to continue the batch file execution.
The register TERMINATE serves to cancel the execution of an active batch file. Select
the port number in order to display the active batch file in the corresponding field.
Register EXECUTE allows to execute single batch file commands. You can enter the
commands into the corresponding field or choose from a list containing the last 25
commands used interactively. As many variable names as you like can be chosen. The
values assigned to are displayed within the output line of the winTMCA32 main form for
two seconds.
© ICx Radiation GmbH
User manual winTMCA32
5.5.3
Batch files
108
winproc monitor
With the winPROC monitor (can be called up via Miscellaneous Menu Þ
winPROC monitor in the winTMCA32 menu header) you can control and observe the
execution of batch files stepwise for testing purposes.
Icon
stops the automatical execution of batch files. Icon
step by step. You cancel this mode with icon
the list. Icon
selected before.
. Icon
executes the batch file
cancels all batch files on
closes the window and deactivates the step-by-step mode, if it was
Register set BATCHES
In the table all active batch files will be sorted by their port numbers. If more than one
batch file was started on the same port number the execution order can be read out in the
LEVEL field. The batch file with the highest level number will be executed at first. If this
© ICx Radiation GmbH
User manual winTMCA32
Batch files
109
execution is finished, the batch file with the next highest level will be started. The ID
field displays an internal assigned number, which is incremented continuously. The name
of the batch file must be taken from the corresponding field. The LINE field displays the
line number of the command executed at the moment. In the STATUS field the following
attributes can be displayed: R (running), S (sleeping), W (waiting), E (executing), C
(child, a daughter process using the same port number was called up) and M (message,
message window is opened).
In the COMMAND field the command corresponding to the line number is displayed.
Clicking into this field displays the command line in the bottom text field. The T(s) field
shows the remaining waiting time that is left before a corresponding command waiting for
a reaction times out. The EX field shows if the batch file which is running uses the
exclusive mode. In the last field, STOPBATCH, it can be displayed if a stop batch was
defined, which will be executed if the running batch is canceled due to an error.
Register set LOOP BATCHES
On the register set LOOP BATCHES the execution of loop batches can be observed. A
loop batch is a batch that is executed continuously within a separate "windows-thread" for
maximum time precision.
In the table all active batch files are listed with their port number (PORT) and name. T[s]
gives the time intervall in seconds which lies between the executions. FIRST/NEXT gives
the time of the first/next execution of the batch file. CYCLE shows the number of the
executions already done before.
5.6
Information window
Using the batch file command ShowWindow 0 an information window can be displayed.
The appearance of this window is determined by the INFO.TXT file located in the
.\CONFIG directory. Within this INFO.TXT file all data fields that are to be displayed are
fixed. The file must have the following structure:
The first line must contain the window caption given by text.
© ICx Radiation GmbH
User manual winTMCA32
Batch files
110
The following lines are always divided into two columns. The first one contains the
description of the value to be given out as text (for example weight). If blanks are used
within the title or text, quotation marks (" ") must be used.
In the second column the data source for the value given out will be determined. This can
be a static text or one of the following predefined data sources, which must be set in
angular brackets :
·
[DLLFloatX] displays the contents of the floating point memory cell number X=1,
2,...64 (see also SetDllFloat).
·
[DLLStringX] displays the contents of the string memory cell number X=1,2,...64.
(see also SetDllString)
·
[DLLFloatPercentageX] displays the contents of the floating point memory cell
number X=1,2,...64 displayed as percentage beam. The 100 % reference value is
the value set by the command SetDLLFloatMaxValue for the corresponding
memory. The beam display changes by default from green to red when the value
exceeds 90 %. You set this threshold with the command
SetDLLFloatPercentageAlarm.
·
[DLLBooleanX] shows the contents of the boolean memory cell number
X=1,2,...64 as control lamp (see SetDLLBoolean). If the memory value is 0 (false)
the control lamp is dark green, if the value is 1 (true) light red.
·
[Time] displays the continuous time.
·
[Now] displays date and time continuously.
·
[ChronoX] displays the chronometer with number X=0,1 (see also
StartChronometer, StopChronometer).
The information window is updated every second.
© ICx Radiation GmbH
Chapter
6
Nuclide database editor DBEDIT.TXT
User manual winTMCA32
6
Nuclide database editor DBEDIT.TXT
112
Nuclide database editor DBEDIT.TXT
You adapt the present nuclide databases or create new ones with the nuclide database
editor DBEDIT.EXE.
Icon
opens an already existing database, icon
creates a new one. With the cursor
keys (ñò) or icons
each nuclide can be listed one after the other. Icon
serves
to erase the displayed nuclide from the database. Icons
append respectively erase
a peak. In order to find a peak with a special energy, the energy can be entered into the
search field which appears after clicking icon
. Peaks located in another database (for
example NUCLIDE.DB) can be appended via Icon . In order to select all peaks for
evaluation, icon
activates the CHECK fields. Icon
deselects all peaks.
The decay probability at each gamma energy is given as a percentage rate. In the next
field the detector efficiency is displayed which is evaluated by efficiency calibration. If no
calibration with this database was carried out the value is set to 100 %. If the calibration
was carried out, an evaluation of the detector efficiency dependent on the gamma energy
will be accomplished.
Attention: Only gamma energies which have their CHECK fields activated will be taken
into consideration in the spectra display and the integration window.
In order to append new nuclides the name must be entered into the nuclide field. After that
icon
serves to select the energy lines.
© ICx Radiation GmbH
Chapter
7
Appendix
User manual winTMCA32
7
Appendix
114
Appendix
Configuration file TMCAINIT.TXT
Example for a layout file created with batch command PrintFormattedPage
Evaluation module NAJCALC
Spectra format
Trouble shooting
Using webMCA
7.1
Configuration file TMCAINIT.TXT
The file named TMCAINIT.TXT serves for hardware configuration and is depending on
software not always located in the .\CONFIG directory, but must be created there if
needed. This can be done with any default ASCII editor like the winTMCA32 editor, for
example. If the file already exists it will be executed automatically every time the program
is started.
Within this file the setups corresponding to the acquisition ports can be adjusted, as for
example the type and number of ports and the communication between PC and external
acquisition hardware. The following parameters can be set:
t=X
i=X
g=X
r=X
X states the total number of acquisition ports to be initialized. If X is not
specified, all acquisition ports, which are physically present, will be
initialized. If the number of the physical present hardware ports is
smaller than X, as many virtual ports as necessary are added to balance
the difference in number.
X is the number of interrupts that will be generated per second to control
the acquisition of data. If this value is not specified it is set to its default
value of 250/s.
X states the time in microseconds necessary to adjust the system clock
due to the time loss caused by the IRQ-Control, when working under
real time conditions (GAP). Default is 35 ms. This value should not be
changed except under special conditions.
X gives the number of physical acquisition ports that should be
controlled by the software. This number can be either bigger than the
number of ports actually present - in which case only this limited number
of ports will be initialized - or smaller which means only those ports
actually present will be started. Is the parameter r = x set to zero, only
one virtual acquisition port will be setted up and neither the IRQ nor the
I/O addresses of an acquisition card will be initialized.
© ICx Radiation GmbH
User manual winTMCA32
v=X
P=X,c(p,b)
7.2
Appendix
115
X is the number of virtual acquisition ports being initialized in addition
to the physical ones. Virtual acquisition ports enhance the interpretation
of values acquired with physical acquisition ports. E.g. signals acquired
in a PHA-spectrum via a physical acquisition port can be interpreted as
MCS-spectrum on a virtual port at the same time.
This parameter assigns specific hardware (c) to an acquisition port (X).
Setups for this type can be "N" for nanoSPEC and "f" for field spec.
Additionally the parameters p=1,2,... for serial COM port and b for baud
rate/100 must be given.
Example for a layout file created with batch command
PrintFormattedPage
The resulting page is shown below:
© ICx Radiation GmbH
User manual winTMCA32
7.3
Appendix
116
Evaluation module NAJCALC
The optional program module NAJCALC.EXE allows the evaluation of NaI-spectra, the
efficiency calibration and the quality control of NaI acquisition ports.
In order to execute NAJCALC it must be started with the corresponding command line
© ICx Radiation GmbH
User manual winTMCA32
Appendix
117
parameters. This can result from menu registers within the winTMCA32, buttons and
batch file commands. This program can be started for testing via START Þ EXECUTE
and the specific command line parameters.
Evaluation
Efficiency Calibration
Quality Control
7.3.1
Evaluation
In order to determine the activity for a nuclide line the integration area is defined around
the desired energy line. The width of this integration area is proportional to
D E = A + B × E keV
.
Within the area it is tried to describe the spectrum shape using a gauss function
( E - E 0 )2
-
G (E ) = e
2 ×s
2
.
If this fit is not successful a mean background is determined at the margins of the
integration range. Therefore five channels are taken into consideration in each case. These
points are used to determine the straight line equation for background. The responding net
area is assigned to the corresponding nuclide, if the centroid of the net area lies within a
pre-fixed energy window (3 keV by default), and the FWHM (full width of half
maximum) lies within margins depending on energy.
If a background spectrum is given, the channel contents are normalized by acquisition
time and subtracted from the measured spectrum before the evaluation of the net area
takes place.
In order to evaluate the minimum detectable activity for the corresponding energy range
within the spectrum the statistical error from the spectrum and from the background
spectrum is used. The efficiency calibration for the corresponding energy is taken into
consideration. The default value of 1s @
events in the integration area.
N , whereby N refers to the number of total
The error of the given activity results from the statistical error of the net area (default 1 s)
and the efficiency calibration error.
For evaluation the following command line parameters are possible:
Command line parameter Function
-d=<Nuclide database>
-s=<n>
Determines the nuclide database that is used during spectrum
evaluation. The name of the database must be entered
without file extension and without specifying a file path.
(The search path is the .\NUCDATA subdirectory located in
the winTMCA32 directory.)
n states the number of the spectrum being evaluated.
© ICx Radiation GmbH
User manual winTMCA32
-b=<n>
-w=<f>
-f=<f>
-e=<f>
-a
Appendix
118
n refers to the number of the spectrum window, where the
background spectrum is located (optionally).
The parameter f creates an energy window around the
desired peak energy. Peaks lying within this window are
identified. The window width is ±f keV (optionally; default
3.0 keV).
This factor can be used to normalize the results, e.g. to
calculate the activities with regard to a weight (Bq/kg), etc.
The results are divided through this factor (optionally;
default f=1.0).
This factor is used to multiply the activity error and the error
of the minimum detectable activity. These errors correspond
then to the root mean square deviation multiplied by f
(optionally; default f=1.0).
Evaluates for every nuclide the decay time until the value is
smaller than the value given in the field for allowed activity
in the nuclide database.
All nuclides selected in the chosen nuclide database are taken into consideration during
evaluation. (The nuclides must by activated, by setting their CHECK fields in the
nuclide database editor DBEDIT.) If more than one gamma peak is activated for a nuclide,
the mean for the activities of the single lines is evaluated.
The evaluation results are stored in the file NAJCRES.TXT. The file is stored in the
.\CONFIG subdirectory of the winTMCA directory.
Example for a NAJCRES.TXT file:
NUCLID=Cs-137 NET=<908.88 GROS=7383.76 ERROR=0.00 NWG=908.88 ERRORREL=0.00
NETCOUNTS=0
HLT=951200000
EFFICIENCY=0.000670
NUCLID=I-131 CENTROID=361.41 CENTROIDERROR=6.30 FWHM=32.71
NUCLID=I-131 NET=6795.19 GROS=14994.26 ERROR=1279.45 NWG=943.93
ERRORREL=18.83
NETCOUNTS=848
HLT=694656.004445798
EFFICIENCY=0.001262
NUCLID=Tc-99m NET=<1061.52 GROS=25679.50 ERROR=0.00 NWG=1061.52
ERRORREL=0.00
NETCOUNTS=0
HLT=21620
EFFICIENCY=0.001709
NUCLID=Tl-201 CENTROID=70.22 CENTROIDERROR=6.01 FWHM=22.65
NUCLID=Tl-201 NET=4231.32 GROS=37240.26 ERROR=1442.67 NWG=1278.71
ERRORREL=34.10 NETCOUNTS=444
HLT=262700
EFFICIENCY=0.001654
NETSUM=11026.51 ERRORSUM=1928.29
For each nuclide (NUCLID) the total activity (NET) in Bq, the gross activity (GROS) in
Bq, the activity error of the total activity (ERROR) in Bq, the minimum detectable activity
(NWG) in Bq, the relative activity error of the total activity (ERRORREL) in % and the
© ICx Radiation GmbH
User manual winTMCA32
Appendix
119
number of net events for all gamma peaks of the nuclide (NETCOUNTS) are given. For
additional information the half life time in seconds (HLT) and the efficiency factor of the
last evaluated nuclide line are given.
If a net activity was calculated, one or more lines precede the result line (depending on the
gamma peaks selected in the nuclide database), where the centroid (CENTROID) in keV,
the centroid error (CENTROIDERROR) in keV, as well as the full width of half
maximum (FWHM) in keV are displayed.
In the last line of the NAJCRES.TXT file, the total activity of all nuclides identified
(NETSUM) in Bq and the error of this total activity (ERRORSUM) in Bq are displayed.
In order to use the results in winPROC-batch files the command line
READSAMPLERESULTS NAJCRES.TXT
can be used. This command is used to assign variables of a temporal winPROC file to all
data.
In order to generate a printout of the results afterwards, the command
PRINTFORMATTEDPAGE <Layout file> <temporary file>
can be used.
7.3.2
Efficiency Calibration
The efficiency calibration is necessary to determine the energy depending efficiency of the
whole acquisition port, which depends on sample geometry, positioning in front of the
detector and the detector itself. The efficiency calibration must be repeated only if the
geometry or the calibration source are changed, or the quality control deviations are too
large. One of the possible reasons for these deviations might be that the detector is too old.
The calibration refers to a nuclide database in which the entries for the efficiency of each
peak is re-evaluated after successful realization. Therefore, every geometry needs its own
nuclide database.
For spectrum evaluation in the actual spectrum window of winTMCA32 the following
command line parameters are recommended respectively possible:
Command line parameters
Function
-c
Starts NAJCALC in the calibration mode.
-d=<nuclide database>
Specifies the name of the nuclide database to be
calibrated (optional, the database can be selected
interactive).
© ICx Radiation GmbH
User manual winTMCA32
-p=<calibration source
parameter file>
-b=<n>
-w=<f>
Appendix
120
Specifies the name of the parameter file to be used
containing the activities of the calibration source used.
The file name must be given without path but with file
extension (default "*.PAR") (optional, the file can be
selected or created interactive).
n specifies the number of the background spectrum taken
into consideration (optional).
f specifies the energy window around the desired peak
position, peaks lying within this window will be
identified. The window width is ± f keV (optional, default
f=3.0)
After starting NAJCALC.EXE the following dialog window appears:
The spectrum number and the name of the selected spectrum are displayed within the
window. The data base selection list shows the name of the actual chosen nuclide
database. Only nuclide databases located in the .\NUCDATA subdirectory of the
winTMCA32 directory are listed. To alter existing databases or to create new ones the
program DBEDIT must be used.
In the parameter selection list one of the present parameter files can be chosen, in which
parameters of the calibration sources that are to be used are stored. If no parameter file
exists a name based on the first displayed nuclide database is proposed. The name in this
field can be changed which means that a new source parameter file is installed. The
extension of this file should be ".PAR". If the selection is finished respectively the name is
entered, the SELECT button must be clicked. That leads to the result that the field for
entering the calibration source data is activated. If an existing parameter file was selected
its saved data will be displayed.
© ICx Radiation GmbH
User manual winTMCA32
Appendix
121
Import a nuclide via button
. Choose a nuclide out of the nuclide selection list. Use the
right mouse button to stop the import. For each chosen nuclide the activity at reference
date (in Bq), the error of the activity (in %) and the reference date (in dd.mm.yyyy
hh:nn:ss) must be given. Delete a nuclide via button
.
After having entered the nuclides, start the evaluation via button
. Therefore the net
areas of all peaks of the nuclides listed in the enter field (which have their CHECK fields
in the nuclide database editor activated) are evaluated. The resulting count rates with
corresponding nuclide activities are related to the actual date. The individual decay
probability of the gamma lines is taken into consideration.
The resulting value pairs of the relation between count rate and calibration source activity
depending on the gamma energy are adapted by the function
2
log(Eff (x )) = å ai ×
i =0
1
x2 .
In the actual spectrum window the resulting function for the detector efficiency is
displayed. The PRINT button serves to print out the analysis. You can adjust the given
activities by activating the field for the calibration source parameters. In that way the fit
can be executed again. In order to use the efficiency adaption for the database press button
.
Button
7.3.3
allows to exit the program at any time.
Quality Control
The command line parameter "-q" enables the customer to perform a quality control with
the NAJCALC program. Therefore, a spectrum must be acquired with the help of the
calibration source and the same geometry as used in an earlier performed calibration
session. When this spectrum is evaluated, the calculated activities are compared to the
values stored in the nuclide database. The half-life of the nuclides is taken into
consideration during the comparison.
The following command line parameters are necessary, resp. possible:
Command line parameters
Function
-q
Starts the NAJCALC program for quality control.
-s=<n>
n states the number of the spectrum being
evaluated.
© ICx Radiation GmbH
User manual winTMCA32
-p=<calibration source parameter
file>
-b=<n>
Appendix
122
Specifies the name of the parameter file
containing the activity declarations of the
calibration source. The file name must be given
without path but with file name extension (default
".PAR").
n specifies the number of the background
spectrum taken into consideration (optionally).
-w=<f>
The parameter w creates an energy window
around the desired peak energy. Peaks lying
within this window are identified. The window
width is ±f keV (optionally; f= 3.0 by
default)
-e=<f>
This factor is used to multiply the activity error
and the error of the minimum detectable activity.
These errors correspond then to the root mean
square deviation multiplied by f. (optionally;
default f=1.0)
The results are written to a file named NAJQRES.TXT, which is stored in the .\CONFIG
subdirectory of the winTMCA32 directory.
Example for a NAJQRES.TXT file:
NUCLID=Ba-133 CENTROID=356.01 CENTROID(C)=363.43 ACT=3379.19 ACT(C)=3394.02
DELTAACT=0.1
NUCLID=Cs-137 CENTROID=661.64 CENTROID(C)=661.49 ACT=4449.31 ACT(C)=4606.31
DELTAACT=0.6
NUCLID=Co-60 CENTROID=1173.23 CENTROID(C)=1159.44 ACT=3234.31 ACT(C)=3280.69
DELTAACT=0.2
NUCLID=Co-60 CENTROID=1332.51 CENTROID(C)=1318.51 ACT=3234.31 ACT(C)=5235.73
DELTAACT=6.4
AVRDELTAACTIVITY=1.82
In the result file the following information is displayed for each selected nuclide from the
database:
· name
· energy (CENTROID) as it is stated in the database in keV
· the energy (CENTROID(C)) determined of the peak centroid of the spectrum
being evaluated in keV
· the nuclide activity at the actual date (ACT) in Bq
· the activity (ACT(C)) calculated from the spectrum with respect to the efficiency
· calibration in Bq
· the difference of these two activities as multiples of the root mean square deviation
of this difference
In the last line of the file the value AVRDELTAACTIVITY states the medium deviation
of all evaluated peaks in multiples of the root mean square deviation.
© ICx Radiation GmbH
User manual winTMCA32
Appendix
123
The quality control feature of the NAJCALC program enables you to check whether an
efficiency calibration is still valid. A new calibration session should be run, if the medium
deviation is larger then three times the root mean square deviation and the system setup
should be checked, too.
7.4
Batch file examples
Inserting values into excel files
Generating specturm names
Creating a mcs spectrum
Example for a startup batch file
Acquiring and integrating
7.4.1
Generating spectrum names
GetsDate sDate
GenerateSPCName SpcName 1 %s%s "SPC_" $sDate
SetSpectrumName 1 $SpcName
StartAcquisition 1 &
SaveSpectrum 1 $SpcName
VARIABLES
sDate %s
SpcName %s
This batch file generates a spectrum name using the format "SPC_ddmmyy.nnn", where
ddmmyy relates to the date and nnn is an autoincrementing number starting from 000. If
this batch file is executed more then one time the extension increments by 1. An example
for a spectrum name generated with this batch file is "SPC_131003.002". You can see
directly from the spectrum name that the spectrum was acquired on 13.10.2003, it was the
third spectrum created on the day (extension 002).
7.4.2
Creating a mcs spectrum
Using this batch file a mcs spectrum can be created:
SetSpectrumLength 3 16384
DeleteAllROIs 1
GetsDate sDate
GenerateSPCName MCSSpectrum 3 %s%s "MCS_" $sDate
SetSpectrumName 3 $MCSSpectrum
ClearSpectrum 3
TimeCalibration 3 30
PresetLivetime 1 30
MkNaiROI 1 662 1.2
SetMCSWindow 3 30
:LOOP
ClearSpectrum 1
StartAcquisition 1 &
Integrate 1 Centroid Fwhm Net Gros Back 662
© ICx Radiation GmbH
User manual winTMCA32
Appendix
124
GetActualDateTime ActDateTime
WriteMCStoEnergy 3 $Net $Actdatetime
SaveSpectrum 3 $MCSSpectrum
GetMCSChannelNumber ChannelNumber 3
GetSpectrumLength SpectrumLength 3
if $ChannelNumber < $SpectrumLength
{
Goto LOOP
}
The mcs window is displayed in spectrum window 3, the integration results of the RoI in
spectrum window 1 are here displayed. The values will be inserted until the end of the
mcs spectrum is reached.
7.4.3
Inserting values into excel files
Using the batch command ImportInExcelWorksheet the contents of a textfile are written
into an excel file:
OpenExcelWorkSheet "C:\Oktober\13102003.xls´" results 1
ImportInExcelWorkSheet ExcelImport.txt
CloseExcelWorkSheet
This batch file openes the excel file 13102003.xls within the directory "C:\Oktober". Then
the contents of the file ExcelImport.txt are transferred into the excel worksheet named
"results". Then the file is closed.
The file ExcelImport.txt has the following contents:
PROBE
33333
DATUM
21.7.2003
ZEIT
17:12:00
GEWICHT
77
This file contains the column names and their corresponding values, which are written into
the next free row within the column.
The resulting excel file looks like this:
© ICx Radiation GmbH
User manual winTMCA32
Appendix
125
These values can also be transferred using the batch command
InsertItemInExcelWorksheet:
OpenExcelWorkSheet "C:\Oktober\13102003.xls" results 1
Insertiteminexcelworksheet PROBE 1020
Insertiteminexcelworksheet Datum "11.10.2003"
Insertiteminexcelworksheet ZEIT "16:47:00"
IncrementExcelWorkSheetRow
Insertiteminexcelworksheet PROBE 1030
Insertiteminexcelworksheet Datum "11.10.2003"
Insertiteminexcelworksheet ZEIT "16:48:00"
IncrementExcelWorkSheetRow
Insertiteminexcelworksheet PROBE 1040
Insertiteminexcelworksheet Datum "11.10..2003"
Insertiteminexcelworksheet ZEIT "16:48:00"
CloseExcelWorkSheet
The resulting excel file looks like this:
7.4.4
Example for a startup batch file
Within the following batch file as comment is written in front of a command. These
comment lines start with a "#".
#Maximize winTMCA to screen
SetScreenState 2
#Show spectra window 1
ShowWindow 1
#Set the spectra window size
WindowFrame 1 1 1 98 98
#Make energy calibration on spectra window 1: 1 channel = 1keV
© ICx Radiation GmbH
User manual winTMCA32
Appendix
126
EnergyCalibration 1 1 1
#Set X unit to keV on spectrum window 1
SetXUnit 1 "keV"
#Setup acquisition hardware: If you don't want to use this section, use # character to mark
the following lines as comment
#Set HV
SetHV 1 $HV
#Set upper level discriminator
SetULD 1 $ULD
#Set lower level discriminator
SetLLD 1 $LLD
#Set noise level
SetNoiseLevel 1 $NOISE
#winTMCA batch file needs variable section
VARIABLES
HV %d 500
ULD %d 1023
LLD %d 0
NOISE %d 15
7.4.5
Acquiring and integrating
In the following batch file a RoI is set around a given energy, and an acquisition is started
for a preset time. If the time has expired the area of the RoI is integrated and the counts
per second are calculated. The result is displayed on the screen within a message window.
#Clear spectrum
ClearSpectrum 1
#Clear all RoIs
DeleteAllRois 1
#Set a single RoI using an energy value: Energy float (keV)
MkNaIROI 1 $Energy 1
#Preset Real time: RT integer (seconds)
PresetRealtime 1 $RT
#Start Acquisition and wait for completion
StartAcquisition 1 &
#Integrate the RoI: Centroid, FWHM, net counts, gros counts, background counts
Integrate 1 Centroid FWHM Net Gros Back $Energy
#Get live (true) acquisition time
#Attention: To assign a value to a variable ommit the $ character in front of the variable
name: $ = access
# contents of variable
GetLivetime LT 1
#Calculate Net live cps
Eval $Net/$LT CPS %.2f
#Build output string
Sprintf OutputLine "Result %.2f" $CPS
#Print result using showmessage: Text file name, Line number in file, time message [s] is
displayed
#(0: stay on screen until OK is pressed)
#optional text (if line number is 0 only the optional text is displayed)
© ICx Radiation GmbH
User manual winTMCA32
Appendix
127
ShowMessage dummy 0 0 $OutputLine
#winTMCA batch file needs variable section
VARIABLES
Energy %f 661.62
RT %d 30
Centroid %f
FWHM %f
Net %f
Gros %f
Back %f
LT %f
CPS %f
OutputLine %s
7.5
Spectra format
The winTMCA32 spectra are stored in ASCII format, so they can easily be imported or
adapted. A spectrum file contains the spectrum header followed by the channel contents.
The header contains the following informations:
·
·
·
·
·
·
·
·
·
·
·
·
·
·
·
·
SpectrumName
XUnit (user defined unit of the x-axis (channel-axis))
YUnit (user defined unit of the y-axis (channel-content axis))
Length (number of channels for the x-axis)
SubSpcNum (number of sub spectra, which means the number of channels for the
z-axis)
StartSubSpc (defines the beginning of the sub spectra area which is saved to the
file)
StopSubSpc (defines the ending of the sub spectra area which is saved to the file)
Comment (user defined comment )
Realtime (whole acquisition time (in seconds) at saving time)
Livetime (dead time corrected acquisition time (in seconds) at saving time)
Deadtime (dead time)
Starttime (date/time of the acquisition start, the format "dd.mm.yyyy hh:mm:ss" is
used)
Stoptime (date/time of acquisition end, the format "dd.mm.yyyy hh:mm:ss" is
used)
CalibPoint1-4 (channel/energy pairs used for energy calibration)
CalibCoeff (polynome coefficients for the energy calibration function (type
3
2
E=a*x +b*x +c*x+d))
SpectrumText (user defined text in the spectrum text window)
After the spectrum header the channel contents are displayed, eight channels per line
separated by ",". Consecutive sub spectra are not separated by ",". Only one spectrum
header is created with every saving.
© ICx Radiation GmbH
User manual winTMCA32
7.6
Appendix
128
Trouble Shooting
This chapter gives some assistance in locating and eliminating problems, which might
occur while working with the winTMCA32-software.
No spectrum can be acquired.
Spectra are not stored in the chosen directory.
Malfunction peak integration
7.6.1
No spectrum can be acquired
Possible sources of error:
Cause
Wrong hardware parameters.
Cable is incorrectly fitted.
7.6.2
Solution
· Check the hardware
parameter like HV, ULD,
Gain, Fine gain, etc
· Check the parameter for serial
communication with
nanoSPEC and identiFINDER
like COM port, baud rate,
etc.
· Check all cable connections.
Spectra are not stored in the chosen directory
Possible sources of error:
Cause
Wrong spectra path.
File extension is not ".SPC".
Solution
Check the path settings for the
spectrum window. The path is
individually selectable for each
spectrum and is stored to the
windows registration database.
In the spectra selection dialog
only files having the extension
".SPC" are displayed by default.
For spectra with other
extensions, select "all files".
© ICx Radiation GmbH
User manual winTMCA32
7.6.3
Appendix
129
Malfunction peak integration
Possible sources of error:
Cause
7.7
Solution
No cursor within a ROI.
· To select a ROI for
integration the cursor must be
located within the ROI.
Marker lines are set.
· If two marker lines are
defined the area within these
marker lines will be
integrated independent of
cursor position.
Using webMCA
The connection to a webMCA acquisition port can be initiated manually while
winTMCA32 is running or automatically if winTMCA32 is started.
Select SPECTRUM Þ SELECTTCP within the menu header to connect manually to the
webMCA. The following input box appears on the screen:
If the IP address is entered the connection is activated by clicking the connect button. If
the connection was successful the dialog box will disappear automatically. The IP address
is stored and will be displayed within the selection list of the TCP Address field if the
dialog is opened again.
If the menu header does not contain this menu item the following line has to be added to
the menu definition file MENU.DEF (which can be found within the CONFIG directory):
SELECTTCP_S SELECTTCPSPECTRUM
It is also possible to connect automatically when winTMCA32 is started. Therefore the
file PORTMAPPING.TXT has to be added to the CONFIG directory. For every webMCA
device a new line consisting of the following format has to be added:
p=n,IP=xxx.xxx.xxx.xxx
n relates to the winTMCA32 acquisition port to which the webMCA shall be connected.
Please note that it is not allowed to connect any other MCA devices like scintiSPEC etc.
to this port!
© ICx Radiation GmbH
Chapter
8
Credits
User manual winTMCA32
8
Credits
131
Credits
A list of additional used Delphi freeware components is given:
TColorPickerButton ã 1999 from Dipl. Ing. Mike Lischke ([email protected])
TComPort ã 1998-2001 from Dejan Crnila ([email protected])
TWSocket (ICS) ã 1997-2001 from François Piette ([email protected])
© ICx Radiation GmbH
Index
Index
-Aacquisition 20
acquisition mode 20
starting all acquisitions 20
starting an acquisition 19
status 52
stopping all acquisitions 20
stopping an acquisition 20
acquisition hardware 7, 8
dMCA card 7
identiFINDER 8
nanoSPEC 8
acquisition menu 19
adapting the menu header 63
add spectrum 37
alarm 57
setting alarm parameters 57
arrange icons 35
compute menu 35
configuration file TMCAINIT.TXT
conversion gain 28
count rate 53
Creating a mcs spectrum 123
credits 131
-DDBEDIT.TXT 112
definitions 24
spectrum definitions
delay 33
deleting ROI 58
divide spectrum 39
dMCA card 7
dmca registerset 31
DOSIS 20
DUAL 20
24
-E-
background stabilisation 32
Batch file examples 123
Batch files 66
examples 123
executing batch files 47
batch status 54
Batch structure 66
baud rate 31
buttons 53
editor 45
efficiency calibration 119
enable pop up menu 49
enable scroll bar 49
energy calibration 21
energy to channel 58
evaluation 117
evaluation module 116
executing batch files 47
exit winTMCA32 16
external acquisition hardware
identiFINDER 8
nanoSPEC 8
-C-
-F-
cards 7
plug-in cards 7
cascade windows 35
change password 16
changing graphical user interface 63
changing marked peaks to ROIs 58
channel to energy 58
clear marked peaks 26
clear spectrum 23
close all windows 35
coarse gain 30
coincidence 33
com 31
fine gain
-B-
© ICx Radiation GmbH
8
30
-Ggain 30
coarse gain 30
conversion gain 28
fine gain 30
gate 33
GenerateSpectrumNames 123
Generating spectrum names 123
graphical user interface 63
114
132
Index
User manual winTMCA32
grid
window menu 35
menu definition files 63
menu header 14, 63
meter 57
miscellaneous menu 45
mode 20
monitor 47
winPROC monitor 47
MULPHA 20
multi channel scaling addition (MCS ADD) 20
multi channel scaling store (MCS STO) 20
multiply spectrum 38
58
-Hhardware 7
acquisition hardware 7
hardware menu 26
hardware requirements 6
Help 15
high voltage 27
horizontal scrollbar 57
-Iicons 35
arrange icons 35
identiFINDER 8, 50
information window 109
inserting values into excel files
integrate 36, 126
internal variables 105
introduction 6
-N124
-Llayout file 115
length 23
load spectrum 24
log file 61
lower level discriminator (LLD)
28
-Mmain window 13
malfunction peak integration 129
manufacturer 6
marker 58
clear marker 58
setting marker 58
MCS ADD (multi channel scaling addition) 20
MCS STO (multi channel scaling store) 20
menu 19
acquisition menu 19
compute menu 35
nanoSPEC/identiFINDER menu 50
preset menu 41
print menu 34
program menu 14
spectrum menu 21
view menu 18
© ICx Radiation GmbH
NAJCALC 116
efficiency calibration 119
evaluation 117
quality control 121
nanoSPEC 8, 50
next ROI 58
no spectrum acquired 128
noise 28
nuclide database 49
activating database selection
editor 112
select nuclide database 15
49
-Ooffset
30
-Ppeak search 41, 48
peak search sensitivity 48
peaks 26
clear marked peaks 26
PHA (pulse height analysis) 20
plug-in cards 7
dMCA card 7
polarity 30
pole zero 34
pop up menu 49
enable pop up menu 49
port number 52
preamp power 27
Pre-defined internal variables 105
preferences 49
preset menu 41
preset mode 41
133
Index
preset service 41
print menu 34
print spectrum 34
printer setup 34
PrintFormattedPage 115
program menu 14
Program winproc 105
pulse heigth analysis (PHA)
20
-Qquality control
121
-RRAWDATA 20
real time 52
register user 16
requirements 6
hardware and software requirements
rescaling x-axis 39
ROI 58
deleting ROI 58
next ROI 58
setting ROI 58
zoom ROI 58
ROIs 24
-Ssave spectrum 23
save spectrum as... 24
scroll bar 49
enable scroll bar 49
scrollbar 57
horizontal scrollbar 57
vertical scrollbar 56
search 41
peak search 41
Select language 15
select spectrum 26
select spectrum window 52
select sub spectrum 26
setting marker 58
setting ROI 58
settings 49
smooth spectrum 40
software requirements 6
software specifications 11
Special characters 105
Spectra format 127
© ICx Radiation GmbH
6
spectrum 37
add spectrum 37
clear spectrum 23
divide spectrum 39
load spectrum 24
multiply spectrum 38
no spectrum acquired 128
peak search 41
print spectrum 34
rescaling x-axis 39
save spectrum 23
save spectrum as 24
select spectrum 26
select spectrum window 52
smooth spectrum 40
spectrum definitions 24
spectrum length 23
spetrum not stored in the chosen directory
subtract spectrum 38
spectrum display 56
spectrum header 55
spectrum menu 21
spectrum window 54
spectrum window context menu 58
STABIL 20
stabilisation 32
StartAcquisiton 126
starting all acquisitions 20
starting an acquisition 19
starting instructions 13
startup 125
status 52
stopping all acquisitions 20
stopping an acquisition 20
sub spectrum 26
select sub spectrum 26
subtract spectrum 38
-Ttext window 57
tile windows 35
TMCAINIT.TXT 114
tool bar 51
toolbar buttons 53
trigger polarity 33
trouble shooting 128
-Uupper level discriminator (ULD)
28
134
128
User manual winTMCA32
user administration
user interface 63
17
-Vvertical scrollbar 56
view menu 18
activating view menu
49
-WwebMCA 129
window list 54
window menu 35
window selection 52
WINDOWS 20
cascade windows 35
close all 35
tile windows 35
winproc 105
command line paramters 106
dialog window 107
monitor 108
winPROC error wait time 47
winPROC monitor 47
winTMCA32 11
attributes 11
main window 13
operating winTMCA32 13
software information 15
starting instructions 13
winTMCA32 editor 45
-Xx-axis 39
rescaling x-axis
-YY-Cursor
58
-Zzoom ROI
58
© ICx Radiation GmbH
39
Index
135
Europe, Asia, Africa, Oceania
ICx Technologies GmbH
Piepersberg 12
42653 Solingen
Germany
North America, South America
ICx Radiation Inc.
100 Midland Road
Oak Ridge, TN 37830
USA
T + 49.212.222090
T + 1.865.220.8700
v + 49.212.201045
v + 1.865.220.7181
k [email protected]
m radiation.icxt.com
k [email protected]
m radiation.icxt.com