1
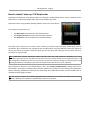
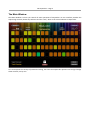
J74 StepLocker – Page 1
J74 StepLocker
A different approach to modulation in Ableton Live
User Manual
J74 StepLocker – Page 2
Table of Contents
About J74 StepLocker.................................................................................................................3
How to install / start up J74 StepLocker.....................................................................................4
The Main Window.......................................................................................................................5
The “Lock”..................................................................................................................................6
Step Selectors and displayed color information..........................................................................8
Programming Parameter Locks...................................................................................................9
Impulse vs Hold modulation styles...........................................................................................11
Direct vs Glide modulation envelopes......................................................................................12
Sequencing controls in the Main View.....................................................................................13
Editing controls in the Main View............................................................................................14
The Sequencer View.................................................................................................................15
The Step View...........................................................................................................................16
Other Features of StepLocker...................................................................................................17
J74 StepLocker – Page 3
About J74 StepLocker
StepLocker is a hybrid sequencing and modulation device for Ableton Live (Max for Live) based on the
concept of parameter locking, whereby each sequencer step can be associated with settings of any
parameters in Live.
Its work-flow is extremely simple: choose one or more target steps, click on a parameter in Live, set its
modulation value and lock it to the step. You can do this for any parameter, in any device, in any track of
Live, all from the same StepLocker.
On top of this you have the classic step sequencer features to play with, including post-locking detailed
editing, playback and value randomization, step length and step count, value interpolation.
StepLocker is an Ableton Live Max for Live device for Live 9 and higher. So you must have a Max for Live
license to run it and it will run properly only in Live 9 or higher (older versions of Live, such as Live 8, are not
supported).
This document will explain how the tool works and how to use it.
Cheers
Fabrizio (aka June74)
For more software and original stuff: http://www.fabriziopoce.com/download.html
J74 StepLocker – Page 4
How to install / start up J74 StepLocker
Installation of StepLocker is extremely simple: just drop the “J74 StepLocker.amxd” device anywhere in Live.
StepLocker is a transparent Audio effect and can be loaded in any track.
StepLocker works using separate floating windows, built in the same device.
The windows in StepLocker are:
•
•
•
The Main View (accessible from the docked device)
The Sequencer View (accessible from the Main window)
The Step View (also accessible from the Main window)
The Main View is where you start from. There is where you define actions (learning, modulating) and lock
parameters. Once locked you can manipulate the recorded values using the Sequencer View (for editing of
all the step values for a given parameter type) and the Step View (for editing of all the values from any
parameter on a given step).
Note: StepLocker records parameter values directly from Live and performs modulation of such
parameters directly into Live. The Max for Live API is the mean used to access Live on such a low level, in a
way completely transparent to the user. So you will not need to setup any routing or scroll long menu's for
selecting parameters. Everything is just based on simple actions like click, set, lock, sequence.
One parameter is present on the docked device. This is the [Latency Compensation] setting, expressed in
milliseconds. The [Latency Compensation] amount specifies the amount of time StepLocker compensates
when performing modulation and helps you eliminating the computational latency which would result in
modulation being slightly off beat.
Tip: The amount used for the [Latency Compensation] should be set to match the Output Latency value
defined in Ableton Live Preferences. By default the value is set to 10ms.
J74 StepLocker – Page 5
The Main Window
The Main Window is where you control all main operations of StepLocker. Its user interface provides the
sequencing controls, the 64 step selectors and the “Lock”, which is the central element in StepLocker.
Let's now explain the concept of parameter locking, the states the StepLocker operates into and go through
these controls, one by one.
J74 StepLocker – Page 6
The “Lock”
The Lock is the heart of StepLocker. It defines the state StepLocker is into and which functions will be
performed, such as modulating, learning or bypassing.
The Lock has essentially two main states (represented by the Lock sign):
•
Locked: when the Lock sign is closed, StepLocker
is in the locked state and modulation is ON, using
the locked (recorded) parameter values and its
sequencing features to perform parameter
modulation.
•
Unlocked: When the Lock sign is open, StepLocker
is in the unlocked state and its modulation is
bypassed. Two sub-states are possible in this case,
depending on the state of the [Step Selectors]:
Unlocked & Programming and Unlocked & Bypass.
Next will explain the difference between the two
sub-states and how you move among them.
Here an explanation of how you move between these states:
•
From the Locked state (lock sign being closed ) you can:
◦ Enter the Unlocked & Programming state by selecting (clicking on) any of the steps. This will
open the lock with the following effects: Modulation is temporary stopped; Each step you
selected (clicked on) is selected as a destination step for new locks (and becomes red);
StepLocker is now able to learn new parameter values from Live for locking (more on this in a
few lines).
◦ Go into the Unlocked & Bypass state by clicking directly on the lock sign. This will open the lock
and temporary stop modulation. In the bypass state you can essentially use Live as StepLocker
would not be present.
•
From the Unlocked & Programming state (lock sign open
, step selected in red) you can:
◦ Commit changes (adding new parameter locks) by clicking on the
button, which is
placed just underneath the Lock sign. This will save the parameter values (lock them) to the
steps you selected. This will also close the lock, move StepLocker back into the Locked state
(with a new configuration) and restart modulation.
◦ Move back to the Locked state (no changes, modulation active) by clicking on the lock sign.
•
From the Unlocked & Bypass state (lock open, no step selected for programming) you can:
◦ Remain in Live for usual operation (as if StepLocker would not be there)
◦ Move back to the Locked state (modulation active again) by clicking on the lock sign.
J74 StepLocker – Page 7
The “state-machine” for StepLocker is defined by the following diagram:
J74 StepLocker – Page 8
Step Selectors and displayed color information
The largest portion of the Main view is used by the [Step Selectors] (or just Steps), in four rows of sixteen
steps (for a total of 64 steps). The steps selectors have two functions:
•
•
They display information about the amount of locked parameters using their color
They define the destination for a new lock when moving into the Unlocked & Programming state.
The color of a step has the following meaning:
•
•
•
•
•
•
•
•
•
•
•
•
Black = no information is recorded, the step is completely empty
Red = step is selected for programming (when in the Unlocked & Programming state)
Orange = 1 (one) parameter has been locked
Yellow = 2 (two) parameters have been locked
Light Green = 3 (three) parameters have been locked
Green = 4 (four) parameters have been locked
Water Green = 5 (five) parameters have been locked
Cyan = 6 (six) parameters have been locked
Sky Blue = 7 (seven) parameters have been locked
Dark Blue = 8 (eight) parameters have been locked
Purple = 9 (nine) parameters have been locked
Magenta = 10 (ten) parameters have been locked
Note: Each step can contain a maximum of ten (10) parameter locks simultaneously. Trying to add more
will result in the lock being silently ignored.
Underneath each [Step Selector] a small [StepView] button is also placed. This button (showing “View” if
you move the cursor on top of it) allows you to open the Step View for the step.
More on the Step View later in this document.
J74 StepLocker – Page 9
Programming Parameter Locks
To add a new parameter lock, do the following:
1. Assuming you start from the Locked state, click on one or more steps in the Main View, where you
wish to record the new parameter lock. The selected steps will become red (meaning they are now
enabled for programming). If you like to change which step is enabled you can click again on a red
step to disable it and/or on a new step to add it. Multiple steps can be locked at the same time (to
the same value). Please note that this action will move StepLocker in the Unlocked & Programming
state, with the Lock sign now being open.
2. Click on the parameter of Ableton Live you wish to lock. It is important to underline the concept of
Clicking on it (rather than directly changing it), as this is the right way to select a parameter in Step
Locker. Clicking allows a correct reading of the return-value for the parameter (see further for an
explanation of what a return-value is).
3. Set the parameter to the modulation value you wish to lock. This value will be locked into the
selected step (or steps). You set this value by simply changing the target parameter using its Live
user interface control (e.g. a dial, fader, number, toggle and so on), as you do normally.
4. Hit the
button (located underneath the Lock sign). This action will commit the modulation
value and lock it into the step (or steps) you selected. Please note that this will move StepLocker in
the Locked state (Lock sign being closed ), that the color of the steps will be updated according to
your changes and that the modulation will turn on.
Note: you do not need to stop playback, recording or whatsoever you were doing in Live while
programming new step parameter locks. You can do this while the transport runs, on the fly. Just do the
actions as specified above.
Modulation Values and Return-values
As you may have understood from the procedure just explained, programming a new parameter lock let's
you specify two values, one implicitly the other explicitly:
•
•
The Modulation value for the step (which is defined explicitly by action 3 in the procedure)
The Return-value of the parameter (which is defined implicitly by action 2 in the procedure)
The Modulation value is simple to understand, as it is the value locked into the step (or steps) as you
selected (indeed) explicitly. The Return-value is a little more obscure. Essentially this is the value the
parameter should have when there is no modulation or when a modulation action has been “completed”.
This is the value the parameter had in Live before the parameter was locked, and it is defined when you first
touch/click on a parameter as done by action 2 in the procedure.
The Return-value is used by StepLocker in the following two cases:
•
•
When modulation is altogether bypassed (in the Unlocked & Bypass state). In this state StepLocker
“returns” to Live by resetting all the parameters used for locks to this their respective Return-value.
During modulation, if modulation is done using the Impulse style.
The latter will become clearer when the Impulse style will be explained further on.
J74 StepLocker – Page 10
Why is action 2 of the programming procedure important
To understand why action 2 is important for the correct behavior of parameter locking and sequencing, let's
explain what happens if you skip this action during the procedure.
Let's say you wish to modulate a Left/Right Panning of a track. Let's also suppose that the original value for
this parameter (before starting programming the new lock) was 64, which for a panning parameter signifies
the perfect center (0 being full left, 127 full right).
You now start parameter lock programming by selecting one or more steps in the Main View (steps turn red,
lock gets open). At this point you move at once the parameter to the value you wish to lock (let's say 85,
somewhere panning right) ans skip action 2 which was just clicking on it first.
As you move the parameter, depending from how quick you do it and from the resolution of you controller
or mouse, a series of values will be read by StepLocker. The first value to be read by StepLocker will be used
as Return-value for this parameter. As in this case you moved the parameter at once, this immediately
changes the value the parameter had before the programming procedure started. The first value to be read
would probably still be close to 64, but not exactly be 64. As you are moving up (right) the first value would
be slightly higher. Let's say it is 67. This is the value (implicitly) assigned to the parameter Return-value in
StepLocker.
Then you would continue moving the dial and StepLocker would track what you do updating the value read
now as candidate modulation value. Let's say you stop at 85 and then you hit the
button. At this
point StepLocker will use the last value it read as the modulation value for the parameter lock.
Result: modulation value is 85, return-value 67.
As modulation now (re)starts ON modulation values would be done using 85 (what you intended it to be)
but the OFF values would be 67 (slightly wrong, off the place from what the parameter “rest” value should
have been when not modulated, 64 in this case). Same thing when you bypass StepLocker: at this stage
StepLocker will (re)set all the value back to the return-values as it learned them. So this Panning would be
reset the value to 67 and not 64. Again slightly wrong indeed.
So the baseline is: click (touch) a parameter before setting its value for locking.
PS: this way you also understand that no “serious problem” occurs if you accidentally forget action 2....
Unlocked & Bypass state: editing in Live and changing Return-Values
As mentioned the Unlocked & Bypass state let's you work in Live as usual, as no StepLocker was in use. You
can edit anything you wish freely, with no modulation by StepLocker being over-imposed to your changes.
Anyway the Unlocked & Bypass state is good also for something else: it allows you to change Return-Values
as well. Changes you made while in the Unlocked & Bypass state will become the new “zero-line” for
StepLocker to modulate onto. So if you change a parameter which is locked somewhere in any of the steps
of StepLocker, this will be used as a new Return-value for the parameter in question.
Note: You can change the return-value also using the [set return-value] field in the Sequencer view.
Note: As you may have imagined, changing a locked modulation value involves exactly the same procedure
as programming a new lock. It just overrides the previous lock (alternative forms of editing are possible
using the Sequencer View and Step View as we will see later).
J74 StepLocker – Page 11
Impulse vs Hold modulation styles
StepLocker has two way to apply step modulation: Impulse style and Hold style. The style can be selected by
the [Impulse/Hold] toggle in the Main window (right/bottom).
Impulse style uses “impulses” for modulation. Let's say that a parameter P has been locked to a step N with
a modulation value V. Moreover let's suppose that such parameter P has return-value being R.
In Impulse style, at the beginning of step N, StepLocker sends out the modulation value V as the ON
modulation value. Then StepLocker immediately looks forward to what is programmed in the next step,
N+1. If, at such next step, the same parameter is not present (meaning it has not being locked to the next
step, so there won't be a new modulation value for it), then StepLocker will send at the end of step N
(which is the beginning of step N+1) the return-value R of the parameter as OFF modulation value
(essentially clearing the last parameter modulation).
An example: a parameter P is locked to step 1 with value 0.6, to step 3 with value 0.2 and to step 6 with
value 0.9. The return-value R of that parameter 0.5, Impulse style modulation will produce the following
modulation envelope:
As you can see this results in an envelope made of one-step-long impulses around the base value as set by
the return-value. Please notice that, by default, the step length is 1/16 th. This setting can be modified by
using the [Speed] control.
In Hold style StepLocker ignores the return-value of the parameters and omits the OFF modulation values,
sending out only the locked modulation values. This results in an envelope with modulation being hold until
the next modulation occurs. Using the same numeric example specified before, Hold style will produce the
following modulation envelope:
J74 StepLocker – Page 12
Direct vs Glide modulation envelopes
StepLocker has also two ways of sending values in output: the Direct and the Glide envelope modes.
The Direct envelope mode is straight forward. Values (modulation and return-values) are sent out just as
they are, as numbers, at once. This produces the sort of “squared” envelopes as presented in the previous
chapter.
Glide envelopes instead do time/value interpolation. Values are not allowed to change suddenly but they
are interpolated with previous values already sent. This produces a smoother curve.
The following picture show how Impulse and Hold style change their envelope shape respectively when
Direct (gray) and Glide (black) envelope modes are used.
You can switch between Direct and Glide envelope modes using the [Direct/Glide] toggle on the
bottom/right of the Main View. The amount of Glide can be set using the [Glide] dial which is available in
the Main view on the top/right portion of the window. At the lowest setting Glide produces the same
envelopes as Direct mode.
If you are familiar with synthesizers and signal waves you may have noticed that this process is equivalent
to applying a low pass filter to the envelope. You may also have come to another conclusion: the resulting
envelope peaks later in time. Essentially Glide adds, besides smoothing, also some latency to the
envelope. To compensate this you may use the [Latency Compensation] setting of the docked layout of
StepLocker.
J74 StepLocker – Page 13
Sequencing controls in the Main View
The Main View contains also the essential sequencing controls:
[Number of Steps]
[Playback Mode]
[Playback Speed]
[Restart]
These controls are quite intuitive and they do what their name implies:
•
[Number of Steps] defines the rotation of steps played. By default this is 16, and it can be set to
anything between 1 and 64. Do not be limited by multiples of 16 steps only. Multiple of 16 are
good for a rhythmic effect as they loop nicely on top of the 4/4 th music signature. But odd and
unusual number of steps (3, 5, 6, 7, 11, 13 etc.) introduce syncopation and poly-rhythm. Although a
very simple control, this parameter can be very effective in real-time use.
Note: besides the [Number of Steps] control you find four small buttons with labels 16, 32, 48 and 64.
These buttons have a dual function. They reset the number of step to the value they report AND restart
the sequence in line with the starting beat of a Live bar. These are handy to use after messing up with the
step numbers for poly-rhythm and syncopation!
•
[Playback Mode] is a toggle to switch between the traditional forward mode (sequencing from the
first to to the last step linearly) and the random mode.
Tip: random mode is fun. Try this out. As this only randomizes the order of playing for the steps but not
their locked values (and the fact several parameters may be locked together at the same step), it produces
chaotic but still effective results.
•
[Playback Speed] is a menu which allows you to change the length of the step. By default this is set
to “normal” which is the reference length of 1/16 th. Other settings include 50%(1/8th), 75%(1/8th
dot), 150% (1/16th dot) and 200% (1/32 nd)
•
[Restart] this simply restarts the playback from step 1.
J74 StepLocker – Page 14
Editing controls in the Main View
Two simple editing controls are available in the Main view:
•
The [c/p] little buttons on the right side offer per group of 16 steps copy and paste commands. This
way you can copy every locked parameter from one block to the other (e.g. from the first 1-16 block
to the third 33-48 block)
•
The [Clear All] button does what you expect it to: it erases everything from StepLocker's memory
and virtually restarts the device from ground zero.
•
From the Main View you can open the two other windows of StepLocker:
◦ To open the Sequencer View use the button located at the top/center of the Main window
◦ To open the Step View use the little button underneath the [Step Selectors]. These buttons
show “View” if you move the cursor over them.
J74 StepLocker – Page 15
The Sequencer View
The Sequencer View allows you to edit the locked parameter as you would with a linear Step Sequencer.
Each locked parameter is listed in the [Selection Menu] on the right/top of the view and can be selected.
In the middle of the view all 64 values are shown. Values shown in gray are the implicit Return-values (they
are not locked parameters, but it is handy to see them displayed). Values shown in color are the actual
locked modulation values.
Note: for practical reason the locked modulation values use a few colors. This is just to visually display their
position, with colors repeating in blocks of four steps. This is meant for easing counting.
You can freely edit any value in this view, as you would do with a usual sequencer. Changes will be used as
new parameter lock values.
Note: editing a gray bar (a Return-value) will turn it into a locked modulation value (colored) for the step.
Tip: this view is meant for fine tuning and complex automation. Anyway as the concept of locked vs returnvalue plus features like random playback still apply, this can deliver original results.
A few editing control are available for quick actions:
•
•
•
•
•
•
The [all values up/down] arrows on the bottom/left portion allow you to raise or decrease all the
locked modulation values. Please note that only the locked modulation values (colored bars) will be
affected, not the return-values.
The [random] button allows you to create a random set of values to replace the locked modulation
values. Again only the locked modulation values (colored bars) will be affected, not the returnvalues
The [copy/paste section] buttons allow you to copy and paste blocks of 16 steps (for the selected
parameter) from one block to the other (e.g. the first block 1-16 can be copied into the third 33-48).
The [commit] button is a bit of a special. It turns all the return-values into locked modulation
values. This is something you may like to do in case you want to perform random value generation.
The [erase] button does the reverse of what the [commit] does. It deletes the locked modulation
values and turns the view to all return-values (but still keeps the parameter for editing purposes)
The [set return-value] field (top/center of the view) allows you to change the Return-value for the
parameter currently selected (this is a quicker way then going into the Unlocked & Bypass state)
J74 StepLocker – Page 16
The Step View
The Step View offers the alternative view to the Sequencer View: a view of all the parameter locks on a
given step. Here you can see what has been locked into the step.
The view is very simple: it is a list with all the available lock-able slots and reports [Parameter Name] and
[Lock Value] (locked modulation value) settings for the step.
You can edit values using the [Lock Value] number boxes. You can delete the value from the step (freeing up
a slot) by pressing the corresponding [Clear] button. You can also mute the specific locked parameter
(without deleting it) using the [Mute] toggles.
You can jump from Step to Step in a few ways:
•
•
•
On the Main View press the [View] button under the step you wish to view in the Step View
On the Step View use the [StepView] box and type the number to jump to
On the Step View use the left/right arrow to scroll across the various step one by one
J74 StepLocker – Page 17
Other Features of StepLocker
Here some of the additional features of StepLocker are explained.
Saving StepLocker in the Liveset and making presets
StepLocker's state can be saved. If you include the StepLocker device as part of
your live-set, all its settings will be saved with the project. This way it is possible
to continue experimenting with it by simply reloading the live-set.
It is also possible to create presets of StepLocker. In this case use Live native
preset saving capability: by pressing the little save button on the top/right title
bar of the device (in Live's track) you will create a preset in the form of a .adv file.
You can drop this preset any time you need and get the StepLocker settings back.
Recording automation in Session view Clips
It is possible to record StepLocker's modulation as automation in Live Session view clips. As StepLocker
virtually “moves” knobs, buttons and faders around during modulation, you just need to have a clip and
arm the tracks you like to record automation into and hit Live's overdub button in the transport.
Note: Overdub can only record into clips. So automation will be recorded into MIDI and Audio tracks (if
they have clips and are armed) but not on the Mixer and Return tracks (which cannot have clips).
Tip: Try recording multiple takes of automation “performances” made with StepLocker, for instance
combining classic looped parameter locking with more chaotic random experiments or variations done
with the step number. For this it may be useful to “unlink” the parameter automation length in the clip.
J74 StepLocker – Page 18
Recording automation in Arrangement view
Similarly to the previous case, StepLocker “performance” can be easily recorded into the Arrangement view.
This involves just the fact of having global recording enabled. Live will record everything, including all the
movements virtually made on the locked parameters by StepLocker.