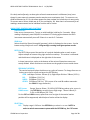
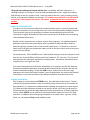
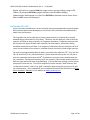
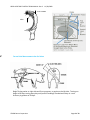
1
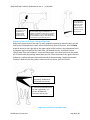
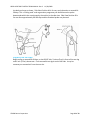
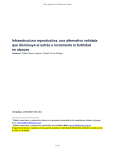
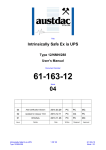
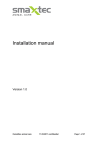
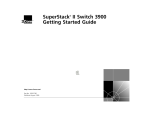
PREG-ALERT PRO®
INSTRUCTIONS
(Rev. 3)
PREG-ALERT PRO® INSTRUCTION MANUAL Rev.3
11/28/2009
For clarity and uniformity, we have given all metric measurement in millimeters (mm), even
though in some cases the common practice may be to use centimeters (cm). To convert to cm,
divide millimeters by 10. For the same reasons we have omitted inch conversions in many cases.
To convert mm to inches, divide mm by 25.4 or multiply by .04. Note that In all cases and for all
readings, measurements can be indicated in either mm or inches.
QUICK START CONTROLS AND FUNCTIONS
ON/HOLD OFF:
Press to turn instrument on. To turn on with backlight, hold key for 2 seconds. When
reading is displayed, press ON/HOLD to maintain it. Pressing again releases the HOLD.
Instrument automatically turns off if there is no use for 3.5 minutes.
SENS Keys
Selects sensitivity 1(least) through 4 (greatest), which is displayed on the screen. Use the
lowest setting that gives a result. Using too high a setting could give spurious results.
DEPTH Keys
The DEPTH Keys control the position of a vertical dashed marker on each screen.
Adjust to depth of interest using right and left arrow keys. This marker is calibrated
and the distance is displayed on the right side of the screen
In these Instructions, scales at the bottom of the various illustration screens are
evenly divided. Minor divisions are not shown on the graphics here to avoid clutter.
PREGNANCY SCREENS:
The vertical marker displays the distance to a spike of interest. To change from mm to
inches, go to the fat screen and press the OPTION key.
COW: Left Major Division: 101mm (4 in) Right Major Division: 338mm (13.5 in)
PIG:
51-288mm (2-11.5 in)
SHEEP: 51-288mm (2-11.5 in)
OTHER: 51-209mm (2-8.3 in). (This screen is for small & medium mammals.
Use COW for large mammals.)
FAT Screen:
LOIN Screens:
Range: 3mm to 42mm (.12-1.65in) OPTION key selects units, mm or in.
Use OPTION Key to select low or high range: 50mm-140mm (25.6in) or 90-180mm (3.6-7.2in).
For the FAT and LOIN screens, spikes that occur to right of the vertical marker
position will be suppressed, which helps to further refine the display.
SELECT Key:
FAT: Display range is 3-42mm. Use OPTION key to select in. or mm. NOTE: In
order to switch measurement system with the OPTION key, the FAT screen
©2009 Renco Corporation
Page 2 of 13
PREG-ALERT PRO® INSTRUCTION MANUAL Rev.3
11/28/2009
must be displayed. The selected measurement system will be used for all
measurements.
LOIN: Use OPTION key to select the low range, 50-140mm or the high range 90 to
180mm.
For both FAT and LOIN measurements, indications to right of the vertical marker are
suppressed, thus mitigating extraneous information.
PREGNANCY: Use OPTION key to select, COW, PIG, SHEEP or OTHER. Note: The
ruler scale division markers on the several pregnancy screens represent different
intervals and are just for reference. To see the actual distance from the skin to
particular spike of interest, use the DEPTH keys to move the vertical marker to it and
read the distance shown (in mm or inches). To help avoid errors, OPTION key must be
held ½ second when changing from one screen to another.
COW, PIG and SHEEP screens display a heavy horizontal bar under the graph, which
indicates the proximate distance to the near and far side of the uterus. Strong spikes
within this area indicate pregnancy.
The Preg-Alert Pro is a microprocessor-based instrument, using low power A-Mode ultrasound
for the detection of pregnancy in mammals and the measurement of fat and muscle tissue
thickness. It can be likened to an electronic ruler that indicates a distance computed from the
time it takes to receive the reflections (echoes) that were generated by the ultrasonic pulses
emitted by the transducer (also called the “probe”). Sound travels at different speeds through
fat and muscle. The instrument uses the appropriate speed for each, which may result in
differences when compared to scanners, most of which use the same speed for both tissues.
The display is an analog presentation in a digital environment, which is enhanced to eliminate
or mitigate the presentation of spurious reflections and noise, often seen on older CRT
displays.
There are three indications for pregnancy, which are displayed as spikes on the screen: 1)
Pattern recognition of a group of reflections from the fetus(es), 2) One spike, a reflection from
the interface between amniotic fluid and the far side of the intrauterine wall. 3) A reflection
from the thickened wall of the uterus (in cattle).
Connect the cable to the instrument and the proper probe to the cable.
Note: That Standard probe having a blue body should be used for all animals except
for very early pregnancy testing on cows, mares, and other large mammals. The
optional Deep probe larger and having a black body should be used for very early
pregnancy testing in cows, mares and other large mammals. The Standard probe can
be used with most large mammals after 90 days gestation. The Standard probe can be
used with large mammals at the early times, but getting good indications is
problematic and in any case more difficult.
©2009 Renco Corporation
Page 3 of 13
PREG-ALERT PRO® INSTRUCTION MANUAL Rev.3
11/28/2009
The probe must make good contact with the skin—air bubbles will block ultrasound. A
coupling fluid such as cooking oil, must be used to enable good contact. Apply the coupling
fluid liberally to the skin, probe or both. Press the probe to the skin, using a rotating-rocking
motion, such that all air bubbles are removed. The number one problem in using ultrasound
instruments is lack of good skin contact. We repeat, Ultrasound will not pass through air
bubbles!
USING THE PREG-ALERT PRO
In order to use the instrument efficiently and with the best results, it must be understood
that this instrument is a tool and like most tools, skill is best obtained by intelligent practice.
The instrument helps you by providing a computer enhanced display where spurious
information is largely eliminated, but the user must be the one to decide the true meaning
of the displayed information.
Backfat and loin measurement are easier to learn than pregnancy. As regards pregnancy
detection, both the animal type and days after conception at which testing is done are
determining factor related to ease of use and skill requirement. To illustrate, on the one
hand, swine at 30 days are perhaps the easiest, while on the other hand, cattle at very early
times are more difficult.
Fat measurement: Select the FAT screen. Most backfat testing in swine for example is done
over the last rib and 40-60mm off the center line (called the “P2” test site). This test site is
also important for making the standard loin measurement. Sometimes, measurements at
multiple sites in this region are used.
Loin muscle measurements include skin and backfat, so to measure just the loin thickness,
first determine backfat thickness, using the backfat screen and then measure the loin and
subtract the backfat reading. Of the two LOIN screens, select the one with the range
appropriate for the total thickness involved. Internal adjustments are made to the speed of
sound factor to minimize the effect of the difference between fat and muscle tissue.
Pregnancy indications:
Each Pregnancy screen except the OTHER screen, has a black bar at the bottom. The bar
indicates the proximate distance to the near and far points of the uterus at the number of
days indicated. It is important to understand that although the pregnancy screens named
Pig, Sheep and Cow have been tailored for the specific animal, the screen can be used for
any animal with the proximate body dimensions of the named animal. A fourth pregnancy
screen, called OTHER, can be used for all small and medium mammals, but not for large
mammals. In addition when testing large mammals at very early times, e.g. cows, mares,
bison, etc., the optional Deep probe should be used.
©2009 Renco Corporation
Page 4 of 13
PREG-ALERT PRO® INSTRUCTION MANUAL Rev.3
11/28/2009
Table 1: Approximate distances to near and far points of the uterus for various
animals at the gestation times shown.
Pigs & Goats
Cattle
Alpacas
Sheep
Horses
Llamas
Miniature Horses
Miniature Cattle
Distances
Days Gestation
2-8 in (50-200mm)
28-30
4-13.5 in (100-338mm)
25-30
1.6-6 in (40-150mm)
12-25
1.6-6 in (40-150mm)
28-30
4.7-13.5in (120-338mm)
14-18
2-6 in (50-150mm)
12-30
2-8 in (60-200mm)
14-18
4.7-8 in (120-200mm)
25-30
The above table is only a guide the purpose of which is to give the user some feel for the
distances involved. In use, the important thing to look for is a strong high spike or group of
spikes in the area of interest as displayed on the screen.
Pregnancy can be determined either by sensing the fetus or the interface between the
amniotic fluid and the far side of the intrauterine wall. When detecting the fetus(es), one
looks for 1 or more spikes near the center of the range. When looking for the amniotic fluid
interface at the far side of the uterus, one looks for one spike at the far end of range. In
some animals (cows and mares) the uterine wall thickens very early in pregnancy and the
instrument will display a spike from the near uterine wall (left end of the bar) in those cases.
©2009 Renco Corporation
Page 5 of 13
PREG-ALERT PRO® INSTRUCTION MANUAL Rev.3
11/28/2009
DISPLAYS
(Note: The fine ruler divisions are not shown in the displays below. The SENS setting is for
illustration only.)
HOLD
SENS-2
100
M
M
PREG
OTHER
BAT
PREGNANCY: SCREEN FOR OTHER
SMALL-MEDIUM MAMMALS
Above are several screen shots illustrating the typical displays for various functions. In the
Pregnancy: OTHER screen, the dotted vertical line is the vertical marker, which the user can
set to indicate the distance of any spike from the skin surface. The heavy solid vertical line
is representative of the actual reading. This might in fact be multiple closely spaced spikes.
In the COW pregnancy screen, the vertical marker is shown (for illustration purposes) near
the spike reading at the left end of the heavy solid bar beneath the graticule. If the test is
attempting to identify very early pregnancy, then since the reading is at the left end of the
black bar, it would probably be indicating a thickened uterine wall. (The Deep probe would
be used for this.) In actual use, if the user wanted to know the actual distance being
measured, the spike would be held using a HOLD key (the legend “HOLD” is displayed) and
DEPTH keys would then be used to superimpose the vertical marker over the reading and
the distance from skin to spike would be displayed.
The LOIN (high range) screen shown above indicates a reading at 150mm. The vertical
marker prevents anything beyond about 165mm from being displayed. Use of the marker is
optional. Pressing and holding the OPTION key momentarily while in the LOIN (high range)
©2009 Renco Corporation
Page 6 of 13
PREG-ALERT PRO® INSTRUCTION MANUAL Rev.3
11/28/2009
display, will switch to a second LOIN (low range) screen, which providing a range of 50140mm. (Pressing the OPTION key again switches to the 90-180mm display.)
(Measurements would appear in inches if the OPTION key had been used to select inches,
when the FAT screen was displayed.)
TESTING AND TEST SITES
As an instrument manufacturer, we are primarily instrument people and not animal people.
While we have done some development, much of the site information provided below is
taken from the literature.
The Preg-Alert Pro can be used with so many mammals that it is impractical to provide
detailed testing information for all of them. Therefore, we will show just a few so that the
operator will have an idea, pictorially, of the general procedure. Pregnancy testing should
be started on the right side with most mammals, but with alpacas, and mares, testing
should be started on the left side. If no pregnancy is detected, then try the other side in all
cases, but be cautious of the results in ruminate animals, where the rumen might interfere.
Fat and Loin testing should be done at what is conventionally called the “P2”” site, over the
10th rib and 6.5cm (2-3in.) off the backbone. (Some literature calls out the 12th rib, but at
least one researcher claims that the 10th rib produces a more accurate result because the
fat is smoother. We leave this decision up to the operator.) Many make measurements on
both the right and the left side of the backbone. In this preliminary writing, we have shown
one picture of the test site. This will be amplified in future manuals. Note however, that
“at the end of the day”, there is no “gold” standard in determining the accuracy of fat and
loin measurement. In the meanwhile, more complete information will be found in the PregAlert® Operator’s Manual© on our website at www.rencocorp.com
©2009 Renco Corporation
Page 7 of 13
PREG-ALERT PRO® INSTRUCTION MANUAL Rev.3
11/28/2009
3 FAT LAYERS
LOIN
Fat and Loin Measurement sites for Swine
Pregnancy Test Site for Swine
Begin Testing swine on right side and if not pregnant, try again on the left side. Testing can
begin at 18 days, testing every day until positive readings are obtained 2 days in a row.
Accuracy is greatest at 30 days.
©2009 Renco Corporation
Page 8 of 13
PREG-ALERT PRO® INSTRUCTION MANUAL Rev.3
11/28/2009
Pregnancy Test Site for Sheep
Top figure illustrates test site for very early checking at 25 days. Bottom figure illustrates
use at 35+ days. Test on left side if not successful. It may be necessary to remove wool and
dirt from test site.
Pregnancy Test Site for Alpacas
Begin testing alpacas on the LEFT side at about 45 days. Test on the right side if not
successful. After 60 days, test on right side first.
©2009 Renco Corporation
Page 9 of 13
PREG-ALERT PRO® INSTRUCTION MANUAL Rev.3
1. Alternate probe
placement for later
in gestation 7-9
months. Aiming
upward into the
abdominal cavity
11/28/2009
2. For early pregnacy, aim diagonally across
the pelvic cradle. (Upper shaded area.) As
gestation progresses, tilt the probe by changing
pressure on its top , so as to scan downward
into the abdominal cavity. (Lower shaded area.)
(The white circle represents the probe.)
Early pregnancy
probe placement.
Aim at 45° across
body to a point
halfway between
the hip bone and
the pin bone.
Pregnancy Test Site for Cows: Side and Top Views
Refer to the three views of the cow: For early pregnancy starting at about 22 days, you will
look for the thickened uterine wall, rather than amniotic fluid or the fetus. Aim the Deep
probe as shown on the right side in the upper region of the outline in the paralumbar fossa
a triangular region forward of the hook bone, just behind the ribs, and about 8 inches
(20cm) down from the backbone. Locate the lowest spot in the fossa into which the probe
will fit comfortably by pressing inward with your fist. Place the probe firmly against the skin
and point it halfway between the hook bone and pin bone pointing it slightly downward.
You don’t need to move the probe in order to scan the uterus, just rock and tilt.
1. Probe placement for early
pregnancy. Shaded area
represents area to scan.
2. Alternate probe placement
for later in gestation, 7-9
months. Shaded area
represents area to scan.
Pregnancy Test Site for Cows Back view
©2009 Renco Corporation
Page 10 of 13
PREG-ALERT PRO® INSTRUCTION MANUAL Rev.3
11/28/2009
Pregnancy Test Site Mares: Side View
Pregnancy Test Site for Mares: Left: Side View Right: Back View
Referring to the three pictorials for mares, place the Deep probe on the LEFT flank area
directly below the hip and in line with the bottom of the vulva. Aim slightly back and across
©2009 Renco Corporation
Page 11 of 13
PREG-ALERT PRO® INSTRUCTION MANUAL Rev.3
11/28/2009
the body and scan as shown. Side View Position #1 is for very early detection at around 1430 days. This a “sliding scale” and as gestation progresses you should move the probe
downwards within the area shown by the outline in the side view. Side View Position #2 is
for use after approximately 90-100 days and the Standard probe may be used.
Pregnancy Test Site: Goats
Begin testing at around 30-40 days, on the RIGHT side, 2 inches (5cm) in front of the rear leg
and 1 inch (2.5cm) above teat. If not successful test again on the left side. It may be
necessary to remove hair from the test site.
©2009 Renco Corporation
Page 12 of 13
PREG-ALERT PRO® INSTRUCTION MANUAL Rev.3
11/28/2009
A WORD ABOUT BATTERIES
This instrument is designed to use disposable AA size carbon-zinc batteries, of which there
are several types. For maximum time, if you are going to use the backlight feature
frequently, use the “Alkaline” variety and if not, use a non-alkaline variety. You may also
use rechargeable Nickel Metal Hydride batteries (NMH), but you must provide your own
charger and they will not give as long a time between charges as you get from the carbonzinc types. Just for reference, usage time with Backlight on and alkaline batteries is about
50 hours. With backlight off, about 150 hours.
WARNING! DO NOT MIX CARBON-ZINC AND NMH BATTERIES!!
When using NMH batteries, the batteries are fully charged when the battery charge
indicator, which appears on each display screen, indicates 1/4th – 3/8ths charged.
SERVICE:
There are no serviceable parts inside of the instrument. DO NOT ATTEMPT TO
DISASSEMBLE. For service, contact the factory:
RENCO CORPORATION
116 Third Ave North
Minneapolis, MN. 55401, USA
Tel: 612-338-6124
Fax: 612-333-9026
Email: [email protected]
Internet: http://www.rencocorp.com
CAUTION! DO NOT USE THE PREG-ALERT PRO ON HUMAN BEINGS
CERTIFICATION AND COMPLIANCE
FCC Required §15.21 Information to User: Caution! Changes or modifications not expressly
approved by RENCO CORPORATION could void the user's authority to operate the equipment.
FCC §15.105 Information to User: NOTE: This equipment has been tested and found to comply
with the limits for a Class A digital device, pursuant to Part 15 of the FCC Rules. These limits
are designed to provide reasonable protection against harmful interference when the equipment is
operated in a commercial environment. This equipment generates, uses, and can radiate radio
frequency energy and if not installed and used in accordance with the instruction manual may
cause harmful interference to radio communications. Operation of this equipment in a residential
area is likely to cause harmful interference in which case, the user will be required to correct the
interference at his own expense. This equipment also complies with Canadian requirements.
This equipment has been certified to be in compliance with CISPR 11, the EMC Directive
89/336/EEC, AS3548, and applicable Harmonized Standards.
©2009 Renco Corporation
Page 13 of 13