1
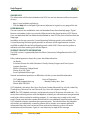
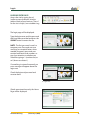
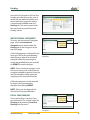
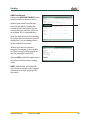
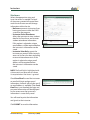
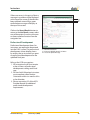
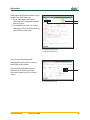
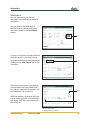
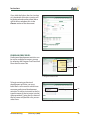
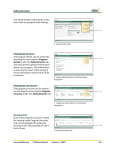
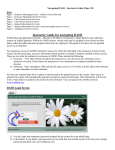
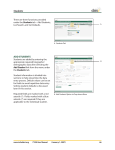
Technical Requirements
HARDWARE/SOFTWARE
REQUIREMENTS
The following list of technical
requirements is highly recommended
for the users of the DAISI system:
• Computer
- 1 Ghz speed computer with a
minimum of 256 Mb of RAM
• Operating System
- Windows XP, Windows Vista
- Macintosh OSX
• Internet Browser
- Mozilla Firefox 2.0+
- Internet Explorer 6.0+
- Netscape 6+
- Safari 1.03+
- All browsers will need to have
JavaScript enabled
• High Speed Internet
- Ethernet
- DSL
- Cable
- High-speed wireless connection
• Pop-ups must be allowed for the
system to work properly.
Screen Resolution
Screen resolution should be set at
1024 X 768 – since lower resolution
requires scrolling left to right.
Determine the operating system used
on your computer and then follow
the instructions provided to set the
resolution correctly.
www.iccbdaisi.org
(February 1, 2009)
6
Technical Requirements
Windows XP
From the Start menu - select Control
Panel.
A
A. Control Panel Option
Once the Control Panel is displayed–
select the Displays icon.
B
B. Displays Icon
NOTE: Be sure you are in Classic View
(all Control Panel icons are showing).
If not, under Control Panel in the left
pane, select Switch to Classic View.
C
C. Classic View Button
www.iccbdaisi.org
(February 1, 2009)
7
Technical Requirements
In the Display Properties dialog boxselect the Settings tab.
D
On the Settings tab, under Screen
Resolution-select a screen resolution
value by moving the slider arrow to set
the resolution to 1024 X 768 and select
OK.
Close the Control Panel by clicking on
the Close button.
E
D. Settings Tab
E. Screen Resolution
Mac OS X
Select System Preferences from the
Apple menu.
F
F. System Preferences
www.iccbdaisi.org
(February 1, 2009)
8
Technical Requirements
Open the Displays Panel and choose
the Display tab.
G
G. Displays Tab
Resolution options are listed on the left
side of the Displays tab. Select 1024 X
768 for optimal viewing.
Close System Preferences when done
by clicking on the red X in the upper left
corner.
H
H. Resolution Options
www.iccbdaisi.org
(February 1, 2009)
9
Help/Support
ONLINE HELP
This information will also be included on the DAISI site and can be accessed from two points
of entry:
• https://www.iccbdaisi.org/help.jsp
• Click the Help link in the upper right corner (adjacent to Logout) on any page of the site.
User Manuals
The user manuals are available for view and download from the online help page. Digital
formats and updates to the user manual will be posted at the above location in PDF format. Users can download the free Adobe Acrobat Reader to view PDF files from a link found on the
Help page.
In addition to the user manual, a Custom Reporting Definition guide is also available. The
Custom Reporting Definition guide provides an overview of the organizational structure
and fields available for the Ad Hoc Reporting tools within DAISI. Please use this guide as a
reference tool when working with Ad Hoc Reports.
Support Contacts/Information
The DAISI system is supported by both the Illinois Community College Board and the CAIT
Helpdesk. Policy-related questions about the system should be referred to:
Jay Brooks
Associate Director for Adult Education & Family Literacy Program and Data System
Support Specialist
Illinois Community College Board
Phone: (618) 942-7460
Email: [email protected]
General and technical questions or difficulties with the system should be referred to:
CAIT Helpdesk Email: [email protected]
Phone: (866) 250-5494 Hours of Operation:
• Monday-Friday: 8am CAIT Helpdesk is closed on: New Years Day, Easter Sunday, Memorial Day, July 4th, Labor Day,
Thanksgiving, Christmas Eve, and Christmas Day. Hours are subject to change.
Note: The CAIT Helpdesk maintains a ticket-based system of all contact with end users. As a
result, when initiating contact with the Helpdesk via email, you will receive an auto-generated
email with a ticket number for tracking purposes. It is not necessary to reply to this initial
email. Please note the ticket number and include it in any additional communication with the
CAIT Helpdesk to better streamline the response process. An individual from the Helpdesk
will contact you individually via email or phone with a solution or to request additional
information after the issue is reviewed. Once resolved, the ticketing system will send a
resolution email confirmation. Again, it is not necessary to reply to this message.
www.iccbdaisi.org
(February 1, 2009)
10
Login
LOGGING INTO DAISI
Access the site by typing the url
(uniform resource locator) into the
address block of your browser. The url
for the site is: https://www.iccbdaisi.org.
The login page will be displayed.
Type the login name and the password
that have been provided and press the
SUBMIT button to enter the site.
Note: The first password issued is a
temporary one. Passwords are case
sensitive so use capital letters when
needed. Temporary passwords can
contain both letters and numbers so
pay close attention to whether you
should be typing a 1 (number one) or
an l (lower case letter L). If something is entered incorrectly, an
error message will appear above the
login area.
A
Check the login and password and
re-enter them.
A. Login Error
If both are entered correctly the Home
Page will be displayed.
www.iccbdaisi.org
(February 1, 2009)
11
Login
FORGOTTEN PASSWORD
If you forget your password, click on the
link provided on the login page.
B
B. Forgot your Password link
The forgotten password page will be
displayed.
Enter the email address that is on file
for you in the space provided and press
the SUBMIT button. If the email is found
within the system, a new password will
be sent via email. Once sent, you will
receive a confirmation page on-screen.
NOTE: The login and password
information is system-generated
and sent to your email account from
[email protected]. Watch for
this address in your Bulk or Junk mail
folders.
www.iccbdaisi.org
(February 1, 2009)
12
Login
CHANGE PASSWORD
The first time a password is used you
will be prompted to change it.
After logging in the first time, the
change password screen will be
displayed.
First, enter your assigned password.
Then, enter your new password. This
is one that you make up, and it should
be one that you can easily remember.
Re-type the same made up password
to confirm it, and press the SUBMIT
button.
Note: Passwords must be between 6
and 32 characters long. They can be all
alpha (A – Z) or all numeric (0 – 9) or a
combination of both. Just remember,
if you use a capital letter when you set
the password, you must also use one
when you enter the system.
www.iccbdaisi.org
(February 1, 2009)
13
Home Page
Successful entry of the login and
password will display the Home Page.
The Home Page is divided into two
sections – the navigation bar (located
along the top of the screen) and the
welcome/information area.
A
B
A. Navigation Bar
B. Welcome/Information Area
WELCOME/Information
This display area is divided into four
sections.
Welcome
This section displays a general welcome
message for users.
FAQ’s
The FAQ area provides a link to the
Excellence in Adult Education website
maintained by the Illinois Community
College Board as a resource for Adult
Education providers. This link will open
in a new browser window.
The Excellence in Adult Education
website offers a discussion forum
dedicated to assisting users of the DAISI
system with questions and provides
ability for end users to communicate
with one another.
www.iccbdaisi.org
(February 1, 2009)
14
Home Page
Profile
Information about the user is displayed
here.
Clicking on the Change Password
link provided will display the change
password screen.
Announcements
Information will be posted here by the
ICCB for users as needed.
Clicking on the link provided will
display the announcements. Each
announcement screen includes a link
to the previous announcement and the
next one. This provides the ability to
scroll from message to message.
www.iccbdaisi.org
(February 1, 2009)
15
Navigation Menu
SITE NAVIGATION
Each of the individual tabs listed at the
top of the screen has menu options.
This is the navigation bar and will be
displayed on each screen throughout
the system.
The label on the tab identifies the area
of the system this is controlled by the
options listed under the tab. A dropdown menu to the functions available is
provided when you hover over a tab.
For example, the Funding tab is used
to access Instructional Categories and
Fiscal Year Funding.
A
A. Funding Tab
Move the mouse over the option to
be selected (such as Instructional
Categories) and click on it. The desired
screen will be displayed.
The order of the tabs on the navigation
bar is: Home, Students, Classes, Courses,
Instructors, Funding, Administration,
and Reporting.
Return to the Home Page at any time
by hovering over the Home tab and
clicking on it.
B
B. Home Tab
www.iccbdaisi.org
(February 1, 2009)
16
Funding
Instructional Categories and Fiscal Year
Funding must be set up at the start of
each fiscal year before any other entry
can be done for a program. Funding
is entered and modified under the
Funding tab. This records grant funds
that are tied to instruction for each
funding source.
Instructional Categories
To access the Instructional Categories
page, select the Instructional
Categories menu option under the
Funding tab in the navigation at the
top of the page.
A list of all categories is displayed for the
fiscal year. Click on the corresponding
check boxes to select all instructional
categories offered by your program
during the specified fiscal year, and click
on SUBMIT to save the changes.
A
A. Instructional Categories Option in Drop-down
Navigation
Note: If an instructional category is tied
to a course, classes, and students there is
no option available to remove it from the
area. The checkbox will be grayed, out
signifying that it cannot be removed.
If allowed, categories can be removed
by clearing the corresponding
checkbox and clicking SUBMIT.
Note: Please see the Appendix for
Instructional Category definitions.
Fiscal Year Funding
Fiscal year funding is setup by fiscal
year and source. This is done under the
Funding tab by selecting Fiscal Year
Funding from the menu.
B
B. Fiscal Year Funding Option in Drop-down
Navigation
www.iccbdaisi.org
(February 1, 2009)
17
Funding
Funding Multipliers
The funding multipliers are displayed
near the top of the screen. Once the
multipliers are entered by the ICCB
for the fiscal year, they cannot be
changed. Multiplier values are used in
the calculation of student generation
amounts and vary each fiscal year.
C
D
Funding Sources
Funding sources are listed on this page,
as well. Funding sources can be added
or changed throughout the year. By the
July 30 reporting deadline each year,
the Budget Line 1 Instruction Totals
within DAISI must exactly match the
Budget Line 1 expenditures appearing
on the final Expenditure Reports.
C. Funding Multipliers
D. Funding Sources
The funding source and instructional
category(ies) are displayed to the left.
The columns of information displayed
for each source are: Total Instruction
(Line 1 - Budget Line 1), Amount Gento-date (Generated-to-date), and %
Gen-to-date (Percent Generated-todate). E
F
G
H
E. Fund Source and Instructional Category
F. Total Instruction
G. % Gen-to-date
H. Amount Gen-to-date
www.iccbdaisi.org
(February 1, 2009)
18
Funding
Generation
Click on the View Generation link to
display funds generated by instructional
type.
This displays the units of instruction and
the foundation level reimbursement
for each instructional category. The
foundation level reimbursement is
calculated based on the number of units
multiplied by the funding multiplier. For
example, the equation for calculating the
foundation level reimbursement for the
I. View Generation Link
ESL category is: 3.87 * $86.07 = $333.09.
I
Generation is a formula by which a unit
of instruction is converted to real dollars,
based on established rates in state
statute. It is calculated based on units of
instruction times the established rates,
which are hard-coded into DAISI each
fiscal year. The Instructional line (Budget
Line 1) of each budget for State Basic,
State Public Assistance, Federal Basic,
and Federal EL/Civics must be generated,
and records must support the claims. Funds must be returned if generation
requirements are not met. Therefore, it
is important to review Generation Status
periodically. 40% of each funding source
must be generated by the mid-year mark,
and 100% of each funding source must
be generated by the end of the year.
The Instructional line of the State
Performance budget does not have
to be generated; however, if 51% of
the instructional costs for a student
are funded with ICCB AEFL State
Performance funds, the student must
be assigned to State Performance when
entered into DAISI. Please see Section 3.3
of the AEFL Provider Manual for further
information.
www.iccbdaisi.org
(February 1, 2009)
19
Funding
Add Fund Source
Click on the ADD FUND SOURCE button
to add a new fund source to the list.
Select a fund source from the drop
down list provided or type the first
number of the fund source. Only the
sources that have not been setup will
be available. This is a required entry.
Enter the dollar amount of the funding.
This comes from the total Instructional
Budget (line 1 on your budget forms)
for the selected fund source.
J
J. Add Fund Source Button
Select at least one instructional
category. If a category is not available
for a fund source, it will be grayed out
and not selectable from the list.
Click on ADD to add the funding source
and return to the Fiscal Year Funding
screen.
Note: Federal Basic and Federal EL/
Civics funds cannot be used to support
Vocational or Foreign Language GED
instruction.
www.iccbdaisi.org
(February 1, 2009)
20
Funding
Edit Fund Source
Information about each funding source
is listed on the Fiscal Year Funding
screen. To edit the funding source
information, click on the link for the
appropriate code and name.
K
K. Edit Fund Link
The edit screen will be displayed.
Edit the funding amount by typing in
the new dollar amount. The amount
can be modified at any time but must
always match with financial records
related to the cost of instruction.
Instructional categories can be added at
any time and can be removed from the
list as long as they have not been used.
Click on UPDATE to save the changes
and return to the Fiscal Year Funding
screen.
Click on CANCEL to exit this screen
without saving the changes.
A fund source can be deleted until it is
used for classes by clicking the DELETE
button.
L
L. Delete Button
www.iccbdaisi.org
(February 1, 2009)
21
Instructors
Instructors are added to the system
under the Instructors tab. This area is
also where lists of instructors can be
viewed and instructor information can
be edited.
add instructors
To add an instructor to the system,
select Add Instructor from the
Instructors tab. The instructor
information screen is divided into the
following five sections:
Biographic/Demographic
Enter as much information as is
available about the instructor. The
fields preceded by a red asterisk (*)
and highlighted on screen with red
text are required fields. Some fields
require text entry and some (such as
gender and ethnicity) provide a dropdown list to select from. Enter the
required information in the Biographic/
Demographic section. The system will
automatically check for duplicates and
prompt the user at the top of the page
if any are identified. Once an instructor
has been added to the system the
sub-menu will be available. These are
discussed later in the document under
the List/Search function.
A
B
C
A. Add Instructor Option in Drop-down Navigation
B. Instructors Sub-Menu
C. Indicates Required Field
Note: When a drop-down list is
present, you can either select the item
with your mouse from the drop-down
list or type the first letter of the item
into the box, and the appropriate item
will be inserted.
www.iccbdaisi.org
(February 1, 2009)
22
Instructors
Note: If an instructor is working for
multiple programs, the instructor
must have a separate record for each
program. Within one program, the system
compares SSN, Last Name, and Birth
Date for possible duplicate accounts. If
any suspected duplicates are found a
message is displayed. D
Note: Fields that have formatted data
such as Social Security Number (000-000000) do not require you to enter the
separators. Key in only the numbers. To
erase the data and make a change to
an entry, highlight the existing data and
then press the delete key.
D. Duplicate Message
Contact Information
Enter the address information as
available. The default value for the state
is Illinois. Other fields can have default
values set for your individual program
(instructor defaults will be described later
in this document).
E
E. Contact Information
www.iccbdaisi.org
(February 1, 2009)
23
Instructors
Education/Employment
Enter the appropriate information paying
close attention to the required fields.
1. Employee Status: Employment
status (full or part-time) as an
instructor in your program.
2. Employment Date: Date first
employed by your program.
3. Years Experience at Date of Hire:
Years of experience in the field of
adult education at time initially
employed by your program.
4. Primary Teaching Area: Type of
instruction teacher spends the
majority of time providing.
5. Secondary Teaching Area: Type
of instruction teacher spends the
minority of time providing. May be
left blank of marked Not Applicable
if teacher provides only one type of
instruction.
F
F. Education/Employment
Custom Fields
If custom fields have been defined
they will appear on the screen just
below the education/employment
section. An explanation of how to setup
the custom fields will be provided
in the Administration section of this
document.
G
G. Custom Fields
www.iccbdaisi.org
(February 1, 2009)
24
Instructors
Site Access
Select the appropriate status and
issue site access as needed. The level
of site access granted will control how
much the instructor can edit/change
information within the site.
• No Access: prevents instructors from
having an account within the DAISI
system for the program.
• Instructor Enter Attendance:
allows the instructor to view student
data for his/her classes and to enter
student attendance information.
If this option is selected a unique
email address will be required before
the instructor’s information can be
saved.
• Instructor View Only: grants the
instructor an account with view-only
access to his/her class data, including
roster and attendance views. If this
option is selected a unique email
address will be required before
the instructor’s information can be
saved.
H
H. Status
Note: The Email field is highlighted with
a blue asterisk and blue text to indicate
it’s required when Site Access is granted.
Check Send Email to send the instructor
an email with login and password
information. An email will only be sent if
an email address is available. If the Send
Email box is not checked, the login and
password information will be displayed
on the screen once the instructor’s
information is successfully saved.
You will need to print the information
and give it to the instructor.
Click SUBMIT to save the information.
www.iccbdaisi.org
(February 1, 2009)
25
Instructors
Submission Errors
Note: If the information entered for an
instructor is not valid or is incomplete,
an error message will be displayed in
a red box near the top of the screen.
Any error messages displayed must
be resolved before the instructor’s
information can be saved successfully.
I
I. Error Message
List/Search Instructors
Instructor information can be edited
and reviewed under the Instructors
tab by selecting the List/Search option
from the menu.
Note: There is a sub-menu available on
this screen under the heading. Hover
over the option to display the link.
J
K
L
M
N
List All – displays all instructors without
regard for search criteria.
List Current FY – displays all instructors
assigned to classes within the current
fiscal year of the system.
Add New – brings up a new instructor
entry screen. This is the same screen
displayed under the Add New function
previously discussed.
J. List/Search Option in Drop-down Navigation
K. Prof. Dev. Report Link
L. Add New Link
M. List Current FY Link
N. List All Link
Prof. Dev. Report – prompts user to
select either PDF or Excel output of
Professional Development-Summary
report including all instructors in results
list.
www.iccbdaisi.org
(February 1, 2009)
26
Instructors
Search – allows you to enter specific
data to use in a search. Click on the box
in front of the search criteria to include
the field in the search and enter the
data to use in the text field, or select a
value from a drop down menu. A partial
search can be done on last name or first
name by entering the first letter(s) of
the name.
For example, checking the first name
box and typing the letter “T” then
clicking on SEARCH will display all
instructors with a first name beginning
with “T”.
O
O. Search
It is important to note that searches
are inclusive. Selecting last name and a
birth date range requires the instructor
match on last name AND on the birth
date range to be listed in the search
results.
Once the results are displayed, a link on
the instructor name is provided to view
more detail for each instructor listed in
the search results.
P
Q
R
S
Also note there are icons for
professional development and view
classes displayed for each instructor.
Clicking on any of the icons will take
you directly to the information it
references.
www.iccbdaisi.org
(February 1, 2009)
P. Instructor Name link
Q. Delete link
R. View Classes Icon
S. Prof. Dev. Icon
27
Instructors
edit instructors
Add/Edit Details
Click the link on the instructor’s name to
display the Add/Edit Details screen.
T
Please note the instructor sub-menu
is available from the Add/Edit Details
page.
The information displayed for the
instructor is the same information that
was entered for the Add New Instructor
screen. It allows editing of each
section entered for the new instructor
-- Biographic/Demographic, Contact,
Education/Employment, Custom Fields,
and Status.
T . Instructor Sub-Menu
Changes can be made to any of these
areas. Required fields must still be
completed. Duplicates are not allowed
and will be checked automatically by
the system.
Note: Once changes are entered be
sure to click on SUBMIT to save them.
Changes will not be saved unless the
SUBMIT button is used.
www.iccbdaisi.org
(February 1, 2009)
28
Instructors
If there are errors in the entry of data a
message in a red box will be displayed
at the top of the screen. If the data has
been updated successfully a green
confirmation message will display at
the top of the screen.
U
V
W
Click on the Search Results button to
return to the List/Search screen, select
one of the options from the sub-menu
or choose another function from the
navigation bar.
Professional Development
Professional development hours for
instructors are required to be entered
into the DAISI system. The professional
development screen displays hours
by activity that an instructor has spent
on professional development for the
specified fiscal year.
U. Search Results Button
V. Instructors: Add/Edit Details Sub-Menu
W. Successful Update Message
Policy at the ICCB now requires:
1. All Instructional staff must receive
at least 6 hours of professional
development training each fiscal
year.
2. All New Adult Education Instructors
must complete a New Teacher
Orientation within six months of his
or her hire date.
3. Please see section 9.2 of the AEFL
Provider Manual for additional
professional development
requirements.
www.iccbdaisi.org
(February 1, 2009)
29
Instructors
Professional development hours can be
entered into DAISI two ways:
1. By an individual instructor by
selecting Prof Development link for
each instructor.
2. For multiple instructors at once by
selecting the Prog Prof Devel link on
the instructors menu tab.
X
Y
X. Program Prof. Devel. Link
Y. Prof. Development Link
You can view the professional
development status of an instructor
from either of two places.
You can click the briefcase icon in
the Prof. Dev. Column next to the
instructor’s name on the List/Search
screen.
Z
Z. Prof. Development Link
www.iccbdaisi.org
(February 1, 2009)
30
Instructors
Or, once an instructor has been selected
from the search list, the professional
development information can be
reviewed by clicking on the Prof.
Development link in the sub-menu.
The professional development screen
provides a summary of activity for the
selected instructor for the specified
fiscal year. Each of the professional
development activities available are
listed for review. The total hours for
each activity are listed along with an
overall total. If the instructor is a teacher
who has met the six hour requirement,
the YES radio button near the bottom of
the screen will be automatically marked
by the system.
To add additional hours for an
individual instructor, click on the ADD
HOURS button and the entry screen will
be displayed. AA
BB
CC
DD
AA. Add Hours Button
BB. Total Hours for Each Activity
CC. Total Hours Attended
DD. 6 Hr. Requirement Radio Button
Add Hours-Individual
Activity date, activity type, and hours
attended are required pieces of
information. Activities can be selected
by highlighting a selection on the droplist or by entering the first letter of the
text description.
www.iccbdaisi.org
(February 1, 2009)
31
Instructors
For example, if you type the letter “S” the
first activity that begins with the letter
will be highlighted. Type it again and
the second activity that begins with the
letter will be highlighted. In this case,
typing the letter “S” twice will highlight
“Special Project Institutes/Retreats”.
Up to five activities can be entered from
this screen. If you need to enter more
than five, click on the SUBMIT button
to save the changes and then select the
ADD HOURS button to add, enter, and
submit additional entries.
After the data has been submitted
and updated you will be returned to
the Professional Development screen
where you can review the changes.
Detailed information about each
category can be displayed by clicking
on the link provided in the Total Hoursto-date column.
To return to the Prof. Development
summary, click the Prof. Development
link in the upper right.
www.iccbdaisi.org
(February 1, 2009)
EE
EE. Prof. Development Link
32
Instructors
View Classes
You can view the classes that an
instructor is assigned to from either of
two places.
You can click on the folder icon in
the View Classes column next to the
instructor’s name on the List/Search
screen.
FF
FF. View Classes Icon
Or, once an instructor has been selected
from the search list, the list of classes
assigned to him/her can be reviewed by
clicking on the View Classes link in the
sub-menu.
GG
GG. View Classes Link
All classes the instructor is assigned to
in the current fiscal year will be listed
first. Classes in previous fiscal years will
be listed below the current list.
HH
While the default is to display all of the
classes, clicking on the List Current link
will display only the current classes for
the instructor.
II
HH. List Current Link
II. Click to View Class Details
www.iccbdaisi.org
(February 1, 2009)
33
Instructors
If you click the link on the class/section
no., the details of the class/section will
be displayed and can be edited. More
will be discussed about this in the
Classes section of the document.
Program Prof Devel
Professional development activities can
be set for multiple instructors at once
by selecting the Program Prof Devel link
from the instructors tab.
JJ
JJ. Program Prof Devel link
To begin entering professional
development activities, you must
build the list of instructors which have
common professional development
activities. To add an instructor to the list,
type the name of the instructor into the
space provided. Typing the first letter of
the last name will provide a list you can
select from.
www.iccbdaisi.org
(February 1, 2009)
KK
KK. Instructor Drop-dow List
34
Instructors
After the first instructor is selected, a list
of instructors will begin to build within
the current display. To add additional
instructors, continue the selection
process described above. To remove an
instructor on the list, select the Delete
link next the instructor you would like
to remove.
LL
LL. Delete link
Once all instructors with common
professional development activities
are selected and present on the list,
enter the Activity Date, Activity Type,
and Hours Attended for each common
activity. You may also enter Activity
Cost and Notes as optional items.
Up to five common activities may be
applied to the list of instructors from
this screen. If you need to enter more
than five, click on the SUBMIT button
to save the changes and then repeat
the process outlined above to submit
additional entries.
MM
MM. Activity Entry Section
When the data is submitted, the
professional development activities
entered will apply to all instructors
within the list displayed. To verify
the activities were added, search for
one of the instructors and view the
professional development summary
page.
www.iccbdaisi.org
(February 1, 2009)
35
Instructors
Set Defaults
Default values can be set for any of the
instructor entry fields by selecting Set
Defaults from the Instructors tab.
NN
Default values are data values that will
display in the fields each time a new
instructor is added. They are designed
to aid in data entry so that values used
most often are completed without
having to enter them each time.
Once the default values are entered,
click on SUBMIT to save them. The
default values will display when a new
instructor is entered. To change values
during data entry, just highlight and
delete the default value and enter the
appropriate information.
www.iccbdaisi.org
(February 1, 2009)
NN. Set Defaults Option in Drop-down Navigation
36