1
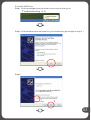
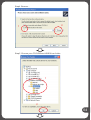
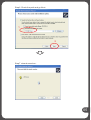
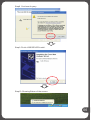
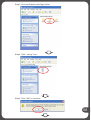
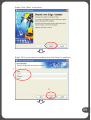
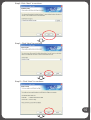
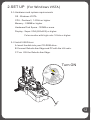
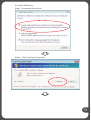
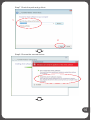
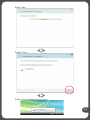
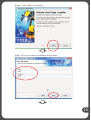
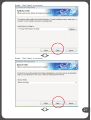
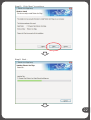
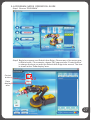
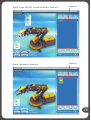
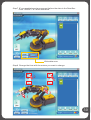
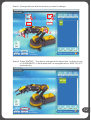
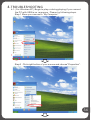
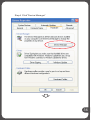
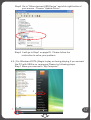
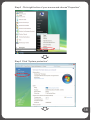
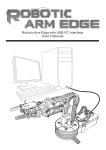
Robotic Ar m Edge with USB PC Interface
User's Manual
Robotic Arm Edge with USB PC Interface
User's Manual
CONTENTS
Product Introduction
01
Warning
01
Caution
01
1.SET UP (For Windows XP)
1-1.Hardware and system requirements
02
1-2.Install USB Driver
02
1-3.Install MAIN PROGRAM
07
2.SET UP (For Windows VISTA)
2-1.Hardware and system requirements
12
2-2.Install USB Driver
12
2-3.Install MAIN PROGRAM
18
3.HOW TO PLAY
3-1.Start the program
24
3-2.Opening animation
24
3-3.MENU
24
3-4.BASIC MODE
25
3-5.PROGRAM MODE
26
3-6.PROGRAM MODE OPERATION GUIDE
27
4.TROUBLESHOOTING
4-1.For Windows XP
34
4-2.For Windows VISTA
37
4-3.USB port connection
41
4-4.Gearbox movement
41
Product Introduction
This kit allows your existing Robotic Arm Edge to communicate
with your personal computer through the USB port.
It is compatible with Windows XP / Vista operating system.
Software includes below functions:
●Basic: Use your keyboard or mouse to have real time manual
control of the arm.
●Programming: Create , edit , load , or save programmable files.
It creates a fun way of learning and experimenting with your Robotic
Arm Edge through your computer.
Warning
All rights reserved, reproduction in any manner in whole or in part
without permission of OWI Inc. is prohibited.
Caution
To prevent damage to the board , kindly avoid the following :
◆ high humidity.
◆ direct sunlight.
◆ static electricity.
◆ reach of small children.
◆ liquid or flammable objects.
Never disassemble or reassemble the interface board
as it may cause short circuit, injury or electric shock.
01
1.SET UP (For Windows XP)
1-1.Hardware and system requirements
OS : Windows XP
CPU : Pentium3, 1.0GHz or higher
Memory : 256MB or higher
Hardware Disk Space : 100MB or more
Display : Super VGA (800x600) or higher
Color monitor with high color 16 bits or higher
1-2.Install USB Driver
A.Insert the disk into your CD-ROM drive .
B.Connect Robotic Arm Edge and PC with the USB cable.
C.Turn ON the Robotic Arm Edge.
Turn ON
02
D.Install USB Driver .
Step1 (If this message does not show on your screen then go to
Troubleshooting 4-1 .)
Step2 (If this window does not show on your screen then go straight to step 3.)
Step3
1
2
03
Step4 Browse...
2
1
Step5 Choose your CD-ROM and USB Driver folder.
1
2
04
Step6 Check the path and go Next.
1
2
Step7 wizard searches..
05
Step8 Continue Anyway
Step9 Finish USB DRIVER install.
Step10 Showing Below of the screen.
06
1-3.Install MAIN PROGRAM
Step1 Choose “My Computer”.
Step2 Click your CD-ROM icon.
07
Step3 Choose Robotic Arm Edge folder.
Step4 Click “ setup ” icon.
Step5 Click “OK” to continue.
08
Step6 Click “Next” to continue.
Step7 Fill in your name or company and click “Next” to continue.
1
2
09
Step8 Click “Next” to continue.
Step9 Click “Next” to continue.
Step10 Click “Next” to continue.
10
Step11 Wait...
Step12 Click “Close” to continue.
Step13 Finish setup
11
2.SET UP (For Windows VISTA)
2-1.Hardware and system requirements
OS : Windows VISTA
CPU : Pentium3, 1.0GHz or higher
Memory : 256MB or higher
Hardware Disk Space : 100MB or more
Display : Super VGA (800x600) or higher
Color monitor with high color 16 bits or higher
2-2.Install USB Driver
A.Insert the disk into your CD-ROM drive.
B.Connect Robotic Arm Edge and PC with the USB cable.
C.Turn ON the Robotic Arm Edge.
Turn ON
12
D.Install USB Driver .
Step1 Choose the first choice.
Step2 Click “Continue” to go next.
13
Step3 Choose the third choice.
Step4 Choose the second choice.
14
Step5 Click”Browse”
Step6 Click your CD-ROM and choose USB Driver folder. Click “OK” to continue.
1
2
15
Step7 Check the path and go Next.
1
2
Step8 Choose the second choice.
16
Step9 Wait...
Step10 Close
Step11 Showing Below of the screen.
17
2-3.Install MAIN PROGRAM EDGE
Step1 Go to computer choice.
2
1
Step2 Click your CD-ROM icon.
18
Step3 Choose Robotic Arm Edge folder.
Step4 Click “ setup” icon.
Step5 Choose the second choice.
19
Step6
Click “Next” to continue.
Step7 Fill in your name or company and go next.
1
2
20
Step8
Click “Next” to continue.
Step9
Click “Next” to continue.
21
Step10
Click “Next” to continue.
Step11 Wait...
22
Step14 Close
Step15 Finish setup
23
3.HOW TO PLAY
3-1.Start the program
Click “Robot Arm Edge”icon on your desktop to start the program.
Robot Arm
Edge
3-2.Opening animation
Click “PLAY” to get into the program.
3-3.MENU
Choose a mode to play.
【MENU】
BASIC mode
PROGRAM mode
Quit
24
3-4.BASIC MODE
Motion area
Label
Back to menu
Control button
Status
Control mode for
Keyboard or Mouse
Mouseover effect: Scroll the mouse wheel to operate motor
25
3-5.PROGRAM MODE
Control button
Data display
Label
File area
Data box
Program display
area
Motion
area
Program tools
Write data area
Status
Control mode for
Keyboard or Mouse
Write data area
ENTER : Fix the total operation time in the program display area.
CLEAR : The timer is reset to “0”.
File area
NEW : Create a new file.
OPEN : Open a saved file.
SAVE : Save a created program.
CLOSE : The display goes back to Menu
Program tools
START : The program in the program display area is executed.
STOP : The program under execution is stopped.
REWIND : Reversed for the time specified in the program display area and
Robotic Arm Edge goes back to the original position.
DELETE : Selected command in the program display area is deleted.
26
3-6.PROGRAM MODE OPERATION GUIDE
Step1 Choose “PROGRAM” .
Step2 Begin to program your Robotic Arm Edge. Choose any of the motor gear
in Motion area. For example, choose “M1”gear and use “Control button”
to change the time you want the Robotic Arm Edge to be moved. The time
is shown at the “Data display”area.
Control
button
2
Data
display
area
1
27
Step3 Press “ENTER” to write the data in “Data box”.
Step4 The data in “Data box”.
Data box
Data box
28
Step5 Keep to choose another motor gear. Choose “M1” and “M3” gear and
change the data.
4
2
3
1
Step6 Press “ENTER” . The data is written into the “Data box” at the same time.
29
Step7 IF you want to insert a movement before the data in the Data Box.
Click “INSERT” at “ Write data area ”.
Write data area
Step8 Change the time with the motors you want to change.
2
4
3
1
30
Step9 Press “ENTER” . The data is inserted into the “Data box” at the same time.
Step10 To overwrite the data. Click “OVERWRITE” at “ Write data area ”.
31
Write data area
Step11 Change the time with the motors you want to change.
4
2
3
1
Step12 Press “ENTER” . The data is changed at the same time. And the choice
of “OVERWRITE” in“ Write data area ” is changed back to “ADD TO LIST”
automatically.
32
Step13 To see the movement you have been set . Press “START” in
“Program tools” area.
Program
tools
Step13 The movement data will show on screen at the same time while
the Robotic Arm Edge is moving.
33
4.TROUBLESHOOTING
4-1 ( For Windows XP ) Begin to play or during playing,if you connect
the PC with USB is no response. Please try following steps.
Step1 Move your mouse to “My Computer”.
2
1
Step2 Click right button of your mouse and choose”Properties”.
34
Step3 Click “Hardware”.
35
Step4 Click”Device Manager”
36
Step5 Go to “Other devices\USB Device” and click right button of
your mouse. Choose “Update Driver”.
OWI
Step6 It will go to Step1 on page03. Please follow the
instruction to solve your problem.
4-2 ( For Windows VISTA ) Begin to play or during playing,if you connect
the PC with USB is no response.Please try following steps.
Step1 Move your mouse to “My Computer”.
OWI
2
1
37
Step2 Click right button of your mouse and choose”Properties”.
Step3 Click “System protection”.
38
Step3 Click “Continue”.
Step4 Click “Hardware”.
39
Step5 Click”Device Manager”
Step5 Go to “Other devices\USB Device” and click right button of
your mouse. Choose “Update Driver Software...”.
OWI
40
Step6 Choose the second choice. It will go to Step1 on page13.
Please follow the instruction to solve your problem.
OWI
4-3 If there is no " Other devices " shown on your computer.
Please reconnect your Robotic Arm Edge with computer or change
other USB port of your computer.
OWI
4-4 If the gearbox dose not work smoothly. Please Check motor
wire connection.
41