Download user manual - Instant Developer Documentation

Transcript
User's Guide
Pro Gamma Instant Developer
The easiest and fastest way to develop
Enterprise-class Rich Internet Applications
Fourth Edition - January 2014
Andrea Maioli – Instant Developer: User's Guide
Summary
Why Instant Developer?........................................................................................................... 7
1.1 The current situation ......................................................................................................... 7
1.2 Instant Developer .............................................................................................................. 8
1.3 Relational programming ................................................................................................... 9
1.4 The RD framework ......................................................................................................... 14
1.5 The benefit for programmers .......................................................................................... 20
1.6 Organization of the book ................................................................................................ 21
1.7 Anatomy of an In.de project ........................................................................................... 22
1.8 Questions and answers .................................................................................................... 23
Manage databases with Instant Developer ............................................................................ 25
2.1 What can developers do with the In.de database management module? .......................... 25
2.2 Structure of a database within an In.de project ................................................................ 26
2.3 Database configuration ................................................................................................... 27
2.4 Creating tables and fields ................................................................................................ 36
2.5 Relationships between tables .......................................................................................... 41
2.6 Importing an existing database structure. ........................................................................ 45
2.7 Management of indexes .................................................................................................. 49
2.8 Creating views, stored procedures, and triggers .............................................................. 49
2.9 Building and updating the database ................................................................................. 50
2.10 Creating database schema documentation ..................................................................... 55
2.11 Questions and answers .................................................................................................. 57
Structure of an In.de application ........................................................................................... 58
3.1 The application object ..................................................................................................... 58
3.2 Life cycle of a session ..................................................................................................... 61
3.3 In-memory database (IMDB) .......................................................................................... 70
3.4 The form object .............................................................................................................. 74
3.5 The main menu ............................................................................................................... 85
3.6 Toolbars and indicators ................................................................................................... 88
3.7 Timers ............................................................................................................................ 90
3.8 Defining application profiles and user roles .................................................................... 91
3.9 Global events .................................................................................................................. 96
3.10 Installation .................................................................................................................... 97
3.11 Questions and answers ................................................................................................ 112
Data presentation and editing panels .................................................................................. 114
4.1 Anatomy of a panel ....................................................................................................... 114
4.2 Definition of panel content: the master query ............................................................... 119
3
Andrea Maioli – Instant Developer: User's Guide
4.3 Lookup and decode mechanisms ................................................................................... 130
4.4 Groups and pages .......................................................................................................... 140
4.5 Static fields ................................................................................................................... 143
4.6 BLOB fields ................................................................................................................. 148
4.7 Resizing mechanisms .................................................................................................... 152
4.8 Panel status ................................................................................................................... 158
4.9 Panel life cycles: loading, validation, saving ................................................................. 161
4.10 Dynamic properties ..................................................................................................... 168
4.11 Multiple selection ....................................................................................................... 170
4.12 Grouped panels ........................................................................................................... 173
4.13 Other noteworthy events ............................................................................................. 175
4.14 Global panel events ..................................................................................................... 176
4.15 Questions and answers ................................................................................................ 178
Document Orientation .......................................................................................................... 179
5.1 From table orientation to Document Orientation ........................................................... 179
5.2 Creating and initializing a document ............................................................................. 183
5.3 Loading a document from the database ......................................................................... 185
5.4 Modifying and validating a document ........................................................................... 195
5.5 Saving a document ........................................................................................................ 202
5.6 Documents and panels .................................................................................................. 208
5.7 Reflection and global events ......................................................................................... 220
5.8 Generalized services for documents .............................................................................. 228
5.9 Remote DO ................................................................................................................... 239
5.10 Extension .................................................................................................................... 241
5.11 Synchronizing documents ........................................................................................... 249
5.12 Questions and answers ................................................................................................ 259
Reports and books ................................................................................................................ 260
6.1 Anatomy of a book ....................................................................................................... 260
6.2 Defining master pages .................................................................................................. 265
6.3 Defining reports ............................................................................................................ 270
6.4 Programming the print engine ....................................................................................... 276
6.5 Resizing mechanisms .................................................................................................... 284
6.6 Subreports and Graphs .................................................................................................. 289
6.8 Interactive books .......................................................................................................... 293
6.9 Advanced printing features ........................................................................................... 304
6.10 File mangler ................................................................................................................ 308
6.11 Questions and answers ................................................................................................ 314
Trees, graphs, and tabbed views .......................................................................................... 316
7.1 Introduction .................................................................................................................. 316
7.2 Viewing and managing hierarchical structures .............................................................. 316
7.3 Graphs .......................................................................................................................... 328
4
Summary
7.4 Tabbed views ................................................................................................................ 336
7.5 Button bars ................................................................................................................... 342
7.6 Questions and answers .................................................................................................. 343
Libraries, web services, and server sessions........................................................................ 344
8.1 The Library object ........................................................................................................ 344
8.2 Creating and using web services ................................................................................... 362
8.3 Server sessions.............................................................................................................. 368
8.4 Questions and answers .................................................................................................. 375
Components and subforms .................................................................................................. 377
9.1 Dividing the application into components ..................................................................... 377
9.2 Creating and using components .................................................................................... 378
9.3 Export and reuse ........................................................................................................... 381
9.4 Interactions between components and the application ................................................... 384
9.5 Subforms ...................................................................................................................... 386
9.6 Using components without importing ........................................................................... 390
9.7 Component graphics ..................................................................................................... 391
9.8 Questions and answers .................................................................................................. 394
Component gallery ............................................................................................................... 395
Extend Instant Developer ..................................................................................................... 396
11.1 Types of extension ...................................................................................................... 396
11.2 Anatomy of the custom directory ................................................................................ 396
11.3 Customizing the graphic theme ................................................................................... 400
11.4 Extending the JavaScript RD3 framework .................................................................. 406
11.5 Including HTML components ..................................................................................... 412
11.6 Extend In.de with In.de ............................................................................................... 414
11.7 Create an In.de wizard ................................................................................................ 417
11.8 The graphic theme editor ............................................................................................ 420
11.9 Questions and answers ................................................................................................ 429
Debugging and tracing ......................................................................................................... 431
12.1 Overview of debugging tools ...................................................................................... 431
12.2 Runtime debugging ..................................................................................................... 432
12.3 Step-by-step debugging .............................................................................................. 440
12.4 Tracing ....................................................................................................................... 448
12.5 Questions and answers ................................................................................................ 448
Runtime configuration ......................................................................................................... 449
13.1 The problem of customization ..................................................................................... 449
13.2 Activating the RTC system ......................................................................................... 450
13.3 RTC system functioning ............................................................................................. 451
5
Andrea Maioli – Instant Developer: User's Guide
13.4 Initializing the RTC module........................................................................................ 453
13.5 RTC Designer ............................................................................................................. 454
13.6 Questions and answers ................................................................................................ 459
Team Works ......................................................................................................................... 461
14.1 Project management .................................................................................................... 461
14.2 Installing the Team Works server ............................................................................... 463
14.3 Configuring the basic data .......................................................................................... 464
14.4 Inserting a project ....................................................................................................... 466
14.5 Developing in Team Works ........................................................................................ 467
14.6 Project management through the web interface ........................................................... 475
14.7 Change history ............................................................................................................ 478
14.8 Managing Team Works components ........................................................................... 479
14.9 Managing tasks ........................................................................................................... 482
14.10 Questions and answers .............................................................................................. 483
Acknowledgments ................................................................................................................. 485
15.1 Acknowledgments ...................................................................................................... 485
6
Chapter 1
Why Instant Developer?
1.1 The current situation
The year 2010 was a pivotal year in the IT world, with the emergence of trends that had
been latent for several years. This was particularly true with respect to the large-scale
adoption of mobile computing devices and the advent of HTML5 as a universal platform for developing Rich Internet Applications. As a collateral effect, we have witnessed a decline in the importance of proprietary frameworks like Flash and Silverlight,
now officially relegated by Microsoft exclusively to Windows Phone.
The coming years will bring even more significant technological innovations, both
at the architectural level with Offline Web Applications, and in terms of user experience with next-generation user interfaces based on the canvas element.
But technology is just one of the factors revolutionizing the world of software development. The success of devices like iPhone and iPad is also a result of the focus on
simplicity and immediacy of use. Considering how today's business applications are
built, with forms containing of hundreds of fields and controls, it is clear that a profound change is becoming necessary in the functional design of every type of application.
Then there are factors like new social media, available web services, cloud computing: a world of interaction that cannot help but significantly affect the design of nextgeneration business applications.
These factors lead to the following question: how can a developer start designing a
significant, state-of-the art business application without having it become obsolete even
before it is released to the market? Faced with these difficulties, and with the cost of
maintaining current solutions, many choose a wait-and-see approach, but this favors
only the big international producers, who have the resources necessary to rewrite their
applications over and over again.
7
Andrea Maioli – Instant Developer: User's Guide
1.2 Instant Developer
The situation described above highlights the primary structural problems that software
engineering must still address.
1. Managing complexity: software development is a difficult task, primarily because
each application is a very complex mechanism, like an engine consisting of thousands or even millions, of small parts. Just one line of code can crash everything or,
worse yet, lead to hidden bugs that are apparent only to the end user.
2. Volatility of technologies: at one time, COBOL was enough for an entire career.
Nowadays, everything changes every six months: new technologies, new languages, new architectures, and new devices. Programmers need to study as much as
they work, but who has this kind of time? Applications that are already developed
must be continually rewritten to remain state-of-the-art, but who has this kind of
time?
Instant Developer, often abbreviated In.de, was developed to solve these problems at
their root: by managing complexity, which makes it the most effective system for developing enterprise applications and addressing volatility of technologies, providing a
platform for developing rich internet applications that are always state-of-the-art.
Instant Developer is a not a CASE tool, a framework, or a simple RAD environment. It is a bona fide development system that manages all aspects of the software life
cycle, from analysis to installation and beyond.
With In.de, it is possible to create Rich Internet Applications in minutes, without
having to know all the technical details. This includes interactive client/server applications, and attractive and animated iPhone applications, to address the increasingly sophisticated needs of the modern user.
These applications are then automatically translated and compiled both in Java and
C#, making them functional on any server. They connect in optimized mode to each
supported database type and can be used with any browser, including those on the iPhone and iPad, taking advantage of their specific features like multi-touch, native animation, and HTML5 caching.
The code generated is standard, the same source code that many good Java or C#
programmers would have written if they had the time. The result is source code that is
readable, commented, and ultimately maintainable even without using Instant Developer, so as not to be IDE-dependent.
8
Why Instant Developer?
1.3 Relational programming
The core function of Instant Developer is relational programming. This term refers to
the fact that In.de allows developers to design the behavior of software through completion of a relationship graphic, rather than through composition of many text files, as
occurs in conventional systems.
To better explain this difference, think of a software system of average complexity,
for example an application on the order of 100,000 lines of code. What makes it difficult to change? the fact that many lines of code are written in such a way as to depend
on others. For example, if a database contains a field of the integer type and a procedure reads the value in memory, this happens taking into account that it is numeric. If
that number is increased, once again, numeric functions are used. Imagine entering the
DDL file and changing the line where the field is defined as an integer to make it a varchar(3). Most likely, the application will stop executing, because the field is not expected to be a character type, but numeric. To fix everything, one must manually
change all lines of code that depend on the field and, in a cascading process, all lines of
code that in turn depend on those changed lines of code, with an entirely manual iterative process that can be very lengthy and require several testing phases.
Conversely, within Instant Developer, code is not stored in a text file but directly in
a graphic, whose relationships are plotted automatically by the IDE. In the example
above, when the integer field is read, the statement contains a relationship with the
field. So if it is changed, the referencing statements are also modified accordingly.
Consequently, almost all the work of updating is performed automatically, and if any
statement or part of the project cannot be updated because it requires a change in specification, then it is listed in a report that provides quick linking to the editing location.
To compare with the real world, In.de works like a social network for lines of code,
instead of people. When people do something, all of their “friends”, i.e. those related to
them, react. If an individual is highly influential, or does something striking, then the
whole social network can be affected. There is a similar mechanism in relational programming: by changing the database field from numeric to character, all related objects
react and change accordingly, and this series of changes is propagated throughout the
graphic until completing all effects.
Let us now analyze the primary advantages of relational programming in software
engineering.
9
Andrea Maioli – Instant Developer: User's Guide
The flickverse social graph. Picture by cobalt
1.3.1 Management of complexity
The specific advantage of relational programming is the ability to manage the complexity of enterprise applications with millions of lines of code. In fact, as the number of
lines of code in the software increases, the number of relationships between objects increases more than proportionally, even crossing barriers of separation implemented between the various system components.
Using the tools for analysis and segmentation of the relationship graphic (software
intelligence), Instant developer can provide an immediate and complete view of the issues to be addressed when modifying part of the project. The auto-updating mechanisms described above instantly and thoroughly perform the majority of the work involved in modification. The results can be summarized in the following statements,
which have proven valid in the ten-year history of In.de.
1. As the complexity of software grows, so does the advantage gained from relational
programming, which is already significant even for very simple projects.
2. Applications are easily maintainable even after years, and even if they become very
large, i.e. on the order of millions of lines of code.
3. Applications can also be maintained by persons other than the original developers,
without posing a significant additional cost. This is especially true considering how
10
Why Instant Developer?
easily the software's functionality can be understood through the included software
intelligence tools.
4. Unlike conventional CASE or RAD systems, the benefit from relational programming, already present during creation of the software system, grows further during
the subsequent maintenance phase.
1.3.2 Technology independence
This is the second specific advantage of the relational programming: objects in the relationship graphic are not dependent on any specific technology. Instant Developer's internal compilers are thus able to generate source code corresponding to the configuration of the technologies targeted.
For example, it is possible to write a query, even a very complex one with joins between tables, unions, subqueries, calculation functions, etc., and generate source code
specific to Oracle, SQL Server, DB2, Postgres, MySQL, etc. A query can be generated
in different ways for different versions of the same database, to take advantage of improved features.
This means that the way In.de achieves technology independence is the opposite of
the traditional approach to the problem: not a less valuable homogenization, but rather
an optimal utilization of the distinctive features of each platform.
What happens at the database level for queries, stored procedures, and triggers, is
then extended to the various application architectures making up the entire software
system, such as web applications, web services, batch services, and the like. For example, it is possible to automatically generate the entire software system in both Java and
Microsoft C#, to enable the application to run on any type of server.
Also, the RIA framework for creating web applications lets you use the application
on any browser, new and old, including mobile devices like iPhone, iPad, and Android,
taking full advantage of typical features like multitouch, geolocation, native animations
and the like. The result is an actual cross-browser application, not just partially but substantially, both in its graphics and its behaviors.
Finally, what is true at one time remains true in the future. The same project can be
recompiled with later versions of In.de and take advantage of advances in technology,
while effortlessly remaining state of the art.
In summary, being technology independent means:
1. An application being able to function with any database, fully utilizing its features.
2. Having the project generated both in Java and Microsoft C# to allow the application
to be installed on any type of server.
3. Not having to worry about compatibility between browsers, including mobile devices.
11
Andrea Maioli – Instant Developer: User's Guide
4. Having an application that always remains state of the art. Gone are the days when
developers had to rewrite their applications because the technology infrastructure
had become obsolete.
5. Don't gamble on specific technologies. Consider what happened to developers who
chose Visual Basic 6, or what is occurring now for those using Flash or Silverlight.
With In.de, you can automatically change from one technology to another when the
previous one becomes obsolete.
1.3.3 Separation between function and technology
Technology independence, from the point of view of the In.de user, results in a separation between function and technology. This allows developers to focus on delivering
the best possible software solution in terms of functionality, user interface, and user
experience without having to worry at the same time about all the technological implications this entails.
The technological scope is not eliminated, but decoupled from the functional
scope. In.de is a valuable partner for developers concerned with the best use of various
technologies, allowing them to be distributed in a standardized way across the working
group, without having to immediately re-train everyone when these technologies suddenly change.
As an example of this, consider the need to create a cross-browser rich internet application based on HTML and JavaScript. Nowadays, more or less every two weeks a
new version of some browser is released, whether it is Internet Explorer being updated
through Windows Update, or updates to Firefox, Safari, Chrome, or Opera. Each update
fixes problems, but at the same time new ones are added that can change the behavior
of web applications in one way or another. Just to handle this problem, it would take a
pool of technicians to continuously test and verify the behavior of applications on all
active versions of all browsers, and to determine how to address the various types of
issues on the different browsers.
In summary, we can say that with Instant Developer:
1. It is possible to focus on creating the best application for the end user without having to worry about the technological aspects.
2. It is easier to decide how to use technologies and to keep members of the working
group aligned with the decisions made.
3. It is no longer necessary to continuously update the entire working group regarding
changes in technology platforms.
12
Why Instant Developer?
1.3.4 A unified vision
Relational programming involves understanding the relationships between the various
components of the information system being designed, from the database schema down
to the last report in the project.
This means that Instant Developer needs to have all the tools necessary for managing the entire software life cycle, and not just part of it. The life cycle must also be
managed as a whole and not merely as a suite of tools connected to one another. Listed
below are the steps managed by In.de as a single tool.
The software life cycle managed by Instant Developer
Unified software management allows full control of the information system being designed or modified. For example, when modifying the database schema, this information is automatically propagated, down to the last report in the project.
Another interesting aspect is that the various modules have access to comprehensive information and thus allow additional benefits in terms of reworking. These are a
few examples:
1. The profiling system, which configures the functions enabled for the various application profiles, also allows the layout of reports to be changed based on the information that various users can view.
2. The centralized multi-language translation system can also translate printouts.
3. The team working module, allowing group work and versioning, is able to operate
on the entire project, from the database schema to the reports.
13
Andrea Maioli – Instant Developer: User's Guide
1.3.5 Complete semantic mapping
All the benefits listed above would be useless if it were not possible to use relational
programming to represent an application's behavior with the same expressiveness of
traditional programming languages.
In fact, the novelty of relational programming is primarily related to the way application behaviors, rather than application logic, are declared. This is what allows use of
the same software design rules and constructs available in traditional programming languages. These are a few examples:
1. It is possible to use object oriented programming constructs: classes, inheritance,
interfaces, virtual methods, properties, and accessors…
2. It is possible to import Java or C# classes to extend In.de libraries and use them
within the code editor just like default classes. Work already completed can be reused in a new Instant Developer project.
3. There is an ORM framework that allows designing business logic with the same
logic as Hibernate + Spring, ADO Entity Framework, or J2EE.
4. There are also aspect oriented programming (AOP) behaviors to allow code injection and advanced reflection.
5. It is possible to use SQL code directly within the programming language, to allow
for syntactic and semantic checking at compile time, avoiding surprises when the
application executes.
In practice, if anything can be written in Java or C#, then it can also be written with
Instant Developer in a similar way and with the same logic. Moreover, relational code
is expressed with a meta-language similar to Java and C# within the visual code editor.
1.4 The RD framework
Rich internet applications developed with Instant Developer are based on a dedicated
framework capable of creating secure and high-performance applications for mobile
devices like iPhone and iPad. The diagram of operation is summarized below.
14
Why Instant Developer?
The RD framework: diagram of operation
The primary functional areas are:
1. RD3 area: consisting of the browser running a dedicated JavaScript library and the
RD3 Manager; this is responsible for rendering the status of the application UI in
the browser.
2. Database area (yellow): consisting of a series of services managing connection to
various databases. This way, you never have to manually manage connections,
which will always be secure and optimized.
3. ORM area (blue): these modules make up the In.de Object Relational Mapper system. Implementation of the business layer has never been so simple.
4. UI area (green): consists of modules for representing server-side user interface logic, which is then transferred to the browser by the RD3 Manager module.
5. Session control Area (pink): consists of the modules for application profiles, application customization, session control (DTT = Debug, Test, & Tracing).
6. In memory database: a notable object not included in the previous areas, displayed
on the left side of the diagram. It is of particular importance because it is part of the
framework's controller, i.e. the system of coordination between the business logic
and the presentation manager.
15
Andrea Maioli – Instant Developer: User's Guide
1.4.1 Where is my code?
Within an Instant Developer project, application code is primarily contained in certain
specific points, highlighted in red on a white background in the above diagram.
1. Database Code: In.de is able to automatically generate views, stored procedures,
stored functions, and triggers within a database.
2. Web Session: methods are added to the web application, they are generated at the
session object level.
3. Defined Forms: are the forms defined in the project. Each form contains a definition of its graphics, as well as its presentation-manager level control code, such as
event handlers for graphic objects.
4. Defined Entities: these are objects (document classes) that are part of the business
layer, representing the application's business objects and their behavior.
It is also possible to create generic classes, interfaces, web services, and batch services,
in addition to importing existing classes both as source code and compiled.
1.4.2 Why is it considered a Rich Internet Application?
Wikipedia defines an RIA as follows:
A “Rich Internet Application” (RIA) is a web application that has many of the
characteristics of desktop applications, but does not require installation on the
hard drive.
RIAs are characterized by their interactive size, multimedia, and speed of execution…And interaction with an RIA takes place remotely, using a common
web browser.
In some sense, RIAs represent a generation of applications that allow a completely new kind of interaction, founded on the best design and functional
characteristics that were traditionally the province of the web or of desktop
applications.
In addition, through their high level of interactivity, RIAs represent one of the
best channels for implementation of the Cloud Computing paradigm, which is
a new mode of software function via distributed architectures.”
Web applications created with In.de satisfy this definition. In fact, the presentation
manager of the interface operates inside the browser through a high performance JavaScript library called RD3. This communicates with the web server using an XMLbased protocol, optimized for the specific characteristics of the network, such as band-
16
Why Instant Developer?
width and throughput time. The data is downloaded to windows and there are no further
server requests, allowing live scrolling navigation of lists of data.
To verify the level of interactivity of RD3-based applications, there is an online
benchmark available at the following address: www.progamma.com/fps: this application reads a series of data on the server and updates the browser as quickly as possible.
The expected results vary depending on the browser and the network topology, but typically the range is 20-40 interactions per second, at least 10 times more interactive than
any other RIA framework currently available.
To qualitatively verify the richness of interfaces and multimedia, there are two
online applications:
 www.progamma.com/webtop: demonstrates implementation of a multi-webtop
with interchange of application objects created in just four hours of work.
 www.progamma.com/portal: allows testing the composition of a personal portal
using a set of interacting widgets.
Also available on the Pro Gamma website is gallery of sample widgets at the following
address: www.progamma.com/eng/widget-collection.htm.
The last aspect to consider has to do with an application's accessibility from a
common web browser. It is easy to verify how applications created with In.de are crossbrowser, both in graphics and in behavior. The level of graphics compatibility is almost
total. In fact, it is possible to view screenshots of the various browsers and verify their
equivalence almost pixel by pixel.
Finally, RD3 does not require plug-ins of any kind, and applications that use it
have the highest level of compatibility with current accessibility standards.
1.4.3 Application security
Unfortunately, security is still not sufficiently taken into account when developing web
applications accessed via the Internet. The main problems are as follows.
1. Poorly handled exceptions: unexpected exceptions, caused by software bugs, are
often not handled properly and thus lead to the application displaying an incomprehensible error screen. For example, the image below shows an unfiltered exception
obtained from a large Italian bank's internet banking application…is the money still
available in the account?
17
Andrea Maioli – Instant Developer: User's Guide
2. Unvalidated parameters: with traditional web applications, communication between the browser and the web server occurs through the sending of POST parameters. If these are not always properly validated, the application may be forced to
perform unintended actions. The most dangerous type of attack is a SQL Injection,
but even the most widely used web applications, like Facebook and Twitter, are
famous for having some type of security issues.
3. Application context not fully controlled: JavaScript files that reveal the behavior of
the application, non-blocked web server methods, and debugging information published in the browser are just a few of the most common mistakes that are easy to
find in publicly used applications in Italy.
The RD3 framework resolves these kinds of problems at the root, because it insulates
the programming environment from web-based objects, as can be seen in the above diagram. Code objects written by In.de users are never in contact with the stream of data
coming from the browser, which is always previously and fully validated by the
framework. Even exceptions are contained within the browser, and in the case of programming errors, an application screen is displayed explaining what has happened. Errors are always errors, but in this case they occur in a controlled manner, without debugging information revealed, and users are better assisted in continuing their work.
18
Why Instant Developer?
Example of exception handled by RD3
The RD3 framework is statistically secure at the application level. In fact, it has been is
validated by independent sources using the most comprehensive penetration tests, and
has been used in the most critical applications from the point of view of security, such
as banking applications.
To be thorough, it should be noted that the components that might be subject to attack are various. Perhaps the most critical is the web server, which may be compromised even before the application level. In this case, an attacker could have a more or
less restricted access to the machine itself. To protect against these types of attacks, it is
necessary to configure and adequately update the application servers.
1.4.4 Management of failures at runtime
Having a secure application is necessary, but this does not necessarily mean it runs
well. For example, non-blocking exceptions can be thrown in certain circumstances,
incorrect results may be given without throwing an exception, or the application may
simply be too slow to be used without problems.
To resolve these malfunctions, the RD3 framework contains an advanced tracking
system that is able to store user actions, a summary of the UI status, and the flow-chart
of code executed by the application, including profiling information. All this infor19
Andrea Maioli – Instant Developer: User's Guide
mation can be sent to the technical support service automatically or based on certain
events. This way non-reproducible errors no longer exist!
1.4.5 Customizing graphics and behavior
Making state-of-the-art applications today requires particular attention to the user interface graphics. Unfortunately, technicians often undervalue this aspect, but it is expected
and taken for granted by users. So, web applications frequently must be integrated between themselves, and the graphics layout must be adapted to existing ones. To accomplish this, In.de uses the following techniques:
1. Graphic styles: within the IDE it is possible to define a hierarchical series of graphic styles that control how information is presented to the user. A style consists of a
collection of almost 100 graphic properties that allow developers to decide how information should be represented based on the possible application states. The advantage is that they are hierarchical, so only the “parent” style needs to be changed
in order to update the style of the entire application.
2. Graphic themes: allows configuration of the general characteristics of UI objects
and consists of a set of icons and a cascading style sheet file. In.de already contains
some graphic themes that allow immediate implementation of a state-of-the-art user
interface, but these can be adapted or new ones created to standardize the look and
feel as needed.
3. Widget mode: a presentation mode suitable for inclusion of application components
inside portals or other existing applications. In this mode, only the active form is
rendered, all other components, like the menu, are hidden.
4. JavaScript library: is the part of RD3 framework that manages the application user
interface in the browser. It is an open source library, designed to be extended or
modified according to specific needs. In this sense, the code has been written to be
easily understood, maintaining a high level of commenting.
1.5 The benefit for programmers
The preceding paragraphs illustrate the advantages derived from using Instant Developer for the production of software projects of any level of complexity. With respect to
individual programmers, for their part, In.de can enhance their professional careers.
The first factor to be taken into account is that, for the most part, programmers'
work takes place in the application scope, i.e. producing software that is designed to
manage a specific process, and not at the infrastructure or framework level. In both cases, the use of Instant Developer can be beneficial, because:
20
Why Instant Developer?
1. It does not mask programming: In.de simplifies programming without masking it.
Using the IDE is quite similar to using Microsoft Visual Studio, and the programming skills required are more or less identical. If, for example, it is necessary to
create code for a bill of materials breakdown, it will naturally require the same
steps, but with In.de it completed faster.
2. A scalable difficulty level: developing a state-of-the-art web application takes an
enormous amount of technological knowledge, even if the process that the application must handle is trivial. With In.de, however, the difficulty is proportional to the
complexity of the process, and the part relating to technological complexity is eliminated.
3. More time for the things that matter: at the application software level, today the
primary added value lies in understanding the processes and in the ability to make
them available through a browser in a simple way. In.de eliminates the most mechanical part of programming and leaves more time to refine and simplify the user
interface so that it can be simple and pleasant to use.
4. Not betting on the wrong horse: it is somewhat utopian to think that mastery of a
particular technology today will add value to a programmer's career for years to
come. Information technologies have a short life cycle, much shorter than the career of a professional. The alternative is spending half of one's working life exploring every new thing released to the market, or sidestepping this problem by focusing on more durable professional skills, as mentioned in the preceding paragraph.
5. A point of reference: the architecture of applications, the use of Document Orientation and aspect oriented programming, and compilers based on the best practices of
technology producers make In.de an important point of reference for learning how
to structure state-of-the-art applications.
6. A flexible framework1: the In.de framework is designed to be extended or modified
directly from within the IDE. Even those working in framework construction will
have material with which to “indulge” themselves.
1.6 Organization of the book
This book is not intended to be a manual or reference guide. For this, please refer to the
documentation center: http://doc.progamma.com/eng/.
The intent is to illustrate how the primary software production processes can be
managed with In.de. It does not attempt to exhaustively cover every possible aspect of
every topic, but to simply illustrate how the various parts function, because they are
designed in a certain way, and to indicate guidelines for easier and faster development.
1
21
Andrea Maioli – Instant Developer: User's Guide
The purpose of this book is to be useful for readers. That is why the last section of
each chapter is devoted to questions and answers. If you do not find the answers you
are looking for by reading a chapter, you can send an e-mail by clicking the link provided, and you definitely receive a reply. Answers to the most frequently asked questions are used to augment the text, and appear within the same paragraph.
1.6.1 Prerequisites
Instant Developer is a development system, so one of the prerequisites for a successful
reading of this book is to be able to program in any language, for example even Access. The second prerequisite is a basic knowledge of relational databases and the SQL
language. For a better understanding of the text, it might be useful, but not essential, to
possess the following knowledge:
1. how to program according to the OOP (object oriented programming) methodology
2. familiarity with Java or C#
3. creating a web application using traditional technology
4. how to use an ORM system like Hibernate.
1.7 Anatomy of an In.de project
An Instant Developer project contains the description of an information system, or a
part of it, at the database, application, and library levels. The objects involved are as
follows:
Project: represents the project in its entirety, the entire relational structure that it
comprises. It is the root object of the object tree. It has no application value but serves
to identify the project within the Team Working system.
Database: represents the connection to a database stored on a server. It contains the
definition of a set of tables and represents the normal transactional context of operations involving data contained in them. Note: In.de allows development of information
systems even without connections to a database. In fact, data can be retrieved from a
variety of sources, such as web services.
Applications: these are the applications that allow managing the data in the databases. Each application object can represent a web application, a web service, or a
batch service.
Libraries: describes the operating environment services provided by the framework
or by the runtime environments. In.de allows using various types of libraries, including
22
Why Instant Developer?
references to web services, or classes precompiled in Java or Microsoft .NET.
Organization of an Instant Developer project
1.8 Questions and answers
This chapter presenting Instant Developer is a summary of what we see happening everyday with people using it. Important issues have been addressed, mentioning innovative solutions, but without demonstrating them yet. Many questions will be answered in
the following chapters, but if anything is unclear or incomplete, please feel free to send
an email by clicking here.
I promise to answer all emails, even if time is limited. Also the most interesting
and frequent questions will be published in this section in subsequent editions of this
book.
This space is reserved for answers to readers' questions
23
Andrea Maioli – Instant Developer: User's Guide
24
Chapter 2
Manage databases with Instant Developer
2.1 What can developers do with the In.de database management module?
Most software projects make use of relational databases, because they are the easiest
and most secure data storage system that the application has to manage. There are various types of database servers, each with its own characteristics, each programmable
with a similar syntax, but never exactly the same 2.
The database structure is of particular importance in a software project because it
defines the nature of the data and manages the relationships between the data. Understanding the data structure is the right starting point for developing the best applications
to manage data.
For these reasons, In.de contains the functions necessary for defining and managing database schemas, in a manner that is portable among various types of servers. It is
thus no longer necessary to use specific database management tools, such as Erwin.
Specifically, the main functions are as follows:
1. Creation of tables, fields, relationships, and indexes.
2. Graphic management of E/R schemata.
3. Importing an existing database structure.
4. Automatic creation of database documentation.
5. Definition of views, stored procedures, stored functions, and triggers in a manner
independent of the database type.
6. Automatic generation of scripts to create or modify database schemata.
The features described function independent of the database server type, if one of the
following is used: Oracle 7-11, SQL Server 7-2008, DB2 9-, MySQL 5-, Postgres 8-,
DB2/400, SQLite 3.6-, Access 97-2010. You can also connect other database types not
listed, but in this case In.de will not be able to modify the schema and generate specific
SQL code. However, all other functions will be equally available.
25
Andrea Maioli – Instant Developer: User's Guide
2.2 Structure of a database within an In.de project
As we have seen in the introduction, the database, along with applications and libraries,
is one of three main parts of an In.de project. The placement of database objects in the
object tree is thus immediately below the project object, whose context menu has a
command to add new ones.
Structure of a database within an In.de project
The definition of a database involves the following types of objects:
Database: represents the connection to a database stored on a server. It contains the
definition of a set of tables and represents the normal transactional context of operations involving data contained in them.
Table: contains a set of data of the same type, for example the Products table contains the data for each Product managed by the application. Defining a database according to the object-oriented programming (OOP) approach, each table corresponds to a
class of objects.
Field (or column): contains a single piece of data for a table row, for example, the
Product Name. In OOP, a field represents a public property of the objects contained in
the same table as the field.
Relationship (or foreign key): represents a relationship between two tables, i.e. a
pointer between objects of one table and those of another. For example, the Order Lines
table will include a relationship with the Products table to indicate which product is
ordered. Within an In.de project, the relationship is an object contained in the table that
26
Manage databases with Instant Developer
points to the object to be identified. In the example above, the relationship to the Products table is contained in the Order Lines table.
Index: a preferential access route to the data contained in the table. All queries that
filter data by columns in the index are generally performed very quickly.
View: defines a specific view of the data contained in the database. In practice, a
view is a query stored in the database that can be invoked as if it were a table. In.de
allows the contents of the view to be defined using the visual code, which is then automatically converted to SQL code optimized for each type of database server supported.
Stored procedure/stored function: a procedure or function stored directly within the
database, which allows the highest level of performance when modifying or managing
the data contained therein. In.de allows developers to write stored procedures or stored
functions using visual code, which will then be automatically converted to code specific
to the database server used.
Trigger: a procedure that is performed automatically by the database every time a
piece of data in a table is modified, deleted, or inserted. Since it refers to a table, the
trigger is contained in the object tree within the table for which it manages modifications. Also in this case, In.de allows developers to write triggers by using visual code,
independent from the database server used.
2.3 Database configuration
Each new Instant Developer project contains a database object. If you want to add
other databases, this can be done with the Add database command in the context menu
of the project object. But if the project does not use a database, it can be deleted. The
chapter related to Document Orientation will explained how to easily build applications
that access data via web services and that therefore do not need to directly connect to a
database.
To begin defining a database, the first thing to do is to properly set some basic
properties through the properties form, specifically the following:
1) Name: represents the name of the database object, as it will be identified within the
project. In this case, it is only a logical reference and does not have an implication
at the application level.
2) Database type: represents the type of database server to which you want to connect.
In.de generates specific code for each supported database, so the type must be indicated. However, if the available server is not listed, choose ODBC to use a generic
connection type.
27
Andrea Maioli – Instant Developer: User's Guide
3) Compatible with: select the types of databases with which you want to maintain
compatibility. We recommend specifying only the databases that you might reasonably need to connect to, because In.de may limit the functions available to maintain
compatibility with older databases that do not support them. It is never advisable to
maintain compatibility with ODBC unless the type of database is actually ODBC.
4) Database and server name: specify here the parameters required for connection, as
described in the following section. The connection specified here is used by In.de to
read or modify the structure, and as a default value to generate connection strings
for applications contained in the project.
5) User name and password: specify here the user credentials of a database administrator, because there must be read and modify access to the schema. If you do not
wish to manage the schema with In.de, then you can also use non-administrator user credentials.
6) Connection string – JDBC: if necessary, a more detailed connection string than the
one generated automatically by In.de can be specified here. Do not use these fields
in place of the previous unless it is absolutely necessary.
When finished defining the properties, we recommend testing the connection using the
corresponding button and then closing the properties form to save the changes to In.de.
It is important to remember that In.de never physically creates the database on the
server, with the exception of Access and SQLite. It must have already been created using tools specific to the database server being used.
2.3.1 How to connect the various types of database servers
Connecting a software application to various types of database servers requires specific
drivers, based partly on the architecture of the application itself. The Instant Developer
IDE is an application written in Microsoft Visual C++, so it requires the OLEDB drivers installed on your development machine. Web applications generated with In.de may
be based on Java architecture, and in this case the JDBC drivers are required on both
the development machine and the production server. Alternatively, they may be based
on Microsoft .NET architecture, and in this case the ADO.NET drivers are required on
both the development machine and the production server.
28
Manage databases with Instant Developer
Connecting to an Oracle database
In.de supports connection to Oracle version 7 or higher databases by using the following drivers:
Application component
In.de IDE
.NET applications
Java applications
Drivers
Oracle OLEDB drivers
Oracle ADO.NET drivers
Oracle JDBC drivers
The database connection parameters are defined as follows:
Server
Database
In.de IDE
.NET application
Net service name as specified in
Oracle Net Configuration Assistant
Not used
User Name
Password
Java application
IP address or server
name
The instance name, if
different from orcl
Name of the user who owns the tables
The user's password.
The connection string generated by In.de is based on the Oracle listener listening on
standard port 1521. If it is connected to a different port, the Java connection string must
be specified. This does not apply in the Microsoft or In.de IDE context, because the
port is specified in the configuration of the Net service name.
To maximize compatibility between the Microsoft and Java environments, we recommend setting the Net service name to the same server name resolved by DNS. This
way, both the In.de IDE and .NET/Java applications will use the same parameters, and
you will not need to create customized connection strings.
The Oracle drivers are normally included in the Oracle client tools installation
package, or they can be downloaded directly from the Oracle Technology Network
website based on the version of Oracle to be used.
Connecting to a SQL Server database
In.de supports connection to SQL Server version 7 or higher databases by using the following drivers:
Application component
In.de IDE
.NET applications
Java applications
Drivers
SQL Server OLEDB drivers
SQL Server ADO.NET drivers
SQL Server JDBC drivers
29
Andrea Maioli – Instant Developer: User's Guide
The database connection parameters are defined as follows:
In.de IDE
Server
Database
User Name
Password
.NET application
Java application
IP address or server name \
instance name if a named instance
Name of database to connect to
Administrative user login
Administrative user password
The SQL Server drivers are normally included in the server installation package, which
allows installation of only the connection drivers. The JDBC drivers, meanwhile, can
be downloaded for free from the Microsoft website, and must be copied to the lib directory of Tomcat or other Java web server.
Connecting to a DB2/UDB database
In.de supports connection to DB2/UDB version 9 or higher databases through the following drivers:
Application component
In.de IDE
.NET applications
Java applications
Drivers
DB2/UDB OLEDB drivers
DB2/UDB ADO.NET drivers
DB2/UDB JDBC drivers
The database connection parameters are defined as follows:
In.de IDE
Server
Database
User Name
Password
.NET application
Java application
IP address or server name
Name of database to connect to
Administrative user login
Administrative user password
The DB2/UDB drivers are contained in the corresponding installation package. The
JDBC drivers must be copied to the shared lib or common-lib directory of the Tomcat
or other Java web server.
30
Manage databases with Instant Developer
Connecting to a DB2/400 database
In.de supports connection to DB2/400 version 5 or higher databases by using the following drivers:
Application component
In.de IDE
.NET applications
Java applications
Drivers
DB2/400 ODBC drivers
DB2/400 JDBC drivers
The database connection parameters are defined as follows:
In.de IDE
Server
Database
User Name
Password
.NET application
Java application
IP address or AS400 server name
Name of default library or list of libraries
Administrative user login
Administrative user password
To connect to a DB2/400 database, you must first install the Client Access package on
the development machine. Then you must create an ODBC data source named ID400,
which serves as a template for In.de to create the actual connection strings. The parameters specified in the In.de properties form will appear with a higher priority than
the ID400 connection, which must exist even if its parameters do not correspond with
those actually used.
For connecting Microsoft .NET applications in a production environment, follow
the same steps listed above. For Java, however, you only need to copy the JDBC drivers to the shared libraries folder both on your development machine and the production
server.
Connecting to a Postgres database
In.de supports connection to Postgres version 8 or higher databases by using the following drivers:
Application component
In.de IDE
.NET applications
Java applications
Drivers
Postgres ODBC drivers
Postgres JDBC drivers
31
Andrea Maioli – Instant Developer: User's Guide
The database connection parameters are defined as follows:
In.de IDE
Server
Database
User Name
Password
.NET application
Java application
IP address or server name
Name of database to connect to
Administrative user login
Administrative user password
The Postgres drivers are contained in the corresponding installation package. The
JDBC drivers must be copied to the shared lib or common-lib directory of the Tomcat
or other Java web server.
Connecting to a MySQL database
In.de supports connection to MySQL version 5 or higher databases through the following drivers:
Application component
In.de IDE
.NET applications
Java applications
Drivers
MySQL ODBC drivers
MySQL ADO.NET drivers
MySQL JDBC drivers
The database connection parameters are defined as follows:
In.de IDE
Server
Database
User Name
Password
.NET application
Java application
IP address or server name
Name of database to connect to
Administrative user login
Administrative user password
The MySQL drivers are contained in the corresponding installation package or downloadable from the manufacturer's website. The JDBC drivers must be copied to the
shared lib or common-lib directory of the Tomcat or other Java web server.
Connecting to an Access database
In.de supports connection to Access version 97 or higher databases, in both mdb and
accdb formats, by using the following drivers:
32
Manage databases with Instant Developer
Application component
In.de IDE
.NET applications
Java applications
Drivers
Access OLEDB drivers
Access ADO.NET drivers
ODBC/JDBC bridge
The database connection parameters are defined as follows:
In.de IDE
Server
Database
User Name
Password
.NET application
Java application
Not used
Name of the .MDB file containing the database
Not used
Not used
The use of an Access database is only possible if the production server is Windowstype, via the preinstalled drivers. Due to architectural limitations, we do not recommend the use of an Access database except for applications that are prototype, demonstration, single-user, or read-only.
Connecting to an SQLite database
In.de supports creation and connection to SQLite version 3.6 or higher databases by
using the following drivers:
Application component
In.de IDE
.NET applications
Java applications
Drivers
SQLite ODBC drivers
SQLite ADO.NET drivers
SQLite JDBC drivers
The database connection parameters are defined as follows:
In.de IDE
Server
Database
User Name
Password
.NET application
Java application
Not used
Name of the .DB file containing the database
Not used
Not used
To use SQLite databases, you only need to install the ODBC driver, since the .NET and
Java drivers are automatically added to the application at compile time. For SQLite,
automatic creation of the schema is also managed at runtime, as shown in section 2.9.3
below.
33
Andrea Maioli – Instant Developer: User's Guide
Connecting to a database not listed
In.de lets you connect to any database not listed by specifying ODBC as the property
type. The drivers used are as follows.
Application component
In.de IDE
.NET applications
Java applications
Drivers
Database ODBC drivers
Database JDBC drivers / connection string.
Connection parameters depend on the database, but are generally defined as follows.
In.de IDE
Server
Database
User Name
Password
.NET application
Java application
Name of the data source or DSN file
Not used
Administrative user name
Administrative user password
If the connection string generated automatically by In.de is too generic, we recommend
specifying one in the database properties form according to the correct syntax of the
database to be connected, as shown in the following section.
When using the ODBC type, In.de encounters several limitations, not being able to
use the specific database syntax. These are generally the following:
1) Import of the database schema is limited to tables and fields.
2) The database functions are generated according to ODBC syntax, but may not be
supported by some database types.
3) Fields of type date and timestamp may not support ODBC syntax for specifying the
value: {d yyyy-mm-dd} and {ts yyyy-mm-dd hh:mm:ss}.
4) In.de is not able to generate statements to create or edit the database schema.
2.3.2 A closer look: connection strings
In.de is able to automatically create connection strings for different environments and
database types. So for the most part, we do not recommend entering a value in the Connection string and JDBC connection string properties. In some specific cases, however,
it may be useful to add additional parameters or use different drivers. The following
table specifies the format of the strings generated by In.de for different types of databases, so you can use or edit them.
34
Manage databases with Instant Developer
.NET environment
The driver is not specified in the connection string, because it is implicitly based on the
database type, as indicated in the preceding paragraphs.
Oracle
Sql Server
DB2 / UDB
DB2 / 400
Postgres
MySQL
Access
ODBC (file)
ODBC (name)
Data Source=<server>
Data Source=<server>;Initial Catalog=<database>
Server=<server>;Database=<database>
DSN=ID400; SYSTEM=<server>;DBQ=<database>;NAM=1 3
DRIVER={PostgreSQL};SERVER=<server>;DATABASE=<database>;
ByteaAsLongVarBinary=1;Encoding=UNICODE 4
SERVER=<server>;DATABASE=<database>
Data Source=<database;Jet OLEDB:System database=<server> 5
Provider=MSDASQL.1;FILEDSN=<server>
Provider=MSDASQL.1;DSN=<server>
You can insert a customized connection string in the database properties form. By
pressing the Create button, it will be created by the Windows OLEDB engine. Alternatively, you can specify the absolute path to a text file containing the connection string
in the Connection string property, as follows: file=<parameter file path>
Java environment
Oracle
Sql Server 2000
Sql Server 20052008
DB2 / UDB
driver=driver=oracle.jdbc.driver.OracleDriver
url =
jdbc:oracle:thin:@<server>:1521:<database>oracle.jdbc.V8Compatible=tru
e
driver=com.microsoft.sqlserver.jdbc.SQLServerDriver
url=jdbc:sqlserver://<server>:1433;selectMethod=direct;sendStringParamet
ersAsUnicode=false 6; DatabaseName=<database>
driver=com.microsoft.sqlserver.jdbc.SQLServerDriver
url=jdbc:sqlserver://<server>:1433;selectMethod=direct;sendStringParamet
ersAsUnicode=false 7; DatabaseName=<database>
Server=<server>;Database=<database>
3
Only if the naming is SQL
Only if the Unicode flag has been enabled in the database properties
5
Only if a database system has been specified in the server property
6
Only if the Unicode flag has not been enabled in the database properties
7
Only if the Unicode flag has not been enabled in the database properties
4
35
Andrea Maioli – Instant Developer: User's Guide
DB2 / 400
Postgres
MySQL
Access
ODBC
driver=com.ibm.as400.access.AS400JDBCDriver
url=jdbc:as400://<server;libraries=<database>;naming=sql/system 8;
prompt=false
driver=org.postgresql.Driver
url=jdbc:postgresql://<server>/<database>
driver=com.mysql.jdbc.Driver
url=jdbc:mysql://<server>/<database>?useOldAliasMetadataBehavior=true
driver=sun.jdbc.odbc.JdbcOdbcDriver
url=jdbc:odbc:Driver={Microsoft Access Driver
(*.mdb)};DBQ=<database>; SystemDB=<server> 9
driver=sun.jdbc.odbc.JdbcOdbcDriver
url=jdbc:odbc:<server>
You can enter a customized Java connection string in the database properties form, as
follows:
driver=<java class of jdbc driver>
url=<parameters passed to driver>
log=1 (if logging of jdbc connection errors is enabled)
You can also specify a data source name for the application server:
datasource=<name of datasource existing in the context java:comp/env/jdbc/>
Alternatively, you can specify the absolute path to a text file containing the url and
driver parameters, as follows:
file=<parameter file path>
2.4 Creating tables and fields
After configuring the database and testing the connection, you can begin to define its
content. For pre-existing databases, we recommend importing the schema, as described
in section 2.6, otherwise you can create new tables using the
Add table command in
the database object's context menu. The properties that are normally entered for a database table are as follows:
1) Name: the logical name of the table used to reference the object within the project.
It is usually expressed in the plural form since it refers to the type of objects the table will contain, such as Products. If you use a name that is readily understood by
8
Based on the tables separator shown in the properties form.
Only if the database system file has been specified in the server property
9
36
Manage databases with Instant Developer
2)
3)
4)
5)
6)
the end user, it will not be necessary to redefine the caption for the various visual
objects that refer to the table. If instead you prefer to use an “internal” name, you
can specify the caption to be shown inside of the user interface with the Caption
property.
Description: a descriptive message that enhances the degree of project documentation and appears in the documentation created automatically by In.de.
Element: indicates the name of a single element in the table. If, for example, the
table is called Products, the word Product should be specified in the element. It is
important to complete this property appropriately, because it is used by In.de to
generate the names of objects that derive from the table and its fields. The singular
form of the table name is normally used, and it is best to use a brief expression of
one or two words maximum.
Number of rows: represents an estimate of the expected number of rows in the table. It is used to calculate the size of the database and to prepare the most appropriate lookup method in the user interface if the automatic method is chosen. It also allows In.de to suggest which indexes to add to speed up queries written in code.
Lookup type: allows the lookup construction method to be set for this table in the
user interface. If Automatic choice is selected, the lookup will be selected based on
the estimated number of rows in the table. For more information about lookup
methods, please read the corresponding section.
Code: this property represents the name of the table object within the database
schema. This property is normally calculated automatically based on the logical
name of the table, but you can change it if you prefer to choose a customized physical name.
After creating the table, you can start adding fields using the Add field command in
table object's context menu. It is important to clearly define some specific properties of
fields:
1) Name: the logical name of the field used for referencing the object within the project. It usually does not contain the name of the table, because this would be repetitive. For example, the Name field of the Products table should not be called Product Name, but simply Name. If you use a name that is readily understood by the end
user, it will not be necessary to redefine the caption of the various visual objects
that refer to it. If instead you prefer to use an “internal” name, you can specify the
caption to be shown inside of the user interface with the Caption property.
2) Description: it is very important to enter an appropriate description of the table
fields, because this message will appear as a tooltip for the corresponding user interface objects, in addition to appearing in the documentation and user manual generated automatically by In.de. We recommend entering a message that helps the user understand how to fill in the field.
37
Andrea Maioli – Instant Developer: User's Guide
3) Field content examples: this property should specify one or more examples of field
content, separated by semicolons. In.de uses these examples in different ways, so
we recommend entering some examples that are good representations of the field's
content.
4) Domain/Value list: you can specify a list of possible values that a field can take. By
pressing the Add button, a list of values will be created automatically from the content examples. For more information on value lists, refer to the following sections.
5) Data type: represents type property contained in the field. The following sections
will list the correspondence between the data type specified and the data type used
in the physical database schema.
6) Max length: if the data type is character, this represents the maximum content
length of the field. If the field is numeric, this property indicates the precision of
the number. For other data types, the maximum length is used only to optimally
prepare the graphic objects that need to show or edit the field.
7) Primary key: if this flag is set, the field becomes part of the table's primary key. For
more information on selecting a primary key, refer to the following sections.
8) Optional: if this flag is set, the field cannot be specified when inserting new rows in
the table. Otherwise, the field will be defined as not null.
9) Default value: this flag indicates that the first content examples will be used as a
default value for the field.
10) Counter: this can only be set if the field is of the integer type and provides an absolute numbering automatically by the database each time a row is added to the table.
Only one field per table can be of the counter type, and it is normally used to generate an artificial primary key. The different types of databases manage counter
fields differently, but In.de but makes the behavior of this feature databaseindependent.
Note: for a guided example of defining tables and fields and modifying the schema of a
database, we recommend following the Database lesson in the introductory course, accessible from the main menu Help – Introductory course.
2.4.1 Selecting the primary key
One of the most important decisions when designing the database schema is the creation of primary key, consisting of one or more fields with values that normally do not
change over time and that make it possible to pinpoint one and only one record in the
table.
38
Manage databases with Instant Developer
While creating the database schema, In.de also creates a unique index for the primary
key fields to ensure uniqueness, if the database does not do this automatically, and the
characteristics of this index make it the fastest way to access a single table row.
In the past, the tendency was to use as a primary key one or more table fields representing properties of objects in the table, such as the tax code to identify an individual. Since none of these are really unique and permanently unchangeable, there is a preference now for using an artificial primary key, i.e., an additional field that does not represent a property of table objects and that can be generated uniquely and permanently
by an algorithm. Normally, this is achieved in one of the following ways:
1) Using a counter field: all table rows are identified by a sequence of integers, automatically generated by the database when a new record is inserted into the table.
2) Using a doc-id field: a doc-id field is defined as a character field with a fixed length
of 20 - char fixed (20) – and its contents can be set using the newdocid() function,
which returns a string that is unique in both time and space. This provides a completely non-contextual identification of records in the table, which can be more advantageous than a counter in the case of union between different databases or references to records in different tables.
2.4.2 Value lists
In the field properties form, you can create or reference a list of possible values that the
field can take, as shown in the image on the following page.
By pressing the Add button shown in the image, a new value list will be created in the
database library based on the content examples specified for the field. Alternatively,
you can select an existing list from the Value List field in the Properties form for the
field.
39
Andrea Maioli – Instant Developer: User's Guide
Creation of a value list is recommended when the values that the field can take are
limited in number, known beforehand, or application-relevant. Associating a value list
to a field has many advantages, including:
1) A greater degree of project and database documentation.
2) The ability to reference in the application code the name of constants instead of the
value.
3) A higher level of context-sensitive help when writing code.
4) The ability to have combo boxes, radio buttons, or check boxes as display/entry
fields.
5) The ability to associate different visual styles or images with the different values
that the field can take and that will be managed automatically inside user interface
panels.
6) If new values are added to the list or existing ones modified, the entire application
is updated automatically.
7) By setting the appropriate flag in the value list properties form, you can also request generation of a check constraint at the database level to obtain a databaselevel verification of the values that the field can take.
2.4.3 A closer look: physical data types used in the database
The following table shows the types of data that will actually be used when In.de creates the database schema based on the data type specified in the field properties.
Integer
Float
Oracle
number(p)
number
SQL Server
int
float(53)
DB2
integer
double
Decimal
number(p,s)
decimal(p,s)
Currency
Character
number(19,6)
varchar2(p) /
nvarchar2(p)
char2(p)
/
nchar2(p)
date
date
date
nclob / clob
(n)varchar2
blob
money
varchar(p) /
nvarchar(p)
char(p)
/
nchar(p)
datetime
datetime
datetime
ntext / text /
(n)varchar
image
Character
(fixed)
Date
Time
DateTime
Text
BLOB
40
MySQL
integer
double
Access
long
double
decimal(p,s)
Postgres
integer
double
precision
numeric(p,s)
decimal(p,s)
decimal(19,6)
varchar(p)
decimal(19,6)
varchar(p)
decimal(19,6)
varchar(p)
currency/
double
currency
text(p)
char(p)
char(p)
char(p)
text(p)
timestamp
timestamp
timestamp
clob
varchar
blob
date
time
timestamp
text /
varchar
bytea
date
time
datetime
text /
varchar
blob
datetime
datetime
datetime
text(p) /
longtext
longbinary
/
Manage databases with Instant Developer
UNICODE Database
Based on the Unicode character fields flag in the database properties form, In.de defines the character fields differently to allow Unicode data to be managed at the database level. This data is then properly managed at the web application and report level.
For proper management of Unicode data at the database level, keep in mind the
tradeoffs and limitations described in the detailed UNICODE article in the documentation center.
2.5 Relationships between tables
A relationship between two tables is the association between an ordered n-tuple of
fields in a table with the corresponding primary key in another table. It represents a
pointer to a record contained in a different table, such as a pointer to the product contained in the order lines table, expressed through the Product ID field corresponding to
the ID field of the Products table. Another term often used for a relationship is Foreign
Key. In the following text, these two terms are used interchangeably.
Instant Developer uses relationships between tables in many ways, because they
represent the relationships between the objects that the information system must manage. For this reason, it is really quite important that they be specified within projects. Specifically, the following types of relationships are:
1) Reference relationship (n-1): the table that contains the relationship points to an
object contained in another table to reference it, as in the case above.
41
Andrea Maioli – Instant Developer: User's Guide
2) Ownership relationship (1-n): objects in the table that contains the relationship are
owned by those pointed to by the table. For example Order Lines are logically
owned by the Order in which they are present. This relationship is usually indicated
by setting the deletion rule to Cascade.
3) Extension relationships (1-1): the fields of the table that contains the relationship
are additional attributes of the object contained in the target table. For example, the
People table may extend the Individual Parties table, adding specific information to
the latter. This relationship results when the related fields constitute the primary
key of both tables.
2.5.1 Creating relationships
Within Instant Developer, you can create a relationship using drag & drop, by dragging
the target table over the table that will contain the pointer, while holding down the shift
key. This operation adds the relationship and all fields of the dragged table's primary
key to the table over which the drop occurred.
Before
After
Creating a relationship by dragging the Products table over the Order Lines table while holding
down the Shift key
If the fields corresponding to the relationship are already present in the table that contains it, then the extra added fields can be deleted, but the right ones must first be connected to the relationship. This takes place through the Edit foreign key command in the
context menu of the individual relationship object, bringing up the following form:
42
Manage databases with Instant Developer
Example of form for editing relationship fields
The list on the left shows the target table's primary key fields (in the example, those of
the Products table) and the corresponding fields of the table containing the relationship.
The list on the right shows the other fields of this table. To change the relationship,
simply drag one of these to replace it.
Note: not all fields can be replaced, since there must be a correspondence at the data type level, and a logical correspondence in case of relationships at multiple levels. If
In.de denies the link, verify that the fields chosen are correct.
If the fields in the relationship are already in the table and have names similar to
those of the target table fields, you can request In.de try to use these without creating
new ones. This is done by holding down both the Shift and Ctrl keys during the drag &
drop that creates the relationship.
2.5.2 Properties of a relationship
The most important properties of a relationship object are the deletion and modification
rules. The deletion rule specifies what should happen if you delete the referenced objects, i.e. the corresponding records in the table pointed to by the relationship.
The default value is Restrict, to be used when the relationship is referential, because the referenced records cannot be allowed to disappear from the database. For example, a product cannot be deleted if it is present in a sales order row.
Another important value is Cascade, to be used when the relationship is of the
ownership or extension type, because normally, when a “parent” object is deleted, its
corresponding “child” objects are deleted as well.
43
Andrea Maioli – Instant Developer: User's Guide
The update rule instead specifies what happens if the primary key fields of the target table are updated. Since it never advisable to update these fields, we recommend
always using Restrict as an update rule.
Finally, the other notable properties include:
1) Primary key flag: if set, the fields that are part of the relationship are also part of
the table's primary key. This flag normally indicates an ownership or extension relationship type.
2) Nullable flag: if set, all fields in the relationship will be optional, i.e. a nullable reference to an object in another table.
3) Create index flag: allows automatically creation of an index on fields that are part
of the relationship. It is often convenient to set this flag for ownership or extension
relationships, since these involve frequent access to child objects from parent objects.
2.5.3 Graphic of relationships between tables
Instant Developer has a graphic display mode showing the relationships between tables,
since this is a very useful way of providing a brief overview of the objects to be managed and the relationships between them.
The various types of relationships are represented with different line styles: dashed for
optional relationships, normal for referential and thicker for ownership or extension
relationships.
44
Manage databases with Instant Developer
Table fields are not shown in the graphic, because they can be quite numerous,
while the purpose of the graphic is to provide a brief overview of the objects to be
managed and the relationships between them.
The graphic's context menu contains commands for changing colors and for optimizing the positioning of tables.
Subject areas
As the number of tables and relationships grows, the database schema tends to become
more complex, perhaps to the point of being incomprehensible. For these cases, you
can create subject areas that represent specific database views.
To define a subject area, simply use the Add subject area command in the context
menu of the project object and then drag the tables in question inside it.
A specific subject area is enabled by selecting it in the combo box contained in the
In.de Browsing toolbar. Each area has its own database graphic that can be changed
independently from the others.
Finally, it is relevant to note that a subject area can also contain other types of objects in addition to tables, such as classes and forms. This way, you can get a simplified
overview of the application part as well. If you compile an application when a subject
area is active, only the visible part of the area will actually be processed, so as to accelerate the development and test process.
2.6 Importing an existing database structure.
In most cases, applications must be built starting with existing databases. In these situations, it is very convenient to be able to import the structure without having to manually
recreate it. To start the import process, you must first set and test the connection parameters as indicated in the previous sections and then use the Import structure command in database context menu.
45
Andrea Maioli – Instant Developer: User's Guide
Example of the database structure import form
In the database structure import form, you can select tables, views, and stored procedures to be imported. The form also contains import options, including:
1) Count table rows: the number of rows in the selected tables will be counted, to be
taken into account when building the application.
2) Sample field content: the first 100 rows of each table will be read to allow loading
of a certain number of field content examples. Refer to section 2.4 for more information about using content examples.
3) Import table schema: in addition to the table name, the schema that contains it will
be imported. This is useful if you want to manage tables contained in different
schemata all within the same database object, but this flag should usually be disabled.
4) Import comments as object caption: this is especially useful for the DB2/400 database type, where it is customary to specify the label to be displayed for the field
within the field's comments in the physical database schema. In fact, in this case the
option will be automatically enabled.
Pressing OK will start the import process, which can take several minutes for large databases. When complete, we recommend performing the operations described in the
following sections regarding how to prepare the database structure according to rules
that will allow In.de to optimize the creation of applications.
46
Manage databases with Instant Developer
2.6.1 Ownership of tables
Imported tables are represented by a white icon to indicate that the table's schema has
already been set within the database. For tables with this status, you can only change
the logical properties of the table and its fields, but not the physical properties, because
these are set by the current database structure.
In view of the structuring operations listed below, it may be useful to take ownership of the table schema so you can edit it from within In.de. This is done with the Take
ownership command in the table object's context menu. After this command is selected,
the table's icon will turn yellow to indicate the new status.
When structuring is complete, if you do not in fact want to change the schema of
the imported tables using In.de, then it is best to release ownership of the tables to
make the schema not changeable. This can be done with the Release ownership command in the table object's context menu.
Finally, it is relevant to note that you can also take ownership of the schema of
views imported from the database. After doing this, you can change the view's schema,
because In.de treats it as a table, specifying the primary key fields, adding relationships,
and so on. Obviously, this is merely a logical operation that enables In.de to use the
view in the best way, but it does not change the physical schema. Using a view as if it
were a table is a very powerful tool at times, but it may have limitations depending on
the type of database server. We therefore recommend doing so only for database views
that are already present and that select fields from one table at a time.
2.6.2 Setting table and field properties
The first thing to do after importing the structure is to set the properties of tables and
fields. Specifically, for tables: the name, description, and the element; for fields: the
name, description, any value list, and the visual style.
It is very important to use names, descriptions, and captions that are clear for both
developers and end users, so that the forms created automatically by In.de will be ready
for release. If you want to use a logical coded name, you can specify the label to be displayed in the user interface in the Caption property of both fields and tables.
If the tables contain a large number of fields that will not be managed by the application, you can delete them from the project. In this case, they will not be managed by
In.de, but no change will occur at the level of the physical database schema. You can
delete fields if they are not required, if they have default values defined at the database
level, or even if the application is not expected to insert new table rows.
47
Andrea Maioli – Instant Developer: User's Guide
2.6.3 Reconstructing relationships
After setting table and field properties, it is very important to check that the proper relationships between tables exist. In the event that the database does not contain the foreign key definitions, or if it was not possible to import it, you will need to manually recreate the relationships. The time invested for this operation will pay off greatly during
the application development phase. The procedure to reconstruct relationships is as follows:
1) Take ownership of the tables where the relationships are to be created.
2) Drag & drop the target tables over those to contain the relationship by holding
down shift and ctrl to try and re-link the fields automatically.
3) If the operation creates new fields, change the relationship by specifying the correct
fields. Then delete the fields that were added during the drag & drop.
4) When finished, release ownership of all the tables.
The relationships added to the database only represent a logical relationship, since they
are not present in the physical database schema. Deletion operations should therefore be
verified or propagated by writing application code.
A relationship can be defined as a logical relationship, even when the schema is
managed by In.de, by setting the deletion and update rules to No check. In this case the
relationship is not in fact created in the physical database schema.
2.6.4 Subsequent imports
The database schema import procedure can be repeated several times, both to import
changes made to the physical database schema using external tools, and to add more
database objects to the project.
During subsequent imports, In.de performs a synchronization with the physical
schema, adding new objects found, modifying existing ones, and finally deleting those
not found if specified in the import options.
You can also request a complete synchronization of the schema imported using the
following commands in the import form context menu.
1) Select all: selects all tables for import.
2) Deselect new objects: clears the selection of tables that are not already in the project.
This way, only the tables already in the project will be managed during the re-import.
48
Manage databases with Instant Developer
2.7 Management of indexes
An index is a preferential access route to data in the corresponding table: all queries
that filter data by the columns in the index will be executed very quickly. An index is
created using the Add index command in the table context menu. After creating the index, you can define the key by dragging the desired fields over the index.
The selection of key fields and their order is very important, because this affects
which types of searches can be performed quickly. To arrange the key fields properly,
simply drag them with the mouse into the correct order.
By setting the Unique key flag in the index properties form, you can verify the
uniqueness of the fields contained in the key. This way, for example, you can verify the
uniqueness of the User Name field of the Users table directly at the database level.
Besides adding indexes within tables, you can also create indexes in the database in
the following ways.
1) Primary key: In.de automatically creates a Unique and Clustered index for the
fields of the table's primary key.
2) Foreign key: by setting the Create index flag for a relationship, an index will be
added to the table that contains the relationship, with the fields making up the relationship as the key.
2.8 Creating views, stored procedures, and triggers
As part of the definition of the database schema, Instant Developer allows you to create
views, stored procedures, stored functions, and triggers directly from within the IDE,
without having to know the different database programming languages. Moreover, if
the type of database is changed, these code objects will be regenerated in an optimized
way.
Views contain the definition of a query, even a very complex one, which can be
called in a simple way with a single query instruction. You can add a view with the Add
view command in the database object's context menu. The view's contents are defined
through the code editor. For more information, please read the chapter Visual Code
Reference in the documentation center. You can also try creating a view with In.de by
following the Views lesson in the introductory course, accessible from the main menu
Help – Introductory Course.
Stored procedures are very important for creating procedures that quickly modify data in the database, since they are performed directly within the database, in an optimized way. Stored functions increase the flexibility of queries, since they can be
called from directly within those queries. To add them, you can use the Add procedure
49
Andrea Maioli – Instant Developer: User's Guide
command from the database context menu. The content and type will be set directly in
the code editor.
Triggers are procedures that are performed automatically when modifying table
contents. They are useful for ensuring the integrity of data between different tables,
such as, for example, when updating the inventory on hand for an item as a result of
entering a processing of that item. To add a trigger to a table, use the Add trigger command in the table's context menu.
Limitations
In.de is able to generate optimized code for views, stored procedures, stored functions,
and triggers, with the following limitations:
1) Code objects cannot be created if the database type is ODBC, since In.de will have
no way of knowing the specific language, and no generic standard exists for the
creation of code objects.
2) Stored procedures can be defined for all database types except ODBC, but they will
be compiled in specific database language only for Oracle and SQL Server. For
other types of databases, In.de creates a client-side functional equivalent of the
stored procedure, which replicates the operation even though not actually stored in
the database.
3) Stored functions and triggers can only be compiled if the database type is SQL
Server or Oracle.
2.9 Building and updating the database
The previous sections have shown how to create or modify the database schema within
an Instant Developer project. These operations, however, do not act directly on the database. For this, you have to enable compiling of the project by pressing F5 or selecting
the menu item Edit – Compile Project. For each database in the project, the compiling
options form will be displayed, as in the image below:
50
Manage databases with Instant Developer
Example of database compiling options form (version 10)
The main options are those for creation, contained in the top left frame. The Create
DDL flag requests building of the file with instructions for creating or modifying the
schema. The Execute DDL flag, shown in red in the image, allows you to actually send
commands to the database.
As long as the Execute DDL flag is not set, no changes to the database will actually
be performed. This can be useful for a preliminary check of the instructions to be sent
to the database and, only after verifying they are correct, actually performing the modifications.
The Single transaction flag, which is enabled when you select Execute DDL, allows the schema modification statements to be executed as one block, so in case of errors, the database can be returned to its previous state in a consistent manner. Resetting
this flag is not recommended, unless the modifications and the database type do not
explicitly require this by reporting an error.
Also in top left frame, you can select which type of modification should be made.
The possible choices are:
1) Recreate structure: in this case, the current database structure will be destroyed,
and a new one created. In the next section we will see how to recover data from the
database in this case.
2) Modify current structure: schema modification statements will be created (alter
table...) so as to maintain the existing one. This option can be chosen if the data51
Andrea Maioli – Instant Developer: User's Guide
base has been built using In.de at least once. Not all possible modifications can be
made, due to limitations of the database servers. If a modification cannot be made,
the database schema must be rebuilt using the function described above.
3) Recreate RTC data only: this option allows you to rebuild the part of the database
on which the Runtime Configuration module is based.
4) Recreate ZZ_OBJECTS table: this last type of modification should be made immediately after importing the structure of an existing database that you want to modify
with In.de. The ZZ_OBJECTS table is in fact the support table containing the current database structure as described within the In.de project.
Beginning with version 10, when you select the structure modification option, you can
display a graphic view of the modifications to be made by clicking on the Show differences button in the database compiling options form. A screen like the following will
be displayed:
Example of the database differences form
The left frame contains the list of objects to be updated in the database. When clicking
on one of them, the upper right frame will display the modifications to be made. When
selecting one of these modifications, the lower frame will display the corresponding
SQL statements. Each node of the tree will have an icon showing whether the item has
been added , requires modifications
, or has been deleted .
The SQL code is modifiable, so it can be adapted to specific needs. In this case,
In.de will display it in red. You can also exclude a modification completely by pressing
the Disable mod button. In this case, the code will be displayed in green. To re-enable
an excluded modification, press the Enable mod button.
52
Manage databases with Instant Developer
To display an overview of the SQL code that will be sent to the database, you can
press the Open DDL button, which displays it all in a text editor. Note that changes
cannot be made within this editor.
By pressing the Save button, the DDL file is rebuilt applying the required modifications and the Create DDL flag in the database update form is reset. This way, if you
confirm the database update operation, the DLL file produced by the differences form
will be used. If instead you press the Cancel button, the form is closed without modifications being made to the DDL file, and the status of the Create DDL flag is not
changed.
The database differences form can be opened directly using the Show differences
command in the database object's context menu. The form, in this case, will be opened
in read-only mode.
To enable the Show differences function, the database must already contain the
ZZ_OBJECTS table that specifies the schema, and there must be no modifications that
require recreation of the structure. If the database has just been imported and the
ZZ_OBJECTS table is not yet present, use the option Recreate ZZ_OBJECTS table described above.
2.9.1 Creating a new structure – Data management
If you choose to create a new database structure, all data in the database will be deleted.
To avoid the risk of data loss, backing up the database is required before starting the
operation.
In this case, the controls in the lower left frame are enabled, allowing management
of the data to be reloaded into the database after the structure has been rebuilt. The possible options are:
1) Empty database: after the structure is rebuilt, the database does not contain anything.
2) Save existing data: before starting the rebuild, the data present in the database are
extracted and stored in the development PC. After the structure is rebuilt, the data
will be reloaded. The extraction and reloading operation can take some time depending on the amount of data to be processed. Note: there is no guarantee that all
data will be able to be reloaded, since it may no longer comply with the integrity
constraints in the database.
3) Create test data: this option allows you to upload a very large amount of data into
the database, achieved by permuting the field content examples specified in the
field properties. The maximum number of records loaded is equal to the number of
rows specified in the table properties, but it may be limited with the corresponding
field in the database build options.
53
Andrea Maioli – Instant Developer: User's Guide
4) Import data from other database: this option allows you to move data from another
database, whose connection parameters must be specified in the upper right frame.
This option can be very useful when it is not possible to move data through backup
and restore, which can occur even with the same type of database server (for example, if the data is contained in a SQL Server 2008 database and you want to transfer
them to a SQL Server 2005 type).
During rebuilding of the structure, a support table called ZZ_OBJECTS will also be
created containing the data for all objects present in the Instant Developer project. With
this table, In.de is able to calculate the statements for modification of the structure
quickly and completely, independent of the type of database server.
2.9.2 Modification of the current structure – details
The current structure can be modified if the database already contains the
ZZ_OBJECTS table. This is the case if the database structure was created at least once
or if the option to create the single ZZ_OBJECTS table has been used.
When modifying an existing database, any data that is not simply for testing should
be backed up first, because there is always a risk of losing it. To minimize this risk, we
recommend proceeding as follows:
1) Select the option to modify the structure without setting the Build database flag,
and then the operation continues.
2) A text editor opens displaying the file containing the DDL statements, so they may
be checked. If they contain unwanted statements, you can delete them from the file.
The file is located in the folder that contains the In.de project and has the same
name as the database, but with the DDL extension.
3) The project is re-compiled. This time, also select the Build database flag. If the file
has been modified manually, reset the Create DDL code flag.
If the modification to the structure has not been successful, you can retry executing it
by checking that the file contains no DDL statements that are unacceptable for the specific database server. In any event, In.de is able to restart only from the part yet to be
modified.
2.9.3 Automatic generation of database schema at runtime
If you use a SQLite database type, you can set a new flag in the database properties
form called Database and schema auto-generated at runtime by applications.
54
Manage databases with Instant Developer
By doing so, creation of the database, as well as generation and updating of the
structure will be performed by the application. This makes it suitable for distributed
database management, as in the case of offline web applications, which will be available with version 11 of Instant Developer.
In the case of .NET applications, the database is saved in the application's DB subdirectory. Meanwhile, for Java, it will reside in WEB-INF. Both folders are externally
inaccessible, even if part of the web application.
The only changes to the schema that cannot be executed at runtime are modification of the DB Code of tables and fields and changes to the table check constraint. In
the first case, the field or table will be deleted and then recreated empty. In the second,
the modification will not be executed.
2.10 Creating database schema documentation
The Instant Developer IDE is the easiest and fastest way to read, analyze, and manage
the structure of databases. However, at times it is necessary to provide updated information regarding the database schema in textual form, such as, for example, in the
technical documentation provided with the information system.
To address this problem, In.de includes a documentation generation system based
on html templates. To enable it, simply use the Create documentation command in the
database object's context menu. After a few moments, a browser will open displaying
the list of tables. By clicking on a table, its definition will be displayed, as shown in the
example below.
55
Andrea Maioli – Instant Developer: User's Guide
Example of the database structure documentation form
In.de reuses the descriptions and other characteristics of the objects added to the project
for composing the list. Each field belonging to a relationship is clickable to allow quick
navigation to the relationship definition. If the project includes subject areas, they are
included in the documentation, and for each, the database graphic is also shown.
The documentation consists of a set of static HTML files that can be published as
they are on a website, or attached to the application. If you want a comprehensive PDF
file, you can use an HTML to PDF converter such as Adobe Acrobat. In this case you
can run the file pdfcss.bat contained in the documentation directory to use a style sheet
better suited to conversion to PDF.
Finally, if you want to change the look and feel of the documentation, you can
modify the template located at C:\Program Files\INDE\CURRENT\Template\DBDoc.
To be specific, the file help.css is the default style sheet for the documentation,
help_pdf.css is used for conversion to PDF and help_html.css is for presentation in
HTML. Initially, help.css and help_html.css are identical.
56
Manage databases with Instant Developer
2.11 Questions and answers
We have arrived at the end of the introduction to the main features of the Instant Developer database management module. Many other aspects could be covered, such as
management of check constraints or domains, but their use is not so common as to
make it useful to do so here.
This introduction, necessarily brief, may not have touched on all points that interest
you particularly. For this reason, I invite everyone to send any questions via email by
clicking here. I promise to answer all emails, even if time is limited. Also the most interesting and frequent questions will be published in this section in subsequent editions
of this book.
This space is reserved for answers to readers' questions
57
Chapter 3
Structure of an In.de application
3.1 The application object
After creating or importing the database schemata containing the necessary data, applications should be added for managing this data. In.de allows you to build different types, including:
Web applications: provide application functions through a normal browser, with an
RIA-type user interface.
Batch applications: application services running on the server that monitor certain
types of events and react accordingly. They are often used to manage task scheduling
queues. Beginning with version 9.5, In.de provides a more efficient system for creating
batch services that does not use separate applications, but rather server session technology, as described in more detail in the related section.
Web service applications: allow third-party application services to be exposed,
through SOAP-based web services technology.
Components: contain application parts that can easily be reused in different projects
and contexts.
To add an application, simply use the commands in the project object's context menu.
All types of applications can be automatically generated and compiled in both C# and
Java. Web applications and server sessions are discussed in detail later in this chapter,
while for a closer look at web services and components, please refer to the chapters relating to those topics.
3.1.1 Application object properties
Each new Instant Developer project already contains a web application object. If
you want to add other applications, this can be done with the corresponding command
on the project object's context menu.
58
Data presentation and editing panels
To begin defining an application, the first thing to do is to properly set some basic
properties through the properties form, specifically the following:
1) Name: represents the name of the application as it will be identified within the project. It is also used as a quick-launch URL for the application and, finally, in the
user interface unless a different title is specified.
2) Technology: allows you to select the language and architecture in which the application will be generated, either Java or C#. If the Keep compatibility flag is set, you
can recompile the project in the other language as well, but you cannot use libraries
imported in only one of the two technologies.
3) Custom directory: contains the template files to be customized. At the beginning of
development, this property is empty, but if you need to customize the template, it
must point to the directory containing the files modified or added.
4) Output directory: the directory containing the application files generated by In.de.
If the project contains multiple applications, the output directories must be different.
3.1.2 Application structure in an Instant Developer project
Along with databases and libraries, applications are one of the three main parts of an
In.de project. Applications appear in the object tree immediately below the project object.
Structure of an application object within an In.de project
59
Andrea Maioli – Instant Developer: User's Guide
A web application created with In.de is generated as a Servlet in Java or an ASPX web
application in C#. The application object is compiled into a Java or C# class that represents the single web session. So, the entire contents of the application are referred to the
session and not to the application in its entirety. The definition of an application involves the following types of objects:
Global variables: represent the properties of the web session that will be compiled
as properties of the class constituting the application in question. If the variable is public, it will be visible throughout the entire application. It can thus be used to store data
relating to the session, such as the parameters of a connected user.
In-memory tables: In.de contains an in-memory database (IMDB) to facilitate the
processing of temporary data. A table inserted at the application level represents an
IMDB table usable globally from all points of the application. There are two types of
in-memory tables: single-row, with cardinality equal to 1, and multi-row. Multi-row
tables behave just like tables in a database, while single-row tables are like data structures whose fields can be accessed directly instead of through queries.
Global methods: methods, procedures, or functions defined at the web session level.
If they are public, they can be called from all points of the application, so they are true
global methods. Since all global methods are compiled in the class representing the web
application, if you want to create libraries of global functions, it is best to create additional classes in which to place these methods, perhaps specifying them as static to
avoid the need to instantiate the class containing them.
Events: procedures called by the framework upon the occurrence of certain events,
such as initializing a new session. They also allow you to customize management of the
session's life cycle.
Form: a class that manages the presentation manager of an application function. For
example, the Products form can contain the screen presentation of the list of products,
along with tools to modify the data.
Class: represents a class of objects managed by the application. The class can contain properties and methods, and can extend other classes or implement interfaces. In.de
allows you to manage a particular type of class called Document, which represents the
basis of the ORM system included in In.de.
Command set: a command set object contains a set of application commands, which
can be represented as part of the main menu, as the application toolbar, or as a popup
menu.
Indicator: a small information panel located at the top of the screen, just below the
application title, that represents the equivalent of the status bar of client/server applica-
60
Data presentation and editing panels
tions. It can be used to show the user a message or other application information. Today, it is rarely used because there are more flexible and automatic systems to obtain
the same results.
Timer: is connected to a procedure that is called periodically and is used to perform
operations in the background while the user is using the application. The timer functions within the browser and sends asynchronous messages to the server, which launches the corresponding procedure and, if necessary, updates the user interface. For this
reason, if a high frequency timer is active in the application, higher than usual internet
traffic can be generated.
Role: represents an application role, or profile. It allows you to declaratively define
active functions for different types of users, permissions down to single report or form
fields, active filters on data, and so on.
Parameter: the In.de framework contains several dozen parameters that allow you
to configure behavior. For a guided configuration of each single compiling parameter,
we recommend using the compiling parameters wizard, activated from the application
context menu.
3.2 Life cycle of a session
Management of application sessions in In.de is substantially equivalent to that of any
other web application: the session is initiated when the browser first connects to the
web server and remains active as long as it continues to call the server before expiration
of the session timeout.
The session is associated with the browser through communication by the web
server of the session cookie: a string of characters that uniquely identifies the browser
and allows the web server to associate a session object with each single connecting
browser.
To manage the steps in the session life cycle, In.de provides several events raised
to the web application by the framework. The following sections will describe in detail
how to manage the initial and final steps of the web session.
61
Andrea Maioli – Instant Developer: User's Guide
3.2.1 Session start step
The session start step can be controlled by the events Initialize, OnCommand, OnLogin,
and AfterLogin of the web application object. To add procedures for management of
these events, you can use the application context menu.
The primary purpose of these events is to verify whether the connecting browser is
authorized to use the application and with which profile it may do so. This is done by
setting the UserRole application property to one of the user roles defined in the project,
or at runtime if the RTC module is used. If this property is left empty, then the application does not start directly, but displays the login form requiring the user name and
password of the user.
Let's take a look at the exact sequence of events as they are raised. The absolute
first event is the Initialize event, but it is only raised when the browser first connects to
the web server. If the UserRole property is set within this event, then the application
can start, and the AfterLogin event immediately fires, which allows the user interface to
be prepared based on the type of profile connected.
Initialize
UserRole = Administrator
AfterLogin
If parameters have been specified in the connection query string, and one of them is the
command code (CMD, in uppercase), then the OnCommand event is also raised, allowing it to be handled. The UserRole property can also be set within this event, and as
mentioned above, in this case the application can start and the AfterLogin event will
fire.
Initialize
www.mysite.com/app?CMD=login&user=pippo
OnCommand
UserRole = UtenteSuper
AfterLogin
If the user role is not set in the Initialize and OnCommand events, the application cannot start directly, rather the access control form is displayed where the user can enter a
62
Data presentation and editing panels
valid username and password. At this time, the application is notified of the OnLogin
event, containing the values entered by the user as parameters. If the UserRole property
is set within this event, the application can start; otherwise the access control form will
be displayed again.
Initialize
OnLogin
UserRole = NormalUser
AfterLogin
Now let's take a look at the most common functions for obtaining the information necessary to complete the login step.
GetURLCommand, GetURLParam: return the command and the parameters contained in the browser query string. If, for example, the application is invoked with
www.mysite.com/app?CMD=login&user=johndoe, then GetURLCommand() returns
“login” and GetURLParam(“user”) returns “johndoe”. You can use these functions in
all events, but this requires the CMD parameter to be present in the query string.
GetSetting: allows the value of a session parameter to be retrieved. Based on the
“section” argument, you can read various types of parameters. In the login step, it may
be useful to read these from the request in progress (section=Form), because they represent all the parameters in the POST and in the query string sent by the browser.
UserName: normally, this property is empty and must be set. However, if the web
server has been configured to require browser authentication before granting access to
the application, then this will already contain the user name that has been authenticated
by the web server. This technique is typically used for applications running within a
corporate intranet, to avoid storing user access parameters.
63
Andrea Maioli – Instant Developer: User's Guide
Example of login management with the In.de standard access control form.
64
Data presentation and editing panels
The above image shows the code of the DoLogin procedure of an application in production. This procedure is called directly by the OnLogin event, from which it receives the
UserName and Password parameters. The first operation performed is a database query
to check if the username and password are present in the Users table. Here, it was decided to store the password directly in the database, but it might be preferable to write
the data in encrypted rather than plain format.
Note that the query not only verifies that the user is registered in the system, but also reads various user parameters and stores them in global session variables or in a
global in-memory table. This way, these parameters will be usable in any part of the
application.
If the user is recognized, then some session initialization operations are executed,
including:
1) The UserRole and UserName properties are set to allow access to the application.
2) The autologin function is automatically activated, so that the user does not have to
re-enter a username and password for the next connection. This is possible because
the application is not used from shared workstations, but only from personal ones.
The autologin function consists of storing the UserName parameter in plain text
and the Password parameter in encrypted format as persistent cookies in the browser. Note the use of the SaveSetting method and SimpleCrypter object to obtain the
result. The cookies are then read back in the Initialize event, with code like the following:
If instead the user is not recognized, a message is displayed on the access control page
with the SetLoginMessage function.
65
Andrea Maioli – Instant Developer: User's Guide
3.2.2 Session termination step
The session may be terminated for the following reasons:
1) The browser has not communicated with the server for a period equal to at least the
session timeout set in the web server. This can happen if the browser remains idle,
or if it is closed. Note that in this case the session does not end immediately, but
only after the server side timeout has expired.
2) The user has pressed the application close button in the application header at the
top right.
3) The application code has called the Exit procedure, which allows the session to be
closed and redirects the browser to another page.
The session closing algorithm is as follows:
OnLogoff
Only in case 2)
Form.Unload
If Logoff not skipped, for
each open form, or if not in
case 2)
Terminate
If logoff or unload not cancelled, or if not in case 2)
If the user presses the application close button, first the OnLogoff event is raised. If the
code does not activate the Skip parameter, then all open forms are closed, and they fire
the Unload event. Finally, if neither the OnLogoff event nor the Unload events have
been canceled by activating the Cancel parameter, the session is terminated and the
Terminate event is raised.
In other cases of session termination, the OnLogoff event is not raised and the form
is closed immediately. In this case, however, the session is terminated even if the forms
refuse to close, with the Terminate event always raised.
The framework on which Instant Developer is based uses the session termination
step to free some resources associated with the session, such as the temporary files (see
also AddTempFile) or some types of application locks associated with documents. In
the same way, the events described can be used to release other types of resources.
However, the session termination step is not always guaranteed. For example if the
web server unexpectedly fails, the event cannot fire. Therefore, this event should not be
relied upon absolutely for freeing up resources associated with the session.
66
Data presentation and editing panels
Finally, current browsers allow windows to be closed without allowing web applications to be notified of this fact and without the ability to request confirmation from
the user. Some types of browsers, however, offer the ability to display a message that
the user can choose to ignore. The In.de RD3 framework can use this function. To activate it, you must set the UnloadMessage property of the RD3_ServerParams browser
object to the text of the message you want displayed to the user. Since this is a browserside object, it can be set with the ExecuteOnClient function, as in this example:
3.2.3 Other noteworthy events
In addition to the OnCommand event that may occur both at the start and during execution of the session, there are other events that may be raised to the session during its life
cycle. The most important are the following:
1) OnFileUploaded: raised if a POST request to the application contains an attached
file, and used to manage it as needed. This type of request with attachments can be
generated either by an external program, or by an application developed with In.de
when a form contains a field of type multi upload.
The code shown below is an example of file management by loading into a blob
field in a table. In the example, the file name contains the identification number of
the record to be edited. Insertion of the blob is done by selecting the related field
and the primary key of the record within a writable for-each-row cycle, then setting
the value of the blob field using the LoadBlobFile function, which loads the file
from disk and assigns it to that field.
67
Andrea Maioli – Instant Developer: User's Guide
2) OnResize: this event is raised when the browser window dimensions are changed,
or at the start of the session immediately following the AfterLogin event. One possible use for this event can be to hide or show parts of the user interface based on
the total size of the browser window. Keep in mind that both the forms and the various graphic objects already contain the functionality necessary to manage the various dimensions of windows, so the Resize event should be used only in cases where
the standard behavior is not sufficient.
3) OnException: allows notification to be received of exceptions not handled by the
application code. It can be used to modify the standard behavior in case of an exception or to log such an exception in the database. If within the management of an
event there is an additional exception, this is not raised to the event itself so as to
avoid causing a potentially infinite loop.
4) OnChangeLocation: raised when the browser location changes, if geolocation is
supported and has been activated by setting the RefreshLocation property. Allows
the application to know the current geographical location of the browser and, if applicable, the speed and direction of movement.
68
Data presentation and editing panels
5) OnBrowserMessage: an event that is raised whenever the browser communicates
something to the application through the RD3 framework. It can be used to find the
type of message, to change the parameters, or more simply to execute code every
time the browser communicates with the server.
It is widely used for synchronization of offline web applications when they return
online. For example, the following shows the code used when the application
iShopping leaves the offline mode: any item purchased while the application was
offline is communicated to the server as a special message, specifically the tags attribute contains the modified value and par1 contains the primary key of the record
to be edited.
69
Andrea Maioli – Instant Developer: User's Guide
3.3 In-memory database (IMDB)
For management of data loaded into memory, In.de provides the same objects as traditional languages, allowing you to use arrays, maps, classes, collections, and recordsets.
In addition to these objects, In.de manages a true in-memory database, often abbreviated IMDB, whose main features are the following:
1) Allows you to define tables and fields both at the application level (session) and at
the single form level. The tables are public, i.e. visible from any part of the application, and permanent, i.e. the data they contain remains so until the end of the session.
2) The tables can be single-row or multi-row. A single-row table always contains only
one record, representing a single data structure whose fields can be accessed directly. Multi-row tables are data structure arrays that can be accessed only by query
statements.
3) There are specific queries for data exchange between the in-memory database and
the application database.
4) The graphic objects that make up the user interface use the in-memory database in
different ways. For example, they may be linked to multi-row in-memory tables to
view or edit the content. Furthermore, the single-row table fields may be used to filter or condition the operation of such graphic objects. Finally, the graphic objects
write “active” data to specific single-row tables. This way, data can be easily synchronized between the various objects making up the application's user interface.
3.3.1 Definition of IMDB tables
To add the definition of an in-memory table, you can use the Add table command in the
context menu of the application or form object. The table properties and fields are identical to the database tables, so please refer to the related chapter for a complete explanation.
In the table properties form, you can select the type of IMDB table: if the cardinality is set to 1, then the table will be single-row and will display a green and white icon,
otherwise it will be multi-row and the icon will be all green.
You can also create in-memory tables that derive their structures directly from
those of the database by dragging and dropping them on the application, or on the
forms that are to contain the corresponding in-memory object. You can also to drag individual database fields to create a corresponding field in the IMDB.
In the following image, an IMDB table was created by first dragging the Shippers
table from the database to the Northwind Client application object. Then the Fax field
was added, dragging it from the Customers table to the IMDB Shippers table. The or-
70
Data presentation and editing panels
ange arrow displayed on the table icon identifies the fact that it was obtained from a
database table and therefore represents the same type of object.
Example of creating an IMDB table from those of the database
3.3.2 Reading or writing the contents of the IMDB
The use of an IMDB table is different depending on whether it is single-row or multirow.
In the first case, the table always contains one and only one record, and so the table
fields can be referenced directly, both reading and writing, in the same contexts where a
global variable at the application level can be used. In the case of single-row tables,
moreover, the delete from statement has a different meaning, because records contained
in the table cannot be deleted. It is only possible to delete all fields, effectively emptying the contents of the table.
The following table continues to use the IMDB Shippers table within a procedure
that reads data for the shipper indicated in the ShipperID field, setting the Fax field
equal to Phone.
Note the different uses of the IMDB table fields: within the Select Into Variables
the ShipperID field is used in the where clause to filter the data for the desired shipper.
Meanwhile, the IMDB fields CompanyName and Phone appear to the left of the columns selected in the query to indicate that the data read from the database will be
stored in the IMDB table. Finally, the Fax field is set directly to the value of the Phone
field read in the query.
71
Andrea Maioli – Instant Developer: User's Guide
Example of reading data from the database in a single-row IMDB table
Multi-row tables should be treated as actual database tables. You can therefore edit the
contents with insert values, insert select, update, and delete statements. The data is read
using select into variables and for each row queries. For more information, also refer to
Visual code queries.
Insert select statements are used to fill a table with the results of a query. If they
involve IMDB tables they may be of three types:
1) Data is to be inserted into an IMDB table, while the select involves database tables:
in this case the data is read from the database and then stored in the in-memory table. This type of query is used to load entire IMDB tables from the database with a
single instruction.
2) Data is to be inserted into an IMDB table, and the select involves in-memory tables.
This query is used to move data from one IMDB table to another, possibly processing the data in the query on the fly.
3) Data is to be inserted into the database, while the select involves in-memory tables:
the data from the in-memory query is stored in the database. This query is used to
store the contents of the IMDB in the database.
Example of reading data from the database in a multi-row IMDB table
72
Data presentation and editing panels
3.3.3 Usage example: storing session data
One of the most classic examples of using single-row IMDB tables involves using one
for storing session-specific data, such as data for the connected user. In subsequent
chapters we will see other examples of using an in-memory database linked to user interface objects.
To store and make session data available to any application, a single-row IMDB
table is usually added to the application, as shown in the following example:
This application allows users to take readings of gas and water meters in the territory. It
is relevant to note that some user data is stored, such as the Company ID, the User ID,
the position, as well as some data regarding operations in progress, such as lot in processing stage, last meter read, lot tolerance parameters, and so on.
The in-memory table is accessed during login through a select-into-variables query
that selects data based on the username and password of the user.
The advantage this kind of procedure has to do with the fact that at all points of the
application it is possible to read or write the Session Data table fields to retrieve or set
the current work session.
73
Andrea Maioli – Instant Developer: User's Guide
3.3.4 Limitations of the in-memory database
Although the in-memory database is defined and used similarly to a normal database,
there are some differences and limitations that must be taken into account.
1) The data in the in-memory database is stored inside the web server for each active
session. Therefore, care should be taken not to load too much data and to empty tables with delete from statements as soon as the data is no longer needed.
2) The data in IMDB tables at the form level is retained even when the form is closed.
If more data is loaded, it may be useful to empty the table in the form unload event.
3) It is not possible to write queries using dynamic SQL, but only through queries defined in visual code. They will in fact be compiled into a procedure in source language that directly runs the query on the data of the in-memory table involved.
4) Transactions on the in-memory database cannot be defined. All queries that modify
data are final.
5) Triggers cannot be created.
6) It is not possible to use indexes, and the primary key is merely descriptive, i.e., the
system does not check if two records are inserted with the same primary key values.
7) The default value of fields is only descriptive. When inserting a new row in an inmemory table, undefined fields will always be null.
8) There is no check whether fields defined as not required are actually set.
9) The IMDB does not support check constraint at the field or table level.
10) Although you can create relationships between in-memory tables, they are not
checked when the data is modified, so the integrity rules of the in-memory database's foreign keys are always of the no-check type.
There are also the following limitations in terms of queries that select data from inmemory tables.
1) It is not possible to use unions or subqueries.
2) You can select outer join only within the from clause and not at the where level.
3) Aggregate functions can have as a parameter only one IMDB table field, and not a
complex expression.
4) Aggregate functions used in where clauses must also be present as a column selected in the query.
3.4 The form object
Forms represent the base object for building the application's user interface. Each form
contains a set of graphic objects that allow the user to activate the various behaviors,
74
Data presentation and editing panels
and since it is compiled as a Java or C# class, it can also contain global variables,
methods, events, etc.
To add a form to the project, you can use the Add form command from the application context menu, or by dragging a database or in-memory table and dropping it on the
application while holding down the shift key. This operation adds a form already prepared to show the data in the dragged table.
Structure of a form object within an In.de project
The graphic part of a form can be defined using Instant Developer's graphic forms editor, which is opened by selecting the form in the object tree and then pressing the Show
graphic (F4) button in the toolbar or View -> Graphic in the main menu. A form can be
divided into horizontal or vertical frames and each frame can contain a complex graphic
object, i.e. one that already contains full functionality. The types of graphic objects that
will be analyzed in later chapters are the following:
Panel: a panel is used to show or edit a record or list of records returned from a
primary (master) query and additional (lookup) queries. It automatically manages both
the grid and form layout.
Tree: allows you to view or edit via drag & drop a series of hierarchical data returned from one or more queries linked to each other or from in-memory objects.
Book: allows you to organize the result of one or more database or in-memory queries within a complex visual structure as needed. It is useful not only to manage printing of each document type, but also to create flexible views of data from different
sources.
75
Andrea Maioli – Instant Developer: User's Guide
Graphic: allows you to view the result of a database or in-memory table query in
graphic form, inside both forms and books.
Tabbed view: used to insert more than one complex graphic object in the same
space in the user interface. The user can choose which one to view by clicking on the
tabs.
Button bar: contains a set of buttons arranged horizontally or vertically. It is rarely
used because there are other, more flexible graphic structures.
A form is compiled into a class of dedicated source code. For this reason it may also
contain the following types of objects:
Global variables: represent the properties of the form that will be compiled as properties of the class corresponding to the form. If the variable is public, it will also be visible to other forms. However, it is not a good practice to use this mechanism since it
decreases encapsulation of the form in question.
In-memory tables: an in-memory table inserted at the form level defines data used
preferably from inside the form. However, they are also accessible from outside, even
when the form is not open.
Methods: a method, procedure, or function defined at the form level. If public, it can
also be called from outside the form and can be a way of passing parameters to open it.
Events: procedures called by the framework at the raising of certain events with respect to the form or its graphic objects, allowing you to customize its life cycle.
Timer: connected to a procedure that is called periodically and is used to perform
operations in the background while the user is using the form. Timers defined at the
form level can be activated only if the form is open.
Command set: a command set defined at the form level may contain a part of the
main menu that is enabled only when the form is open, a set of commands displayed
inside the form, or a popup menu used by the form.
3.4.1 Methods of opening forms
Forms can be opened in different ways depending on their properties and the mechanism that causes the opening.
76
Data presentation and editing panels
1) MDI forms: a form that has the In MDI container flag set is usually opened within
the desktop area of the user interface. Each form open in the desktop has the same
size and overlaps the others. The user can select which one to bring to the foreground through the list of open forms.
2) Popup forms: If the In MDI container flag is not set, the form will normally open as
a popup.
3) Lookup forms: are forms prepared to search other data linked to the data currently
displayed. They are normally opened as a modal popup, and if so, do not allow interaction with the rest of the interface until they are closed.
4) Docked forms: a form will open on the sides of the desktop area if the Docking type
property is other than None. Instant Developer allows a maximum of one docked
form to be opened for each side of the desktop.
5) Sub-forms: a sub-form is a form that is shown as part of another, or within a Book
object.
The mechanisms for opening a form are as follows:
1) Linking it as an “activation object” to another activatable graphic object: for example, if the form is connected to a Command object that is part of the main menu,
when the user clicks on the menu item, the form will be opened in the manner described above.
77
Andrea Maioli – Instant Developer: User's Guide
2) Calling a public method of the form: in this case, the form is opened in the manner
described above, and then the method is called. If the form was already open, the
method is immediately called without taking other actions.
3) Calling the Show method, which allows you to specify a certain type of opening.
If opening is triggered for a form that has already been opened, then it is merely
brought to the foreground and not re-opened.
The following images show how to open a form from another form, also passing
parameters. When the user activates the Product ID field by double-clicking it, the
OpenFor method of the Products form is called, passing the value of the Product ID
field.
The code for the OpenFor procedure uses some panel methods that allow selection of
the record to be displayed on screen, with the result shown in the image below.
78
Data presentation and editing panels
You can also open multiple instances of the same form, writing code that creates the
instance and opens it in the manner desired. Here is an example:
The procedure shown opens 10 popup forms with each of them showing a product with
ID from 1 to 10.
79
Andrea Maioli – Instant Developer: User's Guide
3.4.2 Life cycle of a form
The life cycle of a form begins with its opening, as described in the preceding section,
and ends at its closing. Also in this case, some events are raised to the form to allow
their behavior to be customized. The following diagram shows the form opening cycle.
Init. visual objects
Some object events can be notified here.
Load
Here visual objects are updated based on
the IMDB status.
Activate
Here visual objects are updated based on
the IMDB status.
On Resize
When a form must be shown, the framework creates the object instance of the corresponding class and then inserts it at the top of the open forms list. Then the form initialization is launched preparing visual objects contained in the form, reporting the Load
event, and finally, updating the contents based on the state of the in-memory database.
Handling of the Load event is very useful for setting properties of visual objects directly from code, before the form is displayed to the user.
At this point, if the form is a popup, the Activate event is raised and the form appears in the browser. If instead the form is an in MDI container form, and there is already one open, then the Deactivate event is raised to the previous one. If this is not
canceled the Activate event is raised to the new form opened. Otherwise, if the topmost
form cancels the Deactivate event, then the new one is still opened, but it is not brought
to the foreground. The Activate event is not only raised the first time, but every time
that the form becomes active, returning to the foreground of the desktop. It can be used
to update the status of the form based on events in another, thus avoiding the need to do
so when the inactive form is not visible to the user.
Finally, at the moment the form appears in the browser, all visual objects are rearranged based on their sizes and according to the resizing rules set at design time. The
OnResize event is then raised to the form, and can be used to further customize the
form's appearance, such as hiding parts if it is too small.
80
Data presentation and editing panels
Let us now analyze the form's closing step, which can occur for various reasons, such
as:
1) The form's Close method has been called from code.
2) The user has closed the form by clicking the form's close button.
3) The user has closed the application by clicking the application's close button.
4) The user has selected a row in a form that has the CloseOnSelection property set.
This typically happens with lookup forms.
The form closing cycle is as follows:
Unload
AutoSave mgmt
If at least another form was open, it is
activated.
Activate
First, the Unload event is raised to the form, but it can be canceled, in which case the
form does not close. If it is not canceled, the framework processes the form's AutoSaveType property, which allows you to decide what happens if there is unsaved data at
the time of closing.
Finally, the form is closed, and if there is at least one other form open, it is made
active, and its Activate event is raised.
The following code example shows how the transition from one form to another
can be implemented, closing the initial one.
This is the same code as in the previous section "Methods of opening forms." In this
case, however, the line this.close() has been added, causing the OrderDetails form to be
closed, and moving to the Products form.
81
Andrea Maioli – Instant Developer: User's Guide
3.4.3 Other noteworthy events
There are several other events that are raised to the form, but the most important is definitely the EndModal event, which is raised at the closing of a modal popup form
opened from the initial form.
The most classic use of this event is to retrieve information from a lookup form
used to select data to be included in a panel, as shown in the image below.
When the user double-clicks the Order ID field, a lookup form (modal popup) opens, to
be used to select the order number to display on the underlying form. If the user double
clicks on an order in the lookup form, the lookup form is closed and the order number
is shown in initial form in the proper field.
If the database contains relationships between tables, normally Instant Developer
can write the necessary code automatically. Sometimes, however, relationships between
data are not explicit, and if this is the case, the values must be reported from the lookup
form to the initial form by handling the EndModal event as shown in the following example.
82
Data presentation and editing panels
3.4.4 Zones
Docked forms can be controlled using a special Instant Developer feature, activated
with the Use ScreenZone compiling parameter.
ScreenZones represent the viewing areas above, below, and to the sides of the
desktop area (the central part of the application). They improve the management of
docked forms. For example, without using this feature you can only show one docked
form for each side of the screen, while using it allows you to keep open multiple
docked forms on the same side, possibly showing a Tabbed View to facilitate user navigation.
There are four ScreenZones within the application, accessible from code through the
corresponding procedures:
Each ScreenZone can be configured using the following properties:
 ZoneState: this property is used to configure the zone state. There are three states:
o Pinned: the zone is always visible if it contains at least one form. In this case,
the entire space needed to display the docked form is completely removed
from the desktop area.
o Unpinned: if the zone contains at least one form, a Tabbed View is shown
with the Captions of all forms it contains. When the user selects a tab the corresponding form is displayed. In this case, the desktop is partially covered and
the form remains visible until the user interacts with it.
83
Andrea Maioli – Instant Developer: User's Guide
o
Hidden: the zone is never shown.
The default state is Pinned.
 TabVisibility: this property is used to configure the visibility of the tabs showing
the Captions of the open forms belonging to the zone.
o Hidden: the tabs are never shown.
o Visible: the tabs are always shown, even with just one form in the zone.
o Automatic: The tabs are shown only if there are at least two forms belonging
to the zone or if the zone is Unpinned.
The default state is Automatic. Hiding the tabs is not recommended for Unpinned
zones, because in this case the user cannot reopen the forms when closed.
 TabPosition: this property is used to configure the location where the tabs in the
zone are shown. The default setting is different for each zone according to its position relative to the desktop: left for the left zone, right for the right zone, and so on.
These settings can be modified only for Pinned zones.
 ZoneSize: this property represents the width or height of the zone, depending on its
position relative to the desktop.
 SelectedForm: this property is used to read or set the active form in the zone. If the
zone is Unpinned, the selected form is also automatically expanded.
To retrieve the list of open forms contained in a certain zone, you can use the GetForms
function, which returns an IDArray containing the IDForm objects.
Also, a form can be added to a zone using the AddForm procedure or by changing the
DockingType property. This allows moving a docked form from one zone to another or
changing the default location on opening.
84
Data presentation and editing panels
3.5 The main menu
Even when creating user interface forms based on processes rather than available
functions, the application main menu is still present in most business applications existing today. For this reason Instant developer to allows you to create an application menu
very simply, through definition of Command Set objects and Command objects.
A Command Set object is a container of commands, represented by Command objects. You can add a command set to an application with the Add command set command in the application object's context menu. To create menu items, simply drag a
form or a procedure with no parameters and drop it on the command set. This adds a
Command object that will be responsible for opening the form or launching the procedure.
To create multi-level menus you can add a command set nested within a higher
level using the Add command set command of the context menu for that level.
To the left the definition of the main menu, to the right the application at runtime
85
Andrea Maioli – Instant Developer: User's Guide
You can select the style of the main menu by editing the Menu type property in the application properties form. The styles currently available are:
1) Side bar (left): the most widely used, with the menu appearing in a vertical bar
docked on the left side of the browser. The menu remains visible on screen, so that
the user can select commands easily, but it can be hidden by clicking the corresponding button in the application caption bar.
2) Side bar (right): analogous to the previous, but docked on the right side.
3) Menu bar (top): the classic drop-down menu of desktop applications.
4) Task bar (bottom): the main menu is rendered similar to the task bar on the Windows desktop: by clicking on the "Start" button, the menu appears from below,
from which the various commands can be activated. It can be useful for creating
webtop type applications like the one shown in this example:
www.progamma.com/webtop.
3.5.1 Commands and command code
A very important feature of command objects is the ability to specify for each of
them a string (the command code) that allows the user to activate the command in written form, without looking it up in the menu. This is done through the Cmd field located
on the right side of the application caption bar. The user merely has to enter the command code and press Enter to activate the corresponding command. It is a very rapid
system for functions that users access most often!
There is another very interesting way to activate a command via command code:
calling the address of the application and adding the query string CMD=command
86
Data presentation and editing panels
code. You can test this behavior online by clicking this link:
www.progamma.com/nwind?CMD=EMPLOYEES: the employees form appears immediately, as though we had pressed the corresponding menu item.
The command code may be used in application code, both to launch the corresponding command using the ExecCommandCode method and to retrieve the Command object to then manipulate it through the GetCommandByCode method.
The following example shows how to enable the commands allowed for a certain
user stored in a database table, within the AfterLogin event. Note that before you establish a mechanism for custom profiling, you should consider the fact that Instant Developer has a well-articulated profiling system, which will be described in a later section.
3.5.2 Integration into enterprise portals
The architecture of web applications makes it possible to integrate multiple applications
into a single browser window that coordinates them, as happens, for example, within an
enterprise portal. In these cases, the main menu of applications is handled by an external system, so an application created with Instant Developer should show only the
forms and not the main menu and the rest of the interface.
To obtain this result, simply set the application's WidgetMode property from code,
which results in showing only the form in the browser, eliminating all other parts of the
interface shown in the following sections. The portal can activate the various application functions that will be contained in a frame or in an iframe of the page in the browser, by sending commands via the query string specified in the preceding section.
87
Andrea Maioli – Instant Developer: User's Guide
As a final note, when the WidgetMode property is set, closing the last form also closes
the application session. If the user wants to switch from one form to another closing the
first, the second form must be opened before the first one is closed.
3.6 Toolbars and indicators
We have seen in the previous chapter that definition of the main menu using Command
set and Command objects allows for up to four different menu styles simply by changing an application property.
And the flexibility of these objects does not stop there: you simply have to enable
the Toolbar flag in the command set properties form to view the commands contained
as buttons in a toolbar at the application level. You can choose whether or not to specify images for commands in the toolbar. If you do, the best format is gif or jpeg, 16x16
pixels in size. If an image is not specified, then the command will appear as a button.
Example of toolbar with images and without
88
Data presentation and editing panels
3.6.1 Toolbars in form captions
With respect to forms, we have seen that you can add Command set and Command objects to them. The method of viewing these objects varies depending on the manner in
which they are created, as specified in the following list.
1) If a command set is added to the form using the Add command set command of the
form object's context menu, it will become part of the main menu or toolbar of the
application, but it will be shown only when the form that contains it is opened. This
solution, however, is not the best, because it does not make it clear to the user that
the commands are specific functions of the form, being mixed with the other application commands.
2) If instead the command set is added through the forms editor commands shown in
the following image, then it is represented as a toolbar that appears in the caption
bar of the form or one of its frames.
This way, the commands are visually closer to the functions that they need to activate,
so for the user it is easier to understand their operation.
3.6.2 Indicators
Indicators are small panels consisting of an image and text, which can be used to
show the user individual messages such as, for example, happens in the various parts of
a desktop application's status bar. By inserting one or more indicators at the web application level, you can display a status bar at the top of the application.
Indicators can be clickable, in which case the indicator notifies the application of
the Activate event when this happens.
89
Andrea Maioli – Instant Developer: User's Guide
3.6.3 Toolbar and indicators of webtop-type applications
If the main menu of the application is of the Task bar (bottom) type, then the application toolbars and indicators are displayed within the taskbar. The toolbars appear on the
left side, and are analogous to quick launch toolbars. The indicators appear on the right
side like objects in the Windows tray area.
Toolbar and indicators in the task bar of a webtop
3.7 Timers
Timer objects allow you to launch a procedure with regular frequency. They can be
used, for example, to perform the re-reading of data from a database to always show the
user updated data, or to check the progress of a process that requires a certain time to be
completed.
You can add a timer to the application or to a form with the Add timer command in
the application object's context menu. You then need to us the Add procedure command
in the timer's context menu to create the code procedure to be executed each time the
timer fires. If the timer is inserted at the form level, it will only function when the form
is open.
The procedure's execution interval can be changed both in the properties window
and in code using the Interval property. You can start or stop the timer via the Enabled
property. When a timer is added to the project, it is disabled by default, so it must be
enabled through the properties form or by setting the Enabled property from code.
Finally, if you want to change the procedure that the timer activates, you can drag a
procedure without parameters and drop it on the timer to set it as the activation object.
90
Data presentation and editing panels
This simple code example shows updating of the panel containing the progress of meter
reading lots and consequently the position of users in the territory.
3.8 Defining application profiles and user roles
Role objects are the basis of Instant Developer's application profile management
system. In almost all cases, in fact, the same application must be used by different types
of users, each with a different set of available application functions (application profile).
In applications developed with Instant Developer, you can define application roles directly within the application using the Add role command in the application's context
menu. When you start a new project, the application already contains some predefined
application roles that you can delete or edit as needed.
Predefined roles in a new project
You define the profile for each role by dragging the elements you wish to make available and dropping them on the corresponding role. You can define profiles in both the
negative sense, i.e., limiting access to resources that cannot be used, and in the positive
sense, i.e., explicitly granting access to the resources available for users belonging to
that profile.
91
Andrea Maioli – Instant Developer: User's Guide
The types of objects that can become part of the definition of an application profile
are the following:
Command set: a command set can be invisible or disabled, thereby preventing the
use of all commands and command sets nested within it.
Command: a command can be invisible or disabled, preventing activation, including
through the execution of the corresponding command code.
Panel: for a data view panel, you can disable the edit, insert, delete, and search features.
Panel field: a panel field can be hidden or made read-only.
Field group: a group of panel fields can be hidden or made read-only. This way, all
the fields contained in the group will be hidden or disabled.
Field page: a page of panel fields can be hidden or made read-only. This way, all
the fields contained in the page will be hidden or disabled.
Tree item: a tree item represents a level in the tree's visual hierarchy and can be
hidden or disabled to prevent the user from interacting with it.
Report box: a report box (book) can be hidden or disabled to prevent the user from
activating or editing it.
Report span: a span is a single graphic or textual piece of information contained
within a report (book). It too can be hidden or disabled.
Where: a where clause of a query can be activated only by certain user profiles to
restrict access to data to be viewed.
After adding the item to the profile by drag & drop, you can set its properties with the
context menu commands of the object within the profile.
The Products and Employees toolbar commands are currently hidden for the Super User profile
92
Data presentation and editing panels
3.8.1 Hierarchical roles
As shown in the above image, you can add a role within another, thereby creating a hierarchy of roles. This way, from a negative permissions point of view, it is quite simple
to manage a set of profiles that inherit the prohibitions of higher-level profiles, and to
add new ones.
During application execution, first the rules defined for the higher levels are applied, and then those of the lower levels, up to the active profile for the session. This
way, if the same object appears in more than one level in the chain, the more specific
rule, i.e. the one closer to the profile assigned to the session, prevails. You can also reactivate an object that was limited in a higher role.
We recommend not creating hierarchies of roles that are too deep. Otherwise it is
easy to lose sight of the overall composition of application profiles.
3.8.2 Activation of session profiles
Once profiles are defined, it is necessary to provide the code for associating them to the
user session. This is done in the initial steps of the session, as indicated in section 3.2.1
above, usually in the Initialize or OnLogin event.
The profile is activated by setting the application's UserRole property to a numerical integer value associated with the profile to be activated.
User role set in the Initialize event: everyone can use the application
You may notice that each user role is associated with a constant with the same name.
To find it in the object tree, you can use the Go to command in the role's context menu.
If a role is not associated with a constant, you must drag one over it before compiling
the project. Note also that all constants associated with application roles have different
values and belong to the same value list.
Typically, the users permitted to use the application are stored in a database table
containing a field that specifies the role. This field can be associated with the value list
that contains the constants associated with roles.
93
Andrea Maioli – Instant Developer: User's Guide
With respect to authentication mechanisms, you can use the standard page for applications developed with In.de, handling the username and password in the OnLogin event,
or use other authentication systems existing on the web server, such as Active Directory. In this case, the name of the user authenticated by the system is present in the application's UserName property.
You can also use your own login form, setting an "anonymous" role in the Initialize event, subsequently opening the form in the AfterLogin event. The profile associated with the anonymous role must not permit the use of any application function, so that
the user is forced to remain on the login form until entering the proper data.
94
Data presentation and editing panels
Example of a login page using a custom form
You can associate more than one profile to the session with the RTCEnableRole function, which allows you to enable or disable a particular role. In applying the profile, the
active roles will be considered in reverse order of activation, from last to first. This
way, the first profile will be take priority, because in cases of conflict, the settings defined for it will prevail over roles activated later.
Typically, the activation of multiple profiles is useful if they are defined in the positive sense. For example, if you define an administrative role and a logistical role, and
if a person falls into both roles, you simply need to associate both profiles to the work
session instead of defining a third role that encompasses both of them.
3.8.3 General rule for setting the main menu
The previous sections have shown that you can define profiles in the positive sense, i.e.,
granting permissions to use certain functions, or in the negative, i.e., limiting access to
restricted functions.
This logic is particularly applicable to the main menu of the application: in the positive sense, the entire menu should start off disabled, because the profile explicitly
specifies the command sets and commands that can be used. Conversely, in the negative sense, the entire menu should start off enabled and the individual restricted items
disabled.
95
Andrea Maioli – Instant Developer: User's Guide
To implement this, you can use the application's SetGlobalMenuStatus method, allowing you to choose the initial status of the main menu's command sets and commands.
For more information and an example of usage, please refer to the reference guide section for this method.
Inside forms, meanwhile, permissions tend to be managed in the negative sense: if
the user can access the form, the available functions are enabled by default. Then for
some user roles, the profile may restrict some, such as the ability to view or edit data.
3.8.4 Runtime configuration of profiles
If the software project under development is related to an application that must be installed in many different configurations, it is likely that the definition of application
roles and profiles will require direct editing at runtime. Those defined within the project
represent only the initial setup.
For this purpose, you can use an appropriate function of the in the runtime configuration (RTC) module described in the chapter related to this subsystem. Installers or
administrative users can then add or edit application roles and redefine the profiles associated with them without modifying the In.de project.
Note, finally, that restrictions set on objects at the profile level cannot be bypassed
by the application code under any circumstances. For example, if you set the Enabled
property of a menu item to true, but that command was defined as disabled in the active
profile for the session, then the menu item will be disabled.
In this sense, the profiling system present in the Instant Developer framework is
more powerful than those that can be implemented with custom code, because it completely decouples the profiling issue from the writing of application-specific code.
3.9 Global events
The previous sections have described some events that are raised by Applications, such
as Initialize. Applications, however, may contain another type of events, called global.
Global events are specific events for a particular type of object that you want to
handle in a centralized way. Imagine, for example, that you want to add the logged on
user to the title of each form. For this purpose, you have to handle the Load event of all
forms added to the application, modifying the title through a line of code.
A simpler and more maintainable solution, however, would be to write a single
method modifying the title that all forms would call automatically upon opening.
96
Data presentation and editing panels
This can be achieved by globalizing the form Load event, i.e., using the Make
global command in the context menu of the Load event definition in the form library.
This command inserts the GlobalLoad event at the application level and you can now
manage the title of the form in a centralized way.
Inside the event, it is not possible to reference specific forms, because they all call the
same event. The form is therefore passed as a parameter of the IDForm type, which
allows you to act on a generic form with the same methods as those specified.
In addition to form events, you can also globalize the events of some interface and
business logic objects. These are discussed in the chapters related to panels and Document Orientation.
3.10 Installation
Development of a web application normally ends with its installation on a production
server. This procedure can be complex, because in addition the files that make up the
application, it may also require modifying the structure of the database that it uses.
Moreover, it can interfere with the work of users who are using the application while it
is being updated.
Beginning with version 10, Instant Developer contains a publication module that
makes installation operations simpler and more secure. Specifically, it can automatically update application files by sending only changed files to the server, and it can modify the database structure as required by applications. If the database server allows, all
operations are performed in a single transaction, and if any operation fails, the system
is restored to the state it was in before the update. Finally, the publication module can
detect and manage the activities application users, coordinating them with the need to
update.
97
Andrea Maioli – Instant Developer: User's Guide
3.10.1 Installation and configuration of the manager
The publication module consists of two parts: one is contained within the Instant Developer IDE and the other is a specific web application, called ID Manager, whose task
is to physically perform the update of applications and databases. This web application
must be installed on a web server that can access the database and application files with
write permissions. This is certainly the case when using the same production server, but
it might not coincide.
To begin using the automatic installation services, you must install ID manager on
the server, and for these purposes, the installation directory of Instant Developer contains two different installers, depending on the type of server.
1) IIS Server: copy and run IDManager.exe on the server. Using a wizard, this automatically verifies that IIS is properly configured, creates the virtual directory for
the web application, asks where to write the files, and performs the installation.
2) Java web server: using the manager of the Java web server, upload the web application IDManager.war contained in the Instant Developer installation directory.
Once installation of the manager is completed, it must be configured. When IDManager
is accessed from a browser, the following initial form is displayed:
In this form, you must enter data for the first user permitted to use the manager, who
can then create other users and update applications. For this reason, the default setting
for the role is Domain administrator.
When the domain administrator creates additional users, the role typically chosen
is Application administrator, which permits the user to manage only some of the appli-
98
Data presentation and editing panels
cations present. You can specify whether an individual user can create new applications
by setting the corresponding check box on the form.
After you specify the e-mail address, password, name, and last name and press the
Confirm button, the manager shows the main management form.
Here you can view the list of applications managed using the manager. The first time,
you have to specify additional configuration information by pressing the Configure domain button. You will see a form that depends on the type of server.
IIS server configuration form
99
Andrea Maioli – Instant Developer: User's Guide
Java web server configuration form
The data to be entered are as follows:
1) Application path: specifies the location of applications to be managed using the
manager. This property is used when creating new applications using the manager
or directly from within Instant Developer. You can, however, specify a different
path for each application in its properties form.
2) Tomcat Manager Url: specifies the complete address where the manager can access
the Java web server. ID Manager will contact the manager of the web server to install applications. If ID Manager has been installed on the production server, the
address of the manager is http://localhost:8080/manager.
3) Web server username and Web server password: if you use a Java web server, these
properties specify the credentials of a user permitted to use its manager. If you are
using an IIS server, they specify the credentials of a registered user on the server
with permissions to modify files in the paths where you want to install applications.
Note: instead of specifying the user data in this form, you can provide sufficient
rights to ID Manager by configuring the relative web application within IIS.
If you press the Confirm button or Go back button, you return to the list of applications.
In this form, in addition to managing applications, you can also manage users permitted
to use the manager.
The form that lists the applications allows you to view and edit their properties by
pressing the
button, or to delete them with . To add a new application directly
from the manager, you can use the Add button, but it is usually more convenient to do
so directly from Instant Developer at the time of first publication.
100
Data presentation and editing panels
3.10.2 Preparing for publication
After configuring ID Manager, you can start publishing applications directly from Instant Developer. To start the publishing procedure, simply press Ctrl+F5 or select the
In.de main menu item Edit/Publish project. All versions of In.de can use this command,
except for Express.
The following covers in detail the meaning of the various fields shown in the form:
Publishing form – top section
The first field indicates the type of operation to be performed. The possible values are:
create installer; create installer and send to manager; create installer, send and install
(default). You can therefore perform the three steps making up the installation process
in sequence:
1. Create installer: consists of creating a compressed archive containing the files
needed to update the application. This archive, with the zip extension, can be distributed and used from within the manager to perform the update manually.
2. Send to manager: if Instant Developer can directly access the manager, you can ask
it to upload the installation file. The actual update is based on the Installation day
and Installation time properties defined in the application manager.
3. Install: select this option if you want immediate installation.
You then select the installation type between Full and Differential. In the first case, Instant Developer selects all application files for installation, even if they already exist on
the server and even if they have been modified after those prepared for installation.
With full installation, moreover, you can request that a file only be installed if not
already existing on the server. This can be useful, for example, to install an Access database contained in a single file in the application directory. To achieve this behavior,
you have to change the operation type from Add to Add NE in the row for the list of
files to be installed, via the context menu that appears when you click the right mouse
button.
If instead you choose a differential installation, In.de proposes sending the manager only files that have been modified when comparing those present on the server. To
decide which files to send, the manager calculates an md5 hash of every file on the
server and compares it with that of the corresponding file on the workstation used for
101
Andrea Maioli – Instant Developer: User's Guide
publication. All files whose hashes do not match are included in the list, but will be selected for installation only if the date/time of last modification of files on the server is
not later than that of the corresponding files present on the workstation.
The last option to be selected in the top section of the publication form is the Maximum waiting time, which specifies the number of minutes to wait before proceeding
with installation in case there are users who are using the application at the time it
needs to be updated.
If there are active sessions at time of publication, the manager waits until users disconnect, checking every five seconds whether this has happened. When the maximum
waiting time has expired, if there are still active sessions, the manager ends them and
proceeds with publication. The value zero specifies that publication is to be performed
immediately, even if there are users currently using the application.
During the waiting procedure, which can last for up to 15 minutes, the manager informs the application that it must not initiate new sessions. Users who connect to the
application at this time will see a page informing them that the application is being updated. You can customize this page by editing the unavailable.htm file.
Let us now analyze the bottom section of the publication form.
102
Data presentation and editing panels
1) URL manager: the full address of the manager to be used for installation. For example http://www.myserver.com/IDManager/IDManager.aspx. You can also enter
just the name of the server if the manager has been installed with default parameters.
2) User ID and Password: indicates the user credentials for connecting to the manager. The user must already have been created by the domain administrator within ID
Manager. By clicking on the Save check box, the password is saved in the project
and you will not need to re-enter it when you publish an application. However, if
the project file is used from another PC, the password must be re-entered for security reasons.
3) Back up application: specifies that the manager must back up the application files
into a special compressed archive stored on the server before installing the new version. This archive can be used to restore the previous version of the application, but
the database schema will not be restored, and this may render the application unusable.
4) Enable DEBUG: specifies whether or not the application should be compiled with
the debugging module enabled. If the check box is selected, the application will be
compiled and installed with the debug module configured, but the collection of debug data is not automatically enabled to avoid compromising the functioning of the
application.
5) Path to exclude: you can enter a list of directories, separated by semicolons, that
should not be included in the publication. If, for example, the application stores images in the photo subdirectory of the web application, the manager will attempt to
remove them from the server. To resolve this issue, simply enter photo in the Path
to exclude field.
6) Recompile application: specifies whether to recompile the entire application before
publishing it. Normally In.de decides independently which forms should be compiled, but in some cases it may be preferable to recompile them all.
7) Installer password: specifies the password with which to encrypt the compressed
archive that contains the installer. The default value is the guid of the application,
but you can change it. The password must match the one shown in the application
properties form within the manager.
8) Installed version: specifies the code for the version currently residing on the production server. This field is completed after the publication preparation step has
been completed, as described in the next paragraph.
9) New version: specifies the version code that the application will have after the publication procedure is completed. In.de tries to automatically generate this code
based on the installed version, but you can specify any value, even non-numeric.
10) Installation type: beginning with version 10.1, Instant Developer allows installing
different versions of the same application on the server, such as a test version and a
103
Andrea Maioli – Instant Developer: User's Guide
production. With this combo box, you can select the one to be published, leaving it
blank if the default is published.
After entering the necessary data, press the Next button. At this point, Instant Developer
validates the application locally, connects to the manager, and retrieves the current status. The application is then compiled, and then all differences between local files and
those on the server can be calculated. Those to be updated are listed in the publication
form. You can exclude files and databases by clearing the corresponding row using the
appropriate check box.
During the preparation phase, In.de receives the number of currently active sessions
from the manager. This way, you can decide whether to update the application immediately or postpone the operation.
If this is the first time the application is installed, it is not yet recorded in the manager. In this case, after installation, it is useful to access the manager and correct the
properties, modifying, for example, the database connection strings, which are preset to
the project's design-time values.
104
Data presentation and editing panels
The application properties form will also list all the databases that the application uses.
To change the connection strings, simply open the details of the individual database.
Note that the connection strings are used both by the manager to read and modify the
database schema and at compile time of the application to be installed. During the preparation phase, in fact, the manager communicates the connection strings to In.de, which
sets them temporarily to compile an application that is already able to connect to these
databases. This way, there is no need to manually change the connection strings in the
In.de project to point to the correct database.
105
Andrea Maioli – Instant Developer: User's Guide
3.10.3 Executing publication
When the information shown in the publication form is correct, you can proceed with
publication by pressing the OK button. In.de prepares the installer and, if requested,
uploads it to the manager. At this point, the actual publication operation is finished. The
manager, in turn, creates an installation job linked to the received file, which will be
executed according to the management policies set.
If immediate installation is requested, the IDE will display a small notification
form that allows you to monitor the progress of the installation in real time and open
the new version as soon as it is installed.
You can also check the status of the publication using the manager. To do this,
simply open the properties of the application that you are installing in the section related to the job. The following image shows an example of job details. Note the Log file
field, which is compiled by the manager at the end of installation and contains all details of operations performed and any errors encountered.
Once the manager starts the installation, the status changes to Executing, and then
changes to Executed at the end of the procedure. The result is shown in the appropriate
field. By pressing the
button, you can view the complete log. During execution, you
can update the form by pressing Reload.
106
Data presentation and editing panels
3.10.5 Manual publication
As described in previous sections, you can also update a web application manually using the manager. To do this, simply open the application details form and press the Update button. This opens a new form that allows you to upload the compressed archive
containing the installer produced with In.de.
At this point, the manager creates an installation job that will be executed using the
Installation day and Installation time parameters specific to the application. You can
also execute the job immediately by entering the details and pressing the Execute button.
3.10.6 New features since version 10.1
In version 10.1, the publication module was enhanced with some useful functions. The
most important change is the complete automation of RTC data management. For more
information, please refer to chapter 13Runtime configuration. The other primary changes are as follows.
Automatic update of the manager
During the installation preparation step, In.de verifies that the manager installed on the
server is updated. If it detects a previous version, it asks whether to perform an automatic upgrade. If you answer yes, In.de securely sends the manager the installation
program, which is ready to be updated The operation may take several minutes depending on network speed, since the installation program varies between 5 and 10 megabytes.
To use this feature, you must manually install IDManager version 9 or later on the
server, provided since version 10.1.
Pre and post installation operations
In specific cases, it may be necessary to perform additional operations before or after
the installation procedure. For example, before installing, a backup of the database
might be required.
Beginning with version 10.1, you can set these operations in the Advanced section
of the application properties form in the manager. The text entered is executed as a
server operating system batch file before and after installation. If the pre-installation
batch returns an error code other than zero, the installation fails.
107
Andrea Maioli – Instant Developer: User's Guide
Installation types
In some cases, it may be useful to install multiple copies of the same application on the
server, for example to take advantage of the server's processors, or to have test and production versions. To this end, version 10.1 provides the ability to select the type of installation that you want to publish.
Creation of a new installation type is performed inside the manager, starting from the
default installation created by In.de when the application was published for the first
time. To create a new installation type, simply press the Duplicate button in the application properties form. The manager asks for the code of the new installation type, for
example TEST, and at this point it is created. In the application list, you can see the various installation types provided for an application.
After creating a new installation type, you can configure its properties. In particular,
you should check the database connection parameters, which will initially be the same
as those of the first application. This way, you can have multiple copies of the application pointing to the same database, or to different databases, which is recommended in
the case of test versions.
At this point, you can choose which version to publish from the IDE by choosing
the desired value in the Installation type combo box in the publication form.
108
Data presentation and editing panels
3.10.7 Application control through the Trace module
In version 10.5, the publication module was enhanced with new functions. The most
important change concerns the ability to control web applications managed by the manager and to be informed by e-mail of application errors or malfunctions via the new
Trace module.
To send e-mail, IDManager needs access to an SMTP server. To specify the corresponding details, you need to open the manager's configuration form by pressing the
Configure domain button.
Here you can specify the server details: server name or IP address, TCP port, Username
and Password if the server requires authentication. If no port is specified, IDManager
uses the default, which is 25.
The Check SMTP button lets you check if the information entered is correct. After
pressing it, IDManager asks you to enter an e-mail address to send a test e-mail.
After configuring IDManager, you must configure the Trace module for each application to be controlled. To do this, simply open the application details page and press the
Trace button:
109
Andrea Maioli – Instant Developer: User's Guide
First you must indicate what information should be collected using the Type combo
box. The possible values are:
1) No: specifies that the application should not be controlled by IDManager.
2) Errors: specifies that IDManager should only collect errors in user sessions.
3) Full: specifies that all debug data for each user session should be collected. To use
this last option, you must select the Enable trace option in the web application
properties form inside the Instant Developer project prior to publishing the application. This option is only available if you own a license for the In.de Trace form.
Returning to configuration of the Trace module within IDManager, we can specify the
Period property, which specifies in minutes how often the application should be contacted to retrieve user session data. The value of this property must take into account
the average number of application users, the load on the server, the amount of memory
that the application has available, and whether or not collection of debug data has been
enabled. If, for example, many users are using the application and it is necessary to collect debug data, it is better for this value to be low to release the data collected for each
session from application memory as soon as possible. We recommend leaving the default value of five minutes, and to lower it if you notice excessive memory consumption.
The Alerts e-mail field allows you to specify the addresses where e-mails are to be
sent in case of application errors. You can specify multiple addresses separated by
commas. IDManager sends an e-mail to the persons specified each time a user sees an
error form, and each time the application does not respond for a number of consecutive
times greater than the value specified in the # errors field. If, for example, the value 3
has been entered in the # errors field, IDManager sends an e-mail if the application
does not respond or responds with an error three consecutive times.
The Session debug field allows you to specify to IDManager whether want to collect debug data only for some specific sessions. This option can be useful if the application is used by many users simultaneously, and only some of these are reporting errors.
This way, the application will collect debug data only for the sessions whose name contains the text you have entered in the Session debug field. Thus, the memory used by
the web application is reduced to a minimum.
You can specify a list of names separated by commas. For example, if you enter
the value "Red, Green, White", debug data will be collected for sessions with names
containing the text "Red", "Green", or "White".
By pressing the Show sessions button, you can view the list of application sessions:
110
Data presentation and editing panels
Here you can view the list of sessions. The session name is automatically calculated by
the web application as follows.
1) For user sessions, the system uses the value of the application's UserName property. Therefore, we recommend completing this property in the OnLogin event when
you are granting access to users.
2) For server sessions, the system uses the name of the server session. In this case,
IDManager inserts the prefix SS- to indicate that it is a server session.
The bottom of the form shows some web server data such as the total memory occupied
by user sessions and the free space available on the disk where the application resides.
It also shows the number of events raised by the application, such as, for example, an
application restart.
You can view the details of a particular session by pressing the Details button in
the list. You can also filter the data shown in the list using the fields located above the
list.
The detail page, shown in the image on the next page, shows some statistical data
collected by the application as well as the list of errors encountered by the user who is
using it. You can stop the session by pressing the Stop button, send a message to the
user by pressing Send msg, or open the session's debug form by pressing Open debug. If
you press the Reset button, IDManager resets the statistical data.
When a message is sent to a user session, the application will show it in a message
box. If a message is sent to a server session, the system raises the application's On Session Message event. This feature can be useful, for example, if you want to perform
operations specific to the server session only on IDManager command.
111
Andrea Maioli – Instant Developer: User's Guide
The entire communication between the application and IDManager is compressed and
encrypted with a password generated by In.de each time the application is published,
known only to the application and IDManager. Moreover, until IDManager contacts the
application for the first time after publication, it does not collect debug data. So, if trace
is not enabled, the application does not use additional memory with respect to previous
versions.
3.11 Questions and answers
In this introduction to the general structure of web applications created with Instant
Developer, we have tried to illustrate some situations that are recurrent during implementation of software projects.
However, the possible scenarios are rather numerous, so if you interested in a more
detailed look at a scenario or an issue not covered, I invite you to send a question via
email by clicking here. I promise to answer all emails in my available time. Also, the
most interesting and frequently-asked questions will be published in this section in subsequent editions of this book.
This space is reserved for answers to readers' questions
112
Data presentation and editing panels
113
Andrea Maioli – Instant Developer: User's Guide
Chapter 4
Data presentation and editing panels
4.1 Anatomy of a panel
A panel is a user interface object where the user can view or edit the result of a database or in-memory query. Its high degree of flexibility and automation of processes
makes it one of the most widely used objects in applications created with Instant Developer.
Example of a panel created automatically by Instant Developer via drag & drop
The list of features and behaviors managed automatically by the panels is quite vast, so
only the main ones will be listed. If you want to test them directly online, you can connect to: www.progamma.com/eng/widget-collection.htm
1) Query by example: panels allow the user to easily enter the search criteria to select
data of interest. The criteria entered are then expressed in natural language the user
interface and spreadsheet extractions.
2) Live scrolling: maintenance of a local cache of viewed records, to allow for live
scrolling, as happens in the best client-server applications. Even a dataset the order
114
Data presentation and editing panels
of 100,000 rows scrolls as in a spreadsheet, but here the data is accessed through
the Internet!
3) Links between panels and other graphic objects: panels automatically manage multilevel master-detail behaviors in relation to other panels or graphic objects, even
those contained in different forms.
4) List and detail: a panel can have an in-list or an in-detail presentation layout. The
set of fields viewed in detail may be different from those of the list view. Some
fields may be positioned outside of it to obtain a mixed view.
5) Sorting: while viewing the list layout, you can sort the data by one or more columns
of the panel grid.
6) Groupings: by enabling group view, rows can be viewed grouped together, including at multiple levels. You can insert totaling functions for each single list field.
7) Export to Excel/OpenOffice: with the click of a button, a spreadsheet will open containing the data presented in the panel.
8) Editing data: you can edit the data in the detail layout as well as directly in the list.
Panels also manage the locked status to prevent accidental changes to data. There is
a complete system of validation and error reporting at the level of the individual
field or entire panel. The modified data is saved in the database tables in an automated but customizable way.
9) Editing masks: there is a controlled editing and on-the-fly formatting function for
the different fields, integers, decimals, currency values, dates, times, strings. The
data is checked and formatted while you type, and not only upon exiting the field.
10) Using the keyboard: in both the list and detail layouts, you can easily navigate
through the fields using the keyboard. All panel commands can be activated using
function keys. There is finally a web application you can use without a mouse.
11) Lookup and decode: there are various lookup and decode mechanisms that allow
you to view data related to those present in the panel, and to easily select them using other mechanisms like "intellisense".
12) Unbound columns: some list columns can be disconnected from the database table
fields to insert icons, buttons, values, or other information into the grid that will not
be saved within the database.
13) Formatting by cell: using a specific panel event, you can modify the properties of
individual cells of the panel rather than an entire grid column. This makes it easy to
express rules for conditional formatting of data.
14) Multiple selection: panels allow you to select multiple rows. Some commands, such
as export, delete, and duplicate, act on the selected rows instead of just the active
row in the panel.
15) Types of controls: You can use, in addition to edit boxes and combo boxes, other
types of controls such as check boxes, radio buttons, images controlled directly by
115
Andrea Maioli – Instant Developer: User's Guide
field value, and also a powerful HTML editor to allow preparation of entire documents directly in the browser.
16) Print content: the panel can be linked to a report that prints the content in a PDF
file or directly in a browser preview.
17) BLOB fields: The panels automatically manage uploading and downloading of the
content of a BLOB field in the database. Showing images linked to database records or creating a system for archiving documents becomes almost "child's play".
18) Static fields: You can insert additional fields in the panel layout that are not linked
to data, to be used as labels, buttons, images, backgrounds, containers of other
graphic objects, or other panels.
19) Fixed columns: it may be useful to freeze some columns of the list and to only
scroll the others, as happens in the best spreadsheet programs, except that here it
happens inside a browser.
20) Grouped and paginated fields: if you need to show many fields, you can group
them together and divide them into pages. The groups have an automatic and animated collapsing function, which allows working in the panel in bands.
21) Visual styles: the panel as well as all objects contained in it support specifying a
uniform visual style for the entire application. Gradients, transparencies, and custom borders are also supported.
22) Multitouch: in the case of mobile devices (iPhone, iPad, or Android) the panel features can also be activated with the fingers, such as vertical scrolling through the
list or horizontal scrolling to change the view from list to detail.
4.1.1 Creating a panel
You can create a panel in various ways, either from the forms editor or by drag & drop
in the object tree. Here are a few examples:
1) By dragging a database table, an in-memory table, or a document class over the application while holding down the shift key, a new form is added to the application,
containing a panel that is automatically ready for showing and editing the data contained in the dragged object.
2) By dragging a database table, an in-memory table, or a document class over an
empty frame inside the forms editor, a panel is added for showing and editing the
data contained in the dragged object. If there are relationships between the object
dragged and panels already present in the form, a panel will be created that is already set for master-detail functioning. The same thing happens when dragging the
object over the form in the object tree, but in this case holding down the shift button. The new panel will be added in the first empty frame in the form.
116
Data presentation and editing panels
Two methods to create a panel: drag & drop or context menu
3) Through the Add panel command of the forms editor context menu or from a
tabbed view, a blank panel can be added, whose content can be defined from
scratch, step by step.
4) By dragging a database table, an in-memory table, or a document class over a static
field in the panel inside the forms editor, a panel is added as a sub-frame of another
panel. For more information, refer to the section on static fields.
4.1.2 Structure of a panel object
A panel is a complex object, whose functioning is defined by different types of objects,
as shown in the following image.
117
Andrea Maioli – Instant Developer: User's Guide
Structure of a panel object
Master query: the query that is executed to retrieve the data to view and edit in the
panel. It can be based on a database or on an IMDB, or it can reference a document
class (refer to Document Orientationfor details).
Master field: a master field of a panel contains data from a column in the master
query. It can be part of the list, viewed outside the list, or viewed only in the detail layout.
Lookup field: a field that contains data from a decoded query, i.e. that shows data
related to that retrieved from the master query. An example of a lookup field is the
product name if only its code is contained in the master query.
Static field: a static field is not linked to any query, so it cannot be part of the list.
However, it can be used to show labels, images, backgrounds, buttons, or to contain
entire visual objects within the panel.
Group of fields: fields can be grouped to provide a clearer layout for the end user.
You can also render collapsible groups that allow management of panel bands.
Page of fields: when the number of fields contained in the panel grows, it may be
useful to divide them and toggle between them using a paginated view. By adding pages, a functioning tabbed view is automatically prepared. You can also have some fields
that are visible on all pages.
Lookup query: a lookup query allows you to extract information from the database
118
Data presentation and editing panels
related to that of the master query, for example, decoding codes present in the master
query. Instant Developer automatically creates lookup queries if there are relationships
in the database.
Value list query: a query linked to a panel master field. It allows you to generate at
runtime the value list to be presented within the field, thus allowing implementation of
mechanisms like "intellisense" for a quick entry of data.
4.1.3 Properties of a panel object
The properties of a panel control its overall behavior. Many of them can be modified at
design time through the properties form. Almost all can be adjusted at runtime in the
form load event. The following list describes the main properties. For a complete list
you can review the online documentation related to the panels library and the panel
properties form.
1) List/detail layout: these flags are used to activate the list or detail layout (form) of
the panel. If both are active, then you can select the initial layout by setting or
clearing the Open as detail flag.
2) Automatic layout management: if set, the panel will show the in-detail layout when
search criteria are being entered or when the master query contains only one record;
otherwise it will choose the list layout.
3) Auto save: if this flag is enabled, the panel will automatically save the data of the
master query in the table or document from which it was extracted. This flag must
be enabled if the panel is based on an IMDB or on document classes.
4) Can update, delete, insert, search: these flags enable or disable the main panel
functions. They can also be restricted within application profiles linked to user
roles.
5) Initial status: allows you to specify what the panel should do when the form opens.
Normally, the panel opens in Search (QBE) mode, allowing the user to enter data
search criteria, but if the dataset is small, you should use the value Find data to
immediately execute the data load query.
4.2 Definition of panel content: the master query
After adding the panel to the form, the first thing to be completed is the master query,
which is the way the panel retrieves the data to be viewed or edited. To do this, simply
select it in the object tree to open the code editor and make the necessary changes.
119
Andrea Maioli – Instant Developer: User's Guide
Depending on the type of tables involved in the master query, the panel can use different types of source data.
1) If it contains database tables or views, then the panel will use SQL queries to extract or modify data in the database.
2) If the master query contains in-memory tables, then the panel will be of the IMDB
type, and the data will be retrieved through a query on the in-memory tables.
3) If, however, it contains a document class (refer to the chapter on Document Orientation), then the panel is considered to be of the DO type and will operate on the data contained in a collection of in-memory objects. This way, for example, you can
work with data originating from a web service.
If you want to create a panel where the data can be edited, the master query must contain only one table and all primary key fields must be retrieved. This way, you can be
sure that the recordset will always writable. If you use a view or you add multiple tables to the master query, the resulting recordset cannot be edited.
This may seem like a limitation, because if a table contains a reference to another
table, usually the other table's descriptive fields are extracted through a join clause between the two. For example, the Order Lines table will contain the code for the product
being sold, but it is useful to show on screen the product name, a field of the Products
table. For this reason, panels allow you to define another type of query, called a lookup,
in order to decode the codes in the master query fields.
Example of lookup query and link with panel fields
The previous image shows an example of a panel master query. Within the select list,
i.e. the list of fields extracted from the database, we can see some fields of the Products
table, including the primary key, and a calculated expression: UnitPrice*2. Each field
in the select list can be displayed on screen as a panel field, both inside and outside the
grid, or it can be hidden if it is not important for the user to view it.
Among the filter conditions we can see the reference to Categories.CategoryID,
which is a field of another panel – the product categories panel – to which it is connected in master-detail mode.
120
Data presentation and editing panels
In general, the master query panel can be a complex query if desired, and all code objects visible in the form context, such as global variables, single-row in-memory table
fields, or fields of other graphic objects. The only limitation is that you cannot insert
union clauses. If this is necessary, you would need to create a database view and then
use that in the panel.
4.2.1 Definition of the panel master fields
The master fields of a panel are connected to the fields selected by the master query
and are indicated by an icon with a yellow background. To add a master field to the
panel, you can use the following methods:
1) From the master query editor, use the Add field command from the context menu of
the expressions in the select list. The field is added in both the list and detail layouts.
2) Dragging the select list expression and dropping it directly on the panel viewed in
the forms editor.
3) Dragging a field of the table selected in the master query and dropping it directly
on the panel viewed in the forms editor.
The type of control used for viewing the field depends on the characteristics of the master query field from which it is derived. Specifically, if the expression or database field
is associated with a value list, then the field will be displayed as a combo box, a radio
button, or a check button. However, if the field is not associated with a value list, then
the field is displayed as an edit box, with masked editing depending on data type. If you
decide to use a check button, then the value list must contain only two values, the first
of which is associated with the checked state and the second with non-checked.
To modify the object type, mask, or other graphic characteristics, you can use the
toolbar commands of the forms editor after selecting the fields in the editor, as shown
in the image below.
121
Andrea Maioli – Instant Developer: User's Guide
Relationship between the fields of the table, the master query, and the panel
The main operations available for panel fields using the forms editor are the following:
1) Moving and resizing: by selecting fields in the forms editor you can move them
with the mouse or arrow keys. Resizing is done by dragging the handles of selected
fields with the mouse or the arrow keys while holding down shift. If more than one
field has been selected, resizing with the mouse aligns the dragged edge of the selected fields. For list fields, you operate on the first row, and you can rearrange the
fields by dragging them where you want.
2) Field title: you can change the distance between the field title and the field itself
with the mouse or the arrow keys while holding down ctrl. Clicking on the title of a
selected field, you can edit it directly in the editor. The editor toolbar contains
commands to put the header on top of the field or to hide it.
3) Alignment and arrangement: selecting fields and clicking on one of them with the
right mouse button will display a rich context menu with commands to manage
alignment, size, and vertical or horizontal arrangement.
4) List and detail: you can toggle the between the in-list and in-detail views with the
editor's context menu commands, or you can use the corresponding panel toolbar
button. A field can be present in both layouts or in just one of them: the Hide fields
command can be used to delete the field from one of the two layouts, but you can
also do this from the panel field properties form that opens when you double click
on the field from the forms editor, by unchecking the Show check box under the
122
Data presentation and editing panels
section for the corresponding view. If a field is hidden in both layouts, it becomes a
not present field, identified by a gray icon instead of yellow.
5) Text and background colors, font, alignment, and editing mask: the buttons in the
group to the right of the forms editor toolbar allow you to change some specific
graphic properties of the field. The settings made with these commands are given
priority over those related to visual styles.
4.2.2 Defining the panel field visual properties
The overall look and feel of applications created with Instant Developer is based on a
system of graphic themes and graphic styles. A graphic theme consists of a cascading
style sheet file and the standard icons that appear in the interface. Creating or customizing a graphic theme will be discussed in a later chapter.
Graphic styles are present within the Instant Developer project, and specifically
inside the database library. A graphic style consists of approximately one hundred
properties and allows you to define the visual appearance of part of the user interface –
in this case a panel or one of its fields – in the various situations in which it may be
found.
Graphic styles are organized hierarchically, so they inherit most of their properties
from the previous level. This way, by changing the base style, called the Default Panel
Style, you can change the style of the entire application in a consistent and uniform
way.
New projects already include some predefined visual styles that, unless otherwise
specified, are automatically applied to the various types of fields in the interface. For
example, you can change the way in which primary key fields are displayed. In any
event, you can add your own styles to the hierarchy and apply them to the database
field or the panel fields you want to change.
If, for example, you want to change the background color of a field, you can do this
in one of two ways: either by defining a new visual style with the characteristics you
want, or by applying the background color to the field directly from the visual editor.
The two operations are not equivalent. If you define a visual style, it becomes part of
the hierarchy of styles and can be managed globally. In the second case, however,
changing the background color is specific to the field and always takes priority over
management of styles.
123
Andrea Maioli – Instant Developer: User's Guide
Default graphic styles. By default, key fields are displayed in red
The image above shows the default visual styles when starting a new project. As you
can see, a single visual style defines how the field should appear in the various situations in which it may be found, specifically:
1) Depending on the panel layout: in-list or in-detail.
2) Depending on the status of the field: query by example, data view, in error, with
warning, read-only...
3) Depending on the status of the panel: active row, read-only, field with focus...
The visual style also allows you to set some global field management properties, such
as:
1) The type of cursor that should be used when the mouse is positioned over the field.
2) The type of visual control, such as a combo box, radio button, check button, html
editor...
3) The data editing or viewing mask.
If you want to maintain an application look and feel that is as uniform as possible
across all forms, it is preferable to create graphic styles to be associated with fields, so
that all developers involved in the project can use them consistently. You can also associate visual styles with database fields so that the panel fields that derive from them
use them automatically.
If, however, a change to the graphic properties of a field has a limited scope or it
does not need to be uniform throughout the application, then it is faster to do so via the
forms editor's functions, because this does not involve the creation of visual styles that
are perhaps used in a single point of the project.
124
Data presentation and editing panels
To make a field bold, simply use the forms editor toolbar
A visual style can be applied to a field in various ways:
1) Through the field properties form.
2) Dragging the visual style over the field in the forms editor.
3) Selecting a style from the styles combo box in the forms editor toolbar.
You can initially apply the visual changes from the forms editor, and then elevate them
to the style level by selecting new visual style from the combo box in the editor toolbar.
In this case, a new visual style will be created that is already associated with field selected on screen, with removal of graphic property changes that are no longer needed,
because they are already present in the graphic style.
4.2.3 Field activation object
Suppose, for example, you want to add a button in a grid field so that when the user
clicks it, a new window will open to view the details of the element selected, as illustrated in the following image.
To achieve this, you can set the form to be opened as an activation object of the
panel field. The activation object the project element to be launched when the user double-clicks in the field, clicks a button inside the field, or simply clicks if the field is set
as a hyperlink or button. The possible types of activation objects are the following:
1) A form that will open as part of the desktop (if a normal form) or as a modal popup
(if a search form).
2) A procedure, which must have no parameters.
3) A command set local to the form, which will open as a popup menu from the field.
125
Andrea Maioli – Instant Developer: User's Guide
Drag the activation object and drop it on the field to link the two. You can also add a
procedure that is already linked to the field using the Add procedure command in the
field's context menu.
A field can be activatable or not, even when it is disabled. To change this behavior,
you should use the Not clickable when disabled flag from the panel field properties
form.
Inside the procedure linked to the field, but also in every other part of the project,
you can determine the field values of the panel's active row. To do this, simply reference the code object with the name of the panel field having the following icon
.
For example, suppose we have a list of shippers and want to add a button to contact
them directly in the list. This can be done by adding a calculated column to the master
query and using as an expression a constant that has been linked to the icon to be
shown in the field.
126
Data presentation and editing panels
To obtain the result shown in the image, you must perform the following steps.
1) Add a value list to the database library ( Send Msg Icon).
2) Add the Send Msg constant with any value and associate them with the icon you
want to show in the field.
3) Add a new expression to the master query of the Shippers panel and insert the constant in the expression.
4) Use the Add field command in the expression's context menu, by clicking on its
name after the as keyword.
5) In the field properties form, set Hyperlink as the visual style, clear Enabled, set
Show icon only, and clear Show activator in the visual properties.
To conclude, simply add a procedure linked to the panel field with the Add procedure
command in the field's context menu and enter the following code:
The procedure shows how you can access information regarding the shipper in the active panel row and how you can send an email with only six lines of code.
4.2.4 Master-detail functioning
Let us now discuss the master-detail synchronization mechanism between different
panels: the master query of the detail panel can reference in the filter conditions the
value of the active row of the master panel fields. When the value of the referenced
fields changes, the master query of the detail panel is automatically re-run. You can test
a detail master panel here: www.progamma.com/nwind. When changing rows in the
categories panel, the content of the products panel is updated automatically.
127
Andrea Maioli – Instant Developer: User's Guide
The master query of the Products panel depends on the ID field of the Categories panel
Instant Developer tries to make this connection whenever you add a new panel to a
form by dragging a table and dropping it onto an empty frame in the form. All possible
connections between the new and existing panel added, and you should then check the
newly added panel master query and remove any redundant conditions.
You can also manually add the filter conditions. To reference a panel field, you can
drag & drop the field object (icon ) directly onto the code editor.
The same automatic updating functions by referencing fields of single-row inmemory tables. In effect, each panel has a single-row in-memory table that contains the
data of the active row. This can be used, for example, if we want to change the detail
panel row only after pressing a button. You could add an in-memory table whose contents are modified in the procedure linked to the button and reference it in the master
query of the detail panel.
You can reference in the filter conditions of the master query a global variable of
the form or application. In this case, however, the update is not automatic, but can be
achieved from code with the UpdateQueries panel method.
To complete the master-detail behavior, you can move the key from the master to
the detail: when the user inserts a new row in the detail panel, the key fields must as-
128
Data presentation and editing panels
sume the same value as the corresponding fields in the master panel. This can be done,
for example, in the BeforeInsert event as shown in the image below.
4.2.3 Viewing and editing HTML in panels
Sometimes it may be useful to provide the user with an editor to create small formatted
text documents, as happens, for example, in a CRM system for definition of mail templates to send to customers.
To obtain this result, if a field is displayed in the detail layout or outside the list, it
can be viewed as an HTML editor. To do this, simply select the field in the forms editor
and then use the Set as HTML field command in the editor toolbar.
The Instant Developer framework is compatible with the open-source version of
the CKEditor software product, in the sense that the browser, using JavaScript, calls the
interface methods prepared by the editor, specifying the user interface field where it is
to be viewed. CKEditor is freely available under the LGPL, so it can be used as a compiled component inside your own products developed with In.de without specific limitations.
If you want to show the content of a field containing HTML as read-only, you can
use the Show HTML tags command in the forms editor toolbar. This way, the HTML
tags will be interpreted and the content of the field formatted as specified.
129
Andrea Maioli – Instant Developer: User's Guide
4.3 Lookup and decode mechanisms
In the previous section we saw that, because a panel that extracts data from the database
is writable, the master query must retrieve data from a single database table or view.
If this table contains relationships to other tables, it will contain the corresponding
fields of the primary key of the target records. These, however, are usually not sufficient to make it clear to the user which records are being referenced. The following image, for example, shows that the Order Lines table contains the ID of the product ordered, but not the name, which is instead present in the Products table.
Rows of an order: which product is being referenced? Lookup query helps
Therefore, two problems arise: letting the user know which record is pointed to by a
relationship (decode) and giving the user the ability to specify the product by selecting
it from a list (search or lookup). To solve these problems, you can to add to a panel two
other query types: lookup and so-called value source.
4.3.1 Decode function using a lookup query
A lookup query is a secondary query that extracts and displays data from the content of
fields derived from the panel's master query. To create a new lookup query, you can use
the Add lookup query command in the panel context menu.
The content of the lookup query can be defined using the code editor, and every
lookup query should extract a single row using filter conditions that will depend on the
value of the panel master field, as illustrated in the above image. To reference these
values, you can drag & drop the panel field object from object tree directly onto the
query text displayed in the editor. A lookup query can also reference any field of single-row in-memory table, global form and application variables, and all other fields of
130
Data presentation and editing panels
each master query in the entire application, although it is better to use only those of the
master query of the current panel.
A lookup query can extract data from one or more tables and contain one or more
columns. To add the fields corresponding to the panel, you can use the Add field command of the lookup query column's context menu. The panel fields derived from a
lookup query will be represented by the following icon with a blue background: .
If the database contains relationships between tables, Instant Developer can use
them to automatically create the lookup query when a panel is created from a database
table. You can also drag a table over the panel to add a lookup query to records in it, or
use the Add lookup field command in the forms editor toolbar after selecting the code
field to be decoded.
Automatic addition of the lookup query is not always possible and depends on the type
of relationships between the tables involved. If, after using the command, the lookup is
not added, then you must do it manually as described above.
After creating the lookup query, you can change the value of related master fields
to update the corresponding lookup fields. If the value entered is not contained in the
related table, then an error is reported. To immediately update, you should set the Enabled flag in the master field properties form. Alternatively, the decode will occur by
pressing the enter key, changing rows or sending any command to the application.
4.3.2 Search function using a lookup query
In addition to the decode function, lookup queries allow the user to search for data to be
correlated in a simple way: by writing what you want to find in the lookup fields, a
131
Andrea Maioli – Instant Developer: User's Guide
search engine is activated for the objects that you want to select. If the lookup field is
defined as Enabled, the resulting effect is similar to that of the suggestions in the
Google search box or Intellisense in Visual Studio.
By entering "G" in the lookup field, I can select a different product
If the lookup query has been created manually, use the Enable smart lookup command
in the query context menu to activate this search feature. Those created automatically
have this feature enabled by default. If you do not want the function, you can disable it
using the Disable smart lookup command.
When the user enters a value in the lookup field, the system runs the related query
disabling the filter conditions that linked it to the panel fields and adding others based
on the user-entered text. At first, records are searched with strict conditions, then this is
gradually broadened until finding at least one record. If the query returns exactly one
record, it is immediately associated to the field, otherwise a combo box opens and a
value can be chosen from the list. In any event, there are never more than 30 lines
viewed, and if applicable, the user is encouraged to enter a longer text to limit the
amount of data to display.
You can configure the functioning of lookup queries in two ways. The first is to
add additional columns to the lookup query, which represent other fields in which to
search for the information that the user enters. In this case, the information is automatically shown in a multi-column combo box as illustrated in the following image. Also
available is the Add search fields command from the lookup query context menu, which
automatically adds fields that contain information applicable to the search.
132
Data presentation and editing panels
Example of a search by country name, address, or fax
If you need to further customize the search algorithm, you can use the
OnGetSmartLookup panel event, which is raised whenever the framework needs to execute a search query. Using this event, you can decide how many and what types of
queries to execute, and on which tables and fields. This ultimately allows you to set up
a completely customized search algorithm.
4.3.3 Extracting related data using a lookup query
You can use the decode function of lookup queries to extract data related to that existing in the panel. For example, suppose you want to view for each product both the list
price and the average sales price, extracted from the order lines. It would be possible to
create a database view and then display its contents in a panel, but it is easier to create a
panel on the product table and then add a lookup query that extracts the average sales
price of each product, as illustrated in the following image.
133
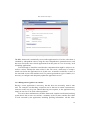
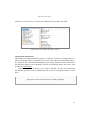
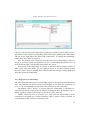
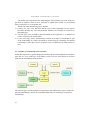
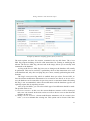
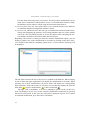
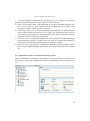
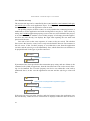
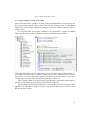
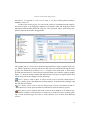
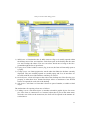
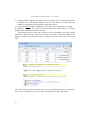
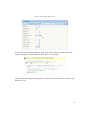
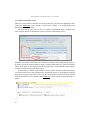
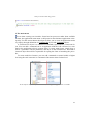
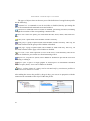
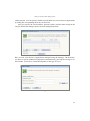
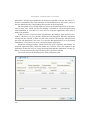
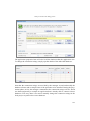
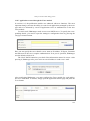
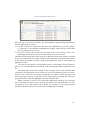
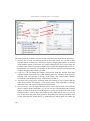
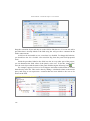
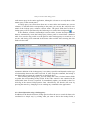
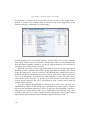
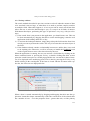
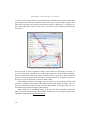
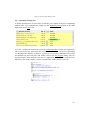
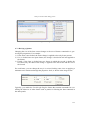
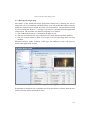
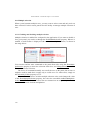
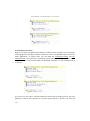
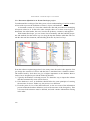
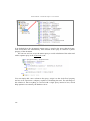
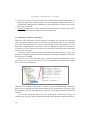
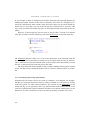
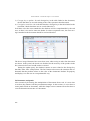
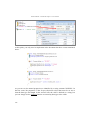
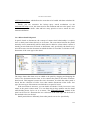
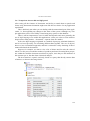
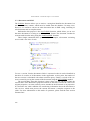
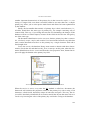
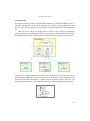
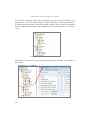
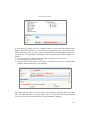
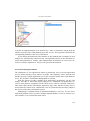
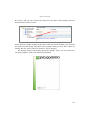
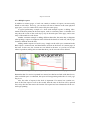
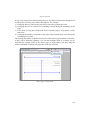
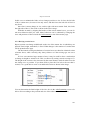
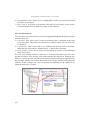
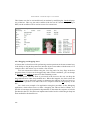
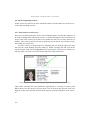
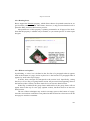
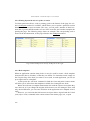
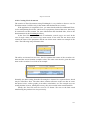
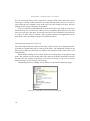
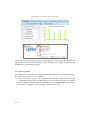
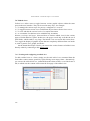
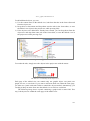
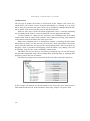
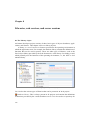
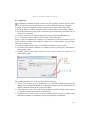
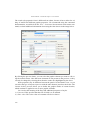
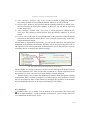
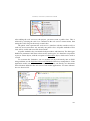
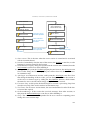
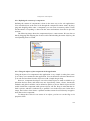
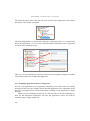
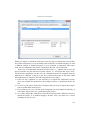
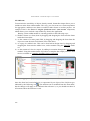
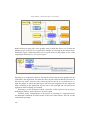
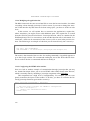
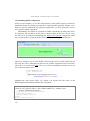
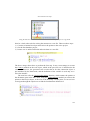
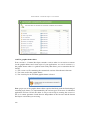
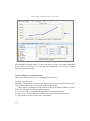
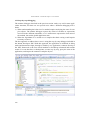
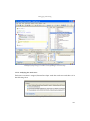
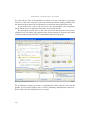
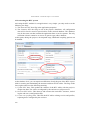
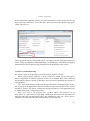
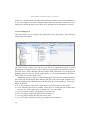
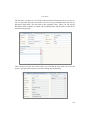
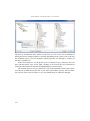
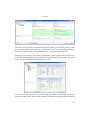
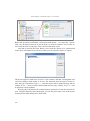
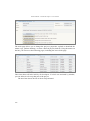
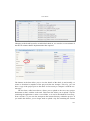
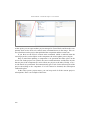
Andrea Maioli – Instant Developer: User's Guide
Lookup query used to calculate data related to that of master fields
In this case, it is unusual for the search mechanism to also be enabled. However it may
be used in conjunction with the OnGetSmartLookup event to modify the data rather
than searching for it.
4.3.4 Value source query function
Value source queries have arisen as a complementary mechanism to lookup queries,
which in the past had only the task of decoding. A value source query is contained
within a master field of the panel, and represents the source of possible values, hence
the name. When a value source query is activated, it opens a combo box from which the
desired value can be selected.
A value source query typically has two columns: the first is the code to be displayed in the field; the second is the corresponding description.
A value source query lists the possible product suppliers
134
Data presentation and editing panels
The image shows that the SupplierID field normally shows the supplier code, as contained in the products table. If you press the button that opens the combo box, a list of
possible suppliers appears. Here, a lookup query is also needed that shows on screen
the name of the supplier of each product.
To avoid adding the lookup query for decoding, you can enable the Auto lookup
flag of the panel's master field properties form. By doing so, instead of the code always
appearing, it is decoded. However, the value source query must be executed for each
row in the panel. Therefore, this can be done if the expected number of rows is not too
high, for example, less than one hundred. Otherwise, it is better to use a lookup query,
also enabling the search function, as described in previous sections.
Auto lookup is ideal if there are not too many suppliers
Like lookup queries, a value source query may contain references to other panel fields,
fields of other panels or forms, single-row in-memory table fields, or global form or
application variables. Whenever the referenced objects change in value, the value
source query will be automatically re-executed, with the exception of references to
global variables, for which you must use the UpdateQueries panel method after the value is modified.
Value source queries can contain more than two columns, to allow viewing a table
instead of a single list. To select which columns to display, you can enable the Visible
flag the column properties form, or the Decode flag to select the column to display in
the field when the combo box is closed. The value to be indicated in the field after the
user's selection, however, is always that of the first column.
135
Andrea Maioli – Instant Developer: User's Guide
Value source query with multiple columns
Some of the additional columns extracted by the value source query can have a special
definition when a particular alias is set for the column in its properties form. The aliases recognized by the framework are the following:
1) ENABLED: the column specifies whether the value can be selected by the user
(value -1 or true) or not (value 0 or false). It can be used to prevent the user from
selecting values that are obsolete but still present in the database and nevertheless
need to be decoded.
2) ICON: shows an icon in the combo box. The column must contain the name of an
image file contained in the web application's images subdirectory.
3) GROUPID: used to group combo box rows. The return value becomes the group
header, and the query must be sorted by this column.
The following image shows a query that uses these functions.
Icons, groups, and disabled rows in a value source query
136
Data presentation and editing panels
4.3.5 Lookup windows
The search methods described in previous sections work well when the amount of data
to be searched is not too large, or when there is no need to perform complex searches
on multiple fields. When this happens, it is best to provide an actual search form that
allows the user to select the data through a query by example on all fields of interest.
With Instant Developer, performing this type of operation is very easy, with just a few
steps.
1) If the search form is not present in the application, you should create one. This can
be done automatically by dragging the table to search and dropping it onto the web
application while holding down the ctrl key.
2) To activate the lookup mechanism, simply drag & drop the field onto the form from
which you want to perform the search. This way it becomes the activation object of
the field.
3) If the database already contains a relationship between two tables, there is no need
to do anything else. Otherwise, it will be necessary to handle the EndModal event
on the original form to retrieve the data selected by the user.
When the application is running, the user can activate a field either by clicking on the
button contained inside it, pressing the F2 key, or double clicking that field. At this
point, the search form opens as a modal popup and the user can search for data of interest, to be displayed in the underlying panel. This is done by pressing the F12 key or by
double clicking in the search panel. If the form is closed with the X button in the caption bar, the values are not displayed below.
Search by order number using a lookup form
When a form is created automatically by dragging and dropping the table onto the application, Instant Developer automatically creates the search forms if the related table
has a number of rows – set in the properties form – greater than 100, or if the primary
137
Andrea Maioli – Instant Developer: User's Guide
key of that table is composed of more than one field. If instead the number of rows is
between 31 and 100, Instant Developer will construct both the lookup query and the
value source query. Finally, if it is less than or equal to 30, only the value source query
will be used as an auto lookup.
It may happen that when attempting to search using a lookup form, the values are
not displayed in the panel below. This can happen when Instant Developer fails to find
relationships between the fields of the search form and those of the panel from which it
was opened. In this case, you should add the EndModal event which is raised when a
modal popup form is closed.
The following image shows the code that you can use in an order lines panel to retrieve both a product and a unit price from a search form.
The EndModal event fires upon closing of any modal form opened from the current
one. That is because in the event, it is necessary to distinguish which form was just
closed. Moreover, the user could have closed the form without confirming the selection,
and for that reason the Result parameter must be tested.
If both tests are satisfied, then you can take the values from the lookup form panel's
master fields and place them in the corresponding fields of the current panel. The simplest way to compose these statements is to drag the master fields directly over the code
editor.
The event also contains an output parameter called Cancel: if set to true, then the
framework will not attempt to automatically display the value of fields from the lookup
form. This can be useful if the automatic function selects undesired fields in a given
panel.
138
Data presentation and editing panels
Finally, note that the lookup form opening mechanism can also be used to open
non-popup forms or forms that have no other purpose than search, such as creating new
records in the searched tables instead of just reading values.
4.3.6 Sorting by lookup fields
Panels allow the end user to sort the data by clicking on the list's master column headers. If clicked while holding down the shift key, the column is added to the order by
criteria, thus allowing sorting by more than one column. The same sort functions can be
activated from code, using the methods described in the chapter Sorting in the documentation.
As described, this also works for master fields decoded using a lookup query, but
the sort is done on the value of the field and not on the decoded value of the field,
which would be more natural. If we wanted to, for example, sort products according to
category, the natural order would be based on the category name and not its ID.
The lookup fields, however, are not sortable, because the panel does not know the
value for all rows loaded, but only those displayed. To overcome this problem you can
use the Make sortable command contained in lookup field's context menu, which enables sorting by that field.
This is achieved by adding an additional column to the master query that extracts
the values of the lookup field for all rows of the panel. Since the master query must
contain a single table to be editable, the lookup expression is extracted as a subquery of
the main query. Making a lookup field sortable causes performance degradation, which
may be irrelevant or not depending on the table used for decoding. For this reason, you
should manually select the lookup fields for which to enable the function.
Subquery added automatically to make the Category Name field sortable
139
Andrea Maioli – Instant Developer: User's Guide
4.4 Groups and pages
When a panel has many fields, you may want to group them to provide the user a simplified navigation. A panel can contain two types of groupings:
groups and
pages.
To group fields, you can select the field in the forms editor and then use the Group
fields command in the editor toolbar.
In-list and in-detail groups viewed in the forms editor
The graphic style used for displaying groups can be set at the single group level. Otherwise, the Default panel style will be used. By editing the default panel style, you can
vary the look and feel of all groups in the application. Some specific visual properties,
such as the type of header, are also editable from the group properties form.
Groups can be edited as a single object of the forms inside the editor by using the
Keep together command in the context menu of a panel field belonging to a group. Also
from the editor, you can move fields into or out of a group by drag & drop while holding down the shift key.
An important feature of groups is that they can be collapsed by the user when they
are viewed outside the list or in detail. To enable this, you must set the corresponding
flag on the group properties form.
If a group is collapsible, next to the caption a button will appear that allows the
group's content, other than the caption, to be hidden, i.e. collapsed, or to be expanded
and shown again. When a group is collapsed, all fields below it are moved up, provided
that they are contained in the group horizontally.
140
Data presentation and editing panels
When the group is collapsed, the Discontinued field moves, but not the Unit Price
If the number of fields in the panel is large, it may not be easy to view them all together
in the same form, but they can be split into multiple pages that are viewable by clicking
on a set of tabs. To achieve this, you can select the fields to display on a page in the
forms editor and use the Move to a new page command from the editor toolbar. After
creating at least two pages, tabs will appear for selecting the fields to view, as illustrated in the following image. If one or more fields are not included within a page, they
will all be shown.
You can also create pages and groups directly from the object tree with the Add group
and Add page commands in the context menu of the panel or one of its pages. To insert
a field in a group or page, simply drag & drop it while holding down the shift key. The
fields can be automatically rearranged between different pages with the Recalculate
layout command in the panel context menu.
Finally, both pages and groups can be manipulated from code using the library
methods relating to them. You can also intercept user actions through the OnChangePage and OnChangeGroupCollapse panel events, which are raised to the form
when the user changes pages or collapses a group.
141
Andrea Maioli – Instant Developer: User's Guide
4.4.1 Setting the tab order of fields
Panels natively manage the order of navigation (or tab order) of fields when the cursor
is moved with the keyboard instead of the mouse.
There are two different types of tab order management: simple and advanced. In
the first, the tab order is the same for both the in-list and in-detail views and is based on
the order of appearance of the fields in the project's object tree. In the second, meanwhile, every layout has a tab order that is unrelated to the position of the fields in the
project.
Modifying the tab order can be done directly from the forms editor, activating it
with the Change tab order command in the toolbar.
In tab order edit mode, a panel field is highlighted by a yellow circle. Clicking on another field specifies that this field should come immediately after in the tab order. If
you click while holding down the ctrl key, you change the highlighted field without
modifying the order.
Using the editor menu commands, you can select the type of management, simple
or advanced, and automatically correct the order if it is mixed up. If the results of automatic correction are not to your liking, you can always undo the changes by pressing
ctrl-z!
Note, finally, that if the management mode is simple, then the groups and pages
represent a navigation context, i.e., you can enter or leave a group or page from a single
point. The First tab field menu command allows you to move the highlighted field to
the beginning of the navigation context to which it belongs.
142
Data presentation and editing panels
4.5 Static fields
In addition to master fields and lookup fields, panels may contain another type of
field, called static, because they do not depend on any type of query. While the master
and lookup fields have as many occurrences as there are rows of the panel, static fields
always have a single occurrence.
Static fields are represented by an icon in the object tree with a gray background,
the same one used for not present fields, which you can distinguish by name. The most
common uses for this type of field are:
1) As a text label to add the text you want to the panel.
2) As a background image, or image overlaid with text, either as a graphic element or
as an enabled clickable element.
3) As a button or hyperlink to activate an application function.
4) As a customizable html/javascript container, for example to include an external
component or an entire external application.
5) As a container for Instant Developer graphic objects, such as other panels, reports,
graphs, or even entire forms.
A panel with many static fields: graphic elements, labels, html code, buttons
143
Andrea Maioli – Instant Developer: User's Guide
To create a static field, simply select the field type from the editor toolbar while other
panel fields are not selected, and then click where you want the field to appear. The
same field can appear in both layouts without the need to duplicate it. To make it appear in the other layout, use the Also show in (list/detail) layout command from the editor toolbar.
Creating a button with three clicks of the mouse
From the point of view of graphic features, static fields are treated like any other, so
you can assign them a graphic style, modify their appearance with toolbar commands,
and move and resize them in the editor with the mouse or keyboard. Static fields can
belong to groups and pages like other types of fields and can be assigned to an activation object, as described in the section on master fields.
After adding a button, for example, you can assign it to a procedure with the Add
procedure command in the field's context menu in the editor. Since the field is, the visual style assigned to it must have the Clickable flag enabled, as happens when you create buttons or hyperlinks using the editor toolbar.
Static fields can be manipulated from code using the same methods used for the
others. For more information on the available methods you can consult the online documentation regarding the panel fields library.
144
Data presentation and editing panels
4.5.1 Using static fields as an HTML container
The previous section showed how to create the various types of static fields. After creating one, you can edit the text content directly from the graphic editor by clicking on it
when it is selected, as well as by changing the description property or the caption property in the field properties form. If you set the caption, you can then use the description
to insert the tooltip text that appears when the user hovers over the field. This is particularly useful for buttons. You can later modify the text of the field even from application code, modifying the Caption property.
One of the most useful features of a static field is that if it contains HTML tags,
they are preserved and interpreted by the browser. This way, you can provide certain
special effects, such as the following:
1) Displaying formatted text with bold, italics, colors, and hyperlinks, or inserting images in the text flow.
2) Including another web page or application within the one developed with Instant
Developer, by inserting an iframe tag in the static field.
3) Enabling a particular component, such as a Flash object or a smart card reader.
Ultimately, static fields provide the ability to insert html code in the page as you wish,
allowing low-level interaction with the browser. Note that the developer should use an
html syntax compatible with all browsers of interest. You can also execute custom javascript code with the ExecuteOnClient procedure. To see a particularly interesting example of this mechanism, you can try out the Google Maps component integration example on the Pro Gamma website.
Google Maps element added to a static field.
145
Andrea Maioli – Instant Developer: User's Guide
4.5.2 Using static fields as sub-frames
Another important characteristic of static fields is the fact that they can be used as a
container for other complex graphic objects, such as other panels or even entire forms.
This way, you can completely control the layout of the user interface in all possible
configurations. For example, you can insert a detail panel in a static field that appears
on a particular page of a paginated panel.
Drag & drop makes it is easy to add a panel inside a static field
To add a panel to a static field, simply drag & drop the table, view, or document class
whose data you want to show directly onto the static field in the editor.
Using the static field's context menu, you can then add other types of graphic objects. Also, if the graphic object is already present in the object tree, you can drag &
drop it onto the field to link the two.
4.5.3 Using static fields as totals rows
We have seen in previous sections that to change the text contained in a static field at
runtime, you must use the Caption property. As an example of this function, suppose
you want to show the sum of a panel column just below the panel. To accomplish this,
you must create a static field below the column to be summed, and then set the mask to
currency using the corresponding context menu command in the editor toolbar. Using
these commands, you can also align text to the right and use bold font.
At this point, you can write code that sums the rows and shows the total in the
field. This code should be executed whenever the panel content changes, so it should be
handled by the search, validate, and delete events. Since the code is identical in all
146
Data presentation and editing panels
events, we can call the same recalculation procedure, which can therefore be written
only once.
The AfterFind event fires after the master query is executed, so it is a good time to calculate the sum of the stock of products selected in the panel. This is achieved by setting
the Caption property of the field to the value returned by the Sum function, converted
to a string. This function totals the data contained in the master field to which it applies.
If instead of the sum we want to perform a more complex task, such as averaging,
we have to use a for-each-row cycle on the panel row and write the code manually, as
follows:
147
Andrea Maioli – Instant Developer: User's Guide
4.6 BLOB fields
BLOB (Binary Large Object) fields are database or in-memory table fields that can
store an entire file, as long as you wish, and can be used to contain documents, images,
or even entire folders of compressed files.
The Instant Developer framework automates the processing of these files, making
it much easier to create a document archiving system: if you create a panel from a table
that contains a BLOB field, the corresponding panel field has a toolbar that lets you
manage the files it contains.
The BLOB field's toolbar commands, highlighted in the image, are the following:
Load: by pressing this button, the field content is replaced with a file selection box.
After selecting one, press the button again to start the upload.
Delete: after asking for confirmation, clears the content of the BLOB field.
Preview: opens a preview window for the field content.
The commands for editing the content are available only when the panel is not locked
and can be disabled with the panel's SetCommandEnabled method. The field content is
not always shown immediately, but only if the file is rather small and consists of a document or an image. The automatic download threshold is 25kb, but you can edit this
using the SetBlobSize method of the panel field.
If the Active flag of the panel field containing the BLOB is set, then the file will be
loaded using a Flash component that with just two clicks allows the file to be selected
148
Data presentation and editing panels
and uploaded. In this case, you can also specify which files you want to upload using
the SetFileTypes method. As an alternative, the EnterUploadMode method prepares the
start of the upload from code.
4.6.1 Controlling the file management process
To customize the file upload process, there are two events raised by the panel to the
form: BeforeBLOBUpdate and AfterBLOBUpdate. The downloading of the file,
meanwhile, fires the OnDownloadBlob event.
The before event fires before the database is updated and at this point, the file is
available where the uploaded BLOB is stored. The event can be canceled, or the file
can be manipulated prior to loading. For example, an image can be resized. This event
is raised even if the BLOB is to be deleted, in which case -1 is passed as the file size.
The after event is raised after the database update has been successful. Only at this
point can the panel's status be changed, for example re-executing the master query.
In the following example, the event is used to check that a CSV-type file is uploaded, and, in this case, to enable the ExecuteImport button, which is linked to a procedure
that downloads the BLOB to a file and then processes it line by line.
4.6.2 Manipulating BLOB fields from code
The framework on which Instant Developer applications are based allows simple management of uploading a file to a BLOB field and, conversely, saving the field content to
disk. Both operations use a for-each-row cycle on the table that contains the BLOB.
149
Andrea Maioli – Instant Developer: User's Guide
This cycle must extract the single row to be processed and then exit. This can be done
easily by selecting the primary key of the table.
The following images show examples of uploading and saving of employee photos
based on employee ID. Note the use of the LoadBlobFile and SaveBlobFile functions
within the for-each-row cycles for loading and saving the BLOB from/to files.
Note that the for-each-row cycles always act on a single record, because the query contains a filter on the EmployeeID field, which is the primary key of the Employees table,
so at most it can return a single record.
If no path is specified, the SaveBlobFile function saves the file in the application's
temp subdirectory, in which case the file is visible from the browser. It can be deleted at
the end of the session with the AddTempFile method.
150
Data presentation and editing panels
4.6.3 Uploading multiple files
A further characteristic of static fields is that they can contain an object for uploading
multiple files. To accomplish this, simply use the SetMultiUpload method of the static
field in the form Load event.
Component for loading multiple files from a static field
As a file is loaded, the framework raises the OnFileUploaded event to the application.
The event receives the path of the file stored on the server and can use it by uploading
to a BLOB in the database, reading it, copying it, etc. For more information on available methods for processing files and folders, refer to the File System library. The following example, taken from the OmniService application, shows how to read the name
file line by line to the variable s and to count the lines in the variable rowcount.
151
Andrea Maioli – Instant Developer: User's Guide
4.7 Resizing mechanisms
The advent of mobile devices has led to a wider variety of device sizes for displaying
applications. Today, you can go from a smartphone with a 320x480px screen size to a
22" monitor with full-HD resolution of 1920x1080px.
Creating user interfaces that best take advantage of screen space is not easy. For
this reason the Instant Developer framework contains several mechanisms to make it
easier to manage the different screen sizes.
1) Each form can respond in a controlled manner to changes in sizes defined at design
time.
2) The frames contained in the form can adapt automatically to changes in the form's
size.
3) The content of each frame, for example a panel, can respond according to its definitions to changes in the size of the frame.
4) Each time the space changes, events will be raised to the application and the form
to allow control of the application's behavior from code.
5) If the application allows it, the user can modify the relative sizes of user interface
elements by dragging them with the mouse.
We will now cover these five mechanisms in more detail.
4.7.1 Resizing the form
Configuring the mechanisms of adjusting the form is at design time is done from the
properties form, modifying the vertical and horizontal resizing. The values that these
properties can take are the following:
1) None: the form does not resize.
2) Extend: the form can be extended with respect to the size at design time, but cannot
be shrunk.
3) Fit: the form is adjusted based on the change in its size from those at design time.
The mode of form adjustment can be viewed within the form editor by activating the
Change resizing command from the editor toolbar. A blue line without arrows indicates
no resizing. If the line has a single arrow the mode is extend. If there are two arrows it
is fit.
The best way to proceed is to design the form with the minimum allowable size
and then use the extend mode, because using additional space is typically more likely
than reducing the space used. The minimum recommended sizes for forms are 780x500
for PC and iPad, and 308x328 for iPhone.
152
Data presentation and editing panels
Activating the resizing mode
4.7.2 Resizing of frames
Changing the size of the form causes changes to the size of frames contained in it, preserving the proportions. For example:
1) If the form is not divided, the entire change is applied to the only frame present.
2) If it is divided into two equal frames, the change is divided in half and applied to
the frames.
3) Finally, if the form is divided into two frames in which the second is double the
first, then only one third of the change is applied to the first frame and the rest to
the second.
For each frame, you can change the way it is resized, locking some sizes or applying a
minimum and a maximum through the properties form, as shown in the image below.
Typically, you enable the Fixed height flag for frames that contain commands for controlling the behavior of other frames such as panels for filtering the data contained in
the other panels.
153
Andrea Maioli – Instant Developer: User's Guide
4.7.3 Resizing of panels
Let us consider how a panel adjusts to changes in the size of the frame that contains it.
The following image shows a panel in the editor when the resizing management mode
is activated.
Note that each panel field has up to two arrows: the vertical one specifies what happens
to the field when the panel is resized in height and the horizontal one concerns changes
in width.
If a field does not show an arrow, this means that it will not respond to resizing in
that direction (no action). If there is an arrow pointing right or down, the field will
move in the direction of the arrow when the corresponding size increases (move). Finally, if there is a double arrow, the field will increase in size in a corresponding manner
(fit).
The same type of arrows may also appear in the space relative to the list as a
whole, specifying how the block of the list of fields will change its size when the panel
size changes. For fields inside the list, the arrows have a different meaning: if the list
changes in height, the number of rows displayed changes and not the sizes of the fields.
But if the width changes, then the width is changed for fields that have Fit as the horizontal resizing mode.
To edit the resizing properties, you can select objects to be modified and then use
the commands in the form editor toolbar, or go directly to the properties form and specify the new values. You need to arrange both the list layout and detail layout, because
the resizing properties are different in the two cases.
154
Data presentation and editing panels
If a field appears on screen with red edges, it means that collisions with other objects are possible, in which case the Change resizing command in the editor toolbar can
find a solution to the problem.
With regard to the list columns, there are two different resizing mechanisms that
can take into account whether or not columns are made invisible at run-time. Normally,
the system reserves a place for invisible columns so the layout does not need to be
changed every time a column is shown or hidden. If, however, you want the layout to
change in this case, you must enable the Resize visible fields flag in the panel properties
form. This way, the system uses the entire space of the list for the columns visible at
any given time. If one is shown or hidden, then the size of the others will be adjusted on
the fly.
While list columns are resized all together proportionally, in-detail fields can be
moved or resized, but always based on the entire change in size. This makes it possible
to adjust a particular field and move the others accordingly, but the sizes of the fields
are not automatically changed in proportion. The following image shows an example of
this situation.
In the first case (OK) when the panel expands so does the Product Name field, while
the Unit Price field moves to the right to make room for the previous field. A collision
is indicated on the right side of the Product ID field, which would happen if the panel
were to be shrunk to the point where the Unit Price touches it, but this is effectively
impossible.
In the second case, meanwhile, when the panel expands, both the Product Name
field and the Unit Price field widen without moving, so the first overlaps the left side of
the second causing the collision indicated.
Therefore, if you need to simultaneously adjust and move a field, you must do so
from code within the form's OnResize event.
As we will see in the next chapter, Book objects have a more flexible resizing management, so panels may be more adjustable in certain situations.
155
Andrea Maioli – Instant Developer: User's Guide
4.7.4 Resizing events
When the automatic resizing mechanisms are not flexible enough, you can write specific code to obtain the desired results in the application OnResize and form OnResize
events. The first is raised when the size of the browser changes and therefore the area
of the desktop. The second is raised when the size of the form changes and it has at
least one resizing property other than No action.
Within these events, you can determine the form size and desktop area through the
positioning methods, while the new size of the form is sent as parameters to the related
event.
This code example shows how the OnResize event can be used to determine the screen
orientation of an iPhone application. Specifically, if the layout is in-list and the phone
is held vertically, then the Stock, Unit Price, and Reorder Level fields and the Commercial Data group are hidden. The determining factor is the form width, which if greater
than 350px, indicates that the phone is in a horizontal position.
An example of using the application's OnResize event is hiding the side menu bar
by setting the application's SuppressMenu property if the form width falls below a certain threshold.
As a final note, keep in mind that the automatic resizing mechanisms function on
the browser side, so they activate immediately after changes to the window size.
Events, meanwhile, are raised to the server, so a fraction of a second is required to see
the effects.
156
Data presentation and editing panels
4.7.5 Resizing via drag & drop
One feature of the Instant Developer application framework is allowing the user to
change the size of UI elements with drag & drop. You can enable this feature using the
parameters wizard, layout section, Resizable frames parameter. The parameters wizard
is accessed using the Wizards -> Configure parameters command from the application
context menu. The resizable user interface elements are as follows:
1) The width of the menu bar, if located on the right or left.
2) The size of docked forms, only if the Resizable visual flag has not been disabled.
3) The size of form frames if their Fixed height or Fixed width flags have not been
enabled.
Whenever the user makes a change of this type, the OnResize events will again be
raised to the application or form.
Widening the menu bar or resizing frames by dragging the borders
If minimum or maximum size constraints have been specified for a frame, then the user
cannot resize the frame outside those limits.
157
Andrea Maioli – Instant Developer: User's Guide
4.8 Panel status
After describing how to set up a panel to show data of interest, we should now take a
closer look at the dynamics of panels. First, we will cover the possible statuses of a
panel, then the functional cycles of the various operations that modify the status.
The panel status is shown to the application user in the caption bar, if the Show status bar visual flag has not been disabled. You can also determine the status of a panel
from code by reading the Status method. The possible return values are:
1) QBE: query by example status; in this status, the panel waits for the user to enter
the search criteria for retrieving data from the database.
2) DATA: after retrieving the data, the panel enters the DATA status. In this status, the
data displayed on screen is the same as the recordset returned from the panel's master query.
3) UPDATED: the user has modified the data present on screen. Changes can be confirmed or canceled.
This is an outline of the transitions between different panel statuses.
FindData
DATA
QBE
EnterQBEMode
UndoChanges
UpdateData
InsertRow
Modified data
SetModified
UPDATED
When the panel is in the QBE status, it can pass to the DATA status if the master query
has been executed. This happens if the user presses the Find button in the panel toolbar
or if the FindData method is called from code. The QBE status can also go directly to
UPDATED if the user presses the insert button or if the InsertRow method is called and
the Logics -> Start inserting compiling parameter is enabled. Otherwise, the panel
passes to the DATA status.
From the DATA status, the panel can return to QBE status if the user presses the
Search button in the panel toolbar or if the EnterQBEMode method is called. If the user
unlocks the panel and edits the data, the panel passes to the UPDATED status, from
which it can exit in one of two ways: by confirming changes or canceling them. The
user can perform these operations using the Save, Clear, or Reload buttons in the panel
158
Data presentation and editing panels
toolbar or they can be executed from code using the UpdateData, UndoChanges, and
RefreshQuery methods.
With each panel status change, the panel's OnChangeStatus event is raised to the
form. All commands executed by the user from code can be intercepted though the OnCommand event, which allows them to be canceled or managed in a customized way.
The initial status of the panel can be set using the properties form. The default value is Search (QBE), i.e., the panel opens requesting the search criteria, but if the records are not excessively numerous, it can be set to Find data to immediately run the
master query and display data to the user. The same operations can be performed from
code in the form Load event.
4.8.1 Entering search criteria
When the panel is in the QBE status, the fields have a different background color (the
default color is green) to indicate that the user must enter criteria for searching data. If
the user enters criteria with multiple fields, they are inserted with and, i.e., all conditions must be satisfied simultaneously. Based on what the user enters in each field, the
following criteria may be set:
1) value: if the field is numeric, records will be searched where the field is equal to the
specified value. If the type is character, records are searched where the field begins
with the entered value. Finally, if it is a date/time and only the date is specified,
then data is searched according to the specified date. For example:
Value
12
ra
12/01/2011
Filter
All data where the corresponding field is equal to 12.
All data where the field value begins with "ra".
All data where the field corresponds to the day January 12 (or December 1, depending on the current locale settings)
2) =value: by inserting the = character before the value, you require a condition of
equality for all data types.
3) #value: by prefixing a # to the value, you get the opposite result of point 1, i.e., data
with different values or data that do not begin with the entered data.
4) >value: selects all the data where the field contains a value greater than that specified.
5) <value: selects all the data where the field contains a value less than that specified.
6) value: : inserting the colon character after the value will search for data with a value greater than or equal to that entered.
159
Andrea Maioli – Instant Developer: User's Guide
7) :value: inserting the colon character before the value will search for data with a
value less than or equal to that entered.
8) value1: value2: specifying two values separated by a colon will search for all data
within the range between the two values.
9) *value*: for numeric fields, the asterisks indicate wildcard values. Placing an asterisk before and after requests all data that contain the specified value.
10) filter1;filter2: you can specify more than one filter, separated by semicolons, in
which case the data is considered if the field value satisfies at least one of the filters
entered. For example <10;>50 specifies that all data less than 10 or greater than 50
should be considered.
11) . (period): inserting a period will search for all data where a value is specified in the
field.
12) ! (exclamation point): exclamation point search criterion specifies that you want to
filter all data where the field is empty (null).
To enter date ranges, you can enter values like this:
1) yyyy: selects all values falling in the year specified.
2) mm/yyyy: selects all values falling in the month and year specified.
3) yesterday, today, tomorrow: the data will be filtered for the specified day. The values are translated into language through RTC.
4) Month abbreviated Jan, Feb...: the data will be filtered for the month specified of
the current year.
These notations are possible even in complex criteria. For example, to select the interval between January and April, you can write Jan:April. For the first ten years of the
millennium: 2000:2010.
Filters on character fields are case insensitive in order to help the user to select
faster, but to do this they must use particular database functions that typically prevent
the use of any indexes. If the data is stored only in all uppercase or all lowercase, you
can give the database field or panel a visual style with a mask, > (greater than) or <
(less than), respectively. This way, the field will only accept capital or lowercase values
and the search criteria will use the indexes present on the field.
160
Data presentation and editing panels
4.9 Panel life cycles: loading, validation, saving
Let us now consider in detail what happens each time a panel's status changes.
4.9.1 Data loading cycle
The data loading cycle starts every time the panel goes from the QBE to DATA status.
This can happen if the user presses the Find button in the panel toolbar or if the application code calls the panel's FindData method. The steps that the framework executes
are the following:
BeforeFind
Query Execution
Read QBE filters
AfterFind
First, the search parameters entered by the user are used to set the QBEFilter property
of each of the panel's master field. Subsequently, the BeforeFind event is raised to the
form, indicating that execution of the master query is imminent. This event is cancelable, and if this occurs, the query is not executed and the panel remains in QBE status.
The BeforeFind event can be used to check if the user enters the expected search
criteria, or to save them or handle them differently. It can also be used to execute the
loading of data in a different manner, such as reading a recordset from code and then
communicating it to the panel by setting the Recordset property.
If the event is not canceled, the panel composes the text of the master query, adding the QBE criteria, then runs the query and displays the data in the fields. At this
point, the AfterFind event is raised, which allows you to customize the activities subsequent to a change in the set of data in the panel.
It should be noted that the panel's QBEEmpty property allows you to decide what
happens if the master query returns no data. The default value is true, in which case, the
panel remains in QBE status, displaying a message to the user. If this happens, the AfterFind event is not raised.
Within the AfterFind event, the panel's recordset is available. It can therefore be
used, for example, to make calculations on it, or to complete the value of calculated
columns that cannot be read from the database. You can also read the filter conditions
associated with the query using the SQLWhereClause panel function. The following
161
Andrea Maioli – Instant Developer: User's Guide
code example shows how to use the AfterFind event to number the rows of the recordset returned by the query, which is not easy to do with SQL code alone.
Note that the last line of the procedure, after the for-each loop on the rows of the panel,
contains the UndoChanges method call, which deals with overwriting the screen buffer
with the contents of the recordset rows that were modified during the for-each loop.
The same method is used to undo changes made by the user that are not saved yet. In
this case, the content of the recordset overwrites the screen buffer, which contains the
data modified by the user but not yet confirmed.
4.9.2 Validation step
When the user edits the data in the panel, it goes from the DATA status to UPDATED.
When this happens, the screen buffer, i.e., the area of memory storing the data visible
on the panel, contains different values from the corresponding recordset rows. In
UPDATED status, it is not possible to navigate to another section of recordset rows,
because the changes would be lost.
While the panel is in UPDATED status, it raises the OnUpdatingRow event to the
form for each cell modified. For rows being inserted, all fields are considered modified.
Within this event you can read the data of the row being validated, modify it, or set
errors or warnings. It is therefore the event of choice for centralized handling of changes to the panel. The following image shows an example of its use to initialize values
and to report an error.
162
Data presentation and editing panels
In addition to the SetErrorText method, used to report an error related to a panel field,
the SetWarningText is also present, allowing a warning to be communicated, possibly
requesting confirmation. These methods must be used within the validation phase, otherwise there is no guarantee the message will actually appear on screen.
In addition to custom validation related to the OnUpdatingRow event, an automatically check is performed on required fields, verifying that the fields of the lookup query
point to existing related records and that the constraints placed on the database at the
table and field level are satisfied. Moreover, fields left empty but which have a default
value, are set automatically.
It may also be necessary to consider as a required field one that is not so in the database, or vice versa. To achieve this, you can call the field's SetOptional method or set
the Required visual flag. A master field that is not present in either the list layout or
detail layout is always considered optional, because the user would not have the chance
to enter it.
The presentation of the errors on screen varies depending on the status of the panel,
but you can change it via the SetErrorMode method. The default method is to underline
the field showing the error as a tooltip if the row is being inserted, or to display the error in the message bar if the row is being updated. If the changes are confirmed without
correcting the errors, a message box will also appear.
163
Andrea Maioli – Instant Developer: User's Guide
4.9.3 Save cycle
If there are no validation errors and the user confirms the changes by pressing Save, or
the application code calls the UpdateData method, the save cycle is started, involving
several events.
First, the BeforeCommit method is called, which establishes the start of the data
confirmation and save step. If this event is not canceled, for each row that contains updated data, the BeforeUpdate event is called, the database is updated, and finally the
AfterUpdate event is raised. The same thing happens for rows being inserted, except
that the BeforeInsert and AfterInsert events are used. At the end of the save step, the
AfterCommit event is raised.
BeforeCommit
BeforeInsert
BeforeUpdate
Query Execution
For each
updated
row
Query Execution
For
each
inserted
row
AfterInsert
AfterUpdate
AfterCommit
Within the BeforeUpdate and BeforeInsert events, you can read the values of the row
being updated or inserted, and you can also change the values. This can be useful in
case of master-detail panels to automatically insert in the new detail rows the value of
the field corresponding to the master panel, which would otherwise remain empty because it typically hidden.
164
Data presentation and editing panels
The BeforeUpdate and BeforeInsert events are cancelable, in the sense that setting the
Cancel parameter to true skips the update or insert query on the database, but the save
cycle continues.
If the table contains a counter field, in the AfterInsert event you can read the value
that the database has generated. This way, other panels linked to it can be saved in a
consistent manner.
If an insert or update statement causes an error at the database level, the OnDatabaseError event is raised, allowing you to handle the error in a customized way. If you
do not, the user will see a dialog aimed at giving the user information on how to correct
the error and how to move forward.
The AfterCommit event receives as parameters the number of rows updated and the
number of errors, and it is the only save cycle event in which you can manipulate the
panel's recordset, for example by re-running the master query. If you do this in other
events, the saving of data may not be successful.
At the transaction level, the save cycle does not automatically manage any transaction, so each row is saved separately. If, however, in the BeforeCommit event a transaction is opened, and then in the AfterCommit event it is confirmed or canceled if there
are errors, it is possible to save all rows in the same transaction. This also allows you to
coordinate the saving of a linked panel, as shown in the following example. However,
the best way to handle these cases will be discussed in the chapter Document Orientation.
165
Andrea Maioli – Instant Developer: User's Guide
4.9.4 Delete cycle
The delete cycle happens when the user presses the Delete button in the panel toolbar or
if the panel's DeleteRow method is called. The operations executed by the panel are the
following:
BeforeDelete
For each
selected
row
Query Execution
AfterDelete
The cancelable event BeforeDelete is used to indicate that a delete operation is about to
start. The program can then check whether the prerequisites have been met and possibly
cancel the command, or complete it in a customized way without querying the database.
After running the query, if there are no errors, the AfterDelete event is raised,
which can be used to complete the delete operation or to update the user interface, for
example if it contains a summed field.
If the panel has multi-select enabled, all selected rows are deleted, as a series of deletion operations independent of one another. The cycle described above is repeated for
each selected row.
As with saving, the delete cycle contains no automatic transaction management.
Each delete query is confirmed separately. Also, any error caused by the delete query
raises the OnDatabaseError event.
In the above example, the AfterDelete event used to update the total of the stock of
products after deletion of one of them.
166
Data presentation and editing panels
4.9.5 IMDB and DO panels
In the description of the panel life cycles, we referred to panels with master queries
based on database tables. How does this change when we are dealing with panels based
on in-memory tables or document classes? Here we will consider the first of these two
cases, covering the second in the chapter Document Orientation, which we recommend
reading, especially in the case of enterprise applications.
In the case of panels of in-memory tables, almost everything discussed in the previous sections applies, with the following main differences:
1) The master query is not compiled in SQL, but acts directly on the in-memory database records. Consequently, the properties that relate directly to the SQL language
and recordsets are not usable.
2) If the content of the in-memory tables on which the master query depends changes,
the panel is automatically updated. This update does not occur immediately after
every single change to the in-memory database, but at the end of handling of the
browser event that initiated the change.
3) Panels of in-memory tables have the Auto save flag enabled by default. This way,
the modified values in the screen buffer are sent as soon as possible to the inmemory database, and the new data can be read directly from memory rather than
from the values of the active row in the panel. Therefore the save cycle almost always follows the validation cycle.
4) In-memory queries never give errors, so the OnDatabaseError event is never raised
and the save operations are always successful.
In the list, we mentioned that updating of the panel content does not happen instantaneously after any change to the in-memory tables; otherwise it would take too long. There
is a fixed time when the panels are updated and are finished handling the event raised
by the browser that caused the change to the in-memory tables. This also applies to
changes to the values of the active panel row. If this happens within a panel lifecycle
management event, it happens immediately, otherwise it is delayed.
Keep this behavior in mind when coordinating panel operations from code. You
can call the UpdatePanel method to force a panel update, as shown in the following image: without UpdatePanel, the value of the LastModifiedDate field would not be saved.
167
Andrea Maioli – Instant Developer: User's Guide
4.10 Dynamic properties
If a field is part of the list, modifying its properties acts on the entire column, i.e., it
applies to all rows. You may, however, want to change some properties only for a specific row and not for all. In other words, you want to act on individual grid cells.
To solve this problem, there is the OnDynamicProperties event, which is raised
whenever the panel is preparing the display of a row. This event also applies to the detail layout, but will be raised only once, because that layout shows only one record at a
time.
By setting some properties within this event, the new values will be treated as exceptions to the value applied to the field as a whole, and will be valid only for the row
for which the event is raised. Within the event, you can determine which row it was
raised for by reading the values of the master fields. For example, let's see how to highlight understocked products in red:
The code example illustrates the fact that the properties set inside the OnDynamicProperties event are exceptions to the normal value for the field. You only need to change
the field to red from code, and not to black. This applies to all master and lookup fields,
but not for static ones. The dynamic properties that can be assigned to each single panel
row are the following:
1) SetVisualStyle: changes the visual style of the field or single cell.
2) Tooltip: changes the tooltip of the field or adds it to a specific cell.
3) Text: changes the text displayed for the field value.
168
Data presentation and editing panels
4) SetVisible: changes the visibility of the field or single cell. If used as a dynamic
property, it can hide a cell in a visible column, but not the reverse. You have to approach it using negative logic.
5) SetEnabled: enables or disables a field or a single cell. If used as a dynamic property, it can disable a cell in an enabled column, but not the reverse. You have to approach it using negative logic.
6) BackgroundColor: directly sets a background color for the field or for a single cell.
7) TextColor: directly sets a text color for the field or for a single cell.
8) FontModifiers: directly modifies the characteristics of the font used for the field or
for the single cell
9) Alignment: directly changes the alignment of the field or single cell.
10) Mask: directly changes the display mask of the field or single cell.
Keep in mind that the OnDynamicProperties event is recurrent, i.e., it is fired by the
framework for each panel row and multiple times in the same response cycle to the
browser, to ensure that the properties of fields to be displayed on form are always updated. For this reason, it is a good to use fast-running code that does not include database queries and does not depend on the number of times it is called. Also, you cannot
change the value of panel's master field inside the event. This will not cause an error,
but the change will not be applied.
In case you want to change the properties of static fields in relation to the values of
the active panel row, you should do so in the OnChangeRow event, which fires every
time these values change, in response to the user either editing them or changing rows
in the panel. For example, if you want to hide a button if the active row does not contain a valid record, you can use the following code.
The OnChangeRow event is also recurrent, i.e., it can be raised in many cases and multiple times in the same response cycle to the browser. That is because the values of the
active row can change several times, including as a result of chains of different events.
169
Andrea Maioli – Instant Developer: User's Guide
4.11 Multiple selection
When a panel contains multiple rows, you may want to select some and only work on
those selected. For this reason, panels have the ability to manage multiple selection of
rows.
4.11.1 Enabling and disabling multiple selection
Multiple selection is enabled for each panel in the application. If you want to disable it
for a given panel, you can do so through the EnableMultiSelection property. When it is
enabled, a small toolbar is displayed with buttons for multiple selection, as shown in
the image below:
You can also send the same commands to the panel from code, using the ShowMultipleSelection property to show the selection check box, and ChangeSelection to select
all rows or clear the selection.
The Select all command normally acts on all the rows in the panel, but at times it
might be useful to make have it apply only to visible rows. To achieve this, simply set
the SelectOnlyVisible property to true.
Whenever the user shows or hides multiple selection or the code changes the value
of the ShowMultipleSelection property, the raises the cancelable OnShowMultipleSelection event. This can be used to show the user instructions on using multiple selection
or additional controls for data manipulation.
170
Data presentation and editing panels
4.11.2 Reading of selected rows
When multiple selection is shown on screen and at least one row is selected, some panel commands function differently. Specifically, the delete, duplicate, and export commands act on the rows selected.
However, in most cases it will be necessary to implement a custom procedure that
acts on the rows selected in the panel. To determine if a row has been selected or not,
you can call the IsRowSelected function. For example, suppose you implement a procedure that increases the unit price of the products selected in the panel. To do this, we
use a for-each loop on all rows and determine if the current one is selected or not, as
shown in the following code:
4.11.2 Row selection events
As the user selects rows in the panel, the panel raises the OnChangeSelection event to
allow the application to respond accordingly, for example showing the totals for selected lines only.
The event is raised whenever the user clicks on a selection check box, but is normally stored in the browser and sent only in conjunction with other events. When the
server receives one or more selection change events, it notifies the panel and then calls
the event once again, setting the final parameter to true to indicate that this is the last
time. This makes it easier to total selected lines.
If you want the events to be raised as soon as the user has clicked on a check box,
you can set the ActiveMultipleSelection property to true. This way, the browser sends
171
Andrea Maioli – Instant Developer: User's Guide
the events to the server immediately. The following image illustrates calculation of the
total stock of products selected in the panel.
4.11.3 Manipulating selection from code
We have seen in previous sections that you can modify the rows selected by using the
ChangeSelection method. However this works on all rows in the panel. To change the
selection more specifically, you can call the SetRowSelected method, which allows you
to select or unselect a single panel row. In the following example, all understocked products are selected:
172
Data presentation and editing panels
4.12 Grouped panels
One of the most useful characteristics of panels is the ability to group rows according to
one or more criteria and to allow the user to modify the arrangement at runtime. Consider, for example, a panel that contains a list of invoices: using QBE criteria, users can
freely search for the data they need, and then using the grouping system they can view
the invoices by month, by client, by type, etc., even combining the various levels.
Products grouped by category and by supplier
The grouping feature is disabled by default. To enable it, set the panel's Can group visual flag. If enabled, the Grouping button is added to the toolbar.
Clicking on it activates group view. In this mode, the data sorting criteria become
grouping criteria: clicking on a list column header, the data is grouped by that column.
If clicked while holding down shift, an additional group level is added. If the user clicks
while holding down ctrl, the existing groups will be deleted. To return to the previous
state, simply press the Grouping button again.
All master columns may be the source of a group. If a column is related to a value
list or a lookup or value source query, then the group's name derives from the decoded
value, as shown in the above image where the data is grouped by Category ID and Supplier ID, but the names of the groups contain the names of the categories and suppliers.
If, however, a column has a value free, then it is automatically clustered to obtain a reasonable number of groups, as illustrated in the following image:
173
Andrea Maioli – Instant Developer: User's Guide
Auto-clustering by product name
Sometimes this behavior may not be desired. For example, if a field contains the number of the invoice month and is not linked to a value list, grouping by that field would
result in a group for each different value. To change this, simply disable the Auto
groups visual flag of the panel field.
You can also set the groups for each panel field from code, using the ResetGroupInterval and AddGroupInterval methods, to be called in the form Load event.
Also in this event, you can set totaling functions that show for each group the totals, counts, averages, etc. This is done by calling the SetGroupFunction method that
allows you to select a calculation function among those available for each field in the
master panel.
4.12.1 Management of groups from code
To decide which groups should be shown, simply call the ResetGroupList,
AddToGroupList, and RefreshGrouping methods, and the rest will be done by the panel.
You can also expand a given group from code using the ExpandGroup method. Finally, when a user expands a group, the panel fires the OnExpandingGroup event. This
way, you can control the process of grouping and navigation among groups in a customized way.
For more details regarding the functions available for managing groups, refer to the
Grouping library in the reference guide.
174
Data presentation and editing panels
4.13 Other noteworthy events
In addition to the various events described in the preceding sections, the panel may
raise many others related to, for example:
1) Low-level handling of mouse clicks inside the panel.
2) The pressing of keys or changes in the selection of fields.
3) Generalized drag & drop of other graphic objects.
4) Management of the cursor and focus.
5) Changes made by the user to the layout of the grid, such as resizing, moving columns, sorting.
For more event information regarding available events and how they work, please refer
to the Panel library, a chapter in the reference manual that is indispensible for tapping
into all the possibilities of this graphic object. The most commonly used events include:
1) OnActivatingRow: Fires when the user clicks the row selector on the left side panel
(if displayed), or if the user double clicks in a field that does not have its own activation object. It is typically used to switch to another view related to the data of the
active row in the panel.
2) OnCommand: a cancelable event raised when the user clicks on the panel toolbar
commands or when the corresponding methods are called from application code. It
is used to customize the execution of commands. For example, you can export to
Excel from code in a different manner from what would happen if done by the panel.
3) OnChangeLocking: fires when the user locks or unlocks the panel with the padlock
button in the toolbar, but also when the Locked property is changed from code.
4) OnChangeLayout: an event raised when the user changes the layout with the panel
toolbar command or when the application code changes the Layout property.
As an example, we can use the last two events to ensure that the panel is editable only
in the detail layout, and locked in the list layout. This can be achieved by implementing
the following rules:
1) If the user unlocks the panel, it switches to the detail layout.
2) If the user returns to the layout list, the panel is locked.
175
Andrea Maioli – Instant Developer: User's Guide
4.14 Global panel events
Suppose we want to implement the behavior of the previous example, but in all panels
in the application. The ideal solution would be to write event handlers only once for the
entire application. To achieve this, you can make the OnChangeLocking and OnChangeLayout events global by opening the panel library and using the Make global
command in the event's context menu, as described in section 3.9. The resulting code is
as follows:
As you can see, the code is virtually identical to that of the preceding section. The only
difference is that it now operates on a generic panel and not a specific one, since all
176
Data presentation and editing panels
panels call the single global event handler, passing themselves as the first argument.
The generic panel is of the IDPanel type, a class that contains all the methods of panels
and their fields.
If you want to implement the mechanism described only for some panels, you
would need to identify them in a generic way. This can be done by attaching a tag to a
panel, i.e., information that can be associated to the panel in the form Load event using
the SetTag method.
This information can be checked within global events to determine if an individual
panel should be processed by using the GetTag method, also present in the generic IDPanel library.
Global panel events are also often used to set some panel fields that are recurrent in all
tables of the application, such as the user and the date/time of the last modification. The
SetFieldValue method is the generic way to set a value in a panel field by identifying it
through the name of the associated recordset column. In all the panels that have this
column, the setting of data will be automatic.
177
Andrea Maioli – Instant Developer: User's Guide
4.15 Questions and answers
Panels for presenting and editing data are by far the most frequently used objects in
business applications developed with Instant Developer. Their flexibility, rich automation, and ease of use make them suitable for implementing most application functions.
For these reasons, this chapter can only address the most common scenarios, without going into a detailed analysis of the interaction between all the various types of behaviors. If it is not clear how to address a specific issue, I invite you to send a question
via email by clicking here. I promise to answer all emails in my available time. Also,
the most interesting and frequently-asked questions will be published in this section in
subsequent editions of this book.
This space is reserved for answers to readers' questions
178
Chapter 5
Document Orientation
5.1 From table orientation to Document Orientation
The first four chapters of this guide described the main components of a business application created with Instant Developer: databases, application elements, forms, and panels. These elements would suffice to create most of business applications of interest.
However, modern applications must have an interface that is more complex than can be
obtained with panels alone, so the subsequent chapters will discuss the graphic objects
available for achieving this.
In the chapter regarding panels, some issues were addressed only partially, specifically those relating to the interaction of multiple panels that display and edit parts of the
same document.
Consider a sales order, consisting of a header that contains general information –
including the customer, conditions of sale, dates – and many rows, each of which describes a purchased product. Panel management, based on a recordset loaded from the
master query, is not sufficient to structure in a precise manner objects like sales orders,
because it does not allow explicit description of the relationships between the header
and the rows. The relationships exist, but only implicitly, divided among the various
events used to coordinate panel functioning.
This example illustrates the reasons that led to creating a system for explicit structuring of complex objects, called Document Orientation, since it represents the description within the project of business documents that the application must process, both as
structure and as workflow.
Document Orientation (DO) is not only a descriptive methodology, but also relies
on a powerful enterprise-class ORM (Object-relational mapping) framework, whose
purpose is far beyond automating the serialization and loading of objects from the database, but to manage the entire life cycle and relationships with other application components such as the presentation manager. The enterprise features of DO are enriched
by the presence of an extensible system of document services, which through AOP
techniques allows you to implement common features that are perpendicular to the hierarchy of classes.
179
Andrea Maioli – Instant Developer: User's Guide
5.1.1 Document definition in an Instant Developer project
To understand the workings of the DO system, a basic understanding of OOP is needed,
at least with respect to the definition of classes, objects, and methods.
A document consists of a class that contains the data and procedures for managing
all aspects related to it. In the sales order example, there are at least several types of
documents: the order header, the rows, but also the products, customers, and suppliers.
With Instant Developer, you can create classes manually and then add the properties and methods, but the easiest way is to drag & drop the database table that will contain the data onto the document, while holding down the shift and ctrl keys.
From the Orders table to the Order class via drag & drop
From the software engineering point of view, many times the order is the opposite: first
you design the structure of classes and then this is translated into a database schema.
The method used by In.de does not give a higher importance to the database than to
classes, but is designed to provide the following benefits:
1) Typically the database is already present. It is therefore easy to import the schema
and then automatically create classes from it.
2) If the database is new, its definition should follow the same principles of creating
the structure of classes. Either way, the process is no different.
3) From the point of view of the DO framework, it also uses some of the information
present within the database definition, such as the structure of the foreign key. That
is because both structures must be defined, and each contains information missing
in the other.
180
Document Orientation
The structure of a document is as follows:
Class: represents the object class that manages a single document instance; the example manages a single order.
Property: a variable that is global to the class and represents a document property. If
it is created from a database table, the class will contain all the properties for all fields
of the table.
Method: a procedure that acts on the document and can therefore access its properties. You can also define static methods, which do not refer to a document instance, but
rather the class, and which cannot access the properties.
Event: the DO framework raises to the document the events that affect its life cycle
so it can be customized. For example, after an order has been saved to the database, the
AfterSave event fires, which allows the save to be completed.
To add properties, methods, and events to a document, simply use the corresponding
commands in the document's context menu.
5.1.2 Description of complex objects
After defining the documents to be processed, you can specify the relationships between them by organizing the structure. This is done by adding a collection, i.e. a set of
other document objects, to a document. In the sales order example, we add the set of
rows to the order header to form the complete document. This can be done by dragging
and dropping sub-documents onto the main document while holding down the ctrl key.
181
Andrea Maioli – Instant Developer: User's Guide
Creating a complex document via drag & drop
Looking at the content of a document, it is not easy to immediately grasp the entire
structure, as it would be if we were dealing with a paper document. In fact, the collections contained in a document show only the next level, but the documents in each of
them may themselves contain additional collections, and so on. It is therefore useful to
have an overview of the entire structure being designed. For this purpose, simply select
the document in the tree and press the F4 key, the Show Graphic toolbar button, or the
View -> Graphic command in the main menu. Here is an example of a complex structure:
A complete business document contains many collections at various levels
In the graphic, a thin line represents a transient collection, i.e., one that is not part of
the main structure of the original document, but represents ancillary data. Dashed lines
specify hidden transient collections, ancillary data that is not normally displayed to the
user.
Also note that the Account Transactions document contains a collection of its same
type. This implies a hierarchical structure at n-levels that can be very deep, because the
number of levels is not fixed at design time but depends on the data in the database.
182
Document Orientation
5.2 Creating and initializing a document
Let us now begin to take a look at how to use documents in application code, addressing the main life cycles.
Creation of a document can be done in different ways. The simplest method is to
define a local variable inside a procedure and initialize it with the new keyword. Note
that Instant Developer only supports the default constructor for architectural reasons.
If you want to maintain the reference to the order document outside the procedure as
well, you can create global variables in a form, the application, or even in another class
or document. To do this, use the Add global variable command in the context menu,
then edit the properties of the new global variable using Object as the type and setting
as the library the document class you want to store. The New (create object) flag allows
the global variable to be initialized to a new document or to leave the value null to then
be able to reference an existing one. The Public flag allows the variable to be available
outside of the object that contains it if set to true, or only from within if false. Another
way to create document-type global variables is to drag & drop onto the application or
form, in the latter case holding the ctrl key.
Keep in mind that variables that reference documents are like any other, so they
can be used in the same contexts. For example, documents can be passed as parameters
to other procedures or functions, return a document as a function's return value, create
an array or map of documents, etc. Unlike other variables, however, it is not possible to
define an output document parameter, since an object is always passed by reference.
5.2.1 Document status and relationship with the database
One of the main features of the DO system is automatically saving documents in the
database. It is therefore important to understand how this relationship happens. Every
document exposes four boolean properties that define it:
1) Inserted: when this property is true, the document is marked as new, and is therefore destined to be inserted in the database.
2) Loaded: if true, then the document has been loaded from the database.
3) Updated: If true, the document was loaded from the database, but was later modified by changing the value of at least one of its public properties.
183
Andrea Maioli – Instant Developer: User's Guide
4) Deleted: specifies that the document is marked for deletion and will be deleted from
the database. If the Inserted property is also true, then the document will neither be
inserted nor deleted from the database, because it would not have been saved in it
yet.
Note that after a document has been created as shown in the previous section, you must
decide whether to: mark it for insertion, thus preparing a document to be inserted into
the database, or to load it from the database to later edit or delete it.
5.2.2 Preparing a document for insertion
The first of the two options is done by calling the Init method on the document, as
shown in the image below:
The call to the Init method executes the operations described in the following outline:
Initialize property
default values
Default values defined at database level are taken into account.
Init. DO services
Identification and Domain services are initialized.
Inserted = true
On Init
Documents in their original condition, then Inserted property is set.
OnInit event notified for customized management.
As you can see, the OnInit event is raised at the end document initialization cycle. Also,
the default values of fields defined at the database level are reused to preset the properties. Through the OnInit event you can customize initialization of the document and any
of its parts, as shown in this example.
184
Document Orientation
Specifically, the third statement sets the ID of the company that has logged into the application as the business document's owner, storing it as a global variable of the GRPS
application.
5.3 Loading a document from the database
If after creation of a document you want to load it from the database, simply set some
properties that allow the system to identify it and then call the LoadFromDB method, as
shown in the image below:
The LoadFromDB method accepts an optional parameter, called number of levels,
which identifies how many levels of sub-documents are to be loaded in addition to the
document itself. This is very important because it is not always necessary to load the
entire structure from the database. Sometimes you just need the main document without
the collections. Specifying 0 as the number of levels, results in one document being
loaded, 1 specifies the documents in the first level collections, and so on. If you do not
specify a value, then the document will be loaded all at levels, apart from collections
declared as transient, which require explicit loading.
185
Andrea Maioli – Instant Developer: User's Guide
The loading cycle is as follows:
Before Load
Query prep.
.
If Skip parameter
is set, exits
Uses MQDO or automatic
Read properties
Collection loading
Doc. is in its original condition after
reading
OnSQLQuery
After Load
Query exec.
1) BeforeLoad: this event is first raised to the document so it can completely customize the loading cycle. If, for example, the document must be loaded from the file
system or through a web service, the corresponding code can be written in this
event. You can also include a custom document loading system by handling this
event globally.
2) Query preparation: at this point the DO framework must prepare the document load
query. This can be defined within the Instant Developer project by adding a master
query to the document, as described in the next section, or alternatively, the framework will automatically generate the query from the metadata of the document itself. The query is then completed by adding as conditions the values of all properties set in the document when it loads. This way, you can simply set the properties
for the primary key to obtain proper loading.
3) OnSQLQuery: this event fires for all queries relating to the document. It is typically
used globally to manage generalized filtering or logging services.
4) Query execution: at this point the actual query is run. There are three types of exceptions that can be thrown to the caller:
a. a SQL error occurs during execution of the query;
b. the query returns no records, i.e., the object was not found;
c. the query returns more than one record, i.e., identification of the document
is ambiguous.
5) Read properties: if the query has returned only one record, the data retrieved is
copied into the document properties. Subsequently, the framework calls the
186
Document Orientation
SetOriginal method to specify that at this time the status of the document is equal to
the content of the database.
6) Collection loading: if in the document structure there are collections of subdocuments and the number of levels loading parameter has not been exceeded, then
at this point the collections are loaded, as specified in the following sections.
7) AfterLoad: as the last step in loading from the database, the document's Loaded
property is set to true. Then the AfterLoad event fires, which allows the document
to finish loading if necessary. If a property must be changed during this phase, it is
important to remember to call the SetOriginal method to signal that the document
has not been changed after loading from the database.
As an example using of the AfterLoad method, suppose we add the OrderTotal property to the Order document and want to initialize it at load time.
5.3.1 Definition of the document's master query
The structure of the document does not always exactly mirror that of the table from
which it derives. This can happen, either because properties have been added to the
document, or because the database structure has changed but the document structure
should not. It may also be useful to add filter conditions that ensure loading of only the
documents for which the user has permissions.
In these cases, automatic calculation of the query by the DO framework is not sufficient, and it would be necessary to manage the entire loading process using the BeforeLoad event.
An intermediate solution between these two extremes is to define a master query
for the document, expressing the desired query without having to recode the entire
loading process. To add the master query to the document, you can use the Add master
query command in the document context menu.
187
Andrea Maioli – Instant Developer: User's Guide
In its default form, the document's master query is equal to the query that the framework would have run automatically. Each column of the query is related to a public
property of the document.
We can now see how to use the master query to avoid calculation of the order total
with a separate query in the AfterLoad event.
You can simply add a new column to the query, assign it to the OrderTotal property
and use as an expression a subquery capable of calculating the total. The advantage of
this solution is that everything is resolved with a single query instead of two, which
helps optimize execution by the database server.
188
Document Orientation
5.3.2 Collections loading cycle
We still have not covered how a document's collections are processed if the loading
cycle requests it. For each non-transient collection, the following operations are executed:
Before Load
Collection
Query prep.
OnSQLQuery
If Skip parameter
is set, exits
Uses VSQRY, or
automatic
Document loading
For each record
retrieved from
the database
Collection loading
After Load
Query exec.
1) BeforeLoadCollection: this event is first raised to an instance of the sub-document
so that it can completely customize the loading cycle of the collections of its type.
If, for example, the collection must be loaded from the file system or through a web
service, the corresponding code can be written in this event. You can also include a
custom collections loading system by handling this event globally.
2) Query preparation: at this point the DO framework must prepare the collection load
query. This can be defined within the Instant Developer project by adding a load
query to the collection, as described in the next section. Alternatively, the framework will automatically generate the query from the document and collection
metadata.
3) OnSQLQuery: this event fires for all queries relating to loading the document's collections. It is typically used globally to manage generalized filtering or logging services.
4) Query execution: at this point the actual query is run. In case of SQL error, an exception will be thrown.
5) Document loading: this step and the next two are executed for each record retrieved
by the load query. First, a new instance of the sub-document is created which is
then added to the collection. Then the sub-document's properties are read from the
current record.
189
Andrea Maioli – Instant Developer: User's Guide
6) Collection loading: if in the structure of the sub-document being loaded there are
additional collections, and the number of levels loading parameter has not been exceeded, then at this point the collections of sub-documents are loaded, always using
this cycle recursively.
7) AfterLoad: finally, this event is raised to each sub-document loaded in the collection to allow for custom completion of the loading cycle.
5.3.3 Defining a collection's load query
When you add a collection of sub-documents a document, the collection is associated
with a foreign key between tables to which the two documents refer, if any. Using this
association, the DO framework is able to automatically create the load query for subdocuments contained in the collection. If there are multiple foreign keys between the
two tables, or the one selected is incorrect, you can edit the association with collection's
context menu commands.
The query is then composed using the sub-document's master query, if any, or the
document's load query generated from its metadata, to which the conditions specified in
the foreign key are added.
There are cases where the load query cannot be generated automatically, so you
can specify one using the Add value list query command in the collection's context
menu. The result is as follows:
The query that is added is the same as would be generated automatically, and at this
point it can be changed as desired. Each column must be connected to a property of the
sub-document, and you can reference the properties of the document that contains the
collection.
You can also specify the order-by criteria in the query. Alternatively, the system
calculates the order-by clause by checking whether the document supports the follow-
190
Document Orientation
ing concepts: DO_SEQUENCE, DO_CODE, DO_DATE, DO_NAME. For more information on the use of these concepts, refer to the Reflection section.
When the collection cannot be loaded simply by using a query, and you need to
write a more complex algorithm, the BeforeLoadCollection event can be useful. Let's
see how to use it to load a collection of documents from a recordset loaded in memory.
Note that the event handler is written in the Order Lines sub-document and not in the
main Order document. This way, all loads of collection of order lines can be managed
in one place. If it is necessary to distinguish the type of loading according to the type of
document doing it, you can use the event's Parent parameter.
Within the event handler, the LoadCollectionFromRecordset method is used,
which, from the records in the recordset, constructs as many documents on which the
method is called, initializes them according to the data in the recordset, and then adds
them to the collection. So that everything will work properly, the names of the recordset columns must be the same as the document's public property codes. To automatically achieve this you can drag & drop the class onto the select statement, as indicated by
the arrow in the image.
191
Andrea Maioli – Instant Developer: User's Guide
5.3.4 Partial loading of a document
In the previous sections we have seen that you can load a complex document partially,
for example the header of the order without the collection of rows. This is important
because it saves a lot of server memory and processing time.
Partial loading is achieved by setting the Number of Levels parameter in the various
loading statements. Specifically the value 0 (zero) specifies not to load additional collections, but only the document in question.
You can then query the status of document loading through its Loaded property
and the Loaded property of its collection. You can also perform multiple loads of the
same document, which, however, will only load the missing parts. If, for example, in
the code for validating an order you need to scroll through the collection of rows, the
following code should be inserted:
This call has no effect if the document has the Inserted status, and it does not affect
parts of the document and its collection that are already loaded. If you want to reload
the document from the database, you need to reset the Loaded property. To do this for
sub-documents as well, the SetLoaded method is available, which sets the property to
the desired value for any number of levels.
If the sub-documents contained in a collection represent ancillary data, useful only
in certain contexts, you will likely want to prevent automatic loading. This can be done
by setting the transient flag in the collection's properties form. At this point only an
explicit call to the LoadCollectionFromDB method can trigger the loading.
5.3.5 Loading a collection of documents
At the beginning of the related section, we saw that to load an instance of a document,
you simply set the properties corresponding to a unique key and then call the LoadFromDB method. In many contexts, it is useful to be able to load from the database a
set of documents that meet certain criteria. We have already seen that this is possible by
writing the load query and then using the LoadCollectionFromRecordset method. However, there is an easier way to get this result: asking a document instance to do it. We
see how in the image below:
192
Document Orientation
In the example, you can see how to create a function that has a client code as an input
parameter and returns a collection of orders made by that customer. The first line defines and initializes the collection of orders that will be loaded and then returned to the
caller. The second line creates an Order document that will be used only to perform the
loading of the collection.
At this point, you simply set the document properties to communicate the search
criteria. In the example, this happens by simply setting the CustomerID property to the
value passed. Finally you perform the actual load by calling the LoadCollectionByExample method.
A useful feature of this method is that it is possible to use the same syntax seen for
the query by example criteria of panels to filter the loading of the collection. For example, if we want to request the loading of all orders delivered to customers during a
range of dates, we can use the following syntax:
Note the syntax of the date range, which uses the colon character to specify the bounds.
Also note the Convert function, which allows you to cast a string to a data-type property without generating a compile error.
Finally, note the MaxRows property of the collection, which allows you to select
the maximum number of documents to be loaded. The default value is 500, to avoid
overloading the server unnecessarily, but can be set to zero to load any number of documents.
193
Andrea Maioli – Instant Developer: User's Guide
5.3.6 Loading a linked document
Sometimes it may be useful to load a document that is linked with the current one. For
example, from an order line it may be useful to load the document related to the product, or even the category, which is a document linked to the product. This can be
achieved by writing code as shown in the preceding sections. However, the DO framework contains the GetLinkedDocuments function, which is able to retrieve a document
linked up to five levels away, by simply stating the intermediate steps to be taken.
The changes from one document type to another can be specified using the class
name of the target document, if there are no ambiguities, or by referencing the property
to be used for the link. Both cases require specification of the database-level foreign
key to be used for resolving the links.
Let us now see how to retrieve the product from an order line and then the product
category, first using the name of the class and then references to the properties.
The function's first parameter is a boolean value that indicates whether the document
should be searched for in a local cache of documents already loaded from the database.
It is best to use the value true to prevent repeated querying, unless you need to force
reloading the document from the database.
In the first line, the static function ClassName is used, which, when applied to a
document-type class, returns the name of the class itself in string format. In the second
line, meanwhile, the properties ProductID of the OrderLine class and CategoryIDof the
Product class are specified. Static references to class properties are prohibited, because
such properties are not static, but the Instant Developer IDE interprets them as references to the property itself and not its value. Consequently, when you must pass a function a property that it must process, you can use the Class.Property notation just to
specify the reference and not the value.
The GetLinkedDocuments function therefore makes it unnecessary to store references to related documents as class properties of the document itself, because you can
retrieve the instance without re-executing the query against the database whenever it is
needed.
194
Document Orientation
5.4 Modifying and validating a document
Once a document has been initialized or loaded from the database, it is ready to be
viewed and modified via the user interface. In this section we will see how operations
are managed based on editing of in-memory documents through visual code, since the
presentation manager will use the same mechanisms directly.
5.4.1 Document transactions
There are three main types of modifications that a document may undergo:
1) Changing a public property, which sets the document's Updated property to true.
2) Adding a document with the Inserted status to a collection.
3) Removing a document from a collection, done by setting the Deleted property to
true, i.e., marking the document for deletion.
This section discusses point 1, while points 2 and 3 are covered in the next section. Although changing the properties of a document may occur in isolation, the DO framework uses the concept of a document transaction. This type of transaction is very different from a database transaction. In effect, it is only a way to mark the beginning and
the end of a change in status of a single document, according to the following outline.
Doc.BeginTransaction
Doc.EndTransaction
OnBeginTrans.
Preparaz. Query
OnEndTrans.
Change properties
A document transaction begins when the BeginTransaction method is called on the
document. Then the OnBeginTransaction is immediately raised to the document, allow
marking the beginning of the transaction, if necessary.
At this point, you can change the document's properties. The transaction ends by
calling the EndTransaction method, indicating that the change in document status is
completed. At this time, the OnEndTransaction event is raised to the document, which
is very useful for responding to changes that occurred during the transaction. Within
this event, you can use the WasModified function to determine whether a given proper195
Andrea Maioli – Instant Developer: User's Guide
ty was changed during the transaction. You can also determine the original value by
calling GetOriginalValue.
In this code example, the OnEndTransaction event of an order line is used to refresh the
unit price when a different product has been selected. Note the use of the function
GetLinkedDocument function, which retrieves the Product document corresponding to
the one in the line with a single statement, without which the code depends on the database structure.
5.4.2 Modifying collections
Modifying a document's collections happens directly, by adding new documents or
marking unnecessary ones for deletion. Suppose, for example, you want to load in an
order products that are generally purchased by the customer. The code to be written is
shown in the image, where we see these steps implemented:
1) The database is queried, loading all products purchased in the last 30 days by the
customer indicated in the current order.
2) For each product, a new Order Line document is created and initialized, then immediately added to the collection of current order lines.
3) A transaction is carried out on the document to indicate the change in product. This
way, the line has the opportunity to recalculate the unit price that is read from the
products data.
For this to work properly, new documents must be added to the collection with the Inserted status, so that the framework knows they are to be inserted into the database.
196
Document Orientation
Removing documents from a collection is done by marking them for deletion. For example, you can delete the order lines with a quantity equal to zero with the following
procedure.
Note that the documents to be deleted must not be removed from the collection, but
must be marked for deletion; otherwise the framework will not know that they were
present and cannot synchronize the database accordingly.
197
Andrea Maioli – Instant Developer: User's Guide
5.4.3 Synchronization of the document's status
In some cases, a document must observe every change to itself and its sub-documents
in order to synchronize its properties with the new overall status. For example, if you
want to keep the Order Total property updated, you must recalculate it every time a line
is added or removed, or if the properties of a line change. Since in general this can be
done at all levels of the hierarchy, keeping track of all possible changes can become
quite complicated.
To simplify this task, the framework raises the OnChange event to a document every time that any of its parts, at all levels, undergoes a change of status, a transaction, or,
finally, is added or marked for deletion.
The event does not fire immediately, so as not to overload the system with unnecessary operations while the status of the document is still being changed. It occurs after
handling a browser event but prior to any and validation or saving of the document.
You can force the update by calling the ProcessChange method, but in general this
should not be necessary.
Note that a change that occurs within OnChange does not cause an additional firing of
the event.
If the transient flag is set for a public property of the document, changes to its value will not cause changes to the document status, nor will it cause firing of OnChange.
This is precisely the case of the Order Total property: since it is a calculated property it
should be transient, because its changes stem from other document events, so it should
not directly trigger changes in the document's status.
We conclude the discussion on modifying a document by covering how to return it
to its original status. The RestoreOriginal method deals with this, undoing any changes
to the public properties of the document and its collection.
If you wish to indicate that the current status of the document is the original one,
you must instead use the SetOriginal method, which resets all status properties to the
initial value.
198
Document Orientation
5.4.4 Document validation
One of the key steps in a document's life cycle is validation. The basic purpose is to
answer the question: does the current status of the document makes it possible to save
in database? If not, what errors exist? What values must be confirmed by the user before proceeding?
The validation process is centralized within the document. Every part of the application involved in document manipulation may require validation without writing additional code. This is the outline of the process:
Doc.Validate
OnValidate
Preparaz. Query
Internal Validate
Only if not skipped
and not deleted
Document validation begins by calling the Validate method, which immediately raises
the OnValidate event to allow the document to customize its validation checks. The
process continues with the framework's internal validation if it has not been disabled in
the event. Then everything is repeated for each sub-document in any collections contained in the main document.
The internal validation performs the following checks:
1) All public properties defined as required must be set.
2) Any public property that contains a value must be of the proper type.
3) The length of character fields must not exceed that defined in the database.
4) Table check constraints defined in the linked table must be met.
For reporting errors on the document or the individual properties you can use one of the
following methods:
1) SetPropertyError: attaches an error message to a property, indicating that the document cannot be validated. A property can have at most one error message or warning attached.
2) AddDocumentError: attaches an error message to the document, indicating that it
cannot be validated. A document can have various error messages attached.
3) SetPropertyWarning: attaches a warning to a property, possibly requiring explicit
user confirmation.
199
Andrea Maioli – Instant Developer: User's Guide
The Validate method returns true if the document has no errors, or false if it has errors.
Errors are normally shown automatically in the user interface, or through the panel's
ShowDocErrors method, which will be covered later.
The following validation example shows code that prevents saving orders that do
not have at least one line and that checks that the shipment date is not earlier than the
order date.
5.4.5 Management of locks
In high-usage business applications, it is possible that multiple users or programs will
attempt to simultaneously edit the same data. To resolve this problem, application
frameworks provide lock management systems.
The first and simplest of these systems is implemented in native recordset objects,
both in Microsoft.NET and Java environments, and is called optimistic locking. The
mechanism is simple: each modified or deleted row of the recordset, before being updated in the database, is re-read to see if some other user has changed it since it was last
read. If this is the case, an error is thrown and the changes are not saved in the database.
Unfortunately, this lock system has several shortcomings. First, it is oriented to
protection of individual records and not to the document as a whole. If, for example,
two users modify two different order lines, the system does not notice. The second
shortcoming is that it is not a true locking system: when a user enters a record to
change it, another user can do so simultaneously, and the faster of the two will "win"
200
Document Orientation
while the other is destined to lose his/her changes. For these reasons, an optimistic lock
is suitable only as an exceptional solution, when usage is very low.
To overcome these shortcomings, the DO framework implements its own locking
system that does not make use of optimistic locking necessarily, but is based on a generalized service for implementing the most appropriate management policy for every
type of application. Although the way to create these services and then select the locking policy will be described in a later section, here we will consider how each document is able to determine whether it can accept the changes or not.
First, each document has a Locked property valued as true if the document has already obtained the lock, i.e., permission to be changed. The functions to request and
release the lock are, respectively, GetLock and ReleaseLock. If a document property or
collection is changed and it has not yet obtained the lock, then it will automatically call
the GetLock function to see if the change can be made or not. The algorithm for obtaining the lock is as follows:
1) First, the system checks what type of document in the hierarchy is delegated to
manage the lock. To select the documents that manage the lock, it is necessary to
set the Document lock flag in the properties form. This way, for example, it is possible to manage a lock at either the order header or single line level. In the first
case, every document modification, even at the line level, will cause the entire order to be locked.
2) If no document in the hierarchy manages the lock, the system considers that it has
been obtained, because none are assigned to managing it. This is the default mode:
all operations are always permitted.
3) If, however, a document in the hierarchy manages the lock and it has not yet been
obtained, then the GetLock event is raised to the generalized services management
object to perform the actual reservation of the document. The default implementation always returns true without actually reserving the document, so all operations
are always permitted.
4) If the locking service, through the GetLock event, verifies that the document cannot
be reserved, then the change is canceled, but an exception is not thrown programmatically. For this reason, we recommend using the GetLock function before
changing from code a document that can be used in shared mode.
When a document is shown in the user interface in a panel, it automatically takes care
of managing the lock and shows appropriate messages to the user when the document
cannot be changed.
The function of ReleaseLock is similar: once the document that manages the lock
is identified, the ReleaseLock event is raised to the generalized services management
object that takes care of freeing the document. If for some reason the lock had not been
made or the general service was not implemented, then no operation is executed and no
exception is thrown. When the document is linked to a user interface object, the lock
201
Andrea Maioli – Instant Developer: User's Guide
release function is called automatically at the appropriate time, but this will be covered
in more detail in a later section. The following image shows the way to work on an inmemory document while addressing lock management.
5.5 Saving a document
When modifications to a document are finished, it must be saved in the database to
make the changes permanent, otherwise they are lost. To save a document, simply call
the SaveToDB function, which returns true if all was successful or false otherwise, in
which case you can use error-handling functions to extract those that occurred.
The save operation causes the modifications to the database necessary for maintaining the current status of the document and all its sub-documents. If, for example,
the document is marked for deletion, the corresponding record in the linked table will
be deleted, as well as all records relating to sub-documents in its collections. The outline of operations executed is as follows:
202
Document Orientation
Re-link FK
Doc.Validate
Preparaz. Query
DB.BeginTrans.
BeforeSave 0
BeforeSave 1
Inserting…
BeforeSave 2
Updating…
To all affected
documents. If
Updated, update
DB
Only if transaction
doesn't exist
BeforeSave 3
Deleting…
From leaves to
root. If Deleted,
delete from DB
To all affected
documents
AfterSave
To all affected
documents
If errors in document, exits
To all affected
documents. If
Inserted, insert
into DB
SetOriginal
DB.CommitTrans.
To all affected
documents
If transaction was
started inside
1) Re-link FK: this operation re-links the properties of sub-documents to the related
properties of the main document if the collection in which they are contained is associated with a foreign key. This way, a sub-document merely has to belong to a
collection to get the proper value for the properties that connect it to its parent in
the database.
2) Validate: before actual saving begins, the document is revalidated. If there are errors, the procedure stops.
3) BeginTransaction: if a transaction has not yet been opened in the database that contains the table linked to the document, one is now opened. This way, all modifications to the document and sub-documents always occur in the same transaction.
4) BeforeSave step zero: the event that starts the save is raised to the document and its
sub-documents. Step zero identifies this stage accurately. Every document can use
this event to prepare to be permanently saved.
5) BeforeSave step one: the event that starts the insert is raised to the document and its
sub-documents. After the event in step 1, if the document is in Inserted status, the
framework will run the insert queries on the database, calculating them automatically based on the metadata. If a document uses a counter field as a primary key, after the insert, the value assigned by the database is immediately read and sent to
any dependent sub-documents.
203
Andrea Maioli – Instant Developer: User's Guide
6) BeforeSave step two: the event that starts the update is raised to the document and
its sub-documents. After the event in step 2, for all documents involved that are in
Updated status, the framework will run the update queries on the database, calculating them automatically based on the metadata.
7) BeforeSave step three: the event that starts the delete is raised to the document and
its sub-documents, this time in reverse order, i.e. from the branches toward the root.
After the event in step 3, for all documents involved that are in Deleted status, the
framework will run the delete queries on the database, calculating them automatically based on the metadata.
8) AfterSave step two: the event that ends the save is raised to the document and its
sub-documents. This can be used to update other documents external to the current
one, for example the inventory of an article in the save of a stock change. Saving a
document in this step uses the same transaction opened at the beginning of the cycle, so everything will stay consistent. In this step, the document still has the information about its status and the original value of its properties, so it is still possible
to analyze the modifications.
9) SetOriginal: if everything was successful, all the documents involved are set to
original status. It is not until this step that those marked for deletion are removed,
because they have now been successfully deleted from the database.
10) CommitTransaction: if the transaction has been opened by this save cycle, at this
point it is confirmed. In case of cancellation of the cycle from code or an error occurring in code or in the database, the transaction is canceled and everything is returned to its status before the save.
Let's take a look at some sample code. The following image shows the BeforeSave
event being used to assign a sequential numeric code, but not calculated until the time
of saving in order to increment the counter in the same transaction in which the Entity
document is permanently saved.
204
Document Orientation
In the example below, meanwhile, the AfterSave event is used to make a further check
at the end of everything, to ensure that any operations executed during the save have
not altered the expected situation.
You may notice that setting the Cancel parameter to true cancels the entire save on
whatever level it occurs. Also, the event is designed throw any unhandled exceptions so
that any unexpected situation causes cancellation of the save.
Saving a collection of documents loaded from code is done by calling that collection's SaveToDB method, which works by saving each single document of the collection in a separate cycle. If you would rather have the entire collection saved in the same
transaction, you can write the following code:
5.5.1 Cancellation of complex documents with cascading delete
In the case of complex documents, the system automatically generates delete queries
only for those parts of the document that have been explicitly marked for deletion, i.e.,
having the Deleted property set to true. If the database contains a foreign key that links
the table to others, deletion of records in the database could cause an error, because
there are records linked to the one being deleted.
205
Andrea Maioli – Instant Developer: User's Guide
If, for example, a delete is attempted on an Order document, this typically happens by
marking the header and not all the lines for deletion. Since there is a foreign key between the order headers table and the order lines table, there may be errors during the
delete step. To avoid this, you can set the foreign key's deletion rule to Cascade. This
way, when you delete the header, the lines are also automatically removed from the database.
However, if the foreign key does not exist or does not have Cascade as a deletion
rule, then you must write the following code in the BeforeSave event of the order line.
The IsDeleted function returns true if one of the documents in the hierarchy that the
line belongs to has been deleted, in which case you simply mark the line for deletion.
This is sufficient, because the deletion order of the records is from the branches toward
the root, so the lines will be removed prior to the order.
The only drawback of this solution is that it requires multiple delete queries instead
of one. For that reason, setting the deletion rule to Cascade, where possible, is preferable.
5.5.2 Customizing the saving of documents
Documents do not always need to be saved to a database. It can happen, for example,
that the save operation needs to be done by calling a method of a web service or writing
to the file system. To achieve these behaviors, you need to use the BeforeSave event,
setting the Skip to true parameter. This way, the DO framework assumes that the event
code has performed the required operation and does not send the modify query to the
database. Let's take a look at how to save an order by invoking a custom web service.
206
Document Orientation
In this example, both the line and the order skip saving to the database. During the order's pre-save step, however, if it is somehow modified, the web service object is created and then the entire order is passed in XML format. In effect, the SaveToXML function prepares an XML string that contains the entire document and all of its collections.
By using this technique within a generalized version of the BeforeSave event, you
can centralize a save mechanism for application documents other than to the database.
5.5.3 Handling database-level errors
If errors occur at the database level during the save, the corresponding error messages
are attached to the document, and then the save cycle is canceled. However, databaselevel error messages are rarely suitable to provide the end user clear guidance on what
has happened, so you need to somehow catch these errors and convert them into something comprehensible.
To automate this process, when save errors occur, the DO framework runs a set of
queries prepared by Instant Developer during application compiling, to verify the constraints existing on the tables involved in the save. The queries run are the following:
1) Primary key: checks whether any other record in the table has the same primary key
values as the document being saved.
2) Unique index: checks whether any other record in the table has the same unique
index key values as the document being saved.
207
Andrea Maioli – Instant Developer: User's Guide
3) Foreign key on update: for each foreign key in the table linked to the document,
checks that there are records relating to the values present in that document.
4) Foreign key on delete: for each table that has a foreign key to the table linked to the
document, checks that there are no records linked to it.
In all these cases the errors attached to the database will be comprehensible by the end
user, so there is no need to intervene further. In other exceptional cases, the error messages attached to the document should be read and decoded.
The above image illustrates how errors that occur when saving an order line document
are shown. In this panel, the check was disabled for the accuracy of the product in the
line, otherwise this error would not have resulted.
During the update query, the database returns an error related to the foreign key
that links order lines with products. The DO framework assesses the situation and understands that the problem relates to the value of the document's Product ID property
and displays it to the user in a comprehensible way.
5.6 Documents and panels
After extensively discussing the manipulation of documents from code, it is now time
to see how they interact with the presentation manager. In this section, we cover how to
create panels based on documents, while the chapter on tree structures describes how to
view the hierarchical structure of a document.
208
Document Orientation
5.6.1 Creating document-oriented panels
The creation of a panel based on a document (DO panel) is quite simple: just drag &
drop the document class onto the application while holding down the shift key. In practice, the same operations apply as in creating panels based on tables, but instead of a
table, is the document class is dragged & dropped.
Visually, the result is identical, the only difference you can see in the master query
is that instead of having a table in the from list, now there is a document, and instead of
the table fields, the select list contains all the document's public properties, unless the
visible flag has been reset in any of their corresponding properties forms.
In the DO panel, the master query is therefore not an actual SQL query, but rather the
relationship between the panel's fields and the properties of the document linked to the
panel. Therefore, neither calculated expressions nor joins between tables or documents
are permitted. If the panel is not linked in a master-detail relationship with others, you
can add where clauses that will be used during data extraction, as well as order-by criteria based on the document's properties.
When a DO panel is opened, an internal instance is created of the document on
which the master query is based, as well as a collection that will contain the data extracted from the database. Upon retrieval of the data, the panel uses the LoadCollectionByExample function to load the collection with the documents to be filtered by user-provided QBE criteria and where clauses added to the master query.
Data modification occurs through use of document transactions. When the user
modifies a row, the panel automatically performs the following operations:
1) A lock is placed on the document to be ensure the ability to modify it, by calling
the GetLock method. If the lock cannot be placed, an error message is shown to the
user and the data modification is canceled.
2) A transaction is opened on the document by calling BeginTransaction.
3) The properties modified by the user are set. Note that DO panels always have the
Auto save flag enabled, because any changes the user makes must be immediately
saved in the document.
4) The transaction on the document is completed by calling EndTransaction.
5) The document is revalidated by calling Validate with the parameters reason = 1 and
number of levels = 0. This is a quick validation of the document, without consider-
209
Andrea Maioli – Instant Developer: User's Guide
ing its sub-documents at this point, serving to alert the user of more immediate errors.
6) If the validation has identified errors in the document, they are extracted and shown
to the user in a manner similar to non-DO panels.
Note that the management of changes in a DO panel must not be done in the panel's
OnUpdatingRow event, but in the document events: OnEndTransaction as regards the
consequence of the changes and OnValidate as regards the checking of errors.
If the user enters a new row, the panel internally creates an instance of the document, initializes it for insertion by calling Init, and adds it to the panel's collection. It
then continues with the operations mentioned above.
Upon saving, the panel calls the collection's SaveToDB method, which behaves as
seen in the previous sections. If the save is unsuccessful, errors will be shown on
screen. The locks placed during the modification step, are released after the save, if the
changes are canceled, or when the form or the application is closed.
The other features of the panel work very similar to those of table-based panels.
The fact that the panel has a collection instead of a recordset makes some operations
easier, such as hiding rows or selecting them using multi-select. The code shown below
demonstrates how to select all products in discontinued status in the products DO panel.
The code is even simpler: just reference the collection contained in the panel, perform a
for-each loop on it, and set each document's Selected property accordingly: this will
update the state of the multiple selection on screen. Conversely, you can read the Selected property to determine whether or not the user has selected a particular document.
The DO panel also has available the Hidden document property, which allows you
to hide a row on screen while keeping it the collection. The effect is an additional filter
on the data, executed directly in memory.
210
Document Orientation
5.6.2 Named properties
We saw in the previous paragraph that the master query of a DO panel cannot contain
calculated columns, but only references to public properties of the document. However,
it is often useful to be able to add to a grid the result of a calculation or an expression
that is not present as a simple property of the document.
To achieve this behavior, there are so-called Named Properties: methods to request
calculated values from the document based on a name in string format. This mechanism
also works by processing the document in memory: by calling the GetNamedPropertyValue function, you request the result of a calculation from the document. By using
the SetNamedPropertyValue, meanwhile, you can request that the document change the
value.
Inside documents, the call to these methods fires a series of events that are used to
manage calculations in a customized way. If not done, the framework will always respond with the value null. Specifically, the events involved are:
1) OnGetNamedPropertyValue: fired when the result of a calculation is requested
from the document.
2) OnSetNamedPropertyValue: fired when the document is requested to modify the
value of the calculation.
3) OnGetNamedPropertyDefinition: if the panel has to show a calculated property, it
first fires this event to the document when calling the corresponding method to determine the definition, i.e., the type of data, maximum length, etc.
To make a DO panel show a calculated property, you can add to the master query an
expression containing only a string constant representing the name of the calculated
property you want to view. At this point, the panel will manage the communication
with the document to obtain the desired information. Also, if the field is writeable, it
will also communicate to the panel the new values to be stored.
Let's take a look at an example of a calculated property. Imagine you want to display in the order header panel the number of lines in the order.
211
Andrea Maioli – Instant Developer: User's Guide
At this point, you only need to implement in the document the three events mentioned
above.
As you can see, the named properties are identified by a string constant "NLINES". In
the first event, the properties of the PropertyDefinition object that must be set are at
least the data type and length. In the second event, the value is defined as a string, but
you can simply use the Convert function to return any data type to the caller.
212
Document Orientation
This is the code of the modifying event. The user can thus increase the number of lines
in the order simply by changing it from the header panel. Note that this example does
not account for the possibility of the number of lines decreasing. This must be done by
deleting the lines with the commands on the corresponding panel.
5.6.3 Document-oriented value source and lookup
DO panels also have the same lookup, value source and autolookup mechanisms as
those covered for normal panels. In addition to that already seen, however, new possibilities arise by using documents instead of tables within lookup and value source queries.
If a document is used within a value source query, it will have the same limitations
seen for the master query: you cannot use joins or calculated expressions. In this case,
you cannot use order-by criteria, or specify where clauses other than the property =
term type, where the term can be a constant, a global variable, a single row in-memory
table field, or a master field of panel in the application.
These limitations stem from the manner in which the panel runs the decode query
in the case of DO: an instance of the document in the lookup query is created internally,
so the terms used in where clauses are stored in the document's properties. Finally, the
LoadFromCache method is called, which checks in a list of documents already loaded
from the database if there is one with the same values. If not found, then the next cycle
of operations will be executed.
213
Andrea Maioli – Instant Developer: User's Guide
BeforeLookup
LoadFromDB(0)
Preparaz. Query
AfterLookup
DocCache.Add
1) BeforeLookup: the framework notifies the document that a lookup is about to begin.
If the document is set to customize it completely, it will set the skip parameter to
skip the next step.
2) LoadFromDB(0): at this point the framework loads the document from the database, setting the number of levels parameter to zero. If the load function causes an
exception, it will be caught, but the result of the lookup will be a blank document.
3) AfterLookup: the framework notifies the document that the lookup has occurred but
that it can still be customized.
4) Add to cache: the document is added to a list of documents that are global to the
session, so that it can be reused if the same values need to be decoded again. The
cache is automatically emptied by the system if the any panel modifies documents
of the same type, or by the RefreshAllLookups procedure.
The advantage of using decode and lookup based on documents instead of tables is to
be able to customize in a centralized how they are to take place. Suppose, for example
that you want to show on screen the first and last name of an employee when referring
to him from other tables. Since the first and last name fields are separated, in each table-based lookup query you need to write an expression that concatenates them. In the
case of DO lookup, however, you simply implement the AfterLookup event once. This
way, if you change your mind later, you only have to edit one part of the application.
A similar mechanism applies to value source queries and autolookup fields. In this
case, however, the support document created by the panel to manage the query is notified of the OnGetValueSource event, which must prepare the recordset to be displayed
in the combo box. This can be done using the CopyFrom method, copying a recordset
returned by a query to the one that is passed as a parameter to the event, or via
214
Document Orientation
AddValueSourceRow, which allows the recordset to be loaded with data calculated directly in the code.
Finally, you can customize the lookup query search mechanism via the
OnGetSmartLookup event, this time raised to the document and not to the panel. Also
in this case, you can decide what and how many queries to run to search for userentered information.
5.6.4 Master/detail DO panels
In panels based on documents, the concept of master-detail relationships is explicit,
since a detail panel relates directly to its master. The association between the panels
normally occurs automatically when a detail panel is added to a form where a master is
already present. Both must be based on documents, and, specifically, the detail recognizes the master since the document on which the latter is based has a collection of subdocuments of the same type as the detail.
The image shows that when rows are added to the panel by dragging and dropping the
Order Lines document onto the form, it also connects the panel to the orders in masterdetail mode. This happens because the Order document, on which the orders panel is
based, has the collection of Order Lines that contains documents of the Order Line
type, the same type of documents on which the rows panel is based.
If the association is incorrect, you can disable it with the Unlink from master command, in the panel context menu. You can then drag & drop another onto the detail
while holding down shift to set it as master. The SetDetailCollection method of the
panel can be used if a document has two collection of the same type and the detail is
not attached to the one desired.
Detail panels behave differently from other panels seen so far. Specifically:
215
Andrea Maioli – Instant Developer: User's Guide
1) They synchronize automatically with the content of the master panel, displaying the
content of the collection of the document selected in it. If the collection has not
been loaded yet, they also perform the loading.
2) QBE functions filter the collection by hiding the sub-documents that do not meet
the criteria. It is, however, always fully loaded because it is part of a document
managed as a single in-memory object.
3) The Padlock button acts on all panels in the hierarchy: if you are preparing to edit a
document, you can do so in all its parts.
4) The Save button triggers saving of the master panel and the whole document being
edited.
5) The Cancel button, meanwhile, reverses only the changes to the collection contained in the panel.
6) The deletion of a row is treated as a document modification, so it does not immediately trigger deletion of the related records from the database. By undoing the
changes, the deleted rows reappear.
As a final note, we see that in the case of DO panels, you do not need to write any code
to manage master/detail behavior, since saving the document always occurs in a comprehensive manner.
5.6.5 Setting documents and collections
So far, we have seen how a DO panel can independently load and manage a collection
based on user-entered search criteria. However, if the collection or the document has
already been loaded from code, how can they be viewed in the panel?
To address this, panels have two methods, SetDocument and SetCollection, which
allow attaching to them an existing document or collection. Both methods have a boolean parameter called master that makes it possible to select the mode in which the operation is to be performed.
If you select the master mode, the panel assumes that the document or the collection is in its possession. For example, if you use the save or delete commands, the content of the panel undergoes the change immediately. In the non-master mode, however,
the panel is limited to viewing and modifying the content, but assumes that the decisive
operations are performed through another graphic object.
You can read the collection or document selected in the panel through the Collection and Document properties. The latter always returns the document on the selected
row of the list, even if the panel contains a collection. The same mechanism applies
when the panel fires events at the row level.
216
Document Orientation
The code example shows how to highlight understocked products in red in a DO panel.
The first line of code extracts the document from the panel, the one for which the event
is raised. Then you can operate directly on it.
The Collection and Document properties can also be set, and if so, attach the collection or document to the panel in non-master mode.
A document or collection can be attached simultaneously to multiple panels. In this
case they share in-memory data, and when changed from one, the other is updated. Let's
see, for example, how to view a list of products and return the selected one in a detail
panel below.
The list panel is read-only. By changing the active row, the product data is shown in the
detail panel, which also allows editing it. If the data is saved, the list must also be updated. All this can be accomplished with a single line of code, written in the OnChangeRow event of the in-list panel.
217
Andrea Maioli – Instant Developer: User's Guide
The OnChangeRow event is raised whenever the data of the selected row in the list
changes, which happens when the user scrolls from row to row. At this point, the document selected in the list is shared in master mode with the detail panel that displays it,
and allows editing and saving.
5.6.6 Link between documents and forms
A document can also be attached to a form, indicating that it is being edited. To do this,
you can set the Document property of the form, which in turn raises the OnChangeDocument event. Attaching a document to a form has two effects:
1) The caption of the form shows the name of the document attached, and if it is in
modified status, it is indicated by an asterisk.
2) If the form is set to save changes (see AutoSaveType), then the document is saved
automatically on closing.
A document may be attached automatically to a form in two cases:
1) If a detail DO panel is contained in a tabbed view, when the user changes the page
and views it, the master document is attached to the form. This way, the user can
know which document's details are being shown.
2) Using the document's Show method, a new form opens that is already attached to
the document. The document is also attached to the first panel of the form, which
designated to display it. This is the method used in the webtop example to open the
forms corresponding to the icons on the desktop.
The association between the document and its form occurs at design time: it is linked to
the first form derived from it, i.e., one created by dragging and dropping it onto the application while holding shift. You can also change the form associated with the document by dragging and dropping another onto it while pressing shift.
Loading and displaying a document with four lines of code
218
Document Orientation
5.6.7 Comparison between DO and SQL panels
After seeing all the features of documents and ability to attach them to panels and
forms, using Document Orientation might seem like the best choice for any application
requirement.
This is definitely true when you are dealing with the transactional part of the application, i.e., that regarding any changes to the status of the system. Although very simple applications can be successfully created using only queries on the database.
There is still an important use case for table-based panels and, more generally, the
use of SQL language even within DO applications: when you want to create relationships between many entities – documents – separate from one another.
In fact, the SQL language originated as a method of querying relational databases,
and is best used precisely for correlating different data together. The use of objects,
however, has a hierarchical approach, and DO is oriented to easily obtaining all documents and related sub-documents.
Suppose, for example, we want to view a list of clients and for each, the value of
orders over the past year and the number of products purchased. Inserting these properties within the customer document would not be proper, since they are not attributes of
the customer per se, but data from a historical analysis.
The best solution is a panel, read-only, based on a query that directly extracts data
of interest, as shown in the image below:
A master SQL query for viewing "reports" in read-only
219
Andrea Maioli – Instant Developer: User's Guide
5.7 Reflection and global events
Most programmers like to write a single algorithm that works for all possible use cases
within an application. This way, while writing less code, you achieve your desired results fast and the application is easier to maintain.
In object-oriented programming, this goal can be achieved by placing some of the
object's data and code in a base class that will be inherited by the various classes that
will require that behavior.
However, this method is not effective for enterprise applications, because the structure of classes, once fixed, is rigid, and considering the fact a class can only inherit
from one base class. This means that you cannot successfully add the same behavior to
objects belonging to different hierarchies.
You might argue that you can inherit all objects from the same class, so you can
always add common behaviors. However, this works well if the behaviors are actually
common at all. Otherwise they enlarge the base class so much that it eventually becomes unmanageable and difficult to maintain. Many behaviors, in fact, also require the
storage of data that would be wasted on objects that do not require it.
For this reason, besides using inheritance, one needs to introduce additional mechanisms to implement common aspects to multiple documents. This can be achieved
through various techniques, such as implementation of interfaces, which will be illustrated in the chapter on libraries, or through generalized services and reflection.
A generalized service is an algorithm invoked automatically by all documents at
specified times in their life cycle, and, in order to function properly, it must be able to
work with documents without knowing their structure defined at design time.
Consider a document properties language translation service. The code for the service must be able to understand what document properties must be translated, read the
required tables and then set them to the correct value, all without directly referencing
them, since their document type is not known at design time.
To perform these operations, there are so called reflection methods, which allow
access to the metadata of documents to determine what properties they implement, their
characteristics, and their values.
Into the same category fall methods related to XML serialization, which allow you
to convert a generic document into an XML string and vice versa.
5.7.1 Analysis of document structure through metadata
Given an untyped document instance, you can determine the structure by calling the
GetStructure method, a function returning an object of the IDDocumentStructure type,
220
Document Orientation
which describes the schema. The following code, for example, discovers the type of
document passed as a parameter and how many properties it contains.
The document passed as a parameter is declared as the IDDocument type, the base type
of all classes that represent documents in applications created with In.de.
Once the IDDocumentStructure object is obtained, you can discover a variety of information relating to the document, such as the name of the table that contains the data,
the number of public properties and collections, and their definition.
Analysis of the properties structure is what allows you to discover most of the information that is useful to generalized services. Returning to the document translation
example, imagine having to translate the properties derived from the database table
fields defined as descriptive, which already have the corresponding flag set in the database field properties form. An example of a descriptive property is the name of a product or business name of a company. Let's look at an example of code that prints the value of these properties.
Notice how you can determine the characteristics of the properties by retrieving,
through the GetPropertyDefinition method, an object of the IDPropertyDefinition type
that contains the description. Note also how to read the document property value by
221
Andrea Maioli – Instant Developer: User's Guide
index, using the GetProperty method, which returns the value of the property corresponding to the previously obtained definition.
The IDPropertyDefinition object contains much information relating to the property, such as the type, maximum length, the name, the database field where it is stored, if
it is required, if it is a counter, and so on.
This object is typically used along with the document's methods that allow working
on the properties by index, such as:
1) GetProperty and SetProperty: to read or write public properties of the document
without referencing them directly.
2) GetOriginalValue reads the original value of public property.
3) GetCollection: returns an object of the IDCollection type, which represents one of
the document's public collections.
4) GetPropertyErrorByIndex: returns the error message related to a property.
In the next section, "Global Events" we will see how to use this information to write the
document translation service.
5.7.2 Concept-based programming
In the scope of programming generalized services, an important notion is conceptbased programming: a property of a document can express a certain meaning, or concept, which may be common to other documents.
For example, if multiple documents have the characteristic of being valid until a
certain date, at least one of their properties has the concept of validity end date. Within
the project's database library, you can define the domains that represent types of fields,
and one of their properties is the concept they express. So the example of the validity
end date can be implemented as follows:
In the image, notice that both the Orders and Products tables have a field that is derived from the domain Validity End Date, which has as a concept VALIDENDDATE. At
this point you can generalize the management of a document's validity end date, be-
222
Document Orientation
cause you can it if it supports this concept, and if so, read or write the corresponding
property. Let's look at an example:
The function returns true if the document is valid, i.e., if it has not yet exceeded its effective date. The advantage is that this is true for any document. The first line, in effect,
uses the GetPropertyIndex function, which searches the document structure for a property that matches the search parameter, in this case VALIDENDDATE. If the property
exists, then it can be read and compared with the current date. Otherwise the function
returns true, because for documents that do not support the concept, the check for validity does not depend on the current date.
In addition to identification of properties by concept, we can attach one or more
tags to the definition of a document's properties through the SetTag method of the
IDPropertyDefinition object. This operation allows you to add one or more attributes to
each property of each document, to then check for correspondence.
Finally, each document always expresses the concept of DNA, i.e., with the
GetDNA function, you can retrieve a string that identifies it fully throughout the system. The framework composes the document's DNA by concatenating the class name
with the value of all its identifying properties. The static function GetFromDNA is then
able to initialize and load a document from the database given its DNA, without knowing its type.
In the following section "Global Events", we will see use of a document's DNA to
load the translations of descriptive properties in the user's language.
223
Andrea Maioli – Instant Developer: User's Guide
5.7.3 Documents and XML
The GetDNA function allows you to retrieve a string that identifies the document, but
not the document's content, which must be loaded from the database. In many cases,
however, it is useful to convert an entire document into an XML string, including its
sub-documents and its complete status.
Dedicated to this purpose is the SaveToXML function, which allows you to save
the entire document to a string or to a file in XML format. The document can then be
reconstructed from the string using the LoadFromXML function.
These simple commands allow you to build, for example, a document versioning
service with a few lines of code.
To save a version, first the document's DNA is extracted so that it can be identified in
the table of versions of all documents in the application. At this point, the number of
the next version is calculated with a data extraction query. Finally, a record of the version is created by saving the content of the document using the SaveToXML method.
The special thing about this function is that it does not just convert to XML the
current value of the document's properties and all its structure, but also the value of its
original properties, its status, and any errors attached to the document or its properties.
It is therefore the ideal candidate for transferring information about the document to
web services, which must process the content and return a complete response to the
caller. For more information on this mode of operation, please read the later section
"Remote DO".
224
Document Orientation
5.7.4 Global events
All document events can be made global, i.e., managed at a single point for all types of
documents, as well as locally. This mode is the basis of generalized services for documents, since it allows you to write an algorithm capable of operating on any type of
document through reflection.
The use of global document events is slightly different from those related to panels
or forms, since it requires the creation of an object called document helper, where the
global document events will be handled. The necessary steps are as follows:
1) Add a class to the application using the Add class command in the application context menu. In the properties form, specify that it extends IDDocumentHelper.
2) Add a global variable that represents an instance of the class just added by dragging
and dropping it onto the application.
3) In the application's Initialize event, set the framework property DocumentHelper to
the variable just created.
4) At this point, you can make document events global by using the Make global
command in the event's context menu in the IDDocument library.
The four steps to making a document event global
The parameters of global events are the same as the local event, but also passed is the
document that raised the event, having the IDDocument type. So, the global does not
know the exact type of document, but it can operate on it by using reflection.
Let us return then to the document translation service example and see how it can
be implemented through the GlobalAfterLoad event.
225
Andrea Maioli – Instant Developer: User's Guide
The GlobalAfterLoad event fires after every application document is loaded from the
database. The code determines which property is to be translated into the language in
question by searching for one that has the Descriptive flag set, reads the translation
from the database, and if it exists, sets it as the value of the property to be translated.
Finally, its returns the document to original status. Note that if the AlreadyLoaded parameter is true, then the translation is not done, because it will have already occurred
when the document was loaded for the first time.
Also note that just a single database table is needed to contain the translations of all
types of system documents, since each document is fully identified by the DNA string.
The application property RTCLanguage is the one normally used to contain the identifier for the user's language.
226
Document Orientation
Let's now take a look at how you can automatically insert translations, using the GlobalAfterSave event.
The GlobalAfterSave event fires after any application document is saved. The code that
handles the event loops through the document's properties to look for the one to be
translated. If it has been modified, it inserts the value in the table of translations.
In reality, the code should be a bit more complex to handle the fact that the translation may already exist, so you should first use a select into variables, then an update or
an insert depending on the result of the first select.
Finally, when you implement this service in a real case, you would typically introduce the concept of the default language of the document. If RTCLanguage is equal to
it, the translation service is disabled, but if it different the service is enabled. In this
case, however, it is done in such way as not to modify the descriptive property, using
the step 2 GlobalBeforeSave event instead of GlobalAfterSave.
227
Andrea Maioli – Instant Developer: User's Guide
5.8 Generalized services for documents
In addition to the ability to create custom services based on global document events, the
DO framework implements some of the most frequently used ones. Here is a list of services currently available:
1) Document identification: a system for standardizing the primary keys and foreign
keys at the database level that allows maximum ease of use.
2) Extensible schema: some documents do not have a standard schema, but the properties that represent them can vary from case to case directly at runtime.
3) Attachments and comments: this service allows linking in a general way a set of
files and text comments to documents.
4) Domains and user information: allows segmenting the ownership of documents so
that everyone can handle those assigned to them; also records the user information
of who has modified the document and when.
5) Logical deletion: if a document cannot be deleted from the database because it is
connected to others, it may nevertheless be made obsolete and hidden through this
service.
6) Lock management: allows customizing the lock policy at the document level.
7) Class factory: a service for redefining at runtime the class that implements a document through extension by substitution.
5.8.1 Document identification
In designing relational databases, particular attention must be paid to the choice of the
primary key of tables. Since there is not one overriding theory in this regard, solutions
are often suboptimal.
The primary key of a table must have four characteristics. First, it must be immutable, because even if the attributes of the object represented by the record change, it
must not change value, or this will invalidate all relationships in place. To ensure immutability, a technical primary key should be used, obtained by adding an artificial attribute, i.e., a field whose value does not depend on the characteristics of the object,
which may be changing, but only on the system, which sets it in a unique and unchanging way.
Second, it must be the as unique as possible, since it must allow identifying the object among many. There are varying degrees of uniqueness : a counter field is unique,
but only in the scope of the table to which it belongs. For example, product no. 1 is
unique only in the products table, because the no. 1 also identifies a customer in the
customers table. Another shortcoming of the counter field is that the value taken from
the field is not known a priori, but only when saving to the database.
228
Document Orientation
Another important characteristic of the primary key is that it must be simple, i.e., consisting of a single field, even when it would be natural to use more than one. A simple
primary key allows you to write queries much faster and allows for better optimization
by the database.
Finally, the last notable characteristic of primary keys is their standardization, i.e.,
all tables should have the same type of primary key, for example consisting only of
counter fields. This way, if you change the structure of relationships, the changes to the
database will have a limited impact, because all the fields involved in the foreign key
are of the same type.
The document identification service serves to obtain a primary key that is immutable , absolutely unique, simple, and standard. It is based on the fact that every table that
must contain documents must have as the primary key a single character field with a
fixed length of 20.
To use the service, the database library must contain a domain with these characteristics (fixed char 20) and that has DO_ID as a concept. At this point, when the document identification service is activated from the class properties form, Instant Developer will apply the domain to the primary key field.
Activating the identification service for the Product document
When the service is active, every time the Init method is called on a document, the
framework will initialize the properties related to the primary key with a string of 20
characters, called DocID, absolutely unique in both time and space. This way, the object will be absolutely identified from its creation and all the objects that must refer to it
can do so by knowing the value of the primary key well before saving to the database.
229
Andrea Maioli – Instant Developer: User's Guide
Another advantage of the identification service arises when duplicating a document. Calling the Duplicate method on a document returns a full in-memory copy, including sub-documents. If the types of documents involved in the copy use the identification service, then all the primary keys of the objects involved will be automatically
regenerated and reconnected, so that the copied object can be immediately saved to the
database without problems.
The use of DocIDs proves to be very advantageous in the case of consolidation of
documents generated on different systems, since conflicts cannot occur. Even if to date
systems of this type are not very common, keep in mind that in the coming years, Offline Web Applications will be widespread, with new documents generated directly in a
browser-side database. Problems with consolidation will therefore become commonplace.
For a complete management of DocIDs, you can also use the following functions at
the application level:
1) NewDocID: generates a new DocID to insert a record using SQL instead of with
documents.
2) DocIDToGuid: converts the DocID from 20-character ASCII85 notation to 36character GUID notation.
3) GuidToDocID: converts the DocID from 36-character GUID notation to standard
20-character notation.
5.8.2 Extensible schema
For some types of documents, a complete schema cannot be formulated at design time.
Consider, for example, products data in a business system. If used in a chemical company, it will need to store the chemical/physical characteristics of products, but if installed in a fashion house, it will need to manage the sizes and colors of garments.
The extensible schema service is ideally suited to these cases, making it possible to
add directly at runtime some attributes to documents, which, will then process them as
if they were natively present from design time.
Before you can activate this service for a document, you must prepare a domain
within the database library that has the concept DO_EXTPROP and that serves as a
model for the creation of fields designated for the storage of extended attributes. Normally you use an optional data type varchar (250).
At the time of activating the service, Instant developer modifies the schema of the
table by adding a number of fields (by default 10) that will contain up to 10 extended
attributes of the document. If a greater number of attributes is needed, you can duplicate the existing fields to obtain those desired.
230
Document Orientation
Activating extensible schemata, fields related to extended properties are added
The definition of additional document properties must occur at runtime, requiring database and form tables designed to manage the data. The definition of these objects is
already present in the project file DOBase.idp, which contains the prototypes of the objects needed by the various services for documents. To import it into your project,
simply drag & drop the Schemata form from the DO Base project onto yours and then
move the new tables to the appropriate database.
At this point, simply include the additional document properties in a panel so the
user can edit them. This usually occurs in detail format, because they may vary from
one document to another. Almost always, you enter only the first line and then use the
Add extended properties command in the panel context menu to get all the others.
When an instance of the document is loaded from the database, the DO framework raises to it the GetSchemaName event to determine what kind of extended schema it requires. This way, each instance of the document may have a different schema. In the
example of the items data source, this can be used to differentiate the additional properties by type of item, as in the following example:
231
Andrea Maioli – Instant Developer: User's Guide
If you do not handle this event, the name of the extended schema will be equal to the
name of the class on which the document is based. At this point, when the document is
viewed in the panel, the fields related to the additional properties are reconfigured
based on the real properties inserted in the document at runtime.
Changing item type (and schema), adjustment of the panel is automatic
5.8.3 Attachments and comments
This service allows attached files and text comments to be linked to each instance of a
document for which it has been activated. Also in this case, you need to import the Attachments form and the Document Helper class from the project file DOBase.idp.
232
Document Orientation
When a document that supports the attachment and comments service is viewed in a
panel, a new button appears in the toolbar allowing the form to be opened for managing
attachments and comments management form.
Attaching an image to an item in the data source
By default, attachments are stored in a blob field of a database table, but you can
change this behavior by changing the code of the GetAttachment, SetAttachment, DeleteAttachment, and ShowAttachment events of the Document Helper class.
You can also manipulate attachments and documents directly from code, using the
following methods of the document's library.
1) EditAttachments: opens the form for managing attachments and comments.
2) ShowAttachment: shows a document attachment in the browser.
3) GetAttachment: retrieves a file attached to the document.
4) SetAttachment: attaches a file to the document.
5) GetComment: retrieves a text comment attached to the document.
6) SetComment: sets a text comment attached to the document.
If a form of management other than that provided is needed for attachments or comments, you can access tables where they are stored via direct SQL statements.
5.8.4 Domains and user information
The Domains service allows you to give documents a membership domain at two levels: that of the group and that of the company.
233
Andrea Maioli – Instant Developer: User's Guide
Before you can activate this service, you must prepare the following domains within the
database library:
1) DO_DOMAIN: a domain of the character type used to contain the group to which
the document belongs.
2) DO_COMPANY: a domain of the character type used to contain the company to
which the document belongs.
3) DO_SCOPE: a domain of the integer type used to contain the document's visibility
context.
The DOBase.idp project contains the definition of these domains and the value list of
the document's possible visibility contexts.
When the domains service is activated, the structure of the table underlying the
document is modified by adding three fields, each of which derives from one of the
domains mentioned above.
In the session initialization step, you must set the DomainID and CompanyID application properties to specify which group and company the user is working for. At
this point, the application will load only the documents that the user can view, based on
the visibility context values:
1) Public: the document is public, so it can be viewed by everyone.
2) Group: the document can be viewed within the group.
3) Private: the document can only be viewed by the company that created it.
The SQL queries written on the document's underlying table will also be converted automatically to implement the same logic.
Note that you can create an alternative document partitioning service by making
the OnSQLQuery event global. This way, you can add a filter to all document load queries based on custom criteria.
The User information service allows you to automatically store who created the document and when, who modified it last and when, and finally document's permissions level: an integer for classifying documents according to their privacy status.
This service also requires several domains that model the properties necessary to it,
all of them already present within the database library of the DOBase.idp project:
DO_CREATIME, DO_CREAUSER, DO_LASTTIME, DO_AUTLEVEL.
In the session initialization step, the AuthorizationLevel application properties
must be set to indicate the permissions level. Only documents with a level less than or
equal to that set will be loaded from the database. It is also important to set the
UserName application property, which will be stored in the creation and last modification fields.
All data of the domains service and the user information service can be viewed in the
attachments and comments management form, as shown in the image below:
234
Document Orientation
5.8.5 Logical deletion
This is the last service that requires additional information, and therefore a domain.
Logical deletion serves to handle cases when a document cannot be deleted from the
database because it is linked to others, but you want to hide it from users when possible.
It requires the DO_LDELETE domain, of the character type, length one, with possible values Y/N, for the purpose of adding a field to the table and the document to
specify whether it has been logically deleted or not. This information is shown in the
information form in the previous image.
Once this service is activated, the system first attempts a physical deletion. If this
fails, it sets the property to Y and updates the record. During subsequent loading from
the database, all documents will be automatically filtered that have the delete flag enabled.
5.8.6 Management of locks
This service was already covered in a previous section, but we will now look at how a
custom lock policy can be implemented, and to this end, handling is required of the
235
Andrea Maioli – Instant Developer: User's Guide
GetLock and ReleaseLock events of the Document Helper object. An example implementation is as follows:
First, a check is made whether the document is new, in which case the user can definitely make changes. Otherwise, the lock table is read to see if another user is editing or
has edited the document. Evaluation of the result is as follows:
The first check determines if the lock is still active. If more than one hour has passed, it
is not considered. Otherwise the Result parameter is set to false and the name of the
user editing the document is returned.
236
Document Orientation
If the lock is not active, you must verify that the document had been loaded from the
database before the other user began editing. For this purpose, you must add to the database library a domain with the concept DO_LOADTIME of the date time type. This
way, once you activate the lock service, a property is added to the document that represents the time of loading from the database. It is set by the framework automatically at
the time of loading.
The load time is read through reflection and compared to the time when the lock
was released, written in the table. If the load occurred before, it is not possible to continue, because the in-memory copy of the document is not up-to-date.
However, if all checks allow continuing, the lock can be registered in the table, as
shown in the image, returning a positive result to the caller: the document can be edited.
The lock release event is simpler, because you only need to update the record in the
table.
237
Andrea Maioli – Instant Developer: User's Guide
5.8.7 Class factory
When an application is designed to be installed in many different settings, the problem
arises of having to modify the code to fit the needs of different customers.
One way to address this is extension by substitution, i.e., the ability to write custom
code inside a class that extends the document class, and then replace it with the custom
class throughout the application.
Extending and substituting allows you to customize the application
To enable this mechanism, you have to activate the Class factory service, which change
the way document instances are created within the system. Instead of using the new operator, a framework-level creation function is called. The following image shows the
code that is generated.
At this point, simply use the document's static SetClassName method to specify the
name of the class to be instantiated in place of the original. This is usually done in the
session initialization steps by reading a configuration table.
238
Document Orientation
5.9 Remote DO
In previous sections, we have assumed that documents are defined within the web application and that they can access the database. To reuse the same documents in other
projects, they can be exported as a component, as will be explained in the related chapter.
There are cases where you might want to create a more complex architecture,
which will physically separate the business layer from that of the presentation manager.
Instant Developer natively supports this mode through remote Document Orientation.
Example of using documents existing in various web services
With In.de, it is rather simple to create this type of application. First, you create the application that contains the web service for access to documents. In this application, you
create and code these documents, as already shown in previous pages. This way, you
obtain an application server that contains the business layer of the information system.
239
Andrea Maioli – Instant Developer: User's Guide
To use these documents within the presentation layer (the web user interface), you
simply create a proxy document through a simple drag & drop. The proxy document is
an actual document running in the presentation manager, but it is natively integrated
with its counterpart functioning in the application server, which exposes it via web services.
Creating proxy documents through drag & drop
At this point, you can use the proxy document as any other document, for example inside a panel.
240
Document Orientation
The communication between the document and its proxy is particularly optimized and
occurs automatically: whenever the proxy must operate from the remote side, such as
during loading, saving, and execution of remote methods.
The proxy document may have local properties and methods, so you can run code
locally, i.e. at the presentation-manager level, without having to communicate with the
web service every time. Instant Developer automatically generates code in the proxy for
prevalidation of data relating to the constraints inserted at the type level.
5.10 Extension
In previous sections we have seen that all documents defined in the application are
classes that derive from that base IDDocument class. This is because normally, a document represents completely an object managed in the application. However there are
cases where a document must be defined generically, and additional documents derived
from it for specialization.
Documents that take advantage of extension
In the above image we see an example of extension. The base Entities document is extended by two more specialized documents, People and Companies. The latter, in their
turn, are extended in Limited Companies and Corporations.
It should be emphasized that extension does not give rise to different documents,
but to different kinds of the same document. When a document of the Limited Companies type is instantiated, one of the Companies and Entities type are not also instantiated, but only the single Limited Companies document, which per se assumes the nature
of Companies and Entities.
Every nature, or base class, also carries properties and methods that are shared
among all documents that extend it, thus fully implementing the OOP paradigm.
241
Andrea Maioli – Instant Developer: User's Guide
5.10.1 Extending documents from the database structure
When you create a document from the database table, Instant Developer checks whether there are 1:1 relationships with other tables, checking if the entire primary key belongs to an indentifying foreign key to another table. If the application contains the
document related to the other table, it becomes the base class of the one being created.
Let's continue with the outline on the previous page:
Now, suppose you drag & drop the Entities table onto the application where you want
to manage the Entity document. Instant Developer creates a document whose properties
correspond to fields in the database table.
The Entity document is a base document.
If you now drag & drop the People table onto the application to create a document that
represents a Person, Instant Developer recognizes the 1:1 relationship with the Entities
table. Notice that there is already a document derived from it, and then a Person document is created that extends it. The properties of the People table's primary key are not
present in the document, because they are used only in the database to manage the relationship between the two tables.
As with non-extended documents, you can add or remove properties deriving them
or not from database table fields. However, keep in mind that all properties and methods of the base document are also present in the extended document, because the base
class is part of the nature of the extended class.
242
Document Orientation
The People document extends Entity.
It is not always necessary to have a database table to create a document that extends
another. When the differences between the two documents have to do with the algorithms and not the data, you can create an extended document that modifies the behavior of the base. The procedure to manually create a document that extends another is as
follows:
1) Use the Add class command from the application object's context menu.
2) Open the properties of the new class.
3) Set the name and description, click on the Use Document Orientation flag and then
indicate which document is to be extended.
Creating an extended document without deriving it from the database structure
The same principle applies even for classes not intended to represent data in the database. The only difference is that you must set the Use Document Orientation flag and
you get base classes and extended classes without database mapping.
243
Andrea Maioli – Instant Developer: User's Guide
5.10.2 Virtual methods
An extended document is for all intents and purposes a normal document, with the difference that it inherits the properties, collections, and behaviors (methods and events)
of all its base documents. So, you can use an extended document in all the possible
ways and contexts covered up to now.
Extended documents behave according to the rules of object orientation, to which
you can refer for more information. You can therefore create virtual methods that specialize the behavior of an extended object and that are resolved directly at runtime.
Instant Developer recognizes the presence of virtual methods from the fact that a
derived class contains a procedure or non-private function with the same name as that
contained in its base class. The easiest way to specialize a method in a derived class is
to drag & drop the method from the base class onto the derived class while holding
down ctrl+shift. This copies the method to the derived class, including the parameters
and the body. After copying, you can modify the code, deleting or replacing that copied
from the base method.
Procedure for specializing a virtual method in a derived class
Within a method of a derived class, you can call methods of the base class by typing its
name and selecting the token that begins with base instead of this. Only within an event
can you call the base event.
How to call the base method from an overriding method
244
Document Orientation
Note that whenever you insert or delete an overriding method in a class, or when you
modify the base class, Instant Developer analyzes all project code and re-links all overriding method calls closer to the selected context, showing a warning message when
this happens. This way, you can keep track of the changes that occur within the entire
project simply by adding/removing an overriding method to/from a class.
Warning message when changing overriding methods
Finally, note that you cannot change the name, return type, and other characteristics of
an overriding method in a derived class. You must instead make any changes at the level of the base class, in which case they will be propagated to the entire structure.
Changes to a method's parameters are permitted, although it is left to the programmer to
make parameters consistent at the different levels of structure. In this case, a warning
message will be shown.
Graphics for calling and called procedures
Instant developer is able to automatically create the graphic for reciprocal calls between
methods from the base method, analyzing the code in a top-down (called procedures) or
bottom-up (calling procedures) fashion.
This analysis can be complicated in the case of calls to virtual methods, because
they are resolved only at runtime. The solution implemented is to consider all code
paths that could be followed after execution of the virtual call, considering that the
overriding methods of all derived classes might be called. This system gives rise to
245
Andrea Maioli – Instant Developer: User's Guide
graphics larger than those actually possible in reality, but allows a more complete view
of the parts of code potentially involved in a particular algorithm.
The above image illustrates calling a virtual method: invocation of Entity.Greet might
actually call all the virtual methods in the derived classes based on the type of object
that makes the call at runtime. The call graphic reflects this possibility by indicating all
the possible code paths.
5.10.3 Loading and saving extended documents
When documents are created from database tables, mapping is handled automatically
during both loading and saving. This remains true even in the case of extended documents. Here's what happens in this case:
 Loading documents or collections: join clauses are generated between all tables
involved in the class hierarchy. The use of join queries is not detrimental because
they occur at the level of the primary keys of tables.
 Saving documents: for inserting or updating, all tables involved in the document
hierarchy are inserted or updated, from the base class to derived classes. Deletion is
246
Document Orientation
the opposite: first you delete records in tables corresponding to the derived classes,
then you proceed toward those that contain the data of the base classes.
Keep in mind that you can edit the link between a document and the database, by dragging and dropping the table you want to link onto the document while holding down the
shift key. The same operation can also be done at the level of single fields and properties. You can also delete the mapping of a document or a property by using the same
context menu command.
Manual mapping
If the automatic mapping mechanism cannot be used in a particular application case,
you can always specify a manual mapping in the following ways:
 Loading documents: add a document master query using the appropriate command
in the document's context menu, then modify the query and link the properties to
the columns of the query. Note that in the case of extended documents, the properties contained in the corresponding base documents can be linked.
 Loading collections: add a document load query using the appropriate command in
the collection's context menu, then modify the query and link the properties to the
columns of the query. Also in this case, properties contained in the corresponding
base documents can be linked.
 Saving documents: implement the BeforeSave event and write the insert, update,
and delete queries most suitable to the specific case.
Master query created automatically; The tables involved in the hierarchy are present.
247
Andrea Maioli – Instant Developer: User's Guide
5.10.4 Reflection of extended documents
The reflection methods shown in the preceding sections also apply to extended documents. The GetStructure function is virtual, like all of the document's other base functions and events, so it returns the object that represents the schema of the entire document, including the properties and collections of the base classes.
The other methods related to reflection also take into account the entire structure of
the object. This means that the creation and use of generalized document services does
not change when they should be applied to extended documents.
5.10.5 Implementing interfaces
The definition and use of interfaces is a powerful feature of object-oriented programming that allows you to define and assign behaviors to objects that are not linked to one
another hierarchically. To define an interface in an Instant Developer project, follow
this procedure:
1) Use the Add interface command in the project's context menu.
2) Edit the properties of the interface, specifying the name and description.
3) Add the functions or procedures to the interface, defining characteristics and parameters like with any other library in Instant Developer.
To ensure that a document or a class implements a particular interface, simply drag &
drop the interface onto the document while holding down the shift key. In the class, the
stubs of the methods defined in the interface are automatically created, ready to be
completed with specific code.
248
Document Orientation
How to implement an interface
To delete an implementation of an interface by a class or document, drag & drop the
interface onto the object while holding down the ctrl key. This operation will delete the
corresponding methods in the class or document.
If you change the definition of the interface or the methods that it contains, all such
changes are automatically reflected in the corresponding objects in the documents or
classes that implement it. Finally, when implementing an interface in a base class, derivatives will also implement it, and you can specialize the methods.
5.11 Synchronizing documents
The architecture of web applications makes it particularly easy to provide application
services shared among a large number of people. The simplicity comes from the fact
that they provide a single application server (also in cluster mode) and a single database
server. So, the data is consolidated and updated in real time.
With the spread of OWA (Offline Web Application) architecture, all this will
change. An OWA is almost the logical opposite of a traditional web application, because it must function completely on the client device without a network connection.
This means that both the data and the application logic must function locally, disconnected from the central server, and that the issue of synchronization becomes central to
the success of the entire information system.
Managing the synchronization of distributed databases is not easy. It is not just a
replication problem, where you have multiple aligned database servers to increase system reliability. Let's consider the main issues:
249
Andrea Maioli – Instant Developer: User's Guide
1) Partitioning: only a small part of the data must be copied to each local terminal,
which are competing with the user who currently is using it.
2) Concurrence: data can be modified simultaneously by multiple terminals, so conflicts must be dealt with during synchronization.
3) Security: terminals can be easily compromised, so incoming data must be revalidated according to the rules of the process, including during the synchronization
phase.
4) Speed: the bandwidth of terminals can also be very limited, requiring implementation of a differential synchronization system, which allows data traffic to be minimized.
5) Real time: synchronization must also take place in real time, if a connection is
available, to allow for immediate feedback for operations.
To address these issues effectively and securely, beginning with version 10.5, Instant
Developer contains a new document service called synchronization, which runs a
framework dedicated to the alignment of data between distributed databases. The following sections describe the operating principles of synchronization, but it is worth
pointing out here that it does not deal with alignment between databases at the singlerecord level, but a communication at the level of document classes. Without the use of
the Document Orientation, it would not be possible to use Instant Developer's synchronization framework.
5.11.1 Reference architecture
To illustrate the operation of synchronization, suppose you are developing an application that allows updating a list of orders in a distributed manner. You will have a central server, where the list of orders resides in a central database, and two secondary
terminals, each having a local database with part of the list of orders.
Since everything is done through Document Orientation, every application will also include the Order and Order Line documents for the processing of data. The outline
on the next page shows the situation described.
So, you must handle this situation: three database and three separate applications.
Suppose that at a given moment the databases are aligned and each one contains the
proper portion of the data. The central has all orders, while the local databases have the
data that the connected user needs to manage.
Note: the framework is able to synchronize counterpart documents, i.e., those with
the same class name. The properties that have the same name are automatically synchronized, while the others are reconciled through the use of named properties.
250
Document Orientation
Activating the synchronization framework requires three conditions:
1) Having enabled the synchronization service in the properties form of document
class that must be aligned.
2) At least one document to synchronize for each application must be connected to a
database table.
3) Not using an Express version of Instant Developer, in which the synchronization
framework is not available.
5.11.2 Retrieval of client-side differences
Let us now see what happens when applications meet the conditions mentioned above.
First, note that the framework creates a new support table called ZZ_SYNC in the project database. This table will contain the changes that have occurred to documents in
the application.
251
Andrea Maioli – Instant Developer: User's Guide
Whenever the application saves a document, either because the user has changed the
user interface or because of code executed, the changes are stored in the ZZ_SYNC
table, with a record for each document or sub-document edited. This applies to insert as
well as delete and edit operations and occurs both in the local and central databases.
Note: if changes are made to the database directly through queries, they will not be
stored in the ZZ_SYNC table and therefore cannot be synchronized.
Note that in the table, the Domain field contains a string that identifies the domain
to which the document belongs, and which can manage it. The choice of the domain is
an application issue. In the order list example, the domain can be represented by the
Employee ID field of the Orders table, which represents the user who created the order
and can therefore manage it.
The synchronization framework checks the document being saved to see if it supports a property that expresses the DO_DOMAIN concept. If not, it raises the OnGetNamedPropertyValue event to the document, passing DO_DOMAIN as a parameter. If
the event does not respond, it is assumed that the document is not associated with a
domain and must therefore be synchronized to each terminal making the request. Let's
look at a code example related to the order document.
5.11.3 Synchronization cycle
Let's take a look at how to set up and trigger the synchronization cycle, which always
takes place from the remote terminal to the central server. Note the code that must be
written:
The first three lines represent the initial settings of the synchronization service and may
be executed once for all activation events of the session. The fourth line is the only one
252
Document Orientation
necessary to start the actual synchronization. Since the operation may take some time, it
can also be executed in a server session to avoid locking the user interface. If it is executed in the session browser instead, then any documents already present in the user
interface will be automatically updated if the synchronization has modified them.
The synchronization cycle consists of the following steps:
1) The client terminal, which initiates synchronization, retrieves all the changes stored
in the ZZ_SYNC table and sends them to the server.
2) The server processes the data received, updates the server documents, then prepares
a list of changes that the client is to receive based on all other synchronizations and
modifications that have occurred on the central server.
3) The client terminal receives a list of changes that must be made to the local database. It executes them and if necessary, updates the user interface. When finished,
it deletes the contents of the ZZ_SYNC table because it was already sent to the
server.
Let's take a look at what happens when the server receives the synchronization data.
1) First, the OnSynchronize event is raised to the server application, allowing calculation, based on the user name and password, of the domain of reference for the terminal that requested synchronization. This will synchronize only the files that belong to that domain, or those that do not support any domain. The event also allows
stopping the entire synchronization operation if the user is not recognized.
2) If the operation can proceed, then all documents for which the client terminal has
sent a change are loaded from the central database, respecting the same modification structure that occurred on the client. If, for example, the user has modified an
order line, the server will load the entire order, not just the line.
3) For each uploaded document, a check is made that the domain recalculated on the
server corresponds to that calculated by the OnSynchronize event, to prevent updating documents outside the domain.
4) At this point, the changes communicated by the client are applied to the document.
5) When all the changes applied by the client have been applied to the set of documents loaded into memory, their validation and saving can begin. The OnValidate
event is raised to all documents involved, specifying 10 as the Reason parameter.
This way, the document knows that it is going to be saved because of a synchronization and can perform the most appropriate checks.
6) All documents that have passed validation are stored to the database, in multiple
steps to counter problems of mutual dependencies. At the end of the save cycle, one
or more documents may not have passed the validation because of errors, others
may not have been saved to the database, and finally, others may have been further
modified during the save cycle itself.
253
Andrea Maioli – Instant Developer: User's Guide
7) The server then initiates retrieval of all changes that must be sent to the client. They
may include changes that occurred on the server based on synchronization by other
clients and on server operations themselves, as well as all the cases listed in the
previous point. These changes and the list of errors is sent as a response to the client, which processes them as outlined below.
The client-side synchronization step resulting from the response received from the
server is substantially identical to that occurring on the server side, except that the value 11 is used as the Reason parameter of the OnValidate event. After the changes received from the server have been applied, the user interface is updated, showing any
errors reported by the server, and when finished, the contents of the client-side
ZZ_SYNC table are deleted.
Note: the synchronization framework never deletes the contents of the server-side
ZZ_SYNC table since it is necessary to synchronize additional clients that will be connecting after unknown intervals of time. We recommended, however, preparing an application function that allows deleting the oldest data, for example, older than one
month, or the maximum time interval after which the client can no longer synchronize
differentially.
5.11.4 Remote queries and re-synchronization
In the previous sections, we have assumed that databases have initially been in an
aligned status. But when a client connects for the first time, or if synchronization occurs
after a very long time interval, how can you ensure a complete synchronization of documents? There are three solutions to address this problem.
The first re-synchronization mechanism occurs when the server notices that the client has never synchronized, or has lost its differential synchronization records after not
having connected in a long time. In this case, the OnResyncClient event is raised to
each document for which the synchronization service has been enabled. The document
can set the search criteria that will be used to load the collection of documents to be
sent to the client, or directly load to it the desired collection. Let's look at an example of
such an operation in the order management application mentioned above.
254
Document Orientation
For the order document it is very simple. Since the domain of the document is represented by the ID of the employee who needs to manage it, the only filter for sending the
order list to the client terminal is the employee ID. Note that the ClientDomain parameter is precisely the domain assigned by the server based on the UserName and Password
communicated by the client.
To order line document, it is more complicated, because the re-synchronization
considers the documents in a flat and unstructured way. A code example is as follows:
In this case, loading the collection of all order lines to be sent to the terminal is done
inside the event itself, selecting those belonging to all orders that the employee has
permissions to manage. Also note that the Skip parameter has been set to true to skip
automatic loading by the framework.
In other situations, it may be the client terminal that requests a synchronization of one
or more document classes, perhaps because their proper alignment is uncertain. To re-
255
Andrea Maioli – Instant Developer: User's Guide
quest re-synchronization, simply use the ResyncClass procedure before the Synchronize method. Let's look at a code example that requests the entire list of orders that can
be managed by a particular terminal.
The last re-synchronization method is suitable for a bulk upload of data from the server
to the client. Suppose for example, a master data table has to be aligned for the first
time with one million records. Using the methods discussed above could be quite onerous, so the ability to run a remote query exists, by using the Query method of the
SyncService library.
This function is not designed to run any SQL query on the server, because it would
be rather insecure. However, it allows you to send a parameter command that the server
parses and executes if to its liking. The result of a remote query is a Recordset that can
be manipulated directly from client code.
When the server receives a query request, it raises the OnSyncQuery the application to the application, always after having authenticated the client through the OnSynchronize event. The next page shows a code example that returns a list of orders based
on a client request.
The use of remote queries for bulk loading is simple. For example, if the client detects that the table to be loaded is empty, it can start to perform remote queries asking
for a piece of the data each time to avoid overloading the system.
Another time to use remote queries is when the client needs to retrieve information
updated in real time and a connection is available, without going through the document
synchronization system.
256
Document Orientation
5.11.5 Management of conflicts
We have seen that based on the partitioning of documents in different domains, you can
prevent multiple people from modifying the same document simultaneously, since only
one of them has it available in the local database. However, a solution that prevents all
possible conflicts is not always possible, so you need to be able to manage them when
they arise.
The Instant Developer synchronization framework lets you do this in two complementary ways, which should be activated only when actually necessary, since they increase the consumption of resources required to manage them.
The first way of managing conflicts is to enable an optimistic locking system for a
certain type of documents, by calling the EnableOptimisticLock procedure on both the
client and the server. When this happens, a client can synchronize changes to the document only if in the interim there have not been any others with precedence, in which
case an error is returned. The granularity of changes is at the level of individual document properties, so two users can simultaneously edit different parts of the same docu-
257
Andrea Maioli – Instant Developer: User's Guide
ment without causing problems. Activation of the optimistic lock doubles the consumption of synchronization resources, because it is always necessary to store the original
value of the property being edited and not just the current one.
There are also the GetLock and ReleaseLock methods of the SyncService library,
which allow you to send a request to lock a document to the server, thus allowing you
to create a preventive, or pessimistic, lock mechanism that in some application situations is better than an optimistic one. However, these methods require an active internet
connection, without which the lock request cannot be forwarded.
5.11.6 Additional SyncService methods
This section discusses additional synchronization framework methods that are useful in
certain situations.
1) ResyncDocument: allows on-the-fly retrieval of the updated version of a document.
The document is updated without being saved.
2) ResyncCollection: allows on-the-fly retrieval of the updated version of all documents in a collection. The collection is updated without being saved.
3) LastSynchronization: returns the date and time of the last synchronization performed by the client.
4) DontSync: this method of IDDocument allows you to specify which properties of a
document should not be synchronized. It is usually used in the document's OnGetNamedPropertyValue event when it is called with the DO_DONTSYNC parameter.
Excluding a document property from the synchronization allows saving client side
resources and protecting private data on the server side.
258
Document Orientation
5.12 Questions and answers
Document Orientation makes it easy to create enterprise applications, including SOAtype, but the framework that allows this functionality is quite complex. It was therefore
only possible to describe interactions at the first level.
If in any event it is not clear how to address a specific issue, I invite you to send a
question via email by clicking here. I promise to answer all emails in my available
time. Also, the most interesting and frequently-asked questions will be published in this
section in subsequent editions of this book.
This space is reserved for answers to readers' questions
259
Chapter 6
Reports and books
6.1 Anatomy of a book
In the chapter on panels, we saw how to create forms that allow the user to view and
edit a list of records or documents, including those related to others. In this chapter,
however, we will see how to create very complex data views which can then be “printed” to PDF files or displayed in a browser preview.
The graphic object described in this chapter is the Book. This name was chosen because it is not a simple report generator, but much more: a system that, based on editorial graphics logic, allows you to design actual books.
Employees report with Customers subreport. Click here to try it online.
260
Reports and books
The following list shows the main features managed by books. To test them directly
online,
you
can
connect
to:
http://instantdeveloper.com/eng/widgetcollection.htm?show=04.
1) Physical media layout management: Through the creation of one or more master
pages, books allow you to define precisely the types of pages to be used and their
sequence.
2) Multiple text flows: Within the page types, you can specify which parts are to contain data retrieved from the queries and the reciprocal links.
3) Multiple reports: A book can contain multiple reports, i.e., multiple queries whose
result will fill the flows of text defined at the master page level.
4) Template: You can define a template to quickly create all books with the same
style. By changing the template, all books will be adapted accordingly.
5) Typographic management: There are some typographic features such as management of widows and orphans, a special algorithm for text justification, the ability to
draw text rotated to any angle, precise adjustment of the spacing between letters
and words, and horizontal scaling of fonts.
6) Management of gradients and opacity: In both the browser preview and the PDFs
generated, books can manage gradients and opacity without increasing the file size.
7) Optimization: The PDF files generated are particularly optimized and even allow
you to decide whether character fonts are to be included. This is very useful, for
example, in printing barcodes.
8) Automatic creation: There are several mechanisms for automatic creation of books
from panels or other objects in the project.
9) In-memory database: The data for the book may originate from both a physical database and an in-memory database, to allow it to display data calculated on the fly
by the application or, for example, retrieved from a web service.
10) Programmable reports: There is a set of events that allow you to reprogram the
book while it is being printed, so you can change the appearance of each individual
section.
11) Overlapping reports: Rather than drawing the sections one below the other, they
are overlapped. They are usually used together with events to retrieve reports of the
X/Y type, such as diagrams, maps, desktops...
12) Groupings: Each report manages multiple grouping levels that are reprogrammable at runtime. Management of sub-levels is automatic so you can easily
create reports that are expandable by the user. There are also aggregate functions
available at all grouping levels.
13) BLOB management: If the database contains images in blob fields, the report is
able to display them directly without the need to write code.
14) Multi-column reports: Each report section can have multiple columns with horizontal or vertical sorting, and the number of columns can be changed at runtime.
261
Andrea Maioli – Instant Developer: User's Guide
15) Subreports: You can insert subreports, including at multiple levels, so as to show
data in a hierarchical form.
16) Graphs: Each report section can contain graphs to show related data.
17) Resizing: The book adjusts automatically to changes in available space compared to
that projected at design time. You can configure the resizing modes or reprogram
them at runtime.
18) Editable reports: When the report is shown in browser preview, you can create user-editable text fields, combo boxes, radio buttons, check boxes, and buttons.
Books allow you to manage visual complexity at any level.
19) Advanced editing features: Books allow users to move and resize parts of reports
with the mouse, as well as drag & drop objects onto other graphic objects.
20) Touch-enabled books: If the book is previewed on a mobile device like an iPhone
or iPad, the user can swipe to the right or left to scroll through its pages. Touch gestures can also be used to drag & drop or to navigate over the page if it is larger than
the screen.
21) Editing layout at runtime: The layout of books can be edited directly at runtime
through the RTC module, or by exporting it and importing it as an XML file.
22) Word or Excel templates: A component called FileMangler is able to manipulate a
Word, Excel, or PDF template created by the end user and to insert data from the
database or application.
6.1.1 Creating a Book
A book is a user interface object, although it can be kept hidden to simply generate a
PDF file. For this reason, books are contained within forms. Creation of a book can be
done in the following ways:
1) Through the Add book command in the form context menu; this adds a hidden book
to the form that can be used to generate PDF files or be previewed in the browser.
2) Through the Add book command of the form editor; in this case the book is shown
in the selected editor frame and will be a stable part of the user interface.
3) Through the Add book command in the panel context menu; in this case, the report
will be formatted to reproduce the panel's detail layout, or the in list layout if the
other is not present.
262
Reports and books
If one or more books have been defined as a template, then the preceding commands
become sub-menus that allow you to select a template as the basis for creating the new
book.
Products book created automatically from the panel
6.1.2 Structure of a Book
Like a panel, a book is also a complex object; its structure is shown in the following
image.
Structure of a Book object
263
Andrea Maioli – Instant Developer: User's Guide
Master page: This is a page template that will be used to compose the book. There
may be multiple templates to obtain pages that are different in both size and arrangement of objects.
Report: This defines the content of the book. A report contains a query that allows
data to be retrieved and displayed within the sections. A book can contain several reports to present data from a variety of sources. The report object can be used as a subreport, even at multiple levels.
Master query: This is the query that is executed to retrieve the data for a report. It
can be based on a physical or an in-memory database.
Section: This is a subdivision of the physical space containing the data for a report.
Sections can be of different types, such as Page header, Detail, and Group footer. The
order of printing depends on the type.
Box: This defines a frame of the master page or section that can be used to hold data, text, images, or other graphic objects.
Span: This contains a single piece of textual data. A box can contain multiple spans,
which will be formatted according to the normal flow of text.
6.1.3 Book object properties
A book object presents few properties at design time, because most of its behavior is
defined using the visual editor. Many are also modifiable at runtime. For more information, please refer to the Book library. Here are the main properties of a book:
1) Unit of measure: This is the unit used for all sizes of objects in the book. We recommend using millimeters, which is also the default value.
2) Count pages: This flag specifies a full formatting of the book before the first print
cycle. This way, the total number of pages is known prior to printing and can be
displayed properly. We recommend setting this flag only if necessary, because it
causes a double formatting cycle.
3) Hide page borders: This allows the book to be previewed without showing the page
borders. This setting is typically used when the book is shown as part of the application’s user interface.
4) Template: This flag specifies that the book can serve as a template for creating other books. When this one is changed, the others will be updated accordingly.
264
Reports and books
6.2 Defining master pages
After creating the book within a form, the first thing to do is define the master page representing the page template used to display data. It is comparable to a pre-printed form,
which can contain fixed information in addition to space reserved for report data.
A book initially has a master page and a report. To open the master page editor, select it from the object tree and then use the View – Graphic (F4) menu command.
Opening the master page editor
6.2.1 The master page object
The most important properties of the master page are the following:
1) Format: This defines the page size. The default is A4. Set it to Custom to specify
the size manually.
2) Size and Unit of measure: This is the size of the master page. The unit of measure
must coincide with that of the book.
3) Orientation: This is the horizontal or vertical direction in which the page will be
oriented during printing.
4) Fit: This specifies whether the page should be resized to fit the available size of the
browser preview. The value Adjust width means that only the width of the page will
change. Fit page, however, means that both sizes will be equal to the space available, so the scrollbar will never appear.
265
Andrea Maioli – Instant Developer: User's Guide
After setting the page size, the next thing to do is define the layout using the master
page editor. This is done by adding boxes of various types – labels, images, buttons,
links – using the buttons on the toolbar.
The boxes contained in the master page can be used as a container for sections of
reports in the book. This way, you can specify where the data resulting from the query
is to be printed. To do this, simply drag the section from the object tree and drop it directly onto the box displayed in the editor.
In a newly created book, the master page contains three boxes called Page header,
Page body, and Page footer. The sections of the report contained in the book are already connected to these boxes, and in particular the header and footer boxes contain
sections of the same name. All others will be printed in the page body.
Link between report sections and master page boxes
If a master page box does not contain report sections, it can be used to hold text. This is
done by inserting one or more span objects, which can be constants and formulas.
To do this, select the box, press the F2 key, and then write the text, enclosing formulas in square brackets. Press Enter to update the spans contained in the box. You can
then complete formulas as desired, by referencing all objects in the context of the form,
including fields of single-row in-memory tables.
Let’s look at an example of how to add information to the master page for the
username of the logged on user. The first thing to do is add the box to the master page,
then press F2, and type the text shown in the following image:
266
Reports and books
Press Enter, and you can see that in the object tree, the spans corresponding to the text
and formula have been created.
At this point, by double clicking on the name of the span for the formula, you can insert
the expression and change the graphic style, perhaps making it bold. This is done by
entering B as the value of the Font modifiers (BIUS) property.
By inserting images and creating appropriate graphic styles, you can create intricate page templates, such as the following letterhead.
267
Andrea Maioli – Instant Developer: User's Guide
6.2.2 Multiple master pages
More than one master page can be created within a book. To do this you can select the
Add master page command in the book context menu. However, a system is needed to
determine how the various pages should alternate. Otherwise, the report would be
printed using only the type of page to which its sections are connected.
Each box on a master page that contains report sections can either be linked to another box in the same master page or not. This link indicates that when the print engine
has filled the first box with the report sections, the data will continue in the linked box.
The links between boxes allow you to decide how the sections will be printed
To show the links between boxes, you can select the corresponding command on the
master page editor toolbar. As you can see, the Page body box of the master page is
linked to itself by default. This means that once the print engine has run out of space, a
new page of the same type will be added to the report, and then printing will resume,
again in the Page body box.
If instead you want to print a book in two side-by-side columns, you can specify
that at the end of the first column, the text is to continue in the second, and vice versa,
as illustrated in the following image.
268
Reports and books
In this example, the print engine will begin filling the left column and then continue
with the right one. When the second one is full, a new page will be added and printing
will start again in the left column.
To link a master box with another, drag the current one and drop it onto the other
while holding down the shift key. This mechanism also works between different master
pages. For example, if you want to create a report whose first page is a letterhead and
subsequent pages are normal, you can proceed as follows:
269
Andrea Maioli – Instant Developer: User's Guide
Since a book can print all the report data it contains, it is important that the links between master boxes constitute a cycle, to always allow additional sections to be added
to a new window or page.
6.3 Defining reports
After preparing the page templates and determining their sequence, the next thing to do
is define what data is to be shown and how, using the report object contained in the
book.
Each report contains a query that defines what data is to be retrieved from the database or in-memory tables. The query may contain more than one table in its from list,
because the resulting recordset is read-only, and can reference any object or variable in
the context of the form. While in panels, the data from related tables are retrieved by
lookup and decoding queries, in reports, data can be added directly to the master query.
If the query contains references to single-row in-memory tables, when their content
changes, the report is updated automatically. For example, the following image shows a
report that prints the names of products in the category selected in the panel and is automatically updated when changing rows.
Report query linked to data for the active panel row
You can open the report editor by selecting a report in the object tree and then the View
– Graphic (F4) menu command. The editor will display the master page to which the
report sections are linked, allowing addition of content, as in the case of master pages,
consisting of boxes and spans.
270
Reports and books
To quickly create boxes and spans related to master query columns, you can drag
them onto the visual editor. Based on the keys pressed, you will get these results:
1) None: The dragged columns will appear side by side, like a list. Column headers
will also be created in the page header section.
2) Shift: The dragged columns will be arranged in list without headers.
3) Ctrl: The dragged columns will be placed one under another, to the right of the
header, as in a detail layout.
4) Ctrl+Shift: The dragged columns will be placed one under another, without the
header.
Note that database fields can also be dragged & dropped onto the editor, and tables can
be dragged & dropped onto the report object in the tree. In these cases, the report query
will be automatically edited and objects added to the report.
The Product Name field could also have been dragged & dropped directly from the database!
Like with boxes on master pages, here you can insert images, backgrounds, frames, and
complex formulas. You can modify the content of a box directly in the editor by pressing the F2 key, and then entering text, with formulas in square brackets. In this case, by
writing the name of a query column in square brackets, it will be directly converted into
the corresponding formula. Otherwise, you must specify an expression in the span
properties form.
271
Andrea Maioli – Instant Developer: User's Guide
6.3.1 Report properties
The report properties form has various flags available. Please read the online documentation to see what additional properties can be modified through application code.
1) Visible: This flag allows the report to be visible or hidden.
2) Hide if empty: If the query returns no data, then the entire report is automatically
hidden.
3) On each page: By setting this flag, you can obtain a reprint of the report on each
new page added to the book, if the page contains at least one box connected to sections of the report.
6.3.2 Section properties
The most important section properties are listed below. Please read the online documentation to see which ones can be modified via code.
1) Height: This specifies the height of the section. It can be changed from the graphic
editor.
2) Number of columns: If you enter a value greater than one, you can create multicolumn reports. The Down first flag allows you to decide whether the order of sections is from left to right (not set) or from top to bottom (set). When this flag is set,
there can be conflicts with other types of advanced logic, since it forces the print
engine to reserve space vertically rather than horizontally.
3) Section type: This specifies when the section is to be printed. Refer to the next section of this chapter for more information.
4) Visual style: This allows you to define the section’s border and background.
The section object also contains many flags that modify its behavior. For example, the
New page after flag forces the print engine to reserve all remaining space in the box
where the section was printed, and to continue to the next, usually adding a new page to
the book. The remaining flags will be discussed later in this guide in the context of their
corresponding behavior.
You can also add multiple sections, including sections of the same type, with the
Add section command in the report context menu. All sections will be printed in the
order defined in the object tree. This way, the same data can be printed in different
formats depending on the type.
For example, in a report of Entities you could have two detail sections: one for
people and the other for entities. By using the formatting events, they will appear correctly.
272
Reports and books
6.3.3 Group sections
In many cases, data must be printed in a grouped format. For example, a list of products
can be broken down by category. To obtain this result, In.de allows creation of group
sections, including at multiple levels. You can create them directly from the report editor, by selecting the field on which to group from the detail section, for example the id
of the category to which the product belongs, and then using the Add group sections
command.
When a group is created, order by clauses are added to the report query and two new
sections are inserted: the group header and the group footer, as shown in the following
image.
273
Andrea Maioli – Instant Developer: User's Guide
It is often necessary to add functions to the group header or footer that perform aggregated calculations on the group’s data, such as sums, averages, and counts. To quickly
obtain these calculated fields, in the detail section, you can select the query field on
which to calculate and then use the menu command shown in the image.
The new calculated field is added to the group header or footer, but it can also be
moved or copied to other groups or to the footer from the header and vice versa, in
which case the aggregate function is calculated in the new context.
After you create the aggregate function, you can change the calculation type by opening
the span properties form and editing the expression. The possible types of calculation
are listed in the aggregate functions library of the section object.
If you add multiple group levels, their order may be modified at design time by
dragging & dropping report query order by clauses from the object tree. The order of
groups can also be changed at runtime through the section’s GroupLevel property. This
allows the end user to be able to select the order of groups.
Finally, it is worth noting some flags in the group section properties form, which
modify their behavior.
1) Show internal sections: This is enabled for group header columns, selects whether
the internal sections of the group are to be displayed or not and allows creation of
drill-down type reports. You can find more information in the section of this chapter relating to previewing reports in the browser.
2) Show on box bottom: This is used primarily for group or report footers, allows sections to be printed at the bottom of the box and to continue onto another box/page.
3) Repeat on new page: This is used for group headers, and allows a new header to be
obtained when the page changes.
4) Keep with next: This allows you to prevent the page from ending with a header section or starting with a footer section. It is similar to the widow/orphan management
of word processing systems.
274
Reports and books
6.3.4 Multiple reports
In addition to master pages, a book can contain a number of reports, not necessarily
linked to each other. This way, you can show all data of interest in the same physical
page space, even if it cannot all be retrieved by the same query.
A typical preliminary example of a book with multiple reports is adding information to the data printed in the main report, such as a summary chart. A calendar view
may show the events of the week day by day in the main part of the page, and a summary of the month in a side frame.
Another common example is adding different data after the main data, as happens
when printing a report of telephone traffic followed the details of each call, whose page
format is different from the first.
Adding another report to a book is easy: simply use the Add report command in the
Book object’s context menu, and then link the sections to the boxes of a master page of
the book. In this case, the sections are not linked in advance, so you have to decide
where to put them, taking into account that those you do not want can be deleted.
After adding a new report, drag & drop the sections onto the master pages
Remember that if a section is printed in a master box that has no links with other boxes,
when available space is exhausted, the report will stop printing unless the On each page
flag is set.
Also, the order of reports in the book is important: If a master box contains sections of the first report as well as the second, then the ones of the first will be printed
first. Only after the data retrieved from the first report has been exhausted will the second begin printing.
275
Andrea Maioli – Instant Developer: User's Guide
6.4 Programming the print engine
This section will cover the following topics:
1) How to initiate and control printing a book.
2) Functioning of the print engine
3) Programming the report using formatting events.
6.4.1 Controlling the printing of a book
We will now look at how to print a book that is not part of the user interface, leaving
the differences in behavior to the corresponding section of this chapter.
Books are printed by calling the Print method, which accepts two parameters: the
first and last page. The result is different depending on the value of the PrintDestination
property: If set to PDF, then printing will be done by creating a PDF file on the server,
but if set to SCREEN the report will be shown in a browser preview. In the latter case,
it is a good idea to show only one page, usually the first, since the preview window
contains commands to change pages.
Procedure linked to a print button that opens to a preview window
If instead you want to immediately create the PDF file, you can set PrintDestination to
PDF, which is the default value, and call the Print method, setting only the starting page
number to 1. If you do not specify a value for the OutputFileName property, the file
will be created with a random name in the web application’s temp subdirectory, so that
it can be opened in a browser preview. In this case, the file will be deleted at the end of
the web session that created it.
After printing, the OutputFileName property contains the full path to the file created, but WebFileName can also be used to obtain a document name to open in the
browser, as shown in the following code:
Print a PDF file and then open it in the browser
276
Reports and books
Once the book has been printed, the reports store the results of the queries, so they do
not have to be re-executed. If the data in the database has changed, then you can update
the queries by calling the RefreshQuery method of the report, or RefreshQuery of the
book if you want to update all reports.
If the query of a report is based on in-memory tables, or depends on fields of inmemory tables or on the value of fields in the active row of a panel, then the report will
be updated automatically, whether it is in the user interface or printed explicitly.
For performance reasons, automatic update of books occurs only at certain times in
the browser response cycle, specifically between one event and another. Therefore, if
you change the value of an in-memory table field from code and then immediately print
the report, it will not have been updated yet. In this case, you must call the UpdateBook
method, which, in a manner similar to that of panels, causes an immediate update of the
book’s content.
Explicit update because the parameters are changed immediately before printing
Sometimes, a report query may depend on parameters not present in the in-memory database, such as a global variable of the form or application. In this case the parameter
value is read when the form opens, and if it changes, the UpdateQuery method of the
report must be called to re-initialize the query with the new values.
The last update method is the book’s Refresh method, which can only be used
when shown in the browser. In this case, the book will save the last pages formatted to
allow for quick navigation, and if the parameters relative to the calculated formulas
change, the cache must be deleted. The Refresh method reformats the pages and recalculates the formula, but does not update the report queries.
277
Andrea Maioli – Instant Developer: User's Guide
Printing multiple PDFs
Sometimes you may want to print multiple PDF files, for example to send email invoices to each customer, but simultaneously obtain a single PDF file combining all the individual pages.
In this case, you would need to provide two different books, one for the individual
invoices and one for combining them together. Since each invoice will not necessarily
take up just one page, printing page by page may not work.
Fortunately, Instant Developer’s print engine provides for multiple printing of
PDFs, a method that allows obtaining a set of individual files, as well as one file combining them together. This is done by providing the book to be printed with the single
object (in the example, the single invoice), then using the OpenMultiPDF and
CloseMultiPDF methods as shown below:
The combined PDF is not simply a concatenation of the individual pages, but is particularly optimized, since all common objects, such as images, are stored only once.
Finally, note the Bookmark property of books, which allows you to give the individual report a name, which will be shown in the index of the combined file.
278
Reports and books
Printing by batch service or server session
Sometimes, the generation of PDF files and subsequent handling can be performed by a
batch process rather than an interactive web application. In later chapters, we will see
the different ways to create applications that are not connected to the browser, but for
now we will describe them as relates to printing.
The use of a server session is certainly the fastest and easiest method: it is a special
execution mode of the same web application used via the browser. In this sense, everything we have seen up to now is also valid for server sessions, even if only printing to
PDF files applies.
Otherwise, if you use a service-type application, you cannot insert forms and, consequently, books and reports. Therefore only the PrintReport method can be used, the
limits of which make it suitable only for simple print jobs. In fact, you cannot use formatting events or calculated formulas, with the only type of configuration being a filter
clause for report queries.
Ultimately, to print data in batch mode, we recommend using a server session, and
this applies to any type of batch processing. If you really want to use a service, you can
only print simple reports.
Reconfiguring reports via XML
In applications to be installed at different customer locations, you may need to make
changes to the layout of a book, depending on the specific needs of each. This can be
achieved to a certain extent by using the runtime configuration (RTC) module, which
will be illustrated in a later chapter.
However, if you also want to change, for example, the report query, RTC is not
enough. In any event, you can use the LoadFromXML method of the Book object,
which functions as follows:
1) Using Instant Developer, you can modify the book as required. The modified book
must be exported to XML by selecting it in the object tree and using the File – Export to XML command in the main menu of In.de.
2) This XML file is loaded using the LoadFromXML method in application code: The
book and the report will be reconfigured at runtime as needed.
3) It is therefore possible to reconfigure the same book in many different ways depending on user requirements.
There are also some limitations: to export the file, In.de must be used in English. If you
are using a version in another language, you can change this setting by selecting Tools
– Options from the main menu. Moreover, neither formatting events nor formulas calculated at runtime can be modified.
279
Andrea Maioli – Instant Developer: User's Guide
6.4.2 Functioning of the print engine
We will now take a look at functional algorithms of the print engine. The complete set
is very complex and would require a diagram of a square meter to represent it completely, so we will only consider an overview of what happens.
When the Print method is called, the book is reformatted from the first page, even
if the PDF file will only contain the range of pages requested. If the book is instead
previewed in the browser, reformatting does not start from the first page, but from the
page in cache closest to the requested page. The most summarized version of the print
algorithm is as follows:
Search for the page
template currently
required
If no report
wants to print,
stop printing.
Page.OnFormatting
For each
visible
report.
Run the query if not
yet done.
Print as many sessions
as possible on the page.
The first step is the search for the page template required by the current print status.
This is done by applying the following algorithm to each visible report:
Run the query if not
yet done.
Check if there is a section pending from a
previous page.
If not present
Search for the first
section to print based
on the type.
280
If a previous page exists,
check which master box
contains the found section.
If it exists, search for the
first non-empty box in the
chain.
The next page is the one
that contains the box.
If not
present
Reports and books
1) If the report has not yet run the query, this is done now.
2) The engine searches for a section to be printed. If the report has been printed on a
previous page, there may be a pending section that is formatted but not printed because there was not enough space. Alternatively, a section is selected to print based
on the type, using the same order of presentation as they appear in the object tree.
3) If a section to be printed is not found, the engine goes to the next report. Otherwise,
it checks which master box will contain the section to be printed.
4) If on the previous page, the box was present but full, it searches through the chain
of linked boxes for one that is not full. If the end of the chain of boxes is reached
without finding one, the report cannot continue printing and the engine passes to
the next.
5) As soon as there is a box in the chain that is not full, a new page is attached to the
report, which is the new page that will be added to the book.
If the next page to be added to the book cannot be found, printing stops. Otherwise, it is
added, the resizing algorithms are applied, and then the OnFormatting event is raised to
the form containing the book, so as to allow adjustment of the page via code.
After adding the page to the book, the reports are consulted to determine if they
want to print something in it, with the following algorithm:
Run the query if not
yet done.
Paste to the page the
sections formatted but
not yet printed.
Section.BeforeFormatting
Automatic fit and resize.
Section.AfterFormatting
As long as there is
space, continue formatting the sections.
Paste section to the page
and continue if space is left.
1) The report runs the query if it has not already done so. If there are pending sections
that have been formatted but not printed by the preceding pages, they are pasted on
the new page being printed.
2) Then the formatting of the report’s visible sections begins, in an order depending
on their type, taking into account that only those linked to boxes contained on the
current page will be processed.
281
Andrea Maioli – Instant Developer: User's Guide
3) When the system needs to format a section, it creates a copy, including the boxes
and spans it contains, and then the BeforeFormatting is raised to the form containing the book. During this event, you can modify the properties of the section, as
well as the boxes and spans it contains.
4) If the event handler code does not hide the section from view, the system continues
formatting it by calculating the value of each span remaining visible. If a box is set
to adjust its height to its content, the system now calculates the new height ensuring
that the text of the span does not overflow.
5) At this point, the system places the copy of the section on the current page, including the boxes and spans remaining visible. Then the section’s AfterFormatting
event fires. By handling this event, you can determine the exact coordinates where
the section has been positioned using the YPos function, and modify some of its
properties. However, at this point the section can no longer be hidden since it has
already been positioned on the page.
6) For printing sections, the report follows this order: starting from those of the Report
header type and continuing with those of the Page header type, which are printed
on each page. Then, for each row of the query, all sections of the Group header
type are printed if the current row indicates the beginning of a group, and all those
of the Detail type. The system continues with sections of the Group footer type if
the current row indicates identifies the end. Finally, sections of the Page footer type
are printed, and if the current row is the last of the query, those of the Report footer
type are printed. Only sections linked to a box on the current master page will ever
be printed.
7) The system analyzes one report at a time and goes to the next only if the current
one runs out of data to be printed, or if there is no more available space on the page
for its sections.
8) When all reports are finished being printed for the current page, the system starts
from the first step until completely exhausting the sections to be printed, or until
reaching last page to be printed.
6.4.3 Programming reports
In this section we will see how to use code to modify the printing of books. We have
seen that books, master pages, reports, sections, boxes, and spans have a rich library of
properties that allow you to modify their graphic characteristics and behavior.
The effect of these changes, however, is different depending on where in code they
occur.
1) By modifying the properties before printing a book, these will apply to all instances
of objects in all pages of subsequent prints. It should be noted, along these lines,
282
Reports and books
that if the report is previewed in the browser, a cache is maintained of the last pages
formatted, to allow them to be navigated quickly.
2) If you edit the Master page properties within the OnFormatting event, these changes will apply only to the one for which the event was called, while subsequent ones
will remain unchanged.
3) If you change the properties of a section, of boxes, and of spans in the section’s
BeforeFormatting event, these changes will only affect the section being formatted
and not subsequent ones.
4) If you change the properties of boxes and spans in the section’s AfterFormatting
event, these changes affect only the section being formatted and not subsequent
ones. There are several limitations on editing section properties inside this event, so
we recommend reading the related documentation.
As a programming example, let’s consider how we can print a map of inventory, as
shown in the following image.
This example shows the layout of the facility in the background, over which shelving
units are placed, selecting them from the inventory structure database. When the book
is in preview mode, each area is clickable to allow displaying a magnified view of its
content.
This print job is completed using the overlapping section mechanism and formatting events. If a section has the Enable overlay flag set, then all copies of the section
corresponding to different rows of the recordset retrieved by the query are printed overlapping each other, instead of one below the other. This flag is normally set for detail
283
Andrea Maioli – Instant Developer: User's Guide
type sections. The overlay effect is interrupted when the report prints a section of another type that does not have the flag set.
The effect of Enable overlay would be detrimental without inserting a formatting
event, because all sections would overlap needlessly. In the following images, we see
the map report in the editor, its query, and the BeforeFormatting event.
The mechanism is quite simple: the report has only one detail section that contains only
one box and one span. The query extracts all mapped areas that must be shown, and for
each one, a detail section will be printed overlapping the others, and then the background. The event code moves the box to the location specified in the database and sets
its name. Also for books, as already seen with panels, you can reference report query
columns to find data corresponding to the detail section being printed.
6.5 Resizing mechanisms
Boxes contained in master pages as well as report sections react automatically to
changes in the size of available space from that set at design time.
284
Reports and books
It may seem strange that when printing, the sizes are different from those designed, but
in reality there are many cases where this happens. For example:
1) Changing the size of the master page from code before printing the book.
2) Changing the size of a master box containing sections during the formatting of the
page.
3) If the book is being previewed in the browser and the page’s Fit property is other
than None.
4) Changing the number of columns or the space between them from code during the
formatting of a section.
The resizing algorithms are different for boxes of the master page and those of sections,
so they will be analyzed separately. You can still configure them in a similar way by
activating the resizing mode in the master page or report editor, and then using the
toolbar commands to modify the properties of the box selected.
Master page resizing mode
285
Andrea Maioli – Instant Developer: User's Guide
6.5.1 Resizing master page boxes
The boxes contained on a master page can have three types of behavior, both vertically
and horizontally.
1) No resizing: The box will not move when the page size changes.
2) Move: The box moves, but does not change in size.
3) Fit: The box changes in size and can also move depending on what happens with
other boxes.
Unlike what happens in panels, where all the fields move or resize to the same extent
according to the change in size, for books the behavior is more complex and takes into
account the positioning of boxes in relation to one another.
To better understand the mechanism, suppose that for every box whose sides have
the same position, we introduce a link that forces them to have the same position even
after resizing. An example of this is shown in the following image:
When the page widens, the links are maintained
Now let’s see what happens if Box2 in the example is not resized, but moves.
286
Reports and books
In this case, to maintain the links, no box changes position or size. In fact, the left side
of Box1 cannot move, because it can only resize, and this forces the left side of Box2 to
stay fixed.
Since Box2 cannot change in size, and its right side must remain fixed, this locks
the right side of Box3. The result is shown in the above image.
With this in mind, by aligning the borders of the various master boxes, you can obtain most behaviors that you want. Other behaviors can be obtained by changing the
sizes and positions of boxes inside the OnFormatting event of the master page.
6.5.2 Resizing section boxes
Report sections can change width based on the size of the master box in which they are
printed. Their height, meanwhile, is fixed. What changes is the number of sections that
will be printed on the page.
The horizontal resizing mechanisms of section boxes are therefore identical to that
of master boxes, while vertically, they always behave as if the resizing type was set to
None.
If a box can contain a large amount of text, it may be useful to have a mechanism
to change its height to include it all. This is achieved by setting vertical resizing to Fit.
The height of the section is also increased by the same amount, while all other boxes do
not change size or position. If you then need to place the box below the one that is
resized, it is a good idea to create a second detail section as shown in the image.
Since the height of Notes may increase, the fields below are in another section
You can determine the final height of the Note box in the AfterFormatting event to be
able to fit it according to the position and size of the other boxes of the section.
287
Andrea Maioli – Instant Developer: User's Guide
6.5.3 Resizing images
Both boxes and spans can contain images. For boxes, this is achieved at design time or
runtime through the SetImage property. Spans must be linked to blob fields containing
images.
An image can adapt in various ways to the size of the box containing it based on
the Stretch property. The possible values are:
1) Automatic: If the report is being previewed it is equivalent to None, but if it is being
printed to PDF, it is equivalent to Enlarge.
2) None: The image retains its original size.
3) Fill: Both the width and height of the image are set equal to the available space,
regardless of the original form factor.
4) Enlarge: The image is enlarged or shrunk to fill the available space, but maintaining the form factor. There may be unused sidebands.
5) Cut: The image is enlarged or shrunk to fill all the available space, but maintaining
the form factor. Some parts of the image may be cropped.
Various image management settings
Within reports, you can use the following image formats: bitmap, gif, jpeg, and png, the
latter preferably 24-bit.
288
Reports and books
6.6 Subreports and Graphs
We have seen that a book can contain multiple reports, each of which retrieves data
from queries that are not inherently connected with the others. It may be convenient, in
some cases, to show data linked to that shown in a certain section. For example, if you
show a list of salespeople, it may be useful to show the best customers of each. This
can be easily achieved using a subreport.
Adding a subreport is easy: simply use the Add report command in the context
menu of the section box where you want it to appear. The box must not contain spans,
so you may need to delete them first.
All subreport sections are linked to the section box containing the report, and this
setting cannot be changed. Normally, only the report header and detail sections are used
for subreports.
In the image, we see a book contained in the North Wind project, Employees form, included among the In.de sample projects. You can access the samples through the main
menu command Help – Application gallery.
The subreport query can be based on both in-memory and database tables. It can
also refer to the columns of the main report, which can be achieved by dragging and
dropping the columns from the object tree directly onto the code editor. In the image
we see that the Customers subreport refers to the ID of the employee to retrieve only
that employee’s customers.
The height of the box where the subreport appears normally limits the available
space, and therefore the number of detail sections that may appear. If you want a subreport printed over multiple pages, you can do the following:
1) Set the vertical resizing mode of the box containing the subreport to Fit
289
Andrea Maioli – Instant Developer: User's Guide
2) Deselect the Keep together flag for the box: this way can it be divided across several pages.
3) Deselect the Keep together flag of the section containing the subreport, so that the
section can be broken into different pages.
You can also have subreports arranged horizontally or in a matrix using multi-column
detail sections, with horizontal as well as vertical sorting.
Note that using subreports should be avoided whenever possible because it requires
running an additional query for each detail row of the main report. If possible, it is
much more efficient to create a main report with a more complex query, which is then
grouped showing data at multiple levels.
Finally, you can create additional levels of subreports, but performance can degrade due to multiplication of queries. Moreover, not all formatting features described
in the preceding sections may be available.
6.6.1 Use of graphs
Inside a section box, you can insert a graph with the Add graph command in the context
menu of the section box. Again in this case, the box must not contain a span.
Configuring graphs will be covered in the next chapter. As with subreports, their query
can refer to columns of the main report and may be based on both in-memory and database tables.
290
Reports and books
6.7 Books and panels
Books are often used to print data that the user sees within a panel. For this reason, automatic systems have been implemented that allow these two graphic objects to work
together.
First, keep in mind that a book can be associated with a panel by dragging it from
the object tree and dropping it onto the panel. This enables a new button in the panel
toolbar, which appears only when the panel is in Data status.
When the print button is pressed, the OnCommand event is raised, and if this is not
cancelled, the OnPrint event fires. The default behavior is to print all pages of the book
to PDF and then display it to the user. Also, the panel’s QBE filters will be passed to
the first report of the book in SQL format, as returned by the panel’s SQLWhereClause
function.
This behavior can be changed via the OnPrint event. By setting the PrintDestination parameter to Screen, you can launch a browser preview. When the SetWhereClause
parameter is set to False, the panel’s filters will not be passed to the report.
6.7.1 Creating a book linked to a panel
After creating and setting the layout of a panel, it may be useful to automatically obtain
a book suitable for printing the data. This can be done through the Add book command
in the panel context menu.
The result of this operation is a book that contains a report whose query is the union of all queries contained in the panel: the master query, the lookup queries, and finally the value source query.
The report layout is copied from the panel’s detail layout if one exists, or the in list
layout otherwise. You can temporarily disable the detail layout if you prefer having the
report based on the in list layout.
291
Andrea Maioli – Instant Developer: User's Guide
At the top the panel layout; below the report created automatically by In.de
Depending on the panel’s configuration, it is not always possible to create a query that
manages to bring together all those of the panel. In this case, warning messages will
appear at the end of the operation, and you will need to complete the report manually.
292
Reports and books
6.8 Interactive books
In this section we will cover using books as graphic objects of the application’s user
interface. This can be done using the Add book command in the form editor toolbar
when an empty frame is selected.
Result of the Add book command in the form editor
When the book is part of the form, it is shown inside the frame but is not automatically
printed unless it contains references to single-row in-memory tables. Otherwise, it must
be automatically updated every time it changes.
In any case, it can be printed using the Print method, including inside the form
Load event. The user can scroll through the pages using the navigation controls on the
toolbar, and if the book is displayed on a touch-sensitive device, by swiping with a finger.
If a book is previewed or is part of a form, it becomes interactive and can be manipulated in many ways. We list them here and analyze them in the following sections.
1) Activation objects: Boxes can be linked to objects that are activated when the user
clicks with the mouse.
2) Drill-down: You can create reports that will expand to show the details of the selected data.
3) Editable fields: You can make spans editable, displaying text fields, combo boxes,
check boxes, and radio buttons.
4) Scrollbar: Boxes can have a scrollbar to be able to contain sections in addition to
the ones displayed.
5) Drag & drop: Boxes can be dragged and dropped onto each other with the mouse to
perform certain operations. These operations can be generic, involving other graphic objects such as panels, trees, and menu commands.
293
Andrea Maioli – Instant Developer: User's Guide
6) Transformable boxes: When a box is transformable, it can be moved or resized with
the mouse or the fingers.
7) Raw clicks: It is possible to generically intercept low-level mouse events such as
clicks and double clicks with the left, right, or center buttons.
6.8.1 Activation objects
You can set the activation object of a box by dragging and dropping the following types
from the object tree:
1) Procedure: This can be used if it has no parameters and is contained on the same
form as the book. When the user clicks the box with the mouse, the procedure will
be launched.
2) Command set: This can be used if it is contained on the same form as the book.
When the user clicks the box with the mouse, a context menu will open.
3) Group header section: This is used to control drill-down reports, as best illustrated
in the next section.
For a box to be actually clickable, it must have a visual style that allows this, for example that of a button. Also, the flag of the span inside the box must be set. When the user
clicks on a section box, the recordset of the report to which it belongs is repositioned to
the record for which it was created. This allows it to read the values by referencing the
columns. In this example, the record is deleted corresponding to the employee for
whom the trash icon is clicked.
294
Reports and books
6.8.2 Drill-down reports
A particular type of report, called a drill-down report, allows data to be viewed at increasing levels of detail by clicking those of interest. Creating these reports with In.de
is easy, simply follow these steps:
1) From the report query, select the data to the maximum level of detail desired.
2) Group the data in the various levels, creating the group header section and deleting
the related group footers.
3) For each group header section, the Show internal sections flag must be deselected.
4) Make a box of the group header clickable; in this case it has been set as a button.
The span inside the box must have the Enabled flag set.
5) Drag the group header section from the object tree and drop it onto the box that was
made clickable.
On the right, you see the report in browser preview mode
You can also control the opening or closing of internal sections from code, by modifying the section’s ShowChildren property. This property can be used in various ways;
we recommend reading the documentation for more information. The following image
shows the code required to open all sections at once.
295
Andrea Maioli – Instant Developer: User's Guide
This code is executed outside the print cycle, so setting the ShowChildren property applies to all sections to be printed. Opening the sections forces a reformat of the book.
Therefore, a Refresh of all pages must be performed, or the cache of the book will contain the wrong ones.
If the drill-down report contains more than one level, you can modify the order and
have the end user select the desired groupings. This is done by using the GroupLevel
property of the group header section. Again in this case, once it is changed, it is necessary to Refresh the pages to update the formatting.
When changing the grouping, the values of aggregate functions are updated accordingly. The layout of the sections, however, does not change, so the visual result may
not be correct. In this case, we recommend reading the GroupLevel property inside the
BeforeFormatting event of the section to reposition the box to the proper place.
6.8.3 Editable reports
When a book is previewed in the browser, you can make the content of some of its
boxes editable. To do this, simply set the Enabled flag of the span contained in it. In
this case, the box cannot contain other spans.
Various types of controls for modifying the content of a book
The result obtained depends on the Control type property of the visual style applied to
the span or the box. The default value is a text or combo box input if the span has an
associated domain. In this case, by changing the visual style, you can also obtain check
296
Reports and books
boxes and radio buttons. You can also associate a value list from code, using the EmptyValueList and SetSpanValueListItem methods of the span.
When the value of a span changes, the system raises the OnChanging event to the
form that contains the book. If the span is part of a report whose query is based on an
in-memory database, the value entered by the user is immediately saved in the inmemory table. Otherwise, no automatic operation is performed. When handling this
event, you can read the values of the record that has generated the section containing
the modified span. To do this, simply access the report query columns, as shown in the
following code.
Code that updates the database based on the value selected by the user
The OnChanging event normally does not fire immediately, but is buffered by the
browser and sent to the server along with other events. If, however, you want your application to respond immediately to user changes, you must set the span’s Active flag.
Finally, if a book contains several editable fields, the tab order depends on the print
order of the boxes containing them.
6.8.4 Boxes with scrollbars
When a book is previewed in the browser, some boxes can contain more content than
they are able to show, thus displaying a scroll bar to navigate through the text. Specifically, this happens in the following three cases:
1) If a box contains more text than can be displayed and vertical resizing has not been
activated.
2) If the Enable scrollbar flag of a section box containing a subreport has been set. In
this case, the subreport is printed in its entirety and not just up to the point of filling
of the visible part of the box.
3) If the Enable scrollbar flag of a master page box has been set. In this case, the report is printed entirely within the box that contains it, without ever changing pages.
297
Andrea Maioli – Instant Developer: User's Guide
This feature can also be activated directly at runtime by modifying the CanScroll property of the box. This way, the entire content of the box can be viewed when printing to
PDF, but the scrollbar will be used on screen for convenience.
The customers subreport now shows all customers and not just the first nine
6.8.5 Dragging and dropping boxes
A feature that is often favored for performing certain operations in the most natural way
is the ability to drag & drop some user interface objects onto others with the mouse. For
example, this is the easiest way to reorder a list of items.
You can activate this feature using the Can drag and Can drop flags in the box
properties form. If a box can be dragged only under certain conditions, you can change
its CanDrag and CanDrop properties in the formatting events.
At this point, when the book is previewed in the browser, the user can drag the
drag-enabled boxes onto drop-enabled ones. When this happens, the book raises the
OnBoxDrop event to the form, passing as parameters the indexes of the two boxes involved in the operation. This index has to be compared with the Me property of the
box.
Let’s look at an example of an application using this procedure. In the iShopping
application, which allows users to make a shopping list with an iPad or iPhone, it is
possible to rearrange the supermarket departments to determine the sequence of articles
purchased in the list. This has been implemented with a book in which drag & drop has
been enabled for the detail boxes.
298
Reports and books
Now let’s look at the structure of the book and part of the OnBoxDrop event code.
Note the use of the ShowDragBox and ShowDropBox methods. The first repositions
the recordset of the report query to the section where the dragged box was added, which
can then be used to determine the data it will contain. In the example, the srcid and
srcseq variables are initialized to the index and the sequence of the supermarket department corresponding to the dragged box.
In a similar manner, the ShowDropBox method positions the recordset of the report
query to the section where the box accepting the drop was added. In the example, the
dstid and dstseq variables are initialized to the index and the sequence of the supermarket department corresponding to the box accepting the drop.
299
Andrea Maioli – Instant Developer: User's Guide
At this point, having retrieved the significant values, it is possible to perform reordering with a desired algorithm, then recording the data to the database. At the end of
the event, the book’s RefreshQuery method is called to show the user the changes that
occurred.
6.8.6 Transformable boxes
A variant of the mechanism seen above is that of transformable boxes. In this case, the
mouse can be used to move or resize a box, instead of dragging and dropping them onto
one another. An online example of this mechanism is the Agenda application, which
allows users to change appointments with the mouse.
To enable transformation of boxes, set the Transformable flag in the properties
form, or even box by box at runtime by changing the CanTransform property in the
formatting events. Again in the properties form, you can decide what types of transformations are allowed and if the move is cancelable or not.
After the user has moved or resized a box, the book raises the OnBoxTrasform
event to the form that contains it, passing as parameters the index of the transformed
box, along with the new size and location, and positions the recordset of the report query to allow reading the data contained in the section corresponding to the box.
The event is cancelable: If you set the Cancel parameter to true, the box is not actually moved. If the event handler code does not provide for cancellation of the event,
we recommend deselecting the Cancelable move visual flag in the properties form of
the box, as to obtain a better visual effect.
6.8.7 Generic drag & drop
The drag & drop mechanism described in the previous sections can also be generic, involving other user interface elements such as panels, trees, books, and menu commands
on any form where they are located.
300
Reports and books
An example of this system is present in the Webtop application: By opening a search
form from the start menu, the user can drag a panel row onto the background to create
an icon corresponding to the dragged document.
Dragging a panel cell onto the background to create an icon for the product
Generic drag & drop can be enabled by setting the Can drag and Can drop visual flags
in the properties of the book, panel, tree, or command set. At this point, when the user
performs a drag & drop, first the OnGenericDrag event of the dragged object fires and
then the OnGenericDrop event of the one accepting the drop. The events are almost
equal for all types of graphic objects, but they may differ in some parameters that better
contextualize the operation according to the type of object.
The OnGenericDrag event is used for the dragged object to declare the data used
for it. If the dragged object is a document oriented panel cell, prior to raising this event,
the framework sets the ActivedDocument session property to the document being
dragged, in which case you can often avoid writing event code.
The OnGenericDrop event is used for the object accepting the drop to manage the
operation. You can check if the ActivedDocument property has been set, and if so, use
it to determine which document has been dragged. Alternatively, the information provided by the OnGenericDrag event is passed as a parameter to this event and can be
used to determine what was dragged.
We see, for example, the OnGenericDrop code of the Webtop application, which
serves to create the icon when the user drags a panel cell onto the background.
301
Andrea Maioli – Instant Developer: User's Guide
The icon is created only if the ActivedDocument property is other than null. In this
case, a drag & drop from a document oriented panel occurred. Using reflection, the icon
is then picked and converted to its large format. Then, the physical location where the
drop occurred is calculated, aligning it to the webtop grid.
At this point, all information is now ready. It is now possible to create the icon by
inserting it into the corresponding table. Note the use of the GetDNA function of the
document, which returns a string that identifies it completely. This will be used when
the user double-clicks on an icon to open it in a separate form.
302
Reports and books
6.8.8 Native mouse click handling
An additional interactive feature of books is the ability to handle mouse clicks natively:
each time the user clicks or double-clicks on the book, the OnMouseClick or OnMouseDoubleClick event, respectively, is raised to the form that contains it, specifying
the position of the mouse, the button used, and the box on which the click occurred.
As an example, take a look at how documents are opened in the Webtop application when the user double clicks on an icon. To obtain this result, the OnMouseDoubleClick event has been handled as follows:
After detecting that a double click with the left mouse button was made on the a box
that represents the icon for a document, the GetFromDNA function is used, which creates an instance of the document and loads it from the database by reading its data from
the report query. At this point, you simply have to invoke the Show method of the document to open it in an editing form.
Mouse click handling is not specific to book objects only, but also applies to panels, graphs, trees, and tabbed views.
Note that events are sent to the server only if they are handled in application code,
in which case you should keep in mind that every time the user clicks the mouse, a
message is sent from the browser to the server.
303
Andrea Maioli – Instant Developer: User's Guide
6.9 Advanced printing features
In this section we will look at some advanced features of books that have not been covered in the preceding sections.
6.9.1 Links between section boxes
We have seen that master page boxes can be linked together to define the sequence to
be used for filling them with report sections. A similar mechanism can be used between
boxes of the same section, but in this case to define how the text is to flow from one to
another. This can be useful if you need to print lots of text and do not want this to happen within just a single box.
To achieve this, you can drag the box containing the text from the object tree onto
the next one, while holding down the Shift key. When activating the link view in the
report designer, links will be highlighted with a green arrow. The next box cannot contain any spans, since the text it will contain will come from the first box.
Link between section boxes in the report designer (above) and in the PDF (below)
This feature currently has some limitations. Specifically, it can only be used to print
PDFs and not for the browser preview mode. This is because the division of the text
happens on the server and the measurements may not coincide with those of the browser.
304
Reports and books
6.9.2 Rotating boxes
Boxes support the Rotation property, which allows them to be printed rotated at an angle from their center as desired. This feature, however, is only present when the book is
printed to PDF, and not in the browser preview.
One possible use of this property is printing watermarks on all pages of the book.
Note that the property is editable only at runtime, so you cannot preview it in the report
designer.
Example of a rotated box in the PDF file
6.9.3 Widows and orphans
In publishing, a widow line is defined as the first line of a paragraph when it appears
alone at the bottom of a page, and an orphan line is the last line of a paragraph when it
appears by itself at the top of a page.
In books, these concepts are transposed to the section level. Specifically, setting
the Keep with next flag of a group header section will prevent it from appearing alone at
the bottom (widow section), but there must also be at least one detail section.
If this flag is enabled at the group footer and detail level, the group footer will not
appear alone at the top of a new page (orphan section), but there must be at least one
detail section.
The use of these techniques may result in an empty space at the bottom of a page,
since the sections that would have been printed at that location have been moved to the
next page to meet the constraints.
305
Andrea Maioli – Instant Developer: User's Guide
6.9.4 Printing beyond the last row of the recordset
To obtain particular effects, such as printing grids to the bottom of the page, the section’s SetReprint method is available, which allows you to reprint a particular section
linked to a row in a report recordset. This way, you can print a number of detail sections that is greater than the number of rows in the recordset, and can thus complete the
printing the page. The following image shows an example. The corresponding code is
shown in the documentation, on the page related to the SetReprint method.
Page without SetReprint on the left, SetReprint on the right
6.9.5 Book templates
When an application contains many books, it may be useful to create a book template
from which to derive all others, so that they are similar. To obtain this result, simply set
the Template flag of the book you want to use as such. In each application, you can set
up to eight books as a template.
At this point, the Add book command in both the form and panel context menus
will allow you to select from the templates available for creating the new book.
Books derived from a template maintain the link with the objects from which they
were derived, so if you change the original, all derivatives are also changed. Thus, with
only one modification, you can cause all books in the application to be adapted accordingly.
However, you can break the link between an object and its original with the Unlink
from (object name) command in the context menu of the master page, box, or span.
306
Reports and books
6.9.6 Debugging the print engine
When the book contains many reports or subreports, if the queries become complex or
advanced features and formatting events are used, it can become difficult to understand
the overall behavior of the print engine and correct it if necessary.
To facilitate this task, Instant Developer contains a runtime debugger that reveals
the operation of the framework. Although debugging techniques will be discussed in a
later chapter, for now we will look at how to use the debugger to understand the functioning of the print engine.
The first thing to do is compile the application with the Enable debug flag set in
the application’s compiling options, selecting Verbose Messages as the message level
for the framework.
After viewing a book page that does not behave as it should, you can enter the debug module by pressing the
button in the application caption bar. A form will appear on the left showing the list of operations performed. Clicking on the last shows the
framework messages related to printing the page, as shown in the following image.
Also, the printing of a simple page may show dozens or hundreds of messages due to
the complexity of the print algorithms. Execution of the report query is highlighted in
purple. By clicking on the green icon at the beginning of the line, you can read the SQL
statement used and see the beginning of the recordset.
The following messages describe the result of every decision by the print engine. If
formatting events were handled, their code will be shown at the point where they are
raised, so that you can understand their overall functioning.
307
Andrea Maioli – Instant Developer: User's Guide
6.10 File mangler
This section does not discuss the features of books or reports, but rather how to provide
for the creation of Word, Excel, and PDF documents containing data extracted from the
database based on a template provided by the user.
To obtain this result, Instant Developer contains a nonvisual component, called FileMangler, which takes as input a template file containing particular bookmarks, and is
able to replace them with data from the database, from in-memory tables, or from calculations performed in the code.
The examples are numerous: from printing offers or contracts based on userdesigned templates, to producing statistics of any kind using the business intelligence
features already present in Excel. Moreover, using PDFs containing forms may be useful, for example, to allow the user to precompile documents that must later be signed
and sent by mail or fax.
6.10.1 Using the file mangler component
After creating an instance of FileMangler, you can provide the data to be inserted into
documents using three methods:
1) AddParameter: This specifies a single value that will be replaced with a bookmark
in the document used as a template.
2) AddValues: This specifies a set of values through a recordset. It is like calling
AddParameter for all columns, passing as the alias of the column as a name along
with the value of the first row of the recordset.
3) AddRecordset: This specifies the entire recordset as a table of values to be replaced. It can be retrieved with a Select Into Recordset or with the SQLQuery function.
The result obtained by setting these parameters is different depending on the type of file
used as a template, as will be explained in later sections. Let’s now look at sample code
for creating a contract based on a PDF template.
308
Reports and books
This is the code that is used to convert and open the file in the user’s browser.
The actual conversion is done using the TranslateFile method, which, based on the License Agreement.pdf file containing the data of the licensee as form fields, creates the
final PDF file with a random name in the application’s temp subdirectory, and then
opens it in the browser.
6.10.2 Creating Word documents
Let’s now look at how to define a template for Word files. To replace single values,
simply select the text and then create a bookmark, as shown in the following image.
In the areas highlighted in yellow, the following bookmarks are defined: FirstName
Last Name, Product ID, Product Name, and Product Price. In the area highlighted in
309
Andrea Maioli – Instant Developer: User's Guide
blue, meanwhile, the Product List bookmark has been defined, which will be used for
generating the table. The file has been saved in RTF format, in the directory containing
the web application. Now let’s look at the code that performs the transformation.
Note that the names of the columns of the products list recordset coincide with those of
bookmarks created in the document. This is the final result:
310
Reports and books
6.10.3 Creating Excel documents
The creation of Excel documents using FileMangler is very similar to what we saw for
Word documents. It differs only in the manner that bookmarks are created.
If the application is compiled in Java, you must download the free additional libraries for manipulating Excel files, which are in a proprietary format. Moreover, there may
be restrictions on their content. For more information and download links, refer to the
documentation for the FileMangler library.
In the Excel file template, instead of bookmarks, named ranges are used. In the
case of single values, the named range must consist of two cells: the one above must
contain the name of the parameter and the one below must contain an example of the
value. The following image illustrates this:
The tables are inserted on two rows: the first contains the names of the recordset columns and the second contains example values. The entire area must be given the same
name as the recordset. Let’s look at an example.
Normally, the data coming from the file mangler is inserted in a separate sheet, which
may be called Raw Data. The other sheets contain references to the raw data to create
the desired views, such as graphs, pivot tables, calculations, etc. The example rows are
usually hidden, because, although necessary, they also remain in the transformed file.
Finally, the Excel file must be saved in xls format. We can see the final result
transforming the products list seen previously.
311
Andrea Maioli – Instant Developer: User's Guide
6.10.4 Creating PDF documents with form fields
File Mangler is able to automatically fill in PDF files that contain form fields. Templates can be created with Adobe Professional and Adobe LiveCycle Designer, creating
Text Fields using the following procedure:
1) Open the PDF file with Adobe LiveCycle Designer.
2) Select Create New Forms from the Forms menu.
3) You can use the automatic field detection utility or select them manually, but in
either case, their names will have to be changed.
4) Select TextField from the LiveCycle Designer library, and then drag a field where
necessary. Right-click the field created and select Rename Object.
5) Type the name of the field that must be populated from the File Mangler. Field names cannot contain “.” Or “_”.
6) Once all necessary fields have been created, save the template document.
7) To fill tables with the AddRecordset method, field names must be in the following
format: [TableName]_[ColumnName]_[RowName], where the first row is number
1, as shown in the following image.
312
Reports and books
To perform the conversion of PDF files, you must download and install free additional
libraries, for Microsoft .NET as well as Java platforms. For more information and
download links, refer to the online documentation for the TranslateFile function.
6.10.5 Converting a Word document to PDF using OpenOffice
We saw in the previous sections that by using File Mangler, you can create Word and
Excel documents based on user templates. However, sometimes these documents must
be converted to PDF format before they can be distributed. This problem is not easy to
solve, because such conversion would require native applications, Word and Excel,
which are not designed to be installed and used on an application server.
Fortunately there is an alternative that frequently solves the problem: using
OpenOffice, which is designed to also function on an application server and is able to
convert RTF and XLS to PDF with good fidelity, albeit not total.
Thus File Mangler provides the ConvertToPDF method, which takes as input the
name of the RTF, DOC, or XLS file to be converted and the path where to save the resulting PDF file. Using the method is simple, but before doing so, OpenOffice must be
installed and configured on both the development machine and the production server.
First, you must download and install a version of OpenOffice 2.0.4, because in version 3, the interfaces have been modified making them incompatible with FileMangler.
Depending on the type of server, and the technology used, one of the procedures below
should be followed:
Installing on a Java server
After installing OpenOffice 2.0.4, enter the program subdirectory of the installation
path and make sure that users running the Tomcat service have execute permissions for
soffice.exe and soffice.bin files.
In the application code, before calling ConvertToPDF, set the following properties
of the FileMangler object:
1) OpenOfficeService = “[OpenOffice installation path]\program\soffice.exe accept=socket,port=8100;urp; -invisible”
2) OpenOfficeConnectionString =
“uno:socket,host=localhost,port=8100;urp;StarOffice.ServiceManager”.
313
Andrea Maioli – Instant Developer: User's Guide
Installing on Windows Server 2003-2008 and .NET platform
After installing OpenOffice 2.0.4, follow these steps:
1) Create a system user to serve as administrator of the application pool used by the
application. You could call this user OOffice, for example.
2) Log in to the system as the OOffice user.
3) Launch the OpenOffice Writer program and complete its installation.
4) Log in again with the previous account.
5) Open the properties of the folder containing the web application, view the Protection page, and add Modify permissions for the OOffice user.
6) Inside the OpenOffice installation folder, open the program folder and give the soffice.exe and soffice.bin files execute permissions for the OOffice user.
7) From the Administrative Tools menu of the control panel, open Component Services, and select from the tree Component Services/Computers/My Computer/DCOM Config.
8) Find the entry OpenOffice.org 1.1 Text Document and open the properties/protection page.
9) Set Access permissions to custom providing local access to the OOffice user.
10) Set Execute permissions to custom setting the execute permissions to true for the
OOffice user.
11) Create a new application pool in IIS7, with Classic type pipeline.
12) For Windows 2008: from the context menu of the application pool just created, select Advanced settings, select OOffice as the as user ID and set the Load user profile flag.
13) For Windows 2003: in the properties of the virtual folder containing the application, select the ASP.NET tab and then click Set Configuration. Then select the Application tab, enable the Local impersonation flag and enter the credentials for
OOffice.
14) From the application context menu, select Advanced settings and then select the
application pool just created.
6.11 Questions and answers
Using books and reports, you can obtain complex views and rich interactivity with a
few lines of code. The possibilities are limitless, so it can be difficult to select the best
way to accomplish what you want.
In any event, if it is not clear how to address a specific issue, I invite you to send a
question via email by clicking here. I promise to answer all emails in my available
314
Reports and books
time. Also, the most interesting and frequently-asked questions will be published in this
section in subsequent editions of this book.
This space is reserved for answers to readers' questions
315
Chapter 7
Trees, graphs, and tabbed views
7.1 Introduction
In this chapter, we will discuss the remaining user interface items that Instant Developer provides natively, specifically:
1) Hierarchical structures (trees).
2) Graphs.
3) Tabbed views.
4) Button bars.
7.2 Viewing and managing hierarchical structures
If you have to manage complex data structures, the best way may be to use a tree view,
which shows data in brief view and allows the user to quickly expand the details. Instant Developer itself uses a tree as the primary view for an entire software project.
Instant Developer’s Tree object can load very complex structures, because the
nodes are loaded as the branches are expanded, and not all at once. It also allows you to
easily handle both drag & drop and multi-selection.
To add a tree view, simply use the Add tree command in the editor context menu,
by clicking on an empty frame.
316
Trees, graphs, and tabbed views
7.2.1 Defining the content of a tree
You can define the content of a tree using a set of objects called Tree items, each of
which contains a query that gives rise to a series of nodes. In this case, you obtain a
hierarchical view of data in database tables. Alternatively, you can associate a document or collection to a tree, which will automatically show the internal structure of
documents and their collections.
As a preliminary example of defining the content, let’s look at how to display data
for categories and products contained in the corresponding database tables. After inserting the tree, you can drag & drop a database table onto it while holding down the Shift
key. This operation adds an item to the tree that contains the table within the query, as
shown in the following image.
Dragging the Categories table onto the tree creates the first item (level)
Now we can create the second level by dragging and dropping the Products table directly onto the
Categories item. This is the result obtained:
317
Andrea Maioli – Instant Developer: User's Guide
We can see that the query at the second level contains a filter clause that refers to one
of the query columns of the parent item. It is this link that allows the tree to work, because when the user expands a node at the first level, the second level query will run,
filtering for the category ID that was expanded.
You can continue to add additional items to the tree this way, both at lower levels
and at the same level. In this case, when a level is expanded, all the queries at the next
lower level will run. The query for an item can refer to each column of its parent item,
as well as to other items in context, such as global variables and application forms,
panel field values, and fields of single-row in-memory tables.
Controlling the appearance of the tree
Tree items display the first column of the query, which can also be a compound expression and can contain html tags to create special effects. The additional columns in the
query can be added to extract the key fields to be referenced in the items below or in
event handlers.
When double-clicking an item in the object tree of the project, its properties form
opens. We can then set an icon that will be the same for all nodes generated by the tree
and select the last column of the query to be used as a tooltip. As an icon, we recommend selecting a 16x16 pixel gif or jpeg image.
Completing the above example, we can obtain a result like the following image:
Categories and products trees with icons and tooltips
318
Trees, graphs, and tabbed views
Some item query columns have a special meaning, summarized in the following list:
1) The first column is the one shown in the browser and is the name of the node. It can
contain HTML code.
2) The last column can be used as the tooltip for nodes if you set the appropriate flag
in the tree’s properties.
3) If a column has the code ICON, it represents the name of an image file that must be
contained in the web application’s images subdirectory and will be used as an icon
for the node. This way, each node can have a different icon.
4) If a column has the code HASH, it represents the node’s identification string, for
use in handling tree events. If not specified, the concatenation of the primary key
column selected in the query will be used.
5) If a column has the code CANCHECK, it represents a binary value. If set to true,
the node can be selected when multi-selection is active, otherwise the node will not
have a check box for multi-selection.
To set the code for a column, simply double click on the column in the code editor and
change the corresponding property.
Finally, you can also add any static items to the tree, i.e., ones that do not contain
any query. To do this, simply use the Add tree item command from the context menu of
the tree or item and then delete the query contained in it. A static element gives rise to
only one node, as we see in the following example:
Recursive items
So far we have seen how to create trees that have a limited number of levels, depending
on how many items we define at design time. There are, however, recursive data structures, such as the directory structure of a file system, which can have any number of
levels, based on the data itself.
319
Andrea Maioli – Instant Developer: User's Guide
To display such a structure, you can create a tree item that is recursive. This is done by
dragging the tree item that you want to make recursive and dropping it onto itself, while
holding down the Alt key. Let’s look at an example:
Recursive data structure and corresponding tree
The Tree Menu table contains a self-reference that allows you to define any number of
menu levels, because each record in the table can be a “parent” of other records in it.
The records of the base level are those that have Parent Command ID equal to null.
The tree representing the menu is made up of three items, each of which is based
on the Tree Menu table. The first, called Root Command, extracts the records that have
Parent Command ID = null. The second, obtained by dragging and dropping the table
onto Root Command, extracts the commands that have Parent Command ID = Root
Command ID. The third is obtained by dragging and dropping the second item onto itself while holding down the Alt key.
The query of the third item, which is initially equal to the second, has to be modified to extract the records that have Parent Command ID = First Level Command ID. It
is therefore necessary to link the third item to the second rather than the first. The query
of recursive items must extract the same columns as that of the item from which it derives, since it will then be used in its place to generate nested levels.
Query of the second and third level items
320
Trees, graphs, and tabbed views
Displaying documents and collections
If the data to be displayed in a hierarchical form is already stored in objects of the IDDocument or IDCollection type, everything is easier. In fact, after adding the tree to the
form, it is not necessary to do any further configuration. You only need to use the SetDocument or SetCollection method to assign to the tree the objects to be displayed. The
first method is used when there is a single root document to be displayed, and the second is used when there are more.
Once it has the documents, the tree takes care of showing the collections and loading them from the database if not yet done. In addition, if the document changes, the
tree can automatically update the view.
To determine what must be shown, the tree raises a series of events to the document, listed in this library. The main ones are the following:
1) OnGetName: The document must respond with the string that represents it, i.e., its
name. If the event is not customized, the framework responds with the concatenation of all descriptive properties, i.e., those derived from the database fields that
have the Descriptive flag set.
2) OnGetIcon: The document must respond with the name of an image file that must
be contained in the web application’s images subdirectory and that will be used as
an icon for the node in the tree. If the event is not customized, the framework responds with an image associated with the document or table from which it derives,
in which case, all documents of that type will be represented by that icon.
3) OnGetTooltip: The document must respond with a string that will be used as a
tooltip. If the event is not customized, no tooltip appears.
As for the documents to be displayed in the tree, you can select which ones are visible
by setting the Hidden property to true for those you do not want shown. If you want to
hide an entire collection and thus prevent loading it into memory, you can deselect the
Visible flag in its properties form.
Products tree with document orientation
321
Andrea Maioli – Instant Developer: User's Guide
7.2.2 Managing trees based on databases
After displaying the data of interest in the tree, usually the first operation that must be
implemented is handling the activation of a node by the user. This can be done in three
ways:
1) By having a query of another user interface object, such as a panel, depend on the
columns of the item in the tree. Each time the user clicks on a node, the data structures are updated in memory, repositioning them to the records that gave rise to the
nodes activated by the user. For example the following image shows the query of a
panel that displays who has purchased the product selected in the tree. We can see
that the filter clause points to the column of the item that originates the products
nodes.
2) By linking a procedure to the tree item as an activation object. This is done by
dragging a procedure without parameters and dropping it onto the item, or with the
Add procedure command in the item’s context menu. In the code of the procedure,
you can reference the columns of the tree items to find out which node has been activated.
3) By using the OnActivateNode event, which is raised to the form each time a tree
node is activated. This method can be useful if you want to use the same procedure
for handling nodes at all levels, while the activation object described above is more
appropriate if handling changes depending on the level. The activated node is
passed to the event in the in Hash Key parameter: a string identifying the node,
322
Trees, graphs, and tabbed views
consisting of a concatenation of the values of all primary key fields of the query, or
the value of the single column with the code HASH, if specified. The following image shows using this event to display the data related to a file selected in a recursive
tree.
The other operations that can be managed for trees based on databases are listed in the
Nodes library. In particular, note the RefreshNodes method, which allows updating the
tree content if the database has changed. This method is, however, unnecessary when
the tree displays the structure of a document.
7.2.3 Managing trees based on documents
In the case of trees that display documents, the methods for management are contained
in the Document Orientation folder of the Tree library. The event that is usually handled is OnActivateDoc, which fires when the user clicks on a tree node to which a document is attached.
The event receives the document directly connected to the node as a parameter. In
the event handler code, you can decide what to do by using reflection or document type
information functions, such as TypeName or IsMyInstance. The following image shows
an example of detecting the activated document.
323
Andrea Maioli – Instant Developer: User's Guide
7.2.4 Drag & drop
A tree is not a tree if it does not provide drag & drop features. For this reason, trees in
Instant Developer include three different modes of functioning.
Drag & drop specific to trees based on tables
This mode is enabled by setting the DragAndDrop property of the tree to true. This is
usually done in the form Load event. At this point you can drag & drop a tree node onto
another, possibly holding down the Shift, Ctrl, and Alt keys to change the outcome of
the operation. You can also drag & drop nodes from one tree onto another, as long as
they are contained within the same form.
When the user completes the drag & drop by releasing the mouse button, the tree
accepting the drop raises the OnDropNode event to the form. Among the parameters of
the event are the hash key values of the two nodes involved in the operation.
If the event is not handled, the tree does not perform any default behavior, so in
fact the operation has no effect. Also, if multi-selection has been enabled for the tree,
the drop operation is repeated for all selected nodes. In this case it is not possible to
perform the tree update operation inside the event, because this may generate errors.
In the following image, we see the code that is used for the products tree to move
the product to a category other than the current one via drag & drop.
324
Trees, graphs, and tabbed views
Drag & drop specific to trees based on documents
This drag & drop mode can also be enabled by setting DragAndDrop to true in the form
Load event. Instead of the OnDropNode event described above, in this case at the end
of a drag & drop operation, the OnDropDoc event fires. If the event is not canceled,
this time the framework has the following default behavior.
1) First, the OnDrop event fires for the document linked to the node accepting the
drop. If this event is not canceled, then the operation continues.
2) At this point, the framework looks for a good “parent” for the dragged document.
To do this, it checks if the target document (or its parent if the operation was done
while holding down the Shift key) accepts the source document as a child. The answer is affirmative if the document has a collection of documents of the same type
as the one dragged.
3) If a good “parent” is found for the dragged document, the framework will move it,
or copy it if the operation was done while holding down the Ctrl key.
In the case of a products tree based on documents, you can therefore simply enable
drag & drop to obtain the behavior you want, without having to add code to event handlers. Note, however, that the documents involved in the operation remain in modified
status. You have to handle saving in a subsequent event, such as the pressing of a button or the closing of the form.
Generic Drag & drop
This drag & drop mechanism has already been covered in section 6.8.7 Generic
drag & drop. It allows for dragging and dropping of objects between trees, panels,
books, and command sets, within the same form or not.
To activate this mechanism, you have to set the Can drag or Can drop visual flags
in the tree properties form. At this point, by handling the OnGenericDrag or OnGenericDrop event, you can pass the information on the node dragged if the operation started
from a tree node, or otherwise handle the drop operation if the object is dragged onto a
tree node.
If the tree contains documents and the dragged object is linked to a document, then
the standard drop operation is the same as described in the previous paragraph. In many
cases, the standard procedure is sufficient, so there is no need to write code to obtain
the proper handling of drag & drop operations on documents, even in a generic sense.
325
Andrea Maioli – Instant Developer: User's Guide
7.2.5 Multi-selection
Like lists in panels, in the case of trees it may be useful to be able to operate on multiple nodes simultaneously. This can be achieved by activating multi-selection, done by
setting the MultipleSelection property to true in the form Load event. When doing so, a
check box will appear to the left of each node for selecting the row, as shown in the
following image:
If you want to immediately handle a change in the selection of nodes, you must set the
Active flag in the tree properties form. Otherwise, selection events will be postponed
and sent all together the first time the browser contacts the server.
The events raised to the form for each changed selection are OnChangeSelection in
the case of trees based on queries, or OnChangeSelectionDoc if it contains documents.
Both events allow you to identify the individual node that was selected or deselected,
and they are raised once for each node that has been changed. If the tree is active, this
happens every time the user selects or deselects a node.
After firing for each node that has changed status, the above events fire once again
to allow overall handling of the selection change. In this case, the Final parameter is
passed as true. In the following image, we see how to use this behavior to display the
number of selected nodes in the caption bar.
326
Trees, graphs, and tabbed views
In the case of trees based on queries, you can obtain a list of selected nodes using the
GetSelectedNodeCount and GetSelectedNode functions. The first returns the number of
selected nodes, while the second returns the hash key of the node specified as a parameter. However, if the tree is based on documents, their selection status is obtained by
reading the Selected property.
You can also change the selection status of nodes via code by using the SelectNode
and SelectAll functions in the case of trees based on queries, or by setting the Selected
property of documents displayed in the tree. Note that in this case, the change events
are not raised.
Let’s look at, for example, the code required to allow selecting all products in a
category when the category is selected.
Finally, note that all nodes do not necessarily have to have a check box for multiselection, but you can choose this. In the case of trees based on queries, you have to
include a column with the code CANCHECK, which makes the node selectable if set to
true.
If instead the tree displays documents, you have to create a domain in the library
with the concept DO_CANCHECK of the boolean type. Then you have to assign this
domain to a public property of the document. The tree checks if the document supports
the DO_CANCHECK concept, and if so, it sets the value as: true for selectable nodes,
and false otherwise.
327
Andrea Maioli – Instant Developer: User's Guide
7.3 Graphs
In the 6.10 File mangler section, we saw how to create Excel spreadsheets based on a
user-provided template and data from a database. These Excel spreadsheets can also
contain pivot tables and graphs, so it is a convenient and fast way to provide the user
with advanced views.
In any event, sometimes you need to display a graph as an integral part of the user
interface. To obtain this result, Instant Developer provides an object that can display
data from queries in the form of a graph. To add a graph to a form, simply use the Add
graph context menu command from an empty frame in the form editor or from a tabbed
view.
After adding the graph, it appears as a thumbnail in the form editor. The preview is
only an outline of the result obtained at runtime, because the application can interface
with different graphic engines that actually render the graph. There are currently two
graphic engines already built-in, but you can add new ones by implementing a class of
the interface.
The first is JFreeChart, is a free open source graph component, available primarily
in Java, but it has also been ported to Microsoft .NET. If you use Java, you have to
manually copy the graphic libraries to the shared directory (shared/lib or common/lib)
of the web server. In the case of Microsoft .NET, the libraries are automatically copied
by In.de when compiling the project. However, the server must have the J# framework
installed and must be configured to operate at 32 bits instead of 64. JFreeChart functions on the server side: it receives data directly from the application, produces the
graph, and sends it as an image to the browser. For this reason it is suitable to be used
on any type of device.
328
Trees, graphs, and tabbed views
The second built-in graphic engine is FusionChart V3. It is not a free component
(see the producer’s website), but since it is based on flash architecture, it allows you to
display animated graphs with stylish looks and can be more appropriate than the other
component in some situations. When using FusionChart the data is supplied directly to
the browser in XML format and the rendering is done on the client side, so it is more
powerful and interactive, especially if the data is on the order of one hundred values.
Unfortunately, the flash format is not suitable to be displayed on many mobile devices,
and in these cases you must use the JFreeChart engine.
The default graphic engine is JFreeChart. To select Fusion Chart you must use the
SetLibrary method.
7.3.1 Graph object properties
After creating the graph, you must set its properties. Some of these are present in the
corresponding properties form, while others can be set at runtime via the form Load
event. For more information, refer to the graphs library. The most important properties
to be set at design time are the following:
1) Graph type: This selects the type of graph to display: line, bar, pie, area, etc.
2) No. of series: This specifies how many data series are displayed. The number of
columns in the query that will be used is based on this number and the type of
graph. For more information refer to the section Types of graphs below.
3) Active: By setting this flag, the graph will fire the click event when the user clicks
on a point of the graph with the mouse.
The remaining properties are used to change the display of the graph’s axes and grid.
7.3.2 Graph queries
If the graph is located inside the project tree, you may notice that it contains a query
that the graph will use to retrieve the data to display. The query can be based on database or in memory tables. This way, the graph can display data that has been calculated
based on a particular algorithm, even if it is not present in that form in the database.
As we have seen for the other user interface objects, the query can reference global
form and application variables, fields of single-row in-memory tables, panel fields, and
columns of trees. Apart from the reference to variables, if the referenced object changes, the graph is updated automatically.
In the following image, we see a graph showing the values for units in stock and
units on order for products in the category selected on the left. When the row in the
panel changes, the graph will be updated automatically.
329
Andrea Maioli – Instant Developer: User's Guide
As we can see in the image, the query of the graph has a filter clause that depends on
the value of the ID field in the categories panel. When the user changes rows, the graph
is updated by re-executing the query.
7.3.3 Types of graphs
The composition of the query for graphs varies based on the type selected in the properties form. Here are the various possibilities:
1) XY lines and scatter graphs: These graphs represent points or lines given the x and
y coordinates of the various points involved. For each series of points, two query
columns must be selected: The first represents the X coordinate and the second represents the Y coordinate. The remaining columns are not used.
330
Trees, graphs, and tabbed views
Example of a scatter graph (points) with two series
2) Pie or doughnut graphs: These types of graphs support only one data series. The
first column of the query contains the labels, the second contains the values, and the
remaining ones are ignored.
Example of a pie graph
3) Category graphs: All other types of graphs are called category graphs, because the
data present on the X axis represents the general categories, identified by strings,
dates, or numbers, on which the graph will generally not perform any sorting. The
only exception is Time line and Time bar graphs, where it is assumed that the values for the X axis are dates, which in this case are sorted. In category graphs, the
first column of the query represents the categories, and the others represent the values of the various series up to the number specified in the graph properties. The additional columns are ignored.
331
Andrea Maioli – Instant Developer: User's Guide
Example of a mixed line-bar category graph
In line or bar graphs, you can choose to display several series in a mixed mode by calling the SetSerieType method and specifying the type desired for the series that are different from that of the graph.
7.3.4 Visual style of graphs
You can specify a visual style in the graph properties form. If not done, the graph is
drawn with the default settings of the graphic engine used. The properties of the visual
style used are the following:
1) Panel background: This is the background color of the part inside the graph axes.
In the case of pie graphs, it is the entire background of the graph.
2) Header background: This is the background color of the part outside the axes. It is
ignored in a pie graph.
3) Border color: This represents the color of the graph’s border.
4) Header text: This allows you to specify the font and color used for the caption.
5) Header alignment: This represents the caption’s alignment.
6) Field text: This allows you to specify the font and color used for the values of the
axes.
7) Group text: This allows you to specify the font and color used in the legend and
labels of pie graphs.
8) Group background: This represents the background color of the legend.
9) Non-nullable fields header: This allows you to specify the font and color used for
the labels of the axes.
332
Trees, graphs, and tabbed views
10) Show values: By using this check box, you can specify whether or not to show labels with values close to the points on the graph.
The custom borders of the visual style represent the color, thickness, and type of line
for the axes and the two grids, specifically:
1) Left border: This is relative to the Y axis. It is not supported by JFreeChart.
2) Bottom border: This is relative to the Y axis. It is not supported by JFreeChart.
3) Top border: This is relative to the grid parallel to the X axis.
4) Right border: This is relative to the grid parallel to the Y axis.
By using the SetSerieVisualStyle method, you can also assign a visual style to a specific series, in which case the style information that affects the series is as follows:
1) Field background: This is the color that will be used to draw the series.
2) Field text: This is the font used in the values label for the series. It does not apply to
pie graphs, in which the font for section labels is identical to that selected for the
graph legend.
3) Custom top border: This sets the line style in the case of a line graph. If the graph is
a bar graph, it sets the color and style of the bar border.
There are several other methods allowing you to modify the characteristics of graphs.
For a detailed analysis, refer to the graph library.
Example of graph with visual styles
333
Andrea Maioli – Instant Developer: User's Guide
7.3.5 Handling click events
If you have set the Active flag in the graph properties form, when the user clicks the
mouse on a value, the GraphClick event is raised to the form that contains it. Inside the
event, you can read the values for the point clicked by referencing the columns of the
graph query. If it has multiple series, the series number clicked is passed as a parameter. Let’s take a look at an example.
In this example, the CategoryID column is read from the graph query. It is not used for
display, but it is useful to determine the point where the user has clicked.
Similarly, the columns of the graph query can be referenced as filter criteria in other user interface objects, and when the user clicks on the graph, the other objects are
automatically updated. An online demonstration of this behavior can be tested on the
page discussing the graph examples on the Instant Developer website: when clicking on
the graph columns, the panel on the right is updated.
Graphs also support the OnMouseClick and OnMouseDoubleClick events. In the
code used for handling these events, however, you still cannot access the values of columns in the graph query. Among the various parameters passed, we still find the index
of the series and the point where the click occurred.
7.3.6 Interfacing with a different graphic engine
If you want to use a graphic engine other than those already built into Instant Developer, you can create an interface class directly in Java or C# depending on the environment in question.
This class must implement the com.progamma.is.IAGraphLibrary interface in Java
or com.progamma.ids.IAGraphLibrary in C#. The name of the class must be reported to
the graph using the SetLibraryName method.
At this point, when the graph must be displayed, an instance of the specified class
will be created on which the methods of the previously mentioned interface will be
called. For more information on the methods of the interface and to download the
334
Trees, graphs, and tabbed views
source code defining it, you can read the article Extensions in the Instant Developer
documentation center.
7.3.7 Graphs and reports
In the section
6.6 Subreports and Graphs we saw that you can add a graph inside a report box to be
able to display it inside detail sections. This graph type works essentially as described
in that section, but keep the following in mind:
1) You can only use graphic engines based on the generation of images, such as
JFreeChart.
2) You can modify the properties of the graph before printing the report. In this case,
the change will affect all subsequently printed sections.
3) If you change the properties of the graph inside the section formatting events, keep
in mind that the change will affect the current section and all subsequent ones. Thus
you can simply write the code so that the properties are changed whenever the section is printed, and not only under certain conditions. In the following images, we
see examples of correct and
incorrect code.
335
Andrea Maioli – Instant Developer: User's Guide
7.4 Tabbed views
Tabbed views allow users to toggle between various graphic objects within the same
space in the user interface. They can be used in many ways, for example:
1) To manage the various steps of a process, as happens in “wizards”.
2) To toggle between screen views for different objects chosen from a list or a tree.
3) To view and edit the various levels of a complex document.
4) As a container for subforms to be added directly at runtime.
Section 4.4 Groups and pages discussed how to obtain a tabbed view for the various
pages of fields added to a panel. In that case, the pages served only to divide the set of
panel fields, which could be very large. The tabbed views covered in this section, however, toggle the display of graphic objects that are completely different from one another, such as panels, trees, graphs, and books.
On the Instant Developer website, you can test the various features of tabbed views
directly online by connecting to this testing page.
7.4.1 Creating and configuring a tabbed view
To add a tabbed view to a form, simply use the Add tabbed view command from the
form editor context menu, opened by right clicking in an empty frame. Alternatively,
you can use the Add tabbed view command from the editor toolbar, even if the frame is
full, in which case the content will become the first page of the tabbed view.
The existing graph is included in the tabbed view
336
Trees, graphs, and tabbed views
To add additional objects, you can:
1) Use the context menu of the tabbed view, both from the tabs in the form editor and
from the object tree.
2) Drag tables or documents and drop them onto the tabs in the form editor, or onto
the tabbed view object in the project tree while pressing Shift.
3) If the objects to be added have already been created, you can drag them from the
object tree and drop them onto tabs in the form editor, or onto the tabbed view in
the project tree while pressing Shift.
Moving an existing panel to the tabbed view
To reorder the tabs, simply move the objects in the project tree with the mouse.
The tabs are re-ordered from the object tree
Each page of the tabbed view can contain only one graphic object: one panel, one
graph, one tree, or one book. If you want to add more than one within the same page,
you must use a panel with static fields to contain the objects needed. Alternatively, you
can drag & drop an entire form onto the tabbed view to add it as a subform.
The following image shows a panel containing a graph inside a static field. This
way, both objects are within the same page of the tabbed view.
337
Andrea Maioli – Instant Developer: User's Guide
Panel and graph together on the same page
The following image shows how to add another form as a page inside the tabbed view.
This way, you can create forms with very complex layouts, although it is a good idea to
keep them as simple as possible to avoid confusing the end user.
Adding an entire form as a page of a tabbed view in another form
Adding a form to a tabbed view can also be done at runtime by calling the AddFormByIndex or AddForm method. To remove forms added at runtime, you can call
DeleteForm.
338
Trees, graphs, and tabbed views
7.4.2 Stylizing tabbed views
The appearance of tabbed view tabs is configured in the graphical theme selected for
the application. However, you can assign each tab its own style index, which allows
you to point to a different class in the theme’s style sheet.
To obtain this result, you use the SetStyle method of the tabbed view after customizing the application’s custom.css file, as described in Chapter 11. The online documentation for the SetStyle method includes a sample customized file, which you can change
if you are familiar with the syntax of cascading style sheet files.
Stylizing the tabs can be useful for documents with more than two levels, because
in that case, it is not easy to determine whether the subsequent tabs refer to the document header or to the first level of detail.
Example of stylized tabs
By using the methods of the tabbed view library, you can change each tab’s caption and
icon, while the visibility of tabs depends on that of the object contained. For example,
if in the preceding image the Entities panel is hidden, the corresponding tab also disappears.
If you set the Hide tabs flag in the tabbed view properties form, then all the tabs
except the active one will be invisible. In this mode, the only way to change the page is
from code, and this can be useful if the page to be displayed depends on other user selections.
Finally, note that the Tab position property is not currently supported: tabs always
appear at the top of the tabbed view.
339
Andrea Maioli – Instant Developer: User's Guide
7.4.3 Managing page selection changes
Managing a tabbed view at runtime revolves around the following three methods:
1) SelectPage: This is used to change the page from code.
2) SelectedPage: This returns the index of the currently selected page.
3) ChangePage: This is the event raised to the form when the tabbed view changes
page, either from code or by the user.
In these methods, the selected page is returned as an integer, which does not represent
the sequential number of the tab, but rather the index of the control contained in it. The
following example shows how to use the SelectPage method to display the desired
page.
Selecting a page using the Me function
The following image shows an example where the page change is cancelled if the panel
on the previous page was still in Query By Example status.
Finally, note that if a tabbed view contains panels linked together in master-detail
mode, the queries of the detail panels are delayed until they are shown in the user interface, i.e., until their page is made active .
If the detail panels need to be updated before they are displayed in the user interface, you can use the FreezedWhenHidden method, passing false as a parameter. The
default value is true, to avoid running unnecessary queries.
340
Trees, graphs, and tabbed views
7.4.4 Generic drag & drop
From version 10, tabbed views also support the generic drag & drop mechanism. By
setting the corresponding flag in the visual properties of the form, you can make tabs
draggable, or allow other objects to be dragged onto the tabbed view.
This way you can, for example, open new forms according to the document
dragged and dropped from the tree, as shown in the following image.
To enable drag & drop between the tree and the tabbed view, the Can drag visual flag
has been set for the tree and Can drop for the tabbed view. At this point, you can simply handle the OnGenericDrop event as in the following example:
The first line retrieves the document that was dragged from the tree. If it exists, a form
is created that is suitable for displaying it by using the Show method. At this point, the
form is added and selected in the tabbed view. Finally, the dummy panel is hidden, as it
served only to prompt the user to complete the first drag & drop. It only took six lines
of code to obtain a really useful result!
341
Andrea Maioli – Instant Developer: User's Guide
7.5 Button bars
The last type of graphic object that we will discuss in this chapter is the button bar,
which allows you to show a series of buttons horizontally or vertically. It is an object
that is rarely used, because the same results can be obtained by adding individual buttons to panels, with more flexibility based on the desired layout.
However, they may be useful for iPhone applications, since a vertically expanding
row of buttons can be used as a menu to launch the various application functions.
To add a button bar, simply use the Add button bar command in the form editor
context menu from an empty frame. Buttons can be added by selecting Add command
in the context menu of the button bar in the project tree.
Button bar commands behave as described in Chapter 3 regarding the main menu
and toolbars of forms. It is thus necessary to associate a form or procedure to them that
will be launched when the user presses the corresponding button. This can be done by
dragging a form or procedure and dropping it onto the button, or by adding a new one
by selecting Add procedure in the command’s context menu.
The button bar does not have its own library of methods, but you can still manage
the individual commands from code by hiding them, disabling them, or changing their
properties, such as the text of a button.
The following image shows a button bar in the form editor and in the object tree.
In the example, the buttons are directly linked to the forms they open when pressed.
This eliminates the need to write procedures whose only purpose is to open a form.
342
Trees, graphs, and tabbed views
7.6 Questions and answers
In just one chapter, we covered four types of graphic objects, each with specific characteristics and methods of use. I have tried to illustrate several types of interactions
among them, and with the objects in the previous chapters, but it was not possible to
cover all possible cases.
Therefore, if it is not clear how to address a specific issue, I invite you to send a
question via email by clicking here. I promise to answer all emails in my available
time. Also, the most interesting and frequently-asked questions will be published in this
section in subsequent editions of this book.
This space is reserved for answers to readers' questions
343
Chapter 8
Libraries, web services, and server sessions
8.1 The Library object
An Instant Developer project consists of three basic types of objects: databases, applications, and libraries. This chapter will cover library objects.
A library is a set of services or features provided to the operating environment in
which the application runs. For example, the database library contains the definitions of
functions that can be used in queries. There are other types of libraries, such as the
Panel object library provided by the In.de framework, or the library for sending e-mail,
which primarily uses the functions of the operating environment, i.e., the .NET or Java
runtime library.
Structure and properties of a library object
Let’s look at the various types of libraries that can be present in an In.de project:
Database library: This is always present in all projects and contains the definitions
of functions provided by the various database servers. It is also used as a repository for
344
Libraries, web services, and server sessions
the definitions of certain global objects of the project, such as value lists, domains, and
visual styles.
Client library: This is always present in all projects and contains the definition of
global functions usable within applications, such as mathematical operators and string
manipulation functions. It also contains the methods of the application object and some
lists of constants used only in applications.
Visual objects libraries: These libraries contain methods available in the various
types of objects you can add to your application. You cannot delete them from the project.
Document Orientation libraries: This defines the methods available in documents
and collections.
Components libraries: Each of these libraries defines the interface of a class in the
framework of In.de or runtime library. You can import or add new ones.
Interfaces: An interface represents a set of methods that a class may choose to implement to conform to it. It is one way to create generalized services out of objects.
References to web services: When using the WSDL import function described below, an interface library is created that allows you to invoke methods of the corresponding web service.
A library can contain the following types of objects:
Procedure: This represents a method that does not return any value to the caller, and
therefore cannot be used inside expressions, but only as a statement.
Function: This is a method that returns a value to the caller. It can be used in expressions and, in some cases, also as a statement.
Event: This is an event that the object defined by the library may raise to its container. In the case of documents, the event is raised to the class that implements it.
Property: This represents a readable and writable property of the object defined by
the library.
Operator: This is contained in the database and client libraries and represents a
mathematical operator to be used in expressions.
Value list: This contains a list of constants that define the possible values to be associated with a field or property. Some value lists are used as generic containers of all the
constants used within the code.
Visual style: This is contained in the database and client libraries, represents a set of
345
Andrea Maioli – Instant Developer: User's Guide
graphic properties that may be associated with the various user interface objects.
Domain: This defines a data type template that can be assigned to database fields or
to properties of objects.
8.1.1 Defining a function
The libraries present in Instant Developer projects contain the methods necessary to
perform the operations normally required in application development. However, you
may want to add a particular function provided by the database server and not present
in the library, or import your own class to reuse previously completed work.
Let’s look at how you add methods to libraries, while the procedure for importing
existing classes will be covered in a later section. To add a method to a library, simply
use the Add function command in the library context menu. The properties to be set are
the following:
1) Name: This is the name that will be used in code when using this method.
2) Type: This is the type of method that is being added to the library. The possible
types are Procedure, Function, Operator, Event, and Property.
3) Return type: For functions, operators, or properties, you can specify which data
type is returned.
4) Library: If Object is specified as the function’s return type, you can specify the
type of objects returned.
5) Domain: You can specify a list of constants to which the returned value belongs. In
this case, the code editor will offer the developer a value from the list when the
function is used.
6) Depends on parameters: If you set this flag, the return type depends on the parameters for which the data type linked to return value flag is set.
7) Auto conversion: By setting this flag, the return type is automatically converted to
the one expected. If the conversion cannot be performed, an exception will occur.
8) Aggregate: Set this flag if the function is aggregate, so it can be treated as such.
This applies to database library functions that influence the composition of queries.
9) Exclude from debug: This specifies that the function’s return value will not be defined for runtime debugging. This flag must be set if the function is not fully stateless, i.e., if the result can change depending on the number of times it is called.
10) Use as procedure: This allows you to use a function as a method in a statement as
well as in expressions.
11) Throws exceptions: If you set this flag for events, the methods that implement them
will not use the local exception handler by default.
12) Static: The method is associated with the class, not with objects of that type.
346
Libraries, web services, and server sessions
13) Global: This applies to globalized events, and should not be changed manually.
14) Public: This specifies the type of method (public or private) that implements the
event handler.
15) Create stub: This is used in default libraries, and should not be changed in new
methods added.
16) Do not use: This indicates that the method is obsolete or overridden. If set, the
method will not be listed in the visual code editor even if the existing code can still
reference it.
Defining parameters
After setting the properties of the function, the next thing to do is add any parameters. The Add parameter command in the function context menu allows you to do this.
The important properties of a parameter are the following:
1) Name: This is the name that will be used in the visual code editor to specify the parameter in code.
2) Allowed data types: You can specify one or more data types that are allowed for
this parameter.
3) Library: If Object is used as an allowed type, you can specify a particular type of
object allowed.
4) Domain: You can specify a list of constants that will be proposed when the developer starts to type the expression of the actual parameter.
5) Linked data type: This flag specifies that the type of value returned by the function
is the same as the type of parameter passed.
6) Default value: This is a constant value that will be used as a default if parameter is
not specified. If you do not want to enter any default value, you can set the null flag
to the right.
7) Optional: This specifies that the expression of the actual parameter can be omitted.
Optional parameters can only appear at the bottom of the list of parameters.
8) Output: This specifies that the parameter can be changed by the function. In this
case, a variable must be entered and not a constant value.
9) Subquery: This is used only in the database library, specifies that a subquery can be
used as an actual parameter. This is true, for example, in the function in.
10) Value list: This is used only in the database library, specifies that a value list can be
used as an actual parameter. This is true, for example, in the function in.
347
Andrea Maioli – Instant Developer: User's Guide
IDVariant and native types
Before writing method expressions in native code, you must understand how scalar data
types are handled within visual code.
When managing scalar values, Instant Developer does not directly use the language’s native types, such as int, float, string, etc., but boxes them in a generic type
called IDVariant. This occurs for the following reasons:
1) Often, data is read from a database, so both variable data types and null values must
be managed properly, without requiring special handling by the developer, which
would be onerous and would lead to errors if forgotten.
2) For maximum compatibility between the Java and .NET frameworks and to remain
open to other architectures.
3) To facilitate the exchange of information between the inside and outside of the
framework, without loss of performance.
Now let’s see how to write conversion expressions between IDVariant and native types.
The IDVariant class has various constructors, one for each native data type. To construct an IDVariant from a native type, simply call the constructor directly inline, as
shown in the expression in blue.
int i = 0;
IDVariant v = new IDVariant(i);
The expression shown above is valid even if the native type is long, float, double,
string, date, etc. Meanwhile, to convert an IDVariant to the native type, you can use the
following extraction methods:
Java
Microsoft .NET
IDVariant v = ...;
int i = v.intValue();
long i = v.longValue();
double i = v.dblValue();
BigDecimal i = v.decValue();
java.util.Date i = v.dateValue();
String i = v.stringValue();
boolean i = v.booleanValue();
IDVariant v = ...;
int i = v.intValue();
long i = v.longValue();
double i = v.dblValue();
Decimal i = v.decValue();
DateTime i = v.dateValue();
String i = v.stringValue();
bool i = v.booleanValue();
The use of IDVariant only applies to scalar values. Management of objects, such as arrays, lists, and maps, occurs in the same way as natively.
348
Libraries, web services, and server sessions
Writing expressions
Now all the necessary information has been provided for specifying the expression of
methods added to the library. This must be done for all types of databases or operating
environments in which you want to reference the method. Note the following when writing expressions:
1) If you leave a method expression blank, it will not be usable with that database or
operating environment. If the operating environment is in the compatibility list of
the database or application, the method will not be available in the code editor.
2) The expression of a procedure must include the “;” character as a line terminator.
For functions, it is not necessary: if used as procedures, the line terminator is added
by the compiler.
3) The expression of a procedure can span multiple lines and can also contain the carriage return.
Inside the expression, you can use the following commonly used tokens:
1) $1, $2… $99: These will be replaced with the expression of the function’s parameters.
2) $0: This represents the object to which the method refers.
3) >: If present at the beginning of the expression and the method is of the property
type, this specifies that the setter method will be expressed as $0.set_xxx($1),
where $0.xxx() is the text written as an expression.
4) #: If present at the end of the expression and the method is of the property type, this
specifies that it is a native type and therefore not an IDVariant. The compiler will
apply the necessary conversions automatically.
5) $NEW: This creates an instance of the class to which it is applied.
The following tokens are used in the default libraries, but rarely within methods added
later.
6) $IMAGE: If the first actual parameter is a constant value, the value is replaced with
the filename of the image associated with it.
7) $DECODE: This returns the description of the value passed as the first parameter in
the value list specified as the second parameter.
8) $PROPIDX: If the first actual parameter is a document global variable, the value is
replaced with the index of the property.
9) CATCH$: This is replaced with the sequential number of the catch block that contains the function call.
10) $BASE: This is used to reference specific objects in multiple form.
11) $R: This is the name of the Instant Developer object to which the method has been
applied.
349
Andrea Maioli – Instant Developer: User's Guide
12) $LN, $L: This is the name of the library or class that contains the method.
13) CN$, $C: This is the name of the object class to which the method has been applied, with or without the namespace.
14) $P: This is the name of the parent of the object to which the method has been applied.
15) $F: This is the reference to the form or class that contains the method call.
16) $D: This is the name of the object class to which the method has been applied, considering the schema of the component.
17) $THIS: This is replaced with this or null depending on whether the call is contained
in an object or is at the global level.
Let’s look at an example of how to map in a library a C# function for calculating the
working days between two dates, with the following interface:
public static int CountWorkdays(DateTime startDate, DateTime endDate)
The function is contained in a class called DateTimeLibCs, which is mapped in a library
added to Instant Developer, as shown in the following image:
The CountWorkdays function is defined as static and has two parameters that accept
dates. The expression of the function in .NET architecture is as follows:
new IDVariant($0.CountWorkdays($1.dateValue(), $2.dateValue()))
Highlighted in blue are the conversions to and from IDVariant, necessary to interface
the native types. In red, meanwhile, we can see the special tokens that specify the object and the actual parameters of the call. At this point, the function can be used in visual code, as shown in the following image:
350
Libraries, web services, and server sessions
8.1.2 Value lists
In addition to defining methods as shown in the preceding section, libraries allow
you to specify the list of constant values to be used in different contexts, including:
1) In the properties of database fields to indicate the possible values of the field.
2) In the properties of global variables to indicate the possible values of the variable.
3) In library functions to specify the values that can be returned by the method or are
allowed as a parameter.
4) In query expressions to indicate the possible return values from the database.
5) As a container of the constants inserted in the visual code editor.
Using a value list simplifies the writing of code and improves the user interface provided for selecting a possible value with lists, check boxes, or radio buttons. You can add a
value list in various ways:
1) With the command Add value list command in the library context menu.
2) From the field content examples of a database field, by pressing the Add button in
the properties form.
3) Directly from the form editor when you want to add a combo box, check box, or
radio button control.
Creating a value list directly from the form editor
The notable properties of a value list object are the following:
1) Allow values of different type: If this flag is set, constants of different types can be
added, such as strings and numbers. It should be used only for lists that contain the
default constants written in the visual code editor.
2) Allow duplicate values: If set, this allows different constants with the same value to
be entered. It should be used only in default lists.
3) Automatically increment values: If a list contains numeric integer constants, when
additional constants are added they will be automatically incremented.
351
Andrea Maioli – Instant Developer: User's Guide
4) Include VCE constants: If set, this allows the constants entered directly in the visual
code editor to be moved to this list. It is typically inserted to distinguish the messages written in code from other constants, as they usually must be translated into
different languages.
5) Show value in VCE: This specifies that the constants of this list are to be shown as
values and not by name in code.
6) Create DB check constraint: If set, this requires generation of an explicit check
constraint for database fields that use this list. This makes it impossible to enter unexpected values, but every time a new constant is inserted, a change to the database
schema will be required. For this reason this flag is not immediately set when the
value list is created.
7) Generate RTC data: If this flag is set, then the values and names of the list will be
editable and translatable at runtime via the RTC module. In this case, the check
constraint cannot be generated.
Properties of constants
1)
2)
3)
4)
5)
6)
7)
The notable properties of the constants contained in the value list are the following:
Name: This is the name that will be used in the code and user interface to display
the constant, unless the Caption property has been set.
Description: This is used as a tooltip for the value of the constant.
Caption: This is the string that will be displayed in the user interface. If not specified, the name will be used.
Value: This is the value of the constant. If the null flag is set, then the constant is
null.
Data type: This is the data type of the constant.
Visual style: This is the visual style with which the value is to be shown. This way,
the possible values can be represented in a different way according to their meaning.
Icon: This is the icon with which the value will be shown in the user interface.
Visual styles applied to constants in the value list
352
Libraries, web services, and server sessions
Sublists
In addition to adding new constants to a list by selecting the Add constant command
in the list context menu, you can also create subsets of values. This can be useful if in
some cases not all constants of the list should be used, but only some.
Sublists can be created by selecting the Add subset command in the list context
menu. After giving a name to the subset, you can add the constants by dragging and
dropping them from the tree.
At this point, you can reference the sublist from all points of the project where you
can reference value lists.
8.1.3 Visual styles
A visual style defines a set of graphic properties that can be applied to various parts
of the user interface, such as panel fields and report boxes. Styles can be defined hierarchically, to customize the properties of a basic style. This makes them a valuable tool
both for standardizing the style of the application and for modifying it completely with
a single operation.
Visual styles are contained within the database library, so they can be referenced
from database fields. There are two main hierarchies: Default Panel Style, used in panels, and Default Report Style, for reports.
Hierarchies of visual styles in a new project
353
Andrea Maioli – Instant Developer: User's Guide
The visual style properties form is different from others, because it has to allow for editing of around 100 different graphic properties. We recommend using the contextual
documentation, accessible from the View - Contextual documentation main menu command, to obtain additional information when using the form shown in the image below.
By clicking the preview frame, you can select the graphic element you want to edit using the controls below. Note that some elements are not present in the preview, so they
can only be changed by selecting them from the combo box highlighted by the arrow.
Some properties may be different between the panel’s list and detail views, so you
can select the type of layout to preview with the radio buttons just above the frame. The
Custom borders preview allows you to define the graphic details of custom borders,
which can then be applied to one or more graphic elements.
Let’s look at the meaning of the flags and additional properties of styles:
1) Password: This specifies that the text of fields is to be masked.
2) Show value: This is the value of constants will also be shown.
354
Libraries, web services, and server sessions
3) Show description: This is the name of constants will be shown, or the caption if
specified.
4) Show icon: This is the icon for the constant will be shown.
5) Clickable: This specifies that the object is clickable.
6) Embed font: This applies to styles associated with reports. It specifies that the font
must be embedded in the PDF because it may not necessarily be installed on the
terminal where it is displayed. The resulting PDF file will be larger in size.
7) Unicode font: This specifies that Unicode font management is to be activated, in
case non-Latin characters are used. The resulting PDF file will be larger in size.
8) Mask: This sets a display or editing mask. Refer to the contextual documentation
for more on how to create one.
9) Control type: This allows you to select the editing field type. For some types, such
as combo boxes, radio buttons, and check boxes, the field must be associated with a
value list.
10) Cursor: This allows you to select the type of cursor that the object will show when
the mouse hovers over it.
Creating and copying visual styles
Visual styles can be added directly from the object tree, with the Add visual style command from the parent. The new style is initially set according to what it contains, and
then its properties can be edited.
Another way to create visual styles is to use the form or report editor, set the
graphic properties of the fields or the box, and then select the value (new visual style) in
the style toolbar. This will create a new style from the graphic characteristics of the selected object.
Creating new visual styles from the form editor
Finally, if you want to make a style equal to another, simply drag the one you want and
drop it onto the one you want to modify while holding down Ctrl.
355
Andrea Maioli – Instant Developer: User's Guide
8.1.4 Domains
A domain represents a template for the data types that the application must deal
with, to provide a common definition. Imagine, for example, that all fields representing
a description within the application must be of the length 100. Instead of having to remember to manually set this information for each field, you could create a domain
called Description and then assign it to the appropriate fields.
In addition to being a template for data types, domains allow you to add validation
formulas for field values and default expressions. For example, the domain Percentage
could verify that the value is between 0 and 100.
Domain objects are normally contained in the Database library, because they must
be referenced both by database fields and by applications. To add a new domain, simply use the Add domain command in the library context menu, or that of another domain.
In fact, a hierarchical definition is possible, so that the lower level domain inherits the
properties and checks of the higher level domain. Another way to create them is to
drag & drop a database field onto the library: this will give you a domain with the same
properties as the field.
The Units In Stock Products domain was obtained by dragging and dropping Units In Stock
onto the Database library
The properties of a domain are similar to those of a database field, since they both represent a data type. You can therefore specify examples, value list, data type, max
length, decimals, visual style, etc. However, some properties have a slightly different
meaning. They are:
1) Nullable: If this flag is set, fields derived from the domain will be nullable, otherwise they will be required.
356
Libraries, web services, and server sessions
2) Allow changing “Nullable” flag: If set, it will be possible to change the Nullable
flag setting for fields derived from the domain, otherwise it will be locked.
3) Default value: When set, this specifies that the resulting fields have a default value,
which is normally the first of the examples. In this case, you can add an expression
for the initial value.
4) Allow changing “Default value” flag: If set, it will be possible to change the Default value flag setting for fields derived from the domain, otherwise it will be
locked.
5) Concept: This is the type of concept supported by the properties of the documents
derived from this domain. Refer also to Concept-based programming in the Document Orientation chapter.
To add check or initialization expressions, you can use the Add check and Add default
commands in the domain context menu, the latter only if the Default flag has been set.
The expression can reference the name of the domain to specify the field to be associated with the check, as shown in the following image.
The expression references the domain to set the check
The description of a check expression is used as an error message to be displayed to the
user if the validation fails. Note also that the assignment of a check expression causes
the creation of a check constraint field in the database schema definition.
Domain objects can be used in the definition of database fields and global variables
of documents. Once a domain is assigned, you cannot change many properties, because
they are now linked to those of the domain. By changing the properties of the domain,
the corresponding properties of all objects referencing it will change.
8.1.5 Interfaces
Interfaces allow you to define a set of methods to be provided by the objects that
decide to implement them. To add an interface to the project, you can use the Add interface command from the Project object.
357
Andrea Maioli – Instant Developer: User's Guide
An interface can contain value lists and methods, the latter being only of the procedure or function type. Expression of the method is automatic, because the interface
code is generated by the Instant Developer compiler.
To specify that a class implements an interface, drag & drop the interface onto the
class while holding down Shift, as better described in the section Implementing interfaces .
An interface is, in effect, an object type of the project. However, it cannot be instantiated directly, but only by creating an object that implements it. Let’s take a look at
a code example.
Example of using interfaces
In the above image, the interface CMSManagement is used to create html pages from
data in the database. The purpose of using an interface rather than directly using a class
is to allow creation of the html code to be customized by providing a different class for
each individual case. The only constraint is that each class provided must implement
the interface.
This mechanism is analogous to using jdbc drivers to connect to a database: the
application does not know which classes will be used to connect to a database, but it
knows that they implement the standard jdbc interfaces.
In all these cases, there must be a class factory mechanism, i.e., a mechanism for
creating objects that implement the interfaces. In the previous image, this is achieved
through the GetCMS function, which simply returns an instance of MyCMS. In reality,
however, it is more common to use mechanisms for creating classes by name, such as
occurs with the GetLibraryClassList and GetDNA methods. The first returns the names
of document classes available in a component loaded on the fly, while the second creates an instance from the name.
358
Libraries, web services, and server sessions
8.1.6 Updating libraries
The standard Instant Developer libraries, which are present when you open a new project, represent the interface between the visual code used in the application and the underlying framework.
Each time you use a different version of Instant Developer, the underlying framework changes, sometimes radically. However, these changes will not require changes to
the code already written in your projects. This is achieved by adapting the definition of
the methods found in the standard libraries to the In.de version you are using.
The library update operation is therefore very important every time you change Instant Developer versions. Failing to do so will result in compile-time errors, because
the code generated will not match the framework version you are using.
To update the libraries, simply use the Update libraries command in the context
menu of one of the standard libraries, such as the DB library. It is not necessary to repeat this command for each library, since it updates them all.
Update libraries command
When opening an old project with a new version, Instant Developer offers to update the
libraries, unless you are using the Team Works group work management system. In this
case, only one developer needs to execute the update, and all others will receive the
current version of the libraries, together with the other updates to the project.
359
Andrea Maioli – Instant Developer: User's Guide
8.1.7 Importing external libraries
In previous sections we saw how to add libraries and create new methods. This allows
you to reuse any existing components by mapping the interface in the project and then
remembering to make the compiled code available to the compiler, either in dll or jar
format, depending on the architecture used.
If the class to be used contains many methods, performing these operations manually is not immediate. For that reason, there is a procedure for importing external classes automatically. The procedure is initiated with the Import library command in the
project context menu, which opens the form shown in the image below.
Form for importing an external library
The steps to execute the import are the following:
1) Select the DLL or JAR file containing the classes to import. You can also specify a
file in C# or java source code. Note the file type filter in the selection window,
which by default shows only DLL files.
2) A list of classes appears. Double clicking on a class will display the methods it contains. You must select both the classes and methods to be imported. There is a context menu to select all objects.
3) If there are many classes or many methods, you can enter a value in the Class filter
or Method filter fields, to view only those that contain the text entered.
360
Libraries, web services, and server sessions
4) Press OK to execute the import. When the operation is completed, the project will
contain a new library for each class imported, and each of these will contain the
methods selected, as shown in the following image.
After importing a class, you can use it in your code
At this point, you can use the imported methods in your application code. If you want
to add methods previously omitted, you can re-import the library.
If a method of a class references another type of object, this will also be imported
if present in the library. However, methods will not be imported unless they are selected in the list. In any event, you can perform a later import operation to add them.
If the Copy library to Custom directory flag is set in the import options, which is
recommended, Instant Developer will handle copying the library into the custom directory of the project and making it available for compiling and installing.
Limitations
The external library import operation may fail for a particular method or class, in which
case you can always complete or correct the result manually. However, the following
limitations currently exist:
1) You cannot import or use DLLs compiled with the .NET 4.0 framework. In this
case, we recommend recompiling using version 3.5.
2) You cannot use parameters of the out or byref type, widely used in VB.NET code,
since it is the default value for parameters. To solve this problem you need to create
a wrapper class containing the same methods, but without the specific out or byref,
and that internally calls the corresponding methods. At this point you can import
the wrapper class.
361
Andrea Maioli – Instant Developer: User's Guide
8.2 Creating and using web services
Web services represent the easiest way to expose machine-to-machine type interoperable application services.
A web service uses XML-SOAP format messages as a system for communicating
with applications that use it, hiding all implementation details to the point that it can
run on any hardware, operating system, and application framework. This is the reason
for their characteristic interoperability.
A web service is described by a document called wsdl, which explains the functions and messages in a formal way. Through the wsdl file, client applications know
how to format the messages to be sent to the web service in order to activate the desired
functions.
The following image shows the sequence of operations performed during a call to a
web service. Starting from point 1 on the left, the application, using the SOAP module,
prepares the request and sends it via the network to the web service. The web service
parses the request, again using the SOAP module, and handles it. It then prepares the
response and sends it to the requesting application.
8.2.1 Creating a web service with Instant Developer
A web service is an actual web application that does not communicate using html protocol, but SOAP, always via http or https transport. To create a web service, you must
add a new application to the project, using the Add web service command from the Project object’s context menu.
362
Libraries, web services, and server sessions
Creating a web service
After adding the web service to the project, you must create a public class. This is
achieved by selecting the Add class command in the web service context menu, then
setting the Public flag for the newly created class.
The public class represents the web service’s interface with the outside world, so
each web service must have one and only one public class. All public methods of this
class will be visible and accessible from outside.
As public methods, they can include both procedures and functions. The data types
handled as parameters and return values are the scalar types. It is therefore not possible
to pass or return objects, with the exception of a Recordset object, which can be used as
a result.
To overcome this limitation, you can serialize an object hierarchy into an XML
string and then use the XMLDocument and XMLNode libraries to manipulate it. If the
application makes use of document orientation, then you can directly use documents
and collections defined in the web service from within applications. For more information see: Remote DO .
Method that returns a recordset
363
Andrea Maioli – Instant Developer: User's Guide
8.2.2 Using a web service created with In.de
Now let’s see how to use a web service created with In.de in another application contained within the same project. All we need to do is define a variable in our code of the
type specified in the web service’s public class and use its methods.
Continuing with the previous example, if you want to retrieve order lines from the
web service and view them in a panel, simply write the following procedure:
For the call to take place, you need to specify the location of the web service, i.e., its
url. This can be done in three ways:
1) By defining the DefaultUrl compiling parameter of the web service. This way, the
service itself declares the address where it is located.
2) By calling the SetWebServiceURL method in the library of the application using
the web service. This way, the application using the web service declares where the
web service is located.
3) Through the Url property of the object representing the web service’s public class
in code. This way, the location of the web service is declared just before it is used.
In the following image, we can see an example of methods 2 and 3. Note that if none of
these methods is used, the application will work correctly during development, because
In.de will take care of managing the value of the DefaultUrl parameter. However, in a
production environment, the web service will not be found.
364
Libraries, web services, and server sessions
8.2.3 Importing the definition of a web service
When the web service is not contained within the same project, you can import the definition using a wsdl file. To do this, you can use the Import web reference command in
the Project object’s context menu.
After writing the full path of the wsdl file, a library is added to the project that contains the methods, as shown in the following image.
Example of importing a web reference; the address indicated is available for testing
At this point, simply use the library in your code, as already covered in previous sections. In this case, you can specify the address of the web service as a property of the
imported library, or with methods 2 and 3 discussed earlier.
Limitations
Instant Developer is not currently able to read all types of valid wsdl files. In particular,
this occurs if complex types have been used.
For more information regarding the limitations of web services, you can refer to
the Limitations section in the documentation center. To overcome these problems, we
recommend proceeding as follows:
1) Using a traditional development system, such as Visual Studio or Eclipse, import
the wsdl file desired.
2) Compile the generated stub classes in a jar or dll file.
3) Import the jar or dll file as an Instant Developer library, as described in previous
sections.
We recommend simplifying the web service interface by creating intermediate classes.
This way, the implementation details will be hidden and it will be simpler to operate
when the web service interface specifications change.
365
Andrea Maioli – Instant Developer: User's Guide
8.2.4 Remote document orientation
Inside a web service, you can create classes in addition to the public class, to handle the
work in a more orderly fashion. In particular, you can add documents in the same way
already seen for web applications: by dragging and dropping database tables onto the
web service while holding down Shift and Ctrl.
If a web service contains documents, they can be used via a proxy from web applications contained in the same project. This is true without having to define methods in
the public class and update or data exchange policies.
Remote document orientation can therefore be a valuable tool when you want to
use documents via web services. Refer to the section Remote DO for details and examples of its operation.
8.2.5 Transferring files
An important feature of web services created with Instant Developer is the ability to
transfer files between them and the applications that use them.
If an application wants to send a file to a web service, it simply has to call the
SendFile method of the public class. This returns the path where the file is stored on the
server where the web service is running. This information can be passed to another
method of the web service that takes care of managing the file or storing it in a blob
field in the database, as shown in the following image.
If you want to retrieve a file from a web service, you can call the ReceiveFile method
of the public class, which handles moving the file from the path specified on the web
service to a local application path. The following image shows how to retrieve a file
from a web service and open it in a browser.
366
Libraries, web services, and server sessions
Files can also be transferred in other ways, such as reading a file to a string that is
passed as a parameter to a web service method, but this may be less generally applicable than the one previously mentioned. Note, however, that currently the file transfer
methods can only be used if the application and the web service have been compiled in
the same language, i.e., both in C# or in Java.
8.2.6 Prerequisites
There are no required prerequisites to be able to develop or use web services with In.de
in a Microsoft.NET environment, since all the base classes needed are already built into
the framework from version 2.0.
In Java environments, unfortunately, the situation is different. There have been
several libraries created over time for the management of web services, profoundly incompatible with one another, and the acquisition of Java by Oracle has yet to solve
these problems. The solution used by In.de for Java environments is currently the following:
1) To develop applications that use web services, either created with In.de or imported, you must install the Axis 1.4 libraries on the Java web server. Later versions do
not work.
2) To develop a Java web service, you must use the following configuration on the
development workstation:
a. Install Java Web Service Developer Pack 1.0
b. Install Tomcat 4.1.18 over JWSDP 1.0.
This only applies to development machines, while the production server does not
require any special prerequisites.
Locating the Java Web Service Developer Pack 1.0 can be difficult, because it is a rather outdated version. For more information on how to obtain and install it, please contact Instant Developer technical support.
367
Andrea Maioli – Instant Developer: User's Guide
8.3 Server sessions
The web applications seen so far have been aimed at providing an interface to users,
while web services allow machine-to-machine interaction. However, there is another
important category of applications: batch services.
These perform application functions independently, without being triggered by users or other applications, as happens with web applications or web services. They are
therefore useful for operations that take a long time, or when processing must be parallelized.
If, for example, you want to create a system for distributing news via email, the
web application with which the user initiates the distribution cannot wait until it is
completed. Sending thousands of emails is not immediate and may take several
minutes, if not hours. Also, it is good practice to parallelize deliveries to minimize
waiting times.
Server sessions are a particular function of Instant Developer that allow you to
manage these issues without having to create additional external applications with more
complicated management.
A server session is a web application session that is not connected to a browser, but
another session, whether browser initiated or server type. While the purpose of a
browser session is to respond as soon as possible to the browser and then release the
allocated resources, a server session uses a thread until it has completed its task.
Considering its nature, a server session has the same capabilities as a browser session. For example, you can open forms, print reports, read and write files, use web services and components, and so on. Some functions that return the characteristics of the
browser, such as, BrowserInfo, are obviously not available.
8.3.1 Life cycle of a server session
A server session is initiated by another session using the StartSession method. Each
session is given a name so that it can be referenced later, whether to terminate it using
the EndSession method or to send it messages by calling SendSessionMessage.
The following image outlines the life cycle of a server session.
368
Libraries, web services, and server sessions
Start Session
Loop until the session reaches its
termination step
Initialize
Preparaz. Query
OnCommand
If a query string
has been passed
OnLogin
If the UserRole
has not yet been
specified
OnSessionMessage
Sleep 50 ms
AfterLogin
No
UserRole
Tick Timer
Session in its
termination step
If the UserRole has
been specified
Terminate
1) Start session: This is the time when the server session is created and is associated
with an execution thread.
2) Initialize: Immediately after the start of the session, the Initialize event fires, as also
happens for sessions started by the browser.
3) OnCommand: If a query string was specified in the session start command, then the
OnCommand event fires to allow handling it.
4) OnLogin: If at this point the UserRole property has not been set, the OnLogin event
fires. If after firing, the UserRole property has still not been set, the session enters
its termination step.
5) AfterLogin: As with browser sessions, at this point the AfterLogin event fires. Note
that during the handling of these events, you can distinguish whether the session is
of the server or browser type by calling the SessionName function, which returns
the name for server sessions and an empty string for browser sessions.
6) Execution loop: At this point, the thread begins to execute a processing loop from
which it exits only if the session reaches its termination step.
7) Tick Timer: For all server session timers, the associated method is called if the timer interval has expired.
8) OnSessionMessage: If the session has received messages from other sessions, at
this point the OnSessionMessage event fires to allow handling it.
9) Sleep: The execution thread is suspended for 50 ms to conserve computing power
during idle server session steps.
369
Andrea Maioli – Instant Developer: User's Guide
10) Terminate: When the session reaches its termination step, the execution loop terminates and the Terminate event fires, as happens with browser sessions.
A session reaches its termination step in one of the following ways:
1) If after the OnLogin event the UserRole property has not been set.
2) If another session calls EndSession specifying the name of this session.
3) If the code executing in timers or events calls the EndSession method specifying
SessionName as a parameter.
8.3.2 Timers and automatic server sessions
In the previous section we saw that a server session can be launched from another session. However, we might want a server session that is always executing, from the time
when the application is installed. This way, even if no user logs in, operations can be
performed.
To obtain this result, simply set the Start server session flag in the application
properties. As soon as the application is installed, a server session is launched with the
same name as the application.
Most server sessions use timer objects to determine if they must perform operations. For a timer to be enabled within a server session, the corresponding flag must be
set in the properties form. A server session timer does not run in browser sessions, and
vice versa.
The following image shows an example application that uses a server session perform geocoding of addresses present in the database.
In the Initialize event, the UserRole is set for the server session
The application has the Start server session flag set in the corresponding properties
form, and there is a timer called Timer Server Session that is triggered every 75 minutes
and has the Server session flag set.
In the procedure linked to the timer, a query is used to check if there are addresses
to be geocoded, and if so, the Errore. L'origine riferimento non è stata trova-
370
Libraries, web services, and server sessions
ta.component is used to perform the operation. The code is not shown because it is not
specific to the server session.
8.3.3 Messages between sessions
Another important feature of server sessions is that they can be used to exchange information between different browser sessions, as in the case of a chat application
among multiple users. The documentation center contains an explanation of how to implement such an application in the article Server session example.
Central to these mechanisms is the ability to send messages to a server session and
receive responses. A message is sent using the SendSessionMessage method, which
requires the name of the session to send to, as well as a timeout value and an array of
parameters.
Note that the session could be busy completing an operation and may not be able to
process the incoming message. If the session does not process the message in the period
of time specified as the timeout, the method returns without the message being successfully delivered.
Within a server session, the message is intercepted by the OnSessionMessage
event. Remember that the objects passed as message parameters can be accessed by
multiple different threads, and this can cause errors or exceptions. If they must be
stored, it is better to serialize them to xml to give the server session a copy of them.
The following image shows an example of using messages to manage the list of active work sessions.
371
Andrea Maioli – Instant Developer: User's Guide
The application launches a server session named SessionLogger, which has a map of
users logged on to the system. During the AfterLogin event of the browser sessions, a
message is sent to SessionLogger specifying which user is logged on to the system. The
message is handled by inserting the user specified in the map of sessions.
During the Terminate event, a message is sent that the session has ended and the
server session handles it by removing the user from the map.
To complete the example, we could handle an additional message that retrieves the
list of logged on users as a return value.
372
Libraries, web services, and server sessions
To compose the list of logged on users, a StringTokenizer object is used, which is very
useful for composing or delimiting strings with separators, as in the case of rows of a
CSV file.
Once the array with the names of users is extracted from the map, a loop executes
passing them to StringTokenizer. The entire string is copied to the Result parameter,
which will be returned to the browser session that sent the request. At this point, within
the browser session, the string that contains the users can be delimited and displayed on
screen using an in-memory table.
Finally, note that you can track the progress of a long operation executed within a
server session using the SessionProgress method. This uses the data prepared by the
StartPhase and TrackPhase functions, which are used for monitoring the progress of
long-running operations and also allow cancellation requests.
8.3.4 Installing server sessions
Some types of Web servers, such as Internet Information Server (IIS), contain automatic resource recovery mechanisms that may interfere with server sessions.
For example, when a web application has no active sessions and does not receive
new requests from the browser for a period of a few minutes, IIS releases the process
managing that application to recover the associated resources. Unfortunately, this hap373
Andrea Maioli – Instant Developer: User's Guide
pens even if there are active server sessions. To prevent this, you have to configure the
application pool for the particular application as shown below.
Specifically, you have to edit the Idle Time-out and Regular Time Interval properties so
that the process managing the application is not interrupted just because it is not receiving browser requests. This way, server sessions that are executing will not be interrupted.
A similar configuration may also be necessary for other types of servers, especially
if there is an application server cluster management system. Please refer to the related
documentation for details.
8.3.5 Batch applications
In addition to the server session mechanism described above, Instant Developer allows
you to implement batch services via a dedicated application, which will be compiled as
a Windows service in a .NET environment, or as a Java console application otherwise.
374
Libraries, web services, and server sessions
If you want to add a batch service to the project, use the Add batch service command in the Project object’s context menu. In any event, using batch services is not
recommended for the following reasons:
1) A batch service is an additional application separated from the web application, so
it must then be installed manually on all servers that cannot take advantage of the
automatic setup feature provided by Instant Developer.
2) You cannot insert form objects in batch services, and so you cannot print reports.
Only the PrintReport function is available, but it has several limitations.
3) Currently, it is not possible to use components in batch services. This limitation
will be removed in a future version.
4) Debugging a batch service is more complicated, because it has no user interface.
Server sessions, meanwhile, are also Web applications, so it is easy to verify their
functioning in interactive mode first, and then in batch.
8.4 Questions and answers
Instant Developer’s libraries connect it with the outside world, so it is important to fully
understand their use to be able to integrate applications produced with other existing
systems. Web services and server sessions complement the architectural landscape by
providing the elements for building complex enterprise systems.
The topics covered in this chapter cover the basic Java and .NET technologies, offering scenarios that are useful, but sometimes complicated. For further information, I
invite you to send a question via email by clicking here. I promise to answer all emails
in my available time. Also, the most frequently-asked questions will be published in
this section in subsequent editions of this book.
This space is reserved for answers to readers' questions
375
Chapter 9
Components and subforms
9.1 Dividing the application into components
So far, we have seen how to create all aspects of an information system, even an enterprise-class system, consisting of web applications, web services, and batch services. To
create applications with any degree of complexity, we still need to cover one more aspect: the ability to divide the architecture of these applications into modules or components.
Division into components is also useful for another purpose: the features provided
by the component can be immediately retrieved from another project and then easily
reused, either in compiled or source form.
Components, finally, can be used to add features to the application directly at
runtime, without the application knowing their content. This is thanks to the dynamic
linking and content analysis functions provided by the Instant Developer framework.
Designing applications with components necessarily implies greater complexity. It
is very important to decide the content of each one to make it independent. It is the application that needs to use the services provided by the component and not the other
way around!
It is also true that a component can take advantage of services provided by others.
If, however, the dependence is mutual or cyclical, then neither component can function
without the other, and this is not permitted.
377
Andrea Maioli – Instant Developer: User's Guide
In the previous image, on the right is a series of references between valid components.
On the left, meanwhile, is a loop between components A, B, and C. Although this situation seems paradoxical, it is easy to get there as the system grows if the project is not
clear from the beginning.
To avoid such situations, you can create additional components to hold the common objects. This way they can be referenced by others without the dependence becoming mutual.
9.2 Creating and using components
To add a new component to a project you can use the Add component command in
the context menu of the Project object.
A component represents an actual sub-application, so the properties forms are similar. However, in this case you can specify additional properties:
1) Package: This is the name of the package where the component’s classes will be
compiled. If, for example, you specify com.progamma, then the full name of the
classes will be com.progamma.ComponentName.ClassName.
2) Export sources: If this flag is set, the file that will contain the exported component
will also contain the source version.
3) Path: This is the path on the local disk from which the component is imported or to
which it is exported. It is set during the import or export operation.
4) Version: This is a string that identifies the current version of the component. It can
be left blank.
5) Demo: This flag specifies that the component is in demo version, so the application
that uses it will also be completed in demo version. This way you can distribute
trial versions of components.
6) Both technologies: By setting this flag, you specify that the file containing the exported component must contain a compiled version in both Java and C#. To use this
flag, you must have an Instant Developer license that permits double compiling.
A component can have everything that an application contains, such as forms and
graphic objects, classes and documents, timers, menus and commands, in-memory tables, etc. You can reference library objects such as domains, visual styles, or database
tables. Images used by the component will also become part.
This is different from how components are normally designed, i.e., sets of classes
to be referenced externally, since you can define global objects that will be joined with
those defined in the application and in other components.
The composition of global objects takes place in the work session initialization
steps, where the component sessions are instantiated and the corresponding properties
are joined to each other and with those of the application that is hosting them.
378
Components and subforms
9.2.1 Defining the content of a component
Defining the content of components is done in the same way as for web applications.
You can add objects at the base level through the component context menu. By dragging and dropping tables onto a component you can create in-memory tables, forms,
and documents. Everything is done with the same mechanisms described in previous
sections.
The following image shows the component object’s context menu. We can also see
that by dragging and dropping the Products table while holding down the Shift key, the
corresponding form is created.
9.2.2 Using the objects of the component in the application
Using the objects of a component in the application is very simple: it takes place exactly as if they were contained in the application. You can therefore reference them directly in code and use them from the object tree with a simple drag & drop.
However, component developers can select which objects to make available to applications that use them, and which ones not. Specifically, forms, classes, documents,
methods, and global variables can be defined as public or private. Public objects will be
usable outside the component while private objects will not. Keep in mind that the default is private, and this is indicated by a “padlock” icon in the object tree. In the above
image, the Products form shows a padlock and thus cannot be used directly in applications that use the component.
To change the Public/Private status of an object, you have to set the flag on its
properties form.
379
Andrea Maioli – Instant Developer: User's Guide
The following image shows that you can create an item in the application’s main menu
that opens a form of the component.
The same thing applies to classes and documents. Along these lines, it is worth noting
that in the application, you can create a document that extends that of the component,
as shown in the following image.
This way, you can add features to those provided by the component, using the extended
class instead of the base if within the application.
9.2.3 Compiling applications that use components
Even if a web application uses components, compiling occurs in the same way already
described. In this case, the compiler detects that the application uses components, and if
necessary recompiles them. It then makes them available in the application’s output
directory.
When you start compiling the project, it is not necessary to set the compiling options for the individual components, but only the application, unless you want to
recompile only a single component.
380
Components and subforms
To prevent the component from appearing in the options form, you can use the Skip
compiling command in its context menu.
You do not have to set options for the component, but only the application
9.3 Export and reuse
One of the most useful features of components is that they can be exported and reused
in other projects. Let’s take a look at how these operations occur.
To export the component, simply use the Export component command in its context menu. The result of the export operation is the creation or updating of a file with
the idz extension that contains everything needed to reuse that component. The export
operation is governed by certain properties defined at the component level.
The Path property contains the full path of the file where the component will be saved
during the export operation.
The Version property is very important, because an idz file may contain multiple
versions of the same component, thus allowing the user to select the one desired. So if
you export a component in a particular version and the idz file contained another, the
previous version is not lost, because the current one is added to it.
The Export sources flag allows you to select whether to include in the idz file the
complete version of the component in the form of an Instant Developer project, or just
381
Andrea Maioli – Instant Developer: User's Guide
the version that defines the interface of public objects. In any case, the idz file will also
include the objects compiled, i.e., the jar or dll file depending on the chosen environment. If you set the Both technologies flag and you have an Instant Developer license
that permits double compiling, then the exported component will contain both.
Finally, the Demo flag allows you to create a demo version of the component. If
you set it, the idz file will not contain the source code even if that flag is set. Moreover,
all applications that use the component will be forcibly compiled in demo mode.
After exporting the component, the message form may contain several warnings,
which you should read to check if everything was done correctly.
9.3.1 Importing a component
To reuse a component in another project, you have to access the idz file that contains it.
You can save the idz file in the same directory as the project to import a specific copy,
or in a common directory to share it among multiple projects or developers.
To start importing a component, simply use the Import component command in the
context menu of the Project object. The form shown below will appear.
The list at the top shows the idz files present in the project folder, along with those
contained in Instant Developer’s default folder. To add an additional idz file, you can
select it with the Browse button.
By selecting a file, the list below will show the components it contains. The first
column, Src, specifies whether the component contains the source or not. The other
columns contain the name and version of the component and which version of Instant
Developer was used to export it. Clicking a row in this list enables the Import button,
which allows you to complete the operation.
382
Components and subforms
When you import a component with source code, the project contains the entire definition of that component, so you can modify and recompile it in another language or with
a different version of Instant Developer. If you re-import a component with source
code, the one contained in the project is updated to the new version imported.
In the case of components imported in binary form, i.e., without source code, the
project contains only the interface of public objects, i.e., all objects that can be referenced from the application. In this case, the component cannot be compiled when the
application is compiled, so the jar or dll file is extracted from the idz file from which
the component was imported. The following behaviors also apply:
1) If the idz file is updated, it is not necessary to re-import the component, because
when you compile the application, the compiled version is extracted from the idz
file.
2) If, however, the public objects have changed, then you must re-import the component to update them in the project.
3) If you want to use a new version of the component you must import it explicitly. It
will replace the previous one, synchronizing the project.
4) You cannot import the component if it has been exported with a different version of
Instant Developer, or in another language. In these cases, you must use a version
including the source code.
383
Andrea Maioli – Instant Developer: User's Guide
9.4 Interactions between components and the application
If a component contained only classes of code, it would not be necessary to discuss any
kind of interaction between it and the application that uses it. The application would
simply create the objects used at the appropriate time.
However, as we have seen in previous sections, a component can contain objects of
all types, and many of these must be joined with those of the application. If, for example, you insert a part of the main menu inside a component, how does the link occur
between this and the other menu items defined in the application? To find out, we will
look at how the integration between components and the application occurs, addressing
in particular the integration between the common parts of the framework.
This process occurs at the time the web session is created. At that moment, the application creates a Component Session object for each component that it must use. The
Component Session is analogous to a session at the application level.
When all component sessions have been created, the process of integrating the
common parts begins, according to the following rules:
1) Command set: The main menu defined in the component is added to the one present
in the application.
2) Timers: The timers defined at the global level in the component are added to those
of the application.
3) Indicators: The indicators defined at the global level in the component are added to
those of the application.
4) Application properties: The general properties of the application are joined to those
of the component so that the component can access those of the application. If, for
example, you use the Path function in the component, it actually returns the physical path where the application is installed.
5) In-memory tables: Tables of the component are added to those of the application,
within a single in-memory database.
6) Visual styles: If the component uses visual styles also present in the project to
which it is imported, then they will be used with the current definitions. Additional
visual styles present only in the component will have the properties defined when it
was exported. This way, the component’s graphical theme will conform to that of
the application to which it is imported.
7) Database connections: All database connections that the component stores are remapped by name with those of the application. You can use the OnGetDbByName
event to customize the mapping of the component’s connections with respect to
those stored by the application.
384
Components and subforms
9.4.1 Components and application roles
We will now discuss how you can configure the features provided by components for
different profiles. The recommended approach is not to define roles and profiles within
the component, but to use those of the application.
Once the component has been imported, you can also include objects of components in the application’s profiles by dragging and dropping them, as previously described for application profiles in the section: Defining application profiles and user
roles.
You can also define the local roles and profiles in the component, in which case its
profiling system is disconnected from that of the application that contains it. By setting
the UserRole property, the component will activate the selected profile in relation to the
objects contained in it.
9.4.2 Application events and global events
Let’s now look at how application events and global events are raised at the component
level.
In the case of application events, such as the Initialize event, the framework raises
them first to the component and then to the application. This way, the application can
have the final say on what will happen, even though the components may contribute to
the proper handling of the event.
As for global events raised by the user interface, if the object raising the event is
part of the application, then it will be handled only by the global events of the application. However, if the event originates from a visual object of the component, it will be
handled globally first by the application and then by the component.
The global events raised by documents will fire only to the corresponding DocumentHelper: those of the component to the DocumentHelper of the component, and
those of the application to the DocumentHelper of the application.
However, integration is possible at the DocumentHelper level. If the DocumentHelper property of the component points to the DocumentHelper object of the application, then the latter will handle the global events of all documents, including those
of the component. You can also obtain the opposite result. To have a component that
handles all the global events of the documents, you can set the application’s DocumentHelper property to the object corresponding to the component. Through visual
code, you can handle mixed situations or use event-handling approaches other than
those described: You simply have to call the corresponding event of the DocumentHelper object in question.
385
Andrea Maioli – Instant Developer: User's Guide
9.5 Subforms
To maximize the reusability of objects already created, Instant Developer allows you to
include an entire form within another. This way, you can create new visual components
for aggregation, and then reuse them as needed in other forms or in other projects. An
example of this is the Errore. L'origine riferimento non è stata trovata. component,
which allows you to include a map within any form in the application.
Reusing a form within another is currently possible in the following ways:
1) Within a frame on a form, done by dragging and dropping the form onto the frame
inside the form editor.
2) As the content of a static panel field, by dragging and dropping the form from the
object tree onto the static field shown in the form editor.
3) As a page in a tabbed view. This can be done both at design time, by dragging and
dropping the form onto the tabbed view, and at runtime using the AddForm method.
4) As the content of a box in a report, by adding it at runtime through the SetSubForm
method. Using this method made it possible to complete the sample portal for iPad
devices available at: examples.instantdeveloper.com/portal.
By dragging the Employee form onto the empty frame, it is reused within the Order
Once the form has been included, it is represented by an object of the Subform type,
indicated by the following icon . The subform can be modified from the form editor,
but the changes will apply to all subforms that reference it, so you should test them in
all contexts where the subform is used.
386
Components and subforms
9.5.1 Interaction between forms and subforms
We will now look at how a form communicates with a subform and vice versa. Suppose
that in the example on the previous page, you want to display the details of the employee who placed the order. Every time the row changes in the orders panel, you have to
send a message to the employees subform to specify which employee must be displayed.
Sending messages to the subform can be approached in a specific or generic way.
The former applies when you know the type of subform, the latter when it is generic.
The explicit approach is based on the ability to call a method on the subform, since
it can be cast to the correct type. Let’s look at an example:
In the OnChangeRow event of the Orders panel, the instance of the Employee form
used as a subform is obtained by calling the IDForm function on the subform. Then the
OpenFor method is used, which updates the panel based on the employee ID passed as
a parameter.
The peculiarity of this method is the need to explicitly specify the type of subform.
You can also use an implicit approach, sending a message to the subform using the
SendMessage function. Let us see how:
This time, a single line of code is used that no longer expresses the type of subform as
in the previous case. Let’s see how this message is intercepted within the subform.
To obtain this result, you use the OnSendMessage event of the form, which takes
as parameters those passed to the SendMessage function in addition to the IDForm object that sent the message. The following image shows a code example.
With this second approach, you can replace the subform contained in the orders
form with a different type at runtime, while still being able to send messages to each in
a uniform manner.
387
Andrea Maioli – Instant Developer: User's Guide
This mechanism of sending generic messages can also be used from within the subform
to communicate with the form that contains it. Suppose, for example, that after changing the data for the employee from within the subform, you want to send a message to
the form that contains it so any updates can be made.
To obtain this result, simply send the message by calling the GetParentForm function, which, in a subform, returns the form object that contains it. An example is shown
in the following image:
9.5.2 Managing subforms at runtime
In addition to preparing subforms at design time by dragging and dropping them onto
the form editor, there are several ways to create and manage subforms directly at
runtime. Specifically:
1) You can replace the subform contained in a form with one of another type, whether
it is inside a frame or inside a static field. This is done by calling the SetSubForm
method on the object that represents the subform.
388
Components and subforms
2) You can add new subforms inside a tabbed view. This is done by calling the AddForm method of the tabbed view.
3) You can insert a form inside a box in a report, by adding it at runtime through the
SetSubForm method.
Let’s look at an example of the second approach, leaving the third illustrated by the
Portal project contained in the collection of sample applications in Instant Developer.
In Chapter 7 we saw how to create tree structures for displaying various objects
managed by the application. Now suppose you want to make sure that when the user
clicks on a tree node, a form is opened for managing the document inside a tabbed
view, as shown in the following image:
To obtain the desired result, you only need a few lines of code in the OnActivateDoc
event of the tree.
In the tree node activation event, the default form is created for editing the document
corresponding to the active node. This is done through the Show method of the document. The form obtained is already designed to be used as a subform thanks to the SubForm constant passed as the opening type. At this point it is added to the tabbed view
by simply calling the AddForm method. With just two lines of code you can create a
Multi Tabbed interface!
389
Andrea Maioli – Instant Developer: User's Guide
9.6 Using components without importing
So far we have seen that to use a component in an application, you have to import it at
design time and then use its objects. Sometimes it may be useful to upload new components directly at runtime, without the application being aware beforehand.
Imagine, for example, a portal type application, where the services provided vary
from day to day and cannot be predicted with certainty. It would be unreasonable to
have to recompile the application every time a new service is added. For this reason,
the Instant Developer framework provides three simple functions to load and use components directly at runtime.
1) GetLibraryClassList: This returns the list of forms or documents contained in a jar
or dll file that contains a component made with Instant Developer.
2) CreateFormFromLibrary: This creates a form contained in the specified dll or jar
file. The association is made by the name of the class representing the form. The result is an IDForm that is ready to be displayed or used as a subform.
3) GetFromDNA: This creates a document contained in the specified jar or dll file,
based on the name of the class. It can be loaded from the database if applicable.
The ability to decouple the application from components at design-time can be indispensable to customizing software according to the installation. To customize a form or
document, in fact, you can install a new jar that contains the modified version, and
point to that instead of the original from within the application. Let’s look at an example of loading a form from a custom component rather than the original.
The RunCommand method takes as a parameter a string in the form componentname.formname and is used from a tree docked to the left of the browser, which serves
as the application menu. Each tree node is associated with a user-configurable com-
390
Components and subforms
mand string. The application has been compiled in C#, so the components are dll-type
files in the web application’s bin subdirectory.
The end result is a fully user-configurable application menu, where each item
opens a form indicating the component and the name. In this way, you can add pieces
of the application directly at runtime or replace existing ones without ever having to
recompile the web application that contains them.
Also, in terms of customization, remember that documents support the Class factory service, which allows the actual name of the class instantiated to be decided at
runtime. This way, you can replace a document anywhere in the application, providing
an extended version and specifying its name within the SetClassName function.
9.7 Component graphics
One of the most interesting aspects in using components is the ability to extract features
already developed in previous projects for reuse.
Unfortunately, this is not always possible, because much depends on how the feature has been developed. If has been designed with a view to reuse, the classes and
forms that implement it become almost completely isolated from the rest of the system.
In other words, they do not depend on global objects or any other application objects.
To be able to determine whether a certain function can be extrapolated, you need to
see the graphic showing the dependencies with other objects. Instant Developer can
display a graphic of this type through the Show linked objects command in the context
menu of forms and classes, but also for tables and database views, in-memory tables,
global procedures, and global variables.
The graphic shows the other application objects on which the selected one depends.
The number listed next to each link specifies how many lines of code or other objects
are affected by the link. By right clicking next to the number, you can open a search
form that lists them.
The [+] button inside the objects indicates that they, in turn, depend on other objects. Clicking on the button will display these also.
391
Andrea Maioli – Instant Developer: User's Guide
Example graphic of linked objects
Right-clicking an empty part of the graphic opens a menu that allows you to filter the
graphic by type of object, or to expand all or collapse all. Clicking on the central object,
meanwhile, opens a menu that allows you to export objects in the graphic to one of the
components of the project, or to a new project.
Context menu of the central object
Exporting to a component is done by moving the visible objects in the graphic into the
component. The application will reference those objects and will therefore function in
the same way. Since, however, only visible objects are moved, it is a good idea to expand the graphic to ensure that the objects moved to the component do not depend on
others remaining in the application, because this is not permitted and will prevent the
application from compiling successfully.
Exporting to a new document, instead, copies the visible objects to a new project,
breaking any links to objects that have not been copied.
To allow greater configurability of the process of exporting to a component, there
are additional commands in context menus of the non-central objects. We can see this
in the following image:
392
Components and subforms
Context menu of linked objects
The first option to configure the export is Cut. By selecting it, the object will become
gray and will not be moved to the component or exported to the new project.
The Duplicate option, however, allows you to copy the object to the component instead of moving it. The application will continue to reference the original, but the component will use its own copy, so they can be modified independently.
By using the linked objects graphic, you can get a picture of the quantity and quality of interconnections among objects to be componentized, and then decide which parts
to send to the component. In very complex and interrelated applications, the number of
connections is so high that the only solution would be to move the entire application
into the component, or at least a large part of it. In these cases, componentization becomes practically impossible.
9.7.1 Suggestions for dividing into components
As we have seen in the previous sections, a component is more than a set of classes,
and contains a component of the framework that is combined with the application at
runtime. Moreover, the application and its components perform cross event notifications as described in section 9.4. For this reason, we do not recommend managing a
very large number of components, each of which providing a single feature.
On the other hand, creating components that are too large could lead to creation of
unnecessary connections between the various functions, also undesirable, making it impossible to separate the parts later.
For this reason, we recommend creating components of average size, each of which
covers one aspect of the application. A component could, for example, coincide with a
module, or with a cross-functionality such as messaging management.
As a general guideline, a small application should contain up to 5 components, an
average one up to 10, and a large one up to 20. You can use loading of components at
runtime to load only those actually used by each work session, which may help to fall
within these guidelines.
393
Andrea Maioli – Instant Developer: User's Guide
9.8 Questions and answers
Through components and subforms, you can obtain a very high degree of code reuse, in
addition to designing modular information systems, even enterprise-class ones.
The topics covered include software engineering issues, and the examples provided
are basic, without covering every possible situation. For further information, you can
send a question via email by clicking here. I promise to answer all emails in my available time. Also, the most frequently-asked questions will be published in this section in
subsequent editions of this book.
This space is reserved for answers to readers' questions
394
Chapter 10
Component gallery
Information on the Component Gallery is no longer contained in this guide. It has been
replaced by the Components Guide, accessible from within Instant Developer and
available online at the following address http://doc.instantdeveloper.com/indecomponents-guide.pdf.
395
Chapter 11
Extend Instant Developer
11.1 Types of extension
The first two parts of this guide describe the major features that Instant Developer provides for creating applications. In any event, however numerous and complete these
features, they may not be sufficient to implement all possible types of behaviors, aspects, and dynamics.
We saw in Chapter 8 that you can extend the Instant Developer library by importing existing code or by connecting web services. This is very useful for adding basic
services that are already implemented, without having to recreate them within In.de.
This chapter is devoted to exploring the other forms of extending and customizing
templates, the framework, and the Instant Developer IDE itself. In particular, we will
discuss the following types of extensions:
1) Customizing the graphical theme of the application and template pages.
2) Structure of the RD3 framework, and possibilities for connection and extension.
3) How to include custom visual components in the browser interface.
4) Creating applications that connect to the IDE and modify its behavior.
5) The Instant Developer wizards system.
11.2 Anatomy of the custom directory
To understand how to customize or extend applications created with Instant Developer,
we will take a closer look at the process of compiling them.
When building the project, for each application that must be compiled, Instant developer performs the following steps:
1) Based on the template files, it creates the application’s source code in the output
folder.
2) The application is compiled using the native compiler of the selected language.
3) The application is placed on the development web server.
396
Extend Instant Developer
4) A browser window opens that links to the development web server to test the application.
Let us now focus on the first step, i.e., generation of the source code. This involves the
three directories specified in the application properties, as shown in the following image:
The Template directory is the starting point, containing the template of all files that the
application version generated must have. We recommend using the version contained in
the Instant Developer installation, denoted by $ID\template…, Where $ID specifies
precisely the directory where In.de was installed.
The Output directory is where the application will be compiled. It includes the
template files and the source code needed. Typically, a directory relative to the location
of the project file is specified, as in the example, .\csharp.
Finally, the Custom directory specifies a directory that contains the custom template files for this project. If you want to change the template, we do not recommend
changing the original files directly, or copying the template entirely into another directory. It is better to place your own files into the directory specified as Custom. Again in
this case it is appropriate to specify a position relative to the project file.
Note that some operations, such as importing an external library as described in
Chapter 8, automatically create or modify the custom directory, because the new library
must become part of the compiled project. Otherwise there would be errors at runtime.
11.2.1 The list of template files
During compiling, not all files in the template directory are processed. Instead, a particular file contained in the template is read, called filelist.txt. It lists the structure of the
template, which files it includes, and how they should be copied to the output directory.
Let’s look at some excerpts of the file contained in the template in C# web applications.
397
Andrea Maioli – Instant Developer: User's Guide
; Styles and Html Fragments
$THEME$\iw.css
custom.css
$THEME$\header.htm
...
; Template Files
ijlib.js
dragdrop.js
custom.js
...
; Temporary File Directory
temp\
docs\
logs\
; Graphic File Directory
images\
$THEME$\images\empty.gif
$THEME$\images\help.gif
...
Note in particular the last part, relating to images. It begins with the line images\, which
tells the compiler to create a subdirectory with that name within the output directory.
The second line contains the token $THEME$. This specifies that the file is not
contained in the current template, but in a parallel folder depending on the graphical
theme chosen for the application in the parameters form. This way, the same template
can be used in combination with different graphical themes.
Now suppose you want to replace the icon for the button that opens the user’s
guide help.gif ( ) with a different one. To do this, you must create the custom directory and specify it in the application properties form. Then you copy the customized
help.gif file to the same location relative to the template within the output directory.
Since in the template, the help.gif file is not at the root level but in the images subdirectory, you have to create a subdirectory with the same name inside the custom directory and copy the custom icon into it.
In fact, whenever the Instant Developer compiler interprets a line of the files list, it
first checks if an equivalent file is present in the custom directory. If so, the custom one
is used; otherwise it proceeds with the standard one.
11.2.2 Adding files to the template
We just saw how to replace the standard template files with custom copies, but the
method described does not allow adding new ones. If, for example, we need to copy an
imported library to the output directory, this is not part of the standard template. It is
therefore not enough to insert it in the custom directory to have it become part of the
compiled application, because there is no line that references it within filelist.txt.
To solve this problem, you can create a text file in the custom directory that also
has the name filelist.txt. The Instant Developer compiler, after processing the template
list, also checks for a filelist.txt file in the custom directory, and processes it as well if
found. For example, if we wanted to copy a library called datetimetool.dll, we could
simply add the following line to the filelist.txt file in the custom directory.
398
Extend Instant Developer
bin\datetimetool.dll
Consequently, the file to be copied must be placed in the bin subdirectory of the custom
directory.
The custom filelist.txt file can also be used to create new subdirectories. For example, if we want the compiled web application to contain a subfolder called photo, we
would put the following line in the custom filelist.txt file:
photo\
11.2.3 Embedding the custom directory into the project
From version 12.5 of Instant Developer, you can embed the entire custom directory inside the project binary file. Thus, the .idp file contains everything needed to compile
the applications it contains.
To embed the custom directory, you open the properties form of the application for
which you want to include custom files and click the Embed button.
If you do not specify a custom directory, a message is displayed indicating: Custom
directory not embedded.
Once the folder is added, In.de updates the message text, indicating the date/time the
operation was carried out and the size occupied in the project. The size can be different
from the size of the files that were on the hard disk because In.de compresses them.
The custom directory embedded into the project can also be updated or deleted. To
update it, simply import it again by pressing the Update button. To remove it, simply
press the Remove button.
399
Andrea Maioli – Instant Developer: User's Guide
When the custom directory is embedded into the project, In.de extracts it again whenever necessary for compiling the application, in particular, if:
1) the custom directory does not already exist on the hard disk at the location specified
by the Custom directory field shown in the properties form;
2) the Recompile all flag is set in the application's compiling form.
In both cases, In.de extracts the files to the path specified in the Custom directory field.
If the directory already exists, the files in it will be overwritten with those contained in
the project.
If the path specified in the Custom directory field is empty and the custom directory was embedded into the project, In.de does not use it and does not extract it. This can
be useful if you want to try compiling your application without the custom files.
Embedding the custom directory into the project can be very useful, especially
when using the Team Works module. In Team Works, all developers receive the updated custom directory simply by clicking Get latest version, and a new one can be distributed to the entire working group simply by performing a check-in.
11.3 Customizing the graphic theme
The entire look and feel of applications created with Instant Developer is controlled by
two types of configurations: graphical themes and visual styles. Graphical themes control the general appearance of the user interface and common objects, while visual
styles affect how the content of forms is displayed.
We have already discussed how visual styles allow you to change the appearance
of panels, reports, books, and graphs. Now we will see how a graphical theme is constructed and customized. A graphical theme consists of the following parts:
1) A cascading style sheet file that controls the general appearance of the interface,
called rd3.css.
2) Other css files in addition to the first to standardize the specifications of the different browsers (safari.css, firefox.css, chrome.css, iphone.css). At runtime, the one
corresponding to the specific browser is used.
3) Another css file called custom.css that allows you to add custom definitions. Inside
the standard template, this is empty.
4) A set of icons that appear in the various parts of the standard user interface, such as
the images for the standard panel buttons.
5) Several html files used to display certain parts of user interface, specifically:
a. calpopup.htm: Calendar control for choosing dates.
b. calpopupip.htm: Calendar control on mobile devices.
c. delaydlg.htm: Visual feedback form for operations that take a long time.
400
Extend Instant Developer
d. desktop.htm: The base application page. It specifies the resource to be loaded
and boots the RD3 framework.
e. desktop_sm.htm: Version of the desktop to use when the application is compiled without the debug module.
f. login1.htm: Login page displayed unless the UserRole property is set during initialization of the web session.
g. qhelp.htm: The standard welcome page of the application. It is shown if there
are no other forms open.
h. unavailable.htm: The page displayed if an attempt is made to access the application while it is being updated.
i. uploadcomplete.htm: The page displayed after a photo is uploaded from a mobile device.
Instant Developer contains three predefined graphical themes called simplicity, casual,
and seattle. The latter is the default, and there is also one designed for creating applications for mobile devices like the iPhone and iPad.
To select a different graphical theme you can open the compiling parameters form
with the Wizards – Configure parameters command in the application object context
menu. The parameter for the graphical theme is contained in the General tab.
Although you can create a graphical theme from scratch by copying an existing one
to a new folder and specifying its name in the compiling parameters form, we generally
recommend using the approach described in the previous section of customizing the
custom directory to make the required adjustments. Let us now look at some examples
of how to change the graphical theme, to illustrate the different scenarios.
11.3.1 Customizing the login page
In chapter 3, we saw that if the UserRole property is not set during session initialization, the user sees the standard login form of the graphical theme chosen. An example
of the login page is shown in the following image:
Normally, this page is customized to change its layout and images, or to require
other information from the user logging in.
Changing the layout can be done by customizing the login1.htm file present in the
location corresponding to the themes of the standard template. For example, if you are
using the seattle graphical theme and Instant Developer is installed at C:\program
files\inde, then the file to be copied to the custom directory is located at: C:\program
files\inde\current\template\theme\seattle\login1.htm.
401
Andrea Maioli – Instant Developer: User's Guide
Example of login form
Although it is an html file, we recommend editing login1.htm using a text editor. In
fact, it will not be served directly from the web server, but included in the application
source code. When a line begins with a backslash character, it is not treated as a string,
but as an expression. This way, you can also call functions written using Instant Developer. Let’s look at an excerpt of the file as an example:
\ <font
color=\"#BCBC77\">" + Glb.HTMLEncode(Caption(), true, true) + " - </font>
<font color="#004d89">Login Form</font></b>
<p><font color="#004d89" face="Trebuchet MS" size="2">Username&nbsp;&nbsp;
\ <input
name=\"UserName\" value=\"" + Glb.HTMLEncode(RolObj.glbUser) + "\" />
<br>Password&nbsp;&nbsp;&nbsp;
<input type="password" name="PassWord" >
<br>&nbsp;</p>
<p><input border="0" src="images/login.gif" name="I1" type="image"></p>
We can see that the first and fourth line start with a backslash. If you take the text from
the line and place it into a line of code in C# or Java, as in the following, you can see
how the compiler processes this file.
String outval = “line“;
402
Extend Instant Developer
After being processed, the value of the string is sent as a response to the browser. This
way, the first line can call the Caption() function, which at the framework level represents the MainCaption property in visual code. The fourth line, meanwhile, uses the
RolObj.glbUser property, which is the equivalent in the framework of the UserName
property in visual code.
The lines that do not begin with a backslash are encoded and sent as strings directly to the browser.
You can also add additional input fields to the login form, whose value can be read
in the OnLogin event of the application. For example, we can add a check box to implement the Remember me feature, which allows the user to access the application in
the future without having to log in. We do this by editing the login1.htm file as shown
below:
<input type="password" name="PassWord" >
<br><input type=”checkbox” name=”remme”> Remember me
<br>&nbsp;</p>
After compiling the application, the login form appears as shown below:
Now let’s see how to retrieve the values entered by the user. The GetSetting function
allows you to read the values passed in the POST request to the browser. The following
code must be added to the OnLogin event.
403
Andrea Maioli – Instant Developer: User's Guide
11.3.2 Customizing panel toolbar icons
This type of customization consists of replacing the image files that are used as icons
for the buttons in the panel toolbar.
For example, we can customize the images/csv.gif ( ) file, which represents the
icon for the Export to Excel button, updating it to the latest version of the spreadsheet.
In the case of icons, it is important to respect the original size, since the final image is
processed as a composition of the background and icon specified. The following image
shows an example of the result.
This result is obtained by inserting the new icon csv.gif (
rectory of the custom directory.
) inside the images subdi-
11.3.3 Customizing the application caption bar
Changing the look and feel of the theme can be done in a very comprehensive way by
editing the custom.css file, where you can insert any setting for each graphic element of
the user interface.
As a preliminary example, let’s look at how to change the appearance of the application caption bar, hiding the field for inserting commands, which is not always desirable.
To discover the characteristics of the graphic element in question, you can use the
DOM inspector tools included in all modern browsers. In this case, it turns out that the
object to be hidden has the identifier header-command-box. At this point, you can
simply create a text file in the custom directory named custom.css and insert the following line in it.
404
Extend Instant Developer
#header-command-box
{
display: none;
}
It may be useful to hide the entire caption bar. In this case, the same attribute should be
applied to the element identified by: header-container. Note that the WidgetMode
property is also available, but it hides all graphic elements other than the open form.
Also, when the last form is closed, the session is terminated as well.
11.3.4 Customizing the welcome page
The welcome page is displayed when there are no other forms open. The version contained in the standard template is a sample page for presenting the application to the
user.
To change the welcome page, you can set the application’s WelcomeURL property
in code, pointing it to any web page. Alternatively, you can customize the qhelp.htm
file, copying it to the root level of the custom directory and editing as desired. In this
case, however, the file is served directly from the web server, so you cannot insert rows
that begin with a backslash as is the case with the login form.
11.3.5 Customizing the caption bar of forms
We will now look at a slightly more complex example. The Portal sample application
uses a custom style sheet to round the borders of forms, add a shadow, and make the
caption bar more vibrant. The complete custom.css file can be downloaded from:
http://www.progamma.com/portal/custom.css. Let's take a look at some excerpts:
.form-caption-container
{
-webkit-border-top-left-radius: 4px!important;
-webkit-border-top-right-radius: 4px!important;
background-image: url(images/wave.jpg) !important;
}
405
Andrea Maioli – Instant Developer: User's Guide
Caption bar of the custom form
The css class form-caption-container is applied to the caption bar of the forms. The
three settings listed specify the rounded borders and the background image.
.form-caption-text
{
color: #E9E9FF !important;
}
.form-container
{
border: 0px solid #99bbe8;
-webkit-border-radius: 4px!important;
-webkit-box-shadow: 3px 4px 4px rgba(0,0,0,0.5);
}
The css class form-caption-text is applied to the caption, and the color set makes it almost white. Finally, the css class form-container is applied to the object that contains
the entire form. The attributes inserted add the rounded borders and the shadow.
11.4 Extending the JavaScript RD3 framework
We will now discuss the ability to customize the RD3 framework dedicated to rendering the browser interface. An analysis of the functioning of this module is beyond the
scope of this section, and it is subject to change in later versions of Instant Developer.
Any modification or customization made at this level may therefore not function when
you change the In.de version used for compiling.
406
Extend Instant Developer
11.4.1 Animations, sounds, and tooltips
The first aspect to customize with respect to the RD3 framework is adjusting the overall
behavior of the system. This can be done through the compiling parameters, or by setting some application properties in the Initialize event. Complete documentation of
these properties is available in the RD3 and Multimedia libraries. To manage animations, you can proceed as follows:
1) Completely disable animations: Through the compiling parameter General / Animation, or with the SetAnimationEnabled method.
2) Change animation types: Using the functions contained in the RD3 library, you can
selectively disable or modify the various types of animations for graphic objects or
for the entire user interface. For example, to disable the page change animation for
a tabbed view, you can use the SetChangeTabPageAnimation method, using None
as the type.
3) The user can also independently disable animations by typing ANI- in the command
box, or ANI+ to enable them.
As for sounds, the typical operations are:
1) Completely disable sounds: Through the compiling parameter General / Sound effects, or with the EnableSound property.
2) Change the sounds for standard actions: You can customize these sounds by including your own sound files in the mmedia subdirectory in the custom folder. The original files are contained in the common/mmedia folder of the template.
3) The user can also independently disable sound effects by typing SND- in the command box, or SND+ to enable them.
Finally, you can use rich tooltips or use only the standard ones of the browser, either
with the compiling parameter General / Rich tooltips or with the EnableRichTooltip
application property.
11.4.2 Types of events
When the user interacts with a web application created with In.de, the RD3 framework
sends the server the user’s actions in the form of events. There are several dispatch
modes, described in the EventTypes value list. These are the most common scenarios:
1) Delayed asynchronous event: The message is stored by the client but not sent to the
server immediately. This happens, for example, when the value of a panel field
changes, if it is not active. This avoids excessive communication with the server.
2) Immediate asynchronous event: The message is immediately sent to the server. If
the customer has previously triggered delayed events, they are sent in the same
407
Andrea Maioli – Instant Developer: User's Guide
message in the order of occurrence. An example of this event is when the active
panel row changes or when the user navigates through it with the scrollbar.
3) Immediate synchronous event: The message is immediately sent to the server, and
the user interface is locked until the response is received. If the customer has previously triggered delayed events, they are sent in the same message in the order of
occurrence. An example of this event when the data in a panel is saved: Until the
server confirms the save, use of the application is locked.
Normally the default event dispatch mode is the one that provides the best usability of
the application, without making too many calls to the server. However, you can change
how most events are handled using the methods contained in the RD3 library of the object.
One possible scenario would be if you want to modify the way page changes are
handled for a tabbed view. The default mode is immediate asynchronous, because the
browser can change pages even if the server has not responded yet.
In some cases, this mode can lead to the selected page being displayed before it is
updated if the server has not been able to respond yet. To avoid this behavior, you can
set the tabbed view’s ClickEventType property to the value ServerSide + Immediate to
prevent the change from occurring on the client side before the server responds.
Lastly, note the panel’s SetCommandBlocking method, which allows you to specify which panel toolbar commands are blocking or not.
11.4.3 Parameters and messages
Although many parameters can be modified within the compiling parameters wizard,
the RD3 framework defines many others that affect the behavior within the browser.
These parameters are described in the ClientParam.js file, contained in the RD3 folder
of the template. Let’s look at an excerpt:
// Standard function keys
this.FKActField = 2; // Activates the individual field
this.FKEnterQBE = 3; // Enter QBE key
this.FKFindData = 3; // Find data key
...
This area of the file defines the association between the buttons of the panel toolbar and
the function keys on the keyboard. The next part, meanwhile, defines some characteristics of RD3 combo boxes.
// IDCombo parameters
this.ComboPopupMinHeight = 14;
408
Extend Instant Developer
this.ComboPopupMaxHeight = 210;
this.ComboActivatorSize = RD3_Glb.IsTouch()?24:15;
this.ComboImageSize = 16;
this.ComboNameSeparator = "; ";
...
To modify these parameters, you should not customize the ClientParams.js file, because it is only used while the application is being developed. When compiled without
debugging enabled, the entire javascript framework is loaded from a single file, called
Full.js, which is minimized and compressed.
In a manner similar to cascading style sheets, for javascript code there is a file
available called custom3.js loaded after all others, which allows you to insert changes,
additions, or customizations. This file, which is empty in the standard template, can be
customized by adding your own settings. For example, if we want to increase the maximum height of combo boxes and change the association of the Search button to
Ctrl+F3, we could insert the following lines into the custom.js file.
function RD3_CustomInit()
{
RD3_ClientParams.FKEnterQBE = 27; // CTRL+F3 returns to QBE
RD3_ClientParams.ComboPopupMaxHeight = 300;
}
The RD3_CustomInit function allows you to execute javascript code after initialization
of the framework’s basic objects. Specifically, the RD3_ClientParams object contains
the parameters of the framework, so it can be used to change them, as shown in the example.
In addition to the parameters file, the RD3 framework also uses a message file
called ClientMessages.js. Again in this case, we do not recommend customizing this
file, but rather modifying the content through the RD3_CustomInit function, as follows:
function RD3_CustomInit()
{
ClientMessagesSet['ENG'].MSG_POPUP_NoButton = "NOT OK";
}
409
Andrea Maioli – Instant Developer: User's Guide
11.4.4 Modifying the application bar
The RD3 framework does not use an html file to create the browser interface, but rather
everything is done through javascript. For this reason, if you want to change the structure of the interface beyond what can be done using styles, you have to do this at code
level.
In this section, we will explain how to customize the application’s caption bar,
where sometimes you might want to add additional parts. The caption bar is created
from the WebEntryPoint.RealizeHeader Javascript function, which is contained in the
WebEntryPoint.js file. For convenience, at the end the function calls a stub named CustomHeader, which can be customized in the custom3.js file as seen in the previous sections. The following is an example of code that you can insert directly into custom3.js:
WebEntryPoint.prototype.CustomizeHeader = function(parent)
{
var cmd = this.CommandBox;
cmd.innerHTML = "<a href='http://www.google.com'>Google</a>";
}
The result is that instead of the text box for sending commands, a hyperlink appears to
go to the Google website. We recommend reading the text of the RealizeHeader function to see how the bar is constructed and how to modify it.
11.4.5 Configuring the HTML editor toolbar
Now let’s look at another example of customization through javascript that you may
see. Instant Developer allows you to use an HTML editor within forms in the browser,
which is currently done by including a javascript component called CKEditor.
This component has a high level of configurability. For example, you can completely customize the layout of the toolbar. To do this, you have to overwrite the following javascript function, again inside custom3.js.
PCell.prototype.CustomizeCK = function()
{
// The Conf object contains the CKEditor configuration
var conf = new Object();
... (Insert your customization here)
return conf;
}
410
Extend Instant Developer
To learn more about the configurable properties of the object returned by the previous
function,
refer
to
the
CKEditor
documentation,
available
at:
http://docs.cksource.com/ckeditor_api/symbols/CKEDITOR.config.html. In any event,
we also recommend reading the text of the original CustomizeCK function contained in
the PCell.js file to see which configurations the Instant Developer framework applies
by default.
11.4.6 Inject events via javascript
The last example of customization at the javascript level concerns the interaction between the frame that contains the application created with Instant Developer, and any
others that may be present in the browser window.
This can happen when you include interface parts created with In.de in a portal. To
do this, you would normally use a portlet containing a simple iframe that loads the
In.de application. Launching of the application and the corresponding startup commands can be passed as a query string to the iframe, but this mechanism is not recommended for subsequent interactions. This is because the application would be reloaded
each time, and, even if the session remained, there would be an unpleasant visual effect.
A better approach is to interact directly at the javascript level, calling the following
function, which must be incorporated into the custom3.js file, from outside the portlet.
function SendCommand(cmd)
{
var ev = new IDEvent("cmd", "wep", null, RD3_Glb.EVENT_ACTIVE, cmd);
}
For example, calling the SendCommand function and passing “ORDER&ID=10248” as
a parameter, the application will receive notification of the OnCommand event with the
string “ORDER” as a parameter. The other data can be extracted using the GetUrlParam function.
Keep in mind that calling a javascript function from a different frame may cause a
cross site scripting issue. To avoid this, both the portal and the In.de application must
be accessible through the same internet domain.
411
Andrea Maioli – Instant Developer: User's Guide
11.5 Including HTML components
In the previous chapters, we saw the characteristics of the graphic objects provided by
Instant Developer for creating user interfaces. Although these generally include everything you need to implement any enterprise application, you may sometimes want to
use a specific HTML component.
Unfortunately, the modes of operation of HTML components are many and varied.
It is therefore not possible to specify how to integrate them in all cases. In any event,
we will look at an example of integrating the JQuery File Uploader component, which
lets you upload files via drag & drop to the browser (Chrome, Safari, and Firefox).
The file uploader in action with the Chrome browser
The way to integrate it is to insert HTML and javascript code in a static panel field. In
this case, the code is interpreted by the browser, and the component can be activated.
The code is set in the form Load event, so it will be immediately executed, but it can
also be done in other events.
Although the code shown looks very simple, you should note the value of the
HTMLUpload constant that initializes the component.
<form id="file_upload_empty"></form>
<form id="file_upload" action="?WCI=IWFiles&WCE=|1" method="post"
enctype="multipart/form-data">
<input type="file" name="file" multiple>
<button>Upload</button>
<div>Drop images here!</div>
</form>
<table id="files"></table>
412
Extend Instant Developer
<!--scr>
$("#file_upload").fileUploadUI({
uploadTable: $("#files"),
downloadTable: $("#files"),
buildUploadRow: function (files, index) {
return $("<tr><td>" + files[index].name + "<\/td>" +
"<td class=\"file_upload_progress\"><div><\/div><\/td>" +
"<td class=\"file_upload_cancel\">" +
"<button class=\"ui-state-default ui-corner-all\" title=\"Cancel\">" +
"<span class=\"ui-icon ui-icon-cancel\">Cancel<\/span>" +
"<\/button><\/td><\/tr>");
}
});
-->
This code comes from the documentation and examples of the JQuery File Uploader
component. Note that the part between the tokens <!--scr> and --> are interpreted as
javascript text, executed after the previous HTML code is rendered inside the static
field.
In addition to the HTML code, this component requires the loading of a number of
javascript files, so the RD3_CustomInit function has been customized within the custom3.js file as follows:
function RD3_CustomInit()
{
RD3_Glb.LoadJsCssFile("jquery.min.js");
RD3_Glb.LoadJsCssFile("jquery-ui.min.js");
setTimeout('RD3_Glb.LoadJsCssFile("jquery.fileupload.js");', 100);
setTimeout('RD3_Glb.LoadJsCssFile("jquery.fileupload-ui.js");', 100);
setTimeout('RD3_Glb.LoadJsCssFile("jquery.fileupload-ui.css");', 100);
}
Note the use of the LoadJsCssFile function, which allows you to attach a javascript file
or style sheet to the document. Some files, i.e., JQuery base files, can be incorporated
immediately. Those specific to the component, however, require a delayed loading for
the user interface to be created in the browser beforehand.
Since the component's files must be present in the application directory, the following filelist.txt file was created in the custom directory.
jquery.min.js
jquery-ui.min.js
jquery.fileupload.js
jquery.fileupload-ui.css
jquery.fileupload-ui.js
pbar-ani.gif
413
Andrea Maioli – Instant Developer: User's Guide
You can download the complete project from this article in the In.de forum, which also
shows the code to intercept the uploaded file. With similar techniques, you can integrate most currently available HTML components.
11.6 Extend In.de with In.de
We will now look at a different way to extend Instant Developer. So far, we have seen
how to add new libraries, modify graphical themes, and customize the framework.
Now, we will see how to modify the Instant Developer IDE to adapt it to your needs.
Instant Developer is in fact a system that is reprogrammable via the Windows
COM interface. There are two recommended connection methods: with a Javascript
program activated through a set of wizards inside the IDE, or with a web application
compiled in C# developed with In.de. Since this application needs to connect to In.de, it
will not be installed on a web server, but launched directly on the development machine.
Now let’s look at the second approach, while the first will be described in the next
section. As an example of extension, we will create a program that can export the structure of the database tables and fields in the project to a text file.
Before you start an In.de extension application, please read the Extensibility chapter in the documentation center, which contains details of the various functions available. The steps required to achieve the desired result are:
1) Create a new Instant Developer project and save it.
2) Download the EsempiMS project from the documentation center and open it together with the previous one.
3) Copy the Extension INDE and INDE TreeWalker libraries from the EsempiMS project to the new one by dragging and dropping them from one onto the other. These
libraries contain the definition of the methods available for connecting to Instant
Developer and reprogramming it.
4) If you do not have a license to compile in C#, you can always use the Express version. Instant Developer Express can compile C# applications with databases containing up to 10 tables and with up to 20 classes, so it is suitable for creating extension applications.
5) In the application properties, deselect the Keep compatibility flag. The extension
libraries, in fact, are only available for C#.
6) Create a new form with a panel and a button that activates the export of the database structure to a text file.
7) Write the code that performs the operation in the procedure linked to the button.
8) Run the application by pressing F5 and see how the desired action actually takes
place.
414
Extend Instant Developer
Drag the libraries onto the tab and then onto the New Project object to copy them.
Now let’s look at the code for writing the structure to a text file. There are three steps:
1) Connect to Instant Developer and retrieve the pointer to the active project
2) Get the first database project
3) Iterate over its tables and fields and write them to a text file.
The above image shows how to perform the first step. It may seem strange to execute
the Connect method on the inde object, which in the previous row is initialized to the
value null. However, the generated code reveals that in fact the connection object is
pre-initialized by the framework, and the definition of the variable is used only to retrieve the instance.
The next line calls the GetActiveDocument function, which returns the pointer to
the document open in the IDE. Then, using the GetRootObject method you retrieve the
pointer to the Project object, at the root of the hierarchy. At this point, we can see how
to navigate through the object tree to find the first database defined in it.
415
Andrea Maioli – Instant Developer: User's Guide
Navigation through the object tree is done using a TreeWalker object, which works
fairly simply. After you have defined and initialized it with the new keyword, you call
the SetRoot method, which allows you to specify which part of the project is to be navigated and which objects you want to search. Then you can use a loop to call the GetNextObject function, which returns the pointers.
For now it is called only once, because we want the pointer to the first database in
the project. If it does not exist, the value zero will be returned, in which case a message
is indicated. Otherwise the pointer is passed to the ExportDatabase procedure, which
will perform the last part of the work. Let’s look at the code.
The procedure first opens a text file in write mode. In the example, the file is stored in
C:/database.txt. You will want to select a path where the application has permission to
write.
Then a TreeWalker is used to iterate over the various database tables with a loop.
Inside the loop, the GetPropString function is used to read the name of the table. Then
416
Extend Instant Developer
an inner loop uses a second TreeWalker on the fields of that table, and their names are
written in the text file. At the end, the file is closed.
With the same procedure you could also write other properties of objects to the file.
To see the different types of objects and properties supported, you can refer to the content of the Value list block in the INDE Extension library.
Value list present in the extension library.
The extensibility library allows operating on the object tree in many ways. We just saw
how to navigate and extract information, but you can also modify the project by executing transactions. In this case, however, we recommend reading the Extensibility chapter, since using the programmability interface can also lead to destructive changes to
the project.
11.7 Create an In.de wizard
Now let’s look at how to use the same approach for integration with Instant Developer
inside a javascript program rather than in a web application. This second extension approach is made possible by the Instant Developer wizard system: a set of html and javascript files that are activated from within the IDE by using an appropriate configuration system.
As an example, we will see how to calculate the cyclomatic complexity of the procedures written in visual code. This report can be useful to check whether there are any
functions that are too complex and that could therefore require much maintenance over
time. We recommend referring to the articles Extend with javascript and Configure
wizards in the documentation center.
First, you have to download the cyclomatic calculation wizard and then save it in
uncompressed format in a folder on your development machine.
The entire wizard, including the html and javascript parts, is in the index.htm file,
excerpts of which are seen below.
417
Andrea Maioli – Instant Developer: User's Guide
// create ActiveX interface
var x = new ActiveXObject("instdev.pgidx");
//
// create treewalker
var tw = new ActiveXObject("instdev.treewalker");
...
if (objID)
tw.SetRoot(objID, OT_PROC);
else
{
var docID=x.idGetActiveDoc();
var prjID=x.docGetRootObj(docID);
tw.SetRoot(prjID, OT_PROC);
}
At the beginning of the javascript code, the x object is created, which serves as a COM
interface with Instant Developer. Immediately after, a TreeWalker is created and used
to navigate through all procedures in the project. Just after that, the SetRoot method is
executed, as already seen in the previous section.
The calculation is performed in the CalcMetrics procedure, with the following
code:
function CalcMetrics(ProcID)
{
var w = new ActiveXObject("instdev.treewalker");
var Cicle = 1;
var Rows = 0;
w.SetRoot(ProcID, 0);
while (true)
{
var o = w.GetNextObject();
if (o == 0)
break;
if (!(x.objTestFlag(o, FL_COMMOUT)))
{
var ot = x.objType(o);
var om = x.objModel(o);
if (ot == OT_BLOCK && (om == BLK_IF || om == BLK_WHILE ||
om == BLK_ELSE || om == BLK_FOR))
Cicle = Cicle + 1;
if ((ot == OT_BLOCK && om != BLK_FOLDER) || ot == OT_STMT)
Rows = Rows + 1;
}
}
return new Array(Cicle,Rows);
}
418
Extend Instant Developer
Here we are not using any new interface functions. We simply perform another loop
through the procedures, looking for all the objects and counting the blocks of code and
the statements. These values are then returned to the calling procedure and displayed in
an HTML table.
Now we need to see how to activate this page from within the IDE. To do this, you
use the Tools – Configure wizards command in the In.de main menu. The following
form will open:
Through the Scope, Object type, Object subtype and Action fields, you can specify
when the wizard will be activated. For the cyclomatic complexity example, we recommend selecting scope Tools and the action 3rd additional command.
The configuration must be completed by entering the name of the command that
will appear in the tools menu, specifying the path to the index.htm file, and setting the
Enabled flag. When finished, press Save to save the settings. At this point, the Cyclomatic complexity command will appear in the Tools section of the main menu. The
following image shows an example of using the wizard.
419
Andrea Maioli – Instant Developer: User's Guide
11.8 The graphic theme editor
From version 11.5, Instant Developer contains a tool to make it even easier to customize the graphic themes and visual styles of your applications. As seen in section 11.3,
the graphic theme editor is a guided visual utility that allows you to customize the following:
1) The custom.css file containing the customized versions of the theme's elements.
2) The icons used in the graphic theme.
3) The visual styles on which the graphic theme is based.
Note: proper use of the graphic theme editor requires familiarity with the functioning of
cascading style sheets (css) implemented by the various types of browsers in which this
application will run. In fact, the editor is only a tool to help in creating the custom.css
file, so it cannot guarantee results that are independent of the browser and the Instant
Developer version that you are using.
420
Extend Instant Developer
11.8.1 Activating the theme editor
The theme editor can be activated in two ways, depending on what you want to configure. If you want to customize the application's entire graphic theme, with the project
open, you select the application and use the new commands in the main menu: Tools –
Graphic theme editor – Open in (browser).
Only the browsers installed on the workstation will be available. If the application to be
customized is of the mobile type, the first two browsers will not be available. If no
browsers are enabled, it means that no application has been selected in the project object tree. Keep in mind that theme customizations are not guaranteed to be browserindependent, so it is necessary to verify them on all browsers where your app will be
used.
In addition to changing the graphic theme of the entire application, the editor can
be used as an alternative to the properties form of visual styles. This will make it possible to immediately verify the appearance of a style in the real use conditions. To access
the editor in this case, there are two new buttons in the properties form of visual styles.
The one on the left opens the editor with a preview for panels or reports, while the one
on the right allows you to configure the style when used in graphs.
421
Andrea Maioli – Instant Developer: User's Guide
11.8.2 Managing graphic themes
When you activate the graphic theme editor , the following management form opens in
the selected browser.
The list contains the themes present in the database. The first two are basic themes and
so they do not have anything listed in the Based on column. They are not configurable
since they contain the basic structures that can be modified and used in your themes.
The meaning of the various buttons on the form is as follows:
1) Customize: opens the form for editing the selected theme in the list. It is not
enabled for the basic themes.
2) Report: shows a page summarizing all the changes made to the basic theme. It is
only enabled for customized themes.
3) Enable: configures the application selected when opening the editor according to
the settings of the custom theme selected in the list.
4) Create new: creates a new custom theme from a basic one. This button is enabled
even when a custom theme is selected, in which case the new theme will be based
on the same basic theme as the selected one.
5) Duplicate: creates a duplicate of the selected custom theme.
6) Delete: deletes the selected custom theme.
7) Import: can be used to import the definition of a theme from an XML file.
8) Export: exports the definition of the custom theme selected in the list to an XML
file.
422
Extend Instant Developer
11.8.3 Customizing the graphic theme
Clicking on the Customize button next to the list of themes opens a form divided into
three panes, as shown in the following image:
The content of the various panes is as follows:
1) Theme structure: the hierarchical structure of the theme that allows selecting the
part of the user interface that you want to change.
2) Preview: shows the preview of the part of the theme selected, so you can see the
effect of your changes. Note: some parts do not have a specific preview form.
3) Properties editor: contains the list of properties and lets you edit them.
If you click inside the preview, the system attempts to detect the part clicked and selects it in the tree. Since not all parts are present in the preview, you will need to scroll
through the tree to check whether the entire theme has been customized.
When a part is selected, a list of configurable properties appears. Each is editable
through a specific editor that appears on the right. Please follow the instructions in the
editor, since the exact definition of the values depends on the css property being edited.
If you want to undo your changes, you can press the Reset button highlighted by
the arrow in the image. You can only undo changes of the selected part, or of the subparts it contains.
423
Andrea Maioli – Instant Developer: User's Guide
Modifying text properties
These properties can be modified through an edit box or a combo box. In the first case,
you can enter any value, but must follow the specific format of the property being edited, which is described in the instructions on the form.
The value entered may depend on the type of browser used. More information about the
acceptable formats for the values can be found on the Internet. One of the most comprehensive web sites in this regard is w3schools.com. Finally, the Important check box
can be used to apply a customization to specific UI elements that overwrites the property values assigned by the framework at runtime.
Modifying color properties
These properties represent a single color of a property of an object, such as a text color.
To change the color, you can enter the color name in the text box or click the button
highlighted by the arrow to open a color picker control.
Modifying background properties
This type of property represents a background. Entering a single color results in a solid
background. If you select a gradient type, you can enter up to four different colors to
achieve the desired effect. You can adjust the percentages of the color segments by
changing the value in the corresponding column. You can also use the color picker by
clicking on the buttons highlighted by the arrow in the following image.
424
Extend Instant Developer
If you are editing a visual style, only two-color gradients are available. Entering a third
and fourth color will have no effect. Note that gradients are available for Internet Explorer only from version 10. For previous versions, modifying the background image is
recommended.
Modifying image properties
An image property represents one of the theme's icons and can be modified with the
editor shown in the picture.
It is very important to replace an image with one of the same type and size: if you
change the size, the visual result may be distorted. You can replace an image by selecting it from disk using the
button, or delete the customization using the
button.
If the custom image has not been created yet, you can do it on the fly by clicking
the Open in editor button , which opens the image in a photo-editing program. After
you have edited and saved the image, click the Import changes button to load the new
version.
425
Andrea Maioli – Instant Developer: User's Guide
The default photo-editing program is Windows Paint. If you want to change the editor,
click Change editor and then enter the full path to the executable file for the program
you want in the box that appears on screen.
Modifying font properties
These properties represent the type of font to be used for displaying information. You
can select the font in the corresponding combo box. If you select the Custom value, you
can enter a different one in the text box highlighted by the arrow. However, in this case
you should make sure that the font will be available on the terminals that will use the
application, otherwise it will be replaced by a standard font.
Modifying border properties
You can use this editor to modify properties relating to the four sides of objects, such as
borders or margins. When you modify the borders, you can enter the size, border type,
and color for each side. You can also use the color picker. Pressing the All equal button
copies the first row to the others. Note that you can leave a row blank, which means
that the border on the corresponding side will not be modified.
426
Extend Instant Developer
11.8.4 Customizing a visual style
When you activate the editor from the properties form of a visual style, the customization page opens immediately and the style you want to configure is immediately selected in the structure pane.
In this case, the preview pane contains a functioning object that is reconfigured according to the properties of the visual style that you are editing. The following are possible, depending on the location of the style:
1) Visual style contained in Default Panel Style: these styles represent the look and
feel of a panel in a desktop application. The preview will show a functioning panel
whose fields will take the visual style being configured.
2) Visual style contained in Default Mobile Style: these styles represent the look and
feel of a panel in a mobile application. The preview will show a functioning panel
whose fields will take the visual style being configured. Since the graphic theme
editor is a desktop application, in this case the panel will appear similar, but not
identical, to what the user will see at runtime.
3) Visual style contained in Default Report Style: these styles represent the look and
feel of a box in a report (book). The preview will show a functioning report whose
boxes will take the visual style being configured.
4) Editor opened in graph mode: when the editor is opened with the button that has a
graph icon, the preview will show a functioning graph. In addition to viewing the
graph, you can select which chart engine to use (JFreeChart, Fusion Charts,
JQPlot), and change the graph type.
427
Andrea Maioli – Instant Developer: User's Guide
After making the desired changes to the visual style, press the Save button highlighted
by the arrow in the image to save the current configuration in the project currently
opened in Instant Developer.
11.8.5 Enabling and managing themes
This section details some aspects of managing graphic themes.
Enabling a graphic theme
Enabling a custom theme causes the the application currently open in the Instant Developer IDE to take on the look and feel defined in that theme.
This is done by selecting the custom theme in the list and then clicking the Enable
button. The operation performs the following steps:
1) A Custom folder is created for the application if not already present.
2) The custom.css file is added or overwritten with the definitions of the theme.
3) The custom icons are copied to the custom folder.
428
Extend Instant Developer
4) The basic visual styles of the project are modified according to the definitions contained in the custom theme.
After the operation finishes, you may want to save your Instant Developer project to
store the changes made. If you press Ctrl+z in the IDE, you can undo the transaction
that applied the theme, although any files overwritten in the custom folder will remain
in the new version.
Exporting a graphic theme
You can use the Export button to export the theme selected in the list to an XML file.
The XML file is created in the base folder of the visual style editor, i.e., c:\program
files\inde\vseditor.
A theme can be exported for backup purposes or for sharing with others. The XML
file also contains any custom icons.
Importing a graphic theme
To import a previously exported graphic theme, copy the corresponding XML file to
the base folder of the visual style editor, i.e., c:\program files\inde\vseditor. When
clicking Import, you will be prompted for the name of the file to import, and at the end
of the operation it will appear in the list of themes.
11.9 Questions and answers
The extensibility of Instant Developer provides the ability to integrate applications developed with existing information systems, both in terms of code and features, and from
the graphics and interface point of view. The ability to reprogram the IDE thus allows
In.de to be adapted to your development process.
Given the importance of this topic and the vast number of issues, the only way to
cover it was through examples. For further information, you can send a question via
email by clicking here. I promise to answer all emails in my available time. Also, the
most frequently-asked questions will be published in this section in subsequent editions
of this book.
This space is reserved for answers to readers' questions
429
Andrea Maioli – Instant Developer: User's Guide
430
Chapter 12
Debugging and tracing
12.1 Overview of debugging tools
During development of an information system, debugging tools are of fundamental importance, because they allow you to verify that the application’s code is correct and that
it is properly integrated with the operating framework.
In the case of Instant Developer, these tools have an even greater importance, since
the framework is rather complex and the debugging tools must allow you to understand
its functioning in your specific situation.
The need for tools that facilitate understanding of the application’s behavior does
not end with the development stage. In fact, it is particularly important after release,
when end-users discover anomalies. It is therefore important to have a tracing tool that
reports debugging information even when the application is in the production stage.
To address these issues, Instant Developer contains the following tools:
1) A runtime debugger, which allows you to monitor the behavior of each executed
line of code in detail and to know the status of the framework at all times.
2) A step-by-step debugger to debug the application as in traditional development systems: by setting breakpoints, executing lines of code one at a time, and checking
the status of objects and values of variables.
3) A tracing system for applications in production, which collects the same information as the runtime debugger directly from users’ sessions. This allows you to
understand how they have used the application and how it has responded to their
actions, down to the level of the individual line of code executing.
The following sections will discuss these tools in detail, showing how they are used in
practice to understand the behavior of applications. The ability to configure the debugging module to allow its use in a production environment will also be illustrated.
431
Andrea Maioli – Instant Developer: User's Guide
12.2 Runtime debugging
The runtime debugger is the easiest and fastest way to verify that your software functions as expected. The debugger is activated from the compiling options page, as we
can see in the following image:
The debugger is enabled by default during the application’s development and testing
stages. The compiling flag that controls it is indicated by the red arrow. When it is active, the controls on the right side of the form are enabled, allowing you to select how
the debugger should behave.
1) Level: This allows you to select the granularity of the information collected. The
Statement level is typically used, because it provides a complete trace of the code
executed.
2) Messages: This specifies what messages the framework should show. The Info
Messages level is typically used. It includes all messages except for report engine
debugging messages. If a report does not behave as expected, you should enable the
Verbose Messages level to trace the decisions made by the print engine at every
step.
3) Include recurring events: This flag allows you to include or exclude the code of
some types of events, such as OnDynamicProperties, which are raised to the application frequently and can mask more useful information.
4) Collect debug data: This tells the system whether to enable data collection or to just
prepare the system for debugging without initiating data collection. This way, you
can put the application into production with debugging enabled, without the fear of
running out of memory on the server due to the data collected. You can then enable
it only for sessions where you are verifying anomalies.
432
Debugging and Tracing
Let’s look at an example of a debug session to illustrate its operation. Suppose you
have handled the OnUpdatingRow event of a panel that shows a list of products and do
not want to allow the user to set the unit price of the product below average prices for
that category. The code that handles the event is the following:
Now we want to verify that the code functions as expected. After compiling the application with debugging enabled, we open the products panel and insert a very low price
for a product. After pressing Enter, we can see that the error message appears as expected, but it is always good to check that the calculation method is correct. When debugging is enabled, the following icon appears in the caption bar of the application and
of popup forms:
Clicking on the bug icon will open a new browser window that represents the debugger’s user interface. We can see how it is composed in the following image:
433
Andrea Maioli – Instant Developer: User's Guide
On the left we see the list of operations executed in the session. We see the initialization step, the opening of the products form via the menu, the search for data, and the
modification of the price. If we click on a row, the code and messages corresponding to
that step will appear in the center.
So let’s see what happened when the user changed the unit price. Above we can see
message #104, which says what happened in the panel. In this case, the unit price in the
first row was changed from 0 to 1. Following the change, the OnUpdatingRow event
was raised, and we can see code for it, because it was handled. For unhandled events,
you usually only see an information message.
When there is a blue line to the left of any line of code, this means that additional
information is available. For example, if we click on the green icon, the event header
will show the values of the parameters.
434
Debugging and Tracing
The additional information is very useful, because it reports the value of the variables
present in the corresponding line of code. This way, for example, you can determine
why the code entered an IF block or the corresponding ELSE block. When a statement
executes a query, the debugger offers both the text of the query and the first part of the
recordset returned as additional information, possibly with further information on how
it is used.
When clicking on the icon of a statement or method header, the Instant Developer
IDE will open at the point specified, so you can quickly make any necessary changes.
The button next to the icon, meanwhile, allows you to hide or show the contents of the
method, so you can focus only on the parts of interest.
The top part of the form contains commands to apply global filters, such as hiding
framework messages, showing or hiding all additional information, and showing or hiding the content of all code blocks.
The lower part, finally, contains an overview of the methods called during the handling of the request selected on the left. It shows the number of times the method was
called, the time spent in the method, and the total time required for its processing, including others called by it. The icons next to the method’s name allow you to stop collecting debug data to prevent wasted time and memory for a method called many times.
Alternatively, you can hide the debug data corresponding to the method. When clicking
on the method’s icon, it will be shown at the top, allowing you to jump to the correct
point in the debug form. If the method is called multiple times, each time you click on
the icon, the next call will be shown.
If you hide or stop collecting debug data for a method, it will not be shown, even in
subsequent debug sessions. If you want to change this setting, you can click the button
with the X icon in the caption bar of the methods frame.
Once a method has been tested, you can prevent its debug information from being
collected. This way it will be compiled just as it will when the application is published.
To do this, simply open the method’s properties form by double clicking on it in the
object tree, then set the Exclude from debug flag.
435
Andrea Maioli – Instant Developer: User's Guide
12.2.1 Setting tracepoints
The runtime debugger does not support breakpoints, unlike the step-by-step debugger
that we will see later. However, it may be useful to automatically detect when the code
executes a particular statement or makes use of a variable or object.
To do this, you can drag & drop the desired object from the object tree or from the
visual code editor directly onto the text box in the lower left corner of the debug window.
The result will be that every time that the dragged statement is executed, it will be highlighted in the debug window both on the left and in the center.
You can drag & drop more than one statement, as well as graphic objects and variables,
allowing you to see when they are referenced or modified. Each dragged object will be
highlighted with a different color.
If you want to clear tracepoints set, simply type RB in the text box and press Enter.
436
Debugging and Tracing
12.2.2 Recognizing infinite loops and recursions
Infinite loops and, even more so, infinite recursion are definitely among the most difficult problems to identify.
The first factor that makes them difficult to recognize is the fact that the application simply stops responding. With a step-by-step debugger, you can insert a breakpoint, but sometimes it is hard to know where, and the immediate break command does
not always give the necessary information. In a production environment, of course, it is
impossible.
Infinite loops that occur due to a set of methods being called recursively are even
more difficult to address. This is because infinite recursion can occur as a result of
events raised by the framework, and because in some systems, it causes a stack overflow, resulting in immediate closure of the process without the ability to obtain additional information.
For this reason, the runtime debugger includes a basic system for identifying infinite loops, both at the loop and stack level. This is done by examining the code and inserting limits on the depth of recursion and the maximum number of loops that can be
executed. This limit is rather low in the debug environment and much higher in production. It can be configured method by method to adapt it to the characteristics of the process being executed.
Let’s look at an example. In the following image, the application code causes an
infinite recursion by firing the OnUpdatingRow event of the panel again.
When the value for the unit price of a product is set below the category average, instead
of an error message appearing, the application stops functioning. If runtime debugging
is enabled, this does not occur, and instead we see a trace like in the following image:
437
Andrea Maioli – Instant Developer: User's Guide
The default setting for the infinite loop recognition system is as follows: In the debug
environment a loop is considered infinite if it runs over 1000 times and a recursion if it
is deeper than 32 levels. In a production environment, however, the number of loops
increases to one million, while the number of recursion levels rises to 100.
These settings can be adjusted through the DTTMaxLoopCycles and DTTMaxStackLoops application properties. For example, if a method reads a text file of 100,000
lines, at the beginning of the loop you can set DTTMaxLoopCycles to 100,000, and
then reset it to its previous value at the end. This way, even in debug mode the entire
file will be read. Alternatively, you can exclude the method from debugging, but then
you will not be able to detect any errors occurring in it.
12.2.3 Application profiling
Another difficult problem to solve occurs when the application is working properly, but
it is slow to respond. In this case, you have to find the point in code where time is wasted and correct it. At times this can be easy, when time is wasted all in one place, as
happens with an unoptimized query. In other cases it can be more complex, such as
when the wasted time results from many concatenated operations.
Instant Developer’s runtime profiling system lets you immediately see where and
why the time is wasted. To enable it, simply press the
icon in the bar at the top left.
At this point, the overall time will be highlighted for each request, and in the center, the
unit and cumulative times of each statement executed will be shown. The following
image shows an example: we can see that the lookup query of the products panel requires just 1 millisecond to execute.
438
Debugging and Tracing
12.2.4 Controlling the runtime debugger
The Debug, Test & Trace library of the Instant Developer framework contains several
methods that can be used to control the debugger both in a development environment
and in production. Here are the main ones:
1) DTTLogMessage: This allows you to specify a message in the debugger, be it informative, a warning, or an error message. It can be used to report a special situation or the value of an expression you want to watch.
2) DTTMaxLoopCycles: This specifies the maximum number of loops before reporting an infinite loop.
3) DTTMaxStackLoops: This specifies the maximum number of levels before reporting an infinite recursion.
4) DTTLoggedLoops: This specifies the number of iterations of a loop that will appear
in the debug window. In fact, if a loop has thousands of iterations, only the first few
will appear to avoid overloading the system. The default value is 10 iterations, but
you can increase this to see a larger portion of code executed.
5) DTTMaxRecords: This specifies the maximum number of records in a recordset
that will appear in the debug window. The default value is 10 records, but you can
increase this to see a larger portion of the data returned.
6) DTTSave: This saves the debug session to an XML file for later analysis.
7) DTTOpenDebug: This opens the debug window for the current work session or for
a work session previously saved to an XML file.
12.2.5 Debugging applications in production
At this point, we will look at how to use the debugger to check the functioning of production applications. The most appropriate solution to this problem is described in section 12.4 below and requires the use of the tracing module.
Without the tracing module, you can install an application into production with the
debugger enabled only if you disable data collection with the corresponding flag. Otherwise, the debugger will continue to use all available memory thus saturating the production server. The collection of debug data can only be enabled by the user clicking
the corresponding icon in the toolbar at the top left of the form.
An alternative is to enable debugging to a file, so that the data collected is downloaded to a text file at the end of each browser request. In this case, the memory will
not be overloaded, but the application will be slower because it must write the file. Also, the text file is more complex to consult.
439
Andrea Maioli – Instant Developer: User's Guide
12.3 Step-by-step debugging
The runtime debugger described in the previous section works very well in most application situations, but there are two special cases where a different debugging tool is
better.
1) When understanding the behavior of a method requires analyzing the state of complex objects. The runtime debugger exposes the values of variables or expressions
involved in the different statements, so it is sufficient to represent the local state of
the method, but not the global application state.
2) When the algorithms to be tested are so complex that their tracing would require
too many resources.
The best approach to address these cases is using the step-by-step debugger included in
the Instant Developer IDE. With this approach, the application is launched in debug
mode and Instant Developer, through a suitable proxy application, connects directly to
the .NET framework or the Java virtual machine to send debug commands and read the
results. You can therefore set breakpoints, execute step by step, query the state of the
application, and inspect the content of complex objects.
Instant Developer during a step-by-step debug session
440
Debugging and Tracing
12.3.1 Enabling the debug session
To activate a step-by-step debug session, simply select the desired application in the
object tree and use the command Debug – Start in the main menu. By default this
command is assigned the F7 function key. You can also use the
button in the debug
toolbar.
Following this command, any browsers and web servers running are closed. Then,
if necessary, the application is recompiled. Finally, the application is launched in debug
mode and a browser opens to use it. During this process, the Instant Developer debug
proxy connects with the .NET framework or Java virtual machine to start communicating with the IDE. Immediately after connecting, Instant Developer shows views for
managing breakpoints, watches, and stack traces, as shown in the above image.
Setting breakpoints
You can set breakpoints by selecting a statement or a control block in the visual code
editor and using the Debug – Toggle breakpoint command (F9 key). The breakpoints
set in your code will be highlighted by a red circle icon to the left of the line. You can
view the list of breakpoints set with the Debug – Breakpoint list command, which
shows the following list.
The first three columns show the position of breakpoints in the code. By double clicking on them, the corresponding point in the code will be opened in the editor.
In addition to the position of breakpoints, there are two columns called Stop at and
Actual hits. By double clicking on the first, you can determine the number of times the
breakpoint must be reached before execution is actually stopped. If you enter zero, the
breakpoint will always stop execution. The second column shows the number of times
441
Andrea Maioli – Instant Developer: User's Guide
the breakpoint has been reached in the current debug session. Double clicking on it will
reset the counter.
You can disable breakpoints without deleting them by clicking on the check icon in
the first column, or by using the context menu. Breakpoints may also be disabled when
In.de not does not know the position in the object’s source file where you want to set
the breakpoint, or if it is commented.
Finally, setting, removing, enabling, or disabling breakpoints can be done at any
time, both before and during the debug session.
Stopping execution
If you want to immediately stop execution, you can use the Debug – Stop command or
the corresponding button in the debug toolbar. As with breakpoints, after stopping, the
system displays the stack trace and highlights the point in code that was being executed
at the time execution was stopped.
Since you can stop execution at any time, some parts of application code may not
necessarily be executing. The debugger must therefore analyze all active threads on the
application server to see if any of them were executing code for the application being
debugged, and this analysis could take a few seconds.
Step-by-step execution
When the application is paused, the following commands for step-by-step execution are
enabled:
1) Step over (F10): This executes the current instruction without entering into any
subprocedures called.
2) Step into (F11): This executes the current statement, entering into any subprocedures called.
3) Step out (Shift-F11): This resumes execution to the end of the current procedure.
4) Run to Cursor (Ctrl-F10): This resumes execution to the statement selected in the
editor.
We recommend using the Step into (F11) command only when the statement to be executed is a call to a subprocedure whose code you want to follow. This is because the
virtual machine executes the step into command only at the java or .NET line of code
level, so the step-by-step debugger has to send many stepping commands to execute the
step required at the visual code level.
Also, we do not recommend executing the Run to cursor (Ctrl-F10) command
when the cursor is on the closing parenthesis of a block, because, due to differences
between the virtual machines, this line of code may not necessarily be executed.
442
Debugging and Tracing
Resuming execution
You can resume execution of a stopped application with the Debug – Start (F7 key)
menu command, or with Edit – Compile project (F5 key). Both commands restart the
virtual machine so that it can continue running.
In Java, before restarting the virtual machine, a check is made whether the project
was modified during the stoppage. If classes were changed, they are recompiled, and an
attempt is made to reload them on the fly. This way, you can correct the code without
having to stop and restart the debug session. However, not all changes can be accepted
by the virtual machine.
Ending the debug session
To end the debug session, simply use the Debug – Stop menu command or the equivalent command in the debug toolbar. Following this command, the browser and the web
server where the application is running are closed, and the IDE returns to its normal
operation.
12.3.3 Analyzing the application state
When application execution is stopped, it is necessary to be able to analyze its current
state. To this end, you can define watches and inspect complex objects.
To add a watch, simply select the object whose state you want to follow and use
the Debug – Add watch (Shift-F9) command, the corresponding command in the debug
toolbar, or the object’s context menu if it is displayed in the code editor. The new watch
will be added to the list, as shown in the following image.
Example of watch list form
443
Andrea Maioli – Instant Developer: User's Guide
The first column shows the object name. Double clicking it will open a form for inspecting the content of that object.
The second column shows the value of the object in the case of variables, or a
summary of the content in the case of complex objects. A green icon is displayed if the
field value has changed since the last time it was read, or a yellow icon if the object is
not in context and therefore cannot be read. By double clicking on this column, you can
change the value if the object is a simple variable. The third column, finally, shows the
previous value of the object.
You can delete a watch using the context menu or the keyboard. You can also add
a special watch called this. This watch refers to the current object, whatever it is.
The objects for which you can define a watch are the following:
1) Primitive type parameters, global variables, and local variables.
2) Local variables, global variables, and parameters of the IDDocument or IDCollection object type.
3) Local variables, global variables, and parameters of the Recordset type
4) References to the panel field values.
5) References to properties of nested classes.
6) For-each-row block cursor fields.
7) IMDB tables.
8) For-each-row code blocks
9) This.
Inspecting the content of complex objects
Double clicking on the name of a watch or adding a watch when execution is stopped
will open a form for analyzing the content of the object in question. Depending on the
type of object, you can obtain different types of watches, specifically:
1) For primitive type objects, a text display of the object’s value will open: this way,
you can easily see xml or html code contained in string variables, or very long
texts.
2) For objects of the IDDocument or IDCollection type, the content will be displayed
in a tree view containing the object’s attributes, properties, errors, collections, and
subdocuments. You can navigate through the structure down to the lowest levels.
3) For in-memory tables, recordsets, and for-each-row blocks, you can display the
content in tabular form.
If you want to keep one or more inspection forms open during step-by-step execution,
we recommend grouping the forms so you can view them alongside the code editor.
444
Debugging and Tracing
Example of inspecting a recordset corresponding to a cursor loop
12.3.2 Analyzing the stack trace
Each time execution is stopped, Instant Developer reads the stack trace and shows it in
the following form.
Example of the stack trace
445
Andrea Maioli – Instant Developer: User's Guide
For each call, the value of the parameters is shown. Also, the code editor is positioned
to the top of the stack. Only the visual code methods are shown, filtering methods that
are internal to the framework, which otherwise would make it more difficult to read.
If you double-click a line in the stack trace, the corresponding code is displayed
and all watch values are updated based on the new location in code.
By opening the context menu of the stack trace form and using the Stack graphic
command, you can display the graphic for the current position in relation to the entire
execution of the current procedure, as illustrated in the following image:
Graphic display of the stack trace
We recommend grouping the forms to simultaneously show both the code and the
graphic. If you keep the graphic open, it will be continually updated based on the position in code of the next instruction to be executed.
446
Debugging and Tracing
12.3.4 Further notes
Handling exceptions
If an exception occurs while an executing application is being debugged, it will be
communicated to the debugger. If the exception is not handled by a try/catch block in
visual code, execution will be stopped at the line that caused the exception, and a message will appear indicating the exception type. If, however, this line is located within a
try/catch block in visual code, execution is not stopped.
Edit and continue
If the application has been generated in the Java language, you can also modify the
code while debug session is executing. Each time that execution resumes after being
interrupted, the modified classes are recompiled, and an attempt is made to redefine
them within the virtual machine without stopping it completely. However, not all
changes can be applied this way. For example, if you try to add a method you will get
an error and the debug session will end. Remember that by adding or changing a query
on in-memory tables, you can add or edit the header of a class method.
If you modify a class method while it is being implemented, it will continue with
the old version and any breakpoints will be disabled until it ends. When the modified
method leaves the stack trace, the next time it executes, the new version will be used
and the breakpoints will be respected again. Instant Developer displays a warning message to remind you of this situation.
Finally, if you want to change the application code while execution is in progress,
you can use the Edit – Compile changes menu command, which stops execution, redefines the class, and restarts the virtual machine.
Optimizing startup times in a Java environment
Each a debug session is started, the entire Tomcat web server must be started in this
mode.
The startup time depends on the number of servlets installed. We recommend that
you remove all unused ones to minimize this. During this operation, however, is not
advisable to remove the preinstalled Tomcat servlets.
447
Andrea Maioli – Instant Developer: User's Guide
12.4 Tracing
So far, we have discussed the tools for verifying and correcting an application’s behavior during its development and testing. However, the most difficult problems to solve
arise after publication, just when end users need to work with the application. The main
reason is that modern applications are feature-rich, and testing them can cover only a
limited number of scenarios: the potential application scenarios created by end users
will always be beyond what testers can imagine!
For this reason, a modern development system must include a way to check applications in production, just when the end user is working with them. Instant Developer
achieves this with the add-on tracing module, which handles:
1) Tracing open sessions in real time, indicating the names and contact details of users
who are using them.
2) Collecting statistical information on sessions, such as execution times, memory usage, and exceptions occurring.
3) Allowing you to manually or automatically enable the system for collecting debug
data, to have a complete record of what happened in a particular work session.
The tracing module is integrated within IDManager and is available from version
10.5 of Instant Developer. For more information, refer to the section:
3.10.7 Application control through the Trace module.
12.5 Questions and answers
An efficient system for debugging, testing, and tracing the behavior of applications is a
key component of a development system, because it significantly affects their speed
and ease of use.
For further information on this topic, you can send a question via email by clicking
here. I promise to answer all emails in my available time. Also, the most frequentlyasked questions will be published in this section in subsequent editions of this book.
This space is reserved for answers to readers' questions
448
Chapter 13
Runtime configuration
13.1 The problem of customization
When an application is intended to be used in different contexts, as is generally the case
with enterprise products, the problem of customization for the end user arises. Customization should be done to the greatest extent possible, but without changes to the original code created by the developer. Otherwise, you could risk having many different
projects, one for each customer, which would make maintenance and evolution difficult.
There are different types of customization: from a simple interface modification to
feature requests, or, even more complicated, specific changes to calculation algorithms.
To simplify this problem, Instant Developer provides an additional module called
Runtime Configuration (RTC), which automates the following types of customizations
at the framework level:
1) Internationalizing the application, allowing translation of the entire user interface
into several languages, including reports and printouts.
2) Modifying most design time properties of the application’s user interface objects,
including reports and printouts.
3) Defining the set of roles and application profiles.
In particular, the second point means that the entire user interface can be designed according to the specifications of each customer. This opens up many possibilities for
customization, since a great number of customer requests are at this level.
Note, however, that the RTC system reconfigures existing objects and does not allow you to insert new ones. For this, you have to use different systems, such as extensible schema or the Visual Query Builder component.
From version 10.1, reconfiguration of the application at runtime is done through
special forms present within IDManager. There is also a component called RTC Designer that lets you include systems for controlling the RTC module in your applications.
449
Andrea Maioli – Instant Developer: User's Guide
13.2 Activating the RTC system
Activating the RTC module for an application is very simple: you only need to set the
following two flags:
1) The Generate RTC data flag in the application properties.
2) The Contains RTC data flag in one of the project’s databases. All configuration
data will in fact be stored in special tables in the selected database. This database
may be the same one that contains the application data or can be separate. The only
constraint is that it cannot be an Access or generic type (odbc) database.
At this point, during the project’s development stage, additional compiling options can
be enabled:
At the database level, you can require modification of only the part of the RTC responsible for creating and maintaining the structure and data of RTC tables. The flags in the
lower right corner have the following meaning:
1) Update RTC data: This updates the contents of the RTC tables with the project’s
design time data. The values reconfigured by the end user are still preserved.
2) Recreate RTC tables: This destroys and recreates the entire RTC structure, including the end user reconfiguration data.
3) Create user profiling data: This fills the RTC tables relating to roles and profiles,
replacing those configured by the end user.
450
Runtime configuration
In the application compiling options, you must remember to set the Enable RTC for this
application flag. Otherwise, even if the RTC data is present in the database, the application will not use it.
These operations must be performed only if you want to test the application with RTC
active during development. When publishing via IDManager, everything will happen
automatically based on the two flags mentioned at the beginning of the section.
13.3 RTC system functioning
We will now discuss the principles on which the RTC module is based.
When constructing the database, 25 pairs of tables are added, one for each type of
object configurable at runtime. Each pair consists of an internal RTC table containing
the design time data for objects of that type, and a user table containing the various reconfigurations.
Let’s look at an example of the pair of tables that allow reconfiguring the properties of panels in the application. The pair of tables in question consists of RTC_Panels
and RTCU_Panels. The former contains the design-time data for each application panel, and the latter their reconfiguration data.
Now, let’s look at the primary keys of these tables. The primary key of
RTC_Panels is composed of a single field, called Guid. Each record in this table contains the data from an application panel, also identified in this way. RTCU_Panels,
meanwhile, has the following four fields making up its primary key:
451
Andrea Maioli – Instant Developer: User's Guide
1) Guid: the value corresponding to the RTC_Panels table.
2) Language: the language for which these customizations apply.
3) Group: The group to which the customizations apply.
4) User: The user to which the customizations apply.
This way, each panel can have different corresponding customizations, depending on
the installation, language, user, and group. These customizations do not overlap, since
at runtime, the reconfiguration engine first reads the data in the RTC_Panels table and
then overwrites it with the corresponding data present in RTCU_Panels, but only if the
value has been specified.
In fact, while the fields of RTC_Panels are always set during construction of the
database, the records of RTCU_Panels contain only those changed from the original, so
most of the fields remain null. If a value is specified in multiple different customization
records for the same object, the following order of priority is applied:
1) Installation: This is equivalent to records with Language = “.”, Group = 0, and User = 0. It specifies the basic customization of the object in that particular installation.
2) Language: Records are selected with Language = RTCLanguage, Group = 0, User
= 0.
3) Group: records are selected with Group = RTCGroupID.
4) User: records are selected with User = RTCUserID.
The configuration data read operation is particularly efficient, because it takes place
through stored procedures that are also created during construction of the RTC database. A part of the data is then stored so that the database does not have to be accessed
again. This way, the application has the same performance both with RTC and without.
452
Runtime configuration
13.4 Initializing the RTC module
During activation of the browser session, it is important to specify the parameters for its
customization. The ways to do this are as follows:
1) RTCLanguage: This sets the language of the work session.
2) RTCGroupID: This sets the RTC group of the work session.
3) RTCUserID: This sets the user ID of the RTC session.
These properties are usually set during the Initialize, OnLogin, or AfterLogin event,
depending on the moment when the user information is available. To modify them during the work session, you can call the RTCReset method to load the customized data
from the database according to the new parameters. You can also temporarily disable
the RTC system for a work session with the RTCEnabled property. This can be useful
to check whether a problem may have to do with the customization data.
The preceding image shows a code example that initializes the RTC module in the OnLogin event. The user ID and the language are read directly from the database. For the
group, the ID of the person the user reports to is used, which allows the application to
be reconfigured for those working under the same person.
The language property (a three character code), the user ID, and the group ID (numeric codes) can then be used appropriately. The important thing is to respect the linking of these properties with the algorithms for applying the customization data.
453
Andrea Maioli – Instant Developer: User's Guide
13.5 RTC Designer
Reconfiguring the application at runtime requires an integrated designer that shows the
design time values and allows them to be easily customized. This designer is integrated
into the IDManager application installation module. In fact, when the application is
published with RTC enabled, the Customize button is enabled in its properties form, as
shown in the following image.
From the dropdown menu that opens, you can select one of three configuration forms:
1) Designer: This is for customizing the individual properties of each object, form, or
report in the application.
2) Translation: This is for translation, including automatic, to various languages.
3) Profiling: This is for managing application roles and the related profiles.
You can also add the same configuration features to your application by incorporating
the Free RTC designer component described in the related section of the Component
Gallery chapter.
Finally, note that each database in the application can contain RTC data. To configure the one desired you can click on the corresponding button in the list of databases,
as shown in the following image.
454
Runtime configuration
13.5.1 Designer form
This form allows you to customize the properties of each configurable object in the application, including forms, panels, and reports. The following image shows an example
of the designer form.
Initially, the designer displays the original configuration of objects, so it is all readonly. To start customizing, you have to press the Change configuration button in the
caption bar. The following form will appear:
455
Andrea Maioli – Instant Developer: User's Guide
After entering the correct values for language, group, or user, the Close button allows
you to start customizing. At this point both the properties form on the right and the designer become active, and you can change the appearance of panels and reports, as well
as the properties of objects.
Although you can change the various properties through the form on the right,
some types of objects can also be modified through a specific editor. These include
panels, master pages, reports, and visual styles.
At the end of the modification, you have to press the Save button in the caption bar
of the form, or Cancel if you want to reload the last saved configuration. Note that the
web application loads the RTC configuration when a session begins, so if you want to
see the effect of the configuration, you need to open a new browser window or close
and reopen an existing session.
13.5.2 Translation form
This form allows you to easily manage translation of the entire application to different
languages at the user interface level.
After choosing the target language using the Choose language button, the sentences to
be translated will appear, and the translation can be written alongside. The identification codes of different languages must match those set in the RTCLanguage property in
application code.
You can also use the automatic translation services of Google or Microsoft to obtain quick results. However, keep in mind that although the accuracy of the translation
may be sufficient in some cases, it will be completely lacking in others, depending on
456
Runtime configuration
the particular subject. Before using these services you must obtain a Google Translate
or Microsoft Translate key, and then enter them in the IDManager domain configuration, as shown in the image below.
At this point, the Autotranslate button is enabled, as shown in the following form:
After specifying the source and target languages, you can start the automatic translation
process. Subject to the limitations of the translation service, the time required may vary
from a few minutes to a few dozen minutes. If you use the free services, then there are
limitations on the maximum number of characters that can be translated daily.
457
Andrea Maioli – Instant Developer: User's Guide
In any case, the translation only affects the panel rows that have not been translated yet,
so you can complete the work in multiple steps. When the automatic translation is finished, please check the results, since there is no guarantee of the translation’s accuracy.
13.5.3 Profiling form
This form allows you to configure the application roles and profiles. The following
image shows an example.
The form consists of three parts. On the left is the list of application objects to which
profiling can be applied. In the center is the list of application roles defined for the application. These can be changed with the context menu commands or by dragging and
dropping them onto the tree. On the right, finally, is a list of the limitations or permissions for the role selected in the center.
Managing a profile is done by simply dragging the objects to be modified from the
tree on the left and dropping them directly onto the panel on the right, and then enabling or disabling their characteristics with the check box in the panel row. Their meaning is as follows:
1) Vis: The visibility of the object. If the object is invisible, then it is not usable.
2) Enab: Whether the object is enabled. If the object is visible but not enabled, then
the user sees it but cannot use it or change it if it is a panel field.
3) Upd: For panels, enables the updating of existing rows.
4) Del: For panels, enables the deletion of existing rows.
5) Ins: For panels, enables the insertion of new rows.
6) Ser: For panels, enables the Query By Example search function.
458
Runtime configuration
Note that the tree of roles supports multi-selection. Clicking the role’s check box
changes the way objects are displayed in the tree on the left, to reflect how users with
that role will see the application. Specifically, an invisible object is shown as
strikethrough, while a disabled one is gray. This makes it easy to check the status of the
application role by role.
Note also that in this case, the tooltip for the tree nodes shows why the object is hidden,
disabled, or otherwise limited. Finally, you can select more than one role, thus seeing
the overall effect on the status of user interface objects. The order of selection is important, because the roles selected first have priority over ones selected later. The role
configuration applied to the tree is shown in parentheses after the name of the application.
13.6 Questions and answers
The problem of software customization, especially enterprise-class software, is not easy
to address and resolve. RTC is an efficient solution to a substantial part of these problems.
For further information on this topic, you can send a question via email by clicking
here. I promise to answer all emails in my available time. Also, the most frequentlyasked questions will be published in this section in subsequent editions of this book.
This space is reserved for answers to readers' questions
459
Andrea Maioli – Instant Developer: User's Guide
460
Chapter 14
Team Works
14.1 Project management
When managing the development of a software project, both the spatial and temporal
dimensions are important.
The spatial dimension comes into play when the application is complex enough
that it has to be developed by multiple people. How can these individual developers
work without hindering one another, perhaps by modifying the same part of the project?
The time dimension, meanwhile, is always present. A software project usually has
several releases and it is necessary to store them, to track changes from one to another,
and to work on one and the other in parallel.
To solve these problems, there are several systems for source code control. However, these can only handle text files. For this reason, Instant Developer has its own
system of managing work teams, particularly suited to the relational structure of the
software projects typical of Instant Developer.
Team Works functional diagram
Team Works is based on a server module to which the various development workstations connect in real time to organize work. It is fully integrated within the Instant
461
Andrea Maioli – Instant Developer: User's Guide
Developer IDE, and once activated, its use is almost transparent. The main functions of
this system are as follows:
1) Managing the work team in real time via the Internet. Team Works coordinates and
adapts modifications to the structure of the project by team members in real time
via the Internet. This way, developers can work from different places on the same
server.
2) All functions include: The normal functions of a version control system are included in the context menu of the IDE: Check out, Check in, Change history, Show differences, Show locks, and so on.
3) Managing locks in real time: Any changes made to the project automatically execute check out of the part of the project that they affect, the smallest part possible.
This way, changes by the various team members do not are not overwritten by others. Upon check in, the server systematizes the changes to ensure the relational
structure is always consistent.
4) Integrated web interface: Team Works has a web interface integrated with In.de for
configuring and setting up projects. You can upload or download the master copy,
define users and working groups, check the active locks and check-ins performed,
all in a straightforward manner without ever leaving the Instant Developer IDE.
5) Offline functioning: There is a specific work mode to allow changes even when not
logged into the server. When logging in, all changes made offline are automatically
synchronized, and any conflicts can be resolved.
6) Resolving conflicts and viewing differences: Through a special form, you can view
differences from the master copy for all or part of the project, and you can also resolve conflicts by specifying which version of each object is the latest.
7) Managing temporary changes: You can make changes, marking them as temporary.
In this mode you can change settings or algorithms only at the local level, without
affecting the master copy or needing to get lock.
8) Managing and summarizing tasks: You can also insert tasks, assign team members,
track completion, and summarize completion times.
9) Branching and merging projects: TW has the ability to define project branches and
to migrate the changes to the entire project or only to a part.
10) Defining, publishing, and subscribing to components: A useful feature of Team
Works is the ability to define a component as a union of parts of a project. For example, you can define an Agenda component from a project that has implemented
this feature. Through the publication and subscription mechanisms, you can also
use the component in other projects while maintaining synchronized versions.
462
Team Works
14.2 Installing the Team Works server
As we saw in the previous section, Team Works is based on a special server version of
Instant Developer. We will now look at how to install it.
First, you must set up a Windows 2003 or Windows 2008 server, where the following programs are installed and operating:
1) Internet Information Services with ASPX enabled.
2) SQL Server 2005 or 2008; we recommend you install the 2008 Express version.
Team Works stores projects and configuration data in the tables of a SQL Server
database for maximum reliability and security.
3) Instant Developer in the same version used on the development workstation, installed by an administrator user on the server.
At this point, simply launch Instant Developer on the server and display the options
page via the Tools – Options menu command. After opening the Team Works section,
you will see a button labeled Team Works server installation. Pressing it will open a
page containing the Set as Team Works Server button. Pressing it starts the actual installation process, which prompts you to provide the following information.
1) Address (hostname) of the database server. If you leave this blank, the same server
where Instant Developer is installed will be used.
2) Database name that will contain the Team Works tables. If you leave this blank,
TW will be used. If the database does not exist, it will be created.
3) Username and password of a database user with administrator permissions. We recommend using sa as the user.
4) Connection port: This is the TCP port number to which the Team Works service
can connect. The default value is 8888.
After entering the proper data, you can click on the Install Team Works Server button,
which performs the following operations:
1) Creates or updates the Team Works database.
2) Installs the Team Works Web client application within IIS.
3) Configures Instant Developer to run as a Windows service.
When finished, closes Instant Developer to allow it to run as a service. At this point,
you only need to check that the Team Works Web client application is functioning. To
do this, use a browser to connect from the server to http://localhost/TWWebClient. If
you see a login form, then there are no problems. Otherwise, you will need to check the
IIS configuration to make sure that it can run ASPX 2.0 applications.
463
Andrea Maioli – Instant Developer: User's Guide
Team Works Web client login form
14.3 Configuring the basic data
After finishing server installation and checking the web application, it is time to configure the basic system data. This is done by running Instant Developer on a development workstation, using the Team Works – Web client main menu command. If this
command is disabled, it means that your In.de user license does not include the ability
to connect to a Team Works server.
The first time you access the web client, Instant Developer prompts you for the
server address, with the following form.
You only have to specify the hostname, not the entire path of the web application. If
you want to change it, press and hold Shift while selecting the command.
464
Team Works
The first time, you have to use TW/TW as the username and password to access the system. At this point, the basic data needs to be set by using commands from the web application’s main menu. The first form is the companies form, where you will specify
the details of the company for which you are administrator and the names of the development teams (groups).
This is followed by the users form, where you will add the users who can access the
system, specifying the username, password, and group membership.
465
Andrea Maioli – Instant Developer: User's Guide
The last basic form is the products form, where you can specify the products you want
to develop and for each one, the groups that can access them. A product consists of a
set of Instant Developer projects.
14.4 Inserting a project
Let’s now look at how to add a project that has been managed individually up to this
point to the Team Works system. To do this, you have to open it within Instant Developer and then access the web client. The following form will appear.
After specifying the product to which the project belongs, selecting from those permitted for the logged in user, you will then upload the master copy, i.e., the Instant Developer project file with the .idp extension that was opened in the IDE.
466
Team Works
After uploading, you should wait a few seconds for the Team Works service to acquire
the changes, at which point everything is ready to start working with a team.
The first step that every team member must perform is retrieving the master copy
of the project. This is done by accessing the web client from Instant Developer, selecting the project from the list, and then pressing the Download master copy button. After
saving the file to a specific folder and opening it, Instant Developer opens a form,
prompting for the information required to access the Team Works service. This only
happens the first time, after which the information will be stored in the local copy of
the project.
After you log in by clicking Connect, Instant Developer is ready to start working with
the team. You can use the commands in the Team Works main menu item to connect or
disconnect the project from the server. The current connection status is reported in the
right part of the Instant Developer status bar.
14.5 Developing in Team Works
We will now look at how using Instant Developer changes for developing applications
while connected to a Team Works server. The main steps we will discuss are the following:
1) Checking out parts of the project.
2) Viewing differences from the master copy.
3) Checking in changes.
4) Retrieving the latest version.
5) Working offline.
467
Andrea Maioli – Instant Developer: User's Guide
14.5.1 Checking out parts of the project
When using Instant Developer connected to a Team Works server, changes to the project are possible only if the part affected by the change has already been reserved for
the person performing it. This avoids the risk of multiple people modifying the same
part of the project in different ways.
Reserving part of a project for a developer to modify is called checking out, which
can be done either manually or automatically. It is done manually by using the Check
out command in the context menu of an object in the tree. For example, if you want to
work on a form, you can see if it can be reserved using the Check out command. Selecting this command will open the following form.
You can request different types of locks. Content is the most common, since it reserves
the entire part of the project for which check out is requested. An Object lock, meanwhile, allows you to change the properties of the object, but not those of objects it contains.
For example, if you want to modify database connection parameters, it is simpler to
request an object lock rather than a content lock, because the latter would prevent anyone from making changes to tables and fields. Also, a content lock can only be granted
if no one else has locks on internal objects, while an object lock is much easier to obtain.
Even if no one else has a lock on the part you want to reserve, you may not necessarily be able to get one. In fact, if the local copy is older than the master, the system
will prompt you to retrieve the latest version before reserving it for you. This avoids the
risk of losing changes made by others.
But if you are sure that your local copy is correct, you can request a forced lock. In
this case, even if the master copy is more recent, the lock is obtained anyway. Finally,
you can request a temporary lock, which allows changes to your local copy without any
468
Team Works
check on the server, so there is no certainty of being able to populate them to the master
copy.
If you start to modify the project without first performing a manual check out, Instant Developer will automatically request a content or object lock for the part of the
project changed. The smallest possible part is reserved depending on the type of modification to the project. For example, if you change one line of code, a content lock will
be requested for the method, but if you change the layout of a panel, the entire form
will be reserved.
The locks obtained are shown in the list of locks available through the Team Works
– Show locks command in the main menu.
The context menu of locks allows you to check in, cancel the lock, or make it temporary. Canceling the lock forces synchronization of the project with the master, and local
changes are lost. Finally, the Show history command opens a web form with a list of
check ins involving the selected object.
14.5.2 Viewing differences from the master copy
One of the most important features of Team Works is the ability to track changes made
to the project. To do this, simply select the object whose changes you want to see from
the tree, for example a form, and then use the Show differences command in the context
menu. You can also see the changes to the entire application, a database, or even the
entire project.
After a few moments the differences form will open. The following image shows
an example.
469
Andrea Maioli – Instant Developer: User's Guide
The form is divided into three frames. In the first, we can see the list of differences,
noting the objects changed, added, or deleted depending on the yellow icon to the left.
For modified objects, you can determine which properties are changed by clicking on
the item’s expand icon.
In the center frame we see the project as it is in the local copy, which we can compare with the master copy on the right. Clicking on an item in the list of differences
causes the other frames to reposition, highlighting the selected object.
The content of the local copy and master copy frames depends on the object selected in the list of differences to the left. If you select a procedure or query, the two different versions of the code are shown so you can immediately see what has changed.
470
Team Works
The color yellow specifies a changed code block, while green specifies parts of code
that are present only in the local copy or the master copy. Vertical scrolling of the two
previews is synchronized, as in traditional source code comparison programs.
Selecting an object that is part of the user interface (panels, panel fields, groups, trees,
tree nodes, graphs, tabbed views, button bars) contained in a form opens two previews
(Form editors), which show the differences visually.
Also in this case, the color yellow specifies that the field has been changed (in the image the decode field has been moved into the list) and the color green specifies that the
471
Andrea Maioli – Instant Developer: User's Guide
object has been deleted (in the image the SupplierID and CategoryID fields have been
deleted in the master copy).
If a form is selected, the two Form editors are not shown, but rather the tree of objects contained in the form, making it easier to compare the contents of the form in the
two versions.
If an object contained in a book (master page, box, span, section, or report) is selected in the list of differences, two previews open (Book editors) showing the differences visually. As in the case of the forms, if a book is selected, the Book editor does
not open, but two project trees are shown allowing you to compare the contents of the
book.
You can drag & drop objects from the three frames onto the Selected objects box
and select the actions to perform on that set of objects. Specifically, you can check out,
check in, or retrieve the latest version of objects. These options are available in the context menu of the objects in the box, as shown in the preceding image. You can also
populate an In.de search form with the selected objects for further analysis when you
close the differences form. The selected operations are performed only after closing the
form with the OK button and after a further confirmation.
By pressing the Export button, you can get a list of changes in text format, which
you can consult with a text editor or attach as project documentation.
14.5.3 Checking in changes
When you are certain that any changes made are correct, and after having verified them
using the differences form, you can add them to the master copy. This operation is
called checking in.
Checking in can be done using the Check in context menu command, both from an
object in the tree and from the list of locks. This way you can check in only some modifications. However, if they are part of the same unit of work, we recommend checking
in from the Project object so that you can track the changes more easily.
472
Team Works
Checking in from the Project context menu is recommended to keep changes together
This will display a form for adding check in notes, which usually consist of a summary
of changes made. Pressing OK starts the operation. When check in is complete, you
will receive a message confirming that everything was successful and that there are no
differences between the master and local copies.
Sometimes, other changes that have taken place on the master copy may cause
small residual differences between the objects in the local copy and those on the server.
If this occurs, at the end of check in a form will appear showing the differences, in
which case the Selected objects box is already filled with the steps necessary to correct
the problem. Clicking OK performs a second check in that will complete the operation.
After transferring the changes to the master copy, there may be project validation
errors. If this happens, the Works Team server rejects the check in, reporting the errors
so they can be corrected. However, if you need to perform check in even with validation errors, you can set the Execute check in with validation errors flag in the options
form.
14.5.4 Retrieving the latest version
Retrieving the latest version is the opposite of checking in, because in this case you
synchronize the local copy with the master, losing any changes. To retrieve the latest
version, you use the corresponding command in context menu of the part of the project
you want to synchronize.
473
Andrea Maioli – Instant Developer: User's Guide
Before the operation is performed, a form opens with options for retrieving. Specifically, you can request retrieval of just the object or its entire contents. You can also retrieve only the more recent parts or the content of the entire object.
After OK is pressed, the Team Works server sends the objects to be synchronized
to the client, and another form will open where you can select the objects to import.
The objects appear in bold when you have a lock on them, and thus selecting them will
cause any changes made locally to be lost. The character after the object’s name denotes the type of operation. If it is “+”, then the object will be imported along with its
content. If it is “–” then it will be deleted from the local copy. Finally, if it is “*”, only
its properties will be updated.
Pressing OK will perform the synchronization operations of only the selected objects. Using the buttons at the bottom right, you can also get a better view of the objects
in question and what changes have been made.
474
Team Works
14.5.5 Working offline
It is not always possible to work on the project while connected to the Team Works
server. You may need to make changes directly from the end customer’s location, during a commute, or from home without having a connection available. Fortunately, the
Team Works system has an offline mode.
The offline mode is activated when you open a project managed with Team Works
in the IDE and the server cannot be contacted. In offline mode, whenever you make
changes that would require a lock, the system displays the following form:
The first option is usually selected: getting an offline lock, for which confirmation will
be automatically attempted when reconnecting. If no one else has modified that part of
the project, the offline lock becomes a normal lock. Otherwise, it will remain an offline
lock and you will have to manually reconcile the differences with the help of the corresponding form.
For this reason, if you expect to work offline, you should perform a precautionary
manual check out of the portion you want to change.
14.6 Project management through the web interface
If a project managed with Team Works is open in the IDE, selecting the Team Works –
Web client main menu command will open the server’s web interface, providing information for that project.
475
Andrea Maioli – Instant Developer: User's Guide
The main page allows you to change the project’s properties, upload or download the
master copy, perform backups, or create a derived project (branch). Using the menus on
the left, you can access the following pages, including the active locks page:
This form shows all locks held by all developers. If a lock was activated by mistake,
you can delete it to free up that part of the project.
The next form shows the list of check ins performed.
476
Team Works
Changing to the detail layout for an individual check-in, we can also see an estimate of
the time in minutes that the implementation has required.
The buttons in the form allow you to view the details of the check in and, notably, to
create or download a snapshot of the project before the changes. This way, you can
have a copy of the project prior to the check in if necessary to compare it with the current copy.
The last form, called Attachments, allows you to upload to the server any project
documents to share with the work team. This form also allows you to upload a zip file
containing the application’s entire custom folder, so it can be downloaded if necessary.
From version 12.5, you can also incorporate the custom directory within the project. If
you enable this feature, you no longer need to upload a zip file containing the custom
477
Andrea Maioli – Instant Developer: User's Guide
directory, because it is automatically distributed to the development team as if it were
any other property of the objects in the project. Therefore, if one of the developers incorporates it and performs check-in of the change, all developers will receive the updated custom directory when retrieving the latest version of the application.
The Tasks and Subscriptions menu items allow you to manage the tasks of the
work group for the project and the Team Works components to which this project has
subscribed. More information about these features can be found in the following sections.
14.7 Change history
Team Works also allows you to see the list of changes made over time on a particular
object using the “Show history” context menu command.
This command opens a new form containing the list of check-ins that have changed the
object in some way. More specifically, for every check-in, the form shows the name of
the user who made the change, the date and time when it was made, the action that was
performed, and the note that the developer wrote when sending the changes to the server.
This form also allows you to compare the current version of the project with the
version at the time of any of the listed check-ins. To do this, simply select a row in the
list and press the Show differences button. This will open a new form containing both
versions where they can be compared intuitively. For example, selecting the second
row of the image above will show the differences between the Products form present in
the local project and the same form as it was after the check-in of the selected row
(check-in 7853). You can also compare between two different check-ins by simply selecting the two rows in the list and pressing the Show differences button. When selecting check-ins 3040 and 3135, Instant Developer shows the differences for the object
whose history was being viewed caused by all check-ins from 3040 to 3135 inclusive.
478
Team Works
The history form not only shows the change history relating to a particular object, but it
also lists all changes made to any of that object's children. For example, returning to the
previous example, if you ask Instant Developer to show the change history of the web
application containing the Products form, you obtain the following list:
As you can see, the form shows the list of changes that affect not only the application
but also any of the objects that the application contains. In the example, you can see
that changes were made to forms and compiling parameters. In this configuration it is
also possible to view the differences between the local project and one of the check-ins.
Similarly, you can view the differences between two check-ins by pressing the Show
differences button after selecting them in the list.
14.8 Managing Team Works components
The Team Works system contains a component manager that allows applications or
parts of applications to be shared across projects it manages.
These types of components are different from those discussed in Chapter 9. In fact,
at the Team Works level, they merely represent a way to identify and share a part of the
project, not infrastructure at the compiled application level.
To publish a Team Works component, follow this procedure:
1) Open the project that contains the part to be shared. The project must be managed
in Team Works.
2) Open the web client and access the Components page from the main menu.
3) Click in the object tree on the object you want to share and use the Add component
command from the context menu. This new component will appear in the web client form as shown in the image below.
479
Andrea Maioli – Instant Developer: User's Guide
At this point, you can open another project managed in Team Works and from the components form use the Subscribe context menu command shown in the image. This creates a link between the project that published the component and the current one.
If you then use the Refresh context menu command, which is enabled when the
current project has a subscription to the component, the actual update process begins.
Keep in mind that updating a component is an operation that takes place on the
server side. Both projects are opened, the source and destination, and then the objects
that are part of the component are moved from one project to the other. Finally, a server-side check in is performed. This automatically gets a lock for the affected part of the
project subscribing to the component. If a lock cannot be obtained, the subscription
cannot take place.
In the Subscriptions project menu, you can keep track of all the current project’s
subscriptions. Here is an example of the form:
480
Team Works
Using the commands on the form, you can update the components, specify that this
should be done automatically, check the status of subscription operations, and view any
error messages at the bottom of the form.
If the update was successful, you can check the result by performing the Get latest
version operation. In fact, the subscription acts at the master copy level, so an automatic check in is performed by the server. To see the results of this check in on your local
copy, you have to retrieve the latest version from the project object.
The publishing operation can be done several times to make new versions of components available. Subscription will be performed automatically or manually, depending on the settings selected on the corresponding form.
Team Works components thus represent a very secure and easy way to manage
parts common to multiple projects. For example, if you want to share the same database
structure between several projects of the same product line, you can publish it as a
Team Works component and then subscribe to it where necessary.
481
Andrea Maioli – Instant Developer: User's Guide
14.9 Managing tasks
Team Works extends Instant Developer’s task management system, allowing them to
be shared among the work group. When a project is managed using Team Works, you
can select whether a task will be private or public. Private tasks will remain only in
your working copy, but public ones will be uploaded to the server.
Making tasks public
The list of tasks in the local copy is not updated from the list on the server automatically, but rather through the Team Works – Get tasks main menu command, which will
open a form to select options for this procedure.
Task management can also be done through the web client, from the Tasks project
menu item, which opens the following form:
482
Team Works
Changing layout, you can see the details of a particular task. Using this form, you can
take charge of tasks, deleting them from the list of other team members. The same can
be done from the IDE by using the Make active command in the task’s context menu. A
task can also be closed directly from the IDE. The recommended approach for managing the tasks is as follows:
1) Create tasks linked to objects in the Instant Developer IDE. Make public those you
want to be handled by other members of the work group.
2) Each team member receives the open tasks by retrieving them from the server and
starts working on them by making them active. This changes them to being in process.
3) When the operation is finished, after changes are checked in, tasks are closed and
also archived on the server.
Remember that tasks are not synchronized automatically, but only through the Team
Works – Get tasks command.
14.10 Questions and answers
The system for managing versions and team work is a key component to the success of
your software development tasks, especially at the enterprise level. It is therefore important to understand how it works and how to best use it.
For this reason, if you want further information on this topic, you can send a question via email by clicking here. I promise to answer all emails in my available time.
Also, the most frequently-asked questions will be published in this section in subsequent editions of this book.
This space is reserved for answers to readers' questions
483
Andrea Maioli – Instant Developer: User's Guide
484
Chapter 15
Acknowledgments
15.1 Acknowledgments
I would like to thank all those who have made it possible for me to write this guide,
starting with my friends and colleagues who for months have taken responsibility for
part of my daily tasks, allowing me to devote time to writing.
If the text flows smoothly and you do not find many errors, it is largely due to my
wife Sonja, who found the patience to proofread and correct it.
I thank all those who suggested ideas, additions, or further information. I also want
to thank all those who, by using Instant Developer and corresponding with us through
the forum and technical support, have allowed us to select the material to be written in
this guide.
Finally, I thank all of you who are reading this guide until the last line and hope
you will join us in the coming years full of fascinating adventures.
485