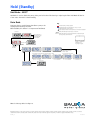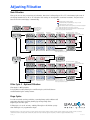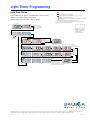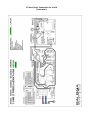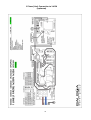
1
USER MANUAL CANCUN SPA SYSTEM - 1x3HP Hydromassage pump - Energy-efficient LAING circulation pump - 22 jets - Metal structure - For 4 persons - UV-C water sanitizer - Exclusive chromotherapy lighting Version: 01.2014 www.wellis.eu Product description Cancun Spa System Diameter: . ............................................. 1650 mm Features: Pool with stretched water surface flush-mounted or built around design Material: . ............................................... Acrylic with foam reinforcement Capacity: . ............................................. 4 persons Water capacity: . .................................... 950 Liters Net weigt: . ............................................ 250 kg Current demand: . .................................. 1x16A (minimum) . ............................................................ 1x25A (optimum) Total number of jets: . ............................ 22 pcs Hydromassage engine: ......................... 1 pcs 3 HP Circulation engine: . ............................... 1 pcs LAING, 0.1kW Exclusive light therapy lighting: ............. 12X1LED-s Heater unit: . ......................................... 1 pcs (3KW/230V/50Hz) BALBOA control system ......................... BP 600 / TP600 Accessories: Built in buffer tank: . ............................... 1 m3 Water level sensor Entry barrier . ......................................... 2 pcs Filter grid Foot structure WARRANTY LETTER Warranty certificate Factory number: ……………………………… Type: ……………………………………… Name of installer: …………………………………………………. Date of installation: …………………………………………………………… Retailer Wholesale dealer Date of purchase: _________________________ Date of purchase:_________________________ Signature: Signature: (Seal): (Seal): Guarantee period for the product 5 years for the surface of the pool: Wellis assumes a warranty of 5 years for water loss through the pool surface, referring to a loss of usability, not appearance. 3 years for the surface of the pool cover: Wellis assumes a warranty for the acrylic pool cover (not from fractures due to physical impact) for material or production defects caused by blistering or detachment beginning from date of the original delivery. 2 years for the pipe system of the pool - if the installation was made by a Wellis service center: We assume a warranty of 2 years for the system plumbing – in case of leakage due to material or production defects – from the date of the original delivery. There is no warranty for the interior, jets or spareparts. 2 years for standard equipment of the pool - if the installation was made by a Wellis service center: Balboa control systems, jet pump(s), circulation pump and heating, wifi module, infra receiver. • for the Pulsar hydrotherapy system, • for the Isis disinfection system, • for Led lighting • for UV-C lamp, • for the components of the audio system: for these components there is no on-site repair service • for the ozone generator 2 years for the electrical systems of the pool - in case of a malfunction due to material or production defects – from the date of the original delivery. The warranty does not cover the fuses, glow lamps, gaskets and bearings. We assume 1 year warranty for the following spare parts: • for the whirlpool engine • for the pool cover • for the Wellis Spa Umbrella system • for the LCD TV system • for the external wrapping of the pool 1 year for the electrical systems of the pool – in case of malfunction due to material or production defects - from the date of the original delivery. The warranty does not cover the fuses, glow lamps, gaskets and bearings. The warranty is not valid for the filters. 90 days for pool cushions, filter houses and filter caps: The cushions and the control buttons/thickeners, taps, water direction switch etc./ filter houses, filter caps are exposed to the chemical effects of the water, but we will assume for these a warranty of 90 days from the date of the original delivery. Terms of warranty A failure to include a letter of warranty with the product or the client not reciving it do not affect the validity of the warranty. 1. The installation verified by an electrician is required for the validation of the warranty! 2. Electric connection Each electric connection must be made by a qualified electrician. Failure to follow this condition immediately invalidites the warranty. The pool must be connected to a seperate electric circuit equipped with emergency breaker and a circuit breaker relay ! A shock protection protocol is required ! 3. Mineral scale development, cleaning and damages due to uninteded uses are not covered by this warranty. 4. Wellis reserves the right to replace the pool, or any required replacement parts with new or remanufactured quality parts! 5. Wellis does not assume any responsibilty for damages caused due to changes and modifications made by the client ! 6. The warranty does not apply to the quality of the wireless reception due to the following reasons: The wireless reception can be weakened due to it’s placement next to the pool, nearby buildings, high voltage lines, repeater towers and other metal components. The reception quality can be severely decreased, if there are mountains nearby, it is installed in a valley or it is outside of the broadcasting radius of the radio station. An outside antenna amplifier would be helpful in such cases, but it is not part of the guarantee. 7. The Wellis Magyarország Ltd. can not be held responsible for accidental and indirect damages. All costs and damages, including the loss of usage and alleged defects from contingent liabilities are excluded from the warranty. Reasons for the exclusion of the guarantee obligation The following reasons are excluded from the guarantee: 1. Damages due to incorrect maintenance and chemical dosage 2. Damage to the jets caused by foreign materials 3. Malfunction due to foreign materials in water or limescale deposts 4. Abrasion damage due to normal use! 5. Damage due to incorrect installation , moving or negligence 6. Damage or discoloration to the surface of the pool due to incorrect chemical dosing. Some houshold detergents can harm the components, which invaldates the guarantee. 7. Damage due to abuse or manufacturer unauthorized modification. 8. Damage to the pump gaskets from normal use. 9. Damage due to incorrect installation by the electrician , electrical voltage drop and voltage peak. 10. Installation of a floor drain is required! In the event of a malfunction, a large volume of water in the unit can be released. In order to avoid damages to the surrounding area, it is required to build out a floor drain ! We do not assume any responsibilty according to 340§ /1/of the Civil Code for damages due to expected or unexpected water escape. In order to avoid or diminish any damages, the customer should follow our recommendation. The cost of damages resulting from the customer’s negligence in this will not be refunded. 11. The pool is equipped with three/four massage jets, which allows for the operation of the jets both individually and at the same time. Do not connect the empty pool to the electric supply otherwise the compontents, (the control unit, heater, the circulation pump) and other systems can be damaged !!! 12. Do not leave the pool empty without a cover if the the temperature is above 50° ! If the pool is placed behind glass walls, see to it that direct sunlight does not reach the unit, as this will result in overheating of the pool body and its connecting parts. We will not assume any responsibilty for damages resulting from overheating. 13. Do not expose the empty pool to direct sunlight! We will not assume any responsibility for the resulting damages. 7 Water hardness conditions ! Limit of the water hardness: it must be between 6 – 10 of the German hardness grade. Electrical conditions! For the electrical installation a 30mA current protection switch /É.V.relay/ must be built for which no other consumer can be connected ! This current protection switch can not be in the same room with the pool ! It is obligatory to create a grounding system for direct potential/EPH/ next to the device ! It is obligatory to comply with the data of the connection diagram for the current demand and for the drain stand, which can be found in the website wellis.hu or in the documentation provided at purchase. Extent of the warranty WELLIS Magyarország Ltd. provides a warranty for products which have been installed in Hungary. The guarantee does not apply to any defects incurred after the handover of the product to the client, so e.g. if the defect has been cauesed by • improper installation (unless the installation was carried out by the dealer of his agent, or if the improper installation can be proven to be due to an error in the operating manual.) • unintended use, ignoring the operating instructions, • improper storage, mishandling, abuse, • acts of god /natural disasters/ In case of a defect within the scope of the guarantee , the client has the right • first of all – at his option – to claim a repair or an exchange, except if the settlement of the chosen warranty claim is impossible, or it would cause the dealer disproportional extra costs compared to the settlement of another guarantee claim. • at his option – to claim an appropriate price reduction , or the withdraw from the contract if he is not entitled to repair, or to exchange the product, or the dealer can not undertake the repair or the exchange, or he can not meet his responsibility within an appropriate period of time without essential inconvenience caused to the client. It is impossible to withdraw from the contract due to a minor defect. If the client makes a claim for exchange within 3 working days from purchase because of a product defect, the dealer can not claim proportional extra costs, but is obliged to exchange the product, providing the defect does not prevent the intended use. The repair of the exchange – with regard to the featueres of the product and the intended purpose by the client - has to be carried out within an appropriate period of time without causing considerable inconveniences to the client. The dealer has to undertake everything to carry out the repair or the exchange within 15 days. If the dealer does not accept the repair of the product in due time, or he does not carry out the repair, the client itself can repair the product or get it repaired at the dealer’s expense. During the repair, only brand new spare part are allowed to be used in the repair of the product. The repair time during which the client can not use the product as intended will not be included in the guarantee period. The guarantee period begins when an exchange or repair of the product is made or when an important part of the product is exchanged, repaired or has parts replaced again and it refers also to the defect as a consequence of the repair. The costs in connection with the fulfillment of the guarantee obligation and with the creation of contract conditions - especially the material,- labor,- and forwarding costs are the responsibility of the dealer. The products with a fixed connection, respectively, products heavier than 10 kg, or those which can not be delivered as a hand luggage in public transport, have - except the vehicles – to be repaired at the place of the installation. If the repair can not be carried out at the place of the installation it is the dealer’s responsibility to handle dismantling and reinstallation, respectively for delivery and return. The guarantee does not affect the inforcement of the legally ensured rights of the client, especially liability, respectively compensation rights. The warranty claim can be made by the warranty card. If the warranty card is missing and the client would like to make a warranty claim, the client’s contract can be considered as concluded if the client presents a receipt of payment for the product. Upon receipt of the product for repair, the dealer or service point are obliged according to § 5 of the regulation of the economy minster to give a confirmation receipt. The client can make its guarantee claim at the dealer. LIMITATIONS The Warranty expressions specified excludes any other implied or oral undertakings. Purchasers also have current rights under statute which will be respected by Wellis Magyarország Kft. After a period of 12 months, for the purpose of assessing Wellis Magyarország Kft. liability, all aspects covered by this Warranty will be treated on a pro-rata basis. Wellis Magyarország Kft. or its agents will not be liable for any incidental or consequential loss or injury. Nor will Wellis Magyarország Kft.be liable for costs associated with but not limited to building alterations or finishes and under no circumstances will be liable for greater expense than the amount paid for the product. THE SPA OWNER MUST DO EVERYTHING STATED IN THE SPA OWNERS MANUAL AND WARRANTY LETTER TO SAFEGUARD AND MAINTAIN THE SPA! MANUFACTURER OF YOUR SPA: Wellis Magyarország Kft. Registered:. CHeadquarters: . 2371 Dabas, Mánteleki út hrsz: 0417 Pf: 7, Hungary 2371 Dabas, Mánteleki út hrsz: 0417 Pf: 7, Hungary AUTHORIZED DEALER OF YOUR SPA Company in charge of your spa Company name: . Registered:. Central premise: . Place of complaint:. E-mail address: . Website:. Phone number: . Fax: . SERVICE-WORK The announcement date of damage: _____________________________ Date of received goods/parts for repair: _____________________________ Date of the return of repaired goods/parts: ____________________________ Date of site service: _____________________________ Improved error: _____________________________ Mode of repair: _____________________________ Failed component: _____________________________ New deadline for the warranty: __________________________ The announcement date of damage: _____________________________ Date of received goods/parts for repair: _____________________________ Date of the return of repaired goods/parts: _____________________________ Date of site service: _____________________________ Improved error: _____________________________ Mode of repair: _____________________________ Failed component: _____________________________ New deadline for the warranty: _____________________________ The announcement date of damage: _____________________________ Date of received goods/parts for repair: _____________________________ Date of the return of repaired goods/parts: _____________________________ Date of site service: _____________________________ Improved error: _____________________________ Mode of repair: _____________________________ Failed component: _____________________________ New deadline for the warranty: _____________________________ The announcement date of damage: _____________________________ Date of received goods/parts for repair: _____________________________ Date of the return of repaired goods/parts: ____________________________ Date of site service: _____________________________ Improved error: _____________________________ Mode of repair: _____________________________ Failed component: _____________________________ New deadline for the warranty: _____________________________ STAMP STAMP STAMP STAMP Safety instructions and warnings Please pay attention to the following safety warnings: - - - the water temperature should not exceed 40 °C or there is a risk of scalding injuries. Always check the water temperature before use ! when the unit is in operation, the heat produced can cause hyperthermia (overheating).The symptoms are: drowsiness, lethargy. children under 14 years of age are not allowed to use operate this porduct without parental supervision. people with heart disease, high blood pressure or in poor health must consult a doctor before use. do not use this product if taking any medication with side effects like drowsiness do not operate this product while intoxicated by alcohol or drugs as it can result in a loss of consciousness persons suffering from any infectious diseases should not use this product a warm water bath while pregnant can cause damage to the unborn child. Consult with a doctor before use. to avoid injuries, make sure to carefully enter and exit the unit do not use the unit if the absorption cover is damaged or faulty do not place any electrical devices within a 2-meter radius of the unit to avoid the risk of electrocution. An electric device falling into the water can cause death, electrocution and serious personal injuries. the unit housing must not be removed while in operation the water treatment should be carried out carefully. If not, the water can cause skin irritation when not in use, cover the unit. This will prevent UV radiation damage and prolong the life of the unit. Lower water temperature is recommend while in use by small children. You should control the water temperature always by hand, before the child enters the unit, and make sure, that it is an appropriate temperature for the child. Take into consideration that the wet surface can be slippery, please warn also your child accordingly during entering and exiting the unit. Do not let your child climb to the thermo cover when it is on a pool full of water. Do not remove any sucking gasket. Do not operate the unit, if the sucking gasket is broken or missing. Keep clothing or hanging jewelry away from the adjustable jets or any moving parts. Test the the shock protection relay/FI relay/ before use. Before electrical service, disconnect the pool from the electric supply. (it can be carried out only by a specialist.) 12 Pre-installation instructions Installation, installation, power cord replacement or repairs must be carried out by professional technicians only! An isolating device must be built into the power grid. Preparation of area 1. INDOOR OR BASEMENT USE If the unit is placed inside a building, the following special requirements should be considered: Water will tend to accumulate around the pool, thus the floor should have appropriate drainage in order to prevent standing water. If the unit is set up in a new room, a floor drain must be installed or else damage can occur due to overflow of water as well as technical defects. In order to prevent any damage, we suggest that a floor drain be installed, otherwise Wellis Magyarország Kft. refuses any liability for damages due to a failure to comply. In the room where the pool is situated, the degree of humidity will increase according to the amount of water in the pool, consequently evaporated water will condense in the room. We recommend the installation of adequate ventilation as well as a dehumidifier. 2. OUTDOOR AND CLOSED GROUND-FLOOR TERACE USE A solid horizontal foundation is recommended. Make sure that the foundation will fully support the unit when in use. It is advisable to consult a qualified architect or a structural engineer for this. For the weight, content and parts of the unit, consult the enclosed data sheet. This weight should not exceed the staticlly measured capacity per square meter of the foundation, otherwise it may cause permanent damages. If the unit is situated outdoors, we recommended a horizontal reinforced concrete surface of 10-15 cm wide. Don’t forget to construct a floor drain in order to ensure the water won't accumulate after heavy rain. When setting up the unit outdoors it is recommended to place it on a base that is about 1015 higher than the bottom of the foundation. The foundation should be sloped as well. On one of the sides there should be a drainage pipe to channel any water away from the unit. Drainage should be installed at the lowest point of any repair pit. It should also have proper safety measures and ventilation. For this purpose we recommend an air extractor or any similar exhaust system. In the case of no protecting cover, the empty unit should not be exposed to direct sunlight. Please keep in mind that long exposure to sunlight may damage the surface and accessories of the unit. Acryl absorbs the heat of sunlight very quickly producing a rather high surface temperature which will cause damage to the unit over time. If the unit has been placed in a glass enclosure, prevent direct sunlight from reaching it through the glass. 3. INSTALLATION OF THE UNIT When installing, be sure to provide access from all directions in order to make all repairs possible. You can ensure this by constructing a repair pit with a width of 60 cm minimum. In case of a sunken installation, sink only the part of the unit under the acrylic edge. Any expenses due to raising the unit are the full responsibility of the customer! The lack of these precautions may lead to the failure of the unit working properly! 4. Electrical connection The ensuring of propper electric wiring, the installation of an adequate circuit breaker as well as shock protection is the responsibility of the client. Each product includes its own electric circuit diagram. Make sure that any power source is equipped with a grounded circuit breaker with an FI relay. Use only copper cables. If a fuse has to be changed, change it only with a fuse of the same type and value. The unit must also be properly grounded. Installation 1. Please, carefully read all instructions and consult a qualified technician to install and adjust the unit for the first time. The unit may only be installed by a trained professional! 2. Remove packaging, and set the new unit on the prepaired foundation. 3. Open the cover of the digital controller under the computer indicator by removing the screw. Open the control box and prepare the copper cable (it should be long enough to be connected to the power supply.) Next, take the empty end of the cable and feed it through the pump-case to the cover channel of the control box, connecting it to the cascade-connection of the control box . Do not use a plug, only a direct patch connection is recommnded. This should be carried out by a professional only! 4. Connect the device to a junction point equipped with a 30 mA FI relay and a separating switch. 5. Clean and wax the interior and covering of the unit. The unit was submitted to a thorough testing in the manufacturing process. Consequently it may be that some residue from this process has been left behind. Thus we highly recommend that the pool should be washed down, dried off and waxed. 6. The device should be inspected and adjusted by a license technician at least once a year. Moreover, every three years it is necessary to examine the electrical safety measures, which must be documented for the record. INSTRUCTIONS FOR USE Attention! Servicing of the pool may only be carried out by a professional technician. Feel free to contact your local professional. 1. Turn off the drain switch, and fill the unit with water After closing the water outlet put the garden hose into the unit and turn on the water; the water level should be one unit higher than the uppermost water jet. If you notice any leaking or running water outside the unit, turn the water off immediately. 2. Starting the unit First ensure the proper functioning of the shock protection and circuit breaker systems of the unit! Only after this, connect it to the power supply. 3. Turn on and test the disconnecter The operating system has already been adjusted at the factory. Press the button PUMP and the VENTILATING WATER JET so as to let them run for a few minutes. This way you can check the functioning of the water jet system. If the air can get out of the heating system and the water jets are already working correctly, then filling the pool has been completed. Make sure that the air-controller and the water jets are open. One possible problem might be the AIR-LOCK, which can hinder the water jets from operating properly. When the pool is quickly filled, air can get stuck in the pipes, thus seal the stuffings as well as the jet openings. Also, the rising water level increases the amount of water leaving the openings of the pool and air can get stuck in the pipes. Because of this, when the pump is switched on, there is only air in the pipes. The pump won't stop working at this point but continues to run, but produces no water. If this happens, open the cover of the pump, loosen the seals that are easily removed at the front of the pump, and let air in. As a result, the airlock will disappear and a small amount of water will come out. Reset the sealings, switch on the pump and it should work appropriately. If it still does not operate correctly, please contact a professional familiar with similar products. 4. Programming the controls of the unit When the unit is correctly operating, the controls can be used to program the unit. Afterwards, put the covering on the unit and let the temperature stabilize. Until then, check the temperature constantly. 5. Taking the unit off line If you don’t want to use the unit for a long time, you must drain it and cut off the power supply.If the unit is located outdoors, a thorough defrosting is recommended after the removal of the water, especially in winter. Make sure all remaining water is removed from the pumps and water dividers in order to prevent any damage to the unit by frozen water. GENERAL INFORMATION Do not expose the unit to direct sunlight without water or a pool covering. Direct sunlight may cause discolouration. Use the cover if the unit is out of service, whether it is filled with water or not. The unit should not be accessable to rain or snow. As much as possible there should be shelter for the unit. The lateral covering of the unit should be protected against excessive UV-radiation /e.g. with a coat of paint/. The covering has been treated but the warranty does not include damage due to exposure to direct sunlight. 1. Don’t leave the electric controls open. The box does not contain any parts that should be handled by the user. 2. At regular intervals you should drain and clean the pool, then refill it with fresh water 3. The filter screen should be cleaned once a month 4. Before entering the pool you should rinse yourself off. Only use the cycle when letting the water out of the bath. This will prevent soap or other detergents from building up in the bathing water. REMOVAL AND CLEANING OF THE FILTER TANK *In order to keep the massage basin clean it is necessary to clean it from foreign particles and chemicals in the water by keeping it constantly moving. For that purpose we use a system consisting of a pump and a filter. The filter strains off particles floating in the water or on the surface. We recommend filters with paper or textile films. Settled particles on the bottom of the unit are filtered through pumps located there. 1. Remove the filter covering. 2. Twist out the filter tank. 3. Clean the filter from particles with a high-pressure washer. 4. Soak the filter for 1-2 hours in lukewarm chlorinated water /e.g. Wellis AlgaSokk/, then rinse it out thoroughly. If you use a textile filter, you can also clean it in a washing machine with chlorine detergent. After that, start the rinsing program of the washing machine without fabric softener. YOU SHOULD NEVER USE ALKALINE DETERGENTS FOR CLEANING THE FILTER Basic knowledge of water treatment Whirling-filtration of water Two fundamental considerations in maintaining the cleanness of the water of a whirlpool is chemical balance and keeping foreign particles from circulating in the water constantly. For that purpose, a separate system is used consisting of a pump and a filter. The filter strains out foreign particles floating in or on the surface of the water. We use paper filters in our pools. Particles on the bottom of the water are filtered out through pumps located there. Chemical balance of water The water of whirlpools will be clean and transparent if it is in chemical balance. 1. pH-value: The first important measurement to observe is the pH-value of the water. PH is measured on a scale of 0-14 where 7 represents a neutral state. The ideal balance is between 7.2 and 7.8. Any other value may result in skin irritation. Below this level the water is too acidic, above it too alkalescent. The pH-value of the human eye is about 7.5, above 7.8 the water irritates the bathers’ eyes. According to experience, most reported problems are caused by a pH-value that is too high. Inadequate values may decrease the efficiency of a disinfectant. A high pH-value can cause the following problems: - the antiseptic will be ineffective - solids may get separated from the solution - the water may become cloudy - eye irritation may occur A low pH-value can lead to these problems: - the water may become cloudy - eye irritation may occur Addition of rain or fresh water will change the pH-value! 2. Disinfection Disinfectant: the chemical that kills or neutralizes the micro-organisms in the water (bacteria, algae, fungi, viruses). Micro-organisms are microscopic living creatures that are invisible to the naked eye. They steadily get into the water through rain, wind and bathers. If they are not eliminated, they can be transferred through water between bathers and cause illnesses or infections. Organic substances may make the water of a pool cloudy. As these pools use heated water, we recommend bromide, chlorine or active oxygen for disinfection. 3. Algae growth Beside the disinfection of the water, it is very important to prevent the growth of algae. Even in the case of satisfactory disinfection and water filtering, algae may still appear. An algicide agent is most effective when an appropriate pH-value is maintained. 4. Hard water stains Hard water level is determined by the amount of calcium and magnesium salts dissolved in the water. When there is too much of these elements present, this is called hard water. When in a state of rest, hard water results in scaling. The encrustment may cause heavy damage on the walls of pool, in the pipe system, on the filter, in the heating and in the mechanical units. In Hungary, most water is of average hardness. While the hardness of water can’t be reduced by chemicals, scaling can be. 5. Foaming: This is the result of the coagulation of larger and smaller masses of bubbles and suspended foreign particles. Foaming is most often the result of a mixture of human skin, cosmetics, body lotions and other such chemicals. Foaming is a danger to the aesthetical maintenance and cleaning of the unit. 6. Water analysers There are several types of water-analysers with which chemical and antiseptic effects can be measured. Chemical /pH/; Disinfectant /Br, O3/. Some examples of analysers: - Box containing pills and a scoop. - Indicators with litmus paper in a box. Chemicals should always be put into the filter. The balance of pool disinfection is satisfactory if the levels of chemicals do not fall below the determined value during at least 48 hours. Even with a very precise disinfectant, the quality of water can’t be maintained for longer than 2-3 months. It is indispensable to replace the water regularly to maintain cleanliness and ensure full functionality of the the unit. When doing so, we recommend an extensive disinfection of the unit. ATTENTION! We remind you that the pool body MUST NOT BE TREATED with any detergent containing alcohol or acetone! Wellis Magyarország Kft. Will not bear any responsibility for damages caused by anyone using these chemicals, irrespective of a valid warranty. TROUBLESHOOTING TP600 and TP400 Control Panels User Interface and Programming Reference – Standard Menus System Model: BP-Series Systems are BP5XX, BP6XX, BP1XXX, BP2XXX. Software Version: 7.0 and later Panel Model: TP600 Series TP400 Series Software Version: 2.3 or later 2.4 or later JETS TS S AUX LIGHT HEAT HE Manufactured under one or more of these patents. U.S. Patents: 5332944, 5361215, 5550753, 5559720, 5,883,459, 6253227, 6282370, 6590188, 6976052, 6965815, 7030343, 7,417,834 b2, Canadian Patent: 2342614, Australian patent: 2373248 other patents both foreign and domestic applied for and pending. All material copyright of Balboa Water Group. 40940_J 10-08-13 Main Menus Navigation Navigating the entire menu structure is done with 2 or 3 buttons on the control panel. Some panels have separate WARM (Up) and COOL (Down) buttons, while others have a single Temperature button. In the navigation diagrams Temperature buttons are indicated by a single button icon. Panels that have two Temperature buttons (Warm and Cool) can use both of them to simplify navigation and programming where a single Temperature icon is shown. The LIGHT Button is also used to choose the various menus and navigate each section. Typical use of the Temperature button(s) allows changing the Set Temperature while the numbers are flashing in the LCD. Pressing the LIGHT button while the numbers are flashing will enter the menus. The menus can be exited with certain button presses. Simply waiting for several seconds will return the panel operation to normal. Key Power-up Screens Indicates Flashing or Changing Segment Each time the System powers up, a series of numbers is displayed. After the startup sequence of numbers, the system will enter Priming Mode (See Page 3). Indicates Alternating or Progressive Message - every 1/2 second A temperature button, used for “Action” Light or dedicated “Choose” button, depending on control panel configuration Waiting time that keeps the last change to a menu item. time (depends on menu item) that reverts to original setting and ***** Waiting ignores any change to that menu item. Main Screen READY RANGE FLTR1 SET While the Temperature is still flashing, press Light. RANGE Light Cycle if enabled SET RANGE SET READY SET 1 P SET Indicates a Menu Item that Depends on a Manufacturer Configuration and may or may not appear. If Time of Day is not set “SET TIME” will appear in this menu. 2 Main Screen READY RANGE FLTR1 Waiting Several Seconds in the Main Menu will allow the display to revert to the Main Screen. Most changes are not saved unless Light is pressed. Refer to Key above. Manufactured under one or more of these patents. U.S. Patents: 5332944, 5361215, 5550753, 5559720, 5,883,459, 6253227, 6282370, 6590188, 6976052, 6965815, 7030343, 7,417,834 b2, Canadian Patent: 2342614, Australian patent: 2373248 other patents both foreign and domestic applied for and pending. All material copyright of Balboa Water Group. 40940_J 10-08-13 Fill it up! Preparation and Filling Fill the spa to its correct operating level. Be sure to open all valves and jets in the plumbing system before filling to allow as much air as possible to escape from the plumbing and the control system during the filling process. After turning the power on at the main power panel, the top-side panel display will go through specific sequences. These sequences are normal and display a variety of information regarding the configuration of the hot tub control. Priming Mode – M019* This mode will last for 4-5 minutes or you can manually exit the priming mode after the pump(s) have primed. Regardless of whether the priming mode ends automatically or you manually exit the priming mode, the system will automatically return to normal heating and filtering at the end of the priming mode. During the priming mode, the heater is disabled to allow the priming process to be completed without the possibility of energizing the heater under low-flow or no-flow conditions. Nothing comes on automatically, but the pump(s) can be energized by pushing the “Jet” buttons. If the spa has a Circ Pump, it can be activated by pressing the “Light” button during Priming Mode. Priming the Pumps As soon as the above display appears on the panel, push the “Jet” button once to start Pump 1 in low-speed and then again to switch to high-speed. Also, push the Pump 2 or “Aux” button, if you have a 2nd pump, to turn it on. The pumps will now be running in high-speed to facilitate priming. If the pumps have not primed after 2 minutes, and water is not flowing from the jets in the spa, do not allow the pumps to continue to run. Turn off the pumps and repeat the process. Note: Turning the power off and back on again will initiate a new pump priming session. Sometimes momentarily turning the pump off and on will help it to prime. Do not do this more than 5 times. If the pump(s) will not prime, shut off the power to the spa and call for service. Important: A pump should not be allowed to run without priming for more than 2 minutes. Under NO circumstances should a pump be allowed to run without priming beyond the end of the 4-5 minute priming mode. Doing so may cause damage to the pump and cause the system to energize the heater and go into an overheat condition. Exiting Priming Mode You can manually exit Priming Mode by pressing a “Temp” button (Up or Down). Note that if you do not manually exit the priming mode as described above, the priming mode will be automatically terminated after 4-5 minutes. Be sure that the pump(s) have been primed by this time. Once the system has exited Priming Mode, the top-side panel will momentarily display the set temperature but the display will not show the temperature yet, as shown below. This is because the system requires approximately 1 minute of water or READY RANGE READY RANGE flowing through the heater to determine the water temperature and display it. *M019 is a Message Code. See Page 15. Manufactured under one or more of these patents. U.S. Patents: 5332944, 5361215, 5550753, 5559720, 5,883,459, 6253227, 6282370, 6590188, 6976052, 6965815, 7030343, 7,417,834 b2, Canadian Patent: 2342614, Australian patent: 2373248 other patents both foreign and domestic applied for and pending. All material copyright of Balboa Water Group. 40940_J 10-08-13 Spa Behavior Pumps Press the “Jets 1” button once to turn pump 1 on or off, and to shift between low- and high-speeds if equipped. If left running, the pump will turn off after a time-out period. The pump 1 low-speed will time out after 30 minutes. The high-speed will time out after 15 minutes. On non-circ systems, the low-speed of pump 1 runs when the blower or any other pump is on. If the spa is in Ready Mode (See page 6), Pump 1 low may also activate for at least 1 minute every 30 minutes to detect the spa temperature (polling) and then to heat to the set temperature if needed. When the low-speed turns on automatically, it cannot be deactivated from the panel, however the high speed may be started. Circulation Pump Modes If the system is equipped with a circ pump, it will be configured to work in one of three different ways: 1, The circ pump operates continuously (24 hours) with the exception of turning off for 30 minutes at a time when the water temperature reaches 3°F (1.5°C) above the set temperature (most likely to happen in very hot climates). 2, The circ pump stays on continuously, regardless of water temperature. 3, A programmable circ pump will come on when the system is checking temperature (polling), during filter cycles, during freeze conditions, or when another pump is on. The specific Circulation Mode that is used has been determined by the Manufacturer and cannot be changed in the field. Filtration and Ozone On non-circ systems, Pump 1 low and the ozone generator will run during filtration. On circ systems, the ozone will run with the circ pump. The system is factory-programmed with one filter cycle that will run in the evening (assuming the time-of-day is properly set) when energy rates are often lower. The filter time and duration are programmable. (See page 10) A second filter cycle can be enabled as needed. At the start of each filter cycle, the blower (if there is one) or Pump 2 (if there is one) will run briefly to purge its plumbing to maintain good water quality. Freeze Protection If the temperature sensors within the heater detect a low enough temperature, then the pump(s) and the blower automatically activate to provide freeze protection. The pump(s) and blower will run either continuously or periodically depending on conditions. In colder climates, an optional additional freeze sensor may be added to protect against freeze conditions that may not be sensed by the standard sensors. Auxiliary freeze sensor protection acts similarly except with the temperature thresholds determined by the switch. See your dealer for details. Clean-up Cycle (optional) When a pump or blower is turned on by a button press, a clean-up cycle begins 30 minutes after the pump or blower is turned off or times out. The pump and the ozone generator will run for 30 minutes or more, depending on the system. On some systems, you can change this setting. (See the Preferences section on page 12) Manufactured under one or more of these patents. U.S. Patents: 5332944, 5361215, 5550753, 5559720, 5,883,459, 6253227, 6282370, 6590188, 6976052, 6965815, 7030343, 7,417,834 b2, Canadian Patent: 2342614, Australian patent: 2373248 other patents both foreign and domestic applied for and pending. All material copyright of Balboa Water Group. 40940_J 10-08-13 Temperature and Temp Range Adjusting the Set Temperature When using a panel with Up and Down buttons (Temperature buttons), pressing Up or Down will cause the temperature to flash. Pressing a temperature button again will adjust the set temperature in the direction indicated on the button. When the LCD stops flashing, the spa will heat to the new set temperature when required. If the panel has a single temperature button, pressing the button will cause the temperature to flash. Pressing the button again will cause the temperature to change in one direction (e.g. UP). After allowing the display to stop flashing, pressing the Temperature Button will cause the temperature to flash and the next press will change the temperature in the opposite direction (e.g. DOWN). Press-and-Hold If a Temperature button is pressed and held when the temperature is flashing, the temperature will continue to change until the button is released. If only one temperature button is available and the limit of the Temperature Range is reached when the button is being held, the progression will reverse direction. Dual Temperature Ranges This system incorporates two temperature range settings with independent set temperatures. The High Range designated in the display by an “up” arrow, and the Low Range designated in the display by a “down” arrow. These ranges can be used for various reasons, with a common use being a “ready to use” setting vs. a “vacation” setting. The Ranges are chosen using the menu structure below. Each range maintains its own set temperature as programmed by the user. This way, when a range is chosen, the spa will heat to the set temperature associated with that range. For example: High Range might be set between 80°F and 104°F. Key Low Range might be set between 50°F and 99°F. Indicates Flashing or Changing Segment Indicates Alternating or Progressive Message - every 1/2 second More specific Temp Ranges may be determined by the Manufacturer. A temperature button, used for “Action” Light or dedicated “Choose” button, depending on control panel configuration Freeze Protection is active in either range. Waiting time that keeps the last change to a menu item. See Ready and Rest on Page 6 for additional heating control information. Main Screen READY Set Temp will Show & Flash SET RANGE FLTR1 High-Range vs. Low-Range Temp Choice RANGE While temperature is flashing... time (depends on menu item) that reverts to original setting and ***** Waiting ignores any change to that menu item. Press a Temp Button repeatedly to change the temperature. SET SET RANGE RANGE Main Screen OR Several Seconds READY RANGE FLTR1 Pressing and holding a Temp Button will also change the temperature. Toggle the Range arrows in the LCD. Main Screen To Set RANGE SET SET RANGE READY RANGE FLTR1 READY RANGE FLTR1 Several Seconds Reverts to Original Setting To next item in Main Menu Main Screen ***** Waiting Set Temp will Show & Flash SET RANGE FLTR1 Press a Temp Button repeatedly to change the temperature. SET RANGE FLTR1 SET RANGE FLTR1 Main Screen OR Several Seconds READY RANGE FLTR1 Pressing and holding a Temp Button will also change the temperature. Manufactured under one or more of these patents. U.S. Patents: 5332944, 5361215, 5550753, 5559720, 5,883,459, 6253227, 6282370, 6590188, 6976052, 6965815, 7030343, 7,417,834 b2, Canadian Patent: 2342614, Australian patent: 2373248 other patents both foreign and domestic applied for and pending. All material copyright of Balboa Water Group. 40940_J 10-08-13 Mode – Ready and Rest In order for the spa to heat, a pump needs to circulate water through the heater. The pump that performs this function is known as the “heater pump.” The heater pump can be either a 2-Speed Pump 1 or a circulation pump. If the heater pump is a 2-Speed Pump 1, READY Mode will circulate water every 1/2 hour, using Pump 1 Low, in order to maintain a constant water temperature, heat as needed, and refresh the temperature display. This is known as “polling.” REST Mode will only allow heating during programmed filter cycles. Since polling does not occur, the temperature display may not show a current temperature until the heater pump has been running for a minute or two. Circulation Mode (See Page 4, under Pumps, for other circulation modes) If the spa is configured for 24HR circulation, the heater pump generally runs continuously. Since the heater pump is always running, the spa will maintain set temperature and heat as needed in Ready Mode, without polling. In Rest Mode, the spa will only heat to set temperature during programmed filter times, even though the water is being filtered constantly when in Circulation Mode. Key Main Screen Indicates Flashing or Changing Segment READY SET RANGE FLTR1 RANGE While the Temperature is still flashing, press Light repeatedly until MODE appears in the LCD. Indicates Alternating or Progressive Message - every 1/2 second A temperature button, used for “Action” Light or dedicated “Choose” button, depending on control panel configuration Waiting time that keeps the last change to a menu item. Main Screen To Set SET READY SET ***** Waiting REST Several Seconds Reverts to Original Setting REST RANGE FLTR1 Toggle between READY and REST Pressing Light when the display is toggled will go to Main Screen. To next item in Main Menu If not toggled READY Mode will allow the spa to Poll and determine a need for heat. The panel will maintain a “current” temperature display. REST Mode will not Poll and will only heat during filter cycles. The panel will not display a current temperature at all times. Main Screen REST RANGE FLTR1 time (depends on menu item) that reverts to original setting and ***** Waiting ignores any change to that menu item. 1 Hour REST RANGE REST RANGE REST RANGE REST RANGE REST RANGE The Main Screen will display RUN PUMP FOR TEMP if the filtration pump has not run for over 1 hour. The Main Screen will display normally during Filter Cycles or when the spa is in use. If the filtration pump has been off for an hour or more, when any function button, EXCEPT Light, is pressed on the panel, the pump used in conjuncton with the heater will run so that temperature can be sensed and displayed. Ready-in-Rest Mode READY/REST appears in the display if the spa is in Rest Mode and Jet 1 is pressed. It is assumed that the spa is being used and will heat to set temperature. While Pump 1 High can be turned on and off, Pump 1 Low will run until set temperature is reached, or 1 hour has passed. After 1 hour, the System will revert to Rest Mode. This mode can also be reset by entering the Mode Menu and changing the Mode. Main Screen REST RANGE Main Screen J READY/REST RANGE Manufactured under one or more of these patents. U.S. Patents: 5332944, 5361215, 5550753, 5559720, 5,883,459, 6253227, 6282370, 6590188, 6976052, 6965815, 7030343, 7,417,834 b2, Canadian Patent: 2342614, Australian patent: 2373248 other patents both foreign and domestic applied for and pending. All material copyright of Balboa Water Group. 40940_J 10-08-13 Show and Set Time-of-Day Be sure to set the Time-of-Day Setting the time-of-day can be important for determining filtration times and other background features. When in the TIME menu, SET TIME will flash on the display if no time-of-day is set in the memory. 24-hour time display can be set under the PREF menu. (See Page 10) Key Indicates Flashing or Changing Segment Main Screen READY RANGE FLTR1 Indicates Alternating or Progressive Message - every 1/2 second SET A temperature button, used for “Action” Light or dedicated “Choose” button, depending on control panel configuration While the Temperature is still flashing, press Light repeatedly until TIME appears in the LCD. RANGE Waiting time that keeps the last change to a menu item. time (depends on menu item) that reverts to original setting and ***** Waiting ignores any change to that menu item. Main Screen Several Seconds P READY RANGE FLTR1 To next item in Main Menu Main Screen To Set P SET SET SET P P SET P ***** Waiting READY RANGE FLTR1 Several Seconds Reverts to Original Setting If Time of Day is not actually programmed due to a power cycle, SET TIME will appear in the menu instead of just TIME. P Note: If power is interrupted to the system, Time-of-Day is not stored. The system will still operate and all other user settings will be stored. If filter cycles are required to run at a particular time of day, resetting the clock will return the filter times to the actual programmed periods. When the system starts up, it defaults to 12:00 Noon, so another way to get filter times back to normal is to start up the spa at noon on any given day. SET TIME will still flash in the TIME Menu until the time is actually set, but since the spa started at noon, the filter cycles will run as programmed. Flip (Invert Display) Main Screen READY RANGE FLTR1 SET While the Temperature is still flashing, press Light repeatedly until FLIP appears in the LCD. RANGE Main Screen or Several Seconds SET SET To next item in Main Menu If not toggled READY RANGE FLTR1 Toggle the inversion of the segmented characters Pressing Light when the display is toggled will go to Main Screen. Note: Some panels may have a dedicated FLIP button, which allows the user to flip the display with a single button-press. Manufactured under one or more of these patents. U.S. Patents: 5332944, 5361215, 5550753, 5559720, 5,883,459, 6253227, 6282370, 6590188, 6976052, 6965815, 7030343, 7,417,834 b2, Canadian Patent: 2342614, Australian patent: 2373248 other patents both foreign and domestic applied for and pending. All material copyright of Balboa Water Group. 40940_J 10-08-13 Restricting Operation The control can be restricted to prevent unwanted use or temperature adjustments. Locking the panel prevents the controller from being used, but all automatic functions are still active. Locking the Temperature allows Jets and other features to be used, but the Set Temperature and other programmed settings cannot be adjusted. Temperature Lock allows access to a reduced selection of menu items. These include Set Temperature, FLIP, LOCK, UTIL, INFO and FALT LOG. Main Screen READY RANGE FLTR1 Key SET Indicates Flashing or Changing Segment While the Temperature is still flashing, press Light repeatedly until LOCK appears in the LCD. RANGE Locks Temp. and Settings. Indicates Alternating or Progressive Message - every 1/2 second A temperature button, used for “Action” Light or dedicated “Choose” button, depending on control panel configuration Locks all function buttons. Waiting time that keeps the last change to a menu item. time (depends on menu item) that reverts to original setting and ***** Waiting ignores any change to that menu item. SET SET SET Several Seconds To next item in Main Menu Main Screen To Set SET ***** Waiting SET Main Screen Main Screen Any Button Press READY RANGE FLTR1 READY RANGE FLTR1 Several Seconds READY RANGE FLTR1 RANGE FLTR1 LOCK will remain on the display for 3 seconds and then revert to the normal display. Temperature Locked Main Screen READY READY Several Seconds Reverts to Original Setting Panel Locked Main Screen RANGE RANGE FLTR1 READY RANGE FLTR1 Several Seconds READY RANGE FLTR1 When the Temperature is locked, the panel will display the Set Temperature by pressing a Temperature Button, as ususal. LOCK will appear if an attempt to reset the temperature is made with a subsequent button press. Adjustable settings in the menus are also locked. Other function buttons will operate normally. Unlocking This Unlock sequence may be used from any screen that may be displayed on a restricted panel. Main Screen While pressing and holding the Temperature Button (or UP button, if available), Slowly press and release the Light Button two times. A Few Seconds READY RANGE FLTR1 NOTE: If the panel has both an UP and a Down button, the ONLY button that will work in the Unlock Sequence is the UP button. Manufactured under one or more of these patents. U.S. Patents: 5332944, 5361215, 5550753, 5559720, 5,883,459, 6253227, 6282370, 6590188, 6976052, 6965815, 7030343, 7,417,834 b2, Canadian Patent: 2342614, Australian patent: 2373248 other patents both foreign and domestic applied for and pending. All material copyright of Balboa Water Group. 40940_J 10-08-13 Hold (Standby) Hold Mode – M037* Hold Mode is used to disable the pumps during service functions like cleaning or replacing the filter. Hold Mode will last for 1 hour unless the mode is exited manually. Drain Mode Some spas have a special feature that allows a pump to be employed when draining the water. When available, this feature is a component of Hold Mode. RANGE FLTR1 Indicates Flashing or Changing Segment Indicates Alternating or Progressive Message - every 1/2 second A temperature button, used for “Action” Light or dedicated “Choose” button, depending on control panel configuration Waiting time that keeps the last change to a menu item. Main Screen READY Key SET While the Temperature is still flashing, press Light repeatedly until HOLD appears in the LCD. RANGE time (depends on menu item) that reverts to original setting and ***** Waiting ignores any change to that menu item. Main Screen SET Several Seconds READY Indicates a Menu Item that Depends on a Manufacturer Configuration and may or may not appear. RANGE FLTR1 To next item in Main Menu Some spas will allow PUMP ING OUT (Drain Mode) with Jet 1 button OR Press JET Button for Pump Out/Drain, only if Drain Mode is enabled. J Jet 1 will toggle pump on and off. Main Screen 3 Seconds READY RANGE FLTR1 M037 is a Message Code. See Page 15. Manufactured under one or more of these patents. U.S. Patents: 5332944, 5361215, 5550753, 5559720, 5,883,459, 6253227, 6282370, 6590188, 6976052, 6965815, 7030343, 7,417,834 b2, Canadian Patent: 2342614, Australian patent: 2373248 other patents both foreign and domestic applied for and pending. All material copyright of Balboa Water Group. 40940_J 10-08-13 Adjusting Filtration Main Filtration Filter cycles are set using a start time and a duration. Start time is indicated by an “A” or “P” in the bottom right corner of the display. Duration has no “A” or “P” indication. Each setting can be adjusted in 15-minute increments. The panel calculates the end time and displays it automatically. Key Indicates Flashing or Changing Segment Indicates Alternating or Progressive Message - every 1/2 second A temperature button, used for “Action” Light or dedicated “Choose” button, depending on control panel configuration Main Screen READY RANGE FLTR1 SET Waiting time that keeps the last change to a menu item. While the Temperature is still flashing, press Light repeatedly until FLTR 1 appears in the LCD. RANGE time (depends on menu item) that reverts to original setting and ***** Waiting ignores any change to that menu item. Sets start hour Shows/flashes start time FLTR1 1 SET FLTR1 P SET Selects minutes SET P FLTR1 Sets Filter 1 length in hours to show RUN HRS Sets 15-minute increments FLTR1 P Selects part of an hour SET FLTR1 P Waiting Several Seconds Reverts to Original Setting ***** Sets 15-minute increments Wait to Revert FLTR1 FLTR1 SET SET FLTR1 FLTR1 SET to show F1 ENDS xx:xx FLTR1 ***** Main Screen To Set A To Set FLTR 2 SET FLTR 2 RANGE FLTR1 Main Screen Waiting Several Seconds Reverts to Original Setting SET FLTR 2 Shows/flashes start time To next item in Main Menu READY will lose any new Filter 1 Start Time and Run Hours and revert to the previous Filter 1 settings. To Set 2 ***** Waiting several seconds SET FLTR 2 P ***** READY To Set Sets start hour SET Selects minutes FLTR 2 P SET Sets Filter 1 length in hours to show RUN HRS RANGE FLTR1 Sets 15-minute increments FLTR 2 P Selects part of an hour SET FLTR 2 P Waiting Several Seconds Reverts to Original Setting ***** Sets 15-minute increments Wait to Revert FLTR 2 FLTR 2 SET SET FLTR 2 FLTR 2 SET to show F1 ENDS xx:xx FLTR 2 ***** Main Screen To Set A To Set ***** Waiting several seconds READY RANGE FLTR1 will lose any new Filter 2 On/OFF, Start Time and Run Hours and revert to any previous Filter 2 settings. Filter Cycle 2 - Optional Filtration Filter Cycle 2 is OFF by default. It is possible to overlap Filter Cycle 1 and Filter Cycle 2, which will shorten overall filtration by the overlap amount. Purge Cycles In order to maintain sanitary conditions, secondary Pumps and/or a Blower will purge water from their respective plumbing by running briefly at the beginning of each filter cycle. If Filter Cycle 1 is set for 24 hours, enabling Filter Cycle 2 will initiate a purge when Filter Cycle 2 is programmed to begin. Manufactured under one or more of these patents. U.S. Patents: 5332944, 5361215, 5550753, 5559720, 5,883,459, 6253227, 6282370, 6590188, 6976052, 6965815, 7030343, 7,417,834 b2, Canadian Patent: 2342614, Australian patent: 2373248 other patents both foreign and domestic applied for and pending. All material copyright of Balboa Water Group. 40940_J 10-08-13 Light Timer Programming Light Timer Option Key Indicates Flashing or Changing Segment If LITE TIMR does not appear in the Main Menu, the Light Timer feature is not enabled by the manufacturer. Indicates Alternating or Progressive Message - every 1/2 second A temperature button, used for “Action” Light or dedicated “Choose” button, depending on control panel configuration When available, the Light Timer is OFF by default. Waiting time that keeps the last change to a menu item. time (depends on menu item) that reverts to original setting and ***** Waiting ignores any change to that menu item. Main Screen READY RANGE FLTR1 SET To next item in Main Menu While the Temperature is still flashing, press Light repeatedly until LITE TIMR appears in the LCD. RANGE To Set SET Indicates a Menu Item that Depends on a Manufacturer Configuration and may or may not appear. Main Screen Waiting Several Seconds Reverts to Original Setting ***** SET Shows/flashes start time SET to show RUN HRS READY To Set A Sets start hour SET RANGE FLTR1 Selects minutes A Sets Timer Length in hours SET Selects part of an hour Sets 15-minute increments A SET A Waiting Several Seconds Reverts to Original Setting ***** Sets 15-minute increments Wait to Revert SET SET ***** SET Main Screen to show TIMR ENDS xx:xx To Set A To Set ***** Waiting several seconds READY RANGE FLTR1 will lose any new Lite Timer On/OFF, Start Time and Run Hours and revert to the previous Lite Timer settings. Manufactured under one or more of these patents. U.S. Patents: 5332944, 5361215, 5550753, 5559720, 5,883,459, 6253227, 6282370, 6590188, 6976052, 6965815, 7030343, 7,417,834 b2, Canadian Patent: 2342614, Australian patent: 2373248 other patents both foreign and domestic applied for and pending. All material copyright of Balboa Water Group. 40940_J 10-08-13 Preferences F / C (Temp Display) Change the temperature between Fahrenheit and Celsius. 12 / 24 (Time Display) Change the clock between 12 hr and 24 hr display. RE-MIN-DERS (Reminders) Turn the reminder messages (like “Clean Filter”) On or Off. CLN-UP (Cleanup) Cleanup Cycle Duration is not always enabled, so it may not appear. When it is available, set the length of time Pump 1 will run after each use. 0-4 hours are available. DOL-PHIN AD-DRES (Dolphin II and Dolphin III) Applies to RF Dolphin only. (This message may not appear depending on the configuration) When set to 0, no addressing is used. Use this setting for a Dolphin Remote which is factory set for no address by default. When set between 1 and 7, the number is the address. (See the Dolphin manual for details.) Manufactured under one or more of these patents. U.S. Patents: 5332944, 5361215, 5550753, 5559720, 5,883,459, 6253227, 6282370, 6590188, 6976052, 6965815, 7030343, 7,417,834 b2, Canadian Patent: 2342614, Australian patent: 2373248 other patents both foreign and domestic applied for and pending. All material copyright of Balboa Water Group. 40940_J 10-08-13 Preferences Main Screen READY RANGE FLTR1 Key SET Indicates Flashing or Changing Segment While the Temperature is still flashing, press Light repeatedly until PREF appears in the LCD. RANGE Indicates Alternating or Progressive Message - every 1/2 second A temperature button, used for “Action” Light or dedicated “Choose” button, depending on control panel configuration Waiting time that keeps the last change to a menu item. time (depends on menu item) that reverts to original setting and ***** Waiting ignores any change to that menu item. To show first item in Preferences menu (F/C) To next item in Main Menu (UTIL) OR Wait Several Seconds to Return to Main Screen Indicates a Menu Item that Depends on a Manufacturer Configuration and may or may not appear. Toggle °F and °C ***** Wait to Revert To Set SET Press Light SET Toggle 12-hour clock and 24-hour clock for 12-24 ***** Wait to To next item in Main Menu (UTIL) Revert SET Press Light SET To Set Toggle Yes and No for REMINDERS ***** Wait to Revert SET Press Light for CLEAN UP SET To view current setting and to toggle number of hours (0-4). To Set ***** Wait to Revert Only if Cleanup Cycle is enabled. SET Press Light SET SET To Set to show Address Menu for Dolphin II or Dolphin III RF Dolphin only. OR Several Seconds To veiw current setting and to toggle address numbers for Dolphin II or Dolphin III (0-7) ***** Wait to Revert SET SET SET To Set Manufactured under one or more of these patents. U.S. Patents: 5332944, 5361215, 5550753, 5559720, 5,883,459, 6253227, 6282370, 6590188, 6976052, 6965815, 7030343, 7,417,834 b2, Canadian Patent: 2342614, Australian patent: 2373248 other patents both foreign and domestic applied for and pending. All material copyright of Balboa Water Group. 40940_J 10-08-13 Utilities and Information INFO (System Information sub-menu) The System Information Menu displays various settings and identification of the particular system. As each item in the menu is highlighted, the detail for that item is displayed at the bottom of the screen. SSID (Software ID) Displays the software ID number for the System. MODL (System Model) Displays the Model Number of the System. SETP (Current Setup) Displays the currently selected Configuration Setup Number. SIG (Configuration Signature) Displays the checksum for the system configuration file. Heater Voltage (Feature not used on CE rated systems.) Displays the operating voltage configured for the heater. Heater Wattage as Configured in Software (CE Systems Only.) Displays a heater kilowatt rating as programmed into the control system software (1-3 or 3-6). H _ (Heater Type) Displays a heater type ID number. SW _ (Dip Switch Settings) Displays a number that represents the DIP switch positions of S1 on the main circuit board. PANL (Panel Version) Displays a number of the software in the topside control panel. Manufactured under one or more of these patents. U.S. Patents: 5332944, 5361215, 5550753, 5559720, 5,883,459, 6253227, 6282370, 6590188, 6976052, 6965815, 7030343, 7,417,834 b2, Canadian Patent: 2342614, Australian patent: 2373248 other patents both foreign and domestic applied for and pending. All material copyright of Balboa Water Group. 40940_J 10-08-13 Additional Utilities Utilities In addition to INFO, The Utilities Menu contains the following: GFCI (GFCI Test) (Feature not available on CE rated systems.) GFCI Test is not always enabled, so it may not appear. This screen allows the GFCI to be tested manually from the panel and can be used to reset the automatic test feature. If the GFCI Test Feature is reset, the device will trip within 7 days. (See Page 17) A / B (A/B Sensor Temperatures) When this is set to On, the temperature display will alternate to display temperature from Sensor A and Sensor B in the heater. FALT LOG (Fault Log) The Fault Log is a record of the last 24 faults that can be reviewed by a service tech. DEMO (Demo Mode) Demo Mode is not always enabled, so it may not appear. This is designed to operate several devices in a sequence in order to demonstrate the various features of a particular hot tub. Manufactured under one or more of these patents. U.S. Patents: 5332944, 5361215, 5550753, 5559720, 5,883,459, 6253227, 6282370, 6590188, 6976052, 6965815, 7030343, 7,417,834 b2, Canadian Patent: 2342614, Australian patent: 2373248 other patents both foreign and domestic applied for and pending. All material copyright of Balboa Water Group. 40940_J 10-08-13 Utilities Key Indicates Flashing or Changing Segment Indicates Alternating or Progressive Message - every 1/2 second A temperature button, used for “Action” Light or dedicated “Choose” button, depending on control panel configuration Main Screen READY RANGE FLTR1 SET Waiting time that keeps the last change to a menu item. While the Temperature is still flashing, press Light repeatedly until UTIL (Utilities) appears in the LCD. RANGE time (depends on menu item) that reverts to original setting and ***** Waiting ignores any change to that menu item. Start display of string. There is a 2 second delay on each number. Start display of string. There is a 2 second delay on each number. To FIRST item in Main Menu (TEMP Range) These strings will display once and return to the beginning. Press Temperature again to display the string again. Start display of string. There is a slight delay on each number. 120 or 240 VAC input power sensed by a OR UL system at startup. Waiting 10 seconds will allow the screen to return to normal operation. 3-6 or 1-3 Heater Wattage as programmed. Displayed by a CE system at startup. Heater Type DIP Switch 1 – Test Mode Off (0) or On (1) DIP Switch 2+3+4 = the number of HS pumps with heat DIP Switch Settings Store Settings (0) or Memory Reset (1) N/A or Special Amperage Rule 1 or 2 Only if GFCI is enabled Displays GFCI Test Menu See Page 17 To Set SET SET When set to ON, Panel will display alternate readings from Senor A and Sensor B on Main Screen ***** Waiting Several Seconds Reverts to Original Setting Displays Fault Log Only if DEMO Mode is enabled Indicates a Menu Item that Depends on a Manufacturer Configuration and may or may not appear. See Page 18 SET OR Several Seconds OR Back to normal operation Manufactured under one or more of these patents. U.S. Patents: 5332944, 5361215, 5550753, 5559720, 5,883,459, 6253227, 6282370, 6590188, 6976052, 6965815, 7030343, 7,417,834 b2, Canadian Patent: 2342614, Australian patent: 2373248 other patents both foreign and domestic applied for and pending. All material copyright of Balboa Water Group. 40940_J 10-08-13 Utilities – GFCI Test Feature Not Available on CE Rated Systems. A GFCI is an important safety device and is required equipment on a hot tub installation. Your spa may be equipped with a GFCI Protection feature. (UL rated systems only.) If your spa has this feature enabled by the manufacturer, the GFCI Trip Test must occur to allow proper spa function. Within 1 to 7 days after startup, the spa will trip the GFCI to test it. (The number of days is factory programmed.) The GFCI must be reset once it has tripped. After passing the GFCI Trip Test, any subsequent GFCI trips will indicate a ground fault or other unsafe condition and the power to the spa must be shut off until a service person can correct the problem. Key Indicates Flashing or Changing Segment Indicates Alternating or Progressive Message - every 1/2 second Main Screen READY RANGE FLTR1 SET A temperature button, used for “Action” Light or dedicated “Choose” button, depending on control panel configuration While the Temperature is still flashing, press Light repeatedly until UTIL (Utilities) appears in the LCD. RANGE Waiting time that keeps the last change to a menu item. time (depends on menu item) that reverts to original setting and ***** Waiting ignores any change to that menu item. To FIRST item in Main Menu (TEMP Range) Only if GFCI is enabled TRIP may also appear briefly under certain circumstances. One of these screens will appear. The GFCI will be tripped at a random interval. When the GFCI trips, the spa will shut down. After the breaker is reset, PASS will appear in this menu and the spa will operate normally. Indicates a Menu Item that Depends on a Manufacturer Configuration and may or may not appear. If the GFCI does NOT trip, FAIL will appear and Spa will not operate. SET ***** Or Wait to Only appears if a GFCI test has been passed. To next item in Info Menu (A/B°) Revert ***** Or Wait to ***** Or Wait to Revert Revert ***** Waiting several seconds inside the GFCI Menu will allow the screen to return to normal operation. Forcing the GFCI Trip Test The installer can cause the GFCI Trip Test to occur sooner by initiating it using the above menu. The GFCI should trip within several seconds and the spa should shut down. If it does not, shut down the power and manually verify that a GFCI breaker is installed and that the circuit and spa are wired correctly. Verify the function of the GFCI with its own test button. Restore power to the spa and repeat the GFCI Trip Test. Once the GFCI is tripped by the test, reset the GFCI and the spa will operate normally from that point. You can verify a successful test by navigating to the above menu. PASS should appear after a temp button is pressed from the GFCI screen. The end-user must be trained to expect this one-time test to occur and how to properly reset the GFCI. Warning: If freezing conditions exist, a GFCI should be reset immediately or spa damage could result. The end user should always trained to test and reset the GFCI on a regular basis. Manufactured under one or more of these patents. U.S. Patents: 5332944, 5361215, 5550753, 5559720, 5,883,459, 6253227, 6282370, 6590188, 6976052, 6965815, 7030343, 7,417,834 b2, Canadian Patent: 2342614, Australian patent: 2373248 other patents both foreign and domestic applied for and pending. All material copyright of Balboa Water Group. 40940_J 10-08-13 Utilities – Fault Log A Little History can tell a lot The Fault Log stores up to 24 events in memory and they can be reviewed under the Fault Log Menu. Each event captures a Fault Message Code, how many days have passed since the fault, Time of the fault, Set Temperature during the fault, and Sensor A and B temperatures during the fault. Main Screen READY RANGE FLTR1 SET RANGE Key While the Temperature is still flashing, press Light repeatedly until UTIL (Utilities) appears in the LCD. Indicates Flashing or Changing Segment Indicates Alternating or Progressive Message - every 1/2 second A temperature button, used for “Action” Light or dedicated “Choose” button, depending on control panel configuration Waiting time - varies depending on function Press Light repeatedly until FALT LOG appears in the LCD. To FIRST item in Main Menu (TEMP Range) M: Message Code READY READY RANGE Indicates a Menu Item that Depends on a Manufacturer Configuration and may or may not appear. RANGE D: Days Ago SET Only if DEMO Mode is enabled M: READY READY RANGE RANGE Time 24 Fault messages is the maximum. Fewer messages may be displayed. READY RANGE P Set Temperature M: READY RANGE Sensor A Temp M: The Fault Log is also available from the Test Menu (in Test Mode). READY RANGE Sensor B Temp Waiting several seconds inside the Fault Log Menu will allow the screen to return to normal operation. See following pages for various Message Codes and definitions. Manufactured under one or more of these patents. U.S. Patents: 5332944, 5361215, 5550753, 5559720, 5,883,459, 6253227, 6282370, 6590188, 6976052, 6965815, 7030343, 7,417,834 b2, Canadian Patent: 2342614, Australian patent: 2373248 other patents both foreign and domestic applied for and pending. All material copyright of Balboa Water Group. 40940_J 10-08-13 General Messages Priming Mode – M019 Each time the spa is powered up, it will enter Priming Mode. The purpose of Priming Mode is to allow the user to run each pump and manually verify that the pumps are primed (air is purged) and water is flowing. This typically requires observing the output of each pump separately, and is generally not possible in normal operation. Priming Mode lasts 4 minutes, but you can exit it earlier by pressing any Temp button. The heater is not allowed to run during Priming Mode. NOTE: If your spa has a Circ Pump, it will turn on with Jets 1 in Priming Mode. The Circ Pump will run by itself when Priming Mode is exited. or READY RANGE READY RANGE Water Temperature is Unknown After the pump has been running for 1 minute, the temperature will be displayed. READY RANGE FLTR1 Too Cold - Freeze Protection A potential freeze condition has been detected, or the Aux Freeze Switch has closed, and all pumps and blower are activated. All pumps and blower are ON for at least 4 minutes after the potential freeze condition has ended, or when the aux freeze switch opens. In some cases, pumps may turn on and off and the heater may operate during Freeze Protection. This is an operational message, not an error indication. Water is too Hot (OHS) – M029 One of the water temp sensors has detected spa water temp 110°F (43.3°C) and spa functions are disabled. System will auto reset when the spa water temp is below 108°F (42.2°C). Check for extended pump operation or high ambient temp. Safety Trip - Pump Suction Blockage* – M033 The Safety Trip error message indicates that the vacuum switch has closed. This occurs when there has been a suction problem or a possible entrapment situation avoided. (Note: not all spas have this feature.) M0XX numbers are Message Codes. See Page 15. * This message can be reset from the topside panel with any button press. Manufactured under one or more of these patents. U.S. Patents: 5332944, 5361215, 5550753, 5559720, 5,883,459, 6253227, 6282370, 6590188, 6976052, 6965815, 7030343, 7,417,834 b2, Canadian Patent: 2342614, Australian patent: 2373248 other patents both foreign and domestic applied for and pending. All material copyright of Balboa Water Group. 40940_J 10-08-13 Heater-Related Messages Heater Flow is Reduced (HFL) – M016 There may not be enough water flow through the heater to carry the heat away from the heating element. Heater start up will begin again after about 1 min. See “Flow Related Checks” below. Heater Flow is Reduced (LF)* – M017 There is not enough water flow through the heater to carry the heat away from the heating element and the heater has been disabled. See “Flow Related Checks” below. After the problem has been resolved, you must press any button to reset and begin heater start up. Heater may be Dry (dr)* – M028 Possible dry heater, or not enough water in the heater to start it. The spa is shut down for 15 min. Press any button to reset the heater start-up. See “Flow Related Checks” below. Heater is Dry* – M027 There is not enough water in the heater to start it. The spa is shut down. After the problem has been resolved, you must press any button to reset and restart heater start up. See “Flow Related Checks” below. Heater is too Hot (OHH)* – M030 One of the water temp sensors has detected 118°f (47.8°C) in the heater and the spa is shut down. You must press any button to reset when water is below 108°f (42.2°C). See “Flow Related Checks” below. A Reset Message may Appear with other Messages. Some errors may require power to be removed and restored. Flow-Related Checks Check for low water level, suction flow restrictions, closed valves, trapped air, too many closed jets and pump prime. On some systems even when spa is shut down, some equipment may occasionally turn on to continue monitoring temperature or if freeze protection is needed. * This message can be reset from the topside panel with any button press. Manufactured under one or more of these patents. U.S. Patents: 5332944, 5361215, 5550753, 5559720, 5,883,459, 6253227, 6282370, 6590188, 6976052, 6965815, 7030343, 7,417,834 b2, Canadian Patent: 2342614, Australian patent: 2373248 other patents both foreign and domestic applied for and pending. All material copyright of Balboa Water Group. 40940_J 10-08-13 Sensor-Related Messages READY RANGE FLTR1 Sensor Balance is Poor – M015 The temperature sensors MAY be out of sync by 2°F or 3°F. Call for Service. Sensor Balance is Poor* – M026 The temperature sensors ARE out of sync. The Sensor Balance is Poor fault has been established for at least 1 hour. Call for Service. Sensor Failure – Sensor A: M031, Sensor B: M032 A temperature sensor or sensor circuit has failed. Call for Service. Miscellaneous Messages No Communications The control panel is not receiving communication from the System. Call for Service. Pre-Production Software The Control System is operating with test software. Call for Service. READY RANGE FLTR1 °F or °C is replaced by °T The Control System is in Test Mode. Call for Service. * This message can be reset from the topside panel with any button press. Manufactured under one or more of these patents. U.S. Patents: 5332944, 5361215, 5550753, 5559720, 5,883,459, 6253227, 6282370, 6590188, 6976052, 6965815, 7030343, 7,417,834 b2, Canadian Patent: 2342614, Australian patent: 2373248 other patents both foreign and domestic applied for and pending. All material copyright of Balboa Water Group. 40940_J 10-08-13 System-Related Messages Memory Failure - Checksum Error* – M022 At Power-Up, the system has failed the Program Checksum Test. This indicates a problem with the firmware (operation program) and requires a service call. Memory Warning - Persistent Memory Reset* – M021 Appears after any system setup change. Contact your dealer or service organization if this message appears on more than one power-up, or if it appears after the system has been running normally for a period of time. Memory Failure - Clock Error* – M020 - Not Applicable on the BP1500 Contact your dealer or service organization. Configuration Error – Spa will not Start Up Contact your dealer or service organization. GFCI Failure - System Could Not Test/Trip the GFCI – M036 NORTH AMERICA ONLY. May indicate an unsafe installation. Contact your dealer or service organization. A Pump Appears to be Stuck ON – M034 Water may be overheated. POWER DOWN THE SPA. DO NOT ENTER THE WATER. Contact your dealer or service organization. A Pump Appears to have been Stuck ON when spa was last powered – M035 POWER DOWN THE SPA. DO NOT ENTER THE WATER. Contact your dealer or service organization. * This message can be reset from the topside panel with any button press. Manufactured under one or more of these patents. U.S. Patents: 5332944, 5361215, 5550753, 5559720, 5,883,459, 6253227, 6282370, 6590188, 6976052, 6965815, 7030343, 7,417,834 b2, Canadian Patent: 2342614, Australian patent: 2373248 other patents both foreign and domestic applied for and pending. All material copyright of Balboa Water Group. 40940_J 10-08-13 Reminder Messages General maintenance helps. Reminder Messages can be suppressed by using the PREF Menu. See Page 11. Reminder Messages can be chosen individually by the Manufacturer. They may be disabled entirely, or there may be a limited number of reminders on a specific model. The frequency of each reminder (i.e. 7 days) can be specified by the Manufacturer. Press a Temperature button to reset a displayed reminder message. Alternates with temperature or normal display. Appears on a regular schedule, e.g. every 7 days. Check pH with a test kit and adjust pH with the appropriate chemicals. Alternates with temperature or normal display. Appears on a regular schedule, e.g. every 7 days. Check sanitizer level and other water chemistry with a test kit and adjust with the appropriate chemicals. Alternates with temperature or normal display. Appears on a regular schedule, e.g. every 30 days. Clean the filter media as instructed by the manufacturer. See HOLD on page 6. Alternates with temperature or normal display. Appears on a regular schedule, e.g. every 30 days. The Ground Fault Circuit Interrupter (GFCI) or Residual Current Device (RCD) is an important safety device and must be tested on a regular basis to verify its reliability. Every user should be trained to safely test the GFCI or RCD associated with the hot tub installation. A GFCI or RCD will have a TEST and RESET button on it that allows a user to verify proper function. Warning: If freezing conditions exist, a GFCI or RCD should be reset immediately or spa damage could result. The end user should always trained to test and reset the GFCI or RCD on a regular basis. Manufactured under one or more of these patents. U.S. Patents: 5332944, 5361215, 5550753, 5559720, 5,883,459, 6253227, 6282370, 6590188, 6976052, 6965815, 7030343, 7,417,834 b2, Canadian Patent: 2342614, Australian patent: 2373248 other patents both foreign and domestic applied for and pending. All material copyright of Balboa Water Group. 40940_J 10-08-13 Reminder Messages Continued Alternates with temperature or normal display. Appears on a regular schedule, e.g. every 90 days. Change the water in the spa on regular basis to maintain proper chemical balance and sanitary conditions. Alternates with temperature or normal display. Appears on a regular schedule, e.g. every 180 days. Vinyl covers should be cleaned and conditioned for maximum life. Alternates with temperature or normal display. Appears on a regular schedule, e.g. every 180 days. Wood skirting and furniture should be cleaned and conditioned per the manufacturers instructions for maximum life. Alternates with temperature or normal display. Appears on a regular schedule, e.g. every 365 days. Filters should be replaced occasionally to maintain proper spa function and sanitary conditions. Alternates with temperature or normal display. As needed. Install new mineral cartridge Manufactured under one or more of these patents. U.S. Patents: 5332944, 5361215, 5550753, 5559720, 5,883,459, 6253227, 6282370, 6590188, 6976052, 6965815, 7030343, 7,417,834 b2, Canadian Patent: 2342614, Australian patent: 2373248 other patents both foreign and domestic applied for and pending. All material copyright of Balboa Water Group. 40940_J 10-08-13 Warning! Qualified Technician Required for Service and Installation Basic Installation and Configuration Guidelines Use minimum 6AWG copper conductors only. Torque field connections between 21 and 23 in lbs. Readily accessible disconnecting means to be provided at time of installation. Permanently connected. Connect only to a circuit protected by a Class A Ground Fault Circuit Interrupter (GFCI) or Residual Current Device (RCD) mounted at least 5’ (1.52M) from the inside walls of the spa/hot tub and in line of sight from the equipment compartment. CSA enclosure: Type 2 CSA Compliance/Conformité Caution: s4ESTTHEGROUNDFAULTCIRCUITINTERRUPTERORRESIDUALCURRENTDEVICEBEFORE each use of the spa. s2EADTHEINSTRUCTIONMANUAL s!DEQUATEDRAINAGEMUSTBEPROVIDEDIFTHEEQUIPMENTISTOBEINSTALLED in a pit. s&ORUSEONLYWITHINANENCLOSURERATED#3!%NCLOSURE s#ONNECTONLYTOACIRCUITPROTECTEDBYA#LASS!GROUNDFAULTCIRCUIT interrupter or residual current device. s4OENSURECONTINUEDPROTECTIONAGAINSTSHOCKHAZARDUSEONLYIDENTICAL replacement parts when servicing. Refer to Wiring Diagram inside the cover of the control enclosure. s)NSTALLASUITABLYRATEDSUCTIONGUARDTOMATCHTHEMAXIMUMmOWRATE marked. Refer to Installation and Safety Instructions provided by the spa manufacturer. Warning: s7ATERTEMPERATUREINEXCESSOFª#MAYBEINJURIOUSTOYOURHEALTH Warning: People with infectious diseases should not use a spa or hot s$ISCONNECTTHEELECTRICALPOWERBEFORESERVICING tub. Attention: Warning: To avoid injury, exercise care when entering or exiting the spa or hot tub. s4OUJOURSVERIlERLEFlCACITEDUDISJONCTEURDIFFERENTIELAVANTDUTILISER differentiel avant d’utiliser le bain. Warning: Do not use a spa or hot tub immediately following strenuous s,IRELANOTICETECHNIQUE exercise s,ORSQUELAPPAREILLAGEESTINSTALLEDANSUNEFOSSEONDOITASSURERUN drainage adequat. Warning: Prolonged immersion in a spa or hot tub may be injurious to your health Warning: Maintain water chemistry in accordance with the Manufacturers instructions. Warning: The equipment and controls shall be located not less than 1.5 meters horizontally from the spa or hot tub. s%MPLOYERUNIQUEMENTALINTERIEURDUNECLOTURE#3!%NCLOSURE s#ONNECTERUNIQUEMENTAUNCIRCUITPROTEGEPARUNDISJONCTEURDIFFERENtiel de Class A. s!lNDASSURERUNEPROTECTIONPERMANENTECONTRELEDANGERDESHOCK electrique, lors de l’entretien employer seulement des pieces de rechange identiques. Warning! GFCI or RCD Protection. s,ESPRISESDASPIRATIONDOIVENTETREEQUIPEESDEGRILLESCONVENANTAU debit maximal indique. The Owner should test and reset the GFCI or RCD on a regular basis to verify its function. Avertissement: s$ESTEMPERATURESDELEAUSUPERIEURESAª#PEUVENTPRESENTERUN danger pour la sante. Warning! Shock Hazard! No User Serviceable Parts. Do not attempt service of this control system. Contact your dealer or service organization for assistance. Follow all owner’s manual power connection instructions. Installation must be performed by a licensed electrician and all grounding connections must be properly installed. s$ECONNECTERDUCIRCUITDALIMENTATIONELECTRIQUEAVANTELENTRETIEN Warning/Advertissement: s$ISCONNECTTHEELECTRICPOWERBEFORESERVICING+EEPACCESSDOORCLOSED s$ECONNECTERDUCIRCUITDALIMENTATIONELECTRIQUEAVANTLENTRETIEN Garder la porte fermer. Manufactured under one or more of these patents. U.S. Patents: 5332944, 5361215, 5550753, 5559720, 5,883,459, 6253227, 6282370, 6590188, 6976052, 6965815, 7030343, 7,417,834 b2, Canadian Patent: 2342614, Australian patent: 2373248 other patents both foreign and domestic applied for and pending. All material copyright of Balboa Water Group. 40940_J 10-08-13 Piping instructions of CANCUN spa 30mA safety relay is need to be installed! E: Electric hole (500mm) to terminal facilities through spa cabinet. 3 m cabels are required! L : Drain connector (600 mm) In case of sinking just allowed to sinking part which is under the spa`s acrylic-flange. You have to make safe the diversion of inlet water in the deepest point of the inspection pit. The inspection pit has to be aired accordingly (proposal: building in an extractor fan). The inspection pit`s minimum width is 60 cm around the spa. If the spa is placed indoor please make allowances for the following special requirements: The water accumulates around the spa so the socket cover has to be in possession of a suitable drainage. This arrangement hinders the water in collecting. L E 500 100 600 2000 100 767 80 Given sizes above are only information, there may be variant sizes on the grounds of the spa`s manufacturing technique. Dátum: 2013.03.13. Megrendelő: Wellis Invest Rajzoló: Szomor Attila Szakellenőr: Nagy András Ellenőrizte: Lakatos József Engedélyező: Megjegyzés: 2000 Rajz leírás: CANCUN - Connection Méret: Rajz file neve: A4 REV CANCUN_bekotesi_rajz Méretarány: 1:20 V3 oldal 1 / 1 1 Phase (Line) Connection to 1x16A (minimum) 1 Phase (Line) Connection to 1x25A (optimum) 44