1
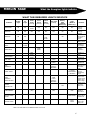
GROUP OF COMPANIES
MERLIN SAGE
and FenceProbe
Users Manual
Revision 1.0
08/12/2009
MERLIN SAGE and FenceProbe
Table of Contents
GUARANTEE…..…………………………………………………………………………..
3
INTRODUCTION…..……………………………………………………………………
4
DISPLAYING THE ENERGIZERS……………………………………………….…..
5
CONTROLLING THE ENERGIZERS………………………………………………..
5
WHAT THE ENERGIZER LIGHTS INDICATE……………………………………
6
NEMTEK FENCEPROBE…………………………………………………………………
7
STARTING FENCEPROBE …………………………………………………………….
7
THE WORKSPACE………………………………………………………………………..
7
DISPLAY BARS…………………………………………………………………………….
7-8
ENABLE OR DISABLE SOUND ALARM……………………………………………..
8
WHAT TO DO IN THE EVENT OF AN ALARM……………………………………
9
DATE AND TIME LOGS…………………………………………………………………..
10
2
MERLIN SAGE and FenceProbe
Guarantee
GUARANTEE
The Merlin Stealth Sage, manufactured by IO Tech Manufacturing (Pty) Ltd, is
guaranteed for a period of one year from date of sale against defects due to
faulty workmanship or materials.
IO Tech Manufacturing (Pty) Ltd will, at its discretion, either repair or replace
a product that proves to be defective.
IO Tech Manufacturing (Pty) Ltd guarantees that the product, when properly
installed and used in line with the specification as determined by IO Tech
Manufacturing (Pty) Ltd from time to time, will execute its function of
generating a suitable potential. IO Tech Manufacturing (Pty) Ltd does not
guarantee that the operation of the product will be uninterrupted and totally
error free. Faulty units must be returned to Nemtek, Units 4 & 5, 64 Vervoer
Street, Kya Sand, Randburg, Gauteng, South Africa OR Nemtek Security
Warehouse, Unit 4, Meadowdale Park, Cnr. Herman & Dick Kemp Roads,
Meadowdale, Edenvale, Gauteng, South Africa. The buyer shall pay all
shipping and other charges for the return of the product to Nemtek or
Nemtek Security Warehouse.
LIMITATION
OF
GUARANTEE
The guarantee does NOT apply to defects resulting from acts of GOD,
modifications made by the buyer or any third party, misuse, neglect, abuse,
accident and mishandling.
EXCLUSIVE
REMEDIES
The remedies provided herein are IO Tech Manufacturing (Pty) Ltd’s sole
liability and the buyer’s sole and exclusive remedies for breach of guarantee.
IO Tech Manufacturing (Pty) Ltd shall not be liable for any special, incidental,
consequential, direct or indirect damages, whether based on contact, tort, or
any other legal theory. The foregoing guarantee is in lieu of any and all other
guarantees, whether expressed, implied, or statutory, including but not
limited to warranties of merchantability and suitability for a particular
purpose.
3
MERLIN SAGE and FenceProbe
Introduction
INTRODUCTION
1.0 Introduction
The Merlin SAGE controller enables up to 32 Merlin Stealth energizers to be
networked.
The system user can send through the SAGE controller global or energizer
specific commands to turn energizers On/Off, change between High-Voltage
and Low-Voltage modes, turn Strobes and Sirens On/Off, Bypass or UnBypass fences and Gate alarms. The full fascia of each energizer is displayed
indicating the condition of fences and gates.
Familiarity with the Merlin Stealth Energizer™ Range will facilitate the
understanding of the Sage controller.
Each of the networked energizers may have their own individual keypads
giving access to all the programmable features of the individual energizer. For
security reasons, the individual keypads, can be disabled by using a unique
personal identification number (PIN) on each energizer.
The mains condition, communication and synchronization status of each
energizer is monitored and displayed.
For safety reasons the energizers may be pulsed in a synchronized manner.
Communication errors in a network can occur and it is the responsibility of the
user to ensure that the system is in the desired state. If operating as a
synchronized network, system safety is of paramount importance, and any
loss of communication or communication error will result in the affected
network components defaulting to a safe operating level. The Sage will detect
a loss in synchronization and take corrective action. The Sage will periodically
align the individual energizer clocks to ensure correct operation.
The installer of the system will have made all the communication connections
between the Merlin Sage, energizers and computer as well as loaded the
software and issued an IP address for the Sage.
The installer must provide the user with the IP address and an User
Password.
4
MERLIN SAGE
Displaying the energizers
Displaying the Energizers
To display the energizers connected to the network use click on the shortcut for
Internet Explorer on the desktop, ensure that it is working on line and type the IP
address of the Sage unit in the address bar and press enter.
The Sage units are standard supplied with the IP address http://192.168.100.100
The installer should inform the user if there were changes in the IP address.
If the address was correct a screen will appear requesting a user name and a password,
type in for the user name the word user and type in the password supplied by the
installer. Press the OK button and the pictures of the energizers fascia should come up
on the computer screen.
Above each picture is the address of the energizer and normally address 1 is for
energizer 1 and address 2 is energizer 2 etc.
Controlling the energizers
It is possible to control the energizers on the network by sending commands available
on the display screen to the energizers.
By clicking on the down arrow under the required energizer an expansion widget will
open showing the commands available. Click on the required command, the expansion
widget will close and it will show the command in the command bar. Click the arrow on
the far right next to the command bar to send the command to the energizer.
The display will not immediately update but will only update at regular intervals
according to a setting which was done by the installer.
To have an immediate update click on the USER STATUS at the top left of the display
screen.
Each energizer can be controlled as described above. It is however also possible to send
a global command to the energizers. All the energizers will obey simultaneously to a
global command and perform the action requested.
The global command bar can be found by scrolling down to the bottom of the energizer
display screen and it operates in the same way as for the individual energizers.
5
MERLIN SAGE
What the Energizer lights indicate
WHAT THE ENERGIZER LIGHTS INDICATE
On
Light
Fence
Good
(1 or 2)
Fence
Check
(1 or 2)
Fence
Alarm
( 1 or 2)
Gate Light
(1 or 2)
FENCE GOOD
ON
ON
SLOW
FLASH
OFF
OFF
OFF
ON
OFF
FENCE OFF
ON
OFF
OFF
OFF
OFF
OFF
ON
OFF
FENCE OFF
ON
OFF
MAINS FAILURE
OFF
Condition:
LOW VOLTAGE
MODE
FENCE BYPASS
SLOW
FLASH
SLOW
FLASH
FAST
FLASH
SLOW
FLASH
Problem on
fence
Fence alarm
switched off
FAST
FLASH
SLOW
FLASH
GATE OPEN
GATE BYPASS
Gate is open
1 FLASH
EVERY 5
SECONDS
GATE
IMMEDIATE
1 SHORT
FLASH EVERY
5 SECONDS
SILENT ALARM
Gate2
LONG
FLASH
EVERY 5
SECONDS
GATE2
CONTROLS
FENCE VOLTAGE
BATTERY
VOLTAGE LOW
ALARM MEMORY
(ON)
Gate alarm
switched off
Appropriate
gate input is in
immediate
mode.
Siren or strobe
light not
activated by
alarm!
Gate 2 closed:
fence in lowvoltage mode
Gate 2 open:
fence in highvoltage mode
No mains,
Faulty fuse
OFF
(ON)
Remarks
Fence on,
working
properly
Fence off,
working
properly
Fence turned
off with alarm
condition
active
System on
battery power
Energizer
switched to
low voltage
Check Fence
Remove
vegetation
ON
FAST
FLASH
FENCE CHECK
FENCE ALARM
Battery
Light
(M15S &
M18S only)
Service
Light
(M15S &
M18S only)
Power
Light
Old alarm.
Enter PIN #
(ON)
SERVICE ALARM
BYPASS
SLOW FLASH
SERVICE ALARM
FAST
FLASH
Service alarm
switched off
No mains,
battery flat,
faulty fuse
NOTE: The AUX LIGHT on the M18S and M15S is not used.
6
NEMTEK- FenceProbe
NEMTEK-FenceProbe
FenceProbe is a software package designed to communicate with a single or
multiple Merlin Sage units. The program allows you to graphically view your
secure areas. It can sound alarms and show in which area the alarm was
triggered. If required it could send emails or SMS messages. Most importantly
it keeps time and date logs on all events on the network, the time and date
logs can printed if so required.
FenceProbe has a Help Menu and all detail information is available in the
Menu.
Starting FenceProbe
To start FenceProbe one should first ensure that the energizer display
provided by the Sage units are minimized and placed on the taskbar of the
computer.
On the desktop there should be a shortcut to Nemtek-FenceProbe, double
click on the shortcut and FenceProbe should start up and display the secure
area in the workspace.
The Workspace
The workspace normally has a bitmap of the protected area. Lines are drawn
on the workspace to indicate the different zones of the energizers and are
normally given names or numbers to identify them.
The colour of the lines indicates the alarm condition of the fences.
Green:
Yellow:
Red:
Grey:
No alarm condition
Warning indication
Critical Alarm
FenceProbe is not receiving information from the Sage
Display Bars
The sidebar and bottom bar will be displayed after starting FenceProbe if they
have been closed for some reason they can be recalled by clicking on View on
the top bar, the view menu will open up and by clicking on sidebar and
bottom bar both bars will be displayed again.
7
FenceProbe
The Bottom Bar
The bottom bar has two tabs on the left side of the bottom bar one is for
showing the alarm list and the other tab is for displaying an event log (up to
1000 events).
The log can be cleared, pasted or printed out with the help of the toolbars
next to the log.
The alarm list shows only the alarms which are present at that instant. After
the alarm has been resolved it will disappear of the alarm list.
The Side Bar
The side bar displays details about the items on the workspace as well as
graphic statistics on the performance of the network.
The toolbar at the bottom of the side bar assist with displaying the graphics
or properties of the alarms on the network.
Enable or Disable Sound Alarm
Normally an alarm on the network will generate an Alarm sound through
FenceProbe at the computer.
This alarm will sound until the problem at the Fence or Energizer has been
cleared. The Sound Alarm for each alarm type can be enabled or disabled in
FenceProbe in case that the alarm can not be cleared immediately.
To Disable the Sound Alarm
-
Check on the alarm list on the bottom bar which alarm is triggering the Sound
Alarm and what is the target ID number of the alarm.
Click on ALL on the toolbar at the bottom of the side bar
Double click on the IP address shown near the top of the side bar
Click on properties on the toolbar at the bottom of the sidebar, all alarm ID
will be shown in the side bar
Find the target ID for the alarm on the sidebar
Click on the + sign to open up the information on the alarm
Click on the + sign next to actions to open up the information on actions
Click on the + sign for Sound Alarm to open up the information on the Sound
Alarm
Click on Enabled and a window will open up
Click on Disabled in the window, the window closes and will show disabled,
the sound should stop
Please note that the sound alarm will not automatically enable after the alarm is
cleared it must be enabled by hand after the fault has been cleared.
8
FenceProbe
To Enable the Sound Alarm
-
Click on ALL on the toolbar at the bottom of the side bar
Double click on the IP address shown near the top of the side bar
Click on properties on the toolbar at the bottom of the sidebar, all alarm ID
will be shown in the side bar
Find the target ID of the alarm on the sidebar
Click on the + sign to open up the information on the alarm and check that it is
the correct alarm you want to have sound for.
Click on the + sign next to actions to open up the information on actions
Click on the + sign for Sound Alarm to open up the information on the Sound
Alarm
Click on the down arrow next to the disabled sign and a window will open up
Click on Enabled in the window, the window closes and will show enabled,
the sound will go off when the alarm is triggered.
WHAT TO DO IN THE EVENT OF AN ALARM.
A properly installed electric fence should not cause false alarms and any alarm
condition should be investigated.
An alarm condition must be cleared with the commands available on the SAGE
Display Screen or it can be cleared at the energizer with a Keypad or a Tag.
To clear an alarm turn the energizer Off and then On again. If the alarm
condition is still present on turn On the alarm will sound again.
If the alarm does not sound again the alarm condition no longer exists and no
further action is required. If the alarm sounds immediately again the alarm
condition still persists. Switch the specific slave off and remedy the cause
alternatively you can bypass the faulty zone and remedy the problem when
possible.
Example: A twelve zone system comprising of 6 energizers with a Sage and
FenceProbe software. A permanent fence fault occurs on Zone 5 (Fence 1 on
energizer 3) because a tree was blown over and has damaged the fence. This
would be displayed by the FenceProbe screen on the Workspace as a flashing
red line for Zone 5 and the Alarm list and computer sound would indicate a
critical alarm.
To clear the alarm
- Click on Nemtek-Internet explorer on the taskbar of the computer, this
will bring up the energizer fascia.
- Click on User Status to get a immediate refresh for the screen
9
FenceProbe
-
-
-
Go to address 3 (energizer 3) and you should see the alarm light
flashing on zone 1. If the alarm light is on solid it means that the fault
on the fence has been cleared.
Turn energizer 3 off with the help of the command bar under energizer
3
Refresh the screen and energizer 3 should show that it is off but the
alarm light would still be flashing since the fault has not been cleared.
If the fault can be attended to immediately then the energizer can be
left in the Off condition and the fault can be cleared at the fence.
Disable the non critical Sound Alarm if required.
If the fault can not be repaired immediately Bypass Fence 1 of
energizer 3 with the help of the command bar under energizer 3
Turn on energizer 3 again; the critical alarm sound should have
changed to the non critical bypass alarm sound.
Click on Nemtek FenceProbe on the computers Task bar to recall the
Workspace
Disable the Sound Alarm for the bypass alarm if so required.
As soon as the fence is repaired alternatively switch energizer 3 back
on or unbypass energizer 3 and enable the disabled Sound Alarm.
Date and Time Logs
Apart from the date and time log on the bottom bar there are also daily logs
available. A window will open by clicking on Aquirer on the top bar and by
clicking on to Logs the log viewer will appear showing today’s log.
If older logs need to be investigated (standard up to 30 days back), click on
the far right down arrow on the top bar of the log viewer. It will show all logs
available and by clicking on the required log date the log will open and can be
printed or pasted if so required.
10