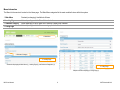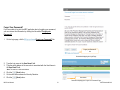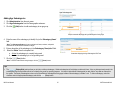
1
Minimum Data Set
(MDS)
User Manual
VERSION 2.0
June 2011
Ph: 888.348.4248
Fax: 412.366.7199
[email protected]
KIT Solutions®, LLC
5700 Corporate Dr
Suite 530
Pittsburgh, PA 15237
TABLE OF CONTENTS
Introduction ......................................................................................................................................................................................................................................................... 5
Tips for Using the System Effectively.................................................................................................................................................................................................................. 6
Recommended Computer Settings................................................................................................................................................................................................................. 6
System Navigating.......................................................................................................................................................................................................................................... 7
Menu Information ....................................................................................................................................................................................................................................... 8
Breadcrumb Trail........................................................................................................................................................................................................................................ 9
Landing Pages ......................................................................................................................................................................................................................................... 10
Listing Pages............................................................................................................................................................................................................................................ 11
Grid View ............................................................................................................................................................................................................................................. 11
Single Form View................................................................................................................................................................................................................................. 12
Edit Forms................................................................................................................................................................................................................................................ 13
Data Fields & Buttons................................................................................................................................................................................................................................... 14
Edit Form Buttons..................................................................................................................................................................................................................................... 15
Additional Feature Buttons ....................................................................................................................................................................................................................... 15
Login Procedure................................................................................................................................................................................................................................................ 16
Change Your Password................................................................................................................................................................................................................................ 19
Forgot Your Password?................................................................................................................................................................................................................................ 21
Account Locked............................................................................................................................................................................................................................................ 23
Home ................................................................................................................................................................................................................................................................ 25
Service.............................................................................................................................................................................................................................................................. 26
Adding Single Services ............................................................................................................................................................................................................................ 27
Adding Recurring Services....................................................................................................................................................................................................................... 31
Reports ............................................................................................................................................................................................................................................................. 35
Block Grant Reports ..................................................................................................................................................................................................................................... 35
Build Your Own Report................................................................................................................................................................................................................................. 36
Create Your Own Report.......................................................................................................................................................................................................................... 37
Recommended Reports................................................................................................................................................................................................................................ 39
Administration (System Administrator).............................................................................................................................................................................................................. 40
Providers ...................................................................................................................................................................................................................................................... 40
Adding a Provider..................................................................................................................................................................................................................................... 41
Provider-Program Assignment...................................................................................................................................................................................................................... 42
Assigning a Provider-Program.................................................................................................................................................................................................................. 43
Staff .............................................................................................................................................................................................................................................................. 44
MDS User Manual
2
©KIT Solutions® 2011
Adding a Staff Member............................................................................................................................................................................................................................. 45
Staff Permission ....................................................................................................................................................................................................................................... 47
Programs...................................................................................................................................................................................................................................................... 48
Adding Programs...................................................................................................................................................................................................................................... 49
Funding Sources .......................................................................................................................................................................................................................................... 50
Adding Funding Sources .......................................................................................................................................................................................................................... 51
Groups.......................................................................................................................................................................................................................................................... 52
Adding Groups ......................................................................................................................................................................................................................................... 53
Service Types............................................................................................................................................................................................................................................... 54
Adding Service Types .............................................................................................................................................................................................................................. 55
Activity Codes............................................................................................................................................................................................................................................... 56
Adding Activity Codes .............................................................................................................................................................................................................................. 57
Service Populations...................................................................................................................................................................................................................................... 58
Adding Service Populations...................................................................................................................................................................................................................... 59
Substates ..................................................................................................................................................................................................................................................... 60
Adding Substates ..................................................................................................................................................................................................................................... 61
Risk and Protective Factors (RPFs) ............................................................................................................................................................................................................. 62
Adding Risk and Protective Factors (RPFs) ................................................................................................................................................................................................. 63
Race/Ethnicity Subcategories....................................................................................................................................................................................................................... 64
Adding Race/Ethnicity Subcategories ...................................................................................................................................................................................................... 65
Age Subcategories ....................................................................................................................................................................................................................................... 66
Adding Age Subcategories ........................................................................................................................................................................................................................... 67
User-Defined Fields...................................................................................................................................................................................................................................... 68
Adding User-Defined Fields...................................................................................................................................................................................................................... 69
Time Limits ................................................................................................................................................................................................................................................... 70
Message of the Day...................................................................................................................................................................................................................................... 71
Manage Library............................................................................................................................................................................................................................................. 72
Adding a Library Document...................................................................................................................................................................................................................... 73
Recommended Reports................................................................................................................................................................................................................................ 74
Tools ................................................................................................................................................................................................................................................................. 75
Library .......................................................................................................................................................................................................................................................... 75
Data Export .................................................................................................................................................................................................................................................. 76
My Profile.......................................................................................................................................................................................................................................................... 77
Updating My Profile Details .......................................................................................................................................................................................................................... 77
Support ............................................................................................................................................................................................................................................................. 78
MDS User Manual
3
©KIT Solutions® 2011
What Analysis You Can Perform With MDS Data ............................................................................................................................................................................................. 79
Appendix........................................................................................................................................................................................................................................................... 80
Using the Reports Viewer............................................................................................................................................................................................................................. 80
Activity Codes............................................................................................................................................................................................................................................... 81
Substate Entities........................................................................................................................................................................................................................................... 82
Staff Security ................................................................................................................................................................................................................................................ 83
Providers ...................................................................................................................................................................................................................................................... 85
Service Populations...................................................................................................................................................................................................................................... 86
Strategies ..................................................................................................................................................................................................................................................... 91
Service Type Codes ..................................................................................................................................................................................................................................... 92
Service Types defined within the MDS ......................................................................................................................................................................................................... 94
User-Defined Fields.................................................................................................................................................................................................................................... 114
Risk or Protective Factors .......................................................................................................................................................................................................................... 115
MDS User Manual
4
©KIT Solutions® 2011
INTRODUCTION
Minimum Data Set is a Web-based, Group Level Evaluation Tool operated under the direction of the Center for Substance Abuse Prevention (CSAP). The system was
developed to enable states, substance abuse agencies, community-based service providers, and others to quantify and compare the numbers and types of primary
substance abuse prevention and early intervention services delivered across the United States. For administrators, this manual is designed to help you get started in
planning, setting up and managing a web-based Minimum Data Set (MDS) process evaluation website for your State.
•
•
•
•
•
Assistance in understanding what you will need in order to use the MDS software within your state, including staffing and technical resources
Instructions for the administration section of MDS
References to the other technical assistance and training materials available from CSAP for MDS
Practical advice, gathered from other states that are currently using MDS, and marked as “Advice From the Field” throughout the document
Details on the data entry for the administrative features of the MDS software
Service providers enter information into MDS on an ongoing basis about the services they are performing in their communities. In so doing, they are able to keep a systematic
account of the valuable work they do.
The accumulation of data in the database makes it possible to explore the extent to which organizations are implementing various types of programs, and to see which general
populations are being served. Many organizations may find that maintaining a complete track record in MDS also helps them satisfy reporting requirements for funding purposes.
The system is database-driven, which enables service providers to enter, store, and retrieve data. Anyone with access to MDS can generate reports using a number of predefined
and user-selected criteria.
MDS User Manual
5
©KIT Solutions® 2011
TIPS FOR USING THE SYSTEM EFFECTIVELY
Recommended Computer Settings
Screen Resolution
You will get the best screen layout if you set your PC monitor settings to 1024 X 768 pixels or larger. If your screen resolution is smaller (i.e., 800 X 600 pixels),
everything on the screen will appear larger. But, if you use 800 X 600 pixels, you will have to scroll more both up & down and left & right to access all the data fields.
To change your PC monitor settings, right click on the Desktop background and select Properties. Next, click on the Settings tab and move the Screen Resolution
scroll bar to the right (towards “more”) to select 1024 X 768 resolution. Click the OK button at the bottom of the window to make the change effective.
Web Browser
The web browsers supported by MDS are Microsoft Internet Explorer (IE) and Mozilla Firefox. Chrome, Netscape, Safari and other browsers may not be supported by
MDS. They may function but not to design specifications. We recommend users have the latest version of IE or Firefox installed on their computer along with all of the
latest updates.
Pop-Up Blocker
Modern computer security technology and usability features development have lead to pop-up blocking. Although this new feature of internet browsers, toolbars, and
other 3rd party managing software blocks hazardous and annoying pop-ups, sites like MDS require pop-ups to be able to function. If your pop-up blocker is enabled,
there is a possibility that MDS may not function or appear properly. You should either disable the pop-up blocker while using MDS (while remembering to enable it, if
desired, when not in MDS) or create exceptions for the pop-up blocker. This is cumbersome, but may be easier than making exceptions to the pop-up blocker.
To create exceptions for the pop-up blocker, open your Internet Explorer browser window. Once the browser is open, click the top toolbar option “Tools” and then go to
“Internet Options”. After the “Internet Options” window is available, you will want to click on the “Privacy” tab at the top of the window. You will notice while on the
“Privacy” tab, at the bottom will be a section on Pop-Up Blockers. If your “Block Pop-Ups” checkbox is checked then click on the “Settings” button. You can now add the
MDS link to the “Allowed Sites” list which the pop-up blocker will ignore when trying to block pop-ups from MDS.
*Note: These are instructions for Internet Explorer 7 and 8 and may be different for other Internet Explorer versions or Firefox.
MDS User Manual
6
©KIT Solutions® 2011
System Navigating
MDS is set up in such a fashion that moving from top to bottom of each page and section to section on the menu is the only approach to using the system. Continuing in
this manner will ensure that all of the sections of the system have enough information to function correctly. If certain sections have not been completed, you will have
difficulty completing other sections. You also must save each screen before moving onto the next section by clicking on the
(Save) button located at the bottom of
the page.
Computer Keys
While entering information into a form, several keys are helpful for moving the cursor from one information box (called a data field) to another. The table below
summarizes those keys:
Key
Description
Function
The Cursor
Points to desired location
The TAB key
Moves the cursor to the next data field
Hold down the SHIFT key and then press the TAB key
Moves the cursor to the previous data field
The Control (Ctrl) key
Enables blocked material to open (due to pop-up blocker)
Use the MOUSE by pointing and clicking to move the cursor
Moves the cursor by pointing and clicking
MDS User Manual
7
©KIT Solutions® 2011
Menu Information
The Menu for the service is located on the Home page. The Main Menu categories list the main modules that are within the system.
1. Main Menu
Constant (unchanging). Available at all times.
2. Landing Page
Varies depending on which Menu link is selected.
3. Submenu Category
Varies depending on which Menu link is selected. Displays the Submenu.
4. Listing Page
Varies depending on which Submenu category link is selected.
1. Main Menu
3. Submenu Category
2. Landing Page
Screenshot displaying the Main Menu (1), Landing Page (2), and Submenu Categories (3)
4. Listing Page
Sample screenshot displaying a Listing Page (2)
MDS User Manual
8
©KIT Solutions® 2011
User logged in
The Menu provides a link to the Home page and a Support link that will take you to
a page listing various help topics (coming soon).
Logout link
Link to Home page
The top of the page provides a link to log out of the MDS system and also displays
the name of the user who is currently logged in.
Breadcrumb Trail
A “Bread Crumb Trail” is provided in the top left corner, to indicate where you
currently are in the system. The links provided in the bread crumb trail also allow
you to move backwards in the system.
Breadcrumb Trail
Screenshot displaying an example of a Breadcrumb Trail
MDS User Manual
9
©KIT Solutions® 2011
Landing Pages
The Landing Page is the main page of each of the main sections, or modules
(Reports, Administration, Tools) within MDS. The Landing Page contains the links
for each module within the section. No data is entered on the Landing Page.
module link
To open a category:
• Click on the module link to begin data entry.
Screenshot displaying a Landing Page – This is a partial screenshot
MDS User Manual
10
©KIT Solutions® 2011
Listing Pages
The Listing Page is the main page of each module within the main sections of MDS. The Listing Page contains either all data that has been entered for the module or a
portion of the data that has been entered with links to view/edit the previously recorded data in its entirety. No data is entered on the Listing Page.
Tips
•
When viewing a Listing Page, all of the data is available for searching.
There are two types of Listing Pages:
1. Grid View
2. Single Form View
Grid View
The Grid View displays the data in tables. Multiple data is entered and saved when
a Grid View Listing Page is available. Specific pieces of data will be displayed
within the grid based on the fields within the Edit Form (See the Edit Forms section for
details on the Edit Form).
•
(Add) button will be available above the grid to create multiple data
An
entries.
•
Clicking on a
(View/Edit) button located to the left within the grid will allow
you to view/edit the data.
Add button
Category field
View/Edit
Sample screenshot displaying a “Grid View” Listing Page
Tips
•
•
Clicking on a field name in a Category field (e.g., ) will allow you to sort through your data in ascending or descending order.
If you are entering data for the first time, the grid will appear empty.
MDS User Manual
11
©KIT Solutions® 2011
Single Form View
The Single Form View is used when the data entered is updated periodically. Only
one form is available and edited. The Single Form View displays the fields on the
Edit Form (See the Edit Forms section for details on the Edit Form).
•
The form can be edited at any time, but you must click the
to update the data.
(Save) button
Sample screenshot displaying a “Single Form View” Listing Page
MDS User Manual
12
©KIT Solutions® 2011
Edit Forms
The Edit Form contains the fields for entering and editing data.
•
•
If you clicked the
(Add) button to enter new information into a form, the
Edit Form data fields will be blank.
When viewing existing data, the Edit Form data fields will display the data
entered/selected previously. These fields may be modified, if needed.
Screenshot displaying a blank Edit Form
MDS User Manual
13
©KIT Solutions® 2011
Data Fields & Buttons
In MDS there are several fields, boxes, and buttons that are used to collect, store, print, organize and delete data. Here are some examples:
Type
Preview/Description
Text Field
(aka ‘Text Box’)
Dropdown List
(aka ‘Pull Down Menu’)
Required Field
Radio Buttons
Check Boxes
checked
unchecked
checked
unchecked
Entering data into MDS can be made easier by using the “Tab” key on the keyboard. The “Tab” key advances the cursor to the next data field. You can go from the
current field to the previous field by holding the “Shift” key and pressing “Tab” (Shift + Tab). You can also navigate through the fields by using the mouse.
If a required field does not have data entered into it and you try to save the form, you will receive a message that informs you of the field vacant of data and you will not
be able to save that form until that field has data. Some or all of the fields may be required in order to save the form. Those fields that are required have an * (asterisk)
next to the field name.
Tips
•
Type an identifying letter of an item in a dropdown list to appear in the box.
MDS User Manual
14
©KIT Solutions® 2011
Edit Form Buttons
Information is entered and edited through the Edit Forms. The table below summarizes the buttons used to enter/edit information into an Edit Form.
Image
Button Name
Function Description
Add Button
Click the Add button to create a new entry.
Add/Expand
Click the Add/Expand button to create a new entry or expand part of a page.
View Icon
View/Edit Icon
Save Button
Cancel Button
Delete/Collapse Icon
Copy Icon
Click the View icon to view an existing form.
Click the View/Edit icon to view and/or make changes to an existing form.
Click the Save button to save your work and complete the section.
Click the Cancel button to cancel an entry and return to the landing page.
Click the Delete icon to remove a specific entry from the database or to collapse part of a page.
Click the Copy icon to copy an existing service record or the contents of a specific text box.
Additional Feature Buttons
Within the MDS application are some additional buttons that may appear within a form:
Takes you back to the previous page.
Displays data based on the selected parameters.
Takes you to the top of the current page.
Uploads a document into the MDS system.
MDS User Manual
15
©KIT Solutions® 2011
LOGIN PROCEDURE
Connect to the Internet using your Internet browser (Internet Explorer or Firefox). In the Address (Location) box, type in the following address and press enter:
https://www.pmrts.samhsa.gov/pmrts/
Login link
To access MDS, you will login through the Prevention Management Reporting and
Training System website.
1. Click the
(Login) link located on the top right hand corner of the screen.
Screenshot displaying the PMRTS Home Page
MDS User Manual
16
©KIT Solutions® 2011
2.
3.
4.
5.
Type the login name in the User Name field.
Type the password in the Password field.
Click the box that states: ‘I agree to these Terms and Conditions’.
Click the
(Log In) button.
*Note: To cancel the login process, click the
Terms and Conditions
check box
(Cancel) button.
Log In button
Screenshot displaying the Login Page
MDS User Manual
17
©KIT Solutions® 2011
Data Submissions button
6. Click
(Data Submissions) from the Prevention Management
menu.
7. Your available systems will be displayed. Click the
(MDS – Dotnet Minimum Data Set) link.
MDS link
Screenshot of the Data Submissions Landing Page
Tips
•
•
The User Name IS NOT case sensitive.
The Password IS case sensitive.
•
The substate you are assigned to will display at the end of the MDS link.
MDS User Manual
18
©KIT Solutions® 2011
Change Your Password
The Change Your Password feature allows a user to change the password for the
account he or she is currently logging into the system with.
My Account link
1. To change your password, begin by clicking the
(My Account) button
from the Prevention Management Reporting and Training System main menu.
2. Click the
(Change Your Password) link.
Partial screenshot displaying the Home Page
3. Select a Security Question* from the dropdown list.
*Note: The Security Question will be used when using the Forgot Password feature to ensure the user requesting a
password is legitimate.
4. Enter your answer to the selected security question in the Security Answer*
field.
5. Type the password you would like to use in the New Password* field.
6. Retype the password in the Confirm New Password* field.
7. Verify or update the email address in the Email Address* field.
8. Click the
(Submit) button.
Submit button
Screenshot displaying the Change Password Page
MDS User Manual
19
©KIT Solutions® 2011
Tips
•
•
•
The User Name IS NOT case sensitive.
The Password IS case sensitive. The Password must also fill the following requirements:
Minimum length: 8 characters
At least one upper case
At least one number
At least one of the special characters: !@#$%^&
You will be required to change your password every 90 days.
MDS User Manual
20
©KIT Solutions® 2011
Forgot Your Password?
If you are unable to log into the MRT application due to forgetting your password,
you can retrieve this information by clicking the link entitled “Forgot your
Password?”
1. On the Login page, click the
Forgot your Password? link.
Forgot your Password?
link
Screenshot displaying the Login Page
2. Type the login name in the User Name* field.
3. Type the email address of the user who is associated with the User Name in
the User Email* field.
*Note: This must be a valid email address.
4. Click the
(Next) button.
5. On the next screen answer the Security Question.
6. Click the
(Next) button.
Next button
Screenshot displaying the Forgot Your Password Page
MDS User Manual
21
©KIT Solutions® 2011
7. A new temporary password will be sent to the email address that is associated
with the User Name.
Partial screenshot displaying the Forgot Your Password Page
Tips
•
•
•
If you currently do not have an account you will not be able to use the Forgot Password feature.
If you do not receive a new temporary password first check your junk mail and spam folders. If you still did not receive a temporary password, contact Support at 1-888-DITIC-4-U
(348-4248). The following reasons may be the cause: your email address has changed since the account was created, you mistyped the email address, or you are unable to receive
emails from Support.
Please add the following domain to your safe list: @kitsolutions.net to ensure you receive emails from Support.
MDS User Manual
22
©KIT Solutions® 2011
Account Locked
If you attempt to log into the system unsuccessfully three (3) times, you will be
locked out of your account. Please contact Support to have your account unlocked.
Contact Support
information
SUPPORT CONTACT INFORMATION:
• 1-888-DITIC-4-U (348-4248)
• [email protected]
• Use the Contact Form on the Support Site:
http://kitusers.kithost.net/support/diticsupport
Once your account is unlocked you will receive an email:
1. The email informs you that your account has been unlocked.
Subject line will read: User Account has Been Unlocked
Screenshot displaying the Account Locked screen
MDS User Manual
23
©KIT Solutions® 2011
When your account is unlocked you can request Support to reset your password if
you do not remember your current password.
Link to change password
Once your password has been reset you will receive an email:
1. The email provides you a link to reset your password.
Subject line will read: Password Has Been Reset
Sample screenshot displaying the Password Reset email.)
MDS User Manual
24
©KIT Solutions® 2011
HOME
The Home page of MDS displays any messages created by the administrator. These messages allow the administrator to convey important news or dates to all users.
•
This is the first page you will see after logging in. If any messages have been
entered by the system administrator, they will be displayed on the Home page.
Messages
Sample screenshot displaying the Home Page
MDS User Manual
25
©KIT Solutions® 2011
SERVICE
Entering services in MDS involves creating new records for the services you are providing to the community.
1. Click Service from the main menu.
2. You may filter the list of services by selecting one (1) or all of the following
dropdown lists:
a. If desired, select a Provider from the dropdown list.
b. If desired, select a staff member from the Enter/Changed by
dropdown list.
c. If desired, select a Service Date range from the dropdown list.
d. Click the
(Display Service Records) button.
(Add Service) button. (For more information,
3. To add a service, click the
Add Service button
see the Adding Single Services and/or Adding Recurring Services sections.)
4. To modify a service, click the
(View/Edit) button next to the appropriate
service.
a. The details will appear in edit mode. Make any changes needed to the
service details.
b. Click the
(Save) button.
*Note: To exit the screen without saving changes, click the
View/Edit button
(Cancel) button.
(Delete) button next to the appropriate
5. To delete a service, click the
service.
a. You will receive a confirmation message asking “Are you sure you want
to delete this record?”
b. Click the
(OK) button to confirm the deletion.
*Note: To cancel the deletion, click the
Delete button
Copy button
Sample screenshot displaying the Service Listing Page
(Cancel) button.
6. To copy a service, click the
(Copy) button next to a similar service.
a. A copy of the service will load in edit mode. Make any changes needed
to the service details. You must change the Service Date.
b. Click the
(Save) button.
*Note: To exit the screen without saving changes, click the
MDS User Manual
(Cancel) button.
26
©KIT Solutions® 2011
Tips
•
A service from a previous fiscal year cannot be edited or deleted.
Add Service button
Adding Single Services
1. Click Service from the main menu.
2. Click the
(Add Service) button to add a new service.
Sample screenshot displaying the Service Listing Page
MDS User Manual
27
©KIT Solutions® 2011
3. Select the staff member who performed the service from the Staff* dropdown
list.
4. Select a Provider* from the dropdown list.
5. Select a Substate* from the dropdown list.
6. Select Single from the Service* radio buttons.
7. Select the service code associated with the service from the Service Type*
dropdown list.
Screenshot displaying Part 1 of the Service Edit Form
Tips
•
•
The Staff dropdown list is populated with the name of the staff member who is currently logged in. You may change this to any staff member who performed the service.
The Provider and Substate dropdown lists are populated with the Provider and Substate that is associated with the staff member who is currently logged in. You may change this
information to what is pertinent to the service.
8. The Service Date* is populated with the date of data entry. If the date is
incorrect, enter the correct date.
9. Select the Program Name/Desc* from the dropdown list.
10. Select the Group Name* from the dropdown list.
11. If applicable, enter the count in the Unit Count* field.
12. If applicable, enter the number of people reached in the Number of people
reached* field.
13. Select a Service Population* from the dropdown list.
Screenshot displaying Part 2 of the Service Edit Form
Tips
•
The Unit Count* and Number of people reached* fields will appear when a specific Service Type is selected.
MDS User Manual
28
©KIT Solutions® 2011
14. Enter the number of people served in the Total Present* field.
15. Enter the number of attendees in the Attendees (Male), Attendees (Female),
and Gender Not Known fields.
16. Enter the number of participants for each section in the appropriate fields:
Participant By Age, Participants By Hispanic Origin, and Participants by
Racial Category.
a. Some Ages and/or Race/Ethnicities may have a subcategory
associated with it. To enter the number of participants for an Age
Subcategory or Race/Ethnicity Subcategory, click the
(Expand)
button next to the appropriate category.
b. Enter the number of participants for the Subcategory.
*Note: To collapse the category, click the
(Collapse) button.
Screenshot displaying Part 3 of the Service Edit Form
Tips
•
•
•
Some Service Types selected do not require demographics to be entered.
The sum of each demographic category (Gender, Age, Hispanic Origin, and Race) must match the Total present field.
To add Age and Race/Ethnicity Subcategories, please see the Age Subcategories and Race/Ethnicity Subcategories sections. *Please note: these sections are only available to the
system administrator.
MDS User Manual
29
©KIT Solutions® 2011
17. Enter the appropriate information in the User Defined Fields. These may vary.
18. Click the
(Save) button to save the changes.
*Note: To exit this screen without saving changes click the
(Cancel) button.
Save button
Sample screenshot displaying Part 4 of the Service Edit Form
Tips
•
An error message will display if you try to save without completing the required fields.
MDS User Manual
30
©KIT Solutions® 2011
Add Service button
Adding Recurring Services
1. Click Service from the main menu.
2. Click the
(Add Service) button to add a new service.
Sample screenshot displaying the Service Listing Page
3. Select the staff member who performed the service from the Staff* dropdown
list.
4. Select a Provider* from the dropdown list.
5. Select a Substate* from the dropdown list.
6. Select Recurring from the Service* radio buttons.
7. Select the service code associated with the service from the Service Type*
dropdown list.
Screenshot displaying Part 1 of the Service Edit Form
MDS User Manual
31
©KIT Solutions® 2011
Tips
•
•
The Staff dropdown list is populated with the name of the staff member who is currently logged in. You may change this to any staff member who performed the service.
The Provider and Substate dropdown lists are populated with the Provider and Substate that is associated with the staff member who is currently logged in. You may change this
information to what is pertinent to the service.
8. The Service Date* is populated with the date of data entry. If the date is
incorrect, enter the correct date.
9. Select the Program Name/Desc* from the dropdown list.
10. Select the Group Name* from the dropdown list.
11. If applicable, enter the count in the Unit Count* field.
12. If applicable, enter the number of people reached in the Number of people
reached* field.
13. Enter the session number in the Session Number* field.
14. Select a Service Population* from the dropdown list.
15. Select an Activity Code* from the dropdown list.
Screenshot displaying Part 2 of the Service Edit Form
Tips
•
The Unit Count* and Number of people reached* fields only appear when an environmental Service Type is selected.
MDS User Manual
32
©KIT Solutions® 2011
16. Enter the number of people served in the Total Present* field.
17. Enter the number of participants in the Participants (Male), Participants
(Female), and Gender Not Known fields.
18. Select Yes or No for the question Is this the last session?
a. If Yes is selected, enter a number in the Total Number of Participants
Completed* field.
19. Enter the number of participants for each section in the appropriate fields:
Participant By Age, Participants By Hispanic Origin, and Participants by
Racial Category.
a. Some Ages and/or Race/Ethnicities may have a subcategory
associated with it. To enter the number of participants for an Age
Subcategory or Race/Ethnicity Subcategory, click the
(Expand)
button next to the appropriate category.
b. Enter the number of participants for the Subcategory.
*Note: To collapse the category, click the
(Collapse) button.
Screenshot displaying Part 3 of the Service Edit Form
Tips
•
•
•
Environmental Service Types selected do not require demographics to be entered.
The sum of each demographic category (Gender, Age, Hispanic origin, and Race) must match the Total present field.
To add Age and Race/Ethnicity Subcategories, please see the Age Subcategories and Race/Ethnicity Subcategories sections. *Please note: these sections are only available to the
system administrator.
MDS User Manual
33
©KIT Solutions® 2011
20. Enter the appropriate information in the User Defined Fields. These may vary.
21. Click the
(Save) button to save the changes.
*Note: To exit this screen without saving changes click the
(Cancel) button.
Save button
Sample screenshot displaying Part 4 of the Service Edit Form
Tips
•
An error message will display if you try to save without completing the required fields.
MDS User Manual
34
©KIT Solutions® 2011
REPORTS
The Reports module allows you to view reports based on your block grant, create your own custom reports, or view recommended reports created by your administrator.
Block Grant Reports
1.
2.
3.
4.
Click Reports from the main menu.
Click Block Grant Reports from the Reports Landing page.
Click the name of the report you wish to view.
The report will load on the next page. (For more information, please see the Using the
Reports Viewer section.)
5. Click the
(Back To Reports Listing) button to return
to the list of Block Grant Reports.
Screenshot displaying the Block Grant Reports Listing Page
MDS User Manual
35
©KIT Solutions® 2011
Build Your Own Report
The Build Your Own Report page allows you to create a custom report and share
it with substates, if desired.
Create your own report
button
1. Click Reports from the main menu.
2. Click Build Your Own Report from the Reports Landing page.
3. To add a report, click the
(Create your own report) button. (For
View button
more information, see the Create Your Own Report section.)
Delete button
4. To view a report, click the
(View) button next to the appropriate report.
a. The report will load on the next page. (For more information, please see the
Edit button
Copy button
Sample screenshot displaying the Reports Listing Page
Using the Reports Viewer page.)
b. Click the
(Back To Previous Screen) button to return
to the list of Report Builder Listing page.
5. To modify a report, click the
(Edit) button next to the appropriate report.
a. The details will appear in edit mode. Make any changes needed to the
report details.
b. Click the
(Save) button.
*Note: To exit the screen without saving changes, click the
(Cancel) button.
6. To copy a report, click the
(Copy) button next to a similar report.
a. A copy of the service will load in edit mode. Make any changes
needed to the report details.
b. Click the
(Save) button.
*Note: To exit the screen without saving changes, click the
(Cancel) button.
7. Click the
(Delete) button next to the appropriate report.
a. You will receive a confirmation message asking “Are you sure you want
to delete this record?”
b. Click the
(OK) button to confirm the deletion.
*Note: To cancel out of the page click the
MDS User Manual
(Cancel) button.
36
©KIT Solutions® 2011
Create Your Own Report
Create your own report
button
1. Click Reports from the main menu.
2. Click Build Your Own Report from the Reports Landing page.
3. Click the
(Create your own report) button.
Sample screenshot displaying the Reports Listing Page
4. Select a data source for your report from the Please select Report Data
Source: dropdown list.
5. Enter a name for the report to identify it by in the Please Name your Report:
field.
6. Click the
(Add another Group Field) button.
a. Select a group field from the Group field 1: dropdown list.
*Note: To remove a group field, click the
(Delete) button.
b. Repeat # 6 for as many Groups as you would like to define.
7. Select a detail field from the Detail Field 1: dropdown list.
a. To add additional Details to the report, click the
another Detail Field) button.
b. Select a detail field from the Detail field 2: dropdown list.
*Note: To remove an additional detail field, click the
(Add
(Delete) button.
c. Repeat # 7a/b for as many Details as you would like to define.
Sample screenshot displaying the Reports Edit Form
MDS User Manual
37
©KIT Solutions® 2011
8. Click the
(Add Filter) button.
*Note: To remove a filter, click the
(Delete) button.
a. Select a field from the first Filter 1: dropdown list.
b. Select an operation from the second Filter 1: dropdown list.
i. If IS, <, >, or Contains is selected, enter the value of your filter
in the Filter 1: textbox.
ii. If Choose From is selected, select from the available options in
the Filter 1: selection box.
c. If more than one filter is added, choose And or Or from the third Filter
1: dropdown list to determin if the new filter criteria must be met in
addition the others or can be met on its own.
9. Click the
(Add Sorting Field) button.
*Note: To remove a sorting field, click the
(Delete) button.
a. Select a field from the first Sort by Field 1: dropdown list.
b. Select Asc (Ascending) or Desc (Descending) from the second Sort by
Field 1: dropdown list.
10. Select whether you want to share this report with others from the Please select
Report Status: dropdown list.
11. Click the
(View) button to preview the report before saving.
12. Click the
(Save) button to save the changes.
*Note: To exit this screen without saving changes click the
Save button
Screenshot displaying the Build Your Own Report Edit Form
(Cancel) button.
13. Click the
(Save & View) button to save the report and view it
immediately. (Skip #s 11-12.)
Tips
•
New report Groups, Details, Filters, and Sorting are ordered numerically in the order you added them (i.e. Filter 1, Filter 2, Filter 3, etc.).
MDS User Manual
38
©KIT Solutions® 2011
Recommended Reports
The Recommended Reports page allows you to view custom made reports shared
by your administrator. These reports were created using the Build Your Own
Report module.
View button
1. Click Reports from the main menu.
2. Click Recommended Reports from the Reports Landing page.
3. To view a report, click the
(View) button next to the appropriate report.
a. The report will load on the next page. (For more information, please see the
Copy button
Using the Reports Viewer page.)
Sample screenshot displaying the Recommended Reports Listing Page
b. Click the
(Back to Previous Screen) button to return to
the Recommended Reports Listing page.
4. To copy a report, click the
(Copy) button next to the appropriate report.
a. A copy of the report will load in edit mode. Make any changes needed
to the report details.
b. Click the
(Save) button.
*Note: To exit the screen without saving changes, click the
MDS User Manual
(Cancel) button.
39
©KIT Solutions® 2011
ADMINISTRATION (SYSTEM ADMINISTRATOR)
The Administration module contains the Providers and Staff, Code Tables, Demographics, and System Settings submenu categories. The submenu categories allow
the system administrator to add providers and assign programs to them, add staff members, create various code tables, enter demographics, and edit various system
settings.
Providers
The Providers page allows you to create providers so that they may enter data for their
services performed. Location and contact information is added on this page.
1. Click Administration from the main menu.
2. Click Providers from the Administration Landing page.
(Add Provider) button. (For more
3. To add a provider, click the
Add provider button
Back to Administration
button
information, see the Adding a Provider section.)
View/Edit button
4. To view or modify a provider, click the
(View/Edit) button next to the
appropriate provider.
a. The details will appear in edit mode. Make any changes needed to the
provider details.
b. Click the
(Save) button.
*Note: To exit the screen without saving changes, click the
Delete button
Sample screenshot displaying the Providers Listing Page - this is a partial screenshot
(Cancel) button.
5. To delete a provider, click the
(Delete) button next to the appropriate
provider.
a. You will receive a confirmation message asking “Are you sure you want
to delete this record?”
b. Click the
(OK) button to confirm the deletion.
*Note: To cancel out of the page click the
(Cancel) button.
6. To return to the Administration Landing page, click the
to Administration) button.
(Back
Tips
MDS User Manual
40
©KIT Solutions® 2011
•
Once a Provider is deleted, it is a permanent action; therefore it is removed from the database.
Adding a Provider
Add provider button
1. Click Administration from the main menu.
2. Click Providers from the Administration Landing page.
3. Click the
(Add Provider) button to add a new provider.
Sample screenshot displaying the Providers Listing Page - this is a partial screenshot
4. Enter a unique provider ID in the Provider ID* field.
*Note: The Provider ID can be any combination of letters, numbers, and special characters but
cannot exceed 10 characters in length.
5. Enter a name for the provider to identify it by in the Provider Name* field.
6. Enter the address of the provider in the Address (Line 1)* field (and the
Address (Line 2) field, if applicable.)
7. Enter the city of the provider in the City* field.
8. Select the state the provider resides in from the State/Jurisdiction* dropdown
list.
9. Enter the 5-digit zip code of the provider in the Zip Code* field.
10. Enter the phone number of the provider in the Phone* field.
11. Select the region of the provider from the Substate* dropdown list.
12. If desired, enter an email address for the provider in the Email field.
13. Select the Status* from the dropdown list.
a. Active: the provider is currently being used in services.
b. Inactive: the provider is no longer being used in services.
14. Click the
(Save) button to save the changes.
MDS User Manual
Save Button
Sample screenshot displaying the Providers Edit Form
41
©KIT Solutions® 2011
*Note: To exit the screen without saving changes, click the
(Cancel) button.
Provider-Program Assignment
The Provider-Program Assignment page allows you to assign programs to the
providers created in the previous section. (To add programs, please see the Programs
section.) This page also allows you to choose which funding sources will coincide
with the assignment.
Add Program Assignment
button
1. Click Administration from the main menu.
2. Click Provider-Program Assignment from the Administration Landing page.
3. Select a Provider* from the dropdown list.
Back to Administration
button
4. To add a new provider-program assignment, click the
(Add Program Assignment) button. (For more information, see the Assigning a
Delete button
View/Edit button
Provider-Program section.)
Sample screenshot displaying the Provider-Program Assignment Listing Page
5. To view or modify a provider-program assignment, click the
(View/Edit)
button next to the appropriate program.
a. The details will appear in edit mode. Make any changes needed to the
program details.
b. Click the
(Save) button.
*Note: To exit the screen without saving changes, click the
(Cancel) button.
6. To delete a provider-program assignment, click the
(Delete) button next to
the appropriate program.
a. You will receive a confirmation message asking “Are you sure you want
to delete this record?”
(OK) button to confirm the deletion.
b. Click the
*Note: To cancel out of the page click the
(Cancel) button.
7. To return to the Administration Landing page, click the
Administration) button.
MDS User Manual
(Back to
42
©KIT Solutions® 2011
Assigning a Provider-Program
1. Click Administration from the main menu.
2. Click Provider-Program Assignment from the Administration Landing page.
3. Select a Provider* from the dropdown list.
4. Click the
Add Program Assignment
button
(Add Program Assignment) button.
Sample screenshot displaying the Provider-Program Assignment Listing Page
5. Select a Program* from the dropdown list.
*Note: Programs will need to be entered in the Program module before a Provider-Program
Assignment can be created.
6. Enter a description for the program in the Program Description* field.
7. Using the Funding Source* checkboxes, select the funding sources for the
program.
a. For every Funding Source selected, enter the amount funded in the
Funding Amount* field.
8. Select a Status* from the dropdown list.
a. Active: the assignment is currently being used.
b. Inactive: the assignment is no longer being used.
9. Click the
*Note: To exit the screen without saving changes, click the
MDS User Manual
Screenshot displaying the Provider-Program Assignment Edit Form
(Save) button.
(Cancel) button.
43
©KIT Solutions® 2011
Staff
The Staff page allows you to administrate system users and security levels. This page
also allows you to set custom permissions, if desired.
Add Staff button
1. Click Administration from the main menu.
2. Click Staff from the Administration Landing page.
3. To add a new staff member, click the
information, see the Adding a Staff Member section.)
(Add Staff) button. (For more
Delete button
4. To view or modify a staff member, click the
(View/Edit) button next to the
appropriate staff name.
a. The details will appear in edit mode. Make any changes needed to the
staff details.
b. Click the
Back to Administration
button
View/Edit button
Sample screenshot displaying the Staff Listing Page
(Save) button.
*Note: To exit the screen without saving changes, click the
(Cancel) button.
5. To delete a staff member, click the
(Delete) button next to the appropriate
staff name.
a. You will receive a confirmation message asking “Are you sure you want
to delete this record?”
b. Click the
(OK) button to confirm the deletion.
*Note: To cancel out of the page click the
(Cancel) button.
6. To return to the Administration Landing page, click the
Administration) button.
(Back to
Tips
•
You will not be able to delete a Staff member if it is associated with a service record. In this instance, set the Status to Inactive.
MDS User Manual
44
©KIT Solutions® 2011
Adding a Staff Member
Add Staff button
1. Click Administration from the main menu.
2. Click Staff from the Providers and Staff submenu.
3. Click the
(Add Staff) button to add a new staff member.
(This is a sample screenshot displaying the Staff Listing Page. This is a partial screenshot.)
4. Enter the first name of the staff member in the First Name* field.
5. Enter the last name of the staff member in the Last Name* field.
6. Enter a user ID for the staff member in the Login* field. This is what the staff
member will use when logging into the system.
7. Enter a password in the Password* field.
*Note: The Password must be at least 8 characters long, and must contain at least 1 uppercase letter, 1 number, and 1 special character.
8. Select the permissions for the staff member from the Security dropdown list.
(For more information, see the Staff section of the Appendix)
a. If Custom is selected, click the
(Permissions) button to load
the Staff Permission page.
9. Enter the address of the staff member in the Address (Line 1)* field (and the
Address (Line 2) field, if applicable.)
10. Enter the city of the staff member in the City* field.
11. Select the state the staff member resides in from the State/Jurisdiction*
dropdown list.
MDS User Manual
45
Screenshot displaying the Staff Edit Page
©KIT Solutions® 2011
12. Enter the 5-digit zip code of the provider in the Zip Code* field.
13. Enter the phone number of the staff member in the Phone* field.
14. Select the region the staff member is associated with from the Substate*
dropdown list.
15. Select the provider the staff member is associated with from the Provider*
dropdown list.
16. Enter an email address for the staff member in the Email field.
17. Select the Status* from the dropdown list.
a. Active: the staff member is currently with your organization.
b. Inactive: the staff member is no longer with your organization.
18. Click the
Screenshot displaying the Staff Edit Page
(Save) button.
*Note: To exit the screen without saving changes, click the
MDS User Manual
Save button
(Cancel) button.
46
©KIT Solutions® 2011
Staff Permission
The Staff Permission page allows you to choose which sections of the MDS
system a staff member is permitted access to.
1. Choose a view from the Scope dropdown list. (For more information, please see the
Staff Security section of the Appendix.)
2. Choose the permission levels for each module using the dropdown lists.
a. No Permission: staff member has no ability to view, add, edit or delete
data within the system.
b. Read Only: staff member has ability to view data entered within the
system
c. Read and Write: staff member has ability to view, add and edit data
entered within the system
d. Full Control: staff member has ability to view, add, edit, and delete data
entered within the system.
3. Click the
(Save) button.
*Note: To exit the screen without saving changes, click the
(Cancel) button.
Save button
Screenshot displaying the Staff Permission Edit Form
MDS User Manual
47
©KIT Solutions® 2011
Programs
The Programs page allows you to create the programs that a provider will identify with
the services they perform.
Add Program button
1. Click Administration from the main menu.
2. Click Programs from the Administration Landing page.
3. To add a new program, click the
(Add Program) button. (For more
Back to Administration
button
information, see the Adding Programs section.)
4. To view or modify a program, click the
(View/Edit) button next to the
appropriate program name.
a. The details will appear in edit mode. Make any changes needed to the
program details.
b. Click the
(Save) button.
*Note: To exit the screen without saving changes, click the
Delete button
View/Edit button
Sample screenshot displaying the Programs Listing Page
(Cancel) button.
5. To delete a program, click the
(Delete) button next to the appropriate
program name.
a. You will receive a confirmation message asking “Are you sure you want
to delete this record?”
b. Click the
(OK) button to confirm the deletion.
*Note: To cancel out of the page click the
(Cancel) button.
6. To return to the Administration Landing page, click the
Administration) button.
(Back to
Tips
•
A Program cannot be deleted if it is assigned to a provider.
MDS User Manual
48
©KIT Solutions® 2011
Adding Programs
Add Program button
1. Click Administration from the main menu.
2. Click Programs from the Administration Landing page.
3. Click the
(Add Program) button to add a new program.
Sample screenshot displaying the Programs Listing Page
4. Enter a unique program ID in the Program ID* field.
5. Enter the name of the program in the Program Name* field.
6. Using the Evidence-Based? radio buttons, select Yes or No indicating whether
the program is evidence-based.
7. Select an IOM Category* from the dropdown list.
8. Select a Status* from the dropdown list.
a. Active: the program is currently used for services.
b. Inactive: the program is no longer used for services.
9. Click the
(Save) button.
*Note: To exit the screen without saving changes, click the
MDS User Manual
Save button
Screenshot displaying the Programs Edit Form
(Cancel) button.
49
©KIT Solutions® 2011
Funding Sources
The Funding Source page allows you to create the funding sources that will be
assigned to a program.
Add Funding Source
button
1. Click Administration from the main menu.
2. Click Funding Source from the Administration Landing page.
3. To add a new funding source, click the
(Add Funding Source)
button. (For more information, see the Adding Funding Sources section.)
Back to Administration
button
4. To view or modify a funding source, click the
(View/Edit) button next to the
appropriate funding source name.
a. The details will appear in edit mode. Make any changes needed to the
funding source details.
b. Click the
Delete button
View/Edit button
Sample screenshot displaying the Funding Source Listing Page
(Save) button.
*Note: To exit the screen without saving changes, click the
(Cancel) button.
5. To delete a funding source, click the
(Delete) button next to the
appropriate funding source name.
a. You will receive a confirmation message asking “Are you sure you want
to delete this record?”
b. Click the
(OK) button to confirm the deletion.
*Note: To cancel out of the page click the
(Cancel) button.
6. To return to the Administration Landing page, click the
Administration) button.
(Back to
Tips
•
A Funding Source cannot be deleted if it is associated with a program.
MDS User Manual
50
©KIT Solutions® 2011
Add Funding Source
button
Adding Funding Sources
1. Click Administration from the main menu.
2. Click Funding Source from the Administration Landing page.
3. Click the
(Add Funding Source) button to add a new funding
source.
Screenshot displaying the Funding Source Landing Page
4. Enter the name of the funding source in the Funding Source Name* field.
5. Select the Status* from the dropdown list.
a. Active: the funding source is currently used for programs.
b. Inactive: the funding source is no longer used for programs.
6. Click the
(Save) button.
*Note: To exit the screen without saving changes, click the
MDS User Manual
Save button
Screenshot displaying the Funding Source Edit Form
(Cancel) button.
51
©KIT Solutions® 2011
Groups
The Groups page allows you to create groups that a provider will use when adding
their services. A service cannot be added without a group.
Add Group button
1. Click Administration from the main menu.
2. Click Groups from the Administration Landing page.
3. To add a new group, click the
(Add Group) button. (For more
Back to Administration
button
information, see the Adding Groups section.)
Delete button
4. To view or modify a group, click the
(View/Edit) button next to the
appropriate group name.
a. The details will appear in edit mode. Make any changes needed to the
group details.
b. Click the
View/Edit button
Sample screenshot displaying the Groups Listing Page
(Save) button.
*Note: To exit the screen without saving changes, click the
(Cancel) button.
5. To delete a group, click the
(Delete) button next to the appropriate group
name.
a. You will receive a confirmation message asking “Are you sure you want
to delete this record?”
b. Click the
(OK) button to confirm the deletion.
*Note: To cancel out of the page click the
(Cancel) button.
6. To return to the Administration Landing page, click the
Administration) button.
(Back to
Tips
•
A Group cannot be deleted if it is associated with a service record.
MDS User Manual
52
©KIT Solutions® 2011
Adding Groups
Add Group button
1. Click Administration from the main menu.
2. Click Groups from the Administration Landing page.
3. Click the
(Add Group) button to add a new group.
Sample screenshot displaying the Groups Listing Page
4. Enter a unique group ID in the Group Code* field.
*Note: The Group Code can be any combination of letters, numbers, and special characters
but cannot exceed 7 characters in length.
5. Enter a name for the group to identify it by in the Group Name* field.
6. Select the provider it is associated with from the Provider* dropdown list.
7. Select a Status* from the dropdown list.
a. Active: the group is currently receiving services.
b. Inactive: the group is no longer receiving services or has completed all
sessions.
8. Click the
(Save) button.
*Note: To exit the screen without saving changes, click the
MDS User Manual
Save button
Screenshot displaying the Groups Edit Form
(Cancel) button.
53
©KIT Solutions® 2011
Service Types
The Service Types page allows you to create service codes that lets providers
identify the specific service that has been rendered to the clients. (For more
information, see the Service Type Codes section of the Appendix.)
Add Service Type button
Back to Administration
button
1. Click Administration from the main menu.
2. Click Service Types from the Administration Landing page.
3. To add a new service type, click the
(Add Service Type) button.
(For more information, see the Adding Service Types section.)
Delete button
4. To view or modify a service type, click the
(View/Edit) button next to the
appropriate service type name.
a. The details will appear in edit mode. Make any changes needed to the
service type details.
b. Click the
(Save) button.
*Note: To exit the screen without saving changes, click the
View/Edit button
Sample screenshot displaying the Service Types Listing Page
(Cancel) button.
5. To delete a service type, click the
(Delete) button next to the appropriate
service type name.
a. You will receive a confirmation message asking “Are you sure you want
to delete this record?”
b. Click the
(OK) button to confirm the deletion.
*Note: To cancel out of the page click the
(Cancel) button.
6. To return to the Administration Landing page, click the
Administration) button.
(Back to
Tips
•
A Service Type cannot be deleted if it is associated with a service record.
MDS User Manual
54
©KIT Solutions® 2011
Adding Service Types
Add Service Type button
1. Click Administration from the main menu.
2. Click Service Types from the Code Tables submenu.
3. Click the
(Add Service Type) button to add a new service type.
Sample screenshot displaying the Service Types Listing Page
4. Enter the service code in the Service Type Code* field.
*Note: The Service Type Code can be any combination of letters, numbers, and special
characters but cannot exceed 6 characters in length.
5. Enter a brief description of the service type in the Service Type Description*
field.
6. Using the Demographics Required*: radio buttons, select Yes or No indicating
whether demographics are required.
7. Select the service type from the Singe/Recurring* dropdown list.
8. Select the Status* from the dropdown list.
a. Active: the service type is currently used in services.
b. Inactive: the service type is no longer used in services.
9. Click the
Screenshot displaying the Service Types Edit Form.
(Save) button.
*Note: To exit the screen without saving changes, click the
MDS User Manual
Save button
(Cancel) button.
55
©KIT Solutions® 2011
Activity Codes
The Activity Codes page allows you to create codes that will help providers link
each session of a recurring prevention service that is performed for a group. (For
more information, see the Activity Codes section of the Appendix.)
Add Activity Code button
Back to Administration
button
1. Click Administration from the main menu.
2. Click Activity Codes from the Administration Landing page.
3. To add a new activity code, click the
(Add Activity Code) button.
(For more information, see the Adding Activity Codes section.)
Delete button
4. To view or modify an activity code, click the
(View/Edit) button next to the
appropriate activity code name.
a. The details will appear in edit mode. Make any changes needed to the
activity code details.
b. Click the
(Save) button.
*Note: To exit the screen without saving changes, click the
View/Edit button
Sample screenshot displaying the Activity Code Listing Page
(Cancel) button.
5. To delete an activity code, click the
(Delete) button next to the appropriate
activity code name.
a. You will receive a confirmation message asking “Are you sure you want
to delete this record?”
b. Click the
(OK) button to confirm the deletion.
*Note: To cancel out of the page click the
(Cancel) button.
6. To return to the Administration Landing page, click the
Administration) button.
(Back to
Tips
•
An Activity Code cannot be deleted if it is associated with a service record.
MDS User Manual
56
©KIT Solutions® 2011
Add Activity Code button
Adding Activity Codes
1. Click Administration from the main menu.
2. Click Activity Codes from the Administration Landing page.
3. Click the
(Add Activity Code) button to add a new activity code.
Sample screenshot displaying the Activity Codes Listing Page
4. Enter an activity code in the Activity Code* field.
*Note: The Activity Code can be any combination of letters, numbers, and special characters
but cannot exceed 6 characters in length.
5. Enter a description of the code in the Description* field.
6. Select the Status* from the dropdown list.
a. Active: the activity code is currently used in services.
b. Inactive: the activity code is no longer used in services.
7. Click the
(Save) button.
*Note: To exit the screen without saving changes, click the
MDS User Manual
Save button
Screenshot displaying the Activity Codes Edit Form
(Cancel) button.
57
©KIT Solutions® 2011
Service Populations
The Service Populations page allows you to create the service populations that
providers will use to identify the target groups that directly received a prevention
services. (For more information, see the Service Populations section of the Appendix.)
Add Service Population
button
1. Click Administration from the main menu.
2. Click Service Populations from the Administration Landing page.
3. To add a new service population, click the
(Add Service
Population) button. (For more information, see the Adding Service Populations section.)
Back to Administration
button
Delete button
4. To view or modify a service population, click the
(View/Edit) button next to
the appropriate population name.
a. The details will appear in edit mode. Make any changes needed to the
service population details.
b. Click the
View/Edit button
Sample screenshot displaying the Service Population Listing Page
(Save) button.
*Note: To exit the screen without saving changes, click the
(Cancel) button.
5. To delete a service population, click the
(Delete) button next to the
appropriate population name.
a. You will receive a confirmation message asking “Are you sure you want
to delete this record?”
b. Click the
(OK) button to confirm the deletion.
*Note: To cancel out of the page click the
(Cancel) button.
6. To return to the Administration Landing page, click the
Administration) button.
(Back to
Tips
•
A Service Population cannot be deleted if it is associated with a service record.
MDS User Manual
58
©KIT Solutions® 2011
Add Service Population
button
Adding Service Populations
1. Click Administration from the main menu.
2. Click Service Populations from the Administration Landing page.
3. Click the
(Add Service Population) button to add a new
service population.
Sample screenshot displaying the Service Population Listing Page
4. Enter a population code in the Service Population Code* field.
*Note: The Service Population Code can be any combination of letters, numbers, and special
characters but cannot exceed 4 characters in length.
5. Enter a description of the code in the Description* field.
6. Select the Status* from the dropdown list.
a. Active: the service population is currently used in services.
b. Inactive: the service population is no longer used in services.
7. Click the
(Save) button.
*Note: To exit the screen without saving changes, click the
MDS User Manual
Save button
Screenshot displaying the Service Population Edit Form
(Cancel) button.
59
©KIT Solutions® 2011
Substates
The Substates page allows you to create a geographic region, county, or district within
the state or outside the state that the provider can use to identify where a prevention
service was provided. (For more information, see the Substate Entities section of the Appendix.)
Add Substate button
Back to Administration
button
1. Click Administration from the main menu.
2. Click Substates from the Administration Landing page.
3. To add a new substate, click the
(Add Substate) button. (For more
information, see the Adding substates section.)
Delete button
4. To view or modify a substate, click the
(View/Edit) button next to the
appropriate substate name.
a. The details will appear in edit mode. Make any changes needed to the
substate details.
(Save) button.
b. Click the
*Note: To exit the screen without saving changes, click the
View/Edit button
Sample screenshot displaying the Substate Listing Page
(Cancel) button.
5. To delete a substate, click the
(Delete) button next to the appropriate
substate name.
a. You will receive a confirmation message asking “Are you sure you want
to delete this record?”
b. Click the
(OK) button to confirm the deletion.
*Note: To cancel out of the page click the
(Cancel) button.
6. To return to the Administration Landing page, click the
Administration) button.
MDS User Manual
(Back to
60
©KIT Solutions® 2011
Add Substate button
Adding Substates
1. Click Administration from the main menu.
2. Click Substates from the Administration Landing page.
3. Click the
(Add Substate) button to add a new substate.
Sample screenshot displaying the Substates Listing Page
4. Enter a substate code in the Substate Code* field.
*Note: The Substate Code can be any combination of letters, numbers, and special characters
but cannot exceed 4 characters in length.
5. Enter a description of the code in the Description* field.
6. Select the Status* from the dropdown list.
a. Active: the substate is currently being used.
b. Inactive: the substate is no longer being used.
7. Click the
(Save) button.
*Note: To exit the screen without saving changes, click the
MDS User Manual
Save button
Screenshot displaying the Substates Edit Form
(Cancel) button.
61
©KIT Solutions® 2011
Risk and Protective Factors (RPFs)
The Risk and Protective Factors (RPFs) page allows you to identify the primary
and secondary risk or protective factors that the intervention is attempting to affect.
(For more information, see the Risk or Protective Factors section of the Appendix.)
Add RPF button
Back to Administration
button
1. Click Administration from the main menu.
2. Click RPFs from the Administration Landing page.
3. To add a new risk or protective factor, click the
(Add RPF) button. (For
more information, see the Adding Risk and Protective Factors (RPFs) section.)
Delete button
4. To view or modify a risk or protective factor, click the
(View/Edit) button
next to the appropriate factor name.
a. The details will appear in edit mode. Make any changes needed to the
factor details.
b. Click the
(Save) button.
*Note: To exit the screen without saving changes, click the
View/Edit button
Sample screenshot displaying the RPFs Listing Page
(Cancel) button.
5. To delete a risk or protective factor, click the
(Delete) button next to the
appropriate factor name.
a. You will receive a confirmation message asking “Are you sure you want
to delete this record?”
b. Click the
(OK) button to confirm the deletion.
*Note: To cancel out of the page click the
(Cancel) button.
6. To return to the Administration Landing page, click the
Administration) button.
(Back to
Tips
•
A RPF cannot be deleted if it is associated with a service record.
MDS User Manual
62
©KIT Solutions® 2011
Add RPF button
Adding Risk and Protective Factors (RPFs)
1. Click Administration from the main menu.
2. Click RPFs from the Administration Landing page.
3. Click the
(Add RPF) button to add a new risk or protective factor.
Sample screenshot displaying the RPFs Listing Page
4. Enter a risk or protective factor code in the Code* field.
*Note: The Code can be any combination of letters, numbers, and special characters but
cannot exceed 5 characters in length..
5.
6.
7.
8.
Enter an abbreviation of the code in the Abbreviation* field.
Enter the long name of the code in the Long Name* field.
If desired, enter a sub-factor name in the Sub-factor field.
Select the Status* from the dropdown list.
a. Active: the factor is currently being used.
b. Inactive: the factor is no longer being used.
9. Click the
(Save) button.
*Note: To exit the screen without saving changes, click the
MDS User Manual
Save button
Screenshot displaying the RPFs Edit Form
(Cancel) button.
63
©KIT Solutions® 2011
Race/Ethnicity Subcategories
The Race/Ethnicity Subcategories page allows you to create subcategories that
providers can use to better specify which races and ethnicities they are providing
services for.
Back to Administration
button
1. Click Administration from the main menu.
2. Click Race/Ethnicity Subcategories from the Administration Landing page.
3. To add a new subcategory to a race or ethnicity, click the
(Add) button.
Add button
(For more information, see the Adding Race/Ethnicity Subcategories section.)
4. To view or modify a subcategory, click the
(View/Edit) button next to the
appropriate subcategory name.
a. The details will appear in edit mode. Make any changes needed to the
subcategory details.
b. Click the
Delete button
View/Edit button
(Save) button.
*Note: To exit the screen without saving changes, click the
Sample screenshot displaying the Race/Ethnicity Subcategories Listing Page
(Cancel) button.
5. To delete a subcategory, click the
(Delete) button next to the appropriate
subcategory name.
a. You will receive a confirmation message asking “Are you sure you want
to delete this record?”
b. Click the
(OK) button to confirm the deletion.
*Note: To cancel out of the page click the
(Cancel) button.
6. To return to the Administration Landing page, click the
Administration) button.
(Back to
Tips
•
A Race/Ethnicity Subcategory cannot be deleted if it is associated with a service record.
MDS User Manual
64
©KIT Solutions® 2011
Adding Race/Ethnicity Subcategories
1. Click Administration from the main menu.
2. Click Race/Ethnicity Subcategories from the Demographics submenu.
3. Click the
Add button
(Add) button to add a subcategory to a race or ethnicity.
Sample screenshot displaying the Race/Ethnicity Subcategories Listing Page - This is a partial
screenshot
4. Enter the name of the subcategory to identify it by in the Subcategory Name*
field.
*Note: The Subcategory Name can be any combination of letters, numbers, and special
characters but cannot exceed 8 characters in length.
5. Enter a description of the subcategory in the Subcategory Description* field.
6. Select the Status* from the dropdown list.
a. Active: the subcategory is currently being used.
b. Inactive: the subcategory is no longer being used.
7. Click the
Save button
Screenshot displaying the Race/Ethnicity Subcategories Edit Form
(Save) button.
*Note: To exit the screen without saving changes, click the
(Cancel) button.
Tips
•
The
(Display/Hide) section allows you to hide or unhide a subcategory. Hidden subcategories will not display on data entry forms. Also, any data previously saved in the
subcategories that are now hidden will not be included in the counts for reporting purposes. It is best to hide/unhide all subcategories you wish “before” any data are entered into
the system. The Display Subcategories column on the Race/Ethnicity Subcategories listing page indicates if the subcategory is hidden or not. To hide a subcategory, select the
checkbox next to the appropriate subcategory and click the
(Save) button.
MDS User Manual
65
©KIT Solutions® 2011
Age Subcategories
The Age Subcategories page allows you to create subcategories that providers
can use to better specify which age groups they are providing services for.
1. Click Administration from the main menu.
2. Click Age Subcategories from the Administration Landing page.
3. To add a new subcategory to an age group, click the
Back to Administration
button
(Add) button. (For
more information, see the Adding Age Subcategories section.)
Add button
4. To view or modify a subcategory, click the
(View/Edit) button next to the
appropriate subcategory name.
a. The details will appear in edit mode. Make any changes needed to the
subcategory details.
b. Click the
(Save) button.
*Note: To exit the screen without saving changes, click the
Delete button
View/Edit button
Sample screenshot displaying the Age Subcategories Listing Page
(Cancel) button.
5. To delete a subcategory, click the
(Delete) button next to the appropriate
subcategory name.
a. You will receive a confirmation message asking “Are you sure you want
to delete this record?”
(OK) button to confirm the deletion.
b. Click the
*Note: To cancel out of the page click the
(Cancel) button.
6. To return to the Administration Landing page, click the
Administration) button.
(Back to
Tips
•
An Age Subcategory cannot be deleted if it is associated with a service record.
MDS User Manual
66
©KIT Solutions® 2011
Adding Age Subcategories
1. Click Administration from the main menu.
2. Click Age Subcategories from the Demographics submenu.
3. Click the
(Add) button to add a subcategory to an age group.
Add button
Sample screenshot displaying the Age Subcategories Listing Page
4. Enter the name of the subcategory to identify it by in the Subcategory Name*
field.
*Note: The Subcategory Name can be any combination of letters, numbers, and special
characters but cannot exceed 8 characters in length.
5. Enter a description of the subcategory in the Subcategory Description* field.
6. Select the Status* from the dropdown list.
a. Active: the subcategory is currently being used.
b. Inactive: the subcategory is no longer being used.
7. Click the
Save button
Screenshot displaying the Age Subcategories Edit Form
(Save) button.
*Note: To exit the screen without saving changes, click the
(Cancel) button.
Tips
•
The
(Display/Hide) section allows you to hide or unhide a subcategory. Hidden subcategories will not display on data entry forms. Also, any data previously saved in the
subcategories that are now hidden will not be included in the counts for reporting purposes. It is best to hide/unhide all subcategories you wish “before” any data are entered into
the system. The Display Subcategories column on the Race/Ethnicity Subcategories listing page indicates if the subcategory is hidden or not. To hide a subcategory, select the
checkbox next to the appropriate subcategory and click the
(Save) button.
MDS User Manual
67
©KIT Solutions® 2011
User-Defined Fields
The User-Defined Fields page allows you to create your own fields that you may feel
necessary for a provider to identify. You can choose to make these fields required or
optional.
Add UDFbutton
Back to Administration
button
1. Click Administration from the main menu.
2. Click User-Defined Fields from the Administration Landing page.
3. To add a field, click the
(Add UDF) button. (For more information, see the
Delete button
Adding User-Defined Fields section.)
4. To view or modify a field, click the
(View/Edit) button next to the
appropriate field title.
a. The details will appear in edit mode. Make any changes needed to the
field details.
b. Click the
(Save) button.
*Note: To exit the screen without saving changes, click the
View/Edit button
Sample screenshot displaying the UDFs Listing Page
(Cancel) button.
5. To delete a field, click the
(Delete) button next to the appropriate field title.
a. You will receive a confirmation message asking “Are you sure you want
to delete this record?”
b. Click the
(OK) button to confirm the deletion.
*Note: To cancel out of the page click the
(Cancel) button.
6. To return to the Administration Landing page, click the
Administration) button.
(Back to
Tips
•
A User-Defined Field cannot be deleted if it is associated with a service record.
MDS User Manual
68
©KIT Solutions® 2011
Add UDF button
Adding User-Defined Fields
1. Click Administration from the main menu.
2. Click User-Defined Fields from the Administration Landing page.
3. Click the
(Add UDF) button to add a new user-defined field.
Sample screenshot displaying the UDFs Listing Page
4. The Field Number* is already filled in for you.
5. Enter the title of the field in the Field Title* field.
6. If desired, enter the Sort Order to determine where the field will appear in the
list on the Service page.
7. Using the Required to Save* radio buttons, Select Yes or No indicating
whether the field will be required in order to save a service.
8. Select the Status* from the dropdown list.
a. Active: the field is currently being used.
b. Inactive: the field is no longer being used.
9. Click the
(Save) button.
*Note: To exit the screen without saving changes, click the
MDS User Manual
Save button
Screenshot displaying the UDF Edit Form
(Cancel) button.
69
©KIT Solutions® 2011
Time Limits
The Time Limits page allows you to set system-wide time limits for users to modify
services.
1. Click Administration from the main menu.
2. Click Time Limits from the Administration Landing page.
3. Using the Set Data Entry Access For: radio buttons, indicate who you are
setting a time limit for.
*Note: If Individual Providers is selected, a list of Providers will display. The list of Providers
was entered using the Providers form.
4. Enter the number of days from the initial record creation that providers are
allowed to edit the record in the Data Entry Access field(s).
5. Click the
(Save) button.
*Note: To exit the screen without saving changes, click the
6. To return to the Administration page click the
Administration) button.
MDS User Manual
(Cancel) button.
(Back to
Save button
Sample screenshot displaying Individual Providers selected on the Time Limits Edit Form
70
©KIT Solutions® 2011
Message of the Day
The Message of the Day page allows you to create the messages that are
displayed on the Home page when a user logs into the system.
1. Click Administration from the main menu.
2. Click Message of the Day from the Administration Landing page.
3. Enter the message you want users to see in the Message of the Day: field.
4. Click the
Save button
(Save) button.
*Note: To exit the screen without saving changes, click the
5. To return to the Administration page click the
Administration) button.
(Cancel) button.
(Back to
Sample screenshot displaying the Message of the Day Edit Form
Tips
•
There is a 4000 character limit. All entered characters entered after 4000 will be cut off and not display.
MDS User Manual
71
©KIT Solutions® 2011
Manage Library
The Manage Library page allows you to upload and manage all the documents
currently available in the Library section.
1. Click Administration from the main menu.
2. Click Manage Library from the Administration Landing page.
3. To add a document, see the Adding a Library Document section.
4. To view a document, click the
name.
(View) button next to the appropriate file
5. To delete a document, click the
(Delete) button next to the appropriate file
name.
a. You will receive a confirmation message asking “Are you sure you want
to delete this record?”
b. Click the
(OK) button to confirm the deletion.
*Note: To cancel out of the page click the
(Cancel) button.
6. To return to the Administration Landing page, click the
Administration) button.
(Back to
Delete button
View button
Back to Administration
button
Sample screenshot displaying the Manage Library Listing Page
Tips
•
The documents can also be viewed in the Library section.
MDS User Manual
72
©KIT Solutions® 2011
Adding a Library Document
1. Click Administration from the main menu.
2. Click Manage Library from the Administration Landing page.
3. Select the file type from the Choose the type of data file you would like to
upload:* dropdown list.
4. To upload a document, perform the follow steps:
a. Click the
(Browse) button.
b. Select the document you wish up upload. Click the Open button.
c. The file path will now appear in the Choose the file you would like to
upload:* field.
(Upload) button.
d. Click the
5. To return to the Administration page click the
(Back to
Administration) button.
Upload button
Sample screenshot displaying the Manage Library Listing Page
MDS User Manual
73
©KIT Solutions® 2011
Recommended Reports
Coming Soon
MDS User Manual
74
©KIT Solutions® 2011
TOOLS
The Tools module contains documents uploaded by your administrator as well as a feature that will allow you to export the data entered in the system
Library
The Library page allows you to view documents that have been uploaded by your
administrator.
1. Click Tools from the main menu.
2. Click Library from the Tools Landing page.
3. Select the file type of the document you wish to view by clicking the file type
link.
4. The document will open with the software that loads the file type you have
chosen.
MDS User Manual
75
©KIT Solutions® 2011
Data Export
Coming Soon
MDS User Manual
76
©KIT Solutions® 2011
MY PROFILE
The My Profile module displays information (Name, Address, Phone, Email, etc.) of the person currently logged into the system.
Updating My Profile Details
1. Click My Profile from the main menu.
2. All fields will be filled in for you already. These fields were filled in when your
staff account was first created by your system administrator. Most fields may
be edited, if needed.
3. Edit any fields that need updated.
4. Click the
(Save) button.
*Note: To exit the screen without saving changes, click the
(Cancel) button.
Save button
Sample Screenshot displaying the My Profile Edit Page
Tips
•
For instructions on changing the password, see the Changing Your Password section.
MDS User Manual
77
©KIT Solutions® 2011
SUPPORT
Coming Soon
MDS User Manual
78
©KIT Solutions® 2011
WHAT ANALYSIS YOU CAN PERFORM WITH MDS DATA
Understanding both what types of analyses you will be able to perform, as well as what analyses you will not be able to perform with the data you will collect with the
MDS is an important first step to planning on the data coding schemes you will use.
With data collected from the MDS, you will be able to report on the number/percentage of participants:
Served by each of the various service providers
By the demographics of the population served (gender, age, race, ethnicity)
By the services administered to various service populations (such as delinquent/violent youth, college students, economically disadvantaged youth, etc.)
By service type (such as community drop-in centers, classroom educational services, small group sessions, etc.)
By program strategy (information dissemination, education, alternatives, program identification and referral, community-based process, environmental)
By IOM category (indicated, selected, universal) if your State decides to collect this data
By zip code (if your State decides to collect this data)
By primary or secondary risk or protective category (if your State decides to collect this data)
By funding source (if your State decides to collect this data and your State defines a standardized list of codes to use for these sources)
Gender, age or ethnicity by service type
Gender, age or ethnicity by service population
Keeping in mind that the Minimum Data Set (MDS) software is designed for reporting aggregate data, you will not be able to report on the number/percentage of
participants such as:
Gender by ethnicity or age
Ethnicity by age or gender
Unduplicated count of participants served by different service providers, strategies, service types
Information about the characteristics of the participants not completing a series of sessions
Dosage information such as total number of sessions completed and length of time in program (unless completion of the program is defined in terms of number of sessions attended) or
demographics of those completing a program (unless there is a 100% completion rate)
Individual improvements based on services provided to that individual (because individual data is not collected in MDS, you cannot link the process data, by individuals,
with outcome evaluations)
MDS User Manual
79
©KIT Solutions® 2011
APPENDIX
Using the Reports Viewer
When using reports on the MDS, they are initially viewed using a Report Viewer.
Thus, when you click the report link or the
up in the screen to the right.
View Report button
(View) button, the reports will show
1. Click the arrows
to maneuver to other pages in the report.
Clicking the single arrow forward or backward, will move the view to the next
page or the previous page. The arrows with the bar can move the report view
to either the first or last page of the report.
2. To move to a specific page in the report, type in a page number into this field
and click the Enter button on your keyboard.
3. The box with the label 100% can be used to change the level of magnification
of the report. To change the level, click the black arrow on the right side of the
blank and choose an appropriate percentage.
4. To find a specific word or phrase enter it into the Find textbox and click the
(Find) link.
a. Click the
(Next) link to be taken to the next instance of the word
or phrase.
5. To download the report, select the type of file you want from the Select a
(Export) link.
format dropdown menu and click the
Sample screenshot displaying a Block Grant Report – This is a partial screenshot
6. Click the
(Printer) button to print a copy of the report.
7. To change the date range on the report, enter a new begin and end date in the
(View Report) button.
Begin Date and End Date fields and click the
8. To return to the list of block grants, click the
(Back to
Reports Listing) button.
MDS User Manual
80
©KIT Solutions® 2011
As you begin setting up the MDS software, the coding that you choose to use when setting up your system will have an effect on what analyses you can perform on the
data you collect from the system.
You will have the opportunity to set up codes that are most appropriate for your State needs. You will also want to be sure to make use of as many of the CSAP default or
predefined coding categories as are practical, as this will ensure that the data you collect from your State services can be aggregated with data from other states to
provide CSAP with usable information on what prevention services are being offered, and the populations these services serve. Without such aggregated data, CSAP
faces serious funding issues with congress; there is little benefit, from the political standpoint, in funding agencies that cannot report on how their money has been spent.
Less Federal funding for prevention services translates to less State funding for prevention.
Activity Codes
The Activity Code is a unique identifier used to link each session within a recurring prevention service that is undertaken with the same group of people over a fixed
period of time. Activity Codes must be assigned to recurring prevention services (they are not used for single prevention services). Some states allow their providers to
determine their own combination of characters and numbers, while others bring providers together and mutually agree on categories for the first three characters of the
activity code (e.g. ASP for after school programs) with the remaining three characters being assigned by the individual provider. States and Providers may select either
method. The most important thing to remember is to assign a new code each time a new, discrete, recurring program is started with a different group of people.
The system administrator can edit, view and add new activity codes. These codes are arbitrary and you may make them whatever you want. The items in the list are used
by your Service Providers for Recurring Services only. The list that the providers will see will be sorted alphabetically by the Activity Code entry, so that A001 is before
B001. (Note that this is not the same as a numerical sort.) If you are using numbers for your codes, you should probably make them all the same number of digits and
use zeros to left pad the numbers, such as 0001, 0002, and so on, so that they will appear in numerical order.
Activity Codes can be up to six characters long, and no longer.
You will enter a descriptive name for the activity in the “Description” text field. This is the description that your service providers will see when they select from the pick list
for the item, and it also the description that is used on the report of Services by Activities Code.
MDS User Manual
81
©KIT Solutions® 2011
Substate Entities
The substate entity code is the alphanumeric code representing the geographic region, county, or district within the state or outside the state where the prevention
service was provided. The entries in the Substate Entity Code column are linked to the corresponding field in the main Data Entry screen. Each Substate Entity Code is
uniquely associated with a Substate Name.
You will want to define your substate entities before you enter Service Providers or Staff, since both of these require you to select the appropriate substate codes.
Substate IDs will be sorted alphabetically and can be no more than ten characters long. Substates may be defined to match geographic regions, administrative divisions,
or programmatic divisions.
Before you add your substate entity categories, you will want to think carefully about how you will be assigning your staff to the various substate entities, as this can effect
how you can pull up information for reporting, as well as what information that those doing data entry will be able to edit and view.
The substate that you assign to a provider will be used to determine what appears on the provider pick list when staff at the “Substate Staff” and “Substate Administrator”
level are doing data entry. Your staff at the substate level will see only those providers matching that substate.
As you organize your codes for substate regions, think about how data entry will happen in your state.
Do you have a few people at top levels that do most of the data entry? If so, then you might want to organize large substate regions and assign responsibility to staff to
enter data for a large region. Defining too many substate breakdowns would mean that this staff would have to log in and out each time they enter data from a provider
that was assigned to a different region if they wanted to use the pick lists. However, if they have a list of the provider codes, they can manually enter these codes.
Or, does program staff do your data entry? Assigning smaller regional areas with fewer providers in each of the areas will help this staff choose the correct providers and
also prevent comparison across providers by data entry staff.
More detail on this topic is provided in the next section on entering staff.
MDS User Manual
82
©KIT Solutions® 2011
Staff Security
The Staff field refers to the name of the prevention service staff member who provided or oversaw the service.
When entering staff, type the staff member’s name, login and password into the appropriate fields. Since the staff person can change their password at any time they
want, you can assign a default password to each user of the system and recommend that they change it the first time that they log into the system.
Select the appropriate level of security for this staff member by clicking the arrow in the Security drop down list and making a selection.
Choosing the correct security level for the user is an important part of setting up your staff. Each level determines what data entry your staff can perform, what data they
will have access to, and what they can report on. The list below provides an overview of what each type of staff person can do, and begins with the lowest level access.
•
•
•
•
•
•
•
•
•
MDS User Manual
Field Staff are generally those providing services, and they are assigned to do data entry for the service they perform. They can enter records and edit
or report on the entries that they, themselves, make.
Provider Staff may input and edit their own records. They can enter data for all other provider staff (for the provider with whom they have been linked),
and view and report on all records for this provider.
The Provider Administrator can input, edit, view and report on all records entered for the provider with whom they have been linked.
Substate Staff may input and edit their own records for the substate entity with which they have been linked, enter data for all substate staff in their
substate, and view and report on all records for this substate entity.
The Substate Administrator can input, edit, view and report on all records entered for the substate to which they are linked.
State Staff can input and edit their own records for services performed in this state as well as view and report on all records for services within the state,
regardless of the substate entity or provider that they were entered under.
The State Administrator has access to all data for editing and reporting, but cannot access the Administration menu for changing settings.
System Administrators have access to all the data and all of the system settings in the Administration menu, including access to all user names and
passwords.
Custom allows you to customize the permission levels per Edit form.
83
©KIT Solutions® 2011
If Custom is chosen as a security level, click the
(Permissions) button to select a staff member’s permission levels for each page. Please see the Staff
Permission section for more details on customizing permissions for a staff member. When selecting custom permissions, you can choose a scope, or view, that the staff
member has access to. The list below provides an overview of what each type of scope can view, and begins with the lowest level access.
•
•
•
•
•
MDS User Manual
Field Scope: staff member can only view data that they have entered into the MDS application.
Provider Scope: staff member can only view data entered by the provider they are assigned to.
Substate Scope: staff member can view data entered by every provider in their substate.
State Scope: staff member can view all data entered by every state.
Admin Scope: staff member can view all data entered by every state.
84
©KIT Solutions® 2011
Providers
The Provider ID is the alphanumeric code representing the organization providing the prevention service. The entries in the Provider ID column are linked to the
corresponding field in the main Data Entry screen. Each Provider ID is uniquely associated with a Provider Name.
You will need to create an alphanumeric code for each provider. The code can be up to ten characters long. You will enter in the Address, City, State, Zip and Phone
information for this provider.
Since each provider can belong to one substate entity, you will need to define your substate entities in a way that allows you to set up the providers across regions.
MDS User Manual
85
©KIT Solutions® 2011
Service Populations
The Service Population refers to the population or specific groups that directly received the prevention services. These codes will be used to identify those to whom
prevention services are being directed. Service population descriptions and examples of common groups (including CSAP high-risk populations) that would be
considered under each service population have been provided in the table below. You will need to emphasize in your training that in recording service populations, staff
should select the category that most closely describes the group(s) or individual(s) who are the recipients of the prevention service. This is only way that accurate
information about service populations can be reported from MDS.
Developing a set of Service Populations that well-describe the populations served in your state that can be defined clearly and communicated clearly to your Service
Providers doing the data entry is, of course, the key to obtaining good analysis of the populations served. The MDS contains 29 service population codes, as follows:
MDS SERVICE POPULATION CODES
SP01—Business and Industry
SP02—Civic Groups/Coalitions
SP03—College Students
SP04—COSAs/Children of Substance Abusers*
SP05—Delinquent/Violent Youth*
SP16—People Using Substances*
SP17—People with Disabilities*
SP18—People with Mental Health Problems*
SP19—Physically/Emotionally Abused People*
SP20—Pregnant Females/Women of Childbearing Age
SP21—Preschool Students
SP22—Prevention/Treatment Professionals
SP23—Religious Groups
SP24—School Dropouts*
SP25—Teachers/Administrators/Counselors
SP26—Youth/Minors
SP27—Law Enforcement/Military
SP28—Gays/Lesbians
SP98—Other*
SP99—Not Applicable
SP06—Economically Disadvantaged Youth/Adults*
SP07—Older Adults
SP08—Government/Elected Officials
SP09—Elementary School Students
SP10—General Population
SP11—Health Professionals
SP12—High School Students
SP13—Homeless/Runaway Youth*
SP14—Middle/Junior High School Students
SP15—Parents/Families
* A CSAP high-risk population.
Service Population codes can be up to four characters long. Many service populations have been predefined within MDS. Your State should add in your State-specific
populations, for example your own high-risk populations. You will want your service providers or data entry staff to carefully consider how to code the general
classifications of population that a service targets as reports that are generated can use this information to determine where the prevention efforts have been focused
MDS User Manual
86
©KIT Solutions® 2011
within the state or region, and focus training efforts in this area.
The MDS defines the service population as follows (an asterisk indicates a CSAP high-risk population):
Business and Industry—Individuals who manage or work in for-profit or not-for-profit businesses or industry. Examples are small businesses, companies, corporations,
industrial plants, and unions. Use Service Population Code SP01.
Civic Groups/Coalitions—Members of civic organizations, nonprofit organizations, and community coalitions. Examples are men’s and women’s state or local civic
groups, nonprofit agency boards of directors or staff, community or statewide coalition members, community partnership groups, and community task forces, alliances,
and similar community organizations. Use Service Population Code SP02.
College Students—Youth and adults enrolled in public or private institutions of higher education, including enrollees in universities, colleges, community colleges,
technical colleges, and other institutions for advanced education. Use Service Population Code SP03.
*COSAs/Children of Substance Abusers—Youth and adults who are children of substance abusers. Examples are adult children of alcoholics, children whose parents
abuse alcohol or other drugs, and children raised in or chronically exposed to situations involving substance abuse. Use Service Population Code SP04.
*Delinquent/Violent Youth—Youth who display risk factors for delinquency or violence or who have been determined to be delinquent or violent. Examples are youth
declared delinquent by a State child welfare system, youth who have been arrested for juvenile delinquent behavior, youth who are chronically truant, and youth who
display chronic or periodic violent behavior, including youth who display antisocial behavior (e.g., chronic fighting, hitting, using weapons). Use Service Population Code
SP05.
*Economically Disadvantaged Youth/Adults—Youth and adults considered to be underprivileged in material goods due to poor economic conditions. Examples are
youth and adults living in poor housing conditions or who are enrolled in state or Federal public assistance programs. Use Service Population Code SP06.
Older Adults—Adults considered being older (in general, persons over 65 years of age). Examples are older persons who are living independently or residing in a
nursing home or an assisted living facility. Use Service Population Code SP07.
Government/Elected Officials—Individuals holding government positions, including those who have been elected to public office. Examples are government workers;
mayors; city administrators; city or county commissioners; supervisors, freeholders, or other elected officials; state legislators and staff; and members of the U.S.
Congress and their legislative staff. Use Service Population Code SP08.
MDS User Manual
87
©KIT Solutions® 2011
Elementary School Students—Youth enrolled in public or private elementary schools in kindergarten through grade 5. Use Service Population Code SP09.
General Population—Youth and adult citizens of a state rather than a specific group within the general population. Use Service Population Code SP10.
Health Professionals—Individuals employed by or volunteering for health care services. Examples are physicians, nurses, medical social workers, medical support
personnel, medical technicians, and public health personnel. Use Service Population Code SP11.
High School Students—Youth enrolled in public or private high schools (generally grades 10 through 12) and home-study youth in these grades. Use Service
Population Code SP12.
*Homeless/Runaway Youth—Youth (and adults) who do not have a stable residence or who have fled their primary residence. Examples are street youth (and adults),
youth (and adults) in homeless shelters, and youth in unsupervised living situations. Use Service Population Code SP13.
Middle/Junior High School Students—Youth enrolled in public or private middle schools or junior high schools, including grades 6 through 8, 6 through 9, or 7 through
9, sixth-grade and seventh grade centers, and home-study youth in comparable grades. Use Service Population Code SP14.
Parents/Families—Parents and families, including biological parents, adoptive parents, and foster parents; grandparents, aunts and uncles, or other relatives in charge
of or concerned with the care and raising of youth; nuclear families; and mixed families. Use Service Population Code SP15.
*People Using Substances—Youth and adults who may have used or experimented with alcohol, tobacco, or other drugs. Examples are youth or adults charged with
driving under the influence (DUI), driving while intoxicated (DWI), or being a minor in possession (MIP); social or casual users of illicit substances; and youth and adults
who smoke tobacco or consume alcoholic beverages but who are not yet in need of treatment services. Use Service Population Code SP16.
*People with Disabilities—Youth and adults who have disabilities. Examples are individuals who are physically handicapped, hearing impaired, speech impaired, or
visually impaired. Use Service Population Code SP17.
*People with Mental Health Problems—Youth and adults with mental health problems. Examples are persons with diagnosable mental illness such as depression,
severely emotionally disturbed youth, and the educable mentally retarded. Use Service Population Code SP18.
*Physically/Emotionally Abused People—Youth and adults who have experienced physical or emotional abuse. Examples are victims of physical abuse, sexual abuse,
incest, emotional abuse, and domestic abuse. Use Service Population Code SP19.
MDS User Manual
88
©KIT Solutions® 2011
Pregnant Females/Women of Childbearing Age—Women who are of the physiological age to bear children and for whom the intent of prevention services is to ensure
healthy newborns. Use Service Population Code SP20.
Preschool Students—Youth enrolled in, or of an age to be enrolled in, public or private preschool programs. Examples are youth enrolled in preschool programs, child
day care, and Head Start programs, and other children aged 4 or younger. Use Service Population Code SP21.
Prevention/Treatment Professionals—Individuals employed as substance abuse prevention professionals. Examples are counselors, therapists, prevention
professionals, preventionists, clinicians, prevention supervisors, and agency directors. Use Service Population Code SP22.
Religious Groups—Individuals involved with or employed in religious denominations or organized religious groups such as churches, synagogues, temples, or mosques.
Examples are members, deacons, elders, clergy, religious associations, ministerial associations, ecumenical councils or organizations, lay leaders, and religious
education staff. Use Service Population Code SP23.
*School Dropouts—Youth under the age of 18 who have not graduated from school or earned a general educational development certificate and/or who are not enrolled
in a public or private learning institution. Use Service Population Code SP24.
Teachers/Administrators/Counselors—Individuals employed in the education field. Examples are teachers, coaches, deans, principals, faculty, and counselors. Use
Service Population Code SP25.
Youth/Minors—Children under age 18 who are not otherwise counted under one of the school grade categories. Examples are youth in recreation programs (camps,
summer programs), youth in employment programs, and youth in clubs or recreation centers. Use Service Population Code SP26.
Law Enforcement/Military—Individuals employed in law enforcement agencies or in one of the U.S. Armed Services. Examples are police, sheriffs, state law
enforcement personnel, and members of the National Guard, Army, Navy, Marines, Air Force, and Coast Guard. Use Service Population Code SP27.
Gays/Lesbians—Individuals who identify themselves as emotionally and physically attracted to others of the same gender. Use Service Population Code SP28.
*Other—Individuals or organizations who do not fit any of the above definitions or who represent a special population on which a particular state wishes to capture
prevention services data. Use Service Population Code SP98.
MDS User Manual
89
©KIT Solutions® 2011
Not Applicable—Used for prevention services not directed at a service population (e.g., clearinghouse, community drop-in centers, community teams). Use Service
Population Code SP99.
MDS User Manual
90
©KIT Solutions® 2011
Strategies
Strategies summarize the prevention service activity according to the program strategy employed by CSAP.
Strategy codes are exactly three characters long. The Strategy Code is used to help identify the primary strategy used for a program, and becomes part of the Service
Type code. Strategy codes defined by CSAP include:
Information Dissemination—STN—provides awareness and knowledge of the nature and extent of substance abuse and addiction and its effects on individuals,
families, and communities. The strategy is also intended to increase knowledge and awareness of available prevention programs and services. Information dissemination
is characterized by one-way communication from the source to the audience, with limited contact between the two.
Education—STE—substance abuse prevention education involves two-way communication and is distinguished from the information dissemination strategy by the fact
that interaction between the educator and/or facilitator and the participants is the basis of its components. Services under this strategy aim to improve critical life and
social skills, including decision-making, refusal skills, critical analysis, and systematic judgment abilities.
Alternatives—STA—provide for the participation of target populations in activities that exclude substance abuse. The assumption is that constructive and healthy
activities offset the attraction to or otherwise meet the needs usually filled by alcohol, tobacco, and other drugs and would therefore minimize or remove the need to use
these substances.
Problem Identification And Referral—STP—aims to classify those who have indulged in illegal or age-inappropriate use of tobacco or alcohol and those who have
indulged in the first use of illicit drugs and to assess whether their behavior can be reversed through education. It should be noted, however, that this strategy does not
include any function designed to determine whether a person is in need of treatment.
Community-Based Process—STC—aims to enhance the ability of the community to more effectively provide substance abuse prevention. Services in this strategy
include organizing, planning, and enhancing the efficiency and effectiveness of services implementation, interagency collaboration, coalition building, and networking.
Environmental—STV--establishes or changes written and unwritten community standards, codes, and attitudes, thereby influencing the incidence and prevalence of the
abuse of alcohol, tobacco, and other drugs by the general population. This strategy is divided into two subcategories to permit distinction between activities that center on
legal and regulatory initiatives and those that relate to service- and action-oriented initiatives.
When adding Strategy Codes for your state, begin the code with your State’s two letter postal code (AZ—Arizona, CA—California, etc.)
MDS User Manual
91
©KIT Solutions® 2011
Service Type Codes
Service Type Codes are used in MDS to identify the specific service that has been rendered to the clients. Your State should use the codes that CSAP has defined if they
are applicable, and enter in your own State Service Type Codes for services specific to your state. Each Service Type Code you add to the MDS must begin with the
three alphanumeric characters of one of the Strategy Codes (see the previous section for a description of these codes.)
Enter a descriptive name for the Service Type in the “description” text field. Each Service Type you define will require you to decide whether or not demographics will be
required; your decision will be based on the availability for demographics to be collected for the service, the reporting requirements to the agency funding the project, the
type of information that may be needed for evaluation, the burden on the program of collecting this data, and the availability of the same data from other sources—for
example, for a school-based universal program, demographics can be obtained from the student management system.
You will also indicate whether the service is a “Single Service” or a “Recurring Service.” Current prevention research indicates that lasting change in behavior, risk
factors, or community attitudes and perceptions is most likely to occur when services are provided with sufficient frequency, intensity, and duration. Thus, prevention
services provided consistently, over time, have a better opportunity to change attitudes and behaviors that place people at risk for substance abuse than do single
prevention events or activities. In planning for and providing prevention services that are likely to effect change, the transition from predominantly single prevention
services to a balanced system of single and recurring services seems to be a logical direction for the future. Working with the six CSAP strategies for primary prevention
(Information Dissemination, Education, Alternatives, Problem Identification and Referral, Community-Based Process, Environmental), individuals, schools, parents, and
communities can receive an appropriate mix of prevention services that encompass both single and recurring services.
How to Identify Single and Recurring Services
In the MDS, the terms “single” and “recurring” are used to distinguish between one-time events and ongoing prevention programs. Single prevention services are
generally conducted once; examples are a presentation at a civic group luncheon or a speech at a school assembly. In contrast, recurring prevention services are efforts
undertaken with the same group of people over a fixed period of time, such as a parent education group where the same individuals meet once a week for 6 weeks.
It is important to know what constitutes a recurring prevention service in your State and what populations or conditions are best served through a program of recurring
services rather than a single service. For example, changing or strengthening parental behavior as a means of helping youth to remain substance-free would probably
require more than a single service. The prevention provider would need to work with the parents over time so that they can practice parenting skills and learn how to
integrate them into their daily living.
States and Providers and Recurring Prevention Services — Prevention services that truly constitute a recurring program, with a planned beginning and end to the
number of sessions conducted, should be identified in your State. States and provider agencies need to think about state and local prevention efforts that constitute a
recurring program and agree to count all of these services as recurring. Examples are statewide initiatives that every provider has to conduct, such as a parenting
program, a school dropout program, a community task force program, prevention resource centers, and family resource centers. Some services are designed for a single
MDS User Manual
92
©KIT Solutions® 2011
application to a group. Although the same service may be administered to other groups, this would still be considered a “Single Service”. Recurring Services are those
services that will take place with the same participants over an extended period of time.
How to Code Recurring Prevention Services
Three fields in the MDS are used to record recurring prevention services.
Single/Recurring Service Code—the single/recurring service code field identifies the service as a single or recurring prevention service. An “R” is used for recurring.
Recurring Service Session Number—the recurring service session number is an incremental number denoting the session number of a recurring prevention service
(e.g., 01 for the first session, 02 for the second session).
Activity Code—the activity code field is a unique identifier used to link each session within a recurring prevention service that is undertaken with the same group of people over a
fixed period of time. Activity codes must be assigned to recurring prevention services. Some states allow providers to determine their own combination of characters and numbers,
while others bring providers together and mutually agree upon categories for the first three characters of the activity code (e.g., ASP for after school programs) with the remaining
three characters being assigned by the individual provider (e.g., ASP001, ASP002). States and providers may select either method. The most important thing to remember is to
assign a new code each time a new, discrete, recurring program is started with a different group of people.
What Will The Recurring Data Show?
Analysis of recurring data enables states and providers to better understand how services are conducted, what activities are being provided, and how frequently. This is
important because there is so much variation across states and among providers as to what types of activities or numbers of sessions are the most effective for
commonly provided services.
The recurring data become particularly important when considering outcome evaluation, developing programs that use research and best practices, and making
decisions about what services the state wants to purchase. The MDS allows the state and its providers to compare services and to determine the most effective
combination of activities and the best frequency of sessions to obtain the desired outcome. For instance, suppose that people who are enrolled in the ABC Agency’s
Parenting and Family Management Program receive a set of services 4 hours a week for 6 weeks. However, the XYZ Agency’s Parenting and Family Management
Program consists of four 1-hour sessions. State agencies funding both these programs expect that parents will receive the services needed to make a significant and
lasting improvement in their parenting skills. Given that their structure and length are so different, it is unlikely that both programs will effect equal change. The MDS
provides the information that can help states and providers better define a prevention program and the best practices to employ with various populations.
MDS User Manual
93
©KIT Solutions® 2011
Service Types defined within the MDS
Information Dissemination
STN01 Clearinghouse/Information Resource Center
STN02 Health Fairs
STN03 Health Promotions
STN04 Original A/V Material Developed
STN05 Original Written Material Developed
STN06 Original Curricula Developed
STN07 Original Periodicals Developed
STN08 Original PSAs Developed
STN09 Original Resource Directories Developed
STN10 A/V Material Disseminated
STN11 Printed Material Disseminated
STN12 Curricula Disseminated
STN13 Periodicals Disseminated
STN14 PSAs Disseminated
STN15 Resource Directories Disseminated
STN16 Media Campaigns Distributed
STN17 Speaking Engagements
STN18 Telephone/Email Info Requests Received
MDS User Manual
Education
STE01 COSA Groups
STE02 Classroom Education Services
STE03 Educational Services for Youth Groups
STE04 Parenting/Family Management Services
STE05 Peer Leader/Helper Programs
STE06 Small Group Sessions
Alternatives
STA01 ATOD-Free Social/Recreational Events
STA03 Community Drop-In Centers
STA04 Community Drop-In Center Activities
STA06 Community Services
STA07 Youth/Adult Leadership Functions
Problem ID And Referral
STP01 Employee Assistance Programs
STP03 Student Assistance Programs
STP05 DUI/DWI/MIP Programs
STP06 Prevention Assessment and Referral
STP07 Tobacco Court Mandated Programs for Youth
94
Community-Based Process
STC01 Accessing Services and Funding
STC02 Assessing Community Needs
STC03 Community/Volunteer Services
STC04 Formal Community Teams
STC05 Community Team Activities
STC06 Training Services
STC08 Technical Assistance Services
STC10 Systematic Planning Services
Environmental
STV01 Environmental Consultation to Communities
STV02 Preventing Underage Sale of Tobacco - Synar
Amendment
STV03 Preventing Underage Alcoholic Beverage Sales
STV04 Establishing ATOD-Free Policies
STV05 Changing Environmental Codes, Ordinances,
Regulations, and Legislation
STV06 Public Policy Efforts
©KIT Solutions® 2011
Strategy: Information Dissemination
Information dissemination provides awareness and knowledge of the nature and extent of substance abuse and addiction and its effects on individuals, families, and
communities. The strategy is also intended to increase knowledge and awareness of available prevention programs and services. Information dissemination is
characterized by one-way communication from the source to the audience, with limited contact between the two.
Types of services conducted and methods used for implementing this strategy include the following: Clearinghouse/information resource centers, health fairs, health
promotion, materials development, materials dissemination, media campaigns, speaking engagements, and telephone information services.
STN01 - Clearinghouse/Information Resource Center
A central repository of and dissemination point for current, factual, and culturally relevant written and audiovisual information and materials concerning substance use and
abuse. Examples are:
• Information resource centers
• Resource libraries
• Electronic bulletin boards
• Prevention resource centers
• Regional Alcohol and Drug Awareness Resource (RADAR) network centers
Count Method: A clearinghouse/information resource center is counted in the data set only once, using the Number of Units field, usually at the beginning of the reporting period
for the year. Categorize as a single prevention service. Record the service population as SP99 (not applicable). Demographic tracking is not applicable to this service type.
STN02 - Health Fairs
Generally, a school- or community-focused gathering, such as a carnival or bazaar, traditionally held for barter or sale of goods, often for charity. These events offer an
opportunity to disseminate materials and information on substance abuse prevention and health-related issues. Examples are:
• School health promotion gatherings
• Health screening programs in shopping malls
• Church fairs or carnivals
• Public health or health education fairs
Count Method: Health fairs are counted in the data set as a single prevention service. Record the service population and the demographics.
MDS User Manual
95
©KIT Solutions® 2011
STN03 - Health Promotions
A wide array of services and methods for dissemination of information intended to educate individuals, schools, families, and communities about specific substance
abuse and health-related risks, risk reduction activities, and other activities to promote positive and healthy lifestyles. Examples are:
• Dissemination of materials at health education programs
• Health screening services
• Showing of substance abuse prevention videotapes at fairs and similar events
Count Method: Health promotion services are counted in the data set as a single prevention service. Record the service population and the demographics.
STN04:STN09 - Materials Development—the creation of original documents and other educational pieces for use in information dissemination activities related to
substance abuse and its effects on individuals, schools, families, and communities. Services under this category include audiovisual materials, printed materials,
curricula, newsletters, public service announcements, and resource directories, as described below:
STN04 – Original Audiovisual Material Developed
Prevention material involving both hearing and sight. Examples are videotapes and films.
STN05 – Original Written Material Developed
Written materials designed to inform individuals, schools, families, and communities about the effects of substance abuse and available prevention approaches and
services. Examples are:
• Brochures
• Flyers
• Fact sheets
• Posters
• Pamphlets
• Prevention plans
STN06 – Original Curriculum Developed
A course of study in prevention.
MDS User Manual
96
©KIT Solutions® 2011
STN07 – Original Periodicals Developed
A report giving prevention news or information of interest to a particular group.
STN08 – Original Public Service Announcements (PSAs) Developed
A media message or campaign, usually less than 5 minutes Iong, and provided through public airways at no charge, designed to inform and educate audiences
concerning substance abuse and its effects on individuals, schools, families, and communities. Examples are:
• Television PSAs
• Radio PSAs
• No-charge newspaper advertisements and announcements
STN09 – Original Resource Directories Disseminated
A list of substance abuse and related programs and services in a particular community, county, or state. Examples are:
• State services resource directory
• Community services resource directory
• Certification directory
• Training course directory
Count Method: Materials development services are counted, using the Number of Units field, each time a new document (or PSA) is developed and ready for dissemination or
use. It is counted as the number of original documents (or PSAs) developed. Count as a single prevention service. Record the service population. Demographic tracking is not
applicable for these service types.
STN10:STN15 - Materials Dissemination
Distribution of written and audiovisual prevention information. Examples are providing handouts for a speaking engagement or providing materials for health fairs.
Products included in the category are defined under Materials Development. Services under this category are:
• Audiovisual Material (Service Type Code STN10)
• Printed Material (Service Type Code STN11)
• Curriculum (Service Type Code STN12)
• Periodicals (Service Type Code STN13)
• Public Service Announcements (Service Type Code STN14)
• Resource Directories (Service Type Code STN15)
MDS User Manual
97
©KIT Solutions® 2011
Count Method: Materials dissemination services are counted, using the Number of Units field, as the quantity of items disseminated.
*Note: A PSA is counted only once in the data set: when it airs for the first time. Count as a single prevention service. Record the service population. Demographic tracking is not applicable to this service type.
STN16 - Media Campaigns
Structured activities that use print and broadcast media to deliver prevention information or health promotion messages relative to substance abuse. In contrast with
PSAs, campaign messages are usually more than 5 minutes long. Examples are:
• Media promotion of Red Ribbon, Project Graduation, or other similar events
• Printing of ads with “no-use” messages
• Distribution of signs to stores and businesses
• Distribution of bumper stickers, posters, etc.
• Use of national substance abuse prevention media materials tagged to a state or community (e.g., Partnership for a Drug-Free America)
• Prevention ads and messages in newspapers
Count Method: Media campaigns are counted in the data set, using the Number of Units field, when the campaign has been distributed to the vendor who will promote it (e.g.,
when the ads are printed in the paper or the store owner puts up the signs). Count as a single prevention service. Record the service population. Demographic tracking is not
applicable to this service type.
STN17 - Speaking Engagements
A wide range of prevention activities intended to impart information about substance abuse issues to general and/or targeted audiences. Examples are:
• Speeches
• Talks
• News conferences
• Briefings
• One-time classroom presentations
• One-time assembly presentations
• Hearings
• Volunteer speakers bureaus
Count Method: Speaking engagements are counted in the data set as a single prevention service. Record the service population and the demographics.
MDS User Manual
98
©KIT Solutions® 2011
STN18 – Telephone/Email Info Requests Received
Telephone services intended to provide information about substance abuse prevention issues and services. This does not include telephone calls that are a normal part
of day-to-day business. Examples are:
• Toll-free telephone number services
• Information and referral lines
• Hotlines
• Crisis lines
Count Method: Telephone information services are counted, using the Number of Units field, in the data set as the total number of calls received during a month. Count as a single
prevention service. Record the service population. Demographic tracking is not applicable to this service type.
MDS User Manual
99
©KIT Solutions® 2011
Strategy: Education
Substance abuse prevention education involves two-way communication and is distinguished from the information dissemination strategy by the fact that interaction
between the educator and/or facilitator and the participants is the basis of its components. Services under this strategy aim to improve critical life and social skills,
including decision-making, refusal skills, critical analysis, and systematic judgment abilities.
Types of services conducted and methods used for implementing this strategy include the following: Children of substance abusers groups, classroom educational
services, educational services for youth groups, parenting/family management services, peer leader/helper programs, and small group sessions.
STE01 - COSA Groups
Substance abuse prevention educational services targeted to youth and adults who are children of substance abusers. Examples are:
• COSA 12-step programs
• Short-term educational groups
• Risk and protective factor programs
• Adult Children of Alcoholics (ACOA) meetings
Count Method: COSA educational groups are counted in the data set as recurring prevention services. Record the service population and the demographics.
STE02 - Classroom Education Services
Prevention lessons, seminars, or workshops that are recurring and are presented primarily in a school or college classroom. Examples are:
• Delivery of recognized prevention curricula (e.g., Babes, Talking With Your Kids About Alcohol)
• Regular and recurring health education presentations to the same group of students
Count Method: Classroom educational services are counted in the data set as recurring prevention services. Record the service population and the demographics.
*Note: A one-time presentation should be counted as a speaking engagement.
STE03 - Educational Services for Youth Groups
Structured substance abuse prevention lessons, seminars, or workshops directed to a variety of youth groups (children, teens, young adults) and youth organizations.
Examples are:
• Substance abuse education for youth groups such as Boys & Girls Clubs and Scouts
• General substance abuse prevention education for other groups or organizations serving youth
MDS User Manual
10
©KIT Solutions® 2011
Count Method: Educational services for youth groups are counted in the data set as recurring prevention services. Record the service population and the demographics.
STE04 - Parenting/Family Management Services
Structured classes and programs intended to assist parents and families in addressing substance abuse risk factors, implementing protective factors, and learning about
the effects of substance abuse on individuals and families. Topics typically include parenting skills, family communications, decision-making skills, conflict resolution,
family substance abuse risk factors, family protective factors, and related topics. Examples are:
• Parent effectiveness training
• Parenting and family management classes
• Prevention programs targeting the family
• Programs designed to strengthen families
Count Method: Parenting/family management services are counted in the data set as recurring prevention services. Record the service population and the demographics.
STE05 - Peer Leader/Helper Programs
Structured, recurring prevention services that use peers (people of the same rank, ability, or standing) to provide guidance, support, and other risk reduction activities for
youth or adults. Examples are:
• Peer resistance development
• Peer/cross-age tutoring programs
• Student non - using groups (e.g., “Just Say No” clubs)
• Teen leadership institutes
• Peer support activities (e.g., clubs, church groups)
Count Method: Peer leader/helper programs are counted in the data set as recurring prevention services. Record the service population and the demographics.
STE06 - Small Group Sessions
Provision of educational services to youth or adults in groups of not more than 16 members. Examples are:
• Substance abuse education groups
• Short-term education groups
• Youth education groups
MDS User Manual
10
©KIT Solutions® 2011
•
•
•
Parent education groups
Business education groups
Church education groups
Count Method: Small group sessions are counted in the data set as recurring prevention services. Record the service population and the demographics.
Strategy: Alternatives
Alternatives provide for the participation of target populations in activities that exclude substance abuse. The assumption is that constructive and healthy activities offset
the attraction to or otherwise meet the needs usually filled by alcohol, tobacco, and other drugs and would therefore minimize or remove the need to use these
substances.
Types of services conducted and methods used for implementing this strategy include the following: Alcohol-, tobacco-, and other drug-free social/recreational events,
community drop-in centers, community drop-in center activities, community services, and youth/adult leadership functions.
STA01 - ATOD-Free Social/Recreational Events
Social and recreational activities for youth and adults that specifically exclude the use of alcohol, tobacco, and other drugs. Examples are:
• Project Graduation and similar events
• After-prom parties
• Alcohol-, tobacco-, and other drug-free school events
• Alcohol-, tobacco-, and other drug-free community events
• Smoke-free gatherings and events
Count Method: Alcohol, tobacco, and other drug-free social/recreational events are counted in the data set as a single prevention service. If the service meets the definition of
recurring, count as a recurring prevention service. Record the service population and the demographics.
STA03 - Community Drop-In Centers
Centers that provide community facilities and structured prevention services that do not permit alcohol, tobacco, or other drug use on their premises.
Count Method: Count the number of community drop-in centers only one time per year, using the Number of Units field, preferably at the beginning of the reporting period for the
year. Count as a single prevention service. Record the service population as “Not applicable” (Service Population Code SP99). Demographic tracking is not applicable to this
MDS User Manual
10
©KIT Solutions® 2011
service type.
*Note: Activities conducted at a community drop-in center are counted under Community Drop-In Center Activities.
STA04 - Community Drop-In Center Activities
Substance abuse prevention activities and events held at community drop-in centers that offer social, recreational, and learning environments free of alcohol, tobacco,
and other drugs. Examples are:
• Teen center activities
• Community center activities
• Recreation center activities
• Senior citizen center activities
Count Method: Activities conducted at the community drop-in center are counted in the data set as a single prevention service. If the service meets the definition of recurring, count
as a recurring prevention service. Record the service population and the demographics.
*Note: The center would be counted under Community Drop-In Centers.
STA06 - Community Services
Functions intended to prevent substance abuse by involving youth and adults in providing a variety of community services. Examples are:
• Community clean-up activities
• Events to repair or rebuild neighborhoods
• Fundraising for charitable causes
• Support to the elderly, handicapped, ill, etc.
Count Method: Community services are counted in the data set as single prevention services. Count the number of attendees who participated in the event, not the recipient of the
event (e.g., count the number of youth repairing the buildings, not the number of buildings repaired). Record the service population and the demographics.
STA07 - Youth/Adult Leadership Functions
Services through which youth/adult role models work with youth to help prevent substance abuse. Examples are:
• Tutoring programs
MDS User Manual
10
©KIT Solutions® 2011
•
•
•
•
Coaching activities
Adult mentoring programs
Adult-led youth groups
Youth/peer mentoring programs
Count Method: Youth/adult leadership services are counted in the data set as a single prevention service. If the service meets the definition of recurring, count as a recurring
prevention service. Record the service population and the demographics.
*Note: A mentoring program is defined as a relationship over a prolonged period of time between two or more people in which the older, wiser, more experienced individual(s) provide stable, as-needed support,
guidance, and concrete help to the younger, at-risk person(s).
MDS User Manual
10
©KIT Solutions® 2011
Strategy: Problem Identification And Referral
Problem identification and referral aims to classify those who have indulged in illegal or age- inappropriate use of tobacco or alcohol and those who have indulged in the
first use of illicit drugs, and to assess whether their behavior can be reversed through education. It should be noted, however, that this strategy does not include any
function designed to determine whether a person is in need of treatment.
Types of services conducted and methods used for implementing this strategy include the following: employee assistance programs, student assistance programs, and
DUI, DWI, and MIP programs.
STP01 - Employee Assistance Programs
Services intended to provide substance abuse information for individuals whose substance abuse-related problems may be interfering with work performance. Examples
are:
• Workplace prevention education programs
• Risk reduction education for work-related problems involving substance abuse
• Health education and health promotion programs for employees
• Supervisor training
• Workplace policy development
• Screening for referral
Count Method: Employee assistance programs are counted in the data set as single prevention services. If the service meets the definition of recurring, count as a recurring
prevention service. Record the service population and the demographics.
STP03 - Student Assistance Programs
Structured prevention programs intended to provide substance abuse information for students whose substance abuse may be interfering with their school performance.
Examples are:
• Early identification of student problems
• Referral to designated helpers
• Follow-up services
• In-school services (e.g., support groups)
• Screening for referral
• Referral to outside agencies
MDS User Manual
10
©KIT Solutions® 2011
•
School policy development
Count Method: Student assistance programs are counted in the data set as single prevention services. If the service meets the definition of recurring, count as a recurring
prevention service. Record the service population and the demographics.
STP05 - DUI/DWI/MIP Programs
In states that count DUI/DWI/MIP programs as a prevention service. Structured prevention education programs intended to change the behavior of youth and adults who
have been involved in the use of alcohol and/or other drugs while operating a motor vehicle. Examples are:
• Alcohol-related highway traffic safety classes
• Alcohol and other drug awareness seminars
• Court-mandated alcohol and other drug awareness and education programs (includes NIEP)
Count Method: DUI/DWI/MIP programs are counted in the data set as recurring prevention services. Record the service population as People Using Substances (Service
Population Code SP16). Record the demographics.
STP06 - Prevention Assessment and Referral Services
Refers to those activities intended to provide a risk screening, assessment, and referral to prevention service populations for placement in prevention or other appropriate
services.
Count Method: Prevention assessment and referral services are counted in the data set as single prevention services. Record the service population and the demographics.
STP07 – Tobacco Court Mandated Programs for Youth
Structured prevention education programs intended to change the behavior of underage youth who have been involved in the use of tobacco and subsequently mandated
by someone in authority to attend a tobacco diversion program.
Count Method: Count as either single or recurring (depending on which definition fits). Record the service population as People Using Substances (Service Population
Code SP16). Record the demographics.
MDS User Manual
10
©KIT Solutions® 2011
Strategy: Community-Based Process
Community-based process strategies aim to enhance the ability of the community to more effectively provide substance abuse prevention. Services in this strategy
include organizing, planning, and enhancing the efficiency and effectiveness of services implementation, interagency, collaboration, coalition building, and networking.
Types of services conducted and methods used for implementing this strategy include the following: Accessing, services and funding, assessing community needs,
community/volunteer services, community teams, community team activities, training services, and technical assistance.
STC01 - Accessing Services and Funding
Assisting states and communities in increasing or improving their prevention service capacity by developing resources to support those services. Examples are:
• Developing and maintaining a resource listing of Federal, state, and local funding programs
• Accessing and coordinating Federal, state, and local grants
• Developing program budgets
Count Method: Accessing services and funding activities are counted, using the Number of Units field, each time a resource is developed or maintained or a grant or budget is
submitted. They are counted as the number of resources developed or maintained or the number of grants or budgets submitted. Count as a single prevention service. Record the
service population. Demographic tracking is not applicable to this service type.
STC02 - Assessing Community Needs
Implementing prevention-focused tasks to determine the need for prevention services, identify at-risk and high-risk populations, or determine priority prevention
populations for service delivery. Examples are:
• Conducting/participating in statewide prevention needs assessments
• Conducting community prevention needs assessments
• Conducting neighborhood needs assessments
Count Method: Assessing community needs is counted in the data set, using the Number of Units field, as the number of needs assessments conducted. Count as a
single prevention service when it is completed. Record the service population as General Population (SP10). Demographic tracking is not applicable to this service type.
STC03 - Community/Volunteer Services
Structured prevention activities intended to impart information and teach organizational development skills to individuals or community groups. Examples are:
• Community volunteer services
• Action planning for community decision-makers
MDS User Manual
10
©KIT Solutions® 2011
•
•
Multicultural leadership mobilization activities
Neighborhood action services
Count Method: Community/volunteer services are counted in the data set as a single prevention service. Record the service population and the demographics of the people who
received the community/volunteer service.
STC04 - Formal Community Teams
Formalized community organizations concerned with fostering common interests and advocacy for prevention services. Examples are:
• Regular and ongoing participation in interagency councils or multi-agency task forces
• Alliances
• Coalitions
• Groupings of citizens, including youth, who promote healthy communities, families, schools, and activities
Count Method: Community teams are counted in the data set, using the Number of Units field, and are recorded only one time once the formal community team is formed. Count
as a single prevention service. Record the service population as not applicable (Service Population Code SP99). Demographic tracking is not applicable to this service type.
*Note: Activities that teams conduct or engage in are counted under Community Team Activities (see below).
SCT05 - Community Team Activities
Activities or services conducted with or sponsored by formalized community teams for the purpose of fostering, supporting, or enhancing community prevention services.
Examples are:
• Multi-agency coordination and collaboration
• Community mobilization events
• Development or implementation of action plans
• Civic advocacy
• Joint planning or programming between two or more agencies or organizations
• Development of interagency or multi-agency cooperative agreements to provide prevention services
Count Method: Community team activities are counted in the data set, using the Number of Units field, as single or recurring (depending on which definition they fit) prevention
services and are recorded as the number of sponsored events. Record the service population. Demographic tracking is not applicable to this service type.
*Note: Count formal community teams under Community Teams (see above).
MDS User Manual
10
©KIT Solutions® 2011
STC06 - Training Services
Delivering structured substance abuse prevention training events intended to develop proficiency in prevention program design, development, and delivery skills. (General public
education or being a guest speaker at a training delivery is not included in this set of services and should be counted under Speaking Engagements under the Information
Dissemination strategy). Examples are:
• Developing prevention training curricula
• Conducting prevention training programs
• Training of trainers
• Other formal skill-building activities
Count Method: Training services are counted in the data set by the agency or individual who conducted the training. Count as a single prevention service . If the service meets the
definition of recurring, count as a recurring prevention service. Record the service population and the demographics.
STC08 - Technical Assistance Services
Services provided by professional prevention staff intended to provide technical guidance to prevention programs, community organizations, and individuals to conduct,
strengthen, or enhance activities to promote prevention. Services recorded under this Service Type Code should be viable technical assistance that will lead to a final
product. Examples are:
• Addressing cultural competence
• Developing an action plan/capacity building
• Quality assurance and improvement
• Conducting evaluations
• Adding programs and services
• Developing funding and resources
• Providing professional expertise
• Organizational development
*Note: Technical assistance involving the environmental strategy is recorded under the Environmental Consultation to Communities Service Type Code.
MDS User Manual
10
©KIT Solutions® 2011
Count Method: Technical assistance services are counted in the data set as single prevention services. If the service meets the definition of recurring, count as a
recurring prevention service. Record the service population and the demographics.
*Note: Attendance at professional meetings is not recorded in the data set.
STC10 - Systematic Planning Services
Structured services that help states and communities to identify prevention needs, assess existing prevention services, set priorities, and allocate prevention resources
systematically, based on objective needs assessments. The specific plan is the product to be counted. Examples are:
• Agency/provider strategic plan
• Community team/organization plan
• Block grant plan
• State prevention plan
*Note: If a state wants to be able to count this service, it must define the specific product or services.
Count Method: Systematic planning services are usually counted in the data set as single prevention services using the Number of Units field. Demographic tracking is
not applicable to this service type.
Strategy: Environmental
The environmental strategy establishes or changes written and unwritten community standards, codes, and attitudes, thereby influencing the incidence and prevalence of
the abuse of alcohol, tobacco, and other drugs by the general population. This strategy is divided into two subcategories to permit distinction between activities that
center on legal and regulatory initiatives and those that relate to service- and action-oriented initiatives.
Types of services conducted and methods used for implementing this strategy include the following: Environmental consultation to communities; preventing underage
sale of tobacco and tobacco products—Synar amendment; preventing underage alcoholic beverage sales, establishing ATOD-free policies; changing environmental
codes, ordinances, regulations, and legislation; and public policy efforts.
STV01 - Environmental Consultation to Communities
Consultation or guidance intended to maximize the development and/or enforcement of substance abuse norms and standards. Examples are:
• TA to Initiatives to Mobilize People for the Control of Tobacco Use (IMPACT)
• TA to the American Stop Smoking Intervention Study (ASSIST)
• TA to communities in monitoring enforcement of laws relative to the sale of alcohol or tobacco to minors
• TA to develop drug-free workplaces
MDS User Manual
11
©KIT Solutions® 2011
•
TA in developing drug-free school zones
Count Method: Environmental technical assistance to communities is counted. Record the service population. Demographic tracking is not applicable to this service
type.
STV02 - Preventing Underage Sale of Tobacco - Synar Amendment
Activities intended to prevent the sale of tobacco and tobacco products to minors. They are also intended to track activities that meet the block grant requirements under
the Synar amendment. Examples are:
• Conducting compliance activities
• Vendor education
• Law enforcement education
Count Method: Preventing underage sale of tobacco and tobacco products activities is counted in the data set, using the Number of Units field, as a single prevention service (e.g.,
conducting compliance activities). If the service meets the definition of recurring (e.g., 6-week vendor education) count as a recurring prevention service. Record the service
population. Demographic tracking is not applicable for compliance activities, but is applicable for other education activities.
STV03 - Preventing Underage Alcoholic Beverage Sales
Activities intended to prevent the sale of alcoholic beverages to minors. They are also intended to track activities such as placing signs (e.g. about drinking and pregnancy) in bars,
restaurants, and other establishments and efforts to educate vendors and law enforcement personnel about these issues. Examples are:
• Social host training and management programs
• Commercial host training and management programs
• Holiday campaigns and special events
• Server education programs
• Signage activities
• Law enforcement education
• Vendor carding
• Working with alcohol beverage vendors (e.g., bars, restaurants) to reduce the sale and consumption of alcoholic beverages by minors
MDS User Manual
11
©KIT Solutions® 2011
Count Method: Preventing underage alcoholic beverage sales activities is counted in the data set, using the Number of Units field, as a single prevention service. If the
service meets the definition of recurring, count as a recurring prevention service. Record the service population. Demographic tracking is not applicable to this service
type.
STV04 - Establishing ATOD-Free Policies
Activities intended to establish places of education and workplaces free of ATOD products and use. These activities track efforts to establish or enhance school and
workplace policies regarding ATOD use. Examples are:
• Establishment of drug-free school zones
• Establishment of drug-free workplaces
• School use policies and procedures (passed or improved)
• Business/workplace use policies and procedures (passed or improved)
• Tobacco use policy (passed or improved)
Count Method: Establishing ATOD-free policies activities is counted in the data set, using the Number of Units field, as a single prevention service. If the service meets the
definition of recurring, count as a recurring prevention service.. Record the service population. Demographic tracking is not applicable to this service type.
STV05 - Changing Environmental Codes, Ordinances, Regulations, and Legislation
Efforts intended to change environmental codes, ordinances, regulations, or other laws to reduce the availability of access to, or incidence or prevalence of abuse of
ATOD. Examples are:
• Zoning ordinances to prohibit new alcohol outlets
• Zoning ordinances to reduce the number of existing outlets
• Drinking-in-public ordinances (passed or improved)
• State Alcoholic Beverage Control (ABC) regulations (passed or improved)
• Other local control powers (passed or improved)
• Prevention efforts aimed at state legislatures
• Prevention efforts aimed at city and county officials
Count Method: Changing environmental codes, ordinances, regulations, or other legislation is counted in the data set, using the Number of Units field, as a single prevention
service. If the service meets the definition of recurring, count as a recurring prevention service. Record the service population. Demographic tracking is not applicable to this service
type.
MDS User Manual
11
©KIT Solutions® 2011
STV06 - Public Policy Efforts
Activities intended to reflect efforts to change public policy about ATOD. Examples are:
• Managing advertising campaigns
• Public policy campaigns to change product pricing
• Public policy campaigns to change the location of alcohol and tobacco products to reduce accessibility to minors
• Conducting public policy campaigns (e.g., warning campaigns, health and safety campaigns)
• Developing uniform law enforcement policies within a jurisdiction or a series of surrounding jurisdictions to provide a community standard in the management of
underage drinking and smoking, and related behaviors
Count Method: Public policy change activities are counted in the data set, using the Number of Units field, when the campaign is completed. Count as a single prevention service.
Record the service population. Demographic tracking is not applicable to this service type.
MDS User Manual
11
©KIT Solutions® 2011
User-Defined Fields
User-Defined Fields (UDFs) are fields added or deleted by an Administrator. They may include entities such as funding source, hours of direct service, hours of indirect
service, and curriculum used. Clicking on UDFs will take you to the Administrative Data Entry: User Defined Fields screen.
Pre-defined user-defined fields are indicated in gray type and cannot be altered. However, you may hide or show a pre-defined UDF in your state's data entry form by
using the “Visible?” setting. Select the “Yes” option if you wish to use the pre-defined UDF, select “No” if you do not.
To create a new User-Defined Field for your state, type the name for field in the appropriate “Field Title” text box. States and agencies have used these codes for many
purposes. For example, a funding code can be used to enter in the primary source of funding for the activity, and reports can then be generated which break down the
activities by funding sources.
The first seven UDFs are set in MDS and cannot be modified. These are:
1. Primary Risk/Protective Factor [Yes/No] - Determines whether the Risk and Protective Factors entered in are displayed and selectable by the user (see next section for these
categories).
2. Secondary Risk/Protective Factor [Yes/No] - Determines whether the Risk and Protective Factors entered in are displayed and selectable by the user as a secondary risk
factor.
3. IOM Category [Yes/No] - Determines whether or not the user must select an Institute of Medicine (IOM) category (indicated, selected, and universal). Universal prevention
measures are desirable for everyone in the eligible population, both general and specific groups. Often such measures can be applied without professional advice or assistance.
The benefits outweigh the risks and costs for everyone. Examples of universal prevention include use of seatbelts, a good diet, avoidance of smoking, immunization. Selected
prevention is desirable only when the individual is a member of a subgroup whose risk of becoming ill is above average. Subgroups can be based on age, gender, occupation, or
family history. An example of selective prevention would be immunization against yellow fever for some travelers; another is breast cancer examinations at young ages for those
with a family history of breast cancer. Indicated prevention is for persons who have a risk factor, condition, or abnormality that places them at high risk for future development of the
disease. Examples are various screening programs for particular diseases, e.g., HIV testing and needle exchange programs for injection drug users.
4. Funding Source [Yes/No] - Determines whether the user will be required to type in the funding source for the service provided. If you require your service providers to supply
this information you should provide them with a coding chart so that the information will be consistently entered. The entry is not checked against a pick list, and your data may
need to be reviewed and cleaned up to obtain accurate counts of the services for a particular funding source.
5. Hours of Direct Service [Yes/No] - Determines whether the user will be required to enter in the number of hours for direct service associated with the service being entered.
6. Hours of Indirect Service [Yes/No] - Determines whether the user will be required to enter in the number of hours for an indirect service associated with the service being
entered (used to track indirect time and effort required to render a service).
7. ZIP Code [Yes/No] - Determines whether the user will be required to supply the zip code where the service was provided.
MDS User Manual
11
©KIT Solutions® 2011
Risk or Protective Factors
The Risk or Protective Factors list is used within the User-Defined Fields for fields 1 and 2. These can be turned on and off, depending on the needs of your State or
agency. This list is used to identify the primary and secondary risk or protective factors that the intervention is attempting to affect. The Center for Substance Abuse
Prevention has identified a set of these factors, based on scientific research. Your state or agency may have modifications of this set, or add to the set, based on the
state or agency priorities and local conditions.
These can be used to generate reports based on the factors, or the data can be downloaded for more detailed cross-tabulation reports on risk or protective factors with
other categorizations of the data.
RPF Codes can be up to ten characters long. You can also enter an optional sub-factor into the “Sub-factor” text field. This data could be used in analysis for breaking
out the primary factors and their contributing sub-factors, for example when evaluating the outcome of a program compared to the implementation.
MDS User Manual
11
©KIT Solutions® 2011