1
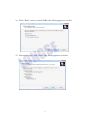
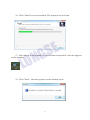
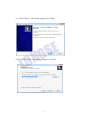
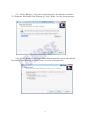
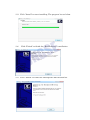
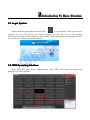
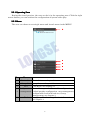
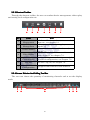
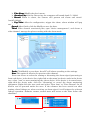
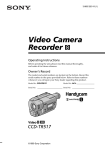
G
N
E
S
Software Manual
O
L
Contents
1 Software Installation------------------------------------------------------------------------------------- 1
1.1 Overview--------------------------------------------------------------------------------------------- 1
1.2 Software Installation----------------------------------------------------------------------------- 1
2 Introduction To Basic Function----------------------------------------------------------------------- 8
2.1 Login System----------------------------------------------------------------------------------------8
2.2 CMS Operating Interface------------------------------------------------------------------------ 8
E
S
2.2.1 Operating Zone----------------------------------------------------------------------------- 9
2.2.2 Menu-------------------------------------------------------------------------------------------9
G
N
2.2.3 Shortcut Toolbar-------------------------------------------------------------------------- 10
2.2.4 Screen Division And Polling Tool Bar---------------------------------------------- 10
O
L
2.2.5 Zoom Toolbar------------------------------------------------------------------------------ 11
2.2.6 Message Prompt Box-------------------------------------------------------------------- 12
3 Configuration Management-------------------------------------------------------------------------- 13
3.1 Device Management----------------------------------------------------------------------------- 13
3.1.1 Zone Add, Modify, Delete---------------------------------------------------------------13
3.1.2 Manually Add----------------------------------------------------------------------------- 13
3.1.3 Online Device Detect-------------------------------------------------------------------- 14
3.1.4 Front-end Device Parameter Settings Management--------------------------- 15
3.1.5Remote Configuration--------------------------------------------------------------------17
3.2 Schedule Configuration-------------------------------------------------------------------------18
3.3 Alarm Linkage Plan Configuration--------------------------------------------------------- 19
3.4 Configuration Lead-in And Lead-out------------------------------------------------------- 21
3.4.1 Configuration Lead-in-------------------------------------------------------------------21
3.4.2 Configuration Lead-out----------------------------------------------------------------- 21
3.5 Group Management----------------------------------------------------------------------------- 21
4 Tools--------------------------------------------------------------------------------------------------------- 24
4.1 Log Management--------------------------------------------------------------------------------- 24
4.2 Remote Replay Back-----------------------------------------------------------------------------24
4.2.1 Remote Video Retrieval----------------------------------------------------------------- 25
4.2.2 Remote Video Control------------------------------------------------------------------- 26
4.3 Version Information----------------------------------------------------------------------------- 26
5 PTZ---------------------------------------------------------------------------------------------------------- 27
E
S
5.1 PTZ Setup------------------------------------------------------------------------------------------ 27
------------------------------------------------------------------------------------------ 28
6 Picture Preview
Preview------------------------------------------------------------------------------------------
G
N
6.1 Watching Video----------------------------------------------------------------------------------- 28
6.1.1 Free View Model-------------------------------------------------------------------------- 28
O
L
6.1.2 Right Menu---------------------------------------------------------------------------------29
6.1.3 Play In Groups---------------------------------------------------------------------------- 29
6.1.4 Polling Play In Groups------------------------------------------------------------------ 30
6.2 Manual Capture And Record------------------------------------------------------------------30
6.2.1 Manual Capture-------------------------------------------------------------------------- 30
6.2.2 Manual Record---------------------------------------------------------------------------- 30
------------------------------------------------------------------------------------------------- 31
7 LNK Tools
Tools------------------------------------------------------------------------------------------------7.1 Status Of Record Channel--------------------------------------------------------------------- 31
7.2 Record Playback---------------------------------------------------------------------------------- 31
7.2.1 Introduction Of Play Back Interface------------------------------------------------ 31
7.2.2 Record Search----------------------------------------------------------------------------- 32
7.2.3 Playback Control------------------------------------------------------------------------- 33
7.3 Local Configuration------------------------------------------------------------------------ 33
7.4 Log out---------------------------------------------------------------------------------------------- 34
1Software Installation
1.1 Overview
This software is a powerful Central Control Software. The system is distributed
framework with more windows, multiple previews, video recording, local and remote
review, log query, alarm playback and remote configuration. The user interface is
friendly; operation is simple and it is convenient to conduct authority settings.
The software can applied on the connection of different type or model devices ( For
example, NVR, IPCAM etc.). This manual focuses on the software operation and takes
NVR’s connection as the example. As for the specific device’s function setting, please
check the relative instruction. This manual is for the person who is in charge of
plan,execution or review the monitor, and the hardware installation. So the person
should be equiped with basic operation knowledge and experience of the relative
devices( such as NVR, IPCAM etc.)
O
L
E
S
G
N
1.2 Software Installation
Find out and double click the file "CMS5.1.27.2.exe", and then the dialog pops up as below.
(1)choose the system language you need, click "Next", the dialog appears as
below.
1
(2)Input the user information, click "Next", the dialog appears as below.
O
L
E
S
G
N
(3)Click "Browse", select the install location, the default location is
"C:\Program Files\HeroSpeedCMS", click "Next", see the below picture.
2
(4)Click "Next", start to install CMS, the dialog appears as below.
O
L
E
S
G
N
(5)Choose the type, click "Next", the dialog appears as below.
3
(6)Click "Install" to start installing. The progress bar as below.
O
L
E
S
G
N
(7)After finish, it will remind you "Initialization completed", then the appears
on the desktop.
(8)Click "Next" , then the appears on the desktop again .
4
(9)Click "Next" , the dialog appears as below.
O
L
E
S
G
N
(10) Click "Next" , the dialog appears as below.
5
(11)Click "Browse", select the install location, the default location is
"C:\Program Files(x86)\Dvr Webocx p", click "Next", see the below picture.
O
L
E
S
G
N
(12)Click "Browse", select the Start Menu install location, the default
location is "Dvr Webocx p", click "Next", see the below picture.
6
(13)Click "Install" to start installing. The progress bar as below.
E
S
G
N
(14) Click "Finish" to finish the “Dvr Webocx p” installation.
O
L
(15)Click "Finish" to finish the Herospeed CMS installation.
7
2 Introduction To Basic Function
2.1 Login System
After finish the installation double click “
”on the desktop. The log-in screen
appears. In the first log-in, you should register a user, the user is the system
administrator with all the authority. You should set the user name and password (such
as, user name: admin, password: admin).
O
L
E
S
G
N
2.2 CMS Operating Interface
After finish the user name and password, click "OK", then enter the Operating
Interface as below picture.
8
2.2.1 Operating Zone
During the visual preview, the user can do it in the operating zone. Click the right
mouse button, you can conduct the configuration of system video play.
2.2.2 Menu
The user can choose to set single menu and its sub-menu in the MENU.
1
O
L
E
S
G
N
2
3
4
5
No.
Name
Note
1
Device List
Device List, see chapter 6.1
2
Group List
group list, see chapter 6.1
3
PTZ
PTZ Menu, see chapter 5.1
Configuration Device Management, Time-table configuration,
management Linked preplan configuration, user management,
4
configuration lead-in & lead-out, Group
management, see chapter 3
5
Tool
Log Query, Batch setting, Version information,
see chapter 4
9
2.2.3 Shortcut Toolbar
Through the shortcut toolbar, the user can conduct device management, video replay
and setting local configuration etc.
1
No.
2
3
Name
Device
Management
Group
Management
1
2
3
O
L
Video Replay
Basic
Configuration
5
6
Log Out
Alarm
Configuration
7
5
6
7
E
S
Note
Include mobile detect alarm, screen mask
alarm etc., see chapter 3.1.
polling group play and group play see
chapter 3.5
Present all the running video channel,see
chapter 7.1.
Pop up local replay of common video and
alarm displayer, see chapter 7.2.
The modify of parameter and password of
the system configuration, see chapter 7.3.
G
N
Video Channel
4
4
The user’s log out, see chapter 7.4.
Equipped with terminal alarm function.
2.2.4 Screen Division And Polling Tool Bar
The user can choose the quantity of monitoring channels and to set the display
mode.
1
2
3
10
4
5
6
No. Name
Note
Scanning real-time and smooth level
setting.
Switch to Full Screen, see chapter
6.1.1.
1
Scanning Grade
2
Full Screen
3
Split Screen Control Multi-screen preview, see chapter 6.1.1.
4
Play Mode Switch
5
Polling Pause
6
Polling Recover
2.2.5 Zoom Toolbar
O
L
Video freely scan mode and video
display group polling mode, see chapter
6.1.
During the visual polling, the polling
can be paused.
E
S
During the polling pause, the polling can
be recovered. See chapter 6.1.4.
G
N
By the Zoom Toolbar, the user can zoom preview zone, take video and picture.
1
No.
1
2
3
4
5
6
2
3
4
5
6
Name
Note
Enlarge the place you click on the preview
Enlarge
screen, see chapter 6.1.1.
Narrow the place you click on the preview
Narrow
screen, see chapter 6.1.1.
Voice
Voice Menu
Video
Record the video, see chapter 6.2.2.
Picture Take the picture on the screen, see chapter6.1.1
Shutdown 5.2.1.
Shut down the channel, see chapter 6.1.1.
11
2.2.6 Message Prompt Box
The massage prompt is as the below picture. During the configuration and
operation, the system will record operating information automatically and prompt with
Message Prompt Box.
O
L
E
S
G
N
12
3Configuration Management
3.1 Device Management
O
L
E
S
G
N
Before the software operation, you should add the device and make the
configuration. Click the Log Query on "Tool" of menu, then the device management
interface comes out as below picture:
3.1.1 Zone Add, Modify, Delete
Right click on the junction point of zone, choose the "Add Zone" on the pop-up menu,
then fill in the Zone Name, then click to finish the zone adding.
Note: right click the zone, "Delete Junction Point", "Modify Name" means to delete
the junction point and modify the name.
3.1.2 Manually Add
Click the "Configuration Management" on the menu, open the window of "Device
Management", choose the "Device List", then the sub-menu "Manual Add" of "Add New
Video Device", as below picture:
13
First: Open Add Device window.
Second: Fill the Device Name, Type and IP information. After filling, click to
confirm the add.
Third: After the add, go back to the main window, now you can double click the
device channel to see the video.
�
�
�
�
E
S
G
N
Device Name: Randomly fill, just as the device Identifier.
Device Type: You can choose DVS、NVR、IPCAM etc.
Device IP: IP address of the video server to be connected.
Channel Quantity: The quantity of video server channels.
O
L
3.1.3 Online Device Detect
1. Click the "Configuration Management", open the window "Device Management",
choose the "Device List" and right click, then sub-menu "Online Search" of "New Video
Device", as the below picture:
14
2. After the Query, choose the device you need to add and select the number of the
front box, then click the " choose device " to confirm.
O
L
E
S
G
N
3.1.4 Front-end Device Parameter Settings Management
Click the device name in the device management, as the below picture:
You can modify the parameters like Device Name, Port No., and User
Name/Password etc. The default port No. is 554, and the default http port No. is 80.
15
Click the channel in the device management, as the below picture:
O
L
G
N
E
S
UDP/TCP Network
transmission protocol choice
1
Modify the channel name.
2
3
Channel data rate mode
choice.
4
Time of auto-record choice.
5
Mobile detect plan choice.
6
Rtsp port
7
Link Type choice.
8
16
3.1.
5Remote Configuration
3.1.5
Open "Device Management", select any device from the device list on the left, then
right click to select the menu of remote configuration.You can also click the remote
config on the right.
O
L
E
S
G
N
DVR, for example,Choose the device of DVR, click "remote config ", then enter the
Operating Interface as below picture.
Note: the related operations is the same as the web operations of DVR. As for the
specific device’s function setting, please check the relative instruction.
17
3.2 Schedule Configuration
Schedule is applied on the period of auto-record, you can choose the time to record
by your own choice. The operation is like this:
First: Click the "Configuration Management", open the "Schedule Configuration"
window
Second: Choose the time to record by your own will.
O
L
E
S
G
N
Third: Schedule Associated Camera.
A Batch of associated camera, choose
plan for the cameras.
18
, make the recording
Single camera associated schedule, open "device management", choose a video
channel, and select the schedule to be set in " Auto-record" (If you chose the time
regulation, the system will obey the regulation to record automatically).
O
L
E
S
G
N
Note: This option is effective for preview video channel.
3.3 Alarm Linkage Plan Configuration
Alarm Linkage offers many alarm prompt methods, the operation is as below:
First: Click the "Configuration Management" on the menu bar, open "Linkage Plan
Configuration" to install the alarm linkage.
19
� Plan Name: Modify the plan’s name.
� Sound to Play: Set the alarm ring, the computer will sound.(rank: 5~1200s)
� Record: When it alarm, the camera will present red alarm and record.
(rank:5~3600s)
� Pop Video: After the configuration, trigger the alarm, alarm window will pop
out.
Second: After finish, click the Modify to save the data.
Third: Video channel associated plan, open "device management", and choose a
video channel, manage the plan according with the alarm mode.
O
L
E
S
G
N
Forth: Click Modify to save data, then PC will alarm according to the settings.
Note: This option is effective for preview video channel.
Users can choose to select the arming or disarming the alarm signal processing to
front-end device, in the device list, right-click on the menu bar device node in the device
tree, select "arm" to start monitoring the alarm device, if the device is in armed state,
right-click the device node, click the "disarming" to cancel the alarm monitoring
equipment. Right-click the zone nude and select "Zone Arm" or "Zone Disarm" for all
devices can be operated under the zone. If the software has been carried out after
arming alarm linkage set, when receiving an alarm signal, it will trigger the relevant
linkage operation. Software restart, armed state will revert to the state before the
shutdown.
20
4 Configuration Lead-in And Lead-out
3.
3.4
4.
1 Configuration Lead-in
3.
3.4.
4.1
Click "Configuration Management" on the menu bar; open the "Configuration
Lead-in and Lead-out ", select "Data Lead-out" to lead-out the configuration file "
SysConfig.conf " to the given content.
Note: " SysConfig.conf " cannot be modified, or the lead-in will fail.
4.2 Configuration Lead-out
3.
3.4
Click "Configuration Management" on the menu bar; open the "Configuration
Lead-in and Lead-out ", select "Data Lead-out" and choose "SysConfig.conf" file. If
succeeded, the data will be effective in the next restart of the Client.
5 Group Management
3.
3.5
E
S
G
N
The software supports polling group play and group play. Before the polling play,
the device should be added and set well.
Click the Device Management; select the group management, as below picture:
O
L
21
The left side is the added device list, the right side group list, the four button’s
function is as below:
Button
Note
Add the selected channel to one group.
Selected channel will be deleted from group. When
you click a group name, click the button, and then the
entire group will be emptied.
The channel Moves up to one position in the group
when the channel is at the top, the button is gray, and
this function is unavailable.
The channel Moves down to one position in the group,
when the channel is at the bottom, the button is gray,
and this function is unavailable.
E
S
G
N
The user Right-clicks group name in the pop-up menu, select "Edit Group", then
dialog box pops up as follows.
O
L
This is the explanation to the box:
Option
Note
Device Group
User defines group name.
Pause Time
Preview display time of the packet polling.
Division Quantity
Polling permission
Show the total number of the split-screen
when group play, the number is generally
consistent with the total number of channels.
channels, the maximum is 64.
Select this option allows the group to
participate in the given polling packet, the
group must supports polling play.
22
When you add a channel to a group, first need to click the group name to be added,
then select the channel be added from the list of devices and then click
.
When you want to removed it from the channel group, first need to select the channel
and then click
, or right-click the channel name, then select "Delete
channel" to delete the channel from the pop-up menu.
Skill: When user need to delete all channels under a group, just click the group
name and then click
, you can right-click the group name and then select
E
S
"Delete Group" to empty a group in the pop-up menu.
O
L
G
N
23
4 Tools
4.1 Log Management
Enter the "Tools" of menu bar and click "Log Search" interface, set the period of the
log to be queried, select the mode and sub-mode of the log, click search, then the log will
come out, as below picture:
O
L
E
S
G
N
2 Remote Replay
4.2
4.
Enter the "Tools" menu on menu bar and click "Remote Replay Back" on the pop-up
interface, as shown in this screen, you can view the video stored in NVR device.
24
G
N
E
S
Introduction to the Remote Replay Interface:
Zone
1
3
5
O
L
Note
Remote Replay window
Select time of Remote
Replay
Control bar of playing
Zone
2
4
6
Note
Device list
File Type Choice
List of Search results
2.1 Remote Video Retrieval
4.
4.2
First: Select the date to be played back;
Second: Select the desired channel playback;
Third: Fill NVR device's IP address;
Forth: Fill NVR device TCP port;
Fifth: Click the Search button to retrieve NVR video files, if the channel video files
exist on that day, the search results will appear in the search results list area. At this
time select a window, double-click the video to watch the video search results in the
NVR device.
25
4.
2.2 Remote Video Control
4.2
1
2
3 4 56 7
8
9 10 11 12 13
Introduction to the Remote Video Control:
NO.
Function
NO.
Function
1
Hide file list area
2
Voice
3
Play
4
Pause
5
Stop Play
6
Video editing
8
Speed control
10
1 split scree
12
Full screen
Picture-shoot
9
All stop
O
L
11
4 split scree
13
Hide workplace
4.
3 Version Information
4.3
E
S
G
N
7
Enter the "Tools" menu on menu bar and click "Remote Replay" on the pop-up
interface,The Version Information of CMS software is seen in the below picture:
26
5PTZ
5.1 PTZ Setup
Click the "PTZ" menu on the menu bar , it will show us as below picture:
O
L
E
S
G
N
1
2
3
4
Introduction to the PTZ Control:
NO.
Function
NO.
Function
1
steering controls
2
Zoom
3
Focus
4
Iris
� Click or press on any "
" button on the steering controls ,you can change the
direction of the PTZ camera.
� Click"+"or "-"button on the zoom menu ,you can adjust the scenery near and far.
� Click"+"or "-"button on the Focus menu ,you can adjust the sharpness of the picture.
� Click"+"or "-"button on the Iris menu ,you can control through the lens of the light.
27
6Picture Preview
Click the device list of the main menu, it will show us the device list Currently.
O
L
6.1 Watching Video
6.1.1 Free View Model
E
S
G
N
� Double-click the channel to play: Select one Play Window of the Video-viewing area,
the channel will play in the Play Window. Under the Spilt Screen Preview Model, it
will be shown as full screen when we double-click any preview frame and it will be
restored when double-click again. The currently channel can be stopped by clicking
the“ ”on the top right corner.
� Click the right key to play: Select any play window of the video-viewing area, right
key the channel of the device tree, and then select "Open to Preview", the channel
will play in the play window.
� Drag the channel to play: Select any channel of the device tree then hold down the
mouse and the channel will start playing when it is dragged to any play window in
the view area.
� Multichannel Preview: Select the Picture-division LNK tool in the Picture-division
, the
and the Polling toolbar
frame can be displayed in 1, 4, 8, 9, 13 and 16 channels.
� Picture Zoom: We can adjust the scaling of digital and number by clicking the
button of zoom in and zoom out
in preview window.The scaling can be
adjusted by rolling the roller under the model of Number zooming out.
28
6.1.2 Right Menu
Select any play window in the video-viewing area, the user can do the following by
right-clicking.
E
S
� Stream Switching: The main stream, stream 2 and stream 3 can be chosen to
preview.
� Picture zoom in: Set the current channel as digital zoom in or number zoom in, the
default is number zoom in.
� Capture: Capture the current time and the picture of the current channel, save it to
the disk.
� Start Recording: Record the current channel and save it to the disk.
� Stream: Show the flow of the preview channel.
� Color Set: Make the color configuration of the current channel and the brightness,
the contrast, the saturation and the sharpness.
� Stop play: Close the frame of all channel.
� Show as original scale: Zoom in pictures as the original scale.
� Show the title bar of all windows: Show the title bar of all windows.
O
L
G
N
6.1.3 Play In Groups
Click the " Device List " , show the device in groups.
29
Right-click the menu to play: Select any play window of the view area.Then
right-click any group of the device list to select " Play in groups " .The group will start to
play the channel of it in turn.
Drag the play group: Select a group in the group list, hold down the mouse button
down, and drag it to view a play area in the window, the packet will change the
playback window to start playing the packet channel in turn.
6.1.4 Polling Play In Groups
Start polling: Click the real-time panel “
”to switch the play model to" Polling
view model ", then the software will polling all groups set as polling with permission in
turn.
Polling Pause/Restore: Click “
” in the real-time panel, the software will pause
polling. After pause, the button will change into"
". Click the button again and it will
restore the polling in groups.
Polling Finish: Click the "Play Model" then select the "Free view model",it will
finish polling."Polling Restore". Click the button again and it will restore the polling in
groups.
Polling Finish: Click the "Play Model" then select the "Free view model", it will
finish polling.
O
L
E
S
G
N
6.2 Manual Capture And Record
6.2.1 Manual Capture
� Title capture: Click the capture button
in title bar, it will capture the directly.
� Right-click the menu to capture: Right-click the play window, the context menu will
be pop out, then select "Capture". It will show you "Capture Successful ".
Note: If the network environment is poor, have dropped the case the playback
screen will appear the situation capture failure.
6.2.2 Manual Record
Window Title Video: Right-click the play window record button
in title bar, it
will record the picture directly. At this time the record button becomes , click again to
stop recording. At the same time there will be a red screen "Rec" prompt.
Right-click the menu to record: Right-click the play window, the context menu will
be pop out, then select "Start record". The context menu will become checked, click
again and the record can be stopped.
It will show us "Start Record" and "Finish Record" when we start or finish
recording.
30
7LNK Tools
7.1 Status Of Record Channel
Select
in LNK tool bar of system and then enter the interface of record channel.
It will show us the channel which is recording, the preview stream, the type of record
channel stream, status of record channel, local save address and other messages.
Shown as the following:
O
L
E
S
G
N
7.2 Record Playback
7.2.1 Introduction Of Play Back Interface
Select
in LNK tool bar of system, then enter Record Playback Interface.
31
O
L
NO.
E
S
G
N
Introduction of Playback Interface:
Introduction
NO.
1
Record Playback
2
3
Local record disk
4
5
Play-control bar
6
Introduction
List of device tree
Search Panel
Time line Panel
7.2.2 Record Search
Step 1: Select the window need to playback and then select the channel in device
tree.
Step 2: Select the type of record file and the disk.
Step 3: Select search date.
Step 4: Click
to search record file. Time line will show us the time bucket.
If there are some records in the time bucket, the time line will act as blue. (Alarm
record is red)
If there are some record files on some day, it will replay the record files from the
earliest time.
Step 5: When move the mouse on the timeline, the panel will show the time point.
Click it and positioning records. The display scale of time line can be zoomed in or out
by clicking
in time line.
32
7.2.3 Playback Control
1 2 34 5 6
8
7
8 9 10 11
9 10 11
Introduction of Playback control bar is as the following:
NO. Function
NO. Function
1
Play
2
3
Stop
4
5
Edit
6
7
Speed Adjustment
8
O
L
1 Picture Division
11
Full Screen
7.3 Local Configuration
E
S
G
N
9
10
Pause
Playback
Single Frame
Capture
Full Stop
4 Picture Division
Monitoring Platform allow users to save in different disks. Click "
tool bar and open the basic configuration window to do it.
33
"on the LNK
� Software Configuration: Manage the alarm log, operation log, failure of
video-connection and AUTO Exec.
� Route Configuration: Set the route of remote download, capture and video-editing.
� Record configuration: Set the route of video storage. There are multi-choices to
choose. When it is checked, the monitoring platform will record from the disk which
remains the biggest free space. And when the free space is little than 1024M, it will
record from the next disk as default.
� Single disk reserved space: The free space that single disk can remain.
� Switch time of record: Set the time of every video.(Range: from 10 to 60 minutes)
� Operation of full disk: Choose to finish recording or delete the earliest file.
� Restore the status of preview: When it is checked, the software will start to enter
the preview status quit at last time automatically.
� Capture Display: Preview captures, pictures will be pop out.
� Pop out the alarm window automatically: When the device alarms, the window of
alarm channel will pop out automatically.
� Double click the main stream to preview: Double click the window, we will preview
pictures with the main stream.
7.4 Log out
O
L
E
S
G
N
Select
in LNK tools bar of the system to enter log out interface.Users cannot log
in the system unless the password is input.
34