1
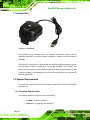
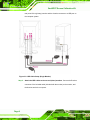
GeniSPOT Screen Calibration Kit
Page i
GeniSPOT Screen Calibration Kit
Revision
Date
Version
Changes
June, 2008
1.01
Changed software interface titles to “MMD
Monochrome Series”
March, 2008
Page ii
1.00
Initial release
GeniSPOT Screen Calibration Kit
Copyright
COPYRIGHT NOTICE
The information in this document is subject to change without prior notice in order to
improve reliability, design and function and does not represent a commitment on the part
of the manufacturer.
In no event will the manufacturer be liable for direct, indirect, special, incidental, or
consequential damages arising out of the use or inability to use the product or
documentation, even if advised of the possibility of such damages.
This document contains proprietary information protected by copyright. All rights are
reserved. No part of this manual may be reproduced by any mechanical, electronic, or
other means in any form without prior written permission of the manufacturer.
TRADEMARKS
All registered trademarks and product names mentioned herein are used for identification
purposes only and may be trademarks and/or registered trademarks of their respective
owners.
Page iii
GeniSPOT Screen Calibration Kit
Manual Conventions
WARNING!
Warnings appear where overlooked details may cause damage to the equipment or result
in personal injury. Warnings should be taken seriously. Warnings are easy to recognize.
The word “warning” is written as “WARNING,” both capitalized and bold and is followed by
text. The text is the warning message. A warning message is shown below:
WARNING:
This is an example of a warning message. Failure to adhere to warning
messages may result in permanent damage to the GeniSPOT or
personal injury to the user. Please take warning messages seriously.
CAUTION!
Cautionary messages should also be heeded to help reduce the chance of losing data or
damaging the GeniSPOT. Cautions are easy to recognize. The word “caution” is written as
“CAUTION,” both capitalized and bold and is followed. The text is the cautionary
message. A caution message is shown below:
CAUTION:
This is an example of a caution message. Failure to adhere to cautions
messages may result in permanent damage to the GeniSPOT. Please
take caution messages seriously.
Page iv
GeniSPOT Screen Calibration Kit
NOTE:
These messages inform the reader of essential but non-critical information. These
messages should be read carefully as any directions or instructions contained therein can
help avoid making mistakes. Notes are easy to recognize. The word “note” is written as
“NOTE,” both capitalized and bold and is followed by text. The text is the cautionary
message. A note message is shown below:
NOTE:
This is an example of a note message. Notes should always be read.
Notes contain critical information about the GeniSPOT. Please take
note messages seriously.
Page v
GeniSPOT Screen Calibration Kit
Packing List
NOTE:
If any of the components listed in the checklist below are missing,
please do not proceed with the installation. Contact the IEI reseller or
vendor you purchased the GeniSPOT from or contact an IEI sales
representative directly. To contact an IEI sales representative, please
send an email to [email protected].
The items listed below should all be included in the GeniSPOT package.
1 x GeniSPOT calibration tool
1 x Utility CD
Images of the above items are shown in Chapter 2.
Page vi
GeniSPOT Screen Calibration Kit
Table of Contents
1 INTRODUCTION.......................................................................................................... 1
1.1 INTRODUCTION .......................................................................................................... 2
1.2 SYSTEM REQUIREMENTS ............................................................................................ 2
1.2.1 Hardware Requirements..................................................................................... 2
1.2.2 Software Requirements....................................................................................... 3
2 UNPACKING ................................................................................................................. 4
2.1 UNPACKING PRECAUTIONS......................................................................................... 5
2.2 PACKAGE CONTENTS.................................................................................................. 5
3 INSTALLATION ........................................................................................................... 6
3.1 INSTALLATION OVERVIEW .......................................................................................... 7
3.2 HARDWARE INSTALLATION ........................................................................................ 7
3.3 DRIVER INSTALLATION ............................................................................................... 9
3.4 GENIPASS INSTALLATION ....................................................................................... 13
4 SOFTWARE CONFIGURATION.............................................................................. 18
4.1 OVERVIEW ............................................................................................................... 19
4.2 STARTING GENIPASS............................................................................................... 19
4.3 USER SETTINGS ........................................................................................................ 20
4.4 AUTO-DIMMING CONTROL....................................................................................... 20
4.4.1 Auto-Dimming Control Setting Wizard ............................................................ 22
4.5 SELECT MONITOR .................................................................................................... 24
4.6 SELECT CONFORMANCE CRITERIA ........................................................................... 25
4.7 PROFILE ................................................................................................................... 26
5 BASIC FUNCTIONS................................................................................................... 29
5.1 OVERVIEW ............................................................................................................... 30
5.2 CONFORMANCE TEST ............................................................................................... 31
5.3 UNIFORMITY TEST ................................................................................................... 32
5.4 LUMINANCE TEST .................................................................................................... 35
5.5 RUN CALIBRATION ................................................................................................... 37
Page vii
GeniSPOT Screen Calibration Kit
5.6 HISTORY LIST........................................................................................................... 38
5.7 SWITCH TO GENIPASS PRO ..................................................................................... 40
5.8 VIEW TEST REPORT .................................................................................................. 41
5.9 ABOUT ..................................................................................................................... 43
6 ADVANCED FUNCTIONS......................................................................................... 44
6.1 OVERVIEW ............................................................................................................... 45
6.2 STOP ........................................................................................................................ 46
6.3 GENISPOT SELF-DIAGNOSIS ................................................................................... 46
6.4 PATTERN................................................................................................................... 46
6.5 IMPORT S/N & P/N .................................................................................................. 48
6.6 SWITCH TO GENIPASS EXPRESS .............................................................................. 48
6.7 SELECT YOUR MONITOR .......................................................................................... 48
A COMPATIBILITY ...................................................................................................... 50
A.1 COMPATIBLE OPERATING SYSTEMS ......................................................................... 51
A.2 COMPATIBLE PROCESSORS ...................................................................................... 51
A.3 COMPATIBLE MEMORY MODULES ........................................................................... 52
B HAZARDOUS MATERIALS DISCLOSURE ......................................................... 53
B.1 HAZARDOUS MATERIALS DISCLOSURE TABLE FOR IPB PRODUCTS CERTIFIED AS
ROHS COMPLIANT UNDER 2002/95/EC WITHOUT MERCURY ....................................... 54
Page viii
GeniSPOT Screen Calibration Kit
List of Figures
Figure 1-1: GeniSPOT.....................................................................................................................2
Figure 3-1: GeniSPOT Holder Attachment ...................................................................................7
Figure 3-2: USB Cable Setup (Single Monitor) ............................................................................8
Figure 3-3: USB Cable Setup (Multiple Monitors) .......................................................................9
Figure 3-4: Hardware Installation Wizard ...................................................................................10
Figure 3-5: Search for Drivers .....................................................................................................10
Figure 3-6: Searching for Drivers................................................................................................11
Figure 3-7: Select GeniSPOT Driver ...........................................................................................11
Figure 3-8: GeniSPOT Drivers Installing ....................................................................................12
Figure 3-9: GeniSPOT Driver Installation Complete .................................................................12
Figure 3-10: GeniSPOT Main Menu.............................................................................................13
Figure 3-11: Language Selection ................................................................................................14
Figure 3-12: Hardware Wizard Welcome ....................................................................................14
Figure 3-13: Choose Installation Directory ................................................................................15
Figure 3-14: Start Menu Folder....................................................................................................15
Figure 3-15: Desktop and Quick Launch Icon Selection ..........................................................16
Figure 3-16: GeniPASS Installation Ready ................................................................................16
Figure 3-17: GeniPASS Progress Indicator ...............................................................................17
Figure 3-18: GeniPASS Installation Complete...........................................................................17
Figure 4-1: GeniPASS Group.......................................................................................................19
Figure 4-2: GeniPASS Tray Icon .................................................................................................19
Figure 4-3: User Settings .............................................................................................................20
Figure 4-4: Auto-Dimming Control..............................................................................................21
Figure 4-5: Auto-Dimming Prompt..............................................................................................21
Figure 4-6: Calibration Complete ................................................................................................21
Figure 4-7: Auto-Dimming Wizard Step 1...................................................................................22
Figure 4-8: Auto-Dimming Wizard Step 2...................................................................................23
Figure 4-9: Auto-Dimming Wizard Step 3...................................................................................23
Figure 4-10: Select Monitor .........................................................................................................24
Figure 4-11: Select Monitor .........................................................................................................25
Page ix
GeniSPOT Screen Calibration Kit
Figure 4-12: Conformance Test...................................................................................................26
Figure 4-13: Select Conformance Criteria..................................................................................26
Figure 4-14: Profile .......................................................................................................................27
Figure 4-15: Profile .......................................................................................................................27
Figure 5-1: GeniPASS Express ...................................................................................................30
Figure 5-2: Conformance Test.....................................................................................................31
Figure 5-3: Conformance Start....................................................................................................31
Figure 5-4: Conformance Test Progress ....................................................................................31
Figure 5-5: Conformance Complete............................................................................................32
Figure 5-6: Uniformity Test..........................................................................................................32
Figure 5-7: Uniformity Test Window ...........................................................................................33
Figure 5-8: Center Block ..............................................................................................................33
Figure 5-9: Top-Left Block ...........................................................................................................34
Figure 5-10: Bottom-Left Block ...................................................................................................34
Figure 5-11: Bottom-Right Block ................................................................................................34
Figure 5-12: Top-Right Block ......................................................................................................35
Figure 5-13: Luminance Test.......................................................................................................35
Figure 5-14: Luminance Test Window ........................................................................................36
Figure 5-15: Start Luminance Test..............................................................................................36
Figure 5-16: Luminance Test Complete .....................................................................................36
Figure 5-17: Run Calibration .......................................................................................................37
Figure 5-18: Start Calibration ......................................................................................................37
Figure 5-19: Calibration Test .......................................................................................................37
Figure 5-20: Calibration Complete ..............................................................................................38
Figure 5-21: History List ..............................................................................................................38
Figure 5-22: History List Window................................................................................................39
Figure 5-23: HTML Results Page.................................................................................................40
Figure 5-24: Switch to GeniPASS Pro ........................................................................................40
Figure 5-25: View Test Report .....................................................................................................41
Figure 5-26: View Test Report Window ......................................................................................42
Figure 5-27: About ........................................................................................................................43
Figure 6-1: GeniPASS Main Window ..........................................................................................45
Figure 6-2: Stop Button................................................................................................................46
Figure 6-3: GeniSPOT Self-Diagnosis ........................................................................................46
Figure 6-4: Pattern ........................................................................................................................47
Page x
GeniSPOT Screen Calibration Kit
Figure 6-5: Pattern Window .........................................................................................................47
Figure 6-6: Pattern Window Options ..........................................................................................47
Figure 6-7: Import S/N & P/N .......................................................................................................48
Figure 6-8: Switch to GeniPASS Express ..................................................................................48
Figure 6-9: Select Your Monitor ..................................................................................................49
Page xi
GeniSPOT Screen Calibration Kit
List of Tables
Table 2-1: Packing List Items ........................................................................................................5
Page xii
GeniSPOT Screen Calibration Kit
Chapter
1
1 Introduction
Page 1
GeniSPOT Screen Calibration Kit
1.1 Introduction
Figure 1-1: GeniSPOT
The GeniSPOT screen calibration tool is for calibrating monochrome monitors used for
diagnostic applications and ensures display consistency, reliability, and conformance to
standards.
The GeniSPOT external sensor combined with the GeniPASS software allows the monitor
to be adjusted to conform to AAPM, DIN, JIS and IEC standards. The GeniSPOT also
features a luminance sensor, so the display brightness is automatically adjusted according
to lighting conditions. The self-diagnosis function allows the GeniSPOT to be calibrated for
accurate performance.
1.2 System Requirements
In order for the software to function correctly the following system minimum requirements
should be met.
1.2.1 Hardware Requirements
The following hardware is required to use the GeniSPOT.
CD-ROM – for driver installation
USB port – for plugging in the GeniSPOT
Page 2
GeniSPOT Screen Calibration Kit
1.2.2 Software Requirements
The GeniSPOT requires the following software:
Microsoft® Windows XP
Page 3
GeniSPOT Screen Calibration Kit
Chapter
2
2 Unpacking
Page 4
GeniSPOT Screen Calibration Kit
2.1 Unpacking Precautions
When the GeniSPOT is unpacked, please do the following:
Make sure the packing box is facing upwards so the GeniSPOT does not fall
out of the box.
Make sure all of the components shown in the next section are present.
2.2 Package Contents
NOTE:
If any of the components listed in the checklist below are missing, do
not proceed with the installation. Contact the IEI reseller or vendor that
the GeniSPOT was purchased from, or contact and IEI sales
representative directly by sending an email to [email protected].
The GeniSPOT is shipped with the following components.
Quantity
Item and Part Number
1
GeniSPOT
1
Utility CD
Image
Table 2-1: Packing List Items
Page 5
GeniSPOT Screen Calibration Kit
Chapter
3
3 Installation
Page 6
GeniSPOT Screen Calibration Kit
3.1 Installation Overview
Installation includes setting up the hardware and connecting it to the system, installation of
the GeniSPOT drivers and finally, installation of the GeniPASS software.
3.2 Hardware Installation
The GeniSPOT can be installed for a single monitor or multiple monitors. Special
instructions for multiple monitors are noted. To install the GeniSPOT please follow the
directions below:
Step 1: Attach the GeniSPOT sensor holder onto the (primary) monitor. Place the
holder on the top of the (primary) monitor so that the two legs are straddling over
the front and back of the monitor edge and the cable is facing the rear of the
monitor. Turn the screw clockwise to tighten the holder into position.
Figure 3-1: GeniSPOT Holder Attachment
Step 2: Attach the GeniSPOT USB cable to the monitor USB hub, and the monitor
to the computer. Connect the cable from the GeniSPOT to one of the A-series
USB ports on the rear panel of the monitor. Attach the USB B-series connector
of the included cable (included with the monitor) to the USB B-series port on the
Page 7
GeniSPOT Screen Calibration Kit
rear panel of the (primary) monitor and the A-series connector to a USB port on
the computer system.
Figure 3-2: USB Cable Setup (Single Monitor)
Step 3: Attach the USB cables to the second (other) monitors. Connect the B-series
connector of the included cable (included with the monitor) to the monitor, and
the A-series end to the computer. Step0:
Page 8
GeniSPOT Screen Calibration Kit
Figure 3-3: USB Cable Setup (Multiple Monitors)
3.3 Driver Installation
To install the drivers for the GeniSPOT please follow the steps outlined below.
Step 1: Connect the GeniSPOT to the system and the hardware installation wizard will
automatically appear. Select “Yes, this time only” then click NEXT to continue.
Page 9
GeniSPOT Screen Calibration Kit
Figure 3-4: Hardware Installation Wizard
Step 2: Insert the GeniSPOT driver CD into the computer’s CD or DVD drive.
Step 3: Select “Install the software automatically (Recommended)” and then click
NEXT to continue.
Figure 3-5: Search for Drivers
Page 10
GeniSPOT Screen Calibration Kit
Step 4: The hardware installation wizard searches for the GeniSPOT drivers.
Figure 3-6: Searching for Drivers
Step 5: Select the “GeniSPOT MONO Calibrator” and click NEXT to continue.
Figure 3-7: Select GeniSPOT Driver
Step 6: The GeniSPOT drivers are installed. This takes a few moments.
Page 11
GeniSPOT Screen Calibration Kit
Figure 3-8: GeniSPOT Drivers Installing
Step 7: The GeniSPOT driver installation is complete. Click FINISH to complete the
installation process. Step0:
Figure 3-9: GeniSPOT Driver Installation Complete
Page 12
GeniSPOT Screen Calibration Kit
3.4 GeniPASS Installation
NOTE:
The drivers for the GeniSPOT must be installed before installing the
GeniPASS software. Without the correct drivers the GeniPASS
software will not function correctly.
To install the GeniPASS quality control software, follow the directions below:
Step 1: Insert the driver CD. The autorun function should start the main menu. Choose
the installation to continue. If the menu does not appear go to Start -> Run and
browse to E:\setup.exe.
Step 2: The GeniPASS main installation menu appears. Select “GeniPASS QC Utility”
to install the GeniPASS monitor quality control software.
Figure 3-10: GeniSPOT Main Menu
Step 3: Select the preferred language for the installation from the dropdown list. Click
OK to continue.
Page 13
GeniSPOT Screen Calibration Kit
Figure 3-11: Language Selection
Step 4: The “GeniPASS Setup Wizard” welcome screen appears. Click NEXT > to
continue.
Figure 3-12: Hardware Wizard Welcome
Step 5: Choose the installation folder for the GeniPASS software (default
recommended). Click NEXT > to continue.
Page 14
GeniSPOT Screen Calibration Kit
Figure 3-13: Choose Installation Directory
Step 6: Choose the name of the Start Menu folder for the GeniPASS software (default
recommended). Click NEXT to continue.
Figure 3-14: Start Menu Folder
Step 7: Select “Create a desktop icon” to automatically create an icon on the desktop
during installation. Select “Create a Quick Launch icon” to automatically
Page 15
GeniSPOT Screen Calibration Kit
create an icon in the Quick Launch bar during installation. Click NEXT to
continue.
Figure 3-15: Desktop and Quick Launch Icon Selection
Step 8: Check the installation details and click INSTALL to begin the installation process.
Figure 3-16: GeniPASS Installation Ready
Page 16
GeniSPOT Screen Calibration Kit
Step 9: The progress indicator shows the installation progress.
Figure 3-17: GeniPASS Progress Indicator
Step 10: The window indicating successful installation appears. Click FINISH to complete
the installation process. Step0:
Figure 3-18: GeniPASS Installation Complete
Page 17
GeniSPOT Screen Calibration Kit
Chapter
4
4 Software Configuration
Page 18
GeniSPOT Screen Calibration Kit
4.1 Overview
This chapter outlines the configuration of the GeniSPOT software. Before running any
tests it is recommended that all the settings be configured. This ensures the best
performance from your monitor and sets up important settings. Proceed through this
chapter through to the end to fully configure the GeniSPOT.
4.2 Starting GeniPASS
After
installation
the
GeniPASS
software
can
be
found
by
selecting
Start -> All Programs -> GeniPASS then selecting the GeniPASS menu item.
Figure 4-1: GeniPASS Group
The GeniPASS tray icon allows easy access to the GeniPASS functions.
Figure 4-2: GeniPASS Tray Icon
Page 19
GeniSPOT Screen Calibration Kit
4.3 User Settings
The first time the GeniPASS software is run, all the user settings should be set. After the
initial setup, individual settings can be adjusted if needed. To adjust all the user settings,
for initial setup, follow the instructions below.
Step 1: Switch to Professional mode to access all the configuration settings
(Section 5.7).
Step 2: Adjust the user settings indicated below. Step0:
1. Auto-Dimming Control configures the auto-dimming controls (Section 4.4)
2. Select Monitor selects the monitor to be tested (Section 4.5)
3. Select Performance Criteria selects the standards for testing the monitor
(Section 4.6)
4. Profile sets and adjusts user profile settings (Section 4.7)
Figure 4-3: User Settings
4.4 Auto-Dimming Control
The Auto-Dimming Control window enables, disables and sets the auto-dimming
options.
To adjust the auto-dimming controls, follow these steps:
Step 1: Click Auto-Dimming Control in the main window.
Page 20
GeniSPOT Screen Calibration Kit
Figure 4-4: Auto-Dimming Control
Step 2: Click OK to continue to the Auto-Dimming Configuration screen.
Figure 4-5: Auto-Dimming Prompt
Step 3: The Auto-Dimming Configuration screen appears. Step0:
Figure 4-6: Calibration Complete
a. Detect Ambient Light detects the level of ambient light (for reference).
b. Ambient Light Level shows the results of the ambient light test.
c.
Toggle On/Off turn the auto-dimming control on/off, the current state of
the auto-dimming is shown in e.
Page 21
GeniSPOT Screen Calibration Kit
d. Run Auto-Dimming Control Setting Wizard configures the settings for
the auto-dimming.
e. Auto-Dimming Control State shows whether auto-dimming is on or off.
f.
Close exits the auto-dimming control window
4.4.1 Auto-Dimming Control Setting Wizard
Step 1: Click the Run Auto-Dimming Control Setting Wizard Button to begin the
wizard.
Step 2: The Auto-dimming wizard appears.
Figure 4-7: Auto-Dimming Wizard Step 1
Step 3: Select the maximum luminance level that the monitor should reach during
operation.
Step 4: Adjust the current ambient light level to the light level where the monitor should
start displaying the highest luminance.
Step 5: Click OK to measure the current light level.
Step 6: The auto-dimming wizard step 2 appears.
Page 22
GeniSPOT Screen Calibration Kit
Figure 4-8: Auto-Dimming Wizard Step 2
Step 7: Select the minimum luminance level that the monitor should reach during
operation.
Step 8: Adjust the current ambient light to the light level where the monitor should reach
the specified minimum luminance.
Step 9: Click OK to measure the current light level.
Step 10: The auto-dimming wizard final screen appears.
Figure 4-9: Auto-Dimming Wizard Step 3
Page 23
GeniSPOT Screen Calibration Kit
Step 11: Click OK to complete the auto-dimming control settings wizard. Step0:
4.5 Select Monitor
The Select Monitor option is for choosing which monitor will be tested using the
GeniSPOT. To select the monitor for testing, follow these steps:
NOTE:
Test multiple monitors one at a time. It is not necessary to disconnect
the GeniSPOT to test another monitor. Leave the GeniSPOT attached
to the primary monitor.
Step 1: Click SELECT MONITOR in the main window.
Figure 4-10: Select Monitor
Step 2: The Select Monitor window appears.
Page 24
GeniSPOT Screen Calibration Kit
Figure 4-11: Select Monitor
Step 3: Select a monitor. Choosing a monitor automatically selects the monitor and
closes the monitor selection window. The monitor is chosen by one of the
following options Step0:
a. COM port number
b. Visual representation (numbered according to DDC/CI port number and
not Windows Desktop Monitor Identifier)
c.
Monitor list
4.6 Select Conformance Criteria
The Select Conformance Criteria option is for choosing which monitor will be tested
using the GeniSPOT.
To select the conformance criteria for testing, follow these steps:
Step 1: Click SELECT CONFORMANCE CRITERIA in the main window.
Page 25
GeniSPOT Screen Calibration Kit
Figure 4-12: Conformance Test
Step 2: The Select Conformance Criteria window appears.
Figure 4-13: Select Conformance Criteria
Step 3: Select the standard for conformance from the dropdown list (labeled “a“).
Section “b” displays the details for the selected conformance standard.
Step 4: Click OK (labeled “c”) to accept the settings and exit.
Click CANCEL (labeled “d”) to discard changes and exit. Step0:
4.7 Profile
Profile allows setting of personalized options and for loading previously saved settings.
To adjust the current user profile, follow these steps:
Page 26
GeniSPOT Screen Calibration Kit
Step 1: Click PROFILE in the main window.
Figure 4-14: Profile
Step 2: The Profile window appears.
Figure 4-15: Profile
Step 3: The Profile menu settings are listed below: Step0:
a.
Select the type of monitor for testing.
b.
Select whether the monitor is color or monochrome.
c.
Displays auto-dimming settings (auto-dimming settings can be
adjusted in the auto-dimming window 4.4).
Page 27
GeniSPOT Screen Calibration Kit
d.
Select the conformance standard to use for testing and calibration.
e.
Select the DDC Port to use.
f.
Displays the position and size of the test images.
g.
Check this option to run a self-diagnosis of the GeniSPOT when the
software is started.
h.
SAVE PROFILE saves the currently displayed profile settings.
i.
LOAD PREVIOUS PROFILE loads the previously saved settings.
j.
USER CURRENT SETTING loads the settings from the main window and
the user setting windows into the current Profile Setting window.
k.
LOAD loads the Profile Setting options into the main window.
l.
CLOSE exits the current window without saving and returns to the
main window.
Page 28
GeniSPOT Screen Calibration Kit
Chapter
5
5 Basic Functions
Page 29
GeniSPOT Screen Calibration Kit
5.1 Overview
This chapter gives an overview of all the functions of the GeniPASS Express Mode.
NOTE:
Turn off auto-dimming before performing any calibration or tests.
The GeniPASS software starts in Express mode. All the necessary features for day-to-day
use can be found in the Express mode interface. The figure below shows the GeniPASS
Express window and is followed by a brief explanation of each button’s function.
1. Conformance Test tests the conformance of the selected monitor
(Section 5.2)
2. Uniformity Test tests the uniformity of the selected monitor (Section 5.3)
3. Luminance Test tests the luminance of the selected monitor (Section 5.4)
4. Run Calibration calibrates the monitor using the previous test results
(Section 5.5)
5. History List displays a list of the results of all previous tests (Section 5.6)
6. Switch to GeniPASS Pro changes to Professional mode (Section 5.7)
7. View Test Report displays the results of the last test (Section 5.8)
8. Configuration opens a list with the following options:
a.
Select Monitor selects the monitor to be tested (Section 4.5)
b.
Select Performance Criteria selects the standards for testing the
monitor (Section 4.6)
c.
Profile sets and adjusts user profile settings (Section 4.7)
9. Exit closes GeniPASS
10. About displays information about GeniPASS (Section 5.9)
Figure 5-1: GeniPASS Express
Page 30
GeniSPOT Screen Calibration Kit
5.2 Conformance Test
The conformance test compares the luminance read by the GeniSPOT to the luminance
that should be produced by the monitor at different luminance levels.
To perform the conformance test, follow these steps:
Step 1: Click CONFORMANCE TEST in the main window. The conformance test starts
automatically.
Figure 5-2: Conformance Test
Step 2: Place the GeniSPOT in the white block and click OK to continue.
Figure 5-3: Conformance Start
Step 3: The GeniPASS software displays a white screen, then a black screen and then
progresses from black and through the grays to white. The process takes a few
minutes. No other software should be used while the conformance test is being
performed. The GeniSPOT must remain in the same position at the center of the
monitor throughout the test.
Figure 5-4: Conformance Test Progress
Page 31
GeniSPOT Screen Calibration Kit
Step 4: Wait for the conformance test to finish. When finished, click OK to complete
the conformance test.
Step0:
Figure 5-5: Conformance Complete
5.3 Uniformity Test
The uniformity test tests the uniformity of the screen. The center, top-left, bottom-left,
bottom-right and top-right are tested and the values compared to determine the evenness
of the screen’s brightness.
To perform the uniformity test, follow these steps:
Step 1: Click Uniformity Test in the main window.
Figure 5-6: Uniformity Test
Step 2: The Uniformity Test window appears. The uniformity test window displays the
readings from the uniformity test. Click the UNIFORMITY TEST button to start
testing the uniformity of the monitor.
Page 32
GeniSPOT Screen Calibration Kit
Figure 5-7: Uniformity Test Window
Step 3: Place the GeniSPOT in the center white block and click OK to continue.
Figure 5-8: Center Block
Step 4: Place the GeniSPOT in the top-left white block and click OK to continue.
Page 33
GeniSPOT Screen Calibration Kit
Figure 5-9: Top-Left Block
Step 5: Place the GeniSPOT in the bottom-left white block and click OK to continue.
Figure 5-10: Bottom-Left Block
Step 6: Place the GeniSPOT in the bottom-right white block and click OK to continue.
Figure 5-11: Bottom-Right Block
Step 7: Place the GeniSPOT in the top-right white block and click OK to continue.
Page 34
GeniSPOT Screen Calibration Kit
Figure 5-12: Top-Right Block
Step 8: The Uniformity Test window appears again. The results of the uniformity test
are shown. Click SAVE TO HTML to save the results to another HTML file (this is
in addition to the HTML file automatically saved for every test). Click OK to leave
the Uniformity Test window. Step0:
5.4 Luminance Test
The luminance test tests the ability of the monitor to correctly produce different levels of
brightness. The test gradually moves from a black screen, through shades of gray, to a
fully white screen.
To perform the luminance test, follow these steps:
Step 1: Click Luminance Test in the main window. The luminance test starts
automatically.
Figure 5-13: Luminance Test
Step 2: The luminance test window appears. The luminance test window shows criteria
for the test and the results of the test. Click RUN TEST to continue.
Page 35
GeniSPOT Screen Calibration Kit
Figure 5-14: Luminance Test Window
Step 3: Place the GeniSPOT in the white block. Don’t move the GeniSPOT until
prompted. Click OK to start the luminance test.
Figure 5-15: Start Luminance Test
Step 4: Click OK to complete the Luminance Test.
Figure 5-16: Luminance Test Complete
Step 5: The Luminance Test window appears again. The results of the luminance test
are shown. Click SAVE TO HTML to save the results to another HTML file (this is
in addition to the HTML file automatically saved for every test). Click OK to leave
the Luminance Test window. Step0:
Page 36
GeniSPOT Screen Calibration Kit
5.5 Run Calibration
Run Calibration sets the calibration of the monitor. The calibration gradually moves from
a black screen, through shades of gray, to a fully white screen.
To Run Calibration, follow these steps:
Step 1: Click Run Calibration in the main window.
Figure 5-17: Run Calibration
Step 2: Place the GeniSPOT in the white block. Don’t move the GeniSPOT until
prompted. Click OK to start the calibration test.
Figure 5-18: Start Calibration
Step 3: The calibration test runs through the screen colors from black to white as shown
in the figure below.
Figure 5-19: Calibration Test
Step 4: Click OK to complete the Calibration Test. Step0:
Page 37
GeniSPOT Screen Calibration Kit
Figure 5-20: Calibration Complete
NOTE:
If calibration is successful, luminance is reset to 450 nit.
5.6 History List
History List displays the results of all the previous tests. The tests are all saved as HTML
files and stored. The History List provides a list of all those saved files. To view the
previous test results, follow the steps below.
Step 1: Click the History List button to display the results.
Figure 5-21: History List
Step 2: The History List window appears.
Page 38
GeniSPOT Screen Calibration Kit
Figure 5-22: History List Window
Step 3: Click one of the buttons a – d to display the results of that test in section e.
a. ALL FILES shows all the results files
b. CONFORMANCE FILES shows the results of all conformance tests
c.
UNIFORMITY FILES shows the results of all uniformity tests
d. LUMINANCE FILES shows the results of all luminance tests
e. Displays the results chosen by clicking one of the buttons a – d above
Step 4: To view results from the list, double-click the filename.
Step 5: The results open in the default web browser. Step0:
Page 39
GeniSPOT Screen Calibration Kit
Figure 5-23: HTML Results Page
5.7 Switch to GeniPASS Pro
The SWITCH TO GENIPASS PRO button switches from the GeniPASS Express interface to
the GeniPASS professional interface. To switch to the GeniPASS professional interface,
click the SWITCH TO GENIPASS PRO button.
Figure 5-24: Switch to GeniPASS Pro
Page 40
GeniSPOT Screen Calibration Kit
5.8 View Test Report
VIEW TEST REPORT displays the results of the last test in a popup window. To view the test
reports, follow the steps below.
Step 1: Click the VIEW TEST REPORT button to display the results.
Figure 5-25: View Test Report
Step 2: The View Test Report window appears. Step0:
Page 41
GeniSPOT Screen Calibration Kit
Figure 5-26: View Test Report Window
The View Test Report window shows the following:
a. JNDs / Luminance Interval vs. Index of Luminance Interval graph
b. KL/L for A JND vs. JND Indices graph
c.
Luminance (cd/m2) vs. digital driving level graph
d. Test results
e. Luminance value table
f.
Check result
g. SAVE TO HTML saves the current results to an HTML file
h. CLOSE exits the window and returns to the main window
Page 42
GeniSPOT Screen Calibration Kit
5.9 About
The About window displays general information about the GeniPASS software, including
revision information.
Figure 5-27: About
Page 43
GeniSPOT Screen Calibration Kit
Chapter
6
6 Advanced Functions
Page 44
GeniSPOT Screen Calibration Kit
6.1 Overview
GeniPASS Professional mode provides a more complex interface for GeniPASS. There
are a few options available in the Professional interface that are not offered in the Express
interface. The details for the additional options are included in this section, while those that
are shared with the Express interface refer to the Basic Functions section.
To switch to the GeniPASS professional interface, refer to section 5.7.
GeniPASS Professional allows easier control over the configuration of the GeniPASS
software. The figure below outlines the options available and a brief description of what
they do.
Figure 6-1: GeniPASS Main Window
1. Conformance Test tests the conformance of the selected monitor
(Section 5.2)
2. Uniformity Test tests the uniformity of the selected monitor (Section 5.3)
3. Luminance Test tests the luminance of the selected monitor (Section 5.4)
4. Run Calibration calibrates the monitor using the previous test results
(Section 5.5)
5. Stop stops the current operation (Section 6.2)
6. GeniSPOT Self-Diagnosis checks the GeniSPOT’s calibration (Section 6.3)
7. Auto-Dimming Control configures the auto-dimming controls (Section 4.4)
8. Pattern opens the white pattern window (Section 6.4)
9. Import S/N & P/N imports serial number and part numbers from connected
monitors (Section 6.5)
10. View Test Report displays the results of the last test (Section 5.8)
11. History List displays a list of the results of all previous tests (Section 5.6)
12. Switch to GeniPASS Express changes to Express mode (Section 6.6)
13. About displays information about the GeniPASS software (Section 5.9)
Page 45
GeniSPOT Screen Calibration Kit
14. Select your Monitor selects the monitor to be tested (Section 6.7)
15. Select Monitor selects the monitor to be tested (Section 4.5)
16. Select Performance Criteria selects the standards for testing the monitor
(Section 4.6)
17. Profile sets and adjusts user profile settings (Section 4.7)
6.2 Stop
Stop halts the current test and returns to the main window.
Figure 6-2: Stop Button
6.3 GeniSPOT Self-Diagnosis
GeniSPOT Self-Diagnosis tests the GeniSPOT to check if it is functioning correctly and
that its measurements are within specification.
Figure 6-3: GeniSPOT Self-Diagnosis
6.4 Pattern
Pattern displays a white window that fills the whole screen.
Step 1: Click Pattern in the main window.
Page 46
GeniSPOT Screen Calibration Kit
Figure 6-4: Pattern
Step 2: The Pattern window appears.
Figure 6-5: Pattern Window
Step 3: Double-click anywhere on the window to display the menu.
Step0:
Figure 6-6: Pattern Window Options
The pattern window has the following options.
a. Hide Menu hides the pattern window options menu.
b. Close Geni closes the GeniPASS program.
c.
Stop Window closes the pattern window and returns to the GeniPASS
main window.
Page 47
GeniSPOT Screen Calibration Kit
6.5 Import S/N & P/N
The Import S/N & P/N button imports serial numbers and part numbers from connected
monitors. To import serial numbers and part numbers, click the Import S/N & P/N button.
Figure 6-7: Import S/N & P/N
6.6 Switch to GeniPASS Express
The Switch to GeniPASS Express button switches the user interface from the
GeniPASS Professional interface to the GeniPASS Express interface. To switch to the
GeniPASS Express interface, click the Switch to GeniPASS Express button.
Figure 6-8: Switch to GeniPASS Express
6.7 Select Your Monitor
The Select Your Monitor drop-down list allows easy selection of the monitor to be tested
and calibrated.
To select a monitor, click on the drop-down list highlighted below, and select the monitor.
Page 48
GeniSPOT Screen Calibration Kit
Figure 6-9: Select Your Monitor
Page 49
GeniSPOT Screen Calibration Kit
Appendix
A
A Compatibility
Page 50
GeniSPOT Screen Calibration Kit
NOTE:
The compatible items described here have been tested by the IEI R&D
team and found to be compatible with the GeniSPOT
A.1 Compatible Operating Systems
The following operating systems have been successfully run on the GeniSPOT.
MS-DOS 6.22
Microsoft Windows XP (32-bit)
Microsoft Windows 2000
Red Hat 9.0
A.2 Compatible Processors
The following Intel® Socket 478 processors have been successfully tested on the
GeniSPOT
CPU
Intel® Pentium 4
FSB
800MHz
Frequency
3.2GHz
L2 Cache
1MB
Page 51
GeniSPOT Screen Calibration Kit
A.3 Compatible Memory Modules
NOTE:
The memory modules listed below have been tested on the GeniSPOT
other memory modules that comply with the specifications may also
work on the GeniSPOT but have not been tested.
The following memory modules have been successfully tested on the GeniSPOT.
Manufacturer
Kingston
Page 52
Model No.
KVR400X64C3A
Capacity
512 MB
Speed
400 MHz
Type
DDR
GeniSPOT Screen Calibration Kit
Appendix
B
B Hazardous Materials
Disclosure
Page 53
GeniSPOT Screen Calibration Kit
B.1 Hazardous Materials Disclosure Table for IPB Products
Certified as RoHS Compliant Under 2002/95/EC Without
Mercury
The details provided in this appendix are to ensure that the product is compliant with the
Peoples Republic of China (China) RoHS standards. The table below acknowledges the
presences of small quantities of certain materials in the product, and is applicable to China
RoHS only.
A label will be placed on each product to indicate the estimated “Environmentally Friendly
Use Period” (EFUP). This is an estimate of the number of years that these substances
would “not leak out or undergo abrupt change.” This product may contain replaceable
sub-assemblies/components which have a shorter EFUP such as batteries and lamps.
These components will be separately marked.
Please refer to the table on the next page.
Page 54
GeniSPOT Screen Calibration Kit
Part Name
Toxic or Hazardous Substances and Elements
Lead
Mercury
Cadmium
Hexavalent
Polybrominated
Polybrominated
(Pb)
(Hg)
(Cd)
Chromium
Biphenyls
Diphenyl Ethers
(CR(VI))
(PBB)
(PBDE)
Housing
X
O
O
O
O
X
Display
X
O
O
O
O
X
Printed Circuit
X
O
O
O
O
X
Metal Fasteners
X
O
O
O
O
O
Cable Assembly
X
O
O
O
O
X
Fan Assembly
X
O
O
O
O
X
Power Supply
X
O
O
O
O
X
O
O
O
O
O
O
Board
Assemblies
Battery
O:
This toxic or hazardous substance is contained in all of the homogeneous materials for the part is
below the limit requirement in SJ/T11363-2006
X:
This toxic or hazardous substance is contained in at least one of the homogeneous materials for
this part is above the limit requirement in SJ/T11363-2006
Page 55
GeniSPOT Screen Calibration Kit
此附件旨在确保本产品符合中国 RoHS 标准。以下表格标示此产品中某有毒物质的含量符
合中国 RoHS 标准规定的限量要求。
本产品上会附有”环境友好使用期限”的标签,此期限是估算这些物质”不会有泄漏或突变”的
年限。本产品可能包含有较短的环境友好使用期限的可替换元件,像是电池或灯管,这些元
件将会单独标示出来。
部件名称
有毒有害物质或元素
铅
汞
镉
六价铬
多溴联苯
多溴二苯醚
(Pb)
(Hg)
(Cd)
(CR(VI))
(PBB)
(PBDE)
壳体
X
O
O
O
O
X
显示
X
O
O
O
O
X
印刷电路板
X
O
O
O
O
X
金属螺帽
X
O
O
O
O
O
电缆组装
X
O
O
O
O
X
风扇组装
X
O
O
O
O
X
电力供应组装
X
O
O
O
O
X
电池
O
O
O
O
O
O
O: 表示该有毒有害物质在该部件所有物质材料中的含量均在 SJ/T11363-2006 标准规定的限量要求以下。
X: 表示该有毒有害物质至少在该部件的某一均质材料中的含量超出 SJ/T11363-2006 标准规定的限量要求。
Page 56
GeniSPOT Screen Calibration Kit
Index
Page 57
GeniSPOT Screen Calibration Kit
monitor...................................................27
A
about..........................................................43
C
calibration ..................................................37
monitor selection ............................ 24, 48
monitor selection window ......................24
overview ................................................20
profile window........................................27
startup............................................. 19, 28
user profile.............................................26
system requirements
G
hardware..................................................2
software ...................................................3
GeniSPOT
self-diagnosis ........................................46
I
import.........................................................48
part numbers .........................................48
serial numbers.......................................48
installation
drivers......................................................9
software .................................................13
interface
basic ......................................................48
professional ...........................................40
S
T
test results
complete ................................................38
latest ......................................................41
tests
conformance test ...................................31
luminance test .......................................35
luminance test window ..........................35
results ....................................................38
results window .......................................38
stop ........................................................46
uniformity test ........................................32
uniformity test window ...........................32
U
Safety Precautions.....................................51
settings
auto-dimming.........................................20
conformance....................................25, 28
conformance window.............................26
express ..................................................48
interface.................................................40
Page 58
unpacking
package contents list ...............................5
precautions ..............................................5
GeniSPOT Screen Calibration Kit
Page 59