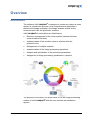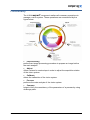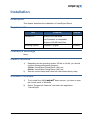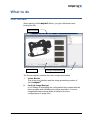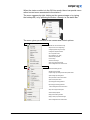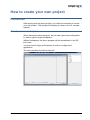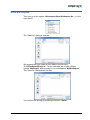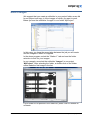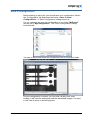
1
VisionExpert Demo version 2.0 AUTONOMOUS INSPECTION CELL Publication : public Document : C:\Projects.VS2010\Compar Products\Expert 4\Documentation\Version 4.0\ManualEnu\Demo\Compar Vision Demo Enu 20.docx Author: Thierry Dupinet Last modification: 19.11.2014 Version: version 2.0 Summary: This document describes the use of VisionExpert demo version. INDUSTRIAL ROBOT VISIONEXPERT vision systems & robotics INTELLIGENT CAMERAS History Version Date Author Comment 1.0 18.03.2010 TD Original version 1.1 23.11.2010 LB Modifications 1.2 03.12.2010 TD New setup procedure 1.3 20.05.2011 TD New concept of the demo software with VisionExpert 3.1.4.0 1.4 09.06.2011 TD - Update with VisionExpert 3.2 - Add the procedure to de-install the demo software 2.0 01.11.2014 TD -Update with VisionExpert 4.0 Table of Contents INTRODUCTION ................................................................................................................................................ 5 Intended readership ................................................................................................................................. 5 Applicability statement .............................................................................................................................. 5 Purpose .................................................................................................................................................... 5 How to use this document ........................................................................................................................ 5 Related Documents .................................................................................................................................. 5 Problem reporting instructions .................................................................................................................. 5 OVERVIEW ....................................................................................................................................................... 6 Architecture .............................................................................................................................................. 6 Functionality ............................................................................................................................................. 7 Operations ................................................................................................................................................ 8 INSTALLATION ................................................................................................................................................. 9 Description................................................................................................................................................ 9 Requirements ........................................................................................................................................... 9 Cautions & Warnings ................................................................................................................................ 9 Install Procedure....................................................................................................................................... 9 Uninstall Procedure .................................................................................................................................. 9 START DEMO................................................................................................................................................. 10 Procedure ............................................................................................................................................... 10 WHAT TO DO ................................................................................................................................................. 11 User Interface ......................................................................................................................................... 11 Login ....................................................................................................................................................... 13 Working modes....................................................................................................................................... 14 Acquire an image ................................................................................................................................... 15 Analyse an image ................................................................................................................................... 16 Edit a sequence ...................................................................................................................................... 17 Preprocessing, Adjust, Calibrate, Compare ........................................................................................... 17 HOW TO CREATE YOUR OWN PROJECT ............................................................................................................ 18 Introduction ............................................................................................................................................. 18 Create a new workspace ........................................................................................................................ 18 Save workspace ..................................................................................................................................... 19 Select images ......................................................................................................................................... 20 Save a configuration ............................................................................................................................... 21 Creating a job file ................................................................................................................................... 22 OPERATIONS ................................................................................................................................................. 23 Current available .................................................................................................................................... 23 version 2.0 19.11.14 3 APPENDIX ..................................................................................................................................................... 27 Limitations .............................................................................................................................................. 27 version 2.0 19.11.14 4 Introduction Intended readership This manual was written for people who want to try out the vision module without any other components of VISIONexpert®. Applicability statement This Document concerns the Demo Software VISIONexpert®, version 4.0.0.0 Purpose The document contains all information for installing and using demo version of VisionExpert. How to use this document The chapter „Overview” offers a general description of the software. The chapter “Installation” explains the procedure to install the demo program. The chapter “Start Demo” shows you how to start the demo program. The chapter “What to do” gives you advices to run the demo properly. The chapter “How to create your own project” describes the way to create your own project with the demo software. The chapter “Operations” lists all operations available in the demo version. The chapter “Appendix” describes the restrictions of the demo program. Related Documents ® VISIONexpert User Manual, version 4.0 Problem reporting instructions All problems that occur with the installation or the configuration of the software should be reported to Compar AG. version 2.0 19.11.14 Introduction 5 Overview Architecture The software VISIONexpert® is designed to create and realize a vision system in a production process. As a comprehensive application it performs the image acquisition, the image analysis as well as the communication with the production machine. ® VISIONexpert functionalities are listed below: Resource management of the vision system (camera interface, communication interface). Implementation of the machine cycle to interface with the production line. Management of multiple modules. Implementation of the image processing operations. Analysis and optimization of the procedure parameters. Assignment of image processing operations to a product. The purpose of the demo is to allow users to run the image processing module of VISIONexpert® with the user interface as standalone system. version 2.0 19.11.14 Overview 6 Functionality The VISIONexpert® component realizes all necessary operations to manage a vision system. These operations are summarized by the figure below: Preprocessing performs an image processing procedure to prepare an image before the main analysis Adjust offers a wizard to create steps in order to adjust the acquisition station of the vision system. Calibrate allows the calibration of the vision system. Process performs the main analysis of the vision system. Compare helps to verify the consistency of the parameters of a process by using challenge parts. version 2.0 19.11.14 Overview 7 Operations For all operations except the “Compare” operation, you can configure an image processing sequence by using the functions of the different types listed below: Image Processing Operations Filters, Blobs, Edge, Pattern Matching, ... Geometrical Tools Point-Point, Line-Point, … Flow Control hierarchical grouping, if statement, loop (for, while), switch..case..default, parallel execution Variable Management List, array, watch, … Mathematical operations Parser, Excel-Spreadsheet User-Interface Graphical tool, message box IO management Image & data file The complete description of the vision module is given in the ® VISIONexpert user manual. version 2.0 19.11.14 Overview 8 Installation Description This chapter describes the installation of VisionExpert Demo. Requirements Item Standard PC Comment Version Minimum 512 MB RAM Intel Processor or compatible Minimum 500 MB Hard Disk Operating System Windows 7 English 32/64bits Cautions & Warnings None Install Procedure 1) Depending on the operating system 32 bits or 64 bits, you should use the corresponding setup program: 32 bits: VisionExpert Setup Demo (x86).exe 64 bits: VisionExpert Setup Demo (x64).exe. 2) Start the correct setup and follow the instructions step by step. Uninstall Procedure version 2.0 1) To de-install the VISIONexpert® demo version, you have to open the control panel of Windows. 2) Select “Programs & Features” and select the application “VisionExpert” 19.11.14 Installation 9 Start Demo Procedure You can start the VISIONexpert® Demo program by selecting the entry: “VisionExpert 4.0 Demo/ Compar Vision” in the “Start/Programs” menu of Windows as shown below: The first time you will be ask if you want to load the demo project which gives you an overview of the possibility of VISIONexpert®: By pressing the button <YES>, you will get the following display: Read the chapter “What to do” to run the demo program. version 2.0 19.11.14 Start Demo 10 What to do User Interface When starting VISIONexpert® Demo, you get a Windows frame looking like this: Demo Program Vision Module Config & Image Manager The Demo program contains two main components called: 1. Vision Module This is the user interface and the image processing module of VISIONexpert 2. version 2.0 ® Config & Image Manager It is in charge of managing the configuration files created with the demo program and simulating the image acquisition. It has an integrated browser which allows looking for previous configurations or image files. 19.11.14 What to do 11 When the vision module is in the Off-Line mode, there is a special menu called context menu associated to the station 1. The menu appears by right clicking on the camera image or by typing the hotkeys F5, or by pressing the button <Ready> in the status bar. The menu gives you access to the camera and control options. Camera Activate and show live camera image. Snap and show a new single image. Configure preprocessing of an image. Configure the adjustment wizard. Use to adjust the camera. Use to calibrate ( mm / pixel ) Set the camera properties. Load an image. Save the actual image. Save a copy of the actual screen. Access management of the camera menu. Control Execute the learning process. Analyze the current image. Compare image processing results with expected results. Open the image processing editor. Show production counters of the module. Open the Comparison Editor. Import image processing operations. Export image processing operations. Access management of the control menu. Snap a new image and analyses it. Set the module properties. Display all the existing variables. Display a history of parameter changes. Access management of the context menu. version 2.0 19.11.14 What to do 12 Login When you want to work with VISIONexpert®, you need first to login in. You reach the login dialog by using the menu option <Application/Login> of the Vision Module or by pressing the function key <F2>. In both cases, the dialog below should appear: You have to fill three fields: user name, group and password. Per default, the four following users are defined: User name Group Password Operator Operator operator Maintenance Maintenance maintenance Access Access level Operator Maintenance Supervisor Developer Supervisor Developer supervisor developer Supervisor Users Developer Below you see the login dialog with the user name “Developer”, the group “Developer” and his password: Then you have to press the button <OK> to validate your entry. If everything is correct, the new user login is displayed in the title bar of the vision module: version 2.0 19.11.14 What to do 13 Working modes The vision module owns two modes of running: 1. Off-Line Mode This mode allows a user to interact with the vision system. 2. On-Line Mode This mode locks the access of the vision module which is now driven by a PLC. To switch between those two modes, you have to use the menu option <Production/Start-Stop>, or the function key <F3>. To see which mode is active, look at the small connector in the status bar below: Symbol Description Connected to PLC Interface (started) / stop on click. Disconnected from PLC Interface (stopped) / start on click version 2.0 19.11.14 What to do 14 Acquire an image If you load the demo project, you can quickly acquire an image by pressing on the icon in the status bar just under the image or selecting in the context menu the option <Camera/Snap>. The “Station 1” tab in the manager module shows the list of the current images configured. “Station1“ tab with the current list of images Every time you press the acquire icon, the next image is loaded. When you load the last image, the next one will be the first one. If you want to load other images, use the folder selection to search on your computer. Then you open the contents of the folder by doubleclicking on it. version 2.0 19.11.14 What to do 15 Analyse an image If you load the demo project, you can perform an analysis by pressing the icon in the status bar just under the image or by selecting in the context menu the option <Control/Run>. The results of the analysis are shown in the image and in the result view on the right side. version 2.0 19.11.14 What to do 16 Edit a sequence If you load the demo project, you can edit the image processing sequence by selecting in the context menu the option <Control/Edit parameters> or by using the key combination SHIFT + <F5>. The editor dialog will show up: Sequence List Selection of parameter pages Run & Teach Current image with result graphics Parameters of the selected operation Zoom in the image Snap a new image By selecting an operation in the sequence list, the parameter dialog will change in consequence. In order to add, insert or delete an operation, you should report to the chapter “Control management” of the user manual. The operations currently available in the demo program are listed in the chapter “Operations” in this document. Preprocessing, Adjust, Calibrate, Compare All of these functions are explained in the VISIONexpert® User Manual. In the project “Demo”, we configured them in order to give you an example. The image “Reference.bmp” should be used for the Adjust & Calibrate functions. version 2.0 19.11.14 What to do 17 How to create your own project Introduction After playing with the demo project, you might be interesting to create your own project. This chapter will explain you how to do it in a simple manner. Create a new workspace When starting the demo program, do not load a previous configuration in order to get an empty workspace. Without workspace, the demo program will be immediately in the Offline mode. You just need to login as Developer in order to configure the application. The user interface should look like this: version 2.0 19.11.14 How to create your own project 18 Save workspace Then you go to the option <Workspace/Save Workspace As…> in the main menu. The “Save As” dialog is opened: We suggest that you create a new folder in the directory “C:\VisionExpert\Projects”. For our example, we create a folder named “MyProject” and we store in it our workspace “MyWorkspace”. The “Save As” dialog looks like this: You confirm the saving by pressing the button <Save>. version 2.0 19.11.14 How to create your own project 19 Select images We suggest that you create a subfolder in your project folder as we did for our project and copy in it the images on which you want to work. Below you see the subfolder “Images” in our folder “MyProject”. In this case, you keep the association between the job you will create and the images on which it is applied. In the demo program, select the “Station 1” tab and use the folder selection to look for your images. In our example, we select the subfolder “Images” in our project “MyProject”. After selecting the folder, a double-click on the folder name loads the first image in the list: If your folder is not present in the folder list, press <F5> to refresh its contents. version 2.0 19.11.14 How to create your own project 20 Save a configuration Before starting to edit a job, you should save your configuration. Select the “Configuration” tab and press the button <Save Current Configuration>. A “Save Configuration” dialog shows up. For our example, we save the configuration in our folder “MyProject” and we call it “MyConfiguration”. The “Save Configuration” dialog looks like this: You see in the picture below the configuration file in our project folder. As your configuration is stored, you can load it at any time. After loading, it will load the workspace and the associated images. It is easy in this case to work on several projects. version 2.0 19.11.14 How to create your own project 21 Creating a job file The creation of a job file is realised by using the option <Application / Save As> in the main menu. In our example, we create the job file “MyJob” in our project folder: You can go now to the editor to build up the image processing sequence. IMPORTANT: The saving of a job file is automatic after confirming a change with the button <OK>. If you want to try something on a job, we recommand to make a copy first before editing it. Use the “Save As” option to copy the current contents into a new job. version 2.0 19.11.14 How to create your own project 22 Operations Current available We give you the list of all operations that are available for this demo: Operation Description Grey Color 1 Compar 3D Cone Fit This operation fits a cone through 3D data given as a height field image plus calibration data to fit in world space. BW - 2 Compar 3D Renderer This operation draws a 3D representation of grayscale image data BW - 3 Compar 3D Undistortion This operation undistorts SICK Ranger image data. BW - 4 Compar Array Element This operation copies the selected element from a given variable array to its output for further use. - - 5 Compar Bar Code Parser This operation verifies a string decoded from a bar code and decomposes it into a list the values it contains according to the chosen format. - - 6 Compar Bayer To RGB This operation converts a Bayer encoded grayscale image to RGB color. BW C 7 Compar Bilateral Symmetry This operation finds an axis of bilateral symmetry through a given point. BW - 8 Compar Bit Arithmetic This operation generates an output word with input Bits and values. - - 9 Compar Blob This operation extracts connected component labeling for object segmentation. BW - 10 Compar CSV Reader This operation reads tabular data from a text file. - - 11 Compar Color Splitter This operation extracts one or more channels from the given color image. - C 12 Compar Color Statistics This operation performs different statistical computation over a color image. - C 13 Compar Combine Color Channels This operation combines three grayscale images to one color image. BW - 14 Compar Coplanarity This operation measures the deviation of an array of 3D points from a reference plane. - - 15 Compar Counter This operation increments a value by a user defined step - - 16 Compar Custom Group This operation implements a measurement group with a configurable GUI - - 17 Compar DXF Reader This operation reads a DXF file and creates a shape list. - - version 2.0 19.11.14 Operations 23 18 Compar DXF Shape This operation presents a single DXF shape as its output. - - 19 Compar DXF Transform This operation transforms the coordinates of a shape list. - - 20 Compar Deformation This operation gives the point at the center of the outer arc and the line where all circle centers pass. The point of this line must be in the area to be modified. BW - 21 Compar Depth Correction This operation corrects the location of the given geometrical objects for their difference in camera distance. BW - 22 Compar Display Elements This operation adds an arbitrary number of dynamic display elements to the screen. - - 23 Compar External Process This operation calls an external program. BW - 24 Compar False Colors This operation maps the gray levels of the input image to arbitrary gray or color values. BW - 25 Compar Function Painter This operation uses an arbitrary mathematical formula to generate an artificial image - - 26 Compar Geometrical Transformation This operation transforms a point position using geometrical transformations. - - 27 Compar Geometrical Transformation List This operation offers a list of geometrical transformations BW C 28 Compar Grayscale Statistics This operation performs different statistical computation over the image. BW - 29 Compar IM Transformation This operation does different transformations: Autocorrelation, Distance Transformation, Regional Maximum BW - 30 Compar Image <=> Client Coordinate Conversion This operation converts coordinates between Image and Client Systems. - - 31 Compar Image Detail This operation copies the selected image detail to a new image. BW C 32 Compar Image Information This operation extracts the properties of its input image and publishes them for linkage. BW C 33 Compar Image Mask This operation creates an image mask to suppress irrelevant image regions. BW C 34 Compar Inline ROI Editor This operation allows the interactive ROI definition - offline and online, too. - - 35 Compar Iterator This operation iterates its subprocess sequence based on a dynamic list of input objects. - - 36 Compar Load ROI from Disk This operation loads an image file from fixed storage BW C 37 Compar Loop Statement This operation implements some loop statements we're all used to from C/C++ programming. - - 38 Compar Mathematical Expression Parser This operation parses a mathematical formula and evaluates it using the given input values. - - 39 Compar Mathematical Operations This operation allows to perform mathematical - logical operations - - 40 Compar Matrix Code Reader This operation reads a matrix code. BW C version 2.0 19.11.14 Operations 24 41 Compar Measure Circle This operation performs sub-pixel circle measurement BW - 42 Compar Measure Line This operation performs sub-pixel line measurement BW - 43 Compar Measure Pick Position This operation determines a list of points which can pick up by a robot based on a list of objects. - - 44 Compar Measure Point This operation performs sub-pixel point measurement BW - 45 Compar Measurement Group This operation allows the building of a sub-sequence of operations. - - 46 Compar Message Box This operation displays a user-defined message box - - 47 Compar Operation Circle / Circle This operation computes measurements between two circles. - - 48 Compar Operation Line / Circle This operation computes measurements between a line and a circle. - - 49 Compar Operation Line / Line This operation computes measurements between two lines. - - 50 Compar Operation Point / Circle This operation computes measurements between a point and a circle. - - 51 Compar Operation Point / Line This operation computes measurements between a point and a line. - - 52 Compar Operation Point / Plane This operation computes measurements between a point and a plane. - - 53 Compar Operation Point / Point This operation computes measurements between two points. - - 54 Compar QDAS DFD Reader This operation reads a Q-DAS DFD file and creates the associated structure. - - 55 Compar QDAS DFX Writer This operation writes a DFX file based on a DFD definition - - 56 Compar Ring Warp This operation transforms a ring image into a rectangle image for further processing. BW C 57 Compar Rotate Image This operation rotates the images BW C 58 Compar Save ROI to Disk This operation allows the saving of a ROI into a file. BW C 59 Compar Save To File This operation allows the storage of a collection of values into a text file - - 60 Compar Scale And Rotate This operation performs a scaling and/or rotation operation on the input image, producing a transformed output image. BW C 61 Compar Shading Correction This operation allows the shading correction of an image based on reference images. BW - 62 Compar Simple Transforms This operation performs simple transforms such as mirroring or inversion. BW C 63 Compar Sorter This operation sorts a list of objects based on their features. - - 64 Compar Statistic Display This operation has several counters and displays a statistic with the counters. - - version 2.0 19.11.14 Operations 25 65 Compar Statistic List This operation manages a list of statistical value trackers. - - 66 Compar String Output List This operation formats a string output based on a list of variables. - - 67 Compar Switched Data This operation defines a switch statement for setting a set of output variables. - - 68 Compar Switched Execution This operation branches execution to one of several subgroups based on a list of conditions and outputs its results for further processing. - - 69 Compar Teach Variables This operation memorizes arbitrary values generated in a teach cycle for future reference. - - 69 Compar Texture This operation processes different types of images for texture analysis. BW - 70 Compar Thresholding This operation segments an image using a single threshold - either manually set or automatically computed. BW - 71 Compar User Defined Event This operation throws an event with an arbitrary integral ID through the COM interface. - - 72 Compar Variable Array This operation allows the construction of an array of variables. - - 73 Compar Variable Assignment This operation copies variable values for cases when a variable link is inappropriate. - - 74 Compar Variable List This operation allows the management of a set of variables. - - 75 Compar Variable Watch This operation performs statistical monitoring on a given variable. - - 76 FlexFactory Anyfeeder SX Control This operation controls the motion and outputs of an Anyfeeder SX device. BW - 77 Database MySQL This operation allows the management of a MySQL database. - - 78 OpenCV Alignment This operation performs an alignment with scaling and rotation. BW - 79 OpenCV Blob This operation extracts contours for object segmentation. BW - 80 OpenCV Color To Grayscale Conversion This operation converts a color image to grayscale using the method of your choice. - C 81 OpenCV ComparMatch This operation executes a gray-scale matching with rotation using image pyramid. BW - 82 OpenCV Convolution This operation performs an arbitrary convolution on the input image. BW - 83 OpenCV Geometric Fitting This operation fits a geometric primitive through a set of points - - 84 OpenCV Match This operation performs a grays-cale matching without scaling and rotation. BW - 85 OpenCV Operations This operation applies an arbitrary sequence of filters. BW C version 2.0 19.11.14 Operations 26 Appendix Limitations There are no limitations in the management of an image processing sequence. The limitations of this program are: version 2.0 - No possibility to acquire an image from a physical camera - No possibility to communicate to any PLC. 19.11.14 Appendix 27