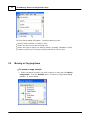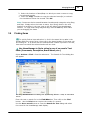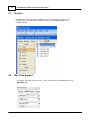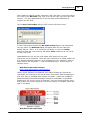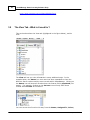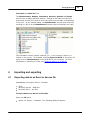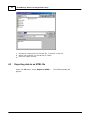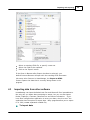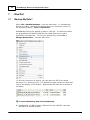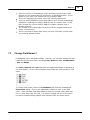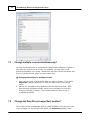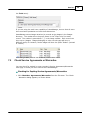
1
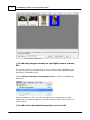
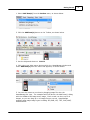
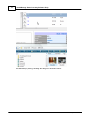
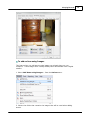
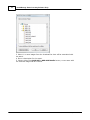
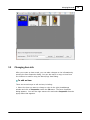
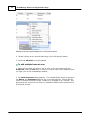
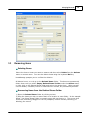
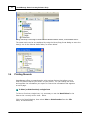
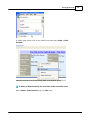
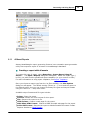
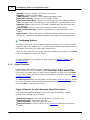
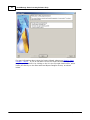
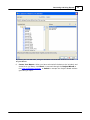
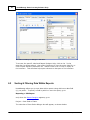
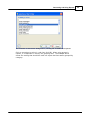
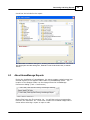
HomeManage 2014
Getting Started Guide
Copyright © 1999-2014
I
HomeManage Home Inventory Software Help
Table of Contents
Foreword
Part I Getting Started
0
1
1 Creating
...................................................................................................................................
a Home Inventory
1
Part II General Info
5
1 Introducing
...................................................................................................................................
HomeManage
5
2 How to ...................................................................................................................................
Buy and Contact Info
6
3 Upgrading
...................................................................................................................................
from an earlier version of HomeManage
7
4 Installing
...................................................................................................................................
HomeManage
7
5 Legal Notices
................................................................................................................................... 8
6 Data Security
................................................................................................................................... 9
Part III Keeping Records
9
1 Creating
...................................................................................................................................
item records
9
2 Changing
...................................................................................................................................
item info
14
3 Removing
...................................................................................................................................
items
16
4 Printing
...................................................................................................................................
Records
17
5 Moving
...................................................................................................................................
or Copying Items
19
6 Finding
...................................................................................................................................
Items
20
7 Queries
................................................................................................................................... 21
8 Bar Code
...................................................................................................................................
Support
21
9 The View
...................................................................................................................................
Tab - What is it used for?
23
Part IV Importing and exporting
24
1 Exporting
...................................................................................................................................
data to an Excel or Access file
24
2 Exporting
...................................................................................................................................
data to an HTML file
25
3 Importing
...................................................................................................................................
data from other software
26
Part V Managing Locations
27
1 What are
...................................................................................................................................
Locations?
27
2 Creating
...................................................................................................................................
new locations
28
3 Editing...................................................................................................................................
Locations
28
4 Removing
...................................................................................................................................
Locations
29
Part VI Generating and Using Reports
29
1 Creating
...................................................................................................................................
Reports
29
All Asset Reports
.......................................................................................................................................................... 32
Report Tem plates
.......................................................................................................................................................... 33
© 1999-2014 Liberty Street Software
Contents
II
Custom Reports
.......................................................................................................................................................... 34
Label and Report
..........................................................................................................................................................
Designer
34
Step-by-Step
.........................................................................................................................................................
Example: Report
36
2 Sorting
...................................................................................................................................
& Filtering Data Within Reports
41
3 About ...................................................................................................................................
HomeManage Reports
44
Part VII How Do I
45
1 Backup
...................................................................................................................................
My Data?
45
2 Change
...................................................................................................................................
Field Names?
46
3 Change
...................................................................................................................................
multiple records simultaneously?
47
4 Change
...................................................................................................................................
the Data File (or Image files) location?
47
5 Check...................................................................................................................................
Service Agreements or Warranties
48
6 Create...................................................................................................................................
a Category?
49
7 Create...................................................................................................................................
A Query?
50
8 Edit a ...................................................................................................................................
Category?
51
9 Remove
...................................................................................................................................
a Category?
52
10 Sort Items?
................................................................................................................................... 52
11 Specify
...................................................................................................................................
which columns I want to see?
53
12 Track ...................................................................................................................................
expenses related to an item?
54
Part VIII Troubleshooting
54
1 Trouble-shooting
...................................................................................................................................
and Frequently asked questions
54
Index
56
© 1999-2014 Liberty Street Software
II
1
HomeManage Home Inventory Software Help
1
Getting Started
1.1
Creating a Home Inventory
HomeManage lets you create an inventory using several different methods.
From the HomeManage main menu, select File > Add Room... to add new
rooms to the program.
A common home inventory strategy is to use a digital camera to take pictures
of all your possessions in a certain area or room. You can then connect your
digital camera and download the images to your computer. If you have done
this, you can then:
Select Actions>Add Items using Images... from the HomeManage main
menu.
Choose the folder that contains the images you wish to use. Most digital
cameras will create a new folder in your Pictures folder that has the date the
images were imported from your camera.
© 1999-2014 Liberty Street Software
Getting Started
Select one or more images for the item to be added, then enter a description in
the Asset Description field. The Quick Add button will add an item to the
current Location / Room with the description and selected images. You can
later enter more information about the item. The Add with Details button will
bring up the Add Asset dialog box where you can enter additional information
about the item such as cost, manufacturer, model, etc..
© 1999-2014 Liberty Street Software
2
3
HomeManage Home Inventory Software Help
To add using Images currently on your digital camera, scanner,
etc..
It is not necessary to use image files on your computer with HomeManage, you
can directly access your digital camera, scanner or other WIA (Windows Image
Acquisition)-compatible device.
Choose Actions> Add Items using Images Source... from the HomeManage
main menu.
Select the device to use. You can then add items to program by selecting
images and entering a description in a manner similar to that shown in the first
section above.
To add an item and attach images later (or not at all)
© 1999-2014 Liberty Street Software
Getting Started
1. Select Add Item(s) from the Actions menu, as shown below.
2. Click the Add Item(s) button on the Toolbar, as shown below.
3. Use the Keyboard shortcut: Ctrl+N
4. Click using your right mouse button within the HomeManage window and
select Add Item(s) from the menu that appears, as shown below.
5. You can also create a new item by dragging image files into the
HomeManage list view. The example below will launch the Add Item(s) dialog
with the AddNote.JPG image as an image. Each record can have up to 16
images, so you can drag up to 16 image files per record. HomeManage
supports most major image types including JPG, BMP, GIF, TIFF, PNG, WMF,
ICON and EMF.
© 1999-2014 Liberty Street Software
4
5
HomeManage Home Inventory Software Help
T h e Ad d Ite m (s ) d ia lo g , s h o win g Ad d No te .JP G , a s d e s cr ib e d a b o v e .
2
General Info
2.1
Introducing HomeManage
What Is HomeManage?
HomeManage allows you to maintain records of all your personal possessions. It
can be used for estate planning, tax or insurance purposes, or simply because you
would like to keep track of what you own.
HomeManage Features include:
Quickly document the entire contents of your home.
Easily inventory your possessions using images directly from your digital camera
Attach photos and receipts to your items. Keep track of repairs and other
expenses.
Export Reports to Microsoft Excel, PDF and many other formats.
Keep track of Warranties and Insurance information.
Single click backup of all data and photos to a ZIP file.
Includes reports for Insurance and Estate Planning. Us the integrated Report
Designer to create your own reports.
You can inventory multiple locations. Create separate inventories for different
residences.
For Business users, we have an Asset Tracking application called AssetManage.
AssetManage includes all the features you see in HomeManage as well as:
Support for Monthly & Annual Depreciation
Abillity to automatically Assign asset numbers, prefixes & suffixes
Check In/Check Out Features.
Linking of assets together.
Asset Audit capabilities.
An ODBC version that will support SQL Server and other ODBC-compatible
databases.
The View Tab lets you enumerate notebook items by Assigned To, Due Date,
Item Type & more.
Please visit www.AssetManageSoftware.com for more information.
© 1999-2014 Liberty Street Software
General Info
2.2
How to Buy and Contact Info
How to buy HomeManage
HomeManage 2014 Order Page
http://www.libertystreet.com/home_inventory_purchasing_options.htm
HomeManage 2014 Web-Site
http://www.libertystreet.com/Asset-Home-Inventory.htm
HomeManage 2014 Support
http://www.libertystreet.com/HomeManage_Support.htm
HomeManage Facebook Page
To Contact Liberty Street Software:
You can contact Liberty Street Software Liberty Street Software at any time:
Sales - [email protected]
Tech Support - [email protected]
Feature Suggestions - [email protected]
Online Chat
Click on the Online Chat Operator Graphic at:
http://www.assetmanagesoftware.com/ContactUs.aspx
Mailing Address
USA
Liberty Street Software
228 Park Ave S #26512
New York, NY
10003-1502
CANADA
Liberty Street Software
3126 Lednier Terrace
Mississauga, ON
L4Y 4A1
Canada
© 1999-2014 Liberty Street Software
6
7
HomeManage Home Inventory Software Help
Phone
Sales: (888) 250-6615
Technical Support: (905) 566-5082
Note that you can access our website and e-mail through hyperlinks in the About
dialog box.
2.3
Upgrading from an earlier version of HomeManage
To upgrade to HomeManage 2014 from an earlier
version
1.
2.
3.
Install Version 2014 either by running the downloaded
setup file or from the CD.
Make sure you select the same installation directories
as were used in the previous version of HomeManage.
These directories will appear as the defaults in their
respective install screens.
Run HomeManage. The first time you run the
program your data will be converted if necessary.
No te : HomeManage must be able to both read from and write to the source of
the file's data, so backup files should be saved on hard drives or other
writeable media and not read-only CD-ROMs. A data import from a read-only
CD will not work.
2.4
Installing HomeManage
System Requirements
HomeManage requires the following minimum system configuration to operate
properly:
Windows XP, Vista, Windows 7 or 8.x (32 & 64 bit versions)
800x600 SVGA display set at High Color (16-bit) or higher
At least 60 MB free hard drive space.
The Setup program will show you exactly how much space is required, and
let you know if there is not enough space available on the selected drive.
Images can greatly increase the amount of space HomeManage uses. All
© 1999-2014 Liberty Street Software
General Info
images you attach to records are converted to jpg format and stored in the .
\AssetImages directory. If you attach a lot of images to records by scanning or
importing, take note of the image size.
How Do I Install From The CD?
Simply insert the CD into your CD-ROM drive. The setup program should start
automatically. If the Setup program does not start automatically, run AUTORUN.
EXE or SETUP.EXE from the root directory of the CD.
Registration Code information
Liberty Street Software supplies a unique registration code with each software
purchase. The code appears on the CD if you bought the CD-ROM version. If you
ever lose the code, please email us and we will look it up for you.
2.5
Legal Notices
HomeManage is protected by Canadian and International Copyright Laws.
Copyright ©1999-2014 by Liberty Street Software. All rights reserved. No part
of this document may be reproduced, transmitted or translated into any other
language by any means including but not limited to electronic, manual, or
mechanical, without the express written permission of Liberty Street Software,
3126 Lednier Terrace, Mississauga, ON L4Y 4A1 Canada (905) 566-5082.
Uses and Limitations
Backup copies of HomeManage may be made in accordance with the above
limitation.
You may not copy or transmit the program to any other person or group.
You may not modify the structure of the database for the purposes of resale
or trade to a third party.
Limitation of Liability
In no event will the author be liable for direct, indirect, special, incidental, or
consequential damages arising out of the use of this software or
documentation. In particular, the author is not responsible for any costs,
© 1999-2014 Liberty Street Software
8
9
HomeManage Home Inventory Software Help
including but not limited to those incurred as a result of lost profits or revenue,
loss of use of the computer program, loss of data, the cost of substitute
programs, claims by third parties or for similar costs.
2.6
Data Security
HomeManage comes with a Microsoft Access format, non-password-protected
data file (ASSETS.MDB). You can use Microsoft Access to set a password for
this file:
Using Microsoft Access (the syntax may vary depending on your version of
Access):
1.
2.
Open the HomeManage Data file (ASSETS.MDB) in Exclusive mode.
Use the Set Database Password... to specify a password
For further security, you can also use Microsoft Access to Encrypt the data
file. Users wishing to encrypt data or password protect files must do so within
Microsoft Access, not within HomeManage. HomeManage simply requests the
password on program startup and refuses access after three tries if the
password has not been entered correctly.
En te r in g a p a s s wo r d in H o m e M a n a g e
3
Keeping Records
3.1
Creating item records
To add an item
There are numerous ways to begin adding items in HomeManage.
1. Select Add Item(s) from the Actions menu, as shown below.
© 1999-2014 Liberty Street Software
Keeping Records
2. Click the Add Item(s) button on the Toolbar, as shown below.
3. Use the Keyboard shortcut: Ctrl+N
4. Click using your right mouse button within the HomeManage window and
select Add Item(s) from the menu that appears, as shown below.
5. You can also create a new item by dragging image files into the
HomeManage list view. The example below will launch the Add Item(s) dialog
with the AddNote.JPG image as an image. HomeManage supports most major
image types including JPG, BMP, GIF, TIFF, PNG, WMF, ICON and EMF.
© 1999-2014 Liberty Street Software
10
11
HomeManage Home Inventory Software Help
T h e Ad d Ite m (s ) d ia lo g , s h o win g th e im a g e a s d e s cr ib e d a b o v e .
© 1999-2014 Liberty Street Software
Keeping Records
To add an item using Images
This feature lets you add assets using images you already have on your
computer. These images have usually already been downloaded from a digital
camera.
1. Select Add Items using Images... from the Actions menu.
2. Choose the folder that contains the images that will be used when adding
assets.
© 1999-2014 Liberty Street Software
12
13
HomeManage Home Inventory Software Help
3. Select 1 or more images from the thumbnail list that will be associated with
the asset.
4. Enter a description for the asset.
5. Choose either the Quick Add or Add with Details button, a new asset with
the selected images will be created.
© 1999-2014 Liberty Street Software
Keeping Records
3.2
Changing item info
After you create an item record, you can make changes to the information by
opening the Item Properties dialog. You can also move or copy an item from
one location to another using the Move/Copy Item Dialog.
To edit an item
There are several ways to edit an item, including:
1. Select the item you want to change or view in the right HomeManage
window and click on Properties under the File menu. The Item Properties
dialog appears. You can also right mouse-click and select Properties from the
popup menu that appears.
© 1999-2014 Liberty Street Software
14
15
HomeManage Home Inventory Software Help
Ed itin g a n ite m b y r ig h t- clickin g o n it, a s d e s cr ib e d a b o v e .
2. Double-clicking on an item will also bring up the Edit Item(s) dialog.
3. Selecting Alt+Enter on the keyboard
To edit multiple items at once
1. Select all the items you wish to edit or view in the list window and click
Properties under the File menu or from the context menu which appears when
you right-click in the HomeManage window.
2. The Item Properties dialog appears. The example below shows a change in
the Status and Comments fields for the 3 records selected. Clicking OK will
result in the data entered in these 2 fields to be changed in all 3 records. Any
data previously entered in the Status or Comments fields will be overwritten on
all selected records.
© 1999-2014 Liberty Street Software
Keeping Records
3.3
16
Removing items
Deleting Items
Select the item or items you want to remove and then select Delete from the Actions
menu or context menu. You can also delete items using the keyboard Del key.
HomeManage prompts you to confirm the deletion.
All deleted a sse t re c ords go to the Deleted Items folder. This does not permanently
delete them until you select Empty 'Deleted Items' Folder under the Actions menu,
or right-click on the Deleted Items folder and select the option there. Other records,
such as Dealer, Customer, Insurer or Manufacturer records, are permanently deleted.
Recovering items from the Deleted Items Folder
1) Open the Deleted Items folder by clicking on item
2) Drag the items you wish to restore back to a location or room folder. In the example
below, the Delete Items Folder is currently open with one item in it. The screen shot
shows the item being 'dragged' to the 'My Company' location thereby restoring (undeleting) the record.
© 1999-2014 Liberty Street Software
17
HomeManage Home Inventory Software Help
"D r a g - a n d - d r o p " r e s to r in g a n ite m fr o m th e D e le te d Ite m s Fo ld e r , a s d e s cr ib e d a b o v e .
The same result can be accomplished by using the Move/Copy Items dialog to move the
item(s) out of the Deleted Items folder, as shown below.
3.4
Printing Records
HomeManage offers a comprehensive print preview feature that allows you to
view the printout before you send it to your printer. You can change the fonts
and organize the information you require to control the information that appears
on each page.
To Print (or Print Preview) a single item
To Print or Preview a single item, it is necessary to set the Detail View for the
item as the currently active view. Either
Click in the Detail Window, then select Print or Print Preview from the File
menu, as shown below,
© 1999-2014 Liberty Street Software
Keeping Records
or simply right mouse-click in the Details View and select Print or Print
Preview.
S e le ctin g P r in t P r e v ie w in th e D e ta ils Vie w, a s d e s cr ib e d a b o v e .
To Print (or Print Preview) the contents of the record list view
Select Print or Print Preview from the File menu.
© 1999-2014 Liberty Street Software
18
19
HomeManage Home Inventory Software Help
The Print Setup dialog will appear. From this dialog you can:
Specify which columns you wish to print.
Select the font to use when printing text
Select the type of report you wish to produce (Catalog, Detailed or Table)
Choose to print only the items currently selected in the list view.
3.5
Moving or Copying Items
To move or copy records
1. Select the asset record(s) you wish to move or copy and click Move/
Copy Items... from the Actions menu. The Move or Copy Items dialog
appears, as shown below.
© 1999-2014 Liberty Street Software
Keeping Records
2. Select the location or Room/Dept. to which you want to move or copy
the selected records.
3. Check the Copy checkbox to copy the selected record(s) or uncheck
the checkbox to move the records. Click OK.
No te : Items can also be moved between locations and categories using Drag
and Drop. Simply select the items to move, then "drag" them to the new
location or category in the tree view on the left side of the HomeManage
window. To copy items using drag and drop, hold the Ctrl key down while
you are dragging the items.
3.6
Finding Items
To quickly find an item and select it, click in the asset list to make it the
window with the current focus, then type in the Asset Number of the asset you
are looking for. If an asset with the entered asset number is present in the list,
that asset record will be selected and scroll into view.
Use HomeManage to find a string in any of an asset's Text
fields (Comments, Description, Brand Name, etc..)
Select Actions > Find... from the main menu. The Search for Text dialog box
will appear.
In v o kin g th e S e a r ch fo r T e x t d ia lo g b o x b y s e le ctin g Actio n s > Fin d , a s d e s cr ib e d
abov e.
Enter the text to search for in the Find What box. Then click on the Find
button. Use the Print button to print the results of a search.
Use the Go to record button to close the Search for Text dialog and select
the record in the HomeManage main display.
© 1999-2014 Liberty Street Software
20
21
3.7
HomeManage Home Inventory Software Help
Queries
HomeManage uses the Query capabilities built into Microsoft Access. Any
queries you create are stored directly within the HomeManage data file
(ASSETS.MDB).
3.8
Bar Code Support
As shown using Microsoft Access™, each item record in HomeManage has a
BarCode field.
© 1999-2014 Liberty Street Software
Keeping Records
When adding or editing records, associate a bar code with a record by placing
the cursor in the Bar Code field, then scan the bar code using your bar code
scanner. The text representation of the bar code will automatically be
inserted into the field.
Use the Bar Code Lookup dialog to later retrieve the item record.
If a bar code scanned within the Bar Code Lookup dialog is not associated
with any asset, the Add Item dialog will appear with the bar code field
already filled in. Note: It is usually not necessary to click the Lookup
button as most bar code scanners will add an Enter character at the end of
the bar code scan.
HomeManage can use any bar code reader that inputs the bar code
characters via the keyboard. These are often referred to as wedge readers as
they wedge themselves between your keyboard and your computer. Some of
these devices are "driverless" -- they are hardware only. Others require a
software driver.
Web Site for bar code scanners
http://www.idautomation.com/scanners/
Liberty Street Software recommends users obtain durable pre-printed bar
code labels for attaching to the actual asset items rather than attempting to
print their own on standard laser printers and paper. Labels are available in
materials ranging from laminated paper through to solid plastic or anodized
aluminium to suit every end use environment. You can choose different sizes
and formats with custom features (such as including your company name and
logo on the label).
Web Site for bar code labels
© 1999-2014 Liberty Street Software
22
23
HomeManage Home Inventory Software Help
http://www.expresscorp.com/barcodelabels3.asp
3.9
The View Tab - What is it used for?
This section describes the View tab (highlighted in the figure below), and its
uses.
The View tab lets you view information in many additional ways. In the
example below, the Status icon tree menu has been expanded to show the
different Status values used by asset records within HomeManage. Clicking on
the Status icon will show all records where the Status field is populated (not
empty). For example, clicking on the On Loan icon will only show those
records with On Loan as the status.
You can access this function this way from the Status, Assigned To, Colors,
© 1999-2014 Liberty Street Software
Keeping Records
Year Made and Made Of icons.
The Manufacturers, Dealers, Customers, Insurers, Queries and Groups
icons work in a slightly different manner. Clicking on the main icon does not
show asset records, but rather a list of the items from the table corresponding
to the icon. In the example below, the Manufacturer icon has been selected,
resulting in a list of all the Manufacturer records from the Manufacturer table.
This information can be printed, exported, etc., in the context in which it is
viewed on the screen. For example, selecting Export to HTML at this point will
export a list of Manufacturers to the HTML file of your choosing. For more
information on exporting to HTML, see Exporting data to an HTML file.
4
Importing and exporting
4.1
Exporting data to an Excel or Access file
HomeManage can export data to 3 formats:
HTML
Microsoft Access – MDB files
Microsoft Excel – XLS files
To export data to an Access or Excel file:
Under the File menu,
Select the 'Export…' command. The following dialog will appear:
© 1999-2014 Liberty Street Software
24
25
HomeManage Home Inventory Software Help
Choose an existing Excel or Access file, or specify a new file.
Select the locations you would like to export.
Click the 'Export' button.
4.2
Exporting data to an HTML file
Under the File menu, select Export to HTML… .
appear:
The following dialog will
© 1999-2014 Liberty Street Software
Importing and exporting
Select an existing HTML file, or specify a new one.
Select the fields to be exported.
Click on the 'Export' button.
If the Show in Browser after Export checkbox is selected, your
default Internet Browser will open with the resulting HTML Document.
Like many other features in HomeManage, the Export to HTML
feature exports the data that is currently being shown in the
program.
4.3
Importing data from other software
HomeManage can import delimited text files and Microsoft Excel spreadsheets.
Not only can you import data pertaining to assets, but you can also import
Dealer, Employee, Customer, Manufacturer and Insurer information. If you
have been using another application to store your data, check to see if the
application has the option to export data. Many programs allow you to export
to a .CSV (comma separated variable file).
To import data
© 1999-2014 Liberty Street Software
26
27
HomeManage Home Inventory Software Help
1. Select Import Data... from the File menu
2. Choose a Text File (.csv, .tab, .txt, .asc) or Excel (.xls) file. and then
select the Open button.
3. HomeManage will show the field structure of the file to be imported in the
Source Field Names column. You will also see the first few rows of data from
the import file. To select a Destination Field for each column, click on the
appropriate row and column within the Destination Field. Then select the
appropriate column from the drop-down list that appears.
Tip: If you are having trouble importing an Excel Spreadsheet, try saving the
spreadsheet as a CSV file and then try the import again.
5
Managing Locations
5.1
What are Locations?
Locations
Locations represent a particular home or office, although it is certainly possible
to use locations to represent something else, such as a vehicle, company or
person. HomeManage provides flexibility, allowing you to use locations in the
most convenient manner for you. In the example shown below, the locations
are Cottage and My Company (highlighted).
Feature Note: Collectors of physical objects using HomeManage to catalogue
their collections may want use locations to represent particular collections. For
instance, Mary Smith has a collection of dolls, and is using HomeManage to
keep track of them. She could then create new "Room/Dept." sub-locations
(like "Dining Room," "Board Room," and "Public Relations" in the figure above)
which would actually represent particular categories within her doll collection
location. Some of Mary Smith's sub-locations could be "19th century Dolls" or
"Barbie Dolls."
The way locations work for you depends on your needs. Some things to keep
in mind when organizing your locations are:
Where are the items physically located?
© 1999-2014 Liberty Street Software
Managing Locations
28
Remember, if you change your locations later, you can easily move the
appropriate items into the new locations and remove the obsolete locations
Rooms
HomeManage allows you to specify which room or department an asset is
located in. Click on the Room to see only the assets found in the selected
Room.
5.2
Creating new locations
You can create locations at any time. A location consists of a Name and
Comments. If you need to change the name of the location, you can change it
by choosing the "Properties" menu item while the location is selected. This is
described in more detail in the following section on Editing Locations. You can
create as many locations as you need.
To create a location
1. Click New Location from the File menu. The Create a New Location dialog appears.
2. Provide a descriptive Name for the location. You can optionally add information
about the location in the Description area.
5.3
Editing Locations
You can modify the location's description as well as the information that
appears on the status bar when the location is opened.
To edit a location
1.
2.
Select the location you want to modify in the Locations tab in the main
window.
Cllick Properties from the File menu. The Location Properties dialog
appears.
Make changes to the Name and description and status bar information as
necessary.
© 1999-2014 Liberty Street Software
29
HomeManage Home Inventory Software Help
Ch a n g in g th e te x t in th e Lo ca tio n b o x , a s d e s cr ib e d a b o v e .
5.4
Removing Locations
You can remove locations at any time. Remember to move your items to
another Location before deleting the location where they reside.
To remove a location
1.
2.
3.
Select the location you want to delete in the Locations tab on the main
window.
Click Delete on the File menu. HomeManage asks you to confirm your
deletion.
Click Yes to remove the location.
Deleting a location will delete all assets that belong to that location. To
recover items accidentally deleted, open the Deleted Items folder and
'drag' the items out to another location.
6
Generating and Using Reports
6.1
Creating Reports
The quickest way to generate a simple report is to use the Generate Asset Report
command Reporting > Generate Asset Report... from the main menu.
© 1999-2014 Liberty Street Software
Generating and Using Reports
30
Enter the name of the report, then specify which fields should be shown, sorting and
grouping options. The Create Report and Design... button will create the report and
open the HomeManage report designer with the newly created report in edit mode. The
Create Report and Close button will simply create the report immediately with no
further actions necessary.
© 1999-2014 Liberty Street Software
31
HomeManage Home Inventory Software Help
Once a report is created, you can execute it by selecting Output Report Using... from
a popup menu or from the Reporting main menu.
© 1999-2014 Liberty Street Software
Generating and Using Reports
6.1.1
All Asset Reports
Among HomeManage's report-generating features is an automatic report generation
utility that outputs a report of all assets in HomeManage's database.
Creating a report with all assets
To create this type of report, select Reporting > Output Report Using All
Assets... The Open > Reports dialog box will appear. Select the report type (.
lst file) you wish from the predefined report templates (or your custom .lst files).
For more information on using report templates, see Report Templates.
Once you choose a report type from the .lst files available, the Print Options
dialog box will appear. The default setting ("Direct to...") is to send the report to
the default printer, but you can choose from many file types and output formats
using the "Direct to..." drop-down menu.
Available output formats and file types include:
Printer: Prints the report.
Preview: Shows the Print Preview for this report.
File: Outputs the report to a file.
HTML Format: Creates a web page for the report.
Multi-Mime HTML Format: Creates a MIME encoded web page for the report.
Adobe PDF Format: Outputs the report to Adobe Portable Document Format.
Requires Acrobat or Adobe Reader.
© 1999-2014 Liberty Street Software
32
33
HomeManage Home Inventory Software Help
Bitmap: Creates a graphic (.bmp) file of the report.
Metafile: Outputs to EMF format.
JPEG (Picture): Outputs to JPEG compressed image format.
Multi-TIFF (Picture): Outputs to TIFF graphic format.
Rich Text Format (RTF): Outputs to a word processor file compatible with all
major word processors (eg. MS Word, Corel WordPerfect, Sun StarOffice, etc.)
Pinwriter (TTY): Outputs to a file format compatible with ASCII printers and
TTY machines.
Text Format: Creates a plain text (ASCII) document of the report.
Microsoft Excel Format: Creates a spreadsheet for Microsoft Office of the
report.
XML Format: Outputs the report in Extensible Markup Language for use with
databases, dynamically-generated websites, and single-sourcing applications.
Configuring Options
The options section of the Print Options dialog box allows you to configure output
ranges by page (for example, all, 2-17) and the page number which appears on the
first page of the report (the upper right selection box).
Once you have selected your output type and configured your options, click Start
to have HomeManage output your report.
For more information on creating and using reports, see Report Templates and
Custom Reports.
6.1.2
Report Templates
HomeManage comes with five report templates (.lst files) built in. To create a
report using one of these templates, select Reporting > Output Report Using...,
then select the report type you wish from the available .lst files, then click Open.
You can also create your own custom report templates (.lst files) using the Label
and Report Designer.
The Print Options dialog box will appear, as described in All Asset Reports. Select
the report properties from the Export Media and Options sections of the dialog box,
then click Start to generate the report.
Types of Reports You Can Generate Using This Feature
Using only the predefined templates that come with HomeManage, you can
generate the following types of reports:
Assets by
Assets by
Assets by
Assets by
records.
Category: Sorts the list of assets by category (eg.
Room: Lists assets by room
Owner: Classifies assets by owner
Picture: Sorts according to the image files attached to the asset
© 1999-2014 Liberty Street Software
Generating and Using Reports
6.1.3
Custom Reports
HomeManage allows you to customize your own reports, aside from providing report
templates.
Creating Custom Reports
From the Reporting menu, select Create New Report. The Project Wizard will
appear, directing you through the steps to create a new project:
1.
2.
3.
4.
5.
Set print options and paper size
Set options for page numbering and title:
Choose table options and summary
Choose the data for the list
Create Your Report, proceed to the Label and Report Designer.
For more information on using these steps, see Step-by-Step Example: Report
6.1.4
Label and Report Designer
The Label and Report Designer allows you to create custom labels, file cards,
and reports to complement HomeManage's functionality. To open the Label and
Report Designer, select
Reporting > Create New Report... to create a new report working with .lst
files, or
Reporting > Create / Edit Labels... to create new labels or work with existing
label (.lbl) files, or
Reporting > Create / Edit File Card... to create new file cards or work with
existing card (.crd) files.
Note: In order to use the Edit... feature, you must have previously created .lbl
or .crd files. To edit labels or cards, select a .lbl or .crd file in the Open dialog
box.
Choosing Create... under Reporting takes you directly to the Project Wizard
main screen, as shown below:
© 1999-2014 Liberty Street Software
34
35
HomeManage Home Inventory Software Help
For more information about using the Project Wizard, please see Step-by-Step
Example: Report. If you do not want to use the Project Wizard to begin your
project, you can close it by clicking on the X in the top right-hand corner, which
takes you directly to the main Label and Report Designer screen, as shown
below.
© 1999-2014 Liberty Street Software
Generating and Using Reports
T h e La b e l a n d R e p o r t D e s ig n e r in te r fa ce , with a r e p o r t s h o win g As s e ts b y P ictu r e
in p r o g r e s s .
No te : The Label and Report Designer is third-party software, not provided by
Liberty Street Software, included with HomeManage to provide the features
described here. It comes with its own help file (not provided by Liberty Street
Software, and not part of this help file).
To access the specific Label and Report Designer Help, click on the ? in the
menu bar (as shown above), then select Contents to view the entire help file, or
click Context Sensitive and move the ? mouse cursor icon to click on a part of
the interface. This will show help topics relevant to that part of the interface.
S e le ctin g Co n te x t S e n s itiv e h e lp in th e La b e l a n d R e p o r t D e s ig n e r .
6.1.4.1
Step-by-Step Example: Report
To create a report as described in Custom Reports, follow these five steps:
© 1999-2014 Liberty Street Software
36
37
HomeManage Home Inventory Software Help
1.
Set print options and paper size: First, using the radio buttons, choose
whether all pages will be printed on the same printer, or whether the cover
page will be printed on a different printer than the following pages. Click Next
to proceed, or Back to return to the Project Wizard welcome screen. Then
set the printer for the report from the available printers (to change a printer
from the default setting, click Choice, which will invoke the Print Setup dialog
box). Then select whether you wish the print to cover the page format, or the
available printing area of the page, using the Force Page Format(s), if
possible and Use physical paper size and not the printable area checkboxes.
Click Next to proceed to Step 2, or Back to return to the initial
printer screen.
T h e P r o j e ct W iz a r d s cr e e n s e ttin g s o m e p r in t o p tio n s , a s d e s cr ib e d a b o v e .
2.
Set options for page numbering and title: HomeManage's default setting is
to number pages, so if you do not wish to have numbered pages, uncheck the
Add Page Numbering check-box. Then, under Options for the title, using
the radio buttons, choose whether your report title will appear only on the first
page or on every page of your report. Click Next to proceed to Step 3, or
Back to return to step 1.
© 1999-2014 Liberty Street Software
Generating and Using Reports
S e ttin g p a g e o p tio n s a n d title in th e P r o j e ct W iz a r d .
3.
Choose Object Type: You To create a report with a single table, simply
select the Table option.
Ch o o s e Ob j e ct T y p e .
4.
Choose the table that will be used for the report: HomeManage can create
reports based on data from different sources. The report designer can also
create nested tables. Choose the table that will be used as the initial base
table for this report. For this example, we will select the Asset table.
© 1999-2014 Liberty Street Software
38
39
HomeManage Home Inventory Software Help
S e le ct S o u r ce T a b le s cr e e n in th e P r o j e ct W iz a r d .
5.
Choose the data for the list: This box lets you choose which data goes into
the report. Click on entries in the Available Fields box to select them
(Ctrl+click to select multiple entries, Shift+click to select multiple sequential
entries), then use the > arrow to move the selected entries to the Selected
Fields box. To move all available fields, click the >> button. To remove fields
from the Selected Fields box, click the < button. To remove a ll fields from
the Selected Fields box, click the << button. You can also sort the selected
fields into whatever order you like (the default is the order in which they're
selected) by clicking on them to highlight them, then using the up- and downarrow keys to move them up and down the list to their desired places.
Unchecking the Add Column Titles check-box at the bottom right will remove
headings from the report. Click Next to proceed to Step 6, or Back to return
to step 4.
© 1999-2014 Liberty Street Software
Generating and Using Reports
40
P o p u la tin g th e lis t with d a ta , u s in g th e Av a ila b le a n d S e le cte d Fie ld s b o x e s in th e
P r o j e ct W iz a r d .
6.
Create Your Report: When you have selected all the data to be included, and
sorted it as you want, click Done! to proceed through the Project Wizard to
the Label and Report Designer, or Cancel to escape the Project Wizard without
generating a report.
© 1999-2014 Liberty Street Software
41
HomeManage Home Inventory Software Help
T h e La b e l a n d R e p o r t D e s ig n e r in te r fa ce .
To access the specific Label and Report Designer Help, click on the ? in the
menu bar (as shown above), then select Contents to view the entire help file, or
click Context Sensitive and move the ? mouse cursor icon to click on a part of
the interface. This will show help topics relevant to that part of the interface.
6.2
Sorting & Filtering Data Within Reports
HomeManage allows you to sort data within reports using whichever data field
(s) you prefer. To specify a field by which to sort the report, go to
Reporting > Edit Report
and, when the Report Designer appears, go to
Project > Sort Order of Data.
The selection of Sort Order dialogue box will appear, as shown below:
© 1999-2014 Liberty Street Software
Generating and Using Reports
T h e s e le ctio n o f S o r t Or d e r d ia lo g u e b o x , s h o win g th e a v a ila b le s o r t o p tio n s .
Click on an option to select it, and then click OK. When using groups in
reports, it is important to sort by the grouping field. The example above
shows the sorting that should be used in a report that has assets grouped by
category.
© 1999-2014 Liberty Street Software
42
43
HomeManage Home Inventory Software Help
T a b le S o r tin g
In addition to choosing the sorting field that will be used by the report, each
table can have a sort field associated with it. Select the table in the Report
structure view and then choose the sort field in the Properties window. In the
example shown, the report will be grouped by Category. The Categories will
be shown in alphabetical order. Within each category group the assets will be
sorted by Asset Number.
HomeManage also has a report filter, which allows you to set up parameters
by which to select the data appearing in a report. To access the report filter,
choose Project > Filter from the Report Designer main menu. When the Edit
Filter Condition dialog box appears, follow the tooltips and the internal Report
Designer help to create the filter, as shown below. In the example below
Asset.Category != "" specifies that assets without an assigned category
© 1999-2014 Liberty Street Software
Generating and Using Reports
should not be included in the report:
T h e Ed it Filte r Co n d itio n d ia lo g b o x , s h o win g Va r ia b le s a n d Fu n ctio n s . T o a cce s s
th e h e lp to p ics fo r th is d ia lo g b o x , click th e ? ico n in th e lo we r le ft, a s s h o wn
abov e.
6.3
About HomeManage Reports
During the installation of HomeManage, the setup program copied several predefined reports to the Reports folder under the HomeManage folder. The
location of the Reports folder can be changed from the HomeManage
Preferences dialog (Tools > Preferences)
Report files have the file extension .lst. You will also notice corresponding
files with the extension .lsv. these files contain the thumbnail image that is
shown when selecting a report to open or edit.
© 1999-2014 Liberty Street Software
44
45
HomeManage Home Inventory Software Help
7
How Do I
7.1
Backup My Data?
Select File > Backup Database... from the main menu. To automatically
backup your data, configure the Backup Directory & Frequency section in
the Preferences dialog - Tools > Preferences
HomeManage stores your backed up data in a ZIP file. The backup includes
the program data file ASSETS.MDB and any image files that you have
attached to entered items. To view your backup files, choose File >
Manage Backup Files... from the main menu.
To view the contents of a backup, you can open the ZIP file by doubleclicking on it or opening the file. The backup file name includes the Date and
Time of the backup in the filename. Older backup ZIP files can be deleted if
necessary.
To restore backed up data into HomeManage
HomeManage can ONLY import a Microsoft Access .MDB file that was
backed up to another location.
© 1999-2014 Liberty Street Software
How Do I
Previous versions of HomeManage (2007 and older) would create a new
filename for the backup data file and store it in the Backup folder. If this
applies to your case, first rename the file to ASSETS.MDB
If you are restoring from version 2014, first unzip the backup file.
Copy the ASSETS.MDB file to the Data folder in your current HomeManage
installation, replacing the ASSETS.MDB file that is currently there (To be
safe, rename the current ASSETS.MDB file or make a backup copy in
another location)
The location of the Data folder can be found in the program Preferences
(Tools > Preferences).
There is no need to import data unless you have suffered a system crash
or accidently deleted records.
7.2
Change Field Names?
HomeManage has 2 user defined fields. However, you can also change the field
names for several other fields, including:Color, Made Of, Year, Number Made
, Size and Shape.
The Color, Made Of and Year fields have the added advantage of appearing in
the View display. So you can enumerate these fields and view records by field
value.
To change field names, Select the Field Names tab from the HomeManage
Preferences dialog. Click on the appropriate column to enter a new field
value. Leave the New Field Name blank to keep the old field name. Note that
the << Asset User Field Tab Title >> is used to change the title of the tab in
the Asset Properties dialog named "User Defined Fields," as shown below.
© 1999-2014 Liberty Street Software
46
47
7.3
HomeManage Home Inventory Software Help
Change multiple records simultaneously?
You may occasionally wish to go back and change some information common to
more than one item record at a time. For example, you may wish to add
insurance information for 8 items. Rather than edit each record individually and
fill in the insurance fields, there is a much easier way:
Changing information for multiple records
1.
2.
7.4
Select all the items records whose data you wish to change. Then select
Properties from the main menu or from the right mouse-click context
menu.
Specify the information to be updated in all the selected records. Note
that leaving a field blank will NOT result in any information in that field
being set to empty (erased). The field will retain the data (if any) it
contained previously.
Change the Data File (or Image files) location?
The location of the HomeManage data file (ASSETS.MDB) or the directory used
to store images can be changed from within the Preferences dialog (under
© 1999-2014 Liberty Street Software
How Do I
the Tools menu).
If you are using the multi-user capability of HomeManage, be sure that all users
have read-write permission on both these directories.
HomeManage stores images attached to records as jpg images in the Images
directory. The number after the prefix 'Asset' is the unique id of the asset
record. The number in parenthesis "( )" is the image number. Each record can
have up to 4 images. Images belonging to other record types will have a
different prefix, for instance, Dealer images will have the prefix "Dealer" (instead
of "Asset").
As s e t im a g e s with p r e fix e s a n d n u m b e r s , a s d e s cr ib e d a b o v e .
7.5
Check Service Agreements or Warranties
You can check for expired (or soon to expire) Service Agreements/Warranties
that apply to items you have entered into HomeManage.
Checking for Expiring Service Agreements/Warranties
1. Click Check Svc. Agreements/Warranties from the File menu. The Check
Warranties dialog appears, as shown below.
© 1999-2014 Liberty Street Software
48
49
HomeManage Home Inventory Software Help
2. Select the date from which you would like to begin checking warranties.
3. Select the end date, then click the Check button.
All the items whose warranties expire between the 2 dates selected will be
shown. You can then print the list by clicking on the "Print..." button.
7.6
Create a Category?
Creating Categories
There are several ways to create a category or room:
1. Click the Add Category… or Add Room... button in the Preferences
dialog, as shown below.
© 1999-2014 Liberty Street Software
How Do I
2. Type the name of the new category in the Category window when
adding or editing an item. To add a room "on the fly," perform the same action
in the Room/Dept. field.
3. A third way to create a new category is to right mouse-click in the
Category view and select Add Category…
7.7
Create A Query?
Suppose you would like to view all the assets that you acquired in December of
2000, or perhaps you would like to view all the assets you own that are worth
more than 1000 dollars. You can accomplish this by creating an HomeManage
Query. To create a Query either:
Select Add Query from the Actions menu
Type Ctrl+Q on your keyboard
The following dialog will appear:
A valid query requires a name, and at least 1 condition. The Create and
Create and Execute buttons will only be enabled when a valid query has been
specified. Below is an example of a query. When executed, this query will
display all assets that were purchased in December of 2003.
© 1999-2014 Liberty Street Software
50
51
HomeManage Home Inventory Software Help
Once you have successfully added a Query, you can be view it in the Queries
section as seen below
To execute the Query, simply click on it.
7.8
Edit a Category?
To edit a category
1.
2.
Select the category you want to modify in the Category tab in the main
window.
Click Properties from the File menu, or from the popup menu that appears
when you right mouse-click. The Category Properties dialog appears, as
shown below.
© 1999-2014 Liberty Street Software
How Do I
7.9
Remove a Category?
HomeManage ships with many pre-defined categories and rooms. You many
want to simplify data entry by removing unnecessary rooms and/or categories.
To delete unused Rooms and/or Categories
1. From the HomeManage Setup dialog, select the rooms and categories you
would like to remove. Note that you can select multiple items in both the
room and category list controls. You many select multiple items by holding
down the Shift or Control keys on the keyboard and using the mouse pointer
to click on the entries and select multiple items. The Shift key will select
multiple sequential entries, and the Control key will select multiple individual
entries.
2. Click the delete button.
3. Click the OK button to permanently delete the items, or
4. Click the Cancel button to abort the process.
S e le ctin g m u ltip le ite m s in th e S e tu p d ia lo g , a s d e s cr ib e d a b o v e .
7.10
Sort Items?
How Do I Sort Items?
To sort items by column, click on the column header. Click on the header again to
toggle the sort from Ascending to Descending and vice-versa. The example below
shows a Descending sort on the Description field.
© 1999-2014 Liberty Street Software
52
53
7.11
HomeManage Home Inventory Software Help
Specify which columns I want to see?
Each company or individual has different needs and requires different information from
HomeManage. Liberty Street Software has kept these differences in mind when
designing HomeManage. You can determine the information you need most often or is
most important to you.
To specify the information you want to view
1.
From the HomeManage Preferences window, open the Columns tab, as shown
below.
2.
For each category, select and organize the columns you want to see using the
following buttons:
Delete — Select a column in the Show the Following area and click Delete to remove
the column from the display.
Add — Select a column in the Available Columns area and click Add to display the
column.
Move Up — Select a column in the Show the Following area and click Move Up to have
the column display further to the left.
Move Down — Select a column in the Show the Following area and click Move Down to
© 1999-2014 Liberty Street Software
How Do I
54
have the column display further to the right.
Reset — Click Reset to ignore your changes and return to the default column setup.
7.12
Track expenses related to an item?
Track expenses related to an item by using the 'Item Notebook' tab when adding or
editing items. This tab is for tracking repairs, part replacements, and other expenses
incurred related to an asset. Use the Add..., Edit... and Delete buttons to manage
entries.
8
Troubleshooting
8.1
Trouble-shooting and Frequently asked questions
Q: I can't see newly imported data after using the Import
A: Try closing and reopening the application.
Q:
A:
function
I change the database location. HomeManage cannot find the database
afterward.
Try closing and reopening the application.
© 1999-2014 Liberty Street Software
55
HomeManage Home Inventory Software Help
Q:
A:
1.
2.
I get "Divide by Zero" errors, or GPFs when trying to add items
Try this:
Run Regedit.exe
Delete All ../Software/Liberty Street Software/HomeManage nodes in both
HKEY_CURRENT_USER and HKEY_LOCAL_MACHINE
Try running HomeManage again.
4.
Q:
A:
Q:
HomeManage crashes when exiting, or when adding items.
This is usually because the Headers.wcd has become corrupted. Delete the
file and try running HomeManage again.
When trying to run HomeManage, a message similar to this appears:
"T he M ic rosoft Je t da t a ba se e ngine c a nnot ope n t he file ...
\Hom e M a na ge \Asse t s.m db. It is a lre a dy ope ne d e xc lusiv e ly by a not he r use r, or
y ou ne e d pe rm ission t o v ie w it s da t a ."
A:
This usually happens when a file called Assets.ldb gets corrupted. Delete
Assets.ldb ( NOT ASSETS.mdb !!) from your HomeManage directory and try
running the program again.
© 1999-2014 Liberty Street Software
Index
Index
-Ddelete an item
16
delete unused Rooms
Deleted Items
29
departments
27
Divide by Zero
54
-..asc
26
.lst files
33
.tab
26
.txt
26
-E-
-550comupd.exe
54
-AAccess
21, 24
Add Category
49
Add Query
50
AssetManage Business
Assets.mdb
5, 21, 45
data security
9
5
-Bbackup
7, 45
backup your data
bar code support
BMP
9
52
45
21
-CCategory Name
51
Category Properties
51
Check Warranties
48
Collate
17
column
53
Columns
53
Contact Information
6
Copies
17
Copy
19
copyright
8
create a category
49
csv 26
custom reports
34
© 1999-2014 Liberty Street Software
edit a category
51
edit a location
28
edit item
14
EMF
9
encryption
9
example how-to
36
Excel
24, 26
expenses
54
export
24, 25
Export data to an Access or Excel file
Export to HTML
25
-FFAQ
54
features
5
file formats
32
find item
20
find what
20
-GGIF
9
-Hhome
HTML
27
25
-IICON
9
images
9
import
7
Importing data
26
24
56
57
HomeManage Home Inventory Software Help
installation
7
interface
23
Item Notebook
54
item properties
14
item records
9
project wizard
34, 36
Properties
51
-Qqueries
Query
-JJPG
9
-R-
-Llabel and report designer
34, 36
Legal Notices
8
Liberty Street Software Technical Support
Liberty Street Software web-site
6
Limitation of Liability
8
locations
27
-Mmanipulating report data
Move Down
53
Move Up
53
move/copy item
14
Move/Copy Note
19
Multi-User Setup
7
-Nnew category
New Location
49
28
-Ooffice
21
50
27
-PPNG
9
Print
17
print options
32
Print Preview
17
Print Quality
17
Print Range
17
print setup
17
41
6
records
9
recover deleted item
16
Registration Code information
remove a location
29
report
36
report templates
33
reports
29, 32, 34, 41
Reports folder
44
reports with all assets
32
Reset
53
rooms
27
7
-Sscanner
21
search
20
search string
20
search text
20
Set Database Password.
9
setup
7
Show Totals
17
Sort
41, 52
Sort report data
41
Sorting
52
System Requirements
7
-TTechnical Support
6
TIFF
9
To add an item
9
Track expenses
54
Troubleshooting
54
© 1999-2014 Liberty Street Software
Index
-Uunused Rooms
52
upgrade
7
Upgrade to from an earlier version
7
using AssetManage with bar codes
21
-Vview information
View tab
23
23
-Wwarranties
48
Web Site
6
website
6
What Are Locations
WMF
9
27
© 1999-2014 Liberty Street Software
58