1
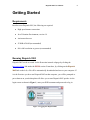
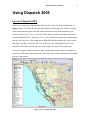
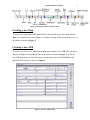
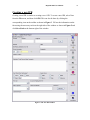
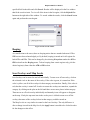
Dispatch 2005 User Manual
1
Dispatch 2005
User Manual
Build 1001
Dispatch 2005 User Manual
2
Table of Contents
Dispatch 2005 ........................................................................................................................ 1
User Manual.......................................................................................................................... 1
Table of Contents.................................................................................................................. 1
Table of Contents.................................................................................................................. 2
List of Figures ....................................................................................................................... 3
Overview................................................................................................................................ 4
Overview................................................................................................................................ 4
Getting Started...................................................................................................................... 5
Requirements ...................................................................................................................... 5
Running Dispatch 2005 ...................................................................................................... 5
Using Dispatch 2005 ............................................................................................................. 6
Layout of Dispatch 2005 .................................................................................................... 6
Creating a new Map............................................................................................................ 7
Creating a new ATR ........................................................................................................... 7
Creating a new IPR............................................................................................................. 8
Saving a Map ...................................................................................................................... 9
Launching a Map ................................................................................................................ 9
Deleting a Map ................................................................................................................... 9
Printing a Map .................................................................................................................... 9
Closing and Exiting ............................................................................................................ 9
Map Engine ........................................................................................................................ 9
Reload Map ...................................................................................................................... 10
Back and Forward............................................................................................................. 10
Toggle Legend Visibility.................................................................................................. 10
Toggle Icon Flags ............................................................................................................. 10
Select ................................................................................................................................ 10
Pan .................................................................................................................................... 11
Zoom................................................................................................................................. 11
Measure ............................................................................................................................ 11
Lat Lon Selector ............................................................................................................... 11
Point Id ............................................................................................................................. 12
Bearing & Distance .......................................................................................................... 13
Dead Reckoning ............................................................................................................... 13
Lightning .......................................................................................................................... 14
SFMS Legend ................................................................................................................... 14
Find Place/Roadname ....................................................................................................... 15
Lists .................................................................................................................................. 15
Beeping............................................................................................................................. 16
Icon Overlays and Map Levels......................................................................................... 16
Glossary ............................................................................................................................... 17
Dispatch 2005 User Manual
3
List of Figures
Figure 1: Logging into Dispatch 2005.................................................................................... 5
Figure 2: Layout of Dispatch 2005......................................................................................... 6
Figure 3: The toolbar buttons and their names ....................................................................... 7
Figure 4: The New ATR window ........................................................................................... 7
Figure 5: The New IPR window............................................................................................. 8
Figure 6: The Point Id window displays weather conditions, location and other information
about a specific location on the map .................................................................................... 12
Figure 7: The Bearing and Distance window ....................................................................... 13
Figure 8: The Lightning Range window with start date and time and optional end date and
time ....................................................................................................................................... 14
Figure 9: The Find Place/Roadname window ...................................................................... 15
Figure 10: The search window ............................................................................................. 16
Dispatch 2005 User Manual
Overview
Dispatch 2005 is a program that was developed by Selkirk Systems for the Ministry of
Forests, Protection Branch. At the time of writing this manual, the most recent build is
1001, which was released on August 14, 2005. This software is still under development, so
newer versions are expected in the future. This Protection Branch-specific software is used
province wide by Protection staff. It is used to view, monitor, and manage information and
resources that are used for fighting forest fires. This manual explains the features and tools
of Dispatch 2005. It also illustrates how to use these tools, and why they would be used.
4
Dispatch 2005 User Manual
Getting Started
Requirements
In order to run Dispatch 2005, the following are required.
• High speed internet connection
• Java 2 Runtime Environment, version 1.4
• An internet browser
• 512MB of RAM (recommended)
• 800 x 600 resolution or greater (recommended)
Running Dispatch 2005
Dispatch 2005 can be accessed via the Protection internal webpage by clicking the
Interactive Maps link under the PISYS section. From there, by clicking on the Dispatch
2005 link on the left, a file will be automatically downloaded and run on your computer. If
it is the first time you have run Dispatch 2005 on that computer, you will be prompted to
put a shortcut on your desktop that will allow you to start Dispatch 2005 quicker. At the
login screen as shown in Figure 1, enter your IDIR username and password to log in.
Figure 1: Logging into Dispatch 2005
5
Dispatch 2005 User Manual
6
Using Dispatch 2005
Layout of Dispatch 2005
There are six main parts to the Dispatch 2005 window. These six parts are illustrated in
Figure 2 below. The Menu Bar has the main functions of Dispatch. The Toolbar contains
many of the functions in the menu bar, and are shortcuts for the most commonly used
functions. The Icon Overlays is a list of all of the objects, resources and other data that are
tracked in Dispatch 2005. The Map Levels is a list of all the layers that can be displayed on
the map. The Map Area is the actual map in Dispatch 2005 that displays all of the overlays
and map levels that are selected. The view of the map can be manipulated by the tools
available in the toolbar as well. The Status Bar displays the scale of the current map
viewed, the progress indicator when the map is being downloaded, and the coordinates of
the position of the mouse in the map area. All of these parts will be explained in more depth
later on in the manual.
Figure 2: Layout of Dispatch 2005
Dispatch 2005 User Manual
7
Figure 3: The toolbar buttons and their names
Creating a new Map
To create a new map instance in Dispatch 2005, from the File menu, select New and then
Map. You can also create a new instance of a map by clicking on the corresponding icon on
the toolbar as shown in Figure 3.
Creating a new ATR
To create a new ATR, select New from the File menu, and then click ATR. This can also be
done by clicking the corresponding icon on the toolbar as shown in Figure 3. When the
new ATR form shows up, fill out the necessary information and click Save/Send on the
right side of the window as shown in Figure 4.
Figure 4: The New ATR window
Dispatch 2005 User Manual
Creating a new IPR
Creating a new IPR is similar to creating a new ATR. To create a new IPR, select New
from the File menu, and then click IPR. This can also be done by clicking the
corresponding icon on the toolbar as shown in Figure 3. Fill out the information on the
form using the necessary tools on the right side of the window as shown in Figure 5 and
click Save/Send on the bottom right of the window.
Figure 5: The New IPR window
8
Dispatch 2005 User Manual
9
Saving a Map
To save a map and all of the overlays and map levels preferences, as well as the current
zoom and map position, select Save Map As…. Then enter in a name for the map to be
called, and if desired, check Load on Startup and click OK.
Launching a Map
To open a previously saved map, from the File menu, select Launch Map and click the
desired map to load.
Deleting a Map
The steps in deleting a map are very similar to launching a map. From the File menu, select
Delete Map and click the desired map to delete.
Printing a Map
To print a map, position the map in the Map Area to print, and then select Print Map from
the File menu.
Closing and Exiting
To close the current map, select Close from the File menu. This will close only the current
instance of the map. To close all the open maps and exit Dispatch 2005, select Exit from
the File menu.
Map Engine
There are three different map engines in Dispatch 2005. The default engine is called
WebTracker and includes the original maps from WebTracker. The second one is
FireView. This engine uses satellite images and orthophotos. The third engine is the NASA
World coverage satellite imagery which uses satellite images owned by NASA. To select a
different map engine to use, from the Tools menu, select Map Engine and choose one of
Dispatch 2005 User Manual
10
the map engines in the list. These engines can also be selected from the Toolbar by clicking
the corresponding icon as shown in Figure 3.
Reload Map
To reload a map and return to the last previously saved settings, click Reload Map from the
Tools menu. This can also be done by clicking on the corresponding icon on the Toolbar.
Back and Forward
A history is kept of every user’s change to the view of the map in Dispatch 2005. To go
back in the map history, click he back button on the Toolbar as shown in Figure 3. Or to go
forward in History, click the forward button next to the back button.
Toggle Legend Visibility
To turn off the legend on the left that contains the icon overlays and the map levels, click
Toggle Legend Visibility from the Tools menu, or click the corresponding icon on the
Toolbar as shown in Figure 3.
Toggle Icon Flags
To turn off the icon flags for some overlays on the map, click Toggle icon flags in the
Tools menu or click the corresponding icon on the Toolbar as shown in Figure 3.
Select
The select tool is used for opening up detailed information on an object that is displayed on
the map. Some examples are opening up an ATR or IPR form, a mobile resource, or an
incident. To use this tool, select Select from the Tools menu and then click on an object on
the map to bring up the detailed information. To see a preview of some of the information,
just rest the cursor over the icon’s flag and a box will appear with the information in it.
Dispatch 2005 User Manual
11
Pan
The pan tool is used for navigating around the map area. This tool moves the map around in
the current zoom to view other parts of the map. To use the pan tool, click Pan from the
Tools menu, or the corresponding icon as shown in Figure 3. When selected, click and hold
a place in the map area and drag the map around to change position.
Zoom
The zoom tool is used to view a more detailed area on the map. To use the zoom tool, select
Zoom from the Tools menu, or click on the corresponding icon on the Toolbar as shown in
Figure 3. To zoom in, use the left mouse button to click on in the map area or scroll up
with the scroll wheel. To zoom out, use the right mouse button to click on the map area or
scroll down. To zoom to a certain region or to view the entire province in the map area,
select the desired region from the Zoom To menu.
Measure
The measure tool is used for determining distance on the map. To use the measure tool,
select Measure from the Tools menu, or click on the corresponding icon on the Toolbar as
shown in Figure 3. To measure the distance between two objects, click and hold the left
mouse button starting at one object and move the mouse to the other object and release the
mouse button. To continue the line from the last point to another point, just move the
mouse to the new point and click the left mouse button once. To draw curved lines, press
the Alt button on the keyboard and click the hold the left mouse button. Then navigate with
the mouse button on the map to measure a curved line. To erase the measurements on the
map, click the right mouse button and all measurements will be cleared.
Lat Lon Selector
The lat lon selector is only enabled for certain tools in Dispatch 2005, for example,
selecting the coordinates of a destination for the Bearing & Distance tool. To use this tool,
select Lat Lon Selector from the Tools menu, or the corresponding icon on the Toolbar as
Dispatch 2005 User Manual
12
shown in Figure 3, and pick the location. This location can be a mobile resource by
clicking on the icon on the map, or any other location by clicking anywhere on the map
Point Id
The point id tool is used for retrieving information on a given location on the map. To use
the point id tool, select Point Id from the Tools menu, or click on the corresponding icon
on the Toolbar as shown in Figure 3. Click on a place on the map and a window will come
up similar to the one shown in Figure 6. This window displays the latitude and longitude of
the location, as well as the region and district that the location is in. It also includes the
hourly and daily weather from the closest weather station. If the location is in an aboriginal
reserve or park, then it will show which reserve or park it is in. to perform a point id query,
right click on a location on the map and select the table and field to get results from the
specified location.
Figure 6: The Point Id window displays weather conditions, location and other information about a
specific location on the map
Dispatch 2005 User Manual
13
Bearing & Distance
The bearing and distance tool is used for determining the distance from specified resources
to a specified resource. To use this tool, select Bearing & Distance from the Tools menu,
or the corresponding icon in the Toolbar as shown in Figure 3. A window will show up
similar to the one shown in Figure 7. Pick an icon type to measure the distance from on the
left of the window. If the icon type is not in the list, click the Customize button and select
the mobile resources from the icon overlays list. Then using the Set Lat/Lon tool that is
automatically selected, pick a destination on the map. In the results part of the window, a
list will appear of all of the icon types and their distances to the selected destination. To
change the type of measurement, select Great Circle, Rhumb, or Magnetic below the list.
Figure 7: The Bearing and Distance window
Dead Reckoning
The dead reckoning tool is used for calculating the current position of a mobile resource.
When the tool is enabled, the calculated current position of a resource is displayed as a
small red dot that is attached by a line to the last known position of the resource. The
Dispatch 2005 User Manual
14
position is calculated from the last known location, speed, and direction of the mobile
resource. To enable this tool, select Dead Reckoning from the Tools menu.
Lightning
The lightning tool displays both positive and negative lightning strikes that have been
reported within the specified time frame. To use this tool, select the lightning icon as
displayed in Figure 3. A window will be displayed as shown in Figure 8. Pick a start date,
and an end date. If no end date is specified, all lightning strikes from the start date right up
to the current time will be displayed. Click the Apply button and all of the lightning strikes
within the chosen time frame will appear.
Figure 8: The Lightning Range window with start date and time and optional end date and time
SFMS Legend
The SFMS Legend contains a list of different map levels and their corresponding values
shown when using the WebTracker map. To enable the SFMS Legend, pick some map
levels as described in the Map Levels section of this manual, and click the SFMS Legend
button as shown in Figure 3.
Dispatch 2005 User Manual
15
Find Place/Roadname
The find place/roadname tool is used for finding the name and information of a specific
location given the coordinates, or vice versa. To use this tool, select Find Place/Roadname
from the Find menu, or click the corresponding icon on the Toolbar as shown in Figure 3.
Enter in the known information about the place, either the placename or the coordinates
using the Set Lat/Lon tool. Once a placename has been chosen, a roadname can be looked
up. To find a roadname, enter in the name in the field below as displayed in Figure 9.
Figure 9: The Find Place/Roadname window
Lists
To view a complete list of a certain item in Dispatch 2005, select an icon from the Lists
menu. A window will appear with a table containing a complete list of all of the
information related to every item in that list.
To search in the list, click the Search button on the right. A window will appear as shown
in Figure 10. In the Search For drop down box, pick a field from the table and in either the
Exact Phrase OR the Containing the Phrase field, enter in the text to search for in the
Dispatch 2005 User Manual
16
specified field in the table and click Search. Results will be displayed in the List window
that fit the search criteria. To view all of the items in the list again, click the Refresh List
button on the right side of the window. To search within the results, click the Search button
again and perform the search again.
Figure 10: The search window
Beeping
As a notification to the users, there are beeping noises that are sounded when an ATR or
IPR have not been acknowledged yet. By default, beeping is turned on for all regions for
both ATRs and IPRs. This can be changed by de-selecting Everywhere under the ATR or
IPR section from the Beeping menu. To hear beeping from certain regions only, pick the
desired region(s) from either the ATR or IPR section.
Icon Overlays and Map Levels
Icon Overlays can be turned on and off individually. To turn on or off an overlay, click on
the coloured circle or the name of the overlay. If the color is green, it is turned on. If the
color is yellow, not all of the overlays for that category are turned on. Finally, if the color is
red, then the overlay is turned off. In order to ensure the overlays are turned on, expand the
category by clicking on the plus on the left until there are no more pluses in that category.
Then turn on or off each overlay individually and instantly icons will appear or disappear
on the map. If only the top most item in the overlay tree is clicked to turn on or off the
overlay, then none of the overlays below in that category could be turned on.
The Map Levels are very similar in control to the Icon Overlays. The only difference is
after a change is made in the Map Levels, the Apply button is needed to be clicked in order
for the changes to take affect.
Dispatch 2005 User Manual
17
Glossary
PISYS – the abbreviation for Protection Information Systems.
ATR – the abbreviation for Air Tanker Request. Dispatchers make these requests to send
out Air tankers to fires.
IPR – the abbreviation for Initial Phone Report. The 1-800 centre creates these reports
from phone calls.
Webtracker - web-based application used by Ministry of Forests Protection program staff
province wide to identify, view and monitor various types of geographically referenced
data
Orthophoto - a completely rectified copy of an original photograph. All variations in scale
and displacements, due to relief, have been eliminated, hence the name ortho (correct)
photography. Orthorphoto and orthophoto map are synonymous, an orthophoto is, very
simply, a photo map.
Mobile Resource – any resource from air tankers to forestry trucks that have tracking
devices in the resource that are tracked in Dispatch 2005.
Incident – when a fire is reported, an incident number is assigned to the fire.
SFMS Legend – the legend that displays Spatial Fire Management System data.