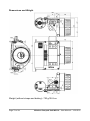
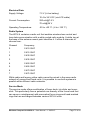
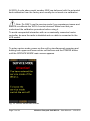
1
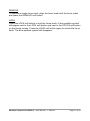
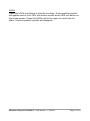
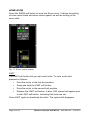
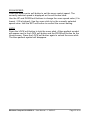
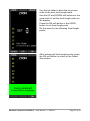
Wireless Compact Unit WCU-4
Software Update Packet 2.0
U S E R
th
M A N U A L
Date: 9 February 2015
Page 2 of 84
Wireless Compact Unit WCU-4 – User Manual – V 02/2015
Imprint
Copyright © 2014 Arnold & Richter Cine Technik GmbH & Co. Betriebs KG.
All rights reserved. No portions of this document may be reproduced
without prior written consent of Arnold & Richter Cine Technik GmbH & Co.
Betriebs KG. Specifications are subject to change without notice. Errors,
omissions, and modifications excepted. ARRI, ALEXA, LDS and LENS
DATA SYSTEM are trademarks or registered trademarks of Arnold &
Richter Cine Technik GmbH & Co. Betriebs KG. All other brands or
products are trademarks or registered trademarks of their respective
holders and should be treated as such. Original version.
For further assistance:
ARRI Cine + Video Geräte Gesellschaft m.b.H.
Pottendorferstraße 25-27/3/1
A-1120 Vienna
Austria
E-mail: [email protected]
www.arri.com
Scope
This instruction manual applies to the following product: Wireless Compact
Unit WCU-4 with Software Update Package (SUP) 2.0
Document Information
Version
Document No.
Date
01
K5.74422.0
17.06.2013
02
K5.74422.0
27.11.2013
03
K5.74422.0
15.01.2014
04
K5.74422.0
09.02.2015
Wireless Compact Unit WCU-4 – User Manual – V 02/2015
Page 3 of 84
Table of Contents
Disclaimer ................................................................................................... 6 For Your Safety .......................................................................................... 8 Risk Levels and Alert Symbols .......................................................... 8 Vital Precautions ................................................................................ 9 General Precautions .......................................................................... 9 Audience and Intended Use ............................................................... 9 Introduction .............................................................................................. 10 How to Use This Manual .................................................................. 11 Scope of Delivery ............................................................................. 11 System Requirements ...................................................................... 11 QUICK START GUIDE .............................................................................. 12 Setting up Motor Controller .............................................................. 12 Powering up Hand Unit .................................................................... 12 Connecting to Motor Controller ........................................................ 12 Calibrating Motors ............................................................................ 12 Using a Pre-Marked Focus Ring ...................................................... 12 System Configuration .............................................................................. 13 Motor Assignment ............................................................................ 13 Wireless Operation .......................................................................... 13 Wired Operation ............................................................................... 15 Network Mode .................................................................................. 15 Lens Data System Options .............................................................. 17 Layout ....................................................................................................... 18 Control Panel ............................................................................................ 21 Power Button ................................................................................... 21 Soft Buttons ..................................................................................... 22 Menu Navigation .............................................................................. 22 Home Screen ............................................................................................ 23 HOME>CAL ..................................................................................... 24 HOME>CAM .................................................................................... 25 HOME>FOCUS................................................................................ 29 HOME>IRIS ..................................................................................... 32 HOME>ZOOM ................................................................................. 34 Page 4 of 84
Wireless Compact Unit WCU-4 – User Manual – V 02/2015
MENU ......................................................................................................... 36 Radio Channel ................................................................................. 37 Control Setup ................................................................................... 38 Motor Setup ..................................................................................... 41 Pre-marked Focus Ring ................................................................... 44 Lens Data ......................................................................................... 45 Lens Programming ........................................................................... 46 Circle of Confusion ........................................................................... 59 User Button ...................................................................................... 59 Backlight .......................................................................................... 61 User Settings ................................................................................... 62 Firmware .......................................................................................... 63 System Info ...................................................................................... 67 Appendix ................................................................................................... 68 Screen Icons .................................................................................... 68 Screen Messages ............................................................................ 69 Accessories ...................................................................................... 70 Compatible Products ........................................................................ 71 Connector Pin-Outs ......................................................................... 71 Dimensions and Weight ................................................................... 72 Electrical Data .................................................................................. 73 Radio System ................................................................................... 73 Service Mode ................................................................................... 73 Zoom Calibration Mode ....................................................................... 75 Knob Calibration Mode ........................................................................ 76 Slider Calibration Mode .................................................................... 77 ARRI Service Contacts .................................................................... 79 International Declarations and Certifications ................................... 80 Wireless Compact Unit WCU-4 – User Manual – V 02/2015
Page 5 of 84
Disclaimer
Before using the products described in this manual be sure to read and
understand all respective instruction.
The ARRI Wireless Compact Unit WCU-4 is only available to commercial
customers. The customer grants by utilization that the WCU-4 or other
components of the system are deployed for commercial use. Otherwise the
customer has the obligation to contact ARRI preceding the utilization.
While ARRI endeavors to enhance the quality, reliability and safety of their
products, customers agree and acknowledge that the possibility of defects
thereof cannot be eliminated entirely. To minimize risk of damage to
property or injury (including death) to persons arising from defects in the
products, customers must incorporate sufficient safety measures in their
work with the system and have to heed the stated canonic use.
ARRI or its subsidiaries do not assume any responsibility for incurred
losses due to improper handling or configuration of the WCU-4 or other
system components.
ARRI assumes no responsibility for any errors that may appear in this
document. The information is subject to change without notice.
For product specification changes since this manual was published, refer to
the latest publications of ARRI data sheets or data books, etc., for the most
up-to-date specifications. Not all products and/or types are available in
every country. Please check with an ARRI sales representative for
availability and additional information.
Neither ARRI nor its subsidiaries assume any liability for infringement of
patents, copyrights or other intellectual property rights of third parties by or
arising from the use of ARRI products or any other liability arising from the
use of such products. No license, express, implied or otherwise, is granted
under any patents, copyrights or other intellectual property right of ARRI or
others.
Page 6 of 84
Wireless Compact Unit WCU-4 – User Manual – V 02/2015
ARRI or its subsidiaries expressly exclude any liability, warranty, demand
or other obligation for any claim, representation, or cause, or action, or
whatsoever, express or implied, whether in contract or tort, including
negligence, or incorporated in terms and conditions, whether
by statue, law or otherwise. In no event shall ARRI or its subsidiaries be
liable for or have a remedy for recovery of any special, direct, indirect,
incidental, or consequential damages, including, but not limited to lost
profits, lost savings, lost revenues or economic loss of any kind or for any
claim by third party, downtime, good-will, damage to or replacement of
equipment or property, any cost or recovering of any material or goods
associated with the assembly or use of our products, or any other damages
or injury of the persons and so on or under any other legal theory.
In the case one or all of the foregoing clauses are not allowed by applicable
law, the fullest extent permissible clauses by applicable law are validated.
Wireless Compact Unit WCU-4 – User Manual – V 02/2015
Page 7 of 84
For Your Safety
Always keep this document on hand. It should be read, understood and
observed by all persons using the Wireless Compact Unit WCU-4. All other
products must be handled as prescribed by their manufacturers.
Risk Levels and Alert Symbols
Safety warnings, safety alert symbols, and signal words in these
instructions indicate different risk levels:
This symbol alerts you to personal injury hazards or damage to the
equipment. Obey all warnings that follow this symbol to avoid possible
injury or death or damage to the equipment.
This symbol alerts you to electrical hazards. Obey all warnings that
follow this symbol to avoid possible injury or death.
DANGER!
Indicates an imminent, hazardous situation, which, if not avoided, will result
in death or serious injury.
NOTICE: Explains practices not related to physical injury. The safety alert
symbol is not used with this signal word.
Note: Provides additional information to clarify or simplify a procedure.
Page 8 of 84
Wireless Compact Unit WCU-4 – User Manual – V 02/2015
Vital Precautions
NOTICE: Read and follow all instructions before using the product.
Use the product only as described therein. Never open it. Never insert
objects.
Never attempt to repair the product: always have it repaired and serviced
by authorized ARRI Service Centers.
Never remove or deactivate any product safety equipment (incl. guarantee
stickers).
Always protect the product from moisture, cold, heat, dirt, vibration, shock,
or aggressive substances.
General Precautions
Use only the tools, materials and procedures recommended in this
document. Unplug all cables during transport.
Do not store the WCU-4 in places where it may be subject to temperature
extremes, direct sunlight, high humidity, severe vibration,
or strong magnetic fields.
Audience and Intended Use
NOTICE: The product is solely and exclusively available for commercial
customers and shall be used by skilled personnel only. Always contact
ARRI preceding other uses. Every user should be trained according to
ARRI guidelines.
The WCU-4 is a hand unit solely and exclusively for remote iris, focus or
zoom control and remote camera control:
•
Wireless via ARRI white radio modem
• Wired via ARRI LCS connection
Never use the product for any other purpose. Always follow the valid
instructions and system requirements for all equipment involved.
Wireless Compact Unit WCU-4 – User Manual – V 02/2015
Page 9 of 84
Introduction
The Wireless Compact Unit WCU-4 is a lightweight, ergonomic hand unit offering up to 3-axis lens control. Rugged and splash proof, it features an
easy-to-read lens data display, vibrating alerts that allow focus pullers to
keep their eyes on the action and ALEXA remote control functionality. The
large lens data display reflects ambient light and remains clearly visible
even in direct sunlight, while the backlit focus knob and control buttons
allow the WCU-4 to also be used in darkness.
WCU-4 Main Features:
•
Ergonomic 3-axis lens control
•
Vibrating markers
•
Easy-to-read lens data display
•
Ultrasonic distance readout
•
Backlit focus knob with adjustable friction
•
Pre-marked focus rings
•
Focus tracking function
•
Remote REC and tally
•
Advanced ALEXA remote control
•
Lens programming interface
Visit www.arri.com/ecs/wcu-4 for up-to-date product information and
software updates.
Page 10 of 84
Wireless Compact Unit WCU-4 – User Manual – V 02/2015
How to Use This Manual
Connectors are written in all capital letters, for example, LCS.
Buttons are written in all capital letters, for example, HOME button.
Menus and screens are written in italic letters, for example, CAM menu and
Home screen.
The appendix at the back of the manual contains useful reference material
including radio frequencies, spare parts and additional accessories,
connector pin-out diagrams and dimensional drawings.
Scope of Delivery
On delivery, please check if the package and its contents are intact. Never
accept a damaged/incomplete delivery. A complete delivery includes:
•
Wireless Compact Unit WCU-4
•
Hand strap
•
Lanyard
•
SD card
•
User manual
•
Original packaging
For scope of warranty, please ask your local ARRI representative. ARRI is
not liable for consequences from inadequate shipment, improper use, or
third-party products.
System Requirements
To tap the full potential of the device, have all connected units updated to a
firmware equal or higher to those listed below.
Product
Firmware
Universal Motor Controller UMC-4
SUP 1.1
ALEXA Plus/Studio
SUP 11.0
Single Motor Controller SMC-1
SUP 1.0
ENG Motor Controller EMC-1
SUP 1.0
Wireless Compact Unit WCU-4 – User Manual – V 02/2015
Page 11 of 84
QUICK START GUIDE
This quick start guide walks you through setting up the WCU-4 with a motor
controller and up to three motors for wireless lens control.
Setting up Motor Controller
First, set up the motor controller on the camera. For details, please read
the motor controllers manual. Make sure to set the correct motor
side/direction and torque.
Powering up Hand Unit
Insert a Sony NP-FM 500H Li-Ion battery (ARRI order no. K2.47851.0).
Press the POWER button momentarily. The WCU-4 screen will light up.
Connecting to Motor Controller
Press the MENU button. Enter the Radio Channel menu. Select the same
radio channel as set on the corresponding ARRI motor controller with
white-coded radio modem. Make sure that the radio transmission is
switched on (upper center soft button). Return to Home screen by pressing
the BACK or HOME button. The selected radio channel will be indicated in
the top center area of the Home screen. A signal strength indicator will be
displayed as soon as a connection between WCU-4 and motor controller is
established.
Calibrating Motors
Calibrate the motor(s) by pressing the CAL soft button on the WCU-4
Home screen or on the motor controller.
Using a Pre-Marked Focus Ring
The use of pre-marked focus rings on the WCU-4 hand unit requires lens
data from the motor controller (Universal Motor Controller UMC-4 or
ALEXA Plus/Studio type camera).
Press the WCU-4 MENU button. Enter the Pre-Marked Focus Rings menu
and select a focus ring. Return to Home screen by pressing the BACK or
HOME button. The selected focus ring will be indicated next to the
numerical focus value in the center of the screen. The digital focus scale on
the display will now align with the pre-marked focus ring.
You are now ready to shoot.
Page 12 of 84
Wireless Compact Unit WCU-4 – User Manual – V 02/2015
System Configuration
The WCU-4 hand unit can control up to three lens motors and provides
remote ALEXA camera control.
The connection between a hand unit and the motor controller can be either
wireless or hard-wired.
A WCU-4 hand unit can be used in parallel with two additional hand units
(so called 'network mode').
Motor Assignment
A lens motor is automatically assigned to its respective control device
(focus knob, iris slider, zoom stick) upon initialization of the system.
If a lens motor is connected to the running system, a popup message on
the WCU-4 screen offers you the option of assigning the lens motor
manually.
Wireless Operation
One WCU-4 can control up to three lens motors on a UMC-4 motor
controller or an ALEXA Plus or Studio type camera.
The ALEXA Remote License Key activates remote camera setup
capabilities on the WCU-4.
Connecting an ALEXA Classic camera and the UMC-4 motor controller
with the UMC-4 to ALEXA cable (K2. 0005951) does provide ALEXA
Remote License compatibility for ALEXA Classic cameras as well.
CLM-2, CLM-3 or CLM-4
WCU-4
ALEXA Plus/Studio
Focus
Iris
Zoom
Fig. 1: WCU-4 controlling three motors on ALEXA Plus
Wireless Compact Unit WCU-4 – User Manual – V 02/2015
Page 13 of 84
WCU-4
UMC-4
CLM-2, CLM-3 or CLM-4
Focus
Iris
Zoom
Fig. 2: WCU-4 controlling three motors on UMC-4
One WCU-4 can control one lens motor (focus, iris or zoom) on the Single
Motor Controller SMC-1:
CLM-2, CLM-3 or CLM-4
WCU-4
SMC-1
Focus
Iris
Zoom
Fig. 3: WCU-4 controlling one motor on SMC-1
One WCU-4 can control focus, iris and zoom on a cine-style servo zoom
lens:
WCU-4
EMC-1
ENG Zoom
Fig. 4: WCU-4 controlling ENG lens servo module
Page 14 of 84
Wireless Compact Unit WCU-4 – User Manual – V 02/2015
Wired Operation
The above configurations are also possible in hard-wired mode. Use the
ARRI LCS cables to connect the WCU-4 to an ALEXA camera with Plus
module or to the Universal Motor Controller UMC-4.
The LCS wiring provides power and control lines. The maximum cable
length is 80 m (260 ft).
Note: The WCU-4’s radio transmission will be disabled automatically if
connected via LCS cable.
Network Mode
Up to three hand units (WCU-4, SXU-1, ZMU-3A or WZE-3) can connect to
one motor controller at the same time, in wireless or wired mode.
WCU-4
ALEXA Plus/Studio
CLM-2, CLM-3 or CLM-4
Focus
Iris
Zoom
SXU-1
ZMU-3A
Fig. 5: Sample network setup with ALEXA Plus
Wireless Compact Unit WCU-4 – User Manual – V 02/2015
Page 15 of 84
WCU-4
UMC-4
CLM-2, CLM-3 or CLM-4
Focus
Iris
Zoom
SXU-1
ZMU-3A
Fig. 6: Sample network setup with UMC-4
WCU-4
EMC-1
ENG Zoom
SXU-1
ZMU-3A
Fig. 7: Sample network setup with EMC-1
Page 16 of 84
Wireless Compact Unit WCU-4 – User Manual – V 02/2015
Lens Data System Options
Lens data is a continuous stream of information about the focus, iris and
zoom settings of a lens. The Universal Motor Controller UMC-4 and the
ALEXA Plus module, as well as the servo drive of ENG-type zooms, all
generate lens data.
Lens data can be displayed on the WCU-4 display and is an important
prerequisite for lens mapping and focus tracking.
Lens Mapping
Lens mapping is the mapping of a lens focus scale to a predefined, premarked focus ring on the WCU-4. Lens Mapping is available with the
Universal Motor Controller UMC-4 or an ALEXA camera including the Plus
module.
Focus Tracking
Focus tracking is a continuous, automatic focus adjustment based on the
distance measured by an ultrasonic measuring device such as the UDM-1.
Focus tracking on the WCU-4 hand unit is available if combined with the
Universal Motor Controller UMC-4 and a distance measuring device like
the Ultrasonic Distance Measure UDM-1 connected to the UMC-4.
UMC-4
WCU-4
CLM-2, CLM-3 or CLM-4
Focus
Iris
Zoom
UDM-1
Fig. 8: WCU-4 Focus Tracking setup with UDM-1 and UMC-4
Wireless Compact Unit WCU-4 – User Manual – V 02/2015
Page 17 of 84
Layout
Status LED
Antenna
REC Button
Power Button
Upper Soft Buttons
Focus Ring
Zoom Stick
Iris Slider
Focus Knob
Lens Data
Display
Friction
Adjustment
Tangible Index
Lower Soft Buttons
M4 Mounting
Points
Ambient Light
Sensor
Lanyard
Bushing
Battery
Compartment
Page 18 of 84
SD Card
Slot
Hand Strap
Lug
LCS
Connector
USER Button
Wireless Compact Unit WCU-4 – User Manual – V 02/2015
Interface
Description
Antenna
Integrated antenna.
Power Button
Switches the unit on/off. Press button briefly to
power-on the unit. Press and hold for approx. 3
seconds to turn the unit off.
REC Button
Press button briefly to start/stop recording.
Status LED
Displays the same status as currently shown on the
camera.
Ambient Light
Sensor
Controls display luminance as well as scale ring and
button illumination in automatic mode.
Upper Soft Buttons
Press button briefly to select the menu item shown
below.
Lower Soft Buttons
Press button briefly to select the menu item shown
above.
USER Button
User configurable push button.
Screen
3” transflective TFT color panel.
Displays camera and lens status and control
information.
Focus Knob
Controls focus lens motor. Re-configurable to iris
lens motor control.
Friction Adjustment
Adjusts the friction for the focus knob. Press and hold
the center button. Turn the focus knob clockwise to
increase the friction. Turn the focus knob
counterclockwise to decrease the friction.
Iris Slider
Slider controls iris lens motor. Re-configurable to
focus lens motor control.
Zoom Stick
Pressure-sensitive switch that controls zoom lens
motor and can be used to scroll through the menu.
Tangible Index
Tangible reference point near the focus knob.
Battery
Compartment
Push in the battery completely when loading. Shift
the release slider to release the battery.
SD Card Slot
Protected by rubber cap. Insert SD card ‘face up’.
Lanyard Bushing
Attach the lanyard here.
Wireless Compact Unit WCU-4 – User Manual – V 02/2015
Page 19 of 84
Interface
Description
Hand Strap Lug
Attach the hand strap here.
M4 Mounting
Points
M4 mounting points for optional accessories.
Page 20 of 84
Wireless Compact Unit WCU-4 – User Manual – V 02/2015
Control Panel
The WCU-4 features a comfortable and comprehensive user interface with
backlit buttons, enabling the user to quickly configure the system. The 3”
transflective LCD display shows vital lens and camera information, and is
easily readable in any ambient light conditions.
Fig. 9: WCU-4 Control Panel
Power Button
Press the power button momentarily to switch the WCU-4 on. To switch the
WCU-4 off, press the button for three seconds and a countdown is
displayed. If the button is released before the countdown has elapsed, the
WCU-4 does not shut down.
Wireless Compact Unit WCU-4 – User Manual – V 02/2015
Page 21 of 84
Soft Buttons
Six soft buttons are located above and below the display. They change
their behavior depending on the screen content, indicating the function
related to each button. Buttons without a label have no function in that
screen.
Menu Navigation
To access a new menu level, press the SELECT soft button or press the
USER button.
To go one level back up, press the BACK soft button.
Press the HOME soft button to return to the Home screen.
Use the UP/DOWN soft buttons or use the zoom stick to navigate through
the menu. Keep the soft button pressed to scroll through the list.
A parameter displayed on the right-hand of the screen can be edited with
the CHANGE soft button.
Press the SET soft button to activate a parameter list item.
Page 22 of 84
Wireless Compact Unit WCU-4 – User Manual – V 02/2015
Home Screen
The Home screen is the default screen. It provides access to the main
menu, the focus, iris and zoom menus, and the camera menu; it also
activates motor calibration through its soft buttons.
In addition the Home screen displays the most important parameters of the
hand unit, motor controller and camera (if available), and shows the current
position of the motors attached to the focus, iris and zoom lens rings.
The distance readout of compatible measuring devices such as the
Ultrasonic Distance Measure UDM-1 or the Cinetape will automatically
appear on the WCU-4 Home screen if connected to the respective motor
controller (UMC-4 or ALEXA Plus/Studio type camera). The distance
readout is displayed as green numbers in the center of the WCU-4 screen.
Fig. 10: Home screen without (left) and with (right) UDM-1 readout
Wireless Compact Unit WCU-4 – User Manual – V 02/2015
Page 23 of 84
Note: Fast focus racks can result in an offset between the graphical focus
scale on the lens data display and the actual position of the focus knob, as
the lens motor can take more time to travel to the desired position than the
focus knob does.
HOME>CAL
Press the CAL soft button for three seconds to calibrate all motors attached
to the motor controller.
Note: A lens motor must be recalibrated under the following conditions:
•
When the lens motor is detached from the lens
•
After changing lenses
•
After a change in motor position while powered down
Omitting motor calibration might lead to damage of the lens due
to the high level of motor torque!
Page 24 of 84
Wireless Compact Unit WCU-4 – User Manual – V 02/2015
HOME>CAM
The CAM screen displays detailed camera information, if available from the
connected camera.
The optional ALEXA Remote License (available from the ARRI License
Shop at alshop.arri.de) offers extended camera setup functionality,
including:
•
Frame Rate
•
Shutter Angle
•
Exposure Index
•
White Balance
•
ND Filter (for ALEXA Studio only)
•
Monitor Output Configuration
•
ALEXA User Button Access (with ALEXA SUP 11 onwards)
Fig. 11: Camera Info screen
Wireless Compact Unit WCU-4 – User Manual – V 02/2015
Page 25 of 84
SETUP
Press the SETUP soft button on the CAM screen to enter the ALEXA
CAMERA SETUP menu.
Use the UP and DOWN soft buttons or the zoom stick to select an option
from the list. Press the SELECT soft button or the USER button to enter the
corresponding sub-menu.
Fig. 12: Camera Setup screen and frame rate parameter list
The Frame Rate, Shutter Angle, Exposure Index and White Balance submenus contain a list of pre-set parameters from the ALEXA camera.
Use the UP and DOWN soft buttons or the zoom stick to select a
parameter from the list. Press the SET soft button or the USER button to
activate the corresponding parameter on the ALEXA camera.
Page 26 of 84
Wireless Compact Unit WCU-4 – User Manual – V 02/2015
USER
Press the USER soft button on the CAM screen to enter the USER
BUTTONS screen. The USER BUTTONS screen contains the ALEXA User
buttons 1 to 3.
Press the respective USER soft button to activate or deactivate the
corresponding function on the ALEXA camera. The USER button function
must be assigned on the ALEXA camera.
Fig. 13: ALEXA User Button screen
Wireless Compact Unit WCU-4 – User Manual – V 02/2015
Page 27 of 84
MONOUT
Press the MONOUT soft button on the CAM screen to enter the MONITOR
OUT screen. The MONITOR OUT screen allows changing monitor output
settings.
Use the UP and DOWN soft buttons or the zoom stick to select a monitor
output option from the list. Press the CHANGE soft button or the USER
button to activate or deactivate the corresponding output setting on the
ALEXA camera.
Fig. 14: Monitor output screen
Page 28 of 84
Wireless Compact Unit WCU-4 – User Manual – V 02/2015
HOME>FOCUS
Press the FOCUS soft button to enter the WCU-4 Focus screen. Pressing
the MARKER/MOTOR soft button toggles the lower three soft buttons
between MOTOR mode (LIMIT, K-LIM, OFFSET) and MARKER mode
(MARK, RESET, REMOVE).
Fig. 15: Focus control screens with Motor mode (left) and Marker mode (right)
LIMIT
The LIMIT soft button lets you set a motor limit that limits the range of the
motor on the lens (for example from 3’ to 10’). To set a motor limit, proceed
as follows:
•
Drive the motor to the first limit position.
•
Press and hold the LIMIT soft button.
•
Drive the motor to the second limit position.
Release the LIMIT soft button. A blue ‘LIM’ symbol will appear next
to the LIMIT soft button, indicating that limits are set.
Press the LIMIT soft button again to deactivate the limits. The symbol will
disappear.
•
Wireless Compact Unit WCU-4 – User Manual – V 02/2015
Page 29 of 84
K-LIM
The K-LIM soft button lets you set focus knob limits. A knob limit limits the
range of the focus knob. To set a knob limit, proceed as follows:
•
Set the focus knob to the first limit position.
•
Press and hold the K-LIM soft button.
•
Turn the knob to the second limit position.
Release the K-LIM soft button. A blue ‘KNB’ symbol will appear
next to the K-LIM soft button, indicating that knob limits are set.
Press K-LIM again to deactivate the limits. The symbol will disappear.
•
OFFSET
The OFFSET function lets you correct an offset between the physical focus
scale of a lens and the corresponding lens data values. To set an offset,
proceed as follows:
•
Drive the lens ring to a witness mark, for example 3’ 6”.
•
Press and hold the OFFSET soft button.
•
Turn focus knob so the value in the WCU-4 display lines up the
physical position on the lens ring.
Release the OFFSET soft button. An orange ‘O’ symbol will appear
next to the OFFSET soft button, indicating that an offset is set.
Press OFFSET again to deactivate the offset. The symbol will disappear.
•
MARK
Press the MARK soft button to set a digital focus mark at the current focus
knob position. A colored line will appear on the lens data display focus
scale. Up to eight color-coded focus marks can be set. The WCU-4 will
vibrate when passing a mark with the focus knob, if vibration is activated.
RESET
Press the RESET soft button to remove all focus marks.
Page 30 of 84
Wireless Compact Unit WCU-4 – User Manual – V 02/2015
REMOVE
To remove a single focus mark, align the focus mark with the focus index
and press the REMOVE soft button.
LOCK
Press the LOCK soft button to lock the focus knob. A blue padlock symbol
will appear next to the LOCK soft button and next to the FOCUS soft button
on the Home screen. Press the LOCK soft button again to unlock the focus
knob. The blue padlock symbol will disappear.
Wireless Compact Unit WCU-4 – User Manual – V 02/2015
Page 31 of 84
HOME>IRIS
Press the IRIS soft button to enter the WCU-4 Iris menu. It allows the
setting of iris motor limits as well as locking of the iris slider.
Fig. 16: Iris control screen
LIMIT
The LIMIT soft button lets you set motor limits. To set a motor limit,
proceed as follows:
•
Drive the motor to the first limit position.
•
Press and hold the LIMIT soft button.
•
Drive the motor to the second limit position.
Release the LIMIT soft button. A blue ‘LIM’ symbol will appear next
to the LIMIT soft button, indicating that limits are set.
Press the LIMIT soft button again to deactivate the limits. The symbol will
disappear.
•
Page 32 of 84
Wireless Compact Unit WCU-4 – User Manual – V 02/2015
LOCK
Press the LOCK soft button to lock the iris slider. A blue padlock symbol
will appear next to the LOCK soft button as well as the IRIS soft button on
the Home screen. Press the LOCK soft button again to unlock the iris
slider. The blue padlock symbol will disappear.
Wireless Compact Unit WCU-4 – User Manual – V 02/2015
Page 33 of 84
HOME>ZOOM
Press the ZOOM soft button to enter the Zoom menu. It allows the setting
of zoom motor limits and zoom control speed, as well as locking of the
zoom stick.
Fig. 17: Zoom control screen
LIMIT
The LIMIT soft button lets you set motor limits. To set a motor limit,
proceed as follows:
•
Drive the motor to the first limit position.
•
Press and hold the LIMIT soft button.
•
Drive the motor to the second limit position.
Release the LIMIT soft button. A blue ‘LIM’ symbol will appear next
to the LIMIT soft button, indicating that limits are set.
Press LIMIT again to deactivate the limits. The symbol will disappear.
•
Page 34 of 84
Wireless Compact Unit WCU-4 – User Manual – V 02/2015
ZOOM SPEED
Press the lower center soft button to set the zoom control speed. The
currently selected speed is displayed on the soft button label.
Use the UP and DOWN soft buttons to change the zoom speed value (0 is
lowest, 100 is highest). Use the zoom stick to try the currently selected
speed value. Use the SET soft button to confirm the current setting.
LOCK
Press the LOCK soft button to lock the zoom stick. A blue padlock symbol
will appear next to the LOCK soft button and the ZOOM soft button on the
Home screen. Press the LOCK soft button again to unlock the zoom stick.
The blue padlock symbol will disappear.
Wireless Compact Unit WCU-4 – User Manual – V 02/2015
Page 35 of 84
MENU
Press the MENU soft button to enter the WCU-4 main menu. The main
menu contains all parameters for the basic WCU-4 and motor setup.
Fig. 18: Main menu
Page 36 of 84
Wireless Compact Unit WCU-4 – User Manual – V 02/2015
Radio Channel
The Radio menu lets you switch the radio on and off and select the radio
channel. The currently selected radio channel is shown in the center of the
screen.
Use the UP and DOWN soft buttons or the zoom stick to select the radio
channel. Confirm the selection by pressing the SET soft button. Pressing
the SET soft button will automatically return to the Home screen. Select the
same channel on the WCU-4 and the corresponding motor controller.
Fig. 19: Radio setup screen
Wireless Compact Unit WCU-4 – User Manual – V 02/2015
Page 37 of 84
Control Setup
The Control Setup screen provides an overview of the current WCU-4
control configuration.
Fig. 20: Control Setup and Knob Setup screens
KNOB
Enter the Knob Setup screen by pressing the KNOB soft button.
Use the UP and DOWN soft buttons or the zoom stick to select Control and
press the CHANGE soft button to assign the knob control to the focus or
iris motor or to switch the knob control off.
Use the UP and DOWN soft buttons or the zoom stick to select Vibration
and press the CHANGE soft button to switch vibrations on digital focus
marks on and off.
SLIDER
Enter the Slider Setup screen by pressing the SLIDER soft button.
Page 38 of 84
Wireless Compact Unit WCU-4 – User Manual – V 02/2015
Use the UP and DOWN soft buttons or the zoom stick to select Control and
press the CHANGE soft button to assign the slider control to the iris or
focus motor or to switch the slider control off.
Use the UP and DOWN soft buttons or the zoom stick to select Blank
Screen and press the CHANGE soft button to activate the blank screen
mode for the iris scale on the Home screen. Use a water-based felt marker
for manual iris marks on the white area next to the iris slider on the Home
screen.
Fig. 21: Slider setup and Blank Screen mode
Wireless Compact Unit WCU-4 – User Manual – V 02/2015
Page 39 of 84
STICK
Enter the STICK SETUP screen by pressing the STICK soft button.
Use the UP and DOWN soft buttons or the zoom stick to select Control and
press the CHANGE soft button to assign the zoom stick to control the zoom
motor or to switch the zoom stick off.
Fig. 22: Slider and stick setup screens
Note: A motor can only be assigned to one control interface at a time.
Assigning the knob to the iris motor will automatically switch the slider to
the focus motor and vice versa.
Assign the motor controls manually according to your preferences when
using multiple hand units in network mode.
Page 40 of 84
Wireless Compact Unit WCU-4 – User Manual – V 02/2015
Motor Setup
The MOTOR SETUP menu allows the torque and direction of the focus, iris
and zoom motors to be set.
Fig. 23: Motor and torque setup screens
TORQUE
The torque of CLM-3 and CLM-4 motors can be adapted to prevent
sensitive lenses from mechanical overload. Torque setting is not available
for the CLM-2 motor.
Select Torque to enter the Torque setup screen. Use the UP and DOWN
soft buttons or the zoom stick to select between focus, iris and zoom
motors. Use the CHANGE soft button to toggle through the torque values
(1 is lowest, 4 is highest).
Wireless Compact Unit WCU-4 – User Manual – V 02/2015
Page 41 of 84
Ensure that the motor torque level matches the lens to avoid lens
damage. Stiff, hard-to-move lenses require a higher torque level. For highspeed applications and large lenses, the torque may be set to higher
values. For small, less ruggedly designed lenses, the torque should be set
to lower values.
CLM-3 lens motors provide very high torque for high-speed lens drive. Be
sure that lens, lens motors and rods are correctly adjusted and fastened.
Re-calibrate the CLM-3 motor after re-attachment of the motor and after
each lens change! Ignoring this procedure can lead to severe lens damage.
Page 42 of 84
Wireless Compact Unit WCU-4 – User Manual – V 02/2015
DIRECTION
Select DIRECTION to enter the MOTOR DIRECTION setup screen.
The direction setting determines the motor drive direction, affecting the
response to the hand control. The direction setting for lens motors refers to
mounting on standard support rods on the bottom of the camera.
Use the UP and DOWN soft buttons or the zoom stick to select between
focus, iris and zoom motors. Use the CHANGE soft button to toggle
through the direction options (Left, Right).
Note: The correct direction setting is crucial for correct lens metadata
generation.
Fig. 24: Motor Direction screen
Wireless Compact Unit WCU-4 – User Manual – V 02/2015
Page 43 of 84
Pre-marked Focus Ring
The WCU-4 offers lens mapping to pre-marked focus rings.
Enter the Pre-marked Focus Ring menu to select one of five different premarked focus rings, corresponding to the physical ring you are using on the
WCU-4.
The displayed focus distance unit (metric/imperial) depends on the lens
data setting of the motor controller. Change the distance unit on the motor
controller if necessary.
Use the UP and DOWN soft buttons or the zoom stick to select your premarked focus ring. Press the SET soft button or the User button to activate
lens mapping to that specific ring.
Note: Lens mapping to pre-marked focus rings requires lens data from
Universal Motor Controller UMC-4, the ALEXA Plus module or the ENG
Motor Controller EMC-1!
Fig. 25: Pre-marked focus ring screens
Page 44 of 84
Wireless Compact Unit WCU-4 – User Manual – V 02/2015
Lens Data
The ARRI Lens Data System (LDS) allows display and capture of lens data
information with ALEXA Plus and ALEXA Studio type cameras and the
Universal Motor Controller UMC-4. The WCU-4 displays the same lens
data on its integrated lens data display.
Fig. 26: Lens Data Menu Screen
Wireless Compact Unit WCU-4 – User Manual – V 02/2015
Page 45 of 84
Lens Programming
An important prerequisite for lens data generation is a lens table that
converts the lens motor encoder values into something a human can use,
like T-stops and focus ring values. Through lens programming, lens tables
– and eventually lens data – can be generated for any lens.
The WCU-4 hand unit offers a lens-programming interface, so a lens can
be quickly programmed, with no additional equipment besides a UMC-4 or
an ALEXA Plus/Studio type camera and lens motors. The resulting lens
table file is stored on an SD card, which can be taken out and reused
elsewhere.
Required Equipment
•
Wireless Compact Unit WCU-4 with battery/power supply.
•
Universal Motor Controller UMC-4 or an ALEXA Plus/Studio type
camera with power supply.
•
At least one lens motor (CLM-2, CLM-3 or CLM-4). We recommend
using one motor per lens scale. If you have only one motor
available but need to add more than one lens axis, you can create
the lens scales sequentially, connecting the motor to the respective
controller connector.
•
SD card
Creating a Lens File
First, set up the motors on the lens and connect them to the UMC-4 or
ALEXA Plus module (motor controller).
Establish a wireless or wired connection between WCU-4 and motor
controller.
Set the correct motor direction and torque.
Insert the SD card into the SD card slot of the WCU-4.
Go to MENU > LENS DATA > LENS PROGRAMMING > CREATE LENS
FILE.
Page 46 of 84
Wireless Compact Unit WCU-4 – User Manual – V 02/2015
Press the CAL soft button to calibrate the
lens motors.
Press the SKIP soft button if motors are
already calibrated.
Select the lens brand.
Use the UP and DOWN soft buttons or the
zoom stick to select the lens brand from
the list.
Select Custom to enter a custom lens
brand (see the following paragraph about
how to enter custom names).
Press the OK soft button or the USER
button to confirm the selection.
Wireless Compact Unit WCU-4 – User Manual – V 02/2015
Page 47 of 84
Enter the lens type.
Use the zoom stick to scroll though the
characters on the left side of the screen.
Press the USER button to select a
character.
Press the DELETE soft button to delete a
character.
Press the OK soft button to set the lens
type.
Select the focal length.
Use the UP and DOWN soft buttons or the
zoom stick to select a focal length from the
list.
Select Custom to enter a custom focal
length.
Select Zoom for a zoom lens.
Press the OK soft button or the USER
button to confirm the selection.
Page 48 of 84
Wireless Compact Unit WCU-4 – User Manual – V 02/2015
Enter the lens serial number.
Use the zoom stick to scroll though the
numbers.
Press the USER button to select a number.
Press the DELETE soft button to delete the
last number.
Press the OK soft button to set the serial
number.
Select the focus unit (metric or imperial).
Use the UP and DOWN soft buttons or the
zoom stick to select the focus unit.
Press the OK soft button or the USER
button to confirm the selection.
Wireless Compact Unit WCU-4 – User Manual – V 02/2015
Page 49 of 84
Select the lens axis to be programmed
next.
Press the FOCUS soft button to program
the focus scale.
Skip this step if you do not want to
program the focus scale.
Use the focus knob to drive the lens focus
scale to its infinity mark.
Press the OK soft button or the USER
button to set the infinity data point.
Page 50 of 84
Wireless Compact Unit WCU-4 – User Manual – V 02/2015
Use the focus knob to drive the lens focus
scale to the close focus mark.
Use the UP and DOWN soft buttons or the
zoom stick to set the close focus value on
the display.
Press the OK soft button or the USER
button to set the close focus data point.
Do the same for the following 12 data
points. Make sure to distribute the data
points as evenly as possible over the lens
scale.
The focus scale will be completed after
setting 14 data points.
Press the OK soft button to return to the
Select Axis screen.
Wireless Compact Unit WCU-4 – User Manual – V 02/2015
Page 51 of 84
Select the lens axis to be programmed
next.
Press the IRIS soft button to program the
iris scale.
Skip this step if you do not want to
program the iris scale.
Use the iris slider to drive the lens iris
scale to its open iris mark.
Use the UP and DOWN soft buttons or the
zoom stick to set the open iris value on the
display.
Press the OK soft button or the USER
button to set the open iris point.
Page 52 of 84
Wireless Compact Unit WCU-4 – User Manual – V 02/2015
Use the iris slider to drive the lens iris
scale to the next iris mark.
Press the OK soft button or the USER
button to set the iris point.
Do the same for the following iris data
points.
After entering all iris points, press the OK
soft button to return to the Select Axis
screen.
Wireless Compact Unit WCU-4 – User Manual – V 02/2015
Page 53 of 84
Select the lens axis to be programmed
next.
Press the ZOOM soft button to program
the zoom scale.
Skip this step if you do not want to
program the zoom scale.
Use the slider to drive the lens zoom scale
to its widest zoom mark.
Use the UP and DOWN soft buttons or the
zoom stick to set the wide focal length
value on the display.
Press the OK soft button or the USER
button to set the focal length point.
Page 54 of 84
Wireless Compact Unit WCU-4 – User Manual – V 02/2015
Use the iris slider to drive the lens zoom
scale to the next focal length mark.
Use the UP and DOWN soft buttons or the
zoom stick to set the focal length value on
the display.
Press the OK soft button or the USER
button to set focal length point.
Do the same for the following focal length
points.
After entering all focal length points, press
the OK soft button to return to the Select
Axis screen.
Wireless Compact Unit WCU-4 – User Manual – V 02/2015
Page 55 of 84
Press the SAVE soft button to save the
lens file to the SD card (folder
/ARRI/ALEXA/LDA).
Make sure to have an SD card in the
WCU-4!
Note: You can use the FOCUS, IRIS or
ZOOM soft buttons to edit/check an
existing scale or to reprogram an existing
lens scale. See page 57 to learn more
about editing lens scales.
Before finally saving the lens file on SD
card, you can edit the lens name that will
be displayed on WCU-4, UMC-4 and
ALEXA screens. This name is also used
as the name of the lens file.
Use the MODE soft button to select
whether to insert, overwrite or delete a
character.
Press the SAVE soft button to finally save
the lens file to SD card folder
/ARRI/ALEXA/LDA.
You can now upload the lens file from SD
card to any ALEXA Plus/Studio type
camera and the Universal Motor Controller
UMC-4.
Page 56 of 84
Wireless Compact Unit WCU-4 – User Manual – V 02/2015
Editing a Lens File
Existing lens files can be edited with the WCU-4 hand unit and then stored
back on the SD card.
Load the lens file to edit onto an SD card in the (folder /ARRI/ALEXA/LDA)
and insert the SD card into the SD card slot of the WCU-4.
Go to MENU > LENS DATA > LENS PROGRAMMING > EDIT LENS FILE.
Use the UP and DOWN soft buttons or the zoom stick to scroll through the
list of lens files on the SD card. Press the SELECT soft button or the User
button to select a lens file.
On the following screen, use the FOCUS, IRIS or ZOOM soft button to
select the lens scale to edit. If metric and imperial scales exist, select the
scale unit first.
The following screen (see image below) provides three different options
(OFFSET, SLIDE, SNAP) for editing existing data points.
Offset Function
Use the OFFSET soft button to correct a fixed offset between the complete
lens scale and the corresponding scale on the WCU-4 screen:
•
Select a reference witness mark on the WCU-4 display (e.g.
infinity).
•
While keeping the OFFSET soft button pressed, drive the lens
scale to the corresponding witness mark.
•
Release the OFFSET soft button when lens scale and display
scale match.
Slide Function
Use the SLIDE soft button to correct an offset for a single data point:
•
Select the witness mark to edit on the WCU-4 display.
•
While keeping the SLIDE soft button pressed, drive the lens scale
to the corresponding witness mark.
•
Release the SLIDE soft button when lens mark and display mark
match.
Wireless Compact Unit WCU-4 – User Manual – V 02/2015
Page 57 of 84
Snap Function
Use the SNAP soft button to correct a slight offset for a single data point.
The snap function will move the nearest available data point on the WCU-4
screen to the currently set lens position:
•
Drive the lens scale to a witness mark.
•
Press the SNAP soft button. The nearest available data point on
the WCU-4 screen will jump to the currently set position.
Press the RESET soft button to reset all editing actions.
Press the BACK soft button to apply all editing actions and return to the
Select Axis screen.
Press the SAVE soft button to save the lens file to SD card folder
/ARRI/ALEXA/LDA. You can edit the lens name before saving
(see page 56).
Fig. 27: Focus edit screen
Page 58 of 84
Wireless Compact Unit WCU-4 – User Manual – V 02/2015
Uploading a Lens File
Uploading a lens file wirelessly to the motor controller is not yet supported.
This feature will be available with a future software update package.
Circle of Confusion
Select the circle of confusion (COC) for correct depth of field calculation.
Use the UP and DOWN soft buttons or the zoom stick to scroll through the
COC list. Press the SET soft button to select a circle of confusion.
User Button
The WCU-4’s USER button (see page 18) can be assigned to different
functions.
Use the UP and DOWN soft buttons or the zoom stick to select the User
button function. Press the SET soft button or the USER button to activate
the setting.
Zoom Zap
Select Zoom Zap for fast zooming, e.g. to check focus. Having the USER
button pressed will set the zoom speed to 100%.
Knob Marker
Select Knob Marker for setting digital focus marks on the WCU-4 lens data
display. Pressing the USER button momentarily will add a new focus mark
to the lens data display.
Focus Tracking
Select Focus Tracking to activate Focus Tracking mode. Having the USER
button pressed will make the focus motor follow the measured value of the
UDM-1 or other compatible distance measuring devices that are connected
to the UMC-4.
Wireless Compact Unit WCU-4 – User Manual – V 02/2015
Page 59 of 84
Fig. 28: User Button screen
Page 60 of 84
Wireless Compact Unit WCU-4 – User Manual – V 02/2015
Backlight
The WCU-4 display, buttons and focus knob illumination can be dimmed
according to operational needs. The Backlight menu lets you select a fixed
or an automatic backlight mode. Press the MODE soft button to toggle
between the two.
Fixed Mode
Select Fixed Mode to set a fixed value for the backlight intensity. Use the
UP and DOWN soft buttons or the zoom stick to select the backlight level.
Press the SET soft button or the User button to set the backlight level.
Automatic Mode
Select Automatic Mode to have an automatic backlight adjustment that
depends on the ambient lighting conditions. Use the UP and DOWN soft
buttons or the zoom stick to select the maximum possible backlight level.
Press the SET soft button or the User button to set the backlight level.
Fig. 29: Backlight screen
Wireless Compact Unit WCU-4 – User Manual – V 02/2015
Page 61 of 84
User Settings
A user setting is a profile of WCU-4 settings. It can be saved to the SD card
and be transferred to a different WCU-4. Up to six user settings can be
stored on or recalled from an SD card.
Load Setting
Select Load Setting and use the UP and DOWN soft buttons or the zoom
stick to select a setting (Setting #1 to #6). Press the LOAD soft button or
the User button to load the setting.
Save Setting
Select Save Setting and use the UP and DOWN soft buttons or the zoom
stick to select the location you want to save a new setting to (Setting #1 to
#6). Press the SAVE soft button or the User button to save the setting to
the currently selected location. This will overwrite the previous setting.
Factory Reset
Select Factory Reset to reset the WCU-4 to its factory default settings.
Fig. 30: User settings menu screen
Page 62 of 84
Wireless Compact Unit WCU-4 – User Manual – V 02/2015
Firmware
Always update the WCU-4 with the latest firmware. In addition, licensed
features are available. WCU-4 software licenses are bound to the WCU-4’s
serial number.
Enter the Firmware screen to install a new Software Update Package or a
new license key.
Fig. 31: Firmware screen
Firmware Update
Update the WCU-4 firmware as follows:
•
Download the Software Update Package from the ARRI website at
http://arri.com/ecs/wcu-4.
•
Copy the Software Update Package to the folder
/ARRI/WCU4/Firmware on an SD card (FAT16 or FAT32
formatted).
•
Insert the SD card into the SD card slot of the WCU-4.
•
Turn the WCU-4 on.
Wireless Compact Unit WCU-4 – User Manual – V 02/2015
Page 63 of 84
•
Go to MENU > FIRMWARE > SELECT UPDATE FILE
•
Use the UP and DOWN soft buttons or the zoom stick to scroll
through the list of update files the SD card. Press the SELECT soft
button or the User button to select an update file.
•
Press the two UPDATE soft buttons simultaneously to start the
update.
•
The update process takes about 5 seconds. The WCU-4 will
restart, and the update process is completed.
Fig. 32: Firmware Update screens
Note: Be sure that the battery is completely charged before
starting any update!
Caution: Do not remove the SD card while the update file is
being copied to the WCU-4!
Do not remove the battery until the WCU-4 has re-started automatically
after update.
Page 64 of 84
Wireless Compact Unit WCU-4 – User Manual – V 02/2015
Installing a License
Before purchasing a license key, please save the WCU-4’s hardware info
file for upload during the purchasing process:
•
Switch the WCU-4 on.
•
Insert the SD card into the SD card slot of the WCU-4.
•
Go to MENU > FIRMWARE > LICENSED FEATURES.
•
Press the HWINFO soft button. A file named “K2.72103.0-####wcu4.ipkg” (with #### being the WCU-4 serial number) will be
stored on the SD card in the folder /ARRI/WCU4/Licenses.
•
Visit the ARRI license shop at http://alshop.arri.de and follow the
instructions for purchasing and downloading license keys. This
includes uploading the hardware info file.
•
Download the license key file and copy it to the SD card, to the
folder /ARRI/WCU4/Licenses.
•
Insert the SD card into the SD card slot of the WCU-4.
•
Go to MENU > FIRMWARE > LICENSED FEATURES.
•
Press the INSTALL soft button and select a license file from the
INSTALL LICENSE screen using the UP/DOWN soft buttons or the
zoom stick.
•
Press the INSTALL soft button again, and then confirm your
selection by pressing both INSTALL soft buttons.
•
The installed license will be indicated on the Licenses screen.
Wireless Compact Unit WCU-4 – User Manual – V 02/2015
Page 65 of 84
Fig. 33: License screens
Deleting a License
Press the DELETE soft button and select a license file using the
UP/DOWN soft buttons or zoom stick.
Press the DELETE soft button again, then confirm your selection by
pressing both DELETE soft buttons simultaneously.
Once purchased, a license key can be re-installed again to the
corresponding WCU-4 at any time.
Page 66 of 84
Wireless Compact Unit WCU-4 – User Manual – V 02/2015
System Info
The System Info screen shows the firmware version and WCU-4 serial
number, the network (MAC) address and firmware version of the installed
radio module, and the network address of the connected motor controller.
Fig. 34: System info screen
Wireless Compact Unit WCU-4 – User Manual – V 02/2015
Page 67 of 84
Appendix
Screen Icons
Iris motor connected, but not available for the WCU-4, e.g.
control through another remote unit. Equivalent for zoom
motor and focus motor.
No iris motor connected. Equivalent for zoom motor and
focus motor.
Iris motor status unknown, e.g. during system startup.
Equivalent for zoom motor and focus motor.
Zoom motor locked. Equivalent for iris motor and focus
motor.
Focus motor limits set. Equivalent for zoom motor and iris
motor.
Focus knob limits set.
Focus motor limits combined with knob limit.
Focus offset is set.
Zoom motor speed value set to 30%.
Camera information, check camera info screen.
Critical CAM information, check camera info screen.
Radio connection active.
Radio connection disabled.
Low battery.
Pre-marked focus ring active, but no lens data available
from motor controller.
Page 68 of 84
Wireless Compact Unit WCU-4 – User Manual – V 02/2015
Screen Messages
Interface
Description
HW Info file could not be stored.
Please insert SD card.
Insert an SD-card.
License file not valid!
The license file on the SD card does not
correspond to the WCU-4 serial
number.
Used path not found!
Create a valid folder structure on the
SD card.
Disabled during record
Function not available during camera
record.
Calibrate lens motors now?
Calibrate lens motors (recommended).
If you are sure that nothing has been
changed since the last calibration, press
CANCEL.
Motors calibrating ...
Wait until calibration is finished.
New IRIS Motor! Connect?
Indicates that an iris motor has been
connected to the running system. Press
the YES soft button to assign the motor
to the iris slider. Equivalent for zoom
and focus motor.
Warning! Second motor
controller detected! Select
another channel!
The WCU-4 is connected to one motor
controller and has detected a second
motor controller on the same radio
channel. Select another radio channel
to resolve this situation.
Wireless Compact Unit WCU-4 – User Manual – V 02/2015
Page 69 of 84
Accessories
The following accessories are directly compatible with the WCU-4:
K2.72117.0
Plain White Focus Ring for WCU-4 or SXU-1
K2.0001651
Pre-Marked Focus Ring 0.20 m for WCU-4
K2.72129.0
Pre-Marked Focus Ring 0.25 m for WCU-4
K2.72130.0
Pre-Marked Focus Ring 0.35 m for WCU-4
K2.72131.0
Pre-Marked Focus Ring 0.50 m for WCU-4
K2.72132.0
Pre-Marked Focus Ring 1.00 m for WCU-4
K2.0001652
Pre-Marked Focus Ring 8" for WCU-4
K2.72133.0
Pre-Marked Focus Ring 12" for WCU-4
K2.72134.0
Pre-Marked Focus Ring 14" for WCU-4
K2.72135.0
Pre-Marked Focus Ring 20" for WCU-4
K2.72136.0
Pre-Marked Focus Ring 3'6 for WCU-4
K2.47851.0
NP-FM500H Battery (Sony)
K2.0002065
BC-QM1 Battery Charger (Sony)
K2.0000425
Hand Unit AC Power Supply HPS-1
K2.0002136
Cable LCS to LCS (3,5m/11ft)
K2.0002141
Cable LCS to LCS (coiled)
K2.41389.0
LCS Cable Drum Extension (75m/250ft)
10.0000268
ALEXA Remote License for WCU-4
K2.0002067
Hand Strap for WCU-4
K2.0002069
Lanyard for WCU-4
K2.72146.0
Carrying case for WCU-4 and accessories
Page 70 of 84
Wireless Compact Unit WCU-4 – User Manual – V 02/2015
Compatible Products
The WCU-4 is directly compatible with the following products:
•
ARRI ALEXA Plus
•
ARRI ALEXA XT Plus
•
ARRI ALEXA Plus 4:3
•
ARRI ALEXA Studio
•
ARRI ALEXA XT Studio
•
ARRI Universal Motor Controller UMC-3A (basic functionality)
•
ARRI Single Motor Controller SMC-1
•
ARRI ENG Motor Controller EMC-1
•
ARRICAM, ARRI 416PLUS, ARRI 435 Extreme equipped with
white radio (basic functionality)
Connector Pin-Outs
LCS
1
2
3
4
5
GND
Not connected
CAN-L
CAN-H
+V-BAT
Ground
CAN bus
CAN bus
Battery supply output
Wireless Compact Unit WCU-4 – User Manual – V 02/2015
Page 71 of 84
Dimensions and Weight
Weight (without straps and battery): 730 g/25.8 oz.
Page 72 of 84
Wireless Compact Unit WCU-4 – User Manual – V 02/2015
Electrical Data
Supply Voltage:
7.2 V (Li-Ion battery)
10.4 to 34 V DC (via LCS cable)
Current Consumption:
220 [email protected] V
70 mA@24 V
Operating Temperature:
-20 to +50 °C (-4 to +122 °F)
Radio System
The WCU-4 contains a radio unit that enables wireless lens control and
lens data communication with a white-coded radio module. A white ring at
the base of the antenna mount point identifies it. It offers 8 channels to
choose from:
Channel
Frequency
0
2.410 GHZ
1
2.415 GHZ
2
2.430 GHZ
3
2.435 GHZ
4
2.450 GHZ
5
2.455 GHZ
6
2.470 GHZ
7
2.475 GHZ
White radio and legacy yellow radio cannot be mixed in the same radio
network of camera and hand units. It is possible to use both systems in
parallel within different radio networks.
Service Mode
The service mode offers recalibration of focus knob, iris slider and zoom
stick. This particularly fixes a potential non-linearity of the focus knob that
can cause a misalignment with pre-marked focus rings and hand-marked
rings that are exchanged between various WCU-4 units.
Wireless Compact Unit WCU-4 – User Manual – V 02/2015
Page 73 of 84
All WCU-4 units above serial number 6262 are delivered with the extended
knob calibration from the factory and usually do not need a re-calibration.
Note: Do ONLY use the service mode if you experience issues and
need to re-calibrate the WCU-4 control devices! Make sure that you
understand the calibration procedure before using it.
To avoid unexpected interaction with an occasionally connected motor
controller, be sure the radio is disabled and no cable is connected to the
LCS socket.
To enter service mode, power up the unit by simultaneously pressing and
holding both upper and lower center soft buttons and the POWER button
until the SERVICE MODE main screen appears.
Fig. 35: Service Mode main screen
Page 74 of 84
Wireless Compact Unit WCU-4 – User Manual – V 02/2015
Zoom Calibration Mode
Press the ZOOM soft button to enter the Stick Setup screen.
If the zoom control acts in the wrong direction, move the zoom stick
upwards and press ADJ-DIR.
If the zoom zero position is not correct (issue: the zoom motor moves
without pressing the stick), leave the zoom stick in its center position (do
not touch it) and press ADJ-0.
Press BACK to return to the SERVICE MODE main screen. The new
calibration becomes effective after rebooting the WCU-4.
Fig. 36: Zoom stick calibration screen
Wireless Compact Unit WCU-4 – User Manual – V 02/2015
Page 75 of 84
Knob Calibration Mode
Press the KNOB soft button to enter the Knob Setup screen.
Turn the knob clockwise to its end position and press K-CW. Then turn the
knob counter-clockwise to its end position and press K-CCW.
Attach the WCU-4 Knob Calibration Ring K2.0000848.
Press TEST to check if the engravings on the Knob Calibration Ring align
with the corresponding values on the WCU-4 screen. If they do not align,
press the K-LIN soft button to start the knob linearizing procedure.
Note: Do not start the linearizing procedure without the ARRI
calibration ring applied. Once started, you must go through the
whole alignment procedure.
By this action, the previously stored alignment points will be cleared and
cannot be restored!
Please note that previously hand-marked focus rings might have an offset
after re-calibrating the focus knob!
Turn the knob exactly to ring position number 1 and press the SET1 soft
button to confirm and store the alignment position. Repeat the procedure
until you finish with position 16.
Press the UNDO soft button if you missed the correct alignment position
and repeat the last step.
Press the READY soft button at the end of the procedure to return to the
SERVICE MODE screen.
The new calibration becomes effective after rebooting the WCU-4.
Page 76 of 84
Wireless Compact Unit WCU-4 – User Manual – V 02/2015
Fig. 37: Knob Setup screens
Slider Calibration Mode
Press the SLIDER soft button to enter the Slider Setup screen.
Move the slider to its top-end position, then press S-UP.
Move the slider to its bottom-end position, then press S-DOWN.
Move the slider exactly to the ”0” position on the display and press SET 0
to confirm and store the alignment position. Repeat the procedure until you
finish with position 12.
Press the READY soft button at the end of the procedure to return to the
SERVICE MODE screen.
The new calibration becomes effective after rebooting the WCU-4.
Note: Beware of a possible parallax error between the slider pointer and
the displayed alignment bar.
Wireless Compact Unit WCU-4 – User Manual – V 02/2015
Page 77 of 84
Fig. 38: Slider setup screen
Page 78 of 84
Wireless Compact Unit WCU-4 – User Manual – V 02/2015
ARRI Service Contacts
Munich, Germany
Arnold & Richter Cine Technik
+49 89 3809 2121
[email protected]
Business hours:
Mo. - Fr. 9:00 - 17:00 (CET)
London, Great Britain
ARRI CT Limited
+44 1895 457 051
[email protected]
Business hours:
Mo. - Thu. 9:00 - 17:30 (GMT)
Fr. 9:00 - 17:00 (GMT)
Milan, Italy
ARRI Italia S.r.l.
+39 (02) 262 271 75
[email protected]
Business hours:
Mo. - Fr. 9:00 - 18:00 (CET)
Burbank, USA
ARRI Inc. West Coast
+1 877 565 2774
[email protected]
Business hours:
Mo. - Fr. 8:15 - 17:00 (PST)
New York, USA
ARRI Inc. East Coast
+1 877 565 2774
[email protected]
Business hours:
Mo. - Fr. 8:00 - 17:30 (EST)
Mississauga, Canada
ARRI Canada Limited
+1 416 255 3335
[email protected]
Business hours:
Mo. - Fr. 8:30 - 17:00 (EDT)
Hong Kong, China
ARRI Asia Limited
+852 2537 4266
[email protected]
Business hours:
Mo. - Fr. 10:00 - 18:30 (HKT)
Beijing, China
ARRI China Co. Limited
+86 10 5900 9680
[email protected]
Business hours:
Mo. - Fr. 9:00 - 18:00 (CST)
Wireless Compact Unit WCU-4 – User Manual – V 02/2015
Page 79 of 84
Sydney, Australia
ARRI Australia Pty Ltd
+61 2 9855 4305
[email protected]
Business hours:
Mo. - Fr. 8:00 - 18:00 (AEST)
International Declarations and Certifications
EC Declaration of Conformity
The product Wireless Compact Unit WCU-4 conforms with the
specifications of the following European directives:
•
Directive 2014/30/EU of the European Parliament and the Council
of 26 February 2014 on the harmonization of the laws of the
Member States relating to electromagnetic compatibility
•
Directive 1999/5/EC of the European Parliament and the Council of
9 March 1999 on radio equipment and telecommunications
terminal equipment and the mutual recognition of their conformity
Directive 2011/65/EU of the European Parliament and the Council
of 8 June 2011 on the restriction of the use of certain hazardous
substances in electrical and electronic equipment
The compliance with the requirements of the European Directives was
proved by the application of the following harmonized standards:
•
•
EN 55022; EN 55103-1; EN 55103-2; EN 301 489-1; EN 301 48917; EN 62479; EN 60950-1; DIN EN 50581
Page 80 of 84
Wireless Compact Unit WCU-4 – User Manual – V 02/2015
FCC Class A Statement:
Note: This equipment has been tested and found to comply with the limits
for a Class A digital device, pursuant to Part 15 of the FCC Rules. These
limits are designed to provide reasonable protection against harmful
interference when the equipment is operated in a commercial environment.
This equipment generates, uses, and can radiate radio frequency energy
and, if not installed and used in accordance with the instruction manual,
may cause harmful interference to radio communications. Operation of this
equipment in a residential area is likely to cause harmful interference in
which case the user will be required to correct the interference at his own
expense.
Contains Transceiver module FCC-ID: Y7N-EMIP100
or Transceiver module FCC ID: W7Z-FSTARPRO
Industry Canada Compliance Statement
Complies with the Canadian ICES-003 Class A specifications.
Cet appareil numérique de la Classe A est conforme à la norme NMB-003
du Canada.
This device complies with RSS 210 of Industry Canada. This Class A
device meets all the requirements of the Canadian interference-causing
equipment regulations.
Cet appareil numérique de la Classe A respecte toutes les exigences du
Règlement sur le matériel brouilleur du Canada.
Contains Transceiver Module IC-ID: 9482A-EMIP100 or
Transceiver module IC: 8254A-FSTARPRO
Wireless Compact Unit WCU-4 – User Manual – V 02/2015
Page 81 of 84
Ident.-No.: K5.74422.0· Technical data subject to change without further notice. © ARRI/2015
ArnoldPage
& Richter
Cine
KGCompact
· Türkenstr.
89 ·WCU-4
D-80799–Munich
· Phone +49
3809 0
82 of
84Technik GmbH & Co. Betriebs
Wireless
Unit
User Manual
– V (0)89
02/2015