1
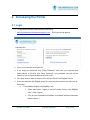
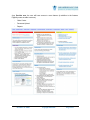
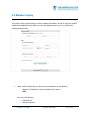
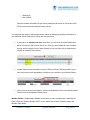
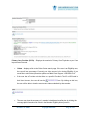
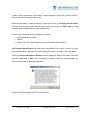
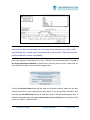
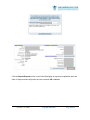
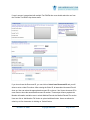
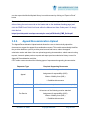
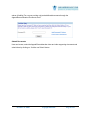
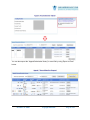
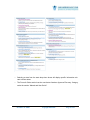
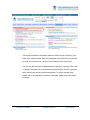
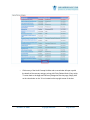
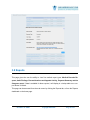
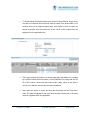
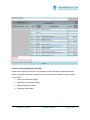
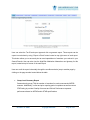
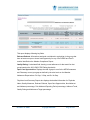
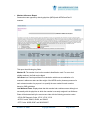
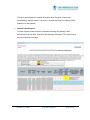
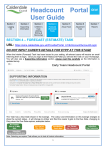
Provider Portal User Guide For Eligibility and Provider users PP v7.5.1_prov (Rev 04/20) Table of Contents 1 Purpose ......................................................................................................................................................... 3 2 Accessing the Portal..................................................................................................................................... 4 2.1 LOGIN ......................................................................................................................................................... 4 3 Eligibility User Experience ......................................................................................................................... 7 3.1 HOME ......................................................................................................................................................... 7 3.2 MEMBER INQUIRY .................................................................................................................................. 9 3.3 CLAIMS CENTER ............................................................................................................................. 12 3.3.1 CLAIMS DETAILS PAGE .................................................................................................................... 15 3.4 MEDICAID INFO ..................................................................................................................................... 20 3.5 DOCUMENT UPLOAD............................................................................................................................ 20 3.6 PROVIDER NEWS ................................................................................................................................... 32 3.7 FORMS & GUIDES .................................................................................................................................. 32 3.8 REPORTS.................................................................................................................................................. 36 3.9 FAQS ......................................................................................................................................................... 46 3.10 CONTACT US ........................................................................................................................................ 47 4 Tutorials ..................................................................................................................................................... 48 5 Disclaimer ................................................................................................................................................... 51 Provider User Guide Copyright 2015-2015 Page 2 of 51 1 Purpose This User Guide is for Eligibility and Provider users of the Provider Portal web application, a secure web-based application, to access information provided by Care Improvement Plus. This guide provides a detailed overview of the application’s functionality, based on a menudriven sequence as displayed in the Home Page, as well as an intuitive dashboard interface for all sections on the landing page for a more visual experience. It also provides a step-by-step process on how to use the application and all of its features effectively. Provider User Guide Copyright 2015-2015 Page 3 of 51 2 Accessing the Portal 2.1 Login 1. To access the Provider Portal click on the link below: https://providerportal.careimprovementplus.com/ . This log-in box will appear: 2. Key in your Username and Password. 3. If you forgot your password, click “Forgot Password?” and enter your Username and email address on file then click “Reset Password”. Your password reset link will be emailed to you on the email address we have on file. 4. If the User does not have an account, the user can click the “Self Register” button. 5. If the User clicks the Self Register button, the user will need to select one of the two options listed. a. To view Member Eligibly only (Eligibility user): Select radio button “I agree to use the Provider Portal to view Eligibility Only” > Click “I Agree” Fill in all user Registration Information (red asterisk indicates information that is required” > Provider User Guide Copyright 2015-2015 Page 4 of 51 Please note that the password must contain at least one digit, one upper case, one lower case, one special character, range between 8-15 characters and should not be a user name. Once you enter the entire user registration information click on ‘Register’. The user will be brought back to the login screen where they can enter in the a User Name and Password created on the User Registration Screen b. To view Claim Information (Provider user): Select radio button “I agree to use the Provider Portal to view Claim Information” > Click “I Agree” This user will need to call Provider Portal Support - 1-800-690-1916 to set up the account. This user will also be able to view the Eligibility Information. 6. Once you are able to logon, the user will arrive on the Home Page. Tutorial Videos: The user can also access the Self-Registration Tutorials through the Log In page. Provider User Guide Copyright 2015-2015 Page 5 of 51 Provider User Guide Copyright 2015-2015 Page 6 of 51 3 Eligibility User Experience 3.1 Home As an Eligibility user, the user will have limited access to the portal. The following menu will be available to the user: - Home - Member Inquiry - Medicaid Info - Provider News - Forms and Guides - FAQ’s - Contact Us Provider User Guide Copyright 2015-2015 Page 7 of 51 As a Provider user, the user will have access to more features (in addition to the features Eligibility users are able to access): - Claim Center - Document Upload - Reports Provider User Guide Copyright 2015-2015 Page 8 of 51 3.2 Member Inquiry This section offers several options to retrieve member information, as well as verify the member eligibility and eligibility history. When you click the “Member Inquiry” menu, you will get the following search screen: Under Search Parameters you can enter any combination of the following o Member’s First Name or Last name (Minimum 2 letters) AND Any one of the following o Subscriber ID; o Medicare Number; Provider User Guide Copyright 2015-2015 Page 9 of 51 o Medicaid #; o Date of Birth. Enter the member information as per search parameters and click on Search and it will list the results associated with the search request. You also have the option of narrowing down the search by adding any additional information in the Additional Search Criteria box, though this is not required. If you want to do multiple searches at one time, you can enter the same combination above and click on Add to Mass Search List. Once you have added all of the members that you were looking for into the Mass Search List you can then click on Search and it will pull all results for those names. Another feature under the Member Inquiry is Export to Excel. This button allows you to save and print an excel spreadsheet of members you received in your Search Results. After you have located your Member, click on the Subscriber ID link to access the details of their record in the Member Details screen. Member Details - Displays basic Member Information, such as, member name, subscriber ID, Date of Birth and Gender, Member’s PCP as per Health Plan records, Eligibility History and Member Plan details. Provider User Guide Copyright 2015-2015 Page 10 of 51 Primary Care Provider (PCPs) – Displays the member’s Primary Care Physician as per Care Improvement Records. Claims – displays a link to the Claim Center search page. If the user is an Eligibility user, the user will see a message “Currently your User account is for viewing Eligibility. If you would like to add Claims permission please call Web Portal Support 1-800-690-1916” If the user has a Provider role that links to a specific Provider’s Tax ID or NPI listed in their User Account, the user will see the icon. By clicking on this icon, the user will be able to view the most recent claims submitted by that member. The user may view the summary of a member’s healthcare benefits plan by clicking the coverage plan information link found in the Member Eligibility History section. Provider User Guide Copyright 2015-2015 Page 11 of 51 3.3 Claims Center This page is accessible by any user that has provider role access to the application. Eligibility users will not be able to have the option. The Claim Center page is useful: To view detailed information on payment status and amount, claim amount, and charge code detail. To see the copy of the Remit related to the specific claims. To review reports for Post Payment Audit Report, such as "Reconsideration & Appeals Activity", "Medical Records Requests", and "Audit Findings" related to the specific claims. To request Remittance Details. To send a Claim dispute. There are two ways to reach to the Claim Center page: On the Member Detail Page, click on the View Recent Claims icon or from the main menu by clicking the Claim Center tab. On this page: The user will see a Search Criteria Box. The user will have the option to search by claim type - Facility or Medical. The user may enter in dates of service date range (this defaults back to a 6 month span) or use the calendar to pick dates. By clicking on the drop down box next to the Status field you can choose from a list of options -- Processing, Processed and Adjusted Claims. The Members First and Last Name will be carried over from the Member Details screen if the user accesses this page from the Member Details page. Otherwise, the user can click the search icon Provider User Guide to find the member first. Copyright 2015-2015 Page 12 of 51 After you have made your selection, click the Search button. A list of Search results should display at the bottom of the screen. By clicking on the column headers, you may sort the information in ascending or descending order. The user can hide the Claim Search Criteria or Claim Search Results by clicking on the adjacent Click the icon. icon in the View Remit column of the search results page to open a link to that claims’ PDF Remit form, if one is available. For more information on Remits, see section 3.3.1 (Claim Details page). If the Members Claim does not match to the NPI or Tax ID associated with this User Account and click Search, No Records should appear with “No Results found” message Provider User Guide Copyright 2015-2015 Page 13 of 51 Under the Claim search results you will see an Export to Excel button. This will allow the option to save the Search Results into excel spreadsheet. By clicking on each Claim ID number, it will take you to a screen where you can view claim details which are generated from the database. All Member information will be protected unless the User has access to view the Claims information by NPI or Tax ID Provider User Guide Copyright 2015-2015 Page 14 of 51 3.3.1 Claims Details page On the Claim Details page, you will see six sections: Claim Summary Remittance Information Payment Information Post Payment Audit Reports Claim Items Claims bundled into same check (If any) On claim summary page, you can find the claim and associated details to it such as claim id, Member ID, Patient account Number (If any), Coverage Type, Dates of service, Servicing Provider User Guide Copyright 2015-2015 Page 15 of 51 Provider, Claim received date, Claim Status, Primary Diagnosis Code (If any), Place of Service, Reason and Note for the given claim if any. Beside this information on claim detail page, hovering the cursor on ‘Servicing Provider Name’ will show the servicing provider address, while hovering the cursor on EXPL Code of Claim Items will show explanation/Note for that selected code. There are three additional buttons available on this page. Request Remittance Details Dispute Export to Excel (To export claim line items and Bundled claims details) Post Payment Audit Reports will display any relevant data for the claim. If there is no audit report data available, it will state ‘no pertinent data for this report’ as shown in the figure above. Clicking the Request Remittance Details button will display an image of the Remit if the claim payment is after July 1, 2009. Prior to showing the available Remit file, a confidentiality disclaimer message will be displayed (see below). Clicking OK will then display the PDF as shown below: Provider User Guide Copyright 2015-2015 Page 16 of 51 Keep in mind that the processing for this claim may still be taking place, and that it might take longer for this to be completed due to the timing of the submission (i.e. prior to a holiday, weekend, etc.). Usually a good rule-of-thumb is to wait around 6-7 days after the claim was first submitted to ensure its availability. If the claim payment is processed prior to July 1, 2009, the user will automatically be directed to the Request Remittance Window as shown below, where the user can enter a valid email address and/or fax number to have the Remit image is sent. Clicking the Request Image button will then open the notification window, where the user may add any comments or notes regarding this claim request. Fill in all necessary information, and then click the Send Notification button to send the request to Provider Portal support team. A message will appear stating that your request was sent successfully and a response will be sent to you within 1-3 business days. Provider User Guide Copyright 2015-2015 Page 17 of 51 Click the Dispute/Request button on the Claim Detail page to request an explanation about the claim. A dispute window will prompt the user to answer OK or Cancel. Provider User Guide Copyright 2015-2015 Page 18 of 51 Clicking OK will bring the user to the next step to enter the e-mail address, add a message and attach Excel-only files which are related to the claim. Provider User Guide Copyright 2015-2015 Page 19 of 51 When attaching file(s), click the Browse button to search for a local Excel file to upload, then once selected click Open in the file selection window. The path to that file should now be listed in the field next to Browse. Click Add to add it to the queue of Excel documents to be uploaded. Once you’ve selected up to three documents that you wish to include, click Upload to send them to the database. Once the Send Notification button is clicked, the IT staff and vendor will receive an email with this information, including links to all the Excel documents that were attached. 3.4 Medicaid Info This page provides claims filing information for Care Improvement Dual Advantage Plan Members in the following eligible states: Arkansas, Georgia, Missouri, South Carolina, Texas and Wisconsin. 3.5 Document Upload This section allows the provider users to submit/upload the medical records, Appeal (Redetermination)/Reconsideration (Technical Denial) upload. Click on the Document Upload menu and go to the appropriate module to upload the intended documents. Provider User Guide Copyright 2015-2015 Page 20 of 51 3.5.1. Medical Record Upload The Medical Records upload module allows the user to submit/upload electronic health records requested by Care Improvement Plus. It also allows the user to find the Medical Record Upload History by clicking on the Expanded Upload History button on the top right corner of the page. To upload the Medical Record documents, click on “Medical Record Upload” or “Click here to upload a Medical Record by using Document ID” link if you have document ID (you may find this in Medical Record Request letter that you received) available for the claims you want to upload the documents. You may chose “Click here to upload a Medical Record by using Claim ID” if you do not know or do not have the Document ID available. Provider User Guide Copyright 2015-2015 Page 21 of 51 If user’s account is associated with multiple Tax ID/NPIs then user should select the one from the Provider Tax ID/NPI drop downs menu. If you do not have the Document ID, you can click on I don’t have Document ID and you will allow to enter a claim ID number. After entering the Claim ID, all associated document IDs will show up. User can select the appropriate document ID or choose ‘I don’t know document ID’ in case does not know the associated document ID number. These steps will auto populate the Member information and allow user to submit Medical Records via Medical Record File section. User can click to ‘Add Another File’ button to upload additional button. Users are allowed to submit up to five documents via clicking on ‘Submit’ button. Provider User Guide Copyright 2015-2015 Page 22 of 51 Note: User may upload PDF, JPEG, TIFF or XML type of file format and maximum size of the file should not exceed more than 60MB. User can view all the total numbers of Medical Records Upload and Most recent upload details via Medical Record Upload history. Clicking on ‘Expand Upload History’ will show all previously uploaded documents by the user. You can filter the list by entering the upload “From” and “To” dates, then click on “Search”. By clicking on ‘Update’ button, user can change/update the previously submitted document. You Provider User Guide Copyright 2015-2015 Page 23 of 51 can also export the Medical Upload History in excel document by clicking on “Export to Excel” button For more information on how to use this specific feature, please go to Forms & Guides (by either clicking the main menu tab or the header tab on the dashboard landing page) and click the ‘EMR Portal Guide’ link found within the Manual and User Guide panel. Or simply click this link: https://providerportal.careimprovementplus.com/pdf/XLHealth_EMR_Guide.pdf 3.5.2. Appeal/Reconsideration Upload The Appeal/Reconsideration Upload module allows the users to electronically upload the documents to support the appeal & reconsideration request. This module automatically identifies the provider details as a part of provider portal account and hence, makes the appeal submission easier and faster. User can upload supporting documentation, submit manual routing request, view and update previous request and export previous submission history to excel for Appeal & Reconsideration activities. CIP Provider users can submit the following types of requests and supporting documentation: Requestor Type Required Supporting Documents At least one of the following must be attached: Assignment of responsibility (AOR) Appeal Waiver of liability form (WOL) 1-5 additional documents Reconsideration 1-5 additional documents (at least one document required) At least one of the following must be attached: Pre-Service Assignment of responsibility (AOR) Waiver of liability form (WOL) 1-5 additional documents Provider User Guide Copyright 2015-2015 Page 24 of 51 Clicking on Document Upload, you will see options for Medical Record Upload and Appeal/Reconsideration Request. To upload an Appeal and/or a Reconsideration documents, click on “Appeal/Reconsideration Request Upload” or “Click here to upload an Appeal/Reconsideration Request” link as shown in following figure. Clicking on “Appeal/Reconsideration Request” will open up appeal/reconsideration document upload module with pre populated information such as provider/facility name, provider name and provider email address associated with the account. If user’s account is associated with multiple Tax ID/NPIs then user should select the one from the Provider Tax ID/NPI drop downs menu. After selecting the Tax ID or NPI from the drop down menu ‘Provider/Facility’ details and ‘Appeal/Reconsideration History’ will show up. User can type in confirmation email address if wants to receive confirmation email on other than displayed email address. Type in the document ID number in the Document ID field and the member information will be populated. User can submit the related documents such as letter of appeal/reconsideration, Provider User Guide Copyright 2015-2015 Page 25 of 51 waiver of liability (For non-par provider only) and additional documents through the Appeal/Reconsideration Documents Field. Submit Documents User can browse, select the Appeal/Reconsideration letter and other supporting documents and submit them by clicking on ‘Confirm and Submit’ button. Provider User Guide Copyright 2015-2015 Page 26 of 51 If you do not have the Document ID or the decision letter, you can click on I don’t have Document ID and you will allow to enter a claim ID number. You can look up the document ID with the date of service plus one of the following. 1. HICN 2. Member Name and Date of Birth Provider User Guide Copyright 2015-2015 Page 27 of 51 3. Subscriber ID Note: If you are unable to locate or look up the document ID number using other information, you can submit a manual routing request. For more information, see the “Submit a Manual Routing Request” procedure at end of this section. After entering the document ID or proceeding through “I don’t have document ID”, you can proceed to document upload and browse for the document, select the Appeal/Reconsideration Provider User Guide Copyright 2015-2015 Page 28 of 51 letter and other supporting documents and submit them by clicking on ‘Confirm and Submit’ button. Note: User may upload PDF, JPEG, TIFF or XML type of file format and maximum size of the file should not exceed more than 60MB. Submit a Manual Routing request If your request was not found when you search for the document ID via “I don’t have document ID” within two attempts, an option to submit a manual routing request will appear at the bottom of the page. Click on “Submit Manual Routing Request” to begin. Provider User Guide Copyright 2015-2015 Page 29 of 51 Click the “Submit Manual Routing Request” button and Manual Routing Request module will open up. Enter the information about the request type, member and date of service then click “Proceed to upload documentation”. Upload documentation and submit. For more information, see the “Submit Documents” on previous section. Appeal/Reconsideration History User can view all the total numbers of Appeal/Reconsideration document Upload and Most recent upload details via Appeal/Reconsideration history. Clicking on ‘Appeal Reconsideration History’ will show all previously uploaded documents by the user. The Appeal/Reconsideration history section allows the user to update previously uploaded appeals or reconsideration documents. Once a document is uploaded, the provider is given a new confirmation number with a revised date for the date of submission for the appeal/reconsideration. Provider User Guide Copyright 2015-2015 Page 30 of 51 You can also export the “Appeal Submission History” to excel file by using ‘Export to Excel’ button. Provider User Guide Copyright 2015-2015 Page 31 of 51 3.6 Provider News The most recent updates/news items will display in this section. The Top 5 most recent news items will display in this panel, and clicking any of these will open the news detail as a PDF document. Clicking the header of the Provider News panel or the Provider News main menu tab will open the public Provider Portal News section in a new browser window and display all news items. 3.7 Forms & Guides Provides all forms and guides related to Manual & User Guide, Appeals & Reconsideration, Prior Authorization, Claims & Payments, Medical Record Reimbursement, Member & Benefit Information, Part D Claim, Part D Coverage Determination and Redetermination, and Part D Mail Order Form. Provider User Guide Copyright 2015-2015 Page 32 of 51 o Selecting a state from the state drop-down boxes will display specific information relevant to those states. o The Forms & Guide section has the new feature listed as Approved Recovery Category under the section “Manual and User Guide”. Provider User Guide Copyright 2015-2015 Page 33 of 51 o This section provides the information about the Audit Concept, Recovery Type, Claim Type, Implementation Date and Description of the Audit. By using this link, the user can look back over 4 years of review data from the current date. o The user can also sort the list alphabetically by clicking on a specific column title to change the default order of items listed by Audit Concept, and the Implementation date column can be sorted chronologically. To jump to another page, please click on the pagination on bottom of the table. Please refer to the following image. Provider User Guide Copyright 2015-2015 Page 34 of 51 o Click on any of the Audit Concept list links and a new window will open up with the details of the recovery category, along with Policy Related Links (if any exist). To return back to the Approved Recovery Categories list view page, simply click on the close button or the ‘X’ icon located on the top-right corner of the box. Provider User Guide Copyright 2015-2015 Page 35 of 51 3.8 Reports This page gives the user the ability to view five medical report types: Medical Records Request, Audit Findings, Reconsiderations and Appeals Activity, Payment Summary and the Stargazer report. If data is available for these reports, it will display in a lookup table once a report button is clicked. This page can be accessed from the main menu by clicking the Reports tab, or from the Reports dashboard on the home page. Provider User Guide Copyright 2015-2015 Page 36 of 51 Providers can also access the PCOR report from the main menu by clicking on the patient numbers under the Provider Alert section on the home page. Please review the Patient Care Opportunity Report (PCOR) section for more details. Provider User Guide Copyright 2015-2015 Page 37 of 51 To access either the Medical Requests or Audit Findings Reports, simply hover over the Post Payment Audit sub-menu field as shown in the picture above. You will then arrive on the Reports search page, with criteria in which to search for reports. A provider user must select one of the Tax ID or NPI numbers they are assigned to in the application first. The Payment Summary Report is a unique report type that allows you to search by a specific Patient Account number or Check Reference ID, along with the Tax ID or NPI number. Users must also select a date range, either by the Date of Service or by date the check was processed and paid for. Users have the option to export and save the information into an Excel document. The data is displayed in the excel sheet by table column and in the same order as it appears within the application. Provider User Guide Copyright 2015-2015 Page 38 of 51 Stargazer Report: The Provider Portal will display any members which are assigned to their office, and each member will have a column for a specific measure. Based on the contents of each column will determine the action required for each member. Provider user can search the Member Stars Detail by selecting the associated TAX ID or NPI and then clicking on the Search button. If a member is Non-Compliant that indicates the member has not received the required screening or test for that required measure. If a member is listed as Compliant, the member has met all requirements and requires no action. If a “-“ or “na” is listed the member does not qualify for that measure and does not require and action. User can find the Glossary on bottom of the table for detailed explanation about the terms. User can scroll the report horizontally through the scrollbar and also jump to another page by clicking on the page number located below the table. Another feature under the Stargazer Summary is Export to Excel. This button allows you to save and print an excel spreadsheet of members you received in your Search Results. Provider User Guide Copyright 2015-2015 Page 39 of 51 Patient Care Opportunity Report (PCOR): Patient Care Opportunity Report for CIP members provides information regarding members where screenings or tests are recommended. User can access four different types of reports under PCOR. 1. Group Level Summary Report 2. Physician Level Summary Report 3. Member Adherence Report 4. Pharmacy Detail Report Provider User Guide Copyright 2015-2015 Page 40 of 51 User can select the Tax ID and report type and click on generate report. These reports can be export to excel sheet by using ‘ Export to Excel’ button located on top right corner of each report. This button allows you to save and print an excel spreadsheet of members you received in your Search Results. User can also view the High-Risk Medication Alternatives and glossary for this report, located at top left corner of the each report. User can scroll the report horizontally through the scrollbar and also jump to another page by clicking on the page number located below the table. Group Level Summary Report Summarizes by group (TIN) the number of members for each recommended HEDIS measure. Additionally, current and prior reporting period compliance as well as current STAR rating is provided. Quality Outcomes and Clinical Performance represent performance based on HEDIS and/or STAR specifications. Provider User Guide Copyright 2015-2015 Page 41 of 51 This report displays important information about total number of physicians within the provider group assigned (or attributed) as the PCP for a member, and total number of members with an assigned PCP that is part of the provider group (Total Patients). This report also gives detail summary of number of Patients for relevant Quality Measures, open care opportunities, Non Adherent and Adherent percentage, Prior Adherent Reporting Period percentage, Adherent Trend, Quality Rating and Adherence Target percentage. Physician Level Summary Report Summarizes by physician (MPIN) the number of members for each recommended HEDIS and Part D measure. Additionally, the number of members eligible for the screening as well as current and prior reporting period compliance is shown. Quality Outcomes and Clinical Performance represent performance based on HEDIS and/or STAR specifications. Provider User Guide Copyright 2015-2015 Page 42 of 51 This report displays following key fields: Relevant Patients: All members assigned or attributed to a physician in the group that have at least one open or closed care opportunity for any of the HEDIS and Part D metrics identified on the Member Compliance Report. Quality Rating: A calculated field showing current adherence for that metric for that group based on the 2012 CMS STAR Rating thresholds. Open Care Opportunities: Displays the total of gaps in care for the HEDIS measures and Pharmacy current year gaps as defined by the alert levels on the Member Adherence Report where: R= Gap; Y=Gap; and G= No Gap. Physician Level Summary Report also displays the detailed information for Physician Name, Quality Measures, Relevant Patients, Open Care Opportunities, Non Adherent and Adherent percentage, Prior Adherent Reporting Period percentage, Adherent Trend, Quality Rating and Adherence Target percentage. Provider User Guide Copyright 2015-2015 Page 43 of 51 Member Adherence Report Summarizes care opportunity data by physician (MPIN) each HEDIS and Part D measure. This report has following key fields: Member ID: The number found on the member's identification card. For some dual eligible members, the field may be blank. Care Score is a Care Improvement Plus calculation which uses a combination of a measure's adherence status and the weight of the HEDIS and/or pharmacy measure for each relevant member. Its purpose is to quantify the care needed for each member based on CMS guidelines. Last Wellness Exam: Displays date that this member had a wellness exam although not necessarily with the physician to which the member is currently assigned. Last Wellness Exam will be determined by the most recent claim with the following procedure codes: - ICD-9-CM Diagnosis Codes: V70.0, V70.8, V70.9 - HCPCS codes: G0402, G0438, and G0439 - CPT Codes: 99385-99387 and 99395-99397 Provider User Guide Copyright 2015-2015 Page 44 of 51 This report also displays the detailed information about Physician, Patient type (New/Existing), Member details, Care score, Last wellness Exam and different quality measures for that member. Pharmacy Detail Report Provides objective member specific information including drug name(s), dates prescriptions were last filled, Prescriber and Pharmacy information. This report may be used to proactively close gaps. Provider User Guide Copyright 2015-2015 Page 45 of 51 3.9 FAQs This section provides information pertaining to any questions the user may have. This is a keyword-driven search engine. Type the question or keyword (Minimum 3 characters) in the search text box field and all the information related to search field will be shown under the search option. The question can be expanded by clicking on ‘+’ icon to find the related answer. It also contains related links such as ‘Provider Communication’ and ‘CMS Resource’. Related information can be found by clicking on any of this links. The user can also find the last updated information on bottom right corner of the answer. Provider User Guide Copyright 2015-2015 Page 46 of 51 3.10 Contact Us This page provides Health Plan contact information related to claims submission, Appeals, Inpatient Hospital Admission Authorization, Eligibility Inquiry and Web Portal Support such as e-mail, fax, TTY and phone numbers. Provider User Guide Copyright 2015-2015 Page 47 of 51 4 Tutorials This section provides the tutorial videos about the different functions of the portal and helps user to understand how to navigate the system and use its specific features. The tutorials section can be access through the Tutorials tab on upper right corner of the portal. The user can find video tutorials on the following topics: How to self-register How to verify member eligibility How to search claims and viewing claim details How to dispute a claim Medical Records Upload How to request a remit if one is not immediately available How to view forms and guides How to view provider news How to verify post payment audit Appeal and Reconsideration Upload Provider User Guide Copyright 2015-2015 Page 48 of 51 The user can also access the Self-Registration Tutorial through the Log In page. To access the tutorial videos, click on Tutorial link and the page with tutorial videos will open up. Click on the video icon or the video topic to play the video. The video will be played in a new window after clicking on the Provider User Guide icon. Copyright 2015-2015 Page 49 of 51 Provider User Guide Copyright 2015-2015 Page 50 of 51 5 Disclaimer Care Improvement Plus has made every effort to ensure that this User’s Manual is accurate and up to date. Care Improvement Plus disclaims liability for any inaccuracies or omissions that may have occurred and makes no commitment to keep the information update or current. Information in this manual is subject to change without any prior notice. No part of this manual shall be assumes any liability to the users. All rights are reserved to Care Improvement Plus. ---------- End of the Document ---------- Provider User Guide PP v7.5.1_prov (Rev 04/20) Copyright 2015-2015 Page 51 of 51