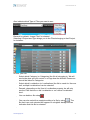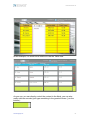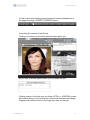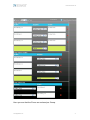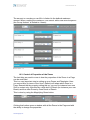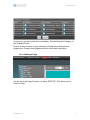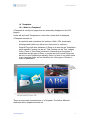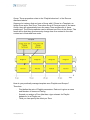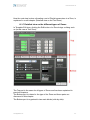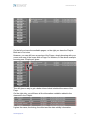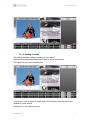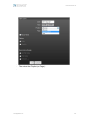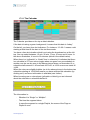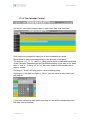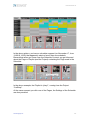
1
!
!
!
!
!
!
!
Digital Signage CMS Solution User Guide
User Guide
Software Version 3.0
!
!
!
Document Version 3.3
Contents
Introduction!.......................................................................................................6
What is a Digital Signage solution, what are the different elements.!................7
SignBox Server in more in detail!......................................................................8
Provided Functionalities!................................................................................8
Some General User Interface topics!................................................................9
Changing your password!................................................................................11
Configuration of the system: Localization and Functionality!..........................12
Localization!.................................................................................................12
Functionality!................................................................................................13
The Localization and Functionality trees!.....................................................14
The Reach: combining Localization and Functionality!................................15
How to set up a Reach structure!.................................................................16
Further configuration: Category!......................................................................20
Where do Localization, Functionality and Category have impact?!.................21
User Management!..........................................................................................22
Localization and Functionality for a User!.....................................................24
Changing an existing User’s Password!......................................................25
The Rights Area!...........................................................................................25
Users Rights!............................................................................................26
Reach Rights!...........................................................................................27
Project Rights!..........................................................................................28
Content Rights!.........................................................................................29
Scheduling Rights!...................................................................................31
Player Rights!...........................................................................................31
Tools Rights!.............................................................................................32
Adding a New User!..................................................................................32
Example 1: Basic User who can only request for content adaptation!.....33
Example 2: a User similar as the one above, but who does not need
approval!34
www.dvsignage.com!
!
2
!
!
Document Version 3.3
A Local DS Manager. He manages the local Reach, the Users, and the
DISplayers. He does not take care of Content!........................................34
Log in as other user!........................................................................................36
Files! 38
Media Files!..................................................................................................38
Preview of the files!......................................................................................42
Media Files!..................................................................................................44
Font Files!....................................................................................................47
Content Management of Pages!......................................................................50
Project view!.................................................................................................51
Page View!...................................................................................................55
Table View!...............................................................................................57
Preview editing!........................................................................................59
The impact of Groups with CMS built Templates!.....................................66
Control of Properties of the Zones!..............................................................72
Deleting a Page!..........................................................................................73
Templates!.......................................................................................................74
What is a Template?!...................................................................................74
How to set up a Template!...........................................................................75
Working in the Template Edit view!..............................................................79
Background Control!.................................................................................81
Adding Zones in the Template!.................................................................85
Control the position and size of the Zone!................................................86
A Template and the “Save As” functionality !.............................................90
Alignment control with multiple Zones selected!......................................97
Template Playlists and Group Management!..........................................101
Detailed view on the different types of Zones!.......................................107
Playlists!........................................................................................................119
Playlist editing!...........................................................................................119
Full View and List View!..........................................................................120
Filter the View!........................................................................................121
Full View!................................................................................................122
www.digitalview.com!
!
3
!
!
Document Version 3.3
Playlists in Playlists!...............................................................................129
List View!129
Playlists and Localization and Functionality!.............................................131
We all have approval rights!...................................................................132
Looking down!.........................................................................................134
The Approval Process!...................................................................................137
Approval process for Pages!......................................................................138
Basic modifications!................................................................................140
Adding records!......................................................................................144
Impact of Requests from other Reach place!.........................................146
Removal of records!...............................................................................148
Requests related to Playlists!.................................................................150
Player control!................................................................................................153
The concept “Test Player”!.........................................................................156
Scheduling!....................................................................................................161
How to set up and edit a schedule!............................................................164
The first steps in creating a new schedule!............................................164
Editing an existing schedule!..................................................................167
Daily recurrence!....................................................................................168
Weekly recurrence!................................................................................169
Scheduling version 2!................................................................................171
The Calendar!.........................................................................................174
The Calendar Control!............................................................................175
The Filter setting!...................................................................................176
Schedule Content!..................................................................................178
Schedule Settings!.................................................................................179
How to Modify or Delete an existing Schedule!......................................183
How to Add a new Schedule!.................................................................188
Scheduling making use of the basic view!.................................................192
Audit! 193
Status!195
RSS information!............................................................................................198
www.dvsignage.com!
!
4
!
!
Document Version 3.3
Weather!.....................................................................................................199
Contact Details!.............................................................................................202
www.digitalview.com!
!
5
!
1
!
Document Version 3.3
Introduction
This manual covers the complete usage of the SignBox V3 software. SignBox
is the specific brand of the DVSignage server and player based digital
signage system. The system is also available as a hosted web SaaS solution
(referred to in the document as iCalmNET) and is totally customer
configurable.
Compared to the V2 release, the main new functionality is the CMS based
Template Editor. This allows the user to create Templates from a web based
environment making the workflow for Digital Signage projects a lot simpler.
This manual is as much as possible written so different chapters can be used
by different levels of users. For instance, the basic user who only needs to
modify the content of a field in a page can refer directly to the chapter related
to content management.
The document makes use of many screenshot of the V3 software. However,
as the software evolves it is expected that these screenshots will not always
100% match with what the User sees on screen. The screenshots examples
are taken from different customer systems and include examples from other
language versions of the software and from the iCalmNET web-based system.
www.dvsignage.com!
!
6
!
2
!
Document Version 3.3
What is a Digital Signage solution, what are the different
elements.
·
The Displays
·
The displays are the digital signs that provide the information .
·
The Players
·
The Players are locally (relatively close to the displays) generating the
content and directly connected to the displays. The Players are
connected to a digital TCP/IP network and are provided with
information from the DS Master Server.
·
The DS Server
·
The DS Server is the platform on which the SignBox MediaMaster/
NetworkMaster (iCalmNET V3) is running. It can be hosted in the
customer’s premises or a service provider can host it. The DS Server
controls what is displayed on the Players at any moment in time.
·
It also often hosts the User Interface applications for the DS Users.
·
The DS Server Software
·
All the software needed to make a DS application run properly. This
consists of User Interface applications, scheduling applications, web
service applications, databases, communication software, etc.
·
The DS Users
·
All the Users that interface with the DS Server Software. As mentioned,
different levels of Users are in place.
·
The Content
·
The Content is what is displayed in the pages on the displays. The
page is the full image on the display and it consists one or more fields
in which different content is shown.
·
The User Interface applications
·
These are the applications used by any of the DS Users to make the
DS system work properly. Such applications provide different
functionalities, such as: User management / DS configuration
management / Page creation / Content creation /Scheduling
SignBox MediaMaster/NetworkMaster (iCalmNET V3) is the DS Server
Software with its User Interface applications in the total DS picture. This
software works with the DVSignage hardware and SignBox Player software
www.digitalview.com!
!
7
!
3
!
Document Version 3.3
SignBox Server in more in detail
3.1
Provided Functionalities
·
System Configuration: Set up for the DS system.
·
Player Management: Which player is located where and what is it used
for.
·
User Rights Management: Which user can do what
·
Template and Playlist Creation
·
Content File Management: the purpose of the different Content files,
where and for what can these be used.
·
Content Management: Which content is displayed in which page and
building & controlling Playlists
·
Related Content Management: Authorization of Content adaptation
·
Scheduling: When is which page displayed where
·
User Interface applications download: provide an easy way to install
User Interface applications (which are not web based) on the User’s
PC.
·
Monitoring of the network traffic
·
Provision of a Database: to host all the settings and content of the DS
solution
·
Provision of a web server: to enable web based user interfaces
·
Audit: of the usage of the DS system
www.dvsignage.com!
!
8
!
4
!
Document Version 3.3
Some General User Interface topics
Starting up the User Interface is done via a web browser.
The URL depends on the local implementation or IP address of the Server.
The Servers systems are pre-configured to pick up an IP address when
connected to a router and once this IP address is known, it can be used to
access the login screen.
The login screen looks like:
Following fields are available:
·
On the left top there is “Support” which brings up an email window.
·
Slightly under this there are different flags representing different
languages. The amount of languages depends on the installation.
·
The main area is in the middle, here you fill in your name and
password. After this, you hit the “Enter” button to get into the
application
www.digitalview.com!
!
9
!
!
Document Version 3.3
The next window looks like:
This screen provides:
·
Right top:
o The “Welcome …” indicates the User who is logged in.
o HOME (is always available and brings you back to this screen)
o SUPPORT (see above)
o PASSWORD: every user can change his own password.
o LOG OUT: logs you out of the application
o The software version
·
Middle bar: the various functionalities (represented by icons). Hitting
one of these icons brings you to the selected functionality.
www.dvsignage.com!
!
10
!
!
Document Version 3.3
·
5
Changing your password
To change your password, you click on the PASSWORD button:
In the top line, you need to fill in your current password, in the next two lines,
you fill in the new password you want to use twice.
Hit OK and your password will have changed (unless you get an error
message).
If you have forgotten your current password, you have to ask your system
administrator to provide you with a new password.
www.digitalview.com!
!
11
!
6
!
Document Version 3.3
Configuration of the system: Localization and Functionality
The software to a large extent depends upon the concepts of Localization and
Functionality1 . Concepts often also referred to as “metadata”.
Its main features are:
·
Providing a solution that “automatically” brings the right Content to the
right displays
·
Making sure that all the Users work in their “domain” only and cannot
interface with displays outside of their domain.
·
Making sure that the different types of users focus only on their
activities and are not distracted by activities beyond their scope.
·
Providing a rollout solution for small as well as large organizations
·
Providing a solution that is scalable in function as the deployment of
the Digital Signage solution extends.
·
Separating the responsibilities and concerns between “normal users”
and Digital Signage (DS) users.
The concept of Localization and Functionality is linked to various objects in
the implementation:
·
Users
·
Pages / Templates
·
Carousels / Playlists
·
Players
·
Content
The structure of Localization and Functionality needs to be implemented
across all the objects in the system.
6.1
Localization
The concept “Localization” is purely physical: it tells us “where” the objects are
located. This “where” relates to various objects in the system:
·
A User: where he (or she) is located
·
A Display or Player: where it is located
·
A Template (or Playlist): where it is to be used
1
For smaller installations it is possible to operate the complete software without using
Localization and Functionality.
www.dvsignage.com!
!
12
!
·
!
Document Version 3.3
Content: where can this content be used
A page this is given a certain Localization will only be displayed on displays
that have been given the same (or similar, see further) Localization.
Equally a User with a certain Localization will only be able to work in his
Localization, create pages for that Localization and manage content in his
Localization.
6.2
Functionality
Functionality tells us about the “type of information” we are working with. In a
practical DS implementation, different types of information are used.
For instance, consider a global company that wants to install a DS solution all
over its premises. The types of information they want to display can be:
·
For the visitors:
o Product information
o General company related information
o Financial information
o Welcome messages
·
For the employees:
o Quarterly financial figures
o Welcome to new employees
o Quality figures
o Employee of the month
o Company information (important orders, acquisitions, etc.)
o Employee restaurant information (menu of the day …)
This Functionality is then related to the different objects in the DS solution:
·
A User: the User creating the welcome message for a visitor will be
different from the User providing the menu of the day for the restaurant.
·
The Displays: depending on their location will display different types of
information. A display in the visitors hall will display something different
to a display in the production area.
·
The Pages: depending upon the type of information required.
·
Content: An employee picture will be used for a different Functionality
then a picture of a restaurant plate.
www.digitalview.com!
!
13
!
6.3
!
Document Version 3.3
The Localization and Functionality trees
Both Localization and Functionality are built as trees.
For instance:
This could be part of a Localization tree. Obviously, the part for “Asia”,
“Americas”, etc. will be further built out. In this illustration, we limit to part of
the tree reaching to the Localizations “Income hall”, “Demo room” and
“Customer Restaurant” under “Global” – “Europe” – “France” – “Paris” –
“Central Office”.
A similar tree is built for Functionality.
An important remark is that the objects (for instance a User) can be on
any of the branches in the tree. For example this means that there can be a
User on the level “France”. He will have a view on everything that is under
“France”. A User could as well be on the Localization “Customer Restaurant”.
He will only have access to that Localization.
www.dvsignage.com!
!
14
!
!
Document Version 3.3
There is always (at least) one user on the levels “Global” (Localization)
and “Overall” (Functionality). He is called the “Global DS Manager” and he is
capable of doing “everything” “everywhere”.
He will typically have “Local DS Managers” (for instance for France) who will
then build out the structure further in their region. As such, the task of
configuration can be distributed across a number of local responsible Users.
Depending on its type, an object can have multiple Localizations and or
Functionalities. For instance, a display in a production environment can
combine the Functionalities of “Quality information”, “Human Resources” and
“Catering”. As such, it will display all the information that is related to these
three Functionalities.
6.4
The Reach: combining Localization and Functionality
The Reach of an object (for instance a Page) is defined as the combination of
the Localization(s) and Functionality (or Functionalities) it has.
For instance, in the next illustration, the Reach is Localization of “Site02” in
Paris and the Functionality “Human Resources”. This will typically be for the
Human Resources department for that Localization.
Another Reach in this illustration is Management, which is Global, covering all
the Localizations. Hence this Functionality has the capabilities of displaying
information on all the displays in the DS solution.
www.digitalview.com!
!
15
!
!
Document Version 3.3
Remark that (depending on the type of object) a Reach can cover
various “rectangles” simultaneously.
6.5
How to set up a Reach structure
One of the main tasks of a DS manager (either Global or Local) is to set up
the tree structures for a DS implementation.
As mentioned, the Global DS Manager can do this for the complete
organization, where the Local DS Manager will do this within his own Reach.
To bring up the “Reach” screen, click the corresponding icon:
This brings you to2:
This view is impacted by the User’s Localization and Functionality. So logging
in as User with Localization “Belgium” and Functionality “Marketing” brings the
User to this Reach:
2
Only users on administrative level have the capability to delete items in the reach trees.
Hence, all other users will not have the delete icon (with the red “X”) available.
www.dvsignage.com!
!
16
!
!
Document Version 3.3
You notice that the “roots” in the panels for Localization and Functionality
have changed from “Global” and “Overall” to “Belgium” and “Marketing”.
Let’s focus on the Localization block of the user interface. The other blocks
operate in completely the same manner.
When clicking on one of the little “-“ or “+” buttons, you can close or open
parts of the tree. For instance clicking on the “+” in front of Brussels opens
that part of the tree:
www.digitalview.com!
!
17
!
!
Document Version 3.3
As such, you can “zoom in” and “out” to the part you are interested in.
When selecting on of the items in the tree (for instance “Brussel”), this will
appear in the “Selected:” box.
Here you can either:
·
Edit the name of the item, store the name with the “pencil” button:
www.dvsignage.com!
!
18
!
!
Document Version 3.3
·
Add a new item under the selected one using the “add” button:
·
Or remove the item using the “remove” button:
3
Specifically, when adding a new item (with
), a new box (labelled “Add:”)
will appear in which you can enter the name of the new item:
Clicking the “Save” button
The button
will store the new item in the tree.
will close the Add field.
Remark to be very careful when removing items in the tree once the
items in the tree are used for User management, Player management and
Content management. When removing such item in a tree, these objects will
be impacted and will have their Localization or Functionality changed. Remark
that only users on administrative level can have the right to remove items in a
reach tree.
3
Only users with administrative level have the delete functionality available.
www.digitalview.com!
!
19
!
7
!
Document Version 3.3
Further configuration: Category
Content (image files, video files, etc.) can be put in different categories.
Zones in pages can also be linked to categories.
By doing so, you will make sure that when a user wants to change content in
a certain area, he will have the correct set of content files to choose from. For
instance, he will not find images of employees (residing in the category
“employee”) in a zone that is linked to pictures of products.
A category tree could for instance look like this:
Setting up a category tree is done completely similar as setting up tree
structures for Localization and Functionality.
www.dvsignage.com!
!
20
!
8
!
Document Version 3.3
Where do Localization, Functionality and Category have
impact?
The illustration provides an overview of where Localization, Functionality and
Category have impact.
·
In “Reach”, the trees are defined
·
In “Users”, who is responsible for which area(s) & for which functions.
·
In “Players”, you define where the Player are and what their purpose is.
·
In “File”, for which Localizations the Files are intended and under which
Category they fall.
·
In “Content”, there is impact on three levels: Projects, Pages &
DataSources: Here you indicated on “zone” level where, for what and
from which category the content can come
www.digitalview.com!
!
21
!
9
!
Document Version 3.3
User Management
DS Users are a very essential part of the total DS implementation. Any User
who has the Rights to do this can do user management.
The icon that brings you into User Management:
The screen that opens after clicking that button looks like:
This is a list of the Users (obviously, under the Reach of the User who logged
in). It lists the User Names plus the last time this User has logged in to the
system.
The Search area:
provides a filter to limit the
amount of Users on the screen. It filters on the name of the users. This can be
valuable when you have a lot of Users.
Remark on the left top the button “Add User”. Click on that button to add a
new User to the System.
Selecting one of the Users is done by clicking on its name. The screen you
will get is similar to:
www.dvsignage.com!
!
22
!
!
Document Version 3.3
Remark on the left top of the screen the additional buttons: “SAVE”, “SAVE
AS ..” and “Delete”. After you have made adaptations to the Reach and/or
Rights of a User, you need to click “SAVE” to store the changes you made.
A user cannot change his own settings.
Obviously, with “DELETE”, you will remove a User from the system.
“SAVE AS…” allows you to create a new user based on all rights of another
one. This is easy when you for instance have a user in London with a certain
set of tasks and you want to have a similar user in Paris. For this, you would
open the user in London, hit “SAVE AS…”, change the Localization to Paris,
hit SAVE and the new user is created.
Under “Detail”, you get a window with the details of the Reach and the Rights
of the User:
www.digitalview.com!
!
23
!
!
Document Version 3.3
This part of the screen has 3 areas:
·
Name area
·
In here, the name of the User is filled in.
·
Localization and Functionality area (see further)
·
The Rights area (see further)
9.1
Localization and Functionality for a User
When clicking on the Localization button: “Localization:
where you can select the Localization of the User:
“, a panel opens
A User can have multiple Localizations. This is because he can be
responsible for the DS solution in multiple locations.
A similar user interface is available for Functionality (for Localization and
Functionality there is a copy/paste functionality available).
When for instance a Functionality panel is open and you click the copy button:
, the currently selected Functionality (or set of Functionalities) is stored in
a paste buffer. When the paste button
is then clicked for another user,
this user will get the Functionality (or set of Functionalities) out of the paste
buffer. This copy/paste method often helps in efficient editing or adding of
Users.
Adding a new User is done by clicking “ADD USER” on the left top of the
screen.
www.dvsignage.com!
!
24
!
9.2
!
Document Version 3.3
Changing an existing User’s Password
When an existing User is selected, his password can be reset. This is needed
when for instance the user has forgotten his password. Clicking “CHANGE
PASSWORD” brings up this box:
Remark, that you, who changes the password of another User, needs to fill in
your own password on the top line before giving (twice) a new password to
the other User.
9.3
The Rights Area
The Rights Area is divided in a number of tabs.
Any User who can create another User and/or who can Modify the Rights of
another User will at maximum be able to give his own Rights to another User.
Rights he doesn’t have are not visible to him. Hence, the list of “visible”
Rights when editing User Rights depends on your own Rights.
Rights can depend on other Rights. For instance, if you cannot see the Users,
you obviously cannot add, remove or modify Users. If this is the case, the
www.digitalview.com!
!
25
!
!
Document Version 3.3
Right as such is not selectable in the list, it is “grayed out”. There is also an
indication informing which other Rights are required in order to get that Right
selectable (such as is the case in the above picture with “Add User Profiles”).
9.3.1 Users Rights
In here, the Rights of this User regarding his capability to work on other Users
are defined.
·
Administrator
·
He by default also gets all the available rights.
·
See Audit list
·
Audit is a possibility to get a view on the actions that have been done
on the CMS (for details; see further). This Right enables this view.
·
See user list
·
Enables a User to see the list of Users within his Reach.
·
Add user
·
The Right to Add a User. Remark: Having the Right to Add a User
without having the Right to Modify a User has no meaning. Hence,
make sure also to provide the Right “Modify User”
·
Modify User
·
The Right to change the Rights of other Users within your Reach.
·
Remove User
·
The Right to remove Users within your Reach.
·
Log in as other user
www.dvsignage.com!
!
26
!
!
Document Version 3.3
·
Having this right, a User logged in under his credentials in the CMS
can create a new tab window in the browser as another User.
Obviously, that other user needs to be within his own Reach.
·
Change own password
·
If this is checked, the User will be able to change his own password
9.3.2 Reach Rights
Reach Rights are related to Localization and Functionality.
·
See Reach List
·
The Right to see the Reach list, both for Localization and Functionality
·
Add to Reach
·
The Right to add an item to the Reach list. Remark that normally a
User with Add Rights would also have Modify and Delete Rights
·
Modify Reach
·
The Right to change the name of items in the Reach list
·
Remove from Reach
·
The Right to remove items from the Reach List
·
Modify own Reach position
·
This allows a user to change his Localization and Functionality setting
to a “lower” level and as such having the possibility to see how content
(More specifically Templates and Playlists) look like on such lower
level.
·
See Category List
www.digitalview.com!
!
27
!
!
·
Add to Category
·
Modify Category
·
Remove Category
·
Similar rights as for Reach (see above)
Document Version 3.3
9.3.3 Project Rights
·
See project list
·
The Right to see the list of projects. Remark that this Right is essential
to also see the Pages and the Content in the pages. Hence, someone
with the basic Right to change something in a Page will always need to
have this Right.
·
Add project
·
The Right to add a Project.
·
Remove project
·
The Right to remove a Project.
·
Modify Reach
·
The Right to modify the Reach of a Project
·
Add Files to project
·
The Right to upload media and font files. Media Files are uploaded to a
Project, Font files are loaded to the Server.
·
This Right is needed to load Fonts.
www.dvsignage.com!
!
28
!
!
Document Version 3.3
·
Remark: Media Files are Image Files, Video Files and Flash Files.
·
Modify File Properties
·
The right to modify the properties of a media File in terms of
Localization and Category of files.
·
Remove Media Files
·
The Right to remove Media Files
·
Add Font File
·
When you have the Right “Add Files to project”, you additionally need
this Right to upload Font files.
·
Remove Font File
·
The Right to remove Font files from the Server.
9.3.4 Content Rights
·
See page list
·
The Right to see the list of pages in a project
·
See datasource list
·
In a Page, there can be fields that can be modified by a User with the
applicable Rights. These fields are linked to datasources. This is the
www.digitalview.com!
!
29
!
!
Document Version 3.3
Right to see these datasources (see also the chapter related to
Content).
·
Add datasource record
·
The Right to add a datasource record.
·
Modify datasource record
·
The Right to modify the content in a datasource record.
·
Remove datasource record
·
The Right to remove datasource records
·
Approve datasource record
·
The Right to approve changes to datasource records. When a User
has this Right, the modification he wants to content will immediately
take place on the screens once he has hit “Update Content” in the
Content screen. If he doesn’t have that Right, he can only post a
request to change the content. Another User, within the correct Reach
and having this Right will have to approve that request before it is seen
on the screens.
·
Immediate Modification of Datasource
·
There are two ways to apply an adaptation to a page. Either this is
done by first adapting all the datasource fields in a page and then
submitting the page using “UPDATE”. The other way is to do this in real
time. Immediately after an adaptation has been done, this is reflected
on the displays. In order to be able to work in the second way, a user
needs the right “Immediate Modification of Datasource”.
·
Add Template
·
The Right to Add Templates
·
Modify Template
·
The Right to modify Templates
·
Remove Template
·
The Right to remove Templates
·
Add Playlist
·
The Right to add a Playlist in a project
·
Modify Playlist
·
The Right to make modifications in a Playlist
·
Remove Playlist
·
The Right to remove a Playlist
www.dvsignage.com!
!
30
!
!
Document Version 3.3
9.3.5 Scheduling Rights
·
See schedule list
·
The Right to observe the schedule list
·
Add schedule
·
The Right to add a schedule
·
Modify schedule
·
The Right to make modifications to existing schedules
·
Remove schedule
·
The Right to remove schedules
·
Use Detailed Schedule view
·
The CMS Scheduling page can be presented in two ways: a basic one
and a detailed one. A User having this Right will get the detailed view.
Refer to the chapter Scheduling for more details.
9.3.6 Player Rights
·
See Player list
www.digitalview.com!
!
31
!
!
Document Version 3.3
·
The Right to see the list of Players in your Reach.
·
Remove Player
·
The Right to remove
·
Edit Player Reach
·
The Right to edit the Reach (Localization and Functionality) of the
Players.
·
Perform major actions on Players.
·
The right to reboot, switch on/off Players. Taking screen dumps is not
within “major actions”.
·
Send Pages to Players
·
The right to directly send content to a Player (Pages and Playlists).
·
Use Test Players
·
The right to make use of Test Players
9.3.7 Tools Rights
·
See client status
·
Client status gives an overview of the disk space used and the traffic
used. This Right provides the capability to view this status
·
See tools
·
A User having this Right can download Tools and can download the
Tools manual.
·
See live info
·
The Right to see which RSS feeds are supported to integrate in Page
designs.
9.3.8 Adding a New User
A new User is added by using the “ADD USER” button.
This brings up following screen:
www.dvsignage.com!
!
32
!
!
Document Version 3.3
As you can observe, the difference with editing existing Users is the existence
of the “Password” and “Repeat Password” areas. This is needed as any new
user needs to get a password. The DS manager will have to inform the User
accordingly.
9.3.9 Example 1: Basic User who can only request for
content adaptation
The parameters related to Localization and Reach are used to indicate where
which type on information can be changed.
This User needs to get approval for content adaptation from another User.
The set of Rights he needs is:
·
Users
·
Nothing
·
Reach
·
Nothing
·
Projects
o See project list
·
Content
o See page list
o See datasource list
o Modify datasource record
www.digitalview.com!
!
33
!
·
Schedule
·
Nothing
·
Player
·
Nothing
·
Tools
·
Nothing
!
Document Version 3.3
9.3.10 Example 2: a User similar as the one above, but who
does not need approval
This is the same set of Rights as above, however plus:
·
Content
o Approve datasource content
9.3.11 A Local DS Manager. He manages the local Reach, the
Users, and the DISplayers. He does not take care of
Content
Even-though this User does not take care of Content, he will need to be able
give these Rights to other Users (which he manages) and so needs these
Rights himself. The set of Rights he needs is:
·
Users
o See user list
o Add user
o Modify user
o Remove user
·
Reach
o See reach list
o Add to reach
o Modify reach
o Remove from reach
·
Projects
o See project list
o Add project
www.dvsignage.com!
!
34
!
!
Document Version 3.3
o Remove project
o Upload files to project
·
Content
o See page list
o See datasource list
o Add datasource record
o Modify datasource record
o Remove datasource record
o Approve datasource record
·
Schedule
o See schedule list
o Add schedule
o Modify schedule
o Remove schedule
·
Player
o See player list
o Edit player reach
·
Tools
o See client status
o See tools
o See live info
www.digitalview.com!
!
35
!
!
Document Version 3.3
10 Log in as other user
In quite some cases, certainly for Users with a higher level of responsibility in
the Digital Signage solution, it is interesting to quickly log in as another user,
without having to provide that other user’s password.
This “other user” obviously needs to be within the Reach of the requesting
User. A User will not be capable of logging in as a User above or besides his
own Reach.
Logged in as another user, you can for instance easily see what his view on
pages, files and playlists is.
It is important to note that giving the right to a User to log in as another
user is something to be very careful with. Only do this for Users who you can
trust and who have a good understanding of what they are doing. Hence this
Right should be exceptional.
“Log in as other user” is available from any location in CMS once you are
logged in:
Click this button gives:
www.dvsignage.com!
!
36
!
!
Document Version 3.3
Using the drop down box, you can select another user, once selected, you get
informed about his or her Reach:
Click “OK” gives:
A second tab is created in your browser giving a CMS from the perspective of
the “other user”.
www.digitalview.com!
!
37
!
!
Document Version 3.3
11 Files
Remarks:
·
with “Files”, we mean Media and Font files.
·
Media Files are always linked to a Project. Hence, if you have a Media
file in Project A, it will not be available in Project B. If you want it in
Project B as well, you will also have to upload it to that project.
·
Media Files are uploaded to their “type” (Image, Video, Flash)
·
Font Files are available to all Projects.
You get in the File screen by clicking on the File button:
There are essentially two types of Files: Media Files and Font Files.
One can see this by selecting “Type of File” in the Files Page:
11.1 Media Files
The Files we are targeting here are content files such as image files.
This brings you to:
www.dvsignage.com!
!
38
!
!
Document Version 3.3
As Files are always linked to a Project, you first need to select a Project which
you do with the drop down box at the left top:
www.digitalview.com!
!
39
!
!
Document Version 3.3
Also indicate which Type of Files you want to see:
Remark: by default: “Image Files” is selected.
Selecting a Project and Type brings you to the Files belonging to that Project,
for instance:
In here, you can:
·
Select which Category (or Categories) the file is belonging to. We will
see further how you can control in a Page how the different Zones can
as well be linked to Categories.
·
Select which Localization (or Localizations) the file is made for. Here as
well, multiple Localizations can be selected.
·
Remark: depending on the User’s Localization property, he will only
see the Files that are on his Localization or on a lower Localization
level.
·
You can delete a file using
·
One can also select the complete setting of a file by using
. The
file that is as such selected will appear on a brighter background as
indication that this file is selected:
.
·
www.dvsignage.com!
!
40
!
!
Document Version 3.3
·
·
Subsequently using the paste button
files.
·
One can also get a thumbnail preview of the image files:
will copy the settings to other
·
·
This is done using the check box “THUMBNAIL PREVIEW” and hitting
“RELOAD LIST”. Remark that when there are lots of files in the project,
it can take some time before all the thumbnails are loaded from the
server to the PC. Therefore, by default, this option is not activated.
Remark you can do this for the main types of content: Images, Videos
and Flash files using the drop down:
www.digitalview.com!
!
41
!
!
Document Version 3.3
Now some important remarks related to this:
·
The Localization property of the File makes sure that a User can only
see the Files on his Localization or lower. However, in Content
management (see further) he will also only be able to make a selection
out of Files on his Localization or lower. Hence, he cannot select a File
(for instance a picture of an employee) belonging to another
Localization.
·
The Category property makes sure that the right content is used on the
right Page. For instance, one cannot select an image of an employee
on a Page that is intended to show the menu of the day in a restaurant.
11.2 Preview of the files
In the CMS, the user gets a thumbnail preview of the content file (for instance
an image).
However, you might want to have a detailed view on this content. For instance
to verify the complete video file.
You can do this by clicking on the thumbnail:
This opens (depending on the system you have this will probably look
different):
www.dvsignage.com!
!
42
!
!
Document Version 3.3
And gives:
Here you can see the image more in details (for instance verify the quality).
For a video file you get something similar:
www.digitalview.com!
!
43
!
!
Document Version 3.3
Remark that of course you need an application on your PC that recognizes
the file and that can “play” the file.
Remark as well that when having large files (such as a video file of hundreds
of megabytes) the upload to your PC might take a considerable time.
11.3 Media Files
Media Files are: Image Files, Video Files, Flash Files.
As mentioned, Media Files are uploaded to a Project and to a Type.
Say, you want to upload an Image Files.
Select the Project you want to upload the file to and select the Type
The click “UPLOAD FILES …”
www.dvsignage.com!
!
44
!
!
Document Version 3.3
Click “Add File …”
And select the file(s) you want to upload from the file system you have access
to on your computer.
www.digitalview.com!
!
45
!
!
Document Version 3.3
Remark: in the file selection window, you get automatically a filter to the
recognized file types.
Click “Open”:
Click “Submit”
You will see a an upload bar in the window and after the upload is done, you
get
Indicating the upload has been successful (or not).
www.dvsignage.com!
!
46
!
!
Document Version 3.3
11.4 Font Files
Select “Font Files” under Type Of File:
Here you get a list of the Fonts available.
Select “UPLOAD FILES…” from the File Page:
You get the Upload Files dialog:
Using “Add Font…” you can select one or multiple fonts from your PC to
upload to the SignBox Client.
Certain versions of the Microsoft Operating System do not allow to
directly select Fonts from the Windows Fonts directory. If this is the case,
simply copy/paste the targeted Font files from that directory to a directory you
create for the purpose in your own environment and select the Font files to
upload from there.
www.digitalview.com!
!
47
!
!
Document Version 3.3
For instance:
Click “Submit” and the Files will be uploaded.
After this is done you get:
When you now go back to the File Page in CMS and reload the Font list you
will see the uploaded Font
www.dvsignage.com!
!
48
!
!
Document Version 3.3
s are available:
From now on, you are able to use the new Fonts in your Templates.
As you see, you can also delete Font files.
When you delete Font files, Templates made using these deleted Fonts
will obviously not behave anymore as before. The Font will typically be
replaced by the first “other” font in the list, which often is Arial. Hence be very
careful when deleting Fonts!
www.digitalview.com!
!
49
!
!
Document Version 3.3
12 Content Management of Pages
In this chapter we focus on the Content Management more specifically related
to pages. Playlists obviously is also seen as Content, but this is discussed in a
next chapter.
On gets into the Content Management area by clicking on the icon:
This will bring you to a screen looking like:
This provides a list of the available projects.
On the left side, this is represented by a tree view and the large area right of it
is providing an icon view on the projects.
The Search area:
provides a filter to limit the
amount of Projects on the screen (in the middle pane). This can be valuable
when you have a lot of Projects.
Remark that the separation bar between the tree view and the thumbnail view
can be moved horizontally.
With “ADD PROJECT...” you can create a new project. Click the button, give a
name:
www.dvsignage.com!
!
50
!
!
Document Version 3.3
And click “OK”, a new project is created.
When you attempt to create a new project with a name already used on
the Client, you will get a warning and you are asked for another name. It is
possible that you do not see this already existing project as projects can be
out of your Reach.
12.1 Project view
Clicking on one of the Projects (either in the left tree or the middle pane)
brings a view on the Pages. Remark that we keep an overview of all Projects
in the left tree view.
www.digitalview.com!
!
51
!
!
Document Version 3.3
When you now use the search function:
, a filter is
made on the Pages and Playlists in the project, more specifically on the
names of these.
As you can see: Projects have Localization and Functionality parameters.
When for instance opening the Localization, you get something like:
www.dvsignage.com!
!
52
!
!
Document Version 3.3
Remark here that for a Project (and as we will see, for a Page as well)
Localization can consist of different items. This, in a practical situation means
that the Project is made to be used in several Localizations.
There are further two other differences:
·
The existence of the Save button:
·
·
When a Localization (or Functionality) of a Project is changed,
this change needs to be saved using this button.
·
Without using this button, the new selected Localization or
Functionality will not be saved internally although the text will have
changed here:
·
·
The existence of Level control:
www.digitalview.com!
!
53
!
!
Document Version 3.3
·
·
Opening this drop down box gives you:
·
·
·
Hence, you can select between “Single Level”, “Two Levels” … “All
Levels”.
·
When this option is for instance set to “Three Levels”, this will impact
the Localization (or Functionality) on the selected Level itself (for
instance “Brussels”) plus two other levels below it, as can be seen in
this picture:
·
·
·
This feature makes it easy to do multiple selections at once.
Remark that it makes no sense to leave higher-level items checked. In
practice, only the lowest levels have a meaning.
www.dvsignage.com!
!
54
!
!
Document Version 3.3
Another point to mention is the “UPLOAD FILES …” button:
.
With this button, you can upload files from you PC to the selected project in
the SignBox Server. Clicking this button gives:
Using the button “Add File…” will open a window where you can select one or
more files on your PC.
Once this is done, with the button “Submit” the set of selected files will be
uploaded to the server4 . After the upload is done, this is illustrated in the
window.
Remark: for more details for uploading files, please refer to the chapter
“Files”.
In this view, you can also delete a Project (DELETE PROJECT). Remark that
extreme care should be taken to do this as it will delete the Project and all its
content, including the Templates, the content of the Pages, the Playlists and
the Files.
12.2 Page View
The next item to discuss is the “Page View”.
A Page is selected by clicking on one of Pages previewed in the Project View,
one can also make the selected with the tree on the left side.
This brings us to something looking like:
4
Remark they will need to given Category and localization properties later using the File
screen.
www.digitalview.com!
!
55
!
!
Document Version 3.3
As you can see, the Page As such can also have Localization and
Functionality properties. We will not further discuss this here, as it is
completely similar to the way you do this in Project.
New is the “Preview at” function:
As you see, you can select between “Preview” and “Table” mode. We will see
further how “Table” view works.
You can also select the side of the Preview using the drop won box:
Hence, you can choose between 33%, 50% and 100%. The percent indication
corresponds with the resolution of the Page. For instance when a Page has a
resolution of 1368 x 768, it will take 684 x 384 pixels in the browser view. This
can for instance come in handy when your screens are full HD (1920 x 1024).
Then a scaling of 33% might better fit your browser window.
www.dvsignage.com!
!
56
!
!
Document Version 3.3
12.2.1 Table View
Table view looks like this:
For this type of Page, this has little value. However, when you have a table as
such in the Page itself, such as:
Hitting a field in this table brings you to a column view in this table. This can
be used, but it might be observed as confusing by some users:
www.digitalview.com!
!
57
!
!
Document Version 3.3
In this example, it is much more intuitive to use the Table view:
As you see, you can directly control the content in the fields, you can also
easily add new records (just type something in the greenish boxes () on the
bottom):
www.dvsignage.com!
!
58
!
!
and you can easily erase a record (clicking
Document Version 3.3
at the right side of the record).
12.2.2 Preview editing
Let’s now further focus on the Preview way of editing Content.
In a Page there are Zones that can be edited by a User. As mentioned, via
Localization, Functionality, Categories and related Rights, some Users might
have more possibilities than others. We here assume that the User has the all
in place to do what we describe.
When the user enters with his mouse cursor in the field of the page, the items
he can adapt are indicated by a red border:
When he hovers over a zone he can edit, this is further indicated by making it
greenish.
www.digitalview.com!
!
59
!
!
Document Version 3.3
In this Page, there are three Zones that can be controlled:
·
The picture
·
The Name field
·
The Explanation
The CMS knows which type of content is available in which Zone and will
automatically adapt the User experience.
·
Controlling the content of the picture
·
When the User clicks in the Zone with the picture, he gets the following
window:
·
·
Here he can control the content of the picture. He can either do this via
de drop down box:
www.dvsignage.com!
!
60
!
!
Document Version 3.3
·
·
Here he gets a list of all the applicable Files, if he knows the name of
the file he wants to use, this can be a fast and simple way of working.
·
However, he also use to get a Preview of the different images using the
button:
. This brings him to such view:
·
·
As you observe, this is thumbnail list of the available images.
·
With the Filter box:
of files.
www.digitalview.com!
, he can filter out a set
!
61
!
·
!
Document Version 3.3
Clicking on one of the previews brings up:
·
·
Where further information of the File is available: it’s creation date and
it’s size.
·
Clicking on the “OK” button will provide a Preview of how the image will
look with the selection of this file:
·
·
Important Remark:
·
There are as indicated two ways to update content. Either this is done
“immediately”:
www.dvsignage.com!
!
62
!
·
!
Document Version 3.3
Or this is done after having properly made all required adaptations to
the page and using “UPDATE CONTENT button”:
·
·
·
·
Controlling the content of text Zones
·
Clicking for instance on the Zone with the Name gives you:
·
·
As you see, a window opens where you can adapt the text:
·
·
·
Clicking outside of the text area (or hitting <CTRL> + <ENTER>) closes
this window and you will see that the content has changed accordingly.
Suppose with did the same for the larger text area, we can get:
www.digitalview.com!
!
63
!
!
Document Version 3.3
·
·
Remark here as well that updating of the content can be done in 2
ways as described above.
·
Remark: similar windows are used for other type of content such as
video files.
·
An important functionality 5 is “SEND TO PLAYER …”:
·
This button allows to directly send the content of the Page you are
working on to a specific player. It is very handsome when you want to
test out how the content will eventually look on the screen.
·
Clicking the “SEND TO PLAYER …” brings up:
·
·
5
We refer to the chapter ‘The Concept of “Test Player” ‘ in the chapter “Player Control” for the
more advanced version of “Send To Player” using Test Players. In this chapter, we assume
having a User without Test Player Right.
www.dvsignage.com!
!
64
!
·
!
Document Version 3.3
Remark you can also work with Groups of Players, but let’s for the
moment focus on a single Player. Click the Drop Down box brings you
to:
·
·
Selecting a Player and hitting the OK button will load the Page on the
selected Player.
·
·
Remark that “UPLOAD CONTENT” must have been done before you
can send the correct content to the screen.
·
What happens if you do not have the Right to update Content yourself
but need approval from somebody else?
·
Refer to the User Right:
·
A User without Approval Rights gets this screen:
·
www.digitalview.com!
!
65
!
!
Document Version 3.3
·
·
As you can see, he does not have the “UPDATE CONTENT” button.
·
All the changes he attempts are stored on the SignBox server, however
nothing is changed of the screens.
12.2.3 The impact of Groups with CMS built Templates
Hereby we need to refer to one of the next chapters (Template Playlists and
Group Management) for a detailed insight.
However, as a basic explanation:
With CMS built Templates, it is possible to define “Groups” in a Template. A
Group links a number of Zones in a Template. This allows to have that Group
act together. For instance, one can create Template Playlists and a Group as
such (for instance a Text Zone and an Image Zone) will simultaneously cycle
through a number of “records”.
A Group has a name, a maximum number of records and a timing:
·
The name is a unique identifier.
·
The maximum number of records: the amount of records that can be
put in the Group
·
The timing: the time it takes that one record remains on the screen.
Let us have a look at a Template with multiple groups (three in this case) and
with an allocation for multiple records. When selecting such Template in
www.dvsignage.com!
!
66
!
!
Document Version 3.3
Content Editing View, one for instance gets (do not yet worry about the
horizontal bars with numbers on the right side of the picture):
When having the mouse cursor over the Template (without having the cursor
over one of the Zones), one gets:
As you see, in the Zones, on the left top, you get the name of the Group the
Zone belongs to (here these are” “top”, “middle” and “bottom”.
Now, let’s have the mouse cursor over one of the Zones. What you get now:
www.digitalview.com!
!
67
!
!
Document Version 3.3
Notice the following:
·
The Zone where your cursor is over gets the rather intense greenish
indication.
·
The other Zone(s) belonging to the Group get a slighter greenish
indication.
·
On the right side of the Template Preview, you get information related
to the Group: the name, the maximum number of items and the timing
of the Group.
Now what do these horizontal bars do there?:
As you can see, we have here three bars, and every bar is associated to a
group (bottom, mid, top).
These bars have following indications and possible actions:
·
The numbers (1, 2, …) refer to a record in the group that has content.
www.dvsignage.com!
!
68
!
!
Document Version 3.3
·
The number in bold and having a black border (in fact, all the “1’s” in
above picture) indicates which record is currently visualized in the
preview.
·
The “+” indicates there is still space to add a new record. As you might
see, the bar associated with the group “bottom” does not have such “+”
which means all available records are occupied (indeed, there is only 2
records for the group “bottom”).
·
Clicking on another number in one of the bars will adapt the preview
and show the content associated to that record.
·
Clicking on the “+” will open a preview with empty zones in which you
can fill in content for a new record for that Zone.
·
The “
·
The blue arrows (“ ” and “ ”) are of use when there are more
records in the group as can be displayed in the horizontal bar. Using
these arrows allows you to scan through all records.
” allows to delete a record in the group.
Some examples:
·
Clicking on “3” for the group “mid” results in:
Obviously, you can in this Preview adapt the content of the selected
record in the group.
·
Clicking on the “+” for the group “mid” results in:
www.digitalview.com!
!
69
!
!
Document Version 3.3
As you see, there are three empty Zones which can now be filled in and as
such a new record is created, for instance:
As you can notice, a fourth record for the group “mid” is as such created.
In “Table View”, you get the following view:
www.dvsignage.com!
!
70
!
!
Document Version 3.3
Here you see that the Zones are ordered per Group.
www.digitalview.com!
!
71
!
!
Document Version 3.3
The amount or records you can fill in is limited to the defined maximum
amount. When reaching the maximum, one cannot add a new record anymore
(the Group “bottom” is limited to 4 items):
12.3 Control of Properties of the Zones
The last thing we need to cover is how the properties of the Zones in a Page
can be controlled.
This is a very important step in setting up your Pages and Templates. Here
you control who (in terms of the User’s Reach) can adapt which Zone in a
Page. Remark that by properly setting this up, you can for instance have one
Zone’s content only controlled by a high level of Reach (for instance your own
Reach) and the other Zones by lower levels of Reach.
This is done by using the Magnifying Glass button:
Clicking that button opens a window with all the Zones in the Page and with
the ability to change the properties:
www.dvsignage.com!
!
72
!
!
Document Version 3.3
As you see, you can control the Localization, Functionality and Category of
the available Zones.
How to do this in terms of User Interface is similar as providing these
properties to Projects and Pages and will not be further discussed.
12.4 Deleting a Page
On the top of the Page Preview, you have “DELETE”. This allows you to
delete a Page.
www.digitalview.com!
!
73
!
!
Document Version 3.3
13 Templates
13.1 What is a Template?
A Template is a setup for pages that are eventually displayed on the DS
players.
Users will work with Templates to control the content that is displayed.
A Template consists of:
·
A resolution and orientation (for instance 1024 x 768, landscape) .
·
A background (which can either be a fixed color or a picture)
·
Several Zone with their attributes. A Zone is an area on the Template in
which specific Content can be set. This Content can be Text, Images,
Video, Flash or Time-Date information. Depending on the player’s
capacities and the type of Zone, a certain amount of such Zones can
be set in to the Template (practically, there is a limit of one Video zone
in any template, there are no limitations for other types of Zones in
terms of quantities).
These are the main characteristics of a Template. The further different
attributes will be explained further on.
www.dvsignage.com!
!
74
!
!
Document Version 3.3
13.2 How to set up a Template
In this chapter, we provide step-by-step the way to create a new Template.
We assume we start from an empty Project (DocProject as an example).
Obviously, there can already be other Templates and/or Playlists in the
Project. The approach in that case is basically the same.
However, in the specific case of an empty project, you will have to click on the
name of the project in the tree view. Remark the icon of DocProject shows it is
empty, hereunder on the left an icon of a project with Templates (and possibly
Playlists) and an empty project on the right:
Anyhow, hit the DocProject button:
This brings you to:
www.digitalview.com!
!
75
!
!
Document Version 3.3
Here, hit “ADD TEMPLATE”
This brings you to this dialog:
Here you can fill in following information:
·
The name of the Template.
·
The resolution of for the Template (using the drop down selector)
·
The orientation of the Template (either Portrait or Landscape)
·
You can also select a background color (remark that this setting can
later still be changed in the Template Edit view).
The name you provide needs to be unique in the Project. In case it
already exists, the name domain will become red and the OK button becomes
de-activated:
www.dvsignage.com!
!
76
!
!
Document Version 3.3
Assume you fill in name etc:
Click OK brings you to:
www.digitalview.com!
!
77
!
!
Document Version 3.3
As you see, in the Project view, a new Template is created.
Click that icon or select it in the tree view.
Obviously, you come in to the content control view:
Obviously though, there is nothing you can do in it as there are no Zones
defined yet.
Hit “EDIT TEMPLATE…” to come in to the view where you can edit the
Template:
www.dvsignage.com!
!
78
!
!
Document Version 3.3
13.3 Working in the Template Edit view
The Template Edit view consists of different control areas. Let’s first have a
basic look at these different control areas. We will further on (where this is
relevant) have a more detailed explanation of the functionalities provided by
these control areas.
Remark: the main square area in the left middle of the illustration above
represents the Template and will contain the different Zones.
www.digitalview.com!
!
79
!
!
Document Version 3.3
·
File ,View, Undo and Redo
·
Once a Template is created, you can Rename the Template, you can
do a “Save As …”, you can Close the Template Edit View, which will
bring you back to the Content Control View. The Functionality “Save
As” is explained more in detail later on.
·
Most actions you do when creating a Template are stored internally.
Using “UNDO” and “REDO”, you can go backwards and forwards
through your actions. Remark that every time you click “SAVE”, the
stored actions are cleared.
·
Template info
·
This is purely informative: you see the name, the orientation and the
resolution of the Template
·
Background control
www.dvsignage.com!
!
80
!
!
Document Version 3.3
·
This control the background of the Template, see further for a detailed
explanation
·
Scale of view
·
Here you control the scale of the view. You can make a selection out of
a set of scales going from 25% to 400%.
·
Alignment control
·
The Alignment Control area contains a number of functionalities that
become accessible when multiple Zones are selected. This will be
discussed more in detail further on.
·
Zone Addition buttons
·
Here you have the different types of Zone that are available. Drag and
Drop of such Button into the Template area will create a new Zone.
This is as well discussed more in detail further on
·
Group Management
·
Zones can be set into “Groups”. This is further discussed in detail
hereunder
13.3.1 Background Control
Click following button:
You get control of the Background of the Template:
As you see, you have the option to select between “Color” and “Image”
Suppose you want to have a uniform Color for the background, then select the
“Color” button and hit the Color area :
www.digitalview.com!
!
81
!
!
Document Version 3.3
!
This gives the Color Dialog. This allows you to select a Color. You can either
do this from a set of predefined colors or by creating your own color:
www.dvsignage.com!
!
82
!
!
Document Version 3.3
Remark that you can also create your own set of “User Colors”.
Suppose you want to use an image as background, then select the “Image”
radio button:
www.digitalview.com!
!
83
!
!
Document Version 3.3
As you see, there are two things you can select:
·
The Category
·
In a typical use case, you will put all your background files under a
certain category, for instance “Backgrounds”. Here you select the
category from where you want to get a list of available background
files.
·
The File
·
This allows to make a selection out of the files available in the selected
Category.
By using Background Images you can make the Template very
attractive. You created such images using standard applications. The images
can then indicate where the Zones in the Template need to come.
Background actions are not stored for UNDO / REDO.
We advise to create such background images in the resolution of the template
itself. The background image will be scaled to occupy the full area of the
Template. Hence at least care should be taking respecting the aspect ratio of
the Image and making it the same as the aspect ratio of the Template.
www.dvsignage.com!
!
84
!
!
Document Version 3.3
13.3.2 Adding Zones in the Template
The following buttons:
represent the different types on Zones you can use. From left to right:
·
Text
·
Image
·
Video
·
Flash
·
Time/Date
The details related to these types will be explained more in detail in later
chapters.
You can put a Zone into the Template area by drag-and-drop. Therefore,
select one on the buttons with left mouse key, keep it pressed while you drag
the icon onto the Template and release the mouse key when you arrive at the
location on the Template where you want to position to new Zone.
Depending on the type of Zone, a different Zone Image Indication will be
seen:
From left to right, top to bottom:
·
Text
·
Image
·
Video
www.digitalview.com!
!
85
!
·
Flash
·
Time/Date
!
Document Version 3.3
As you will see, a Zone will be put in to the Template region. The size of the
zone is fixed, but this can later be changed.
You will also immediately have the Zone parameter dialog box opened where
you can specify all the parameters related to the Zone. These aspects will be
explained in further chapters. For the moment it is ok to close this dialog box.
13.3.3 Control the position and size of the Zone
Suppose we have a Zone in the Template and we want to control the position
and size of it. How can we do that?
When your mouse cursor is not located in the area of the Zone, the image of
the Zone is as such:
www.dvsignage.com!
!
86
!
!
Document Version 3.3
However, when you move your mouse cursor over this image, it will suddenly
change:
Let’s zoom in a little:
www.digitalview.com!
!
87
!
!
Document Version 3.3
We can distinguish various areas with various functionalities.
·
The edges allow to move the sides of the zones (left/right or up/down)
·
The corners allow to move both directions (left/right and up/down)
·
The area with the name of the zone included (in this case “Text001”)
allows to move the complete Zone around in the Template
·
The “Edit Access” opens the dialog to further specify the parameters of
the Zone
·
The “Add to alignment group” will add the Zone to the set of Zones on
which Alignment actions can be done (see further)
·
The “Delete Zone” button allows to remove the Zone from the Template
Remark: on the bottom you have similar edge and corner areas
These areas allow to position the Zone in the Template by using the mouse.
Using the Edit Access button allows to also control the position and size of the
Zone in a different way. Click the button opens up a dialog:
Do not yet look to the bottom area. These are specific per type of Zone and
will be explained in later chapters. The top section (as in the illustration
above) is the same for all types of Zones.
On the top, you can control the Name of the Zone. By dropping a new Zone in
a template, a name is automatically given to the Zone. You can change the
name of the Zone here if you want to. All names of Zones must be unique.
There under, you find three areas:
www.dvsignage.com!
!
88
!
·
Position
·
Z Order
·
Alignment
!
Document Version 3.3
With Position you can specify on the pixel precise where and in what size the
Zone should be.
The Z Order is relevant when Zones are overlapping. When you want for
instance an Image on which you want to position Text, this is possible. But
clearly you need to make sure that the Text is “in front” of the image. Using
the buttons in this area allows use to perfectly control which Zone is
positioned in relation with the other Zones.
The Alignment buttons further allow other controls for position and size of
Zones:
From left to right, top to bottom (Remark that when moving with the cursor
over any of these buttons, a tooltip will appear on the screen):
: Center Horizontally: The Zone is positioned horizontally in the middle
of the Template. The distance from the left side of the Zone to the left of the
Template becomes equal to the distance from the right side of the Zone to the
right edge of the Template.
: Stick Left: The left side of the Zone is put at the left side of the
Template.
: Center Vertically: The Zone is positioned vertically in the middle of the
Template. The distance from the top side of the Zone to the top of the
Template becomes equal to the distance from the bottom side of the Zone to
the bottom edge of the Template.
: Stick Right: The right side of the Zone is put at the right side of the
Template.
www.digitalview.com!
!
89
!
!
Document Version 3.3
: Stretch Horizontally: the width of the Zone is put equal to the width of
the Template.
: Stick Top: the top side of the Zone is put at the top side of the
Template.
: Stretch Vertically: the height of the Zone is put equal to the height of
the Template.
: Stick Bottom: the bottom side of the Zone is put at the bottom side of
the Template.
It is not possible to position parts of Zones out of the Template area.
When trying to do this, the Zone will automatically be repositioned and
rescaled to fit completely within the Template.
see also “Alignment control with multiple Zones selected” where other
ways of controlling the position of Zones are explained.
13.3.4 A Template and the “Save As” functionality
Once a Template exists, you can make a copy of it using the “Save As”
functionality.
This functionality goes further though than simply making a one-to-one copy.
One can obviously make copies of an existing Template to a new Template
with the same resolution and orientation. However, one can also create new
Templates from an existing one, but giving it another resolution. This can be
done by either respecting the aspect ratio of both Templates, but also by not
respecting it. One can even change the orientation.
When in the Template Edit View, hit the “SAVE AS…” button.
This brings:
www.dvsignage.com!
!
90
!
!
Document Version 3.3
Remark: if you leave everything unchanged (apart from the file name of
course) you will create a Copy of the Template with the same resolution and
orientation.
Apart from that;
You have following selections:
·
Respect Aspect Ratio
·
When this Check Box is ticked, you are limited to selecting other
resolutions that have the same aspect ratio as the existing Template.
For instance with this example (having 1280 x 720 resolution, which is
an aspect ratio of 16:9) clicking the Template resolution list box gives:
·
www.digitalview.com!
!
91
!
!
Document Version 3.3
·
·
Scale Fonts
·
You can scale the fonts with the new resolution or not. When you scale
the Fonts, the size of the characters will relatively match the size of the
Template. Do remark however that this is not a guarantee that the
words of the text will have exactly the same position in both Templates.
Small changes can occur.
Let’s have a closer look at working without respecting the Aspect Ratio.
Therefore, you need to consider the following points:
·
The aspect ratio of the Zones in the new Template
·
The Zones in the original Template all have a certain aspect ratio on
their own. In the new Template (that Template as such having a
different aspect ratio as the original Template) the aspect ratio of all the
Zones remain the same as in the original Template. Not doing this
would create distortions of images, videos and flash content. This is
something we do not want.
·
Relative position of the Zones
·
In the new Template, the relative position of the Zones to one another
is kept.
·
Background Images
·
As mentioned, if the background of a Template is an Image, that Image
is always stretched to the complete area of the Template. Clearly this
will also be the case in the new Template. This means that if an Image
is used as background and it provides positioning indications for the
Zones, then these will not match anymore. Hence you will have to
www.dvsignage.com!
!
92
!
!
Document Version 3.3
create a new background Image that matches the aspect ratio of the
new Template and the position of the Zones.
Following pictures illustrate this in another manner:
In the “Save As” dialog, un-tick the “Respect Aspect Ratio” check box. This
results in:
www.digitalview.com!
!
93
!
!
Document Version 3.3
As you see, you now have the option to select the Orientation. Having a look
to the resolution you can select gives:
www.dvsignage.com!
!
94
!
!
Document Version 3.3
As you see, you now have all the supported resolutions available.
Now select a resolution with a different aspect ratio as the original Template
aspect ration, for instance 1600x1200 (which is aspect ration 4:3). This gives:
As you see, you also get an Alignment selection: This is either Top, Middle or
Bottom.
The differences are illustrated in the following pictures:
www.digitalview.com!
!
95
!
www.dvsignage.com!
!
!
Document Version 3.3
96
!
!
Document Version 3.3
Remark that it also possible that the new Template aspect ratio provides a
similar selection, but then “Left”, “Middle” or “Right”. This is automatically
detected and the select possibilities will adapt accordingly.
13.3.5 Alignment control with multiple Zones selected
First we need to see how Zones are selected in the context of “multiple Zone”
manipulation, here specifically the alignment operations.
Therefore it should also be understood that with such multiple Zone selection,
there is always one “Master” and the other Zones are “Slaves”. The Master
Zone is always the first Zone that is selected. All the other Zones (selected
after the first Zone is selected) are then Slave Zones.
In one specific case, the order of selection (1, 2, 3, …) is also taken into
consideration (see further: Spacing Align).
www.digitalview.com!
!
97
!
!
Document Version 3.3
Click this button and you will see two things:
·
The “+” button is changed to a “-“ button (assume the mouse cursor is
over the Zone). Hence it is clear that a click on the “+” will add a Zone
to the multiple Zone select set. Once it is there, clicking “-“ will remove
it from that set.
·
·
·
·
When moving the mouse cursor out of the Zone, you will notice that the
selected Zone gets new border, indicating it is selected. The border will
either be “red-white dashed” or “full red”. The first (red-white dashed)
indicates the Zone is the Master, the other (full red) indicates the Zone
is a Slave.
·
Selected Zones cannot be removed. Be sure the Zone is not selected if
you want to remove it.
www.dvsignage.com!
!
98
!
!
Document Version 3.3
In the above illustration, the left top text Zone is the Master in the selected set,
the text Zone slightly to the right of it is a Slave in the selected set and the text
Zone at the bottom is not selected.
When 2 or more Zones are selected (or in other words: one Master plus one
or more Slaves), the according Alignment buttons become activated:
As you can see, there are 4 different types of alignment:
·
Edge Align
: Left Edge Align. The left side of the Slave Zones is put on the same
horizontal position of the left side as the Master Zone. Vertical positions of the
Zones in the Template and size of the Zones are not changed.
www.digitalview.com!
!
99
!
!
Document Version 3.3
: Right Edge Align. The right side of the Slave Zones is put on the same
horizontal position as the right side of the Master Zone. Vertical positions of
the Zones in the Template and size of the Zones are not changed.
: Top Edge Align. The top side of the Slave Zones is put on the same
vertical position as the top side of the Master Zone. Horizontal positions of the
Zones in the Template and size of the Zones are not changed.
: Bottom Edge Align. The bottom side of the Slave Zones is put on the
same vertical position as the bottom side of the Master Zone. Horizontal
positions of the Zones in the Template and size of the Zones are not changed.
·
Center Align
: Horizontal Center Align: The horizontal center of the Slave Zones is
put on the same horizontal position as the horizontal center of the Master
Zone. Vertical positions of the Zones in the Template and size of the Zones
are not changed.
: Vertical Center Align: The vertical center of the Slave Zones is put on
the same vertical position as the vertical center of the Master Zone. Horizontal
positions of the Zones in the Template and size of the Zones are not changed.
·
Spacing Align
: Horizontal Spacing Align: The selected Zones are horizontally spaced
such that the distance from the left edge of the Template to the left edge of the
first selected Zone, the distance from the right edge of the first selected Zone
to the left edge of the second selected Zone etc. … and the distance of the
right edge of the last selected Zone to the right edge of the Template are all
the same.
: Vertical Spacing Align: The selected Zones are vertically spaced such
that the distance from the top edge of the Template to the top edge of the first
selected Zone, the distance from the bottom edge of the first selected Zone to
the top edge of the second selected Zone etc. … and the distance of the
bottom edge of the last selected Zone to the bottom edge of the Template are
all the same.
With Horizontal Spacing Align and Vertical Spacing Align, the role of the
Master and Slaves is slightly different. The sequence of selection is more
relevant. For instance, with Horizontal Spacing Align, the first selected Zone
will be at the most left position, the second selected will be next, etc
·
Size Align
www.dvsignage.com!
!
100
!
!
Document Version 3.3
: Vertical Size Align: the widths of the selected Slave Zones are put
equal to the width of the Master Zone. Height and Position of the Zones are
not impacted.
: Horizontal Size Align: the heights of the selected Slave Zones are put
equal to the height of the Master Zone. Width and Position of the Zones are
not impacted.
When the requested action is not possible, you will get an error message
and nothing will happen. This can be because of several reasons, for instance
with Horizontal Space Align when the sum of the widths of the selected Zones
is larger than the width of the Template. More in general, it will be due to the
fact that the requested action positions (parts of) Zones outside the area of
the Template.
13.3.6 Template Playlists and Group Management
13.3.6.1The principle of Playlists and Groups in a Template
What is meant with “Playlist behaviour” of a Zone?
You can have a Zone in a Template act as a Playlist on its own. This is
specifically relevant for Zones of the type Text, Image and Video.
Let’s take an Image Zone as an example. Suppose the Template is displayed
on a screen, then the Zone with the Image will cycle through a number of
Images over time.
As an example, the following picture illustrates a situation where the content
of the Image Zone changes every 10 seconds and where in total we have 3
images. After the third image, the first image is shown again and the cycle
restarts.
www.digitalview.com!
!
101
!
!
Document Version 3.3
Such Playlist has three main parameters:
·
Timing
·
Is the time certain content stays before other content is shown
·
Effect
·
The transition effect going from one content to the other content
·
Number of Items
·
The maximum amount of Items that can be put in the Playlist.
·
You do not have to fill in all the “spaces” for Items. For instance,
you can define the Number of Items to 10 and have the system work
with 5 spaces filled in with content.
·
However do not put the number too high. Keep it realistic.
·
When the Number of Items is put to “1”, the Zone is actually a
Zone without Playlist behaviour.
Now we will to explain what a “Group” is.
Any Template exists of Zones 6. A Group is a set of Zones. By defining a
Group, you define a number of common properties to all the Zones in the
6
The amount of Zones could be zero, but this is not relevant in the context of this chapter.
www.dvsignage.com!
!
102
!
!
Document Version 3.3
Group. These properties relate to the “Playlist behaviour” of the Zone as
discussed above.
Suppose for instance that we have a Group with 2 Zones in a Template, an
Image Zone and a Text Zone. Then when those 2 Zones are part of the same
Group, they will automatically have the same Time and Amount of Items
parameters. The Effect parameter can be different per Zone in the Group. The
result will be that they synchronously change from one content to the next
content as is illustrated here under.
How do you practically manage template zone Playlists and Groups?
Therefore:
·
First define the sets of Playlist parameters. Each set is given a name
and Number of Items and Timing.
·
Second you assign a Zone (that has a type relevant for Playlist
behaviour) to a Playlist set.
·
Third you can specify the effect per Zone
www.digitalview.com!
!
103
!
!
Document Version 3.3
When you add new Zones to a Template, they will all be linked to an
existing set of Playlist parameters. This you can then later adapt.
When you don’t care about Playlists in a Template (because you don’t
need to use them), all Zones will be given the Playlist set called “default”. This
has Number of Items set to 1, so these will act as Zones without Template
behaviour
When you open a Template, CMS automatically scans all the Zones in it
and creates the sets of Playlist parameters. This means that when you define
a set of Playlist parameters in a Template and you do not allocate it to one or
more Zones, you will not save it when you save the Template. When you reopen the Template, that set will be lost.
13.3.6.2How to define a set of Playlist parameters
This is done at the bottom of the Template Edit View:
www.dvsignage.com!
!
104
!
!
Document Version 3.3
The left dropdown box gives a list of the defined sets of Playlist parameters.
For instance:
The edit button
www.digitalview.com!
opens a dialog to edit the Sets of Playlist parameters:
!
105
!
!
Document Version 3.3
The dialog is divided in three areas:
·
Overview of the Playlist Group sets (left top)
·
Area to change the name of a set or to add a new set
·
The info related to the Amount of Items and the Time of the selected
set
A set is selected by clicking on one in the Overview area. The selected
set has a grey background.
There is no method to delete a set. This is not required as sets that are
not used will not be saved in the Template.
It is impossible to provide duplicate names for sets. All names must be
unique. When you try to use an existing name, the buttons
disabled and the text area shows red.
are
To change the name of an existing set, type a new name in the text area and
hit
.
To add a new set, provide a new name and hit
.
To change Amount of Items and/or Time, just fill in the new value.
For practical reasons, the maximum amount of Amount of Items is set to
99. The maximum time is set to 30000 seconds.
www.dvsignage.com!
!
106
!
!
Document Version 3.3
How the next step is done: allocating a set of Playlist parameters to a Zone, is
explained in a next chapter (Detailed view on the Text Zone).
13.3.7 Detailed view on the different types of Zones
In Template Edit view, clicking the Edit button of a Zone brings a dialog such
as (in this case a Text Zone):
The Top part is the same for all types of Zones and has been explained in
previous chapters.
The Bottom part is related to the type of the Zone and these parts are
discussed in this chapter.
The Bottom part is organized in two main blocks (side by side):
www.digitalview.com!
!
107
!
!
Document Version 3.3
·
The Parameter block
·
This block is using tabs to host different types of parameters:
·
·
·
·
By clicking on one of the tabs, the related parameters will be displayed.
·
For instance clicking “Alignment” in the Text Zone gives:
·
·
·
The Copy/Paste block
www.dvsignage.com!
!
108
!
!
Document Version 3.3
·
This part allows to copy a set of parameters from one Zone to another
Zone.
·
For instance. Click on the Copy button:
·
·
·
gives:
·
·
·
·
As you are informed: the settings of the Zone “Text001” out of the
Template “MyNewTemplate” is buffered.
·
Opening the dialog of another Text Zone and hitting the Paste button:
·
·
·
will paste the buffered settings to the Text Zone
·
·
The parameters are stored per Type of Zone. It has no meaning
for instance to copy Font settings to an Image Zone. Hence, you can
take a copy in a Text Zone which will then be buffered for all other Text
Zones. At the same moment though, you can do the same for another
type of Zone, for instance and Image Zone. The buffers exist in parallel
and can be used simultaneously.
·
·
The settings are kept in the buffers as long as your CMS session
is open. Hence you can use the Copy/Paste functionality also between
different Templates, between different projects. (though in order not to
overload the Copy/Paste area in the dialog box only the name of the
Template and the name of the Zone are shown).
·
www.digitalview.com!
!
109
!
·
!
Document Version 3.3
There is one exception: the Copy/Paste function does not store
the “Playlist settings”. These are to be set in a different way.
A number of “tabs” are similar in the different types of Zones.
These are:
·
Styles (used in Text and Time/Date)
·
Alignment (used in Text and Time/Date)
·
Playlist (used in Text, Image, Video)
·
Source (used in Text and Image)
These tabs will only be explained in the first appearance hereunder
In the further chapters, we will have a look to the different tabs, from left to
right.
13.3.7.1Detailed view on the Text Zone
·
Styles
This is divided in three areas:
o Font
o Typical font related settings
! Vertical: Letters will be placed on top instead of next to
each other.
www.dvsignage.com!
!
110
!
!
Document Version 3.3
! Wrapping is a feature that forces all text to fit within the
margins of the bounding box. All text will automatically be
transferred to new lines if necessary.
! Shrink Automatically
o Spacing!
o Color settings
! To adapt the colors, click on the colored boxes.
·
Alignment
The alignment can be set vertically and horizontally, the white box on the right
is only intended as example of how the result will be.
·
Playlist
Here you can make a selection out the defined sets of Playlist Groups.
Amount of Items and Time will be updated (remark you can not change this
here, this is done in the corresponding dialog box, see a previous chapter).
The “Effect” can be set using the drop down box.
www.digitalview.com!
!
111
!
!
Document Version 3.3
The time the Effect takes can be set when an Effect is selected.
The “Alternate” selection is done between “Separate” and “Concatenate”.
Practically, “Concatenate” only has value for RSS feeds. The separator will be
placed between the different RSS elements.
If you use “Concatenate” with other text, you get for instance on the Displays:
www.dvsignage.com!
!
112
!
!
Document Version 3.3
On the left, this is a text Zone set “Separate” that cycles through the different
record contents with specified time, effect etc.
On the right, this is a text Zone set “Concatenate”. As you see, it doesn’t cycle
but it concatenates the different record contents.
·
Scrolling
When Enable is not checked, no scrolling will occur.
Use the Horizontally/Vertically radio buttons to select the orientation of the
scrolling.
Move the sliders to increase or decrease the scroll speed and set the direction
(left or right / up or down).
www.digitalview.com!
!
113
!
!
Document Version 3.3
By selecting Restart Immediately, text will restart on the starting side as soon
as the previous text reaches the other end. Otherwise the text will only restart
once the previous text has completely disappeared.
Only scroll when text does not fit. When this is not checked, the text will only
scroll when it does not fit in its Zone. If checked, the text will always scroll.
·
Source
Which is the case when the text content is provided by the CMS user
Or:
In this case the text comes from an external source, an RSS feed7.
Here you can specify the source parameters: the type, the origin and the
content field.
13.3.7.2Detailed view on the Image Zone
·
7
Image
See chapter “RSS Information” to see how to manage the RSS feeds
www.dvsignage.com!
!
114
!
!
Document Version 3.3
Stretch to Bounding Box will automatically fit the image into the bounding box
drawn by the user.
Keep Aspect Ratio will lock the dimensions (width and height) of the imported
image.
·
Playlist (see Text Zone)
·
Remark: obviously the Image do not have the “Alternate” option.
·
Source (see also Text Zone)
Remark: due to the fact that this is an Image zone, the available fields are
filtered:
13.3.7.3Detailed view on the Video Zone
·
Type
You can select between a File and an External source.
When selecting “External Source” you get:
www.digitalview.com!
!
115
!
!
Document Version 3.3
Which give you an extra tab where you can define the external source
·
Sound
Here you can Enable or Disable sound, define if Fade in and/or Fade out is
used and set the sound level with the slider.
·
Playlist (see Text Zone)
·
External Source
This allows you to select between S Video input and CVBS input.
13.3.7.4Detailed view on the Flash Zone
·
Settings
www.dvsignage.com!
!
116
!
!
Document Version 3.3
Variables can be defined in the Variables frame. These variables are inherent
to the used flash file and are not defined by Template editing.
In the When page starts frame the following options are available:
·
Continue playing: when using a flash file in a page which is used in a
carousel, this option will guarantee that the flash file will continue from
where it had stopped previously, at the next appearance in the
carousel.
·
Restart playing: when using a flash file in a page which is used in a
carousel, this option will guarantee that the flash file will start playing
from the beginning every time it appears in the carousel.
Enable Allow Trigger on End for this Zone if the flash file needs to be played
to its end independent of a swap time of the page in a carousel or any other
object timing.
Enable Loop the flash (if possible) to activate a looped playback of the flash
file. The possibility to loop a flash file depends on the configuration of the flash
file itself.
13.3.7.5Detailed view on the Time/Date Zone
·
Format
This allows to control the format.
A brief overview:
www.digitalview.com!
!
117
!
!
Document Version 3.3
o Display
o Select between what you want to see (Time or Date or a
combination)
o Time
o Specifies the format of the Time field
o Date
o Specifies the format of the Date field
o Preview
o Provides a view on how the result will be in the screen
·
Styles (see Text Zone)
·
Alignment (see Text Zone)
!
www.dvsignage.com!
!
118
!
!
Document Version 3.3
14 Playlists
14.1 Playlist editing
What is a Playlist?
A Playlist is a sequence of Pages that is shown in a certain order. When the
end of a Playlist is reached, it is restarted from the first Page. The trigger to go
from one Page to another is either based on time or on the end of content in a
Page (more specifically, a Video or Flash coming to an end).
A Playlist is always a part of a project. When a project has been selected, the
button “ADD PLAYLIST” becomes available:
Clicking that button brings you to:
in which you need to provide a name for the Playlist file.
For instance:
www.digitalview.com!
!
119
!
!
Document Version 3.3
After clicking “OK” the new Playlist appears in the project view:
The ones that are accessible are CMS Playlists.
14.1.1 Full View and List View
There are two ways to look at the Playlist: Full View and List View.
You can select which view you want using the button at the top which is
available when the project containing the Playlist you want to work on is
selected:
Clicking this button toggles between “PLAYLIST: FULL VIEW” and “PLAYLIST:
LIST VIEW”.
www.dvsignage.com!
!
120
!
!
Document Version 3.3
14.1.2 Filter the View
It is possible to filter the pages you have available to use in the Playlist. This
can be helpful when you have a significant amount of pages available.
For instance:
www.digitalview.com!
!
121
!
!
Document Version 3.3
Remark: preceding the Filter text with a “!” will result in a list excluding all the
file or playlist names having the specified text.
14.1.3 Full View
Clicking on a Playlist icon brings you to:
www.dvsignage.com!
!
122
!
!
Document Version 3.3
This is the Playlist control page.
The bottom part is a list of the existing pages in the project, the top part is
where the Playlist is constructed and managed.
You add pages to the Playlist by “drag and drop”. Just Click with your left
mouse button on a page in the bottom part and keep the mouse button “in”
and drag the page to the top area. By releasing the mouse button the page
will appear in the top area.
www.digitalview.com!
!
123
!
!
Document Version 3.3
gives:
As such, you can keep adding pages to the Playlist.
For instance:
www.dvsignage.com!
!
124
!
!
Document Version 3.3
Once a Page is in the Playlist, you can also change the sequence of the
pages using “drag and drop”.
The blue “+” indicates where the page will come when you release the mouse
button.
Looking a little bit closer to the Page icon in the Playlist:
www.digitalview.com!
!
125
!
!
Document Version 3.3
In the middle, you have a thumbnail view of the Page.
In the left top corner, you have the edit button (see further)
In the right top corner, the delete button which will remove the page out of the
Playlist
Under the thumbnail, you have the Info existing of the name of the Page and
the trigger to go to the next page.
There under, you have the Validity window.
Let’s look at the Edit dialog (click on the edit button).
www.dvsignage.com!
!
126
!
!
Document Version 3.3
First you have the area where you control the “end” of the page in the Playlist.
This is either a time or an “end of” event.
Only pages with for instance a video object will show “Trigger on Video
End” (same goes for Flash).
The time of the page can be entered in various ways: you can separately
specify hours, minutes, seconds or the total amount of seconds. You use the
keyboard, or the up and down buttons.8
The Validity Window allows you to specify between which dates the page will
be shown in the Playlist.
You can specify a start and an end date. Before or after these dates, the page
will not be shown.
Editing these dates is done by selecting “With Start Date” (and / or “With End
Date”) and filling in the date(s). This can be done in an easy way using the
calendar view.
8
There is a maximum time implemented of 30.000 seconds.
www.digitalview.com!
!
127
!
!
Document Version 3.3
With some data filled in in the Start and End Dates, you get something like:
Remark the following:
·
At the bottom, you see the indications for the Start and End Date
usage. The far left page has a Start and an End Date. The next one
has no Start Date, but an End Date, the next one a Start but no End
www.dvsignage.com!
!
128
!
!
Document Version 3.3
Date. The fourth page has no Start and no End Date. The last one, is
again a page with only an End Date.
·
The pages with a white border are active today. The pages with a
yellow border (as the one at the far left) is not active yet, but will
become active in the future. The pages with a red border (as the one at
the far right) has an end date that is already gone, hence the page is
not displayed today, nor will it be in the future.
Pages are not cleared in the Playlist when they are “expired”. This
because the user might want to re-use the page again later. This he can then
do easily be re-adjusting the Start and End Dates.
Remark you always need to click the “SAVE” button to save all changes
you make to a Playlist.
14.1.4 Playlists in Playlists
It is possible to insert a Playlist in another Playlist.
The view on such Playlists is as such:
14.1.5 List View
A List view has most value when you have lots of pages in your project and/or
when you have lots of pages in a in a playlist.
Using List view, the thumbnails (which are used for the preview of the pages
and in the playlist items) are not retrieved from the server which makes the
behaviour a lot faster.
Selecting a Playlist under List view gives:
www.digitalview.com!
!
129
!
!
Document Version 3.3
On the left you have the available pages, on the right you have the Playlist.
Both are in List view.
However, you can still have a preview of the Pages, simply hovering with your
cursor over one of the boxes with a Page. For instance, in the above example
hovering over “Employee” gives:
This still gives a way to get a better idea of what is behind the name of the
Page.
On the right side, you still have all the information available related to the
elements in the Playlist.
It gives the name, the timing, the effect and the date validity information.
www.dvsignage.com!
!
130
!
!
Document Version 3.3
You also have the edit and the delete buttons which act similar as in the Full
view.
Dragging the pages to the Playlist is also done in the same way (but now from
left to right).
14.2 Playlists and Localization and Functionality
Playlists benefit from Localization and Functionality in a very interesting
manner.
For the remainder of this chapter, we will focus on Localization, but please
remember that this is completely the same for Functionality and the
combination of Localization and Functionality.
Suppose we have created a situation such as:
www.digitalview.com!
!
131
!
!
Document Version 3.3
Hence:
·
The major Localization here is “Loc A”
·
There under you have “Loc B1” and “Loc B2”.
·
Under “Loc B2”, you have “Loc C1” and “Loc C2”
·
The users are as in the illustration, where the users “UserB2.b” and
“User C2” differ as they have no Approval rights (they can only request
for a modification of a Playlist).
14.2.1 We all have approval rights
Suppose now that User A creates a Playlist.
And he makes it available (in terms of Reach) to B1, C1 and C2 (which
implicates also B2 is part of it).
From that moment on, the Playlist is obviously available in all the mentioned
Localizations. As such (supposing it is scheduled there) these Playlists will
also be used on the players in these Localizations.
However, the local Users will be able to add pages of their own in these
Localizations.
Suppose User A makes:
www.dvsignage.com!
!
132
!
!
Document Version 3.3
When either other user now looks to this Playlist, he sees:
Clearly, he sees the same, however the images are “grayed out”, indicating he
has no access to them (he cannot adapt the sequence or any other
parameter).
A User not on the highest level (where the Playlist was created) can now add
“his” pages to the Playlist, he can even insert “his” pages between the already
existing ones. For instance:
Clearly, this User has added the page “test24” and set the end of the page to
“Video End” and he has given an End Date for the Validity window.
Remark that User B1 and User B2.a can do this completely independent.
Supposing it was User B2.a who made the local adaptation, then this Playlist
will become available on the Localizations Loc C1 and Loc C2. There again,
the local users can start adding pages etc.
www.digitalview.com!
!
133
!
!
Document Version 3.3
14.2.2 Looking down
So far, User A has provided a Playlist to Localizations “under” him. He might
want to see what happens with his Playlist on a lower level because on these
levels the Users have the capability to add pages; “What are they doing?”
Therefore, a user can adapt his reach by hitting the “ADAPT REACH” button:
He gets:
www.dvsignage.com!
!
134
!
!
Document Version 3.3
In this dialog, he can change his Reach either by selecting a specific user or
by manually setting Localization and Functionality. He can also easily return to
his own Reach by using the button “Set to Own Reach”
Once the User has changed his Reach this is clearly indicated on the top of
his browser window (see hereunder in red on top of illustration)
After User A changing his Reach to the one of User B2, he gets:
www.digitalview.com!
!
135
!
!
Document Version 3.3
As you can see, User A now has exactly the same view on the Playlist as
Users on level Loc B.
Changing your Reach only has effect on what you see as content in
Playlists and in Pages. It for instance does not affect you view on Players,
Users, etc.
This also allows you to see as User A what the content is of Pages on
other levels.
www.dvsignage.com!
!
136
!
!
Document Version 3.3
15 The Approval Process
Users either have approval right or not. This right is set in the Content tab of
the user right definition page:
A User having the “Approve zone content” right is able to change the content
on the displays himself. A User not having that right can request for content
changes, before the content changes appear on the displays, he needs
approval from another user who does have the right.
However, who can give approvals also depends on the Reach position of the
Users. For instance (and looking only to the Localization, though in reality it
depends on both Functionality and Localization).
In the illustration below, the “yellow” users (User B2.b and User C2) do not
have Approval rights, the “blue” users (User A, User B1, User B2.a and User
C1) have Approval Rights.
www.digitalview.com!
!
137
!
!
Document Version 3.3
User B2.a can approve both the requests of User B2.b and User C. User A
can do this as well. But User B1 and User C1 cannot as the Users B2.b abd
C2 are not within their Reach.
The Approval decision can either be “Deny” or “Allow”. As long as there has
not been a decision (or if the decision was “Deny”) the content on the players
remains the original content.
How does a User with Approval right know there are Approval requests
waiting?
The Approval process is in place for changes on content of Pages and
changes on content of Playlists
15.1 Approval process for Pages
When a User with Approval right logs on, he gets the following screen (when
there are requests waiting:
www.dvsignage.com!
!
138
!
!
Document Version 3.3
Which informs that there a certain amount of requests waiting.
He can then go directly to the “Approval Page”.
Here, he is informed about:
·
The Project,
·
The Page,
·
The Zone the Request is linked to
·
The User who posted the Request
·
The moment (Date) the Request was posted
Per Request, the User can make a decision:
www.digitalview.com!
!
139
!
!
Document Version 3.3
Or, he can set all request together to Allow or Deny:
After he has made the Allow or Deny Decisions, he needs to click “PROCESS
DECISIONS” to make his decisions have effect.
However, obviously, on this page, the User does not see “what” the request
was about. Therefore, the “Preview” buttons will bring the User to a view on
the page and what the Request relates to:
15.1.1 Basic modifications
Clicking such button brings us to something that looks like:
www.dvsignage.com!
!
140
!
!
Document Version 3.3
At the bottom, you see a table with the waiting Approval Requests for that
page.
The columns are:
·
Show Request
·
This is a check box. When this box is “on”, you see how the page looks
when the Request is approved. When the box is “off”, you see the
current status.
·
The User who posted the Request
·
The Date it was posted
·
The name of the Zone
·
The of the Group it belongs to
·
A Remark field (see further)
·
The buttons “Allow” and “Deny”
·
The Visible indication
·
this is specifically for content with Groups and for requests from Users
with a different Reach. At one moment in time, one can only see the
content related to one record in a Group and/or from a certain Reach.
When the indicator is green, you currently see that record, when it is
red, you do not see it. By clicking the “Show Request” check box, the
according record will be visualized.
As an example, clicking the “Show Request” check box of the first request
above gives:
www.digitalview.com!
!
141
!
!
Document Version 3.3
So, you see that the current picture is with the cyclist on the bicycle where the
request is a picture of him in close-up. You can either allow or deny the
request.
Now, let’s look at a following example, being multiple requests on various
records of the same page.
Clicking on the top “Show Request” check box allows to compare the
situations with and without the request:
www.dvsignage.com!
!
142
!
!
Document Version 3.3
Here as well, the request relates to replacing the image.
Clicking on the bottom “Show Request” check box will show the request
related to the third record in the page:
www.digitalview.com!
!
143
!
!
Document Version 3.3
15.1.2 Adding records
A following example relates to adding a new record.
Assume for instance the Requester wants to add a new record.
The approver will see something like:
As you see, none of them is visible and in the Remarks you see these are
related to a new record.
Clicking on of the requests gives:
www.dvsignage.com!
!
144
!
!
Document Version 3.3
It is very obvious that the request relates to a new sequence in this page
(which consists of an image and two text fields). So click the other two “Show
Request” check boxes gives:
This gives a view on the user’s request for a new sequence. You either allow
or deny all three of the requests (which sounds the most reasonable) or you
allow part of them. Remark that in if you allow only part of the requests, the
denied zones will remain empty.
When a Requester first adds a record and, before this request is
approved, posts another request for a modification of that record, the request
www.digitalview.com!
!
145
!
!
Document Version 3.3
for adding the record will be in the approval list but will remain “invisible”. For
instance:
Here you have a request for adding a new sequence in the page. It consists of
an image and two text zones. The Requester however has also changed the
text zone “Text001” after he added it. As you see, the request for adding the
record “Text001” is not visible. However, by clicking the “Show Request”
check box of the modification of “Text001”, you will see the request of the
modification and implicitly the request for the addition of the record.
15.1.3 Impact of Requests from other Reach place
Suppose our page is accessible on lower Reach levels (which is something
very often is the case).
Suppose we have a request coming from a lower level. The Preview will look
like:
www.dvsignage.com!
!
146
!
!
Document Version 3.3
In the “Remark” column, you see that the Request is currently “Out Of
Reach”.
However clicking the “Show Request” check box will automatically set your
Reach to that of the Requester:
The further processing is the same as described above.
When the request is for adding a record, this will be shown in the Remark
column:
www.digitalview.com!
!
147
!
!
Document Version 3.3
15.1.4 Removal of records
Consider a case when a user request to delete one of the sequences using
the delete button:
Then, implicitly in this case, he requests to remove three records. This will
show up as follows (remark in this case the request comes from a User with a
lower Reach).
www.dvsignage.com!
!
148
!
!
Document Version 3.3
Clicking one of the “Show Request” check boxes gives:
Remark that clicking the check box on / off will not make a visual difference.
Obviously, it is best either to allow or to deny all the requests. Otherwise you
keep a sequence that is partly filled in which makes little sense.
www.digitalview.com!
!
149
!
!
Document Version 3.3
15.1.5 Requests related to Playlists
When a User without Approval rights wants to post a request to change a
Playlist, he can do this by moving and/or adding Pages to the Playlist.
Once he has done this, he needs to click the button “SEND CHANGE
REQUEST”.
Once a User has sent a change request, the Playlist is locked on all
levels (even on higher levels) until someone has processed the request.
However, the user who posted the request can still change his request (this in
order to allow him to still provide modifications to his own original request).
The Approver will see this:
www.dvsignage.com!
!
150
!
!
Document Version 3.3
Where the top is the “current” Playlist and the bottom is the “requested”
playlist.
He can either approve or deny using the buttons on the left top:
When the request comes from a User with a lower Reach, the view is the
completely the same, except that the User is informed that the request came
from somebody “out of reach”.
www.digitalview.com!
!
151
!
www.dvsignage.com!
!
!
Document Version 3.3
152
!
!
Document Version 3.3
16 Player control
Player control is accessed by hitting the icon:
This brings up the following screen (or a screen similar to):
This is a list with the Players you see under your Reach.
The first column provides a view on the state of the players:
www.digitalview.com!
!
153
!
!
Document Version 3.3
The green “V” indicates Activated and Connected
The red “/” sign indicates Activated but Disconnected
The lock sign indicates Not Activated
There is till another sign: the green “V” on a black screen background:
this means that the player is Connected, but the display is off.
,
The following three columns indicate the Player Name, the Serial Number and
the MAC Address.
The next 2 columns allow controlling the Localization and the Functionality of
the Players. Remark that you can only have one Localization per Player.
Players are activated in this page. This is done entering a key code in the
dialog that comes up after clicking the “ACTIVATE” button:
www.dvsignage.com!
!
154
!
!
Document Version 3.3
When a player is selected, you get extra functionalities:
Here, player “Dublin” is selected.
As you see, you can reboot the player, you can power it off and you can take
a Screendump. Remark that when the player is powered off, you have a
button to power it on:
www.digitalview.com!
!
155
!
!
Document Version 3.3
When clicking SCREENDUMP button, you first get the loading indicator:
After which you get a Screendump at 50% size.
Downloading a screendump can take some time! It depends on the
resolution of the screen, the complexity of the content and the network
connection.
16.1 The concept “Test Player”
The configuration of Functionality, Localization, Categories over Users,
Templates, Playlists, Zones and Players can go quite deep. It is very powerful
as you for instance can have multiple users making use of the same
Templates on different levels of Functionality and Localization of different
Players.
www.dvsignage.com!
!
156
!
!
Document Version 3.3
However in the end, someone might want to verify if his Template or Playlist
actually does appear on a certain Player with the right content, just as he
foresaw it.
Therefore, we have the concept of “Test Player”. This concept allows to use a
certain Player and let it behave as any of the Players in the field and observe
what the result is.
A Test Player is a Player that is typically installed with the User who creates
content, manages Localization and Functionality, etc.
A Player needs to be assigned to act as a Test Player, this is done in the
Players Page:
When in Preview Editing, one can select “SEND TO PLAYER”9.
9
See also the chapter “Preview Editing” under “Content Management” for an explanation of
the basic (meaning without Test Player) “Send to Player” functionality.
www.digitalview.com!
!
157
!
!
Document Version 3.3
Having rights to make use of the Test Player functionality, this gives:
We refer to the chapter “Preview Editing” under “Content Management” for the
explanation of using “Player” and “Groups of Players”.
Select the radio button “Test Player” and open the drop down list as
illustrated:
www.dvsignage.com!
!
158
!
!
Document Version 3.3
Here you get the list of Test Players.
Now open the drop down box at the bottom:
Select the player you want to “emulate”, for instance “Dublin”.
www.digitalview.com!
!
159
!
!
Document Version 3.3
Click on the button “Obtain Reach”, you will notice the indication “behaves as:
Dublin”.
If you now click “OK”, the Page or Playlist you are on will be sent to the
selected Test Player which fully behaves as “Dublin”.
Once a Test Player has obtained the Reach of another Player, it forgets
its previous Reach setting and keeps the new Reach setting. This means that
(supposing iCalmBE is used as Test Player) if you select the Player iCalmBE
from the Player radio button (using the top drop down box) after it obtained a
certain Reach, it will still act with the Reach it obtained.
www.dvsignage.com!
!
160
!
!
Document Version 3.3
17 Scheduling
Scheduling indicates which content (in terms of Pages of Playlists) is
displayed on which Player and When it is displayed.
Though it is possible to schedule Pages, we strictly advise to build your
schedules on Playlists only.
Scheduling is brought up using the icon:
It brings up a screen as such:
Scheduling is done per Player or per Group.
A Player is selected using the Drop down box at the left top.
www.digitalview.com!
!
161
!
!
Document Version 3.3
Selecting one of the players brings you to the schedule for that player:
This view gives you the scheduling of for the selected Player.
Remark that you can set the scale of the time using the drop down box:
For instance, putting the scale on 60 min will give a complete day view.
You can either edit an existing schedule or create a new schedule.
www.dvsignage.com!
!
162
!
!
Document Version 3.3
Clicking with the mouse on the calendar in an existing schedule will allow to
edit an existing schedule.
Clicking on the calendar on an area where there is no schedule yet will allow
to create a new schedule.
For instance clicking in the example on the existing schedule gives:
This tells us that this schedule has following properties:
·
It runs from 9:00 till 12:00
·
Comes from the project “MainProject”
·
And comes from the Playlist “MorningPlaylist”
·
It has recurrence:
o Daily
o Every one day
o Till 2011, August 31.
www.digitalview.com!
!
163
!
!
Document Version 3.3
17.1 How to set up and edit a schedule
17.1.1 The first steps in creating a new schedule
·
When clicking with the mouse in the calendar out of an existing
schedule brings up:
·
·
·
·
As you can see, the date filled in in “Date:” is the date where you
clicked in the calendar.
·
Remark you are not capable of selecting a date before “now”. Your
date will automatically be brought to the date of today and you will get
a warning.
·
The Time filled in is 1 hour long by default and starts at the time you
clicked in the calendar.
·
The rest needs to be filled in.
·
First select the Project:
·
www.dvsignage.com!
!
164
!
!
Document Version 3.3
·
·
The select the Playlist (or Page):
·
www.digitalview.com!
!
165
!
!
Document Version 3.3
·
·
·
Once this is done, the rest of the actions are similar to editing an
existing schedule. Suppose we filled in the recurrence etc (see further,
we will see the new schedule appear:
www.dvsignage.com!
!
166
!
!
Document Version 3.3
17.1.2 Editing an existing schedule
A schedule can either be with or without recurrence.
When the schedule is without recurrence, it will only take place once: on the
selected day and within the selected time frame. If you want to do that, you
leave the related check box unchecked:
When the schedule is with recurrence, it will be repeated as you indicate it to
do. Therefore, you first need to check the related check box:
This opens op the capabilities to provide a recurrence schedule:
www.digitalview.com!
!
167
!
!
Document Version 3.3
As you can see, the recurrence pattern can either be Daily or Weekly:
17.1.3 Daily recurrence
When Daily is selected (as in the above picture), you can indicate:
·
If it is displayed every day or ever “n” amount of days.
·
For instance, if you choose to display the Page every 3 days:
·
·
it will appear on:
o Day 0 (the selected day, suppose this is a Monday)
o Day 3 (3 days later, this would be Thursday)
www.dvsignage.com!
!
168
!
!
Document Version 3.3
o Day 6 (again 3 days later, this would be Sunday)
o Etc.
·
The Recurrence Range:
·
o Selecting “No End Date” means the schedule runs “for ever”
o Selecting “End Date” allows you to specify the last Date the
occurrence is allowed to happen. After this Date, it will not
happen any more:
o
o Clicking in this area brings up a calendar where you can easily
select your date.
o You can also specify the amount of times the schedule should
take place:
o
17.1.4 Weekly recurrence
When Weekly is selected:
you get:
www.digitalview.com!
!
169
!
!
Document Version 3.3
Here you can specify which days in the week the schedule should take place:
You can also specify if it needs to be displayed every week or every “n”
weeks. This is similar as explained for Daily recurrence.
The specification of the Recurrence Range is exactly the same as in Daily
recurrence.
www.dvsignage.com!
!
170
!
!
Document Version 3.3
Once you finished the settings, click OK and you will see the schedule appear
in the calendar. From that moment on, the schedule is in place.
17.2 Scheduling version 2
Scheduling indicates which content (in terms of Pages of Playlists) is
displayed on which Players and When it is displayed.
Though it is possible to schedule Pages, we advise to build your
schedules on Playlists only.
Schedules can either be done on the level of a Player or Reach based.
Here we advise to mainly use the Reach based scheduling as it is far
more transparent.
There are two different views available for scheduling, a basic one and an
expanded one. The expanded one is for the more advanced user giving lots of
information. The basic one is more intended for a basic user who just wants to
add and modify some schedules. The difference between both is set in the
User Rights.
Certainly for the expanded view, we recommend using a higher resolution
monitor. A monitor with a resolution of XGA (1024 x 768) will really be too low.
As a hint: using F11 on most browsers will maximise the view.
One can have at the same moment in time 1, 2 or more schedules running.
Say for instance we have these schedules:
www.digitalview.com!
!
171
!
·
Schedule 1 from 13:00 till 15:00
·
Schedule 2 from 14:00 till 16:00
!
Document Version 3.3
In this case, from 14:00 till 15:00 we have 2 schedules running in parallel.
This is further referred to as a “Multiple” segment. The other segments are
referred to as “Single”.
Scheduling is brought up using the icon:
Let’s have a look at the different regions (we will see later why this view has
more content):
www.dvsignage.com!
!
172
!
!
Document Version 3.3
We see following regions:
·
Action buttons
·
These buttons will trigger actions such as creating new schedules,
deleting schedules, modifying schedules, …
·
Filter settings
·
Here you control the view on the schedule information. You either do
this by selecting a Player or selecting a Reach
·
Calendar control
·
Here you control the view of the Calendar
·
Calendar
·
Here you get a view on the schedules in function of date and time
·
Schedule content
·
When an item in a calendar is clicked, you get a visual view on the
page items in the schedule
·
Schedule settings
·
Here you get a view of the settings of a schedule
www.digitalview.com!
!
173
!
!
Document Version 3.3
17.2.1 The Calendar
The Calendar provides on the top a date indication.
If the date is having a green background, it means that this date is “today”.
On the left, you have time slot indicators. For instance: “13:00 >” means a slot
starting at that time till the start of the slot thereunder.
You have a time slot duration which is set using the dropdown box at the left
top. You can select between: 15 min, 30 min, 1 hour, 2 hours and 4 hours. In
the above illustration, it is set to 30 minutes (which is the default value).
When there is a “yellowish” or “bluish” box in a timeslot, it indicates that there
is a schedule in it. These colors toggle when one goes from one schedule to
another one (as can be seen in the above picture where on November 18, a
schedule starts around 11:45 and lasts till 13:00, at 13:00 a new one starts till
14:30.
When the colors are slightly brighter (as in the above picture in the bottom two
schedules starting at 13:00) this means you have selected this schedule (by
clicking on it) and more information is available (see further).
When hovering over a colored part (yellowish or bluish) you are informed
about the schedule or schedules behind it.
The information is:
·
Whether it is “Single” or “Multiple”.
·
The time the segment takes.
·
In case the segment is a single Playlist, the name of the Page or
Playlist it uses.
www.dvsignage.com!
!
174
!
!
Document Version 3.3
17.2.2 The Calendar Control
On the left, you select between day or week view. Day view looks like:
Such view can be helpful in case lots of short schedules are used.
Remark that a week view always start on the first day in the week.
The buttons “<<”, “<”, “>”, and “>>”. Allow you to move forward and backwards
in the Calendar. Depending on the Day/Week selection is per day or per week
with “<” and “>”. If using “<<” or “>>” we move forward or backwards with 4
days or weeks.
Clicking on “Today” will bring you to a view including today.
Clicking on in the date box right of “Go to:” you can select a date where you
will jump to.
If you have selected a date where you jump to, this will be indicated by have
the date colored reddish:
www.digitalview.com!
!
175
!
!
Document Version 3.3
17.2.3 The Filter setting
The filter setting allows to set the view on the schedules.
The view is either based on selection of a Player or based on selection of a
Reach.
Player selected gives:
The drop down field allows for the selection of a single Players:
www.dvsignage.com!
!
176
!
!
Document Version 3.3
Once you have selected a Player, the Calendar will automatically provide you
with the schedule information for that Player.
The schedules shown with a Player selected are a mix of schedules
made specifically for that Player and Reach based schedules that are
effective on that Player. We see further on how this information is seen.
When using the Reach filter, you can select the localizations and the
functionalities for which you want to see the schedules, for instance (similar
for Functionality):
www.digitalview.com!
!
177
!
!
Document Version 3.3
Here as well, once you select a Localization and/or a Functionality set the
Calendar is update automatically.
In Reach view, you will only see schedules made for Reach, but none
made per Player.
17.2.4 Schedule Content
When clicking on a schedule segment in the calendar, one gets the area of
Schedule Content filled in:
www.dvsignage.com!
!
178
!
!
Document Version 3.3
Remark that in the Calendar, the segment gets a red border and the
segments on other dates with the selected schedule in it are all slightly
highlighted.
The Schedule Content represents the different pages that are shown in the
schedule segment with their attributes. In case a Multiple schedule segment is
clicked, the combination of the Pages coming from the different segments is
shown.
At the right side of the you get information about the total duration of the
schedule(s). When there are pages that trigger on the end of video or flash
this is indicated as well, but the exact total time is not known.
17.2.5 Schedule Settings
If you click on one of the Pages in the Schedule Content, then the Page (in
case the schedule is made of one Page) or all the pages of the Playlist to
which the Page belongs (in case the schedule is made of a Playlist) are
getting a red border in the Schedule Content. For instance:
www.digitalview.com!
!
179
!
!
Document Version 3.3
In the above picture, you have a schedule segment (on November 17, from
13:00 till 13:30) that apparently exists of more than one schedule.
Remark that when you hover over the Schedule Content, you get informed
about the Page or Playlist (and the Project) containing the Page used in the
Schedule:
In the above example, the Playlist is “play1”, coming from the Project
“CarShop”.
At the same moment you click one of the Pages, the Settings of the Schedule
are also provided:
www.dvsignage.com!
!
180
!
!
Document Version 3.3
The Schedule Settings consist out of a number of blocks which we will have a
closer look at:
17.2.5.1Main Parameters
Here you see:
·
The Project of the Schedule
·
The Page (or Playlist) of the Schedule
·
The Date the Schedule is planned, or its start date
·
The Time segment in the Day
17.2.5.2Recurrence selection
Here you see if there is recurrence for this Schedule or not. The recurrence
can either be “daily” or “weekly” (see further).
www.digitalview.com!
!
181
!
!
Document Version 3.3
17.2.5.3Weekly recurrence pattern
If the recurrence is set to “weekly”, you can select which days in the week the
schedule will appear by clicking the days on or off.
17.2.5.4Recurrence Range
There are following options for the Recurrence Range:
·
No End Date
·
The recurrence runs “forever”.
·
With an End Date
·
The latest occurrence will take place on the specified date, or will have
taken place before that date (for instance, when the specified End Date
is a Sunday and the weekly recurrence is up to a Friday, the latest
occurrence will have been the Friday before the End Date).
·
The amount of times a Schedule should occur
·
With an interval, either “Every … days” or “Every … weeks”.
17.2.5.5Schedule Reach
This is only relevant for Reach based Schedules. When looking at a Player
based Schedule this has no meaning.
www.dvsignage.com!
!
182
!
!
Document Version 3.3
Obviously, this tells in which Reach the Schedule is active.
Remark that as with the concept of Reach, all lower Reach levels will also use
the Schedule.
17.2.6 How to Modify or Delete an existing Schedule
When you have selected a Schedule as explained above, you can start
making modifications to it by adapting the parameters in the Schedule
Settings. Clicking “MODIFY: will show the result in the Calendar. For instance,
suppose we have the following:
And we want to change this to a weekly schedule on Monday till Saturday,
with End Date December 31 2011.
Steps to take are:
·
Click “weekly” (radio button)
www.digitalview.com!
!
183
!
!
·
Click the days Monday … Saturday (check buttons)
·
Click End Date (radio button)’
·
Click the field with the End Date and adapt the End Date.
Document Version 3.3
Result of these steps:
When you now click the “MODIFY” button:
www.dvsignage.com!
!
184
!
!
Document Version 3.3
You will see the result in the Calendar:
www.digitalview.com!
!
185
!
!
Document Version 3.3
Remark: after clicking “MODIFY” the schedule is not selected anymore. In
case you further want to work on it, you need to reselect it.
Once a Schedule is selected, you can remove it by clicking on the “DELETE”
button:
All the modifications you do to existing Schedules (or removing existing
Schedules, or adding new Schedules – see below) are not stored until you hit
“APPLY”. Hence, DO NOT FORGET to click APPLY when your work on
Schedules is done.
www.dvsignage.com!
!
186
!
!
Document Version 3.3
As long as you have not hit “APPLY”, all your actions (modify, add,
delete) are stored and you can use the “REDO” and “UNDO” functionalities.
www.digitalview.com!
!
187
!
!
Document Version 3.3
17.2.7 How to Add a new Schedule
There a two ways to start adding a new Schedule:
·
Either you in the Calendar in a free time slot which brings up a window
in which you can define the Schedule
·
Either you click the ADD button and define the Schedule in the
Schedule Settings area at the bottom of the screen.
17.2.7.1Clicking in the Calendar
Click an empty time slot in the Calendar brings up the Schedule Definition
window:
Remark that the Date and the Time are filled in according to the place you
clicked in the Calendar.
When you select the Project and the Page (or Playlist), the “Add” button
becomes accessible. You can obviously further specify the recurrence
parameters and hit “Add”.
For instance:
www.dvsignage.com!
!
188
!
!
Document Version 3.3
Click “Add”:
And you see the new Schedule added in the Calendar.
you need an empty time slot in order to be able create a Schedule by
clicking in the Calendar. When there is already a Schedule Segment in the
time slot, you will not get the Schedule Definition window
17.2.7.2Using the ADD button
First click “NEW”:
www.digitalview.com!
!
189
!
!
Document Version 3.3
Then in the Schedule Content area at the bottom, fill in all the settings for the
Schedule (Project, Page, recurrence). For instance:
Then click “ADD”:
www.dvsignage.com!
!
190
!
!
Document Version 3.3
You will as a result see the new Schedule in the Calendar:
All the modifications you do to existing Schedules (or removing existing
Schedules, or adding new Schedules) are not stored until you hit “APPLY”.
Hence, DO NOT FORGET to click APPLY when your work on Schedules is
done.
17.2.7.3Caution when adding Schedules on a lower Reach
When you specify the Schedule Settings for a Reach based Schedule, you
can obviously set the Reach Settings as well. However, at any moment in
time, you are looking to the Schedules from a certain Reach view that you can
set in the Filter Settings. When you add a new Schedule based on a Reach
that is under your current Filter Reach, this Schedule is not visible in the
Calendar. Hence, after clicking “Add”, nothing will be added in the Calendar.
However, you do get an alert window informing you about this:
www.digitalview.com!
!
191
!
!
Document Version 3.3
17.3 Scheduling making use of the basic view
The User Right “Use Detailed Schedule view” provides you with Schedule
view as described above.
For Users who have a lower resolution display and/or Users who do not need
all the details, the basic view can be used (which is selected for the user by
not clicking the Right “Use Detailed Schedule view”).
The difference with the detailed view is the absence of the Schedule Content
part.
The user can still add schedules, delete schedules and modify Schedules.
However for modification and removal, he will need access to the Schedule
from a “Single” Schedule Segment.
Remark, the above screenshot is taken for a User without any Reach Rights.
Hence you do not see the Reach boxes in the Filter area and in the Schedule
Settings area.
www.dvsignage.com!
!
192
!
!
Document Version 3.3
18 Audit
The Audit page is brought up using the related icon:
This brings up:
Here you can see:
·
Who (User Name) …
·
When (Date) …
·
Did what action (Operation) …
·
With details (Detail)
Audit can be helpful to see which actions has been done by who and when.
As such you can for instance track down who was responsible for some
“weird” content at a certain date.
After some time obviously this list can become very long. Therefore, there is a
means to clean up the list. This is accessed using the “CLEANUP” button.
This gives following dialog:
www.digitalview.com!
!
193
!
!
Document Version 3.3
As you see, you are informed about the amount of items kept in the list and
about the earliest date of the oldest stored action.
One can either clean up the list by filling in the number of items to remain in
the list (as in the illustration above) or by filling in the earliest date one wants
to keep in the list:
Obviously, all removed events are not recoverable.
www.dvsignage.com!
!
194
!
!
Document Version 3.3
19 Status
Status gives an overview of the consummation of traffic over the network
during the present month and of the amount of memory on the hard disk in
use.
You bring up the Status view using the icon:
And you will get a view as such:
www.digitalview.com!
!
195
!
!
Document Version 3.3
Here you see:
·
The current month we explore:
www.dvsignage.com!
!
196
!
!
Document Version 3.3
·
·
How far we are in the month, percentage-wise:
·
·
Also in this form:
·
·
The amount of traffic used this month:
·
·
The amount of traffic still available:
·
·
Then traffic is also split over outgoing and incoming traffic:
·
·
Which is then further detailed in traffic related to Tools and to the
Players:
·
·
Further you see the use of disk space:
·
www.digitalview.com!
!
197
!
!
Document Version 3.3
20 RSS information
Is brought up using the icon:
And brings:
This is a screen providing the available RSS feeds that can be used in the
construction of Templates.
You see three sections, listed according to the types of feeds:
·
News feeds
·
Weather feeds
·
Exchange feeds
Using the button “EDIT RSS FEEDS…” you can create new feeds or delete
existing ones.
Hit that button gives:
www.dvsignage.com!
!
198
!
!
Document Version 3.3
As you see, here you can delete or add feeds.
We only support standard RSS feeds for news, weather and exchange.
All other types of links will not work.
Only Administrative level users have access to this functionality.
Remark that for inserting feeds in your content, you are responsible to
follow all the rules imposed by the provider.
20.1 Weather
Weather feeds are specifically made for www.weather-forecast.com.
Go to http://www.weather-forecast.com/countries?page=1 for a list of the
countries and cities supported.
For instance, take Netherlands, Amsterdam
When looking this up, you get: http://www.weather-forecast.com/locations/
Amsterdam/forecasts/latest
Fill this in in the URL zone in the Add area of the “Edit RSS Feeds” and you
will have the related RSS Feed defined.
The fields supported by this provider are:
·
Text
o Day
o DayOfWeek
o Summary
o MaxTemp
www.digitalview.com!
!
199
!
!
Document Version 3.3
o MinTemp
·
Image
The RSS feed returns a name of a file that is used for the image.
As such, you need to have (your own) images ready to fill in the image Zone
in the project.
The names (which need to be exactly the same) are (images are here as an
example):
o clear.png
o cloudy.png
o light rain.png
o light snow.png
o mod. rain.png
www.dvsignage.com!
!
200
!
!
Document Version 3.3
o rain shwrs.png
o snow shwrs.png
o some clouds.png
www.digitalview.com!
!
201
!
!
Document Version 3.3
Contact Details
USA
18440 Technology Dr.
Building 130, Morgan Hill, CA 95037
USA
Tel: +1-408-782-7773 | Fax: +1-408-782-7883
Email: [email protected]
-Germany
Landshuter Allee 162a,
D 80637 Munich
Germany
Tel: +49-(0)89 143 47 52-0 | Fax: +49-(0)89 143 47 52-30
Email : [email protected]
-HongKong
16th floor Millennium City 3
370 Kwun Tong Road, Kwun Tong
HONG KONG
Tel: +852-2861-3615 | Fax: +852-2520-2987
Email : [email protected]
www.dvsignage.com
www.dvsignage.com!
!
202