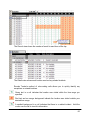
1
GUARD1 PLUS SE Administrator's Manual Version 4.4 30700 Bainbridge Road Solon, Ohio 44139 Phone 216-595-0890 Fax 216-595-0991 [email protected] www.guard1.com © 2010 TimeKeeping Systems, Inc. GUARD1 PLUS and THE PIPE are registered trademarks of TimeKeeping Systems, Inc. i GUARD1 PLUS SE Administrator's Manual Table of Contents GUARD1 PLUS Server Edition System Requirements ................................................................. 1 Server System Requirements ................................................................................................... 1 GUARD1 PLUS SE Client Workstation .................................................................................... 1 GUARD1 PLUS SE Attendant Workstation .............................................................................. 2 GUARD1 PLUS Rounds Tracker SE Workstation .................................................................... 3 GUARD1 PLUS SE Reporting Services Client Workstation ..................................................... 3 Upgrading GUARD1 PLUS Server Edition .................................................................................... 4 Upgrading ................................................................................................................................. 4 Installation Overview ................................................................................................................... 11 Configuring the SQL Server .................................................................................................... 11 Installing GUARD1 PLUS Server Edition ................................................................................ 11 Configuring GUARD1 PLUS Server Edition ........................................................................... 11 Configuring the workstation(s) ................................................................................................ 11 Configuring the SQL Server ........................................................................................................ 12 Installing GUARD1 PLUS Server Edition .................................................................................... 13 Installing GUARD1 PLUS SE Server ...................................................................................... 13 Installing GUARD1 PLUS SE Client ....................................................................................... 13 Configuring the GUARD1 PLUS Server Edition Installation ........................................................ 15 Running the Database Setup Wizard ..................................................................................... 15 Running the Activate Software Wizard ................................................................................... 16 Converting an Older GUARD1 PLUS database to a SE database (if applicable) .................. 18 Configuring the workstations ....................................................................................................... 20 Installing GUARD1 PLUS SE Clients ..................................................................................... 20 Installing GUARD1 PLUS SE Attendant ................................................................................. 20 Running GUARD1 PLUS SE Client or SE Attendant on Vista................................................ 22 Installing Rounds Tracker SE ................................................................................................. 23 Adding the Downloaders......................................................................................................... 25 Installing Guard1 Plus SE Reporting Services ............................................................................ 26 Installing SQL Server Reporting Services .............................................................................. 26 Configuring SQL Server Reporting Services .......................................................................... 27 Installing GUARD1 PLUS SE RS Server ................................................................................ 30 Installing GUARD1 PLUS SE RS Client ................................................................................. 30 Configuring your GUARD1 PLUS SE RS Installation .................................................................. 31 Running the Reporting Services Setup Wizard ...................................................................... 31 Creating GUARD1 PLUS SE RS reports .................................................................................... 33 Best Practices ............................................................................................................................. 35 Archiving with the Data Maintenance Wizard ......................................................................... 35 Viewing Archived Data............................................................................................................ 36 Creating a GUARD1 PLUS SE Backup .................................................................................. 36 Viewing Backup Data.............................................................................................................. 37 Appendix A - GUARD1 PLUS SE Configuration Utility Commands ............................................ 38 Appendix B - GUARD1 PLUS SE RS Configuration Utility Commands ...................................... 45 Appendix C - SE Error Codes ..................................................................................................... 48 Appendix D - Running the GUARD1 PLUS SE Configuration Utility ........................................... 52 Appendix E - Archiving the GUARD1 PLUS SE Database ......................................................... 55 Appendix F - SE Attendant Modes .............................................................................................. 57 Appendix G - Creating the Rounds Tracker SE Reports ............................................................. 64 Appendix H - Tracking Offenders in Guard1 Plus ....................................................................... 74 Appendix I - Tracking Offenders in Rounds Tracker ................................................................... 79 GUARD1 PLUS Server Edition System Requirements Following are the minimum recommended configurations. Server System Requirements These are the minimum requirements for computers on which you install the G UARD1 PLUS SE Server and Reporting Services Server. Pentium 4 processor at 2.8 GHz or Core 2 Duo 1.8 GHz processors 4 GB memory (RAM) 10 GB of available hard disk space* CD-ROM or DVD drive VGA or higher resolution monitor Supported SQL Server Versions SQL Server 2005 Standard Edition with Service Pack 3 (32 bit) SQL Server 2008 Standard Edition with Service Pack 2 (32 and 64 bit) SQL Server 2008 R2 Standard Edition SQL Server 2005 Express with Service Pack 3 or SQL Server 2008 Express with Service Pack 1 (32 and 64 bit) or SQL Server 2008 R2 Express (Advanced Services is required if you want to implement GUARD1 PLUS SE Reporting Services) Windows Server 2003 with Service Pack 2 (32 bit) or Windows Server 2008 with Service Pack 2 (32 and 64 bit) or Windows Server 2008 R2 Reporting Services for SQL Server 2005 or SQL Server 2008 is a free add-on for SQL Server. SQL Reporting Services is required if GUARD1 PLUS SE Reporting Services is installed. SSL is NOT supported for the Guard1 Plus Reporting Services reports. Active Directory environment *Actual requirements will vary based on your system configuration and the applications and features you choose to install. Additional available hard-disk space may be required. The required hard-disk space indicated is for Guard1 Plus SE program installation only and does not include space for database storage. Refer to documentation for MS SQL Server for more information on database storage requirements. GUARD1 PLUS SE Client Workstation These are the minimum requirements for computers on which you install the Guard1 Plus SE Client. 1 2.8 GHz or higher Pentium compatible CPU 512 MB memory (RAM) 50 MB of available hard disk space and Network Connectivity Supported Operating Systems - Windows XP with Service Pack 3 (32 bit) - Windows Vista with Service Pack 2 (32 and 64 bit)* - Windows 7 (32 and 64 bit)* - Windows Server 2003 with Service Pack 2 (32 bit) - Windows Server 2008 with Service Pack 2 (32 and 64 bit) - Windows Server 2008 R2 Microsoft Word 2003, Word 2007 or Word 2010 required for advanced reporting features Microsoft Excel 2003, Excel 2007 or Excel 2010 required for Rounds Tracker SE support *To use the GUARD1 PLUS SE Help on Vista or Windows 7 you must download the WinHelp32.exe file from Microsoft as described in this technical article: http://support.microsoft.com/kb/917607 GUARD1 PLUS SE Attendant Workstation These are the minimum requirements for computers on which you install the GUARD1 PLUS SE Attendant. 2.8 GHz or higher Pentium compatible CPU 128 MB memory (RAM) 20 MB of available hard disk space Available USB or serial port Supported Operating Systems - Windows XP with Service Pack 3 (32 bit) - Windows Vista with Service Pack 2 (32 and 64 bit)* - Windows 7 (32 and 64 bit)* - Windows Server 2003 with Service Pack 2 (32 bit) - Windows Server 2008 with Service Pack 2 (32 and 64 bit) - Windows Server 2008 R2 * To use the GUARD1 PLUS SE Help on Vista or Windows 7 you must download the WinHelp32.exe file from Microsoft as described in this technical article: http://support.microsoft.com/kb/917607 2 GUARD1 PLUS Rounds Tracker SE Workstation These are the minimum requirements for computers on which you install the G UARD1 PLUS Rounds Tracker SE. 2.8 GHz or higher Pentium compatible CPU 1 GB of RAM and 1.5 GB of available hard disk space Supported Operating Systems - Windows XP with Service Pack 3 (32 bit) - Windows Vista with Service Pack 2 (32 and 64 bit)* - Windows 7 (32 and 64 bit)* - Windows Server 2003 with Service Pack 2 (32 bit) - Windows Server 2008 with Service Pack 2 (32 and 64 bit) - Windows Server 2008 R2 Rounds Tracker reports can be emailed. For email support, Microsoft Outlook must be installed and configured prior to use. Excel 2003 or higher with macro code enabled. GUARD1 PLUS SE Reporting Services Client Workstation These are the minimum requirements for computers on which you install the Guard1 Plus SE Reporting Services Client. 2.8 GHz or higher Pentium compatible CPU 512 MB memory (RAM) 50 MB of available hard disk space Network Connectivity Supported Operating Systems - Windows XP with Service Pack 3 (32 bit) - Windows Vista with Service Pack 2 (32 and 64 bit)* - Windows 7 (32 and 64 bit)* - Windows Server 2003 with Service Pack 2 (32 bit) - Windows Server 2008 with Service Pack 2 (32 and 64 bit) - Windows Server 2008 R2 GUARD1 PLUS SE Client *To use the GUARD1 PLUS SE Help on Vista or Windows 7 you must download the WinHelp32.exe file from Microsoft as described in this technical article: http://support.microsoft.com/kb/917607 3 Upgrading GUARD1 PLUS Server Edition Upgrading Follow the instructions below to upgrade your GUARD1 PLUS Server Edition 4.20 or 4.30 installations to version 4.4x. This includes GUARD1 PLUS SE Server, Attendant SE, GUARD1 PLUS SE Client and (if applicable) GUARD1 PLUS Reporting Services Server, GUARD1 PLUS Reporting Services Client and Rounds Tracker SE installations. Upgrading to GUARD1 PLUS SE 4.40 from 4.20 or 4.30 GUARD1 PLUS SE Server 1. Close all Guard1 Plus applications including: SE Client, Attendant SE and Rounds Tracker SE and the IP Attendant Service if installed. 2. The file server is the server where the “Guard1 Plus SE Server” shared folder resides. 3. Place the GUARD1 PLUS SE 4.40 CD in the CD drive on the file server. 4. If the install does not auto start, browse the CD and double click setup.exe. 5. Select the appropriate language, click OK. 6. At the Welcome Screen, click Next. 7. Select “I accept the terms in the license agreement” and click Next. 8. Confirm that the install directory listed is where the GUARD1 PLUS SE 4.20 or 4.30 Server is installed, and then click Next. 9. Click Install. 10. Click Finish. GUARD1 PLUS SE Client The following needs to be done at each GUARD1 PLUS SE Client workstation. 1. Exit from the GUARD1 PLUS SE Client if it is currently running. 2. Browse to the share “Guard1 Plus SE Server” on the File Server. 3. Open the Client folder and double-click setup.exe. 4. Select the appropriate language, click OK. 5. At Welcome Screen, click Next. 6. Select “I accept the terms in the license agreement” and click Next. 4 7. Make sure that the install directory listed is where GUARD1 PLUS SE Client 4.20 or 4.30 is installed, then click Next. 8. Click Install. 9. Click Finish. Upgrade the GUARD1 PLUS SE application and configuration databases: Upgrade only needs to be done once from any GUARD1 PLUS SE Client. Upgrade the database from a SE Client running on the SQL Server to reduce the amount of time for upgrading. Upgrading the database from a Client on a workstation will take more than five times longer than upgrading it from a SE Client on the SQL Server. Back up your Application database for safekeeping before proceeding with the database upgrade. Please contact your SQL database administrator to have a Backup performed. 1. From a workstation that has a GUARD1 PLUS SE Client installed (preferably on the SQL Server), map the “Guard1 Plus SE Server” share to an available drive such as X. 2. Click Start, Run and type cmd. 3. Type: X: (where X is the drive mapped to the “Guard1 Plus SE Server” share) and press Enter. 4. To view the command syntax for all commands in the GUARD1 PLUS Configuration Utility, type G1Cfg then Enter. Click “OK” at the “No command arguments were given” window. This will open the Command Usage Summary – use this as a reference to verify the syntax of each command. Click Close to exit from this window. 5. Upgrade the configuration database by typing the following command then pressing Enter: G1Cfg 103;SQL Server Password For example: G1Cfg 103;guard NOTE: The SQL Server password is the password for the SQL user who is the db_owner of the Guard1 Plus configuration database. 6. 5 Click Yes to upgrade the Guard1 Plus configuration database. 7. Once the Guard1 Plus configuration database is upgraded, click OK at Finish screen. 8. Upgrade the application database by typing the following command then pressing Enter: G1Cfg 204;Supervisor User;Supervisor Password;Data Source Name For example: G1Cfg 204;super;super;Guard1Plus NOTE: The supervisor user and password is Guard1 Plus user who has supervisor rights within the application. 9. Click Yes to upgrade the application database and click OK to continue. 10. Once the Guard1 Plus application database is upgraded, click OK at Finish screen Attendant SE: The following needs to be done at each Attendant SE workstation. 1. Exit the Attendant SE program (right-click the Attendant SE icon in the System Tray and select Shutdown). 2. 3. 4. 5. 6. 7. 8. Browse to the share “Guard1 Plus SE Server” on the file server. Open the Attendant SE folder. Double-click setup.exe. Select the appropriate language, click OK. At the Welcome Screen, click Next. Select “I accept the terms in the license agreement” and click Next. Make sure that the install directory listed is where the Attendant SE 4.20 or 4.30 program is installed and click Next. Click Install. Click Finish. 9. 10. 6 Rounds Tracker SE (if applicable) The following needs to be done at each Rounds Tracker SE workstation. 1. Exit Rounds Tracker. 2. Browse to the share “GUARD1 PLUS SE Server” on the file server. 3. Open the Rounds Tracker SE folder. 4. Double-click setup.exe. 5. At the Welcome Screen, click Next. 6. Select “I accept the terms in the license agreement” and click Next. 7. Make sure that the install directory listed is where Rounds Tracker SE 4.20 or 4.30 program is installed and click Next. 8. Click Install. 9. Click Finish. Reporting Services Server (if applicable) The file server is the server where the “Guard1 Plus SE Server” share folder resides. 1. Place the GUARD1 PLUS SE Reporting Services 4.40 CD in the CD drive on the file server. 2. If the install does not auto start, browse the CD and double-click, setup.exe. 3. Select the appropriate language, click OK. 4. At the Welcome Screen, click Next. 5. Select “I accept the terms in the license agreement” and click Next. 6. Make sure that the install directory listed is where the GUARD1 PLUS SE 4.20 or 4.30 Server is installed and click Next. 7. Click Install. 8. Click Finish. Reporting Services Client (if applicable) The following needs to be done at each Reporting Services Client workstation. 7 1. Exit GUARD1 PLUS SE Client if it is currently running. 2. Browse to the share “Guard1 Plus SE Server” on the File Server. 3. Open the Reporting Services folder. 4. Double-click setup.exe. 5. Select the appropriate language, click OK. 6. At the Welcome Screen, click Next. 7. Select “I accept the terms in the license agreement”, click Next. 8. Make sure that the install directory listed is where GUARD1 PLUS SE Client 4.20 or 4.30 is installed and click Next. 9. Click Install. 10. Click Finish. 8 Upgrade the GUARD1 PLUS SE Reporting Services database: These steps are required only if you have Guard1 Plus Reporting Services running under version 4.2x or 4.3x. You only need to upgrade the Reporting Services database once from any GUARD1 PLUS SE Client. NOTE: You should back up your Application database for safekeeping before proceeding with the database upgrade. Please contact your SQL database administrator to have a Backup performed. 1. From a workstation that has a GUARD1 PLUS SE Client installed, map the “Guard1 Plus SE Server” share to an available drive such as X. 2. Click Start, Run and type cmd. 3. Type: X: (where X is the drive mapped to the “Guard1 Plus SE Server” share) and press Enter. 4. To view the command syntax for all commands in the GUARD1 PLUS Reporting Services Configuration Utility, type G1RSCfg then Enter. Click “OK” at the “No command arguments were given” window. This will open the Command Usage Summary – use this as a reference to verify the syntax of each command. Click Close to exit from this window. 5. Upgrade the reporting services reports by typing the following command then pressing Enter: G1RSCfg Identifier 601;Data Source Name;Credentials Identifier;Language For example: G1RSCfg 601;Guard1Plus;1;1 If you have Guard1 Plus SE Backups and/or Archives You must upgrade each Backup and Archive database separately 1. Open a Command Window and navigate to the “Guard1 Plus SE Server” directory. 2. For each Backup and Archive Database use the following to upgrade the database: G1Cfg 204;supervisor user;supervisor password;data source name The Data Source Name must match the name of the database on the FILE > OPEN ARCHIVE or FILE > OPEN BACKUP list in the Guard1 Plus SE Client. You may also run the G1Cfg 0 command to see a list of Archive and Backup data sources and their names. 9 3. After all your Backup and Archive databases are upgraded, you may access them using the FILE > OPEN ARCHIVE or FILE > OPEN BACKUP command in the Guard1 Plus SE Client. 10 Installation Overview To install GUARD1 PLUS SE successfully, it is important that you perform these actions in the following order. The installation is divided into four distinct phases: configuring the SQL Server, installing GUARD1 PLUS Server Edition, configuring the GUARD1 PLUS Server, and configuring your workstations. Configuring the GUARD1 PLUS server is wizard based but all of the DOS configuration utility commands are summarized in the section “Guard1 Plus SE Configuration Utility Commands”. You can only upgrade to version 4.4 from version 4.20 or 4.30. Refer to Upgrading GUARD1 PLUS Server Edition for those instructions. Configuring the SQL Server 1. Create a SQL Server login for GUARD1 PLUS SE. 2. Create SQL server databases for GUARD1 PLUS SE configuration and application databases. 3. Assign user to the SQL server GUARD1 PLUS SE application and configuration databases. Installing GUARD1 PLUS Server Edition 1. Install GUARD1 PLUS SE Server. 2. Install GUARD1 PLUS SE Client(s). Configuring GUARD1 PLUS Server Edition 1. Run the Database Setup Wizard. 2. Run the Activate Software Wizard. 3. If applicable, convert a GUARD1 PLUS version 2.60, 2.71 or 3.02 database by following the directions which begin on page 18. Configuring the workstation(s) 11 1. Install GUARD1 PLUS SE Client(s). 2. Install GUARD1 PLUS SE Attendant(s). 3. Install the downloader(s). 4. If you purchased GUARD1 PLUS SE Reporting Services, refer to the section "Installing GUARD1 PLUS SE Reporting Services" for installation instructions. 5. If you purchased GUARD1 PLUS SE Rounds Tracker, refer to the section "Installing Rounds Tracker SE " for installation instructions. 6. Use the chart in Running the GUARD1 PLUS SE Configuration Utility to help track names and passwords as you proceed through the installation instructions. Configuring the SQL Server If you should have any questions about these SQL Server activities, refer to Help in SQL Server. 1. Install SQL Server 2005 or SQL Server 2008 selecting Mixed Mode Authentication. GUARD1 PLUS SE is NOT compatible with Windows Authentication Only mode. 2. For SQL 2008, on the SQL Server, open the TCP ports 1433-1434 through the Windows Firewall Settings. This will allow the remote Guard1 Plus SE Clients to communicate to the SQL Server. 3. Create the configuration database: 4. 5. Collation name should be SQL_Latin1_General_CP1_CI_AS Recovery model should be Simple Suggested name is Guard1PlusConfig; Do NOT use spaces Create the application database: Collation type should be SQL_Latin1_General_CP1_CI_AS Recovery model should be Simple Suggested name is Guard1Plus; Do NOT use spaces Create a SQL Server login for use with GUARD1 PLUS SE such as "Guard". This login must use SQL authentication only. Disable the password policy Assign the login to the Database Creator (dbcreator) and the Bulk Insert Administrator roles (bulkadmin) Map this login to Guard1 Plus SE application and configuration databases as a db_owner Summary: At the completion of the above steps you have created the following items. The suggested users and file names are written in parentheses. GUARD1 PLUS SE SQL Server User: (Guard)___________________________ GUARD1 PLUS SE SQL Server User’s Password: (Guard)_________________ Configuration database: (Guard1PlusConfig)___________________________ Application database: (Guard1Plus)__________________________________ 12 Installing GUARD1 PLUS Server Edition Installing GUARD1 PLUS SE Server You can install the GUARD1 PLUS SE Server on the SQL Server or on any file server on your network. The installer creates the GUARD1 PLUS SE Server folder which contains the installation packages for the other GUARD1 PLUS SE programs and their configuration files. 1. Place the GUARD1 PLUS SE CD in the drive and the installer should begin automatically. 2. If the installer does not begin automatically, click Start, Run and browse to the CD drive. Locate the setup.exe file and double-click. 3. Select the language and click OK. 4. GUARD1 PLUS SE Server will now prepare to install on your server. 5. Click NEXT at Welcome Screen. 6. Read and Accept the license agreement. 7. Click NEXT to continue. 8. You can leave the default install directory or change it by clicking CHANGE… 9. Once you have selected the install directory, click NEXT. 10. Click INSTALL to install GUARD1 PLUS SE Server. 11. Click FINISH once the installation is complete. 12. Share the \Program Files\ GUARD1 PLUS SE Server folder making it available on the network so that client(s) and attendant(s) can be installed across the network. 13. All GUARD1 PLUS SE users MUST have read/write access to this shared folder. Installing GUARD1 PLUS SE Client In order to run the GUARD1 PLUS SE configuration wizards, you must install a client either on the same computer where the GUARD1 PLUS SE shared folder resides or on a workstation. 13 1. From the client workstation, browse to the shared GUARD1 PLUS SE Server folder on the file server, i.e. \\server name\share name. Do NOT use a mapped drive. 2. Open the Client folder and double-click Setup.exe file. 3. Select the language and click OK. 4. Click NEXT at the Welcome Screen. 5. Read and Accept the license agreement. 6. Click NEXT to continue. 7. You can leave the default install directory or change it by clicking CHANGE. 8. Once you have selected the install directory, click NEXT. 9. Click INSTALL to install GUARD1 PLUS SE Client. 10. Click FINISH to complete the GUARD1 PLUS SE Client installation. 11. Restart the computer. 12. You will see an icon on your desktop for GUARD1 PLUS SE. 14 Configuring the GUARD1 PLUS Server Edition Installation There are two wizards that you will need to run before you can begin to use GUARD1 PLUS Server Edition: The Database Setup Wizard will initialize the configuration and application databases. You will only need to use this wizard once when deploying GUARD1 PLUS Server Edition. The Activate Software Wizard will authorize and import your license file. Internet access is required to perform this task. The Activate Software Wizard will be run once to authorize and request a license file from TimeKeeping Systems, Inc. Once you receive the license file via email, you will run the Activate Software Wizard again to apply the license. If you purchase additional licenses later, you will use the Activate Software Wizard again to add them. Running the Database Setup Wizard 2. From a workstation that has a GUARD1 PLUS SE Client installed, browse to the shared GUARD1 PLUS SE Server folder on the file server, i.e. \\server name\share name. Do NOT use a mapped drive. Double-click the G1DBSetup.exe file to start the Database Setup Wizard. 3. Click NEXT at the Welcome Screen. 4. Enter your SQL Server name. Do NOT enter fully qualified name. 5. Enter the SQL Server login and password that you created for GUARD1 PLUS SE. (example: "Guard", "Guard") 6. Click NEXT to continue. 7. Enter the name of your GUARD1 PLUS configuration database (If you followed our example it would be Guard1PlusConfig). If you have not created your GUARD1 PLUS configuration database, go to your SQL Server's Database Management Tool and create it now. 8. Click NEXT to continue. 9. Here is where you set up GUARD1 PLUS SE’s supervisor’s login and password. Enter the Login for GUARD1 PLUS SE supervisor and the password. This Supervisor account is for GUARD1 PLUS SE only and from this account you can add, edit and delete other GUARD1 PLUS SE users. 1. 10. Click NEXT to continue. 11. Review the information that was entered. Click BACK to correct any of the data or click NEXT to continue. 15 12. Click NEXT to initialize the configuration database. This process should only take a few seconds. 13. The next screen states that the configuration database completed successfully. We are now ready to initialize the GUARD1 PLUS SE application database. Click NEXT to begin this next task. 14. Enter your SQL Server name. Do NOT enter fully qualified name. 15. Enter the SQL Server login and password that you created for GUARD1 PLUS SE. 16. Click NEXT to continue. 17. Enter the name of your GUARD1 PLUS application database (If you followed our example it would be GUARD1 PLUS). If you have not created your GUARD1 PLUS application database, go to your SQL Server's Enterprise Manager or Management Studio and create it now. 18. Click NEXT to continue. 19. Review the information that was entered. Click BACK to correct any of the data or click NEXT to continue. 20. Click NEXT to initialize the application database. This process should only take a few seconds. 21. The next screen states that the application database completed successfully. 22. Setup is complete, click FINISH to exit from the Database Setup Wizard. 23. Proceed to the next section where you will activate your GUARD1 PLUS SE installation. Running the Activate Software Wizard 1. From a workstation that has a GUARD1 PLUS SE Client installed, browse to the shared GUARD1 PLUS SE Server folder on the file server, i.e. \\server name\share name. 2. Double-click the G1ActivateSoftware.exe file to start the Activate Software Wizard. 3. The only available radio button should be Obtain an Authorization license. 4. Click NEXT to continue. 5. Enter your support code and password. Your support code and password are included with your GUARD1 PLUS SE shipment. If you can not find this information, contact TimeKeeping Systems, Inc. at (216) 595-0890 or [email protected]. 6. Click NEXT to continue. 16 7. Enter your contact information including your email address. Your email address is particularly important as your license file will be sent to this address. TimeKeeping Systems, Inc. respects your privacy and we do not sell your email address to third parties. Please note that all data fields are required except Fax. 8. Click NEXT to continue. 9. Review the information that was entered. Click BACK to correct any of the data or click NEXT to continue. 10. Click NEXT to authorize GUARD1 PLUS SE. 11. The next screen should give you a message that GUARD1 PLUS SE has been authorized successfully. 12. Click FINISH to exit from the Activate Software Wizard. 13. You will receive your license file in a few minutes but no more than an hour. If an hour has passed and you still do not have the email containing your license file, contact TimeKeeping Systems, Inc. for assistance at (216) 5950890 or [email protected]. 14. Once you have received your license file, save it to a convenient folder, then browse to the shared GUARD1 PLUS SE Server folder on the file server, i.e. \\server name\share name. 15. Double-click the G1ActivateSoftware.exe file to start the Activate Software Wizard again. 16. The only available radio button should be I'm ready to complete the process. I have an authorization license. 17. Click NEXT to continue. 18. Click BROWSE to locate and select your license file. 19. Click NEXT to continue. 20. The next screen should give you a message that GUARD1 PLUS SE has been activated successfully. 21. Click FINISH to exit from the Activate Software Wizard. 17 Converting an Older GUARD1 PLUS database to a SE database (if applicable) The Conversion Wizard can convert only one GUARD1 PLUS version 2.60, 2.71 or 3.02 database. If you have several master GUARD1 PLUS databases, you should select the database with the greatest number of buttons to convert. After this database is converted, you will need to add the buttons that are defined in the other master databases by reading these buttons with THE PIPE. You would define each new button through the Assign Names Wizard. When using the Conversion Wizard, you will be asked if you want to convert Download Data. The conversion process is very quick if you do not convert the download data. If you convert the download data, it may significantly increase the duration of the conversion process. If you are converting a GUARD1 PLUS 3.02 database, you must run the Conversion Wizard from the GUARD1 PLUS 3.02 computer. You can convert your GUARD1 PLUS database (2.60 or 3.02) by following these steps: 1. Create a directory on the workstation and call it TempConvert. 2. Share TempConvert on the network. Be sure to give read/write rights to this share. 3. Launch GUARD1 PLUS 2.60, 2.71 or 3.02. Create a backup using the GUARD1 PLUS application. 4. Once the backup is complete, copy it to the TempConvert directory. 5. Exit GUARD1 PLUS. 6. From a workstation that has a GUARD1 PLUS SE Client installed, browse to the shared GUARD1 PLUS SE Server folder on the file server, i.e. \\server name\share name. Double-click the G1ConversionWizard.exe file to start the conversion wizard. Click NEXT at Welcome Screen. 7. 8. 9. Make sure that no one is using GUARD1 PLUS or GUARD1 PLUS SE, then click NEXT. 10. Enter GUARD1 PLUS SE Supervisor’s name and password. 11. Click NEXT to continue. 12. Select radio button GUARD1 PLUS Backup or Archive. 13. Click NEXT to continue. 14. Click BROWSE and navigate to the TempConvert share. Double click the Backup that was just created. 15. Click NEXT to continue. 18 16. If you wish to convert your download data, select radio button “Yes”. Remember that with this selection, the conversion will take much longer. If you do not need to convert your download data, select radio button “No”. This selection will convert everything (buttons, facilities, custom report, rules, etc) but it will not convert your download data. 17. Click NEXT to continue. 18. Click BROWSE and navigate to the shared folder TempConvert. Click OK once you have it highlighted. 19. Click NEXT to continue. 20. Click NEXT to begin the conversion. 21. If you have pictures associated with your location buttons or maps associated with your rules, you will see the following message at the end of the conversion process: “This database contains images associated with rules or locations. To make these images available to other users, place a copy of the images in the ‘Images’ folder in the server installation path. The list of images that were detected in the database are contained in the file ‘\\ServerName\TempConver\Images.txt’. Click OK. See ** for more information. 22. You should see a message that the conversion is complete. Click FINISH. **Once the conversion is complete, browse to the TempConvert directory. Open the file “Images.txt”. This is a listing of the images that are associated to locations or rules. Copy these images to \\FileServerName\Guard1PlusSEServerShareName\Images folder. 19 Configuring the workstations GUARD1 PLUS SE workstations can have any combination of GUARD1 PLUS SE Client, SE Attendant, SE Rounds Tracker or Reporting Services Client installed. However your ability to run the program is determined by having an available license. Whereas the GUARD1 PLUS SE Client, Reporting Services Client and Rounds Tracker use concurrent licensing, GUARD1 PLUS SE Attendant uses fixed licensing. Any license can be released manually if necessary. See Appendix A for the appropriate commands. Installing GUARD1 PLUS SE Clients The SE Client provides the user interface to Guard1 Plus SE. From the SE Client, you can add buttons, create tours and run reports. 1. From the client workstation, browse to the shared GUARD1 PLUS SE Server folder on the File Server, i.e. \\server name\share name. Do NOT use a mapped drive. 2. Open the Client folder and double-click Setup.exe file. 3. Select the language and click OK. 4. Click NEXT at the Welcome Screen. 5. Read and Accept the license agreement. 6. Click NEXT to continue. 7. You can leave the default install directory or change it by clicking CHANGE… 8. Once you have selected the install directory, click NEXT. 9. Click INSTALL to install GUARD1 PLUS SE Client. 10. Click FINISH to complete the GUARD1 PLUS SE Client installation. 11. Restart the computer. 12. You will see an icon on your desktop for GUARD1 PLUS SE. Installing GUARD1 PLUS SE Attendant The GUARD1 PLUS SE Attendant can run on the same workstation where the GUARD1 PLUS SE Client is installed or it can run by itself on another workstation. Beginning with version 4.12, the GUARD1 PLUS SE Attendant has four distinct modes of operation: Direct, Remote, Remote Attendant File Manager (RAFM) and Direct with RAFM. When the Attendant is initially installed, the default mode of operation is Direct. After THE PIPE is placed in the downloader, its data is added directly and immediately to the GUARD1 PLUS SE database that resides on the SQL server. 20 If these download files are large and are transferred over a slow VPN connection, the data transfer may take longer than desired. In this scenario, you may elect to have the download file stored remotely on a share folder so that the download's file addition to the SE database takes place after THE PIPE has downloaded. The Remote mode of operation retrieves the data from THE PIPE and stores this download data as "remote download files" in a share folder. If you have any Attendants operating in a Remote mode, you must also have one Attendant operating in the RAFM mode. The RAFM mode retrieves these remote download file(s) and processes them into the SE database. You may have more than one RAFM in your GUARD1 PLUS SE installation but each RAFM must point to a different download share. The last mode of operation is the Direct/RAFM which processes its own download files locally and the remote download files in the share folder. It is possible to have multiple Attendants running in different modes in your GUARD1 PLUS SE deployment. All Attendant modes require a license with the exception of RAFM. Refer to the "GUARD1 PLUS SE Advanced Attendant User's Manual" for instructions on how you can change the Attendant's mode of operation. The following section describes how you will install the GUARD1 PLUS SE Attendant. 1. Browse to the shared GUARD1 PLUS SE Server folder on the file server, i.e. \\server name\share name. 2. Open the Attendant SE folder and double-click Setup.exe file. 3. Select the language and click OK. 4. Click NEXT at the Welcome Screen. 5. Read and Accept the license agreement. 6. Click NEXT to continue. 7. You can leave the default install directory or change it by clicking CHANGE…(If you are installing the Attendant on the same workstation where a Client is installed, be sure to install into the same directory as the Client). 8. Once you have selected the install directory, click NEXT. 9. Click INSTALL to install GUARD1 PLUS SE Attendant. 10. Click FINISH to complete the GUARD1 PLUS SE Attendant installation. 11. Restart the computer. 12. You will see two new icons on your desktop. One will be labeled “Attendant SE” and the other “Add Devices”. 21 Running GUARD1 PLUS SE Client or SE Attendant on Vista or Windows 7 Both the GUARD1 PLUS SE Client and SE Attendant will run on Vista or Windows 7. To use the GUARD1 PLUS SE Help you must download the WinHelp32.exe file from Microsoft per this technical article: http://support.microsoft.com/kb/917607 . If you do not download this file, you will receive this error message when opening Help: "There was a problem running the macro. (1037)" . 22 Installing Rounds Tracker SE Rounds Tracker is an optional companion application for GUARD1 PLUS SERVER EDITION (SE). Using data from any GUARD1 PLUS database, backup or archive, Rounds Tracker displays your rounds information in Microsoft Excel. Rounds Tracker creates five different views, which you can print, save, or e-mail. From these views, you can determine whether all locations have been visited at the required frequency. Installing Rounds Tracker SE Follow these steps to install Rounds Tracker: 1. Close any applications running on your computer, including screen savers and the Microsoft Office Suite. 2. Browse to the shared GUARD1 PLUS SE Server folder on the file server, i.e. \\server name\share name. Do NOT use a mapped drive. 3. Open the Rounds Tracker folder and double-click setup.exe. 4. The installation program should start. 5. Follow the on-screen instructions. When the installation is complete, you will need to restart your computer. 6. After the computer has restarted, find the icon on your desktop labeled Guard1 Plus Rounds Tracker SE. Double-click this icon to start Rounds Tracker. 7. If a Security Warning appears, select Always trust macros from this source and click Enable Macros. 8. 9. 23 Rounds Tracker will open in Excel. Enter the database name, your Guard1 Plus user name and password and click OK. 10. To change the database, click Change Database in the lower left hand corner of the Setup window. Enter the database name, your Guard1 Plus user name and password and click OK. For help in selecting another database, consult your IT department or primary Guard1 Plus user. 24 Adding the Downloaders After THE PIPE is placed in the downloader, its data is added directly and immediately to the GUARD1 PLUS SE database that resides on the SQL server. If these download files are large and are transferred over a slow VPN connection, the data transfer may take longer than desired. In this case, you may elect to have the download file stored remotely on a share folder so that the download's file addition to the SE database takes place after THE PIPE has downloaded. Refer to Appendix F – SE Attendant Modes for instructions on how to change the Attendant's mode of operation. For the Direct, Remote and Direct with RAFM modes, you will follow the steps listed below to add a downloader to your computer. 1. Connect the downloader to the computer's serial or USB port. Be sure to place an empty PIPE in the downloader device. 2. If the downloader is connected to a USB port you will have to point to the USB driver which is located on the file server. Browse to the shared GUARD1 PLUS SE Server folder on the file server, i.e. \\server name\share name. Then navigate to Attendant SE\Direct Downloader USB drivers folder. 3. Once the drivers have been installed, double-click the Add Devices icon on the Attendant’s workstation desktop. This will launch the Add Devices Wizard. 4. Select the radio button Yes. (You can add both readers and downloaders this way.). 5. Click NEXT to continue. 6. Select option box Connected to my computer. 7. Click NEXT to continue. 8. For a Direct Downloader, insert a PIPE in the downloader and click NEXT to continue. 9. Click NEXT to begin searching for the device. This task may take a couple of minutes. 10. Enter a Name to describe this particular Downloader. 11. Click NEXT to continue. 12. Click NEXT to continue. 13. Enter a Name to describe this particular reader (i.e. PIPE). 14. Click NEXT to continue. 15. Click NEXT to continue. 16. Click FINISH to exit from the Add Devices Wizard. 25 Installing Guard1 Plus SE Reporting Services GUARD1 PLUS SE Reporting Services is an optional module. The following instructions apply only if you purchased GUARD1 PLUS SE Reporting Services. To install GUARD1 PLUS SE RS, you will perform the following actions which are described thoroughly in the sections that follow. These activities are grouped together in five different areas: installing SQL Server Reporting Services, configuring SQL Server Reporting Services, installing GUARD1 PLUS SE RS server, installing GUARD1 PLUS SE RS client, and running the Reporting Services Setup Wizard. 1. Installing SQL Reporting Services. 2. Assign domain users to the System User role in SQL Server Reporting Services. 3. Install GUARD1 PLUS SE RS Server. 4. Install GUARD1 PLUS SE RS Client(s). 5. Initialize the GUARD1 PLUS SE application database with GUARD1 PLUS SE RS reporting objects and initialize SQL Server Reporting Services with GUARD1 PLUS SE RS reporting objects. Installing SQL Server Reporting Services If you should have any questions about these activities, refer to the SQL Server Reporting Services help. 1. Confirm that your SQL Reporting Services Server meets these requirements. Internet Information Services (IIS) is installed with Integrated Windows Authentication (not applicable for SQL 2008) Enhanced Internet Security (Windows Component) is not enabled 2. Install SQL Server Reporting Services. 3. When installing SQL 2005/2008 Reporting Services, include the Integration and Notification Services components. 4. From a web browser, open the Report Manager (\\Reporting Services Server name\Reports). 26 Configuring SQL Server Reporting Services If you should have any questions about these activities, refer to the SQL Server Reporting Services help. 1. From a web browser, open the SQL Server Reporting Services home page, Report Manager on the SQL Reporting Services Server (\\Reporting Services Server name\Reports). 2. In the upper right hand corner, click Site Settings. 27 3. Under Security, click the Configure site-wide security link. 4. At the System Role Assignments page, click New Role Assignment button. 5. At the New System Role Assignment page, enter the Windows domain account name for a user wishing to use the GUARD1 PLUS SE RS module to view reports. 28 6. Click the checkbox next to the System User role. 7. Click OK to save the new role assignment. 8. Repeat steps 5 through 7 for each additional user. 29 Installing GUARD1 PLUS SE RS Server 1. Place the GUARD1 PLUS SE Reporting Services CD in the CD drive in the Guard1 Plus file server. The installer should begin automatically. 2. If the installer does not begin automatically, click Start, Run and browse to the CD drive. Locate the setup.exe file and click OK. 3. Select the language and click OK. 4. Click Next on the Welcome screen. 5. Review the license agreement. Afterward, click the I Accept… option button and Next. 6. The destination folder will default to the folder where GUARD1 PLUS SE Server was installed. Click Next to accept the default. 7. Click Install on the Ready to Install screen. 8. GUARD1 PLUS SE RS Server will now install on your server. 9. Restart the computer. Installing GUARD1 PLUS SE RS Client 1. From a workstation that has a GUARD1 PLUS SE Client installed, open the shared GUARD1 PLUS SE Server folder on the file server, i.e. \\server name\share name. 2. Open the Reporting Services folder. 3. Double-click the Setup.exe file. 4. Select the language and click OK and the Client software is installed. 5. Click Next on the Welcome screen. 6. Review the license agreement. Afterward, click the I Accept… option button and Next. 7. The destination folder will default to the folder where the GUARD1 PLUS SE client was installed. Click Next to accept the default. 8. Click Install on the Ready to Install screen. 9. Restart the computer. 30 Configuring your GUARD1 PLUS SE RS Installation There is one wizard that you need to run before you can begin to use your G UARD1 PLUS SE Reporting Services module. The "Reporting Services Setup Wizard" will update the application database and the SQL Server Reporting Services database. This wizard needs to be run only once unless you reinstall your GUARD1 PLUS Server Edition installation. All wizards will only run on a computer that has the GUARD1 PLUS SE Client installed Running the Reporting Services Setup Wizard 1. Close all GUARD1 PLUS and GUARD1 PLUS SE applications. 2. From a GUARD1 PLUS SE Client computer, using Windows Explorer, browse to the shared GUARD1 PLUS SE Server folder on the file server, i.e. \\server name\share name. Do NOT use a mapped drive. 3. Double-click the G1RSSetupWizard.exe file to start the setup wizard. 4. Click Next. 5. Enter your SQL Server Reporting Services server name. Do NOT use fully qualified name. 6. The virtual directory name, the reports root directory name and the Reporting Services Endpoint (ReportService2005.asmx) are usually left at their default values. Click Next to continue. 31 7. Select the name of the GUARD1 PLUS SE data source (the default application database name is Guard1Plus) and click Next. 8. Select the type of credentials to use when accessing the GUARD1 PLUS data source and click Next to continue. It is recommended that you select "Guard1 Plus SE user (Current User)". (If the Reporting Services database is on a different SQL server than the Guard1 Plus SQL databases, use “Windows Authentication” (Current User)” ). 9. Review the information and click Next. 10. Click Next to initialize the SQL Server Reporting Services. 11. After the SQL Server Reporting Services setup completes, click Next. 12. Enter a GUARD1 PLUS SE supervisor name and password, and click Next. 13. Review the information and click Next. 14. Click Next to update the GUARD1 PLUS SE application database. 15. After the setup is complete, click Finish to exit from the Reporting Services Setup Wizard. 32 Creating GUARD1 PLUS SE RS reports You can only create GUARD1 PLUS SE Reporting Services reports from the GUARD1 PLUS SE Reporting Services Client. Once the report is created, it can be run either from the SE Reporting Services Client or from Reporting Services Report Manager. You can change the report’s dates from the Reporting Services Client. You cannot change any dates when you run the report from the Reporting Services Report Manager therefore the reports should be defined in the GUARD1 PLUS SE Reporting Services Client with relative dates. To create and generate the GUARD1 PLUS SE Reporting Services reports from the GUARD1 PLUS SE Client follow these steps. 1. Launch the GUARD1 PLUS SE Client. 2. Select the Reporting Services tab. 3. Navigate to the report that you would like to run. To run the Officer, Location, Incident report, click Standard Reports, Tour Reports and double click Officer Location Incident report. 4. From the General tab, change the report’s name and enter the date range for this report. 5. Go to the Appearance tab and select the desired parameters. 6. Go to the Filter - Locations tab and choose the client, facility, group or location you want included in this report. 7. Go to the Filter - Incidents tab and choose the incidents you want included in this report. 8. Go to the Filter - Officers tab and select the officers you want included in this report. 9. Click the View icon (Print Preview) icon to display the report in Internet Explorer. 10. Click the Save icon (floppy disk) to save this report definition. 33 To run the GUARD1 PLUS SE Reporting Services reports from SQL’s Reporting Services Report Manager follow these steps. 1. Open an Internet Explorer window and open the Report Manager (\\Reporting Services server name\reports). 2. Navigate to the report that you would like to run. For example, to run the Officer Location Incident report, click your report folder such as G1PSE. 3. Click guard1plus and then en followed by Tour Reports and lastly double click Officer Location Incident Report. 4. From the report pull down list, select a report. (These reports were previously created from the GUARD1 PLUS SE Client. If you do not see any reports listed, refer to the previous section on creating GUARD1 PLUS SE Reporting Services reports.) 5. Click the View Report button in the upper right to display the report. 6. If you click the Printer icon from the Internet Explorer Window, you will only print the current page. To view the remaining pages, go to the page controls in the upper left hand corner of the report. 7. To create a file that you can print or save, select an export format such as .pdf and click Export. 34 Best Practices Archiving with the Data Maintenance Wizard The Data Maintenance Wizard archives your GUARD1 PLUS SE database. Archiving removes the data from the current application database and places this data in a separate database. You can open your archive database from the GUARD1 PLUS SE Client, from the File > Open Archive function. Archive your GUARD1 PLUS SE database by following these steps. 1. Close all GUARD1 PLUS SE Clients. 2. Browse to the shared GUARD1 PLUS SE Server folder on the file server, i.e. \\server name\share name. Double-click the G1DataMaintenanceWizard.exe file to start the Data Maintenance Wizard. 3. Click NEXT at Welcome Screen. 4. Enter GUARD1 PLUS SE Supervisor’s name and password. 5. Click NEXT to continue. 6. Enter a date. This date is the cut off point for the Archive database. Any data prior to this date will be removed from the master database and placed in the Archive database. Note that this database does not yet exist in your SQL Server. This Wizard will create the database for you 7. Click NEXT to continue. 8. Review the information and make sure that it is correct. change any information, click BACK. 9. Click NEXT to continue. 10. Click NEXT to begin the archive task. 11. Click FINISH to exit from the Data Maintenance Wizard. 35 If you need to Viewing Archived Data Once the Data Maintenance Wizard is finished, you may view this Archived data within the GUARD1 PLUS SE Client. 1. Launch GUARD1 PLUS SE Client. 2. Select FILE on the menu bar. 3. Select Open Archive. 4. In the Archive list, click the archived data source filename. 5. The archived database will open in GUARD1 PLUS. Note that you may not edit data in an Archive database. You may view and run reports only. 6. To return to the original master database, select FILE on the menu bar, then select OPEN MASTER. Creating a GUARD1 PLUS SE Backup 1. Use SQL Server Enterprise Manager or Management Studio to create a backup of the GUARD1 PLUS SE database. 2. Create a new database. 3. Restore the backup created in step 1, into the database created in step 2. 4. From a workstation that has a GUARD1 PLUS SE Client installed,, click Start, Run, type cmd and click OK. 5. Navigate to the shared GUARD1 PLUS SE Server folder on the file server, i.e. \\server name\share name. 6. Create a data source definition for this database backup by typing the following command. G1Cfg 200;Supervisor User;Supervisor Password;Data Source Name;Data Source Type;SQL Server;Database;SQL Server Login;SQL Server Password Where, Supervisor User – GUARD1 PLUS SE supervisor’s name. Supervisor Password - The password for the above supervisor user. Data Source Name - A unique name for the new data source. Data Source Type - The type of the new data source. Valid types are 1 for the master database, 3 for a backup database. SQL Server - The SQL Server where the database is located. Database - The name of the backup database on the above server. 36 SQL Server Login - A SQL Server login that has dbo equivalence in the above database. To create backup or archive databases, the login must also have permission in the above server to create new databases. SQL Server Password - The password for the above login. Viewing Backup Data Once the backup has been created and restored into a new database and the G1Cfg 200 command line has been executed, you may view this Backup data within the GUARD1 PLUS SE Client. 37 1. Launch GUARD1 PLUS SE Client. 2. Select FILE on the menu bar. 3. Select Open Backup. 4. In the Backup list, click the backup data source filename. 5. The backup file will open in GUARD1 PLUS. Note that you may not edit data in a backup database. You may view data and run reports only. 6. To return to the original master database, select FILE on the menu bar, then select OPEN MASTER. Appendix A - GUARD1 PLUS SE Configuration Utility Commands List Current Configuration Command: G1Cfg 0 List Licensing Activity Command: G1Cfg 1 Initialize Configuration Database Connection Parameters Command: G1Cfg 100;SQL Server;Database;SQL Server Login;SQL Server Password Where, SQL Server - The SQL Server where the database is, or will be, located. Database - The name of the configuration database on the above server. You must create this database before initializing it with this utility. SQL Server Login - A SQL Server login that has dbo equivalence in the above database. SQL Server Password - The password for the above login. This will be stored in a secure manner. Initialize Configuration Database Command: G1Cfg 101;SQL Server Password;Supervisor User;Supervisor Password Where, SQL Server Password - The password for the SQL Server login used to connect to the configuration database. Supervisor User - An application user that has supervisor rights. Supervisor Password - The password for the above supervisor user. This will be stored in a secure manner. 38 Clear Configuration Database Command: G1Cfg 102;SQL Server Password Where, SQL Server Password - The password for the SQL Server login used to connect to the configuration database. Upgrade Configuration Database Command: G1Cfg 103;SQL Server Password Where, SQL Server Password - The password for the SQL Server login used to connect to the configuration database. Refresh Configuration Database Procedures Command: G1Cfg 104;SQL Server Password Where, 39 SQL Server Password - The password for the SQL Server login used to connect to the configuration database. Create Data Source Command: G1Cfg 200;Supervisor User;Supervisor Password;Data Source Name;Data Source Type;SQL Server;Database;SQL Server Login;SQL Server Password Where, Supervisor User - An application user that has supervisor rights. Supervisor Password - The password for the above supervisor user. Data Source Name - A unique name for the new data source. Data Source Type - The type of the new data source. Valid types are 1 for the master database, 3 for a backup database and 4 for an archive database. SQL Server - The SQL Server where the database is, or will be, located. Database - The name of a database on the above server. You must create this database before initializing it with this utility. SQL Server Login - A SQL Server login that has dbo equivalence in the above database. To create archives, the login must also have permission in the above server to create new databases. SQL Server Password - The password for the above login. This will be stored in a secure manner. Delete Data Source Command: G1Cfg 201;Supervisor User;Supervisor Password;Data Source Name Where, Supervisor User - An application user that has supervisor rights. Supervisor Password - The password for the above supervisor user. Data Source Name - The name of the data source to delete. 40 Initialize Database Command: G1Cfg 202;Supervisor User;Supervisor Password;Data Source Name Where, Supervisor User - An application user that has supervisor rights. Supervisor Password - The password for the above supervisor user. Data Source Name - The name of a data source defining the database to initialize. Clear Database Command: G1Cfg 203;Supervisor User;Supervisor Password;Data Source Name Where, Supervisor User - An application user that has supervisor rights. Supervisor Password - The password for the above supervisor user. Data Source Name - The name of a data source defining the database to clear. Upgrade Application Database Command: G1Cfg 204;Supervisor User;Supervisor Password;Data Source Name Where, 41 Supervisor User - An application user that has supervisor rights. Supervisor Password - The password for the above supervisor user. Data Source Name – The data source assigned to this application database. Refresh Application Database Procedures Command: G1Cfg 205;Supervisor User;Supervisor Password;Data Source Name Where, Supervisor User - An application user that has supervisor rights. Supervisor Password - The password for the above supervisor user. Data Source Name - The name of a data source defining the database to refresh. Archive Database Command: G1Cfg 300;Supervisor User;Supervisor Name;Database;Archive Date Password;Data Source Where, Supervisor User - An application user that has supervisor rights. Supervisor Password - The password for the above supervisor user. Data Source Name - The name of a data source defining the database to archive. Database - The name of a database that will hold the archived data. Archive Date - The date used to determine what will be archived. All tour data that was downloaded prior to the archive date will be archived. Accepted formats are mm/dd/yyyy and mm-dd-yyyy. Change Supervisor Password Command: G1Cfg 400;SQL Server Password;Supervisor User;Supervisor Password Where, SQL Server Password - The password for the SQL Server login used to connect to the configuration database. Supervisor User - An application user that has supervisor rights. Supervisor Password - The new password for the above supervisor user. This will be stored in a secure manner. 42 Reset Database Pairing Command: G1Cfg 401;Supervisor User;Supervisor Password;Data Source Name Where, Supervisor User - An application user that has supervisor rights. Supervisor Password - The password for the above supervisor user. Data Source Name - The name of a data source defining the database to pair with the current configuration database. Authorize GUARD1 PLUS Server Edition Command: G1Cfg 500;Support Code;Password;Email;Name;Title;Phone;[Fax] Where, Support Code - The number assigned by TimeKeeping Systems to the GUARD1 PLUS Server Edition customer. Password - The password for the above support code. Email - The email address of the primary GUARD1 PLUS Server Edition contact. The authorization license file will be sent to this address. Name - The full name of the primary GUARD1 PLUS Server Edition contact. Title - The job title of the primary GUARD1 PLUS Server Edition contact. Phone - The phone number of the primary GUARD1 PLUS Server Edition contact. [Fax] - The fax number of the primary GUARD1 PLUS Server Edition contact. This is an optional input parameter. Add License Command: G1Cfg 501;Path Where, 43 Path - The license file name and path such as "C:\Temp\LicenseFile.lic". Free Attendant License Command: G1Cfg 502;Supervisor User;Supervisor Password;Attendant License ID Where, Supervisor User - An application user that has supervisor rights. Supervisor Password - The password for the above supervisor user. Attendant License ID - The unique ID number for the Attendant license that should be freed (obtained by running G1Cfg 1). Free Client License Command: G1Cfg 503;Supervisor User;Supervisor Password;Client License ID Where, Supervisor User - An application user that has supervisor rights. Supervisor Password - The password for the above supervisor user. Client License ID - The unique ID number for the client license that should be freed (obtained by running G1Cfg 1). Free Rounds Tracker Client License Command: G1Cfg 504;Supervisor User;Supervisor Password;Rounds Tracker Client License ID Where, Supervisor User - An application user that has supervisor rights. Supervisor Password - The password for the above supervisor user. Rounds Tracker Client License ID - The unique ID number for the Rounds Tracker client license that should be freed (obtained by running G1Cfg 1). 44 Appendix B: GUARD1 PLUS SE RS Configuration Utility Commands List Current Configuration: identifies the GUARD1 PLUS SE Server folder, configuration database parameters, defined data sources (for the backups and archives) and licensing information Command: G1RSCfg 0 Initialize Report Server Parameters: creates the GUARD1 PLUS SE Reporting Services Reports root folder Command: G1RSCfg 600;Servername;Virtual Directory; Reports Root Directory;Reporting Services Web Service Endpoint Where, Servername - The name of the Report Server. Virtual Directory - The name of the virtual directory where the Report Server can be accessed. For example, by specifying "ReportServer", the Report Server can be accessed as: http://<Servername>/ReportServer. Reports Root Directory - The name of the root directory where GUARD1 PLUS SE reports will be stored on the Report Server. Reporting Services Web Service Endpoint - The name of web service endpoint, normally ReportService.asmx. Create Report Server Reports: creates the reports’ subdirectories and the GUARD1 PLUS SE Reports along with populating the catalog table in the ReportServer database Command: Identifier 45 G1RSCfg 601;Data Source Name;Credentials Identifier;Language Where, Data Source Name - The name of the GUARD1 PLUS SE data source to run reports against on the Report Server. Credentials Identifier - The identifier that specifies the type of credentials to use to access the GUARD1 PLUS SE data source to run reports against on the Report Server. Valid credentials identifiers are 1 for GUARD1 PLUS SE user credentials and 2 for Windows current user credentials. Language Identifier - The identifier that specifies the language of the reports that will be stored on the Report Server. Valid language identifiers are: 1 for English, 2 for German and 3 for French. Initialize Database Reports: creates the GUARD1 PLUS SE Reporting Services tables in the GUARD1 PLUS SE application database and populates the catalog table in the ReportServer database with the GUARD1 PLUS SE entries Command: G1RSCfg 602;Supervisor User;Supervisor Password;Data Source Name Where, Supervisor User - An application user that has supervisor rights. Supervisor Password - The password for the above supervisor user. Data Source Name - The name of the data source defining the database to initialize with Report Server reports. Clear Database Reports: removes the GUARD1 PLUS SE Reporting Services tables from the GUARD1 PLUS SE application database and removes the GUARD1 PLUS SE entries in the catalog table in the ReportServer database Command: G1RSCfg 603;Supervisor User;Supervisor Password;Data Source Name Where, Supervisor User - An application user that has supervisor rights. Supervisor Password - The password for the above supervisor user. Data Source Name - The name of the data source defining the database to clear Report Server reports from. 46 Refresh Database Procedures: updates the stored procedures associated with GUARD1 PLUS SE Reporting Services Command: G1RSCfg 604;Supervisor User;Supervisor Password;Data Source Name Where, 47 Supervisor User - An application user that has supervisor rights. Supervisor Password - The password for the above supervisor user. Data Source Name - The name of a data source defining the database to refresh. Appendix C - SE Error Codes License Manager return codes Error Code Explanation Resolution -100 DATABASE_HACK_DETECTED Delete hacked configuration database and create a new config database using the configuration utility. A new license will be required. -101 SERVER_NAME_REQUIRED The config utility was unable to determine the server name on which the config database resides. Check the Config.ini file for accuracy and the Network.ini file for accuracy if it exists. -102 LICENSE_MASTER_TABLE_INVALID Delete hacked configuration database and create a new config database using the configuration utility. A new license will be required. -103 AUTHORIZATION_NOT_INITIATED Run the authorize command of the config utility. -104 ADD_LICENSE_FAILED Verify the contents of the license file. Contact TKS. -105 INITIALIZE_LICENSE_MASTER_TABLE_INSERT_FAILED Database error. Contact TKS. -106 LICENSE_FILE_ALREADY_EXISTS Illegal operation User tries to add license file info into the config database that has already been added. -107 ADD_AUTHORIZATION_LICENSE_FAILED The authorization license was not added to the config database. Contact TKS. -108 LICENSE_FILES_INSERT_FAILED Database error. Contact TKS. -109 LICENSE_MASTER_INSERT_FAILED Database error. Contact TKS. -110 AUTHORIZATION_NOT_COMPLETE Authorize GUARD1 PLUS SE. -111 ADD_LICENSES_LICENSE_FAILED Verify the contents of the license file. Contact TKS. -112 LICENSE_FILES_TABLE_INVALID Delete hacked configuration database and create a new config database using the configuration utility. A new license will be required. 48 License Manager return codes -113 LICENSE_MASTER_UPDATE_FAILED Database error. Contact TKS. -114 GET_ATTENDANT_AUTHORIZATION_FAILED Use the config utility to check that there are Attendant licenses in the system. If not contact TKS to purchase. -115 NO_ATTENDANT_LICENSES_AVAILABLE Use the config utility to free an Attendant license for use. -116 LICENSED_ATTENDANTS_TABLE_INVALID Delete hacked configuration database and create a new config database using the configuration utility. A new license will be required. -117 LICENSED_ATTENDANT_INSERT_FAILED Database error. Contact TKS. -118 GET_CLIENT_AUTHORIZATION_FAILED Use the config utility to check that there are Client licenses in the system. If not, contact TKS to purchase. -119 NO_CLIENT_LICENSES_AVAILABLE Use the config utility to free a client license for use. -120 LICENSED_CLIENTS_TABLE_INVALID Delete hacked configuration database and create a new config database using the configuration utility. A new license will be required. -121 LICENSED_CLIENT_INSERT_FAILED Database error. Contact TKS. -122 GET_ROUNDS_TRACKER_CLIENT_AUTHORIZATION_FAILED Use the config utility to check that there are Rounds Tracker licenses in the system. If not, contact TKS to purchase. -123 NO_ROUNDS_TRACKER_CLIENT_LICENSES_AVAILABLE Use the config utility to free a rounds tracker license for use. -124 LICENSED_ROUNDS_TRACKER_CLIENTS_TABLE_INVALID Delete hacked configuration database and create a new config database using the configuration utility. A new license will be required. -125 LICENSED_ROUNDS_TRACKER_CLIENT_INSERT_FAILED Database error. Contact TKS. -126 INITIALIZE_LICENSE_MASTER_TABLE_UPDATE_FAILED Database error. Contact TKS. -127 LICENSE_MASTER_TABLE_NOT_EMPTY In the config database, clear the entry in the license master table. -128 SERVER_NAME_INVALID Verify the server's name and try again. 49 Web Service return codes Error Code 0 Explanation Resolution AUTHORIZE_SUCCESS -300 AUTHORIZE_FAILED Authorization failed unspecified reason. TKS. for an Contact -301 LICENSE_FILE_GENERATE_FAILED The web service was unable to generate the license file for an unspecified reason. Contact TKS. -302 AUTHORIZATION_ALREADY_ISSUED You are trying to authorize an instance of GUARD1 PLUS SE that appears to already have been authorized. Contact TKS. -303 SUPPORT_CODE_NOT_FOUND Verify your support code with TKS. -304 GET_SUPPORT_CODE_FAILED Database error. Contact TKS. -305 UPDATE_SUPPORT_CODE_FAILED Database error. Contact TKS. -306 FILE_OPEN_WRITE_ACCESS The web service was not able to generate the license file because of a permissions issue. Contact TKS. -307 EMAIL_SEND_FAILED The web service was unable to send the email containing the license file. Contact TKS. -308 AUTHORIZATION_ALREADY_ISSUED_DIFFERENT_SERVER Obtain authorization additional server from TKS. -309 LICENSE_MASTER_TABLE_NOT_EMPTY Delete the contents of the license master table in the config database. -310 SERVER_NAME_INVALID The config utility was unable to determine the server name on which the config database resides. Check the Config.ini file for accuracy and the Network.ini file for accuracy if it exists. for 50 License File return codes Error Code Explanation Resolution -200 LICENSE_FILE_INVALID Obtain a new license file from TKS. -201 SERVER_NAME_INCORRECT Install and configure GUARD1 PLUS SE on the same server authorization was performed. 51 Appendix D - Running the GUARD1 PLUS SE Configuration Utility For the following commands, sample command parameters are listed below. You may find it helpful to insert your own unique command parameter names by adding them to the user column entitled "Your Information". If you receive any error messages as you perform these commands, refer to SE Error Codes for further explanation. Command Parameter Name Description Example SQL Server The name of the SQL Server where the database is, or will be, located. SQLServer1 Configuration Database The name of the database on SQL Server. Guard1PlusConfig SQL Server Login The login you created for use with GUARD1 PLUS SE. Guard SQL Server Password The password for the above SQL Server login. This password will be stored in a secure manner. Password Supervisor User An application user that has supervisor rights. This user is created in the Database Setup Wizard. Super Supervisor Password The password for the above supervisor user. This password is created in the Database Setup Wizard. Super Support Code The number assigned by TimeKeeping Systems to the GUARD1 PLUS Server Edition customer. 9911 Password The password for the support code. password Email The email address of the primary GUARD1 PLUS Server Edition contact. The authorization license file will be sent to this address. [email protected] Name The full name of the primary GUARD1 PLUS Server Edition contact. GUARD1 PLUS Contact Phone The phone number of the primary GUARD1 PLUS Server Edition contact. 123456789 [Fax] The fax number of the primary Server Edition contact. This is an optional input parameter. 234567891 Data Source Name A unique name for the data source and it is usually has the same as the application database's name. Guard1Plus Data Source Type The type of the new data source. which are: 1 for the master database, 3 for a backup database and 4 for an archive database. 1 Database The name of the application database on the SQL server. You must create this database before initializing it with this utility. Guard1Plus Your Information Keep password secure. Keep password secure. Keep password secure. 52 Running the GUARD1 PLUS SE Configuration Utility To manually perform the tasks completed by the GUARD1 PLUS SE Database Setup Wizard and the Activate Software Wizard, you would use the following steps. These commands are given to you as a reference and we encourage you to use the Wizards as they were created for your convenience. 1. From a GUARD1 PLUS SE Client workstation, map the GUARD1 PLUS SE Server share to an available drive such as X. 2. Click Start, Run and type cmd. 3. Type: X:\Program Files\ GUARD1 PLUS SE Server where X is the drive mapped to the GUARD1 PLUS SE Server share and press Enter. 4. To view the command syntax for all commands in the GUARD1 PLUS Configuration Utility, type G1Cfg ?. You can also refer to Appendix A for further information. Click Close to exit from this window. 5. Initialize the configuration database connection by typing the following command: G1Cfg 100;SQL Server;Configuration Database; SQL Server Login;SQL Server Password For example: G1Cfg 100;SQLServer1;Guard1PlusConfig;Guard;Password 6. Click Yes to initialize the configuration database connection. 7. Initialize the configuration database by typing the following command. G1Cfg 101;SQL Server Password;Supervisor User;Supervisor Password For example: G1Cfg 101;Password;Super;Super 8. Click Yes to initialize the configuration database and click OK to continue. 9. Authorize GUARD1 PLUS Server Edition by typing the following command. You must have internet access to perform this command. The support code and password are included with your GUARD1 PLUS Server Edition shipment. If you do not have a support code or password, call (216)595-0890 for assistance. G1Cfg 500;Support Code;Password;Email;Name;Title;Phone;[Fax] For example: G1Cfg 500;9911;password;[email protected]; GUARD1 PLUS Contact;Security Admin;2165950890;2165950991 53 10. Click OK to close the GUARD1 PLUS SE Configuration window. 11. Import the license file that you received from TimeKeeping Systems, Inc. by typing the following command. G1Cfg 501;Path\filename.lic For example: G1Cfg 501;C:\Temp\0fba6a4487674d49a7f2bf5a0f74ab86.lic 12. Click OK after the license file has been successfully added. 13. Create a data source definition for the master application database by typing the following command. G1Cfg 200;Supervisor User;Supervisor Password;Data Source Name;Data Source Type;SQL Server;Database;SQL Server Login;SQL Server Password For example: G1Cfg 200;Super;Super;Guard1Plus;1;SQLServer1;Guard1Plus; Guard;Password 13. Click OK to close the GUARD1 PLUS SE Configuration window. 14. Initialize the master application database by typing the following command. G1Cfg 202;Supervisor User;Supervisor Password;Data Source Name For example: G1Cfg 202;Super;Super;Guard1Plus 15. Click Yes to initialize the database and after the process is finished click OK. 16. If you have an older GUARD1 PLUS database to convert to GUARD1 PLUS SE, do so now by following the directions in the next section. 17. You can now start the GUARD1 PLUS Client or Attendant application by double-clicking the icons on your desktop. 54 Appendix E - Archiving the GUARD1 PLUS SE Database Archiving removes the download data from the GUARD1 PLUS SE database and places it in a separate database. Archiving reduces the size of the GUARD1 PLUS SE database. You can perform archiving through the Data Maintenance Wizard that is explained in this manual in the section, Archiving with the Data Maintenance Wizard or you can archive by following the G1Cfg commands in this section. The Data Maintenance Wizard requires that the application database name contain no spaces. Archive the database by performing the following steps. 1. Close all GUARD1 PLUS SE Client applications. 2. Map the GUARD1 PLUS SE Server share to an available drive such as X. 3. From the GUARD1 PLUS SE Client, click Start, Run, type cmd and click OK. 4. Type: CD X:\Program Files\ GUARD1 PLUS SE Server where X is the GUARD1 PLUS SE Server share and press Enter. 5. To archive the GUARD1 PLUS database, type the following command. G1Cfg 300;Supervisor user;Supervisor password;Data Source Name; Archive database filename;Archive date Where, Supervisor User - An application user that has supervisor rights. Supervisor Password - The password for the above supervisor user. Data Source Name - The name of a data source defining the database to archive. Archive Database - The name of a database that will hold the archived data. Do NOT use spaces in the name; example: Guard1Plus2009. Archive Date - The date used to determine what will be archived. All tour data that was downloaded prior to the archive date will be archived. Accepted formats are mm/dd/yyyy and mm-dd-yyyy. 55 6. Click Yes to archive the database. 7. Archiving may take several minutes depending on the amount of download data that will be moved to the Archive Database. 8. Click OK and click Close to exit from the GUARD1 PLUS SE Archiving window. 9. Create a data source definition for this archived database by typing the following command. G1Cfg 200;Supervisor User;Supervisor Password;Data Source Name;Data Source Type;SQL Server;Database;SQL Server Login;SQL Server Password Where, Supervisor User - An application user that has supervisor rights. Supervisor Password - The password for the above supervisor user. Data Source Name - A unique name for the new data source. Data Source Type - The type of the new data source. Valid types are 1 for the master database, 3 for a backup database or 4 for an archive database. SQL Server - The SQL Server where the database is, or will be, located. Database - The name of a database on the above server. You must create this database before initializing it with this utility. SQL Server Login - A SQL Server login that has dbo equivalence in the above database. To create archives, the login must also have permission in the above server to create new databases. SQL Server Password - The password for the above login. This will be stored in a secure manner. 10. Double-click the GUARD1 PLUS SE icon. 11. On the File menu, click Open Archive. 12. In the Archive list, click the archived database filename. 13. The archived file will open in GUARD1 PLUS. 14. To return to the original master database, on the File menu, click Open Master. 56 Appendix F - SE Attendant Modes The GUARD1 PLUS SE Attendant has four distinct modes of operation: Direct, Remote, Remote Attendant File Manager (RAFM) and Direct with RAFM. When the Attendant is initially installed, the default mode of operation is Direct. In this mode, after THE PIPE is placed in the downloader, its data is added directly and immediately to the GUARD1 PLUS SE database that resides on the SQL server. If these download files are large and are transferred over a slow VPN connection, the data transfer may take longer than desired. In this case, you may elect to have the download file stored remotely on a share folder so that the download's file addition to the SE database takes place after THE PIPE has downloaded. The download files that are stored in the share folder are called the "remote download files". The Remote mode of operation retrieves the data from T HE PIPE and stores this download data as "remote download files" in a share folder. If you have any Attendants operating in a Remote mode, you must also have one Attendant operating in the RAFM mode. The RAFM mode retrieves these remote download file(s) and processes them into the SE database. The last mode of operation is the Direct/RAFM which processes its own download files locally and the remote download files in the share folder. It is possible to have multiple Attendants running in different modes in your GUARD1 PLUS SE deployment. All Attendant modes require a license with the exception of RAFM. The next section shows you how to switch from one mode to another by using the Advanced Attendant Configuration Wizard. 57 Switching Attendant SE Modes of Operation You will need to run the "GUARD1 PLUS Advanced Attendant Configuration Wizard" if you want to switch your Attendant's mode of operation. Each time you install the Attendant, it is installed in the Direct mode. Running the GUARD1 PLUS SE Advanced Attendant Configuration Wizard 1. Shut Down the Attendant SE application. 2. From the Attendant workstation, browse to the shared GUARD1 PLUS SE Server folder on the file server, i.e. \\server name\share name. 3. Double-click the G1AttendantConfig.exe file to start the “GUARD1 PLUS SE Advanced Attendant Configuration Wizard”. 4. The Welcome Screen appears: 58 59 5. Click Next. 6. The currently configured communication mode is displayed. 7. Select the communication mode for the Attendant and click Next. 8. If the Direct mode is chosen go to step 11. 9. If Remote mode is chosen, enter the share path where these remote download files will be stored and click Next. Go to step 11. 10. If RAFM or Direct/RAFM is chosen, enter the path to the share where the remote download files are located and click Next. 60 11. You may now review your mode settings on this summary screen. If you agree with these settings, click Next. If you need to make changes to these settings, click Back. If you decide to make no changes to the Attendant's mode of operation, click Cancel. 12. You have changed the Attendant's mode of operation. Click Finish to exit the wizard. 61 13. Restart the Attendant by clicking Start, Programs, GUARD1 PLUS SE, Attendant SE . 62 SE Advanced Attendant Error Messages You can review the mode changes for the Attendant by opening the file, AttendantConfig.log, in the Attendant install directory. The possible error messages and their resolution are listed below. Error Message 63 Resolution Path error. Please confirm path and try again! Check the location of your share. Confirm that you can access this share with your current login. Access error. Please confirm Change access rights and try again! You do not have write access to the share. Change your access rights or change the share location. Network connection error. Please confirm network connection and try again Confirm your access to this share with your current login. Unable to connect to configuration database to delete license The Attendant SE license must be manually freed. Use the G1Cfg 502 command to free the license. Refer to the GUARD1 PLUS SE Administrator's Manual for further information. Appendix G – Creating the Rounds Tracker SE Reports Rounds Tracker is an optional companion application for GUARD1 PLUS SERVER EDITION (SE). Using data from any GUARD1 PLUS database, backup or archive, Rounds Tracker displays your rounds information in Microsoft Excel. Rounds Tracker creates five different views, which you can print, save, or e-mail. From these views, you can determine whether all locations have been visited at the required frequency. Rounds Tracker Report Types Rounds Tracker offers five ways to view your data. The Quick View displays each visit with a green or red marker, so you can quickly identify any exceptions. 64 The Time Between view shows the number of minutes between reads The Time view shows the time that each location button was read 65 The Rounds view shows the number of reads for each hour of the day. The Details view shows each location read and any related incidents. Rounds Tracker's method of color-coding cells allows you to quickly identify any exceptions or missed locations. Green text in a cell indicates the location was visited within the time range you specified. Red text and an orange background indicate the location was visited outside your desired time range. A spotted background in a cell indicates that there is a related incident. Hold the cursor over the cell to view this information. 66 A red triangle in the corner of the cell represents additional detail. Hold the cursor over the cell to view this information. Follow these steps to create the Rounds Tracker reports: 1. From your desktop, double-click the Rounds Tracker SE icon to start Rounds Tracker. If a Security Warning appears, select Always trust macros from this source and click Enable Macros. 2. 3. Rounds Tracker will open in Excel. Enter the database name, your Guard1 Plus user name and password and click OK. 4. To change the database, click Change Database in the lower left hand corner of the Setup window. Enter the database name, your Guard1 Plus user name and password and click OK. For help in selecting another database, consult your IT department or primary Guard1 Plus user. 5. From the toolbar, click Setup. 6. Select a database file. 7. Select the specific, client, facility, group or location to include. 8. Select the views you require. 9. Select a Date and Time option and enter any required details. 10. Select any desired options from Defaults and Options tabs. 11. Click OK. 12. An hourglass appears on the screen as Rounds Tracker prepares the display. 67 The Toolbar The Rounds Tracker Toolbar has three selections: Refresh, Setup, and Email. Click Refresh to update the view with the latest contents of your selected database. This will refresh the active worksheet only. Click Setup to open the Setup window. Click E-mail to send a copy of the current view as an e-mail attachment. Setup Use the setup window to select your data, the views you want to display, and related options. 68 Database To select a database: 1. From the Setup Window, click Change Database. 2. From the Rounds Tracker SE window, enter the database name, your Guard1 Plus user name and password. 3. Click OK. Filter The Filter section of the Setup Window shows the GUARD1 PLUS Facilities tab. You must select a client, facility, group or location to create a worksheet. If the Facilities tab is changed in GUARD1 PLUS, click Refresh to update the list. Worksheets The Worksheets selection determines which views Rounds Tracker will display. Each view is created in a separate Excel worksheet. Date and Time There are three ways to define the period of time displayed: Synchronized Mode displays a period of time including the present. To refresh the data in the current view automatically, click Automatically Refresh and select a time interval. A time interval less than 15 minutes is not recommended. 69 Shift Mode includes the data recorded from the time entered in the Since field. Specific Date Range includes the data defined by related date and time boxes. Defaults You can select values for the Minimum and Maximum Time Interval between visits to a location. These values apply to all views except Rounds view. If the time between location reads is less than the minimum or greater than the maximum, an exception is noted on the worksheet. The Default Rounds Value applies only to the Rounds view. It specifies how many times per hour each location should be read. If the number of visits is less than the default rounds value, an exception is indicated in the Rounds view. Options 24-Hour Time – when selected, times are displayed in 24-hour format. Show Seconds – when selected, seconds are displayed in views and incident detail. Auto-Load Spreadsheet – when selected, Rounds Tracker loads the most recently used database on startup, skipping the Welcome Screen. Show Incidents – when selected, incidents are included. Show Offenders – when selected, offenders are included. 70 Using Rounds Tracker About Rounds Tracker Operation Rounds Tracker is a computation-intensive application. When preparing or refreshing the display, it will require most of your computer's processing power. Therefore, it is important to limit the amount of data that Rounds Tracker must process. To reduce the time Rounds Tracker requires to prepare or refresh the display, we recommend one or all of the following: Limit the choice of client, facility, group to the data you really need. For example, don't select a whole facility if there is a group with fewer locations that contains the locations you need. The more locations in your selection, the longer Rounds Tracker requires to process your data. Limit the date and time range. Select a time period of twenty-four hours or less. Select only the views you need. The more views you select, the longer Rounds Tracker requires to process your data. Refresh only when necessary. If you use the auto-refresh function, select a time value of fifteen minutes or higher. To Display Data 1. 2. 3. 4. 5. 6. 7. 8. From the toolbar, click Setup. Select a database file. Select the specific, client, facility, group or location to include. Select the views you require. Select a Date and Time option and enter any required details. Select any desired options from Defaults and Options tabs. Click OK. An hourglass appears on the screen as Rounds Tracker prepares the display. Printing Printing a worksheet is done using the Excel print functions. Before printing, you must define the Print Area for each worksheet. The Print Area defines what part of the worksheet will be printed. To Define the Print Area: 1. On the View menu, click Page Break Preview. 2. Select the area you want to print by clicking and dragging over the specific cells. 3. On the File menu, click Print Area, then click Set Print Area. 4. When you save the document, your print area selection will also be saved. 71 To Clear the Print Area: On the File menu, click Print Area, then click Clear Print Area. To Print the Worksheet On the File menu, click Print. E-mailing Worksheets Outlook is required to email a worksheet directly from Rounds Tracker. Rounds Tracker's E-mail function creates an Excel Workbook (.xls) file of the active worksheet and attaches the file to an Outlook email message. To E-Mail with Outlook 1. Rounds Tracker will send only the active worksheet via e-mail. Select the worksheet you wish to e-mail. 2. From the Toolbar, click Email. The Save As appears. 3. Type a file name and select the Microsoft Office Excel Workbook (*.xls) file type. Select the file's folder location. 4. Click Save. An e-mail message is created with the .xls file attached. 5. Complete the email by adding the recipients and any additional message. 6. Click Send. To E-Mail with Another E-Mail Client If you do not have Outlook, you must first save the workbook, then send it as an e-mail attachment. 1. From the Excel Menu, click File. 2. Click Save As. The Save As window appears. 3. Type a file name and select the Microsoft Office Excel Workbook (*.xls) file type. Select the file's folder location. Click Save to create the file. 4. Follow the instructions for your e-mail program to create a new message and attach the file you saved. Troubleshooting The Toolbar is not visible For Windows 2000 and XP, follow these steps to display the Toolbar: 1. From the Excel menu, click View. 2. Click Toolbars. 3. Click Guard1 Plus. 72 For Windows Vista, follow these steps to display the Toolbar: 1. From the Excel menu, click Add-Ins. 2. Click Toolbars. 3. Click Guard1 Plus. The Setup Window does not appear If the Setup Window does not appear when you click Setup, the database file that Rounds Tracker is trying to open may be corrupted. Contact TimeKeeping Systems technical support for assistance. There is no data in the worksheet If no data is displayed: 73 Confirm that the download data exists by viewing the downloads in GUARD1 PLUS. Check that the time and date range is correct. Appendix H – Tracking Offenders in Guard1 Plus Beginning with GUARD1 PLUS SERVER EDITION (SE) version 4.3x, you can track offenders. From the Guard1 Plus SE Client, you assign an offender to a particular location. There are three new Reporting Services reports where you will see the offender’s name. You can also see the offender’s activity in Rounds Tracker. Reports reflect the current assignment history as entered in Guard1 Plus. Guard1 Plus does not maintain a history of offender assignment changes. If an audit trail of offender assignment changes is required, we recommend you consider implementing an audit in SQL Server. A number of third-party tools are available for this purpose. TimeKeeping Systems can provide additional information to customers interested in implementing an audit trail of offender assignment changes or other data. To enable Offender Tracking in Guard1 Plus SE: 1. Open the Guard1 Plus Client. 2. On the left hand side of the window, open the System tab. 3. Highlight Guard1 Plus SE and right-click, then click Guard1 Plus SE Options. 4. Open the Offenders tab. 5. Place a check beside “Enable Offender tracking feature” and click Save. Restart the client to make this change effective. 74 To create an offender: 75 1. Launch the Guard1 Plus SE Client. 2. On the left hand side of the window, select Facilities tab. 3. Right-click Guard1 Plus and select New Offenders. 4. Enter the offender information. 5. Click Next and then click Finish. To assign an offender into a location: 1. Launch the Guard1 Plus SE Client. 2. On the left hand side of the window, select the Facilities tab. 3. Highlight the location button where the offender will be located. 4. Right-click and click Assign Offender to this Location. 5. Click New Assignment. 6. Enter a name or ID and click Search to view the offenders. 7. Double-click the offender that will be assigned to this location. 8. Enter the date and time that the offender was assigned and click Assign. To assign an offender out of a location: 1. Launch the Guard1 Plus SE Client. 2. On the left hand side of the window, select the Facilities tab. 3. Highlight the location button. 4. Right-click and click Assign Offender to this Location. 5. Click Edit Assignment. 76 6. Click the box beside the Out dates and enter the date and time that the offender moved out of this location 7. Click Assign to save the changes. There are three types of reporting services offender reports. Offender Activity Report – shows the officer, location and incident activity for a single offender Offender Location Report – shows the movement of a single offender Location Offender Report – shows all offenders assigned to a location To create a Location Offender Report in Guard1 Plus: 77 1. Launch the Guard1 Plus SE Client. 2. On the left hand side of the window, select the Facilities tab. 3. Highlight a location button or a client, facility or group. 4. Right-click and point to Reporting Services, and then click Location Offender Report. 5. Enter the date and time you want to see in this report. 6. Open the other tabs to filter by officer, incident or offender. 7. Click the Print or Print Preview icons to see the report. To create an Offender Activity Report in Guard1 Plus: 1. Launch the Guard1 Plus SE Client. 1. On the left hand side of the window, select the Facilities tab. 2. Highlight a location button. 3. Right-click and point to Reporting Services, and then click Offender Activity Report. 4. Enter the date and time you want to see in this report. 5. Open the other tabs to filter by officer, incident or offender. 6. Click the Print or Print Preview icons to see the report. To create an Offender Location Report in Guard1 Plus: 1. Launch the Guard1 Plus SE Client. 2. On the left hand side of the window, select the Facilities tab. 3. Highlight a location button. 4. Right-click and point to Reporting Services, and then click Offender Location Report. 5. Enter the date and time you want to see in this report. 6. Open the Filter-Offender tab to filter by offender. 7. Click the Print or Print Preview icons to see the report. 78 Appendix I – Tracking Offenders in Rounds Tracker Beginning with GUARD1 PLUS SERVER EDITION (SE) version 4.3x, you can track offenders. From the Guard1 Plus SE Client, you assign an offender to a particular location. You will see the offender’s name in both the Reporting Services Offender and Rounds Tracker reports. Reports reflect the current assignment history as entered in Guard1 Plus. Guard1 Plus does not maintain a history of offender assignment changes. If an audit trail of offender assignment changes is required, we recommend you consider implementing an audit in SQL Server. A number of third-party tools are available for this purpose. TimeKeeping Systems can provide additional information to customers interested in implementing an audit trail of offender assignment changes or other data. To enable Offender Tracking in Rounds Tracker: 79 1. Launch Rounds Tracker. 2. After you log in, the Setup Window appears on the screen. 3. Select the client, facility, group or location. 4. Select the Worksheets. 5. Enter the Date and Time. 6. Under the Defaults tab, enter the minimum and maximum time intervals along with the rounds requirement. 7. In the lower right hand corner, open the Options tab. 8. Place a check beside “Show Offenders”. 9. Click OK to generate the reports. 10. A sample report is found below. 80 81 ED-99-0035-002 82