1
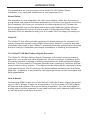
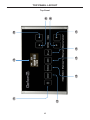
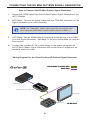
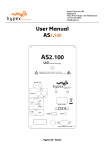
®
1080P
HD Mini Pattern
Signal Generator
GTV-HD-MPSG
User Manual
gefentv.com
ASKING FOR ASSISTANCE
Technical Support:
Telephone
(818) 772-9100
(800) 545-6900
Fax(818) 772-9120
Technical Support Hours:
8:00 AM to 5:00 PM Monday through Friday, Pacific Time
Write To:
Gefen, LLC
c/o Customer Service
20600 Nordhoff St
Chatsworth, CA 91311
[email protected]
www.gefentv.com
Notice
Gefen, LLC reserves the right to make changes in the hardware, packaging and
any accompanying documentation without prior written notice.
HD Mini Pattern Signal Generator is a trademark of Gefen, LLC
HDMI, the HDMI logo, and High-Definition Multimedia Interface are trademarks
or registered trademarks of HDMI Licensing in the United States and other
countries.
© 2011 Gefen, LLC, All Rights Reserved
All trademarks are the property of their respective owners.
Rev A4
CONTENTS
1Introduction
2 Operation Notes
3Features
4 Top Panel Layout
5 Top Panel Descriptions
6 Side Panel Layout
7 Side Panel Descriptions
8 Connecting the HD Mini Pattern Signal Generator
8
Wiring Diagram
9 Operating the 4x1 HD Switcher w/ Audio Decoding
9
Powering the Signal Generator
10
Display Window
11
Pattern Buttons
13
Timing Buttons
14
Audio Button
15
Switching between PC, HD, and 3D signal types
16
Switching between Internal and External Mode
17
Accessing the Menu System
18 Menu System
18
System Info
19
Sink Edid
24
Source Infoframe
26
CEC Command
29
Audio Return
30
DeepColor Set
31
Max KSV Count
33 Supported Timings
34 Specifications
35 Warranty
INTRODUCTION
Congratulations on your purchase of the GefenTV HD Pattern Signal
Generator. Your complete satisfaction is very important to us.
About Gefen
We specialize in total integration for your home theater, while also focusing on
going above and beyond customer expectations to ensure you get the most from
your hardware. We invite you to explore our distinct product line. Please visit
http://www.gefen.com for the latest offerings in High-Definition signal solutions
or call us between the hours of 8:00 am and 5:00 pm Monday-Friday, Pacific
Standard Time for assistance with your A/V needs. We’ll be happy to assist you.
GefenTV
The GefenTV line offers portable and easy-to-install solutions for common A/V
system integration setups using HDMI connectivity. GefenTV products are wallmountable and small in size. GefenTV products are easily transported in the field
and are ready for immediate and simple installations in working environments.
The GefenTV HD Mini Pattern Signal Generator
The GefenTV HD Mini Pattern Signal Generator is the most advanced testing
device for your audio and video equipment. 19 built-in timings, 6 patterns, and 1
3D pattern provide hundreds of testing combinations for both analog and digital
devices. The front panel LCD screen provides easy viewing of functions and features for each timing / pattern. This device can be conveniently controlled via the
front panel buttons, the IR remote or the downloadable software from the Gefen
Web site. In addition to its portability, this signal generator is wall-mountable and
field-upgradeable.
How It Works
Connect the HDMI output port of the GefenTV HD Mini Pattern Signal Generator
to your HDTV display. Power-on all equipment. The front panel LCD will display
all features and options of the active timing and pattern. You can feed digital or
analog audio into the generator’s rear panel and hear multi-channel digital audio
or use the built-in sine wave test tone.
1
OPERATION NOTES
READ THESE NOTES BEFORE INSTALLING OR OPERATING
THE GEFENTV HD MINI PATTERN SIGNAL GENERATOR
•
Firmware updates for the GefenTV HD Mini Pattern Signal Generator can be
downloaded under the Support -> Downloads section of the Gefen Web site.
2
FEATURES
Features
•
Supports SD and HD resolutions up to 1080p Full HD
•
Supports VESA resolutions up to 1920x1200 (WUXGA) @ 60Hz
•
19 built-in timings
•
6 patterns and 1 3D pattern in three different formats
•
3D pattern support
•
HDCP pattern
•
Up to 12-bit Deep Color support at 1080 Full HD
•
Signal Generator bypass mode for analyzing an external source
•
Supports LPCM 7.1CH 48/96Khz, LPCM 5.1CH 48/96Khz and LPCM 2CH
48/96Khz
•
Analyzes input source info-frame and output sink EDID
•
Touch button control
•
OLED show Input / Output timing information
•
Supports ARC (Audio Return Channel) using TOSLINK output
•
Firmware upgradeable via 3.5mm plug (requires DB-9 to 3.5mm adapter)
Sample Applications
•
Apparatus Testing and Troubleshooting
•
Equipment Adjustment
•
EDID checking
•
Source / Sink definition
•
HDCP Verification
Package Includes
(1) GefenTV HD Mini Pattern Signal Generator (GTV-HD-MPSG)
(1) 5V / 1A DC Power Supply (EXT-PS51AIP-O)
(1) Quick-Start Guide (QSG-GTV-HD-MPSG)
3
TOP PANEL LAYOUT
3
1
4
2
5
6
10
7
8
9
Top Panel
4
TOP PANEL DESCRIPTIONS
Power
Press this button to turn the Signal Generator power ON or OFF. The Power
button will glow red when the Signal Generator is in Standby Mode. In Standby
Mode the unit consumes less than 1W of power.
2
Display window
The high-resolution OLED display shows pattern, timing, and audio information.
Additional information is displayed when using an external source. See page 10
for more information.
3
INT / EXT
Press this button to toggle between External and Internal modes. When
analyzing a sink device (e.g., HDTV display, A/V Receiver, etc), the Signal
Generator should be set to Internal (INT) mode. When the Signal Generator is
used with an external source, the Signal Generator should be set to External
(EXT) mode. This button will glow bright blue when set to External mode.
4
PC / HD / 3D
Press this button to toggle between PC (VESA) resolutions, HD resolutions, and
the 3D test pattern.
5
AUDIO
Pressing this button consecutively will cycle through the different audio output
◄
options.
See page 14 for details.
6
M/
Displays the Main Menu. See page 17 for more information.
7
TIMING ▼
Cycles backward through the list of timings.
8
PATTERN ▼
Cycles backward through the list of patterns.
9
TIMING ▲
Cycles forward through the list of timings.
┘
1
10 PATTERN ▲
Cycles forward through the list of patterns.
5
SIDE PANEL LAYOUT
Left Side
1
3
2
Right Side
5
4
6
6
SIDE PANEL DESCRIPTIONS
1
Service
This port is used for performing firmware updates. An RS-232 to 3.5 mm
adapter is required for the update process.
2
ARC Optical Out
Connect an optical cable from this TOSLINK connector to an audio amplifier.
This TOSLINK connector can only be used when using the Audio Return
Channel (ARC) feature in HDMI 1.4.
3
HDMI Out
Connect an HDTV display to this HDMI port. DVI displays can be connected
using an HDMI to DVI cable or adapter.
4
HDMI In
Used to connect a Hi-Def source to the Signal Generator using an HDMI
cable. DVI sources can be connected using an HDMI to DVI cable or adapter.
Connect a sound device to the HDMI In port to obtain infoframe and other
information from the source device.
5
DC 5V
Connect the included 5 V DC power supply to this connector
6
Service button
Used during the firmware update procedure.
7
CONNECTING THE HD MINI PATTERN SIGNAL GENERATOR
How to Connect the HD Mini Pattern Signal Generator
1. Connect an HDMI cable from the HD Mini Pattern Signal Generator to the
HDTV Display.
2. OPTIONAL: Connect an optical cable from the TOSLINK connector on the
Signal Generator to an audio amplifier.
NOTE: The TOSLINK™ audio output connector can only be used
when using the Audio Return Channel (ARC) feature in HDMI 1.4.
3. OPTIONAL: Use an HDMI cable to connect a Hi-Def source to the HDMI
In on the Signal Generator. See page 16 for more information on using an
input source.
4. Connect the included 5V DC power supply to the power receptacle on
the HD Mini Pattern Signal Generator and connect the AC adapter to an
available electrical outlet.
Wiring Diagram for the GefenToolbox HD Pattern Signal Generator
DIGITAL AUDIO (TOSLINK) CABLE
HDMI CABLE
®
Hi-Def Source
D
H
i
in
M
t
T
A
P
a
P
n
r
N
R
e
E
T
t
IM
T
G
ig
IN
S
l
a
n
r
e
n
e
G
a
o
t
t
r
al
Ou
t
tic
HD Mini Pattern Signal Generator
C
AR
I Ou
Op
M
HD
ice
rv
Se
HD Display
Audio Receiver
8
GTV-HD-MPSG
OPERATING THE HD MINI PATTERN SIGNAL GENERATOR
Powering the Signal Generator
Once the Signal Generator is connected to a power source, the Power button
will glow bright red. Press the Power button to power ON the Signal Generator.
When the Signal Generator is powered, the power button will glow bright blue.
Use the Power button to turn the Signal Generator ON or OFF.
NOTE: If the power cord is disconnected from the Signal Generator,
then the Signal Generator will automatically return to the last powered state (ON or OFF) when the power cord is reconnected.
Power button
Press to turn ON or turn OFF the
HD Mini Pattern Signal Generator.
Standby Mode
Power button is RED
(power must be connected)
9
Powered
Power button is BLUE
OPERATING THE HD MINI PATTERN SIGNAL GENERATOR
Display Window
The Display window of the GefenTV HD Mini Pattern Signal Generator uses a
high-resolution OLED display. This display will show the currently selected timing
and pattern on the output. In addition, this display is also used for providing
information or messages about an input source. When the unit is powered on, a
screen similar to the following will be displayed:
Audio Sampling Rate
Displays the current sampling
rate of the audio signal.
Audio Channels
Displays the number of audio
channels (see page 14).
Current Timing
Displays the currently
selected timing.
Horizontal Resolution
Displays the number of vertical
scanlines. Some timings will also
display the Vertical Resolution.
10
OPERATING THE HD MINI PATTERN SIGNAL GENERATOR
Pattern Buttons
To change the pattern, use the ▲ and ▼ Pattern buttons. The ▲ button will
move forward through the patterns. Use the ▼ button to move backward through
the patterns. The Signal Generator contains 6 test patterns and 1 3D pattern
with three different formats. The current timing is displayed in upper left-hand
corner of the OLED screen.
▲ button
Cycles forward through the
timings.
▼ button
Cycles backward through
the timings.
HDCP Pattern
If the output device does not
support HDCP content, then the
output device will not display a
signal.
Purity (Red)
This pattern is typically used to
check color purity.
720p @ 60Hz
Enable HDCP !!
720p @ 60Hz
11
OPERATING THE HD MINI PATTERN SIGNAL GENERATOR
Purity (Green)
This pattern is typically used to
check color purity.
Purity (Blue)
This pattern is typically used to
check color purity.
720p @ 60Hz
720p @ 60Hz
Color Bar
The Red, Green, Blue color bar
pattern is typically used to test for
color convergence.
Needle
This grey and black pattern is typically
used to test horizontal bandwidth and
phase behavior of color monitors.
720p @ 60Hz
720p @ 60Hz
Side-by-Side (3DSH)
Side-by-Side 3D Pattern.
720p @ 60Hz
720p @ 60Hz
Side-by-Side (Half)
Side-by-Side (Half)
Top-Bottom (3DTB)
Top-Bottom 3D Pattern.
Frame Packing (3DFP)
Frame-Packing 3D Pattern (not
shown)
12
720p @ 60Hz
Top-and-Bottom
720p @ 60Hz
Top-and-Bottom
OPERATING THE HD MINI PATTERN SIGNAL GENERATOR
Timing Buttons
To change the timing, use the ▲ and ▼ Timing buttons. The ▲ button will move
forward through the timings. Use the ▼ button will move backward through the
timings. See page 33 for a list of supported timings.
▲ button
Cycles forward through the
timings.
▼ button
Cycles backward through the
timings.
Selecting the 3D format
Use the Timing buttons to select the 3D-format when using the 3D testing
pattern.
The following 3D formats are available:
•
•
•
Pattern
Shown on display as:
Side-by-Side
Top-Bottom
Frame Packing
3DSH
3DTB
3DFP
NOTE: Because the HD Mini Pattern Signal Generator uses a touch
screen, each button will momentarily glow bright blue when it is
pressed.
13
OPERATING THE HD MINI PATTERN SIGNAL GENERATOR
Audio Button
Press the AUDIO button to cycle through the different audio output formats. Note
that audio is only output over HDMI. The TOSLINK connector is reserved for the
Audio Return Channel (ARC).
AUDIO
Press to cycle through the
audio output formats.
The table below lists the order in which each of the audio settings will appear
after each press of the AUDIO button. The audio frequency is always 1 kHz.
Sampling Rate
Number of Audio Channels
48 kHz
2 Channel
48 kHz
5.1 Channel
48 kHz
7.1 Channel
96 kHz
2 Channel
96 kHz
5.1 Channel
96 kHz
7.1 Channel
192 kHz
2 Channel
NOTE: The highlighted audio settings are only available when using
3D timings (3DFP, 3DSH, 3DTB).
14
OPERATING THE HD MINI PATTERN SIGNAL GENERATOR
Switching between PC, HD, and 3D signal types
Press the PC/HD/3D button to switch between PC (VESA), HD, and 3D signal
types.
PC/HD/3D button
Press to cycle through the
audio output formats.
192K
2CH
VGA@60
H640
192K
V480
2CH
480P@60
PC Signal
Displayed in VESA format along with the
refresh rate. PC signals also show both
the number of Horizontal and Vertical scan
lines.
HD Signal
Includes resolutions from 480i to 1080p.
The refresh rate is listed along with the
number of active vertical scan lines
(horizontal resolution).
H:720
192K
2CH
H:1280
3DFP
720P@60
3D Signal
Only 720p and 1080p signals provide
3D support on the Signal Generator.
See page 33 for a list of available 3D
transmission methods.
The 3D transmission format is abbreviated
in the lower-right of the display.
15
OPERATING THE HD MINI PATTERN SIGNAL GENERATOR
Switching between Internal and External Mode
By default, the Signal Generator will output a signal to a display or other output
device. Pressing the INT / EXT button will enable or disable the HDMI In
connector on the Signal Generator. Connecting an external source to the HDMI
In connector will provide information on attributes such as color space, color
depth, extended colorimetry, video and audio infoframe information, and KSV
count.
INT / EXT button
Press to toggle between Internal and
External Mode.
When the Signal Generator is in External
Mode, the INT / EXT button will glow bright
blue
External (EXT) Mode without source
The Signal Generator display indicates
that no source signal is being received.
External (EXT) Mode with source
The display shows the current resolution
and timing information of the source
device.
BYPASS
BYPASS
---@--
1080P@60
H: - - - -
H: 1920
16
OPERATING THE HD MINI PATTERN SIGNAL GENERATOR
Accessing the Menu System
┘
The HD Mini Pattern Signal Generator has a built-in on-screen Menu System
which provides access to additional functions during testing. Press the M / ◄
button to display the Main Menu.
┘
M /◄
Press this button to display
the built-in on-screen Menu
System.
NOTE: If an external source is being used, the Main Menu will appear in the foreground of the input signal. If no external source is
being used then the currently displayed pattern will be replaced by
a black background with the Main Menu in the foreground.
MAIN MENU
System Info.
Sink Edid
Source Infoframe
CEC Command
Audio Return
DeepColor Set
Max KSV Count
Exit
17
MENU SYSTEM
Menu System
System Info
Provides basic information about the sink and the source. If an external source
is connected to the Signal Generator, the Input Device Information will also be
displayed.
MAIN MENU
System Info.
Sink Edid
Source Infoframe
CEC Command
Audio Return
DeepColor Set
Max KSV Count
Exit
1.
Press the MENU button on the Signal Generator. The System Info option will
be highlighted.
2.
Press the MENU button to display the device information.
3.
Press the MENU button again to return to the Main Menu.
** Input Device Information **
Source Name : -------Video Signal : HDMI
Resolution
: 1080i @ 60Hz
Color Space : 8-bit
** Output Device Information **
Sink Name
: GEF300XUT
DeepColor Support: Y444=0
48bit=0 36bit=0 30bit=0
3D Format
: Not Support
GTV-HD-MPSG
FW: V1.0r
18
MENU SYSTEM
Sink Edid
Displays EDID information from the downstream device. Options: Block Data,
Description.
Sink Edid > Block Data
Displays the EDID block data in hexadecimal format.
MAIN MENU
System Info.
Sink Edid
>>
Block Data
Source Infoframe
Description
CEC Command
INT (GEF) *
Audio Return
EXT
DeepColor Set
Save to INT
Max KSV Count
Exit
Exit
1.
Press the MENU button on the Signal Generator.
2.
Use the ▲ and ▼ Pattern buttons to highlight the Sink Edid function, then
press the MENU button to access the Sink Edid submenu.
3.
Use the ▲ and ▼ Pattern buttons to select Block Data, then press
the MENU button to display Block 0.
4.
Use the ▲ and ▼ Pattern buttons to switch between Block 0 and Block 1.
5.
Press the MENU button to return to the Main Menu.
00
10
20
30
40
50
60
70
00
00
32
0F
01
45
52
4D
00
01
FF
13
50
01
00
0F
32
4C
02
FF
01
54
01
FD
00
33
49
03
FF
03
25
01
1E
0A
30
49
04
FF
80
CE
01
11
20
58
49
EDID
05 06
FF FF
33 1D
00 01
01 02
00 00
20 20
56 54
47 43
BLOCK
07 08
00 59
78 23
01 01
3A 80
1E 00
20 20
0A 20
41 30
CheckSum : 0x EA
0
09
3A
90
01
18
00
20
20
36
0A
65
85
01
71
00
00
20
35
0B
00
A3
01
38
FD
00
20
31
PASS!!
19
0C
00
58
01
2D
00
00
00
33
0D
00
53
01
40
38
FC
00
0A
0E
00
9F
01
58
4C
00
00
01
0F
00
26
01
2C
1F
56
FF
EA
<DOWN>
MENU SYSTEM
Sink Edid > Description
Displays a verbose description of the EDID data structure.
MAIN MENU
System Info.
Sink Edid
>>
Block Data
Source Infoframe
Description
CEC Command
INT (GEF) *
Audio Return
EXT
DeepColor Set
Save to INT
Max KSV Count
Exit
Exit
1.
Press the MENU button on the Signal Generator.
2.
Use the ▲ and ▼ Pattern buttons to highlight the Sink Edid function, then
press the MENU button to access the Sink Edid submenu..
3.
Use the ▲ and ▼ Pattern buttons to select Description, then press
the MENU button.
4.
Use the ▲ and ▼ Pattern buttons to scroll through each of the pages.
5.
Press the MENU button to return to the Main Menu.
ID Manufacturer Name
ID Product Code(Hex)
ID Serial Number(Hex)
Week of Manufacture
Year of Manufacture
EDID Version
EDID Revision
VESA DFP 1.x
MAX Horz Size
MAX Vert Size
Gamma value
:
:
:
:
:
:
:
:
:
:
:
GEF
0065
00000000
50
2009
1
3
Not Support
051cm
029cm
2.20
20
<PAGE 01>
MENU SYSTEM
Sink Edid > INT
Sets the Signal Generator to use the Internal EDID. The Manufacturer ID of
the EDID will be indicated next to the INT option (a Gefen EDID is shown in the
example, below). Use the Save to INT option to store an Internal EDID. See
page 23 for details. The active EDID (Internal or External) will be highlighted in
orange text.
MAIN MENU
System Info.
Sink Edid
>>
Block Data
Source Infoframe
Description
CEC Command
INT (GEF) *
Audio Return
EXT
DeepColor Set
Save to INT
Max KSV Count
Exit
Exit
1.
Press the MENU button on the Signal Generator.
2.
Use the ▲ and ▼ Pattern buttons to highlight the Sink Edid function, then
press the MENU button to access the Sink Edid submenu.
3.
Use the ▲ and ▼ Pattern buttons to select INT ([Manufacturer ID]), then
press the MENU button. An asterisk will appear next to the selection,
indicating that the Signal Generator will use the (stored) Internal EDID.
4.
Use the ▲ and ▼ Pattern buttons to scroll down to the Exit option, then
press the MENU button to return to the Main Menu.
21
MENU SYSTEM
Sink Edid > EXT
Sets the Signal Generator to use the External EDID. The active EDID (Internal
or External) will be highlighted in orange text. The External EDID is equivalent to
the downstream (pass-through) mode.
MAIN MENU
System Info.
Sink Edid
>>
Block Data
Source Infoframe
Description
CEC Command
INT (GEF)
Audio Return
EXT
DeepColor Set
Save to INT
Max KSV Count
Exit
*
Exit
1.
Press the MENU button on the Signal Generator.
2.
Use the ▲ and ▼ Pattern buttons to highlight the Sink Edid function, then
press the MENU button to access the Sink Edid submenu.
3.
Use the ▲ and ▼ Pattern buttons to select EXT, then press the MENU
button. An asterisk will appear next to the selection, indicating that the
Signal Generator will use the External EDID.
4.
Use the ▲ and ▼ Pattern buttons to scroll down to the Exit option, then
press the MENU button to return to the Main Menu.
22
MENU SYSTEM
Sink Edid > Save to INT
Saves the downstream EDID to the Signal Generator. The Manufacturer ID of
the EDID will be indicated next to the INT option (a Gefen EDID is shown in the
example, below).
MAIN MENU
System Info.
Sink Edid
>>
Block Data
Source Infoframe
Description
CEC Command
INT (GEF)
Audio Return
EXT
DeepColor Set
Save to INT
Max KSV Count
Exit
*
Exit
1.
Press the MENU button on the Signal Generator.
2.
Use the ▲ and ▼ Pattern buttons to highlight the Sink Edid function, then
press the MENU button to access the Sink Edid submenu.
3.
Use the ▲ and ▼ Pattern buttons to select Save to INT. The source EDID
will be saved to the Signal Generator.
4.
Use the ▲ and ▼ Pattern buttons to scroll down to the Exit option, then
press the MENU button to return to the Main Menu.
23
MENU SYSTEM
Source Infoframe
Displays information on the transmission of Infoframe packets. Options: AVI,
AUD
Source Infoframe > AVI
Displays information about the AVI (Video) Infoframe packet.
MAIN MENU
System Info.
Sink Edid
Source Infoframe >>
AVI
CEC Command
AUD
Audio Return
Exit
DeepColor Set
Max KSV Count
Exit
1.
Press the MENU button on the Signal Generator.
2.
Use the ▲ and ▼ Pattern buttons to highlight the Source Infoframe function,
then press the MENU button to access the Source Infoframe submenu.
3.
Use the ▲ and ▼ Pattern buttons to select AVI, then press
the MENU button.
4.
Use the ▲ and ▼ Pattern buttons to scroll through each of the pages.
5.
Press the MENU button to return to the Main Menu.
AVI InfoFrame Packet
DataByte(HEX) : 82 02 0D 1C
InfoFrame Type Code
InfoFrame Version Number
Length of AVI InfoFrame
CheckSum
Video Code
Pixel Repetition
RGB or YCbCr
Active Format Information
Bar Info
Scan Information
A8 00 05 00 0F 00 2A 02 18 01 97 08
: 02h
: 02h
: 0Dh
: B3h
: [5] 1920x1080i @ 59.94/60Hz
: No Repetition
: RGB
: Active Format(R0...R3)
: Vert. and Horiz.
: No Data
<DOWN>
24
MENU SYSTEM
Source Infoframe > AUD
Displays information about the Audio Infoframe packet.
MAIN MENU
System Info.
Sink Edid
Source Infoframe >>
AVI
CEC Command
AUD
Audio Return
Exit
DeepColor Set
Max KSV Count
Exit
1.
Press the MENU button on the Signal Generator.
2.
Use the ▲ and ▼ Pattern buttons to highlight the Source Infoframe function,
then press the MENU button to access the Source Infoframe submenu.
3.
Use the ▲ and ▼ Pattern buttons to select AUD, then press
the MENU button.
4.
Use the ▲ and ▼ Pattern buttons to scroll through each of the pages.
5.
Press the MENU button to return to the Main Menu.
AUD InfoFrame Packet
DataByte(HEX) : 84 01 0A 01 00 00 00 00 00 00
InfoFrame Type Code
: 04h
InfoFrame Version Number
: 01h
Length of AUD InfoFrame
: 0Ah
CheckSum
: 70h
Analog Coding Type
: Refer to Stream
Audio Channel Count
: 2 channel
Sampling Frequency
: Refer to Stream
Sample Size
: Refer to Stream
Speaker Placement
: FL FR
Level Shift Value
: 0dB
25
00 00 00
Header
Header
Header
<DOWN>
MENU SYSTEM
CEC Command
Sends a CEC command to the downstream device. There are three CEC
commands that can be transmitted: Standby, Active Source, Monitor.
CEC Commands > Standby
Command Type: Request. Issues a System Standby message which places all
connected devices in Standby Mode.
MAIN MENU
System Info.
Sink Edid
Standby
Source Infoframe
CEC Command
>>
Active Source
Audio Return
Monitor(Read)
DeepColor Set
Exit
Max KSV Count
Exit
1.
Press the MENU button on the Signal Generator.
2.
Use the ▲ and ▼ Pattern buttons to highlight the CEC Command function,
then press the MENU button to access the CEC Command submenu.
3.
Use the ▲ and ▼ Pattern buttons to select Standby, then press
the MENU button.
4.
The Signal Generator will send a Standby request message to all devices
connected to the sink. All connected devices will be placed in standby
mode.
26
MENU SYSTEM
CEC Commands > Active Source
Command Type: Request. This command switches to the (next) active source.
If the next active source is not connected or not powered, then the display will
appear blank.
MAIN MENU
System Info.
Sink Edid
Standby
Source Infoframe
CEC Command
>>
Active Source
Audio Return
Monitor(Read)
DeepColor Set
Exit
Max KSV Count
Exit
1.
Press the MENU button on the Signal Generator.
2.
Use the ▲ and ▼ Pattern buttons to highlight the CEC Command function,
then press the MENU button to access the CEC Command submenu.
3.
Use the ▲ and ▼ Pattern buttons to select Active Source, then press
the MENU button.
4.
The Signal Generator will send an Active Source request message to the
downstream sink. The Active Source request will switch away from the
current input to the next active input on the sink.
27
MENU SYSTEM
CEC Commands > Monitor(Read)
Command Type: Informative. Displays the traffic on the CEC line from the
monitor / display.
MAIN MENU
System Info.
Sink Edid
Standby
Source Infoframe
CEC Command
>>
Active Source
Audio Return
Monitor(Read)
DeepColor Set
Exit
Max KSV Count
Exit
1.
Press the MENU button on the Signal Generator.
2.
Use the ▲ and ▼ Pattern buttons to highlight the CEC Command function,
then press the MENU button to access the CEC Command submenu.
3.
Use the ▲ and ▼ Pattern buttons to select Monitor(Read), then press
the MENU button.
4.
The Signal Generator will send a Monitor Read information request to the
downstream sink. Any CEC messages sent to the downstream sink, by
other source devices, will be displayed on the screen.
28
MENU SYSTEM
Audio Return
The Audio Return option enables / disables the Audio Return Channel (ARC).
When ARC is enabled, the audio is returned from the downstream device. The
audio signal is carried over an HDMI 1.4 cable from the downstream device to
the Signal Generator and outputted via the TOSLINK connector.
Audio Return > ON
Enables the Audio Return Channel (ARC)
Audio Return > OFF
Disables the Audio Return Channel (ARC)
The active ARC status will be highlighted in orange text.
MAIN MENU
System Info.
Sink Edid
Source Infoframe
ON
CEC Command
Audio Return
DeepColor Set
>>
OFF
Exit
Max KSV Count
Exit
1.
Press the MENU button on the Signal Generator.
2.
Use the ▲ and ▼ Pattern buttons to highlight the Audio Return function.,
then press the MENU button to access the Audio Return submenu.
3.
Use the ▲ and ▼ Pattern buttons to select ON, to enable the Audio Return
Channel (ARC).
4.
Select OFF to disable the Audio Return Channel (ARC).
29
MENU SYSTEM
DeepColor Set
Sets the bit depth for Deep Color.
DeepColor Set > 8bit
Sets the output signal to 8-bit Deep Color
DeepColor Set > 10bit
Sets the output signal to 10-bit Deep Color
DeepColor Set > 12bit
Sets the output signal to 12-bit Deep Color
The active color depth will be highlighted in orange text.
MAIN MENU
System Info.
Sink Edid
Source Infoframe
8bit
CEC Command
10bit
Audio Return
12bit
DeepColor Set
>>
Exit
Max KSV Count
Exit
1.
Press the MENU button on the Signal Generator.
2.
Use the ▲ and ▼ Pattern buttons to highlight the DeepColor Set function,
then press the MENU button to access the DeepColor Set submenu.
3.
Use the ▲ and ▼ Pattern buttons to highlight either 8-bit, 10-bit, or 12-bit
Deep Color output settings.
4.
Press the MENU button to select the desired bit depth.
30
MENU SYSTEM
Max KSV Count
Returns the KSV count of the source device.
MAIN MENU
System Info.
Sink Edid
Source Infoframe
CEC Command
Audio Return
DeepColor Set
Max KSV Count
Exit
1.
Connect an external source device to the HDMI In on the Signal Generator.
2.
Press the INT/EXT button to turn on External mode.
3.
Press the MENU button on the Signal Generator.
4.
Use the ▲ and ▼ Pattern buttons to highlight the Max KSV Count function.
5.
Press MENU button to begin the KSV count process.
The KSV count process may take several minutes to complete. During the
KSV count process, a progress bar indicates that the Signal Generator is
still processing the KSV count request.
The INT/EXT button glows
blue when set to External
mode.
Start to find...
KSV : 14
-------
31
MENU SYSTEM
5.
After the Max KSV Count process has completed, the Signal Generator will
display a message similar to the following:
Start to find...
KSV : 16
-- COMPLETED --
It is important to note that not all devices will report a KSV count. In this
case, the Signal Generator will not perform a KSV count.
NOTE: When running the Max KSV Count, the source signal will
occasionally “blank out”. This is normal behavior.
32
SUPPORTED TIMINGS
Table of Supported Timings
The table below lists the supported timings available in the HD Mini Pattern
Signal Generator.
Timing Name
Resolution
3D Transmission Method
VGA @ 60
640 x 480
---
SVGA @ 60
800 x 600
---
XGA @ 60
1024 x 768
---
SXGA @ 60
1280 x 1024
---
WUXGA
1920 x 1200
---
480I @ 60
720 x 480i
---
480P @ 60
720 x 480p
---
576I @ 50
720 x 576i
---
576P @ 50
720 x 576p
---
720P @ 50
1280 x 720p
---
720P @ 50
1280 x 720p
3DFP (Frame Packing)
720P @ 50
1280 x 720p
3DSH (Side-by-Side)
720P @ 50
1280 x 720p
3DTB (Top-Bottom)
720P @ 60
1280 x 720p
---
720P @ 60
1280 x 720p
3DFP (Frame Packing)
720P @ 60
1280 x 720p
3DSH (Side-by-Side)
720P @ 60
1280 x 720p
3DTB (Top-Bottom)
1080I @ 50
1920 x 1080i
---
1080I @ 60
1920 x 1080i
---
1080P @ 50
1920 x 1080p
---
1080P @ 60
1920 x 1080p
---
1080P @ 24
1920 x 1080p
---
1080P @ 24
1920 x 1080p
3DFP (Frame Packing)
1080P @ 24
1920 x 1080p
3DSH (Side-by-Side)
1080P @ 24
1920 x 1080p
3DTB (Top-Bottom)
33
SPECIFICATIONS
Maximum Pixel Clock............................................................................... 225 MHz
Video Input Connector......................................... (1) HDMI Type-A, 19-pin, female
Video Output Connector...................................... (1) HDMI Type-A, 19-pin, female
Audio Output....................................................................................... (1) TOSLINK
Service Port.................................... (1) 3.5 mm mini-stereo (for firmware upgrade)
Display.......................................................... OLED (Organic Light Emitting Diode)
Power Supply................................................................................................ 5V DC
Power Consumption............................................................................... 3W (max.)
Operating Temperature............................................................................ 0° - 40° C
Dimensions (W x H x D).......................................................... 4.70” x 0.98” x 2.76”
(119mm x 22mm x 70mm)
Shipping Weight................................................................................1.0 lb. (0.5 kg)
34
WARRANTY
Gefen warrants the equipment it manufactures to be free from defects in material
and workmanship.
If equipment fails because of such defects and Gefen is notified within two (2)
years from the date of shipment, Gefen will, at its option, repair or replace the
equipment, provided that the equipment has not been subjected to mechanical,
electrical, or other abuse or modifications. Equipment that fails under conditions
other than those covered will be repaired at the current price of parts and labor in
effect at the time of repair. Such repairs are warranted for ninety (90) days from
the day of reshipment to the Buyer.
This warranty is in lieu of all other warranties expressed or implied, including
without limitation, any implied warranty or merchantability or fitness for any
particular purpose, all of which are expressly disclaimed.
1. Proof of sale may be required in order to claim warranty.
2. Customers outside the US are responsible for shipping charges to and from
Gefen.
3. Copper cables are limited to a 30 day warranty and cables must be in their
original condition.
The information in this manual has been carefully checked and is believed to
be accurate. However, Gefen assumes no responsibility for any inaccuracies
that may be contained in this manual. In no event will Gefen be liable for
direct, indirect, special, incidental, or consequential damages resulting from
any defect or omission in this manual, even if advised of the possibility of such
damages. The technical information contained herein regarding the features and
specifications is subject to change without notice.
For the latest warranty coverage information, refer to the Warranty and Return
Policy under the Support section of the Gefen Web site at www.gefen.com.
PRODUCT REGISTRATION
Please register your product online by visiting the Register Product page
under the Support section of the Gefen Web site.
35
Rev A4
20600 Nordhoff St., Chatsworth CA 91311
1-800-545-6900
818-772-9100
www.gefentv.com
Pb
This product uses UL or CE listed power supplies.
fax: 818-772-9120
[email protected]