1
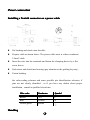
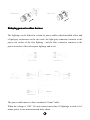
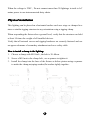
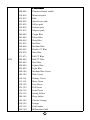
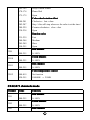
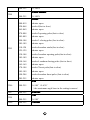
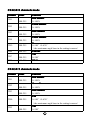
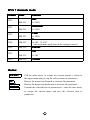
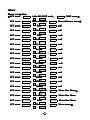
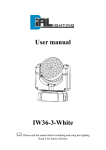
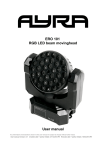
LED Moving head
User manual
LM-2013
� Please read the manual before installing and using this lighting
Keep it for future reference
Contents
Introduction............................................................................................. 2
Overview and Dimensions...................................................................... 3
Safety information................................................................................... 4
Power connection.................................................................................... 5
DMX protocol......................................................................................... 7
Button.................................................................................................... 13
Menu......................................................................................................14
Technical parameters............................................................................. 19
1
Introduction
Thank you for using our products!
LM-2013 is a very small and light LED Moving head light, its weight is only 3.6
kg. Its beam is very narrow and very bright . It runs extremely fast. It is suitable
for bar, disco, stage , decoration ,etc .
This product complies with the following standards:
IEC60598-1:2003
IEC60598-2-17:1984+A2:1990
Main features
36 Pcs high-power 3W CREE XP-E LED
Excellent mixed color system
Dimmer very smooth
Tight, punchy beam
compact,silent design
Speedly
Blue LCD display
Standar DMX-512 communication protocol
Easy for power connection
2
Overview and Dimension
imensionss
All dimensions are in millimeters
3
Safety information
important
Every person involved with the installation , operation and maintenance of this
device has to be qualified and follow the instructions of this manual .
Manufacturer will not with responsibility for those operation not according to this
Instruction
�
Verify that the voltage matches the rated voltage.
�
When the voltage is 110V , Do not connect more than 10 lightings in total to
AC mains power in one interconnected daisy chain
�
When the voltage is 220V , Do not connect more than 20 lightings in total to
AC mains power in one interconnected daisy chain
�
Before using the fixture, check that all power distribution equipment and
cables are in perfect condition and rated for the current requirements of all
connected devices.
�
Always ground (earth) the fixture electrically .
�
Avoiding hit the Light when you are move or install the light .
�
The minimum distance between light-output and the illuminated surface
must be more than 0.5 meters. Keep all combustible materials (for example
fabric, wood, paper) at least 0.2 meters away from the fixture .
�
Do not expose the fixture to rain or moisture.
�
Avoid looking directly into the light source (especially those who suffer from
epileptic fits)
�
Maximum ambient temperature (Ta) is 40°C. Do not operate fixture at
temperatures higher than this .
�
The Maximum surface temperature is 50°C
�
When suspending the fixture above ground level, verify that the structure can
hold at least 10 times the weight of all installed devices.
�
Verify that all external covers and rigging hardware are securely fastened and
use an approved means of secondary attachment such as a safety cable.
4
Power connection
Installing a Neutrik connector on a power cable
�
Put bushing and chuck onto thecable.
�
Prepare cable as shown above. The power cable must is a three-conductor
2.5mm2 cable.
�
Insert the wire into the terminals and fasten the clamping device by a flat
screw driver.
�
Push insert and chuck into housing (pay attention to the guiding keyway.)
�
Fasten bushing.
the color-coding schemes and some possible pin identification schemes; if
pins are not clearly identified , or if you have any doubts about proper
installation , consult a qualified electrician
Wire color
Conductor
Symbol
Brown
Live
L
Blue
Neutral
N
Yellow/green
ground
Handling
5
Relaying power to other devices
The lightings can be linked in a chain by power cables which installed a blue and
a light-gray connectors on the two ends. the light-gray connector connects to the
power out socket of the first lighting , and the blue connector connects to the
power in socket of the subsequent lighting, and so on.
The power cable must is a three-conductor 2.5mm2 cable.
When the voltage is 110V , Do not connect more than 10 lightings in total to AC
mains power in one interconnected daisy chain.
6
When the voltage is 220V , Do not connect more than 20 lightings in total to AC
mains power in one interconnected daisy chain .
Physical installation
This lighting can be placed on a horizontal surface such as a stage or clamped to a
truss or similar rigging structure in any orientation using a rigging clamp.
When suspending the fixture above ground level, verify that the structure can hold
at least 10 times the weight of all installed devices.
Verify that all external covers and rigging hardware are securely fastened and use
an approved means of secondary attachment such as a safety cable.
How to install a clamp to the lighting:
1. Choose a clamp with M10 bolt , the bolt is 30~40cm.
2. Screw a M10 nut to the clamp bolt , use a spanner to tighten it.
3. Install the clamp into the base of the fixture as below picture.using a spanner
to make the clamp,nut,sping washer,flat washer tightly together .
7
DMX protocol
This lighting has five Channels modes , including:
HSV Mode
7
Channels Mode
STAGE Mode
12 Channels Mode
9 Channels Mode
8 Channels Mode
5 Channels Mode
The default mode is STAGE 12 Channels Mode. If you want to alter it, enter
DMX menu .
STAGE 12 channels mode
Channel
Value
Function
strobe
CH1
000-019
shutter open
020-064
strobe1(fast to slow)
065-069
shutter open
070-084
strobe2:opening pulse(fast to slow)
085-089
shutter open
090-104
strobe3: closing pulse (fast to slow)
105-109
shutter open
110-124
strobe4:random strobe(fast to slow)
125-129
shutter open
130-144
strobe5:random opening pulse(fast to slow)
145-149
shutter open
150-164
strobe6: random closing pulse (fast to slow)
165-169
shutter open
8
CH2
170-184
strobe7:burst pulse(fast to slow)
185-189
shutter open
190-204
strobe8:random burst pulse (fast to slow)
205-255
shutter open
Gobal dimmer
000-255
0~100%
Pan
CH3:
000-255
0~540°/0~630°
(the maximum angle base in the setting in menu)
CH4
CH5:
CH6:
000-255
Pan fine
Tilt
000-255
0~240°
000-255
Tilt fine
Fixture control settings
CH7
000-009
No function
010-014
Reset (hold for 8s)
015-039
No function
040-044
Normal motor speed
045-049
Maximum motor speed
050-054
Minimum motor speed
055-059
No function
060-064
Max. cooling fan speed
065-069
No function
070-074
Cooling fan speed trermostatically regulated
075-109
No function
110-114
Fast dimmer
115-119
No function
120-124
Smooth dimer
125-249
No function
250-255
Illuminate display
9
CH8
000-009
010-014
015-019
020-024
025-029
030-034
035-039
040-044
045-049
050-054
055-059
060-064
065-069
070-074
075-079
080-084
085-089
090-094
095-099
100-104
105-109
110-114
115-119
120-124
125-129
130-134
135-139
140-144
145-149
150-154
155-159
160-164
Color wheel
Dimmer channel enable
Moroccan pink
Pink
Special rose pink
Follies pink
Fuchsia pink
Surprise pink
Congo Blue
Tokyo Blue
Deep Blue
Just Blue
Medium Blue
Double CT Blue
Slate Blue
Full CT Blue
Half CT Blue
Steel Blue
Lighter Blue
Light Blue
Medium Blue Green
Dark Green
Primary Green
Moss Green
Fern Green
JAS Green
Lime Green
Spring Yellow
Deep Amber
Chrome Orange
Orange
Gold Amber
Millennium Gold
10
165-169
170-174
175-179
180-201
202-207
208-229
230-234
235-239
240-244
245-249
250-255
CH9
CH10
CH11
Deep Golden Amber
Flame Red
Open
Color wheel rotation effect
Clockwise,fast→slow
Stop(this will stop wherever the color is at the time)
Counter-clockwise,slow→fast
Open
Random color
Fast
Medium
Slow
Open
Red dimmer
000-255
0~100%
Green dimmer
000-255
0~100%
Blue dimmer
000-255
0~100%
Color temperature control
CH12
000-019
No function
020-255
100000K → 2500K
STAGE 9 channels mode
Channel
CH1
CH2
CH3
Value
Function
Red dimmer
000-255
0~100%
Green dimmer
000-255
0~100%
Blue dimmer
11
000-255
CH4
0~100%
Gobal dimmer
000-255
0~100%
strobe
CH5
000-019
shutter open
020-064
strobe1(fast to slow)
065-069
shutter open
070-084
strobe2:opening pulse(fast to slow)
085-089
shutter open
090-104
strobe3: closing pulse (fast to slow)
105-109
shutter open
110-124
strobe4:random strobe(fast to slow)
125-129
shutter open
130-144
strobe5:random opening pulse(fast to slow)
145-149
shutter open
150-164
strobe6: random closing pulse (fast to slow)
165-169
shutter open
170-184
strobe7:burst pulse(fast to slow)
185-189
shutter open
190-204
strobe8:random burst pulse (fast to slow)
205-255
shutter open
Pan
CH6:
000-255
0~540°/0~630°
(the maximum angle base in the setting in menu)
CH7
CH8
CH9:
000-255
Pan fine
Tilt
000-255
0~240°
000-255
Tilt fine
12
STAGE 8 channels mode
Channel
CH1
CH2
CH3
Value
Function
000-255
Red dimmer
0~100%
000-255
Green dimmer
0~100%
000-255
Blue dimmer
0~100%
CH5:
000-255
CH6
000-255
Gobal dimmer
0~100%
Pan
0~540°/0~630°
(the maximum angle base in the setting in menu)
Pan fine
000-255
Tilt
0~240°
000-255
Tilt fine
CH4
CH7
CH8:
000-255
STAGE 5 channels mode
Channel
CH1
CH2
CH3
CH4:
CH5
Value
Function
000-255
Red dimmer
0~100%
000-255
Green dimmer
0~100%
000-255
Blue dimmer
0~100%
000-255
000-255
Pan
0~540°/0~630°
(the maximum angle base in the setting in menu)
Tilt
0~240°
13
HVS 7 channels mode
Channel
CH1
CH2
CH3
Value
Hue
000-255
000-255
0~100%
Value
000-255
000-255
CH5
000-255
CH7:
0~100%
Saturation
CH4:
CH6
Function
0~100%
Pan
0~540°/0~630°
(the maximum angle base in the setting in menu)
Pan fine
Tilt
000-255
0~240°
000-255
Tilt fine
Button
/ESC
:
SET
SET/ESC
/ESC:
:
UP
UP:
:
DOWN
DOWN:
:
ENTER
ENTER:
Call the main menu, or escape the current menu(i.e. return to
the upper menu and give up the selected item or parameter) .
Browse the menu item forward or increase the parameter .
Browse the menu item backward or decrease the parameter .
Confirm the selected item or parameter(i.e. enter the next menu,
or escape the current menu and save the selected item or
parameter)
14
Menu
Menu navigation
SET menu
DMX menu
①SET
menu← SET/ESC—Addr:001(DMX mode
mode)─ENTER →DMX
menu②
UP↑↓DOWN
Manualdimmer menu
SET menu
menu← SET/ESC—ManualDimmer—ENTER →Manualdimmer
menu③
UP↑↓DOWN
SET menu
menu← SET/ESC—
null
—ENTER →null
Red
UP↑↓DOWN
SET menu
menu← SET/ESC—
null
─ENTER →null
Green
UP↑↓DOWN
SET menu
menu← SET/ESC—
null
─ENTER →null
Blue
UP↑↓DOWN
SET menu
menu← SET/ESC—
null
─ENTER →null
Yellow
UP↑↓DOWN
SET menu
menu← SET/ESC—
null
─ENTER →null
Cyan
UP↑↓DOWN
SET menu
menu← SET/ESC—
null
─ENTER →null
Purple
UP↑↓DOWN
SET menu
menu← SET/ESC— PureWhite
null
─ENTER →null
UP↑↓DOWN
SET menu
menu← SET/ESC—
null
─ENTER →null
Amber
UP↑↓DOWN
SET menu
menu← SET/ESC—
null
─ENTER →null
AllWhite
UP↑↓DOWN
SET menu
menu← SET/ESC—
nul
null
─ENTER →nul
3200K
UP↑↓DOWN
SET menu
menu← SET/ESC—
null
─ENTER →null
5600K
UP↑↓DOWN
SET menu
menu← SET/ESC—
null
─ENTER →null
6500K
UP↑↓DOWN
SET menu
menu← SET/ESC—
null
─ENTER →null
8500K
UP↑↓DOWN
SET menu
menu← SET/ESC—
null
─ENTER →null
10000K
UP↑↓DOWN
SET menu
menu← SET/ESC—
ChangColor ─ENTER →Motor
Motor Run Menu
Menu④
UP↑↓DOWN
SET menu
menu← SET/ESC—
Twinkling
Motor Run Menu
─ENTER →Motor
UP↑↓DOWN
SET menu
menu← SET/ESC—
Motor Run Menu
─ENTER →Motor
Fade
UP↑↓DOWN
SET menu
menu← SET/ESC—
Macro menu
─ENTER →Macro
menu⑤
Macro
UP↑↓DOWN
15
SET menu
①SET
SET Menu:
├Reset Machine
│ ├Reset:ON
;Reset the machine
│ └Reset:OFF
;Do not reset the machine(default)
├Load Parameter
│ ├Load ON
;Restore factory settings
│ └Load OFF
;Do not restor factory settiings(default)
├Master / Alone
│ ├Master Mode
│ └Alone Mode
;(default)
├Auto / Sound
│ ├Auto Mode
│ └Sound Mode
├MIC Sense:00~99%
;(default:20)
├TC Switch
;Temperature control,it will reduce the output
│ ├TC Switch Mask
afeter over temperature
│ │ ├Switch ON
;Enable the switch(default)
│ │ └Switch OFF
;Disable the switch
│ └TC Switch Temp
(password protected)
│
├TC Temp Cap
;Capture the current temperature
│
└TC Temp Set
;Set the value of the TC switch
├Scan Setting
│ ├Reverse Pan
│ │ ├Reverse Pan :ON
│ │ └Reverse Pan :OFF
;(default)
│ ├Reverse Tilt
│ │ ├Reverse Tilt:ON
16
│ │ └Reverse Tilt:OFF
;(default)
│ ├Pan Degree
;Set the max angle rage of the Pan
│ │ ├Pan Degree:630
│ │ └Pan Degree:540
;(default)
│ ├Scan BlackOut
│ │ ├ScanBlackOut:ON
;Black out while the motor runs
│ │ └ScanBlackOut:OFF
;(default)
│ └Feed Back
│
├Feed Back:ON
;Enable pan/tilt position feedback;(default)
│
└Feed Back:OFF
;Disable the feedback
├Dimmer Curve
│ ├Square Law
;(default)
│ ├Inv Square Law
│ └S-Vurve
├Dimmer Speed
│ ├Dimmer: Smooth
;(default)
│ └Dimmer: Fast
├Dmx Reset
│ ├Enabled
;Enable reset via DMX;(default)
│ ├Disabled
;Disable reset via DMX
├Fan
;Fan speed
│ ├Regulated
;Thermostatically regulated(default)
│ └Full
;Max. cooling fan speed
└Information
├Time:tt/mm/ss
├Date:mm/dd/yy
└Use Time :hour: minute
17
DMX menu
②DMX
DMX Menu:
;DMX mode
├DMX Address: 001
;Set DMX address
├No DMX Signal
;Run if there is no DMX signal
│ ├Stop Run
;(default)
│ ├Hold Run
│ ├Auto Run
│ └Sound Run
└DMX Channels
├HSV Mode
└STAGE Mode
├12 Channels
├9
Channels
├8
Channels
└5
Channels
;(default)
Macro menu
③Macro
Macro Menu:
;Programable auto program
├Motor Run
;Motor automatically run or not
│ ├Auto Run:OFF
;Motor do not run
│ └Auto Run:ON
;Motor automatically run
├Step Quantity:3
;0~62 steps(default:3)
├Program Step 01
;Select one built-in program for the 1st step of
│ ├ChangeColor
the macro
│ ├Twinkling
│ └Fade
│.......
└Program Step 62
18
Motor Run Menu
④Motor
Motor Run Menu
└Motor Run
;Motor automatically run or not
├Auto Run:OFF
;Motor do not run
└Auto Run:ON
;Motor automatically run
ManualDimmer menu
⑤ManualDimmer
ManualDimmer:
├Light Switch
│ ├Light ON
;(default)
│ └Light OFF
├Light Red:255
;Red dimmer 0~255(default :255)
├Light Green:255
;Green dimmer 0~255 (default :255)
├Light Blue:255
;Blue dimmer 0~255 (default :255)
├Light Strobe:000
;Blue dimmer 0~255 (default :0)
├Scan Pan:0
;(default:0)
├Scan Tilt:0
;(default:0)
├Scan PanFine:000
;(default:0)
├ScanTiltFine:000
;(default:0)
└Light Calibrate
├Cal Pan:-128~+127
;Pan calibration(default:0)
└Cal Tilt:-128~+127
;Tilt calibration(default:0)
19
Technical parameters
Rated voltage:100~240V
Rated frequency:50/60Hz
Power:120W
LED:3W CREE XP-E
LED lifespan:about 50,000hours
LED quantity:12R+12G+12B
Color mixing: R:0~255,G:0~255 ,B:0~255
Effect: strobe, fade , color wheel
Beam angle:8°
Rotation Angle:Pan 540°/630°,Tlit 240°,self-correcting
Channel quantity:5,7,8,9,12
Control mode:DMX512,Master/slave,Sound actived
Protection grade:IP20
Working environment: indoor
Environment temperature:-30~+40℃
Size:L242*W130*H289mm
Weight:3.6kg
20