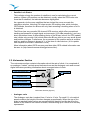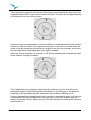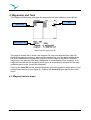
1
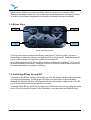
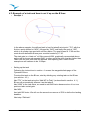
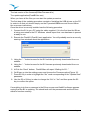
B1nav User manual
Document version 1.1
2009 FLYMASTER Avionics Ltd.
R. Comendador Rainho, 192 - Apartado 118
3701-910 S. João da Madeira
Portugal
Tel: + 351 256 880 568
Fax: + 351 256 880 551
All rights reserved. Except as expressly provided herein, no part of this manual may be
reproduced, copied, transmitted, disseminated, downloaded or stored in any storage
medium, for any purpose without the express prior written consent of FLYMASTER
Avionics Lda. herein FLYMASTER avionics. FLYMASTER Avionics hereby grants
permission to download a copy of this manual onto a hard drive or other electronic storage
medium to be viewed and to print a copy of this manual or of any revision hereto, provided
that such electronic or printed copy of this manual must contain the complete text of this
copyright notice and provided further that any unauthorized commercial distribution of this
manual or any revision hereto is strictly prohibited.
Information in this document is subject to change without notice. FLYMASTER Avionics
reserves the right to change or improve its products and to make changes in the content
without obligation to notify any person or organization of such changes or improvements.
Visit the FLYMASTER Avionics website (www.flymaster-avionics.com) for current updates
and supplemental information concerning the use and operation of this and other
FLYMASTER Avionics products.
Document version: 1.1
Page 2
Warning
It is the sole responsibility of the pilot to operate the aircraft in a safe manner, maintain full
surveillance of all flying conditions at all times, and not become distracted by the Flymaster
B1nav. Flymaster Avionics is not responsible for any damages resulting from incorrect or
no data provided by the Flymaster B1nav. Flight safety is the sole responsibility of the pilot.
It is unsafe to operate the Flymaster B1nav while in the air. Failure by the pilot equipped
with a Flymaster B1nav to pay full attention to the aircraft and flying conditions while flying
could result in accident with property damage and/or personal injury.
Document version: 1.1
Page 3
Table of Contents
1.Introduction........................................................................................................................ 5
1.1.Getting started........................................................................................................................ 5
1.2.B1nav Keys.............................................................................................................................6
1.3.Switching B1Nav On and Off...................................................................................................6
2.The Flight Mode Screen.....................................................................................................7
2.1.Status indicators Section.........................................................................................................7
Battery Level Indicator..........................................................................................................8
Sound Level Indicator...........................................................................................................8
Satellite Lock Status............................................................................................................. 9
2.2.Variometer Section..................................................................................................................9
Analogue vario..................................................................................................................... 9
Integrated vario.................................................................................................................. 10
Maximum and Minimum Integrated vario............................................................................10
Gain in thermal................................................................................................................... 10
2.3.Time Section......................................................................................................................... 10
2.4.Altimeter and Speed Section................................................................................................. 11
2.5.User Defined Data Section.................................................................................................... 11
2.6.Navigation Section................................................................................................................ 12
3.Menu mode...................................................................................................................... 14
Task Delay..........................................................................................................................15
4.Waypoints and Task......................................................................................................... 16
4.1.Waypoint action menu...........................................................................................................16
4.2.Edit task(route)......................................................................................................................17
Edit route point................................................................................................................... 19
Move Route Point............................................................................................................... 20
Remove Route Point.......................................................................................................... 20
Delete Route...................................................................................................................... 20
5.GPS status....................................................................................................................... 21
6.Settings menu.................................................................................................................. 22
6.1.Set Altimeter..........................................................................................................................22
6.2.Timing................................................................................................................................... 23
Vario Integrator................................................................................................................... 23
Track interval...................................................................................................................... 23
6.3.Date/Time..............................................................................................................................23
6.4.Vario Acoustics......................................................................................................................23
6.5.Advanced Features............................................................................................................... 24
Damper...............................................................................................................................25
Cadence............................................................................................................................. 25
Dynamic Frequency............................................................................................................25
Buzzer................................................................................................................................ 26
Auto Silent.......................................................................................................................... 26
6.6.Screen contrast..................................................................................................................... 27
6.7.Language/Units..................................................................................................................... 27
6.8.Data fields............................................................................................................................. 27
6.9.FS Keys................................................................................................................................ 28
6.10.Firmware............................................................................................................................. 28
7.Miscelaneous................................................................................................................... 30
7.1.Fail Safe firmware update..................................................................................................... 30
Document version: 1.1
Page 4
1. Introduction
Thank you for choosing FLYMASTER B1nav. If you have any questions or comments
regarding the use of our vario you can visit our website or contact our Support
Department ([email protected]).
This manual covers Firmware versions up to 1.07. If have a more recent version of
firmware some of the features may not be covered.
1.1. Getting started
Fully charge battery before using FLYMASTER B1nav for the first time.
The battery may be charged by either connecting the B1nav's USB connector to the
wall socket charger or USB cable. B1nav's connector can be found on the right side of
the B1nav (see figure:1).
Battery charger connection (figure:1)
Please note that charging the battery using the wall socket charger is much faster using
a PC and respective USB cable, During the charging process the B1nav display “Quick
Charge” when connected to the wall socket charger and “Slow Charge” if connected to
the PC USB cable. In “Quick charge” the battery should fully charge within
approximately 3 hours, whilst in “Slow charge” it may take up to 15 hours. Once the
battery is fully charged the B1nav will display “Complete” and stop charging.
Document version: 1.1
Page 5
B1nav uses a Lithium-ion polymer battery, which is not prone to “memory effect”,
Therefore the battery does not need to be totally discharged before recharging. In fact,
in order to avoid battery degradation total battery discharge should be avoided.
1.2. B1nav Keys
S3
S1
S4
S2
B1nav keyboard (figure:2)
Four keys are used to interact with B1nav (see figure:2). Each key has 2 functions
depending on wether the device is in flight mode or in menu mode. Additionally the S1
key is used to “power-up” the B1nav when it is switched off.
In the flight mode Keys S2, S3 and S4 have user configurable functions F1, F2 and F3
that can allocated in the Menu->Settings->FS Keys. In menu mode all keys have fixed
functions represent by a symbol on the key.
1.3. Switching B1Nav On and Off
To switch on the B1nav, briefly push the S1 key, this will display the start up screen with
a 10 second countdown . Pushing the S2 (Enter key) before the 10 seconds have
elapsed will initiate the B1nav. On startup the B1nav will initiate in flight mode. If the S2
key is not pushed the B1nav will go back to sleep.
To switch off the B1nav, push the S1(menu key) to activate menu mode, using the arrow
keys (S3 or S4) scroll the cursor to the “Shutdown” item and push the S2(Enter Key).
Document version: 1.1
Page 6
2. The Flight Mode Screen
The B1nav has a high resolution (320x240) and contrast display. This allows it to show
more useful information simultaneously.
In order to increase the usability of the device some of the information is dynamic. This
means the information can change according to the situation of flight. For example, if a
route is active and contains a start gate, the “Duration” field shows the “Time to Go” up
to the point of start opening, after which it will show the duration of the flight.
The flight mode screen is divided into several areas called “sections”, see figure bellow:
Status indicators
Vario
Navigation
User defined data
Altitude/Speed
Time
Flight mode screen (figure:3)
2.1. Status indicators Section
In flight mode at the top of the FLYMASTER B1nav screen, 3 symbols are visible
reporting the hardware status.
The 3 symbols from left to right are the Battery Level Indicator, Sound Level Indicator
and Satellite Lock Status.
Document version: 1.1
Page 7
•
Battery Level Indicator
This symbol shows the status of the battery or charging indication.
Symbol
•
Description
•
Battery level above 85%
•
Battery level between 65% and 85%
•
Battery level between 45% and 65%
•
Battery level between 15% and 45%
•
Battery level between 5% and 15%
•
Less than 5% battery remaining
•
Battery is charging.
•
Battery not charging. This may be because of excess heat, the
B1nav's internal charge circuit will not charge the battery when
the battery temperature exceeds a 45ºC. Wait a while of try
moving the B1nav to a cooler location. If this status persists in
may indicate a problem with the battery.
Sound Level Indicator
This symbol indicates the currently selected sound level (i.e. volume).
Symbol
Document version: 1.1
Description
•
Sound Level 3 (maximum sound level)
•
Sound Level 2
•
Sound Level 1
•
Sound is muted (No sound)
Page 8
•
Satellite Lock Status
This indicator shows the number of satellites in use for calculating the current
position. When a 3D position can be obtained, usually when the GPS locks onto
more that 5 satellites, the indicator becomes highlighted.
As a general rule the more satellites that are locked the more accurate the
navigation solution. Note that FAI rules require 3D tracklog data, which includes
GPS altitude, therefore the B1nav will only start recording a tracklog when a 3d fix
is obtained.
The B1nav has very powerful 50 channel GPS receiver which offers unmatched
tracking performance in harsh signal environments (-160 dBm sensitivity), and very
short acquisition times. A differentiating factor of the B1nav is the 4 Hz GPS update
rate (others only provide 1Hz) which allows the B1nav pilot to see very small speed
and position changes. Furthermore, the movement of the position arrow is smother
and any position change is shown in ¼ of the time of other devices. (4 Hz update
rate requires more than 5 satellites in view).
More information about GPS accuracy and also other GPS related information can
be seen in (http://www.kowoma.de/en/gps/errors.htm).
2.2. Variometer Section
The variometer section contains information about the rate of climb, it is comprised of
an analogue “instant” vertical speed indicator know as the Analogue vario and several
digital indicators providing information about averaged rates of climb.
Max Integrated vario
Analogue vario
Integrated vario
Gain in thermal
Minimum Integrated vario
Variometer Section (figure:4)
•
Analogue vario
The Analogue vario bar is scaled from -5 m/s to +5 m/s. For each 0.1 m/s vertical
speed variation the height of the bar changes proportionally. When the top of the
scale is reached higher values are represented by blanking out the bar from the
bottom of the scale to the maximum scale, thus allowing up to 10m/s to be visually
represented.
Document version: 1.1
Page 9
•
Integrated vario
This indicator displays the averaged rate of climb during the last X seconds. The
factory default for X is 10 seconds, but can be adjusted in the settings (see item
6.2. on page 26). The resolution of the digital vario is 0.10 m/s and the full scale is
reached at ±99.9 m/s.
The integrated vario is particularly useful in determining the actual strength of a
bumpy thermal.
•
Maximum and Minimum Integrated vario
Once a flight has started these indicators show the maximum and minimum thermal
strength encountered during the flight. Note that these values are using the
integrated vario not the instantaneous rate of climb, so they offer a good indication
of the quality of the day's thermals. When the B1nav is switched off these values
are reset back to zero.
•
Gain in thermal
The B1nav considers a thermal has been entered when the Integrated vario value
goes above 0.5m/s and considers the thermal is exited integrated vario goes bellow
-1.0 m/s. Once in the thermal the Gain indicator will keep track of the maximum
altitude reached in the thermal. If the altitude is less than the the max thermal
altitude then a negative number will show the difference from the highest point
reached. If the altitude is equal or higher than the maximum reached then a positive
number will show the altitude gained since entering the thermal.
The thermal gain indicator is particularly useful in measuring the performance of a
thermal. Typically a thermal may have slow point (inversions) the unique gain
indicator keeps track of how much altitude is being gained in the thermal. When the
pilot enters the thermal B1nav will reset the Gain indicator to 0 and will start to track
how much altitude the pilot has gained. At a certain point in the thermal the lift may
become weaker and inconsistent. At this point the gain indicator will show altitude
loss in this inconsistency. Once the pilot cores the thermal correctly again the
indicator will show the gain since thermal start.
2.3. Time Section
The Time Section contains 2 fields, the actual local time and an elapsed time or time
remaining. These fields are represented in Hour:Minute:Second format. The local time
can be adjusted in the settings (see item 6.3. on page 26).
All the internal B1nav time calculations are based on UTC (Coordinated Universal
Time). This is also the time saved on the track-log. However, the time displayed in the
time field is calculated adding an UTC offset to the UTC time obtained from the GPS
receiver. The “UTC offset” should be defined in the settings menu (see item 6.3. on
page 26) so that the correct local time is displayed.
Document version: 1.1
Page 10
The second time field is dynamic and will vary according to the current flight status and
type of task defined. It will show TTG (time to go) before start gate opening, and will
then change to “Dur” (duration) which is the time elapsed since the opening of the start.
If no start gates are defined in the task or no task is defined then this field will show
“Dur” which in this case is the time elapsed since takeoff. The takeoff is event is
triggered when ground speed exceeds 10km/h and a 3d fix is available.
2.4. Altimeter and Speed Section
•
Altitude
The “altitude” field (see Figure 6) indicates the absolute height in meters or feet
depending on the setting. This altitude corresponds to the barometric altitude and
thus depends totally on the QNH (absolute pressure at a given moment and
location in regards to the correspondent pressure at MSL).
The altimeter cannot be reset, but can be set using the corresponding menu option
(see item 6.1. on page 25).
•
Speed
The “speed” field indicates the speed over ground in km/h. The speed is only
available when the GPS receiver has a valid signal.
2.5. User Defined Data Section
The B1nav has 6 user defined fields which the pilot can configure for his own needs
(see item 6.8. on page 31).
The following table lists and explains the available data fields, as the B1nav firmware
evolves this list will likely grow.
Field ID
Description
VMG
Velocity made good, is the speed at which the pilot is approaching the
active turn point.
Dist Toff
Distance to take off. The direct distance to the point of take off.
Dist Start
Distance to start. The distance to the start cylinder line.
Dist.Goal
Distance to goal. From the current position and flying through all pending
turnpoints.
Speed Strt
Speed to Start. The speed at which the pilot must fly in order to reach the
start gate at its opening.
G.R.Goal
Glide ratio to goal. Indicates the glide ratio (finesse) from the current
position and altitude to the Goal going through the remaining turn points.
Cur G.R.
Current glide ratio. This glide ratio is calculated from the integrated vario
over the current ground speed.
G.R.M.G
Glide ratio made good. The actual glide ratio towards the active turn
point. It is calculated using the integrated vario over the VMG.
Document version: 1.1
Page 11
Field ID
Description
A.OverGoal
Altitude over goal, is the difference in altitude from the current altitude to
the goal's altitude. Based on barometric altitude.
Max.Alti
Maximum altitude of reached during current flight. This is based on
barometric altitude.
GPS Alti
Altitude reported by the GPS.
Alt Gain
Altitude gained in current thermal.
Land in
During competitions tasks it is common, usually due to safety reasons to
have a “land by” time. The land by time if defined by adding a waypoint
typically the goal to the already defined task, setting it as "Landing" and
defining the time. “Land in” shows the amount of time remaining before
having to be on the ground.
Goal close
The time remaining to goal close time.
2.6. Navigation Section
Direction of travel
Direction of next point
Fine adjustment indic.
Wind direction
Distance to next point
Distance start/goal
This is B1nav main navigation information section. It shows graphically which direction
to navigate, the actual travel direction, wind direction, next waypoint and start gate/goal
distances.
For information to be displayed in the navigation section the B1nav must have a valid
GPS fix. When no valid fix is available the direction arrow will not be shown and the
distance indicators will show “-----”.
The “direction of next point” arrow will show when a route is active or if no route is
defined it will start showing the direction to the takeoff after the takeoff is detected, i.e.
speed exceeds 10km/h.
Document version: 1.1
Page 12
The image below (figure:5) the direction of next point is showing that the next turn point
is approximately at 45º to the current direction of travel. Turning to the left approximately
45º will place us on the correct course.
Navigation wheel (figure:5)
As the correct course approaches it becomes difficult to understand which is the perfect
direction, so B1nav shows a “fine adjustment indicator” in the form of a small arrow. An
arrow to the left means the pilot should turn slightly to the left, and inversely an arrow to
the right indicates a small adjustment to the right is needed.
When the course is perfect, i.e. less than 1º off, B1nav indicates this by showing a large
arrow forward, see figure:6 bellow.
Perfect heading (figure:6)
The 2 fields bellow the navigation wheel show the distance to go for next active turn
point and a dynamic field showing either the distance to the start gate or the distance
remaining to the goal depending on wether the start has been validated or not.
A start is automatically validated when a pilot correctly completes the start, until the start
is completed B1nav will not advance to the next point in the route. Another important
aspect of the start is B1nav does not point to the start cylinder but rather to the next turn
point on the list.
Document version: 1.1
Page 13
The distance to start will become highlighted when the pilot is in an irregular position,
i.e. inside a start cylinder where he should be out or vice-versa.
Document version: 1.1
Page 14
3. Menu mode
When in the flight mode screen, pushing the menu(S1) button accesses the menu
mode screen. When in the menu pushing the menu(S1) button will go back to flight
mode.
Main menu (figure:7)
To access the different items on the menu use the arrow up(S3) and arrow down(S4)
buttons. Once a menu item is selected pushing the enter(S2) executes the selected
function.
Menu item
Description
Waypoints/Task
Accesses B1nav's waypoints and task definitions. (see item 4.
on page 17)
Task delay
Shifts all time data in the active task. (see %%)
Flight log
Accesses the stored flights list.
GPS
Displays detailed GPS status and allows GPS module reset.
(see item 5. on page 24)
Settings
Accesses the Settings sub menu. (see item 6. on page 25)
Shutdown
Switches off the B1nav, and displays detailed battery status.
Document version: 1.1
Page 15
•
Task Delay
During competitions it is common practice due to weather conditions to postpone a
task. Generally take off is postponed and so is the start gate, goal close and land by
times. Instead of having to edit the defined task B1nav offers a task delay feature
which moves all defined times in a task forward by X minutes. To delay a task in the
menu simply push the enter(S2) key on the Task delay option, using the arrow keys
(S3 and S4) select the number of minutes to delay by and push the enter(S2) key.
To exit the “Task delay” function without changing task times push the menu(6) key.
Document version: 1.1
Page 16
4. Waypoints and Task
The Waypoints/Task page manages the waypoints and task definition in the B1nav.
Task
Waypoint list
Selected item data
Waypoints/Task page (figure:8)
The page is divided into 3 areas, the waypoint list, task and selected item data. On
entering the page the cursor is active on the waypoint list, and the selected item data
will show details about the selected waypoint. As the cursor is moved to a different
waypoint so the selected item data changes as to show details of that waypoint. If no
waypoints are defined the waypoint action menu is automatically opened and the only
available option is the “Insert new Waypoint”.
Pushing the enter(S2) on the selected waypoint opens the waypoint action menu in the
selected item data area (see figure 9). Pushing the menu(S1) goes back to the main
menu.
4.1. Waypoint action menu
Document version: 1.1
Page 17
Waypoint action menu (figure:9)
On entering the waypoint action menu the selected waypoint becomes grayed indicating
that waypoint specific actions will be carried out over the respective waypoint.
Action
Description
Add WP to Task
Adds the selected waypoint to the end of the task.
Insert New WP
Starts a new waypoint entry. The current location is
automatically used for default waypoint data.
Edit WP
Start editing the selected waypoint.
Delete WP
Delete the selected waypoint. If the waypoint is being used in
the task this option is disabled.
Delete all waypoints
Deletes all waypoints and task.
Edit Task
Starts editing task. If no waypoints have been added to the
task this option is disabled. (see item 4.2. on page 18)
4.2. Edit task(route)
In the Waypoint action menu selecting the “Edit Task” option will activate the Task edit.
The cursor will highlight the on the task item, know as a Route point (see figure 10).
Warning: After the task is edited navigation will be restarted at the beginning of the
route.
Document version: 1.1
Page 18
Edit task (figure:10)
In the “Selected item data” information about the Task turn-point is displayed, the
example above shows the B01 task turn-point configured as a Cylinder with a 400meter
radius.
In the above example the task has only one turn point and is thus considered to be a
“go to” type route. The B1nav will automatically start navigating to that point.
When the task contains more that one point then the first turn point will automatically be
assumed as the take-off point, therefore is ignored in navigation and is only used for
calculating the total task length.
Each route point in the task is defined having a particular type, the table below explains
the different types and how they are handled by the B1nav.
Type
Navigation
Take off
This route point type must be the first one in the sequence of points. It
is only a place marker, for calculating the entire task length. B1nav
will ignore it for navigation purposes.
Cylinder
This is the most common route point type. The cylinder type is
defined by a coordinate and a radius. The coordinate is taken from
chosen waypoint and the radius can be defined by the user. By
default the B1nav will add route points with a 400m radius since this
is the FAI standard. During navigation B1nav will only advance to the
next route point once the user enters it.
Start In
Start In route points are start gates, sometimes also known as “Exit
start”. B1nav will only validate the point and advance to the next point
on the route if the user is inside the set radius at a latter time than the
one defined. Note that the sequence in which this point appears in the
task list in very important.
Document version: 1.1
Page 19
Start Out
Start Out is the most commonly used start gate, sometimes also
known as an “Enter start”. B1nav will only validate this point and
advance to the next point when the user is outside the radius at a
latter time that the one defined. Note that the sequence in which this
point appears in the task list in very important.
Goal Cylinder
The goal cylinder is very similar to the Cylinder, expect for the fact
that it has a “Closing Time”. The closing time is used to calculate the
Goal Close user defined field.
Goal Line
A goal line is defined as a line, with a specific length and centred in a
the route point. By definition the line is perpendicular to the direction
from the previous turn point to it. Due to safety is common to have
competition tasks that include a Goal Cylinder used for measuring
time (end of speed section) followed by a line which must be crossed.
In this type of task the Goal route point is inserted twice, and then set
as a Goal Cylinder and Goal Line respectively.
Landing
Most of the times landing can take place at the Goal, in this case the
Goal waypoint may be inserted again. Doing so allows a Landing limit
time to be inserted which B1nav uses to calculate the “Land In” data
field. On some occasions, for safety reasons, landing is
recommended to be elsewhere, so a different waypoint may be used.
As the B1nav validates a turn point it emits a audible notice informing the user that
navigation has now changed.
•
Edit route point
Added route points are automatically set as cylinders with a 400m radius, (except
for the first one as mentioned above which is set as takeoff). To modify a route point
push the enter(S2) button which will display the route point configuration menu,
selecting “Edit Route Point” will start editing the route point attributes (see figure
11).
Route point edit (figure: 11)
Each route point has an associated type, which can be takeoff (automatically
assumed to be the first one), cylinder, start-out, start-in, goal cylinder, goal line and
landing. Should a route point require to simultaneously more that one type, for
example a turn point which is also a start gate point, it should be added again for
each required type.
Document version: 1.1
Page 20
Very important: The sequence in which the route points are listed is very important
since B1nav will navigate them in that order, so in the case of a start gate which is
also a turn point (as is commonly used in competition tasks) the start must be
placed before the turn point.
The “Time” is only available on turn point types that are time related, thus the “Time”
will only be visible when the turn point type requires a time. The table below shows
field types and their associated time field meaning. The time field is represented in
local time.
Turn point Type
•
Time field usage
Take off
No time field.
Cylinder
No time field.
Start out
Start in
The time at which the start opens. The start is only validated if
the pilot is in a regular position (in or out) later than the defined
time. The TTG (time to go) will show how much time remains to
the opening of the start, i.e the difference between this field's
value and the local time of day. Navigation to next point will only
continue after the validation of the start.
Goal Cylinder
Goal Line
Time of goal close. The time it will be used by the “Goal Close”
configurable data field displaying how much time is left until the
close of the goal.
Landing
Time of compulsory landing. The time will be used to calculate
the “Land In” user defined field.
Move Route Point
The sequence of a route point in a route may be easily changed. To change the
position of a route point simply select the route point using the arrows (S3 and S4),
push the enter(S2) button to activate the route point configuration menu then select
the Move Route Point option and push enter(S2) button. The move indicator will be
shown next to the selected route point, using the arrow buttons (S3,S4) moves the
route point within the route and pushing the the enter(S2) ends the move function.
•
Remove Route Point
To remove a route point from the route, select the point using the arrows (S3 and
S4), push the enter(S2) button to activate the route point configuration menu. Then
select the “Remove Route Point” option from the menu and push the enter(S2). The
point will be removed.
•
Delete Route
Delete route will delete the entire route. On any route point push enter(S2) button
to activate the route point configuration menu. Select the “Delete Route” option from
the menu and push the enter(S2) button. The route will be deleted and the cursor
will be returned to the Waypoint list since no task now exists for editing.
Document version: 1.1
Page 21
4.3. Example of a task and how to set it up on the B1nav:
•
Example 1
In the above example, the defined task is has it's takeoff set at point “T01” with the
first turn point defined at “W06”, followed by “W03” and finally the goal at “G05”
which is a cylinder type goal with a 400m radius. The goal closes at 17:00 and the
meet director defines that everyone must be landed by 17:30.
The start gate is a “start out” at 18km around W06, graphically represented above
as the red circle around waypoint W06. In other words the pilot must be further than
18km from the turn point until the defined “start opening time” which for this
example we will assume to be 12:30pm.
•
Setting up the task
Following the instructions in section 4. access the waypoints/task page of the
Flymaster B1nav.
To setup this task on the B1nav, start by deleting any existing task on the B1nav
(see section 4.2.).
Add “T01” to the task using the “Add WP to Task” (as described in section 4.1.),
B1nav will automatically assume it as the takeoff.
Add “W06” to the task twice, we need to add W06 twice because since it is a turn
point and also a start gate.
Add W03.
And add G05 twice. We will use the second occurrence of G05 to define the landing
deadline.
Next step “Edit task”.
Document version: 1.1
Page 22
The task list will contain the following items:
T01
W06
W06
W03
G05
G05
On the task list, select first occurrence of “W06” and edit it. Change the waypoint
type to “Start out”, set the distance to 18.000km and the start time to 12:30.
Beware: It is very important that the first occurrence of W06 be set as the start,
otherwise B1nav will assume that the turn point W06 needs to be completed before
the start gate, and that is not what is required for this task.
Edit the first occurrence of the G05, and change it's waypoint type to “Goal cylinder”
since the radius of goal is 400m the B1nav already assumes 400 as the default
value, so only the time needs to be defined, we set it to 17:00 which is the goal
close time.
Edit the second occurrence of G05 and change it's waypoint type to “Landing”, this
waypoint will serve to warn us we must be on the ground before the landing
deadline. So we define the time as 17:30.
We are now setup for the task, going back into the “Flight Mode Screen”
automatically activates the task and starts navigation.
Document version: 1.1
Page 23
5. GPS status
In the main menu the B1nav provides a detailed view of the GPS status.
Satellite status (figure:12)
Figure 12 illustrates the GPS satellite reception page, in the example B1nav shows 7
satellites are visible, and 4 are being used to provide the position fix. Each bar shows
the signal strength for each individual satellite. A filled bar indicates B1nav has a “lock”
on that satellite.
If B1nav is switched on in a location where no satellites are visible (indoors for example)
it will go into wide search mode. If this occurs going outdoors will again will take B1nav
abnormally long to pick up satellite signals. Should this occur pushing “enter” on the
GPS menu item will reveal the “Reset GPS” option, changing it to yes will make B1nav
reset the GPS status and start a new search. So if you notice B1nav is taking
abnormally long to get a fix (over 2 minutes) a “gps reset” will probably get it locked
quicker.
Document version: 1.1
Page 24
6. Settings menu
The settings menu is used to configure B1nav's many features. The menu is divided into
two sections, the menu option and the associated configurable fields. To use the
configuration menu, select the desired option by using the arrow keys (S3 and S4) then
push the enter(S2) key to edit the fields. When accessing the fields the menu item
becomes “grayed” and the respective field data item is highlighted. Using the arrow
keys (S3 and S4) changes the value on each field, enter(S2) moves to the next field
and menu(S1) moves to the previous field. If the enter(S2) key is pushed on the last
field the all the data in the selection section is stored and control returns to the
configuration menu, inversely if the menu(S1) key is pushed on the first data field the
changed settings are restored and control is returned to the configuration menu.
6.1. Set Altimeter
The set altimeter page adjusts the barometric altimeter. A barometric altimeter
calculates altitude based on atmospheric pressure. Since atmospheric pressure can
vary substantially along time it should be calibrated prior to takeoff.
Calibrating the altimeter can be achieved by entering the know altitude of the location.
Entering an altitude automatically calculates the QNH. If the QNH is changed then the
altitude is adjusted accordingly. This method allows calibrating the altimeter by either
entering a know altitude at the current location or known QNH for a particular instant in
time at the current location.
Document version: 1.1
Page 25
6.2. Timing
The timing page sets interval related parameters. The current firmware version supports
two parameters the “Vario Integrator” and “Track Interval”.
Timing Parameters (figure:13)
•
Vario Integrator
The Integrated Vario (see Integrated vario on page 10) is calculated using the last X
seconds defined by this value.
•
Track interval
During flight B1nav will store a track log point every track interval seconds,
recording a track automatically starts once a speed of 10km/h is exceeded and
B1nav has a 3d GPS fix. However when a task is active B1nav will store a track log
point immediately as it enters a turn point cylinder, open start or goal.
6.3. Date/Time
Using it's GPS B1nav will automatically adjust time to Universal Coordinated Time
(UTC). The user should adjust the UTC offset so that the time displayed by B1nav
matches the local time. Alternatively when no GPS signal is available the time may be
adjusted manually, but this adjustment will be overridden the instant B1nav picks up a
valid GPS fix. Also available on the B1nav is a wakeup alarm, which will only trigger
when the B1nav is switched off, this alarm can be used for waking up in the morning.
6.4. Vario Acoustics
The user can change the climbing and sinking rate sound trough the respective
threshold values. These thresholds correspond to the climbing and sinking rates at
which sound activates.
The user can also define in the Acoustic Thresholds option the sink alarm and the
sound volume of is B1.
Document version: 1.1
Page 26
The sinking threshold is set to -2 m/s by default. The value can be changed by pressing
the S2 key when the “Acoustic Thresholds” option is highlighted on the settings menu.
This action will highlight the “Sink TH” threshold which can be changed using S3 and S4
keys to increase and decrease the value. Confirmation should be made by pressing S2
key, which at the same time highlights the “Climb TH” threshold, and same procedure
can then be used to adjust the sinking threshold. The “Sink Alarm” is highlighted when
the confirmation of “Climb TH” is made.
Additionally the audio frequencies can be adjusted to match the user's preference, by
setting the “Base Frq” and “Increments”.
The “Base Frq” is the first frequency used to produce the initial sound which
corresponds to the climb threshold, usually 0.1 m/s. Later, as the climb rate increases, a
bip, bip sound is produced for which the cadence and frequency also increase. The
“Base Frq” can be set between from 500 to 1500 Hz. The higher is the frequency value,
the more high pitched the sound is.
The “Increments” parameter sets the frequency increment for each 0.1 m/s climb rate
increase. The “increments” can be set from 1 to 99 Hz.
The preset values for “Base Frq” and “Increments” are respectively 700 Hz and 10 Hz.
In order to change the base frequency value press S2 key after “Audio Frequencies”
menu option is highlighted. This action will highlight the “Base Frq” value so it can be
increased using S3 key or decreased using S4 key. S2 key should then be pressed,
thus confirming the “Base Frq” setting and highlighting the “Increments” option.
The same procedure can be used to change the “Increments”, after you chose the value
for the increments, to confirm and return to Settings menu press S2.
6.5. Advanced Features
The advanced features settings option can be used to adjust the B1nav acoustics to the
user preferences. Using these features the user can turn the vario sound more or less
responsive, and can also turn on and off the buzzer functionality.
There are following four advanced features:
Document version: 1.1
Page 27
•
Damper
B1navs vertical speed calculation are based on air pressure variations. Is is very
seldom that the air pressure absolutely stable. Turbulence caused wind is sufficient
to cause small variations in pressure. For this reason B1nav filters (averages) the
pressure data to prevent constantly detecting tiny pressure variations. The value
that defines how must is filtered is the damper. Setting a lower damper value cause
the B1nav to become more responsive but harsher, inversely a higher value cause
B1nav to be less responsive but smoother. We have found that an ideal value is 8
and therefore the default value.
•
Cadence
When a rate of climb higher than specified by Climb threshold is reached the
B1nav creates a beeping sound. The rate(cadence) of the Beeps increment as the
rate of climb increases. This increase in rate is not linear, the cadence parameter
specifies which cadence curve should be used. Current there are 2 possibilities, see
the graphs below for a details on cadence times for rate of climb.
•
Dynamic Frequency
The B1nav beeps at a specified pitch(frequency) when a certain rate of climb is
encountered, when dynamic frequency is off the pitch(frequency) of that beep will
remain constant every if the rate of climb changes. With dynamic frequency on the
pitch of the beep may vary if the rate of climb varies during the individual beep.
Document version: 1.1
Page 28
•
Buzzer
Is so called because of the sound it emits, which resembles a buzzing sound. This
buzzing sound is emitted when the rate of climb is close to, but has not yet reached
the specified Climb threshold. Although the value is set as a value between 0 and 9
each unit is considered to be 0.1 m/s, ie. 3 is 0.3m/s. Subtracting this decimal value
from the climb threshold will give us the value at which the B1nav will start buzzing.
For example with B1nav's default values, Climb threshold=0.1m/s and Buzzer=3
(0.3m/s) the buzzing with start at -0.2m/s because 0.1 - 0.3= -0.2. Also at the
0.1m/s directly bellow the Climb threshold B1nav will emit a constant sound varying
rapidly in pitch from around 100hz to the set base frequency at which the first beep
is emitted. Setting the Buzzer value to 0 will disable the buzzer feature.
Although the Buzzer will sound very annoying on the ground it becomes an
amazing companion if flight allow the pilot to pick-up thermals he would have
usually missed.
A practical example of the advantages of the buzzer feature can is illustrated in
figure 30. In this example both pilots are sinking at -1.0 m/s. The orange paraglider
has a B1nav for which the climbing threshold is set to 0.1 m/s and the Buzzer
parameter is set to 3. The green paraglider has usual vario for which the climbing
threshold is set to 0.1 m/s.
0.1 m/s
- 0.9 m/s
0.8 m/s
- 0.2 m/s
Brrr..
1.1 m/s
0.1 m/s
Beep..
Beep..
As shown in the figure, when both pilots enter the thermal nothing is heard. The air
is rising at 0.1 m/s but both pilots are descending at -0.9 m/s. In the second level of
the thermal the air is rising at 0.8 m/s and so pilots are descending at -0.2 m/s. At
this stage the orange pilot starts to hear the Next to Climb brrrrr sound of his B1nav,
which helps him to centre the thermal, while the green pilot is still unaware of the
thermal. Finally, in the 3 level the air is rising at 1.2 m/s and so both pilots climb at
0.2 m/s. The B1nav pilot starts to hear his vario beep... beep... sound, it is only at
this point the green pilot hears the first beep from his instrument.
•
Auto Silent
Document version: 1.1
Page 29
Setting Auto silent on will keep the B1nav's vario quiet until a “start flight” has been
detected. A start flight is detected when the speed exceeds 10km/h and the GPS
has a 3dFix. The audio will then be kept active until the B1nav is switched off. The
default value for the auto silent parameter is “On”.
6.6. Screen contrast
The screen contrast may be adjusted to the pilot's needs. Beware of adjusting a very
low value, which may cause the display to be totally blank making it difficult to readjust
the display since, nothing will be visible. Should this happen a reset will restore the
default parameter. B1nav also has backlight, it is useful when the pilot wants to see
flight data in low light conditions. Backlight can be turned on/off trough the “Backlight”
parameter.
6.7. Language/Units
The “Language and Units” menu option allows the user to change the B1nav interface
language and units. This menu option also allows changing the coordinate format for
the GPS data position display.
Document version: 1.1
Page 30
6.8. Data fields
The User Defined data section fields described in 2.5. of page 11, can be defined here
the image below (figure:14) shows the correspondence to the data field number:
User defined fields (figure:14)
6.9. FS Keys
In Flight Mode keys S3,S4 and S2 assume functionality that can be defined by the user.
6.10. Firmware
Firmware update setting (figure:15)
The update of the firmware is a simple procedure that adds new features to the B1nav
firmware.
Before beginning update procedure make sure you download from our site
(www.flymaster-avionics.com) the next list of files:
USB Drivers (FlymasterUSBdrivers.msi)
Document version: 1.1
Page 31
The last version of the firmware(B1NavFirmware.b1n)
The update application(FlashB1Nav.exe)
When you have all the files you can start the update procedure.
The first step of the updating procedure consists of installing the USB drivers on the PC.
In order to do that you should simply run the FlymasterUSBdrivers.msi file and follow
the on-screen instructions.
Once the driver is correctly installed use the following procedure.
1. Connect the B1 to your PC using the cable supplied. If it is the first time the B1nav
is being connected to the PC Windows should report that new hardware is present
a ready to use.
2. Execute the FlashB1 (FlashB1.exe) application. You will probably receive a security
warning from windows about the application.
FlashB1Nav (figure:16)
3. Using the “...” button browse for the B1 firmware previously downloaded from our
website.
4. Using the “...” button browse for the B1 firmware previously downloaded from our
website.
5. 4-Click the “Send” bottom. FlashB1Nav will report “Waiting for B1...”
6. On B1nav go into the settings menu and choose the Firmware option(Figure 15).
7. Press S2 key in order to highlight the “No” word corresponding to the “Update Now”
parameter.
8. Use the S3 or S4 key in order to change the “No” to “Yes” and then press the S2
key to confirm the option
If everything is ok then a message in the B1nav screen and flashB1 software appears
saying that the B1 is updating. You should wait until the process ends and the B1nav
starts to function normally.
Document version: 1.1
Page 32
7. Miscelaneous
7.1. Fail Safe firmware update
•
Introduction
The Fail Safe firmware update is a last resort tool if an unexpected error occurs
during the update process. This will leave the B1nav with incorrect or incomplete
firmware, rendering the use of the settings menu inoperable.
Note: This procedure is a last resort measure, FLYMASTER
•
Update procedure
To update the B1 you will need to install the B1nav’s USB driver which is available
on our web site, in the section downloads of the B1nav.
Follow the same procedure described in section 6.10. to install the drivers, once
they are correctly installed use the following procedure.
1. Connect the B1 to your PC using the cable supplied. If it is the first time the B1
is being connected to the PC Windows should report that new hardware is
present a ready to use.
2. Execute the FlashB1 application.
3. Select the B1Firmware.b1b file previously downloaded from the web site.
4. Push the “Send” button.
5. Hold the “Menu” button on your B1, and insert a toothpick into the reset orifice
on just above the USB connector on the B1 in such a way as to reset the B1.
6. Release the reset button but do not release the the “Menu” button. If the
message “Erasing memory…”is shown in FlashB1 you may release the “Menu”
button, if not press and release the reset button again until the message is
shown. Note that the reset button is a small switch inside the B1, you should
feel it click.
7. Wait until you see the message “Complete” on the FlashB1 ,and B1 starts to
function normally.
Document version: 1.1
Page 33
Alphabetical Index
Analogue vario....................................................................................................................................11
Auto Silent..........................................................................................................................................28
Battery Level Indicator.......................................................................................................................10
Buzzer.................................................................................................................................................27
Cadence.............................................................................................................................................. 26
Charge battery.......................................................................................................................................6
Cylinder.............................................................................................................................................. 21
Damper............................................................................................................................................... 26
Delete Route....................................................................................................................................... 22
Delete waypoint..................................................................................................................................19
Dynamic Frequency............................................................................................................................27
Edit route point................................................................................................................................... 21
Fail Safe firmware update.................................................................................................................. 31
Flight Mode Screen.............................................................................................................................. 9
Go to................................................................................................................................................... 20
Goal cylinder...................................................................................................................................... 21
Goal line............................................................................................................................................. 21
Integrated vario...................................................................................................................................12
Landing...............................................................................................................................................21
Lithium-ion polymer battery................................................................................................................ 7
Move Route Point...............................................................................................................................22
Quick charge.........................................................................................................................................7
Remove Route Point...........................................................................................................................22
Satellite Lock Status........................................................................................................................... 11
Shutdown.............................................................................................................................................. 8
Slow Charge......................................................................................................................................... 7
Sound Level Indicator........................................................................................................................ 10
Start-in................................................................................................................................................ 21
Start-out.............................................................................................................................................. 21
Switch off............................................................................................................................................. 8
Switch on.............................................................................................................................................. 8
Takeoff................................................................................................................................................21
Task Delay.......................................................................................................................................... 17
USB...................................................................................................................................................... 6
Document version: 1.1
Page 34