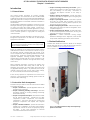
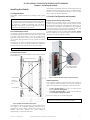
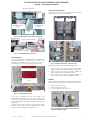
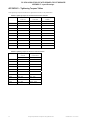
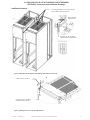
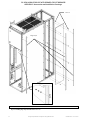
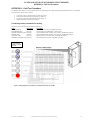
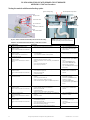
1
g GE Energy Industrial Solutions DC OEM Module For use with Gerapid DC Circuit Breaker Installation and Maintenance Instructions 2011-04-26 S47183Ee rev.01 Design and specifications are subject to change without notice 1 2 Design and specifications are subject to change without notice S47183Ee rev.01 2011-04-26 INDEX TESTING AND INSPECTION.............................................................................................15 INTRODUCTION .....................................................................................................................5 1-1 General Notes ............................................................................................................5 1-2 Instruction Book Arrangement .........................................................................5 1-3 Related Publications...............................................................................................5 RECEIVING, HANDLING AND STORAGE .......................................................................6 2-1 Receiving ......................................................................................................................6 Module and Trolley Package .................................................................................6 Inspecting for Damage ............................................................................................6 Filing a Claim ................................................................................................................6 2-2 Handling and unpacking ......................................................................................6 Module handling and unpacking ........................................................................6 Trolley handling and unpacking .........................................................................7 2-3 Storage ..........................................................................................................................7 Circuit Breakers ...........................................................................................................7 Modules and Trolleys ................................................................................................7 6-1 General Notes .........................................................................................................15 Prior to Test ................................................................................................................15 Connecting Control Circuits ...............................................................................15 6-2 Field Testing Procedure .....................................................................................15 Testing the Module with Remote Racking System ..................................15 Testing the Module w/o Remote Racking System ...................................15 High Potential Tests ...............................................................................................15 Grounding Circuit Check ......................................................................................15 OPERATING THE MODULE ..............................................................................................16 7.1 Mechanisms and Interlocks..............................................................................16 Racking Mechanism................................................................................................16 Access Interlocks .....................................................................................................16 Secondary Control Interlock ..............................................................................16 Remote Racking ........................................................................................................17 Trolley Operated Switches ..................................................................................17 Padlocks........................................................................................................................17 7.2 Trolley with Manual Racking ............................................................................18 Operational Positions ............................................................................................18 Racking – In Procedure .........................................................................................18 Rack-Out Procedure ...............................................................................................19 GENERAL DESCRIPTION .....................................................................................................8 3-1 General Notes ............................................................................................................8 3-2 Summary Description ............................................................................................8 Ratings .............................................................................................................................8 Interlocks ........................................................................................................................8 Accessories ....................................................................................................................8 3-3 The Module ..................................................................................................................8 Breaker Compartment .............................................................................................8 Cable Compartment..................................................................................................9 Control Compartment ..............................................................................................9 3-4 The Trolley ...................................................................................................................9 7.3 Trolley with Remote Racking ...........................................................................19 Operational positions. ...........................................................................................19 Remote Rack–In Procedure. ...............................................................................20 Manual Rack-Out Procedure..............................................................................21 7.4 Operate the breaker. ...........................................................................................21 TROUBLESHOOTING AND MAINTENANCE ...............................................................22 8.1 Troubleshooting .....................................................................................................22 Manually operated trolley ...................................................................................22 Motor driven trolley ................................................................................................22 8.2 Maintenance ............................................................................................................22 3-5 Gerapid Breakers ................................................................................................. 10 CUSTOMER SUPPORT .......................................................................................................23 INSTALLING THE MODULE ............................................................................................. 11 4-1 General Notes ......................................................................................................... 11 Environmental Requirements ........................................................................... 11 Foundation Requirements .................................................................................. 11 4-2 Module Configuration and Assembly ......................................................... 11 Multiple Modules Side by Side Assembly ..................................................... 11 Module Preparation ............................................................................................... 11 Module Rejection Interlock ................................................................................. 12 Main Busbars Connection ................................................................................... 12 Ground Bus Connection ....................................................................................... 12 Connecting Secondary Controls ...................................................................... 12 Device mounting on control compartment door .................................... 12 INSTALLING THE BREAKER ............................................................................................ 13 8.1 Warranty ....................................................................................................................23 8.2 Field Service Support ...........................................................................................23 8.3 Publications and other support ......................................................................23 APPENDIX “A” – MODULE & TROLLEY DRAWINGS ................................................24 APPENDIX B – PRIMARY TERMINALS DRAWINGS..................................................26 APPENDIX C – LAYOUT DRAWINGS ............................................................................29 APPENDIX D – TIGHTENING TORQUES TABLES......................................................30 5-1 General Notes ......................................................................................................... 13 APPENDIX E – ELECTRICAL DIAGRAMS......................................................................31 5-2 Installing Gerapid Breaker ............................................................................... 13 Prior to Installation ................................................................................................ 13 Installation Procedure .......................................................................................... 13 Configuration of the Rejection Interlock ..................................................... 14 APPENDIX F – RATING TABLES .....................................................................................39 APPENDIX G – ACCESSORIES & INSTALLATION DRAWINGS .............................40 APPENDIX H – FIELD TEST PROCEDURE ...................................................................43 2011-04-26 S47183Ee rev.01 Design and specifications are subject to change without notice 3 4 Design and specifications are subject to change without notice S47183Ee rev.01 2011-04-26 DC OEM MODULE FOR USE WITH GERAPID CIRCUIT BREAKERS Chapter 1 Introduction Introduction 1-1 General Notes This manual contains procedures for receiving, handling, storage, operation, and maintenance of GE’s DC OEM Module (called also the Module in this document) with withdrawable DC OEM Trolley (referred to as Trolley in this document) for use with Gerapid high speed DC circuit breaker (referred to as Breaker in this document). The OEM Module is designed to simplify the construction of a DC switchgear assembly. Typical applications for such equipment are Heavy and Light Rail Transit systems, commercial IT systems (Data Centers), heavy industrial applications in mining and metals. Other applications include equipment to supply DC motors, excitation systems or high power DC testing and research facilities. DC OEM Module and Trolley described in this document are UL Recognized components for use with GE’s UL listed Gerapid high-speed circuit breaker. NOTE: The personnel responsible for installing, operating, and servicing this equipment should be thoroughly familiar with the contents of this manual. Before any installation work is performed, thoroughly read and understand the material in this instruction manual. A copy of the instruction manual is shipped with each module, in the control compartment. When requesting additional information from GE Energy, include the complete data appearing on the equipment nameplate, including requisition number. The module’s label is located inside the control compartment. The trolley’s nameplate is located on the right side of the trolley, next to doors. Chapter 5 Installing and Removing the Breaker - gives a step-by-step procedure for lifting the breaker from the floor, and installing it on the trolley. Information on configuring the Rejection Interlock on the trolley is included. Chapter 6 Testing and Inspection - reviews items which should be field-tested or inspected prior to energizing and operating the switchgear. Chapter 7 Operating the Module - covers how to operate the trolley, the module and the breaker. This section contains information concerning drawout provisions, and functions of various accessories. Chapter 8 Energizing the Module - outlines the steps to be taken before and during the electrical energization of the completed equipment. Chapter 9 Maintaining the Module - provides instructions for recommended preventive maintenance, servicing, and lubrication information for the module. Appendixes - contains information covering ratings, dimensional drawings, electric diagrams; screw and bolt torque values, field testing procedures, and accessories. 1-3 Related Publications Detailed Users Guides and Instruction Books for the Gerapid breaker and other devices not fully described in this instruction book are available at: http://www.geindustrial.com Go to: Products -> Circuit Breakers -> Gerapid When requesting information concerning any specific item furnished with module and/or trolley, refer to that item by description, part number, its location within this manual, and any applicable drawing number. Any materials, which may be required to meet local codes, such as mats, screens, railings, etc., are not included, and not furnished by GE Energy. If there are any questions or requirements not covered in this manual or in the accompanying drawings, please contact the local sales office of GE Energy. 1-2 Instruction Book Arrangement Information and procedures in this instruction book are divided into Chapters as follows: Chapter 1 Introduction - provides applicable data for the module and its components. Chapter 2 Receiving, Handling and Storage - describes procedures required for receiving, handling and storage the module and trolley. Chapter 3 Component Description - describes the module and its various components. Included are the cable compartment, breaker compartment, and instrument compartment. This section also lists the electrical and mechanical components and explains their assigned functions. Chapter 4 Module Installation - provides the information needed prior to installation, site location and foundation requirements, and how to anchor the equipment properly and safely. It also covers information on electrical connections and mechanical construction. 2011-04-26 S47183Ee rev.01 Fig. 11-1 DC OEM Module and Trolley with Gerapid High Speed Circuit Breaker Design and specifications are subject to change without notice 5 DC OEM MODULE FOR USE WITH GERAPID CIRCUIT BREAKERS Chapter 2 Receiving, handling and storage Receiving, handling and storage Remove the carton box and check plastic covers for any damages. Do not remove the plastic if the breaker will be stored for long periods. (See. Fig. 21-2 and 21-3) 2-1 Receiving Module and Trolley Package Every package leaving the factory is plainly marked with the case number, requisition number, and customer's order number. The Module and the trolley are shipped in separate wooden crates. The contents of each shipping package are listed on the crate. NOTE: Breakers, Trolleys and Modules are ordered individually and shipped separately. Module accessories, if ordered, are shipped separately. See Fig. 21-1 for crates dimensions. Crates load weights are: Crate with module, Crate with trolley, D 6.5x2.6x8.0 [ft] / ~850 [lbs], 3.9x2.6x5.8 [ft] / ~ 500 [lbs], Fig. 21-2 Gerapid circuit breaker package W H Fig. 21-3 Breaker plastic shrink-wrap protection Filing a Claim If any damage is evident, or indication of rough handling is visible, file a claim for damage at once with the transportation company and notify the nearest GE Energy Sales Office immediately. Information on damaged parts, part number, case number, requisition number, etc., should accompany the claim. Fig. 21-1 Typical wooden module crate for shipment Inspecting for Damage Module handling and unpacking All equipment leaving the factory is carefully inspected and packed by personnel experienced in the proper handling and packing of electrical equipment. Upon receipt of any equipment, immediately perform a visual inspection to ascertain if any damage has been sustained in shipping or if there are any loose parts. Be sure to inspect all devices mounted inside compartments of each section to see if any have been dislodged or damaged. Gerapid circuit breakers are shipped separately in individual boxes with the breaker in the open position. (See Fig. 21-2) Circuit breakers should be unpacked and visually inspected for damage or loose parts as soon as possible after they have been received. 6 2-2 Handling and unpacking NOTE: The Module should be transported and installed in its final location prior to installing the trolley. The module shipping crate should be transported using forklift only. During transport, the module should remain in its original package. To unpack the module, start by removing the top cover, then remove sidewalls and all inner supports. CAUTION: Never use a forklift to transport an unpacked module, as the module is not bolted to the shipping palette. Design and specifications are subject to change without notice S47183Ee rev.01 2011-04-26 DC OEM MODULE FOR USE WITH GERAPID CIRCUIT BREAKERS Chapter 2 Receiving, handling and storage Removable lifting plates are provided on the top of each module, as standard equipment. Using a crane or overhead hoist, carefully lift the module from the palette using the four lifting plates. (See Fig. 22-1) NOTE: After transportation, but before installing of the breaker, loosen six attachment screws and remove lifting frame from the trolley. Replace and tighten these screws! Lifting slots. Min. 4 ft Fixing screws. Fig. 22-2 Lifting of the trolley CAUTION: Never use forklift to transport unpacked trolley, as it is not bolted or fixed to the shipping palette NOTE: Do not lift or transport the trolley, using forklift. Never lift the trolley with a breaker mounted. Never roll the trolley on the floor with a breaker set in place, unless the breaker is properly bolted to the trolley and arc chutes properly secured to the breaker (if installed). 2-3 Storage Fig. 22-1 Overhead lifting of the module To preserve the external appearance of the equipment, it is suggested that the lifting plates be left in place. Utilize four equal length cables or slings, each with a minimum load rating of twice the weight of the Module package. See section 2.1. NOTE: The angle between the cables and the top of the equipment must be at least 45 degrees. This requires the use of chains/slings at least 4 ft long. If this is not possible, spreader bars must be used. NOTE: Do not move, lift or handle the module with a trolley installed. Take up the slack in the lifting device very carefully and manually stabilize the module to prevent it from rotating. WARNING: Do not stand under the module while it is being moved. Serious injury may occur if the cables or lifting device fail. CAUTION: Gently lower the module onto the level site location. If the module is roughly handled or jarred, it is possible to damage or misalign internal components. Trolley handling and unpacking Circuit Breakers Open shipping cartons and thoroughly inspect shipping materials for damage. If shipping plastic is in satisfactory condition, leave the breakers in their shipping cartons for storage. Do not remove the circuit breaker shipping material (shrink wrap) at this time. Store the circuit breakers in a clean, dry location in an upright position. If shipping plastic is damaged, a plastic or canvastype cover should be provided to reduce the possibility of damage or contamination to the breakers due to dust and water. For details concerning Gerapid breakers handling consult the breaker’s User Guide, S47183De. Modules and Trolleys Remove protective covering. Check thoroughly for damage. Store in a clean, dry, rodent-free location with moderate temperature and provide protective coverings to prevent dirt, water, or other foreign substances from entering the equipment. If dampness or condensation may be encountered in the storage location, heaters must be placed inside the module breaker compartment (module must be without trolley) and in the front of the trolley with trolley door open to prevent condensation. Approximately 250 watts of heat in each section is required. Incandescent lamps can be used and located in the bottom of the breaker compartment and supported so the bulbs will not touch adjacent materials. The trolley, in its original package, should be transported using forklift only. To unpack the trolley, remove the top cover first, and then remove sidewalls and all inner supports. To lift the trolley, use special lifting frame available. See Fig. 22-2. 2011-04-26 S47183Ee rev.01 Design and specifications are subject to change without notice 7 DC OEM MODULE FOR USE WITH GERAPID CIRCUIT BREAKERS Chapter 4 Installing the Module General Description 3-3 The Module 3-1 General Notes This section contains a description of the GE DC OEM Module and Trolley for use with Gerapid high speed DC circuit breaker. It also describes the functions of the electrical and mechanical systems. 3-2 Summary Description The DC OEM Module is an individual, freestanding, metal-enclosed switchgear section, designed to be used in conjunction with the withdrawable trolley, containing a Gerapid circuit breaker, auxiliary contacts, primary finger clusters and secondary disconnect. Breaker Compartment The module is metal-enclosed construction, and consists of the front breaker compartment, upper controls compartment and rear cable compartment. Fig. 33-1 shows the location of the module compartments. Dead-front, drawout circuit breaker compartment is a standard construction feature with all modules. The breaker compartment door remains closed and latched while the breaker is racked out from the CONNECTED position through TEST position, to the DISCONNECTED position. See chapter 7. Ratings The module is designed to be used on DC systems operating up to 800VDC and 6000A continuous. The module is available in two continuous current ratings: 4000A for use with 2500A and 4000A Gerapid breaker, 6000A for use with 5000A and 6000A Gerapid breaker, Control Compartment Cable Compartment NOTE: See Appendix “F” for complete ratings of the Module and the breaker. Breaker Compartment Interlocks Module and trolley are equipped with variety of safety interlocks that minimize risk of incorrect operations. The following interlocks are incorporated into the module and trolley: Positive Interlock preventing movement of the trolley to or from CONNECTED position when breaker is closed. Negative Interlock preventing breaker closing unless the trolley is in CONNECTED or TEST position. Access Interlock – ensures breaker opening before any manual operations. Secondary Control Interlock preventing movement of the trolley from TEST position to CONNECTED position unless secondary disconnect is connected. The same interlock prevents the trolley from being fully withdrawn from the module unless the secondary disconnect is unplugged. Breaker Disconnected Padlock Provisions allows padlocking the trolley in DISCONNECTED position. Control Compartment Padlock Provisions allows for padlocking of the controls compartment door. Rejection Interlock prevents trolley coded for particular breaker current rating from being inserted into the module that is coded to different rating. Shutter Safety Padlock allows padlocking of the safety shutters in closed position. Accessories Several accessories are available with the module and the trolley for user convenience: Side Covers for cable compartment, Crank Handle for trolley racking operations, Cable Channel connectors and covers, Attachment Hardware Kits for different components, Hinges for user furnished compartment doors, Fig. 33-1 Front view of the Module with Trolley inside Control Compartment Padlock Provisions Secondary Disconnect Secondary Control Interlock Primary Disconnect Shutters In front of Primary Stabs Racking Drive Socket Grounding Circuit Stab Rejection Interlocks NOTE: See Appendix “G” for full list of accessories, their codes and illustrations. NOTE: Detailed description of all accessories functions is given in Chapter 7. 8 Fig. 33-2 Front view of the module Design and specifications are subject to change without notice S47183Ee rev.01 2011-04-26 DC OEM MODULE FOR USE WITH GERAPID CIRCUIT BREAKERS Chapter 4 Installing the Module Grounded steel barriers on the top, sides, bottom, and front enclose the breaker compartment. In the back, a flame-retardant, track resistant, glass-filled polyester base minimizes the possibility of fault communication between compartments or to the bus. 4000A Terminals Breaker compartment has primary stabs for connecting the breaker. Insulated shutters cover primary stabs. See Fig 33-2. NOTE: See Appendix A for all dimensional drawings of the breaker Compartment. 6000A Terminals Primary disconnect shutters are provided as standard feature to provide protection against contact with the energized stationary primary stabs when the trolley is removed from its compartment. The shutters are constructed from fiberglass reinforced thermoset polyester. A padlock can lock the shutters in the closed position. See Fig. 33-3. Ground Bus Connection Shutters Fig. 33-4 Rear views of 4000A and 6000A Modules 3-4 The Trolley The module is designed to be used with Gerapid high-speed circuit breaker installed on the withdrawable trolley. The trolley can be ordered in two different versions, with manual racking or with motor operated remote racking system. Remote racking trolley equipped with motor drive can also be operated manually by the crank handle. NOTE: The crank handle is an accessory and has to be ordered separately. Padlock Fig. 33-3 Safety padlock on the shutters Every module is equipped with rejection Interlock that must be properly configured by the OEM. This interlock allows configurations for all current ratings. It is placed on both sides of the breaker compartment. See Fig. 33-2. Trolley structure is compatible with all the modules and all Gerapid circuit breakers listed in Section 3-5. The OEM must correctly configure the rejection Interlock on the trolley and in the module for the specific rating of breaker being installed. All breaker controls, control power supply and auxiliary contacts are extended to the control compartment via the secondary disconnect and harness. Negative and positive interlocks are operated from access console at the front of the trolley. The access opening for the manual crank handle is there as well. Secondary Disconnect Plug Cable Compartment The primary stabs extend into the cable compartment and are suitable for connection with ANSI type busbars. Fig 33-4 shows primary terminals for 4000A and 6000 A rated modules. Ground bus connection in the cable compartment is the same on all module types. Cable compartment is provided without side covers. See Fig. 33-1. Painted and pre-punched side covers can be ordered as separate accessories. NOTE: See Appendix A for all dimensional drawings of the primary terminals and cable compartment. Access Console Module is also equipped with trolley-operated contacts that are activated in CONNECTED and TEST position as well as with some other limit switches that are used for internal interlocks. Control Compartment The secondary control plug located in the breaker compartment is prewired, with a 3ft tagged wire harness brought into the controls compartment for User’s connections. The matching secondary disconnect plug is mounted on the trolley. NOTE: See Appendix A for all dimensional drawings of the Control Compartment. 2011-04-26 S47183Ee rev.01 Rejection Interlock Motordrive Fig. 34-1 Trolley features (motorized racking shown) Design and specifications are subject to change without notice 9 DC OEM MODULE FOR USE WITH GERAPID CIRCUIT BREAKERS Chapter 4 Installing the Module 3-5 Gerapid Breakers The GE Gerapid DC Circuit Breaker is a high speed, single pole breaker used for protection of high power DC supply systems. The main features of the Gerapid circuit breaker are: Modular construction, easy to inspect and maintain Non-flammable and non-toxic insulation materials High speed, current limiting short circuit characteristics Up to 24kA tripping threshold for OC release High speed remote impulse release for distant faults Shunt or zero voltage releases for opening operation Powerful closing solenoid enables quick closing operation Easy and safe remote and local control of the breaker, Wide variety of accessories, such as counter, indicators, interlocks, manual handle, etc.. See Fig. 35-1 for overview of the breaker construction. NOTE: See Appendix F for all ratings and see User Manual S47183De for breaker details and accessories. Four current ratings of Gerapid circuit breakers are available for mounting on the trolley and used in the module. These circuit breakers are UL Listed and type tested in accordance with IEEE/ANSI C37.14-2000 Standards. Continuous current ratings range from 2500 to 6000 ampere frame size. All Gerapid circuit breakers of the same type and rating may be interchanged, provided the breaker accessories have the same ratings. Fig. 35-1 Gerapid circuit breaker construction Gerapid 2508 (See Fig. 35-2) 2500A frame size Standard 200kA peak interrupting current at 800VDC 3700V power frequency withstand level Current limiting characteristic Tested for duty type a, b, c and d according to ANSI C37.14 Trip-free capability according to ANSI C37.100 Gerapid 4008 (See Fig. 35-2) 4000A frame size Standard 200kA peak interrupting current at 800VDC 3700V power frequency withstand level Current limiting characteristic Tested for duty type a, b, c and d according to ANSI C37.14 Trip-free capability according to ANSI C37.100 Gerapid 5008 (See Fig. 35-3) 5000A frame size Standard 200kA peak interrupting current at 800VDC 3700V power frequency withstand level Current limiting characteristic Tested for duty type a, b, c and d according to ANSI C37.14 Trip-free capability according to ANSI C37.100 Fig. 35-2 Gerapid 2508 and 4008 circuit breakers Gerapid 6008 (See Fig. 35-3) 6000A frame size Standard 200kA peak interrupting current at 800VDC 3700V power frequency withstand level Current limiting characteristic Tested for duty type a, b, c and d according to ANSI C37.14 Trip-free capability according to ANSI C37.100 Fig. 35-3 Gerapid 5008 and 6008 circuit breakers 10 Design and specifications are subject to change without notice S47183Ee rev.01 2011-04-26 DC OEM MODULE FOR USE WITH GERAPID CIRCUIT BREAKERS Chapter 4 Installing the Module Installing the Module 4-1 General Notes The foundation must be flat and level in all planes with maximum deviation of 0.8 inch at the length of 3 foot. The module should be anchored to the floor through holes shown on Fig. 41-1 using 7/16” or metric M12 grade 5 steel bolts. This chapter contains instructions for installing the GE DC OEM Module. 4-2 Module Configuration and Assembly CAUTION: Personnel installing this equipment must be thoroughly familiar with this instruction manual and all articles of the National Electrical Code applicable to the installation of this equipment. In addition, all drawings, both mechanical installation and electrical, must be understood and strictly followed to prevent damage to the module. Environmental Requirements The module as provided is designed for indoor installations only and should be placed in an indoor area where clean, dry air is free to circulate around and above it. Since air is taken into the equipment at the bottom of each section and exhausted at the top, a location with good airflow must be provided for efficient operation. A minimum of 30 inches of clear space above the equipment is recommended. In order to properly withdraw the trolley there should be at least 7 foot of space in the front of the module. Multiple Modules Side by Side Assembly Modules can be connected together to form switchgear lineups. To bolt two modules together, edge trim strips must be removed. Special connection spacers must be used and are inserted into 12 hex shaped cut outs visible in the sidewalls. Fig. 42-1 shows the location of the front 4 connection spacer openings. Location of all openings and installation tips are shown in Appendix G. A Module Coupling Kit can be ordered under Cat. No.: 289169. Each kit consists of 12 Connection spacers, bolts and washers necessary to connect two adjacent modules. NOTE: See Appendix D for connection drawings. NOTE: See Appendix C for sketches concerning layout. Foundation Requirements The foundation requirements detailed in this chapter should be strictly adhered to. Top View on the floor. Connection Spacers 12 per side-by-side. Fig. 42-1 Location of front module connection spacers Anchor Points Module Preparation Use M12 or 7/16” grade 5 bolts. Every module is suitable for operating either with manually or motor operated trolley. Depending on the type of trolley being utilized, a locking plate in the module may need to be removed: Locking Plate If motor operated trolley is going to be used with the Module, remove the locking plate. If manually operated trolley is going to be used with the module, keep the locking plate in place See Fig. 41-1 and Fig. 42-2 to locate locking plate. NOTE: Look for the yellow warning label placed on the module’s floor to find bottom guide rail and the plate. Fig.41-1 Module anchor bolt hole locations The foundation must be strong enough to prevent sagging due to the weight of the completed switchgear structure and to withstand the impact loading caused by the opening of the breakers under fault conditions. The impact loading is approximately 1-1/2 times the static load. 2011-04-26 S47183Ee rev.01 Design and specifications are subject to change without notice 11 DC OEM MODULE FOR USE WITH GERAPID CIRCUIT BREAKERS Chapter 4 Installing the Module Locking Plate Ground Bus Connection Remove for motor operated trolley ! Ground bus connection terminal is located at the bottom of the module in the cable compartment. See Fig. 33-4. Circuit connections to a ground bus are made so that it is not necessary to open-circuit the ground bus to remove any connection made to the ground bus. Ground connections are provided for all removable elements to ensure that the frame and mechanism are grounded until the primary circuit is disconnected and the removable element is moved a safe distance. NOTE: See Appendix B for ground terminal drawings. Connecting Secondary Controls Secondary disconnect plug in the module is pre-wired with the harness going into control compartment. All wires that should be used by OEM for completing the module and breaker control are numbered and accessible inside the Control Compartment. Fig. 42-2 Locking Plate Module Rejection Interlock OEM must configure the rejection interlock in the module, before its usage. Four different configurations are possible: 2500A, 4000A, 5000A or 6000A. In the module, rejection markers must be screwed in place aligned with all current ratings except the one that module is dedicated to. This should be done on the right and left side of the module. Fig. 42-3 illustrates a correctly configured module rejection Interlock for a 2500A rated Gerapid breaker. Rejection markers must be fixed on both right and left sides of the breaker compartment, aligned with ratings: 4000A, 5000A and 6000A. NOTE: See Appendix E for electrical schemes for connections. NOTE: See Appendix A for control compartment dimensions. All trolley control commands and supply connections are also available thru the harness in the Control Compartment. Top mounted wire way access covers Installed Breaker Rating Markers Components Mounting Plate Rejection Markers Grounding Stud Fig.42-3 Rejection interlock set up for rating of 2500A NOTE: Always verify that the rating on rejection interlock is not higher that the module rated current. NOTE: Always configure rejection interlock on both sides of the module breaker compartment. Fig.42-4 Control compartment Main Busbars Connection Device mounting on control compartment door Module primary terminals are silver plated copper and are suitable to connect to copper bus bars as per IEEE Std. C37.14 Table 6. Connected bus bars should not have cross sections less that recommend in Table 6. Gerapid circuit breakers are not polarized. Therefore the load and the supply line can be connected to either top or bottom terminal. See Fig. 33-4 for primary terminals views. Control compartment’s door should be removed before making any cutouts. To remove the door, open and remove grounding connection. Lift the door up until the pins are free from hinges. All auxiliary devices can be attached to the mounting plate provided at the back of the control compartment. However it is recommend prefabricating a separate metal sheet and installing it in the control compartment using frame supports. There are two cover plates that provide access to the top mounted wire way (cable channel). Remove the covers to use them. See Fig. 42-4. NOTE: See Appendix B for primary terminals drawings and recommend bus bar dimension. 12 Design and specifications are subject to change without notice S47183Ee rev.01 2011-04-26 DC OEM MODULE FOR USE WITH GERAPID CIRCUIT BREAKERS Chapter 5 Installing the Breaker Installing the Breaker 5-2 Installing Gerapid Breaker 5-1 General Notes Prior to Installation Before installing, operating, or removing a circuit breaker, refer to the Gerapid breaker instruction manual S47183De for preparation, inspection, and test. Check thoroughly for damaged or loose parts and for any dirt or foreign matter, which may be in the breaker. To install the breaker, proceed as follows: 1) 2) Before installing a breaker, check the contact areas on each primary disconnect cluster of fingers for foreign matter that may have accumulated. Clean these areas if necessary. Be sure that a thin film of the red lubricating grease “MOBIL GREASE 28” covers the fingers areas before putting a breaker in the compartment. Check to see that the breakers match their respective trolley and compartment. Each breaker is assigned a serial number and ratings. These are shown on the breaker’s nameplate. The breaker may also be identified using the 20digit PST catalog number. See Fig 51-1. Prior to placing a breaker in its intended location on the trolley, please check following precautions: 1) Find the foil bag with breaker bolting kit no. 700701 that is attached to the trolley’s platform. Remove it. 2) Ensure that the breaker is OPEN. 3) Ensure that arc chute is NOT on the breaker. 4) Ensure that lifting device can carry ~300 lbs and that lifting slings are min. 6 ft long. Installation Procedure To install the Gerapid circuit breaker, proceed as follows: 1) Ensure that the lifting frame has been removed from the trolley. See Fig. 22-2. 2) Place the lifting slings in position. See Fig. 52-1. Carefully lift the breaker and place it on the trolley. 3) Slide in the breaker toward the front of the trolley, until four attachment bolt holes in platform match the holes in breaker baseplate. Install bolts provided and tighten with torque listed in Table D-1. The fixing kit is attached to the trolley’s platform. 4) Plug in all connectors to correct terminals at the front of breaker’s control box. Tight the connectors. See Fig. 52-3. WARNING: Do not stand under the circuit breaker during the lifting and transport operations. NOTE: Do not transport the circuit breaker with arc chute installed. Fig. 51-1 Nameplate of Gerapid breaker Breakers of the same rating are interchangeable in their equipment compartments, as long as they have the same accessories equipped. The trolley design is the same and universal, regardless of the Gerapid breaker type intend to operate with. WARNING: A breaker with different rating fit into any of the trolleys. If the trolley’s rejection interlock does not match the breaker’s rating, but it does match the compartment’s rejection interlock, it is possible to rack-in an incorrect breaker into the compartment. This may lead to serious damages and could result in death or serious injury for operator! Fig. 52-1 Lifting the breaker 2011-04-26 S47183Ee rev.01 Design and specifications are subject to change without notice 13 DC OEM MODULE FOR USE WITH GERAPID CIRCUIT BREAKERS Chapter 5 Installing the Breaker Fig. 52-3 Control connectors for Gerapid breaker Fig. 52-2 Breaker on the trolley NOTE: Do not use attachment screws longer than ~1.2 in. Longer screws may damage trolley’s components. Configuration of the Rejection Interlock It is strongly recommended to check and set up correct position of the rejection interlock immediately after breaker is installed on the trolley. All trolleys have their rejection interlock set at 2500A, by default. If the breaker has a different rating, the rejection interlock has to be configured accordingly. 1) 2) Remove both rejection markers from default positions. Reattach them in to the positions which correspond to the breaker’s current rating. In example from 2500A to 5000A, see Fig. 52-4 CAUTION: Make sure both rejection markers on both sides of the trolley match the breaker current rating. Fig. 52-4 Rejection Interlock of the trolley 14 Design and specifications are subject to change without notice S47183Ee rev.01 2011-04-26 DC OEM MODULE FOR USE WITH GERAPID CIRCUIT BREAKERS Chapter 5 Installing the Breaker Testing and Inspection High Potential Tests 6-1 General Notes After the equipment has been installed and all connections made, equipment must be tested and inspected before it is put in service. Although each module and each breaker have been tested at the factory, a final field test must be made to be sure that the equipment has been properly installed and that all interlocks operate correctly. High-potential tests, to check the integrity of the insulation, are not necessary if the installation instructions are carefully followed. Each module and each trolley undergo High Potential Tests before shipment. Passing of compete Factory Acceptance Test sequence is marked by sticker note. See Fig. 61-1. Directions for inspection and testing breakers are given in the instruction book S47183De, furnished with each breaker. The extent of the tests on the equipment as a whole is given below. NOTE: See Appendix H for corresponding Field Test Procedure, where all steps are listed in Tables H-2, H-3 and H-4. Prior to Test Before any operation on the module, it is required to check if corresponding trolley is remote or manual racking type. Remote racking trolley includes motor drive installed in a bottom-front compartment of the trolley. See Fig. 34-1. NOTE: Make sure that locking plate has been removed, if the trolley is manual racking type. See section 4.2. Connecting Control Circuits Some of the field test procedures require control circuits to be active and energized. Therefore it is necessary to connect the wiring harness of the module to a dedicated system, which enables control of the module. To see recommended connections, please refer to Appendix H, Fig. H-1. CAUTION: All wires, which are not connected, must be insulated while test is running. Fig. 61-1 Quality check markings after FAT tests If local codes demand this test, or the purchaser wishes to make high-potential tests, the voltage should not exceed, for the power circuit, 2.8 kV RMS or 3.9 kV DC and for the control circuit 1.2 kV RMS. Testing procedure is described in Appendix H, Table H-7. Grounding Circuit Check If local codes demand this test, or the purchaser wishes to make earthing system test, refer to procedure described in Appendix H, Table H-8. Minimum current required for checking of grounding connections is 10 A. Resistance for each measured grounding connection must be less than 0.1 Ohm. The Remote Racking option is available only with ~230 V 60 Hz control voltage. For other values please contact GE Industrial Solutions representatives. Supply source should be capable to carry ~3 A permanent current. NOTE: See Appendix F for details concerning electric characteristics of auxiliary loads. 6-2 Field Testing Procedure NOTE: Extended descriptions of the module operating modes with illustrations are given in Chapter 7. Refer to these during Field Testing execution. Testing the Module with Remote Racking System Proceed with steps 1.1 to 1.9 from Appendix H, Table H-4. Testing the Module w/o Remote Racking System Proceed with steps 1.1 to 1.9 from Appendix H, Table H-5. 2011-04-26 S47183Ee rev.01 Design and specifications are subject to change without notice 15 DC OEM MODULE FOR USE WITH GERAPID CIRCUIT BREAKERS Chapter 7 Operating the Module Operating the Module Access Interlocks Front door Access Interlock, see Fig. 71-4, ensures tripping of the breaker before the Crank Handle can be inserted for racking. Lifting up of the Trip Lever causes breaker to trip open, and additionally enable access to manual racking slot. 7.1 Mechanisms and Interlocks Racking Mechanism The racking mechanism is designed for moving the trolley between two (2) positions, TEST and CONNECTED. Clockwise rotation of the racking shaft, Fig. 71-1, results in Trolley movement toward the CONNECTED position. Counterclockwise rotation of the racking mechanism results in trolley movement from the CONNECTED to the TEST position. NOTE: The Access Lever is locked in lower position when the breaker is closed. Racking Shaft Trip Lever Indicator Shaft Fig. 71-1 Racking system Access Lever The racking mechanism can be manually or remotely operated, closed-door drawout, designed to prevent overtravel, and equipped with guides for alignment of the breaker in the module. The Crank Handle has a torque clutch. See Fig. 71-2. This clutch protects the racking system against damages caused by applying excessive force when Trolley is in CONNECTED position. Clutch Fig. 71-4 Front door Access Interlock Trip Lever is mechanically coupled with a vertical interlock under the trolley. This interlock mechanically locks the trolley in TEST or CONNECTD position. When the Tri Lever is lifted up, the “Crank Lock” stop switch (S3F) electrically cuts-off the closing circuit of the breaker and blocks remote racking. This ensures no remote command activates the trolley or closes the breaker with the Crank Handle is inserted. See Fig. 71 5 and wiring circuit in Appendix D. Operating Rod Fig 71-2 Crank Handle An indicator is provided to show breaker position within the compartment. See Fig. 71-3. The indicator is visible from the exterior of the switchgear. Lower position -S3F stop switch Upper position Fig. 71-5 Locking rod with S3F end switch “Crank Lock” Secondary Control Interlock TEST CONNECTED Fig. 71-3 Position Indicator Trolley is equipped with integral wheels for moving the trolley in and out of a cubicle and sized to carry the weight without deforming or cutting into the concrete surface. The wheels roll, but not slide, and guide the trolley to correctly align and engage the racking mechanism. 16 Secondary Disconnect consist of a receptacle installed in the stationary cell and removable plug, which is a part of the trolley. See Fig. 71-6. This disconnect is equipped with Rack-in Interlock preventing movement of the trolley from TEST position to CONNECTED position unless Secondary Disconnect is connected. Rack-out Interlock prevents the trolley from being fully withdrawn from the Module unless the secondary disconnect is unplugged. See Fig. 71-6. After removing the plug, both interlocks move to the right and reset. This enables withdrawal operation and blocks rack-in operation as shown at Fig. 71-7. Design and specifications are subject to change without notice S47183Ee rev.01 2011-04-26 DC OEM MODULE FOR USE WITH GERAPID CIRCUIT BREAKERS Chapter 7 Operating the Module Receptacle Snap Lock Trolley Operated Switches Stationary part of the Module is equipped with set of trolley position switches. See Fig. 71-9 for location. 33-5/33-4 Rack-Out Interlock (active) 33-3/S4F Rack-In Interlock (release) Plug Fig. 71-6 Secondary Disconnect with two interlocks Rack-In Interlock activated Park position for the plug. Fig. 71-7 Operation of Rack-in Interlock Remote Racking A motor drive 230V 60 Hz and 250 W (0.34 Hp) is available for Remote Racking option. The gear-motor is installed in the front-bottom compartment of the trolley. See Fig. 34-1. Complete rack-in or rack-out operation lasts ~8 seconds. Fig. 71-9 Position switches 33-3, S4F, 33-4, 33-5 Following signal switches are available with the Module: Access to 33-1 & 33-2 Actuator Pins of 33-1 & 33-2 Switch S4F: NC dry contact available at (Y64 Y65). Indicate coupling of the racking shaft with racking socket. Switch 33-4: NO and NC dry contacts available at (Y66 Y67) and (Y68 Y69). Indicate TEST position. Switch 33-5: NO and NC dry contacts available at (Y70 Y71) and (Y72 Y73). Indicate CONNECTED position. Padlocks There are three interlocks, which can be padlocked. Padlock’s diameter shall not exceed 1/3 inch. Padlocks are not included. Safety Shutters, see Fig. 33-3, Access Console, see Fig. 71-10, Control Compartment, see Fig. 71-10. Racking Socket Fig. 71-8 Limit switches 33-1 and 33-2. The motor is protected by 2.5 A fuse element. Two independent limit switches, 33-1 and 33-2, switch off the motor drive’s supply when the trolley reaches CONNECTED position. Limit switch 33-3 stops the trolley in TEST position. See Fig. 71-9. All three switches are wired to block the breaker CLOSE operation if the trolley is between CONNECTED and TEST positions. See circuit diagram E-2, Appendix E. 2011-04-26 S47183Ee rev.01 Fig. 71-10 Padlock set at Access Console (left) and Control Compartment (right). Design and specifications are subject to change without notice 17 DC OEM MODULE FOR USE WITH GERAPID CIRCUIT BREAKERS Chapter 7 Operating the Module 7.2 Trolley with Manual Racking Operational Positions The trolley has four separate operating positions: 1. CONNECTED position – Primary Disconnects and Secondary Disconnect in full contact, breaker ready for normal operation. Position Interlock, see Fig. 72-1, keeps the trolley in this position. Secondary Disconnect Secondary Disconnect Primary Disconnects Position Interlock Fig. 72-2 TEST position of the trolley Primary Disconnects NOTE: Crank Handle is necessary for racking operations. Crank Handle has to be ordered separately. 1. Position Interlock Fig. 72-1 CONNECTED position of the trolley 2. TEST position - Primary Disconnect separated by a safe distance and shutters closed. The Secondary Disconnect is in full contact. Trolley is withdrawn ~5 inches and locked by Position Interlock. See Fig. 72-2. 3. DISCONNECTED position - Primary Disconnects separated by a safe distance and shutters closed. Secondary Disconnect is disengaged. Trolley positioned in the TEST position. 4. WITHDRAWN position – Trolley outside of the Module. NOTE: Manual racking-in and racking-out does not require control voltage to be present. Although, switching ON/OFF the breaker will not possible in such case. 18 Racking – In Procedure 2. Trolley WITHDRAWN. Push trolley toward the module until it stops at DISCONNECTED position. Open the trolley’s door and install Secondary Disconnect. Now the trolley is at the TEST position. NOTE: .Use the Door Key to open all Door Locks and release Door Interlock. See Fig. 72-3. NOTE: Make sure that Receptacle Snap Lock is engaged. 3. Lift up the Access Lever (Fig. 71-4) and push the trolley in further until racking shaft (Fig. 71-1) couples with socket (Fig. 71-8). NOTE: S4F contact should indicate the coupling position if connected (Y64 Y65) to any external indication device. Design and specifications are subject to change without notice S47183Ee rev.01 2011-04-26 DC OEM MODULE FOR USE WITH GERAPID CIRCUIT BREAKERS Chapter 7 Operating the Module Rack-Out Procedure Lift to release NOTE: Crank Handle is necessary for racking operations. Crank Handle has to be ordered separately. 1. 2. Door Interlock Trolley CONNECTED. Open the breaker either using OPEN command or pulling up the Trip Lever (Fig. 71-4). Lift up the Access Lever (Fig. 71-4) and insert Crank Handle. Rotate the crank counterclockwise until trolley stops. Breaker is now at TEST position. NOTE: TEST position is indicated by Position Indicator, (Fig. 71-3) or by contacts of the switch 33-4 (Fig. 71-9). 3. Open the trolley’s door and disconnect the Secondary Disconnect. Hang it on the frame to the right (Fig. 71-7). Now the trolley is at the DISCONNECTED position. NOTE: Use the Door Key to open all Door Locks and release Door Interlock. See Fig. 72-3. Door Key Door Locks 4. 4. Remove the crank. Lift up the Access Lever (Fig. 71-4) and pull the trolley out from the module. Fig. 72-3 Door locks positions 7.3 Trolley with Remote Racking Insert Crank Handle into the Access Console slot, Fig. 72-4 and rotate the crank clockwise until trolley reaches CONNECTED position. Operational positions. The trolley has distinguished four operational positions: NOTE: CONNECTED position is indicated by Position Indicator, (Fig. 71-3) or by contacts of the switch 33-5. 5. Remove the Crank Handle. Push down the Trip Lever, (Fig. 71-4), to make sure that both levers of the Access Console are in their maximum lower positions. Secondary Disconnect NOTE: If the Access Lever is not at its maximum lower position, closing of the breaker will not be possible. Fig. 72-4 Crank Handle installed Position Interlock Primary Disconnects Fig. 73-1 CONNECTED position for the remote racking trolley 2011-04-26 S47183Ee rev.01 Design and specifications are subject to change without notice 19 DC OEM MODULE FOR USE WITH GERAPID CIRCUIT BREAKERS Chapter 7 Operating the Module 1. CONNECTED position – Primary Disconnects and Secondary Disconnect in full contact, breaker ready for normal operation. Position Interlock, see Fig. 73-1, keeps the trolley in this position. 2. TEST position - Primary Disconnect open and separated by a safe distance with shutters closed. The Secondary Disconnect is in full contact. The Trolley is withdrawn ~4 inches and locked by Position Interlock. See Fig. 72-3. Secondary Disconnect Secondary Disconnect Primary Disconnects Position Interlock Fig. 73-3 DISCONNECTED position for remote racking trolley. Remote Rack–In Procedure. Position Interlock Primary Disconnects Fig. 73-2 TEST position for remote racking trolley 3. DISCONNECTED position - Primary Disconnects open and separated by a safe distance with shutters closed. Secondary Disconnect is open. Trolley is withdrawn ~5 inches. See Fig. 723. 4. WITHDRAWN position – Trolley outside of the module. NOTE: Crank Handle is necessary for completing racking operations. Crank Handle has to be ordered separately. WARNING: EMERGENCY RACKING STOP circuit (Y58 Y59) must be wired to a pushbutton (furnished by OEM). It is recommended the STOP PB be installed on the control compartment door. See example Fig. 73-4. Use this pushbutton for immediate interruption of racking operation and stop the trolley regardless of its position. NOTE: Remote racking-operations require control voltage and control commands to be provided. See Appendix E for electrical circuit drawings. EMERGENCY RACKING STOP Fig. 73-4 EMERGENCY STOP pushbutton (by OEM) 20 Design and specifications are subject to change without notice S47183Ee rev.01 2011-04-26 DC OEM MODULE FOR USE WITH GERAPID CIRCUIT BREAKERS Chapter 7 Operating the Module 1. 2. Trolley WITHDRAWN. Push trolley toward the module until it stops at DISCONNECTED position. Open the trolley’s door and install Secondary Disconnect. NOTE: Use the Door Key provided to open all Door Locks and release Door Interlock. See Fig. 73-4. Manual Rack-Out Procedure. NOTE: Crank Handle is necessary for completing of racking operations. Crank Handle has to be ordered separately. 1. NOTE: Make sure that Receptacle Snap Lock is engaged. 3. Lift up the Access Lever (Fig. 71-4) and push the trolley in further until racking shaft (Fig. 71-1) couples with socket (Fig. 71-8). NOTE: S4F contact should indicate the coupling position if connected (Y64 Y65) to any external indication device. 4. Insert Crank Handle into the Access Console slot, Fig. 72-4 and rotate Crank Handle clockwise until trolley reaches TEST position. NOTE: TEST position is indicated by Position Indicator, (Fig. 71-3) or by indication of switch 33-4 (Fig. 71-9). 5. Remove Crank Handle. Push the Trip Lever down, (Fig. 71-4), making sure that both levers of the Access Console are in their maximum lower positions. NOTE: If the Access Lever is not at its maximum lower position, closing of the breaker or remote rack-in will not be possible. 6. Use RACK BREAKER-IN command (Y60 Y61) to start motor for rack in operation. Trolley will stop at CONNECTED position. WARNING: Use EMERGENCY STOP pushbutton in case of emergency situation. See Fig.73-4. Lift to release 2. Trolley CONNECTED. Open the breaker either using OPEN command or pulling up the Trip Lever (Fig. 714). Use RACK BREAKER-OUT command (Y62 Y63) to start motor for rack out operation. Trolley will stop at TEST position. NOTE: TEST position is indicated by Position Indicator, (Fig. 71-3) or by indication of switch 33-4 (Fig. 71-9). 3. Open the trolley’s door and disconnect the Secondary Disconnect. Hang it on the frame to the right (Fig. 71-7). NOTE: Use the Door Key to open all Door Locks and release Door Interlock. See Fig. 73-4. 4. 5. Lift up the Access Lever (Fig. 71-4) and insert Crank Handle. Rotate Crank Handle counterclockwise until trolley stops. Now the trolley is in the DISCONNECTED position. Remove Crank Handle. Lift up the Access Lever (Fig. 71-4) and pull the trolley out from the module. 7.4 Operate the breaker. Gerapid circuit breakers can be operated electrically and manually. NOTE: Manual CLOSE operation at the breaker is possible only at WITHDRAWN position of the trolley. Manual closing should only be performed for maintenance. Manual OPEN operation at CONNECTED or TEST positions is possible by means of Trip Lever. For maintenance purposes breaker can be operated by means of dedicated hand lever at WITHDRAWN position. NOTE: See User Manual S47183De for breaker operation details and accessories. Door Interlock All electric control commands and signals are wired thru available harness (Y01 Y54). See Appendix E for details of available commands and signals. Door Key Door Locks Fig. 73-4 Door locks 2011-04-26 S47183Ee rev.01 Design and specifications are subject to change without notice 21 DC OEM MODULE FOR USE WITH GERAPID CIRCUIT BREAKERS Chapter 9 Customer Support. Troubleshooting and Maintenance 8.1 Troubleshooting Troubleshooting section describes potential issues that user may experience during operation of the trolley. Contact GE Energy service in case the problem is not resolved. NOTE: See User Manual troubleshooting information. S47183De for breaker Manually operated trolley A. B. C. D. E. F. Cannot lift Access Lever to insert Crank Handle Check if the breaker is OPEN. When CLOSED, breaker’s drive rod activates interlock, which locks the Access Lever. Check the length of four M8 mounting screws for the breaker. Screws may limit the movement of the Access Lever if are longer than 25 mm (1”). Cannot trip the breaker by means of Trip Lever Check the length of four M8 mounting screws for the breaker. Screws may limit the movement of the Trip Lever if are longer than 25 mm (1”). Check the Forced Tripping Release pin under the breaker’s base. The pin should be able to be fully pressed against base. If this does not work, the pin may be damaged inside the breaker. Cannot move the trolley using Crank Handle Check if Crank Handle is properly and fully inserted into Access Slot. The crank engages fully with the shaft only with proper orientation of the handle. Check if Crank’s clutch is set at minimum 50 Nm. Cannot rack-in the trolley into DISCONNECT / TEST position Check point C. Check if rating Rejection Interlock of the trolley and the module match. Check if Racking Shaft is bent. Check if Indicator Shaft is jammed. Cannot rack-in the trolley into CONNECTED position. Check point C. Check if Secondary Disconnect is connected. Check if shutters are jammed or closed. Cannot rack-out the trolley from TEST position. Check if Secondary Disconnect is disconnected. Check if Access Lever is lifted up. 8.2 Maintenance NOTE: See User Manual S47183De for complete breaker inspection and maintenance routines. Expected service life of the OEM module is 20 years, with MTBF exceeds 2,000 racking operations. The module and trolley construction is nearly maintenance free. The system is designed to operate during specified period and in prescribed conditions without functional part replacement. Only simple preventive maintenance is recommended to be performed every two years: Check the racking shaft of the trolley and grease it with molybdenum based grease, such as MOLYKOTE G4700 or NYE Rheolube® 373. Also grease racking socket in the structure. Check the Primary Disconnect clusters. Clean and apply a light coating of red Mobile 28 grease, manufactured by ExxonMobil. Perform testing routine as listed in Appendix H, tables H3 or H4. Motor driven trolley NOTE: Check points A thru F are also valid for motor driven trolley. Refer to them in case of related issues. G. H. 22 Cannot rack-in the trolley to CONNECTED position. Check if Access Lever is in down position. Check if motor thermal overload protection GPS1B is activated. Check if end switch S4F is activated. Check if end switch S3F is activated. Cannot rack-out the trolley from CONNECTED position. Make sure the breaker contacts are OPEN. Check point G. Design and specifications are subject to change without notice S47183Ee rev.01 2011-04-26 DC OEM MODULE FOR USE WITH GERAPID CIRCUIT BREAKERS APPENDIX A Module & Trolley Drawings. Customer support 8.1 Warranty For warranty issues or other after sales service, contact the GE Energy GE Resolve Customer support line at : 1-888-437-3765. 8.2 Field Service Support To request and schedule GE Energy Service Engineering support, call : 1-800-533-5885. 8.3 Publications and other support Instruction Books, Drawings and other technical documents can be found and downloaded from the GE Energy web site at http://www.geindustrial.com Go to: Products -> Circuit Breakers -> DC High Speed Circuit Breakers -> Gerapid. 2011-04-26 S47183Ee rev.01 Design and specifications are subject to change without notice 23 DC OEM MODULE FOR USE WITH GERAPID CIRCUIT BREAKERS APPENDIX A Module & Trolley Drawings. APPENDIX “A” – Module & Trolley Drawings Fig. A-1 Outline dimensions of the trolley. Units are mm [inches] Fig. A-2 Primary disconnect clusters for 2508, 4008 (left) and 5008, 6008 (right) Gerapid breakers. Units are mm [inches] 24 Design and specifications are subject to change without notice S47183Ee rev.01 2011-04-26 DC OEM MODULE FOR USE WITH GERAPID CIRCUIT BREAKERS APPENDIX A Module & Trolley Drawings. Fig. A-3 Outline dimensions for OEM Module with 750 mm [ 29.53 inches ] Cable Compartment Fig. A-4 Outline dimensions for OEM Module with 450 mm [ 17.72 inches ] Cable Compartment 2011-04-26 S47183Ee rev.01 Design and specifications are subject to change without notice 25 DC OEM MODULE FOR USE WITH GERAPID CIRCUIT BREAKERS APPENDIX B Primary Terminals Drawings. APPENDIX B – Primary Terminals Drawings Fig. B-1 2500A and 4000A Primary Terminals of OEM DC Module. Units are mm [inches] 26 Design and specifications are subject to change without notice S47183Ee rev.01 2011-04-26 DC OEM MODULE FOR USE WITH GERAPID CIRCUIT BREAKERS APPENDIX B Primary Terminals Drawings. Fig. B-2 5000A and 6000A Primary Terminals of OEM DC Module. Units are mm [inches] 2011-04-26 S47183Ee rev.01 Design and specifications are subject to change without notice 27 DC OEM MODULE FOR USE WITH GERAPID CIRCUIT BREAKERS APPENDIX B Primary Terminals Drawings. Side View Top View Fig. B-3 Ground bus main connection 28 Design and specifications are subject to change without notice S47183Ee rev.01 2011-04-26 DC OEM MODULE FOR USE WITH GERAPID CIRCUIT BREAKERS APPENDIX B Primary Terminals Drawings. APPENDIX C – Layout drawings TOP VIEW : Dimension A: - min. 0.3 ft Dimension B: - min. 7 ft Dimension C: - min. 0.3 ft in case of no need for rear access, - min. 1.5 ft in case of need for rear access. NOTE: Minium free space over the Module’s roof should be 1.5 ft. Trolley Fig. C-1 Minimum required distances for installing the DC OEM Module 2011-04-26 S47183Ee rev.01 Design and specifications are subject to change without notice 29 DC OEM MODULE FOR USE WITH GERAPID CIRCUIT BREAKERS APPENDIX C Layout Drawings. APPENDIX D – Tightening Torques Tables All the tightening torques listed below are applicable for Module, Trolley and Breaker. Table D-1 Tightening torques for mechanical construction elements Screw size Hex-head screws Class 5.8 Hex-head screws Class 8.8 Self-tapping screws Less M3 Inch-pounds 3–4 Inch-pounds 5-6 - M3 7–8 10 - 11 - M3.5 9 - 10 15 - 17 8 - 10 M4 14 - 15 22 - 24 15 - 17 M5 26 - 29 44 - 49 62 - 68 M6 47 - 51 75 - 83 132 - 146 M8 106 - 117 177 - 194 177 - 194 M10 230 - 253 362 - 398 - M12 362 - 398 620 - 681 - M16 885 – 973 1500 - 1650 - Inch-pounds Table D-2 Tightening torques for electric circuits connections Screw size Auxiliary & control circuits Copper bus bar connections Less M3 - - M3 9 - 10 - M3.5 10 - 11 - M4 13 - 15 - M5 26 - 29 - M6 52 - 58 71 - 78 M8 124 - 136 177 - 194 M10 230 - 253 354 - 390 M12 354 - 390 620 - 681 M16 531 - 584 1240 - 1360 Inch-pounds 30 Inch-pounds Design and specifications are subject to change without notice S47183Ee rev.01 2011-04-26 DC OEM MODULE FOR USE WITH GERAPID CIRCUIT BREAKERS APPENDIX E Electrical Diagrams. APPENDIX E – Electrical Diagrams Fig. E-1 Remote Racking Module - Gerapid connections 2011-04-26 S47183Ee rev.01 Design and specifications are subject to change without notice 31 DC OEM MODULE FOR USE WITH GERAPID CIRCUIT BREAKERS APPENDIX F Rating Tables. Fig. E-2 Remote Racking Module – Control diagram 32 Design and specifications are subject to change without notice S47183Ee rev.01 2011-04-26 DC OEM MODULE FOR USE WITH GERAPID CIRCUIT BREAKERS APPENDIX E Electrical Diagrams. Fig. E-3 Remote Racking Module – Secondary Disconnect coding 2011-04-26 S47183Ee rev.01 Design and specifications are subject to change without notice 33 DC OEM MODULE FOR USE WITH GERAPID CIRCUIT BREAKERS APPENDIX F Rating Tables. Fig. E-4 Remote Racking Module – Wiring Harness coding 34 Design and specifications are subject to change without notice S47183Ee rev.01 2011-04-26 DC OEM MODULE FOR USE WITH GERAPID CIRCUIT BREAKERS APPENDIX E Electrical Diagrams. Fig. E-5 Manual Racking Module - Gerapid connections 2011-04-26 S47183Ee rev.01 Design and specifications are subject to change without notice 35 DC OEM MODULE FOR USE WITH GERAPID CIRCUIT BREAKERS APPENDIX F Rating Tables. Fig. E-6 Manual Racking Module – Control diagram 36 Design and specifications are subject to change without notice S47183Ee rev.01 2011-04-26 DC OEM MODULE FOR USE WITH GERAPID CIRCUIT BREAKERS APPENDIX E Electrical Diagrams. Fig. E-7 Manual Racking Module – Secondary Disconnect coding 2011-04-26 S47183Ee rev.01 Design and specifications are subject to change without notice 37 DC OEM MODULE FOR USE WITH GERAPID CIRCUIT BREAKERS APPENDIX F Rating Tables. Fig. E-8 Manual Racking Module – Wiring Harness coding 38 Design and specifications are subject to change without notice S47183Ee rev.01 2011-04-26 DC OEM MODULE FOR USE WITH GERAPID CIRCUIT BREAKERS APPENDIX G Accessories and Installation Drawings.. APPENDIX F – Rating Tables Breaker Rating Arc chute type Rated continuous current Rated short circuit peak/sustained current Short circuit characteristics Rated maximum system voltage Power frequency withstand voltage Maximum arc voltage Mechanical endurance w/o maintenance* Breaker weight Gerapid 2508 1x2 2,500 A 200/120 kA Duties a b, c, d 800 V 3,700 V / 60 sec 1,500 V 20,000 cycles 310 lbs Gerapid 4008 1x2 4,000 A 200/120 kA Duties a b, c, d 800 V 3,700 V / 60 sec 1,500 V 20,000 cycles 310 lbs Gerapid 5008 1x2 5,000 A 200/120 kA Duties a b, c, d 800 V 3,700 V / 60 sec 1,500 V 20,000 cycles 480 lbs Gerapid 6008 1x2 6,000 A 200/120 kA Duties a b, c, d 800 V 3,700 V / 60 sec 1,500 V 20,000 cycles 480 lbs Table F-1 UL listed Gerapid Ratings according to IEEE Std. C37-14-2002 Module Rating Rated continuous current of the primary circuit Type of Gerapid breaker for installation Rated short circuit peak/sustained current Rated maximum voltage Rated insulation level of the primary circuit Rated insulation level of the secondary circuits Mechanical endurance w/o maintenance* Weight of the trolley without Gerapid breaker Weight of the Module without Trolley DCOEM 4000 4,000 A 2508 & 4008 200/120 kA 800 V 5,200 V d.c. 1,500 V 500 cycles 300 lbs 550 lbs DCOEM 6000 6,000 A 5008 & 6008 200/120 kA 800 V 5,200 V d.c. 1,500 V 500 cycles 300 lbs 580 lbs Table F-2 UL listed DC OEM Module. Ratings according to IEEE Std. C37.20.1-2002 No functional parts replaced during the listed number of operations. Breakers require servicing at recommended intervals. Servicing consists of adjusting, cleaning, lubricating, tightening and similar procedures as recommended in Users Guide S47183De. 2011-04-26 S47183Ee rev.01 Design and specifications are subject to change without notice 39 DC OEM MODULE FOR USE WITH GERAPID CIRCUIT BREAKERS APPENDIX G Accessories and Installation Drawings. APPENDIX G – Accessories & Installation Drawings Accessories Table G-1 List of accessories for DC OEM Module A Catalogue Name Cat No. DCOEMCRANK 700695 DCOEMCOVER15 700696 DCOEMCOVER18 700697 DCOEMCONNECTOR 700698 DCOEMCHANCOVER 700699 DCOEMM8x25KIT 700701 DCOEMM6x12KIT 289158 DCOEMCOVERFIX 289160 DCOEMCOUPLINGS 289169 DCOEMHINGES 289709 B C D E F G H I J Description Crank handle for manual racking. Consists of: 1 pc of crank handle. Side cover kit for 450 mm depth cable compartment. Consists of: 2 pcs of side cover 4 pcs of edge trim strip 16 pcs of bolting sets like in 289160. Side cover kit for 750 mm depth cable compartment. Consists of: 2 pcs of side cover 4 pcs of edge trim strip 20 pcs of bolting sets, like in 289160. Cable channel connector for connecting top cable channels. Sufficient for connecting eleven (11) OEM modules side-by-side. Attachment requires four (4) screws M6x12 (289158) per single cable duct connector. Consist of: 10 pcs of cable duct connector 10 pcs of cable duct connector cover End covers for top cable channels. Fixation requires four (4) screws M6x12 (289158) per single cover. Consist of: 10 pcs of cable channel covers Screws for fixation of the single Gerapid breaker to the single Trolley. Consist of: 4 pcs of countersunk screws M8x25 Screws M6x12 use for fixation of user components to the skeleton frame. Consist of: 500 pcs of screws M6x12 Side covers fixing kit. Consist of: 100 fixing sets for side covers installing.. Module coupling kit. Consist of: 12 bolting sets for connecting two adjacent Module frames. Hinges kit. Single hinge requires one screw M6x12 (289158). Consist of: 12 pcs of hinges for doors. “A” – DCOEMCRANK “B” - DCOEMCOVER15 “C” - DCOEMCOVER18 “E” – DCOEMCHANCOVER connector “F” – single M8x30 screw “G” – single M6x12 screw “I” – single frame bolting connector 40 “D” - DCOEMCONNECTOR “H” – single side cover “J” – single hinge Design and specifications are subject to change without notice S47183Ee rev.01 2011-04-26 DC OEM MODULE FOR USE WITH GERAPID CIRCUIT BREAKERS APPENDIX G Accessories and Installation Drawings. Installation Drawings 12 bolting elements “I” for connecting of rear, middle and front columns. cable channel connector “D”. 4 screws “G” for installing cable channel connector “D”. Fig. G-3 Bolting two frames together and installing cable channel connector “D” cable channel cover “E” 2 screws “G” for installing cable channel cover “E” Fig. G-4 Installing end cover “E” for top cable channel. 2011-04-26 S47183Ee rev.01 Design and specifications are subject to change without notice 41 DC OEM MODULE FOR USE WITH GERAPID CIRCUIT BREAKERS APPENDIX G Accessories and Installation Drawings. Part “H” Edge Strips NOTE: Cover “C” (750mm depth) has two additional “H” screws, centered at the top and bottom of the cover. Fig G-5 Installing edge strips and side cover “B” or “C” 42 Design and specifications are subject to change without notice S47183Ee rev.01 2011-04-26 DC OEM MODULE FOR USE WITH GERAPID CIRCUIT BREAKERS APPENDIX H Field Test Procedure. APPENDIX H – Field Test Procedure This Appendix describes full recommended procedure for Field Testing of DC OEM Module equipped with Gerapid DC Circuit Breaker. The description consists of four chapters: Connecting control commands to the module. See Fig. H-1 Testing the module with Remote Racking. See Table H-3. Testing the module with Manual Racking. See Table H-4. High potential test (optional). See Table H-6. Connecting control commands for testing Following control commands are available for OEM wiring: Name Wire Points Description RACK BREAKER-IN (Y60-Y61) Moves trolley from TEST to CONNECTED position. RACK BREAKER-OUT (Y62-Y63) Moves trolley from CONNECTED to TEST position. GERAPID SOLENOID CLOSE– (Y04-Y05) Closes Gerapid breaker, possible only in TEST or CONNECTED positions. GERAPID OPEN (Y06-Y07) Opens Gerapid breaker, possible only in TEST or CONNECTED positions. POSITIONS CHECK (Y67/Y73) Signals when trolley reaches TEST or CONNECTED position. EMERGENCY RACKING STOP (Y58-Y59) Immediately stops the trolley regardless of position. Typical external controls, furnished by OEM. Fig. H-1 Wiring diagram for connection of control functions for the module. 2011-04-26 S47183Ee rev.01 Design and specifications are subject to change without notice 43 DC OEM MODULE FOR USE WITH GERAPID CIRCUIT BREAKERS APPENDIX H Field Test Procedure. Testing the module with Remote Racking option (g) Secondary Plug (f) Receptacle Snap Latch (d) Trip Lever UNLOCK LOCK (e) Access Lever (c) Access Slot (a) Position Indicator (i) Rack-In Interlock (h) Rack-Out Interlock (b) Crank Handle Fig. H-2 Access Console and Secondary Disconnect of the trolley NOTE: Please refer to section 7 for module operating instructions and hints. Table H-3 DC Module with Remote Racking - Field Test Procedure Step Starting Point Check Points Pass Criteria 1.1 Trolley is in WITHDRAWN position. Breaker is OPEN. Insert Crank Handle (b) into Access Slot. a. Try to rack-in the trolley to TEST position. a. The trolley must not move into TEST position, while Plug (g) is disconnected. 1.2 Trolley is in DISCONNECTED position. Breaker is OPEN. Insert Crank (b) into Access Slot (c). Connect the Plug (g). Trolley is in TEST position. Breaker is OPEN. Remove Crank Handle (b) from Access Slot (c). a. Manually rack-in the trolley to TEST position, using the Crank Handle (b). Try to CLOSE the breaker at TEST position. a. The breaker must not CLOSE, while Crank Handle (b) is inserted. CLOSE the breaker. Check the position indication in TEST. Send a command to rack-in the trolley to CONNECTED position. Try to lift up Access Lever (e). Try to lift up Trip Lever (d). a. b. The breaker must CLOSE. “Positions Check” signal must be active. The trolley must not move. Access Lever must not open, while breaker is CLOSED. Trip Lever must release and open the breaker. Use Crank Handle (b) to rack the trolley between TEST and CONNECTED positions. Remove Crank Handle. CLOSE the breaker. Send a command to rack-out the trolley to TEST position. Try to lift up Access Lever (e). Send a command to OPEN the breaker. Check “Position Check” signal in CONNECTED position c. The breaker must not CLOSE, if it is not in TEST or CONNECTED position. a. The trolley must not move, while the breaker is closed. Access Slot (c) must not open, if breaker is CLOSED. The breaker must OPEN. “Positions Check” signal must be active. 1.3 b. a. b. c. d. e. 1.4 1.5 1.6 1.7 1.8 1.9 44 Trolley is in TEST position. Breaker is OPEN. Insert Crank Handle (b) into Access Slot (c). Trolley is in CONNECTED position. CLOSE the breaker. Trolley is in CONNECTED position. Breaker is OPEN. Insert Crank Handle (b) into Access Slot (c). Trolley is in TEST position. CLOSE the breaker. Remove Crank Handle (b) from Access Slot (c). Trolley is in TEST position. Breaker is OPEN. Insert Crank Handle (b) into Access Slot (c). a. b. c. a. b. c. d. a. b. c. d. a. b. a. b. c. d. e. c. d. e. b. c. d. c. Use Crank Handle (b) to rack-out the trolley into position between TEST and CONNECTED. Remove Crank Handle. CLOSE the breaker. OPEN and move the trolley to TEST position. Send a command to rack-in the trolley to CONNECTED a. position. OPEN the breaker. Use Crank Handle (b) to rack-out the trolley to DISCONNECTED position. Remove Crank Handle. Try to manually pull trolley out of the module. Disconnect Secondary Plug (g). Try to manually pull trolley out of the module. c. e. The breaker must not CLOSE, if it is not in TEST or CONNECTED position. The trolley must not move, while breaker is CLOSED. The trolley must not move out of the module, while Plug is connected. The trolley must move out of the module. END OF PROCEDURE Design and specifications are subject to change without notice S47183Ee rev.01 2011-04-26 DC OEM MODULE FOR USE WITH GERAPID CIRCUIT BREAKERS APPENDIX H Field Test Procedure. Table H-4 DC Module w/o Remote Racking - Field Test Procedure Step Starting Point Check Points Pass Criteria 1.1 Trolley is in WITHDRAWN position. Breaker is OPEN. Insert Crank Handle (b) into Access Slot (c). Trolley is in DISCONNECTED position. Breaker is OPEN. Insert Crank Handle (b) into Access Slot (c). Connect Secondary Plug (g). Trolley is in TEST position. Breaker is OPEN. Remove Crank Handle (b) from the slot (c). a. Try to rack-in the trolley to CONNECTED position. a. The trolley must not move, while Secondary Plug (g) is disconnected a. Try to CLOSE the breaker. a. The breaker must not CLOSE, while Crank Handle (b) is inserted. a. b. CLOSE the breaker. Check “Position Check” signal at this position. Try to lift up Access Lever (e). Try to lift up Trip Lever (d). a. b. The breaker must CLOSE. “Positions Check” signal must be active. The Access Lever must not move, while breaker is CLOSED. The breaker must OPEN. The breaker must not CLOSE, if it is not in TEST or CONNECTED position. 1.2 1.3 c. d. 1.4 Trolley is in TEST position. a. Breaker is OPEN. Insert Crank Handle (b) into Access Slot b. (c). c. d. 1.5 Trolley is in CONNECTED position. Breaker is OPEN. a. b. c. d. e. 1.6 Trolley is in CONNECTED position. a. Breaker is OPEN. Insert Crank Handle (b) into Access Slot b. (c). d. e. 1.7 Trolley is in TEST position. Breaker is OPEN. Remove Crank Handle (b) from slot (c). a. b. c. d. Trolley is in TEST position. Breaker is OPEN. a. 1.8 b. c. 1.9 Rack-in the trolley to a position between TEST and CONNECTED. Remove Crank Handle. CLOSE the breaker. Rack-in the trolley to CONNECTED position. Remove Crank Handle. CLOSE the breaker. Try to lift up Access Lever (e). Try to lift up Trip Lever (d). Check “Position Check” signal at this position. Rack-out the trolley into a position between CONNECTED and TEST. Remove Crank Handle. CLOSE the breaker. Rack-out the trolley into TEST position c. d. c. b. c. d. The Access Lever must not open, while breaker is CLOSED. The breaker must OPEN. “Positions Check” signal must be active. c. The breaker must not CLOSE, if it is not in TEST or CONNECTED position. CLOSE the breaker. Try to lift up Access Lever (e). Try to lift up Trip Lever (d). Check “Position Check” signal at this position. b. The Access Lever must not open, while breaker is CLOSED. The breaker must OPEN. “Positions Check” signal must be active. Try to manually pull trolley out of the module. Disconnect Secondary Plug (g). Try to manually pull trolley out of the module. a. c. d. c. The trolley must not move out of the module, while Secondary Plug is connected. The trolley must move out of the module. END OF PROCEDURE 2011-04-26 S47183Ee rev.01 Design and specifications are subject to change without notice 45 DC OEM MODULE FOR USE WITH GERAPID CIRCUIT BREAKERS APPENDIX H Field Test Procedure. Table H-6 High Potential Tests for the module and the trolley Step Starting Status Check Points 2.1 Trolley is at CONNECTED position. CLOSE the breaker. Trolley is at CONNECTED position. Breaker is OPEN. Connect BOTTOM connector with frame. Trolley is at CONNECTED position. Breaker is OPEN. Connect TOP connector with frame. END OF PROCEDURE. Apply 3.9 kV DC or 2.8 kV RMS for 60 seconds between main No flashover. connectors and frame. Apply 3.9 kV DC or 2.8 kV RMS for 60 seconds between TOP main No flashover. connector and frame 2.2 2.3 2.4 Pass Criteria Apply 3.9 kV DC or 2.8 kV RMS for 60 seconds between BOTTOM No flashover. main connector and frame Rear view on the bus bars compartment. Main TOP connector Main BOTTOM connector Step 2.2 46 Step 2.3 Design and specifications are subject to change without notice S47183Ee rev.01 2011-04-26 DC OEM MODULE FOR USE WITH GERAPID CIRCUIT BREAKERS APPENDIX H Field Test Procedure. Table H-7 High Potential Tests for control and auxiliary circuits Step Starting Status Check Points Pass Criteria 3.1 Trolley is at TEST position. Breaker is OPEN. Connect all control wires together. Disconnect all earthing wires. END OF PROCEDURE Apply 3.9 kV DC or 1.2 kV RMS for 60 seconds between wiring harness and frame. No flashover. 3.2 Step 3.1 Table H-8 Grounding Circuit Tests Step Starting Status Check Points a. 4.1 4.2 Trolley WITHDRAWN a. Rack-in the trolley into TEST b. position. c. Connect Secondary Plug (g), Fig. Hd. 2. Step 4.1a 2011-04-26 b. c. S47183Ee rev.01 Pass Criteria Check mounting screws of end switches no: 331 / 33-2 / 33-3 / S4F / 33-4 / 33-5, Check door locks of the control compartment, Check end switch S3F under the trolley. Check the motor drive’s housing, Check breaker’s grounding point at –X2:3, Check door locks of the trolley, Check handles at the front of the trolley. Grounding path resistance, between main ground bus and measured point, must be less 0.1 Ohm. Step 4.1a Design and specifications are subject to change without notice 47 DC OEM MODULE FOR USE WITH GERAPID CIRCUIT BREAKERS APPENDIX H Field Test Procedure. Step 4.1b Step 4.1c Step 4.2a Step 4.2b Step 4.2c 48 Step 4.2d Design and specifications are subject to change without notice S47183Ee rev.01 2011-04-26 GE Industrial Solution 41 Woodford Ave. Plainville, CT 06062 www.geindustrial.com © 2010 General Electric Company All Rights Reserved S47183Ee rev 01 2011-04-26 S47183Ee rev.01 Design and specifications are subject to change without notice 49