1
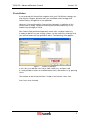
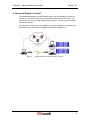
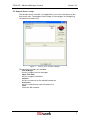
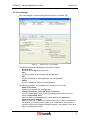
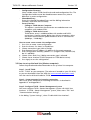
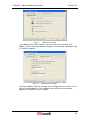
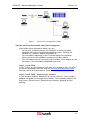
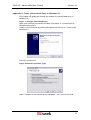
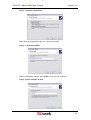
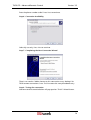
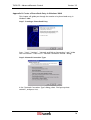
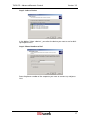
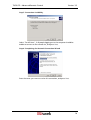
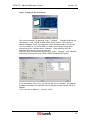
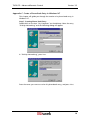
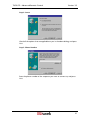
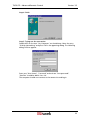
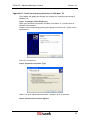
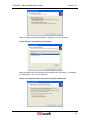
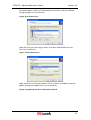
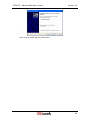
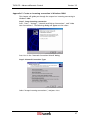
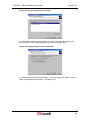
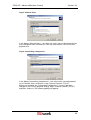
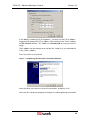
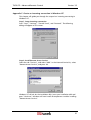
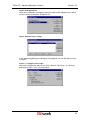
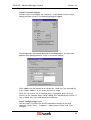
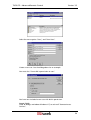
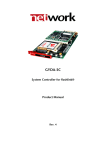
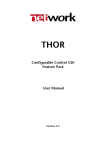
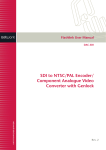
THOR
Advanced Remote Control
Feature Pack
User Manual
Version 3.5
THOR FP – Advanced Remote Control
Version 3.5
Network Electronics ASA
Thorøya
P.O. Box 1020
Sandefjord, Norway
Phone: +47 33 48 99 99
Fax: +47 33 48 99 98
E-mail: [email protected]
www.network-electronics.com
Service Phone: +47 90 60 99 99
Revision history
Current revision of this document is the uppermost in the table below.
Revision Replaces
3.5
3.0
2.9
2.0
1.95
1
0
3.0
2.9
2.0
1.95
1
0
-
Date
27/06/05
24/11/04
26/02/04
01/06/02
05/04/02
25/09/01
02/02/01
Change description
Updated to reflect SW release 3.5
Updated to reflect SW release 3.0
Updated to reflect SW release 2.9
Updated to reflect SW release 2.00
Updated to reflect SW release 1.95
Updated and expanded to include User Guidance
Initial Revision
2
THOR FP – Advanced Remote Control
Version 3.5
Contents
Revision history............................................................................... 2
Definitions, Acronyms and Abbreviations...........................................................3
1 Introduction ................................................................................ 4
2 Installation................................................................................... 5
3 Advanced Remote Control........................................................... 6
3.1 Remote Access setup ...................................................................................7
3.2 Sites Manager..............................................................................................8
3.3 How to set up the local site (Master computer) ...........................................9
3.4 How to set up the remote site (Client computer).......................................11
Appendix A: Create a Phone Book Entry in Windows XP ............... 12
Appendix B: Create a Phone Book Entry in Windows 2000 ........... 16
Appendix C: Create a Phone Book Entry in Windows NT .............. 20
Appendix D: Create an incoming connection in Windows XP ....... 23
Appendix E: Create an incoming connection in Windows 2000 .... 27
Appendix F: Create an incoming connection in Windows NT ....... 31
Definitions, Acronyms and Abbreviations
Remote site
Local site
RAI
Site you are connecting from
Site where the routers are located
Network - Remote Access Interface
3
THOR FP – Advanced Remote Control
Version 3.5
1 Introduction
This document describes how to install and use Advanced Remote Control of
the THOR – Router Management System, Version 3.5.
Advanced Remote Control
- Interface for control and monitoring of routers from remote sites via
Internet or dial-up connections.
4
THOR FP – Advanced Remote Control
Version 3.5
2 Installation
If you received this Feature Pack together with your THOR Main Package, you
may skip this Chapter, because then you install both Main Package and
Feature Pack(s) all together in one operation.
However, if you purchased this Feature Pack separately, installation of this
Feature Pack is simply a matter of entering the correct Product Key in the
Product Key Manager of THOR.
Each Feature Pack purchased separately comes with a unique Product Key.
In order to add this to your existing system, use the Product Key Manager that
you will find under the Help pull down menu. The following view appears:
Figure 1:
Product Key Manager
In this view, just add the new Feature Pack Product Key, and press Add.
It is also possible to select an installed Feature Pack, and remove it, by pressing
Delete.
The number of active Feature Packs is listed in the Software Status view.
Press Done when finished.
5
THOR FP – Advanced Remote Control
Version 3.5
3 Advanced Remote Control
The Advanced Remote Control Interface gives you the possibility to connect
remote PC’s to local router sites, for monitoring and control of routers. You
can access the sites by using a WAN/Internet access, or with a point-to-point
Dial-up connection.
This document shows how to configure your office computer to connect to a
local router site, and how to configure the remote computer(s).
Figure 2:
Advanced Remote Control Interface overview
6
THOR FP – Advanced Remote Control
Version 3.5
3.1 Remote Access setup
The Remote Access Interface is the application you use for connection to the
local router sites. The program also includes a site manager, for configuring
connections to router sites.
Figure 3:
Remote Access Interface manager
The following functions are available:
- Sites Manager
Use this to open the Sites Manager.
- Open Thor RMS
Use this to open THOR RMS.
- Connect
Use this to connect to the selected remote site.
- Disconnect
Use this to disconnect from the remote site.
- Close
Closes the RAI interface.
7
THOR FP – Advanced Remote Control
Version 3.5
3.2 Sites Manager
The Site Manager is used to configure connections to remote sites.
Figure 4:
Remote Access site manager
The following fields are displayed in the above window:
- Remote Sites
List with the configured remote sites.
- New
Use this to create a new remote site configuration.
- Edit
Use this to modify an existing remote site configuration.
- Delete
Use this to delete a remote site configuration
The following options are available when you press New or Edit:
- Remote Site Name
Name of the Remote Site Configuration
- DialUp Connection / Network (LAN) connection
Shows the connection type. If you select dialup connection you must
select a Phone Book Entry.
How to create a Phone Book Entry is described in the appendices.
- Remote Server IP Address
Here you type the IP address of the Remote Server. If you are connecting
via Internet, the remote server needs static IP address on the Internet. If
you are using a point-to-point dialup connection, see chapter “How to set
up an incoming connection“.
8
THOR FP – Advanced Remote Control
-
-
-
Version 3.5
Configuration Directory
Select a folder where THOR should write and read configuration files. The
Configuration folder cannot be shared between remote sites, due to
difference in router configurations.
Phonebook Entry
Shows the selected Phonebook Entry and the dialling information
(Number, Username and Password).
Server Interface
- Calling to THOR Master Computer
This option is used when the connection are made between two
computers with modem/ISDN.
- Calling to THOR device server
THOR device server is a dedicated box with modem and RS232
connections. Used for remote dialup sites without computers. Select
the router communication speed the device server is connected to
(9600 bps / 19200 bps).
How to create a new remote site configuration
1. Press New to create a new configuration
2. Enter the Remote Site Name in the edit box
3. Choose connection type (LAN or Dialup)
4. Enter Remote Server IP address, IP address of the remote computer
5. Enter Configuration Directory (default is C:\Program Files\Network\RAI,
but it is editable).
6. Choose Phone Book Entry if dialup connection type is selected.
7. Choose Server Interface (THOR Computer or THOR device server).
8. Press Apply to save the configuration.
3.3 How to set up the local site (Master computer)
Follow the procedure described hereunder to set up a local site computer.
Step 1: Install THOR
Install “THOR” on your computer. The software is located on your CD-ROM,
or you can download it from the WEB site (www.network-electronics.com).
You also need a valid serial code for THOR.
Step 2: Setup computer for incoming connection
How to set up the computer for incoming connections is described in
Appendix D: and Appendix E:.
Step 3: Configure THOR – Router Management System
You must configure THOR – Router Management System with Multi User
interface. In THOR – Router Management System, select menu “File” and
“Communication Settings”.
In the dialog “System Settings”, select “Enable Multi User Interface”.
9
THOR FP – Advanced Remote Control
Figure 5:
Version 3.5
THOR system settings
In the dialog “Multi User Interface”, you must enter the Hostname, or IP
address, of the master/local remote computer. The computer should be set up
as “Master Computer”.
Figure 6:
THOR Multi User settings
The drawing below shows an example of the configuration of a system. If you
have a network adapter in your computer you should select the network
adapter as “Network Server” IP address.
10
THOR FP – Advanced Remote Control
Figure 7:
Version 3.5
Remote Access configuration example
3.4 How to set up the remote site (Client computer)
Please follow these checkpoints before you start:
- You can only install the Remote Site Computer on an MS Windows
computer with one of the following operating systems: Windows 98,
Windows NT, Windows 2000 and Windows XP.
- You will need the operating system CD-ROM during the installation
process, because some Windows components will be installed.
- You will need an Internet connection with a Modem, ISDN adapter or LAN
connection. This should be installed before you start.
Step 1: Install THOR
Install “THOR” on your computer. The software is located on your CD-ROM,
or you can download it from the WEB site (www.network-electronics.com).
You also need a valid serial code for THOR.
Step 2: Install THOR - Remote Access Interface
In your Windows Explorer double click on the file “RAI.EXE”. The installation
program will guide you through the installation. The installation program will
also create a shortcut to the “Remote Access Interface” program on your
desktop.
11
THOR FP – Advanced Remote Control
Version 3.5
Appendix A: Create a Phone Book Entry in Windows XP
This chapter will guide you through the creation of a phone book entry in
Windows XP.
Step 1: Creating a Phone Book Entry
Open your Network Connections window (Start Menu Æ Control Panel Æ
Network Connections).
Create a new connection by pressing the option on the left (Æ “Create a new
connection”).
Press Next to continue.
Step 2: Network Connection Type
Select “Connect to the network at my workplace”. Press Next to continue.
12
THOR FP – Advanced Remote Control
Version 3.5
Step 3: Network Connection
Select Dial-up connection type. Press Next to continue.
Step 4: Connection Name
Enter a connection name in the edit box. Press Next to continue.
Step 5: Phone Number to Dial
13
THOR FP – Advanced Remote Control
Version 3.5
Enter the phone number to dial. Press Next to continue.
Step 6: Connection Availability
Select My use only. Press Next to continue.
Step 7: Completing the New Connection Wizard
There is no need to “Add a shortcut to this connection to my desktop” for
THOR remote connections. Press Finish to create the new phonebook entry.
Step 8: Testing the connection
Username and Password selection will pop up after “Finish” Wizard Screen.
14
THOR FP – Advanced Remote Control
Version 3.5
This Username and Password will be
the one used to connect to the PC
that is dialled into. On that PC under
“Incoming Connections”, this
username and password must be
added. (Or use existing users)
For this dial up connection example,
only the user who was logged into
this PC can execute this remote
connection. For “Anyone who uses
this computer” to be available, log in
as Administrator to this PC.
15
THOR FP – Advanced Remote Control
Version 3.5
Appendix B: Create a Phone Book Entry in Windows 2000
This chapter will guide you through the creation of a phone book entry in
Windows 2000.
Step 1: Creating a Phone Book Entry
Press: “Start”, “Settings”, “Network and Dial-up Connections” and “Make
New Connection”. Press Next in “Network Connection Wizard “ dialog.
Step 2: Network Connection Type
In the “Network Connection Type” dialog, select “Dial-up to private
network”, and press Next.
16
THOR FP – Advanced Remote Control
Version 3.5
Step 3: Select a Device
In the dialog “Select a device”, you select the device you want to use for dialup and press Next.
Step 4: Phone Number to Dial
Enter the phone number of the computer you want to connect to, and press
Next.
17
THOR FP – Advanced Remote Control
Version 3.5
Step 5: Connection Availability
Select: “For All Users”, if all people logging on to the computer should be
enable to connect to the remote site, and press Next.
Step 6: Completing the Network Connection Wizard
Enter the name you want to use for this connection, and press Next.
18
THOR FP – Advanced Remote Control
Version 3.5
Step 7: Trying out the connection
Test your connection, by pressing “Start“, “Settings”, “Network and Dial-up
Connections”, and <YOUR PHONE BOOK ENTRY name>. The “Connect”
dialog will appear. Enter your login User name and password on the remote
site. You choose to “Save Password”, in order to have quick access when
connecting to the “Remote Access Interface”. Upon pressing Dial, the
computer will connect to your remote site.
You may verify the connection by pressing, “Start“, “Settings”, and “Network
and Dial-up Connections and <YOUR PHONE BOOK ENTRY name>.
In the connection status view, you will see the Server IP address. This address
should be included in the Remote Access Interface settings Remote Server IP
Address.
In this case the IP address is “148.122.155.0”
19
THOR FP – Advanced Remote Control
Version 3.5
Appendix C: Create a Phone Book Entry in Windows NT
This chapter will guide you through the creation of a phone book entry in
Windows NT.
Step 1: Creating Phone Book Entry
Double click on the icon “My Computer” on the desktop. Select the entry
“Dial-Up Networking” and the following dialog will appear:
In “Dial-Up Networking”, press New.
Enter the name you want to use for this phonebook entry, and press Next.
20
THOR FP – Advanced Remote Control
Version 3.5
Step 2: Server
Check all the options that are applicable to you in the above dialog, and press
Next.
Step 3: Phone Number
Enter the phone number of the computer you want to connect to, and press
Next.
21
THOR FP – Advanced Remote Control
Version 3.5
Step 4: Finish
Step 5: Trying out the connection
Double click on the icon “My Computer” on the desktop. Select the entry
“Dial-Up Networking” and press Dial in the appearing dialog. The following
dialog will then appear:
Enter your “User Name”, “Password” and activate “Save password”.
“Domain” should be blank. Press OK.
The computer should now connect to the remote site and log in.
22
THOR FP – Advanced Remote Control
Version 3.5
Appendix D: Create an incoming connection in Windows XP
This chapter will guide you through the setup of an incoming connecting in
Windows XP.
Step 1: Creating a Phone Book Entry
Open your Network Connections window (Start Menu Æ Control Panel Æ
Network Connections).
Create a new connection by pressing the option on the left (Æ “Create a new
connection”).
Press Next to continue.
Step 2: Network Connection Type
Select “Set up an advanced connection” and press Next to continue.
Step 3: Advanced Connection Options
23
THOR FP – Advanced Remote Control
Version 3.5
Select “Accept incoming connections” and press Next to continue.
Step 4: Devices for Incoming Connections
Select the device that shall accept the incoming calls. Normally is it a modem
or ISDN device. Press Next to continue.
Step 5: Incoming Virtual Private Network (VPN) Connection
24
THOR FP – Advanced Remote Control
Version 3.5
This option doesn’t affect the THOR remote connections. Leave the default
setting and press Next to continue.
Step 6: User Permissions
Select the users you want to give access to or press Add to add new users.
Press Next to continue.
Step 7: Network Software
Make sure that the “Internet Protocol (TCP/IP)” option is enabled. Leave the
default settings unchanged. Press Next to continue.
Step 8: Completing the New Connection Wizard
25
THOR FP – Advanced Remote Control
Version 3.5
Press Finish to create the new connection.
26
THOR FP – Advanced Remote Control
Version 3.5
Appendix E: Create an incoming connection in Windows 2000
This chapter will guide you through the setup of an incoming connecting in
Windows 2000.
Step 1: Setup incoming connection
Press: “Start”, “Settings”, “Network and Dial-up Connections”, and “Make
New Connections”. The following dialog will appear on the screen:
Press Next in the “Network Connection Wizard“ dialog.
Step 2: Network Connection Type
Select “Accept incoming connections”, and press Next.
27
THOR FP – Advanced Remote Control
Version 3.5
Step 3: Device for Incoming Connections
In “Device for Incoming Connections” you must select the device that you
want to receive your incoming connection from, and press Next.
Step 4: Incoming Virtual Private Connection
In “Incoming Virtual Private Connection” you must select the option “Do not
allow virtual private connections”, and press Next.
28
THOR FP – Advanced Remote Control
Version 3.5
Step 5: Allowed Users
In the dialog “Allowed Users”, you select the user(s) that are allowed to log on
to the computer from a remote site. You may also create a new user for this
purpose here.
Step 6: Networking Components
In the dialog “Networking Components”, you select which network protocol
to use. Remote Access Interface is using ”Internet Protocol (TCP/IP)”.
Before you complete the “Networking Components” you must do some
changes in the (TCP/IP) protocol setting. Select ”Internet Protocol (TCP/IP)”
and press Properties. The following dialog will appear:
29
THOR FP – Advanced Remote Control
Version 3.5
In the dialog “Incoming TCP/IP Properties”, you must set the TCP/IP address
assignment to specify the TCP/IP address. You should set the “From“ address
to 192.168.0.10 and the “To” address to 192.168.0.20, or insert your own IP
range.
The IP address for the remote server will be 192.168.0.10, if you selected this
in the “From” address.
Press OK, and Next to continue.
Step 7: Completing the Network Connection Wizard
Enter the name you want to use for this connection, and press Finish.
You have now setup the computer to accept an incoming dial-up connection.
30
THOR FP – Advanced Remote Control
Version 3.5
Appendix F: Create an incoming connection in Windows NT
This chapter will guide you through the setup of an incoming connecting in
Windows NT.
Step 1: Setup incoming connection
Press “Start“, “Settings”, “Control Panel”, and “Network”. The following
dialog will appear on the screen:
Step 2: Install Remote Access Service
Select the tab “Services”, and select “Add”. In the Network Service list, select
“Remote Access Service”, and press OK.
Windows NT will ask for the installation disk. Insert your installation disk and
press “Continue”. Windows will now install all components used for installing
“Remote Access Service”.
31
THOR FP – Advanced Remote Control
Version 3.5
Step 3: Add RAS device
When the installation is complete you must select which adapter you want to
use for the RAS connection, and press OK.
Step 4: Remote Access Setup
In the appearing dialog you configure the properties for the RAS device. Press
Configure.
Step 4.1: Configure Port Usage
You must configure the port to use either “Receive Calls Only”, or “Dial out
and Receive Calls”. Press, OK when done.
32
THOR FP – Advanced Remote Control
Version 3.5
Step 4.2: Network Settings
The next step is to configure the “Network”. In the “Remote Access Setup”
dialog you press Network. The following dialog will appear:
The configuration should look identical to the dialog above. You must also
perform some configuration for TCP/IP in the server settings.
The IP address for the remote server will be 192.168.0.10, if you selected this
in the “Begin” address, or you insert your own IP range.
When the “RAS server TCP/IP Configuration” is complete, press OK. Press
Continue in the “Remote Access Setup” dialog. The “Remote Access Service“ is
now installed. Press Close and restart your computer.
Step 5: Configure login users
The next step is to select users that are allowed to connect to the local
computer. Select “Start”, “Programs”, “Administrative Tools” and, “User
Manager”.
33
THOR FP – Advanced Remote Control
Version 3.5
Select the menu option “User”, and “New User”.
Create a new user. See the dialog above for an example.
You must also “Grant dial in permission to user”.
You have now included a new user with dial in permission.
Step 6: Finish
Close all dialogs and reboot Windows NT, to active all “Remote Access
Services”.
34