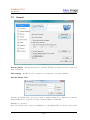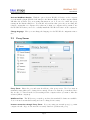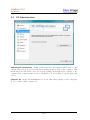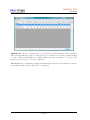
1
WebBlock 2011 User Manual WebBlock 2011 User Manual WebBlock 2011 This manual and the appendant software belong to blue image GmbH Germany and are subject to the appendant license agreements and copyright regulations. 2004-2011 blue image GmbH Manual Version of March 13, 2011. © Important Notice: The software is constantly being expanded and improved. Therefor it is possible that this manual is not yet showing all functions of the software. Please inform yourself about new versions of the manual on our homepage www.blueimage.de. The blue image GmbH Germany assumes no liability for the correctness of this documentation. Page 2 WebBlock 2011 User Manual Contents 1 Installation 1.1 System requirements . . . . . . 1.1.1 Hardware requirements 1.1.2 Software Requirements . 1.2 Installation of the Software . . 1.3 Functionality of the Filter . . . 1.3.1 General Description . . 1.3.2 Filterlists . . . . . . . . . . . . . . . . . . . . . . . . . . . . . . . . . . . . . . . . . . . . . . . . . . . . . . . . . . . . . . . . . . . . . . . . . . . . . . . . . . . . . . . . . . . . . . . . . . . . . . . . . . . . . . . . . . . . . . . . . . . . . . . . . . . . . . . . . . . . . . . . . . . . . . . . . . . . . . . . . . . . . . . . . . . . . . . . . . . . . . . 4 4 4 4 4 5 5 5 2 Configuration 2.1 Starting WebBlock 2011 . . . . . . 2.2 General . . . . . . . . . . . . . . . 2.3 Proxy Server . . . . . . . . . . . . 2.4 PC-Administration . . . . . . . . . 2.5 Blocksite . . . . . . . . . . . . . . . 2.6 Websites . . . . . . . . . . . . . . . 2.6.1 Blacklist . . . . . . . . . . . 2.6.2 Whitelist . . . . . . . . . . 2.6.3 Whitelist as Positive Filter 2.7 Search Engines . . . . . . . . . . . 2.8 Update . . . . . . . . . . . . . . . 2.9 Registration . . . . . . . . . . . . . 2.10 Password . . . . . . . . . . . . . . 2.11 Logfile . . . . . . . . . . . . . . . . . . . . . . . . . . . . . . . . . . . . . . . . . . . . . . . . . . . . . . . . . . . . . . . . . . . . . . . . . . . . . . . . . . . . . . . . . . . . . . . . . . . . . . . . . . . . . . . . . . . . . . . . . . . . . . . . . . . . . . . . . . . . . . . . . . . . . . . . . . . . . . . . . . . . . . . . . . . . . . . . . . . . . . . . . . . . . . . . . . . . . . . . . . . . . . . . . . . . . . . . . . . . . . . . . . . . . . . . . . . . . . . . . . . . . . . . . . . . . . . . . . . . . . . . . . . . . . . . . . . . . . . . . . . . . . . . . . . . . . . . . . . . . . . . . . . . . . . . . . . . . . . . . . . . . . . . . . . . . . . . . . . . . . . . . . . . . . . . 6 6 7 8 9 12 13 13 14 15 15 16 16 18 18 3 Browser Settings (at Client) 3.1 Microsoft Internet Explorer . . . . . . . . . . . . . . . . . . . . . . . . . . . . 3.2 Mozilla Firefox . . . . . . . . . . . . . . . . . . . . . . . . . . . . . . . . . . . 19 19 20 4 WebBlock Notifier (at Client) 4.1 WebBlock Notifier . . . . . . . . . . . . . . . . . . . . . . . . . . . . . . . . . 4.1.1 Installation of the WebBlock Notifier . . . . . . . . . . . . . . . . . . . 4.1.2 Configuration of the WebBlock Notifier . . . . . . . . . . . . . . . . . 22 22 22 22 Index 24 . . . . . . . Page 3 WebBlock 2011 User Manual Chapter 1 Installation This chapter describes how to install WebBlock content filtering software. 1.1 System requirements 1.1.1 Hardware requirements The Server-/Client-PC should have the following minimum requirements: IBM compatible PC with 1000 MHz 256 MB Main Memory Screen Resolution of 800x600 Pixel 16 Bit Color Depth a direct internet access without any other proxyserver 1.1.2 Software Requirements WebBlock Proxy runs with Windows XP, Windows Vista and Windows 7 (32 and 64-bit). The program needs Microsoft .NET Framework Version 3.5 SP1, which you can download e.g. from the Windows website. 1.2 Installation of the Software To install the software you need to log in with administrator rights. Please download the WebBlock software from the download area of our website www.webblock.de. Install the WebBlock software by starting the downloaded file. During the installation you will be asked to select between installing the WebBlock 2011 or the WebBlock Notifier. Normally you install just the WebBlock 2011. The WebBlock Notifier can be installed on Client computers as a plugin for the Internet Explorer which will then filter the websites. This can be used as a method to increase the performance of the Clients (see Use WebBlock Notifier in this manual. Page 4 WebBlock 2011 User Manual The installation should be executed without any error messages. You will see a confirmation massage at the end of the installation. 1.3 1.3.1 Functionality of the Filter General Description Usually the software is installed on the main computer and it can ’administrate’ any number of other PCs (depending on the licence). The software is based on a Global Filter List which is on a Gobal WebBlock Server in the Internet. This software sends all requests to this server and receives the current filter information. This information is saved in a local cache, to avoid multiple requests of the same website to the Global WebBlock Server. It is not necessary to install any WebBlock software on the Client PCs. You only need to change the settings in the browser on the Client PC for the use of WebBlock (see Chapter 3 → Settings in the Browser ). 1.3.2 Filterlists The WebBlock software is based on following filterlists: blue image Global Filter List (list on the global WebBlock Server) with entries of websites and search items BPjM-Module (global list on the Global WebBlock Server) with entries of websites (especially for Germany) Whitelist (local list with your own entries of websites) Blacklist (local list with your own entries of websites) Search item list (local list with your own entries of searchitems for search engines) The global filterlists are updated regularly. For information about the operating mode and performance of the BPjM-Module please see www.bundespruefstelle.de/bpjm/die-bundespruefstelle,did=59090.html Page 5 WebBlock 2011 User Manual Chapter 2 Configuration 2.1 Starting WebBlock 2011 After the installation your start menu contains a new folder: Programs\WebBlock 2011 Click on WebBlock 2011 in the start menu. On the tray-bar next to the clock on the right side the WebBlock button will appear, right after starting the program. Select Open WebBlock 2011 after clicking the symbol with the right-mouse-button. Note: Starting the program for the first time, your firewall may show you the connection attempts of the WebBlock software. Allow all connections, because the software needs incoming (to connect the Client-PC’s with the internet) as well as outgoing connections (e.g. to download websites or for requests to the global WebBlock server). Page 6 WebBlock 2011 User Manual 2.2 General Activate Service Activate the service to start the WebBlock software as service with every start of Windows. Filter settings WebBlock can be activated or deactivated for specific daytimes. Activate Penalty Time Activate the Penalty time option if you want to unable surfing at a computer if a customer intentionally tried to search for blocked websites within a certain time. Example (see picture): If two blocked sites were requested within 60 seconds, surfing will be blocked for 60 seconds. Page 7 WebBlock 2011 User Manual Activate WebBlock Notifier With the option Activate WebBlock Notifier on this computer you can install a plugin (WebBlock Notifier) for the Internet Explorer on this computer which will filter the websites. If you are using this function you do not need to make any proxy settings in the Internet Explorer. You should only activate this option if you are using the software on just this one computer. If you have more than one computer and you want to use the WebBlock Notifier you need to actually install the WebBlock Notifier on all computers. Change language Here you can change the language for the WebBlock configuration interface. 2.3 Proxy Server Proxy Server Enter the port and network address of the proxy server. Use Port 8082 as standard setting (this can be changed if necessary). Please note that the port indicated here also needs to be entered in the browers settings at the computer where you want to filter the websites (Client computer). WebServer-Port The Webserver port is the port where the standard blocksites are available. Port 81 is used as standard setting and can be changed if necessary. Internet connection through Proxy Server If you are using an external proxy (e.g. main computer in schools) you can enter the necessary data here (address and port). Page 8 WebBlock 2011 User Manual 2.4 PC-Administration Add computer automatically If this option is activated, all computers will be added to the computer list as soon as you enter the proxy settings in the browser of the computer. This means that a user who has access to the browser settings can actually add a computer to the computer list to gain automatic access to the internet. To avoid this you can deactivate this option. Computer list In the PC-Administration you can define filter settings for the computers. To do so, click on Edit computer list. Page 9 WebBlock 2011 User Manual Computer list In the computer list you can edit the default settings for the computers. These settings will then be used for all newly added computers. You can also definde settings for each computer individually, for example which categories you want to be blocked. The internet access can also be blocked completely. Please note: If you define filter settings in the InterCafe software for the WebBlock software, the settings in this computer list will be overwritten! Page 10 WebBlock 2011 User Manual Edit entry The settings for an individual computer can be edited by double clicking on the according entry in the list. You can enter the name of the computer for a better identification. Allow Internet Access Activate this option to allow internet access for this computer. If you want to block the internet access of a computer you can deactivate it. Switch Off WebFilter Switching off the WebFilter allows an internet access with WebBlock software without filtering the websites. This means that all websites will be displayed. Allow Whitelist only If this function is activated, only the websites from the whitelist (see also Website → Whitelist) will be displayed. This function is especially recommended for info terminals where it is only allowed to open predefined websites (e.g. information about a product or a company) or also as a ’positive search engine’ for kids. Categories The entries of the filter lists are allocated in categories. You can select the categories which you want to be blocked. The activated WebBlock will filter all werbsites of the selected categories. Page 11 WebBlock 2011 User Manual 2.5 Blocksite Websites / Search terms Please define if you want to use the standard blocksite (WebBlock blocksite) or an individual blocksite for the filtering of websites and search terms. The customer will be redirected to the blocksite (URL) if he tries to open a blocked website or if he enters a blocked search item. You can enter your own website e.g. www.myblocksite.com. The standard setting for the port is 80. Note: You can replace or edit the standard blocksite (HTML-files) in C:\programms\WebBlock 2011\html if you don’t want to use a site from the internet. Select the option use standard blocksite, to display this website. Page 12 WebBlock 2011 User Manual 2.6 Websites Here you can create your own filter lists. These are used additionally to the WebBlock filter list. The WebBlock filter list is located on the Global WebBlock Server of blue image and therefor it can only be edited by blue image. 2.6.1 Blacklist In the blacklist you can enter websites which shall always be blocked. Page 13 WebBlock 2011 User Manual Add website to blacklist Use the following form to add websites to the list: mywebsite.com. Each entry needs to be assigned to at least one category. Add the entry to the list by clicking on Add. 2.6.2 Whitelist Enter websites which you want to always be unblocked to the whitelist. This is how you can unblock websites which have been blocked by mistake. Page 14 WebBlock 2011 User Manual Add website to whitelist Use the following form to add websites to the list: mywebsite.com. Add the entry to the list by clicking on Add. Note: Entries in the whitelist can also allow the access on improper contents. So the customer may have the possibility to open adult-pages or websites with illegal contents (e.g. racism). 2.6.3 Whitelist as Positive Filter The whitelist can also be used as ”‘Positive Filter”’. To do so you need to activate the option ”‘Use whitelist only”’ in the computer list for the selected computers. All other websites will the be blocked. This feature is especially useful for information kiosk where you only want certain websites to be accessed (e.g. websites of a certain product or a company). Positive filters can also be used for children if you want to allow access to selected ”‘save”’ websites only. 2.7 Search Engines Here you can enter search terms which you do not want to be used in common search engines. By entering the symbol * (so called wildcards) in front and behind the search term you can also block search terms which include this word. Note: When you enter the term *sex*, the search item Essex will be blocked too. Please think twice before using wildcards. Page 15 WebBlock 2011 User Manual 2.8 Update Here you can define, if entries of the local filter list should be sent to the Global WebBlock Server. With the next update, the entries will be checked and added to the global filterlist. This way all users of the WebBlock software can benefit from the new entries and the protection can be improved frequently. 2.9 Registration The WebBlock software can be used for 20 days as trial version with all functions. After this time the program can not be started again without a registration. Page 16 WebBlock 2011 User Manual To enter the registeration dates, click on Registration → Register. Now you can enter the registration name and Softwarekey (pay attention to a correct and exact entry!). Click Register to finish the registration. For the registration of the program you need to be connected to the internet. The registration will be confirmed online with every start of the software. Page 17 WebBlock 2011 User Manual 2.10 Password You can define a password to protect the WebBlock configuration. In this case the configuration of the program can only be accessed with the password. Note: The security functions of Windows should be disabled for the user. Otherwise the user can close the WebBlock software with the Task Manager. 2.11 Logfile This is a special module (WebBlock Logfile) for which you need a special license. All sites visited with the WebBlock software will be listed in the logfile. Note: Due to the law regulations cyber cafes in Italy are highly recommended to use this module. Page 18 WebBlock 2011 User Manual Chapter 3 Browser Settings (at Client) The WebBlock software can be used with all common browsers. For the filtering of websites the WebBlock software is used as proxy. Therefor you need to define the proxy settings in the browser at the Client computer. This manual describes these settings for the most common browsers. Please note that you need to avoid changes to the browser settings by other users (e.g. by using the policy settings of the InterCafe Software) so that nobody can deactivate the filter unauthorized. If you do not have a possibility to disable the access to the browser settings you should use the WebBlock Notifier (see WebBlock Notifier in this manual. 3.1 Microsoft Internet Explorer Click on Tools → Internetoptions... in the Internet Explorer to open the dialog. Click on Connections → LAN-Settings. Page 19 WebBlock 2011 User Manual Select the option Use Proxyserver for LAN in Proxyserver and click on Advanced. Deactivate the setting Use the same Server for all protocols. Enter the IP-address or the computer name of the computer on which the WebBlock Software is running in the box HTTP. Enter the port you have used in the settings of the WebBlock (usually Port 8082 ). Leave the fields for Secure, FTP, Gopher and Socks empty. 3.2 Mozilla Firefox Click on Tools → Options... in the Mozilla Firefox to open the dialog. In Advanced please click on Network → Connection → Settings. Page 20 WebBlock 2011 User Manual Select Manual configuration and enter IP-address or the computer name and the port on which the WebBlock software is running. Leave the fields of the remaining protocols empty. Page 21 WebBlock 2011 User Manual Chapter 4 WebBlock Notifier (at Client) 4.1 WebBlock Notifier The WebBlock Notifier is a plugin for the Internet Explorer. Use this additional tool only if you wish to increase the performance of the Client computers. If using the WebBlock Notifier the WebBlock will get the filter information from the Server but will not use the Server for the internet connection. This way the performance of the websites can be increased. The WebBlock Notifier is a plugin for the Internet Explorer. If you are using this additional tool at the Client the filter request will still go through the Server on which the Webblock software runs but the internet connection itself will be directly from the computer to the internt. This can improve the performance of the Clients when surfing in the internet. If you are using the WebBlock Notifier you do not need to make any proxy settings in the browser.. If you are using the WebBlock software without the InterCafe Software and can therefor not avoid access to the browser by the users you should use the WebBlock Notifier so that the users cannot deactivate the WebBlock filter themselves. 4.1.1 Installation of the WebBlock Notifier Start the installation of WebBlock 2011 (WebBlock2009.exe) at the Client. If necessary download the installation file from our website www.webblock.de. Select the option Install WebBlock Notifier during the installation. WebBlock Notifier will be installed as plugin for the Internet Explorer. 4.1.2 Configuration of the WebBlock Notifier Start the WebBlock Notifier by clicking on Start → Programs → WebBlock 2011 → Configurate WebBlock . Page 22 WebBlock 2011 User Manual Activate WebBlock Notifier Aktivate the WebBlock Notifier and enter the computer name or IP-address of the computer on which the WebBlock 2011 Software runs (usually the server/main computer of your network). Password Click on Password to enter a password for this configuration. It is important to enter a password so that the settings in the WebBlock Notifier cannot be changed by other users. Page 23 WebBlock 2011 User Manual Index Allow Internet Access, 11 Allow Whitelist only, 11 Blacklist, 13 Block Internet access, 10 Browser settings, 19 Internet Explorer, 19 Mozilla Firefox, 20 Edit Computer list, 10 Installation, 4 Logfile, 18 Password, 18 System requirements, 4 Update, 16 WebBlock Notifier, 22 WebBlock Settings, 6 Whitelist, 14 Page 24