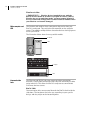
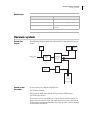
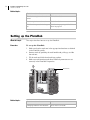
1
BioCel System User Guide Agilent Technologies ,Notices © Agilent Technologies, Inc. 2009 Warranty No part of this manual may be reproduced in any form or by any means (including electronic storage and retrieval or translation into a foreign language) without prior agreement and written consent from Agilent Technologies, Inc. as governed by United States and international copyright laws. The material contained in this document is provided “as is,” and is subject to being changed, without notice, in future editions. Further, to the maximum extent permitted by applicable law, Agilent disclaims all warranties, either express or implied, with regard to this manual and any information contained herein, including but not limited to the implied warranties of merchantability and fitness for a particular purpose. Agilent shall not be liable for errors or for incidental or consequential damages in connection with the furnishing, use, or performance of this document or of any information contained herein. Should Agilent and the user have a separate written agreement with warranty terms covering the material in this document that conflict with these terms, the warranty terms in the separate agreement shall control. User Guide Part Number G5500-90002 January 2009 rebranded edition September 2006 fifth edition Contact Information Agilent Technologies Inc. Automation Solutions 5301 Stevens Creek Blvd. Santa Clara, CA 95051 USA Technical Support: 1.800.979.4811 or +1.408.345.8011 [email protected] Customer Service: 1.866.428.9811 or +1.408.345.8356 [email protected] European Service: +44 (0)1763853638 [email protected] Documentation feedback: [email protected] Web: www.agilent.com/lifesciences/ automation Acknowledgements Microsoft and Windows are registered trademarks of the Microsoft Corporation in the United States and other countries. Technology Licenses The hardware and/or software described in this document are furnished under a license and may be used or copied only in accordance with the terms of such license. Restricted Rights Legend If software is for use in the performance of a U.S. Government prime contract or subcontract, Software is delivered and licensed as “Commercial computer software” as defined in DFAR 252.227-7014 (June 1995), or as a “commercial item” as defined in FAR 2.101(a) or as “Restricted computer software” as defined in FAR 52.227-19 (June 1987) or any equivalent agency regulation or contract clause. Use, duplication or disclosure of Software is subject to Agilent Technologies’ standard commercial license terms, and non-DOD Departments and Agencies of the U.S. Government will receive no greater than Restricted Rights as defined in FAR 52.22719(c)(1-2) (June 1987). U.S. Government users will receive no greater than Limited Rights as defined in FAR 52.227-14 (June1987) or DFAR 252.227-7015 (b)(2) (November 1995), as applicable in any technical data. Safety Noticies A WARNING notice denotes a hazard. It calls attention to an operating procedure, practice, or the like that, if not correctly performed or adhered to, could result in personal injury or death. Do not proceed beyond a WARNING notice until the indicated conditions are fully understood and met. A CAUTION notice denotes a hazard. It calls attention to an operating procedure, practice, or the like that, if not correctly performed or adhered to, could result in damage to the product or loss of important data. Do not proceed beyond a CAUTION notice until the indicated conditions are fully understood and met. Agilent Technologies Letter to our Customers Dear Customer, The Agilent Technologies acquisition of Velocity11 resulted in the following changes: • Creation of Agilent Technologies Automation Solutions, formerly Velocity11 • Renaming of some Velocity11 products • New Customer Service and Technical Support contact information • New website address for product information Please make a note of the following changes as they impact this user guide. Velocity11 product name changes Velocity11 product name Changes to … Access2 Automated Microplate Loader Automated Centrifuge Loader Element Automation System BioCel 900 System IWorks Device Driver Programming Interface VWorks Device Driver Interface PlatePierce Seal Piercing Station Microplate Seal Piercer VCode Barcode Print and Apply Station Microplate Barcode Labeler Velocity11 Robot 3- Axis Robot VHooks Integration Interface VWorks Hooks Interface VPrep Pipetting System Vertical Pipetting Station VSpin Microplate Centrifuge Microplate Centrifuge VStack Labware Stacker Labware Stacker New contact information Documentation feedback: [email protected] Technical Support: 1.800.979.4811 or +1.408.345.8011 [email protected] Customer Service: 1.866.428.9811 or +1.408.345.8356 [email protected] European Service: +44 (0)1763853638 [email protected] Web: www.agilent.com/lifesciences/automation Agilent Technologies, Inc., Automation Solutions, 5301 Stevens Creek Blvd., Santa Clara, CA 95051 USA Letter to our Customers 2 Agilent Technologies Inc., Automation Solutions Division Table of Contents BioCel User Guide Content Chapter 1. Introduction Chapter 2. BioCel overview . . . . . . . . . . . . . . . . . . . . . . . . . . . . . . .............. Who should read this guide . . . . . . . . . . . . . . . . . . . . . What this guide covers . . . . . . . . . . . . . . . . . . . . . . . . What is new in this version of the user guide. . . . . . . . . Accessing Velocity11 user guides . . . . . . . . . . . . . . . . . Reporting problems . . . . . . . . . . . . . . . . . . . . . . . . . . . Safety information about the BioCel . . . . . . . . . . . . . . . .. .. .. .. .. .. .. .. .. .. .. .. .. .. .. .. .. .. .. .. .. .. .. .. .. .. .. .. .. .. .. .. .. .. .. .. .. .. .. .. .. .. ... ... ... ... ... ... ... .. .. .. .. .. .. .. .. .. .. .. .. .. .. .. .. .. .. .. .. .. Basic description. . . . . . . . . . . . . . . . . . . . . . . . . . . . . . . . . . . . . . . . . . . . . . . . . BioCel specifications . . . . . . . . . . . . . . . . . . . . . . . . . . . . . . . . . . . . . . . . . . . . . . BioCel 1200 external features . . . . . . . . . . . . . . . . . . . . . . . . . . . . . . . . . . . . . . . BioCel 1600 and 1800 external features . . . . . . . . . . . . . . . . . . . . . . . . . . . . . . . Utilities connections . . . . . . . . . . . . . . . . . . . . . . . . . . . . . . . . . . . . . . . . . . . . . . Power panel . . . . . . . . . . . . . . . . . . . . . . . . . . . . . . . . . . . . . . . . . . . . . . . . . . . . Hardware control components . . . . . . . . . . . . . . . . . . . . . . . . . . . . . . . . . . . . . . . Power system . . . . . . . . . . . . . . . . . . . . . . . . . . . . . . . . . . . . . . . . . . . . . . . . . . . Air system . . . . . . . . . . . . . . . . . . . . . . . . . . . . . . . . . . . . . . . . . . . . . . . . . . . . . Vacuum system. . . . . . . . . . . . . . . . . . . . . . . . . . . . . . . . . . . . . . . . . . . . . . . . . . Computers and networking. . . . . . . . . . . . . . . . . . . . . . . . . . . . . . . . . . . . . . . . . . Adjusting the keyboard shelf . . . . . . . . . . . . . . . . . . . . . . . . . . . . . . . . . . . . . . . . Docking the mobile device table to the BioCel . . . . . . . . . . . . . . . . . . . . . . . . . . . . BioCel devices . . . . . . . . . . . . . . . . . . . . . . . . . . . . . . . . . . . . . . . . . . . . . . . . . . BioCel accessories . . . . . . . . . . . . . . . . . . . . . . . . . . . . . . . . . . . . . . . . . . . . . . . Chapter 3. Preparing for a run . . . . . . . . . . . . . . . . . . . . . . . . . . . Workflow for preparing the BioCel for a Run. . . . . . . . . . . . . . . . . . . . . . . . . . . . . . Turning on the BioCel . . . . . . . . . . . . . . . . . . . . . . . . . . . . . . . . . . . . . . . . . . . . . Performing a BioCel ready-state check . . . . . . . . . . . . . . . . . . . . . . . . . . . . . . . . . Preparing devices and accessories . . . . . . . . . . . . . . . . . . . . . . . . . . . . . . . . . . . . Placing and removing plate hotel labware . . . . . . . . . . . . . . . . . . . . . . . . . . . . . . . Setting up a VSpin counterweight plate . . . . . . . . . . . . . . . . . . . . . . . . . . . . . . . . . Aligning and testing auxiliary bar code readers. . . . . . . . . . . . . . . . . . . . . . . . . . . . Setting up the PlateHub . . . . . . . . . . . . . . . . . . . . . . . . . . . . . . . . . . . . . . . . . . . . Performing pre-run checks . . . . . . . . . . . . . . . . . . . . . . . . . . . . . . . . . . . . . . . . . . 1 2 3 4 5 7 8 13 14 15 17 18 19 21 22 27 30 31 32 33 34 35 36 41 42 43 45 46 50 51 53 54 55 i ii Table of Contents BioCel User Guide Chapter 4. Performing a run . . . . . . . . . . . . . . . . . . . . . . . . . . . . . Pausing and stopping a run . . . . . . . . . . . . . . . . . . . . . . . . . . . . . . . . . . . . . . . . . Comparing interlock and emergency circuits . . . . . . . . . . . . . . . . . . . . . . . . . . . . . Monitoring the status of a run . . . . . . . . . . . . . . . . . . . . . . . . . . . . . . . . . . . . . . . Cleaning up after a run . . . . . . . . . . . . . . . . . . . . . . . . . . . . . . . . . . . . . . . . . . . . Turning Off the BioCel . . . . . . . . . . . . . . . . . . . . . . . . . . . . . . . . . . . . . . . . . . . . . Chapter 5. Diagnostics . . . . . . . . . . . . . . . . . . . . . . . . . . . . . . . . . . . 59 60 62 63 65 66 . . . . . 69 70 71 72 79 83 ........... Routine maintenance . . . . . . . . . . . . . . . . . . . . . . . . . . . . . . . . . . . . . . . . . . . . . Resolving robot errors. . . . . . . . . . . . . . . . . . . . . . . . . . . . . . . . . . . . . . . . . . . . . Overriding the safety interlock . . . . . . . . . . . . . . . . . . . . . . . . . . . . . . . . . . . . . . . Resolving plate placing errors . . . . . . . . . . . . . . . . . . . . . . . . . . . . . . . . . . . . . . . Resolving lid removal problems . . . . . . . . . . . . . . . . . . . . . . . . . . . . . . . . . . . . . . Recovering from a power outage . . . . . . . . . . . . . . . . . . . . . . . . . . . . . . . . . . . . . 85 86 87 90 91 92 93 Index . . . . . . . . . . . . . . . . . . . . . . . . . . . . . . . . . . . . . . . . . . . . . . . . . . . . . . . 95 About Diagnostics software . . . . . . . . . . . . . . . . Using Bio I/O Diagnostics . . . . . . . . . . . . . . . . . Using Robot Diagnostics . . . . . . . . . . . . . . . . . . About fine-tuning robot teachpoints . . . . . . . . . . Fine-tuning a robot teachpoint . . . . . . . . . . . . . . Chapter 6. .. .. .. .. .. .. .. .. .. .. ... ... ... ... ... .. .. .. .. .. .. .. .. .. .. .. .. .. .. .. .. .. .. .. .. .. .. .. .. .. .. .. .. .. .. .. .. .. .. .. ... ... ... ... ... Maintenance and troubleshooting Chapter 1: Introduction BioCel User Guide Introduction This chapter contains the following topics: ❑ ❑ ❑ ❑ ❑ ❑ “Who should read this guide” on page 2 “What this guide covers” on page 3 “What is new in this version of the user guide” on page 4 “Accessing Velocity11 user guides” on page 5 “Reporting problems” on page 7 “Safety information about the BioCel” on page 8 1 1 2 Chapter 1: Introduction BioCel User Guide Who should read this guide Job roles This user guide is for people with the following job roles: Job role Responsibilities Lab manager, administrator, or technician Someone who is responsible for: ❑ Managing the BioCel ❑ Developing the applications that are run on it ❑ Solving the more challenging problems that might arise ❑ Developing training materials and standard operating procedures for operators Operator Someone who performs the daily production work on the BioCel and solves routine problems. Your organization may choose to create its own procedures for operators including the procedures in this guide. Related topics For information about... See... What this guide covers “What this guide covers” on page 3 What uis new in this user guide “What is new in this version of the user guide” on page 4 Accessing Velocity11 user guides and online help “Accessing Velocity11 user guides” on page 5 Using the BioCel safely “Safety information about the BioCel” on page 8 Chapter 1: Introduction BioCel User Guide What this guide covers What is covered This guide covers a description of the BioCel system, the operation of the hardware components, and the use of diagnostics. What is not covered This guide does not cover using VWorks, setting up devices, and networking the BioCel. Hardware version This guide covers the hardware for the BioCel 1200, 1600, and 1800. This includes accessories such as the Weigh Pad and plate hotel. BioCel customization Because the BioCel is a custom product with many options, this guide describes features that might not be included in your BioCel. Related topics For information about... See... Using VWorks VWorks User Guide Using diagnostics for a third-party device Device Driver User Guide Operating a Velocity11 device The user guide for that device Networking the BioCel VWorks User Guide 3 4 Chapter 1: Introduction BioCel User Guide What is new in this version of the user guide About this topic This topic briefly describes the new features this guide covers. New Feature Feature Description See... BioCel 1200 Automation platform that is smaller than the BioCel 1600 and 1800. “BioCel 1200 external features” on page 17 BioCel 1800 Automation platform that is larger than the BioCel 1200 and 1600. “BioCel 1600 and 1800 external features” on page 18 Modifications to the BioCel 1600 ❑ Changes in the power panel ❑ Changes to the air panel ❑ “Power panel” on page 21 ❑ “Hardware control components” on page 22 Device table Mobile table that locks into the BioCel “Docking the mobile device table to the BioCel” on page 34 New accessories ❑ Translator linear robot ❑ PlateHub ❑ “Translator linear robot” on page 38 ❑ “PlateHub” on page 37 Related topics For information about... See... Hardware features “BioCel overview” on page 13 What this guide covers “What this guide covers” on page 3 Accessing the online help “Accessing Velocity11 user guides” on page 5 Chapter 1: Introduction BioCel User Guide Accessing Velocity11 user guides About this topic This topic describes the different formats of Velocity11 documentation. Each Velocity11 user guide is delivered to you as: ❑ Online help ❑ A PDF file ❑ A printed book The information in each format is the same but each format has different benefits. Where to find the user guides Online help The online help is added to your computer with the software installation. Velocity11 website You can download the latest version of any PDF file from our website at www.velocity11.com. All Velocity11 user documentation can be searched from the website at www.velocity11.com. Online help The online help is the best format to use when you are working at the computer and when you want to perform fast or advanced searches for information. To open the online help: 1. Do one of the following: Select Help > VWorks Help. Press F1. Clicking the question mark icon on the toolbar for contextsensitive help. 2. Click on the BioCel User Guide link. Note: If you are not using our software, you can access the help from the Velocity11 website at http://www.velocity11.com. Main features The online help includes a navigation pane, content pane, and navigation buttons. 5 6 Chapter 1: Introduction BioCel User Guide Navigation pane Content pane Navigation buttons The navigation pane has four tabs, providing four different ways to locate information. The content pane displays the online help topics. Navigation buttons in the content pane allow you to navigate through the pages. PDF user guides Computer requirements To open a user guide in PDF format, you need an Acrobat viewer. You can either use the viewer that is built into Adobe Acrobat, or you can download the free Adobe Reader application from http://www.adobe.com/support/downloads/main.html. Printing and searching We provide user guides in PDF format mainly for printing additional copies. You can use them for simple searches from the Find button, although these searches are much slower than online help searches: More information For more information about using PDF documents, see the Adobe Acrobat PDF help system that can be accessed from your Acrobat viewer. Chapter 1: Introduction BioCel User Guide Related topics For information about... See... Hardware features “BioCel overview” on page 13 What this guide covers “What this guide covers” on page 3 Contacting Velocity11 “Reporting problems” on page 7 Reporting problems About this topic If you have a technical problem that you cannot resolve after reading the chapter on maintenance and troubleshooting, read the information in this topic for how to report problems with the BioCel. Reporting hardware problems If you have a problem with a hardware component of the BioCel that you cannot resolve, let us know by: ❑ Sending an email to [email protected] or [email protected] ❑ Calling Velocity11 Technical Support at 1-800-979-4811 or 1-650-846-6611 Reporting user guide problems If you find a problem with this user guide or have suggestions for improvement, please use the feedback button in the online help. Your comments will be reviewed promptly and used to write the next version of the guide. You can also send an email directly to [email protected]. Related topics For information about... See... Reporting software problems VWorks User Guide Sending files VWorks User Guide 7 8 Chapter 1: Introduction BioCel User Guide Safety information about the BioCel About this topic This topic gives general information about BioCel safety hazards. Before using the BioCel Before using a BioCel, your organization should make sure that you are properly trained in: ❑ General laboratory safety ❑ The correct and safe operation of the BioCel ❑ The correct and safe operation of other lab automation systems or components used in combination with the BioCel If you are the person in your organization responsible for training others on the BioCel and you have a safety question, please contact Velocity11 Service Center. Safety labels Pay attention to any safety labels printed on your BioCel. A safety label, shown below, consists of a warning symbol. A description of the warning and information that will help you to avoid the safety hazard are located in the safety information topic of the user guide. Chemical hazards Some chemicals used when working with the BioCel might be hazardous. Make sure you follow the recommendations in the MSDS (Material Safety Data Sheet) for every chemical that you plan to use. The manufacturer of the chemical should provide you with the MSDS. Waste disposal Remember to dispose of chemicals in compliance with all applicable regulations. Product use Velocity11’s products must only be used in the manner in which we intend, as described in our user guides. Any other use might damage the product or injure you. Velocity11 is not responsible for damages caused, in whole or part, by unauthorized modifications, or by procedures that are not explicitly described in our user guides. Any modifications or changes to products not expressly approved in Velocity11 user guides could void the warranty. The BioCel is not intended or approved for diagnosis of disease in humans or animals. Overhead door injury hazards The overhead door hazards apply only if you have a BioCel 1600 or 1800 that has overhead doors. Chapter 1: Introduction BioCel User Guide !! INJURY HAZARD !! Opened overhead doors are approximately 188 cm (6 ft 2 in) above the floor. To avoid injury, be aware of the door height and position at all times when working around the BioCel. 00007 6 feet 2 in. 188 cm !! INJURY HAZARD !! The pneumatic braces on overhead doors should be adjusted so you can comfortably open and close the doors. If you have to strain to open a door, please contact the Velocity11 Service Center and ask to have the braces adjusted. Overhead door damage hazard The overhead door hazards apply only if you have a BioCel 1600 or 1800 that has overhead doors. !! DAMAGE HAZARD !! Always open and close overhead doors using their handles. Opening and closing overhead doors by pulling and pushing on their corners can crack the glass and damage the pneumatic braces. Computer monitor damage hazard The computer monitor hazard applies only if you have a BioCel 1600 or 1800 that has overhead doors. !! DAMAGE HAZARD !! To avoid damage to the computer monitor, make sure that you move the monitor out of the way as you close the overhead doors. 9 10 Chapter 1: Introduction BioCel User Guide 00008 Lower side door injury hazard The lower side door hazards apply only if you have a BioCel 1600 or 1800. !! INJURY HAZARD !! Always close the lower side doors when you finish the operation that led you to open them. Leaving side doors open creates a tripping hazard. It can also block escape routes in a laboratory. Interlock override injury hazard !! INJURY HAZARD !! Only fully trained BioCel administrators should have access to, and use of, the safety interlock key. Use the override only when you know how the robot and devices will move during the protocol, when the robot speed is slow, and when you have taken measures to keep away from the areas in which the robot and device parts will be moving. With the interlock overridden, it is possible to be hit by the robot when it is moving. If this happens, the robot will immediately stop, minimizing injury, and the likely outcome is minor bruising. However, not all circumstances can be foreseen and more serious injury is possible. It is the responsibility of every operator to use the built-in BioCel safety features, follow warnings and safety labels and keep out of the robot’s radius whenever it is likely to move. Laser warnings BioCel lasers Your BioCel contains one or more lasers used to read bar codes. One bar code reader, attached underneath the robot arm, is used to read plates as they are picked up. Other bar code readers might be included on your system, attached to platepads, VPrep shelves, or VCode printers. !! INJURY HAZARD !! The BioCel bar code readers use class II lasers. Before using the BioCel, you should be trained in the safe use of these lasers. Chapter 1: Introduction BioCel User Guide The laser beam will not harm your skin so there is no danger in exposing your arms or hands to the beam. However, you could damage your eyes if you stare directly into the beam. Bar code readers emit light for up to 0.5 seconds only when taking a reading so they are only a hazard during protocol runs. When a plate is being read, the beam should not pass beyond the plate. If you are operating the BioCel without plates, and with the overhead doors open, the risk of exposure is increased. Before using the BioCel you should identify the locations of all bar code readers and establish the directions in which they point. All readers point downwards to minimize the potential exposure at eye level. The robot bar code reader represents the greatest hazard because of its height above the table. This bar code reader is angled downwards at 15° and has a maximum illumination arc of 60°, centered perpendicularly to the reader. With these measurements you can establish the space that is illuminated on occasions when there is no plate in the robot gripper. !! INJURY HAZARD !! Class II laser hazard. Do not look directly at the laser beam. Looking directly at the laser beam can result in serious eye injury. !! INJURY HAZARD !! Do not disassemble bar code reader sensor heads. Laser emission from the reader is not automatically stopped if the sensor head is disassembled. !! INJURY HAZARD !! Unless following a procedure in a Velocity11 user guide, do not touch the white test button on the side of the sensor head of an auxiliary bar code reader. This button turns on the laser creating the possibility of a long exposure to the beam. Third-party lasers Your BioCel might also contain lasers built into other third-party devices, such as Zeiss Multimode readers and Liconic incubators. For information about laser safety for third-party devices, see the relevant device’s documentation. Related topics For information about... See... Reporting problems “Reporting problems” on page 7 BioCel features “Basic description” on page 14 11 12 Chapter 1: Introduction BioCel User Guide Chapter 2: BioCel overview BioCel User Guide BioCel overview 2 This chapter contains the following topics: ❑ ❑ ❑ ❑ ❑ ❑ ❑ ❑ ❑ ❑ ❑ ❑ ❑ ❑ ❑ “Basic description” on page 14 “BioCel specifications” on page 15 “BioCel 1200 external features” on page 17 “BioCel 1600 and 1800 external features” on page 18 “Utilities connections” on page 19 “Power panel” on page 21 “Hardware control components” on page 22 “Power system” on page 27 “Air system” on page 30 “Vacuum system” on page 31 “Computers and networking” on page 32 “Adjusting the keyboard shelf” on page 33 “Docking the mobile device table to the BioCel” on page 34 “BioCel devices” on page 35 “BioCel accessories” on page 36 13 14 Chapter 2: BioCel overview BioCel User Guide Basic description About the BioCel The BioCel is a plate-processing automation platform that is used in combination with devices for applications such as: ❑ ❑ ❑ ❑ ❑ Compound management Sample preparation Plate replication PCR purification High-throughput screening To operate the BioCel, you should be familiar with the operating procedures in this guide as well as the guides for the devices installed on your BioCel. Basic BioCel components Every BioCel includes: ❑ ❑ ❑ ❑ ❑ ❑ ❑ ❑ ❑ ❑ A frame A table A robotic arm A controlling computer, a monitor, a keyboard, and a mouse A main power panel and electrical supply circuits Communication hubs and cables A Bio I/O console for managing sensor information One or more uninterruptible power supplies (UPSs) An AC/DC converter (DC power supply) An air system that includes a main air panel, pressure regulators, an air filter, and air lines ❑ VWorks software ❑ Software for each device Related topics For information about... See... BioCel features ❑ “BioCel 1200 external features” on page 17 ❑ “BioCel 1600 and 1800 external features” on page 18 BioCel specifications “BioCel specifications” on page 15 VWorks VWorks User Guide Chapter 2: BioCel overview BioCel User Guide BioCel specifications About this topic Physical specifications Electrical requirements for all BioCels This topic describes the physical, electrical, and environmental specifications of the BioCel. Dimension 1200 no hood 1600 with hood 1800 with hood Height 196.8 cm (77.5 in) 259.1 cm (102 in) 259.1 cm (102 in) Width 205.7 cm (81 in) 152.4 cm (60 in) 182.9 cm (72 in) Depth 121.9 cm (48 in) 152.4 cm (60 in) 152.4 cm (60 in) Weight Approximately 1088.6 kg (2400 lb) Approximately 2268 kg (5000 lb) System location Requirement EU US 230V~ 120V~ 50–60 Hz 50–60 Hz Current 20 A 30 A Fuse 20 A 30 A Voltage Frequency Air-flow (pressure) requirements Requirement Air pressure Equipment rating All BioCels 100–110 psi (0.62–0.69 MPa) The BioCel conforms to the requirements of Council Directive 72/23/ EEC relating to electrical safety by application of the following standard: EN61010-1:1993, including Amendment 2:1995 Environmental specifications Requirement 1200 1600 1800 15–40 °C 15–40 °C 15–40 °C Relative humidity 10–75% RH 10–75% RH 10–75% RH Elevation 1–2000 m 1–2000 m 1–2000 m Temperature 15 16 Chapter 2: BioCel overview BioCel User Guide Related topics For information about... See... BioCel features ❑ “Basic description” on page 14 ❑ “BioCel 1200 external features” on page 17 ❑ “BioCel 1600 and 1800 external features” on page 18 BioCel systems ❑ “Power system” on page 27 ❑ “Air system” on page 30 ❑ “Vacuum system” on page 31 Networking “Computers and networking” on page 32 Chapter 2: BioCel overview BioCel User Guide BioCel 1200 external features Diagram The main external features of the BioCel 1200 are shown in the following diagram. Note: The exact locations of the components on your BioCel might be different. External connections Interlock sensor Enclosure panels Monitor Keyboard Power panel Frame post 00242 Biocel 1200 00242 Side door Foot Related topics For information about... See... BioCel features ❑ “Basic description” on page 14 ❑ “BioCel 1600 and 1800 external features” on page 18 BioCel systems ❑ “Power system” on page 27 ❑ “Air system” on page 30 ❑ “Vacuum system” on page 31 Networking “Computers and networking” on page 32 17 Chapter 2: BioCel overview BioCel User Guide BioCel 1600 and 1800 external features Diagram The main external features of the BioCel 1600 and 1800 are shown in the following diagram. Note: The exact locations of the components on your BioCel may be different. Hood with lights External connections Status light Overhead door Monitor Keyboard Power panel Frame post 00002 18 Foot Side door Related topics For information about... See... BioCel features ❑ “Basic description” on page 14 ❑ “BioCel 1200 external features” on page 17 BioCel systems ❑ “Power system” on page 27 ❑ “Air system” on page 30 ❑ “Vacuum system” on page 31 Networking “Computers and networking” on page 32 Chapter 2: BioCel overview BioCel User Guide Utilities connections About the utilities connections There are usually the following connections to external utilities on the BioCel: ❑ ❑ ❑ ❑ Main power line Main air line Main vacuum line (optional) Main Ethernet Some BioCels may also have direct plumbing lines for water and waste instead of reservoirs and waste containers. This topic describes the entry of these connections for the BioCel 1200, 1600, and 1800. BioCel 1200 utilities connections On the BioCel 1200, the connections to the external utilities enter through one of the main frame posts and connect into the BioCel behind the side doors. These connections are visible when you open the side doors on the BioCel. The illustration below shows where the utilities are connected behind the side doors of the BioCel. The illustration represents one possible configuration. The placement of the UPS and main computer might be different, depending on how your BioCel 1200 is configured. Air panel Utilities entry Main air line UPS BioCel 1200 Air panel 00244c Main computer 00252 BioCel Computer and UPS back 00244c 00242 00242 Biocel 1200 24V SUPPLY J3 J1 1-3 24V SUPPLY 12- -3 F1-FANS, 2F2 4+ 4+ F3 SERIAL 500mA ROBOT SUPPLY 24VDC TO UPS (240V) FROM UPS AC FROM FACILITY AIR INLET/OUTLET FANS J2 1+ 3+ 6- -2 +5 -8 1+ 3+ 6- 00248 BioCel Utility connections 00252 00248 J4 -2 +5 -8 Main Ethernet Main power entry 19 Chapter 2: BioCel overview BioCel User Guide BioCel 1600 and 1800 utilities connections On the BioCel 1600 and 1800, the external utilities connections are located on the top of the BioCel, usually above the power panel. Main vacuum line Main air line Ethernet cable Main power line 00001 20 Direct plumbing Any BioCel can be customized to have direct plumbing from an external water source. In this case, the water lines enter through the frame corners. Related topics For information about... See... Entry of utilities ❑ “BioCel 1200 external features” on page 17 ❑ “BioCel 1600 and 1800 external features” on page 18 Specifications “BioCel specifications” on page 15 Chapter 2: BioCel overview BioCel User Guide Power panel About the power panel The power panel contains the main controls that power the BioCel. This topic describes a typical power panel for a BioCel. BioCel power panel diagram The following diagram shows a typical power panel for a BioCel. INTERLOCK RESET AIR 0 Air switch 0 Reset button Interlock keyhole EM E R G E N CY Emergency stop button BioCel 1200 Control Panel 00243c S TO P Power panel keyhole MAIN POWER ROBOT ON OFF 0 HOOD LIGHTS 0 Hood light switch (1600, 1800 only) WARNING Main power switch BioCel 1200 Power panel functions About opening the power panel 00243c Robot power switch You can use the power panel to perform the following procedures: Procedure See... Turn on and off the main power, air supply, and power to the robot “Turning on the BioCel” on page 43 Turn on and off the hood lights (if available) “BioCel 1600 and 1800 external features” on page 18 Override the safety interlock “Overriding the safety interlock” on page 90 Activate an emergency stop “Pausing and stopping a run” on page 60 Reset the safety interlock after an emergency stop has been activated “Emergency stop error recovery” on page 87 The fuses to the BioCel are located inside the power panel. If you suspect a blown fuse, contact the Velocity11 Service Center before you attempt to open the power panel. 21 22 Chapter 2: BioCel overview BioCel User Guide !! INJURY HAZARD !! The power panel should only be opened by someone from the Velocity11 Service Center or a BioCel administrator, working under the guidance of Velocity11 service staff. Do not force open the power panel door. It has a safety device to prevent it from opening when the main power switch on the power panel is turned on. Related topics For information about... See... Power system configuration “Power system” on page 27 Overriding the interlock “Overriding the safety interlock” on page 90 Using the emergency stop “Pausing and stopping a run” on page 60 Status of the BioCel “Monitoring the status of a run” on page 63 Hardware control components About the hardware control components The main hardware control components include the following: ❑ ❑ ❑ ❑ ❑ ❑ Air panel Main computer Uninterruptible power supply (UPS) Bio I/O Ethernet hub RS-232 hub Optional components include the following: ❑ Bar code power supply ❑ Weigh Pad hub ❑ Pump modules The placement, and in some cases the physical attributes, of these control components depends on how your BioCel is configured. For example, your computer may be mounted in a rack, or it may be a freestanding tower, depending on what other devices and equipment are on your BioCel. Air panel The air panel on all BioCels is located behind the power panel. It is accessible by opening one of the side doors. Chapter 2: BioCel overview BioCel User Guide Some BioCels might have an additional air pressure regulator for a vacuum delidder. The BioCel air panel shown below has only a robot air pressure regulator. BioCel 1200 Air panel 00244c Robot air pressure regulator Air manifold Main air line Main shutoff valve Main air pressure regulator 00244c Air filter Interlock air shutoff valve Function The air panel contains components that control the flow of air to all parts of the BioCel. Component description Component Description Robot air pressure regulator Controls how firmly the robot grips a plate. Air manifold Houses air supply connectors for the BioCel devices. Main air line Directs the external air source. Main shutoff valve Controls the air supply. The valve lies between the main air line and the AIR switch on the power panel. Note: The AIR switch is usually used to turn the air supply on and off. You should not need to use the main shutoff valve. Main air pressure regulator Controls the air pressure. The regulator lies between the main air line and the AIR switch on the power panel. Air filter Provides an extra purification step for house air. You should not need to adjust the air gauges. Interlock air shutoff valve Shuts off the air to moving parts when the interlock circuit is interrupted. 23 24 Chapter 2: BioCel overview BioCel User Guide PlateLoc air filter !! IMPORTANT !! PlateLoc devices intended for use with the BioCel do not contain an air filter. If you plan to remove a BioCel PlateLoc for use in stand-alone mode, you must contact Velocity11 Service Center and arrange to have a filter installed. Without a filter your PlateLoc can become damaged. Main computer and UPS The location and model of these components depend on how your BioCel is configured. They might be rack mounted, or they might be towers. The model used depends on what other devices and equipment are on your BioCel. The illustration below shows the two possible models. Computer 00245 BioCel 1200 CPU and UPS UPS 00245 Computer 00251 BioCel Biocel1800 shelf mount UPS 00251 Communication hubs The Ethernet and RS-232 hubs form communication connections between a single cable connected to the computer and multiple cables going to devices. This allows the BioCel’s computer to communicate with many devices at once. BioCel 1200 Communication hubs are mounted beneath the BioCel deck inside the side doors. The location of the hubs vary, according to your specific design, and they might not be located together. Chapter 2: BioCel overview BioCel User Guide 00250 BioCel RS232 Hub Fans RS-232 hub Bio I/O console 00250 Ethernet hub BioCel 1600/1800 Both communication hubs are mounted beneath the BioCel deck inside the side doors. The location of the hubs might vary, according to your specific design. Ethernet hub RS-232 hub Bio I/O 00251 BioCel Biocel1800 shelf mount 00251 Bio I/O console The Bio I/O console: ❑ Makes information from analog and digital sensors available to the computer. ❑ Initiates actions such as turning on the status lights, and opening and closing optional trash and enclosure doors. ❑ Provides 24V power to some devices such as the Lid Hotel and Vacuum Delidder. Many of the thin, gray, low-voltage cables that run through the BioCel go to the Bio I/O. You should not need to touch the Bio I/O. Bar code power supply (optional) If you have multiple auxiliary bar code readers, you may have a separate power supply for connecting them. The bar code power supply is mounted inside a side door underneath the BioCel deck. 25 Chapter 2: BioCel overview BioCel User Guide 00255 00255 BioCel Reader Power Supply BARCODE READER POWER SUPPLY READER 1 Weigh Pad hub (optional) READER 2 READER 3 READER 4 If you have Weigh Pads for reservoirs and waste, you may have a hub for connecting the Weigh Pads to VWorks. The hub is usually mounted with the other communication hubs inside a side door underneath the BioCel deck. 24V FUSE 5V RS232 1 2 3 4 5 6 7 00256 BioCel Weighpad Power Supply 00256 WEIGHPAD INPUTS 8 Pump modules (optional) If you have a VPrep configured on your BioCel, the pump modules may be mounted inside a side door underneath the BioCel deck. Here they do not take up deck space and are easily accessible for maintenance. 00254 26 Related topics For information about... See... The BioCel air system “Air system” on page 30 Opening Bio I/O Diagnostics “Using Bio I/O Diagnostics” on page 71 Turning on the BioCel “Turning on the BioCel” on page 43 Chapter 2: BioCel overview BioCel User Guide Power system About this topic This topic summarizes the power system of the BioCel. Becoming familiar with how your BioCel is wired will help you to understand the behavior of your BioCel and solve problems. Overview diagram The power system is summarized in the following diagram. Optional enclosure door controller Module Device AC power in Module Device Module Device Module Post-emergency stop power strip Post-emergency stop power strip Power panel Fuse Emergency stop button Emergency stop button Reset Button Interlock override Main switch Emergency stop relay Pre-emergency stop block Temperature-controlled water baths Interlock switch Incubator environmental control UV lights Clean room output fan Pre-emergency stop power strip Door interlocks UPS Monitor PC RS-232 hub Robot DC power supply System DC power supply Ethernet hub Clean-room intake and recirculation fans VPrep Pump VPrep Cooling fans Bio I/O console Robot 27 28 Chapter 2: BioCel overview BioCel User Guide In the diagram, dotted lines are control enable circuits and solid lines are AC and DC power circuits. The dot-dash line indicates those elements that lie inside the power panel. The dotted line between the robot DC power supply and system DC power supply indicates that the two power supplies are housed in the same box. Main power The main AC power enters at the external connections and travels down inside the corner post to the power panel. It passes through a main fuse, through the main switch, and out of the power panel to the UPS. Pre-UPS, preemergency stop current If your BioCel includes environmental control or a clean room, one or more electrical lines branch off before the UPS. These lines supply current to the following options: ❑ Cooling and heating water baths ❑ Environmental controller console that houses the iSeries controllers for the main BioCel (not for any separate environmental enclosures) ❑ Liconic incubators (environmental control, not transfer mechanism) ❑ UV lights and hood lights ❑ Clean-room output fan These options therefore receive pre-UPS, pre-emergency stop current. They are not affected by emergency stops or interlocks but are also not buffered by the UPS from power outages. UPS connections If there is more than one UPS, they are connected in series so that current output from UPS 1 supplies the current input for UPS 2. The UPS, or UPSs, provide current backup to the monitor, PC, and communications hubs. If there is more than one computer and more than one UPS, one computer is fed from one UPS and the other computer is fed from the other UPS. From the UPS, current is passed back into the power panel and through the main switch to the rest of the BioCel. This means that when you turn off the main switch, current is cut to the UPS, but it is also cut between the UPS and the main part of the BioCel, preventing the BioCel and its devices from draining the UPS. The UPS will continue to be drained by the computer, monitor, and communication hubs, which is why the shutdown procedure includes a step for turning off the UPS. Pre-emergency stop After the main switch, the electrical line enters a bank of connections in the power panel known as the pre-emergency stop block. A preemergency stop power strip is connected to this block. Devices wired from the pre-emergency stop power strip do not have their power cut when an emergency stop is activated. For example, the robot retains power after activation of an emergency stop because its DC power is supplied by the robot DC power supply fed from the pre-emergency stop block. Chapter 2: BioCel overview BioCel User Guide Emergency stop and interlocks An electrical line from the pre-emergency stop block enters the emergency stop relay which controls the emergency stop circuit. One output from the emergency stop relay powers an interlock circuit switch. Another output supplies the BioCel power strips from which most of the BioCel devices and system components receive current (exceptions to this are the VPrep, VPrep pumps, Ethernet hub, and clean-room intake and recirculation fans). These devices and system components are all wired after the emergency stop and therefore receive no current when an emergency stop is activated. This includes the Bio I/O and cooling fans, which use DC electricity produced by the system DC power supply. If an emergency stop is activated, the reset button must be pushed to reset the emergency stop relay to a position that allows current to flow. The door interlock system is fed AC electricity from the emergency stop relay. If an overhead door is opened during a run, the interlock switch cuts power to the enable wires that lead to the robot, VPrep, VPrep pumps, and clean-room intake and recirculation fans. This stops the robot and VPrep motors and turns on their respective z-axis brakes. The brakes make sure that the VPrep head and robot do not drop, preventing damage and eliminating a crushing hazard. The interlock switch is bypassed when the interlock override switch is activated by turning a key on the power panel. This maintains current in the enable wires even when the overhead doors are open. Related topics For information about... See... Systems affected by interlocks and emergency stops “Comparing interlock and emergency circuits” on page 62 Stopping a run with hardware “Pausing and stopping a run” on page 60 Turning the BioCel off. “Turning Off the BioCel” on page 66 29 30 Chapter 2: BioCel overview BioCel User Guide Air system Air and power interaction The following diagram shows how the air and power systems interact. Becoming familiar with these systems will help you to understand the behavior of your BioCel and solve problems. Main air line Air panel Regulators Robot Main regulator Main air shut-off valve Interlock air shut-off solenoid Main distribution manifold Vacuum delidder Power panel Device Main switch Emergency stop circuit Air switch Secondary distribution manifold Device Device Secondary distribution manifold Device Device AC power in Air system description Air is used on the BioCel to: ❑ Move parts, such as the robot gripper, VStack grippers, and VPrep shelves ❑ Create vacuums, such as for the suction-based vacuum delidder The flow of air through the system is controlled by air pressure regulators. Many devices have their own, built-in regulators. Air pressure to other parts is controlled by regulators in the air panel of the BioCel. The diagram above shows how air to the BioCel can be cut off during a run by: ❑ ❑ ❑ ❑ Pressing an emergency stop button Turning off the AIR switch on the power panel Turning off the main air shutoff valve in the air panel Turning off the main power in the power panel Chapter 2: BioCel overview BioCel User Guide Related topics For information about... See... Power system “Power system” on page 27 Vacuum system “Vacuum system” on page 31 Emergency stop “Pausing and stopping a run” on page 60 Vacuum system Vacuum flow diagram The following diagram shows the vacuum flow in the optional vacuum system. Pump Main vacuum line VPrep Reserve tank Filtration station VStack Distribution manifold Pinch valve Waste bottle(s) Vacuum system description A vacuum may be used on the BioCel for: ❑ Filtration stations ❑ Suction to hold plates flat on a VPrep shelf or VStack stage ❑ Third-party devices The vacuum can be supplied by a pump or house vacuum system. If a house vacuum system is used, the main vacuum line enters the BioCel with the other external connections. If a pump is used, it will be located on the floor of the BioCel. 31 32 Chapter 2: BioCel overview BioCel User Guide A reserve vacuum tank may be used to ensure an instantaneous vacuum supply. Waste liquid produced by filtration stations is collected in one or more waste containers. Vacuums are also created in devices and accessories using vacuum ejectors that create the vacuum at the site where it is required, such as at the suction-based lid remover. Related topics For information about... See... Utility connections “Utilities connections” on page 19 Lid removing devices “BioCel accessories” on page 36 Computers and networking Computer functions The BioCel computer is used to: ❑ ❑ ❑ ❑ Control the BioCel and its devices. Input bar code labelling instructions. Store and export log files. Store and export data collected by plate readers. Note: Some plate readers have their own computer for storing data. ❑ Communicate with other computers on your organization’s network for the exchange of files, reporting of errors, and accessing email. Network cards If you are an administrator and you need information about the network cards in the BioCel, see the VWorks User Guide. Device computers If your BioCel has a device that includes its own computer, such as the Zeiss Multimode plate reader, the same monitor is used for both computers. You can switch the monitor display between the two computers. This feature is a property of the monitor switching device. To switch the monitor display between two computers: 1. Rapidly press the SCROLL LOCK key on the keyboard twice. Chapter 2: BioCel overview BioCel User Guide Related topics For information about... See... Networking VWorks User Guide Log files VWorks User Guide Using bar codes ❑ VWorks User Guide ❑ VCode User Guide Adjusting the keyboard shelf About this topic This topic describes how to change the position of the computer shelf and monitor by adjusting the shelf at the appropriate pivot joints. Adjusting the shelf To adjust the position of the computer shelf: 1. Swivel the shelf at the appropriate pivot joints to make the adjustments. Use the labeled illustration below to locate the appropriate joint for adjusting. 2. To loosen or tighten the joints, pry off the joint covers and use a wrench to make adjustments. Monitor position lock 00241 Biocel Computer arm Pivot joints Related topics For information about... See... BioCel computer “Computers and networking” on page 32 Power to the computer “Power system” on page 27 33 34 Chapter 2: BioCel overview BioCel User Guide Docking the mobile device table to the BioCel About this topic Some users might have a Velocity11 mobile device table which holds an external device that exchanges plates with the BioCel. The device is mounted to this mobile table, which in turn is mounted to the BioCel. This ensures the device’s position does not change. This topic describes how to dock and undock the mobile table. Read this topic if you have a device external to the BioCel and want to integrate it with a BioCel using a Velocity11 mobile table. Connection description Two alignment rods and a threaded shaft are all permanently mounted to the mobile table. Two docking slots that receive the alignment rods and a T-nut that receives the threaded shaft are permanently mounted on the BioCel. The following diagram shows the table docked. Mobile table BioCel T-nut Docking slot Alignment rods Threaded shaft Procedure To engage the mobile table: 1. Move the mobile table so the alignment rods on the mobile table are within the docking slots on the BioCel. 2. Check to be sure that the threaded shaft is positioned in front of the T-nut. 3. Insert an 8-mm T-wrench in the end of the center threaded shaft and turn it clockwise to screw it into the T-nut that is bolted to the BioCel. 4. Continue tightening the shaft until it stops. The tightening of the threaded shaft will bring the alignment bolts into their proper position. Chapter 2: BioCel overview BioCel User Guide To disengage the mobile table: 1. Insert an 8-mm T-wrench in the end of the main threaded shaft and turn it counter-clockwise until it comes out of the T-nut. 2. Move the mobile table away from the BioCel. Related topics For information about... See... Accessories “BioCel accessories” on page 36 Third-party devices “BioCel devices” on page 35 BioCel devices Definition Devices are individual pieces of equipment that sit on the BioCel table and manipulate or enable the manipulation of plates. Velocity11 device list The following Velocity11 devices can be used on a BioCel. Third-party devices Device Description and Comments PlateLoc Thermal plate sealer PlatePierce Seal piercing station VCode Bar code print and apply station VPrep Pipetting station VSpin Plate centrifuge VStack Labware stacker VersaScan Plate reader There are many third-party devices that can be used on a BioCel. For a comprehensive list, see the Device Driver User Guide. If there is product that you would like to add to your BioCel, please contact Velocity11 for customization information. Related topics For information about... See... BioCel accessories “BioCel accessories” on page 36 BioCel specifications “BioCel specifications” on page 15 35 36 Chapter 2: BioCel overview BioCel User Guide For information about... See... BioCel features “Basic description” on page 14 BioCel accessories About this topic This topic briefly describes the accessories available for the BioCel. The following is a list of the available accessories for the BioCel. One or more of them may be present on your BioCel. Plate hotel Accessory Description and Comments Auxiliary bar code reader One or more bar code readers attached to a platepad or other device. Environmental Enclosure Glass-enclosed area for controlling temperature and humidity. Tip box delidder A static arm with suction cups that removes lids from tip boxes and drops them into the waste bin. Lid hotel See “Lid-removal devices” on page 38 for a description. Plate hotel See “Plate hotel” on page 36 for a description. PlateHub See“PlateHub” on page 37 for a description. Transfer station See “Transfer station” on page 37 for a description. Translator linear robot See “Translator linear robot” on page 38 for a description. VShuttle See “VShuttle” on page 39 for a description. Weigh Pad See “Weigh Pad” on page 40 for a description. A plate hotel stores a smaller number of plates than a VStack, but unlike the VStack, the robot has immediate, random access to all plates. You can remove the hotel from the BioCel to access plates from the front, or leave the hotel in the BioCel and access plates from the back. Chapter 2: BioCel overview 00253 BioCel User Guide PlateHub 00253 single plate hotel The PlateHub is a twelve-sided plate storage carousel with each side capable of storing up to 8 tip boxes or 16 plates for a total of 96 tip boxes or 192 plates. The PlateHub must be used with the VWorks inventory management system. For information about setting up and using the VWorks inventory management system, see the VWorks User Guide. 00247 BioCel Plate hub 00247 Transfer station The transfer station is a special platepad used to transfer a plate between the StoreX and the BioCel robot. Some transfer stations, such as the one shown in the following diagram include two platepads. 37 Chapter 2: BioCel overview BioCel User Guide 00105 00105 transfer station Translator linear robot The translator linear robot transports plates, one at a time, from a device (or robot) to a device (or robot). Because it translates plates, the two robots do not need to access the same positions or to define an envelope. The translator linear robot is available in multiple lengths. Adding a rotational motor enables it to turn the plate in any orientation. 00246 Biocel Robot 00246 38 Lid-removal devices The BioCel supports two types of lid-removal device. Vacuum-based lid remover The vacuum-based lid remover sits over the waste opening in the table. It uses one or more suction cups to remove plate lids. The vacuum used to hold the lids is created by a vacuum ejector, which uses an air line rather than a vacuum line. Lid hotel The lid hotel is able to store lids so they can be returned to the plates that they were removed from. It includes a sensor at each lid position so the system knows which positions contain lids. Unlike a plate hotel, a lid hotel cannot be easily removed from the BioCel table. Lidded plates are brought to the lid hotel, so that the lids are held by the rollers. The robot then pulls the plate down, leaving the lid behind. Chapter 2: BioCel overview 00087 plate hotel 00087 BioCel User Guide †Concept developed by Novartis Pharma AG, NIBR/DT/IAT, Basel, Switzerland. The VShuttle has two decks, each with a pair of rotating plate pads. It allows plates to move between robots while maintaining the same orientation. 00109 VShuttle 39 40 Chapter 2: BioCel overview BioCel User Guide Weigh Pad Weigh Pads are available in different sizes. They report the percentage of liquid in a container that sits on the Weigh Pad. 00110 Weighpads Related topics For information about... See... Adding and removing plates from the Plate Hotel “Placing and removing plate hotel labware” on page 50 Using the PlateHub Device Driver User Guide Chapter 3: Preparing for a run BioCel User Guide Preparing for a run 3 This chapter describes how to start the BioCel and prepare it to run an existing protocol. All of the procedures in this chapter can be performed by someone with operator privileges. This chapter contains the following topics: ❑ ❑ ❑ ❑ ❑ ❑ ❑ ❑ ❑ “Workflow for preparing the BioCel for a Run” on page 42 “Turning on the BioCel” on page 43 “Performing a BioCel ready-state check” on page 45 “Preparing devices and accessories” on page 46 “Placing and removing plate hotel labware” on page 50 “Setting up a VSpin counterweight plate” on page 51 “Aligning and testing auxiliary bar code readers” on page 53 “Setting up the PlateHub” on page 54 “Performing pre-run checks” on page 55 41 42 Chapter 3: Preparing for a run BioCel User Guide Workflow for preparing the BioCel for a Run Workflow steps Step The general workflow for starting the BioCel and preparing for a run is given in the following table: For this task... Look here to find the procedure... 1 Starting the BioCel “Turning on the BioCel” on page 43 2 Logging in to Windows VWorks User Guide 3 Starting VWorks and logging in VWorks User Guide 4 Opening a protocol VWorks User Guide 5 Setting protocol, general, error, and log options VWorks User Guide 6 Performing a ready-state check “Performing a BioCel ready-state check” on page 45 7 Preparing labware and accessories “Preparing devices and accessories” on page 46 8 Preparing the plate hotel “Placing and removing plate hotel labware” on page 50 9 Setting up a VSpin counterweight “Setting up a VSpin counterweight plate” on page 51 10 Testing the auxiliary bar code reader “Aligning and testing auxiliary bar code readers” on page 53 11 Setting up the PlateHub “Setting up the PlateHub” on page 54 12 Performing pre-run checks “Performing pre-run checks” on page 55 Related topics For information about... See... Using BioCel Diagnostics “Diagnostics” on page 69 Overriding the interlock “Overriding the safety interlock” on page 90 Stopping a run “Pausing and stopping a run” on page 60 Chapter 3: Preparing for a run BioCel User Guide Turning on the BioCel About this topic This topic describes how to turn on the BioCel. To better understand what is happening as you turn on the BioCel, refer to the description of the “Power system” on page 27. Procedure To turn on the BioCel (part one): 1. Make sure that the main power line, air line, vacuum line (optional) and Ethernet cable (optional) are plugged in. 2. Make sure that external drains and water lines are attached if your BioCel uses them. Make sure the hoses are not kinked and that the hoses go through the appropriate pumps. 3. Make sure that any autofilling reservoirs are plugged in. 4. On the power panel, turn the main power switch to the ON position. The main power indicator light on the power panel remains off and this action does not appear to do anything. This is correct. 5. Open the side door next to the power panel. 6. Turn on the UPS (uninterruptible power supply) by pushing the power button. The UPS LEDs illuminate to indicate the UPS power status. If you have more than one UPS on your BioCel, make sure you turn on all of them. If the UPSs are connected in series, turn on the UPS that is connected to the main power first, followed by the remaining UPSs in the order in which they are connected together. If they are not connected in series, the order you turn them on does not matter. The blue light on the main power panel turns on. For more information about the operation of the UPS and the meaning of its status lights, see the UPS manufacturer’s documentation provided with your BioCel. 7. On the power panel, turn the Robot power switch and System power switch (if your BioCel has one) to the ON position. The lights adjacent to the switches turn on. To turn on the BioCel (part two): 1. Check that the power indicator lights on the Ethernet and RS-232 communication hubs are on. 2. If the computer monitor is off, turn it on. 3. Make sure that all devices are turned on. 4. Push the computer on/off button to start the computer. The computer performs self-tests, starts the operating system, and opens the Welcome to Windows screen. 5. Log in to Windows. 43 44 Chapter 3: Preparing for a run BioCel User Guide 6. Close the side door. !! INJURY HAZARD !! For BioCel 1600 and 1800 users, always close the side doors when you finish the operation that led you to open them. Leaving side doors open creates a tripping hazard. It can also block escape routes in a laboratory. 7. Make sure that the emergency stop button on the power panel and the emergency stop buttons on the tabletop are in the out position. 8. Close the deck enclosure doors. If you have overhead doors, heed the following warnings. !! INJURY HAZARD !! Opened overhead doors are approximately 6 feet 2 inches (188 cm) above the floor. To avoid injury, be aware of the door height and position at all times when working around the BioCel. !! INJURY HAZARD !! The pneumatic braces on overhead doors should be adjusted so you can comfortably open and close the doors. If you have to strain to open a door, please contact the Velocity11 Service Center and ask to have the braces adjusted. !! DAMAGE HAZARD !! Always open and close overhead doors using their handles. Opening and closing overhead doors by pulling and pushing on their corners may crack the glass and damage the pneumatic braces. 9. Press the green reset button on the power panel. 10. If there is a secondary computer, for a third-party device such as a plate reader, turn it on and log in to Windows. To turn on the BioCel (part three): 1. On the power panel: a. Check that the INTERLOCK light is on. This indicates that the enclosure doors are closed, provided the interlock override is not in use. b. Turn the AIR switch counterclockwise and check that the indicator light is on. This turns on air to the devices. If the air does not come on or the green reset button does not restore power to the devices, check the emergency stops, doors, and interlock key. c. If your BioCel has lights, turn the HOOD LIGHTS switch clockwise to ON. 2. If you use devices that require a vacuum created by a vacuum pump: a. Check that the gauge on the vacuum pump indicates a vacuum pressure. b. Make sure that the vacuum system is connected correctly. 3. If you use devices that require a gas supply, such as a StoreX incubator, make sure that the supply is turned on. Chapter 3: Preparing for a run BioCel User Guide 4. Make sure that all four lights on the power panel are on. If you have not previously selected the option to sense the air pressure automatically, check that the operating pressure is 100– 110 psi (0.62–0.69 MPa) for the main regulator and 35–60 psi (0.27– 0.34 MPa) for the robot regulator. 5. Turn on the devices if they are not already on. For more information, see the device’s user guide. Related topics For information about... See... Connections for utilities “Utilities connections” on page 19 Power panel “Power panel” on page 21 Vacuum system “Vacuum system” on page 31 BioCel hazard warnings “Safety information about the BioCel” on page 8 Performing a BioCel ready-state check Ready state conditions When the BioCel is on and ready for a protocol to be opened: ❑ The status lights are off. (BioCel 1200 does not have status lights.) ❑ All devices are on, pneumatic devices are supplied with air, and a vacuum is supplied where used. ❑ The computer is on and ready for a user to log in to the operating system. ❑ The UPSs are charged, ready to provide battery backup if the main AC power supply is cut. ❑ All doors are closed. ❑ The interlock override is off so that opening an enclosure door or pressing an emergency button will activate the emergency stop circuit. Related topics For more information about... See... Status lights “Monitoring the status of a run” on page 63 Turning on the BioCel “Turning on the BioCel” on page 43 45 46 Chapter 3: Preparing for a run BioCel User Guide For more information about... See... Interlock override ❑ “Resolving robot errors” on page 87 ❑ “Overriding the safety interlock” on page 90 Checking the UPS charge VWorks User Guide How this procedure fits into the overall process of performing a run “Workflow for preparing the BioCel for a Run” on page 42 Preparing devices and accessories About this topic This topic provides a quick reference for use when preparing Velocity11 devices and accessories for use on the BioCel. For procedures for setting up third-party devices, see the manuals for the individual devices. The procedures in this topic assume that the devices are already turned on and that you are familiar with the operation of the devices on your BioCel. When to Use Prepare devices and accessories after you have become familiar with the protocol. Set up order You would typically prepare the BioCel devices and accessories in the order presented in this topic. Using this order you first set up devices and accessories that have no time-sensitive elements, and can therefore be set up the night before the run. Leave the more complex preparations, which might use expensive and unstable reagents, until last. Note: If the protocol includes User Message tasks to prompt you to perform some setup steps, such as placing counterweight plates, you do not have to include these steps in the setup. About placing plates Depending on the protocol you intend to run, you might need to manually place plates, tipboxes, reservoirs, or counterweights onto platepads, hotel shelves, VStacks, VSpin rotors, or VPrep shelves. Always place plates so that the A1 well is in the top-left corner, as viewed by the robot. The following illustration is from the operator’s perspective. Chapter 3: Preparing for a run BioCel User Guide A1 well A B C D E F G H I J K L M N O P 1 2 3 4 5 6 7 8 9 10 11 12 13 14 15 16 17 18 19 20 21 22 23 24 00015 Robot arm and plate Waste bin set up Empty the waste bin and replace it under the waste opening in the BioCel table. !! INJURY HAZARD !! If your BioCel has an automatic door over the waste bin, use caution when removing or replacing the waste bin. If a protocol is running, the automatic door for the waste opening may open or close at any time. Low force is used to open and close the door, so the risk of serious injury is low. However, protect yourself by keeping away from the door mechanism at all times. To remove the waste bin from its hanger: 1. Open the side door nearest the bin. 2. Hold the bin at the top-right corner with your right hand. 3. Lifting the front side of the bin upwards with your right hand, place your left hand underneath at the bottom-left corner. 4. Supporting the bin with both hands, lift it up and off the hanger, resting it on the BioCel floor. 5. Slide the bin out of the BioCel. 6. Close the side door. To replace the waste bin on its hanger: 1. Open the side door nearest the bin. 2. Slide the empty bin into the BioCel until it lies underneath the waste opening, with the side of the bin resting against the hanger. 47 48 Chapter 3: Preparing for a run BioCel User Guide 3. Lifting the front side of the bin upwards with your right hand, place your left hand underneath at the bottom left corner. 4. Using both hands, lift the bin up, over the hanger, and down so the hanger supports the underside of the lip. 5. Close the side door. VStack setup The general process for loading a VStack with plates for a run is described here. For more detailed procedures, see the VStack User Guide. To set up a VStack: 1. Make sure there is no plate on the stage and then press the load/ release button to disengage the plate from the grippers and allow removal of the rack. Note: A rack must be present in the VStack for the load/release button to work. 2. Remove the rack. 3. Fill with the correct labware. 4. Return the rack to a VStack that will deliver plates, according to the protocol you will run. As the racks can be positioned either way round, make sure that the A1 wells of the plates are in the top-left corner, as viewed by the robot. 5. After opening the protocol, press the load/release button to set the gripper. PlateLoc setup The general process of preparing a PlateLoc is described here. For more detailed procedures, see the PlateLoc User Guide. To set up a PlateLoc: 1. Make sure there is enough seal stock on the roll for the run. 2. Make sure that the right support insert is installed for the plates you are using. 3. Open the PlateLoc Diagnostics to set default startup values. (The seal parameters are set in the Task Parameters within the protocol.) VCode setup The general process of preparing a VCode for a run is described here. For more detailed procedures, see the VCode User Guide. To set up a VCode: 1. Make sure that there is enough label stock in the label source roll. 2. Make sure that there is enough media stock in the media source roll. Chapter 3: Preparing for a run BioCel User Guide 3. If the radius width of the label backing on the take-up roll is more than 1 inch (2.5 cm) wide, remove the label backing from the takeup roll, cut it, and re-attach the end. Too much label backing on the take-up roll can interfere with operation of the VCode. 4. Use VCode Diagnostics to perform a plate-labeling test. VSpin set up For more detailed information about operating the VSpin manually, see the VSpin User Guide. The VSpin can spin one or two sample plates at the same time. Spinning one sample plate at a time always requires a counterweight plate. The counterweight plate can be added manually or robotically. To set up a VSpin: 1. Do one of the following: If you are using a manually loaded centrifuge counterweight, place the counterweight into bucket 2, using VSpin Diagnostics to open and close the VSpin door. If you are using robot-loaded counterweights, make sure you have correctly set up counterweights in VWorks, placed the counterweights in the correct plate positions, and checked to make sure the buckets are empty. If you are spinning two protocol plates and not using a counterweight, make sure you have set up the plate loading properly in VWorks and that both buckets are empty. !! DAMAGE HAZARD !! To avoid a robot crash, always place the counterweight into bucket 2 and leave the door open with bucket 1 at the front. The sample plate will always be moved to bucket 1 by the robot. Related topics For more information about... See... Setting up a counterweight “Setting up a VSpin counterweight plate” on page 51 Workflow this procedure belongs to “Workflow for preparing the BioCel for a Run” on page 42 Testing an auxiliary bar code reader “Aligning and testing auxiliary bar code readers” on page 53 Placing and removing hotel plates “Placing and removing plate hotel labware” on page 50 Setting up a PlateHub “Setting up the PlateHub” on page 54 49 50 Chapter 3: Preparing for a run BioCel User Guide Placing and removing plate hotel labware About this topic You can place plates into a plate hotel and remove plates from a plate hotel by: ❑ Removing the plate hotel from the BioCel first (if the hotel is not attached). ❑ Leaving the plate hotel on the table. In general, it is better to add and remove plates while leaving the hotels in place. This way you are less likely to spill liquids in the plate wells, and it will reduce wear on the registration pins (metal dowel pins) and hotel bases. Removing and replacing a hotel !! IMPORTANT !! If you remove a plate hotel, you must put it back in the same place to maintain accurate teachpoints. To remove a plate hotel: 1. Holding the top handle, lift directly upwards. The plate hotel lifts off its base. To replace a plate hotel: 1. Holding the top handle, position the plate hotel above the base so that the dowels are aligned with the dowel holes. 2. Slowly lower the plate hotel onto its base. Note: On some BioCels, the plate hotels are screwed onto the BioCel deck, in which case they cannot be removed. Related topics For more information about... See... Plate hotels “Plate hotel” on page 36 How to orient plates “About placing plates” on page 46 Chapter 3: Preparing for a run BioCel User Guide Setting up a VSpin counterweight plate About this topic This topic describes how to set up a counterweight for the VSpin. A counterweight plate is always required when centrifuging a single plate in a VSpin device on a BioCel. A counterweight plate is the same as a sample plate except that it is empty, or contains water to provide a more accurate balance. If a counterweight is not used, a load imbalance error will result. The load imbalance tolerance is 10 grams. Using a counterweight plate and centrifuging one sample plate at a time does not typically increase the length of a protocol run, compared to spinning two sample plates at a time. This is because the centrifuge task is not typically the time-limiting step of a protocol. If your spin time is short, about 0–45 seconds, the protocol will probably run faster if you load the counterweight by hand. If your spin time is 45 seconds or longer, the protocol will probably run fastest if you load two protocol plates and don’t use a counterweight. Options for loading plates A counterweight should be the same weight as the sample plate. You can load counterweights into a VSpin by any of the following methods: ❑ By hand, using VSpin Diagnostics software to open and close the centrifuge door and move the rotor. ❑ With the robot, using a combination of Robot Diagnostics and VSpin Diagnostics. ❑ Automatically, using the robot during a normal run. Setting up robotically loaded counterweights is done when creating a protocol. Some setup is required by administrators before you can load counterweights robotically. Manually loading counterweights To load a counterweight by hand: 1. Open VSpin Diagnostics software. The VSpin Control dialog box opens. 2. Follow the directions in the VSpin User Guide to open the VSpin door and load the counterweight. !! DAMAGE HAZARD !! To avoid a robot crash, always place the counterweight into bucket 2 and leave the door open with bucket 1 at the front. The sample plate will always be moved to bucket 1 by the robot. 51 52 Chapter 3: Preparing for a run BioCel User Guide About robotically loaded counterweights For the robot to be able to load a counterweight: ❑ The platepad containing the counterweight must be associated in VWorks with the type of labware used for the counterweight so the robot knows how to pick it up. This association is created by an administrator in the manage counterweights database when creating the protocol. ❑ The Centrifuge task that uses the counterweight must specify from which device to pick up the counterweight. This is specified by an administrator when creating the Centrifuge task for the protocol. ❑ The counterweight plate must be placed by the operator on the platepad specified in the Centrifuge task. !! IMPORTANT !! It is the operator’s responsibility to make sure that the counterweight on the pickup platepad is of the correct type to balance the sample plate. VWorks does not generate an error if the type of counterweight picked up does not match the type of sample plate. Note: The administrator who creates a protocol can add user messages to the protocol to remind the operator before a run which types of plate to put on which platepad. Setting up robotically loaded counterweights To set up robotically loaded counterweights: 1. Identify a process that includes a Centrifuge task, look at the plate instance and note the type of plate used for the process. 2. In the same process pane, click the Centrifuge task in the process. 3. In the Protocol Task Parameters toolbar, note the name of the device defined in the Select counterweight to use list. If you are unable to select a device, the administrator has not yet defined a counterweight. Note: If you have just added a counterweight and it does not appear in the list, click a different task and click back on the Centrifuge task. 4. Repeat the procedure for the remaining Centrifuge tasks in the protocol. It might help to create a table that looks like this one, which replicates the relevant information from the manage counterweights database: Plate Type Platepad w 1 x 2 y 3 5. Place the counterweights on the platepads with which they are associated. Chapter 3: Preparing for a run BioCel User Guide Related topics For information about... See... Setting user message tasks VWorks User Guide Centrifuge task parameters VWorks User Guide Aligning and testing auxiliary bar code readers About this topic This topic describes the procedure for testing auxiliary bar code readers. If a device has a bar code reader, you should make sure that it is functioning and correctly aligned before starting runs. Note: Auxiliary bar code readers are set up in the Device Manager. Laser warnings !! INJURY HAZARD !! Class II laser hazard. Looking directly at the laser light might seriously damage your eyes. !! INJURY HAZARD !! Do not disassemble bar code reader sensor heads. Laser emission from the reader is not automatically stopped if the sensor head is disassembled. !! INJURY HAZARD !! Unless following a procedure in a Velocity11 user guide, do not touch the white TEST button on the side of the bar code reader sensor head. This button turns on the laser creating the possibility of a long exposure to the light. Procedure To align and test a bar code reader: 1. Place a plate labeled with a bar code on the plate pad that has the reader you want to test. 2. Press and hold the white button labelled TEST on the side of the reader for about 4 seconds. When you release the button the green light next to the label LASER ON should remain on. 3. Adjust the reader, if needed, to have as many laser lines crossing the bar code as possible. 4. In VWorks, select Tools > Test bar code reader. 5. If you have more than one auxiliary bar coder reader, select the appropriate one from the list. 6. Click Test. The bar code appears in the bottom of the dialog box followed by the percentage read quality. Adjust the bar code reader until the percentage is as high as possible (usually about 50%). 7. Press the test button again to turn the laser off. 53 54 Chapter 3: Preparing for a run BioCel User Guide Related topics For information about... See... Troubleshooting bar code reader errors VWorks User Guide Positioning the bar code reader VCode User Guide Workflow this procedure belongs to “Workflow for preparing the BioCel for a Run” on page 42 Setting up the PlateHub About this topic This topic describes how to set up the PlateHub. Procedure To set up the PlateHub: 1. Make sure that the racks are in the appropriate locations as defined in the PlateHub profile. 2. Remove racks by grabbing the rack handle and pulling up to slide the rack out. 3. Fill the racks and slide them back into position. 4. Make sure rack locations and other PlateHub parameters are set correctly in the PlateHub Diagnostics. Rack handle 00257 BioCel Plate hub tower removal 00257 Related topics For information about... See... Changing PlateHub rack locations Device Driver User Guide Chapter 3: Preparing for a run BioCel User Guide For information about... See... Workflow this procedure belongs to “Workflow for preparing the BioCel for a Run” on page 42 Preparing devices for a run “Preparing devices and accessories” on page 46 Performing pre-run checks About this topic After turning on the BioCel, creating a protocol, and preparing the devices you would typically perform a number of pre-run checks. This topic describes the checks to perform. Procedure To check that the BioCel is ready for a run: 1. For each VPrep, make sure that any reservoirs and Micro Wash trays are on the correct shelves. 2. Make sure that there are no stray plates or lids in robot-accessible places, which include: Platepads VPrep shelves VStack plate stages VSpin buckets VCode plate stages PlateLoc plate stages Plate hotel shelves PlateHubs Lid hotel bays Lid removal devices Third-party devices You can also set the robot to check all accessible positions at the beginning of a run. !! DAMAGE HAZARD !! Leaving a stray plate in the system might cause the robot, when holding a plate, to crash into the stray plate. A typical robot crash will damage the plates, spill samples and stop the robot. It might also damage the robot gripper pads. 55 56 Chapter 3: Preparing for a run BioCel User Guide 3. For each VSpin, if you are using the robot to load the counterweight, make sure that the counterweight plate is on the correct platepad in the correct orientation and that the VSpin is empty. If you are manually loading a counterweight, make sure that the counterweight is loaded in the VSpin according to the protocol you will run, and that it is oriented correctly. 4. For each VStack, make sure that the stacker contains the plates specified by the protocol and that the labware and plate name displayed on the display panel match: The actual labware in the stacker The labware and plate name in the protocol 5. Make sure that the device air pressures regulators lie within the following ranges: Device Air Pressure (psi) Air Pressure (MPa) PlateLoc 87–90 0.60–0.62 VCode 85–90 0.56–0.62 VPrep 90–95 0.62–0.65 VStack 40–65 0.28–0.34 PlatePierce 75–80 0.65–0.55 To find the current incoming air pressure for the PlatePierce, open the PlatePierce Diagnostics software. 6. For each VStack, open the VStack BioNet Diagnostics software to check that the grip pressure is appropriate for the type of plates that you are using. For more information about adjusting the grip pressure, see the VStack User Guide. 7. If your BioCel is equipped with environmental control, check that environmental settings are within acceptable ranges for the run. 8. Close all doors. !! DAMAGE HAZARD !! If running a BioCel 1600 or 1800, make sure that you move the computer monitor out of the way as you close the overhead doors. 9. If the interlock override is on, put the key into the interlock override keyhole in the power panel and turn it to the 12 o’clock position. This disables the interlock override and stops the robot if the door is opened. Related topics For more information about... See... Workflow this procedure belongs to “Workflow for preparing the BioCel for a Run” on page 42 Chapter 3: Preparing for a run BioCel User Guide For more information about... See... Setting the robot to check all VWorks User Guide accessible plate positions 57 58 Chapter 3: Preparing for a run BioCel User Guide Chapter 4: Performing a run BioCel User Guide Performing a run 4 This chapter describes the hardware procedures associated with performing a run. All of the procedures in this chapter can be performed by someone with operator privileges. This chapter contains the following topics: ❑ ❑ ❑ ❑ ❑ “Pausing and stopping a run” on page 60 “Comparing interlock and emergency circuits” on page 62 “Monitoring the status of a run” on page 63 “Cleaning up after a run” on page 65 “Turning Off the BioCel” on page 66 59 60 Chapter 4: Performing a run BioCel User Guide Pausing and stopping a run About this topic This topic describes the different ways to pause and stop a run and how the result is different depending on the method you choose. About stopping a run set Pausing or stopping a run set is the same as pausing or stopping a run. Ways to stop a run You can stop a run by: ❑ Clicking Pause in VWorks. ❑ Opening an enclosure door, or if the door is open, activating the safety interlock by turning the key. ❑ Pushing an emergency stop button. Runs stopped this way cannot be continued. Before continuing with a stopped run Before continuing with a run that was stopped, make sure that the system is in a valid state for the point of the protocol at which the run stopped. In other words, make sure that the partial completion of a task has not made changes that will cause an error or cause samples to be switched around when the run continues. For example, errors can be caused when manually moving a plate to a location that should not have a plate. Stopping a run using VWorks Use VWorks to stop a run under normal circumstances, such as when you want to: ❑ ❑ ❑ ❑ ❑ Add or remove labware from stackers Clean up a spill Add reagent to a VPrep reservoir Diagnose a problem Perform an operation that is not part of the protocol See the VWorks User Guide for a procedure. Using an emergency stop button !! IMPORTANT !! You cannot continue with a run after using an emergency stop because VWorks must be restarted. Use this option for emergencies only. In an emergency situation, you can instantly stop all accessible moving parts (does not include cooling fans) by pressing an emergency stop button. Emergency stop buttons are located on the table and the power panel. Pressing an emergency stop button: ❑ Cuts power to the robot motor ❑ Cuts power to the instruments (except for the main power to any VPreps and VPrep pumps) Chapter 4: Performing a run BioCel User Guide ❑ Cuts power to the VPrep motors that move the head, and activates the brake on the head to prevent it from falling 00005 ❑ Stops the air supply to the instruments Opening an enclosure door during a run Provided the interlock circuit has not been overridden, you can open an enclosure door at any time during a run to instantly stop BioCel motion. The interlock light on the power panel will turn off when this happens and generates a robot error, after which you can either continue or abort the run or enter diagnostics. When you close the door, an error dialog box opens. If a VPrep was in motion when the door was opened, a VPrep Error dialog box might also be displayed. !! IMPORTANT !! Do not use the door interlocks to routinely stop a protocol. The door interlocks are designed to be a safety backup system. Instead, use the pause button in VWorks. Related topics For more information about... See... Working with diagnostics software “Diagnostics” on page 69 Recovering from an emergency stop “Emergency stop error recovery” on page 87. Recovering from an interlock error “Door interlock error recovery” on page 87 61 62 Chapter 4: Performing a run BioCel User Guide Comparing interlock and emergency circuits About this topic This topic provides a table that lists the power circuits that are controlled by the interlock and emergency stop. If you open an enclosure door during a run, the run will stop. When you close the door, and click Continue in the stop dialog box, the run will resume. If you press an emergency stop button during a run, you will have to perform a more invasive recovery procedure and you cannot continue with the protocol. Power components affected by the interlock and emergency stop The following table shows how different components are affected by the door interlock circuit and emergency stop circuit. Component Interlock cuts? Emergency stop cuts? Bio I/O power No No Cooling fan power No No Device power, such as platepad bar code reader No Yes Module power No Yes (except VPrep) Robot motor servo power Yes Yes Robot system power No No System air No Yes VPrep motor servo power Yes Yes VPrep pump module motor power Yes Yes Cooling or heating waterbaths No No Liconic incubator environmental control No No UV lights No No Clean-room output fan No No Related topics For more information about... See... Recovering from an emergency stop “Emergency stop error recovery” on page 87. Recovering from an interlock error “Door interlock error recovery” on page 87 Chapter 4: Performing a run BioCel User Guide For more information about... See... Stopping a run “Pausing and stopping a run” on page 60 Monitoring the status of a run About this topic After starting a run, the operation of the BioCel should be monitored. This topic describes how to monitor the status of a run and points to other topics that describe how to monitor specific aspects of a run. What to monitor After starting a run, monitor the operation of the BioCel. Exactly what you do to monitor a run depends on the protocol that you are using. For example, you might need to: ❑ Compare the motions of the robot to the protocol tasks being completed. You can identify the task that is currently being performed from the position of the green ball in the process panes. Because VWorks can schedule more than one task at a time, there might be more than one green ball displayed. ❑ ❑ ❑ ❑ ❑ Add and remove labware. Empty the waste bin. Empty liquid waste containers. Fill liquid reservoirs. Replace an empty roll of PlateLoc seal or bar code labels. !! IMPORTANT !! No errors are reported when a liquid waste container becomes full or a liquid reservoir becomes empty unless they are on a Weigh Pad, VPrep WeighShelf, or some third-party devices. To guard against the problem of a full waste container or empty reservoir container, the protocol writer can incorporate User Message tasks into the protocol to remind the operator at the appropriate steps in the protocol. Alternatively, operators can set their own timer alarms to remind them to fill reservoirs and empty a waste containers at the appropriate time. System monitoring What information is monitored by the BioCel during a run depends on the options selected for the protocol. For more information, see the VWorks User Guide. 63 64 Chapter 4: Performing a run BioCel User Guide Monitoring BioCel status The BioCels 1600 and 1800 have status lights, located on the frame, that enable you to monitor the current status of the system from a distance. The status of your BioCel is indicated by one of the following status light configurations. Note: Monitoring the status of a BioCel 1200 is done through VWorks. Blue status lights A blue status light is located on each BioCel frame post. Different light patterns indicate different BioCel conditions. Light Pattern Status All on solid Run progressing normally All off Not currently running All blinking simultaneously Run error One light on each post blinking twice, followed by the other light on each post blinking twice Run progressing normally but with interlock bypass in use All blinking in circular pattern Run complete Traffic light status lights A single red, yellow and green light fixture is located above one of the BioCel’s frame posts. Different light patterns indicate different BioCel conditions. Light Pattern Status Comment All off Idle System is not in operation. VWorks might not be running. Green Normal operation System is in normal, error-free operation. Yellow Warning-running The system has encountered an error. Plates are continuing to process but the error requires attention. Yellow Warningcomplete System has completed operation, but errors occurred during the runset resulting in error plates. Red Warning-idle System is idle, but an error was encountered during the compiling of the protocol that will keep the protocol from running. Chapter 4: Performing a run BioCel User Guide Light Pattern Status Comment Red Error During operation, an error occurred and the system cannot continue without user intervention. Yellow Error During operation, a network or disk space error occurred. The system will stop until the error is fixed. Related topics For information about... See... Setting error options VWorks User Guide Monitoring the UPS VWorks User Guide Troubleshooting an error ❑ “Maintenance and troubleshooting” on page 85 ❑ VWorks User Guide Stopping a run “Pausing and stopping a run” on page 60 Setting up the waste bin “Preparing devices and accessories” on page 46 Using the User Message task VWorks User Guide Cleaning up after a run About this topic This topic provides a list of tasks to perform on the BioCel after the last run. For more information about cleaning up after the run, see VWorks User Guide. Procedure To clean up after a run: 1. Remove sample plates that have been used. 2. Remove manually placed plates from platepads, hotel shelves, VPrep module shelves, and so on. 3. If necessary, remove the counterbalance plate from VSpin devices. 4. Wash all items, such as, reservoirs, tubes and manifolds, that were contacted by liquid. 5. Empty the waste bin. 6. Check run logs. 65 66 Chapter 4: Performing a run BioCel User Guide 7. Turn off environmental controls and temperature-controlled water baths. Related topics For information about... See... Turning off the BioCel “Turning Off the BioCel” on page 66 Shutting down the software VWorks User Guide Working with logs VWorks User Guide Turning Off the BioCel About this topic This topic describes how to shut down the BioCel. The procedure for turning off the BioCel is the same as the procedure for turning on the BioCel except that you do not need to press the green reset button. When to use Shut down the BioCel when you intend to: ❑ Move it ❑ Leave it unused overnight or for an extended period of time Procedure To shut down the BioCel: 1. Make sure you have performed a clean-up after the last run. 2. Exit VWorks. 3. If you have a secondary computer: a. Exit any software running. b. Shut down the secondary computer (through Windows). Wait for the operating system to shut down. 4. Shut down the main computer through Windows. Wait for Windows to exit. 5. Turn off the computer monitor. 6. If you use modules or devices that require a vacuum pump, optionally turn off power at the pump if the pump has an on/off switch. 7. Turn off the Robot power on the power panel. 8. Turn off the System power on the power panel, if applicable to your BioCel. Chapter 4: Performing a run BioCel User Guide 9. Push the UPS button that turns off power output to all parts of the system. If you have more than one UPS on your BioCel, make sure that you turn them all off. For more information about turning off the UPS, see the user manual for the UPS. 10. On the power panel, turn the main power switch counterclockwise to the off position. 11. If moving the BioCel, unplug the air, Ethernet and main power cables. Related topics For information about... See... Post-run clean-up “Cleaning up after a run” on page 65 Stopping a run “Pausing and stopping a run” on page 60 Monitoring a run “Monitoring the status of a run” on page 63 67 68 Chapter 4: Performing a run BioCel User Guide Chapter 5: Diagnostics BioCel User Guide Diagnostics 5 This chapter explains how to use diagnostics software to control the robot. For information about how to use the diagnostics software for Velocity11 devices, see the user guide for the device. For information about how to use the diagnostics software for third-party devices and Velocity11 devices not sold as standalone products, see the Device Driver User Guide. This chapter contains the following topics: ❑ ❑ ❑ ❑ “About Diagnostics software” on page 70 “Using Bio I/O Diagnostics” on page 71 “Using Robot Diagnostics” on page 72 “About fine-tuning robot teachpoints” on page 79 69 70 Chapter 5: Diagnostics BioCel User Guide About Diagnostics software Background The BioCel can be controlled in real time directly through the VWorks Diagnostics software using simple commands. Diagnostics software is used for: ❑ ❑ ❑ ❑ Troubleshooting Setting teachpoints Performing manual operations outside a protocol Creating and editing profiles For example, if an error occurs during a run that leaves a plate where it should not be and the VStack stage out of its home position, you can use Robot Diagnostics to move the plate and VStack Diagnostics to return the VStack stage to its home position. Types of diagnostics software Instruments and robots manufactured by Velocity11 include their own diagnostics software. You can find instructions for using this software in the relevant user guide. Related topics For information about... See... Diagnostics for Velocity11devices Relevant Velocity11 device user guide Diagnostics for third-party devices Device Driver User Guide Bio I/O Diagnostics “Using Bio I/O Diagnostics” on page 71 Robot Diagnostics “Using Robot Diagnostics” on page 72 Chapter 5: Diagnostics BioCel User Guide Using Bio I/O Diagnostics About this topic The Bio I/O Diagnostics software is primarily used by Velocity11 personnel for troubleshooting communication problems between VWorks and the BioCel devices. During troubleshooting, Velocity11 personnel might ask you to assist with some tasks in Bio I/O Diagnostics. This topic describes how to open the Bio I/O Diagnostics in VWorks3 and test an output. If you are running VWorks4, the procedure might be different. Procedure To use the Bio I/O Diagnostics: 1. Open the Bio I/O Diagnostics: a. Click the Device Manager tab. b. In the Device List expand System, if closed, and then doubleclick BioIO. The Bio I/O Diagnostics opens. 2. To test an output, select it from the list and then click Turn on selected outputs. The indicator next to the output lights up. The output remains on until you turn it off. 71 72 Chapter 5: Diagnostics BioCel User Guide Related topics For information about... See... What the Bio I/O does “Hardware control components” on page 22 Using Robot Diagnostics About this topic This topic explains how to move the robot using Robot Diagnostics software. For general information about diagnostics software, and to learn how to open diagnostics software, see “About Diagnostics software” on page 70. !! DAMAGE HAZARD !! Before you use Robot Diagnostics software to move the robot, make sure that there is nothing on the table that the robot can crash into. Move the robot slowly. Robot axes The robot has three axes of movement: Axis r Description Radial. The horizontal distance, in millimeters, between the back of the robot’s gripper in the home position and the back of the robot’s gripper in the current position. t Angle. The angle, in degrees, between the center point of the robot’s gripper in the home position and the center point of the robot’s gripper in the current position. z Height. The vertical distance, in millimeters, between the center point of the robot gripper at the home position and the center point of the robot gripper at the current position. Setting robot speed To set the speed of robot movement: 1. In the Robot Speed area, select Slow, Medium, or Fast. Note: We recommend using the Slow or Medium setting for manual control. Chapter 5: Diagnostics BioCel User Guide Moving the robot by hand Robot movement is controlled by motor servos. You can move the robot by hand in the plane of the robot arm, but you cannot change its height. To move the robot by hand: 1. In the Servo control area, select R & T servos off. 2. Holding the end effector, which is the last segment of the arm, slowly move the arm to where you want it, in the horizontal plane of motion. 3. Select R & T servos on to return control to VWorks. Jogging the robot You can move the robot in increments, in either the z-axis, r-axis, or taxis. The process of moving in increments is called jogging. !! DAMAGE HAZARD !! Before you jog the robot, make sure that there is nothing on the table that the robot can crash into. Move the robot slowly and keep the jog increment small until you are certain that there is no obstruction. To jog the robot: 1. If you intend to pick up a plate, in the Jog Settings area, either: Select a type of labware from the list box, in which case the appropriate value is automatically entered into the Gripper offset text box. Enter the value directly into the Gripper offset text box. 2. In the Jog settings area, check, and possibly change, the following settings: 73 74 Chapter 5: Diagnostics BioCel User Guide Setting Comments Gripper offset The height above the teachpoint, which is typically 2–3 mm. You will rarely need to change this value from the values automatically entered for the plate type. However, you can type a value into the Gripper offset text box if you need to. Be aware however, that this is a temporary change. To change it permanently, you need to make the change in the labware editor. Jog increment The distance or angle to move the robot at each jog. 3. In the Position Control area, click one of the following buttons: Button Moves the robot... Down Down, decreasing the z-axis value Up Up, increasing the z-axis value In In towards the center of the robot’s radius, decreasing the r-axis value Out Out from the center of the robot’s radius, increasing the r-axis value CW Clockwise, decreasing the t-axis value CCW Counterclockwise, increasing the taxis value The readout displays the current coordinates of the robot in relation to the home position. Moving the gripper You can open and close the robot’s gripper in a single movement. To open or close the robot’s gripper: 1. In the Position Control area, click Open gripper or Close gripper. Chapter 5: Diagnostics BioCel User Guide Homing and resting the robot Homing and resting the robot both move the robot to the home position, but there are some important differences between these two actions. Homing Each axis of the robot has a sensor that is triggered when the robot is in a specific position. This position defines the home position for that axis. When the robot is homed, it moves the r-axis, followed by the t-axis and then the z-axis until the sensors on each axis are in the triggered position. This home position serves as a positional reference for all other points, with z, r, and t coordinates of 0, 0, 0. You should home the robot after a high-speed crash. The robot homes automatically when you start VWorks. Resting When the robot is moved to the rest position, it takes the shortest path to the z, r, t coordinates of 0, 0, 0. Provided the home coordinates have not changed, this position is the same as the home position. Resting the robot is faster than homing the robot because it moves at the speed set in Robot Speed and the arm moves faster because it is not using the sensors. You may choose to move the robot to the rest position to quickly move it out of the way when you are working on the table. To home or rest the robot: 1. Click Home or Move to rest position. Checking communication time The Position Control group box displays the time interval between the receipt of positional coordinates from the robot. This refresh time should be less than 45 milliseconds. If it is consistently greater than this, contact the Velocity11 Service Center. Reading a plate’s bar code You can use diagnostics software to read a plate’s bar code for troubleshooting purposes. To read a plate’s bar code: 1. Place the plate with the bar code on a platepad. 2. Select the teachpoint from which to pick up the plate in the Position 1 list. 75 76 Chapter 5: Diagnostics BioCel User Guide 3. In the Position 2 list, select Nowhere. 4. For Position 1, enter a value for the approach height. The approach height is the height to raise the robot gripper above the teachpoint when the robot moves the plate horizontally towards or away from the place plate position. Make this value large enough to avoid catching the plate on a lip, or other protuberance, as it is moved from a position, but not so high that the robot hits a shelf or other object above the position. This value is device-dependent. For most devices a value of 8– 10 mm will work. Start with a value of 6 mm for picking a tipbox from a VPrep shelf or removing a plate from the VSpin when making these settings. !! IMPORTANT !! If approach heights are set incorrectly, it could result in a robot crash. 5. Click Pick & Place 1->2. The robot moves to Position 1 and picks up the plate. The bar code is read and displayed in the Bar Code Testing group box. : Ignoring robot errors You have the option of ignoring robot errors when using Robot Diagnostics. You may do this, for example, when you want to simulate the movement of plates without using plates, which would otherwise give a plate sensor error. This setting only affects the use of Robot Diagnostics. It does not affect VWorks error settings. To ignore errors when using Robot Diagnostics: 1. Select Ignore errors. Checking the plate sensor The plate sensor in the robot gripper might need to be recalibrated if it is not sensing a plate when there is a plate in the gripper. You can also use the plate sensor indicator to check the function of the plate sensor. To check the plate sensor: 1. Move the robot to a position that has a plate. 2. Move up by the robot gripper offset for the plate in question. 3. Close the gripper. 4. Look at the Plate present indicator. Chapter 5: Diagnostics BioCel User Guide If the indicator is on, the plate sensor is registering a plate in the gripper. 5. Open the gripper. Moving the robot to a teachpoint You can move the robot directly to any teachpoint when there is no plate in the gripper. To move the robot to a teachpoint: 1. From the Position 1 or Position 2 list, select the teachpoint to move to. 2. Make sure grippers are open and click Move to point for either Position 1 or Position 2, as appropriate. !! DAMAGE HAZARD !! When you use the Move to point function, the robot does not use the Approach height. Instead, it moves to the point using the most direct path. If there is a plate in the gripper, the plate might contact a lip on the device, causing a robot crash. Also, if there is a plate at the position and the robot grippers are closed, there will be a robot crash. Moving a plate between teachpoints You can move the robot from one teachpoint to another, and then back again. If the first teachpoint has a plate, the robot will pick it up and move it to the second teachpoint. To move a plate between teachpoints: 1. Select one teachpoint from the Position 1 list. 2. Select the other teachpoint from the Position 2 list. 3. Set the Approach ht for each position. 4. To move a plate from: Locating the teachpoint file Position 1 to Position 2, click Pick & Place 1->2 Position 2 to Position 1, click Pick & Place 2->1 You might need to locate the robot teachpoint file so you can send it to us for troubleshooting purposes. 77 78 Chapter 5: Diagnostics BioCel User Guide To locate the teachpoint file: 1. View the path to the file at the bottom of the Robot Diagnostics dialog box. Changing robot profile settings Robot-specific settings are grouped into a profile. BioCel platforms with more than one robot use more than one profile. You should rarely, if ever, need to change the robot profile on your BioCel. !! IMPORTANT !! If you change the robot profile and later click Save & Exit, the values are changed in VWorks, which will affect protocols that you run afterwards. To change robot Profile Settings: 1. Type the new value into the text box for the parameter you want to change, using the following table as a guide. Parameter Description Robot COM port The communications port to which the robot is connected. BCR COM port The communications port to which the robot’s bar code reader is connected. Gripper open delay Interval between the time the gripper starts to open and the time the robot starts to depart from a plate. If this value is set too low, the gripper might not have completely released the plate before the robot moves, causing the plate to be dragged. Gripper close delay Interval between the time the robot gripper starts to close and the time to departure. If this value is set too low, the plate might be held too high in the gripper. Chapter 5: Diagnostics BioCel User Guide Parameter Description Retry pushdown Pushdown is a robot action used with filtration stations, vacuum platepads and vacuum shelves on VPrep pipettors. The purpose of the action is to flatten a plate on the stage. If, during operation, the vacuum seal indicator indicates the absence of a seal, the robot will push down on the plate in an attempt to create a seal. The value for this parameter is the distance pushed down in millimeters. Related topics For information about... See... Robot errors “Resolving robot errors” on page 87 Moving to a teachpoint “Moving the robot to a teachpoint” on page 77 About fine-tuning robot teachpoints Where teachpoints are used Teachpoints are axis position coordinates needed by: ❑ The robot, to be able to accurately pick up and move plates to and from devices ❑ VPrep heads, to be able to accurately position pipette tips into plate wells ❑ VSpin centrifuges, to be able to accurately position the buckets in relation to the door ❑ VStack stackers, to be able to accurately position the plate stage during operation Teachpoint coordinates are relative to the robot’s or device’s home position and are set up by Velocity11 before shipping and verified at your site on installation. However, you might occasionally need to finetune teachpoints. For information about device teachpoints, see the relevant user manual. This topic covers only robot teachpoints. Robot teachpoints defined When teachpoints are initially set at the factory, they are defined as described in the following table. 79 80 Chapter 5: Diagnostics BioCel User Guide The goal of finetuning robot teachpoints Axis Teachpoint position is set when the... r Bumper of the plate calibration tool touches the back of the gripper. t Plate is centered in the gripper. z Top of the plate calibration tool bumper is flush with the top surface of the gripper fingers. !! IMPORTANT !! Accurate placement of a plate is a property of both the picking position’s teachpoint and the placing position’s teachpoint. Therefore when you are fine-tuning a teachpoint, always consider the teachpoint of the position that a plate is collected from. The ability to tolerate a deviation from the optimal teachpoint depends on the tolerance in the geometry of the device that receives the plate. It is less important for the absolute value of the teachpoint for a plate position to be optimal than it is for the teachpoints of the position at which a plate is picked up and the position to which the plate is delivered to work together. To explain further, if the teachpoint at the pick position is 1 mm less than the optimum r-value and the teachpoint at the place position is 1 mm less than the optimum, the end result is that the plate is placed accurately at the position. Also, if the teachpoint of the picking position has an r-value that is low by 1 mm and the teachpoint of the placing position has an r-value that is high by 1 mm, the combined effect is that the plate is placed 2 mm forward of where should be. Correct and incorrect teachpoint examples Using the teachpoint plate calibration tool, the following diagrams demonstrate both a correct and incorrect example of a teachpoint. Correct teachpoint example The first diagram shows where the gripper picks up the teachplate calibration tool on a platepad when the r-teachpoint is set accurately. Notice that the optimal teachpoint is where the inside surface of the gripper back is aligned flush with the back of the teachplate tool. Chapter 5: Diagnostics BioCel User Guide Optimal teachpoint Back of plate 00259 00259 Correct Teachpoint The next diagram shows a side view of the correct teachpoint to illustrate the correct z-teachpoint. 00261 00261 Side Teachpoint Incorrect teachpoint example In the next diagram, the teachpoint is incorrect. The back of the robot gripper stops before aligning with the back of the teachplate calibration tool, and the teachplate is held too far back in the gripper. The result is the plate is delivered too far forward and thus does not sit correctly on the platepad. 81 Chapter 5: Diagnostics BioCel User Guide Optimal teachpoint Back of plate 00260 Incorrect Teachpoint 00260 82 The next diagram shows a side view of an incorrect z-teachpoint. 00262 00262 Z off Teachpoint Related topics For information about... See... Fine-tuning procedure “Fine-tuning a robot teachpoint” on page 83 Robot Diagnostics “Using Robot Diagnostics” on page 72 Chapter 5: Diagnostics BioCel User Guide Fine-tuning a robot teachpoint About this topic This topic describes how to fine-tune a robot teachpoint using the teachplate calibration tool. The process of fine-tuning robot teachpoints is empirical. You make small, incremental adjustments until a plate can be accurately picked up and placed at a position. Note: The smallest increment of movement is 0.05 mm. !! IMPORTANT !! Accurate placement of a plate is a property of both the picking position’s teachpoint and the placing position’s teachpoint. Therefore when you are fine-tuning a teachpoint, always consider the teachpoint of the position that a plate is collected from. !! IMPORTANT !! To help standardize the process, it is imperative to select one platepad to use as a reference picking position for all teachpoints. On most BioCels this is platepad 1. Teachpoints are manipulated through the Robot Diagnostics software. You should be familiar with the features of this software before working with teachpoints. Before you start Before you start, make sure you have a teachplate calibration tool to use for the fine-tuning. Procedure To fine-tune a robot teachpoint (part one): 1. Examine the teachpoint coordinates for other devices that you know should be aligned in one or more axes with the device whose teachpoint you are working on. For example, all stackers sitting directly on the table and mounted in equivalent hole patterns should have very similar z- and r-values. This might give you a clue about whether the teachpoint is inaccurate and in which direction. 2. If this is the first time that your BioCel has had its teachpoints finetuned, select a platepad to use as your picking reference position. If you have fine-tuned teachpoints before, make sure you use the same platepad for the picking reference position. 3. Click Diagnostics. 4. Click Robot. This opens the Robot Diagnostics window. 5. In the Position 1 list, select the reference platepad. 6. In the Position 2 list, select the device whose teachpoint you want to fine-tune. Remember that you should check both the location places to and picked from. 83 84 Chapter 5: Diagnostics BioCel User Guide 7. Check the values for the approach heights. The approach height is the height to raise the robot gripper above the teachpoint before the robot moves the plate horizontally towards or away from the place plate position. Make this value large enough to avoid catching the plate on a lip, or other protuberance, as it is moved from a position, but not so high that it hits a shelf or other object above the position. This value is device-dependent. For most devices a value of 8– 10 mm will work. Start with a value of 6 mm for picking a tipbox from a VPrep shelf when making these settings. !! IMPORTANT !! If approach heights are set incorrectly, it could result in a robot crash. To fine-tune a robot teachpoint (part two): 1. Set the Robot Speed to Slow. 2. Click Pick & Place 2>1. 3. Carefully watch how the robot places the plate and listen to the sounds it makes. If the plate catches the lip of the plate position, because the r- or tvalue is incorrect, it can make a double-click sound. If the z-value is incorrect the plate will make a dropping sound or a crunching sound, depending on whether the value is too high or low. 4. When you have established the direction and approximate magnitude of the inaccuracy, set the jog increment. 5. Click Move to Point for Position 2. 6. Click the appropriate jog button to move the gripper, and click Teach point here for Position 2. This temporarily applies the new teachpoint setting. If you click Cancel the new setting will not be saved. 7. Using the Pick & Place function, move the back plate to the reference position, repeat the move to the place position, and look to see if the accuracy has improved. 8. Continue with this iterative process until the plate is placed correctly. 9. Click OK to save the new teachpoint. Related topics For information about... See... Robot Diagnostics “Using Robot Diagnostics” on page 72 Teachpoints “About fine-tuning robot teachpoints” on page 79 Chapter 6: Maintenance and troubleshooting BioCel User Guide Maintenance and troubleshooting 6 This chapter tells you how to keep your BioCel in good working order and what to do when you encounter a problem. This chapter contains the following topics: ❑ ❑ ❑ ❑ ❑ ❑ “Routine maintenance” on page 86 “Resolving robot errors” on page 87 “Overriding the safety interlock” on page 90 “Resolving plate placing errors” on page 91 “Resolving lid removal problems” on page 92 “Recovering from a power outage” on page 93 85 86 Chapter 6: Maintenance and troubleshooting BioCel User Guide Routine maintenance About routine maintenance The BioCel does not require a lot of routine maintenance. In general, practice good housekeeping by cleaning up spills and following the clean-up procedures. Once a month, check that the: ❑ ❑ ❑ ❑ ❑ ❑ Checking the air filter for replacement Robot gripper pads are not torn, cracked or otherwise worn Overhead doors remain at the correct height Liquid handling tubing is not torn, cracked or discolored Air filter is clean Main air pressure reads 100–110 psi (0.62–0.69 MPa) Table top is free of debris, such as pieces of chipped plates and microtubes If the house air supplied to the BioCel is clean, the air filter should rarely need to be changed. To check the air filter for replacement: 1. Open the side door behind the air panel. 2. Look at the front of the air filter container. If there are any oil droplets or general dirt visible on the filter, the filter should be changed. Contact the Velocity11 Technical Support for instructions. Device maintenance For information about routine maintenance of the individual devices, see the relevant device documentation. Replacing fluorescent tube lights The interior of the BioCel has standard type fluorescent tube lights that occasionally need to be replaced. We recommend that two people work together to replace a light. To replace a fluorescent tube light: 1. If your BioCel has a light switch, turn off the lights. 2. At the light itself, unplug the power cord that goes to the light. 3. Remove the screws securing the light cover. 4. With one person working at each end of the light, remove the light cover by sliding the cover up and pulling out at the bottom. 5. Remove the lamp. 6. Install a new, identical lamp. 7. Replace the cover. Chapter 6: Maintenance and troubleshooting BioCel User Guide Related topics For information about... See... Cleaning up post-run “Cleaning up after a run” on page 65 Locating the air filter “Air panel” on page 22 Resolving robot errors About robot errors Robot errors are among the most common errors that occur during a run. Types of robot error There are four types of robot error. Door interlock error recovery Error Type Error Message ❑ Door interlock ❑ Emergency stop While placing at <location> robot emergency stop or door interlock detected Plate sensor Failed to sense plate when picking from <location> Servo While placing at <location> a servo error has occurred A door interlock error occurs when an overhead door is opened during a run. To recover from a door interlock error: 1. Make sure that the system is in a valid state for the protocol. In other words, make sure that you have not made changes that will cause a further error, such as moving a plate to a position that should not have a plate, or cause samples to be switched around, such as moving a plate from one VStack to another. 2. Close the overhead door that was opened. 3. Make sure that the interlock light on the power panel is on. 4. In the Robot Error dialog box, select Retry. If you are an administrator you can use the interlock override to continue the run with the overhead doors open. Emergency stop error recovery With an emergency stop error, power is cut to modules and devices, and VWorks loses information about the state that the modules and devices are in. This prevents VWorks from continuing the protocol. 87 Chapter 6: Maintenance and troubleshooting BioCel User Guide !! IMPORTANT !! You cannot continue the current protocol run after an emergency stop has been activated. After an emergency stop button is pushed, all device motion stops and error messages are generated in the error log as the scheduler attempts to continue with the protocol. To recover from an emergency stop: 1. Clean up any spills or debris if necessary. 2. Twist the activated emergency stop button in a clockwise direction. The spring-loaded button pops out. 00006 88 3. Close any open doors. 4. Push the reset button on the power panel. A stop dialog box opens in addition to the Robot Error dialog box that is already open. 5. Activate the interlock override by turning the key in the power panel. 6. If the protocol includes a pipette task, in the VPrep EStop detected dialog box, click Retry. 7. If there is a plate in the gripper, move it back to the pickup location: a. Establish the location that the plate was picked from. b. In the Robot Error dialog box, click Diagnostics. c. Gently hold the plate in your fingers, or ask another operator to do the same. d. Click Open Gripper to release the plate to your hand. 8. Close all overhead doors. 9. Remove the interlock override by turning the key in the power panel. 10. Push the reset button on the power panel. 11. Click Abort Process in the stop dialog box. 12. Close and restart VWorks. When you restart VWorks, communication with the devices that lost power is re-established. Chapter 6: Maintenance and troubleshooting BioCel User Guide Plate sensor error recovery Before you can recover from a plate sensor error, you must establish the cause of the error. To recover from a plate sensor error: 1. If there is no plate in the gripper, establish whether the plate was: Knocked out of the gripper. In this case, establish what knocked the plate out of the gripper. Missing from the location that the robot attempted to pick it up from. In this case, place the correct plate in the location and click Retry in the Robot Error dialog box. Not picked up. In this case, there may be a problem with either the labware definition for the plate or a teachpoint. Check the teachpoint at the position where it failed to pick up the plate, and also the teachpoint at the previous position. If there does not seem to be a teachpoint error, contact Velocity11. 2. If the plate is held in the gripper but is not seated correctly, establish whether the plate was positioned correctly at the pickup location. Servo error recovery If the plate was not positioned correctly at the pickup location, reposition the plate and click Retry in the Robot Error dialog box. If the plate was positioned correctly at the pickup location, there may be a problem with the approach or departure height. Alternatively, there might be a problem with the plate, the labware definition for the plate, a teachpoint, or the plate sensor. In this case, you should contact Velocity11. The robot’s motion is controlled by a servo system that cuts power to the robot if it encounters resistance to movement that is slightly higher than that expected from just the inertia of the robotic arm holding a plate. Additionally, when the power is cut, a servo error is generated. The great majority of servo errors occur when the plate being carried crashes into another plate sitting on a device. To recover from a servo error: 1. Check the BioCel deck to determine the cause of the collision and remove the obstruction. For example, it may be a plate from a previous run. 2. Check the plate being held by the robot to make sure that it has not been damaged or spilled. 3. Check to be sure that the plate did not slip in the grippers during the collision. 4. If the plate has not slipped and was not damaged during the collision, click Retry. 89 90 Chapter 6: Maintenance and troubleshooting BioCel User Guide 5. If the plate has slipped during the collision (or was damaged), click Diagnostics and move the plate manually: a. Move the robot to a position that is easy for you to access. b. While holding the plate with your hand, click Open gripper to release the plate from the robot. c. Place the plate at the destination location manually. d. Close Diagnostics. e. Click Ignore and continue. 6. If the crash was particularly hard, you might need to re-home the robot. Click Home. The robot uses servo motors with encoders that always track the robots position, even during a collision. Only re-home the robot after a severe collision. Related topics For information about... See... Using the interlock override “Overriding the safety interlock” on page 90. Emergency stop circuits “Power system” on page 27 Power panel “Power panel” on page 21 Checking teachpoints “About fine-tuning robot teachpoints” on page 79 Overriding the safety interlock About this topic At times you might need to override the safety interlock so you can perform tasks on the BioCel deck. This topic describes how to temporarily override the safety interlock. This procedure should only be performed by an administrator. Procedure !! INJURY HAZARD !! Only fully trained BioCel Administrators should have access to, and use of, the safety interlock key. Use the override only when you know how the robot and VPrep modules will move during the protocol, when the robot speed is slow, and when you have taken measures to keep away from the areas in which the robot and VPrep modules will be moving. To override the safety interlock: 1. Insert the override key into the interlock key hole on the power panel and turn it clockwise to the zero position. Chapter 6: Maintenance and troubleshooting BioCel User Guide 2. In the Robot Error dialog box, select Retry. Related topics For information about... See... Opening a door during a run “Pausing and stopping a run” on page 60 Safety interlocks and emergency stops “Comparing interlock and emergency circuits” on page 62 Resolving plate placing errors About plate placing errors If the robot does not place a plate accurately on a device, the problem could be with the: ❑ Teachpoint for either that device or for the previously scheduled device, including approach height. In this case, see for more information about fine-tuning teachpoints. ❑ Device, because it was moved or reconfigured by someone else who did not re-teach the teachpoints. ❑ Plate. In this case, replace the plate with one that is not deformed. Relate information For information about... See... Fine-tuning teachpoints “Using Robot Diagnostics” on page 72 91 92 Chapter 6: Maintenance and troubleshooting BioCel User Guide Resolving lid removal problems Vacuum-based lid remover problems If your BioCel has a vacuum-based lid remover, you may occasionally find that it does not function properly. If this happens, you will need to adjust the vacuum sensor that provides feedback on whether a lid is attached to the suction cups. This adjustment requires you to turn the air on and off through the Bio I/O Diagnostics software while making incremental adjustments to the screw head that lies in the hole on the side of the station. To do this you have to remove the side panel on the vacuum delidder device. For help with this procedure, contact the Velocity11 Service Center. Lid hotel problems Preventing problems To prevent problems with a lid hotel, make sure that: ❑ The rollers are free of debris and dirt. ❑ The robot holds the plates below the lids. ❑ Bar code labels are not applied to the lids connecting them to plates. ❑ Stacks of labels are not allowed to build up on the plates. ❑ The lids are free of sticky residue from labels. Solving problems If you receive a lid detection error, try the following: 1. Check that the plate type in the protocol is correct for the plate. 2. Make sure that the sensors are working: a. Open the lid hotel diagnostic software. b. Depress the delidder arms on the left side of the delidder (from the robot’s perspective) and check to see if the green light on the delidder device and in the delidder diagnostics lights for the arm you pressed. c. If the green light does not turn on, make sure the delidder is plugged in and configured correctly and that the other arms work (their green lights turn on). If one arm does not work, a setscrew may need adjustment. To do this, call Velocity11 Service Center. 3. Check the lid hotel teachpoints to make sure that they are correct. If you need help with this, contact the Velocity11 Service Center. Related topics For information about... See... Using the lid hotel VWorks User Guide Chapter 6: Maintenance and troubleshooting BioCel User Guide For information about... See... Stopping a run “Pausing and stopping a run” on page 60 Recovering from a power outage About this topic This topic describes behavior of the BioCel when the power is cut to it and what to do to recover from the outage. What happens when the power is cut If there is a main power outage the following events will occur: ❑ The UPS starts to beep while providing power to the devices. Note: Power to the environmental control will be cut. ❑ VWorks writes an error message to the log, displays an error message on the screen and notifies you are if you have email notification configured. ❑ The BioCel continues to run (execute a protocol) until the UPS charge passes the thresholds specified in VWorks at which time VWorks closes and the computer performs an orderly shutdown. Recommended actions during a power outage If you are running a protocol and are near the end, you might consider letting it continue until it is finished. What happens when the power is restored If the BioCel was not shut down during the power outage, the system will receive power, the UPS recharges, and the protocol (if running) continues. If you have just started running a protocol and/or require environmental control for your protocol and you anticipate a lengthy outage, you might consider stopping the run. If the BioCel was shut down during the power outage, it remains off until you turn it on. Related topics For information about... See... Setting the VWorks UPS threshold VWorks User Guide Turning on the BioCel “Turning on the BioCel” on page 43 93 94 Chapter 6: Maintenance and troubleshooting BioCel User Guide Index BioCel User Guide Index Note: You can search our technical documentation on our website at www.velocity11.com A AC power entry, 28 accessories, 36 Acrobat Reader, 6 air controlling flow, 30 filter, 22 filter checking, 86 main supply, 19 panel parts, 22 pressure, 56 shutoff valve, 30 switch, 30 system, 30 approach height, 76, 77, 84 B bar code auxiliary reader, 36 reading manually, 75 Bio I/O diagnostics software, 71 BioCel behind the side doors, 27 cleaning, 65 components, 14 definition, 14 external features, 17, 18 overview, 14 ready state, 45 routine maintenance, 86 starting, 43 C clean-room, 28, 32 computer monitor damage hazard, 9 networking. see networking counterweight plate, 56 manually loaded, 51 robotically loaded, about, 52 setting up robotic loading, 52 DC power supply, 28 diagnostics software about, 70 Bio I/O, 71 robot, 72 disposing of waste, 8 door opening, 60 E emergency stop, 29 button, 60 compared to interlock, 62 recovering from, 88 enable wires, 29 environmental control, 28, 56 environmental enclosure, 36 errors door interlock, 87 emergency stop, 88 hardware, reporting, 7 placing plate, 91 plate sensor, 89 robot, 76 servo, 89 Ethernet cable, 19 hub, 29 F fans, clean-room, 29 file, teachpoint, 77 filtration station, 31 Find button, 6 finding the file, 5 fuse, 21, 28 G gripper, 74 close delay, 78 offset, 74 open delay, 78 D H damage hazard computer monitor, 9 overhead door, 9 hotel. see plate hotel and lid hotel I injury hazard 95 96 Index BioCel User Guide interlock override, 10 side door, 10 instruments, preparing for a run, 46 interlock air shutoff valve, 22 air system, 30 compared to emergency stop, 62 injury hazard, 10 override, 56 recovering from errors, 87 safety, 10 iSeries controller, 28, 63 J job roles for readers of this guide, 2 jog increment, 74 jogging. see robot K keyboard shelf, adjusting, 33 L lid hotel, 36, 38 removal device, 38 suction-based remover, 36, 38 lights, maintenance, 86 M main panel, 30 manifold, air distribution, 30 Materials Safety data Sheet. see MSDS modules definition, 35 list of, 35 preparing for a run, 46 MSDS, 8 O online help, 5 overhead door, damage hazard, 9 PlatePierce, 35 power main supply, 19 panel, 21 pre-emergency stop current, 28 pre-run checks, performing, 55 pre-UPS current, 28 pushdown defined, 79 R regulators, 22, 30 reserve tank, 31 reset button, 29 resting the robot, 75 robot axes, 72 brakes, 29 communication time, 75 errors, 87 homing, 75 jogging, 73 moving, 73 profile, 78 recovering from servo errors, 89 resting, 75 speed, 72 run cleaning up after, 65 monitoring, 63 stopping, 60 S safety interlock override, 10, 29 labels, 8 training, 8 servo errors, recovering from, 89 side door injury hazard, 10 starting the BioCel, 43 status lights, 64 stopping a run, 60 suction-based lid remover, 38 P PDF guide, 5, 6 pinch valve, 31 plate placing errors, 91 sensor checking, 76 sensor errors, 89 plate hotel, 36 description placing and removing, 50 PlateLoc, 35 T teachpoint file, 77 teachpoints fine tuning, 79 inaccurate, 80 moving a plate between, 77 moving robot to, 77 third-party devices, 35 transfer station, 37 turning on. see starting the BioCel Index BioCel User Guide U UPS connections, 28 UV lights, 28 VSpin, 35 VSpin,counterweight. see counterweight plate VStack, 35 V W vacuum creating, 30 system, 31 VCode, 35 VPrep, 29, 35 brakes, 29 pumps, 29 warranty, 8 waste bottle, 31 disposal, 8 Weigh Pad, 36 workflow overview, 42 97 98 Index BioCel User Guide Agilent Technologies User Guide G5500-90002