1
User’s Manual
Version 5.4x
Copyright 2002-2004 MA Lighting Technology GmbH
The reproduction and distribution of the documentation and software and the use of its contents is
subject to written authorization from MA Lighting Technology GmbH.
Trademarks
Windows ® 2000, Windows NT ®, Windows XP ®, Windows 98 ®, Windows ME ® and Microsoft ®
are registered trademarks of Microsoft, Corp.
All other names mentioned may be trademarks or registered trademarks of their respective owners.
Welcome to grandMA 3D
Thank you for placing your trust in this product.
This manual will provide all the necessary information for you to get the best out of your visualization
software.
The ‚grandMA 3D‘software is subject to continual development. It is therefore possible that the entire
information printed in this manual is out-of-date.
Up-t o-date information can always be found in the current readme.txt file on the CD or the downloaded
program disks.
For the current software version refer to www.malighting.de
We need your help!
If you have wishes or suggestions please send us an e-mail (mailto:[email protected]) or visit
our forum at www.spectrolight.de .
Looking forward for a good cooperation
Your grandMA 3D team
MA Lighting Technology GmbH • Dachdeckerstr. 16 •
D-97297 Waldbüttelbrunn
•
www.malighting.de
Phone: +49 9 31 49 79 4- 0 Fax: +49 9 31 49 79 4-29 • Hotline: [email protected]
•
eMail: [email protected]
User’s Manual grandMA 3D V 5.4
Page 2
Contents
1
WHAT IS GRANDMA 3D?..............................................................................................5
1.1
Program Features..............................................................................................................6
1.2
Technical Features.............................................................................................................6
1.3
New Features in V 5.4.........................................................................................................7
2
SYSTEM REQUIREMENTS ...........................................................................................7
3
INSTALLATION ................................................................................................................8
3.1
Version of grandMA desk or grandMA Off-line ..................................................................8
3.2
Program Installation...........................................................................................................8
3.3
IP Addresses......................................................................................................................8
3.3.1
How to set the IP Address of the PC...............................................................................9
4
COMMUNICATION WITH THE GRANDMA DESK SERIES..................................10
4.1
Connection with the grandMA desk ................................................................................. 10
4.2
Connection with the grandMA Off-line software .............................................................. 11
5
5.1
DATA MANAGEMENT..................................................................................................11
Desk Connection Dialog................................................................................................... 11
5.2
Modifying Fixtures........................................................................................................... 17
5.2.1
Fixture Type Visualization............................................................................................ 19
5.3
Assignment of properties to dimmer channels................................................................ 20
5.4
Creating new Fixture Types............................................................................................. 21
6
3D GEOMETRY SYSTEM ............................................................................................21
7
QUICK GUIDE ................................................................................................................22
7.1
Step 1 – Insert Fixtures.................................................................................................... 22
7.2
Step 2 – Inserting trusses................................................................................................ 23
7.3
Step 3 – Positioning of Fixtures....................................................................................... 24
8
PROGRAM SURFACE..................................................................................................26
8.1
Menu bar.......................................................................................................................... 28
8.1.1
File............................................................................................................................. 28
8.1.2
Edit............................................................................................................................. 28
8.1.3
View... ........................................................................................................................ 28
MA Lighting Technology GmbH • Dachdeckerstr. 16 •
D-97297 Waldbüttelbrunn
•
www.malighting.de
Phone: +49 9 31 49 79 4- 0 Fax: +49 9 31 49 79 4-29 • Hotline: [email protected]
•
eMail: [email protected]
User’s Manual grandMA 3D V 5.4
Page 3
8.1.4
8.1.5
8.1.6
Settings... ................................................................................................................... 30
Windows..................................................................................................................... 32
Help... ........................................................................................................................ 32
8.2
Property Bar..................................................................................................................... 33
8.2.1
Objects....................................................................................................................... 33
8.2.2
Properties ................................................................................................................... 34
8.2.3
Layer .......................................................................................................................... 35
8.3
Toolbar............................................................................................................................. 36
8.4
2D View............................................................................................................................ 38
8.4.1
Context Dialog ............................................................................................................ 39
8.4.2
Object Properties ........................................................................................................ 40
8.5
Grid View ......................................................................................................................... 41
8.5.1
Working with the Grid .................................................................................................. 42
8.6
3D View............................................................................................................................ 44
8.6.1
Rotation of Objects...................................................................................................... 45
8.6.2
Scaling of Objects ....................................................................................................... 45
8.7
Full-screen View............................................................................................................... 46
8.8
Followspot Function ........................................................................................................ 47
8.9
Data Bases....................................................................................................................... 48
8.9.1
Dynamic Objects......................................................................................................... 48
8.9.2
Fixtures ...................................................................................................................... 53
8.9.3
Predefined Objects...................................................................................................... 54
8.9.4
Groups ....................................................................................................................... 55
8.9.5
Worlds ........................................................................................................................ 55
8.9.6
Textures ..................................................................................................................... 56
8.9.7
Playback of Videos (.avi) ............................................................................................. 57
8.9.8
Moving Pathes ............................................................................................................ 58
8.10
9
Channel Test Dialog...................................................................................................... 61
VIDEO CREATION.........................................................................................................62
9.1
Creating an avi file........................................................................................................... 63
10
BASIC 3D DEFINITIONS...........................................................................................65
11
KEYBOARD SHORTCUTS.......................................................................................67
12
FAQ ...............................................................................................................................68
12.1
Software Questions: ..................................................................................................... 68
12.2
Hardware Questions: .................................................................................................... 69
13
INDEX............................................................................................................................70
MA Lighting Technology GmbH • Dachdeckerstr. 16 •
D-97297 Waldbüttelbrunn
•
www.malighting.de
Phone: +49 9 31 49 79 4- 0 Fax: +49 9 31 49 79 4-29 • Hotline: [email protected]
•
eMail: [email protected]
User’s Manual grandMA 3D V 5.4
Page 4
1
What is grandMA 3D?
The grandMA 3D is a unique new user interface, created for the visualization as well as the design of
three dimensional stage layouts to be utilized in conjunction with the grandMA product range.
The software is designed as a pre-programming tool for light designers. It simplifies the process of
creating shows to save time and money.
Rendering tools have two major expectations: Maximum speed and good rendering quality.
The major focus of grandMA 3D is real-time visualization to get an impression of what will happen on
stage.
grandMA 3D allows a set up of any custom stage or scenery layout with 2D drawing facilities and a
library of basic graphical elements. Multiple windows with front/side/top view can be opened and
updated at the same time. All the stage elements can be positioned in x/y/z directions and may also
be rotated around the various axes. Custom textures for the surface of these elements can be
imported in a bitmap format or may be chosen from a library.
The set up of lanterns, luminaries or moving lights can be simply retrieved from the grandMA console's
show file per electronic transfer. There is no need to set DMX lines, DMX addresses or operation
modes for the single fixtures, as these details are already pre-adjusted in the grandMA. Once the
transfer takes place the user just has to position these fixtures in the 3D environment of the grandMA
3D software. The user may also group them logically on bars, scenery elements or trussing.
When switching to 3D rendering mode, the grandMA 3D software becomes an extremely powerful
visualizer with real time rendering facilities. All drawing elements, fixtures and lant erns are shown with
surface textures, as a kind of virtual reality. All functions of the installed lights are remotely controlled
by a connected grandMA and displayed with realistic movements, colors and images. At the same
time the viewing angle can be changed by just moving the virtual camera around with full control of
zoom, position and rotation. Or just switch to another pre-defined camera position and start a new
movement from there.
All optical fixture parameters, like beam angle, color (even color mixing) and gobos can be displayed.
Custom gobos can be inserted by simply assigning a color bitmap file to the gobo position of the
related fixture.
With the use of special graphic cards supporting shutter glasses, the grandMA 3D software enables
an even more realistic display of movements, by moving the “virtually” audience in the middle of the
scenery. The full processing power of this new add-on software can be discovered in this real 3Dmode whereas as the user wears electronic shutter glasses to give him/her a vivid holographic view of
his/her lighting design.
All the show data can later be received "online" from the grandMA and displayed in real time
rendering. It may also be recorded live and converted into one of the standard video compression
formats. These files can be easily viewed on any personal computer or MAC with standard media
player software and may even be sent by e-mail.
MA Lighting Technology GmbH • Dachdeckerstr. 16 •
D-97297 Waldbüttelbrunn
•
www.malighting.de
Phone: +49 9 31 49 79 4- 0 Fax: +49 9 31 49 79 4-29 • Hotline: [email protected]
•
eMail: [email protected]
User’s Manual grandMA 3D V 5.4
Page 5
1.1
Program Features
This new generation of visualization software comes with its own 3D engine and is based on the
Microsoft DirectX® standard for best performance. It communicates directly with the grandMA via
Ethernet and in this way it even receives the show ´s configuration and patching. No external
interfaces or components are required – not even a dongle needs to be installed. The grandMA 3D
Version is tailored for use with the new software in conjunction with the grandMA console range and
the grandMA on PC software.
The internal structure of grandMA 3D is strictly object oriented and allows the definition of a group of
elements for easy set up and design. A truss bar with connected fixtures can then be moved, rotated
and repositioned in one go.
Although the grandMA 3D software runs on an external PC or notebook computer, it shares all
databases and fixture libraries with the connected grandMA console. During offline applications, the
software may even be used with the grandMA Off-line software, with both software programs running
on the same PC. Both software packages, grandMA 3D, as well as the grandMA Off-line software, are
available for free, via download on the Internet.
1.2
•
•
•
•
•
•
•
•
•
•
•
•
•
•
•
•
•
•
•
•
•
•
•
•
•
•
•
•
•
•
Technical Features
Real-time visualization engine for all major features of lanterns and moving lights
Followspot mode for movinglights in real-time
Direct transfer of libraries, fixtures, patches and DMX address settings of the grandMA via
Ethernet
Live control of all fixtures via virtual DMX lines on a grandMA 3D Ethernet protocol
Transfer of all grandMA 3D set ups for fixtures and dimmer to the grandMA's hard disk
Built-in graphical editor for the design of basic stage layouts and scenery elements
Extensive objects library with free upgrades via download from the Internet
Recording of shows and show features, video compression standards "live"
Complete offline creation of shows in conjunction with the grandMA Off-line software running on
the same PC
Undo, redo buttons
Video machine for playing videos with grandMA 3D
Visualization of fixture types
Realistic fog
Alignment manager for easy positioning of objects
Dynamic moving pathes allow programmed camera movements
Automatic download of all relevant fixture data of the current show (including gobos, color gels,
and rigging coordinates)
New fixture type editor
Colour gel library for dimmers and fixtures
Multilayer technology for objects, fixture etc.
Own 3D library with objects like people, instruments etc.
Direct import of the following file formats possible (also using drag and drop) – 3DS, dxf (3D only),
jpg, bmp, gif, tif, pgm, ppm, tga, pcx, psd, eps. The import is realized using an „open plug-in“
import structure.
Data monitoring for one or more fixtures
Selectable data formats: Percent, 8 bit (DMX) or 16 bit (DMX)
Automatic creation of multiple default cameras
Additional data views: Grid mode (dependent on active layer)
Objects can be controlled from the console and „moving paths“ can be assigned allowing console
control of truss movement or other objects
Sound file (.WAV) can be executed during show playback allowing demo shows with synchronized
music
Fog can be controlled via the desk
Fixture Type plausibility function
Fixtures can be controlled via the ‘Channel Test Dialog’
MA Lighting Technology GmbH • Dachdeckerstr. 16 •
D-97297 Waldbüttelbrunn
•
www.malighting.de
Phone: +49 9 31 49 79 4- 0 Fax: +49 9 31 49 79 4-29 • Hotline: [email protected]
•
eMail: [email protected]
User’s Manual grandMA 3D V 5.4
Page 6
•
•
•
•
Fixture Library and Setup Support makes it possible to build a complete Setup
Visualization of two rotating gobo wheels
3D Visualization Quality Manager
LED Fixture support
1.3
•
•
•
•
•
•
•
2
New Features in V 5.4
Performance optimized + bug fixing
Truss library revised
Video creation via wizard
Plausibility & Structure check
Working with grandMA „Worlds“
Properties „Angle“ and „Intensity“ for every dimmer individual
…
System requirements
•
IBM® compatible PC or notebook with 800 MHz processor with at least
64 MByte RAM
•
Ethernet card with 10/100 B-T/TX connector and TCP/IP protocol enabled
•
Highspeed 3D graphics card with hardware acceleration with at least
32 MByte video memory in high color mode with 16bit color depth enabled
•
1024x768 pixel resolution or above
•
50 MByte available disk space on hard disk
•
Microsoft Windows® 2000 or Windows® XP operation system
•
Microsoft DirectX® version 7 or above
•
grandMA console software 5.4x or grandMA Off-line 5.4x
MA Lighting Technology GmbH • Dachdeckerstr. 16 •
D-97297 Waldbüttelbrunn
•
www.malighting.de
Phone: +49 9 31 49 79 4- 0 Fax: +49 9 31 49 79 4-29 • Hotline: [email protected]
•
eMail: [email protected]
User’s Manual grandMA 3D V 5.4
Page 7
3
Installation
The installation is divided into three parts:
• Installation of the PC-program
• Connection with the grandMA, grandMA light or grandMA ultra light
• Connection with the grandMA off-line editor
3.1
Version of grandMA desk or grandMA Off-line
You can determine by means of the version number of grandMA 3D if the software version of the
visualizer fits to the software version of the desk or off-line.
Version X.X
X.X
represents the version number of the desk software.
This number should correspond to the desk- or off-line software version !
The grandMA Off-line software can run on the same PC or on an external PC connected via Ethernet.
3.2
Program Installation
The software is available on a CD-ROM or it can be downloaded from the Internet.
Internet downloads:
Please extract the downloaded file into a temporary folder and run the setup.exe program.
CD versi on:
The installation program should start automatically after inserting the ‚grandMA 3D‘ CD.
If not, you can run the setup.exe program from the root directory.
Note:
You should have administration rights on the machine to install the program.
Before you install a new version of the program, please be sure that you have un-installed any old
versions! You must un-install the application from the control panel under ‘add/remove programs’. It’s
not sufficient to just delete the files.
3.3
IP Addresses
IP addresses are what allow the internet and most modern networks to work. It’s a way of identifying a
computer by a unique set of numbers (an IP address). An IP address is made up of a set of four
numbers. Each number can have a value between 0 and 255.
Your PC and the grandMA must have their respective IP addresses set up correctly.
The first three sets of numbers must be the same and the last set must be different.
For example:
GrandMA console IP address:
192.168.0.5
PC with grandMA 3D IP address:
192.168.0.10
To setup the IP address of the desk, please refer to the grandMA user’s manual.
MA Lighting Technology GmbH • Dachdeckerstr. 16 •
D-97297 Waldbüttelbrunn
•
www.malighting.de
Phone: +49 9 31 49 79 4- 0 Fax: +49 9 31 49 79 4-29 • Hotline: [email protected]
•
eMail: [email protected]
User’s Manual grandMA 3D V 5.4
Page 8
3.3.1 How to set the IP Address of the PC
Please note if you are already part of a network please check with your network
administrator before changing your IP settings (you may not need to!) and before
connecting any device, such as a the lighting console, to an existing network.
Windows® 2000
•
•
•
•
•
•
•
START – SETTINGS -NETWORK & DIAL-UP CONNECTIONS
Double click on LOCAL AREA CONNECTION
Click on PROPERTIES
Select INTERNET PROTOCOL (TCP/IP) from the list of protocols.
Click on PROPERTIES
In the properties window you will see either your existing IP address or a selection that says
OBTAIN AN IP ADDRESS AUTOMATICALLY.
In the case of the latter,
click on the radial button USE FOLLOWING IP ADDRESS.
Click OK once you have entered your required IP address.
This may prompt an error box to appear telling you that a SUBNET MASK is required,
however, when you click “OK” you should see a default SUBNET MASK has already been
input and you can just click OK to leave it.
Windows® XP
•
•
•
•
•
•
START – CONTROL PANEL – NETWORK CONNECTIONS
Double click on LOCAL AREA CONNECTION
Select INTERNET PROTOCOL (TCP/IP) from the list of protocols.
Click on PROPERTIES
In the properties window you will see either your existing IP address or a selection
that says OBTAIN AN IP ADDRESS AUTOMATICALLY.
In the case of the latter
click on the radial button USE FOLLOWING IP ADDRESS.
Click OK once you have entered your required IP address.
This may prompt an error box to appear telling you that a SUBNET MASK is required,
however, when you click “OK” you should see a default SUBNET MASK (255.255.255.0) has
already been input and you can just click OK to leave it.
MA Lighting Technology GmbH • Dachdeckerstr. 16 •
D-97297 Waldbüttelbrunn
•
www.malighting.de
Phone: +49 9 31 49 79 4- 0 Fax: +49 9 31 49 79 4-29 • Hotline: [email protected]
•
eMail: [email protected]
User’s Manual grandMA 3D V 5.4
Page 9
4
Communication with the grandMA Desk Series
Notice that the DM X channels have to be ‚patched’ to visualize the spotlights with grandMA 3D.
The simplest way of ‚patching’ is to set the switch ‚Auto Patch’ in the dialog
‚Create New Fixtures or Channels’ to ‚On’ at the desk or the Offline.
4.1
Connection with the grandMA desk
Please make sure, that the program version of the grandMA desk meets the specifications described
in: 3.1 Version of grandMA desk or grandMA Off-line .
For communication you have to connect the PC with the grand MA console or another PC running the
off-line editor.
You can do this directly with a patch crossover cable with two RJ-45 connectors.
RJ- 45 cable
If you use a network with a hub or a switch, connect the PC with a regular patch network cable to the
hub or switch.
Connect the cable to the desk.
Start the desk and load a show
Start a new session at the desk (MA Network Connections ‘Start New Session’)
Start the grandMA 3D application with ‘New document’
The application automatically connects to the desk and receives the data of the current show.
The received show will be visualized.
If you do not get a connection to the desk, make sure that grandMA 3D is connected as slave as
described in ‘5 Data management ’.
MA Lighting Technology GmbH • Dachdeckerstr. 16 •
D-97297 Waldbüttelbrunn
•
www.malighting.de
Phone: +49 9 31 49 79 4- 0 Fax: +49 9 31 49 79 4-29 • Hotline: [email protected]
•
eMail: [email protected]
User’s Manual grandMA 3D V 5.4
Page 10
4.2
Connection with the grandMA Off-line software
Please make sure, that the program version of the grandMA Off-line software meets the specifications
described in: 3.1 Version of grandMA desk or grandMA Off-line .
Both applications, grandMA 3D and the grandMA Off-line can work on the same PC or you can use
two PC’s connected via Ethernet.
Start the grandMA Off-line and load a show
Start a new session at the grandMA Off-line (MA Network Connections ‘Start New Session’)
Start the grandMA 3D application with ‘New document’ in the wizard mode.
grandMA 3D searches for a running grandMA Off-line. if grandMA Off-line is found grandMA 3D
connects automatically with grandMA Off-line and loads the current show.
If you do not get a connection to the desk, make sure that grandMA 3D is connected as slave as
described in ‘5 Data management ’.
5
Data management
This section describes how data is managed by the desk and the visualizer.
The visualizer is a free programming tool allowing light designers to create shows comfortably.
Desk and visualizer software can work independently.
Master / Slave:
If the console and visualizer are connected you can determine, via the connection dialog,
whether the application runs in master or slave mode. The master, usually the console, holds the
current show and fixture data. It follows that any confirmed modification of a fixture in grandMA3D will
also be updated in the console.
5.1
Desk Connection Dialog
When you launch grandMA 3D it will automatically try to make a connection with the grandMA console
or the Offline.
The four possible states of the connection are indicated by the button in the toolbar:
The LED is grey.
No connection exists.
The LED is red.
At least one Session was found on the Network. GrandMA 3D is not member of a session.
Maybe that the „Allot invite“ switch is not set.
The LED is Green wit an ‘S’.
GrandMA 3D has joined a session as slave -
The LED appears blue wit an ‚M’.
GrandMA 3D has the Master function of a session.
The creation of a session with grandMA 3D can be used to transfer all data of an .sl_ file
(grandMA 3D format) to a desk or offline. If the loading is completed, the desk automatic becomes the
master and grandMA 3D gets the slave.
ATTENTION: With the start of a new session (Create) the session founder overwrites all data of the
other members. I.e. if a new session is founded by the grandMA 3D all data in the desk will be
overwritten!
MA Lighting Technology GmbH • Dachdeckerstr. 16 •
D-97297 Waldbüttelbrunn
•
www.malighting.de
Phone: +49 9 31 49 79 4- 0 Fax: +49 9 31 49 79 4-29 • Hotline: [email protected]
•
eMail: [email protected]
User’s Manual grandMA 3D V 5.4
Page 11
If more than one console, visualizer or offline editor are connected to the network the connections to
the equipment will have to be properly assigned.
§
The communication between consoles, visualizer and off-line editors takes place in sessions.
§
A session has only one founder. This is e.g. the master. On connection the founder transfers
its data (fixture types) to the slaves.
From then on, all session members are synchronized and have equal rights. If a fixture is
edited in the slave the change is reflected in the master and vice-versa.
§
Devices not assigned to any session are not in the list.
If you press the ‘Invite’ Button you get a list of these MA devices.
MA Lighting Technology GmbH • Dachdeckerstr. 16 •
D-97297 Waldbüttelbrunn
•
www.malighting.de
Phone: +49 9 31 49 79 4- 0 Fax: +49 9 31 49 79 4-29 • Hotline: [email protected]
•
eMail: [email protected]
User’s Manual grandMA 3D V 5.4
Page 12
The network configuration can be managed by the ‚Desk Connection’ dialog:
With the ‘>>’ button
you can expand the
dialog.
The upper part of the dialog shows the active sessions and their members in a tree view.
The session master is printed bold.
GrandMA 3D is printed green.
Create (a new session):
GrandMA 3D creates a new session as master. This function is used for example if a show exists as
.sl-file (grandMA 3D Format). The show with all data is sent to the slave. It must not be loaded via disk
to the desk. If the loading is completed, the desk automatic becomes the master and grandMA 3D
gets the slave.
Join (Session):
Join the selected session as a member (usually as slave).
After that data of the desk is transferred to the grandMA 3D.
Leave (Session):
Leave the session.
>>:
Expands the dialog view.
Settings:
Session Name:
Input or display for the name of a session.
Password:
If a password is required for the session you can enter it in this field.
IP:
Use this listbox to choose an IP address for network communication. If there is more than one IP
available (e.g. multiple network cards installed) select the IP address which is linked to the grandMA
desk.
MA Lighting Technology GmbH • Dachdeckerstr. 16 •
D-97297 Waldbüttelbrunn
•
www.malighting.de
Phone: +49 9 31 49 79 4- 0 Fax: +49 9 31 49 79 4-29 • Hotline: [email protected]
•
eMail: [email protected]
User’s Manual grandMA 3D V 5.4
Page 13
Allow Invite:
If the switch is on, grandMA 3D can be invited to a session.
Invite:
Opens a dialog that shows all connected MA members (desks and off-line) of the network.
You can invite new members via the dialog.
Dismiss:
The member of the session has to leave the session.
The following pattern demonstrates how the Scan types (Fixture types) library is managed by the desk
and the 3D visualizer.
In this example the grandMA desk is the Master and the grandMA 3D is the Slave.
When the application is connected to the desk, it receives all scan types included in the actual show.
The included scan type data is taken from grandMA 3D and shown in its ‘Data Base’.
These Fixture Types can be edited with grandMA 3D and the changed properties are immediately
taken up by the desk.
MA Lighting Technology GmbH • Dachdeckerstr. 16 •
D-97297 Waldbüttelbrunn
•
www.malighting.de
Phone: +49 9 31 49 79 4- 0 Fax: +49 9 31 49 79 4-29 • Hotline: [email protected]
•
eMail: [email protected]
User’s Manual grandMA 3D V 5.4
Page 14
MA Lighting Technology GmbH • Dachdeckerstr. 16 •
D-97297 Waldbüttelbrunn
•
www.malighting.de
Phone: +49 9 31 49 79 4- 0 Fax: +49 9 31 49 79 4-29 • Hotline: [email protected]
•
eMail: [email protected]
User’s Manual grandMA 3D V 5.4
Page 15
MA Lighting Technology GmbH • Dachdeckerstr. 16 •
D-97297 Waldbüttelbrunn
•
www.malighting.de
Phone: +49 9 31 49 79 4- 0 Fax: +49 9 31 49 79 4-29 • Hotline: [email protected]
•
eMail: [email protected]
User’s Manual grandMA 3D V 5.4
Page 16
5.2
Modifying Fixtures
You can modify the connected fixture data e.g.: change the gobos or use other DMX settings.
The modified properties of the fixtures are valid for the fixtures included in the show. The original data
of the fixture library are kept.
To modify a fixture type right click with your mouse on the selected fixture in the 2D or 3D view or
select the fixture in the object manager and click on ‘Edit Fixture Type’.
The following dialog appears:
The top of the dialog shows: Name, manufacturer, fixture type and comments.
This data is provided by the desk database.
Name:
Designated fixture name
e.g. VL 1000 AS 16 Bit
Manufacturer:
The Manufacturer e.g. VARI*LITE
Type:
The type e.g. VL 1000
Comment:
Any comments e.g. „with gobos advertising“
Info: Info fields
Visual. Type: Visualization in the 3D window
MA Lighting Technology GmbH • Dachdeckerstr. 16 •
D-97297 Waldbüttelbrunn
•
www.malighting.de
Phone: +49 9 31 49 79 4- 0 Fax: +49 9 31 49 79 4-29 • Hotline: [email protected]
•
eMail: [email protected]
User’s Manual grandMA 3D V 5.4
Page 17
Angle: Beam angle in degrees from…to
Brightness: in the zoom range from…to
(the brightness varies in dependence of the zoom )
Type:
Head- or mirror moved fixture or a dimmer
The fixture or dimmer properties are listed at the bottom of the dialog.
These properties are described in a similar way to the console using three hierarchical stages:
Channel Types
Channel Sets und
Properties (Channel Values)
Channel Types:
A channel Type is a physical image of the DMX channels. It corresponds with a fixture effect e.g.
color. In addition to this it can contain split effects on this channel e.g. 0…50% dimmer and
51…100% strobe.
The allocation of a channel type is described in the associated channel set.
If a channel is represented more than once, e.g. pan, pan (for 16 Bit Pan), the first entry describes
the channel type properties.
Channel Sets:
The Channel set describes the different channel type intervals.
For example: Channel Type = Colour, Channel Set White = 0…15 %, Channel Set Red =
16…31% etc.
Additional channel sets can be added using the right mouse button context menu. You can
write anything you want in the description text e.g. “Gobo 1”
If there is a gap in the description of the channel set, the values of channel set color and
gobo are interpolated. You can switch of the interpolation via the menu entry ‘Options –
switches’.
Special case :
Mode Channels
With some fixture types the channel effect depends on the control channel.
For example:
For the Gobo channel a certain value (50%) will be selected for Gobo 1.
If the mode channel is now activated, the Gobo position changes into a rotation (e.g. with
some ‘High-End’ models)
MA Lighting Technology GmbH • Dachdeckerstr. 16 •
D-97297 Waldbüttelbrunn
•
www.malighting.de
Phone: +49 9 31 49 79 4- 0 Fax: +49 9 31 49 79 4-29 • Hotline: [email protected]
•
eMail: [email protected]
User’s Manual grandMA 3D V 5.4
Page 18
Properties:
This describes the channel set properties.
Units: Units can be displayed in percent %, as 8 bit or 16 bit values.
Effect: In this list box you can choose how the effect will be visualized.
from: (exists for every effect) smallest value
to: (exists for every effect) largest value
The selected properties are dependent on the chosen effects.
Mode channels indicate a valid effect range if the mode channel is valid
(Mode Ch != -1)
Mode From: Mode to: Mode Ch.:
After confirming the changes with the “OK” button the changed console values will be transferred to
the database.
5.2.1 Fixture Type Visualization
There are several 3D models of fixtures available inside the library.
If there is a model for the fixture type, this model is used. If not, the standard model is taken for the
visualization.
For changing the visualization type open the dialog via ‚Edit Fixture Type’ -> ‚Visual. Type’ and choose
another model:
The selected fixture model is presented
in a 3D-view.
The size of the 3D model can be scaled
to adjust it to the expected size.
If your fixture is not present in the data
base, choose a similar model and adjust
the size with the scale factor.
MA Lighting Technology GmbH • Dachdeckerstr. 16 •
D-97297 Waldbüttelbrunn
•
www.malighting.de
Phone: +49 9 31 49 79 4- 0 Fax: +49 9 31 49 79 4-29 • Hotline: [email protected]
•
eMail: [email protected]
User’s Manual grandMA 3D V 5.4
Page 19
5.3
Assignment of properties to dimmer channels
The following properties can be assigned to dimmer channels:
• Color (RGB value or Color Filter from manufacturer library
• Gobo (Image on the illuminated surface)
• Beam angle
• Intensity
So you have the possibility to assemble your spots for example with different color gels and lamp
types in spite of the fact that all have the same fixture type:
In this example you can see 4 PAR spots on one bar with
different emitting angles and colors all of the type ‘Dimmer’.
To assign a color, an emitting angle, the intensity or a gobo
select the dimmer in the Object Bar and press the
‚Color/Gobo/Beam’ Button.
In the appearing dialog you can choose
a color, a gobo (any bitmap), an angle
and the intensity for every spot
individually.
MA Lighting Technology GmbH • Dachdeckerstr. 16 •
D-97297 Waldbüttelbrunn
•
www.malighting.de
Phone: +49 9 31 49 79 4- 0 Fax: +49 9 31 49 79 4-29 • Hotline: [email protected]
•
eMail: [email protected]
User’s Manual grandMA 3D V 5.4
Page 20
5.4
Creating new Fixture Types
In the current version creation of new, additional fixture types is only possible with the grandMA desk.
6
3D Geometry System
GrandMA 3D geometric system lets you define and manipulate objects in 3D space.
It features a geometric system architecture that defines the x-y plane as the ground area with the
height as z –axis:
For a better orientation axes are marked with
colors:
---- red
---- blue
---- green
MA Lighting Technology GmbH • Dachdeckerstr. 16 •
D-97297 Waldbüttelbrunn
•
www.malighting.de
Phone: +49 9 31 49 79 4- 0 Fax: +49 9 31 49 79 4-29 • Hotline: [email protected]
X-axis
Y-axis
Z-axis
•
eMail: [email protected]
User’s Manual grandMA 3D V 5.4
Page 21
7
Quick Guide
This capture gives a brief description how to operate with the grandMA 3D.
For the following steps a grandMA desk or the grandMA off-line should be connected. Without the
connected desk, or off-line editor, you are able to create a stage but because the fixture data comes
from the desk there will be no fixtures available.
We shall build a simple stage with the following settings:
- a square area of 10 * 20 meters with a rigging height of 5 meters,
- the rear trusses will be fitted with moving spotlights,
- and the lights are to be switched on.
7.1
Step 1 – Insert Fixtures
•
•
•
•
•
Start the connected desk or off-line with an empty show.
(Backup; Load Show; New Show)
At: ‚Tools’ ‚MA Network’ you should see a session named ‚Default Session’. If not, start a new
session with ‘Start New Session’.
Insert 4 fixtures into the show.
(‚Setup’, ‚Full Access’,’Fixture Layer, New’,’Create New Fixtures or Channels’, ‚From Library,
for instance VL1000’, ‚Quantity = 4’, ‚Auto Patch = on’,’Create’)
Select the 4 fixtures and switch the dimmer ‚on’.
Then start grandMA 3D with ‚New Document’.
The desk will be recognized and grandMA 3D will be connected as slave.
The active connection as ‘slave’ is signaled by a green LED ‘S’.
Switch to the Play Mode.
At the 3D View the inserted fixtures are displayed.
All fixtures are set to the origin with the coordinates (0,0,0)
on the ground an the beams show up into the sky:
Switch back to the Stop mode to position the fixtures.
With the menu entry ‚View - Property Bar’ switch on the object tree.
Here the 4 inserted fixtures are shown.
The size of the stage also has been received from the desk (GrandMA
Stage WidthX, DepthY).
If you change the size the new size is send to the desk.
All other data like textures etc. is hold by grandMA 3D.
MA Lighting Technology GmbH • Dachdeckerstr. 16 •
D-97297 Waldbüttelbrunn
•
www.malighting.de
Phone: +49 9 31 49 79 4- 0 Fax: +49 9 31 49 79 4-29 • Hotline: [email protected]
•
eMail: [email protected]
User’s Manual grandMA 3D V 5.4
Page 22
7.2
Step 2 – Inserting trusses
Trusses can be inserted from the library as predefined elements via drag and drop into the 2D- or 3D
View or they can be created dynamic at the 2D View.
In this example we will create dynamic trusses:
•
•
•
Switch to the 2D View .
Set the grid to 1 m (‚Properties – Grid’ at the ‘Property Bar’).
With a right mouse click into the 2D View change to the ‚Front’ view:
•
•
•
You will see the ‘Front’ view of the stage with a 1 m grid.
For the Y-coordinate that is not displayed in the view enter 4
m. The y-coordinate for the inserted trusses will be assigned
to 4 m.
Select the 4-pipe truss in the ‚2D Toolbar’.
•
Now you can draw trusses holding down the left mouse
button in the 2D view. These trusses are generated at
runtime.
This way you can draw all trusses for the frame.
MA Lighting Technology GmbH • Dachdeckerstr. 16 •
D-97297 Waldbüttelbrunn
•
www.malighting.de
Phone: +49 9 31 49 79 4- 0 Fax: +49 9 31 49 79 4-29 • Hotline: [email protected]
•
eMail: [email protected]
User’s Manual grandMA 3D V 5.4
Page 23
7.3
Step 3 – Positioning of Fixtures
•
Select the ‘Select’ button in the 3D toolbar.
•
Select a fixture with a left mouse click and move it
under the truss while holding down the mouse button
down.
•
Switch to the ‚Top’ view with the context menu of the
right mouse button.
Hold the ‚Ctrl-button’ pressed and select all 4 fixtures
with the left mouse button. Now you can move all
selected fixtures on the truss.
•
The fixtures are shining up and have to be turned down 180°.
This can be done separately for every fixture via the properties or for all together in the property grid.
•
Switch to the grid view
•
•
Select the column ‚rotation’ by clicking with left mouse button.
Click with the right mouse button the selected entry and choose ‚Fill selected Colums’
•
•
MA Lighting Technology GmbH • Dachdeckerstr. 16 •
Enter 180 in the ‘Cell Text’.
After closing the dialog all fixtures are rotated by 180°
and look on the bottom.
After pressing the ‚Play’ button the result in the 3D view
should look like this.
D-97297 Waldbüttelbrunn
•
www.malighting.de
Phone: +49 9 31 49 79 4- 0 Fax: +49 9 31 49 79 4-29 • Hotline: [email protected]
•
eMail: [email protected]
User’s Manual grandMA 3D V 5.4
Page 24
Changing the settings:
If you want to change the fixture settings, select one of the fixtures
in the 3D view or in the object manager.
You can also click on the fixture in 2D or 3D view using the left
mouse button and then call up the context menu with the right
button to edit say for example the fixture type.
The appropriate object will be selected in the object manager and
the settings can be changed using the controls below.
Say you wanted a rotation of 180° around the X-axis you can enter
the value using the keyboard, or move the slider value by using
shifting the mouse while keeping the mouse button pressed or you
can use the mouse scroll wheel.
The changes can be seen online in the 2D and 3D views.
The changed settings are sent directly to the console.
Hint:
If you can’t see the right gobos or you are discontent with other settings please edit the fixture type as
described in ‚5.2 Modifying Fixtures’.
Note:
This example is part of the installation. You can find it in the menu under ‘File Open’ > ‘Manual
Example.sl_’
MA Lighting Technology GmbH • Dachdeckerstr. 16 •
D-97297 Waldbüttelbrunn
•
www.malighting.de
Phone: +49 9 31 49 79 4- 0 Fax: +49 9 31 49 79 4-29 • Hotline: [email protected]
•
eMail: [email protected]
User’s Manual grandMA 3D V 5.4
Page 25
8
Program surface
Positioning of the windows has been revised:
All windows can be presented in a register view where you can switch
between the windows with the tabs above
or the windows are presented like multi document
windows and can be arranged in the way you prefer.
This mode is especially useful with a second
monitor.
During editing in the 2D-View on the first monitor you
can watch the result on the second monitor in the
3D-View.
The views can be switched via the menu entry “Windows - Full Screen; Tabbed; Floating“ .
The „Wizard Mode“ became obsolete with the new functionality.
After starting the program, the following dialog will appear on the screen:
Automatic the last used document will be opened or if you cancel a new empty document is created.
MA Lighting Technology GmbH • Dachdeckerstr. 16 •
D-97297 Waldbüttelbrunn
•
www.malighting.de
Phone: +49 9 31 49 79 4- 0 Fax: +49 9 31 49 79 4-29 • Hotline: [email protected]
•
eMail: [email protected]
User’s Manual grandMA 3D V 5.4
Page 26
A new document with a blank stage appears.
(In this example the Offline is connected with four fixtures)
The surface should look like this:
If the application looks different, you can switch on the missing views in the menu bar under ’View’
plus the window name. Under the menu entry ‘Windows’ + ‘Tabbed’ you can arrange the views on the
screen.
As already seen in other applications, the program surface is divided into several parts:
Menu bar
Toolbar
Frame for 2D – and 3D views
Property Bar with
Object Manager
Data Bases
Status Bar
MA Lighting Technology GmbH • Dachdeckerstr. 16 •
D-97297 Waldbüttelbrunn
•
www.malighting.de
Phone: +49 9 31 49 79 4- 0 Fax: +49 9 31 49 79 4-29 • Hotline: [email protected]
•
eMail: [email protected]
User’s Manual grandMA 3D V 5.4
Page 27
8.1
Menu bar
Like in several other Windows application you can store and recall files, and adjust the settings of the
program:
8.1.1 File...
New:
Open…:
Create a new, empty stage file
Open a stored stage file (.sl_). Files created with previous versions (<V2.0)
have the extension .sld. They also can be loaded.
Print…:
Printout a protocols or patch lists.
Create Avi…:
Opens a dialog to create an .avi file (Video).
See also chapter Video Creation.
Import…:
Opens a dialog for importing objects.
The following file formats are supported:
3DS, dxf (3D only), jpg, bmp, gif, tif, pgm, ppm, tga, pcx, psd, eps
Save:
Save the current stage file under the given name shown in the title.
Save as…:
Save the current stage file with a new name.
Recent file list: These menu entries represent a list of the files edited previously. A mouse
click in that list opens the file.
Exit:
Leave the application.
8.1.2 Edit...
Cut:
Copy:
Paste:
Undo:
Redo:
Cut the selected object and copy it to the Windows clipboard.
Copy the selected object to the clipboard.
Paste the contents of the clipboard into the current scene.
Undo the last action; multiple undo is possible.
Cancel the ‘Undo’ action.
8.1.3 View...
Data Control:
Opens a dialog to display the data received from the console. This dialog is
not modal i.e. when open the changed settings are used and the results
(movements etc.) can be seen immediately in the 3D view. If the ‚Start’ button
is not pressed or no console is connected data can also be simulated using
the sliders. GrandMA 3D will show the changes in the 3D view.
MA Lighting Technology GmbH • Dachdeckerstr. 16 •
D-97297 Waldbüttelbrunn
•
www.malighting.de
Phone: +49 9 31 49 79 4- 0 Fax: +49 9 31 49 79 4-29 • Hotline: [email protected]
•
eMail: [email protected]
User’s Manual grandMA 3D V 5.4
Page 28
Status Bar:
Standard Bar:
Switches the Status Bar at the bottom on/off
Switches the Standard Bar on / off.
File Browser:
Data Bases:
Switches the file browser on / off.
Switches the data bases on / off.
Property Bar:
Switches the ‘Property Bar’ on / off.
Preview Window: Opens a ‚Preview Window’ that shows the selected object.
Video Creation: Opens a dialog to create a video file in AVI compatible format
(see 9 Video Creation).
MA Lighting Technology GmbH • Dachdeckerstr. 16 •
D-97297 Waldbüttelbrunn
•
www.malighting.de
Phone: +49 9 31 49 79 4- 0 Fax: +49 9 31 49 79 4-29 • Hotline: [email protected]
•
eMail: [email protected]
User’s Manual grandMA 3D V 5.4
Page 29
8.1.4 Settings...
Select 3D Driver:…
Options…
Change the Direct 3D driver for graphical output (for advanced users!)
Opens a dialog with the following options:
Fixture / Beam:
Interpolate Channel Sets:
Channel set values will be interpolated.
Interpolate Pan/Tilt Movement:
Due to the Pan/Tilt delay, you will get a different move
distance for the way out and the return when moving
between two points. This effect can be reduced by
interpolation.
Disable Channel Delays:
Switches off channel delays.
Gobo Scale: The size of the gobos can be adjusted to the
beam via scaling.
Gobo Base Intensity: Setting of the base intensity for the
gobo projection.
Beam Length: For a more realistic visualization of the
beam it is cut after this length..
Advanced:
Play Sound File simoultanious with „Start“:Pressing the
‚Start’ button you can play any sound file (.WAV). This
makes it possible to have a ‚show‘ e.g. a Timecodeshow
which can be shown as time synchronized.
Ambient Base Intensity:
Global setting for the base intensity of the ambient light.
Units:
Change units: between cm, Inch, Meter, mm
and setting for the time units.
All values are recalculated after changing the unit.
Help Language: Language for the online help.
Quality:
Quality settings:
The quality of the visualization can be changed by the
menu entry ‚3D – Quality’ from low to high.
A lower quality needs less PC Power. Often a simple draw
mode is sufficient to edit a complex show.
These individual settings can be done at this page and they
can be stored for the next use.
You can preview your settings without leaving the dialog by
pressing the ‘Set’ button.
Hide Toolbars while running:
MA Lighting Technology GmbH • Dachdeckerstr. 16 •
D-97297 Waldbüttelbrunn
•
www.malighting.de
Phone: +49 9 31 49 79 4- 0 Fax: +49 9 31 49 79 4-29 • Hotline: [email protected]
•
eMail: [email protected]
User’s Manual grandMA 3D V 5.4
Page 30
If the ‘Play’ button is pressed the 3D window is switched to full size and
covers all other widows
Call Rendertime Validation Dialog:
To find out the performance of the renderengine the rendertime for one
frame is calculated before pressing the ‘Start’ button.
If this time is below the timeout value automatic the ‘Rendertime Validation
Dialog’ is opened.
Here you can change the settings to increase the performance or set up the
timeout value.
3D View
Quality:
Set the rendering quality to high, medium or low. The lower the quality of the
visualization, the higher the performance (frames / second) of the
application.
Textures:
Switches the textures on/off.
View Selection Border: Draw a rectangular frame for the selected object. (on/off).
View Selection Wire Frame: Switches the wire frame of the selected object on/off.
View Center Cross:
Switches the center crosses through the origin on/off.
Wireframe:
Shows all objects as wireframes.
Solid:
Shows all objects with surfaces.
MA Lighting Technology GmbH • Dachdeckerstr. 16 •
D-97297 Waldbüttelbrunn
•
www.malighting.de
Phone: +49 9 31 49 79 4- 0 Fax: +49 9 31 49 79 4-29 • Hotline: [email protected]
•
eMail: [email protected]
User’s Manual grandMA 3D V 5.4
Page 31
2D View:
Update 3D View while Mouse Action:
3D-View is updated with every mouse action
Dock to Trusses:
If you select a truss at the end the cursor changes. Now you can drag
it (with pressed left mouse button) around to the end of another truss. If the
switch is ‘on’ the dragged end will dock automatic to the other end.
8.1.5 Windows...
Full screen:
Switches into full-screen mode.
You can also use the ‘Enter’ key on the keyboard to toggle between fullscreen and windowed mode.
Tabbed:
Shows the 2D and 3D window in a tabbed view.
Floating:
Tiles the 2D and 3D window.
Floating optimized: Optimizes the floating view
8.1.6 Help...
Help <F1>…:
About…:
Shows context sensitive help.
Shows the about box with the current version number.
In the lower part of the box you can find the license information.
In the about box under the entry ‘File’ you can find the release notes
(Version history).
MA Lighting Technology GmbH • Dachdeckerstr. 16 •
D-97297 Waldbüttelbrunn
•
www.malighting.de
Phone: +49 9 31 49 79 4- 0 Fax: +49 9 31 49 79 4-29 • Hotline: [email protected]
•
eMail: [email protected]
User’s Manual grandMA 3D V 5.4
Page 32
8.2
Property Bar
8.2.1 Objects
Every single item located on the stage: a lamp, a trusses, a
person... is represented as an object. The structure of these
objects is shown in the tree view in the object manager.
If you select an object in the tree with a mouse click, it will be
marked in all views.
For a better organization objects can be renamed: After the
selection do a single mouse click on the object name and
enter your text.
Depending on the type of the selected object all object
parameters will be shown in the lower part of the object
manager window. In this case you can change, for example,
the X,Y,Z location or the rotation.
If you want to make a copy, just select the object with the left
mouse button in the tree view and drag it, while holding the
button down, into the 2D or 3D view.
With these buttons you can
switch parts of parameter on- or off. With the right mouse
button you can switch the preferred part exclusive on.
Opens the dialogs to
display and setup
the fixture
properties.
Properties of the Followspot function see: 8.8 Followspot
Function.
MA Lighting Technology GmbH • Dachdeckerstr. 16 •
D-97297 Waldbüttelbrunn
•
www.malighting.de
Phone: +49 9 31 49 79 4- 0 Fax: +49 9 31 49 79 4-29 • Hotline: [email protected]
•
eMail: [email protected]
User’s Manual grandMA 3D V 5.4
Page 33
8.2.2 Properties
On the ‘Properties’ tab of the ‚Property Bar’ following information is available:
One of the three coordinates X,Y, or Z cannot be shown in 2Dview. The insert value for the non visible axis can be set in the
editable field. In this example the X-Y plane is shown.
If you insert an object in the 2D- or 3D-view the Z-coordinate
(height) of the inserted object is set to 5 meters.
Gobos are projected with the selected resolution.
A higher resolution decreases the performance.
Grid settings for snapping of objects
in the 2D- and 3D-view.
Zoom setting of the 2D-view.
Setting of the background color
8.2.2.1 Fog
Fog can be set static or controlled dynamic via a desk channel.
The fog settings:
Fog: Switches Fog on / off.
strong…low: Setting of the fog intensity.
The intensity can be controlled via the grandMA desk.
For that click with the right mouse button into the
control field and enter a channel index.
Color: Setting of the fog color.
Using fog generates a more realistic impression of the light:
Screenshot without fog
MA Lighting Technology GmbH • Dachdeckerstr. 16 •
Screenshot with fog
D-97297 Waldbüttelbrunn
•
www.malighting.de
Phone: +49 9 31 49 79 4- 0 Fax: +49 9 31 49 79 4-29 • Hotline: [email protected]
•
eMail: [email protected]
User’s Manual grandMA 3D V 5.4
Page 34
8.2.3 Layer
The administration of the objects can take place in different
layers.
By default all objects like fixtures, stages, cubes etc. are
created in the ‚Main’ layer.
With the ‚New Layer’ button additional layers can be added
e.g. one could produce a layer for the dimmers and a Layer
for the movinglights. Whether you are interested in the
movinglights or the conventional light, you can always blend
out (hide) the layer not needed.
Any layer can be added in the upper part of the layer view.
Which layer an object is assigned to is decided with the ‚
Grid View’. (See: 8.5Grid View ).
MA Lighting Technology GmbH • Dachdeckerstr. 16 •
D-97297 Waldbüttelbrunn
•
www.malighting.de
Phone: +49 9 31 49 79 4- 0 Fax: +49 9 31 49 79 4-29 • Hotline: [email protected]
•
eMail: [email protected]
User’s Manual grandMA 3D V 5.4
Page 35
8.3
Toolbar
The toolbar contains several buttons that are related to the general operations of the program.
Time controlled actions like triggering of ‘Explosion Objects’ or ‚Moving Pathes with external Access’
need to be assigned to specific points on the time axis.
The time starts with pressing the ‘Play’ Button at 0.00 Seconds and runs
continuously counting up.
The time is displayed in the timeline at the status line.
There you can enter also a specified time in this control and the
animation continuous with pressing the ‘Continue’ button at this time.
Create a new file, open or save a file
Filters:
To keep the 2D and 3D view clear you can blend out the objects you do not wish to
see.
If the views contain many objects, it is often complicated to select the proper object
with the mouse. With this tool you can set filters to exclude objects for selection. For
example, when the selection of the stage object is erroneous, de-select the entry.
To obtain a better picture in the 3D view, you can switch the ambient lights
on / off.
Sets the current camera position head on stage.
Opens the dialog to connect grandMA 3D to the grandMA desk.
See 5.1 Desk Connection Dialog.
With the ‚Undo’ function you can cancel plenty of actions.
(Keyboard: Ctrl. + Z)
The ‚Redo’ function cancels the respective last ‚Undo’ action.
(Keyboard: Ctrl. + A)
MA Lighting Technology GmbH • Dachdeckerstr. 16 •
D-97297 Waldbüttelbrunn
•
www.malighting.de
Phone: +49 9 31 49 79 4- 0 Fax: +49 9 31 49 79 4-29 • Hotline: [email protected]
•
eMail: [email protected]
User’s Manual grandMA 3D V 5.4
Page 36
Opens a ‘Check’ dialog:
A validity check about all used textures and fixtures used in the current show is done.
The result shows if textures are missing or if the fixture type contains inconsistent channel values.
MA Lighting Technology GmbH • Dachdeckerstr. 16 •
D-97297 Waldbüttelbrunn
•
www.malighting.de
Phone: +49 9 31 49 79 4- 0 Fax: +49 9 31 49 79 4-29 • Hotline: [email protected]
•
eMail: [email protected]
User’s Manual grandMA 3D V 5.4
Page 37
8.4
2D View
The 2D window is the platform to create the technical drawing of the stage:
The side toolbar offers the following functions:
Select object tool; select multiple objects by holding down ctrl while clicking with the mouse.
Zoom function
Switch to ‘Top’, ‘Right’, ‘Left’ view
Insertion of dynamic trusses.
Depending on the button a 1…4 point truss is inserted.
To insert a truss click on the desired start point, while holding down the left mouse button
move to the end position. The truss visualization will be updated during the movement.
Docking to other trusses is indicated by a change of colors and a „Plop“ sound.
Docking the selected object to a magnetic helpline.
Magnetic help lines are added by clicking with the mouse on the ruler and then drag it to the
2D view. When releasing the mouse button the helpline will appear.
Now select one or more objects and click on the ‚Align’ button, the selected objects will be
automatically aligned to the helpline.
Notice: If the grid is active, objects will be aligned automatically.
MA Lighting Technology GmbH • Dachdeckerstr. 16 •
D-97297 Waldbüttelbrunn
•
www.malighting.de
Phone: +49 9 31 49 79 4- 0 Fax: +49 9 31 49 79 4-29 • Hotline: [email protected]
•
eMail: [email protected]
User’s Manual grandMA 3D V 5.4
Page 38
If several objects are on top of each other hold the ‘Shift’ key down and do a left
mouse click on the objects. In the appearing dialog you can choose the preferred
object.
Similar to a normal CAD program, the 2 dimensional view on the construction area can be changed by
clicking the right mouse button into the 2D view beneath the stage:
A popup dialog appears:
§
The selected object can be copied to the clipboard
§
The views can be changed between Top, Front etc
§
You can swap between the last zoom settings or centre the zoom
range.
§
You can arrange various views in the 2D window simultaneously.
8.4.1 Context Dialog
If you select an object with the right mouse button, a context menu will
appear showing the specific alternatives
what to do with it.
Every object type is assigned its own property dialog. You can then distinguish a fixture property
dialog from a traverse property dialog which for example doesn’t have any channel info.
MA Lighting Technology GmbH • Dachdeckerstr. 16 •
D-97297 Waldbüttelbrunn
•
www.malighting.de
Phone: +49 9 31 49 79 4- 0 Fax: +49 9 31 49 79 4-29 • Hotline: [email protected]
•
eMail: [email protected]
User’s Manual grandMA 3D V 5.4
Page 39
8.4.2 Object Properties
If you choose ‚Object Properties‘ in the context menu of a fixture the following dialog will appear:
The most impressive tool that can be used to change the
properties of the objects is the ‘Properties’ dialog.
This dialog is not modal, this means that you can see your
modifications directly in the 2D or 3D view while changing
the values in the window.
For example, change the Y-position of a fixture by setting
the focus with a left mouse click into the slider field
‚Position X‘.
The slider control field allows the changing of values in
several ways:
•
•
Shift the mouse cursor above the slider. It changes the
appearance to an horizontal arrow. Then press the left
mouse button, move the value slider controlling.
With a left double click in the control field, you can
enter numerical values directly.
With the buttons ‚Edit Fixture Type’, ‚Channel Info’ and ‚Show Channel Test’ you can reach the
respective dialog.
If the fixture has a colorwheel or a mixer this button is disabled.
Otherwise you can set the default values for the color and a gobo.
For the explanation of ‘Position Mode’ refer to: 8.8 Followspot Function.
MA Lighting Technology GmbH • Dachdeckerstr. 16 •
D-97297 Waldbüttelbrunn
•
www.malighting.de
Phone: +49 9 31 49 79 4- 0 Fax: +49 9 31 49 79 4-29 • Hotline: [email protected]
•
eMail: [email protected]
User’s Manual grandMA 3D V 5.4
Page 40
8.5
Grid View
The ‘Grid View’ lists all available objects in a grid:
With Edit Fixture Type and Channels you reach the fixture type or channel dialog.
The name of the object.
These are the coordinates of the object in the
virtual room.
The amount of triangles describes the complexity of the object.
The layer is displayed and can be changed.
The object is invisible if this switch is not set.
Intersections. Projection of the gobos and colors on the object surface.
This button is very important for the visualization performance!
You can switch the intersections for all objects on or off. If the intersection is switched on, all beams
that hit the object are calculated by the render engine. For every triangle of the object gobo projection,
color, intensity etc. are calculated and shown in the 3D view.
For fast online rendering, the intersection is switched on only for the stage object and the surrounding
room.
If you want a more realistic rendering, for example for an avi video, select additional intersections for
the corresponding objects.
The ‚Follower Mode’ is activated on the object surface.
If the channel is a dimmer the color is shown here.
Fixture type.
Colour mixing system CMY or RGB
MA Lighting Technology GmbH • Dachdeckerstr. 16 •
D-97297 Waldbüttelbrunn
•
www.malighting.de
Phone: +49 9 31 49 79 4- 0 Fax: +49 9 31 49 79 4-29 • Hotline: [email protected]
•
eMail: [email protected]
User’s Manual grandMA 3D V 5.4
Page 41
8.5.1 Working with the Grid
The grid is very useful when you wish to change the properties of several objects.
For example, if you want to change the offset of all vertical trusses, select all vertical trusses in the
view and list them in the property grid.
Select the ‚Y‘ entries and do a right mouse click on the headline ‘Y’.
Select ‚Fill selected columns‘ in the context menu.
The dialog that appears allows you to enter new values into all
selected cells.
If ‚increment values‘ is selected, the first column is filled with the
start value. The next value is incremented by the given number and
so on. This is, for example, useful for entering new DMX offset addresses for a large number of
fixtures or to build stairs with a number of boxes.
If you do not want to select the whole column, hold the ‚ctrl‘key down
and select the fields you would like to change.
The filling mechanism also works in this mode.
To sort the entries you can use the ‚text sort‘ function in the context
window
MA Lighting Technology GmbH • Dachdeckerstr. 16 •
D-97297 Waldbüttelbrunn
•
www.malighting.de
Phone: +49 9 31 49 79 4- 0 Fax: +49 9 31 49 79 4-29 • Hotline: [email protected]
•
eMail: [email protected]
User’s Manual grandMA 3D V 5.4
Page 42
8.5.1.1 Printouts
The property grid is also useful for printing equipment lists. Before printing you can format the
columns. In order to print right click the mouse inside the grid and select ‚print‘ in the context menu. In
the appearing dialog you can change the printer properties.
Printing of patch lists can be done with the menu function ‘File – Print’.
If you want to make printouts of the 3D View, you can use the Windows copy function.
• Hold the ‚Alt’ key down an press the ‚Print’ key on the keyboard.
• The content of the actual window is copied to the clipboard.
• Now you can insert the contents of the clipboard into any drawing program for example ‚Paint’
via ‚Edit – Paste’.
• The picture is ready for post editing
MA Lighting Technology GmbH • Dachdeckerstr. 16 •
D-97297 Waldbüttelbrunn
•
www.malighting.de
Phone: +49 9 31 49 79 4- 0 Fax: +49 9 31 49 79 4-29 • Hotline: [email protected]
•
eMail: [email protected]
User’s Manual grandMA 3D V 5.4
Page 43
8.6
3D View
The 3D view enables you to obtain the most realistic impression of the real stage. In this view you can
take a walk around with a video camera and get a realistic impression of how your creation will look in
reality. You can create several cameras by dragging a new camera from the data base into the 2D- or
3D view and step from camera to camera with the ‚Tab‘ button of the keyboard.
You should try walking around using the keyboard to get a
feeling for stage control.
A special algorithm allows the positioning of objects in the 3D
view. If you click with the mouse into the view, the algorithm
searches for the first object under the mouse arrow. If an
object is found, it is selected and marked with a 3D cross.
For better orientation, the object is marked in the 2D-view, as
well as in the object manager.
The axes of the cross are highlighted in color:
---- Red
X-axis
---- Blue
Y-axis
---- Green
Z-axis
The object itself is bordered with a wire frame to show the
contours.
If you want to move the object, keep the left mouse button
down and move the object around. Keeping the left mouse
button pressed you can move the object in the X-Y plane or
level. If you want to change the height (the Z-level) keep the
left and the right mouse button down and move the mouse forward or backward.
Remember that the magnetic grid will be also active in the 3D-view if turned on. So if you want to
position a fixture outside of the currently selected grid steps switch it off or increase the resolution of
the grid.
If you catch an object at the colored axis you can do one of the following actions:
( These actions also can be done in the 2D view.)
Move along the object axis
Rotate around the object axis
Scale
Example: Rotation in the 3D view:
If an object is selected in the 3D view
and the
rotation tool is selected you can rotate
the object directly with the mouse
around the axis. Therefore move the mouse near
the colored axis and rotate the object with the
pressed left mouse button.
In the example beneath the rotation is done
around the Y-axis (blue).
Rotations in the 3D view are done around the
colored object axis.
MA Lighting Technology GmbH • Dachdeckerstr. 16 •
D-97297 Waldbüttelbrunn
•
www.malighting.de
Phone: +49 9 31 49 79 4- 0 Fax: +49 9 31 49 79 4-29 • Hotline: [email protected]
•
eMail: [email protected]
User’s Manual grandMA 3D V 5.4
Page 44
8.6.1 Rotation of Objects
The rotation of objects can be done in two different systems:
• Rotating in the 3D view around the object axis as described above.
• Or rotating via the property dialog around the axis of the coordinate system:
In the Object Properties you can rotate an object around the axis of the coordinate system:
Elevation:
Rotation referring to the X/Y -plane
of the coordinate system.
Spin:
Rotation seen from the top view.
This virtual axis sticks through the object origin and runs
parallel to the Z-axis of the coordinate system.
Rotation:
Rotation around the X-axis of the object.
Data are also shown in the grid
8.6.2 Scaling of Objects
To set the dimensions of an object to a specific size, all sides of the object can be scaled with an own
scaling factor.
The desired dimension in X, Y and Z direction can also entered numerical in the edit fields.
Important: (in conjunction with Moving Pathes)
‚Assign Properties to Object’ – Rotation parameters, coordinates and scaling factors are assigned to
the object permanently. I.e. the changed position in the 3D world and the changed scaling is assigned
to the object as origin data.
This step should be done before an object is assigned to a moving path.
So the moving path can work correctly if for example objects are combined together with sub objects.
MA Lighting Technology GmbH • Dachdeckerstr. 16 •
D-97297 Waldbüttelbrunn
•
www.malighting.de
Phone: +49 9 31 49 79 4- 0 Fax: +49 9 31 49 79 4-29 • Hotline: [email protected]
•
eMail: [email protected]
User’s Manual grandMA 3D V 5.4
Page 45
8.7
Full-screen View
This view uses the full screen for the 3D view.
There are three ways to switch into the full-screen view:
• Select the menu entry ‚View full-screen‘
• Hit the ‚Enter‘ key on the keyboard.
The ‚Enter‘ button switches to the full-screen view. ‘ESC’ switches back.
• Do a right mouse click into the 3D window and select ‚Change Device‘ in the context menu.
In the following dialog you can select the resolution of the 3D window.
If you deselect the ‚windowed‘ marker and choose ‚Set Driver‘ the application switches into the
full-screen mode.
Type ‚Enter‘ to go back to the windowed view or ‚Esc‘ to stop the visualization and go back to the
windowed view.
MA Lighting Technology GmbH • Dachdeckerstr. 16 •
D-97297 Waldbüttelbrunn
•
www.malighting.de
Phone: +49 9 31 49 79 4- 0 Fax: +49 9 31 49 79 4-29 • Hotline: [email protected]
•
eMail: [email protected]
User’s Manual grandMA 3D V 5.4
Page 46
8.8
Followspot Function
You can use the grandMA 3D software in collaboration with the grandMA desk to position the beams
of the fixtures. The Followmode can be used to enter the Pan/Tilt values for the desk presets or to
use the fixtures in real time as follow spots.
The ‘Positioning Mode’ of grandMA 3D
calculates the Pan/Tilt values for a focus point
on the stage or any object.
This point faces on the intersection area (the
surface) of the object.
For this the ‘Followmode’ of the
object has to be switched ‚on’ in
the grid.
So e.g. you drag a staircase stage element
on the stage and switch the ‘Followmode’ of
this object ‘on’, you can walk upstairs with the mouse cursor and the beams will follow.
The calculated Pan/Tilt data is send continuously to the connected grandMA desk.
This works with moving head fixtures as well as with moving mirror fixtures.
The ‘Play’ mode can be switched on or off.
- If ‘Play’ mode is on, all fixtures are updated in the 3D View.
- If ‘Play’ mode is off, only the fixtures positioned via grandMA 3D are updated.
Switches the ‘Positioning Mode’ on in the 3D View Toolbar.
The cursor marks the focus position in the 3D View as a target cross.
Select the fixtures to position in one of the following ways:
- Select a group in the ‘Data Base’.
These groups correspond to the groups in desk.
- Or select the desired fixtures directly in the 3D View with the left mouse button
or make a multi selection of several fixtures with ‘Ctrl’ + left mouse button.
- Or select the required fixtures at the grandMA desk.
Selected fixtures are highlighted in the grandMA desk and the 3D. Therefore the desk has to be in
the ‘full tracking backup mode’ and in grandMA 3D the following switch must be switched ‘off’:
’Ignore desk selections’
You can find the switch via right mouse button click on the ‘Positioning Mode’ button:
‘Height offset’ – The focus of the beams can be shifted in the Z-direction (height) with a constant
offset to the intersection area. Enter the height in the upcoming dialog.
You can also change the offset directly by using the mouse wheel.
This feature enables you to follow the top of the person.
The height is marked as a vertical line in the 3D View.
MA Lighting Technology GmbH • Dachdeckerstr. 16 •
D-97297 Waldbüttelbrunn
•
www.malighting.de
Phone: +49 9 31 49 79 4- 0 Fax: +49 9 31 49 79 4-29 • Hotline: [email protected]
•
eMail: [email protected]
User’s Manual grandMA 3D V 5.4
Page 47
For head movers there is a special setting for the position
mode:
Because of the rotation characteristics of a head mover there
are always two, sometimes even more possible ways to reach
a certain position.
In Auto-mode the application tries to find the optimal (shortest movement) to the requested position.
The ‚uses smallest pan change’ or ‚use smallest tilt change’ option forces the algorithm to choose the
solution with the smallest change of pan or tilt value.
Use one of those two options, if you want to force a certain behavior of your fixture in tracking mode.
Note:
Often the problem off the light position mode is, that the min and max values are the other way round
e.g. min 180° max -180°. When you changed this in the 'fixtures type' dialog, positioning works well
here.
If the spot shines in the opposite direction after pressing the 'Play' button, you have to change the
'INVERT' pan or tilt parameter at the desk.
On the desk switch to ‚Full Access’- in the Fixture Layer and change the 'Func.Pan' or 'Func.Tilt'
'INVERT’ flag.
8.9
Data Bases
The whole virtual 3D world consists of objects. You can find all these objects in the database which
acts your component box to build your 3D world. The database is not a static pool of predefined
objects, it is managed dynamically and growing continuously.
Objects can simply be dragged and dropped into the 2D or 3D view.
The data base resembles
a catalogue divided into
several property sheets.
These sheets contain sub
sheets like the fixture
sheet that contains, for
example, the fixtures
sorted according to the
manufacturers.
8.9.1 Dynamic Objects
In contrast to pre-defined objects, dynamic objects are built by the user at runtime. You do not select
an object from a pre-defined library; you create, for example, a truss from the left to the right side of
the stage dynamically with the mouse.
MA Lighting Technology GmbH • Dachdeckerstr. 16 •
D-97297 Waldbüttelbrunn
•
www.malighting.de
Phone: +49 9 31 49 79 4- 0 Fax: +49 9 31 49 79 4-29 • Hotline: [email protected]
•
eMail: [email protected]
User’s Manual grandMA 3D V 5.4
Page 48
8.9.1.1 Wall Objects
With this type of object you can you can insert dynamic walls.
For this you pull the object into the 2D or 3D view using the left mouse button.
It is easy to move the corners or to provide more walls in
the 2D view (Top, Bottom):
§ Move the wall corners with the left mouse key
pressed.
§ With the right mouse button you can add further
corners or delete them.
You can follow the changes in real-time in the 3D view.
8.9.1.2 Plane Objects
With this type of object you can insert dynamic planes or canvas.
For this you pull the object into the 2D or 3D view using the left mouse button.
To set properties and assignments of textures etc. for these objects use the property dialog.
This Example shows a transparent canvas framed with
trusses.
To make the Plane transparent set the vertex texture to
transparent.
MA Lighting Technology GmbH • Dachdeckerstr. 16 •
D-97297 Waldbüttelbrunn
•
www.malighting.de
Phone: +49 9 31 49 79 4- 0 Fax: +49 9 31 49 79 4-29 • Hotline: [email protected]
•
eMail: [email protected]
User’s Manual grandMA 3D V 5.4
Page 49
8.9.1.3 Trusses
The simplest way to insert new trusses is to work in the 2D view and
use the truss buttons from the toolbar, as described in section 2D
View.
But you can also drag and drop trusses from the data base with 1, 2,
3 or 4 pipes into the 2D- or 3D view.
Dynamic Trusses:
If you insert dynamic trusses from the data base into the view, they are inserted with the default length
of 1 meter.
You can change the truss data in the property dialog.
MA Lighting Technology GmbH • Dachdeckerstr. 16 •
D-97297 Waldbüttelbrunn
•
www.malighting.de
Phone: +49 9 31 49 79 4- 0 Fax: +49 9 31 49 79 4-29 • Hotline: [email protected]
•
eMail: [email protected]
User’s Manual grandMA 3D V 5.4
Page 50
8.9.1.4 Stage Objects
Only one stage object is possible.
You must have at least one stage object.
The X-Y Dimensions are communicated with the grandMA desk.
8.9.1.5 3D-Files
GrandMA 3D supports several data formats to define bodies in 3 dimensions objects. The
following file formats (3D and 2D) can be imported:
3DS, dxf (3D only), jpg, bmp, gif, tif, pgm, ppm, tga, pcx, psd and eps.
Import is realized through an „open plug-in“ import structure and can be extended to further
formats. After importing grandMA works on files with its own internal 3D format.
3D-files consist of a mesh of triangles that form a body.
A great amount of X-files are available in the Internet for free download.
Objects can be imported via the menu entry ‚File – Import Objects’.
Importing of X-files also can be done via the database X-File icon: Drag the X-file icon holding the left
mouse button down into the 2D- or 3D view and drop it.
A file dialog appears. Select the file and after clicking the OK button the object appears in your scene.
Now change the properties of the X-file object to meet your
requirements.
If you want to scale the whole object, set the ‘Same Scale
Parameter’ switch and adjust the size with the scale slider.
You can watch the results online in the 2D- or 3D view.
Move the object sliders to the final position with the position and
rotation.
The X-file object consists of sub
objects with different vertexes.
In this example, the car consists
of the body, the windows, the
tires and the lights. You can
‘dress’ this car object by covering
different bitmaps over the meshes
for each sub object.
MA Lighting Technology GmbH • Dachdeckerstr. 16 •
D-97297 Waldbüttelbrunn
•
www.malighting.de
Phone: +49 9 31 49 79 4- 0 Fax: +49 9 31 49 79 4-29 • Hotline: [email protected]
•
eMail: [email protected]
User’s Manual grandMA 3D V 5.4
Page 51
8.9.1.5.1 Exporting Objects
If you have modified an object you can export it for further use in other projects.
Select the object in the object manager with the right mouse button and select ‘Export’ in the context
menu.
Choose a path for the export file and type in a file name.
If you have exported the file to the ‘models’ directory it appears in the data base view.
For storing the 3D object grandMA 3D uses its internal .xob file format.
8.9.1.6 Cylinder Objects
You can build cylindrical objects with this icon and place them onto the stage.
After dragging the icon with the left mouse button into the 2D or 3D view a dialog appears
to specify the dimensions and the textures.
8.9.1.7 Ambient Lights
There are two types of lights to illuminate the scenery:
- Sun Light: The ‚Sun Light’ illuminates the whole scenery.
- Lights: Point lights. You can set several lights to supply your scenery with an even
illumination.
The lights can be switched on or off with the switch in the toolbar as described in 8.3.
8.9.1.8 Cube Objects
With cube objects you can build rectangular objects to place onto the stage.
Because Cube Objects are covered inside with textures they can also be used to build
rooms placed over the stage.
After dragging the icon with the left mouse button into the 2D or 3D view a dialog appears
to specify the dimensions and the textures.
8.9.1.9 Cameras
You can put several cameras into your scene by dragging the camera object from the
data base into the 2D- or 3D view.
Switch from camera to camera in the 3D view with the keyboard ‘TAB’ button or select
the preferred camera in the object manager or 2D view.
MA Lighting Technology GmbH • Dachdeckerstr. 16 •
D-97297 Waldbüttelbrunn
•
www.malighting.de
Phone: +49 9 31 49 79 4- 0 Fax: +49 9 31 49 79 4-29 • Hotline: [email protected]
•
eMail: [email protected]
User’s Manual grandMA 3D V 5.4
Page 52
8.9.2 Fixtures
Desk Fixture Types:
The fixture sheet shows all fixtures included in the current show.
The types are loaded from the grandMA desk’s fixture library.
If the fixture type is modified as described in 5.2 Modifying Fixtures
and the application is connected to the desk or is off-line editor, the
desk will recognize these changes and put them into its data base.
Fixture Library:
The Fixture Library is identical to the grandMA desk fixture library.
If a fixture is dragged from the library into the 3D View, the show in the desk is extended with this
fixture.
So a fixture setup can be made with grandMA 3D without a connected desk:
Make a setup with grandMA 3D
Create an empty new show with the desk (no session created).
Start a master session at grandMA 3D.
Invite the desk to the session (Join).
Now all fixtures are transferred automatic to the empty show of the desk.
The desk gets automatic the master of the session.
MA Lighting Technology GmbH • Dachdeckerstr. 16 •
D-97297 Waldbüttelbrunn
•
www.malighting.de
Phone: +49 9 31 49 79 4- 0 Fax: +49 9 31 49 79 4-29 • Hotline: [email protected]
•
eMail: [email protected]
User’s Manual grandMA 3D V 5.4
Page 53
8.9.3 Predefined Objects
The supplied library comes with various 3D objects, ordered by certain topics.
This library is constantly expanded.
If you have special requests please do not hesitate to contact us!
The 3D objects in the library have been specially designed for grandMA 3D.
They therefore possess a visible number of triangles so as not to limit the performance too much.
Complex superstructures such as crossbeams
with wired lights, steps, people, instruments
etc. can be provided by the user and saved as
‚Predefined Object‘.
Complex objects can therefore be made
available for later projects.
Simply pull the desired object into the 3D view using the left mouse button. It will appear in the centre
(0,0,0). Then you can freely move, turn or scale it.
If you wish to place other objects you can do this using the import function.
Select ‚File – Import Objects’ from the menu and in the next dialog you will see the supported file
formats.
You can find the objects sorted in a subdirectory from :
…\grandMA 3D\Data\Predefined Objects\...
Some examples in the miniature view:
Environment (Stadium, stages, halls etc. ):
Equipment:
Instruments:
Movable Assets:
Musicians:
Static Trusses: (Additional to the trusses from the 2D-View that are generated dynamical)
2-,3-, 4-Pipes:
Straight truss elements in several length
Trusses 3W:
3 pipes circle trusses (circles, semi circles, quarter circles)
Trusses 4W:
4 pipes circle trusses (circles, semi circles, quarter circles)
MA Lighting Technology GmbH • Dachdeckerstr. 16 •
D-97297 Waldbüttelbrunn
•
www.malighting.de
Phone: +49 9 31 49 79 4- 0 Fax: +49 9 31 49 79 4-29 • Hotline: [email protected]
•
eMail: [email protected]
User’s Manual grandMA 3D V 5.4
Page 54
Eurotruss:
Library of the manufacturer Eurotruss:
8.9.4 Groups
Fixtures or Dimmer can be combined to ‚Groups’ at the desk or via the grandMA 3D. This makes
programming of shows easier or allows a fast multiselection for the Followspot function.
To build a group in grandMA 3D select the members and press the right mouse button in the 3D View.
In the context menu select the entry ‘Store Fixture Group’ and a new group is created.
This new group membership is send to the desk immediately.
8.9.5 Worlds
Worlds allow a filtered view on a part of a show.
If a world is selected only the members of this world are visualized.
To build a world in grandMA 3D select the members and press the right mouse button in the 3D View.
In the context menu select the entry ‘Store Fixture Worlds’ and the new world is created.
This new world membership is send to the desk immediately.
MA Lighting Technology GmbH • Dachdeckerstr. 16 •
D-97297 Waldbüttelbrunn
•
www.malighting.de
Phone: +49 9 31 49 79 4- 0 Fax: +49 9 31 49 79 4-29 • Hotline: [email protected]
•
eMail: [email protected]
User’s Manual grandMA 3D V 5.4
Page 55
8.9.6 Textures
Textures are bitmaps (.bmp, jpg files) that “dress” the wireframes of your objects.
You can select a texture from the catalogue in the database and cover the selected object by dragging
the texture in the 2D- or 3D view.
You can use your own textures like simple drawings, company logos or digital photos.
You only need a copy of the pattern in one of the supported formats.
Copy the file to \Program Files\MA Lighting Technologies\GrandMA 3D\ Data\ Textures\... and it will
appear in the preview.
8.9.6.1
Colorkeying Textures
With this technique you can save a lot of polygons. So you get a much better performance.
Colorkeying makes it possible to draw images with transparent colors.
A Color Key is when you choose a certain color in the image to be transparent.
GrandMA 3D attaches two conditions to use the color keying technique for an image:
• The transparent color of the image is defined as 255, 0,255 (R, G, B) i.e. you have to paint the
transparent areas exactly with this color.
• The name of the image must have the extension “@CK”. For example [email protected].
Note:
We recommend using the .BMP format for color keying images. The compression of other formats
may cause fraying effects at the transparent boarders.
The following example shows a typical application for Colorkeying:
Bitmap with Colorkeying background
(255, 0, 255) [email protected]
Appearance in grandMA 3D
Additional conditions for Colorkeying Images:
Filename
Consequence
XYZ@CK(AUTO).jpg
Always the color of the first pixel in the upper left corner is taken as
key color
[email protected]
The 9 digits after the “@CK” are used as RGB value for the key
XYZ@CK(255,0,255).jpg
The key RGB values are the numbers in ()
XYZ@CK(BLACK).jpg
The key is defined as text in ()
XYZ@CK(WITHE).jpg
XYZ@CK(RED).jpg
XYZ@CK(GREEN).jpg
XYZ@CK(BLUE).jpg
Otherwise Value RGB (255, 0, 255) is the key color for the mask
MA Lighting Technology GmbH • Dachdeckerstr. 16 •
D-97297 Waldbüttelbrunn
•
www.malighting.de
Phone: +49 9 31 49 79 4- 0 Fax: +49 9 31 49 79 4-29 • Hotline: [email protected]
•
eMail: [email protected]
User’s Manual grandMA 3D V 5.4
Page 56
8.9.7 Playback of Videos (.avi)
GrandMA 3D is able to playback videos in the virtual 3D world.
The videos can be started by the grandMA desk.
Surfaces of objects can be covered
with video (.avi) files. This works
similar as covering with textures.
The videos have to be present in the AVI format.
In the current version the AVI files have to meet the following restrictions:
With and height of the AVI should be divisible by 128 for example 256 * 128.
The color depth must be 16 bit.
Several movies can run simultaneously. Their number is restricted by the performance of the PC.
To assign a movie to an object’s surface please proceed in this way:
Drag the movie file from the ‚Data Base’ to the selected object in the 3D View or to the object in the
‚Object Manager’ and drop it.
Because movies need the assignment to exact moments on the timeline it is necessary to define a
starting point. So for every AVI file a ‚Video Player’ object is created in the ‚Object Manager’.
With the ‚Video Player’ the starting point can be defined on the timeline or if the movie can be started
by a dimmer channel via the desk.
„Video Player“ objects in the ‚Object Manager’.
Start Time:
Start the movie at nn.nn seconds
after pressing the ‚Start’ button
If selected the movie can be controlled external
Select desk channel for controlling
Trigger:
Dimmer:
MA Lighting Technology GmbH • Dachdeckerstr. 16 •
D-97297 Waldbüttelbrunn
•
www.malighting.de
Phone: +49 9 31 49 79 4- 0 Fax: +49 9 31 49 79 4-29 • Hotline: [email protected]
•
eMail: [email protected]
User’s Manual grandMA 3D V 5.4
Page 57
8.9.8 Moving Pathes
Moving Pathes allow the movement of objects like trusses with their attached sub objects like fixtures.
You can attach a Moving Path to an object via dragging the Moving Path at the Data Base and drop it
onto the desired object in the Object Manager. Then fill in the Moving Path parameter in the Object
Manager.
Controlling of the position is always done relative to the origin coordinates. I.e. if an object with moving
pathes is moved manually, the tracks of the Moving Pathes are always moved parallel to the new
object coordinates.
Several Moving Paths can be attached to an object:
External Access: Controlling of movements in the 3D Space
via the grandMA Desk
Time controlled: Time controlled movement in the 3D space
8.9.8.1 External Access Moving Pathes (controlling via dimmer channel)
The movement in X,Y or Z-direction or the rotation around the X,Y or Z -axis is controlled by the
dimmer channels of the connected grandMA desk.
Dimmer Custom, Posi tion…Rotation X,Y,Z:
Movement or rotation of an object controlled via a
dimmer channel
Trigger : (without function)
Example for ‘Dimmer Z-Position’:
Movement of a truss with 4 fixtures in Z-direction (lifts and goes down).
A truss with 4 mounted head moving fixtures should be lifted with the dimmer channel 1 of
the grand MA desk
•
•
Create 4 fixtures and one dimmer with the grandMA desk
The dimmer should be named „Dim 1“
•
With grandMA 3D the 4 fixtures are assigned as sub objects of
the truss.
This is done by dragging and dropping the fixtures to the truss in
the object manger.
From the Data Base assign the Moving Path „Dimmer Position
Z“ via drag and drop to the truss in the Object Manager.
Enter the properties of the Moving Pathes in the Object
Manager:
Type: Pos Z (can be changed if it’s a ‘Dimmer custom’ Moving
Path)
Dimmer: In this box all dimmers from the desk are listed with
their names. Select „Dim 1“.
From .. To: Input for the relative movement range.
•
•
•
•
•
MA Lighting Technology GmbH • Dachdeckerstr. 16 •
D-97297 Waldbüttelbrunn
•
www.malighting.de
Phone: +49 9 31 49 79 4- 0 Fax: +49 9 31 49 79 4-29 • Hotline: [email protected]
•
eMail: [email protected]
User’s Manual grandMA 3D V 5.4
Page 58
If all entries are done, the truss (5) with all
mounted fixtures can be lifted 3 meters via the
desk dimmer channel “Dim 1”.
Combining several different Moving Pathes
you can realize nearly any movement you want
to.
In the example beneath, a movement in zdirection is added with a rotation around the yaxis.
Attention: If you have rotated or scaled your objects press first ‚Assign Properties to Object’ (see:
8.6.2 Scaling of Objects) for your sub objects.
Otherwise the Moving Pathes act on the origin data and you don’t get the requested movement.
MA Lighting Technology GmbH • Dachdeckerstr. 16 •
D-97297 Waldbüttelbrunn
•
www.malighting.de
Phone: +49 9 31 49 79 4- 0 Fax: +49 9 31 49 79 4-29 • Hotline: [email protected]
•
eMail: [email protected]
User’s Manual grandMA 3D V 5.4
Page 59
8.9.8.2 Time controlled Moving Pathes
By pressing the „Start“ button the time starts at the point 0.0 seconds.
Beginning from this time on the positions of the objects can be controlled by
„Time controlled Moving Pathes“
Circle Path:
Move:
Continuous movement on a certain orbit.
Continuous movement between two points.
Dynamic Move: Time controlled movement between different points.
This makes precise camera movements possible for example from A via B to C…
Pathes between the points are called Keyframes. The route between the points will be linearly
interpolated.
Example: Camera movement from A to B and back in 10 seconds.
•
Drag a Dynamic Moving Path on the Main Camera (1) object
in the Object Manager
•
To modify the Dynamic Moving Pathes switch into the
‚Edit Mode’
Move the camera to the start position ‚A’
Press ‚Add Keyframe’
As start time for the first Keyframe enter 0.00 s in the
following dialog
•
•
•
•
•
•
Move the camera to the second position ‚B’
Press ‚Add Keyframe’
As start time for the second Keyframe enter 5.00 s in the
following dialog
•
Set the slider to the first Keyframe position. The camera
jumps to the starting point ‚A’.
Press again ‚Add Keyframe’
As starting time for the third Keyframe enter 10.00 s in the
following dialog.
•
•
The result should be a smooth camera movement between the entered points ‚A’ and ‚B’ in the
defined period of 10 seconds.
Note:
Controlling of the position is done relative to the origin coordinates. i.e. if an object with moving pathes
is moved manually, the tracks of the Moving Pathes are always moved parallel to the new object
coordinates.
If you want to move an object manually without modifying the Moving Path tracks, select the switch
‚Use Data Absolute’:
at the end of the property dialog.
MA Lighting Technology GmbH • Dachdeckerstr. 16 •
D-97297 Waldbüttelbrunn
•
www.malighting.de
Phone: +49 9 31 49 79 4- 0 Fax: +49 9 31 49 79 4-29 • Hotline: [email protected]
•
eMail: [email protected]
User’s Manual grandMA 3D V 5.4
Page 60
8.10 Channel Test Dialog
The Channel Test dialog is used for different tasks:
• The received values can be observed while connected to grandMA console or off-line editor (Desk
Monitor Function)
• All the channel values can be stimulated if the application is not in ‚Run’ mode.
• The received console values can be shown in ‚Run’ mode.
This dialog is not modal i.e. when open, the
changed values are used and any results
(movements etc.) are immediately viewable in
the 3D view if the ‚Play‘ button is pressed.
You can change the current value Seite: 61
with the corresponding slider.
The slider fields can be edited in various ways:
•
•
MA Lighting Technology GmbH • Dachdeckerstr. 16 •
D-97297 Waldbüttelbrunn
•
Hold down the left mouse button and move
the mouse up or downwards. The value will
change by small amounts.
Position the mouse cursor over the shown
value. The cursor will change to an arrow
(<->) Now the value can be changed in large
amounts with depressed mouse button.
• With a left double click or a right mouse
click you can enter the amount
numerically.
www.malighting.de
Phone: +49 9 31 49 79 4- 0 Fax: +49 9 31 49 79 4-29 • Hotline: [email protected]
•
eMail: [email protected]
User’s Manual grandMA 3D V 5.4
Page 61
9
Video Creation
For presentation videos you can record walk-arounds by means of the virtual world you have created.
You can store these videos in several file formats and send them to your customers via CD or e-mail
or place them on your homepage.
Time Objects:
To visualize processes over time, grandMA 3D works internally with time objects (.TOF files). With this
functionality grandMA 3D can store and recall cues, camera movements and all objects movements in
the 3D world and afterwards the cues can be replayed.
To create a video, call up the video window and select the menu entry ‘File’ + ‘Create Avi…’.
The following dialog will appear:
With ‚Open’ and ‚Save’ you can load or save a TOF file.
Buttons to play, stop or pause the recorded .TOF file.
Pressing the ‚Record’ button starts the recording of the .TOF files.
With ‚DMX’ and ‚Camera’ you select what data is
recorded.
If the record has dropouts (Video falters) this may be
caused by missing DMX values in the .TOC file.
With ‚Lock Rendering while Recording’ the rendering
process is not shown in the 3D window. This releases the CPU and the gaps will be avoided.
MA Lighting Technology GmbH • Dachdeckerstr. 16 •
D-97297 Waldbüttelbrunn
•
www.malighting.de
Phone: +49 9 31 49 79 4- 0 Fax: +49 9 31 49 79 4-29 • Hotline: [email protected]
•
eMail: [email protected]
User’s Manual grandMA 3D V 5.4
Page 62
9.1
Creating an avi file
To record the received data and the camera movements, select
these entries
Press the ‘Record’ button and begin with the show.
All DMX value changes and the camera movements are recorded.
You can perform the operations with the desk and walk around in the scene with your camera or
switch between different cameras.
Every operation is recorded until the ‘Stop’ button is pressed.
Now you can store the recorded data in a special grandMA 3D format (.TOF) or create a video file with
the operations you have recorded:
To store the show in the .TOF format press the ‚Save’ button and enter a filename.
To create an AVI-file press the ‘Next’ button.
In the following dialog you can select the AVI Parameters:
Generally speaking, you can say that the better the quality of the video file, the longer the rendering
process will take.
MA Lighting Technology GmbH • Dachdeckerstr. 16 •
D-97297 Waldbüttelbrunn
•
www.malighting.de
Phone: +49 9 31 49 79 4- 0 Fax: +49 9 31 49 79 4-29 • Hotline: [email protected]
•
eMail: [email protected]
User’s Manual grandMA 3D V 5.4
Page 63
§ Filename:
Opens a dialog to enter a filename.
§ FPS:
You can select the frame rate (24 pictures per second corresponds to TV quality)
§ Color Bits:
Choose: 8 bit – 256 colors; 16 bit – high color (65536 colors); 32 bit true color (16 million colors)
§ Codec:
Choose an option for the compression of the video pictures.
Press the ‘Codec.’ button and select for example ‘Microsoft Video1’ in the window that appears.
§ Dimensions:
Enter the dimensions of the AVI-video in X/Y pixels. For example, 768x576 pixels correspond to
the German TV standard resolution.
After you pressing ‘Create Avi’ the program starts the rendering process:
Depending on the complexity and duration of the
scene, the rendering process could take from
some seconds up to several hours.
During the rendering process, the estimated time
is displayed in a window.
MA Lighting Technology GmbH • Dachdeckerstr. 16 •
D-97297 Waldbüttelbrunn
•
www.malighting.de
Phone: +49 9 31 49 79 4- 0 Fax: +49 9 31 49 79 4-29 • Hotline: [email protected]
•
eMail: [email protected]
User’s Manual grandMA 3D V 5.4
Page 64
10 Basic 3D definitions
For a better understanding of how grandMA 3D works it is useful to know something about the
mechanism of 3D visualization.
Let us begin by defining some basic 3D visualization concepts. The goal of this section is to introduce
or refresh basic concepts that appear on paper.
Most people think a 3D world is very difficult to simulate. Actually this world consists only of several
points called vertex or vertices. These vertexes are combined with polygons and the results are
faces.
Picture: human face divided in vertexes
So a vertex is a vector that describes the position of a point in a 3D world.
With these points you can describe the whole 3D world. Faces are also polygons built from vertices.
But faces include additional information for example colors, textures etc..
Camera.
A basic aspect of the rendering process is to determine how the three-dimensional objects that form a
part of a scene are projected onto a two-dimensional plane that forms the resulting image. This
process is very similar to the one that takes place inside a real camera (or our eyes), where a 3D
scene is projected onto the plane of a 2D film (retina).
Lights.
Lights can be of different types, each simulating a real light:
Ambient light. The light is produced and spreads in all directions.
Directional light. The rays are parallel to the directional vector of the light beam.
Punctual light. This light strews rays in all directions, but their intensity decreases the farther the
distance from the source.
Spotlight These lights, structured in the shape of a cone, are directed according to a vector, which
has an origin and a destination. Spotlights decrease in strength the further the distance from the
origin.) They are also bounded by the sides and bottom of the cone.
Material Features. Different objects provide varying visual sensations to the human eye, depending
on the way light interacts with their surfaces. Characteristics like color, shine, transparency, opacity,
and reflectivity alter the way we perceive each material.
The process of simulating the reflective features of a material under the influence of lighting mediums
is known as shading. This is an important part of the rendering process where color reflected by a
material can be calculated as a function of its reflective properties and the properties of the lights in
the scene.
Each pixel in the final image is colored by the cumulative effect of the following components of light.
The environmental component is the color observed when a surface is affected by sources of
environment lights. The diffused component simulates directional light reflected from a surface with
equal intensity in all directions. The intensity is higher when the light incidence is perpendicular to the
surface and it reduces in proportion to the angle between the incident light and the surface. More so
MA Lighting Technology GmbH • Dachdeckerstr. 16 •
D-97297 Waldbüttelbrunn
•
www.malighting.de
Phone: +49 9 31 49 79 4- 0 Fax: +49 9 31 49 79 4-29 • Hotline: [email protected]
•
eMail: [email protected]
User’s Manual grandMA 3D V 5.4
Page 65
as the angle approaches zero. The spotlight shine component simulates direct light that bounce from
surfaces like mirrors. The environmental reflected component comes from a secondary light that
surrounds the object, not from any specific light.
Reflection maps are a way of providing the surface with the reflective properties of a mirror.
Texture. A (2 dimensional) bitmap pasted onto objects or polygons to add realism.
Rendering methods. Rendering methods are related to the way objects are seen on the screen.
Different rendering methods produce differing visuals.
Wire frame rendering is the simplest. The objects are represented only by the edges that join their
vertices. Hidden lines or surfaces are not removed. This, of course, is the fastest method.
Hidden-line wire frame rendering. This method makes the wire frame look more realistic by
removing the surface edges that would not be visible from the chosen viewpoint.
Solid model rendering. Solid modeling fills each surface of the object model with a constant
brightness or color, making it appears solid. Surfaces that appear behind one another are eliminated
by the rendering process.
Shaded solid model rendering. A shaded solid model adds lighting effects, making the rendering
look more realistic. For example, if a light source illuminates the object from one side, that side will
appear brighter than the other side.
Rendering improvements:
Aliasing. A form of image distortion associated with signal sampling. A common effect of aliasing is
a stair-stepped appearance along diagonal and curved lines. A technique known as antialiasing that
.
reduces this effect does exist
When a scene is rendered only the elements that are visible from the camera ´s point of view are
used for calculations. This reduces the amount of geometrical information that has to be processed,
improving the rendering time and memory consumption.
Culling consists of eliminating from a scene all the polygons whose normal point is in the direction
opposite to the point -of-view vector. This is to be done just before starting the rendering process.
Clipping eliminates all the geometry that is outside the view volume.
Ray-tracing This technique determines the visibility of surfaces by tracing imaginary rays of light
from the viewer's eye (camera) to the objects in the scene. A centre of projection (the viewer's eye)
and a window on an arbitrary view plane are selected. The window may be thought of as being
divided into a regular grid, whose elements correspond to pixels at the desired resolution. Then, for
each pixel in the window, (one or more) eye ray (s) is fired from the centre of projection through the
pixel's centre into the scene. The pixel's color is set to that of the object, closest to the camera at the
point of intersection.
MA Lighting Technology GmbH • Dachdeckerstr. 16 •
D-97297 Waldbüttelbrunn
•
www.malighting.de
Phone: +49 9 31 49 79 4- 0 Fax: +49 9 31 49 79 4-29 • Hotline: [email protected]
•
eMail: [email protected]
User’s Manual grandMA 3D V 5.4
Page 66
11 Keyboard Shortcuts
The common shortcuts:
Key
Function
TAB
ESC
Enter
Ctrl + W
Ctrl + S
Ctrl + T
<- ->
Ctrl. + <- ->
Ctrl. + F5
Ctrl. + F6
Ctrl. + F7
F 12
TAB
Shift + l.Mouse
Ctrl + l. Mouse
Switch to the next camera
Ends Fullscreen Mode and stops the animation
Fullscreen Mode
Wireframe Mode
Solid Mode
Textures on / off
Camera rotate
Camera move parallel
Quality High
Quality Medium
Quality Low
Camera rotate 180 degree
Switch between the views: top, left etc...
Opens Dialog to select objects that are on top of each other
Select several objects with the mouse
Ctrl + Z
Ctrl + A
Undo
Redo
All
2D
3D
View
Please note, that possible installed drivers for example for 3D graphic cards affect the keyboard
shortcuts as well.
Camera movements with the mouse
In the 3D view movements can be made as follows using the mouse:
Actions are released by pressing the middle mouse button in the 3D view.
Camera movements are started or stopped with a click on the middle mouse button.
The movements:
• Normal: Move the active camera in X and Y direction.
• With Shift: Rotation around the X and Z axis.
• With Control: Zoom in the direction of the camera (like a telescopic lenses)
Information about the camera can be found in the status area.
MA Lighting Technology GmbH • Dachdeckerstr. 16 •
D-97297 Waldbüttelbrunn
•
www.malighting.de
Phone: +49 9 31 49 79 4- 0 Fax: +49 9 31 49 79 4-29 • Hotline: [email protected]
•
eMail: [email protected]
User’s Manual grandMA 3D V 5.4
Page 67
12 FAQ
Should you have any problems with the application, you can refer to the frequently asked questions
below:
12.1 Software Questions:
Nr.
Question
1. problems with the communication
PC <-> desk
2. Two network cards installed – no
communication with the console
3. DirectX Installation
4. All connected fixtures are centered
on the middle of the stage area.
5. Cannot find the connected
grandMA desk
6. Old Stage setup build with version
V 1.1 looks strange
7. Followspot doesn’t work
8. my avi renderings are black
MA Lighting Technology GmbH • Dachdeckerstr. 16 •
Answer
Check the TCP/IP settings:
- Is a network card installed?
- Is the TCP/IP protocol configured?
- The TCP/IP subnet mask of the PC must be equal with
the subnet mask of the desk for example 255.255.255.0
- The first 3 numbers of the IP address of the PC must be
equal to the first three numbers of the desk for example:
PC: 192.168.0.10
Desk: 192.168.0.5
- The last number of the IP address must be unique in the
complete network.
- Please don’t use the automatic distribution of IP settings
as offered by Windows because these IPs don’t fit the
requirements.
Select the IP address belonging to the network card
attached to the grandMA desk.
See: 5.1 Desk Connection Dialog
Microsoft DirectX® from version 7 has to be installed on
the PC.
Windows XP/2000 is delivered with these versions.
You can find the actual Direct X version on the Microsoft
homepage.
The positions of the connected spots are read from the
desk when the desk is connected. Place the fixtures in
the 2D or 3D view on their positions. These positions are
stored in the desk, and if the application is connected to
the desk again, these coordinates are read from the desk.
Check the IP Settings.
Make sure, that grandMA 3D is connected as slave.
See: 5.1 Desk Connection Dialog
Some objects can not be imported from older versions
(objects with sub objects). Please construct these objects
new.
Often the problem off the light position mode is, that the
min and max values are the other way round e.g. min
180° max -180°. When you changed this in the 'fixtures
type' dialog, positioning works well here.
If the spot shines in the opposite direction after pressing
the 'Play' button, you have to change the 'INVERT' pan or
tilt parameter at the desk.
On the desk switch to ‚Full Access’- in the Fixture Layer
and change the 'Func.Pan' or 'Func.Tilt' 'INVERT’ flag.
Sometimes occurs the problem in GMA 3D with
renderings on special ATI graphic boards. The result of
the rendered avi shows a black screen. To solve the
problem switch off the second graphic port (especially on
notebooks). It is a problem that not so expensive graphic
boards have only one chip which feeds both ports. If you
know actual trouble with that problem, please try out and
let us know.
D-97297 Waldbüttelbrunn
•
www.malighting.de
Phone: +49 9 31 49 79 4- 0 Fax: +49 9 31 49 79 4-29 • Hotline: [email protected]
•
eMail: [email protected]
User’s Manual grandMA 3D V 5.4
Page 68
9. Fixture Library is empty
GrandMA offline and grandma 3D share the folder of the
fixture library. In some cases it can happen, that the
folders are not congruent for example:
3D:
…\MA Lighting Technologies\GlobData\ NewFixtures
offline:
… \MA Lighting
Technologies\grandMA\ide0\NEWFIXTURES
In that case copy the content of the offline library into the
folder shown in grandma 3D.
10. Disconnecing if a firewall is active
The use of a firewall can cause problems with the
communication.
To avoid this, the firewall has to be configured as open in
both directions for grandma 3D and the offline.
The use of the Windows XP included firewall of Service
Pack 2 caused no known problems so far.
11.
12.2 Hardware Questions:
Nr.
Question
1. Which 3D shutter glasses are
supported?
2. Can I get the 3D stereo Effect
with an LCD or TFT monitor ?
Answer
ELSA REVELATOR shutter glasses and simple red/green
glasses have been tested with NVIDIA graphic cards.
Please install the current ‚Detonator‘driver from
‚NVIDIA.COM’. You can find a list of supported graphic
cards and 3D shutter glasses on the ‚Detonator‘ homepage
of NVIDIA.
The 3D stereo effect with a shutter glass requires a refresh
rate of 120 pictures per second. At the moment these rates
can only be reached with tube monitors.
But you can use the NVIDIA driver also in a red/green
mode and take a simple red/green glass to see how the
stereo effect works. Unfortunately the color information is
wrong.
3.
MA Lighting Technology GmbH • Dachdeckerstr. 16 •
D-97297 Waldbüttelbrunn
•
www.malighting.de
Phone: +49 9 31 49 79 4- 0 Fax: +49 9 31 49 79 4-29 • Hotline: [email protected]
•
eMail: [email protected]
User’s Manual grandMA 3D V 5.4
Page 69
13 Index
.
F
.avi ...................................................... 57, 63
.avi file (Video). ........................................ 28
.TOF files.................................................. 62
.xob .......................................................... 52
faces......................................................... 65
FAQ .......................................................... 68
Features of the material ............................ 65
Filters ....................................................... 36
Fixture Library .......................................... 53
Fixture Type Visualization ........................ 19
Fixtures .................................................... 53
Fog ........................................................... 34
Follower Mode .......................................... 41
Followspot ................................................ 47
founder..................................................... 12
Full screen ................................................ 32
Fullscreen View ........................................ 46
2
2D View .................................................... 38
3
3D Geometry System ............................... 21
3D View .................................................... 44
3D-Files.................................................... 51
A
G
Aliasing .................................................... 66
Ambient Base Intensity............................ 30
Ambient light............................................ 65
Ambient Lights......................................... 52
antialiasing............................................... 66
avi file ...................................................... 63
Grid View .................................................. 41
Groups...................................................... 55
H
Hardware Questions................................. 69
Height offset’ ............................................ 47
Hidden-line wireframe rendering .............. 66
C
Camera..................................................... 65
Camera movement’s wit the mouse ......... 67
Cameras................................................... 52
canvas...................................................... 49
change the properties of several objects. 42
Channel Delays........................................ 30
Channel Test Dialog ................................. 61
Check dialog ............................................ 37
Clipping.................................................... 66
Color Filter ............................................... 20
color gels................................................. 20
Colorkeying.............................................. 56
Context Dialog ......................................... 39
Cube Objects ........................................... 52
Culling...................................................... 66
Cylinder Objects ...................................... 52
I
Import Objects.......................................... 28
Inserting trusses....................................... 23
Installation ............................................ 8, 11
Intersections............................................. 41
IP13
IP address...................................................8
K
Keyboard Shortcuts.................................. 67
L
Layer .................................................. 35, 41
Lights ....................................................... 65
M
D
magnetic helpline ..................................... 38
Master....................................................... 11
Menu bar................................................... 28
Menue bar................................................. 28
Modifying Fixtures.................................... 17
Moving Pathes.................................... 45, 58
Data Bases............................................... 48
Data Control ............................................. 28
Data management ............................... 10, 11
Desk Connection...................................... 11
Desk Fixture Types .................................. 53
Desk Monitor Function............................. 61
diffused component ................................. 65
Dimmer bar .............................................. 20
Docking.................................................... 38
Dynamic Objects...................................... 48
O
Object Properties...................................... 40
Objects ..................................................... 33
P
E
Plane Objects ........................................... 49
Playback of Videos................................... 57
Predefined Objects ................................... 54
Printouts................................................... 43
printouts of the 3D View ........................... 43
environment component.......................... 65
Exporting XOB-files ................................. 52
MA Lighting Technology GmbH • Dachdeckerstr. 16 •
D-97297 Waldbüttelbrunn
•
www.malighting.de
Phone: +49 9 31 49 79 4- 0 Fax: +49 9 31 49 79 4-29 • Hotline: [email protected]
•
eMail: [email protected]
User’s Manual grandMA 3D V 5.4
Page 70
Program surface ...................................... 26
Properties ................................................ 34
properties of dimmer channels................ 20
Property Bar............................................. 33
Property Grid ........................................... 42
Punctual light........................................... 65
T
Texture ..................................................... 66
Textures ................................................... 56
Time Objects ............................................ 62
Toolbar ..................................................... 36
Trusses..................................................... 50
Q
U
Quality settings........................................ 30
Undo’ ........................................................ 36
units ......................................................... 30
R
Ray-tracing............................................... 66
Reflection maps....................................... 66
release notes............................................ 32
Rendering methods.................................. 66
Rendertime Validation Dialog................... 31
Rotation of Objects.................................. 45
V
Version history ......................................... 32
Version of grandMA desk or off-line 8, 10, 11
vertex........................................................ 65
vertices..................................................... 65
Video Creation .......................................... 62
Videos ...................................................... 57
S
Scaling of Objects.................................... 45
session .................................................... 12
Shaded solid model rendering ................. 66
shading .................................................... 65
shine component ..................................... 66
Slave ........................................................ 11
slider control field .................................... 40
Solid model rendering.............................. 66
Sound....................................................... 30
Sound file (.WAV)..................................... 30
Spotlight .................................................. 65
Stage Objects........................................... 51
System requirements................................. 7
MA Lighting Technology GmbH • Dachdeckerstr. 16 •
D-97297 Waldbüttelbrunn
W
Wall Objects ............................................. 49
Wireframe rendering ................................. 66
Worlds ...................................................... 55
X
X-Files ...................................................... 51
Z
Zoom function .......................................... 38
•
www.malighting.de
Phone: +49 9 31 49 79 4- 0 Fax: +49 9 31 49 79 4-29 • Hotline: [email protected]
•
eMail: [email protected]
User’s Manual grandMA 3D V 5.4
Page 71


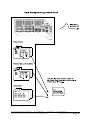
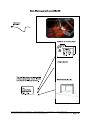
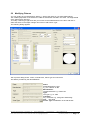
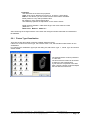
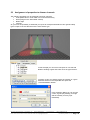

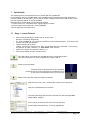
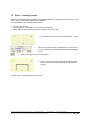
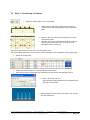


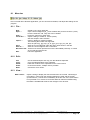
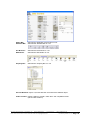


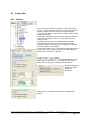
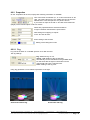
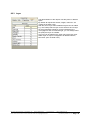
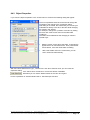
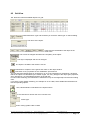
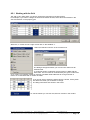
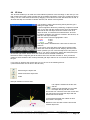
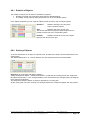
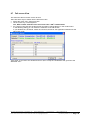
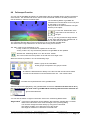
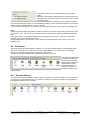
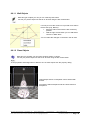
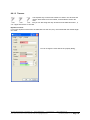
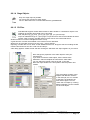

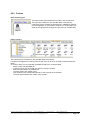
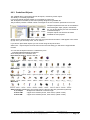

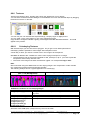

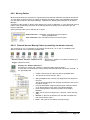
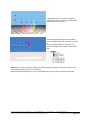
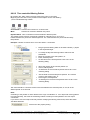
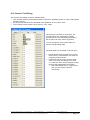
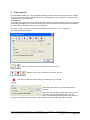
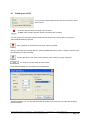
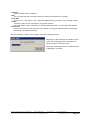
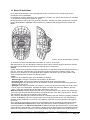
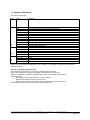
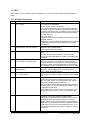
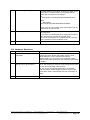


![[DYS 3 Axis Gimbal User Manual]](http://vs1.manualzilla.com/store/data/005821240_1-6054c49231c96ddf730544e81a975eb9-150x150.png)
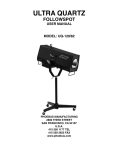
![[Silk Gimbal User Manual]](http://vs1.manualzilla.com/store/data/005969411_1-2c584c7da53e0ea80ffb995f6422f5dc-150x150.png)