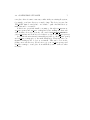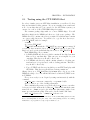
1
CTX Mate Version 0.71
System Administrator’s Manual
Jack Devanney
Sisyphus Beach
Tavernier, Florida
2006
ii
c 2006 Jack Devanney
Copyright Permission is granted to copy, distribute and/or modify this document under
the terms of the Gnu Free Documentation License (GFDL), Version 1.2
or any later version published by the Free Software Foundation; with no
Invarient Sections, no Front-Cover Texts, and no Back-Cover Texts. A copy
of the GFDL is available at www.gnu.org.
CTX Mate is distributed under the Gnu Public Licence and can be
downloaded from www.c4tx.org. CTX Mate employs the immersed section
area integration algorithm initially developed by Herreshoff & Kerwin, Inc.
Halsey C. Herreshoff and Justin E. Kerwin have kindly allowed the Center
for Tankship Excellence to use this algorithm in the CTX Mate package.
However, the CTX is solely responsible for the code that uses this algorithm.
Published by The CTX Press
212 Tarpon Street
Tavernier, FL 33070
Publishers’s Cataloging-in-Publication Data
should be Library of Congress Cataloging-in-Publication Data Devanney, Jack
CTX mate installation manual / Jack Devanney — Tavernier, Fla :
The CTX Press, 2006
p. : cm.
ISBN: 0-xxxxxxx-0-0
ISBN 13: yyy-0-xxxxxxx-0-z
1. Tankers – Design and Operations. 2. Tankers – Loading. 3.
Tankers – Spill reduction. I. Devanney, Jack. II. Title
VM455.D38 2005
387.2/45—dc22
Printed in the United States of America
10 09 08 07 06 • 5 4 3 2 1
2005938363
Contents
1 Preamble
1
2 Installation
2.1 Linux . . . . . . . . . . . . . . . . . . .
2.2 Configuring CTX Mate . . . . . . . . .
2.3 Testing using the CTX DEMO fleet . .
2.4 Installing your own ships using the CTX
. . . . . . .
. . . . . . .
. . . . . . .
File System
.
.
.
.
.
.
.
.
.
.
.
.
.
.
.
.
.
.
.
.
3
3
6
8
11
3 Automatic Ullaging
13
3.1 The Auto.pid file . . . . . . . . . . . . . . . . . . . . . . . . . 13
3.2 The saab2ctx.pl process . . . . . . . . . . . . . . . . . . . . . 15
3.3 Using Auto mode for stress testing CTX Mate . . . . . . . . 17
iii
iv
CONTENTS
Chapter 1
Preamble
This manual is targeted at system administrators and consultants who are
responsible for installing and administering CTX Mate. It assumes basic
Linux adminstration skills and familiarity with the CTX Mate User’s Manual
(User’s Manual). and the CTX Mate Data Preparation Guide (Data Guide).
Almost nothing in these two documents is repeated in this manual. Most
importantly, it assumes a good understanding of the purpose and goals of
the CTX Mate package.
This version of the Administration Manual is incomplete. But it should
be enough to allow you to install and test CTX mate.
1
2
CHAPTER 1. PREAMBLE
Chapter 2
Installation
2.1
Linux
Currently, CTX Mate only runs on Linux, although ports to other Unix
based operating systems should be straightforward. The basic Linux installation process involves the following steps:
Unpack the tarball The source distribution is packaged as a tarball. Download the latest version from www.c4tx.org. The easiest way to do this
is to point your browser at www.c4tx.org/ctx/job/mate/summary.html
and click on the get-latest-version link at the bottom of the page.
Unpack the tarball via
%tar xvzf ctxmate-n.mm.k.tar.gz
where n is the major version number, mm is the minor, and k is
the patch number. This will create a sub-directory ctxmate-n.mm.k.
Change directory to this folder. If this is not an operational install,
skip the next step. Go straight to configure.
Edit ctx Varient.h as required. CTX Mate implements the ability to
set a number of important variables at compile time. This is done
via editing libctxmate/ctx Varient.h prior to compiling. See Data
Guide, Chapter 5 for the details of ctx Varient.h.
As distributed, the policy variables in ctx Varient.h are set for normal Loading Instrument use, that is quite tightly. But the ctx Varient.h
variable CTX MATE NO CHANGES is set to N. This means that many of
3
4
CHAPTER 2. INSTALLATION
the site data policy variables can be overridden by the site configuration file, ctx mate.policy simply by editing this file. See Data Guide,
Chapter 5, for the details of ctx mate.policy.
As distributed, ctx mate.policy is set leniently, which is what you
want during an initial install and during the ship data preparation process. In fact, for most purposes, you can leave ctx Varient.h alone,
since most of these variables can be controlled from the ctx mate.policy
configuration file. But once the ship’s data is fully available and tested,
then a tighter ctx Varient.h may be appropriate. In particular, if
you are compiling Mate as an official on-board Loading Instrument,
Class will probably require that you set CTX MATE NO CHANGES to Y in
ctx Varient.h and recompile. This will freeze all the site data policy
variables at their ctx Varient.h values, and ctx mate.policy will be
ignored. In this situation, site data policy cannot be changed without
access to the source code. Normally, only binaries are distributed to
the ships.
In situations where Mate is being used on board as an official Loading
Instrument, ctx Varient.h must be approved by the ship’s Classification Society, and cannot be changed afterwards without Class’s
approval. It is crucial that any change in ctx Varient.h be properly approved and documented. In particular, you must never change
ctx Varient.h without changing the Varient name, CTX MATE VARIENT
in ctx Varient.h. The Varient name shows up on almost all CTX
Mate reports.
In other words, don’t change ctx Varient.h unless you have to, and
control site data policy via ctx mate.policy. In most situations,
restrictive permissions on this file will suffice.
Mate has another site configuration file called ctx mate.config. See
Data Guide, Chapter 5 for the details of ctx mate.config. This
file controls site specific parameters, which are not user preferences
— the file should be writable only be sysadmin and the like — but
are also not subject to Class approval, e.g location of various files in
the filing system. Even if CTX MATE NO CHANGES is Y, the variables
in ctx mate.config still apply. In almost all cases, this file can be
ignored until after Mate is installed. However, if the install is only
partially successful, for example, the print commands don’t seem to
work, then you may be able to solve the problem by editing the system
commands in this file.
2.1. LINUX
5
configure Once you have a ctx Varient.h you are happy with, issue
%./configure [--enable-tcl]
In order to be able to use the graphical user interface, you must specify
the --enable-tcl option. The configure step will check to see if the
packages Mate needs are installed on your computer. The possibly
non-standard packages are:
•
•
•
•
•
•
•
•
libxml2
latex
troff
tcl (8.4 or better) including development
tk (8.4 or better) including development
blt (2.9 or better) including development
itcl/itk/iwidgets including development
xpdf
The only absolutely necessary package is libxml2. But if you have
neither latex nor troff, you will not be able to generate any non-XML
reports. If you don’t have tcl/tk, you won’t have the graphical user
interface. If you don’t have BLT, you won’t be able to display the
bending moment and righting arm plots. Thus, Tcl/tk/BLT and either
latex or troff are required if Mate is to be used as a loading instrument.
If you don’t have itcl/itk/iwidgets, then you will have to start Mate
sessions from the command line. xpdf is only used for displaying some
of the drawings and the on-line manuals. Strictly speaking, xpdf is
not required for Loading Instrument use, but some of the drawings
are extremely useful, especially in damaged situations. If you don’t
have xpdf, Mate will try and use your browser to display the manuals.
1
make Issue make to compile the package. This will take two to five minutes on a normal desktop machine. You should be able to ignore any
compiler warning messages.
install Assuming the compile completed, issue make install to install
CTX Mate. The executables will be installed in /usr/local/bin,
the shared library libctxmate will be installed in /usr/local/lib,
and the various configuration files, docs, and scripts will be installed in
1
You will also need Perl to implement the auto mode. See Chapter 3.
6
CHAPTER 2. INSTALLATION
/usr/local/share/ctxmate. If you have itcl/itk/iwidgets, ctxmate.desktop
will be installed in /usr/share/applications, and you should now
see CTX Mate listed in the Applications menu if you are running KDE
or GNOME. Your users can put CTX Mate on their desktops and/or
panels by drag-and-dropping the Mate icon in this list.
Check using Demo mode Make sure your LD LIBRARY PATH includes
/usr/local/lib and /usr/local/bin is in your PATH. You should
now be able to run Mate in Demo mode. If you have built with
--enable-tcl, issue
ctx_mate_tcl -D
If the CTX Mate Mainscreen appears, you have successfully installed
CTX Mate. If you built without tcl, issue
ctx_mate_cmd -D
If you get a message saying
CTX Mate Version n.m.k successfully installed.
then everything looks OK. Demo mode only works from the build
directory. It is not documented in the User’s Manual.
2.2
Configuring CTX Mate
You may play around with Mate in Demo mode. All functions should be
working for the DEMO ship, with the exception that Auto mode is simulated. However, Demo mode only works in the build directory. To actually
use Mate, you must now configure CTX Mate for your site(s). This is done
by editing ctx mate.policy, and ctx mate.config in /usr/local/share/ctxmate/site.
In doing so, you must be careful to end up with well-formed XML. If this
is your first encounter with CTX Mate, and you just want to test Mate
with one of the DEMO ships, you can leave ctx mate.policy as shipped
alone. The only variable you may have to change in ctx mate.config is
TFS ROOT, the absolute path to the top of the Tanker File System. As
shipped, TFS ROOT is set to /tfs which is its standard location in the
CTX Tanker Filing System. But for initial testing or if you are merely
checking the package out, you will probably want to set TFS ROOT to
2.2. CONFIGURING CTX MATE
7
some place where it cannot cause any conflict with your existing file system,
for example, your home directory or maybe /tmp. The choice is yours; but
TFS ROOT must be an absolute – not relative – path. And this directory
must exist and be executable.
If this is an operational install, you must go through ctx Varient.h,
ctx mate.policy and ctx mate.config line by line, making sure that each
value is what you need for your site. Of course if CTX MATE NO CHANGES in
your ctx Varient.h is Y, then you don’t have to worry about ctx mate.policy.
In operational environments, it is usually preferable to edit ctx mate.policy
and ctx mate.config prior to the make install step. That way your configuration settings won’t be lost on a reinstall. This can be done in the
package site sub-directory. Even better copy your ctx mate.policy and
ctx mate.config to a safe place from which they can be retrieved when
necessary.
8
CHAPTER 2. INSTALLATION
2.3
Testing using the CTX DEMO fleet
In order to further test your CTX Mate installation, you will need both a
ship and an initial loading pattern. If you are starting from scratch and
none of your ships has yet been converted to the CTX Mate system, you
can use one or more of the CTX DEMO ships for testing.
The ctxmate package ships with one or more DEMO ships. You will
find these ship(s) is the DEMO sub-directory of the source package. The
DEMO directory contains a fleet directory named X, which in turn contains
one or more ship directories. You will need to copy the fleet directory to
your TFS ROOT, with for example,
cd DEMO
cp -avf X TFS ROOT
TFS ROOT must match the TFS ROOT in your ctx mate.config. If
you already have an X fleet directory in TFS ROOT, then go down to the
ship level, and copy the individual ship directories to TFS ROOT /X.2
Each DEMO ship folder contains;
1. A DATA/MATE sub-directory which contains all the ship data that
Mate needs to run that ship. This can serve as a template for your
own ships. This directory should be Read only.
2. A V/DEMO sub-directory which contains a number of loading patterns and a set of reports based on those loading patterns. This directory should be Read only.
3. You a V/TEST sub-directory in which you can TEST and play with
CTX Mate. This directory should have lenient permissions.
Change directory to TFS ROOT /X/ship/V/TEST where ship is one of the
DEMO fleet ship codes. You will find the same load files in V/TEST as are
in V/DEMO.
Now you are ready to test. Begin by testing non-interactively with the
command
ctx mate cmd --fleet=X --ship=ship --voy=TEST loadfile
where loadfile is one of the loading pattern files.
This command will generate a report file called out loadname.ctx where
loadname is loadfile without the leading lf . This should match the same
named file in ../DEMO except for the meta-data (timestamp, author, hostname, process id and the path). This can be checked with a diff. Issue
diff out loadname.ctx ../DEMO/out loadname.ctx
2
Alternatively, you could rename X. However, in most CTX Filing Systems, X is the
fleet code for ships that are not part of any of the owner’s/manager’s fleets. Accounting,
maintenance, etc programs are set up to ignore this fleet code.
2.3. TESTING USING THE CTX DEMO FLEET
9
When you issue this command, you should see only the top five lines
(the meta-data) of each report, which means all the other lines in these two
files are the same.
Repeat this for other load files until you are satisfied that you are producing the same results as in the DEMO directory.
If you built with --enable tcl, you are now ready to play interactively.
Issue
ctx mate tcl --fleet=X --ship=ship --voy=TEST loadfile
where loadfile is one of the loading pattern files. This should bring up
the Mate Mainscreen from which you can change the loading pattern as you
wish. See the User’s Manual. If you save a changed loading pattern, it is an
excellent idea to change the name. Otherwise, you can easily be confused
when you re-run the changed loading pattern, and don’t get the same results
as are in the V/DEMO directory.
You can make life a little easier on yourself by setting the environment
variables FLEET, SHIP and VOY to the above values.3 Then you can test
this ship to your heart’s content with simply
ctx mate tcl loadfile
With the Mainscreen up, you should systematically go through each of
the menus on the Menubar, checking that each function performs per the
User’s Manual. In particular, you will need to check that the hardcopy
reports are being printed properly, and that the documentation in the Help
menu displays properly.
The DEMO ships don’t really have an Auto mode. What happens when
you change to Auto mode is that Mate runs a simulated Auto mode in which
random gauging system responses are generated.4 This is an excellent way
of stress testing Mate, since this creates six or more loading patterns per
minute, some of them quite outlandish. See Chapter 3 for a full discussion.
You may repeat this whole process for one or more of the other DEMO
ships if you wish.
If you have itcl/itk/iwidgets and are using KDE or Gnome, CTX Mate
should show up somewhere in the Applications menu. On my Suse it shows
up in the list of Applications. On my Ubuntu, it shows up in the Other
sub-menu. Once you find it, double clicking should launch the CTX Mate
start up form. See User’s Manual, Section 2.1. Your users may drop and
drag the icon in Applications sub-menu to the Desktop or the Panel if they
3
In a full implementation of the CTX File System, these shell variables are re-set
appropriately as the user moves around the file system. This is done by re-implementing
cd.
4
Provided your system has Perl installed,
10
CHAPTER 2. INSTALLATION
desire. However, this won’t do them much good, until your own ships are
installed.
Finally, to match the User’s Manual, you should put a symlink from
mate to /usr/local/bin/ctx mate tcl somewhere in your users’ PATH.5
5
In the future CTX intends to implement a user interface based on a different toolkit,
for example, gtk. The corresponding command will be ctx mate gtk. The link will allow
you to direct your users to the GUI of your choice.
2.4. INSTALLING YOUR OWN SHIPS USING THE CTX FILE SYSTEM11
2.4
Installing your own ships using the CTX File
System
12
CHAPTER 2. INSTALLATION
Chapter 3
Automatic Ullaging
3.1
The Auto.pid file
CTX Mate has the capability of accepting input from automatic gauging
systems. To implement this capability, Mate uses a separate process which
queries the ullaging system’s computer and prepares an intermediate XML
file containings the results of the communication. This file is called auto.pid
where pid is the CTX Mate session’s process ID and is placed in mate rep dir.
This file gets over-written each time the gauging system is interrogated. Here
is a portion of an auto.pid file.
<ctx_Autos path="/U/al/V/DEMO/auto.12345" gen_by="fake2ctx.pl" at="2006-08-10T16:10:11Z"
error="0" msg="fake no error">
<ctx_Auto tank="1P
" dip_pt="SA" dip_opt="U" dip_ok="G" dip=" 6.168"
temp_ok="G" temp="25.92" press_ok="G" press=" 511"/>
<ctx_Auto tank="1C
" dip_pt="SA" dip_opt="U" dip_ok="G" dip=" 5.021"
temp_ok="G" temp="47.37" press_ok="G" press=" 511"/>
<ctx_Auto tank="1S
" dip_pt="SA" dip_opt="U" dip_ok="G" dip=" 7.772"
temp_ok="G" temp="22.91" press_ok="G" press=" 511"/>
.... more readings .....
<ctx_Auto tank="3FO_P
" dip_pt="SA" dip_opt="I" dip_ok="G" dip="
temp_ok="N" temp=" 0.00" press_ok="N" press="
0"/>
<ctx_Auto tank="3FO_S
" dip_pt="SA" dip_opt="I" dip_ok="G" dip="
temp_ok="N" temp=" 0.00" press_ok="N" press="
0"/>
</ctx_Autos>
4.571"
7.665"
The format of this file is nearly self-explanatory. The outer element is
a ctx Autos whose attributes are the standard documentation fields plus a
transmission error code and error message. The possible transmission errors
13
14
CHAPTER 3. AUTOMATIC ULLAGING
0 Successful Communication
1 Unable to open or write to auto.pid. (See footnote below)
are 2 Unable to set Port Parameters (probably a permission problem)
3 Request time out. (No response from gauging system)
4 Checksum error
The fact that the transmission error code is zero, does not means that
all the tank readings were error-free as we shall see below.1
The ctx Autos element contains a number of ctx Auto sub-elements,
one for each tank for which auto-gauging is implemented. Each ctx Auto
has nine attributes. All nine are always required. These attributes are:
tank The Mate tank name for this gauge’s compartment.
dip pt The Mate dipping point code for this gauge.
dip opt A flag which must be either U, I, or P indicating whether the
reading is an Ullage, an Innage, or fraction full.2
dip ok A flag which must be either N, E or G. G means the gauging system
thinks it has returned a good ullage/innage/fraction. E means the
gauging system detected a sensor error for this tank. N means the
requested capability does not exist for this tank.
dip If dip ok is G and dip opt is U, the ullage in meters rounded to the
nearest millimeter. If dip ok is G and dip opt is I, the innage in meters rounded to the nearest millimeter. If dip ok is G and dip opt is
P, a number between 0.0 and 1.0 inclusive. Otherwise, zero (NOT
BLANK).
temp ok G means the gauging system thinks it has returned a good temperature. E means the gauging system detected a sensor error for this
tank. N means the requested capability does not exist for this tank.
dip If temp ok is G, the tank temperature in degrees Celsius. rounded to
the nearest hundreth of a degree. Otherwise, zero.
1
Error 1 is unable to open or write auto.pid file. In this case the process attempting
to write the auto.pid file cannot put 1 into a non-existent file; but the transmission error
is also the return code of the interrogation process. In any event, ctx Mate will find the
file missing or with a bad time stamp and be able to ascertain the problem.
2
In production environments, only U or I is allowed. But the P opt is very useful in
testing as we shall see.
3.2. THE SAAB2CTX.PL PROCESS
15
press ok G means the gauging system thinks it has returned a good ullage
space pressure. E means the gauging system detected a sensor error
for this tank. N means the requested capability does not exist for this
tank.
dip If press ok is G, the ullage space pressure in mm water gage (- is vaccum). Otherwise, zero.
3.2
The saab2ctx.pl process
Currently, only gauging systems using the Saab Radar protocol are implemented in Mate. The program which periodically generates auto.pid in
this case is called saab2ctx.pl. It is a Perl script.3 In Auto mode, Mate
executes saab2ctx.pl every CTX AUTO SLEEP seconds.4 saab2ctx.pl then
prepares the auto.pid file which is then read by CTX Mate proper. If
Mate is sufficiently happy with what it finds in the auto.pid file, the available data is used to re-balance the ship. If not, Mate displays an error
dialog and switches back to Normal mode. This process is repeated every
CTX AUTO SLEEP seconds until either Mate or the user decides to leave Auto
mode.5
This overall design insulates Mate from the details of the gauging system, and localizes just about all the ship specific issues in saab2ctx.pl.
Mate only needs to know the location and coordinate system of each gauge.
The details of the gauging system protocol or site specific hardware can
change without affecting Mate proper at all. Other protocols can be eas3
In order to use Mate’s Auto mode, your site must have a Perl interpreter installed.
And you must set the path name in the first line of saab2ctx.pl to the location of that
interpreter. The default is /usr/bin/perl. If you do not have and cannot install a Perl
interpreter, your only alternative is to re-write the rather simple saab2ctx.pl program in
a scripting language you do have available.
4
CTX AUTO SLEEP can be adjusted within limits by setting the configuration variable ctx auto sleep.
5
Many of Mate’s capabilities are not available while in Auto mode. But the user can
switch back and forth between Auto and Normal mode as he wishes, temporarily freezing
the loading pattern at the last update. While in Normal mode, he can designate one or
more tanks as being offline, in which case the auto-gauging system’s reading(s) for those
tanks will be ignored. Auto-gauging systems tend to be very error prone, especially when
a tank is nearly full or nearly empty. Often they will happily return erroneous results
without reporting a sensor error. The crew must always be watching for bad numbers. By
taking a tank whose gauge is producing bad readings off-line — and periodically entering
data from another source (e.g. hand dips) — the user can continue to use the auto-gauging
for those tanks for which the system appears to be working. See Users Manual for details.
16
CHAPTER 3. AUTOMATIC ULLAGING
ily implemented by providing another script. In fact one such ”protocol”
has been implemented; it is called fake2ctx.pl. fake2ctx.pl simulates
an automatic gauging system by producing auto.pid files filled with random responses. This allows the auto-gauging portion of Mate proper to
be debugged and exercised without having access to a Saab or equivalent
system.
Our experience is that each auto-gauging installation — or at least the
installation for each tanker class — requires some specialized tweaking: port
numbers, baud rates, and other modem settings, etc. All these problems are
localized in saab2ctx.pl. Your job will be to get saab2ctx.pl working
on your ships; but you won’t have to mess with ctx Mate proper at all.6
To facilitate this saab2ctx.pl must be installed in the ship’s CTX Mate
data directory (usually /fleet/ship/DATA/MATE)., not the normal CTX
Mate shared resources directory (usually /usr/local/share/ctxmate). To
implement Auto mode for a particular ship, after installing CTX Mate, you
must copy the saab2ctx.pl template included in the distribution from the
Mate shared resources directory to the ship’s CTX Mate data dir.
In order to do its job saab2ctx.pl (or your equivalent) needs saab.xml
in the ship’s Mate data directory. Here’s a typical saab.xml.
<ctx_Auto_Gauges>
<!-- /U/al/DATA/MATE/saab.xml djw1 did by hand 2006-08-09-->
<!-- Version 28 in which saab2ctx.pl determines Mate tank and dip_point -->
<!-- 2006-08-10 djw1 switched LD to SA in FP and 1B_P
-->
<ctx_Auto_Gauge tank="1P
" dip_pt="SA" id=" 1" opt="U" has_temp="Y"
<ctx_Auto_Gauge tank="1C
" dip_pt="SA" id=" 2" opt="U" has_temp="Y"
<ctx_Auto_Gauge tank="1S
" dip_pt="SA" id=" 3" opt="U" has_temp="Y"
<ctx_Auto_Gauge tank="2F_P
" dip_pt="SA" id=" 4" opt="U" has_temp="Y"
has_press="Y"/>
has_press="Y"/>
has_press="Y"/>
has_press="Y"/>
..... more tanks ......
<ctx_Auto_Gauge
<ctx_Auto_Gauge
<ctx_Auto_Gauge
<ctx_Auto_Gauge
<ctx_Auto_Gauge
</ctx_Auto_Gauges>
6
tank="1FO_S
tank="2FO_P
tank="2FO_S
tank="3FO_P
tank="3FO_S
"
"
"
"
"
dip_pt="SA"
dip_pt="SA"
dip_pt="SA"
dip_pt="SA"
dip_pt="SA"
id="35"
id="36"
id="37"
id="38"
id="39"
opt="I"
opt="I"
opt="I"
opt="I"
opt="I"
has_temp="N"
has_temp="N"
has_temp="N"
has_temp="N"
has_temp="N"
CTX has exempted saab2ctx.pl from the GPL. You may modify saab2ctx.pl and even
release the modified code to others without making the modified code freely available.
See the license terms in the saab2ctx.pl file. Since saab2ctx.pl (or equivalent) runs in
a separate process from Mate, CTX Mate can be run with your version of saab2ctx.pl
without violating the GPL. Of course, if your modifications are valuable, we would hope
you would give back to the tanker community. One way to do this would be to send the
modified code to CTX, so CTX can include it in future distributions of Mate.
has_press="N"/>
has_press="N"/>
has_press="N"/>
has_press="N"/>
has_press="N"/>
3.3. USING AUTO MODE FOR STRESS TESTING CTX MATE
17
Once again the file is nearly self-explanatory. id is the gauging system’s
code for a particular tank. In a Saab protocol based system, it is an integer
assigned by the vendor. tank and dip pt are the corresponding Mate tank
code and dipping point code.7 opt is either U or I (reading is Ullage/Innage).
and the remaining two flags indicate whether this particular gauge includes
a temperature sensor and a ullage space pressure sensor.
Only saab2ctx.pl uses saab.xml. Mate proper makes no use of saab.xml,
so if necessary saab.xml can be changed to accommodate the idiosyncracies
of a particular gauging system. Or better yet a different yyyy.xml produced where yyyy is the protocol. The only thing that Mate cares about
is the value of the <ctx auto script> element in the ship’s main.xml file.
This element must be set to the name of the auto.pid generating script:
for example, saab2ctx.pl. As long as that script produces an auto.pid
file as descibed in Section 3.1, Mate is happy. So if you wish to run Mate
with fake2ctx.pl simulating a gauging system, set <ctx auto script> to
fake2ctx.pl in main.xml.8
3.3
Using Auto mode for stress testing CTX Mate
fake2ctx.pl is a good way to check out the robustness of Mate’s hull balance algorithm for your ship(s). Put Mate in Auto mode using fake2ctx.pl
and let it run over-night. During that period fake2ctx.pl will produce
about 7000 loading patterns some of which will be really wild. If the program is still in Auto mode the next morning, then it was able to balance
the ship in each and every case.
Since fake2ctx.pl also randomly simulates gauging errors (which unfortunately are quite common in the real world) and Mate automatically
flips back to Normal mode if the number of simultaneous gauging errors
is more than the ctx mate.config variable ctx auto max errors, you will
need to temporarily set this number very high to guarantee that Mate does
not bomb out on too many gauging errors. Remember to re-set this variable
when you are finished with the test,.
7
Mate will accept more than one automatic gauge per tank. Just assign each such
gauge its own ctx Dip Point (location and coordinate system). However, currently all the
ship’s auto-read out gauges must be using the same protocol.
8
Needless to say, in production Loading Instrument environments, main.xml must be
a Read only file with <ctx auto script> set to the correct ullage system to XML script.
18
CHAPTER 3. AUTOMATIC ULLAGING