1
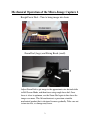
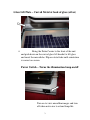
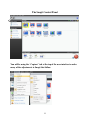
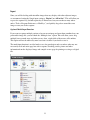
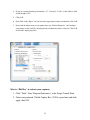
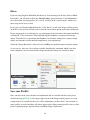
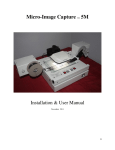
Micro-Image Capture 2
™
Installation & User Manual
July 2011 v_us1
1
Mechanical Operation of the Micro-Image Capture 2
Rough Focus Dial – Turn to bring image into focus
Zoom Dial (large) and Fixing Knob (small)
Adjust Zoom Dial to get image to the approximate size desired while
in Full Screen Mode, and then focus using rough focus dial. Once
focus is close to optimum, use the Zoom Dial again to fine focus the
image even more. This lift mechanism is a precision scientific
mechanical product that is designed to move gradually. Take care not
to turn too fast, as damage may occur.
2
Glass Lift Plate – Curved Metal at back of glass (silver)
•
Bring the Fiche Carrier to the front of the unit
and push down on the curved glass lift bracket to lift glass
and insert the microfiche. Flip or rotate fiche until orientation
is correct on-screen.
Power Switch – Turns the illumination lamp on/off
Turn on to view microfilm images and turn
off when not in use to extend lamp life.
3
Micro-Image Capture 2
Minimum system requirements
• Processor: Pentium IV 2.4GHz or equivalent AMD Athlon
• 140 MB free HD space for view and capture programs
• Operating System: Microsoft Windows XP, Microsoft Windows Vista, Vista
Home, W7
• RAM memory: 512 MB RAM – Recommend 1GB or more & USB 2.0
• 16-bit color display w/ DirectX 3D support (works with 32 and 64 bit as well)
• DirectX 9.0 or above
*High Resolution LCD Monitor capable of 1024 x 768 at a minimum, and with
sufficient height and width to display microfilmed image at its original size. A
graphics card providing high resolution streaming video with matched monitor will
provide the best very best image viewing and capture quality.
To view and capture these Portrait and Landscape microfilm images at optimum
resolution, your monitor view area must be at least 8.5” high and 11” wide for
landscape images and 11” high minimum for portrait.
Portrait
Landscape
Snagit System Requirements
• Microsoft Windows 2000, XP, XP x64, Vista, or Windows 7 (32-bit or 64-bit)
installed and configured on your system. ~ Recommended:
• Internet Explorer 6.0 or later required.
• Windows 2000 users require Windows Installer 2.0.
• 1.0 GHz processor (2.4 GHz recommended)
• 512 MB of RAM (1 GB recommended)
•
60 MB of free hard disk space (100 MB for CDROM installations due to video
tutorials)
4
Software Installation & Adjustments
** Please do not connect the Micro-Image Capture USB cable to your PC until
AFTER the software and drivers are fully installed. Doing so may prevent the
drivers from fully installing and the unit may not operate properly.
Micro-Image Capture Software – Quick Start Guide
There are three main tabs in the MIC user interface; Video, Image and OCR. The Video tab is
where you will view and capture microform images using Snagit.
You may use the Micro-Image Capture Software to capture images but we strongly
recommend using Snagit instead as it offers increased functionality, speed and ease of use.
If you do capture images with the MIC User Interface instead of Snagit, the Image tab is where
post scan images can be adjusted, printed, faxed, e-mailed and OCR’d if desired. The OCR tab
will open up the OCR’d document(s) when complete, for review and saving. A mouse with a
scroll wheel provides optimum usability when using the MIC user interface.
1. Load the Micro-Image Capture software, plug in the USB cable to an available USB 2.0
port, then click the Micro-Image Capture launch icon.
5
2. Click on the Video tab to activate the Micro-Image Capture unit and display a video
image of your microfilm.
3. The default mode is color, but the Grey Scale, Black Line and Color Inverse modes are
more suitable for viewing and capturing microfilm images on most media. Now click the
Grey Scale option to remove color from the image. * You may need to slide the
“saturation” slider up and down to fully remove the color *
4. The image will probably be out of focus initially, so raise or lower the MIC head unit
using the large black knob on the side of the unit until you see some sort of image, even if
out of focus. We will first concentrate on getting image settings correct, and then focus.
5. Adjust the image quality by un-selecting the auto exposure box and manually adjust the
exposure to provide a viewable base line exposure.
6. Adjust the brightness and contrast in order to achieve the most legible image in the grey
scale mode. Dark portions of your image should be as black as possible while light
portions should be white, not gray.
7. Adjust Gamma to remove excess gray in the background of the image in order to achieve
a best possible contrast.
8. If you are viewing negative film, you may now try the”Inverse mode” in order to see the
image with a more natural white background and grey/black text (aka positive mode)
9. When switching from “Grayscale” to “Inverse mode”, you may need to re-adjust some of
the settings in order to achieve the best view and scan result in that mode.
10. If you have high quality film with very good film density and contrast, the “Black Line”
mode will provide an excellent negative image to view and print with, but you will have
to program Snagit to invert the output color by choosing “Color Substitution” , then
“Invert Colors” so that your output print and scan will be positive. More on this in the
Snagit adjustment section.
11. Using the scroll wheel on your mouse will enlarge and reduce the onscreen image of your
microfilm while in the user interface mode only.
6
Full Screen Mode
We strongly recommend using “Snagit” to capture and send images to a network printer or
folder. The “Full Screen” mode is how you will effectively view your images at full size in order
to achieve the very best on-screen image, as well as the best digital scan and/or print.
Click the “Full Screen” icon on the MIC toolbar.
The Full Screen Mode allows for a much larger image to be displayed since the user interface
tool bars are not in view. You can capture images by activating the Snagit function hot key (See
Snagit installation instructions),or mouse over the lower image area to activate the scan button
using the Micro-Image Capture program (we however recommend using Snagit exclusively)
Zoom and focus the image so that the displayed microfilm image is as close to its full original
size as possible. In order to view and capture images at optimum resolution, it is important that
you have a quality LCD monitor with sufficient vertical and horizontal area to allow the image to
be zoomed to its original letter (8.5x11”) or legal size (8.5x14”). (Engineering applications
should use a large format monitor). Hold a blank 8.5 x 11” paper to the screen and try and make
the image that size. If you monitor does not have sufficient view area, you may need another.
Click escape key or mouse over the lower middle of the full screen mode
and click “Exit Full Screen” to go back to the standard view mode.
7
User Interface - Video Tool Bar Icons & Descriptions
Clicking the scan button will capture the complete viewable screen. (Use the
“rectangle select” to designate a smaller capture area) *Use Snagit to capture scan images
Clicking the record button will record a video file of the movements made with the
microform until you click again to end the video. This option can be used to create a presentation
of microform content. *Use Snagit to capture video
Clicking this icon will activate the color inverse mode changing a negative grayscale
image into a standard black on white image which may be easier to view for some and saves on
toner consumption if printing.
Clicking this icon will activate the grey scale mode removing color from the image
and displaying in shades of grey only.
Clicking this icon activates the black line mode with can provide excellent contrast
on some microfilmed images. Use in conjunction with the “Color Substitution” in Snagit.
Click this icon and use your mouse to drag a capture box onto the image display.
When active the capture area will be brighter than the non capture areas. When clicking scan,
only the capture box will be printed or saved. *Use Snagit to capture images
Full screen mode allows for optimal image size and removes the user interface
tools. You can still scan images by moving mouse pointer to the bottom of screen where the scan
and exit icons will pop up.
8
Click to bring image back to original size after zooming or reducing with mouse
wheel.
The clear button will clear the previous change made and continuing to clear will
revert back one step at a time.
Click the move button to use the mouse to position or nudge the image onscreen.
Rotates the image 90 degrees clockwise
Rotates the image 90 degrees counter clockwise
Vertically flips or mirrors the image
Horizontally flips or mirrors the image
If you are using the MIC interface to scan and capture images instead
of the “Snagit” software, thumbnails of images scanned will appear on
the left side scan result area. Clicking on an image thumbnail will open
the image in the Image Tab and clicking on “File Location” at the
bottom will open the image destination folder for review or selection of
images for printing or other actions.
Once you have achieved an acceptable image for viewing, scanning and
printing, record the video property settings (brightness, contrast, hue,
saturation, sharpness, gamma and exposure) so that you have a future
reference that will allow for quick and easy adjustment in the future.
*Use Snagit to capture images
9
The MIC user interface will remember the last adjustment settings when the system is closed and
re-opened, but you may have several formats of microfilm that requires different setting for
optimum performance, note these settings and keep them close to system for reference.
Video Resolution
Video resolution is optimum at 2592x1944 (5MP). Adjusting to the next setting down
2048x1536 (3MP) will provide a faster refresh rate ( less latent movement of image) and
almost the same scan / print result so try that setting if you prefer a faster refresh rate when
searching for images.
After image is located, the Video Resolution can be maximized with the slider in an instant. All
digital microform viewer/scanners have a measure of image latency which gets a little getting
used to. After several uses you will become accustomed to the operation of the unit.
Install Snagit Software, check all boxes during install, accept
license agreement, check 30 Day Eval (A full license code is
provided on the DVD label for future use).
Snagit will launch after installed so review the following
section to set up Snagit for optimum functionality, speed and
ease of use.
10
Snagit Capture Software
Using Snagit to capture displayed Microfilm Images
Snagit allows you to capture anything you see on your computer screen.
You will use Snagit to capture your displayed microfilm images instantly
converting them to the file of your choice (tiff, pdf, jpg, etc.) and within a second
or so, copy them to the file folder of your choice, your printer or both
simultaneously!
Snagit has a lot of functionality which can be used for many other applications,
but for our purposes, we will concentrate on how to configure Snagit to quickly
and effectively print and save your microfilm images.
Snagit is an essential part of the Micro-Image Capture 2 system and its ability to
capture, scan, print and invert negative images to achieve a positive output. It is
therefore critical that you read the next section carefully and follow the directions
step by step to insure proper operation of your system. Once you get familiar with
Snagit and its capabilities, you will be able to realize optimal performance from
your new Micro-Image Capture device.
If you require assistance or have any questions about the installation process,
please call your Micro-Image Capture dealer.
Once Snagit is installed and properly configured, you will be able to press a
function key on your keyboard (hot key) and instantly capture the displayed
microform image, sending it to a file folder as a .tiff, .pdf or other format, to your
network printer or both in a second or two. If you cannot achieve this functionality,
call for assistance.
Click the Snagit icon on your desktop to launch the Snagit Control Panel
11
The Snagit Control Panel
You will be using the “Capture” tab at the top of the user interface to make
many of the adjustments to Snagit that follow.
12
Input
Since you will be dealing with microfilm images that may display with other adjacent images,
we recommend setting the Snagit input setting to “Region” or “All in One”. This will allow you
to press the capture key (default capture key is Printscreen, but you can choose many others
under “Tools > Program Preferences > Hot Keys”) and quickly drag a box around the exact
image or area you wish to capture.
Optional Multi-Input Function
If you want to capture multiple portions of an on-screen image and want them combined on your
print and/or image file, you can check the “Multiple Area” option. This will allow you to drag
multiple boxes around areas and when you are done, a right click of the mouse will combine.
This option will not be utilized by most users but it is there if you decide to use it.
The multi-input function is an ideal mode to use for genealogists and researchers who may not
necessarily need and entire page but wish to capture a heading, article, picture and other
information from the displayed image and compile on one page for printing or saving as a digital
file.
13
Output
Some users will only need a printout of the microfilm image. In this case you would choose the
“Printer” as the output device. If you would like the images captured saved to a file, you can
choose “File” so that the moment you drag a box around the image and release the mouse button,
the image will drop into the designated folder as an image file.
Snagit allows for “Multiple Outputs” so you can send the image to a file and print it
simultaneously. If you prefer this option, check the “Multiple Outputs” and choose the various
desired outputs. You will be able to configure the settings for each output later.
If you check the “Preview in Editor” option it will open the editor after each capture so that you
can annotate or make adjustments to the image. This is not an option that most microfilm
users will need as you want a fast and efficient capture of what you see on the screen
without the need to make adjustments. We recommend un-checking the preview in editor after
selecting at least one output type.
If your Micro-Image Capture is adjusted properly, you will get an exact copy of the image you
see onscreen spooling to your printer or saving to a file folder within a second or two.
Output Properties
At the top of the user interface, click on Capture tab, then mouse over Output and finally click on
“Properties”. Here you will configure the output properties for each output chosen. The first tab
here is the Image File tab where you will choose what format image you prefer, if you want the
program to prompt you for a file name prior to saving or if you want the images automatically
named with the prefix of your choice like “Microfilm.0000.pdf”. Here you will also designate
the destination folder that will receive all of your captured images.
Keep in mind that choosing “ask for a filename” will prompt you after every capture, so if you
do not need to index your images at the time of capture, it is much faster to choose the
“Automatic File Name” option.
If you are printing images, you will need to go to the “Print” tab and select your designated
printer. All printers on your PC/network will show up, just choose your preferred printer then
you will configure image scaling so that even slightly undersized captures will fill the print area
of your output document. Follow these steps to set up your printer:
1. Select “use these settings”, choose your printer and click the apply button at the bottom.
2.
Click on “page set up” and select “fixed size” and unselect the “keep aspect ratio”
3. If you are viewing Portrait documents (11” tall by 8.5” wide), set the width to 8.3 and the
height to 10.6
14
4. If you are viewing Landscape documents (11” wide by 8.5” tall), set the width to 10.6
and the height to 8.3)
5. Click O.K.
6. Next click on the “Paper” tab and select the appropriate format (orientation), click O.K.
7. Now click the button next to your printer that says “Printer Properties” and configure
your printer so that it will by default print the orientation you have selected. Click O.K.
and exit the output properties.
Select a “Hot Key” to activate your captures;
1. Click “Tools”, then “Program Preferences” in the Snagit Control Panel.
2. Select your preferred “Global Capture Key” (F10 is a good one) and click
apply, then O.K.
15
Effects
If you are using Negative Microfilm and choose to view the images in the Grey Scale or Black
Line modes, you will need to check the “Invert Colors” option under the “Color Substitution”
tab so that when your image prints (or is saved), it will be in the “positive mode” which saves
toner usage and is easier to read.
If you view your Negative Microfilm in the “Color Inverse” mode, your images will be positive
on the PC screen and you will not need to select the invert colors option under color substitution.
If your output print or saved image has a grey background, you can remove that automatically by
selecting the “Color Correction” effect and adjusting the brightness or contrast of the image
output. You will have to experiment with brightness and contrast settings here, capture sample
images and continue to adjust until the output meets your requirements.
Check the “Image Resolution” effect and set it to 600dpi for optimum capture and print quality.
As you can see, there are a lot of effects available including the watermark which is one that
some companies can use to show that the output document or image was created by them.
Save your Profile!
Once you have made your selections and adjustments and are satisfied with the result, please
click on the large green
+ at the upper right section of the Snagit control panel to save your
settings and create a profile for that saves all the adjustments you have made. You can make as
many profiles as needed and they will always appear on the Snagit control panel for you to select
prior to capturing images displayed from your Micro-Image Capture unit.
16
Every Micro-Image Capture unit goes through a quality assurance tests
that check for proper focus and resolution quality as well as mechanical
build and fitment.
We use both negative and positive film in low and high magnification
ranges to insure the unit meets our quality standards prior to packaging
for shipment. A print sample from a capture is included with each unit
and contains the unit serial # and calibration settings used to achieve
that particular scan/print.
Safety precautions
Observe the following guidelines to ensure that your Micro-Image Capture 2 will
operate safely and to prevent defects.
• Do not use this device in environments outside the
following range: temperature: 0°C to 40°C, relative humidity:
45% ~ 85%.
• Do not use this device under:
– direct sunlight exposure;
– very humid and dusty environment;
– near any kind of heat or vibration sources
• Do NOT attempt to disassemble or repair your Micro-Image Capture 2 by
yourself. Do not open the camera housing as this will void the warranty.
• Protect the device from oil, vapors, steam, moisture, and dust.
17
Camera Setting Term Definitions
Auto Exposure -Exposure Compensation is a feature of a camera that allows you
to adjust the exposure measured by its light meter. This means that you can adjust
the exposure measured by telling the camera to allow more light in (positive
exposure compensation) or to allow less light in (negative exposure compensation).
Some microfilm allow too much light to reach the camera sensor, so please take
note that we recommend that you uncheck the auto exposure box and manually
adjust the exposure to obtain the very best quality image.
Brightness - Brightness enables you to adjust the brightness of the displayed
image or video to suit your own preference. Use the slider to find your preferred
setting. Microfilm tends to let a lot of light through to the camera, so we
recommend the brightness level be turned down below the half way mark for most
applications.
Contrast - Contrast enables you to control the ratio between dark and light
according to your own preference. Use the slider to find your preferred setting.
With negative microfilm in particular, you should set the contrast between ¾ to full
end of the scale.
Gamma - Gamma enables you to brighten dark areas within the displayed image
or video and visualize more details without over-exposing already light areas. Use
the slider to find your preferred setting.
Saturation
Saturation enables you to set the color reproduction from black and white to a full
color image or video according to your own preference. Use the slider to find your
preferred setting. We recommend saturation be turned completely down to make
the image black and white. If color displays, turn it up, then down.
Video Resolution & Shutter Speed
Increasing video resolution will improve view and print quality but shutter speed at
the highest resolution will be slower than at the next setting down. Higher shutter
speed will reduce lag (latent image) when moving the microfilm.
18
Copyright
Copyright© 2010 by Micro-Image Capture, LLC, All rights reserved. No part of
this publication may be reproduced, transmitted, transcribed, stored in a retrieval
system or translated into any language or computer language, in any form or by
any means, electronic, mechanical, magnetic, optical, chemical, manual or
otherwise, without prior written permission from Micro-Image Capture, LLC.
The Micro-Image Capture 2 was designed and is a patented by Micro-Image
Capture, LLC and is distributed by authorized dealers in the U.S. and worldwide.
Micro-Image Capture™ is a registered trademark of Micro-Image Capture, LLC, a
Wyoming Corporation
Brands and product names referred to in this manual are trademarks or registered
trademarks of their respective companies and used for descriptive and illustrative
purposes.
19