1
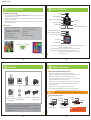
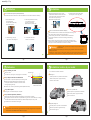
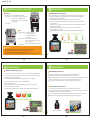
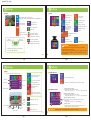
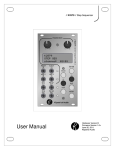
manual 1p.~4p.
Contents
VTR17LD
VTR17LD
Safety cautions
3
Products
5
Names and functions
6
Components
7
Installation requirements
8
Installation
9
Calibration
11
Installation location by car model
12
Product features
14
Settings
17
Functions
24
Firmware upgrade
27
Viewer program
28
FAQ
30
User Manual
1p
.
.
.
Warning
for potential serious accidents or damages/injuries due to violation of instructions
Do not put the product in any heating devices(stove, microwave oven, etc.) to dry when it is wet.
It can cause deformation or malfunction for which free services are not available.
2p
Caution
Items to check before use
When driving on a road where there is no lane or it is difficult to see the lane
Do not use chemical detergents(benzene, thinner, alcohol, etc.) to clean the product.
It can cause fire.
When the lane is not continuous
Do not disassemble or apply physical impact. Free services are not available for damages caused
by random disassembly or physical impact.
When the sight is not good due to extreme weather (rain, snow, fog, etc.)
Caution
for potential minor injuries/product damages due to violation of instructions
When GPS reception is not good in a busy city or due to a natural disaster
When there are problems with tunnel entrances/exits or the headlights while driving at night
When there is no light or the outside lighting changes abruptly
Abrupt cutting in, changing the lane abruptly
Install according to the manual. Otherwise the product may not operate or operate properly.
Keep the windshield in front of the lens clean. Foreign substances may cause malfunction
and hinder video input. Keep any objects away from the dashboard as possible.
It may cause reflection on the glass surface which can hinder video input.
Watching the screen while driving can hinder safe driving. Be aware that the user is liable
to accidents and damages.
Apply double-sided tape firmly when installation. Long-hour driving or rocking of the vehicle can
misplace the product which can deteriorate the performance.
Cautions are to prevent accidents or danger by using the product safely and properly; therefore please
follow the instructions. The company is not responsible for any problems caused by violation of instructions
in this manual.
3p
Sharp turn with the radius of curvature less than 250m
Dark tint on the windshield, poor sight due to stickers and accessories
When the vehicle cannot detect the lane if it is driven according to lanes
‘FCWS’ function may not work depending on the color or shape of a car ahead,
brightness of the headlights or whether there are streetlamps
In the condition above, safety assistant systems(LDWS, FCWS) may not work properly therefore drive carefully.
The company is not responsible for any problems caused by violation of instructions in this manual.
4p
manual 5p.~8p.
Products and functions
Names and functions
AI safety driving assistant device
Holder
It is a cutting-edge product with FCWS, LDWS and BLACKBOX(2CH simultaneous recording) function to deliver
essential information for safety driving.
Separate 2-channel camera views front and rear view simultaneously and you can check the view on the spot
through 3.5” full touch wide LCD.
Built-in GPS receiver: It receives GPS signals, sets the operation speed and saves the time and location of the
accident while saving the video.
Angle adjusting bolt
Rear camera connection(R.Cam)
Micro SD card(M.SD)
Camera lens
VTR17LD
Speaker
Audio input(MIC)
Main functions
Forward Collision Warning System(FCWS)
Normal, event, parking, manual(forced) recording
Lane Departure Warning System(LDWS)
Built-in battery discharge preventing circuit
BLACKBOX(2CH simultaneous recording)
3.5” Full touch wide LCD
Built-in GPS receiver
Exclusive PC viewer
Security warning light (Blue LED)
Reset
Power connection (DC 12V~24V)
Direction indicator connection(T/C)
SD card format
Automatic memory managing
GPS receiver connection(GPS)
Real time front/rear view checking
3.5” Touch LCD
Power LED(Red LED)
Left LDWS
Right LDWS
FCWS
Real time front / rear view
3.5” Full touch wide LCD
Security warning LED: In parking mode, it blinks rapidly when it detects physical impact or motion
and warnsz that BlackBox is recording.
Direction indicator connecting port: Connect the cable that comes with the product.
Angle adjusting bolt: Adjust angle between the main body and the holder.
Adjust angle for optimal performance according to car models
(car, SUV, large van, bus, truck).
5p
6p
Components
Installation requirements
Check the items below before installing the product:
GPS
VTR17LD
VTR17LD
User Manual
Main body/holder
User manual
External GPS Cable
Cigar Jack(DC12V~24V)
Make sure the surface for installation is flat and the engine is turned off.
All essential parts/components are in the box; check and follow the installation instructions.
The manual covers installation instructions for car, SUV, large van, bus and truck.
For bus or truck, the installation is similar to that for cars except for the installation location;
please refer to ‘detail installation instructions’ for each part.
Re-install the product if it doesn’t work properly by referring to the installation instructions.
Make sure to connect the rear camera with BlackBox not connected to the power cable.
Keep the windshield clean.
Tinted windows or heat rays deteriorate video quality of the rear camera.
Remove the protection plastic sheets from the front/rear camera lenses after installation.
Caution
Micro
SD
Adapter
Micro SD card
Tape for fixing,
(built in the main body), cable organizing clip
SD card Adapter
Power cable
Direction indicator
connecting cable
Check whether all components are included as shown above after purchasing the product.
Contact the store of your purchase if any component is damaged or does not perform properly.
Components above are subject to change for better performance.
(Images above are to help consumers with understanding the product and may be different from
the actual product.)
7p
This product is designed to be embedded therefore make sure to apply power
before completing installation and check for normal saving function of the front/rear video.
Pin arrangement of each terminal
VCC
TXD
GND
GPS
connecting cable
+ACC Yellow
+B Red
Turn Left Yellow
Turn Right Red
GND
- GND Black
Direction indicator
connecting cable(T/C)
8p
Power cable
Warning Make sure the marked part
not touching any metal part of the car
with the power ON.
manual 9p.~12p.
Installation
Installation
How to install and adjust the position(calibration)
Please install and follow the instructions in the manual details how to turn OFF the vehicle start mounting.
2. Place the taped holder horizontally
on the installation location
(according to car models).
(Remove the lens protection film
1. Place double-sided tape
(in the package box)
onto the surface of the holder,
remove the tape cover.
5. Attach double-sided tape to the rear camera
to determine the installation location and attach
it to the rear window. Connect the rear camera
cable to the main body R.cam port.
(Remove the lens protection film)
6. Connect the power cable to the product
main body, turn it on to apply power.
R.Cam
Horizon
* Caution: check T/C connection
How to connect direction indicator cable(T/C)
VTR17LD
3. Connect the cigar jack type
power cable in the package box.
4. Fix the power cable inside
the filler not to be visible.
When the direction indicator is connected with the cable, the alert won’t go off
when changing the lane with the indicator light turned on.
The lines are red, yellow and black, all of which should be connected with
the signal lines connected to the direction indicator light when setting
the direction.
Direction indicator light cable signal lines are usually under the wheel; connect
the black one to the GND and red/yellow one to either left/right direction indicator
light signal line. Use the closest location if it’s difficult to connect.
Rear Panel
The following cases may cause serious damage to the product due to violation of
the instructions:
Check ‘T/C connection’ when connecting the main body during installation of the direction indicator
cable(T/C) to a vehicle.
Connecting to a wrong location can cause serious damage to the product. Please check for the right location.
The company is not responsible for any damage to the product due to violation of the instructions.
Warning
9p
10p
Calibration
Installation location by car model
Step 1: Selecting car model
4 car models are available for installation.
Select car model.
Car models: car, SUV, large van, bus (see page 12 in the manual)
Calibration lines
Step 2: Adjust horizontal and calibration line
Horizon
Passenger car
Park the vehicle in a place with open front space and flat ground.
Match the horizontal line(where the red dotted lines meet)
to the yellow calibration line marked on the monitor and fix
the angle adjusting bolt firmly.
Calibration line is visible only when setting calibration(LDWS initialization).
Install the product in top center of the windshield.
Make sure the product is aligned horizontally.
Virtual line
Select car mode l: Sedan
Horizon and yellow
Calibration lines match
Step 3: GPS reception
SUV, mini van, small truck
Audio guide is on when GPS reception is complete.
Install the product in top center of the windshield.
Make sure the product is aligned horizontally.
Step 4: Position adjustment (calibration)
Select car mode: SUV
When audio guide informs completion of GPS reception, start operation for calibration.
Audio guide will inform that calibration is complete after driving for over 1 minute at 30km/h on a straight
road where either white fine lanes(not centerline) or dotted lanes(both lanes) are clearly visible.
All functions work normal after the audio guide
Large SUV, large van
Install the product in top center of the windshield.
Caution
Reset calibration when the main body angle is altered or the car model is changed due to car replacement.
Reset calibration when LDWS/FCWS alert doesn’t work properly.
11p
Make sure the product is aligned horizontally.
Select car mode: large van
12p
manual 13p.~16p.
Installation location by car model
Product features
Large truck
LDWS(Lane Departure Warning System)
Horizontal position – Install in the center of the vehicle.
Vertical position – For trucks, install 10cm higher than the wipers.
Attach the holder horizontally and place
the cables using the organizing clip not to block
the driver’s sight.
Car model: Bus
10cm
- Driving assistant device with built-in automotive camera for safe driving by obtaining/analyzing videos of
the road ahead and detecting and warning lane departure which can occur due to driver’s negligence,
dozing off while driving, not seeing ahead, etc.
- You can check LDWS video in the monitor. (but for safe driving, check only if it’s necessary)
Informs the driver of lane departure information and status. (improving driver’s attention and ability
to handle situations)
Continuous alert for lane departure (when the driver didn’t notice the alert and repeats lane departure,
the alert goes off repeatedly)
Adjusting feature that enables the driver to customize time of alert for his/her preference
(left lane: 4 steps, right lane: 4 steps)
It operates at 60km/h or faster and you can select the operation speed(60km/h, 70km/h, 80km/h).
Bus
Horizontal position – For buses, the support is in
the middle therefore avoid
the support area(within 10cm)
for installation.
Vertical position – Install the product 10cm higher than
the wipers so that the wipers are not within
the video input range.
Organize the cables using the organizing clip.
Car model: Bus
10cm
Danger
Caution
Drive
Caution
When installing in trucks or buses, power stabilization cable(24V->12V adopter) is required.
This product supports DC12V-24V however it may not work for all trucks and buses.
Consult with the store of your purchase before installing in a truck or a bus.
The company is not responsible for any product damage due to power issues when installed in a truck/bus.
13p
14p
Product features
Product features
FCWS(Forward Collision Warning System)
BLACKBOX(Driving Video Recorder)
- Driving assistant device with built-in automotive camera for safe driving by obtaining/analyzing videos of
the road ahead and detecting and warning forward collision which can occur due to driver’s negligence,
dozing off while driving, not seeing ahead, etc.
- You can check FCWS video in the monitor. (but for safe driving, check only if it’s necessary)
Informs the driver of danger of collision with the car ahead beforehand.
Time To Collision(TTC) feature
It is the alert feature that calculates the estimated time of collision and gives you the warning
at the time according to your TTC setting.
It operates at 10km/h or faster and you can select the operation speed(10km/h, 20km/h, 30km/h).
Danger
Caution
It automatically records for 30 sec. of the status of front/rear condition before/after collision.
GPS receiver saves the information on the time/location of collision as well as the video.
Regardless of the level of collision, you can force to save 30-sec. video by pressing the manual(forced) save button.
It saves the video whenever driving and you can check the video through the viewer program.
It supports separate PC viewer program and you can check the saved videos on PC or laptop.
Automatic parking surveillance feature
It is converted to parking surveillance mode automatically when the car is stopped/parked.
It is automatic parking surveillance feature that automatically records 30-sec. video when terror activities or other
movements(e.g. rear impact of a car ahead, etc.) are detected.
Its security warning LED in the front blinks when movement is detected and warns that it is recording video.
Once the car starts to move, the feature is converted automatically to normal recording mode.
Drive
VTR17LD
Security warning LED
15p
16p
manual 17p.~20p.
Settings
Settings
Screen
Menu
Moves to Settings menu (see page 18).
Menu button appears by touching the screen while BlackBox is on.
Displays the front
view in real time.
BlackBox screen
Displays the rear
view in real time.
Menu
SD card recognized.
No SD card.
Forces to save the
front / rear view video.
Sets lane departure
alert. (page 22))
Sets front impact
alert. (page 23)
Sets driving impact,
motion intensity,
etc. (page 20)
Sets recording quality,
sound recording,
volume, etc. (page 21)
Sets cut-off voltage,
protection at high
temperature, etc.
(see page 22)
Moves the saved videos to
the BlackBox video list.
(page 19)
GPS receiver activated.
Starts BlackBox recording
(page 17)
GPS receiver inactivated.
Check the cable connection.
Left lane
departure alert
Right lane
departure alert
Initializes lane
departure alert setting.
Rear camera connected.
No rear camera connected.
Initializes SD card.
Check the cable connection.
Front impact alert
Caution
* The feature should be set to ‘ON’ in Settings
for activate FCWS, LDWS alert.
17p
18p
Settings
Settings
Player
LDWS Calibration
Select the video list and press Play button.
Video list
Play button
2013 01_M_01.avi
2013 02_M_02.avi
2013 03_M_03.avi
Displays video list of normal
recording while driving
Resets lane departure alert.
Previous list
Displays video list of impact
recording while driving.
Calibration the lane departure alert to the factory setting.
Next list
Displays video list of parking
surveillance recording
while driving.
1/5
2013 04_M_04.avi
Move to Menu
-Player listDisplays video list of manual
(forced) recording while driving.
Move to Player
View previous
video
Read carefully before use
Setting the menu while driving hinders safe driving. Set the menu
after parking the car in a safe place.
Recording is disabled once you entered the menu. Recording will resume
once it’s converted to BlackBox mode by pressing BlackBox button after
finishing setting.
Video
recording
status
display
Play/Pause
View next
video
19p
-1
1
-1
0
-1
1
Sets sensitivity of the impact on vehicles.
- Options: (low sensitivity) -4, -3, -2, -1, 0, 1, 2, 3, 4(high sensitivity)
5min
Parking impact sensitivity
Sets sensitivity of the impact while parking.
- Options: (low sensitivity) -4, -3, -2, -1, 0, 1, 2, 3, 4(high sensitivity)
Motion detection sensitivity
Selects/runs front video
Selects/runs rear video
Moves to Player list
-Player viewer-
Driving impact sensitivity
BLACKBOX Setting 1
Move to Menu
Caution
10
Select Item Sets sensitivity of detecting motions captured on camera
while parking.
button
- Options: (low sensitivity) -1, 0, 1 (high sensitivity)
Parking mode
Sets the time to be converted to parking surveillance mode.
- Options: 10 min. 15 min. 20 min. 25 min.
Video recording may be activated while driving due to audio guide.
20p
manual 21p.~24p.
Settings
Settings
BLACKBOX Setting 3
BLACKBOX Setting 2
Recording quality
Nomal
On
3
Move to Menu
Touch screen setting
Sets the video recording quality.
- Options: Low, normal, high
It is recommended to set the quality to high in normal
(driving) and parking mode.
However the storing capacity and time may be reduced.
SD card lifespan may be shortened by setting the quality ‘high’.
5min
Select
Item
button
Audio recording
Auto screen off
Sets audio recording.
- Options: OFF, ON
Sets the screen display time.
- Options: OFF, 5 min.
11.8V
Select Item
button
-1
Sets motion cut-off temperature to protect the product. At the set
temperature, the power is cut off and when the temperature is
lowered, BlackBox is turned on automatically.
Options : (Low) -2, -1, 0, 1, 2 (High)
Working Speed
Left Warning Time
Sets the time of alert for the left lane.
- Options: (slow) -2, -1, 0, 1, 2 (fast)
On
43mph
-1
[Calibration Process]
Touch the yellow dots
Temp. Protection
Sets the operation speed of LDWS.
- Options: 37mph, 43mph, 50mph
1
[Calibration Process]
.
Sets motion cut-off voltage to save battery when in normal
power mode.
Options : 11.6V, 11.8V, 12V, 12.2V 12.4V
Sets whether to activate LDWS
- Options: OFF, ON
LDWS setting
Adjusts speaker volume.
- Options: (small) 1, 2, 3, 4, 5 (loud)
Set the coordinates by touching the center of the yellow
dots correctly.
After coordinate setting by touching the 3 corners,
press OK button.
Press cancel if the setting is incorrect
[Calibration Process]
and repeat the steps again.
Touch the screen
Cut-off Volt.
LDWS
Move to Menu
Speaker volume
Touch screen adjustment
.
2
Press OK to save
Cancel
OK
Move to Menu
Select Item
button
to start
1
Right Warning Time
Sets the time of alert for the right lane.
- Options: (slow) -2, -1, 0, 1, 2 (fast)
LDWS display
Caution
With rain or while driving at night, some of the features may be
limited depending on the visibility of the front.
Be aware of the condition while driving.
3
21p
Settings
22p
Functions
Power ON/OFF
FCWS Setting
FCWS
Sets whether to activate FCWS.
- Options: OFF, ON
ON
6mph
Move to Menu
1.5
Sedan
Select Item
button
Working speed
Sets the operation speed of FCWS.
- Options: 6mph, 12mph, 18mph
Time to Collisisn
Sets the estimated time of collision with a vehicle ahead.
- Options: (low sensitivity) 0.5, 1.0, 1.5 (high sensitivity)
Car Type
Selects car model
- Options: Sedan, SUV, large van, bus
Caution
FCWS display
With rain or while driving at night, some of the features
may be limited depending on the visibility of the front.
Be aware of the condition while driving.
23p
Power is automatically applied once a car is started and the power light(red LED) is turned ON.
The main body should be connected to the cigar jack power supply(normal power supply).
Once booting is complete, input audio guide and run BlackBox.
Motion detection, parking impact detection feature
Parking surveillance feature runs automatically unless there is movement in parking mode.
Security warning light(blue LED) blinks to inform parking surveillance feature is activated.
(Page 20 Setting time for parking mode in the manual)
Parking surveillance mode is converted automatically to BlackBox mode(normal save/impact save/manual
(forced) save) once the vehicle is started again.
When motion is detected during parking surveillance, it saves 30-sec. video in ‘Motion’ folder.
When impact is detected during parking surveillance, it saves 30-sec. video in ‘Even’ folder.
When motion or parking impact is detected, security warning light(blue LED) blinks rapidly to display
a video is being saved.
In parking surveillance mode, normal save/manual(forced) save features are not available.
To use parking surveillance feature, normal power supply should be connected.
(install normal power supply cable provided with the product)
Caution Contact stores or installation service centers near you regarding normal power supply cable
connection. (see page 8 Pin Arrangement)
Power is automatically cut off once the room temperature goes up since the high temperature protection
circuit is built in. This is not malfunctioning and when the temperature falls into normal range, it automatically
starts again.
Battery protection circuit is built in however it may be discharged if the battery is worn out or depending on
the vehicle’s condition.
The company is not responsible for worn-out batteries due to using normal power supply.
24p
manual 25p.~28p.
Functions
Functions
Normal save
Micro-SD card Format
It saves videos automatically once the power is ON; and saves videos in ‘Normal’ folder in Micro SD card.
- It initializes SD, which deletes all videos in the card. Save the videos in another storing device
before initialization.
- Micro-SD card warranty period: 3 months for free replacement period.
Data won’t be saved.
No free replacement is available for damage, waterlog and destruction.
- When formatting a new Micro-SD card, format your computer to FAT32.
Impact save
It detects impact with built-in G-sensor and saves 30-sec. videos in ‘Event’ folder.
The power light(red LED) blinks rapidly to inform that impact video is being recorded.
G-sensor sensitivity of impact save feature can be adjusted in driving impact sensitivity setting. (page 20)
Manual(forced) save
Press manual recording button for manual(forced) save. Red LED blinks until the saving is complete.
SD card installation / discharge
When LCD screen is OFF, touch the screen and press manual recording button.
Manual(forced) save feature saves videos in ‘Manual’ folder in Micro SD card.
Security LED
Installation: Insert Micro-SD card with the printed side toward
the lens part.
Applying too much pressure may damage SD card.
Discharge: Press the card gently to remove it.
Warning
When motion is detected during parking surveillance, security warning light(blue LED) in the front blinks,
notifying/warning that BlackBox is ON, which can prevent crimes.
Caution
Lenz
The level of impact detection can vary even with the same set value depending on the car model, condition and
how much the vehicle can absorb impact.
The detection feature detects physical impact therefore it cannot be determined by perception/feeling of the user.
The company is not responsible for repair expenses or any legal issues if the saving feature of impact detection
doesn’t work.
Micro
SD Card
Power LED
Even when the power
is cut off, the last video is being saved
as long as the power LED(red LED)blinks.
Removing Micro-SD card during operation
causes serious damage or malfunction.
Caution
Do not use Micro-SD card for a storing device for other equipments. Many incompatible files may cause errors
and malfunction. Do not remove or insert Micro-SD card with power ON.
This product operates(saves) once the power is ON, therefore inserting/removing the card may damage
the card.
25p
26p
Firmware upgrade
Viewer program (PC Viewer)
Run BlackBox viewer installation file in Micro-SD card and install by following the instructions.
When installation is complete, click on the Open icon to open the viewer program.
Read the followings carefully before upgrade. (contact the stores for upgrade files.)
- Step 1: Copy the upgrade files onto the root directory of Micro-SD card.
PC viewer screen
- Step 2: Turn the power OFF and insert Micro-SD card.
Select normal recording
Select impact recording
- Step 3: Connect the power cable to the main body and turn the power ON.
- Step 4: Wait for about 10~20 sec.
Select parking surveillance recording
* Insert Micro-SD card with
the printed side toward the lens.
- Step 5: Start upgrade once the power LED(red LED)
Select front/rear video
Select forced(manual) recording
and parking surveillance LED(blue LED) are ON.
- Step 6: It automatically restarts after finishing
upgrade.
- Once firmware upgrade is done, all settings are
initialized.
Front video
- Adjust calibration for setting FCWS and LDWS.
Micro SD Card
Screen brightness
Volume
control
(page 11)
Power LED
Video data timeline
Switch top/bottom, left/right
Accelerating sensor
Enlarge screen
Screen capture
Caution
(1) Do not turn the power OFF during firmware upgrade. It may damage the system.
(2) If normal booting during upgrade or normal upgrade doesn’t work, format Micro-SD card and reinstall.
27p
Rear Video
Open files
Play
28p
manual 29p.~32p.
Viewer program (PC Viewer)
FAQ
Switch Front/Rear
Switch windows
Switches front/rear and plays the video.
Select video folder to save
Maximize
Close program
the screen size
Minimize
20130001 0231_M_001.avi
Nomal : Normal recording video list
Even t : Impact recording video list
20130002 0232_M_002.avi
Motion : Parking surveillance recording video list
20130003 0233_M_003.avi
Manual : Manual(forced) recording video list
20130004 0234_M_004.avi
Open the folder, select the file and press Play button to play the video.
the screen size
Play control buttons
Import
Stop
Previous
file
Rewind
Play
Fast
Next file
View
forward
by frame
Play control button
Top, bottom, left and right button
Accelerating sensor: Displays accelerating
sensor graph.
Enlarge screen: Enlarges the screen size.
Screen capture: Saves videos in images.
Switches top/bottom/left/right
of the videos.
LDWS
It takes a while to start when I use it in morning commute.
– LDWS starts when driving faster than the speed set as LDWS speed (see page 22) after GPS reception.
The alert goes off too often.
– Change the time for left/right alert (see page 22). Set towards ‘slow’.
What happen if it’s raining?
– Some features may be limited in rain. Drive carefully.
What happen while driving at night?
– Some features may not work depending on brightness of the headlights or whether there are streetlamps.
Drive carefully.
FCWS
It takes a while to start when I use it in morning commute.
– FCWS starts when driving faster than the speed set as FCWS speed (see page 23) after GPS reception.
The alert goes off too often.
– Change the estimated time of collision (see page 23). Set towards ‘low sensitivity’.
What happen if it’s raining?
– Some features may be limited in rain. Drive carefully.
What happen while driving at night?
– Some features may not work depending on brightness of the headlights or whether there are streetlamps.
Drive carefully.
BlackBox
Does BlackBox work after GPS reception?
– No. BlackBox is turned ON after safety driving guide after the car starts.
The alert goes off too often.
– Change the driving impact sensitivity (see page 20). Set towards ‘low sensitivity’.
– Set car model, aging level of the vehicle according to the driver’s preference.
How can I watch the recorded BlackBox videos?
– Use the viewer exclusively for the product provided by the company. (see page 28)
29p
30p
Memo
Specifications
Model
VTR17LD
Main features
FCWS, LDWS, BlackBox, Parking surveillance
Capacity
Micro SDHC Class10 (supports up to 32GB)
Front camera
2M HD 1280 x 720
LCD
3.5” Full touch wide
GPS
External
Operating volt.
Operation/storing
temperature
DC 12V ~ 24V
Size/weight
115 x 116 x 43mm / 190g
0℃ ~ 60℃ / - 10℃ ~ 70℃
This product is driving safety assistant product for cars.
Consumers are responsible when accidents occur therefore drive safely
and use the product as intended.
31p
32p