1
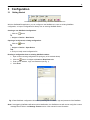
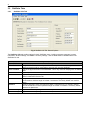
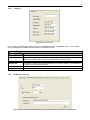
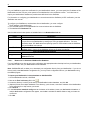
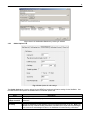
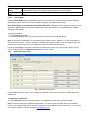
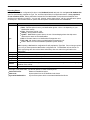
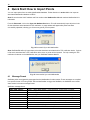
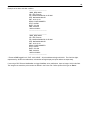
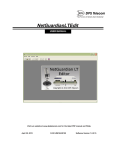
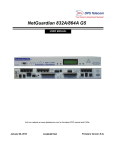
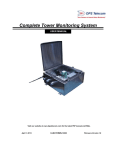
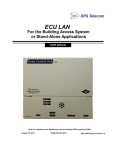
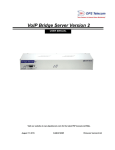
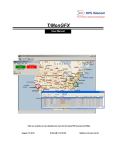
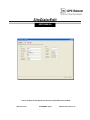
SiteDialerEdit
USER MANUAL
Visit our website at www.dpstelecom.com for the latest PDF manual and FAQs.
March 27, 2014
D-UM-SDEDT-12001
Software Version 2.0.0.13
Revision History
March 27, 2014
Added "DX1-3 Alg 1-8" to "Points Tab" section
August 1, 2012
Updated Global Options Tab information
May 18, 2011
Included instructions regarding new "Server Mode"
July 16, 2009
Revisions to NetGuardian Info Tab, Points Tab, addition of Quick
Starts, and Message Format. (D-OC-UM097.16100)
June 12, 2009
SiteDialerEdit User Manual released (D-OC-UM096.12100)
This document contains proprietary information which is protected by copyright. All rights are reserved. No part of this
document may be photocopied without prior written consent of DPS Telecom.
All software and manuals are copyrighted by DPS Telecom. Said software and manuals may not be reproduced, copied,
transmitted or used to make a derivative work, by either mechanical, electronic or any other means in whole or in part, without
prior written consent from DPS Telecom, except as required by United States copyright laws.
© 2011 DPS Telecom
Notice
The material in this manual is for information purposes and is subject to change without notice. DPS Telecom shall not be
liable for errors contained herein or consequential damages in connection with the furnishing, performance, or use of this
manual.
Contents
Visit our w ebsite at w w w .dpstelecom .com for the latest PDF m anual and FAQs
1 Introduction
1.1 Configuring the SiteDialer
2 Help Menus
3 Configuration
3.1 Getting Started
3.2 SiteDialer Tabs
3.2.1
SiteDialer Info Tab
3.2.1.1 Ethernet
3.2.2
NetGuardian Info Tab
3.2.2.1 Browse for an Associated NetGuardian Database
3.2.3
Global Options Tab
3.2.3.1 Server Mode
3.2.4
Notification Devices Tab
3.2.4.1 Notification Schedules
3.2.5
Phone List
3.2.6
Call List Tab
3.2.7
Points Tab
4 Quick Start: How to Import Points
4.1 Message Format
5 Quick Start: How to Create Alarm Shout Configurations
5.1 Create Voice Configurations
6 Technical Support
7 End User License Agreement
1
1
1
2
2
3
3
4
4
5
6
7
7
8
9
10
11
13
13
15
15
16
17
1
1 Introduction
The SiteDialerEdit is an offline, Windows-based editor for the NetGuardian SiteDialer. With it, you will determine
system settings, connection information for your NetGuardian, point parameters, and other information, then upload
your configuration to your SiteDialer over LAN.
With the SiteDialerEdit application, you can easily manage multiple SiteDialer units and keep separate, offline
copies of databases for all your SiteDialer units.
You can also read configuration files from a remote SiteDialer for local editing/provisioning by simply entering the IP
address and password of your SiteDialer. SiteDialerEdit supports Windows 95, 98, NT, ME, XP and 2000 and
SiteDialer firmware versions 1.0A and above.
1.1
Configuring the SiteDialer
Your NetGuardian will listen for the SiteDialer on a user-defined TCP port. (You'll configure this TCP port as a
notification on the NetGuardian.) The SiteDialer will then receive notice of alarms from the NetGuardian and relay
voice notification for those alarms.
At minimum, to receive alarms from your NetGuardian, you must:
1. Provide the SiteDialer with the IP address of the NetGuardian
2. Provide the SiteDialer with the open TCP port on the NetGuardian to which it will connect
3. Upload the NetGuardian's alarm database to the SiteDialer so it can parse alarms.
At minimum, to send voice alerts from the SiteDialer (for alarms set by the NetGuardian), you must:
1. Enter phone numbers for the technicians you wish to receive voice notifications for alarms
2. Assign phone numbers to call lists
3. Assign call lists to alarms.
2 Help Menus
You can access help menus within the SiteDialerEdit program at any time by clicking Help > Help.
2
3 Configuration
3.1
Getting Started
Create a new directory or open an existing one from the SiteDialerEdit menu
With the SiteDialerEdit application, you can configure a new SiteDialer unit, open an existing SiteDialer
configuration, or import a configuration file directly from an existing SiteDialer station.
Creating a new SiteDialer Configuration:
Click the
button
Or
Navigate to Device > New Device
Opening a locally saved, existing configuration:
Click the
button
Or
Navigate to Device > Open Device
And
Find your locally saved configuration file.
Reading a configuration from an existing SiteDialer station:
1. Open a new or existing configuration file (using any of the methods above)
2.
3.
4.
Click the
button or navigate to Connect > Read from unit
Enter your IP address, Login, and Password (see Fig. 1).
Click Read.
Fig. 1 Read SiteDialer configuration information by entering the IP address, login and password of the SiteDialer
Note: If not triggering SiteDialer notifications with a NetGuardian, the SiteDialer must still receive config files in same
message format. Refer to the Message Format section of this manual for more information
3
3.2
3.2.1
SiteDialer Tabs
SiteDialer Info Tab
Fig. 2 SiteDialer Info Tab: General Options
The SiteDialer Info tab provides options for basic SiteDialer setup, including username, password, system
information, ethernet settings, and SNMP community settings. See the table below for available fields in the
SiteDialer Info tab.
System
Field
Device Name:
Device Location
Contact Number
From Email:
User Name:
Password
Get Community
Set Community
Description
Assign the SiteDialer a name of your choice. For easy identification, it's a good idea to
assign a name that will be meaningful to everyone who uses the SiteDialer.
Type in the physical location of the SiteDialer. This is very useful for keeping track of different
units.
Type in a phone number or email address for the person responsible for this SiteDialer unit.
Type in the display email address used in email alarm notifications. From Email can also be
edited in Notification Devices Tab.
Assign a user name, which must be at least 3 characters long. For security reasons, DPS
recommends a minimum length of at least 5 characters. The factory default user name is
admin.
Assign a password, which must also be at least 3 characters long. For security reasons,
DPS recommends a minimum password length of at least 5 characters. The factory default
password is dpstelecom.
Type in the community string for SNMP Get requests
Type in the community string for SNMP Set requests
Available fields in the SiteDialer Info tab
4
3.2.1.1
Ethernet
Fig. 3 Ethernet Connection
You'll configure your SiteDialer's ethernet port from the SiteDialer Info tab in the Ethernet section. See the table
below for descriptions of available Ethernet fields in the SiteDialer Info tab.
Ethernet
Field
Host Name
Enable DHCP
IP address
Subnet mask
Gateway
DNS Server 1 to 2
3.2.2
Description
The NetBios Name of the Device
Toggles Dynamic Host Connection Protocol. Enabling DHCP disables the user-defined IP
address as the DHCP server will assign the SiteDialer's IP address instead.
The IP address of the SiteDialer.
A Path defining whether your packets should stay on your local network or get forwarded to
an address on your Wide Area Network.
Default Gateway path
Enter the IP addresses of your domain name servers.
NetGuardian Info Tab
Fig. 4 Connect Site Dialer to NetGuardian by entering IP address and port number for NetGuardian
5
For your SIteDialer to send voice notification for your NetGuardian's alarms, you must specify the IP address of the
NetGuardian and the TCP port you've opened on the NetGuardian in the notification section. You'll also have to
import your NetGuardian's database to provide alarm definitions for the SiteDialer.
For information on configuring your NetGuardian to communicate with the SiteDialer (via TCP notification), see the
SiteDialer user manual.
To configure your SiteDialer to receive alarms from a NetGuardian, you must configure:
1. The IP address of the NetGuardian
2. The TCP Port opened on the NetGuardian for communications with the SiteDialer
3. The NetGuardian's Database File
See the table below for descriptions of available fields in the NetGuardian Info tab.
Field
Description
The IP address of the NetGuardian from which the SiteDialer will receive alarms
The number of the open NetGuardian TCP port for SiteDialer communications. You'll configure
this port first on the NetGuardian by setting-up a TCP-type pager/notification. For more
information about TCP Notifications and opening a port for communication with the SiteDialer,
see your SiteDialer user manual
Timed Tick Value The interval at which the SiteDialer will check for and report local alarms (alarms specific to the
SiteDialer itself). If set to 0, the SiteDialer will not set or report local alarms.
Associate NetGuardian Database
Database File
Click Find to locate your NetGuardian's alarm database file
Config Name
This field displays the name of the database file selected from the directory indicated in the
Database File field
IP
Port
available fields in the NetGuardian Info tab
3.2.2.1
Browse for an Associated NetGuardian Database
For your SiteDialer to be able to send voice notifications with appropriate alarm descriptions from your NetGuardian,
you'll have to load it with your NetGuardian's alarm database.
Note: SiteDialerEdit will not allow you to download your configuration directly from your NetGuardian. If you do not
have a locally saved NetGuardian configuration file, you may read a configuration file from your NetGuardian using
the NGEdit program.
To import your NetGuardian's alarm database to SiteDialerEdit:
1. On the NetGuardian Info tab, click Find.
2. Next to the Find in directory field, click
.
3. Locate the directory in which you've saved your NetGuardian's alarm database, and click Ok
4. (Optional) If there are multiple databases in the directory you've chosen, enter the IP address of the NetGuardian
you're searching for to help narrow your search.
5. Click Search
6. In the Select from matched configs area at the bottom of the window, locate your NetGuardian's database. If
multiple NetGuardian configuration files appear, use the Net1 and Net2 IP address fields to help you locate the
correct one.
7. Click Ok.
6
3.2.3
Fig. 5 Search for NetGuardian Database by entering IP address
Global Options Tab
Fig. 6 Global Options for call settings
The Global Options tab contains various inbound DTMF and outbound notification settings for the SiteDialer. See
the table below for descriptions of available fields in the Global Options tab.
Field
Call Unit ID
Play site name
instead of unit ID
DTMF Password
Call Delay
Description
The display ID of your SiteDialer. SiteDialer notifications will include the call unit ID.
If checked, the SiteDialer will play its device name rather than its unit ID in outbound alarm
notifications.
The code incoming callers will dial to acknowledge alarms and perform other DTMF functions.
The time the SiteDialer will wait between calls as it progresses through a call list. Note: The
SiteDialer will only continue sending notifications if an alarm has not yet been acknowledged.
Once a technician acknowledges an alarm, the SiteDialer will cease sending notifications.
7
Disable Ring
Detect
Voice Prompt
Delay
This option is designed to solve an issue related to DTMF connections from certain phones.
Do not enable this option unless given expressed direction from DPS Support.
The amount of time the unit will wait for input from the user when giving verbal options over the
phone.
fields available in the global options tab
3.2.3.1
Server Mode
Enabling Server Mode allows the SiteDialer to listen for a connection from an alarm reporting device rather than
attempting to open a connection with the IP address configured in the NetGuardian Info tab.
Note: Server Mode is not compatible with NetGuardian RTUs. NetGuardian RTUs operate as servers for client
SiteDialers. NetGuardian RTUs cannot be configured as clients and therefore are incompatible with a SiteDialer
operating in Server Mode.
To enable Server Mode:
1. Click the Server radio button
2. In the Server Port field, enter the TCP port that the site dialer will open to receive alarms.
Note: In this mode, the SiteDialer can receive alarms from multiple sources. However, it can only receive alarms
from one source at a time. Once the SiteDialer is engaged and receiving an alarm, it will not accept an alarm from
another source until the connection is complete (the remote has finished sending alarms).
In order for the SiteDialer to send voice notification for devices that connect to it in server mode, alarms must be
sent in the format listed in the Message Format section of this manual.
3.2.4
Notification Devices Tab
Fig. 7 Notification Devices Tab
From the Notification Devices tab, you'll configure the SiteDialer to send email notifications or SNMP traps when
alarms occur.
To setup email notifications:
1. in the From Email field, enter the email address your SiteDialer will send alarm notifications From.
Note: This doesn't have to be a legitimate email address. You won't have to send email back to the SiteDialer.
However, many email servers will not route email sent form an email address with an invalid format. So, ensure the
"From Email" address is correctly formatted "[email protected]".
8
2.
3.
4.
5.
6.
Check the Enable box to enable the notification
Use the drop-down box to set the Type to Email.
In the Server Name/IP Address field, enter the IP address of your outgoing mail (SMTP) server.
Enter the port address of your mail server (typically 25 - the default setting).
In the "To"Email/Trap Community field, enter the full email address of the person to which the SiteDialer will
send email alarm notifications.
7. Click the Hyperlinks in the Schedule 1 and Schedule 2 columns to set the email notification schedule.
To Setup SNMP notifications (traps):
1. Check the Enable box to enable the notification
2. Use the drop-down box to set the Type to SNMP
3. In the Server Name/IP Address field, enter the IP address of your SNMP server
4. Enter 162 in the Port field
5. Input your SNMP Community String in the "To" Email/Trap Community field.
6. Click the Hyperlinks in the Schedule 1 and Schedule 2 columns to determine when the SiteDialer can send
SNMP Traps.
3.2.4.1
Notification Schedules
Notification schedules allow you to determine when the SiteDialer can send email notifications or SNMP traps for
alarms. To set a notification schedule, click on the blue hyperlink in the Schedule 1 or Schedule 2 columns.
(Clicking either hyperlink will allow you to edit both notification schedules.)
Use the checkboxes to determine which days the SiteDialer can issue the notification. Use the drop-down time
boxes to determine the times of day between which the SiteDialer can send notifications.
Fig. 8 Edit Schedule for Pager Notification
9
3.2.5
Phone List
Fig. 9 Call List Tab
From the Phone List tab, you can create a directory the SiteDialer will use to send voice notifications for alarms.
Fill in the appropriate fields for each number added to the directory
Field
Answer
Phone Number
Description
C1-C4
Description
Check this box to indicate that there is an answering machine on this phone number.
The Phone Number the SiteDialer will call to issue voice notifications
A description of the phone contact
Call List designations. Check a box to add it to the appropriate call list. A phone number may
belong to multiple call lists. You'll configure the order in which the SiteDialer will call members
of the call list and the call list schedule from the Call List tab.
Note: Active phone numbers must be members of a call list (C1-C4) in order to receive voice alarm notifications.
The SiteDialer only calls members of a call list, not individual phone numbers.
10
3.2.6
Call List Tab
Fig. 10 Call List Tab
With Call Lists, you can set a "call list" for multiple technicians, determining the time during which the SiteDialer
can call those technicians and the order in which it should call them. See the table below for descriptions of
available fields in the call lists tab.
Field
Enable
DTMF
Password
Schedule 1 /
Phone List
Description
Check to enable a call list. The SiteDialer will not send voice notifications to disabled call lists
The code incoming callers on the call list will dial to acknowledge alarms and perform other DTMF
functions
2Clickable link to edit the days of the week and times of day during which the SiteDialer can call
members of the call list. (See Fig. 11 below)
Click the link to open the Call Order dialog box. The Call Order determines the order in which the
SiteDialer will call members of the call list. Left-click and drag members up and down the list to
determine the order. (See Fig. 12, below)
Available fields in the Call List tab
Fig. 11 Edit Schedule Window
Fig. 12 The Phone List/Call Order window, opened by clicking the "Click here to set call order" link
11
3.2.7
Points Tab
Fig. 13 Points Tab
You can edit point descriptions, call lists, notifications and other alarm settings from the Points tab.
12
Importing Points:
Load your NetGuardian configuration file (done in the NetGuardian Info tab) and click the Sync with NetGuardian
option to automatically populate the Type, Pnt, and Description fields for all applicable alarms. Once populated,
do not edit these fields. Editing information retrieved from the NetGuardian could prevent the SiteDialer from
sending voice notification for alarms. You may still, however, set the alarm priority, call list, and notification options
for each point. See the table below for options and descriptions of available fields in the Points tab.
Field
Type
Pnt
Description
Priority
Notify
Call List
Escalate
N1-N4
Description
The Point/Alarm type:
Base - Discrete points local to your NetGuardian (points 1-32 or 1-64 depending on your
NetGuardian model)
Ping - Ping alarms (points 1-32)
Analog - Analog threshold alarms
System - NetGuardian system alarms; the set of housekeeping alarms that help users
determine the status of their NetGuardian
DX1-3 - Discrete alarms on a NetGuardian DX expansion unit
DX1-3 Alg 1-8 - Analog inputs on a NetGuardian DX expansion unit.
Local - Alarms local to the SiteDialer (SiteDialer system alarms)
Note: Importing a NetGuardian configuration file will populate the Type field. Do not change a point's
type once you have imported a NetGuardian configuration file. The SiteDialer will not dial out if a
point's type (along with other critical alarm information) does not match the type listed on the
NetGuardian.
The point number
A description of the alarm - imported from your NetGuardian's configuration file.
The alarm priority: low, medium, or high
Determine whether you want the SiteDialer to send notifications for Alarms, Clears, or both
Set which call list, 1-4, you want the SiteDialer to call in the event of an alarm
If checked, the SiteDialer will only issue notifications N1-N4 if the alarm goes unacknowledged by
members of the call list.
Determines which notifications (email/SNMP trap) you want sent for each alarm.
Fields available in the Points tab
To the right of the points table, you will find options to create or delete points.
Delete All Points:
Deletes all established points
Add Local:
Imports points from list of SiteDialer local alarms
Sync with NetGuardian:
Synchronizes points with the associated NetGuardian Device
13
4 Quick Start: How to Import Points
You can import points from an existing NetGuardian database. Follow directions in section 3.2.2.1 to import an
associated NetGuardian database .mdb file.
Note: Be sure that the Unit IP address and Port number under NetGuardian Info tab matches NetGuardian Unit
information.
From the Points tab, click on the Sync with NetGuardian button. This will automatically import all points in the
file that have been associated with a TCP notification. A popup window will appear after points have been
successfully uploaded, informing you of how many points you've imported.
Fig. 14 Successful Sync with NetGuardian
Note: SiteDialerEdit will only import alarm points that have been associated with a TCP notification device. If points
in file aren't associated with a TCP notification device, then no points will be imported. For help creating the TCP
notification for alarms on the NetGuardian, see your SiteDialer Hardware Manual.
Fig. 15 Unsuccessful Sync with NetGuardian
4.1
Message Format
SiteDialer points are triggered by messages from the NetGuardian for alarm events. These messages are compiled
in a specific format. If not using a DPS Telecom NetGuardian to trigger the SiteDialer, the SiteDialer must receive
alarm events in the same message format.
SiteDialer message format:
<MSG_BEG XXXXX>
VID :
FID :
SITE:
PNT :
DESC:
STAT:
DATE:
TIME:
<ASCend XXXXX>
Header, "<MSG_BEG XXXXX>" ,must be present, number does not matter
Vendor ID, tag and line must be present, value does not matter
Firmware ID, tag and line must be present, value does not matter
Site name, tag and line must be present, value does not matter
Point Map, format is 99.01.XX.XX (**See note below for XX.XX formatting)
Point description, must match PNT (case sensitive) as defined in SiteDialer Edit
Alarm state, Must be "ALARM" or "CLEAR" (case sensitive)
Date, format is MM/DD/YY
Time, format is HH:MM:SS (24 Hour clock)
Terminator, "<ASCend XXXXX>" ,must be present, number does not matter
14
Example of an alarm and clear condition:
---------------------------------------<MSG_BEG 00001>
VID : DPS Telecom
FID : NetGuardian864-G5 v5.1D.0025
SITE: NetGuardian864-G5
PNT : 99.01.01.01
DESC: POINT NUMBER 1
STAT: ALARM
DATE: 07/14/09
TIME: 09:00:48
<ASCend 00001>
------------------------------------------------------------------------------<MSG_BEG 00002>
VID : DPS Telecom
FID : NetGuardian864-G5 v5.1D.0025
SITE: NetGuardian864-G5
PNT : 99.01.01.01
DESC: POINT NUMBER 1
STAT: CLEAR
DATE: 07/14/09
TIME: 09:00:59
<ASCend 00002>
---------------------------------------**Format of PNT tagged line is "PNT : 99.01.XX.XX". All point addresses begin with 99.01. The final four digits,
represented by XX.XX in the table above, indicate the two digit display and point references respectively.
If not using a DPS Telecom NetGuardian to trigger SiteDialer voice notifications, input an integer 1-255 in this field.
The integer must match the point number as defined in the Points Tab. Define points of this type as "Base".
15
5 Quick Start: How to Create Alarm Shout Configurations
Alarm Shout technology will enable you to create your text-to-speech alarm notifications, or upload your own .WAV
files. You’ll easily create your own custom voice configurations using the online RTU voice wizard in the MyDPS
area of the DPS website (www.dpstele.com/MyDPS).
5.1
Create Voice Configurations
To generate voice config files from currently open configuration:
1. Click on the
Generate and Upload Voice button at the top of the screen.
2. When prompt appears, select start to send POST request.
Fig. 16 Send Post Request
3. To upload new web and firmware, type in SiteDialer IP address, user name and password. Select Check for new
firmware to get the latest firmware version.
Fig. 17 Upload New Firmware
4. Click Upload to upload new web and firmware to the unit. Or click Cancel to keep current .bnd file in install
directory
5. Click Save As... to save new web and firmware to your PC
6. Upload new .bnd file to SiteDialer via SiteDialer web browser
16
6 Technical Support
Fig. 9 Link to DPS website
DPS Telecom products are backed by our courteous, friendly Technical Support representatives, who will give
you the best in fast and accurate customer service. To help us help you better, please take the following steps
before calling Technical Support:
1. Check the DPS Telecom website.
You will find answers to many common questions on the DPS Telecom website. Look here first for a fast
solution to your problem. http://www.dpstele.com/support/techfaqs/netguardian.php
2. Prepare relevant information.
Having important information about your DPS Telecom product in hand when you call will greatly reduce the
time it takes to answer your questions. If you do not have all of the information when you call, our Technical
Support representatives can assist you in gathering it. Please write the information down for easy access.
Please have your user manual and hardware serial number ready.
3. Have access to troubled equipment.
Please be at or near your equipment when you call DPS Telecom Technical Support. This will help us solve
your problem more efficiently.
4. Call during Customer Support hours.
Customer support hours are Monday through Friday, from 7 A.M. to 6 P.M., Pacific time. The DPS Telecom
Technical Support phone number is (559) 454-1600.
Emergency Assistance: Emergency assistance is available 24 hours a day, 7 days a week. For emergency
assistance after hours, allow the phone to ring until it is answered with a paging message. You will be
asked to enter your phone number. An on-call technical support representative will return your call as
soon as possible.
17
7 End User License Agreement
All Software and firmware used in, for, or in connection with the Product, parts, subsystems, or derivatives thereof,
in whatever form, including, without limitation, source code, object code and microcode, including any computer
programs and any documentation relating to or describing such Software is furnished to the End User only under a
non-exclusive perpetual license solely for End User's use with the Product.
The Software may not be copied or modified, in whole or in part, for any purpose whatsoever. The Software may not
be reverse engineered, compiled, or disassembled. No title to or ownership of the Software or any of its parts is
transferred to the End User. Title to all patents, copyrights, trade secrets, and any other applicable rights shall
remain with the DPS Telecom.
DPS Telecom's warranty and limitation on its liability for the Software is as described in the warranty information
provided to End User in the Product Manual.
End User shall indemnify DPS Telecom and hold it harmless for and against any and all claims, damages, losses,
costs, expenses, obligations, liabilities, fees and costs and all amounts paid in settlement of any claim, action or
suit which may be asserted against DPS Telecom which arise out of or are related to the non-fulfillment of any
covenant or obligation of End User in connection with this Agreement.
This Agreement shall be construed and enforced in accordance with the laws of the State of California, without
regard to choice of law principles and excluding the provisions of the UN Convention on Contracts for the
International Sale of Goods. Any dispute arising out of the Agreement shall be commenced and maintained only in
Fresno County, California. In the event suit is brought or an attorney is retained by any party to this Agreement to
seek interpretation or construction of any term or provision of this Agreement, to enforce the terms of this
Agreement, to collect any money due, or to obtain any money damages or equitable relief for breach, the prevailing
party shall be entitled to recover, in addition to any other available remedy, reimbursement for reasonable attorneys'
fees, court costs, costs of investigation, and other related expenses.
Warranty
DPS Telecom warrants, to the original purchaser only, that its products a) substantially conform to DPS' published
specifications and b) are substantially free from defects in material and workmanship. This warranty expires two years from the
date of product delivery with respect to hardware and ninety days from the date of product delivery with respect to software.
If the purchaser discovers within these periods a failure of the product to substantially conform to the specifications or that
the product is not substantially free from defects in material and workmanship, the purchaser must promply notify DPS. Within
reasonable time after notification, DPS will endeavor to correct any substantial non-conformance with the specifications or
substantial defects in material and workmanship, with new or used replacement parts. All warranty service will be performed at
the company's office in Fresno, California, at no charge to the purchaser, other than the cost of shipping to and from DPS,
which shall be the responsiblity of the purchaser. If DPS is unable to repair the product to conform to the warranty, DPS will
provide at its option one of the following: a replacement product or a refund of the purchase price for the non-conforming
product. These remedies are the purchaser's only remedies for breach of warranty. Prior to initial use the purchaser shall have
determined the suitability of the product for its intended use. DPS does not warrant a) any product, components or parts not
manufactured by DPS, b) defects caused by the purchaser's failure to provide a suitable installation environment for the
product, c) damage caused by use of the product for purposes other than those for which it was designed, d) damage caused
by disasters such as fire, flood, wind or lightning unless and to the extent that the product specification provides for
resistance to a defined disaster, e) damage caused by unauthorized attachments or modifications, f) damage during shipment
from the purchaser to DPS, or g) any abuse or misuse by the purchaser.
THE FOREGOING WARRANTIES ARE IN LIEU OF ALL OTHER WARRANTIES, EXPRESS OR IMPLIED, INCLUDING BUT
NOT LIMITED TO THE IMPLIED WARRANTIES OF MERCHANTABILITY AND FITNESS FOR A PARTICULAR
PURPOSE.
In no event will DPS be liable for any special, incidental, or consequential damages based on breach of warranty, breach of
contract, negligence, strict tort, or any other legal theory. Damages that DPS will not be responsible for include but are not
limited to, loss of profits; loss of savings or revenue; loss of use of the product or any associated equipment; cost of capital;
cost of any substitute equipment, facilities or services; downtime; claims of third parties including customers; and injury to
property.
The purchaser shall fill out the requested information on the Product Warranty Card and mail the card to DPS. This card
provides information that helps DPS make product improvements and develop new products.
For an additional fee DPS may, at its option, make available by written agreement only an extended warranty providing an
additional period of time for the applicability of the standard warranty.
Technical Support
If a purchaser believes that a product is not operating in substantial conformance with DPS' published specifications or there
appear to be defects in material and workmanship, the purchaser should contact our technical support representatives. If the
problem cannot be corrected over the telephone and the product and problem are covered by the warranty, the technical
support representative will authorize the return of the product for service and provide shipping information. If the product is
out of warranty, repair charges will be quoted. All non-warranty repairs receive a 90-day warranty.
“We protect your network like
your business depends on it” ™
www.dpstelecom.com
4955 E. Yale • Fresno, CA 93727
(559) 454-1600 • (800) 622-3314 • (559) 454-1688 fax