1
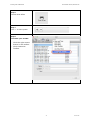
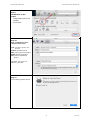
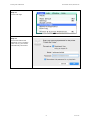
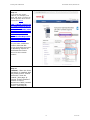
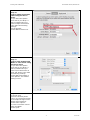
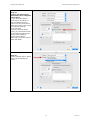
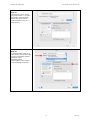
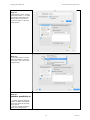
Directie ITS
Information and Technology Services
USER MANUAL
Printing with a Macintosh
This manual describes how to print with a Macintosh
Provided by: ITS – Printing
Version: 2014-11-24
Printing with a Macintosh
What should you do?
Universiteit Utrecht, directie ITS
Screenshot
Step 1.
Printing with a Macintosh (OS
X 10.7 or Higher)
Note: OS X version 10.6
does not work!
Step 2.
When you are connected with
the (Wireless) Eduroam
network you can print at all
new multifunctionals at
Utrecht University.
Step 3.
You need to login with
your Solis-id and be
connected to the Eduroam
network. Install a new
printer on your Mac.
Proceed as follows 1:
Step 4.
With this guide you print
in colour by default. This
can’t be changed. Would
you also print in Black and
White (as it is a document
containing colour) then go
straight to Step 14.
Step 5.
Go to System Preferences
1
You need admin rights on your Mac.
2
27-01-15
Printing with a Macintosh
Universiteit Utrecht, directie ITS
Step 6.
Choose Print & Fax
Step 7.
Press ‘+’ to add a printer
Step 8.
Customise your toolbar
•
Click the right mouse
button in the toolbar.
•
Click Customize
Toolbar.
3
27-01-15
Printing with a Macintosh
Universiteit Utrecht, directie ITS
Step 9.
Add Advance to the
toolbar
•
Drag Advanced to the
toolbar
•
Click Done
Step 10.
Click on Advanced and
complete this form:
Type: Windows printer via
spoolss
Device: Another Device
URL: smb://print.uu.nl/black
Name: Follow Me Printer
Use: Generic PostScript
Printer
Click Add. The printer is
added to your Mac.
Step 11.
Check settings double sided.
4
27-01-15
Printing with a Macintosh
Universiteit Utrecht, directie ITS
Step 12.
Print a test Page
Step 13.
Check ‘Remember this
password in my keychain’.
From now on, you will be
automatically connected.
5
27-01-15
Printing with a Macintosh
Universiteit Utrecht, directie ITS
Step 14.
If you miss any printer
features, for example print
black and white, you have to
use the specific Xerox driver.
Download it here:
http://www.support.xe
rox.com/support/work
centre-7800series/downloads/enus
.html?associatedProduc
t=WorkCentre-78xxbuiltin+controller&operatin
gSystem=macosx1010
&fileLanguage=en
Do you have a different
version than Mac OS
10.10 click the arrow next
to Operating System to
download the correct
driver for the correct
version.
Step 15.
Caution! : After the driver
(package) is installed, Still
the printer queue "Follow
Me Printer" must be
created. (See page 2).
Choose "Select Software"
(search on Xerox
WorkCentre 7855) instead
of General postscript
printer. (See page 4).
6
27-01-15
Printing with a Macintosh
Universiteit Utrecht, directie ITS
Step 16.
How to staple documents
when using the Xerox
driver
Do you have the specific
driver Xerox (see Step 14
above) installed and you
want to staple documents?
Then make the following
settings:
Set the Finisher.
Choose Office Finisher LX.
Step 17.
How to print in Black and
White or Color when using
the Xerox driver
Do you have the specific
driver Xerox (see Step 14
above) installed and you
want to print documents in
black and white? Then make
the following settings:
Choose Black and White in
Color Options. The default
setting is Color.
Step 18.
Go to File print
Select the desired printer
queue (eg. Follow Me Printer)
In the Copies & Pages menu,
choose Xerox Features
Choose Color options
In Color Corrections choose
Black and White
Choose print
7
27-01-15
Printing with a Macintosh
Universiteit Utrecht, directie ITS
Step 19.
How to use Preferences
black and Colour using the
Xerox driver
Do you have the specific
driver Xerox (see Step 14
above) installed and you
want to use the preferences
Black and Colour? Then make
the following settings:
Go to File print
Select the desired printer
queue (eg. Follow Me Printer)
In the Copies & Pages menu,
choose Xerox Features
Choose Color options
With Color Correction choose
Black and White
Step 20.
Choose Presets option: Select
Save Current Settings as
Preset ....
8
27-01-15
Printing with a Macintosh
Universiteit Utrecht, directie ITS
Step 21.
Preset Name: Fill in: Black
(only this printer) + ok. End
with [Print], otherwise the
setting will not be saved.
(now the Black is set as a
fixed preset).
Step 22.
To set Automatic Color as a
fixed preset, do the following:
In Color Corrections choose
Automatic Color
(Recommended)
Presets option: Select Save
Current Settings as Preset ....
9
27-01-15
Printing with a Macintosh
Universiteit Utrecht, directie ITS
Step 23.
Preset Name: Fill in: Colour
(only this printer) + ok. End
with [Print], otherwise the
setting will not be saved.
(now the Colour is set as a
fixed preset).
Step 24.
So you just have to Preset
Black and White or choose
the Colour. This can be preprogrammed.
Step 25.
Another possibility is:
1. Create 2 Printer Queues:
Follow me Black and Follow
me Colour with the specific
Xerox driver.
2. Set the Follow me Black
Black in the preference.
10
27-01-15
Printing with a Macintosh
Universiteit Utrecht, directie ITS
3. Set the Follow Me Colour
Color in the preference.
Now you just click on the
correct printer and the
document will Print in black
and white or colour.
11
27-01-15