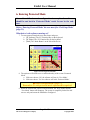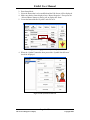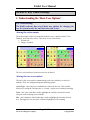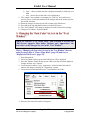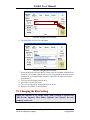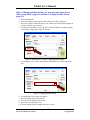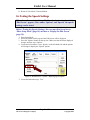
1
Etalk3 User Manual
Etalk3
User Manual
Page 1 of 75
The Great Talking Box Company
Copyright 2004
Etalk3 User Manual
Table of Contents
CHAPTER ONE: GETTING STARTED .........................................................................................................4
Section A: Key Understandings .........................................................................................................5
1. Understanding some Basic Terms ............................................................................................................. 5
2. Understanding what a Button can do ........................................................................................................ 6
Section B: Step by Step Process.........................................................................................................7
1. Output Buttons........................................................................................................................................... 7
2. Linking Buttons ......................................................................................................................................... 8
3. Function Buttons........................................................................................................................................ 9
4. Digital Recording Buttons ......................................................................................................................... 9
5. A Multi-Action Buttons...........................................................................................................................10
Section C: Chapter Summary ..........................................................................................................11
1. What should the user understand?...........................................................................................................11
2. What should the user be able to do?........................................................................................................11
CHAPTER TWO: ETALK3 MODES OF OPERATION ..................................................................................12
Section A: Key Understandings .......................................................................................................13
1. Understanding the ‘Modes’ of the Etalk3 software ................................................................................13
2. Moving between ‘Modes’........................................................................................................................14
3. The Editing Process .................................................................................................................................15
Section B: Step by Step Process.......................................................................................................17
1. Exiting Protected Mode ...........................................................................................................................17
2. Entering Setup Mode ...............................................................................................................................18
3. Displaying the Edit Screen ......................................................................................................................19
4. Exiting the Edit Screen ............................................................................................................................20
5. Exiting Setup Mode .................................................................................................................................21
6. Entering Protected Mode .........................................................................................................................22
Section C: Chapter Summary ..........................................................................................................23
1. What should the user understand?...........................................................................................................23
2. What should the user be able to do?........................................................................................................23
CHAPTER THREE: BASIC BUTTON EDITING ...........................................................................................24
Section A: Key Understandings .......................................................................................................25
1. Understanding the ‘Basic Visual Properties’ of a button........................................................................25
2. Understanding the ‘Basic Output Properties’ of a button.......................................................................26
3. Understanding the ‘Basic Action Properties’ of a button .......................................................................27
Section B: Step by Step Process.......................................................................................................28
1. Modifying the Button Label ....................................................................................................................28
2. Modifying the Button Symbol.................................................................................................................29
3. Modifying the Button Color ....................................................................................................................32
4. Modifying the Button Message ...............................................................................................................34
5. Modifying the Button Output Type.........................................................................................................34
6. Modifying the Button Goto Action .........................................................................................................36
7. Modifying the Button Function ...............................................................................................................37
Section C: Available Options Explained .........................................................................................39
1. Button Output Type Options ...................................................................................................................39
2. Button Goto Action Options....................................................................................................................40
3. Button Function Options .........................................................................................................................41
Section D: Chapter Summary ..........................................................................................................42
1. What should the user understand?...........................................................................................................42
2. What should the user be able to do?........................................................................................................42
3. What should the user know?....................................................................................................................42
CHAPTER FOUR: ETALK3 BASIC USER OPTIONS ...................................................................................44
Section A: Key Understandings .......................................................................................................45
1. Understanding the ‘Basic User Options’.................................................................................................45
Section B: Step by Step Process.......................................................................................................48
1. Displaying Text or Images in the “Text Window” .................................................................................48
2. Changing the ‘Font’ for text in the “Text Window”...............................................................................49
3. Changing the ‘Font Color’ for text in the “Text Window”.....................................................................51
4. Changing the ‘Background Color’ for the “Text Window”....................................................................52
5. Changing the ‘Access Type’ ...................................................................................................................53
6. Changing the ‘Access Scan Color’..........................................................................................................55
Page 2 of 75
The Great Talking Box Company
Copyright 2004
Etalk3 User Manual
7. Changing the ‘Access Scan Size’............................................................................................................57
8. Changing the ‘Access Scan Speed’ .........................................................................................................58
9. Changing the Auditory Prompt Setting ...................................................................................................60
10. Changing the Button Select (Touchscreen) Setting ..............................................................................61
11. Changing the Highlight Button When Selected Setting .......................................................................63
12. Changing the Key Click When Selected Setting...................................................................................64
13. Changing the Highlight Current Position Setting .................................................................................65
14. Changing the Voice Setting...................................................................................................................67
15. Changing the Rate Setting .....................................................................................................................68
16. Testing the Speech Settings...................................................................................................................70
Section C: Chapter Summary ..........................................................................................................72
1. What should the user understand?...........................................................................................................72
2. What should the user be able to do?........................................................................................................72
CHAPTER FIVE: APPENDIX A: TABLE OF FIGURES ................................................................................74
Page 3 of 75
The Great Talking Box Company
Copyright 2004
Etalk3 User Manual
Chapter One:
Getting Started
Page 4 of 75
The Great Talking Box Company
Copyright 2004
Etalk3 User Manual
Section A: Key Understandings
1. Understanding some Basic Terms
Key Understanding:
There are three basic terms that should be understood; a profile, a
page, and a button.
A Profile
A User Profile is all the information and data required to run a user’s communication
grid set on the Etalk3 software. A profile includes all the user settings, all pages
created for that profile, and any digital audio & digital images that are required to
ensure complete running of the communication grid set.
More than one profile can be stored on the system at once. This allows the
communication grid set and settings for more than one user to be stored side by side
on the same device.
A Page
When the system is running a user’s communication grid set, all the buttons that are
displayed on the screen at once, and any background color or image are collectively
known as a ‘page’. Each ‘page’ in a profile that is created by the user is given a name.
A Button
Each individual shape that is drawn on the page that either speaks, writes, or has a
action is called a button. There can be any number of buttons on a page, either
arranged in grids, or arranged to any size and position on the page.
Figure 2: A Button
Figure 1: A Page
Page 5 of 75
The Great Talking Box Company
Copyright 2004
Etalk3 User Manual
2. Understanding what a Button can do
Key Understanding:
A button can have any one of a number of actions / outputs. It can
also have a combination of multiple actions / outputs.
Outputs
A button can speak out a word or phrase via the speech engine (synthesized speech).
A button can write a word or phrase to the text window.
A button can play a digital recording (digitized speech).
Actions
A button can perform a special function (eg Volume up / Clear Text Window)
A button can link to another page in the profile.
Page 6 of 75
The Great Talking Box Company
Copyright 2004
Etalk3 User Manual
Section B: Step by Step Process
1. Output Buttons
When a page is displayed simply press anywhere on the button
(including the border) to select and activate that button. Most
buttons will speak or write an output (a word or phrase).
The following is the ‘main’ page in the default advanced example profile:
Figure 3: The Main Screen – Example Main Page
For example, to selected and activate the “I don’t know” button, simply press
anywhere within the marked area as shown.
If this button is set to speak out a word or phrase it will now do it. In this case it will
speak “I don’t know”. It will also write this text to the text window.
Page 7 of 75
The Great Talking Box Company
Copyright 2004
Etalk3 User Manual
2. Linking Buttons
All buttons that have an arrow in the top right-hand corner will link
off to another page.
The following is the ‘main’ page in the default advanced example profile:
Figure 4: The Main Screen – Example of a linking button.
When the “Social” button is pressed and activated it will link off to another predetermined page in the profile; in this case the social page. This can be known
because of the red arrow in the top right-hand corner. This denotes the button as a
linking button.
When the button is pressed and activated the Screen will change to display the page
that has been linked to. In this case the social page:
Figure 5: The Social Page
Page 8 of 75
The Great Talking Box Company
Copyright 2004
Etalk3 User Manual
3. Function Buttons
Some buttons may perform special functions. These have been
programmed to run one of the Etalk3 special functions.
Again, the following is the ‘main’ page in the default advanced example profile:
Figure 6: A function Button
When the “Volume Up” button is pressed it activates a special function that has been
programmed behind the button that turns up the volume of the speakers on the
communication device or computer. There are many useful special functions that are
described in later chapters.
4. Digital Recording Buttons
Some buttons may playback a digital recording (digitized speech).
A button can have a message / phrase recorded for it, so when it is selected and
activated by the user it plays back a digital recording (digitized speech).
Page 9 of 75
The Great Talking Box Company
Copyright 2004
Etalk3 User Manual
5. A Multi-Action Buttons
Some buttons may perform a number of actions.
A button can perform more than one different action. A button can speak & write. It
can also link to another page, as well as performing a special function.
For example, a button called “Drinks” could say “Can I have a drink of” and then link
to a drinks page with lots of different drinks to choose from.
Page 10 of 75
The Great Talking Box Company
Copyright 2004
Etalk3 User Manual
Section C: Chapter Summary
1. What should the user understand?
Key Understanding:
There are three basic terms that should be understood; a profile, a
page, and a button.
Key Understanding:
A button can have any one of a number of actions / outputs. It can
also have a combination of multiple actions / outputs.
2. What should the user be able to do?
Use Output Buttons
Use Linking Buttons
Use Function Buttons
Use Digital Recording Buttons
Use Multi-Action Buttons
Page 11 of 75
The Great Talking Box Company
Copyright 2004
Etalk3 User Manual
Chapter Two:
Etalk3 Modes of Operation
Page 12 of 75
The Great Talking Box Company
Copyright 2004
Etalk3 User Manual
Section A: Key Understandings
1. Understanding the ‘Modes’ of the Etalk3 software
Key Understanding:
The Etalk3 Software has three ‘Modes’ of operation. Each mode is
used for a different purpose.
The Three Modes of Operation
1. Protected Mode
2. User Mode
3. Setup Mode
Protected Mode
‘Protected Mode’ is the mode that the system should be in when being used for
communication by the end-user. When the software is in ‘Protected Mode’ the system
is completely locked and the pages cannot be modified and the settings cannot be
configured. Anyone using the system can only ‘use’ the system for communication
and has no access to any of the setup or editing features.
User Mode
‘User Mode’ is used in conjunction with ‘Setup Mode’. In ‘User Mode’ the system
acts as it will for the end-user when it is in protected mode. However, the user has
access to the setup and editing features. This mode is used to find the page that the
user wished to modify, and for the user to ‘try out’ modifications they have made.
This mode also gives you access to on-screen help information.
Setup Mode
‘Setup Mode’ is used to modify and configure the pages and settings for the software.
A user should enter setup mode is they wish to modify the pages or settings of the
software and system.
Page 13 of 75
The Great Talking Box Company
Copyright 2004
Etalk3 User Manual
2. Moving between ‘Modes’
Key Understanding:
In order to use, modify or configure the Etalk3 software the user
must ‘move’ to the appropriate mode of operation.
Moving between ‘Modes’
When the software is loaded, the software is started in ‘Protected Mode’. The user
can change modes as follows:
Protected Mode
Password Required
User Mode
Setup Mode
Figure 7: Moving between ‘Modes’ of operation
The actual step by step process for moving between ‘modes’ of operation is detailed
in Section B (page 17).
Page 14 of 75
The Great Talking Box Company
Copyright 2004
Etalk3 User Manual
3. The Editing Process
Key Understanding:
All modifications and/or configuration of the software and system are
achieved using the ‘Edit Screen’.
User Mode / Setup Mode / Edit Screen
When the software is in ‘User Mode’ the user is able to navigate through the pages to
find the page they wish to modify. When they have found the page they wish to
modify they enter ‘Setup Mode’.
While in ‘Setup Mode’ the user is able to select a button on the page and display the
‘Edit Screen’ to modify that button. When they have finished they can close the ‘Edit
Screen’ and choose another button and repeat the process.
When all the modifications to one page have been made, the user can exit ‘Setup
Mode’ and return to ‘User Mode’. Here they are able to navigate to another page they
wish to modify and enter ‘Setup Mode’ again and repeat the process.
Page 15 of 75
The Great Talking Box Company
Copyright 2004
Etalk3 User Manual
The Editing Process
Here is a visual representation of the process:
Enter User Mode
Navigate to a page
Enter Setup Mode
Select a Button
Display the Edit Screen
Modify Button and Close Edit Screen
Figure 8: The Editing Process
The actual step by step process for displaying the ‘Edit Screen’ and entering and
exiting ‘Setup Mode’ is detailed in Section B (page 17).
Page 16 of 75
The Great Talking Box Company
Copyright 2004
Etalk3 User Manual
Section B: Step by Step Process
1. Exiting Protected Mode
When the software is in ‘Protected Mode’ the system is completely
locked for end-user use only and cannot be modified or configured.
To modify and configure the system the user must ‘Exit Protected
Mode’.
Before ‘Exiting Protected Mode’ the user must first know the password.
1. To exit protected mode the user must locate and press:
a. [PC Software] The ‘F6’ Function Key on the keyboard.
b. [PC Editor] The ‘F6’ Function Key on the keyboard.
c. [Etalk] The ‘Mode Button’ on the side of the device.
2. A screen will be displayed asking for the user to enter the password. This is to
secure the system and to make sure that protected mode cannot be left
accidentally.
Figure 9: Entering the Protected Mode Password
&
&W
Whhaatt iiss tthhee ppaassssw
woorrdd??
R
Reem
meem
mbbeerr:: T
Thhee ddeeffaauulltt ppaassssw
woorrdd iiss ““eettaallkk””..
3. Enter the password into the space marked ‘Please enter Password’.
4. Now press the OK button
5. If the password was incorrect then a message is displayed to inform the user,
and the system is returned to ‘Protected Mode’. Please return to step 1 and try
again.
6. If the password was correct then the system will exit from ‘Protected Mode’
and will enter ‘User Mode’.
Page 17 of 75
The Great Talking Box Company
Copyright 2004
Etalk3 User Manual
2. Entering Setup Mode
In order to edit a button, or change any of the settings of the system,
the software must first be put in ‘Setup Mode’.
Before ‘Entering Setup Mode’ the user must first ‘Exit Protected Mode’
(page 17).
1. The user must decide which page to modify and make sure that the page is
displayed on the screen.
2. Locate the ‘User Mode’ button in the top right-hand corner of the screen.
Figure 10: The User Mode Button
3. Now press this button. The text on the button will now change to display
‘Setup Mode’. The software is now in setup mode.
Page 18 of 75
The Great Talking Box Company
Copyright 2004
Etalk3 User Manual
3. Displaying the Edit Screen
Once in Setup Mode, the ‘Edit Screen’ must be displayed to carry out
any editing or configuration tasks.
Before ‘Displaying the Edit Screen’ the user must first ‘Enter Setup
Mode’ (page 18).
1. Firstly the user must decide which button they wish to edit.
2. To display the ‘Edit Screen’ simply press the button that is to be modified.
Figure 11: The Edit Screen
3. The ‘Edit Screen’ will now be displayed.
Page 19 of 75
The Great Talking Box Company
Copyright 2004
Etalk3 User Manual
4. Exiting the Edit Screen
Once the user has made modifications to the button, or has changed
the software configuration, the user must ‘Exit the Edit Screen’.
Before ‘Exiting the Edit Screen’ the user must first have ‘Displayed the
Edit Screen’ (page 19).
1. Locate the ‘OK’ button at the top right-hand corner of the ‘Edit Screen’.
Figure 12: Exiting the Edit Screen
2. Press the ‘OK’ button to exit the Edit Screen.
3. The newly modified page will be display.
Page 20 of 75
The Great Talking Box Company
Copyright 2004
Etalk3 User Manual
5. Exiting Setup Mode
Once the user has made all the modifications to the current page, or
has completed any configuration, the user must ‘Exit Setup Mode’
Before ‘Exiting Setup Mode’ the user must first ‘Exit the Edit Screen’
(page 20).
1. Locate the ‘Setup Mode’ button in the top right-hand corner of the screen.
Figure 13: Exiting Setup Mode
2. Now press this button. The text on the button will now change to display ‘User
Mode’. The software is now returned to ‘User mode’.
Page 21 of 75
The Great Talking Box Company
Copyright 2004
Etalk3 User Manual
6. Entering Protected Mode
Once all modification and configuration is complete the software
should be put back in ‘Protected Mode’ ready for use by the enduser.
Before ‘Entering Protected Mode’ the user must first ‘Exit Setup Mode’
(page 21).
What device is the software running on?
7. To enter protected mode the user must locate and press:
a. [PC Software] The ‘F6’ Function Key on the keyboard.
b. [PC Editor] The ‘F6’ Function Key on the keyboard.
c. [Etalk] The ‘Mode Button’ on the side of the device.
Figure 14: Entering Protected Mode
8. The software will ask the user to confirm that they wish to enter ‘Protected
Mode’
a. If the user chooses ‘No’ the software will stay in ‘User Mode’.
b. If the user choose ‘Yes’ the software will enter ‘Protected Mode’
&
&W
Whhaatt iiss tthhee ppaassssw
woorrdd?? ((ppaaggee 1177))
R
Reem
meem
mbbeerr:: T
Too eexxiitt pprrootteecctteedd m
mooddee aa ppaassssw
woorrdd iiss rreeqquuiirreedd..
9. When the software has entered ‘Protected Mode’ the ‘Help’ button and the
‘User Mode’ button will disappear. The system is completely locked for enduser use only and cannot be modified or configured.
Page 22 of 75
The Great Talking Box Company
Copyright 2004
Etalk3 User Manual
Section C: Chapter Summary
1. What should the user understand?
Key Understanding:
The Etalk3 Software has three ‘Modes’ of operation. Each mode is
used for a different purpose.
Key Understanding:
In order to use, modify or configure the Etalk3 software the user
must ‘move’ to the appropriate mode of operation.
Key Understanding:
All modifications and/or configuration of the software and system are
achieved using the ‘Edit Screen’.
2. What should the user be able to do?
Exit Protected Mode
Enter Setup Mode
Display the Edit Screen
Exit the Edit Screen
Exit Setup Mode
Enter Protected Mode
Page 23 of 75
The Great Talking Box Company
Copyright 2004
Etalk3 User Manual
Chapter Three:
Basic Button Editing
Page 24 of 75
The Great Talking Box Company
Copyright 2004
Etalk3 User Manual
Section A: Key Understandings
1. Understanding the ‘Basic Visual Properties’ of a
button
Key Understanding:
Any button on a page has 3 basic visual properties; a label, a symbol,
and a color.
The Label
Figure 15: Button Visual Property - Label
This is the text that is written on the button when it is displayed on the page. This text
can be anything the user wishes to have written on the button.
The Symbol
Figure 16: Button Visual Property - Symbol
This is the image that is drawn on the button when it is displayed on the page. This
image can be either one of the Mayer-Johnson Picture Communication Symbols
(PCS), or it can be any digital image imported into the software.
Page 25 of 75
The Great Talking Box Company
Copyright 2004
Etalk3 User Manual
The Color
Figure 17: Button Visual Property – Background Color
This is the color of the button when it is displayed on the page. Each button can be
drawn with any color of the user’s choice.
2. Understanding the ‘Basic Output Properties’ of a
button
Key Understanding:
Any button on a page has 2 basic output properties; a message, and
an output type.
The Message
The message can be used to store the text that is either spoken and/or written when the
button is selected. This text is not visually displayed on the button at all, and so
enables the user to have a short piece of text as a “hint” stored as the label for a button,
which will be visually displayed on the button, and then a longer message text which
is spoken and/or written when the button is selected.
The Output Type
The output type is used to decide what is written to the text window, and what is
spoken through the synthesised speech engine. The user can choose from various
options that enables no output, written output, spoken output, or written and spoken
output.
Page 26 of 75
The Great Talking Box Company
Copyright 2004
Etalk3 User Manual
3. Understanding the ‘Basic Action Properties’ of a
button
Key Understanding:
Any button on a page has 2 basic action properties; goto, and
function.
The Goto Action
The ‘goto’ action property is set if you want the button to link to another page when
selected. If there is no selection, or the goto property displays the current page, then it
will not link anywhere. However, if the goto property displays a different page then
when the button is selected it will speak and write and output, perform any function
and then link to the page specified in the goto property.
The Function Action
The ‘function’ action allows the user to select a special function to be performed
when the button is selected. Examples include speak all, clear, delete word, volume up
& down.
Page 27 of 75
The Great Talking Box Company
Copyright 2004
Etalk3 User Manual
Section B: Step by Step Process
1. Modifying the Button Label
When the software is in ‘Setup Mode’ and a button is selected the
‘Edit Screen’ appears. Here under ‘Selected Button’ the label
displayed on the button can be modified.
Before ‘Modifying the Button Label’ the user must first know how to
‘Enter Setup Mode’ (page 18) and how to ‘Display the Edit Screen’
(page 19).
1.
2.
3.
4.
Firstly navigate to the page to be altered.
Enter Setup Mode
Select the button that is to be modified and the Edit Screen will be displayed.
Make sure that the frame displayed says ‘Button Properties’. If not press the
‘Selected Button’ button on the top row to display this frame.
Figure 18: Displaying the Button Properties Frame
5. Locate where is says ‘Label’ and click in the box next to it.
Page 28 of 75
The Great Talking Box Company
Copyright 2004
Etalk3 User Manual
Figure 19: Changing the Button Label Property
6. Modify the text in this box. This is the text that is displayed on the button
when it is drawn on the page.
&
&D
Deevviiccee V
Veerrssuuss C
Coom
mppuutteerr??
R
Reem
meem
mbbeerr:: W
Whheenn eenntteerriinngg tteexxtt oonn tthhee ddeevviiccee,, tthhee IInnppuutt
K
Keeyybbooaarrdd ssccrreeeenn w
wiillll aappppeeaarr,, w
whheerreeaass,, w
whheenn eeddiittiinngg oonn aa
ssttaannddaarrdd ccoom
mppuutteerr,, iitt w
wiillll bbee rreeqquuiirreedd ttoo uussee tthhee ssttaannddaarrdd
ccoom
mppuutteerr kkeeyybbooaarrdd..
&
&W
Whhaatt sshhoouulldd tthhee llaabbeell ssaayy??
R
Reem
meem
mbbeerr:: T
Thhee llaabbeell iiss tthhee tteexxtt oonn tthhee bbuuttttoonn,, aanndd iiss uusseedd ttoo
aaiidd tthhee uusseerr ttoo rreem
meem
mbbeerr w
whhaatt m
meessssaaggee iiss ssttoorreedd uunnddeerr tthhaatt
bbuuttttoonn,, oorr w
whhaatt aaccttiioonn iiss ppeerrffoorrm
meedd.. T
Thheerreeffoorree tthhee llaabbeell sshhoouulldd
‘‘hhiinntt’’ aatt w
h
a
t
t
h
e
b
u
t
t
o
n
what the button ssaayyss oorr ddooeess..
7. Press ‘OK’ to close the Edit Screen
8. The new label text should be displayed on the button.
9. Return to User Mode / Protected Mode.
2. Modifying the Button Symbol
When the software is in ‘Setup Mode’ and a button is selected the
‘Edit Screen’ appears. Here under ‘Selected Button’ the symbol
displayed on the button can be modified.
Before ‘Modifying the Button Symbol’ the user must first know how to
‘Enter Setup Mode’ (page 18) and how to ‘Display the Edit Screen’
(page 19).
1. Firstly navigate to the page to be altered.
Page 29 of 75
The Great Talking Box Company
Copyright 2004
Etalk3 User Manual
2. Enter Setup Mode
3. Select the button that is to be modified and the Edit Screen will be displayed.
4. Make sure that the frame displayed says ‘Button Properties’. If not press the
‘Selected Button’ button on the top row to display this frame.
5. Locate the button labelled ‘Symbol’ and click on it.
Figure 20: Changing the Button Symbol Property
6. When the ‘Symbol’ button has been pressed the ‘Symbol Search Screen’
should be displayed.
Figure 21: The Symbol Search Screen
Page 30 of 75
The Great Talking Box Company
Copyright 2004
Etalk3 User Manual
7. Click in the box under ‘Search For’ and enter the text to be search for.
&
&W
Whhaatt w
woorrddss sshhoouulldd ggoo iinn hheerree??
R
Reem
meem
mbbeerr:: T
Thhee ssyym
mbboollss aarree sseeaarrcchheedd ffoorr bbyy tthheeiirr nnaam
meess;;
w
whhiicchh ddeeppiicctt w
whhaatt tthheeyy rreepprreesseenntt.. SSoo iiff,, ffoorr eexxaam
mppllee,, aa ssyym
mbbooll
ttoo rreepprreesseenntt aa llooaaff ooff bbrreeaadd iiss rreeqquuiirreedd tthheenn sseeaarrcchh ffoorr ‘‘bbrreeaadd’’..
Figure 22: Symbol Search Screen – Search Criteria
8. Once the search criteria have been entered in the ‘Search For’ box, press the
search button to start the search.
Figure 23: Symbol Search Screen – Search button
Page 31 of 75
The Great Talking Box Company
Copyright 2004
Etalk3 User Manual
9. When the search is complete the ‘Search Results’ list on the left-hand side will
display all symbols found matching the search criteria. To view the suggested
symbols simply click on the name of each one in turn in the ‘Search Results’
list and the appropriate symbol will be displayed in the preview window on the
right-hand side.
Figure 24: Symbol Search Screen – Symbol Preview
10. When the desired symbol has been located, and is being displayed in the
preview window, simply press the ‘OK’ button in the top right-hand corner to
select this symbol for the button.
&
&W
Whhaatt iiff tthhee ssyym
mbbooll iiss nnoott ffoouunndd??
R
e
m
e
m
b
e
r
:
T
h
e
s
y
m
b
o
l
s
s
e
Remember: The symbols seaarrcchh ssccrreeeenn hhaass m
maannyy m
moorree
aaddvvaanncceedd ffeeaattuurreess.. PPlleeaassee rreeffeerr ttoo tthhee cchhaapptteerr oonn tthhee SSyym
mbbooll
SSeeaarrcchh SSccrreeeenn..
11. The ‘Symbol Search Screen’ should now disappear and the ‘Edit Screen’
should be back in view. Press the ‘OK’ button to exit the ‘Edit Screen’.
12. The new symbol should now be displayed on the button.
13. Return to User Mode / Protected Mode.
3. Modifying the Button Color
When the software is in ‘Setup Mode’ and a button is selected the
‘Edit Screen’ appears. Here under ‘Selected Button’ the color of the
displayed button can be modified.
Page 32 of 75
The Great Talking Box Company
Copyright 2004
Etalk3 User Manual
Before ‘Modifying the Button Color’ the user must first know how to
‘Enter Setup Mode’ (page 18) and how to ‘Display the Edit Screen’
(page 19).
1.
2.
3.
4.
Firstly navigate to the page to be altered.
Enter Setup Mode
Select the button that is to be modified and the Edit Screen will be displayed.
Make sure that the frame displayed says ‘Button Properties’. If not press the
‘Selected Button’ button on the top row to display this frame.
5. Locate and press the button labelled ‘color’.
Figure 25: Edit Screen – Button Color Property
6. The ‘Color Chooser Screen’ should be displayed.
7. Select any color from the color palette on the screen, and it will be displayed
in the selected color box.
Figure 26: Color Chooser Screen
8. Once the desired color has been located press the ‘OK’ button in the top righthand corner to select that color.
9. The ‘Color Chooser Screen’ should disappear and the ‘Edit Screen’ back in
view.
Page 33 of 75
The Great Talking Box Company
Copyright 2004
Etalk3 User Manual
10. Press ‘OK’ to close the Edit Screen
11. The button should be displayed in the new button color.
12. Return to User Mode / Protected Mode.
4. Modifying the Button Message
When the software is in ‘Setup Mode’ and a button is selected the
‘Edit Screen’ appears. Here under ‘Selected Button’ the message of
the selected button can be modified.
Before ‘Modifying the Button Message’ the user must first know how to
‘Enter Setup Mode’ (page 18) and how to ‘Display the Edit Screen’
(page 19).
1.
2.
3.
4.
Firstly navigate to the page to be altered.
Enter Setup Mode
Select the button that is to be modified and the Edit Screen will be displayed.
Make sure that the frame displayed says ‘Button Properties’. If not press the
‘Selected Button’ button on the top row to display this frame.
5. Locate where is says ‘Message’ and click in the box next to it.
Figure 27: The Edit Screen – Button Message
6. Enter the text in this box that is required to be spoken and/or written when the
button is selected.
7. Press ‘OK’ to close the Edit Screen
8. Return to User Mode / Protected Mode.
5. Modifying the Button Output Type
When the software is in ‘Setup Mode’ and a button is selected the
‘Edit Screen’ appears. Here under ‘Selected Button’ the output type
of the selected button can be modified.
Page 34 of 75
The Great Talking Box Company
Copyright 2004
Etalk3 User Manual
Before ‘Modifying the Button Output Type’ the user must first know
how to ‘Enter Setup Mode’ (page 18) and how to ‘Display the Edit
Screen’ (page 19).
1.
2.
3.
4.
Firstly navigate to the page to be altered.
Enter Setup Mode
Select the button that is to be modified and the Edit Screen will be displayed.
Make sure that the frame displayed says ‘Button Properties’. If not press the
‘Selected Button’ button on the top row to display this frame.
5. Locate where is says ‘Output’ and click the drop-down arrow at the far righthand end of the selection box.
Figure 28: The Edit Screen – Button Output Type
6. When the drop-down arrow has been pressed, a list will appear.
Figure 29: The Edit Screen – Output Type – Drop Down List
7. Select the output type desired and the list will disappear and the desired output
type will be displayed in the box next to the ‘Output’ label.
Page 35 of 75
The Great Talking Box Company
Copyright 2004
Etalk3 User Manual
&
&W
Whhaatt aarree tthhee ddiiffffeerreenntt oouuttppuutt ttyyppeess??
R
Reem
meem
mbbeerr:: T
Thhee ddiiffffeerreenntt oouuttppuutt ttyyppeess aarree aallll lliisstteedd aanndd
eexxppllaaiinneedd iinn tthhee nneexxtt sseeccttiioonn ooff tthhiiss cchhaapptteerr..
8. Press ‘OK’ to close the Edit Screen
9. Return to User Mode / Protected Mode.
6. Modifying the Button Goto Action
When the software is in ‘Setup Mode’ and a button is selected the
‘Edit Screen’ appears. Here under ‘Selected Button’ the goto action
of the selected button can be modified.
Before ‘Modifying the Button Goto Action’ the user must first know
how to ‘Enter Setup Mode’ (page 18) and how to ‘Display the Edit
Screen’ (page 19).
1.
2.
3.
4.
Firstly navigate to the page to be altered.
Enter Setup Mode
Select the button that is to be modified and the Edit Screen will be displayed.
Make sure that the frame displayed says ‘Button Properties’. If not press the
‘Selected Button’ button on the top row to display this frame.
5. Locate where is says ‘Goto’ and click the drop-down arrow at the far righthand end of the selection box.
Figure 30: The Edit Screen – Goto Action
6. When the drop-down arrow has been pressed, a list will appear.
Page 36 of 75
The Great Talking Box Company
Copyright 2004
Etalk3 User Manual
Figure 31: The Edit Screen – Goto Action – Drop Down List
7. Select the desired page that this button should link to when selected.
8. The list will disappear and the desired page will be displayed in the box next
to the ‘Goto’ label.
&
&W
Whhaatt ppaaggeess aarree aavvaaiillaabbllee ttoo lliinnkk ttoo??
R
e
m
e
m
b
e
r
:
T
h
Remember: Thee ssppeecciiaall ppaaggeess aanndd aallll aavvaaiillaabbllee uusseerr ppaaggeess aarree
lliisstteedd aanndd eexxppllaaiinneedd iinn tthhee nneexxtt sseeccttiioonn ooff tthhiiss cchhaapptteerr..
9. Press ‘OK’ to close the Edit Screen
10. Return to User Mode / Protected Mode.
7. Modifying the Button Function
When the software is in ‘Setup Mode’ and a button is selected the
‘Edit Screen’ appears. Here under ‘Selected Button’ the function of
the selected button can be modified.
Before ‘Modifying the Button Function’ the user must first know how
to ‘Enter Setup Mode’ (page 18) and how to ‘Display the Edit Screen’
(page 19).
1.
2.
3.
4.
Firstly navigate to the page to be altered.
Enter Setup Mode
Select the button that is to be modified and the Edit Screen will be displayed.
Make sure that the frame displayed says ‘Button Properties’. If not press the
‘Selected Button’ button on the top row to display this frame.
5. Locate where is says ‘Function’ and click the drop-down arrow at the far righthand end of the selection box.
Page 37 of 75
The Great Talking Box Company
Copyright 2004
Etalk3 User Manual
Figure 32: The Edit Screen – Button Function
6. When the drop-down arrow has been pressed, a list will appear.
Figure 33: The Edit Screen – Button Function – Drop Down List
7. Select the desired function that this button should perform when selected.
8. The list will disappear and the desired function will be displayed in the box
next to the ‘Function’ label.
&
&W
Whhaatt aarree aallll tthhee ffuunnccttiioonnss??
R
Reem
meem
mbbeerr:: T
Thhee ffuunnccttiioonnss aavvaaiillaabbllee aarree aallll lliisstteedd aanndd eexxppllaaiinneedd
iinn tthhee nneexxtt sseeccttiioonn ooff tthhiiss cchhaapptteerr..
9. Press ‘OK’ to close the Edit Screen
10. Return to User Mode / Protected Mode.
Page 38 of 75
The Great Talking Box Company
Copyright 2004
Etalk3 User Manual
Section C: Available Options Explained
1. Button Output Type Options
No.
1
Name
Nothing
2
Say & Write Label
3
Say & Write Message
4
Say Label
5
Say Message
6
Write Label
7
Write Message
Explanation
Nothing is spoken out and nothing is written
to the text window.
The text displayed on the button is spoken
out via the speech engine and is also written
to the text window.
The text stored in the button message is
spoken out via the speech engine and is also
written to the text window
The text displayed on the button is spoken
out via the speech engine; however, nothing
is written to the text window.
The text stored in the button message is
spoken out via the speech engine; however,
nothing is written to the text window
Nothing is spoken out; however, the text
displayed on the button is written to the text
window.
Nothing is spoken out; however, the text
stored in the button message is written to the
text window.
Page 39 of 75
The Great Talking Box Company
Copyright 2004
Etalk3 User Manual
2. Button Goto Action Options
No.
1
Name
[Home Page]
2
[Previous Page]
3
[Drawing Page]
4
User Pages in Profile
Explanation
This special page link will send the user to
whatever page is designated the ‘Home
Page’.
This special page link will send the user to
whichever page the user was on before they
came to the current page. This allows the user
to have a button on a page linking back to the
previous page even when the page may be
accessed from several different pages.
This special page link brings up the drawing
utility. (N.B. This is only available for direct
access users. Switch / Joystick access users
will find that this link will not perform any
action when selected in one of their scanning
modes.)
The ‘Goto’ list is also populated with all the
pages created by the user in the current
profile. Therefore, a user can link to any page
that has already been created.
Page 40 of 75
The Great Talking Box Company
Copyright 2004
Etalk3 User Manual
3. Button Function Options
No.
1
Name
No Function
2
Clear
3
Delete Character
4
Delete Word
5
Keyboard Character
6
Keyboard Predict
7
8
9
Power Off
Sleep / Suspend
Space
10
Speak All
11
Stop Speaking
12
Total Power Down
13
14
Volume Down
Volume Up
Explanation
The selected button performs no special
function
The text window is completely cleared of all
text.
The last character displayed in the text
window is deleted.
The last word displayed in the text window is
deleted.
This is an advanced function used only on
word-prediction pages. Please see the chapter
on creating word prediction pages.
This is an advanced function used only on
word-prediction pages. Please see the chapter
on creating word prediction pages.
The power to the device is turned off.
The device is put in sleep / suspend mode.
This is an advanced function used only on
word-prediction pages. Please see the chapter
on creating word prediction pages.
All the text in the text window is spoken out
via the speech engine.
Any speech currently being spoken, or
waiting to be spoken by the speech engine is
instantly stopped and discarded.
The device is forced to perform an immediate
and total power down.
The speaker volume is turned down.
The speaker volume is turned up.
Page 41 of 75
The Great Talking Box Company
Copyright 2004
Etalk3 User Manual
Section D: Chapter Summary
1. What should the user understand?
Key Understanding:
Any button on a page has 3 basic visual properties; a label, a symbol,
and a color.
Key Understanding:
Any button on a page has 2 basic output properties; a message, and
an output type.
Key Understanding:
Any button on a page has 2 basic action properties; goto, and
function.
2. What should the user be able to do?
Modify the Button Label
Modify the Button Symbol
Modify the Button Color
Modify the Button Message
Modify the Button Output Type
Modify the Button Goto Action
Modify the Button Function
3. What should the user know?
Button Output Type Options
Button Goto Action Options
Page 42 of 75
The Great Talking Box Company
Copyright 2004
Etalk3 User Manual
Button Function Options
Page 43 of 75
The Great Talking Box Company
Copyright 2004
Etalk3 User Manual
Chapter Four:
Etalk3 Basic User Options
Page 44 of 75
The Great Talking Box Company
Copyright 2004
Etalk3 User Manual
Section A: Key Understandings
1. Understanding the ‘Basic User Options’
Key Understanding:
The Etalk3 software has several basic user options for changing the
way the system works for, and interacts with, a user.
Altering the written output
The written output, which is generated by default as text, is displayed in the “Text
Window” at the top of the screen. This can be in one of two forms:
1. Written text
2. Images / Symbols
Figure 34: Written text in the Text Window
Figure 35: Images in the Text Window
The size, color and font of written text can also be altered.
Altering the user access method
The user is able to access the communication grids is the software in a variety of
methods. These are configured using the following options:
Access Type – this is the access method that is chosen for the user. This could be
direct access (using the Touchscreen), or a switch / joystick access method (scanning).
Color – this is the color that is used to highlight the currently selected area when
using one of the scanning access methods.
Size – this is thickness of the border that is used to highlight the currently selected
area. The bigger the size, the more visible the highlight used for scanning.
Page 45 of 75
The Great Talking Box Company
Copyright 2004
Etalk3 User Manual
Speed – this is speed at which the selected row, column, or area move on to the next
area when a scan is used that automatically moves from one selected area to another.
Row Cycles – the number of times each row will be scanned without a switch
activation.
Column Cycles – the number of times each column will be scanned without a switch
activation.
Hold – The amount of time the switch must be held down before the switch activation
is accepted.
Release – The amount of time after switch release before a new switch activation may
be accepted – similar to a “debounce” function.
Repeat – The amount of time after the initial switch call before the switch call is
repeated
Enable Auditory Prompt – this option turns on “Auditory Prompting”. This gives
audible cues to users who cannot see the scan moving on the screen, or who cannot
understand the visual representation of the scan displayed on the screen.
Altering the Touchscreen interaction
The settings of the Touchscreen can be altered so that the Touchscreen, mouse, or
head-pointer interacts differently with the user and the system.
Select Button On – the Touchscreen can be set to be activated on the initial touch
(Button Press), or the final release (Button Release) of a user’s touch – or the
completion of a left mouse click.
Highlight when Selected – this allows the user to see a visual cue on the screen when
a button is selected. This indicates to the user that a button has been selected.
Key Click when Selected – this allows the user to hear an audible cue when a button
is selected. This again indicates to the user that a button has been selected.
Highlight Current Position – this allows the user to visually see what button will be
selected. It highlights the user’s current position on the screen and moves as this
position changes.
Altering the Voice Output (Speech)
The speech output can be altered and varied to suit the user’s taste.
Voice – this is the actual pre-set voice that the user wishes to use.
Rate – this is the speed of the spoken output. (I.e. how quickly the words are spoken.)
Page 46 of 75
The Great Talking Box Company
Copyright 2004
Etalk3 User Manual
Test – this allows the current speech settings to be tested with a phrase so the speech
output can be heard.
Page 47 of 75
The Great Talking Box Company
Copyright 2004
Etalk3 User Manual
Section B: Step by Step Process
1. Displaying Text or Images in the “Text Window”
When the software is in ‘Setup Mode’ and a button is selected the
‘Edit Screen’ appears. Here under ‘Options’ and ‘Appearance’ the
‘Text Window’ display type can be changed.
Before ‘Displaying Text or Images in the Text Window’ the user must
first know how to ‘enter setup mode’ and how to ‘Enter Setup Mode’
(page 18) and how to ‘Display the Edit Screen’ (page 19).
1. Enter Setup Mode.
2. Select any button on the page and the Edit Screen will be displayed.
3. Press the ‘Options’ button on the top row. Make sure that the frame displayed
changes and now says ‘Options’.
4. Locate and select where is says ‘Appearance’ on the left-hand side and the
options will change to display the ‘Appearance’ options.
Figure 36: The Edit Screen – Options - Appearance
5. Locate the box next to “Use Images in Text Window”
Page 48 of 75
The Great Talking Box Company
Copyright 2004
Etalk3 User Manual
Figure 37: Use Images in Text Window
6. This box can be “ticked” or “not ticked”:
a. Ticked – Displays Images / Symbols in the “Text Window”
b. Not Ticked – Displays written text in the “Text Window”
7. When the desired selection has been made press the OK button in the top
right-hand corner to exit from the edit screen.
8. The “Text Window” will change to display either text or images as selected.
9. Return to User Mode / Setup Mode.
2. Changing the ‘Font’ for text in the “Text Window”
When the software is in ‘Setup Mode’ and a button is selected the
‘Edit Screen’ appears. Here under ‘Options’ and ‘Appearance’ the
font can be changed for text in the ‘Text Window’.
Before ‘Changing the font for text in the Text Window’ the user must
first know how to ‘Enter Setup Mode’ (page 18) and how to ‘Display
the Edit Screen’ (page 19).
1. Enter Setup Mode.
2. Select any button on the page and the Edit Screen will be displayed.
3. Press the ‘Options’ button on the top row. Make sure that the frame displayed
changes and now says ‘Options’.
4. Locate and select where is says ‘Appearance’ on the left-hand side and the
options will change to display the ‘Appearance’ options.
Page 49 of 75
The Great Talking Box Company
Copyright 2004
Etalk3 User Manual
Figure 38: The Edit Screen – Options - Appearance
5. Ensure that the Use Images in Text Window checkbox is NOT ticked.
6. Locate and select the button that says ‘Text Window Font’.
Figure 39: Text Window Font
7. Now the font selection window will appear:
Figure 40: Text Window Font – Font Selection
8. Here the following properties can be changed:
a. Font – choose a font from the fonts available in the list.
Page 50 of 75
The Great Talking Box Company
Copyright 2004
Etalk3 User Manual
b. Style – choose whether the font is displayed normally or italicised or in
bold.
c. Size – choose the size the font is to be displayed at.
9. The “sample” area (software on computer) or “Preview” area (software on
device) gives a visual representation of the settings and can be used to preview
the current selections.
10. When the settings are altered press OK to return to the Edit Screen.
11. Press OK in the top right-hand corner to exit the Edit Screen.
12. The “Text Window” will change to display text in the selected font settings.
13. Change to User Mode / Protected Mode.
3. Changing the ‘Font Color’ for text in the “Text
Window”
When the software is in ‘Setup Mode’ and a button is selected the
‘Edit Screen’ appears. Here under ‘Options’ and ‘Appearance’ the
font color can be changed for text in the ‘Text Window’.
Before ‘Changing the font color for text in the Text Window’ the user
must first know how to ‘Enter Setup Mode’ (page 18) and how to
‘Display the Edit Screen’ (page 19).
1. Enter Setup Mode.
2. Select any button on the page and the Edit Screen will be displayed.
3. Press the ‘Options’ button on the top row. Make sure that the frame displayed
changes and now says ‘Options’.
4. Locate and select where is says ‘Appearance’ on the left-hand side and the
options will change to display the ‘Appearance’ options.
5. Locate and select the button that says ‘Text Window Font Color’.
Figure 41: Text Window Font Color
6. Now the color selection window will appear:
Page 51 of 75
The Great Talking Box Company
Copyright 2004
Etalk3 User Manual
Figure 42: Text Window Font Color - Color Chooser
7. Select a color from those displayed on the screen.
8. The selected color will be previewed on the right-hand side.
9. To accept the chosen color press OK in the top right-hand corner.
10. The Edit Screen will be displayed again.
11. Press Ok to exit the edit screen.
12. The “Text Window” will now display the text in the desired color.
13. Return to User Mode / Protected Mode
4. Changing the ‘Background Color’ for the “Text
Window”
When the software is in ‘Setup Mode’ and a button is selected the
‘Edit Screen’ appears. Here under ‘Options’ and ‘Appearance’ the
color can be changed for the background of the ‘Text Window’.
Before ‘Changing the background color for the Text Window’ the user
must first know how to ‘Enter Setup Mode’ (page 18) and how to
‘Display the Edit Screen’ (page 19).
1. Enter Setup Mode.
2. Select any button on the page and the Edit Screen will be displayed.
3. Press the ‘Options’ button on the top row. Make sure that the frame displayed
changes and now says ‘Options’.
4. Locate and select where is says ‘Appearance’ on the left-hand side and the
options will change to display the ‘Appearance’ options.
5. Locate and select the button that says ‘Text Window Background Color’.
Page 52 of 75
The Great Talking Box Company
Copyright 2004
Etalk3 User Manual
Figure 43: Text Window Background Color
6. Now the color selection window will appear:
Figure 44: Text Window Background Color – Color Chooser
7. Select a color from those displayed on the screen.
8. The selected color will be previewed on the right-hand side.
9. To accept the chosen color press OK in the top right-hand corner.
10. The Edit Screen will be displayed again.
11. Press Ok to exit the edit screen.
12. The “Text Window” will now display the desired color background.
13. Return to User Mode / Protected Mode.
5. Changing the ‘Access Type’
When the software is in ‘Setup Mode’ and a button is selected the
‘Edit Screen’ appears. Here under ‘Options’ and ‘Access’ the access
type can be changed.
Page 53 of 75
The Great Talking Box Company
Copyright 2004
Etalk3 User Manual
Before ‘Changing the Access Type’ the user must first know how to
‘Enter Setup Mode’ (page 18) and how to ‘Display the Edit Screen’
(page 19).
1. Enter Setup Mode.
2. Select any button on the page and the Edit Screen will be displayed.
3. Press the ‘Options’ button on the top row. Make sure that the frame displayed
changes and now says ‘Options’.
4. Locate and select where is says ‘Access on the left-hand side and the options
will change to display the ‘Access’ options.
Figure 45: The Edit Screen – Options – Displaying Access Options
5. Locate where it says ‘Access Type’ and press the drop-down arrow at the far
right-hand end of the box.
Figure 46: Changing the Access Type
6. Now the drop-down list with the choice of access types will appear:
Page 54 of 75
The Great Talking Box Company
Copyright 2004
Etalk3 User Manual
Figure 47: Access Types
7. Select an access type from those displayed in the list.
&
&W
Whhaatt aarree tthhee aacccceessss ttyyppeess??
R
Reem
meem
mbbeerr:: T
Thhee aacccceessss ttyyppeess aavvaaiillaabbllee aarree aallll lliisstteedd aanndd
eexxppllaaiinneedd iinn tthhee nneexxtt sseeccttiioonn ooff tthhiiss cchhaapptteerr..
8. The selected access type will be displayed in the box.
9. Press Ok to exit the edit screen.
10. The access type will be changed and now be active.
11. Return to User Mode / Protected Mode
6. Changing the ‘Access Scan Color’
When the software is in ‘Setup Mode’ and a button is selected the
‘Edit Screen’ appears. Here under ‘Options’ and ‘Access’ the access
scan color can be changed.
Before ‘Changing the Access Scan Color’ the user must first know how
to ‘Enter Setup Mode’ (page 18) and how to ‘Display the Edit Screen’
(page 19).
1. Enter Setup Mode.
2. Select any button on the page and the Edit Screen will be displayed.
3. Press the ‘Options’ button on the top row. Make sure that the frame displayed
changes and now says ‘Options’.
4. Locate and select where is says ‘Access on the left-hand side and the options
will change to display the ‘Access’ options.
Page 55 of 75
The Great Talking Box Company
Copyright 2004
Etalk3 User Manual
Figure 48: The Edit Screen – Options – Displaying Access Options
5. Locate where it says ‘Color’ and press the drop-down arrow at the far righthand end of the box.
Figure 49: Changing the Access Scan Color
6. Now the drop-down list with the choice of colors will appear:
Figure 50: Access Scan Colors
Page 56 of 75
The Great Talking Box Company
Copyright 2004
Etalk3 User Manual
7. Select a color from those displayed in the list.
&
&W
Whhaatt aarree tthhee aacccceessss ccoolloorrss??
R
Reem
meem
mbbeerr:: T
Thhee aacccceessss ssccaann ccoolloorrss aavvaaiillaabbllee aarree aallll lliisstteedd aanndd
eexxppllaaiinneedd iinn tthhee nneexxtt sseeccttiioonn ooff tthhiiss cchhaapptteerr..
8. The selected access scan color will be displayed in the box.
9. Press Ok to exit the edit screen.
10. The access scan color will be changed and now be active.
11. Return to User Mode / Protected Mode.
7. Changing the ‘Access Scan Size’
When the software is in ‘Setup Mode’ and a button is selected the
‘Edit Screen’ appears. Here under ‘Options’ and ‘Access’ the access
scan size can be changed.
Before ‘Changing the Access Scan Size’ the user must first know how
to ‘Enter Setup Mode’ (page 18) and how to ‘Display the Edit Screen’
(page 19).
1. Enter Setup Mode.
2. Select any button on the page and the Edit Screen will be displayed.
3. Press the ‘Options’ button on the top row. Make sure that the frame displayed
changes and now says ‘Options’.
4. Locate and select where is says ‘Access on the left-hand side and the options
will change to display the ‘Access’ options.
Figure 51: The Edit Screen – Options – Displaying Access Options
5. Locate where it says ‘Size’ and press the drop-down arrow at the far righthand end of the box.
Page 57 of 75
The Great Talking Box Company
Copyright 2004
Etalk3 User Manual
Figure 52: Changing the Access Scan Size
6. Now the drop-down list with the choice of sizes will appear:
Figure 53: Access Scan Sizes
7. Select a size from those displayed in the list.
&
&W
Whhaatt aarree tthhee aacccceessss ssccaann ssiizzeess??
R
e
m
e
m
b
e
r
:
T
h
e
Remember: The aacccceessss ssccaann ssiizzeess aavvaaiillaabbllee aarree aallll lliisstteedd aanndd
eexxppllaaiinneedd iinn tthhee nneexxtt sseeccttiioonn ooff tthhiiss cchhaapptteerr..
8. The selected access scan size will be displayed in the box.
9. Press Ok to exit the edit screen.
10. The access scan size will be changed and now be active.
11. Return to User Mode / Protected Mode.
8. Changing the ‘Access Scan Speed’
When the software is in ‘Setup Mode’ and a button is selected the
‘Edit Screen’ appears. Here under ‘Options’ and ‘Access’ the access
scan speed can be changed.
Page 58 of 75
The Great Talking Box Company
Copyright 2004
Etalk3 User Manual
Before ‘Changing the Access Scan Speed’ the user must first know how
to ‘Enter Setup Mode’ (page 18) and how to ‘Display the Edit Screen’
(page 19).
1. Enter Setup Mode.
2. Select any button on the page and the Edit Screen will be displayed.
3. Press the ‘Options’ button on the top row. Make sure that the frame displayed
changes and now says ‘Options’.
4. Locate and select where is says ‘Access on the left-hand side and the options
will change to display the ‘Access’ options.
Figure 54: The Edit Screen – Options – Displaying Access Options
5. Locate where it says ‘Speed’ and press the drop-down arrow at the far righthand end of the box.
Figure 55: Changing the Access Scan Speed
6. Now the drop-down list with the choice of speeds will appear:
Page 59 of 75
The Great Talking Box Company
Copyright 2004
Etalk3 User Manual
Figure 56: Access Scan Speeds
7. Select a speed from those displayed in the list.
8. The selected access scan speeds will be displayed in the box.
9. Press Ok to exit the edit screen.
10. The access scan speed will be changed and now be active.
11. Return to User Mode / Protected Mode
9. Changing the Auditory Prompt Setting
When the software is in ‘Setup Mode’ and a button is selected the
‘Edit Screen’ appears. Here under ‘Options’ and ‘Access’ the
auditory prompt can be enabled.
Before ‘Changing the Auditory Prompt Setting’ the user must first
know how to ‘Enter Setup Mode’ (page 18) and how to ‘Display the
Edit Screen’ (page 19).
1. Enter Setup Mode.
2. Select any button on the page and the Edit Screen will be displayed.
3. Press the ‘Options’ button on the top row. Make sure that the frame displayed
changes and now says ‘Options’.
4. Locate and select where is says ‘Access on the left-hand side and the options
will change to display the ‘Access’ options.
Page 60 of 75
The Great Talking Box Company
Copyright 2004
Etalk3 User Manual
Figure 57: The Edit Screen – Options – Displaying Access Options
5. Locate where it says ‘Enable Auditory Prompt’.
Figure 58: Changing the Auditory Prompt Setting
6. The box can either be ‘ticked’ or ‘not ticked’:
a. Ticked – Auditory Prompt is enabled
b. Not Ticked – Auditory Prompt is not enabled
7. Press Ok to exit the edit screen.
8. The auditory prompt setting will be changed and now be active.
9. Return to User Mode / Protected Mode.
10. Changing the Button Select (Touchscreen) Setting
When the software is in ‘Setup Mode’ and a button is selected the
‘Edit Screen’ appears. Here under ‘Options’ and ‘Touchscreen’ the
button select property can be set.
Before ‘Changing the Button Select (Touchscreen) Setting’ the user
must first know how to ‘Enter Setup Mode’ (page 18) and how to
‘Display the Edit Screen’ (page 19).
Page 61 of 75
The Great Talking Box Company
Copyright 2004
Etalk3 User Manual
1. Enter Setup Mode.
2. Select any button on the page and the Edit Screen will be displayed.
3. Press the ‘Options’ button on the top row. Make sure that the frame displayed
changes and now says ‘Options’.
4. Locate and select where is says ‘Touchscreen’ on the left-hand side and the
options will change to display the ‘Touchscreen’ options.
Figure 59: The Edit Screen – Options – Displaying Touchscreen Options
5. Locate where it says ‘Select Button On’.
Figure 60: Changing the Button Select Setting
6. The selection can either be ‘Button Press’ or ‘Button Release’:
a. Button Press – The button selects (is activated) as soon as the user
presses the screen (device), or presses the mouse button (computer
software). The button selected is the button under the position of the
finger (device) or mouse pointer (computer software) at the location of
where the press originated.
b. Button Release – The button does not select (not activated) until the
user releases their touch from the screen (device), or releases the
mouse button (computer software). The button selected is the button
under the position of the finger (device) or mouse pointer (computer
Page 62 of 75
The Great Talking Box Company
Copyright 2004
Etalk3 User Manual
software) at the location of where the release happens – not at the
location of where it was originally pressed.
7. Press Ok to exit the edit screen.
8. The button select setting will be changed and now be active.
9. Return to User Mode / Protected Mode.
11. Changing the Highlight Button When Selected
Setting
When the software is in ‘Setup Mode’ and a button is selected the
‘Edit Screen’ appears. Here under ‘Options’ and ‘Touchscreen’ the
highlight button when selected property can be set.
Before ‘Changing the Highlight Button When Selected Setting’ the
user must first know how to ‘Enter Setup Mode’ (page 18) and how to
‘Display the Edit Screen’ (page 19).
1. Enter Setup Mode.
2. Select any button on the page and the Edit Screen will be displayed.
3. Press the ‘Options’ button on the top row. Make sure that the frame displayed
changes and now says ‘Options’.
4. Locate and select where is says ‘Touchscreen’ on the left-hand side and the
options will change to display the ‘Touchscreen’ options.
Figure 61: The Edit Screen – Options – Displaying Touchscreen Options
5. Locate where it says ‘Highlight Button When Selected’.
Page 63 of 75
The Great Talking Box Company
Copyright 2004
Etalk3 User Manual
Figure 62: Changing the Highlight Button When Selected Setting
6. The selection can either be ‘ticked’ or ‘not ticked’:
a. Ticked – The selected button will be highlighted prior to being
activated.
b. Not Ticked – The selected button will NOT be highlighted and will
just be activated.
7. Press Ok to exit the edit screen.
8. The highlight button when selected setting will be changed and now be active.
9. Return to User Mode / Protected Mode.
12. Changing the Key Click When Selected Setting
When the software is in ‘Setup Mode’ and a button is selected the
‘Edit Screen’ appears. Here under ‘Options’ and ‘Touchscreen’ the
key click when selected property can be set.
Before ‘Changing the Key Click When Selected Setting’ the user must
first know how to ‘Enter Setup Mode’ (page 18) and how to ‘Display
the Edit Screen’ (page 19).
1. Enter Setup Mode.
2. Select any button on the page and the Edit Screen will be displayed.
3. Press the ‘Options’ button on the top row. Make sure that the frame displayed
changes and now says ‘Options’.
4. Locate and select where is says ‘Touchscreen’ on the left-hand side and the
options will change to display the ‘Touchscreen’ options.
Page 64 of 75
The Great Talking Box Company
Copyright 2004
Etalk3 User Manual
Figure 63: The Edit Screen – Options – Displaying Touchscreen Options
5. Locate where it says ‘Key Click When Button Selected’.
Figure 64: Changing the Key Click When Selected Setting
6. The selection can either be ‘ticked’ or ‘not ticked’:
a. Ticked – The selected button will give an audible key click prior to
being activated.
b. Not Ticked – The selected button will NOT give an audible key click
and will just be activated.
7. Press Ok to exit the edit screen.
8. The key click when selected setting will be changed and now be active.
9. Return to User Mode / Protected Mode.
13. Changing the Highlight Current Position Setting
When the software is in ‘Setup Mode’ and a button is selected the
‘Edit Screen’ appears. Here under ‘Options’ and ‘Touchscreen’ the
highlight current position property can be set.
Page 65 of 75
The Great Talking Box Company
Copyright 2004
Etalk3 User Manual
Before ‘Changing the Highlight Current Position Setting’ the user
must first know how to ‘Enter Setup Mode’ (page 18) and how to
‘Display the Edit Screen’ (page 19).
1. Enter Setup Mode.
2. Select any button on the page and the Edit Screen will be displayed.
3. Press the ‘Options’ button on the top row. Make sure that the frame displayed
changes and now says ‘Options’.
4. Locate and select where is says ‘Touchscreen’ on the left-hand side and the
options will change to display the ‘Touchscreen’ options.
Figure 65: The Edit Screen – Options – Displaying Touchscreen Options
5. Locate where it says ‘Highlight Current Position’.
Figure 66: Changing the Highlight Current Position Setting
6. The selection can either be ‘ticked’ or ‘not ticked’:
a. Ticked – The position of the user’s touch on the screen will be
highlighted.
b. Not Ticked – The position of the user’s touch on the screen will NOT
be highlighted.
7. Press Ok to exit the edit screen.
Page 66 of 75
The Great Talking Box Company
Copyright 2004
Etalk3 User Manual
8. The highlight current position setting will be changed and now be active.
9. Return to User Mode / Protected Mode.
14. Changing the Voice Setting
When the software is in ‘Setup Mode’ and a button is selected the
‘Edit Screen’ appears. Here under ‘Options’ and ‘Speech’ the voice
property can be set.
Before ‘Changing the Voice Setting’ the user must first know how to
‘Enter Setup Mode’ (page 18) and how to ‘Display the Edit Screen’
(page 19).
1. Enter Setup Mode.
2. Select any button on the page and the Edit Screen will be displayed.
3. Press the ‘Options’ button on the top row. Make sure that the frame displayed
changes and now says ‘Options’.
4. Locate and select where is says ‘Speech’ on the left-hand side and the options
will change to display the ‘Speech’ options.
Figure 67: The Edit Screen – Options – Displaying Speech Options
5. Locate where it says ‘Voice’ and press the drop-down arrow at the end of the
box.
Page 67 of 75
The Great Talking Box Company
Copyright 2004
Etalk3 User Manual
Figure 68: Changing the Voice Setting
6. The drop-down list of voices will appear:
Figure 69: Changing the Voice Setting
7. Select the desired voice from the list. (Please note for computer installations of
the Etalk 3 PC software, that the list of voices is dependent upon which speech
synthesizers are installed on the computer – thus fewer or more choices may
be presented.)
8. The voice will be displayed in the box.
9. Press Ok to exit the edit screen.
10. The voice setting will be changed and now be active.
11. Return to User Mode / Protected Mode.
15. Changing the Rate Setting
When the software is in ‘Setup Mode’ and a button is selected the
‘Edit Screen’ appears. Here under ‘Options’ and ‘Speech’ the rate
property can be set.
Page 68 of 75
The Great Talking Box Company
Copyright 2004
Etalk3 User Manual
Before ‘Changing the Rate Setting’ the user must first know how to
‘Enter Setup Mode’ (page 18) and how to ‘Display the Edit Screen’
(page 19).
1. Enter Setup Mode.
2. Select any button on the page and the Edit Screen will be displayed.
3. Press the ‘Options’ button on the top row. Make sure that the frame displayed
changes and now says ‘Options’.
4. Locate and select where is says ‘Speech’ on the left-hand side and the options
will change to display the ‘Speech’ options.
Figure 70: The Edit Screen – Options – Displaying Speech Options
5. Locate where it says ‘Rate’ and press the drop-down arrow at the end of the
box.
Figure 71: Changing the Rate Setting
6. The drop-down list of rates will appear.
7. Select the desired rate from the list.
8. The rate will be displayed in the box.
9. Press Ok to exit the edit screen.
10. The rate setting will be changed and now be active.
Page 69 of 75
The Great Talking Box Company
Copyright 2004
Etalk3 User Manual
11. Return to User Mode / Protected Mode.
16. Testing the Speech Settings
When the software is in ‘Setup Mode’ and a button is selected the
‘Edit Screen’ appears. Here under ‘Options’ and ‘Speech’ the speech
settings can be tested.
Before ‘Testing the Speech Settings’ the user must first know how to
‘Enter Setup Mode’ (page 18) and how to ‘Display the Edit Screen’
(page 19).
1. Enter Setup Mode.
2. Select any button on the page and the Edit Screen will be displayed.
3. Press the ‘Options’ button on the top row. Make sure that the frame displayed
changes and now says ‘Options’.
4. Locate and select where is says ‘Speech’ on the left-hand side and the options
will change to display the ‘Speech’ options.
Figure 72: The Edit Screen – Options – Displaying Speech Options
5. Locate the button that says ‘Test’.
Page 70 of 75
The Great Talking Box Company
Copyright 2004
Etalk3 User Manual
Figure 73: Testing the Speech Settings
6. The test phrase will speak out using the chosen speech settings.
7. Press Ok to exit the edit screen.
8. Return to User Mode / Protected Mode.
Page 71 of 75
The Great Talking Box Company
Copyright 2004
Etalk3 User Manual
Section C: Chapter Summary
1. What should the user understand?
Key Understanding:
The Etalk3 software has several basic user options for changing the
way the system works for, and interacts with, a user.
2. What should the user be able to do?
Display Text or Images in the Text Window
Change the Text Window Font
Change the Text Window Font Color
Change the Text Window Background Color
Change the Access Type
Change the Access Color
Change the Access Size
Change the Access Speed
Enable / Disable Auditory Prompting
Change the Button Select On Setting
Enable the Highlight on Button Selected Property
Enable the Key Click on Button Selected Property
Enable the Highlight Current Position Property
Change the Voice Property
Change the Rate Property
Test the Current Speech Settings
Page 72 of 75
The Great Talking Box Company
Copyright 2004
Etalk3 User Manual
Page 73 of 75
The Great Talking Box Company
Copyright 2004
Etalk3 User Manual
Chapter Five:
Appendix A: Table of Figures
FIGURE 1: A PAGE ........................................................................................................................................5
FIGURE 2: A BUTTON....................................................................................................................................5
FIGURE 3: THE MAIN SCREEN – EXAMPLE MAIN PAGE ...............................................................................7
FIGURE 4: THE MAIN SCREEN – EXAMPLE OF A LINKING BUTTON. .............................................................8
FIGURE 5: THE SOCIAL PAGE .......................................................................................................................8
FIGURE 6: A FUNCTION BUTTON ..................................................................................................................9
FIGURE 7: MOVING BETWEEN ‘MODES’ OF OPERATION .............................................................................14
FIGURE 8: THE EDITING PROCESS ..............................................................................................................16
FIGURE 9: ENTERING THE PROTECTED MODE PASSWORD .........................................................................17
FIGURE 10: THE USER MODE BUTTON .......................................................................................................18
FIGURE 11: THE EDIT SCREEN ....................................................................................................................19
FIGURE 12: EXITING THE EDIT SCREEN ......................................................................................................20
FIGURE 13: EXITING SETUP MODE .............................................................................................................21
FIGURE 14: ENTERING PROTECTED MODE .................................................................................................22
FIGURE 15: BUTTON VISUAL PROPERTY - LABEL ......................................................................................25
FIGURE 16: BUTTON VISUAL PROPERTY - SYMBOL ...................................................................................25
FIGURE 17: BUTTON VISUAL PROPERTY – BACKGROUND COLOR.............................................................26
FIGURE 18: DISPLAYING THE BUTTON PROPERTIES FRAME ......................................................................28
FIGURE 19: CHANGING THE BUTTON LABEL PROPERTY ............................................................................29
FIGURE 20: CHANGING THE BUTTON SYMBOL PROPERTY .........................................................................30
FIGURE 21: THE SYMBOL SEARCH SCREEN ...............................................................................................30
FIGURE 22: SYMBOL SEARCH SCREEN – SEARCH CRITERIA ......................................................................31
FIGURE 23: SYMBOL SEARCH SCREEN – SEARCH BUTTON ........................................................................31
FIGURE 24: SYMBOL SEARCH SCREEN – SYMBOL PREVIEW ......................................................................32
FIGURE 25: EDIT SCREEN – BUTTON COLOR PROPERTY ............................................................................33
FIGURE 26: COLOR CHOOSER SCREEN .......................................................................................................33
FIGURE 27: THE EDIT SCREEN – BUTTON MESSAGE..................................................................................34
FIGURE 28: THE EDIT SCREEN – BUTTON OUTPUT TYPE...........................................................................35
FIGURE 29: THE EDIT SCREEN – OUTPUT TYPE – DROP DOWN LIST.........................................................35
FIGURE 30: THE EDIT SCREEN – GOTO ACTION .........................................................................................36
FIGURE 31: THE EDIT SCREEN – GOTO ACTION – DROP DOWN LIST ........................................................37
FIGURE 32: THE EDIT SCREEN – BUTTON FUNCTION.................................................................................38
FIGURE 33: THE EDIT SCREEN – BUTTON FUNCTION – DROP DOWN LIST ................................................38
FIGURE 34: WRITTEN TEXT IN THE TEXT WINDOW....................................................................................45
FIGURE 35: IMAGES IN THE TEXT WINDOW ...............................................................................................45
FIGURE 36: THE EDIT SCREEN – OPTIONS - APPEARANCE .........................................................................48
FIGURE 37: USE IMAGES IN TEXT WINDOW ...............................................................................................49
FIGURE 38: THE EDIT SCREEN – OPTIONS - APPEARANCE .........................................................................50
FIGURE 39: TEXT WINDOW FONT...............................................................................................................50
FIGURE 40: TEXT WINDOW FONT – FONT SELECTION ...............................................................................50
FIGURE 41: TEXT WINDOW FONT COLOR ..................................................................................................51
FIGURE 42: TEXT WINDOW FONT COLOR - COLOR CHOOSER ...................................................................52
FIGURE 43: TEXT WINDOW BACKGROUND COLOR....................................................................................53
FIGURE 44: TEXT WINDOW BACKGROUND COLOR – COLOR CHOOSER ....................................................53
FIGURE 45: THE EDIT SCREEN – OPTIONS – DISPLAYING ACCESS OPTIONS .............................................54
FIGURE 46: CHANGING THE ACCESS TYPE .................................................................................................54
FIGURE 47: ACCESS TYPES .........................................................................................................................55
FIGURE 48: THE EDIT SCREEN – OPTIONS – DISPLAYING ACCESS OPTIONS .............................................56
FIGURE 49: CHANGING THE ACCESS SCAN COLOR ....................................................................................56
FIGURE 50: ACCESS SCAN COLORS ............................................................................................................56
FIGURE 51: THE EDIT SCREEN – OPTIONS – DISPLAYING ACCESS OPTIONS .............................................57
Page 74 of 75
The Great Talking Box Company
Copyright 2004
Etalk3 User Manual
FIGURE 52: CHANGING THE ACCESS SCAN SIZE ........................................................................................58
FIGURE 53: ACCESS SCAN SIZES ................................................................................................................58
FIGURE 54: THE EDIT SCREEN – OPTIONS – DISPLAYING ACCESS OPTIONS .............................................59
FIGURE 55: CHANGING THE ACCESS SCAN SPEED .....................................................................................59
FIGURE 56: ACCESS SCAN SPEEDS .............................................................................................................60
FIGURE 57: THE EDIT SCREEN – OPTIONS – DISPLAYING ACCESS OPTIONS .............................................61
FIGURE 58: CHANGING THE AUDITORY PROMPT SETTING ........................................................................61
FIGURE 59: THE EDIT SCREEN – OPTIONS – DISPLAYING TOUCHSCREEN OPTIONS ..................................62
FIGURE 60: CHANGING THE BUTTON SELECT SETTING .............................................................................62
FIGURE 61: THE EDIT SCREEN – OPTIONS – DISPLAYING TOUCHSCREEN OPTIONS ..................................63
FIGURE 62: CHANGING THE HIGHLIGHT BUTTON WHEN SELECTED SETTING ..........................................64
FIGURE 63: THE EDIT SCREEN – OPTIONS – DISPLAYING TOUCHSCREEN OPTIONS ..................................65
FIGURE 64: CHANGING THE KEY CLICK WHEN SELECTED SETTING .........................................................65
FIGURE 65: THE EDIT SCREEN – OPTIONS – DISPLAYING TOUCHSCREEN OPTIONS ..................................66
FIGURE 66: CHANGING THE HIGHLIGHT CURRENT POSITION SETTING .....................................................66
FIGURE 67: THE EDIT SCREEN – OPTIONS – DISPLAYING SPEECH OPTIONS .............................................67
FIGURE 68: CHANGING THE VOICE SETTING ..............................................................................................68
FIGURE 69: CHANGING THE VOICE SETTING ..............................................................................................68
FIGURE 70: THE EDIT SCREEN – OPTIONS – DISPLAYING SPEECH OPTIONS .............................................69
FIGURE 71: CHANGING THE RATE SETTING ...............................................................................................69
FIGURE 72: THE EDIT SCREEN – OPTIONS – DISPLAYING SPEECH OPTIONS .............................................70
FIGURE 73: TESTING THE SPEECH SETTINGS ..............................................................................................71
Page 75 of 75
The Great Talking Box Company
Copyright 2004